
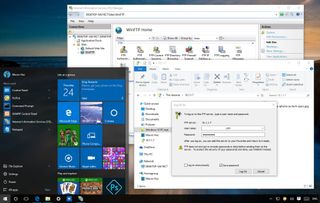
Компьютеры на базе Виндовс 10 представляют собой многофункциональные устройства, позволяющие пользователям осуществить практически любую задумку. Кто-то работает в фоторедакторах, кто-то монтирует видео, а кто-то подключает FTP-сервер на операционной системе Windows 10. Далее разберемся, что это за сервер, для чего он нужен и как его можно настроить, используя встроенные средства ОС и специальные программы.
Для чего он нужен
Перед началом настройки сервера нужно понять, что за аббревиатура «FTP» прячется в его названии. FTP (File Transfer Protocol) – это протокол передачи данных через интернет. В первоначальном виде он появился в далеком 1971 году, но до сих пор пользуется популярностью. Следовательно, FTP-сервером допустимо назвать хранилище данных в интернете, к которому может обратиться человек, чтобы скачать музыку, фильмы, фото и другие файлы.

Раз уж в этом материале мы говорим о настройке FTP-сервера на ПК с операционной системой Windows 10 на борту, то стоит пояснить, что в нашем случае в качестве хранилища (сервера) будет выступать сам компьютер. А FTP будет использоваться в качестве протокола для передачи данных. Таким образом, вы сможете делиться информацией, сохраненной на вашем устройстве, с другими пользователями, не тратя время на загрузку данных в облако и, уж тем более, копирование данных на флеш-накопители.
Как создать и настроить FTP-сервер на компьютере Windows 10
Настройка FTP-сервера – это сложный процесс, который вызывает у новичков массу сложностей. Однако встроенные средства Windows 10 дают возможность подготовить сервер для подключения устройств любому желающему. Главное – четко следовать требованиям инструкции, а они не такие мудреные, как может показаться на первый взгляд.

Алгоритм действий для создания и настройки FTP-сервера выглядит следующим образом:
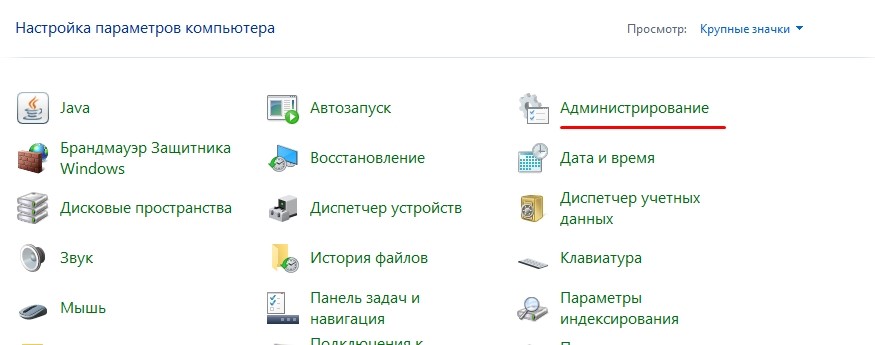
- Сначала нам нужно активировать встроенный FTP-протокол на компьютере, так как по умолчанию он отключен. Для этого нужно открыть «Панель управления» через поисковую строку Windows или любым другим способом.
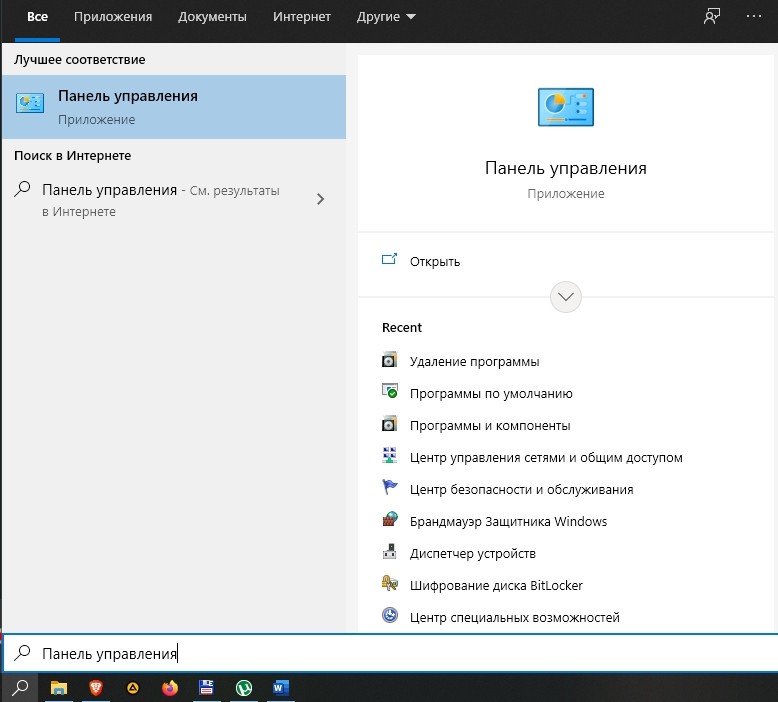
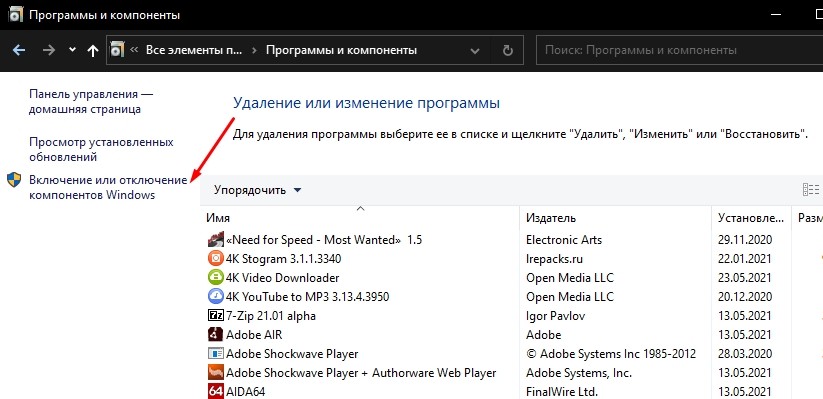
- Во вкладке «Просмотр» установите значение «Крупные значки». Это поможет вам как можно быстрее найти нужный раздел «Программы и компоненты», в который необходимо перейти для дальнейшей настройки.
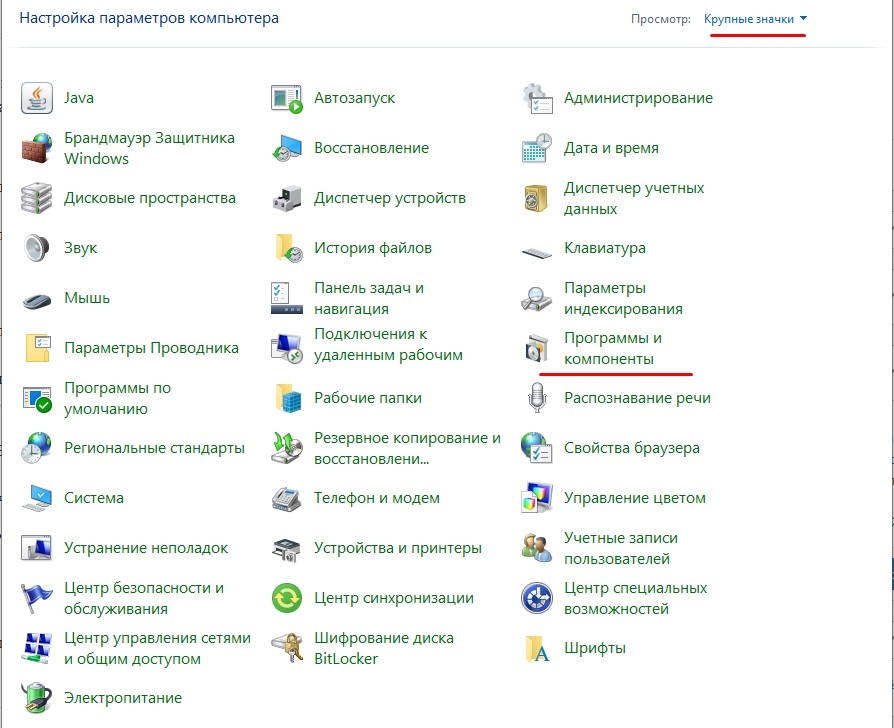
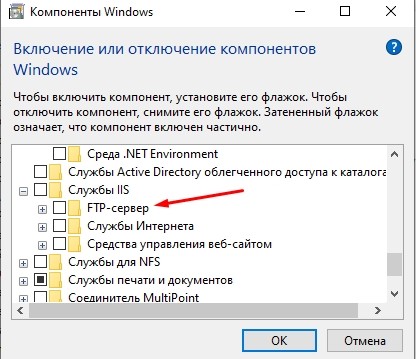
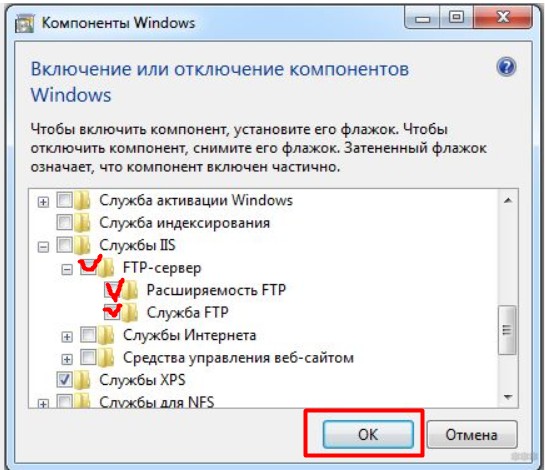
- В открывшемся окне вы увидите несколько вкладок. Поочередно раскройте «Службы IIS» и «FTP-сервер».
- Отметьте галочками вкладки «FTP-сервер», «Расширяемость FTP» и «Служба FTP».
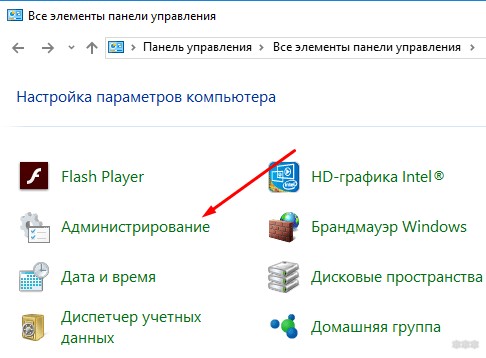
- Теперь можно сказать, что мы активировали протокол. Далее останется создать собственный сервер и задать координаты для подключения к нему. Поэтому вернитесь на главную страницу «Панели управления» и перейдите в раздел «Администрирования».
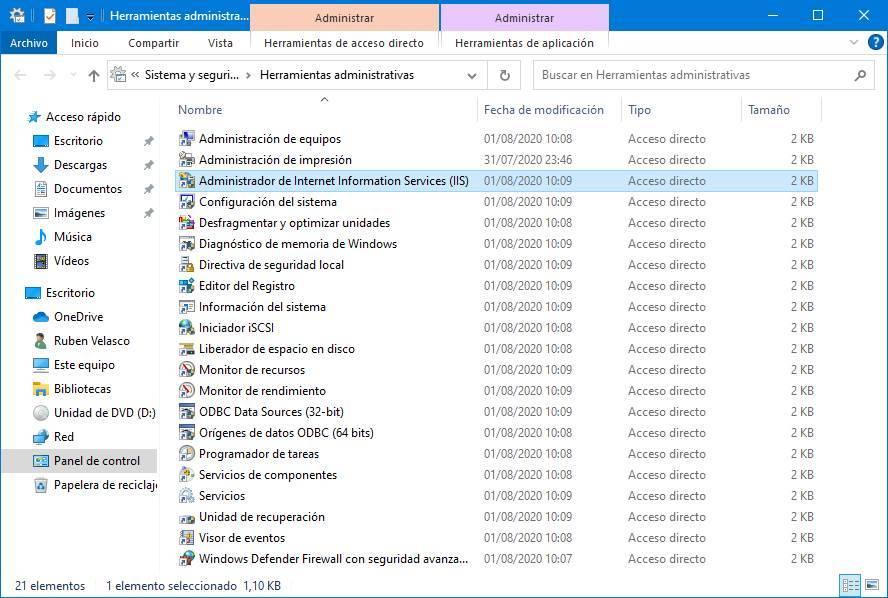
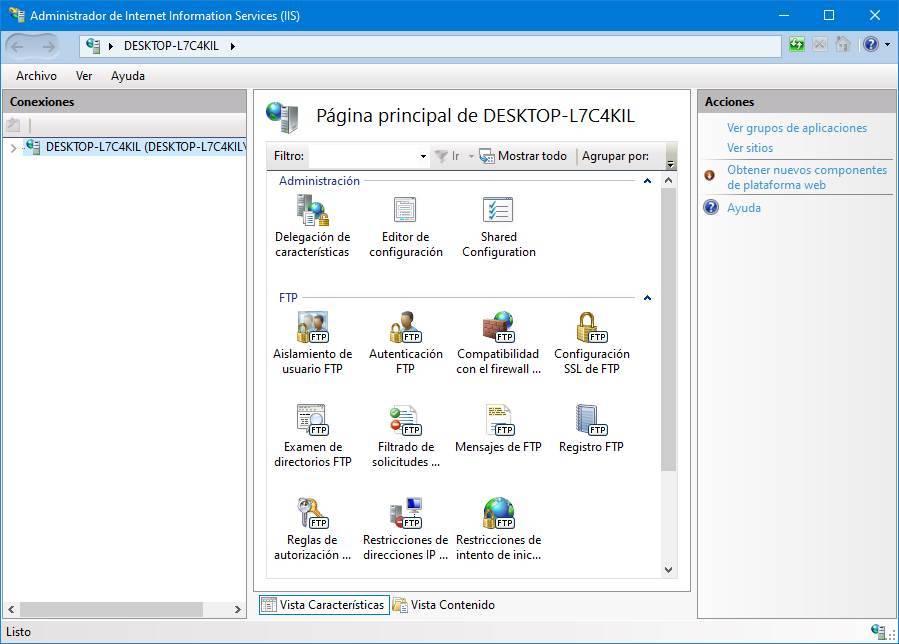
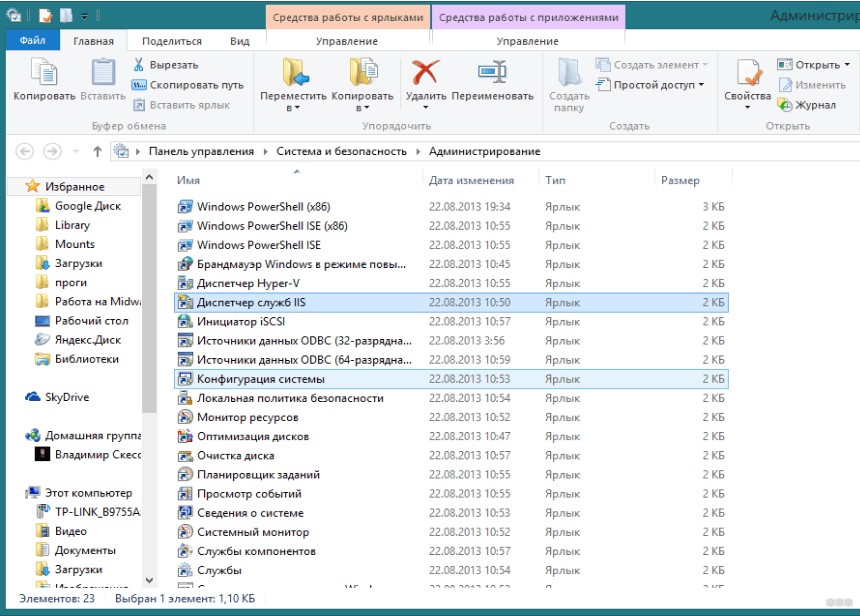
- Здесь находится множество файлов, среди которых нас будет интересовать «Диспетчер служб IIS». Запустите его двойным щелчком ЛКМ или откройте любым другим способом.
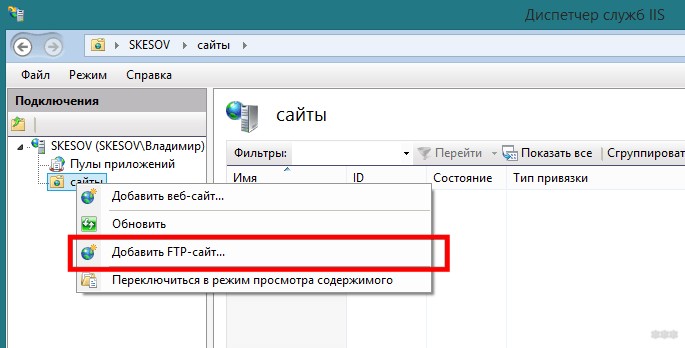
- В левой части открывшегося интерфейса будет располагаться вкладка «Сайты». Щелкните по ней ПКМ и выберите опцию «Добавить FTP-сайт».
- Придумайте название и укажите расположение данных (например, диск «D» или конкретная папка).
- Следующим шагом требуется настроить параметры привязки. Здесь рекомендуется установить значение «Все свободные» в качестве IP-адреса, выбрать порт «21», отметить галочкой пункт «Запускать сайт FTP автоматически» и запретить использование SSL («Без SSL»).

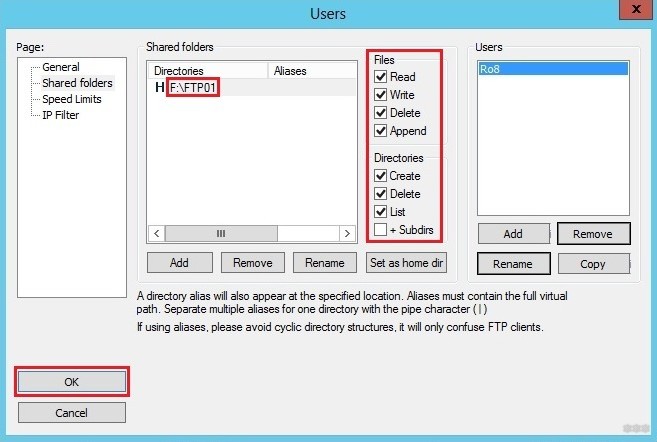
- На следующем этапе настраиваем параметры доступа. «Анонимный» – доступ к серверу можно будет получить без логина и пароля, «Обычный» – наоборот.

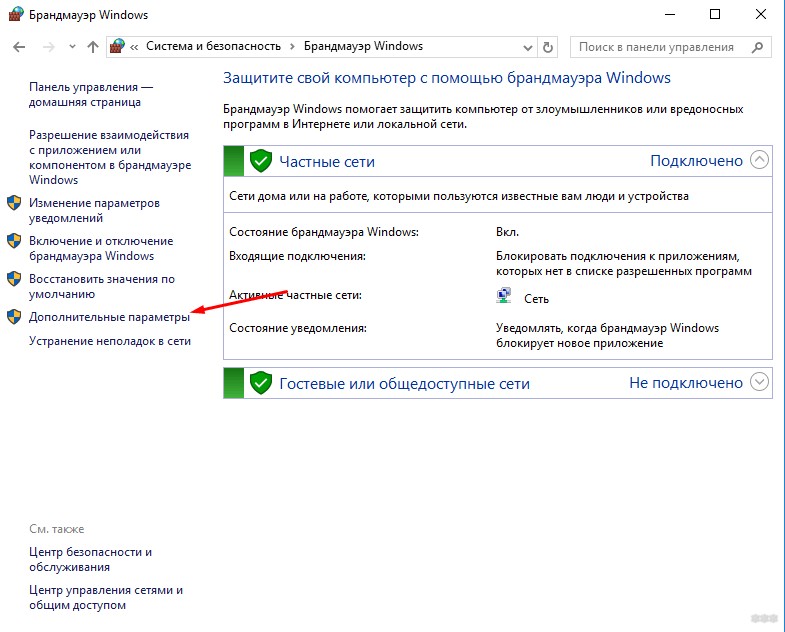
Важно. После создания FTP-сервера необходимо перейти в настройки брандмауэра и активировать доступ к FTP. Для этого откройте «Дополнительные параметры» и поставьте соответствующие галочки.
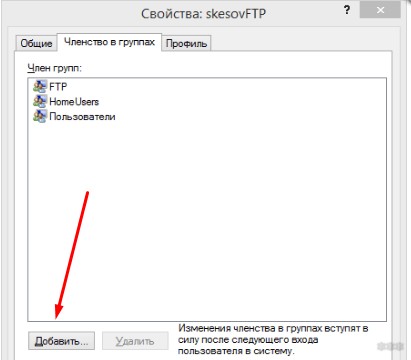
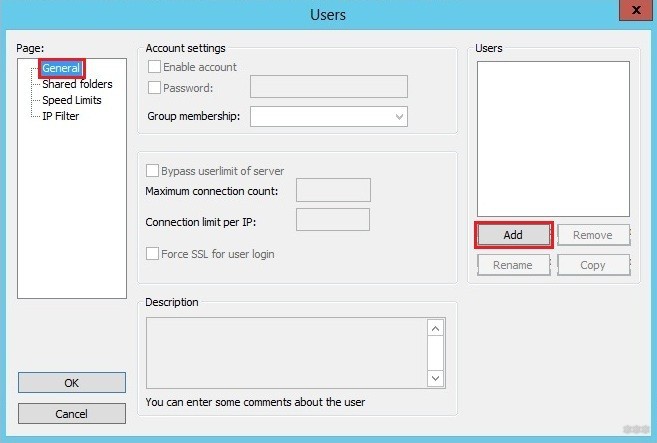
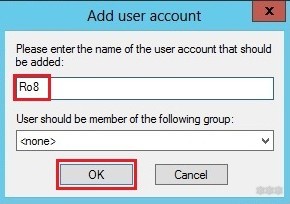
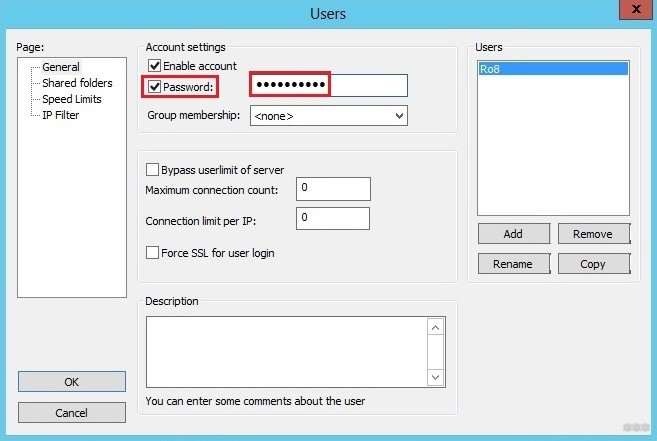
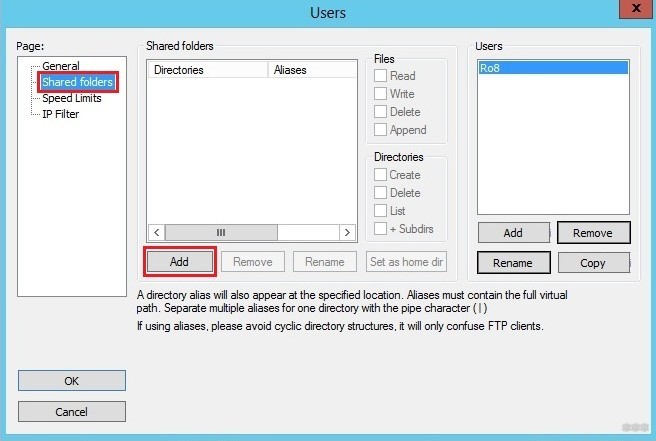
Создание сервера закончилось, и теперь нам осталось определить, кто из пользователей получит к нему доступ:
- Через «Панель управления» запустите инструмент «Управление компьютером» (находится в разделе «Администрирование»).
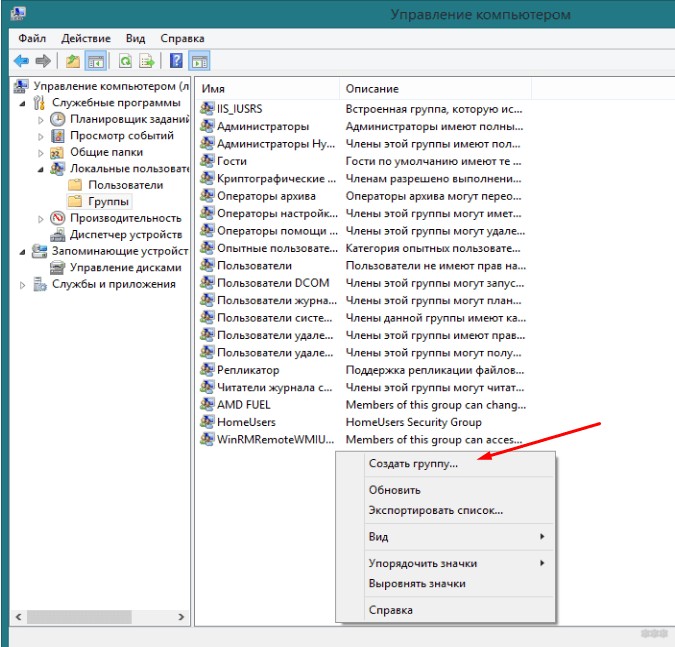
- Щелкните ПКМ и выберите «Создать группу».
- Добавьте пользователей, открыв получившуюся группу и нажав ПКМ.
- Как только все учетные записи будут добавлены, перейдите в «Свойства» группы и откройте вкладку «Безопасность».
- Нажмите на кнопку «Изменить» и добавьте созданную группу в список.

Теперь пользователи, добавленные в группу, смогут получить доступ к вашему FTP-серверу.
Лучшие FTP-серверы
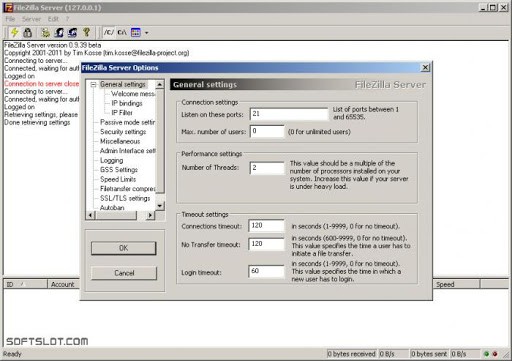
Как вы уже могли догадаться, создание сервера FTP встроенными средствами компьютера – рутинное и очень сложное занятие. Намного легче установить приложение с собственным сервером и разрешить ему доступ к файлам, сохраненным на компьютере.
FileZilla Server 0.9.23
Самое известное приложение, которому удалось поднять вопрос удобства при подключении средствами FTP. Вам достаточно разрешить доступ к определенной папке, настроить параметры входа (имя сервера и пароль), а затем отправить эти данные человеку, решившему подключиться к вам через ту же программу FileZilla.
Xlight FTP Server
Еще одна программа, способная сделать пользовательский сервер. Приложение отличается устаревшим, но в то же время удобным интерфейсом. Русского языка нет, зато есть масса настроек вроде активации доступа через IPv6.

FAR
FAR-manager – еще один популярный клиент с массой настроек. Его можно посоветовать лишь тем, кто уверен в собственных знаниях, так как меню приложения напоминает старые версии BIOS, а весь интерфейс представлен на английском языке.

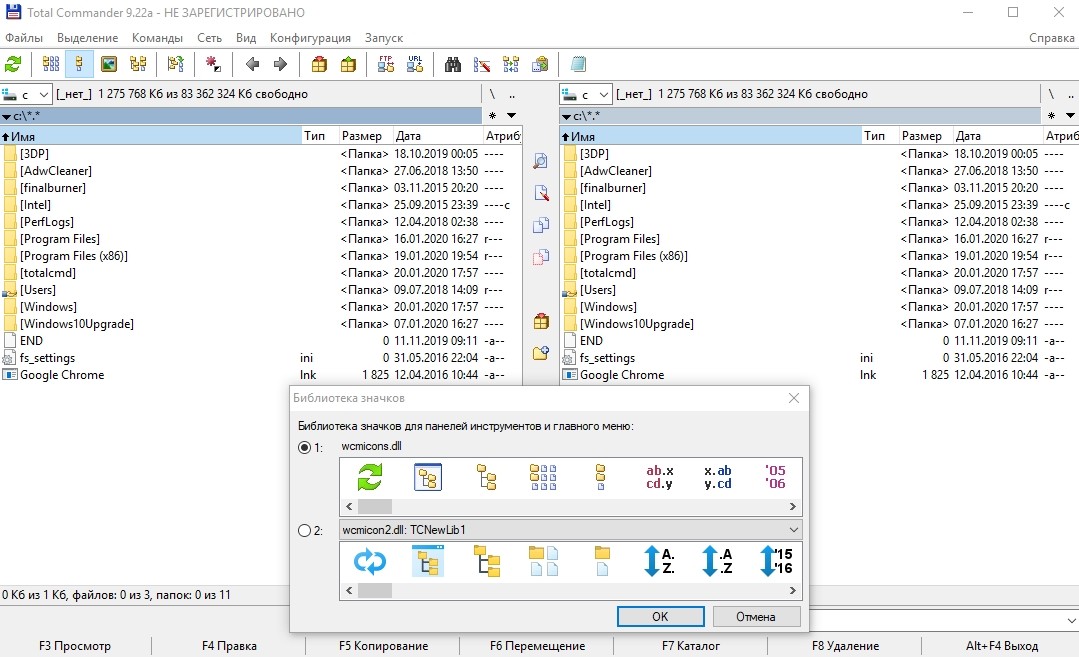
Total Commander
Файловый менеджер с функцией создания удаленного сервера, на который сможет попасть любая папка вашего ПК. Точнее, менеджер не создает сервер, а только управляет им. Отличается высоким уровнем удобства за счет поддержки русского языка и наличия раздела «Справка». Работает как на компьютере, так и на смартфоне.
FTP-сервер Complete FTP
Инструмент без файлового менеджера, но с интуитивно понятным меню. Интерфейс выглядит приветливым даже для новичка, а настройка сервера осуществляется за 5-7 нажатий и требует от пользователя не более пяти минут свободного времени.

Direct FTP
Платный клиент, чей недостаток с лихвой компенсируется удобством взаимодействия. Наличие раздела «Справка» позволяет без труда разобраться в азах даже новичку, но на изучение инструкции придется выделить от получаса до часа.
TYPSoft FTP Server 1.10
Простой клиент, который пользуется популярностью, как среди профессионалов, так и среди новых пользователей. Отличается удобным интерфейсом, наличием русского языка и настройкой массы удаленных функций – от скачивания до удаления файлов.
FTP-сервер Core FTP Server
Приложение распространяется в двух версиях. Одна является платной, вторая – бесплатной. У второй модификации есть ряд функциональных ограничений, но базовые потребности пользователя способна удовлетворить даже она.

FTPRush
Бесплатная программа, выполненная в стилистике продуктов Microsoft. Это позволяет рассчитывать на быстрое освоение утилиты. Также приложение готово похвастать наличием менеджера закачек.

CoffeeCup Free FTP
Незамысловатая программа, которая подойдет новичкам. Интерфейс переведен на русский язык, а меню не выглядит перегруженным. Есть поддержка двухпанельного режима работы и передачи файлов с одного сервера на другой без прямого взаимодействия с хранилищем ПК.
Причины, по которым могут не работать
Чаще всего FTP-сервер не работает по причине того, что пользователь забыл активировать соответствующую опцию в Панели управления через инструмент «Программы и компоненты». Также сложности связывают с неправильным вводом логина и пароля, закрепленных за определенным сервером.
Download PC Repair Tool to quickly find & fix Windows errors automatically
An FTP or File Transfer Protocol Server is a public or private server which can host files that can be accessed locally as well as globally. It is seamless, flexible and fast which means that you can store any kind of files on that server depending on the total size of the server. If this sounds useful, great news! Windows 11 and Windows 10 allow you to create your FTP Server. You can host it both locally and make it available globally via the Internet. This article is about configuring an FTP Server – and then, enabling the connections to pass through the Windows Firewall.
We will be undertaking the following tasks-
- Configuring an FTP Server.
- Configuring the Windows Firewall for the connections to pass through.
1] Configuring an FTP Server on Windows `11/10
Start by searching for Turn Windows Features On or Off in the Search Box. Select the appropriate result to get a mini window to pop up.
Scroll down to the list, to expand Internet Information Services under which you need to expand FTP Server.
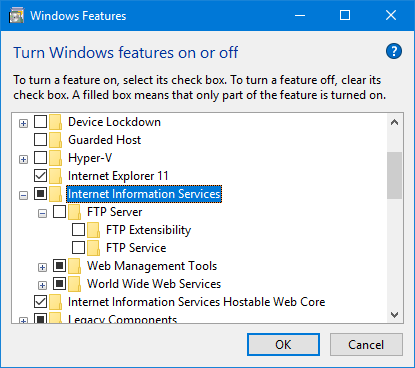
Select all the checkboxes to enable all the entries and click on OK. Let it apply the required changes.
Your computer is now enabled to host an FTP Server.
Now, to configure the FTP Server, search for Internet Information Services (IIS) Manager in the Search Box.
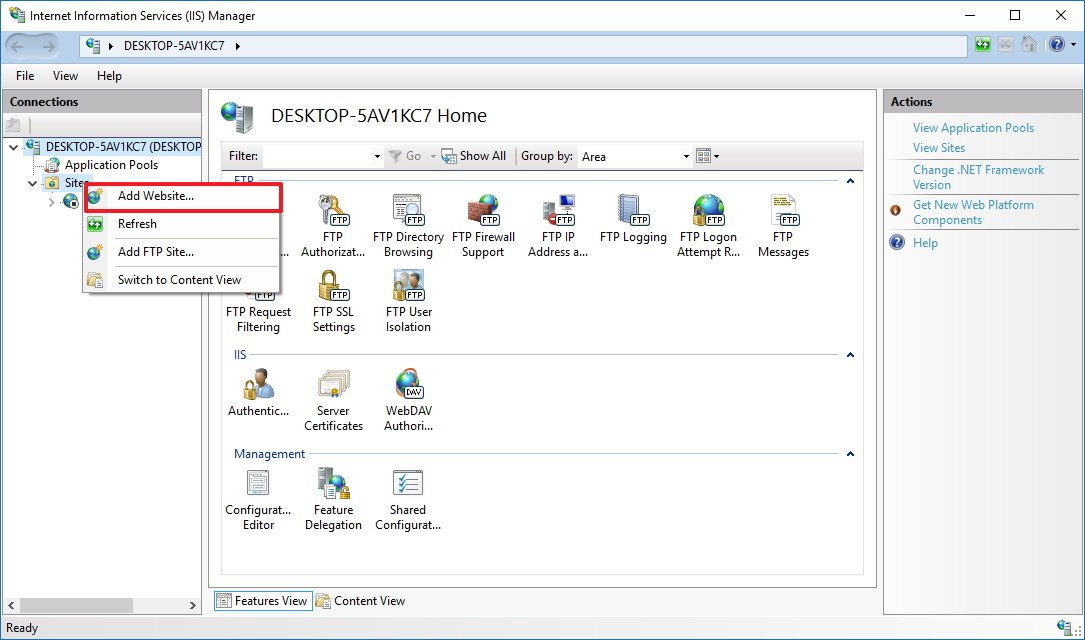
Under the navigation bar of Connections, right-click on Sites. Then select Add FTP Site.
A new window will open where you need to enter some details regarding your FTP Hosting.
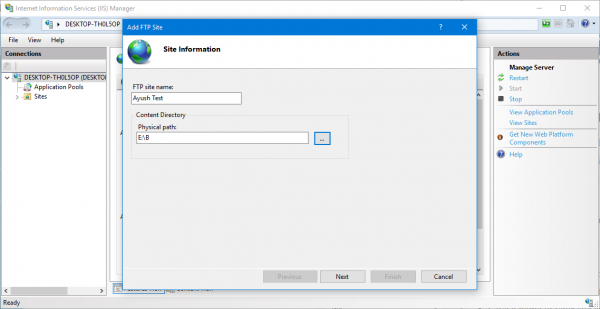
Enter the details and click Next.

You will be asked to enter some Authentication details upon clicking Next. Enter these details.
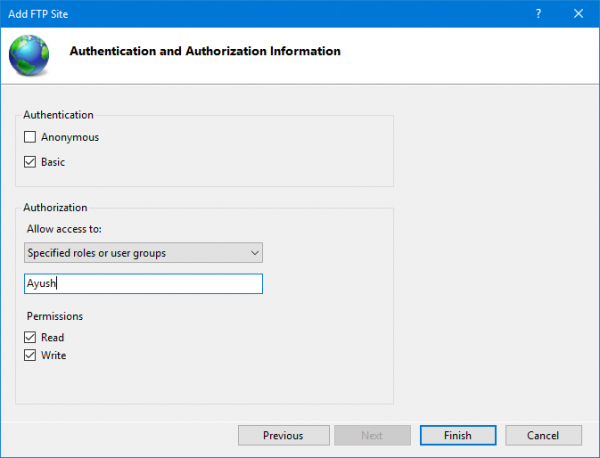
As you click on Finish, you will get an FTP Server being hosted on your Windows 10 computer.
Next, we have to allow connections from and to the FTP Server.
Read: FileZilla FTP client for Windows computers
2] Configure Windows Firewall for FTP connections to pass through
You need to configure your Windows Firewall to allow connections to and from it.
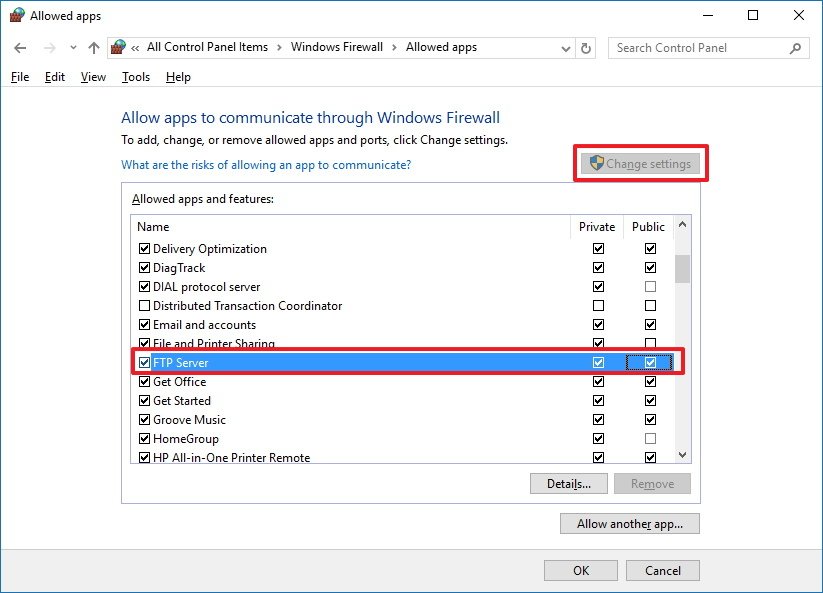
For that, start by searching for Allow an app or feature through Windows Firewall and select the appropriate result.
A window with all the settings will pop up. You can click on the Change Settings button.
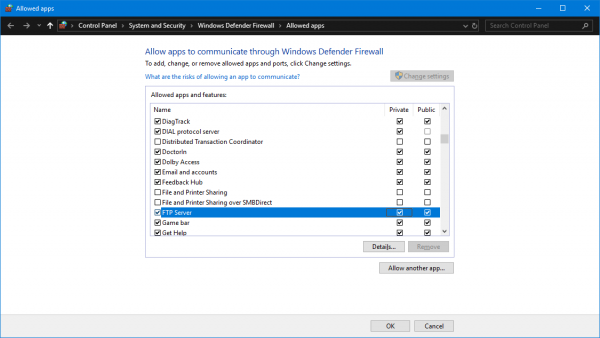
You will get a list populated, within which you need to enable the checkboxes for FTP Server in both Private and Public configurations.
After you are done, just click on OK.
You will now be able to access the FTP Server on your local network.
Next, we will see how to set up an FTP server to be accessed via an external network.

Ayush has been a Windows enthusiast since the day he got his first PC with Windows 98SE. He is an active Windows Insider since Day 1 and has been a Windows Insider MVP.
Download PC Repair Tool to quickly find & fix Windows errors automatically
An FTP or File Transfer Protocol Server is a public or private server which can host files that can be accessed locally as well as globally. It is seamless, flexible and fast which means that you can store any kind of files on that server depending on the total size of the server. If this sounds useful, great news! Windows 11 and Windows 10 allow you to create your FTP Server. You can host it both locally and make it available globally via the Internet. This article is about configuring an FTP Server – and then, enabling the connections to pass through the Windows Firewall.
We will be undertaking the following tasks-
- Configuring an FTP Server.
- Configuring the Windows Firewall for the connections to pass through.
1] Configuring an FTP Server on Windows `11/10
Start by searching for Turn Windows Features On or Off in the Search Box. Select the appropriate result to get a mini window to pop up.
Scroll down to the list, to expand Internet Information Services under which you need to expand FTP Server.
Select all the checkboxes to enable all the entries and click on OK. Let it apply the required changes.
Your computer is now enabled to host an FTP Server.
Now, to configure the FTP Server, search for Internet Information Services (IIS) Manager in the Search Box.
Under the navigation bar of Connections, right-click on Sites. Then select Add FTP Site.
A new window will open where you need to enter some details regarding your FTP Hosting.
Enter the details and click Next.
You will be asked to enter some Authentication details upon clicking Next. Enter these details.
As you click on Finish, you will get an FTP Server being hosted on your Windows 10 computer.
Next, we have to allow connections from and to the FTP Server.
Read: FileZilla FTP client for Windows computers
2] Configure Windows Firewall for FTP connections to pass through
You need to configure your Windows Firewall to allow connections to and from it.
For that, start by searching for Allow an app or feature through Windows Firewall and select the appropriate result.
A window with all the settings will pop up. You can click on the Change Settings button.
You will get a list populated, within which you need to enable the checkboxes for FTP Server in both Private and Public configurations.
After you are done, just click on OK.
You will now be able to access the FTP Server on your local network.
Next, we will see how to set up an FTP server to be accessed via an external network.
Ayush has been a Windows enthusiast since the day he got his first PC with Windows 98SE. He is an active Windows Insider since Day 1 and has been a Windows Insider MVP.
Building your own FTP (File Transfer Protocol) server can be one of the easiest and most convenient solutions to transfer file through a private or public network without limitations and restrictions typically found with most cloud storage services.
There are also many benefits running your FTP server. For example, it’s private, and you have absolute control. It’s fast (depending on your internet connection speeds), and there is virtually no limits on the amount and type of data you can store.
Also, you don’t have restrictions on file sizes either, which means that you can transfer something as small as a text file or a 1000GB PC backup, and you can even create multiple accounts to let friends and family access or store content remotely too.
You’ll find many third-party software on the internet to build a file transfer server, but Windows includes an FTP server feature that you can set up without the need to resource to other solutions. In this Windows 10 guide, we’ll walk you through the steps to successfully set up and manage an FTP server on your PC to transfer files from your home network or remotely over the internet.
How to install an FTP server on Windows 10
Very similar to previous versions, Windows 10 includes the necessary components to run an FTP server. Follow the steps below to install an FTP server on your PC:
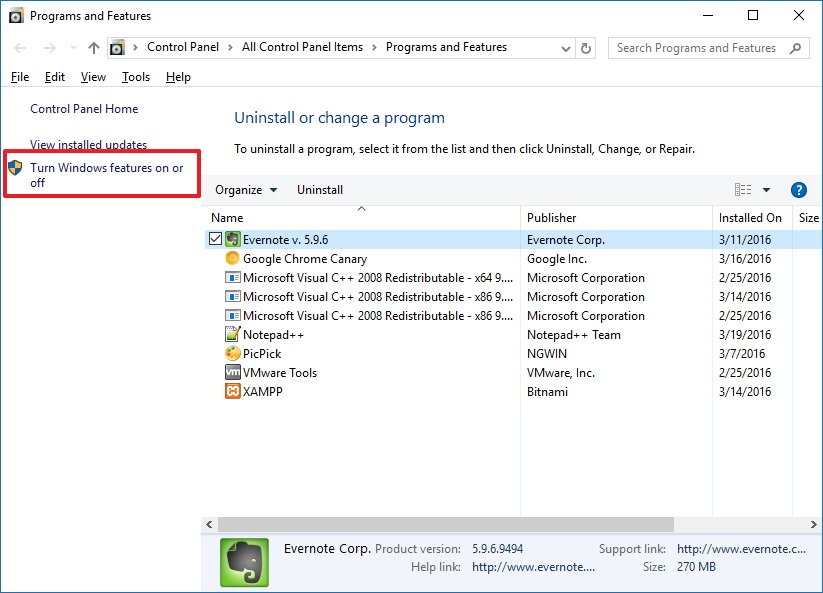
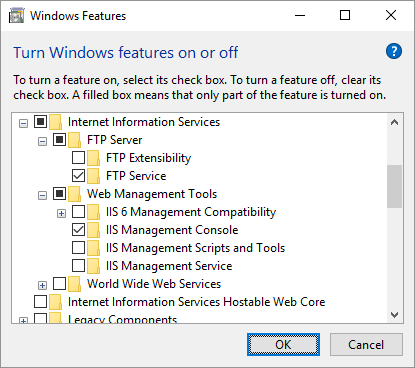
- Use the Windows key + X keyboard shortcut to open the Power User menu and select Programs and Features.
- Click the Turn Windows features on or off link.
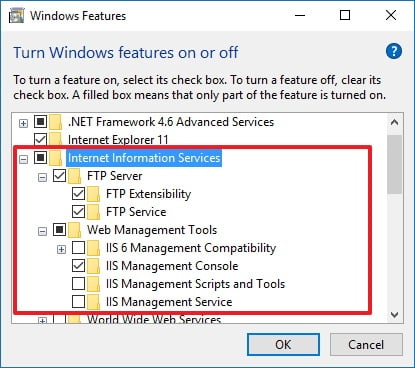
- Expand Internet Information Services and check the FTP Server option.
- Expand FTP Server and check the FTP Extensibility option.
- Check Web Management Tools with the default selections.
- Click OK to begin the installation.
- Click Close.
How to configure an FTP site on Windows 10
After installing the necessary components to run an FTP server on your PC, you need to create an FTP site using the following instructions:
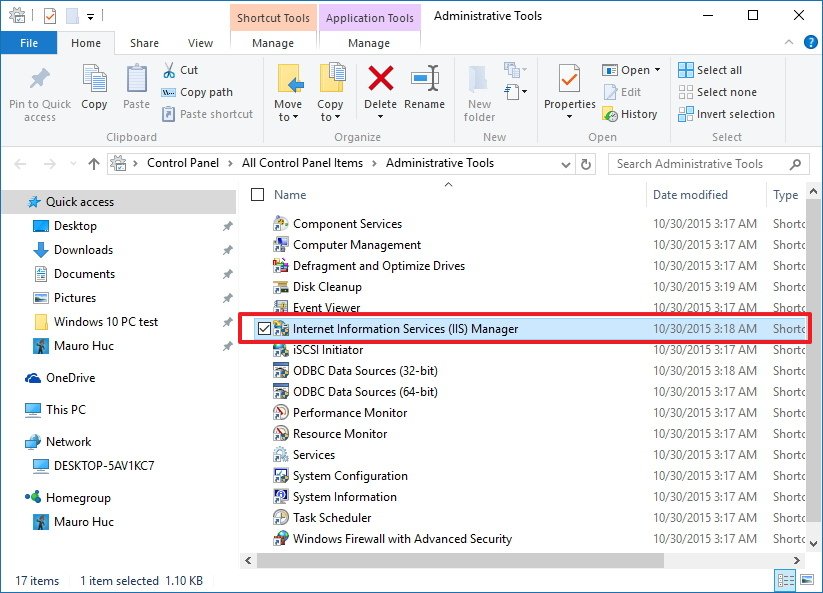
- Use the Windows key + X keyboard shortcut to open the Power User menu and select Control Panel.
- Open Administrative Tools.
- Double-click Internet Information Services (IIS) Manager.
- Expand and right-click Sites on the Connections pane.
- Select Add FTP Site.
- Name your new FTP site and enter the path to the FTP folder you want to use to send and receive files.Note: You can also use the Make New Folder button to create a specific folder to store your FTP files.
- Click Next.

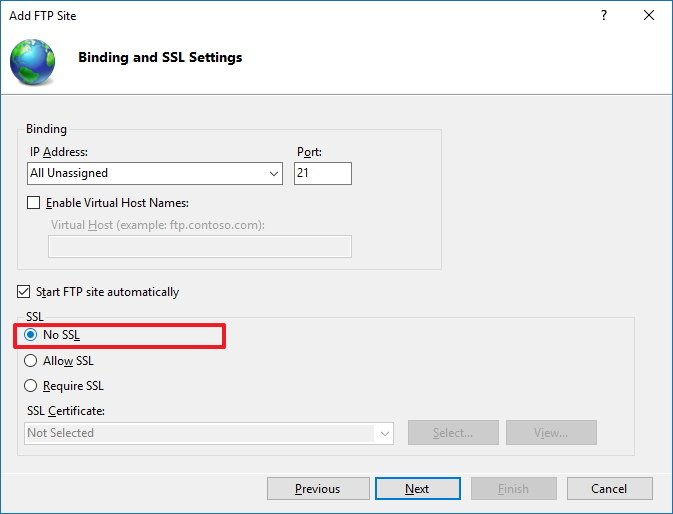
- On Binding and SSL Settings leave all the default settings, but change the SSL option to No SSL.Note: It’s worth pointing out that in a business environment or on an FTP server that will host sensitive data, it’s best practice to configure the site to require SSL.
- Click Next.
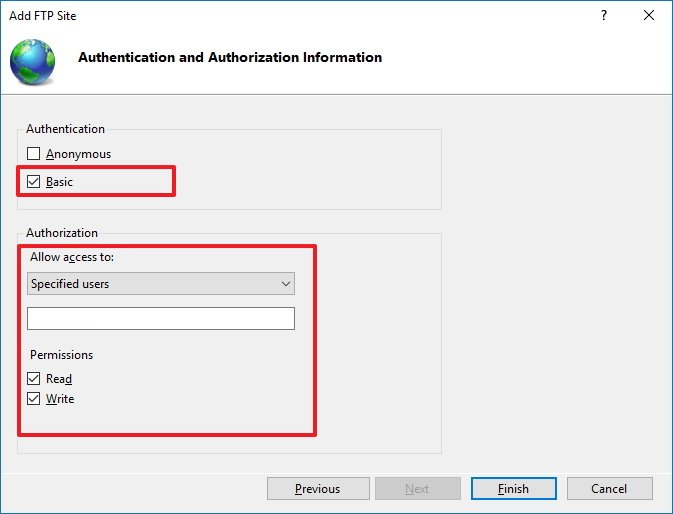
- On Authentication, check the Basic option.
- On Authorization, select Specified users from the drop-down menu.
- Type the email address of your Windows 10 account or local account name to allow yourself access to the FTP server.
- Check the options Read and Write.
- Click Finish.
How to allow an FTP server through Windows Firewall
If you have Windows Firewall running on your computer, then the security feature will block any connections trying to access the FTP server. Use the steps below to allow the FTP server through the firewall.
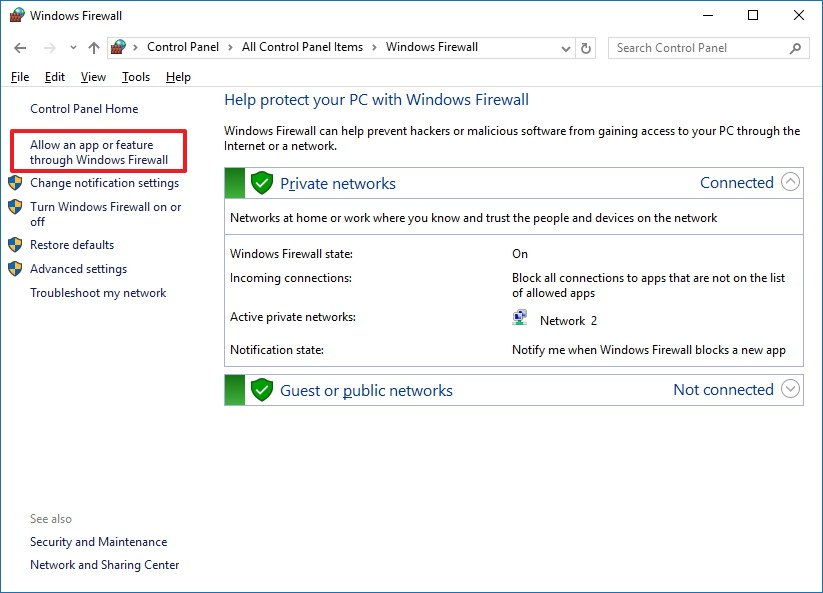
- Open the Start menu, do a search for Windows Firewall, and press Enter.
- Click the Allow an app or feature through Windows Firewall link.
- Click the Changes settings button.
- Select FTP Server and make sure to allow it on a Private and Public network.
- Click OK.
At this point, you should be able to use your favorite FTP client to connect your newly created FTP server from your local network.
Note: Make sure to check your software vendor support website for specific instructions to allow an FTP server, if you’re using another security software other than the Windows Firewall.
How to configure a router to allow external connections
For your FTP server to be reachable from the internet, you need to configure your router to open TCP/IP port number 21 to allow connections to your PC.
The instructions to forward a port will vary from router-to-router, but below you’ll find the steps to configure most routers. (For more specific instructions to forward TCP/IP ports, you should check your router’s manufacturer support website.)
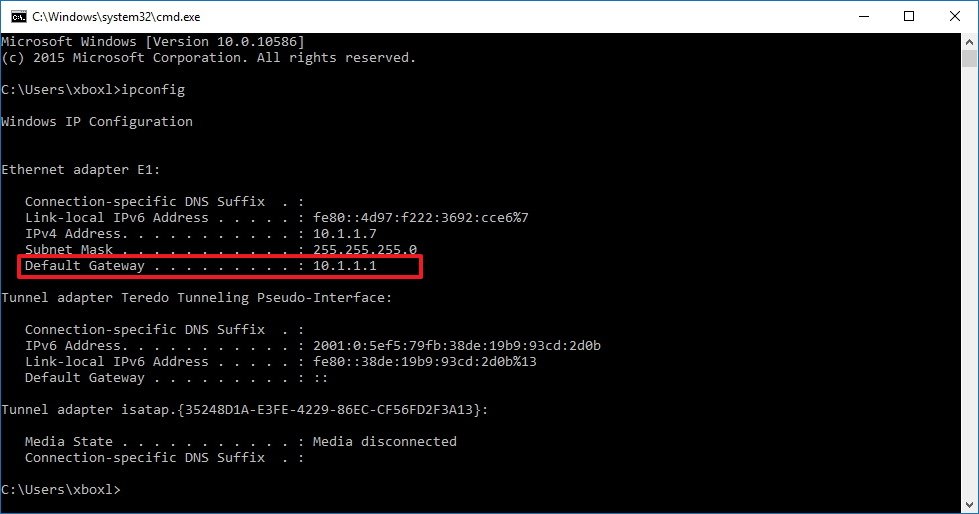
- Use the Windows key + X keyboard shortcut to open the Power User menu and select Command Prompt.
- Type the following command:
ipconfigand press Enter. - Make note of the Default Gateway IP address, which is the IP address of your router. Typically, it’s private address in the 192.168.x.x range. For example, 192.168.1.1 or 192.168.2.1.
- Open your default web browser.
- On the address bar enter the router’s IP address and press Enter.
- Sign-in with your router credentials.
- Find the Port Forwarding section — usually you’ll find this feature under the WAN or NAT settings.
- Create a new port forwarding that includes the following information:
- Service name: You can use any name. For example, FTP-Server.
- Port rage: You must use port 21.
- PC’s TCP/IP address: Open Command Prompt, type
ipconfig, and the IPv4 address is your PC’s TCP/IP address. - Local TCP/IP port: You must use port 21.
- Protocol: TCP.
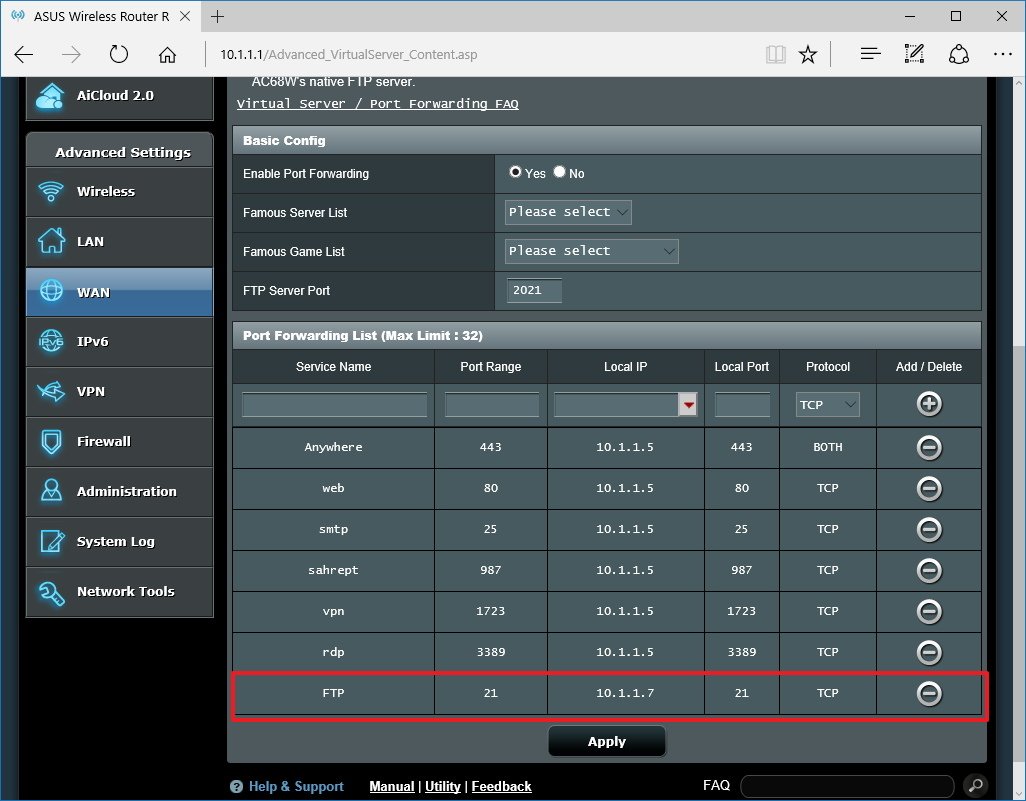
- Apply the new changes, and save the new router configurations.
How to access an FTP server from any PC
Here’s the quickest way to test your FTP server, after configuring the firewall, and forwarding port 21 on your router.
Open your default web browser and in the address bar type your Windows 10 PC IP address, on an FTP link format, and press Enter. The address should look like this: FTP://192.168.1.105.
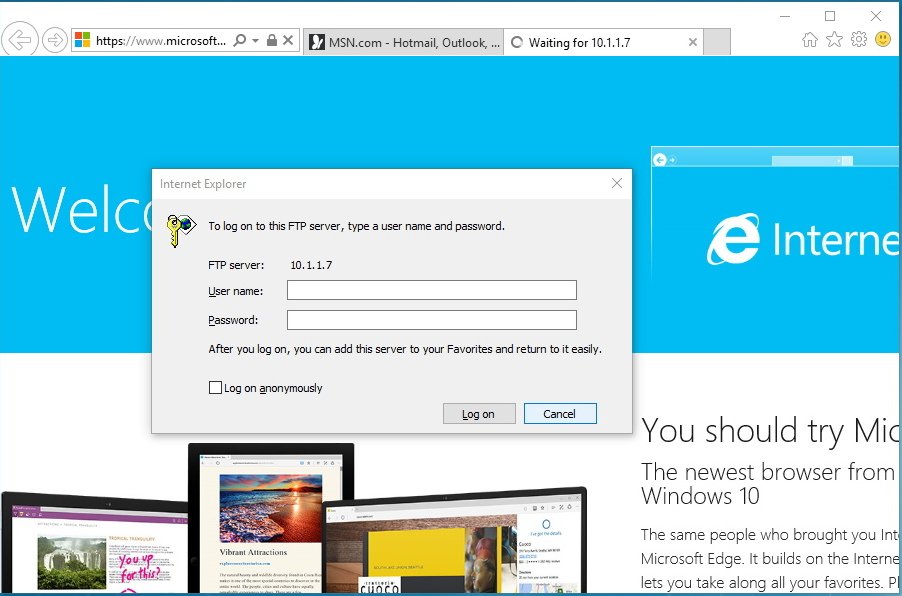
Note: I’m using Internet Explorer, because Microsoft Edge seems not to include the functionality to browse FTP sites. You can also opt to use Chrome, Firefox, or another modern web browser.
To test if your FTP server is reachable from the internet, visit Google or Bing, do a search for «What’s my IP?». Note your public IP address from the results and type it into the address bar using the FTP link format and press Enter.
If you get a login prompt, then everything is working as expected. Simply enter your account credentials and you’re should be able to sign-in.
How to upload files to an FTP server on Windows 10
Keep in mind that the method shown above is only useful to test, browse, and download files from an FTP site. You have to use the following instructions to be able to browse, download and upload files.
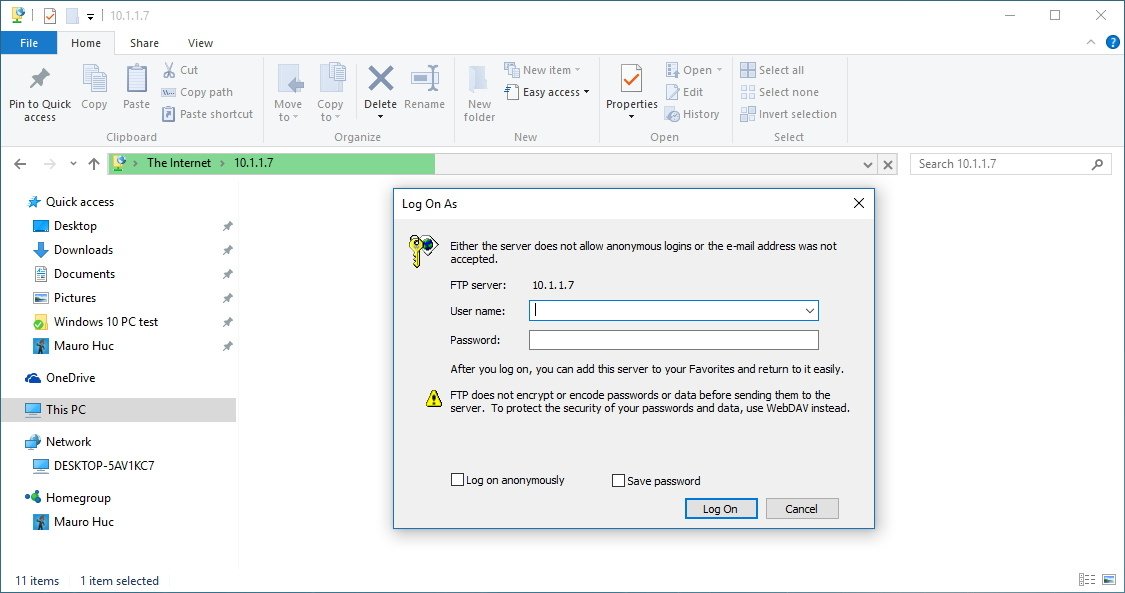
- Use the Windows key + E keyboard shortcut to open File Explorer.
- On the address bar type your public IP address on an FTP format. For example, FTP://172.217.3.14.
- Enter your username and password.
- Check the Save password option.
- Click Log On.
Using this method, you can browse, download, and upload files as if FTP server was just another drive connected to your computer.
Furthermore, you can also right-click Quick Access on the left pane and select Pin current folder to Quick Access to easily reconnect to the FTP server at a later time.
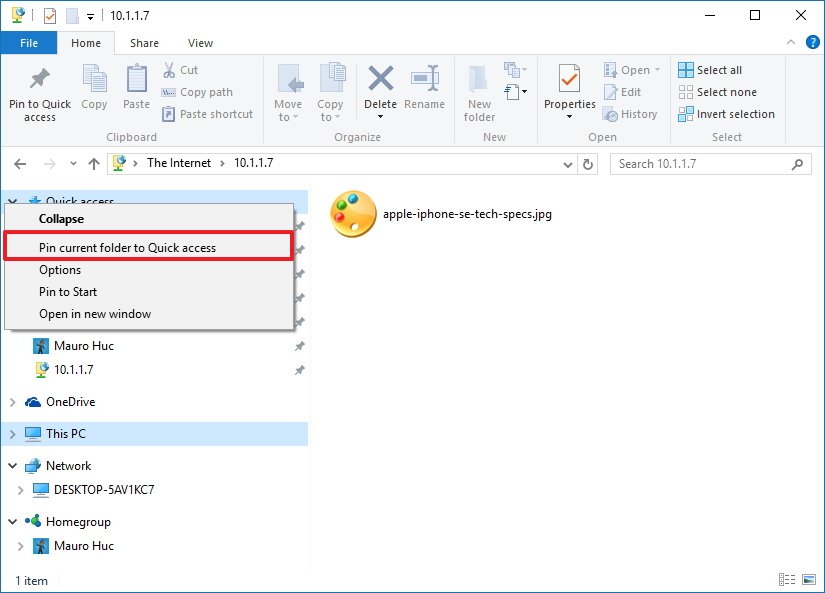
Quick Tip: You’re not limited to use only File Explorer, you can use any FTP client like the popular FileZilla open source software to transfer files over a local or public network.
How to create multiple FTP accounts on Windows 10
If you want to allow other people to access your FTP server too, you can create multiple accounts with specific permissions to download and upload files.
To let other people access to your FTP server, you need to create a new Windows 10 account for each user, associate each account with the FTP home directory, and configure the appropriate settings. Follow the steps below to accomplish these tasks:
Add a new user account on Windows 10
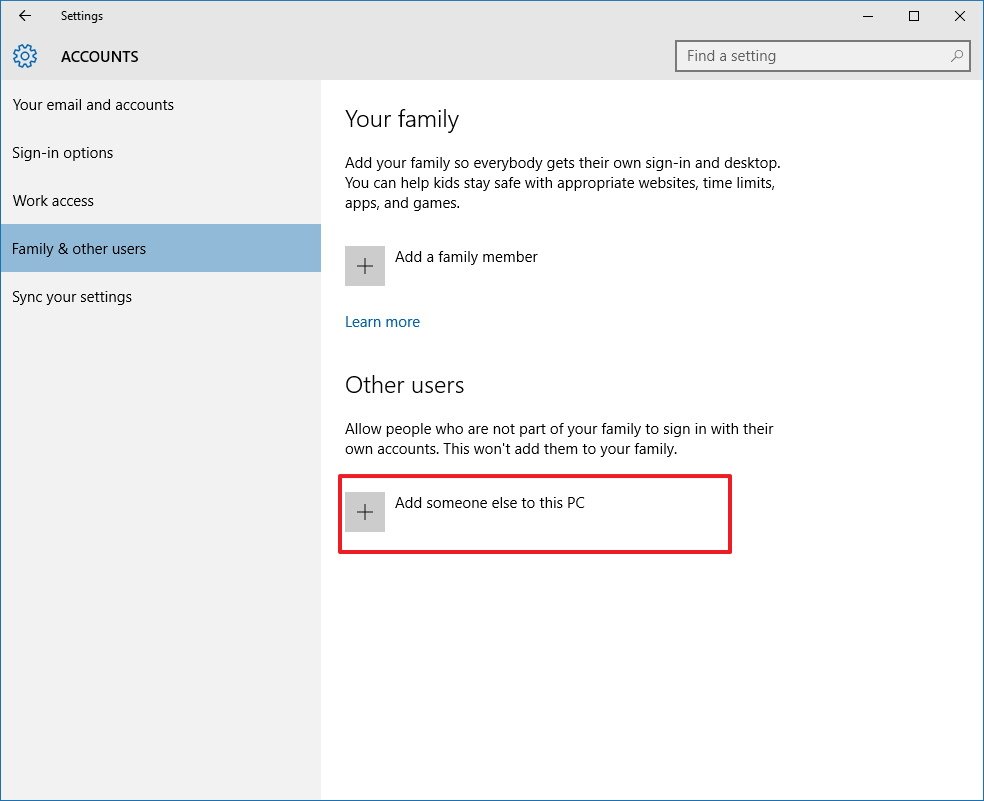
- Use the Windows key + I to open the Settings app.
- Click Accounts.
- Click Family & other users.
- Click Add someone else to this PC.
- Click the I don’t have this person’s sign-in information link.
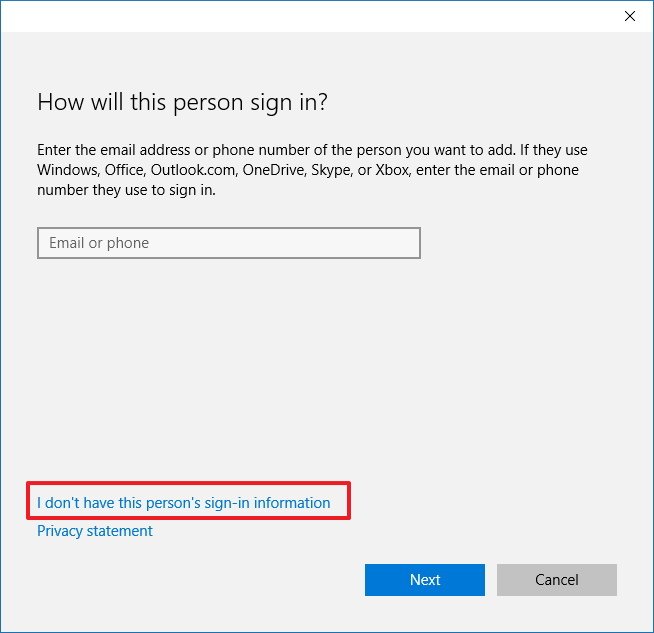
- Click the Add a user without a Microsoft account link.
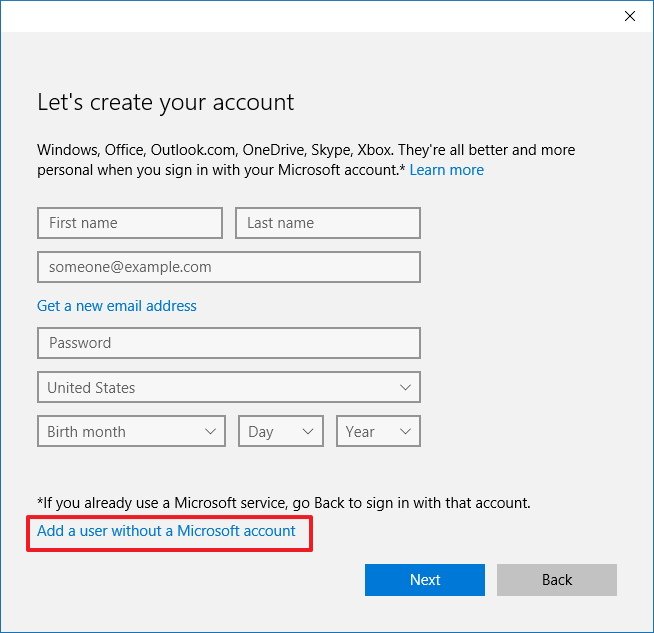
- Enter the new user account information and click Next to complete the task.Note: This account will be accessed from the internet, as such make sure to use a strong and secure password.

Add a new user account to access the FTP folder
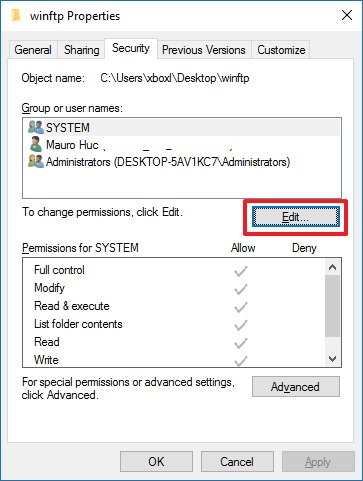
- Right-click the FTP folder and select Properties.
- Click the Security tab.
- Click Edit.
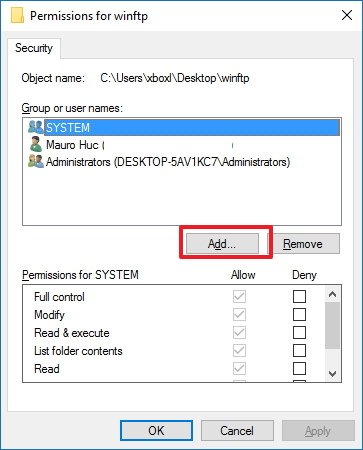
- Click Add.
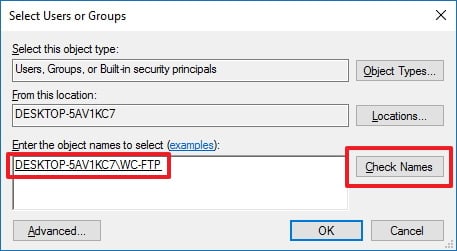
- Enter the user account name and click Check Name.
- Click OK.
- On Group or user names, select the user account you just created, and select the appropriate permissions.
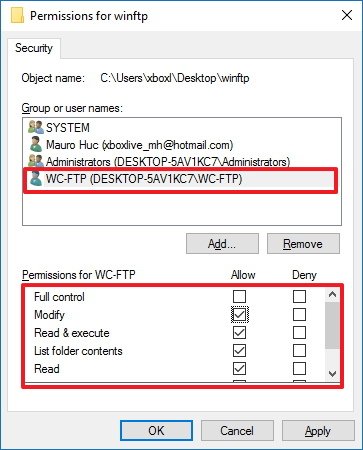
- Click Apply.
- Click OK.
Configure a new user account to access the FTP server
- Use the Windows key + X keyboard shortcut to open the Power User menu and select Control Panel.
- Open Administrative Tools.
- Double-click Internet Information Services (IIS) Manager.
- Expand Sites.
- Select the FTP site and double-click Authorization Rules.

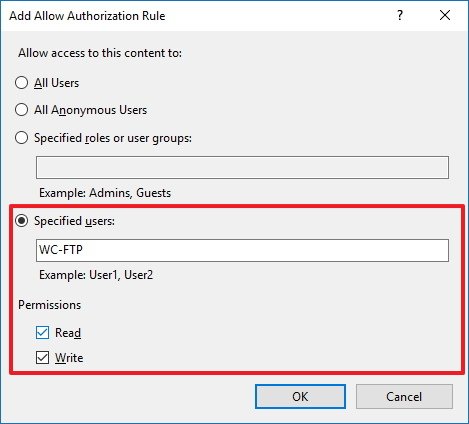
- Right-click on and select Add Allow Rules from the context menu.
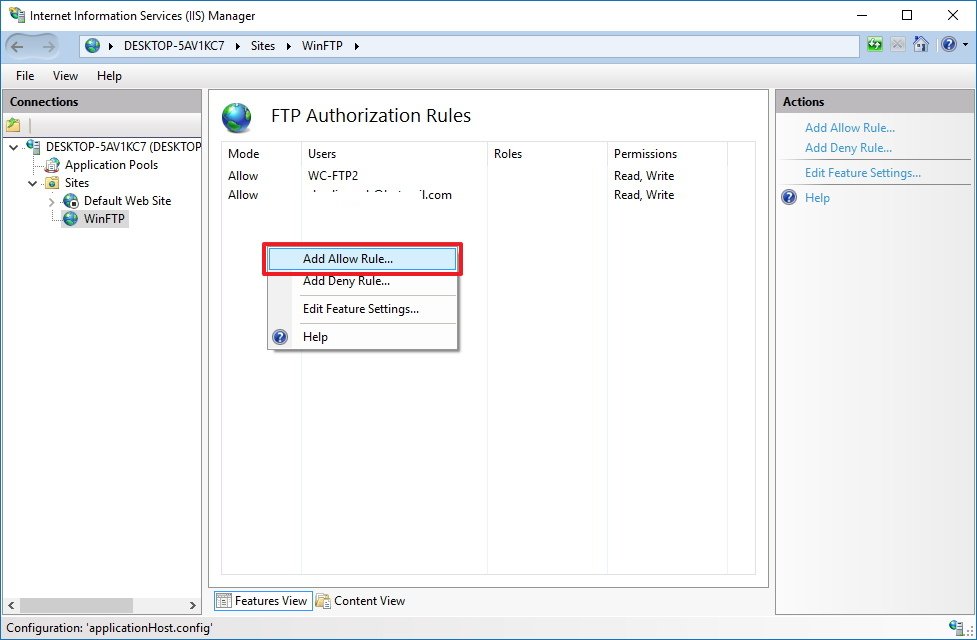
- Select Specified user and enter the name of the Windows 10 user account you created earlier.
- Set the Read and Write permissions you want the user to have.
- Click OK.
Now the new user should be able to connect to the server with their own credentials. Repeat the steps mentioned above to add more users to your FTP server.
Wrapping things up
In this guide, you learned to set up and manage your own private FTP server without third-party software, and we’ve shown you different methods to access your files remotely. Just remember that your PC must be turned on and connected to the internet for the FTP server to work, you won’t be able to access any files if your computer is in Sleep or Hibernation mode.
The FTP feature is available on Windows 10 Pro as well as on Windows 10 Home, and previous versions of the operating system.
Windows 10 resources
For more interesting guides, tips, coverage, and answers on Windows 10, you can visit the following resources:
- Windows 10 help, tips, and tricks
- Windows 10 on Windows Central – All you need to know
- Windows 10 forums on Windows Central
Get the best of Windows Central in in your inbox, every day!
Mauro Huculak is technical writer for WindowsCentral.com. His primary focus is to write comprehensive how-tos to help users get the most out of Windows 10 and its many related technologies. He has an IT background with professional certifications from Microsoft, Cisco, and CompTIA, and he’s a recognized member of the Microsoft MVP community.
Если вы хотите создать частное облако для обмена и преобразования больших файлов без ограничений, вы можете создать FTP-сервер (сервер протокола передачи файлов) на своем компьютере с Windows 10.
См. Также: Инструкции по настройке отдельного FTP-сервера с помощью FileZilla.

Как и в предыдущих версиях, в Windows 10 также интегрированы необходимые элементы для запуска FTP-сервера. Выполните следующие действия, чтобы установить FTP-сервер на компьютер с Windows 10:
1. Нажмите комбинацию клавиш Windows + X, чтобы открыть меню «Питание» и выбрать «Программы и компоненты».
2. Щелкните ссылку Включение или отключение компонентов Windows.

3. Разверните Internet Information Services, затем отметьте опцию FTP Server.
4. Разверните FTP-сервер и выберите «Расширяемость FTP».
5. Отметьте Инструменты веб-управления с параметрами по умолчанию.
6. Щелкните OK, чтобы начать установку.
7. Щелкните «Закрыть».
2. Настройте FTP-сайт в Windows 10.
После того, как вы установили необходимые элементы для запуска FTP-сервера на вашем компьютере с Windows 10, перейдите к созданию FTP-сайта:
1. Нажмите комбинацию клавиш Windows + X, чтобы открыть меню «Опытный пользователь», и выберите «Панель управления».
2. Откройте «Администрирование».
3. Дважды щелкните Диспетчер информационных служб Интернета (IIS).
4. Разверните таблицу подключений и щелкните правой кнопкой мыши узел.
5. Выберите Добавить FTP-сайт.
6. Назовите свой новый FTP-сайт и введите путь к FTP-каталогу, который вы хотите использовать для отправки и получения файлов.
Примечание:
Вы можете использовать кнопку «Создать новую папку», чтобы создать конкретную папку, содержащую FTP-файл.
7. Щелкните Далее.
8. В интерфейсе «Настройки привязки и SSL» удалите все настройки по умолчанию, измените параметр SSL на «Нет SSL».
9. Щелкните Далее.
10. В разделе «Проверка подлинности» выберите вариант «Обычная».
11. В разделе «Авторизация» выберите в раскрывающемся меню «Указанные пользователи».
12. Введите адрес электронной почты своей учетной записи Windows 10 или имя локальной учетной записи, чтобы получить доступ к FTP-серверу.
13. Отметьте параметры чтения и записи.
14. Щелкните Готово.
3. Как разрешить FTP-сервер через брандмауэр Windows (идея брандмауэра)?
Если на вашем компьютере работает брандмауэр Windows, он блокирует любое соединение, пытающееся получить доступ к FTP-серверу.
Выполните следующие действия, чтобы включить FTP-сервер через брандмауэр (брандмауэр):
1. Откройте меню «Пуск», войдите в брандмауэр Windows и поле поиска и нажмите Enter.
2. Щелкните ссылку или функцию Разрешить приложение через брандмауэр Windows.
3. Щелкните «Изменить настройки».
4. Выберите FTP-сервер и отметьте оба варианта: Частный и Общедоступный.
5. Щелкните ОК.
С этого момента вы можете использовать FTP-клиент для подключения к FTP-серверу, который вы только что создали в локальной сети.
4. Настройте маршрутизатор, чтобы разрешить внешние подключения, например?
Чтобы ваш FTP-сервер мог подключаться к Интернету, вы должны настроить маршрутизатор так, чтобы он открывал порт номер 21 в TCP / IP, чтобы разрешить подключение к вашему компьютеру.
1. Нажмите комбинацию клавиш Windows + X, чтобы открыть Меню опытного пользователя и выберите Командная строка.
2. Введите команду ipconfig в окне командной строки и нажмите Enter.
3. Запишите IP-адрес шлюза по умолчанию. IP-адрес шлюза по умолчанию — это адрес вашего маршрутизатора.
4. Откройте браузер по умолчанию на вашем компьютере.
5. В адресной строке введите IP-адрес маршрутизатора (который является IP-адресом шлюза по умолчанию, который вы указали выше) и нажмите Enter.
6. Войдите в систему, указав информацию о маршрутизаторе.
7. Найдите переадресацию портов (обычно эта опция находится в настройках WAN или NAT).
8. Создайте новую переадресацию портов, которая включает следующую информацию:
Имя службы: любое имя, которое вы хотите использовать. Такие как FPT-Server.
Ярость порта: используйте порт 21.
TCP / IP-адрес компьютера: откройте командную строку, затем введите ipconfig в окне командной строки. IPv4-адрес — это TCP / IP-адрес компьютера.
Локальный порт TCP / IP: используйте порт 21.
Протокол: TCP.
9. Примените изменения и сохраните новую конфигурацию маршрутизатора.
5. Доступ к FTP-серверу на любом компьютере.
Вот как проверить самый быстрый FTP-сервер после настройки брандмауэра и переадресации портов 21 на маршрутизаторе:
Откройте браузер по умолчанию на вашем компьютере, затем введите адресную строку IP-адреса вашего браузера, отформатируйте ссылку FTP и нажмите Enter.
Например, ваш IP-адрес FTP://192.168.1.105.
Чтобы проверить FTP-сервер, подключенный к Интернету, перейдите в Google или Bing и выполните поиск по запросу «Какой у меня IP?».
Снова запишите IP-адрес, затем введите этот IP-адрес в адресную строку браузера, используя формат ссылки FTP, и нажмите Enter.
6. Как загружать файлы на FTP-сервер Windows 10?
1. Нажмите комбинацию клавиш Windows + E, чтобы открыть проводник.
2. В адресной строке введите свой общедоступный IP-адрес в формате FTP, например FTP://172.217.3.14.
3. Введите ваше имя пользователя и пароль.
4. Отметьте опцию Сохранить пароль.
5. Щелкните Войти.
Кроме того, вы можете щелкнуть правой кнопкой мыши «Быстрый доступ» на левой панели и выбрать «Закрепить текущую папку в быстром доступе», чтобы легко повторно подключить FTP-сервер в следующий раз.
7. Как создать несколько учетных записей FTP в Windows 10?
Если вы хотите разрешить нескольким пользователям доступ к FTP-серверу, вы должны создать новую учетную запись Windows 10 для каждого пользователя, чтобы получить доступ, связать эти учетные записи с папкой FTP и настроить соответствующие параметры. Для этого выполните следующие действия:
Добавьте новую учетную запись пользователя в Windows 10:
1. Нажмите комбинацию клавиш Windows + I, чтобы открыть меню настроек.
2. Щелкните Учетные записи.
3. Щелкните Семья и другие пользователи.
4. Щелкните, чтобы выбрать «Добавить кого-нибудь на этот компьютер».
5. Щелкните ссылку У меня нет этой информации для входа.
6. Щелкните ссылку Добавить пользователя без учетной записи Microsoft.
7. Введите информацию об учетной записи пользователя и нажмите «Далее» для завершения.
Добавьте учетную запись пользователя для доступа к папке FPT:
1. Щелкните правой кнопкой мыши папку FPT и выберите «Свойства».
2. Щелкните вкладку Безопасность.
3. Щелкните Edit.
4. Щелкните Добавить.
5. Введите имя учетной записи для учетной записи пользователя и нажмите Проверить имя.
6. Щелкните ОК.
7. В разделе «Группа или имена пользователей» выберите только что созданную учетную запись пользователя и выберите соответствующие разрешения.
8. Щелкните Применить.
9. Щелкните ОК.
Настройте новую учетную запись пользователя для доступа к серверу FPT:
1. Нажмите комбинацию клавиш Windows + X, чтобы открыть Меню опытного пользователя и выберите Панель управления.
2. Откройте «Администрирование».
3. Дважды щелкните, чтобы выбрать Диспетчер информационных служб Интернета (IIS).
4. Разверните «Сайты».
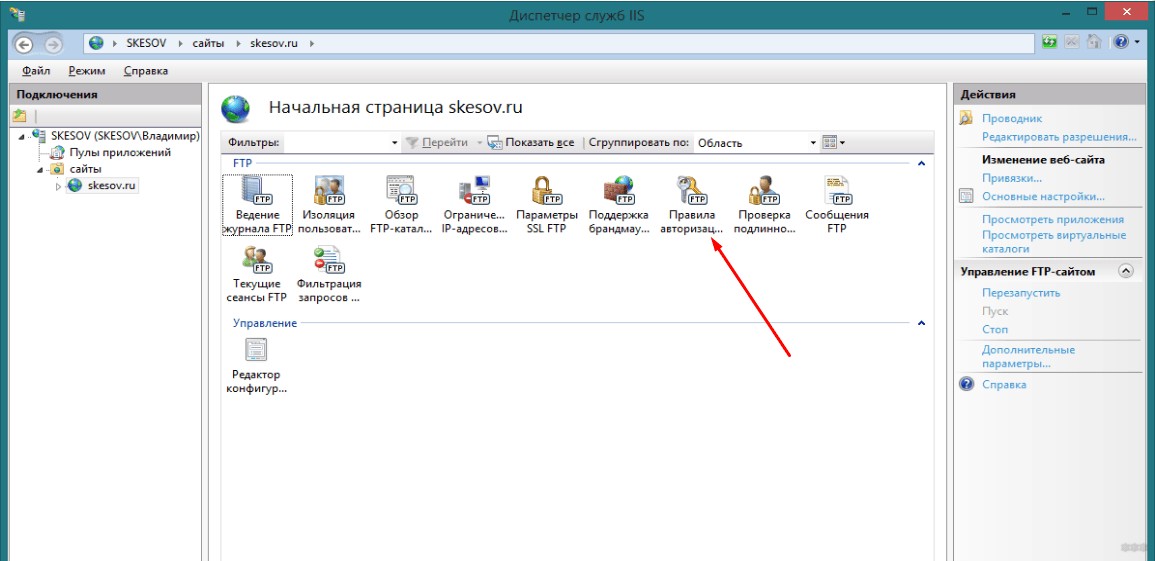
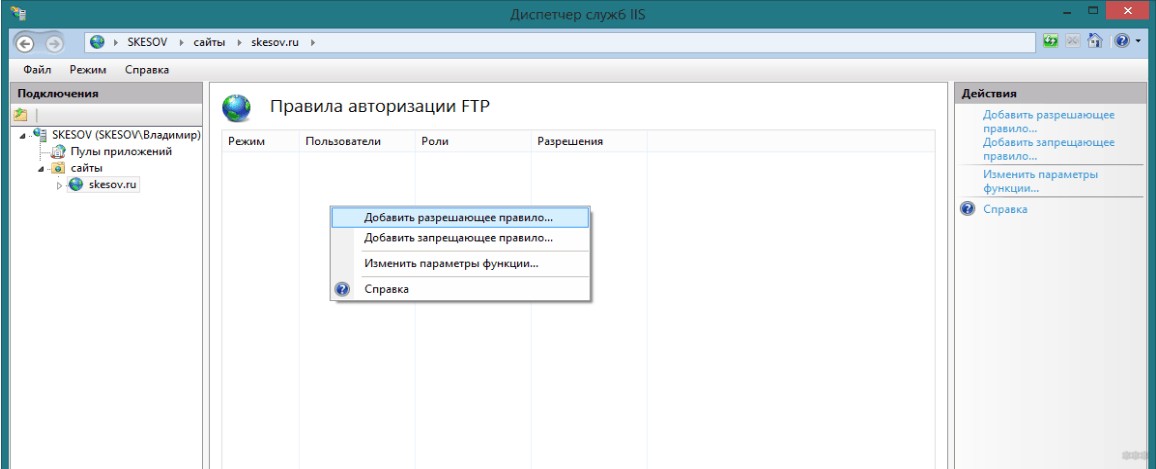
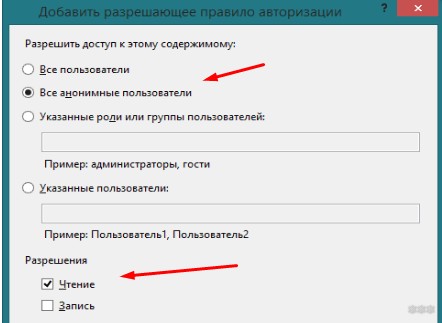
5. Выберите FTP-сайт, затем дважды щелкните Правила авторизации.
6. Щелкните правой кнопкой мыши и выберите Добавить разрешающие правила.
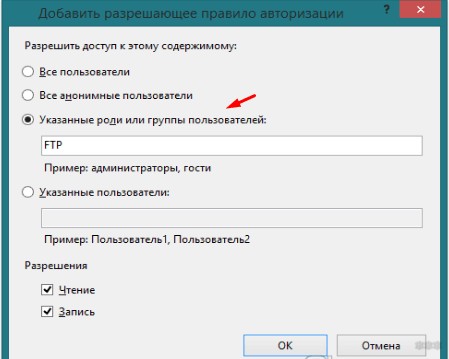
7. Выберите «Указанный пользователь», а затем введите новое имя учетной записи пользователя, которое вы только что создали.
8. Установите разрешения на чтение и запись, если вы хотите разрешить доступ пользователям.
9. Щелкните ОК.
См. Некоторые из следующих статей:
- Все проблемы с запуском Windows в безопасном режиме
- Инструкции по настройке и управлению Сетевым мостом в Windows 10
- Как удалить Wi-Fi, сохраненный в Windows 10?
Удачи!
Documentation » Using WinSCP » Guides » Other »
You may want to install a secure FTP server on Windows either as standalone file storage or to have means of editing your website hosted on IIS (Internet Information Services) web server. In both cases, you can use an optional FTP Server component of the IIS. It can be installed standalone or along with a Web Server.1
- Installing FTP Server
- On Windows Server 2022, Windows Server 2019, Windows Server 2016 and Windows Server 2012
- On Windows Server 2008 R2
- On Windows Desktop (Windows 11, Windows 10, Windows 8, Windows 7 and Windows Vista)
- Opening IIS Manager
- Creating Certificate for the FTPS Server
- Servers behind external Firewall/NAT
- Windows Firewall Rules
- Restarting FTP Service
- Adding FTP Site
- To a Web Site
- Standalone FTP Site
- Connecting to Your FTPS Server
- Further reading
Installing FTP Server
On Windows Server 2022, Windows Server 2019, Windows Server 2016 and Windows Server 2012
- In Windows Server Manager go to Dashboard and run Manage > Add Roles and Features.
Advertisement
- In Add Roles and Features wizard:
- Proceed to Installation Type step and confirm Role-based or feature-based installation.
- Proceed to Server Roles step and check Web Server (IIS) role. Note that it is checked already, if you had IIS installed as a Web Server previously. If your are prompted to install IIS Management Console tool, confirm it.
- Proceed to Web Server Role (IIS) > Role Services step and check FTP Server role service. Uncheck Web Server role service, if you do not need it.
- Proceed to the end of the wizard and click Install.
- Wait for the installation to complete.

Advertisement
Skip to the next step.
On Windows Server 2008 R2
If you do not have IIS installed yet:
- In Windows Server Manager go to Roles node and in Roles Summary panel click Add Roles.
- In Add Roles wizard:
- Proceed to Server Roles step and check Web Server (IIS) role.
- Proceed to Role Services step and check FTP Server > FTP Service role service. Uncheck Web Server role service, if you do not need it. Make sure Management Service > IIS Management Console role service is checked.
- Proceed to the end of the wizard and click Install.
- Wait for the installation to complete.
If you have IIS installed already (i.e. as a Web Server):
- In Windows Server Manager go to Roles node and in Web Server (IIS) > Role Services panel click Add Role Services.
- In Add Role Services wizard:
- Check FTP Server > FTP Service role service.
- Make sure that Management Service > IIS Management Console is checked.
- Confirm with Next button.
- Proceed to the end of the wizard and click Install.
- Wait for the installation to complete.

Advertisement
Skip to the next step.
On Windows Desktop (Windows 11, Windows 10, Windows 8, Windows 7 and Windows Vista)
- Go to Control Panel > Programs > Programs and Features > Turn Windows features on or off.
- On a Windows Features window:
- Expand Internet Information Services > FTP Server and check FTP Service.
- Expand Internet Information Services > Web Management Tools and check IIS Management Console, if it is not checked yet.
- Confirm with OK button.
- Wait for the installation to complete.
Opening IIS Manager
- Go to Control Panel > System and Security > Administrative Tools (Windows Tools on Windows 11) and open Internet Information Services (IIS) Manager.
- Navigate to your Windows server node.
Advertisement
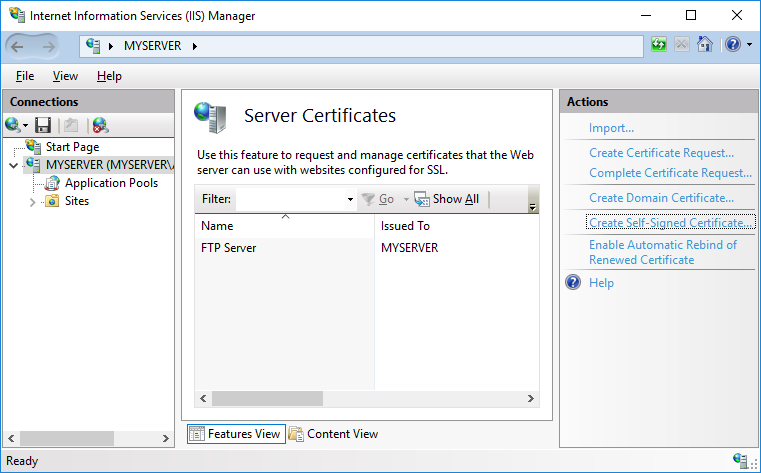
Creating Certificate for the FTPS Server
You need a TLS/SSL certificate to secure your FTP server. Ideally, you should acquire the certificate from a certificate authority.
You may also create a self-signed certificate locally, but in such case users of your FTPS server will be warned, when connecting to the server.
To create the self-signed certificate:
- In IIS Manager, open IIS > Server Certificates.
- Click on Create Self-Signed Certificate action.
- Specify a certificate name (e.g. “FTP Server”) and submit with OK.
Self-signed certificates created by old versions of IIS Manager do not work with FTPS clients that check for key usage violations.2 To create a certificate with a correct key usage, use New-SelfSignedCertificate PowerShell as an Administrator:
New-SelfSignedCertificate -FriendlyName "FTP Server" -CertStoreLocation cert:localmachinemy -DnsName ftp.example.com
Servers behind external Firewall/NAT
If your server is behind an external firewall/NAT, you need to tell the FTP server its external IP address, to allow passive mode connections.
- In IIS Manager, open FTP > FTP Firewall Support.
- Specify your server’s external IP address.
For Microsoft Azure Windows servers you will find the external IP address in Public IP address section of the virtual machine page.
When behind an external firewall, you need to open ports for data connections (obviously in addition to opening an FTP port 21 and possibly an implicit TLS/SSL FTP port 990). You won’t probably want to open whole default port range 1024-65535. In such case, you need to tell the FTP server to use only the range that is opened on the firewall. Use a Data Channel Port Range box for that. Any time you change this range, you will need to restart FTP service. Learn how to open ports on Microsoft Azure.
Advertisement
Click Apply action to submit your settings.
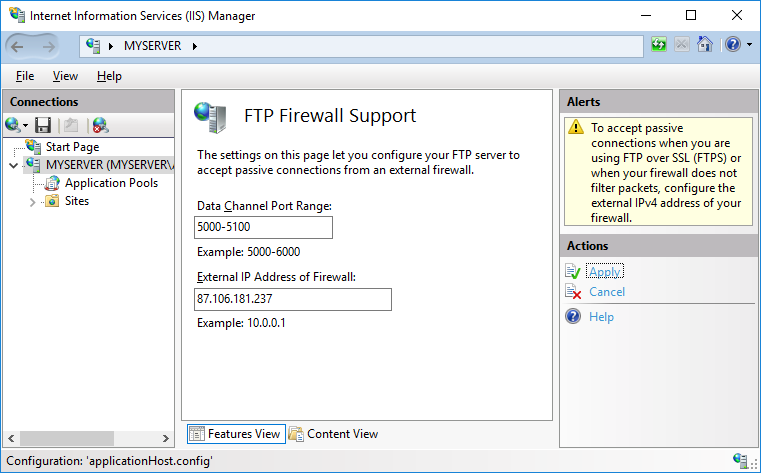
Some external firewalls are able to monitor FTP control connection and automatically open and close the data connection ports as needed. So you do not need to have whole port range opened all the time, even when not in use. This won’t work with the secure FTPS as the control connection is encrypted and the firewall cannot monitor it.
Windows Firewall Rules
An internal Windows firewall is automatically configured with rules for the ports 21, 990 and 1024-65535 when IIS FTP server is installed.
The rules are not enabled initially on some versions of Windows.3 To enable or change the rules, go to Control Panel > System and Security > Windows Defender Firewall4 > Advanced Settings > Inbound Rules and locate three “FTP server” rules. If the rules are not enabled, click on Actions > Enable Rule.
Restarting FTP Service
While the internal Windows firewall is automatically configured to open FTP ports when FTP server is installed, this change does not seem to apply, until FTP service is restarted. The same is true for changing data channel port range.
To restart FTP service go to Control Panel > System and Security > Administrative Tools (Windows Tools on Windows 11) and open Services. Locate Microsoft FTP Service and click Restart service.5
Adding FTP Site
To a Web Site
If you want to add FTP server to manage your existing web site remotely, locate your web site node in IIS Manager and:
- Click Add FTP Publishing action.
- In Add FTP Site Publishing wizard:
- On an initial Binding and SSL Settings step, select Require SSL to disallow non-encrypted connections and select your certificate.
- On Authentication and Authorization Information step, select Basic authentication and make sure Anonymous authentication is not selected. Select which users (Windows accounts) you allow to connect to the server with what permissions. You can choose All users or select only some. Do not select Anonymous users.
- Submit with Finish button.
Advertisement
Your secure FTPS server is now running and can be connected to.

Standalone FTP Site
If you want to add a standalone FTP server to store/exchange files, locate Sites node (folder) of your Windows server in IIS Manager and:
- Click Add FTP Site action.
- In Add FTP Site wizard:
- On an initial Site Information step, give a name to your FTP site (if it’s the only site you are going to have, simple “FTP site” suffice) and specify a path to a folder on your server’s disk that is going to be accessible using FTP.
- On a Binding and SSL Settings step, select Require SSL to disallow non-encrypted connections and select your certificate.
- On Authentication and Authorization Information step, select Basic authentication and make sure Anonymous authentication is not selected. Select which users (Windows accounts) you allow to connect to the server with what permissions. You can choose All users or select only some. Do not select Anonymous users.
- Submit with Finish button.
Your secure FTPS server is now running and can be connected to.
Connecting to Your FTPS Server
For connecting to a Microsoft Azure Windows instance, see a specific guide.
Start WinSCP. Login Dialog will appear. On the dialog:
- Select FTP protocol and TLS/SSL Explicit encryption.
- Enter your Windows server hostname to Host name field. Avoid using an IP address to allow WinSCP to verify that the hostname matches with host the server’s certificate was issued to (not applicable to self-signed certificates).
- Specify username and password for Windows account you want to connect with (when using domain accounts, you need to specify a full username with format
domainusername). - You may want to save your session details to a site so you do not need to type them in every time you want to connect. Press Save button and type site name.
- Press Login to connect.
- If you are using self-signed certificate, you will be prompted to accept it.
Advertisement

Further reading
- Installing secure FTP server on Microsoft Azure using IIS;
- Installing SFTP/SSH Server on Windows using OpenSSH;
- Upload files to FTP server or SFTP server;
- Automate file transfers (or synchronization) to FTP server or SFTP server.
Приветствую, уважаемый читатель! В этой статье нашего портала WiFiGid мы попробуем разобраться в настройке FTP сервера под Windows разными методами. Раз уж вы попали сюда, наверняка вам известно, что такое FTP и что с ним делать. Поэтому кратко и без воды – только инструкция.
Нашли ошибку? Есть пожелание или дополнение? Наши комментарии открыты для всех желающих. Всегда можно написать туда свое мнение или вопрос, помочь другим людям, улучшить статью.
Содержание
- Что будем делать?
- Способ 1 – Встроенный FTP
- Частые вопросы по способу 1
- Способ 2 – FileZilla Server
- Задать вопрос автору статьи
Что будем делать?
Не знаю, кто будет читать эту статью, но он явно хочет очень быстро запустить у себя FTP сервер. Скорее всего что-то замудренное здесь не пойдет, а грамотные сисадмины для конфигурации своего сервера на Unix сформулируют запрос точнее, поэтому остановимся на бесплатном, быстром, удобном.
Ниже будет представлено несколько готовых решение. Все что нужно – просто брать и делать, и уже вскоре вы сможете спокойно подключаться к своему компьютеру по FTP, для чего бы вам это не было нужно.
За редким использованием забываешь, что в «винде» уже есть встроенный FTP, так что и ходить далеко не нужно. Но он по умолчанию выключен, так что начнем с самого начала. Все на примере Windows 7, на «десятке» пробуем аналогично или идем в следующий раздел, где будем устанавливать стороннее решение.
- Пуск – Панель управления – Программы и компоненты:
- Нажимаем «Включение или отключение компонентов Windows». В открывшемся окне переходим в Средства IIS – FTP-сервер. И отмечаем галочкой все подкпункты. В конце не забываем нажать кнопку «ОК».
- Переходим к настройке. Пуск – Панель управления – Администрирование.
- Диспетчер служб IIS:
- Щелкаем по элементу Сайты правой кнопкой мыши и в появившемся меню выбираем «Добавить FTP-сервер»:
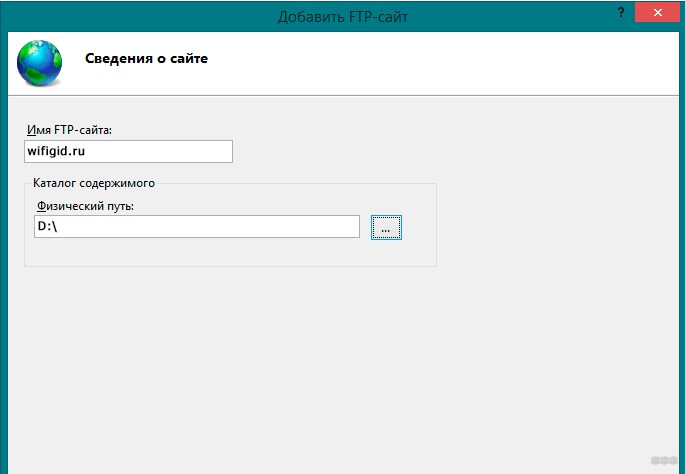
- В появившемся окне задаем имя FTP-сайта. Можно на самом деле любое. Мы уж обзовемся как есть – WiFiGid.ru. И физичекий путь до папки, с которой будет происходить обмен – у нас на это выделен полностью диск D:
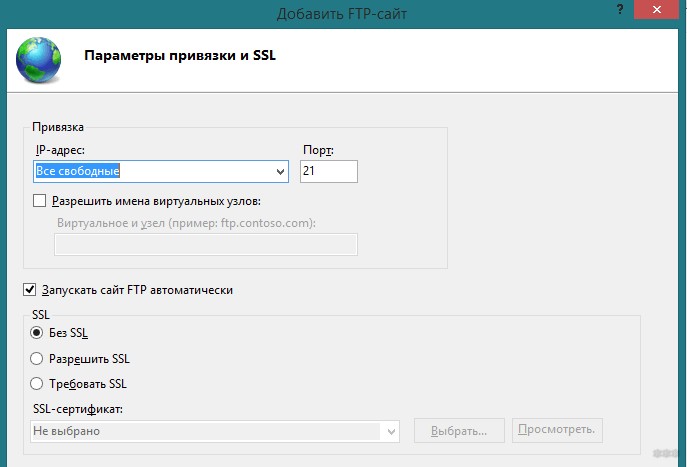
- На следующей странице задаем IP, порт, шифрование. Лучше оставить вот так:
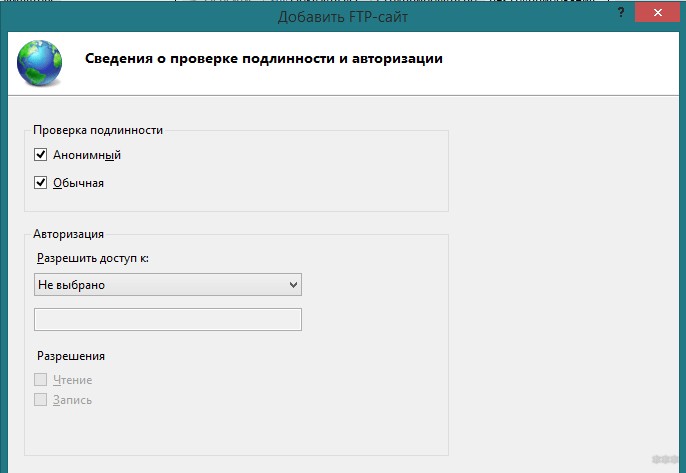
- Определяем параметры доступа. Галочка Анонимный – разрешение доступа без логина и пароля. Обычный – по логину и паролю:
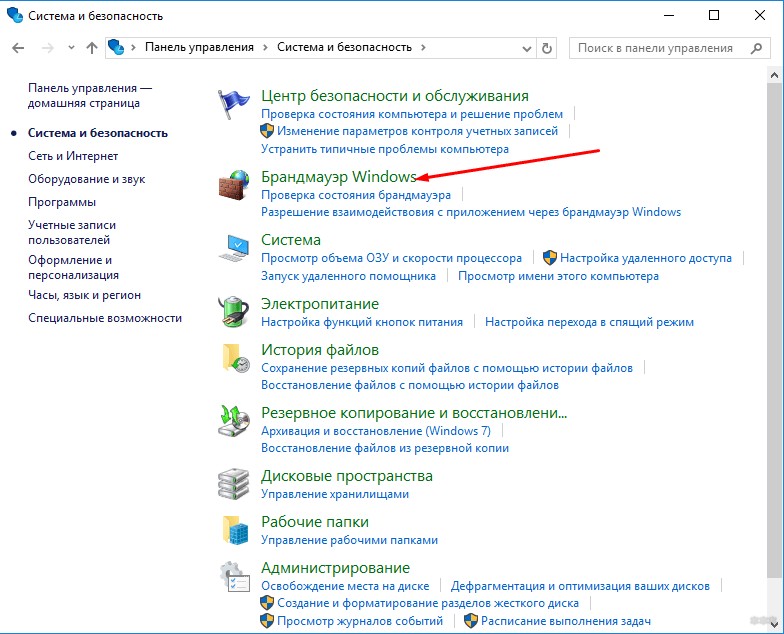
- Все. Сам FTP создан, остается лишь задать верные настройки доступа. Переходим: Панель управления – Система и безопасность – Брандмауэр:
- Дополнительные параметры:
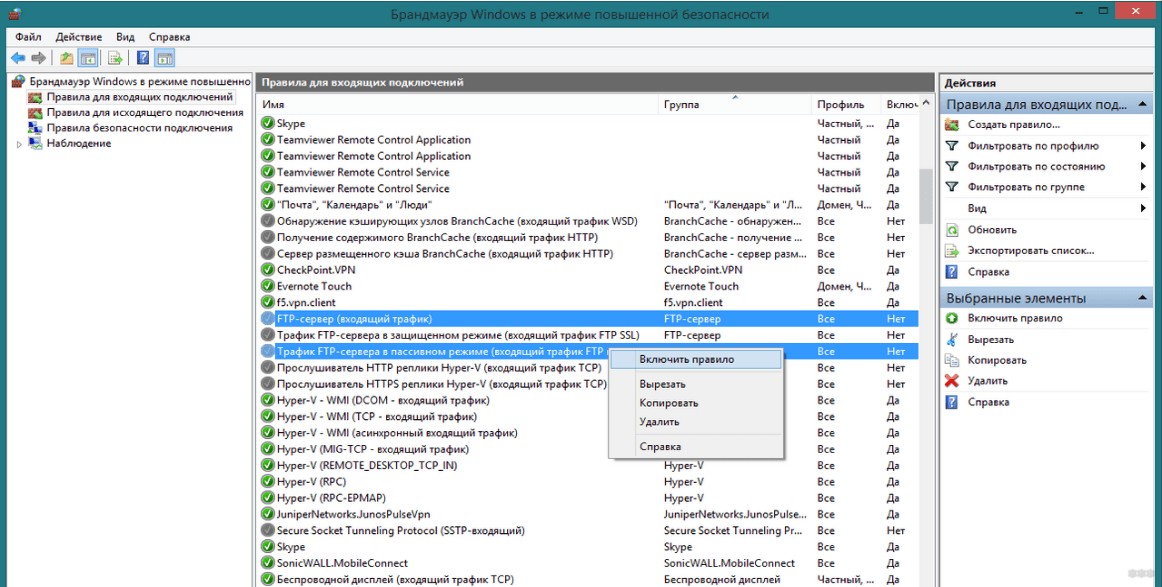
- В левой части выделяем вкладку «Правила для входящих подключений», а справа ищем «FTP-сервер» и «Трафик-FTP сервера в пассивном режиме». Кликаем по ним правой кнопкой мыши и нажимаем «Включить». Так мы активировали правила для входящих подключений. До этого – никаких правил не было вовсе:
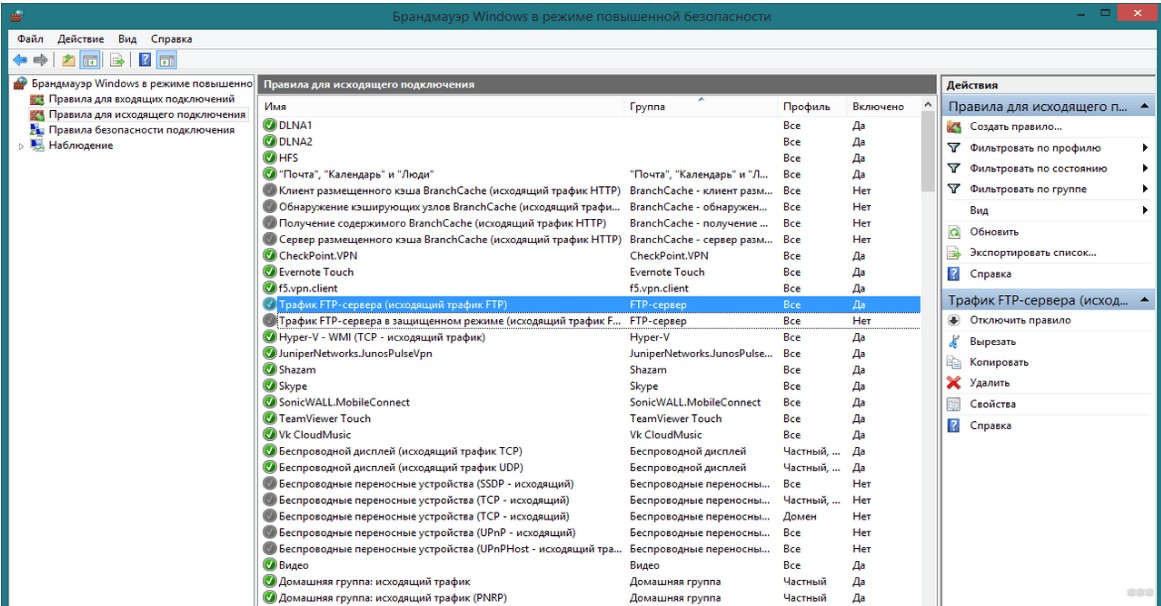
- Переходим к исходящим подключениям и делаем то же самое для «Трафика FTP-сервера»:
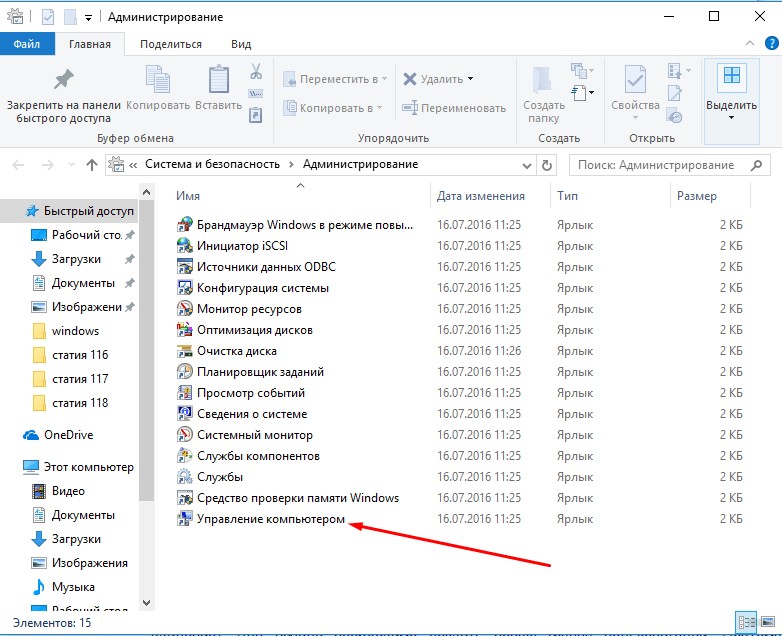
- Теперь сервер включен, правила созданы, но нужно определить пользователей, которые смогу взаимодействовать с сервером. Идем: Панель управления – Система и безопасность – Администрирование – Управление компьютером:
- Создаем группу пользователей. Локальные пользователи и группы – Группы. Щелкаем правой кнопкой по свободному месту и выбираем «Создать группу»:
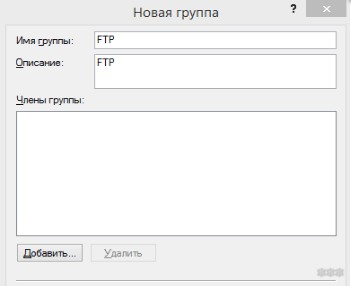
- Задаем вот так (FTP – FTP):
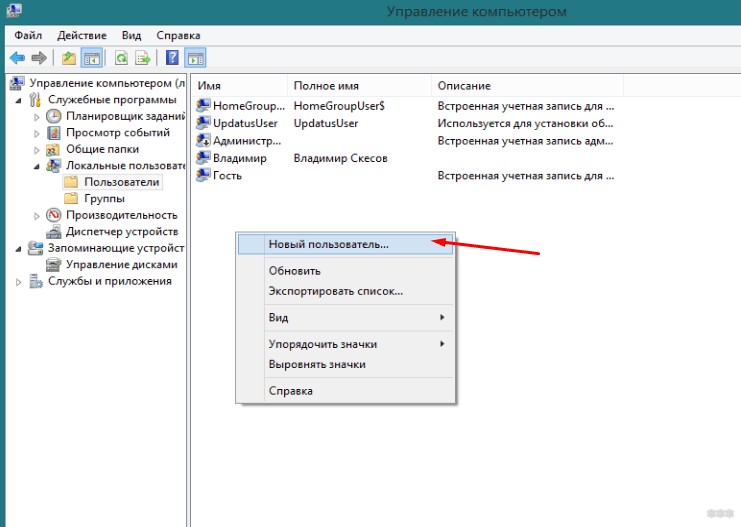
- В соседней подпапке Пользователи создаем нового пользователя:
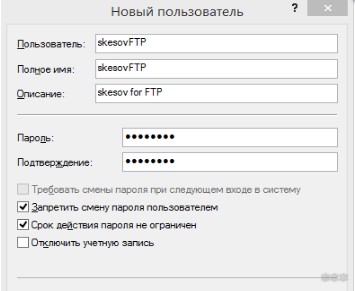
- Заполняем поля по своему пользователю. Т.е. здесь главное имя пользователя и пароль, по которым и будет происходить подключение к FTP:
- Увидели в списке пользователей своего новосозданного? Теперь его нужно запихнуть в группу FTP. Щелкаем правой кнопкой по нему – Свойства. А далее переходим на вкладку «Членство в группах», где через кнопку Добавить добавляем группу:
- Уже почти все готово. ФТП работает, пользователь есть. Но Windows просто так не даст пользоваться своими ресурсами абы кому, если ты не администратор. Поэтому нужно разрешить нашему пользователю взаимодействовать с выделенной для нужд FTP папкой. Щелкаем по ней правой кнопкой мыши – Свойства. На вкладке Безопасность кликаем по кнопке «Изменить»:

- Нажимаем кнопку Добавить и добавляем нашу группу. А заодно ниже ей в колонке Разрешить отмечаем все галочки:

- Теперь снова возвращаемся в службы IIS и идем настраивать наши правила на авторизацию. Щелкаем по нашему созданному здесь сайту и выбираем «Правила авторизации FTP»:
- Тут же правой кнопкой по пустому месту – Добавить разрешающее правило:
- По умолчанию доступ можно производить и без авторизации, но мы то не хотим ничего плохого? (если хотим, все связанное с созданием пользователя вообще можно было пропустить). Выбираем здесь пункт «Указанные роли или группы пользователей» и вписываем нашу группу FTP:
- А вот в качестве альтернативы можно, например, разрешить подключение анонимным пользователям, но ограничить их в правах только на чтение. Тогда они ничего не удалят:
За этим первый вариант заканчиваем. Надеюсь, и вам удалось настроить FTP-сервер.
Частые вопросы по способу 1
Как подключиться?
Есть несколько способов сделать это:
- В локальной сети достаточно зайти через Проводник, используя IP-адрес компьютера, на котором запущен сервер. Например, ваш адрес – 192.168.1.10. Тогда в строку Проводника можно просто вбить ftp://192.168.1.10. Все содержимое хранилища должно отобразиться. Тут же можно войти с авторизацией. Формат следующий: ftp://ваше_имя:пароль@192.168.1.10.
- Для доступа из интернета нужно использовать внешний IP-адрес сети. Но перед этим не забываем пробросить 21 порт на нужную машину.
Инструкции по пробросу портов: сначала на роутере, а затем на компьютере.
- Кроме Проводника спокойно можно использовать сторонние программы. Лично я долгие годы использую FileZilla. Бесплатно и удобно. Для входа достаточно вводить IP адрес и данные для авторизации.
- Еще вариант использование FTP-хранилищ – как сетевого диска. Процедура подключения стандартная, в выборе используем вот это:

Сервер не работает
Это самое обширное понятие. На каком этапе он именно не работает? Запуск? Подключение? Расшаривание? Авторизация? При грамотном проходе всей инструкции обычно проблем не возникает, но если у вас что-то особенное – пишем в комментарии свой вопрос.
Способ 2 – FileZilla Server
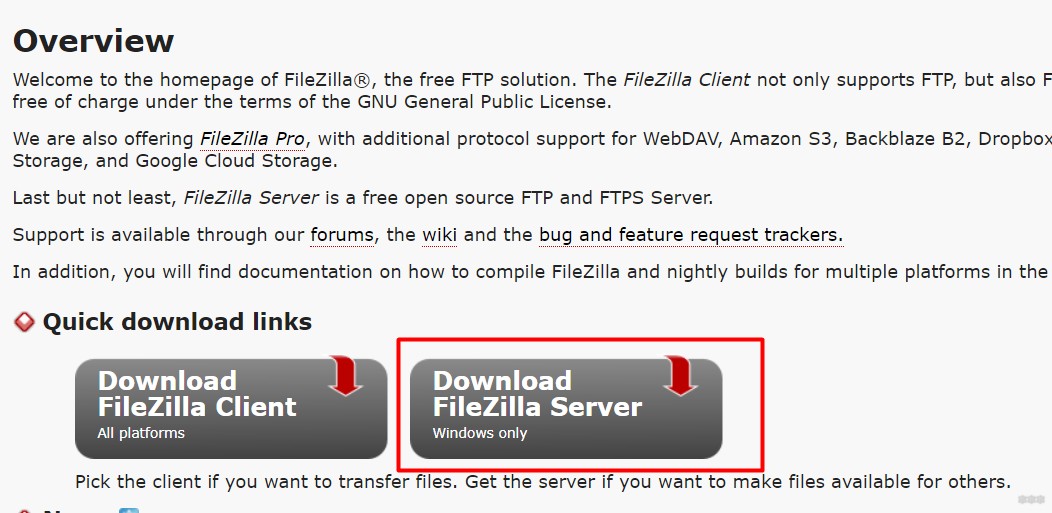
Альтернативный способ с годами проверенным решением для простой настройки FTP-сервера – будем использовать FileZilla Server. Многие знают, что у них отличный FTP-клиент, так еще есть и прекрасный FTP-сервер. Но самое главное – никуда больше ходить не нужно, здесь в коробке расположено сразу все самое нужное.
Скачать сервер можно с ОФИЦИАЛЬНОГО САЙТА
Начинаем наши деяния:
- Скачиваем и устанавливаем сервер по ссылке выше:
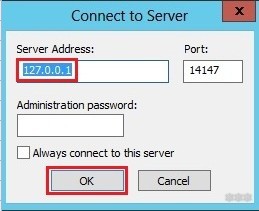
- Весь процесс установки FTP-сервера описывать нет смысла – просто жмите далее. Пока не появится окно ввода первых параметров. Здесь задаем локальный IP сервера и порт (можно оставить как есть, это не адреса подключения, внешние адреса подключения остаются теми же, что и в предыдущем способе):
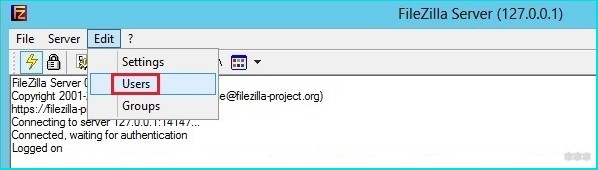
- Создадим пользователя для подключения к серверу. Edit – Users:
- Добавляем – Add:
- Задаем имя пользователя:
- И пароль:
- Создаем папку для нашего пользователя:
- И задаем на нее права:
Все! Больше ничего придумывать не нужно. Все находится удобно и по вкладкам. Гораздо быстрее использования стандартных средств Windows 7.
Итого – были рассмотрены 2 случая создания FTP-сервера. Оба будут работать, ищущие конкретные моменты – лезут в настройки, скорее всего там это уже придумали. Истинные любители и вебмастера выберут Linux, и самостоятельно запустят сервер (там это уже с полпинка реализуется по той же механике). Вот и все. На этом прощаюсь. Комментарии ниже всегда открыты для вас (и порой там намного интереснее чем в самой статье).
Looking for Setup an FTP server on Windows PC? Here this post we go through step by step How to Setup an FTP Server in Windows, Setup a folder on your Windows computer as an FTP repository, Allow an FTP server through Windows Firewall, Share the folder and files to Access Via FTP server and Access them from a different machine Via Lan or Wan. Also, Give access to your FTP site by restricting users with username/password or anonymous access. Let’s start.
What is FTP?
FTP stands for file transfer protocol A useful Feature to transfer files between the client machine and the FTP Server. For Example, you share some File folders on a configured FTP server on a port number, And a user can read and write files through the FTP protocol from anywhere. And most browsers support FTP protocol so we can access the FTP servers through the browser using FTP:// YOURHOSTNAME or IP address.
How To Setup FTP Server in Windows
— Advertisement —
In order to host an FTP server, your computer must be connected to a wireless network. And need a public IP address to access Upload/Download files folders on the FTP server from a different location. Let’s prepare your Local PC to Act as an FTP server. To do this first we need to enable FTP Feature and IIS (IIS is a web server software package you can read more from here).
Note: Below steps also applicable to setup and configure the FTP server on windows 8.1 and 7!
Enable FTP feature
To Enable FTP and IIS features,
- Press Windows + R, type appwiz.cpl and ok.
- This will open Windows programs and features
- Click on ‘Turn Windows features on or off’
- Toggle on Internet Information Services, and select FTP SERVER
- All features which are ticked need to be installed.
- Press OK to install the selected features.
- This will take some time to install the features, wait until complete.
- After that restart Windows To take effect the changes.
How To Configure FTP server on Windows 10
— Advertisement —
After successfully enable The FTP feature now follow the steps below to configure your FTP server.
Before you go ahead first to Create a new folder Anywhere And Name it (for example Howtofix FTP server)
— Advertisement —
Note down your PC IP address (To check this open command prompt, type ipconfig) this will display your local IP address and default gateway. Note: You must use static IP on your System.
Also if you are planning to access your FTP files over a different network, you must need a public IP address. You can ask your ISP for the public IP address. To check your Public IP open chrome browser type whats my IP this will display your public IP address.
- Type Administrative Tools in the start menu search and Select it from Search results.
- Also, you can access the same from the Control panel -> all control panel items -> administrative tools.
- Then look for Internet information service(IIS) manager, And Double click on it.
- In the next window, expand the localhost (basically it’s your PC name) on your left side panel and navigate to “sites.”
- Right-click “sites” and choose “add FTP site” option. This will create an FTP connection for you.
- Give a name to your site and enter the path of the FTP folder that you want to use to send and receive files. Here we are set the folder path we previously created for the FTP server. Alternatively, you can also choose to create a new folder to store your FTP files. Just depends on your personal preferences.
- Click “next.” Here you need to select the local computer’s IP address from the drop-down box. I hope you have already set up static IP for the computer.
- left the port number 21 as the default port number of the FTP server.
- And change the SSL setting to “no SSL.” Leave the other default settings.
Note: If you’re configuring a business site, make sure to choose the “Require SSL” option, as it will add an extra layer of security to the transfer.
- Click “next” and you’ll get the authentication screen.
- Navigate to the authentication section of this screen, and select the “basic” option.
- In the authorization section, type “specified users” from the drop-down menu.
- In the text box below, type the username of your Windows 10 account to give you access to the FTP server. You can add more users too if you like.
- In the permission section, you need to decide how others will be accessing the FTP share and who will be having Read-only or Read & Write access.
Let’s assume this scenario: If you want specific users to have read and write access, so obviously they must type a username and password for it. Other users can access the FTP site without any username or password to view the content only, it’s called anonymous users access. Now Click Finish.
- Finally, click “finish.”
With this, you’re done setting up an FTP server on your Windows 10 machine, but, you have to perform some additional things to start using the FTP server to send and receive files.
Allow FTP to pass through Windows Firewall
Windows Firewall security feature will block any connections trying to access the FTP server. And that’s why we need to manually allow the connections, and tell the firewall to give access to this server. To do this
Note: Nowadays firewalls manage by Antivirus application, So either you need to configure/Allow FTP from there or Disable Firewall protection on your Antivirus
Search for Windows firewall in the Windows start menu and press “enter.”
On the left-side panel, you’ll see “allow an app or feature through Windows Firewall” option. Click on it.
When the next window opens, click on the “change settings” button.
From the list, check the “FTP server” and allow it on both private and public networks.
Once done, click OK
That’s it. Now, you should be able to connect to your FTP server from your local network. To check this open Web browser On a different PC connected to the same network type ftp://yourIPaddress (Note: here use FTP server PC IP address). use the username and password whom you previously Allowed to access the FTP server.
FTP port (21) Forwarding on Router
Now the Windows 10 FTP Server is enabled to be accessed from the LAN. But if you looking for accessing the FTP server from a Different network (our side LAN) then you need to allow FTP connection, and you must enable Port 21 in your router’s firewall to allow incoming connection via FTP port 21.
Open the Router configuration page, using the Default Gateway Address. You can check your default gateway (router IP address) using the Ipconfig command.
For me it’s 192.168.1.199 this will ask for Authentication, Type router admin username, and password. Here from Advanced options look for Port forwarding.
Create a new port forwarding that includes the following information:
- Service name: You can use any name. For example, FTP-Server.
- Port rage: You must use port 21.
- PC’s TCP/IP address: Open Command Prompt, type ipconfig, and the IPv4 address is your PC’s TCP/IP address.
Now Apply the new changes, and save the new router configurations.
Access an FTP server from a Different network
All is set now, Your FTP server is ready to access from anywhere the PC is connected to the internet. Here is how to quickly test your FTP server, I hope you have noted down your Public IP address (Where you configured the FTP server, Otherwise open the browser and type whats my IP)
Go to any computer outside of the network and type FTP:// IP address in the search bar. You should enter the username and password again and click OK.
Download and Upload files, Folders On FTP server
Also, you can use third-party applications like (FileZilla) to Download Upload manage files, Folders between the client machine and FTP Server. There are multiple free FTP Clients available you can use any of them to manage your FTP server:
FileZilla: an FTP Client available for Windows
Cyberduck: FTP Client available for Windows
WinSCP: A free and open-source SFTP, FTP, WebDAV, Amazon S3, and SCP client for Microsoft Windows
Manage FTP using Filezilla
Let’s use FileZilla client software to manage (Download/Upload) files folders on the FTP server. It’s very simple, Visit Filezilla’s official site and download the Filezilla client for windows.
- Right-click on it and Run as administrator to install the application.
- To open the same type Filezilla on the start menu search and select.
Then Input the FTP Server details, for example, ftp://10.253.67.24 (Public IP). Type the username to whom you are allowed to access your FTP server from anywhere type the password for authentication and use port 21. When you click Quickconnect this will list out all file folders available for download. The left side windows in your machine and right side are the FTP Server
Also here Drag files from left to right will copy the file move to the FTP server and Drag files from Right to left will copy the file move to the Client machine
That’s all you have successfully created and configured the FTP server on Windows 10. Did you encounter any problems while following these steps, let us know in the comments below, we do our best to guide you?
Also, Read
- Ethernet doesn’t have a valid IP configuration (Unidentified Network) Windows 10
- How to fix USB ports not working in Windows 10 Laptop/PC
- WiFi connected but no internet Access Windows 10 (5 Working fixes)
- How To Setup and configure VPN Connection In Windows 10/8/7?
- DNS server is not responding on Windows 10? Apply these solutions