Customizing the /etc/default/grub file
There are two ways of doing this using editing a grub file. These are described in the Ubuntu Community Documentation Grub2 page
The two ways are:
- Boot which ever operating system you booted last time, the «saved method»
- This is the one I use. It lets me decide which one I going to use and will allow me to reboot into that system, handy when I’m updating.
- Boot a specific operating system by default.
- The answer to your exact question.
Finding the menuentry to set as the new default
To start we need to find out what we are booting or want to boot. Open a terminal with Ctrl+Alt+t and type in
sudo grep menuentry /boot/grub/grub.cfg
user@YourComputer:~$ grep menuentry /boot/grub/grub.cfg
[sudo] password for user:
menuentry 'Ubuntu, with Linux 2.6.35-31-generic' --class ubuntu --class gnu-linux --class gnu --class os {
menuentry 'Ubuntu, with Linux 2.6.35-31-generic (recovery mode)' --class ubuntu --class gnu-linux --class gnu --class os {
menuentry 'Ubuntu, with Linux 2.6.35-30-generic' --class ubuntu --class gnu-linux --class gnu --class os {
menuentry 'Ubuntu, with Linux 2.6.35-30-generic (recovery mode)' --class ubuntu --class gnu-linux --class gnu --class os {
menuentry "Memory test (memtest86+)" {
menuentry "Memory test (memtest86+, serial console 115200)" {
menuentry "Windows NT/2000/XP (loader) (on /dev/sda1)" {
menuentry "Ubuntu, with Linux 2.6.32-34-generic (on /dev/sdb1)" {
menuentry "Ubuntu, with Linux 2.6.32-34-generic (recovery mode) (on /dev/sdb1)" {
menuentry "Ubuntu, with Linux 2.6.32-33-generic (on /dev/sdb1)" {
menuentry "Ubuntu, with Linux 2.6.32-33-generic (recovery mode) (on /dev/sdb1)" {
menuentry "Windows Vista (loader) (on /dev/sdc1)" {
You can see that the «saved» method can come in handy when booting multiple operating systems. Save the name of the entry you want e.g. Windows NT/2000/XP (loader) (on /dev/sda1), we need it later.
Editing the /etc/default/grub file
Type in the terminal
sudo nano -B /etc/default/grub
and your password if asked. The nano editor will open.
A. Saved method — In my preferred way, I made the following changes from the standard grub file.
-
I changed the value of
GRUB_DEFAULTtosaved:GRUB_DEFAULT=saved -
I enabled the SAVEDEFAULT functionality by adding the following line:
GRUB_SAVEDEFAULT=true
B. Specific menuentry — In the way you are asking for
-
Change the value of
GRUB_DEFAULTto the name of the Windows system you want to always boot. The name of the corresponding Grub menuentry can be found as described in the previous section. -
I wanted to have Window XP always set as default at boot, I would set
GRUB_DEFAULTto"Windows NT/2000/XP (loader) (on /dev/sda1)":GRUB_DEFAULT="Windows NT/2000/XP (loader) (on /dev/sda1)"
Note: Some versions of Ubuntu require single quote (‘) vice double quote («).
You could also set GRUB_DEFAULT to the line number in the menu entry list (with 0 being the first), but when the kernel in Ubuntu is updated grub adds the new kernel to the top of the list, you would have to change the number, since Windows is the last one in the menu entry list. You can see this in my menu entry list.
Update the boot configuration
Now you have to run
sudo update-grub
to update the system generated grub.cfg file in the /boot/grub/ directory.
user@YourComputer:~$ sudo update-grub
Generating grub.cfg ...
Found background: /usr/share/images/grub/Apollo_17_The_Last_Moon_Shot_Edit1.tga
Found linux image: /boot/vmlinuz-2.6.35-31-generic
Found initrd image: /boot/initrd.img-2.6.35-31-generic
Found linux image: /boot/vmlinuz-2.6.35-30-generic
Found initrd image: /boot/initrd.img-2.6.35-30-generic
Found memtest86+ image: /boot/memtest86+.bin
Found Windows NT/2000/XP (loader) on /dev/sda1
Found Ubuntu 10.04.3 LTS (10.04) on /dev/sdb1
Found Windows Vista (loader) on /dev/sdc1
done
Addendum
Notes on nano
nano is especally easy to use in the terminal. Move around with the arrow keys. Type in you addtions, delete the unwanted.
The -B or --backup option backs up the previous version of it to the current filename suffixed with a ~. Very handy in case of the dreaded Fat pfinger effect.
When you are through, Ctrl+o will allow you to save your edits by hitting Enter and Ctrl+x will close. These and other options are shown at the bottom of the terminal screen with the ^ indicating Ctrl.
^G Get Help    ^O WriteOut    ^R Read File   ^Y Prev Page   ^K Cut Text    ^C Cur Pos
^X Exit        ^J Justify     ^W Where Is    ^V Next Page   ^U UnCut Text  ^T To Spell
Notes about nano, sudoeditor and other editors
Some in the Ubuntu community suggest sudoedit instead of nano. I recommend nano — which is the default sudoedit editor in later distributions of Ubuntu — instead of sudoedit, because the default can be overridden in non-obvious ways, unless you are an administrator. sudoedit is safer in that it automatically saves a backup copy of the edited file, but the -B command line option in nano does the same thing. nano is more intuitive than editors like vi or emacs, which are very flexible but require learning a lot of commands, shortcuts or different modes.
If you prefer not to use the nano editor and prefer the Gnome Text Editor, instead of sudo nano -B use gksu gedit. I generally do this for large files, and /etc/default/grub could easily be considered a large file. Thus type in gksu gedit /etc/default/grub instead of sudo nano -B /etc/default/grub. Note that the Gnome text editor does not automatically make a backup!
Notes on my grub file
I made some changes to grub for my personal needs. Such as the background picture of the moon launch. How to do these are discussed at the Ubuntu Community Documentation page on Grub2, recommended.
Good luck!
Наверняка почти у каждого пользователя ОС Linux и ОС Windows, а я имею в виду именно тех, у кого, в силу ряда причин, установлены обе системы, время от времени возникал вопрос: «А нельзя ли, черт возьми, придумать способ, с помощью которого можно было бы устанавливать эти системы в произвольном порядке? Без порчи настроек загрузчика?» Ведь если ставим сначала Windows а потом Linux всё хорошо — линуксовый загрузчик (например GRUB) обычно подхватывает bootmgr. Если ставить в обратном порядке то увы. Даже с использованием GPT + EFI. В случае с EFI нет опасности перезаписи MBR, зато таки есть один нюанс, который лично мне не нравится — установщик Windows в режиме EFI хоть и не перезаписывает сектора диска своим кодом, но зато переопределяет NVRAM, подсовывая туда путь к своему загрузчику. Так что функционал GBUB всё равно приходится восстанавливать. В настройках штатного установщика нет опций для кастомизации процесса установки загрузчика. А что если… не использовать стандартный установщик?! Ну, или почти не использовать…

И такой способ есть. И основан он на технологии установки Windows, которую мы имеем в её дистрибутивах начиная с «семерки». Способ работает для случая Windows версий 7/8/8.1/10, как в случае с MBR + BIOS системы, так в случае с EFI + GPT. Установить систему можно как в раздел HDD, так и на VHD. При этом функционал установщика нужен нам в общем-то для запуска программы настройки BCD-хранилища конфигурации загрузчика. Вместо установочного диска можно использовать загрузочный носитель на основе WinPE. Если бы утилитам bcdedit.exe и BootICE была *nix альтернатива, весь процесс развертывания системы можно было бы вообще выполнить в среде Linux.
Предположим у вас имеется компьютер, с установленным на HDD загрузчиком GRUB2 и свободным разделом, отформатированном в NTFS. Устанавливать будем Windows 7 Ultimate SP1. Для этого потребуются:
- Установочный диск с виндой
- Чистая флешка объемом >= 4 Gb
- Архиватор 7-zip соответствующей разрядности
- Утилита BootICE, желательна, но совершенно не обязательна, можно обойтись и bcdedit.exe, входящим в дистрибутив винды
1. Создаем загрузочную флешку
Дело в том, что семерка не хочет устанавливаться в EFI-режиме с DVD. Вот не хочет и всё. К тому же, на установочном носителе нам понадобятся дополнительные утилиты, которые туда надо поместить, а в случае с флешкой это несколько проще, чем в случае с DVD.
Монтируем установочный образ с виндой, допустим он лежит у нас в /home/$USER/install с именем win7-setup.iso
$ mkdir ~/iso

$ sudo mount -t udf ~/install/win7-setup.iso ~/iso
Вставляем флешку в USB-порт. Допустим, она получила имя устройства /dev/sdb. Выполним её разметку в формате MBR
$ sudo fdisk /dev/sdb
Создем на флешке один единственный раздел. После чего форматируем её в FAT
$ sudo mkfs.vfat /dev/sdb1
Копируем содержимое дистрибутива винды на флешку
$ mkdir /tmp/flash

$ sudo mount /dev/sdb1 /tmp/flash -o uid=1000,gid=100,fmask=113,dmask=002

$ cp -rv ~/iso/* /tmp/flash/
Скопируем конфиги EFI-загрузчика на уровень выше
$ cp -rv ~/tmp/flash/efi/microsoft/* ~/tmp/flash/efi/
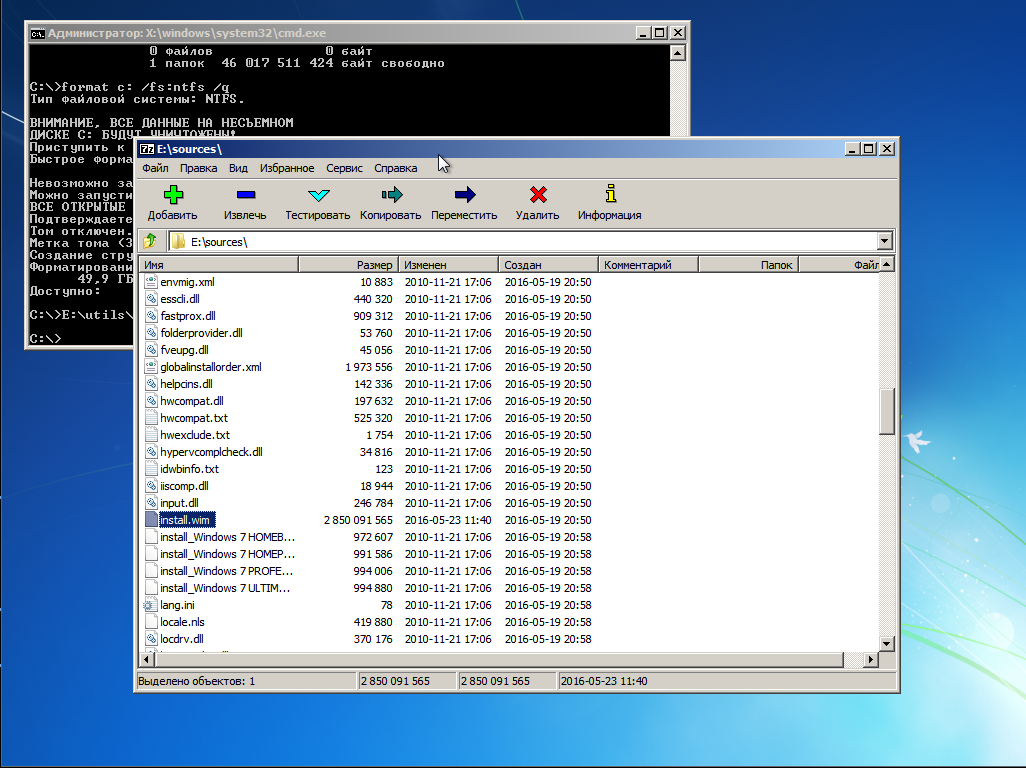
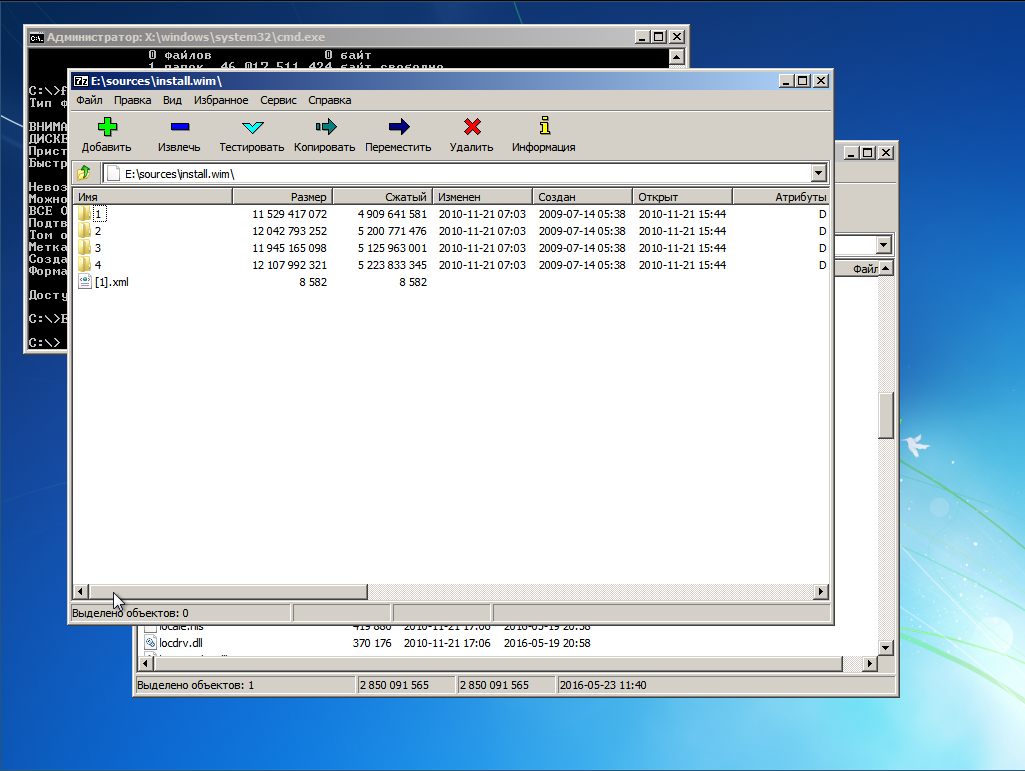
Теперь нам нужен EFI-загрузчик винды. Его придется выцарапать из дистрибутива. Это легко сделать с помощью архиватора 7-zip, который имеется в репозитории extra/p7zip. Все содержимое дистрибутива винды сжато в образ wim-формата находится на установочном DVD в файле source/install.wim. Обычно этот образ имеет следующую структуру
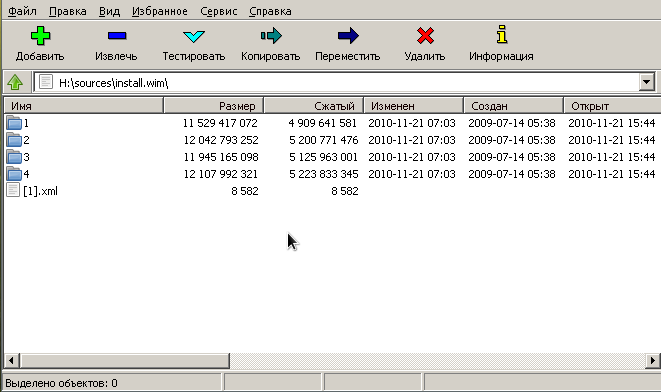
В каталогах с именами в виде цифр 1-4 находятся разные редакции винды. Чтобы выбрать нужную надо посмотреть внутрь файла с именем [1].xml. Распакуем его в /tmp
$ cd /tmp

$ 7z e ~/iso/sources/install.wim [1].xml
и посмотрим с помощью какого-нибудь браузера, ибо в текстовом редакторе он выглядит ужасно, а специального редактора xml у меня в наличии не оказалось. Каждую редакцию винды описывают структурой вида

где нода EDITIONID указывает на редакцию. Параметр INDEX — как раз номер каталога, в котором валяется нужная редакция. Итак, мне нужна Ultimate, а это индекс 4. Соответсвенно выковыриваем загрузчик оттуда
$ 7z e ~/iso/sources/install.wim 4/Windows/Boot/EFI/bootmgfw.efi
Оки, теперь перенесем полученный файл на флешку
$ mv bootmgfwm.efi /tmp/flash/efi/boot/bootx64.efi
Порядок, теперь у нас в наличии загрузочная флешка для установки винды. Теперь добавим на неё необходимые для установки утилиты — виндозную версию архиватора 7-zip и утилиту BootICE. Архиватор качаем с официального сайта и распаковываем на флешку в каталог utils
$ mkdir -p /tmp/flash/utils/7-Zip/

$ cd /tmp/flash/utils/7-Zip/

$ 7z x ~/downloads/7z1602-x64.exe
Туда же помещаем и bootice
$ cp ~/install/BOOTICEx64.exe /tmp/flash/utils
Уф, всё, отмонтируем флешку
$ cd ~

$ sudo umount /tmp/flash/
Перезагружаемся. Если у вас система с EFI и съемные диски стоят в приоритете загрузки, то компьютер загрузится в установку винды автоматом. Если же появилось таки меню GRUB, ничего страшного, жмем «С» и в консоли набиваем команду exit. Вас вывалит в меню EFI, где выбираем загрузку с флешки. Если же ваша система с BIOS, то тут чуть сложнее, ибо мы не стали заморачиваться с настройкой MBR на флешке. Тогда в консоли GRUB даем команду ls — появится список всех дисков и разделов. Находим нашу флешку, она отобразится в виде (hdX, msdosY), где X, Y — номер диска и раздела соответственно. Теперь вбиваем в консоли команды
grub> set root=hdX,Y

grub> ntldr /bootmgr

grub> boot
Начнется загрузка установщика винды. Он то загрузится, но нам он и не нужен — мы всё будем делать руками. Чтобы стало понятно, что к чему, придется рассмотреть некоторую теорию
2. О развертывании Windows из WIM-образа и капризном нраве Sysprep
Начиная с семерки установка Windows заключается в следующих этапах
- Разметка диска в соответствии с архитектурой системы инициализации оборудования. Если BIOS — установщик размечает диск в MBR. При наличии активной EFI — разметка будет GPT.
- Распаковка образа install.wim в выбранный для установки раздел
- Установка загрузчика и перезагрузка
- Инициализация оборудования. Ребут
- Локализация, ввод ключа, окончание настройки системы
Это стандартный путь. У нас же диск уже размечен. И нам не нужна автоматическая установка загрузчика — мы поставим его вручную. Разметка диска должна удовлетворять следующим требованиям
- Если система с EFI на диске должен присутствовать FAT-раздел с типом 0xEF. Если у нас уже установлен линукс с EFI-загрузчиком, то таковой раздел уже имеется
- Если система с BIOS, то раздел, в котором располагается загрузчик, а это наш NTFS-раздел должен быть активным. Это очень важно! Почему, будет объяснено ниже.
Таким образом, перед распаковкой системы мы должны убедится в том, что перечисленные требования выполнены. После того, как мы распакуем все файл системы и установим загрузчик, система перезагрузиться. После перезагрузки запустится утилита Sysprep, среди прочего настраивающая оборудования и проверяющая конфигурацию системы. Так вот, если в режиме EFI Sysprep не найдет загрузчик и его конфигурацию в EFI-разделе по пути EFI/microsof/boot, а в системе с BIOS каталог Boot и bootmgr будут лежать в неактивном разделе, то Sysprep завершится с ошибкой sysprep generalize error, а в лог, расположенный по адресу WindowsPanthersysperr.log выплюнет что-то похожее на
2015-03-11 16:55:42, Error [0x0e00b3] TOOL Sysprep_Specialize_Bcd: There was an error opening the system store. Status=[0xC0000098]

2015-03-11 16:55:42, Error [0x0f0082] SYSPRP LaunchDll:Failure occurred while executing 'c:WindowsSystem32spbcd.dll,Sysprep_Specialize_Bcd', returned error code 1006

2015-03-11 16:55:42, Error [0x060435] IBS Callback_Specialize: An error occurred while either deciding if we need to specialize or while specializing; dwRet = 0x3ee
и никакие танцы с бубном нам уже не помогут. Винда требует, чтобы загручик лежал в загрузочном разделе и точка. В случае с BIOS просто делаем активным раздел NTFS в котором лежит винда и туда же кладем и загрузчик. Грузится будем всё равно с помощью GRUB, а ему все равно, какой раздел будет активным. В случае с EFI загрузчик придется положить рядом с GRUB в EFI-разделе.
3. Распаковка системы
Итак, определимся, куда мы хотим ставить винду. Можно поставить в NTFS-раздел, а можно и в VHD-диск. Это уж как вам хочется. Я буду показывать процесс на примере с виртуальной машиной EFI, имеющей следующую разметку
The protective MBR's 0xEE partition is oversized! Auto-repairing.
Partition table scan:
MBR: protective
BSD: not present
APM: not present
GPT: present
Found valid GPT with protective MBR; using GPT.
Command (? for help): p
Disk /dev/loop1: 104857600 sectors, 50.0 GiB
Logical sector size: 512 bytes
Disk identifier (GUID): 0D217C93-6699-435A-9BBB-61DFAA6F30B7
Partition table holds up to 128 entries
First usable sector is 34, last usable sector is 104857566
Partitions will be aligned on 2048-sector boundaries
Total free space is 4029 sectors (2.0 MiB)
Number Start (sector) End (sector) Size Code Name
1 2048 206847 100.0 MiB EF00 EFI system partition
2 206848 104855551 49.9 GiB 0700 Basic data partition
На этом диске нет линукса, установлен только GRUB в раздел с EFI. Если мы ставим систему непосредственно в NTFS-раздел, то загружаемся с флешки, дожидаемся запуска программы установки и жмем Shift + F10, чтобы вызвать консоль. Запускаем утилиту diskpart и смотрим список подключенных томов
X:sources> diskpart

DISKPART> list vol
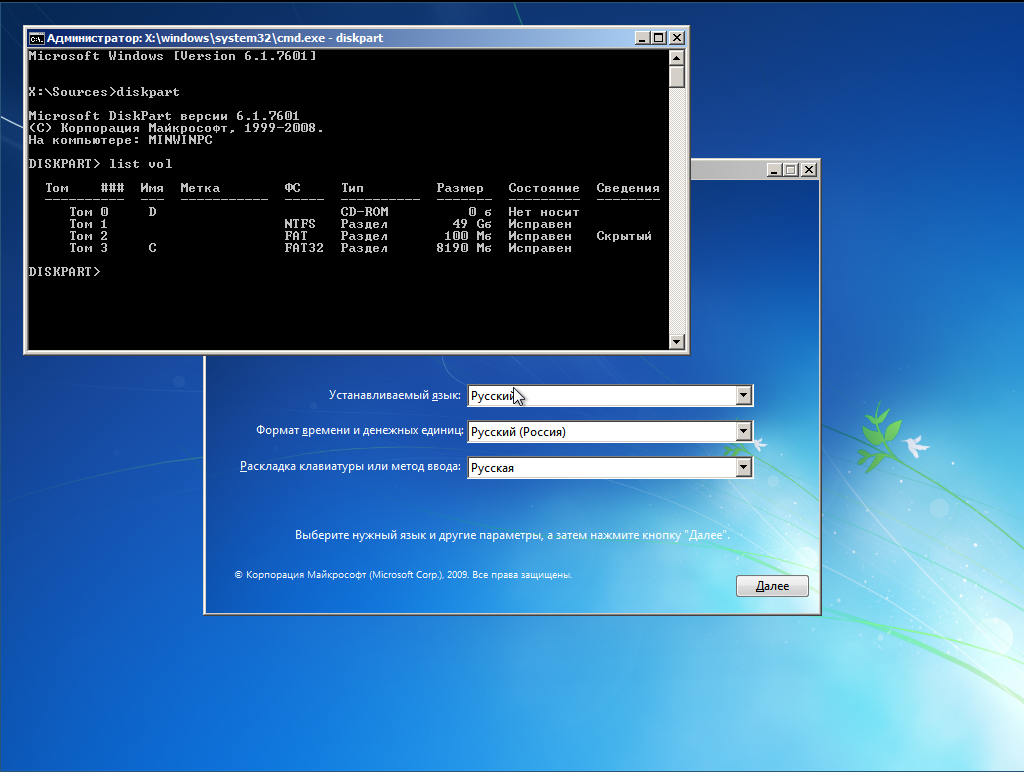
Видим, что флешка (объемом 8 Гб) подключена как диск C:, а раздел для установки вовсе не смонтирован. Непорядок. Делаем так
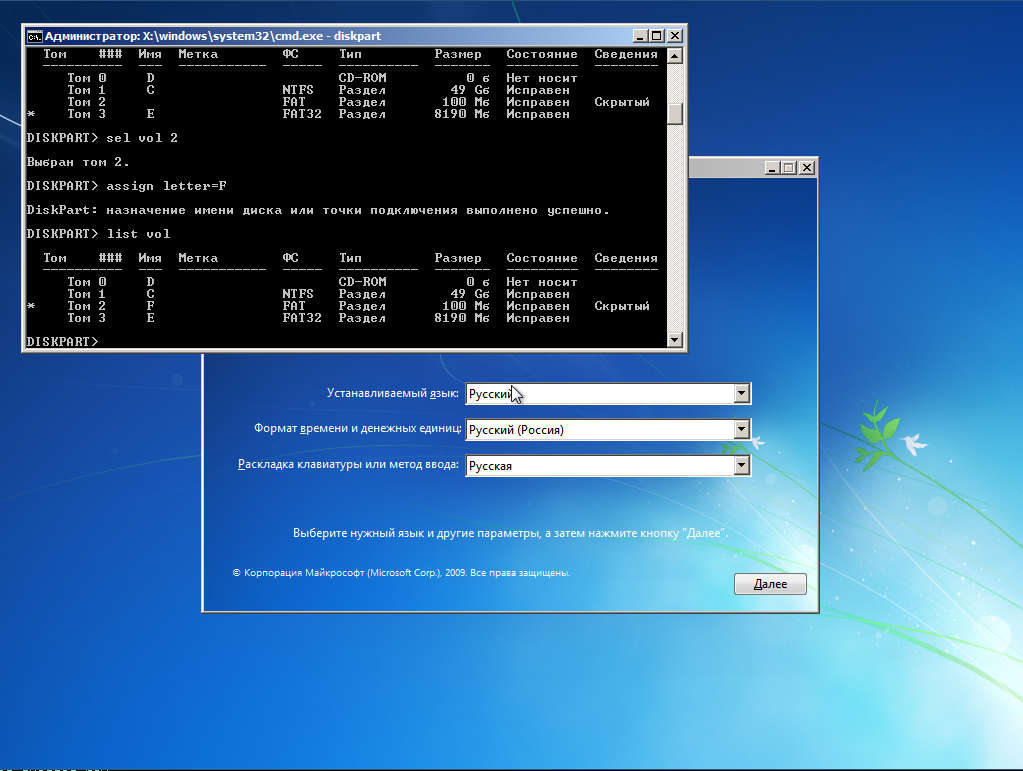
DISKPART> sel vol 3

DISKPART> remove

DISKPART> assign letter=E

DISKPART> sel vol 1

DISKPART> assign letter=C

DISKPART> list vol

DISKPART> sel vol 2

DISKPART> assign letter=F
Вот теперь порядок, диск на который будем ставить винду стал диском C:, флешка — диском E:, а EFI-раздел — диском F:
Если же мы хотим поставить систему на VHD, то делаем так
DISKPART> sel vol 3

DISKPART> remove

DISKPART> assign letter=E

DISKPART> sel vol 1

DISKPART> assign letter=G

DISKPART> exit
Для порядка создаем каталог с образами
X:sources> md G:vhd

X:sources> diskpart
Создаем виртуальный диск, создаем на нем разметку GPT и раздел NTFS и монтируем его к C:
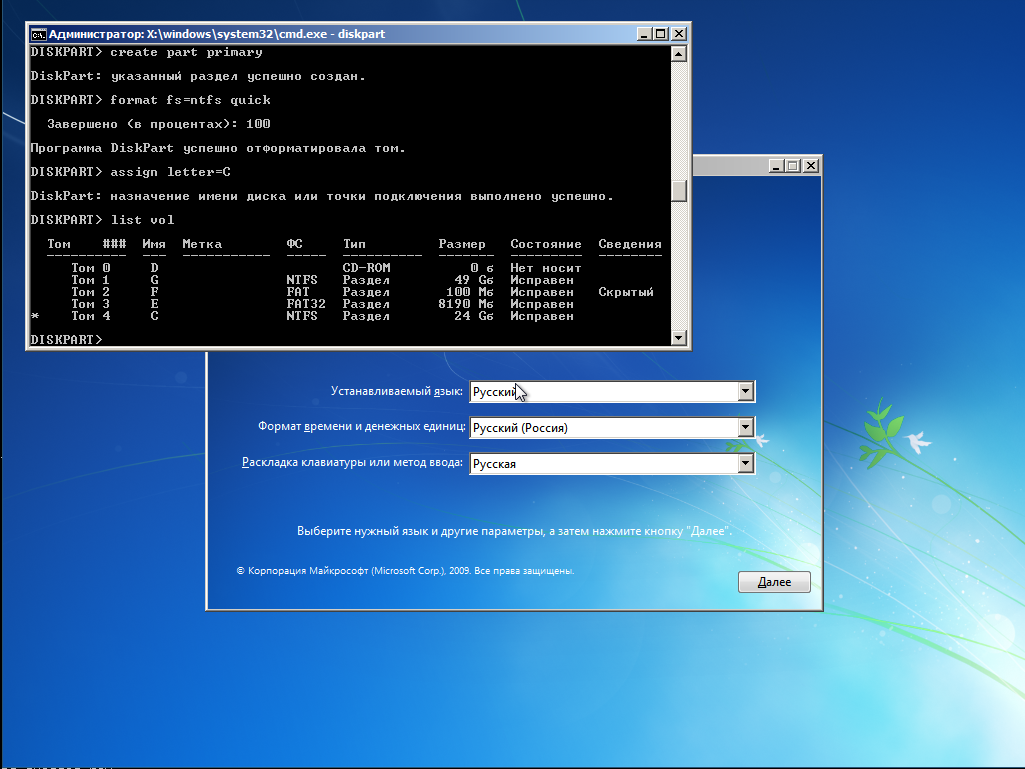
DISKPART> create vdisk file="G:vhdwin7.vhd" maximum=25600 type=fixed

DISKPART> attach vdisk

DISKPART> clean

DISKPART> convert gpt

DISKPART> create part primary

DISKPART> format fs=ntfs quick

DISKPART> assign letter=C
EFI-раздел монтируем к F:
DISKPART> sel vol 2

DISKPART> assign letter=F
Получаем такую картину
Очень важно! Убеждаемся в том, что EFI-раздел отформатирован именно в FAT, а не в FAT32. Иначе Sysprep не простит нам этой ошибки. Если на компе уже есть линукс, то настройки будут верны.
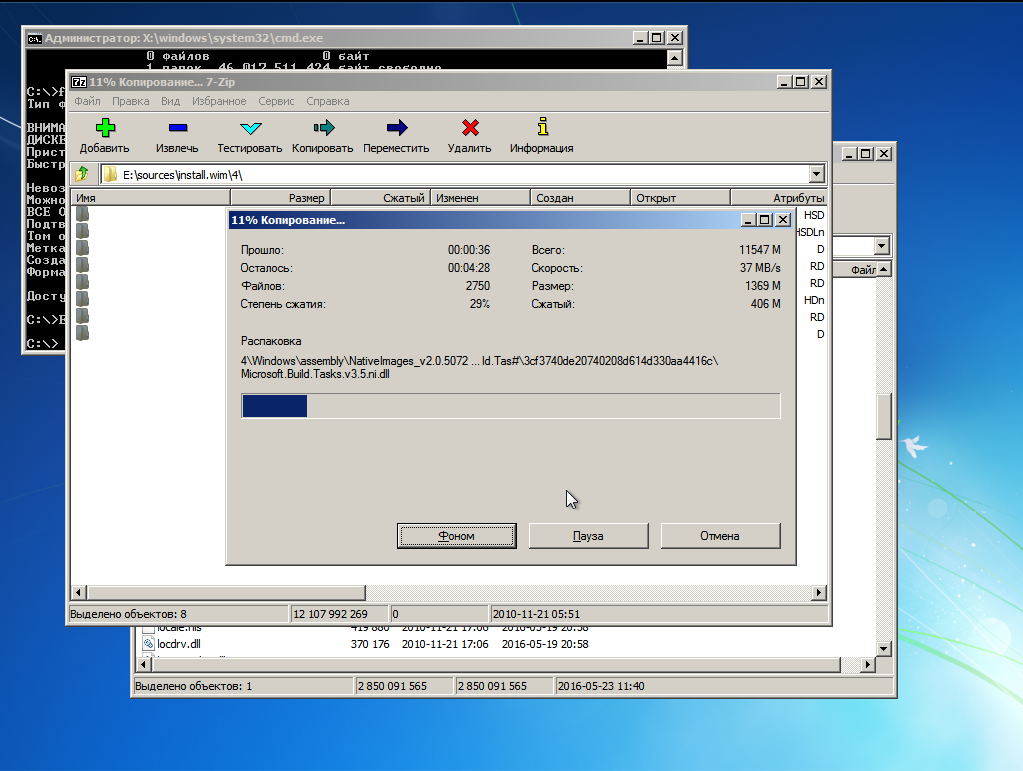
Теперь распаковываем дистрибутив на диск C:
X:sources> E:

E:> utils7-Zip7zFM.exe
Откроется GUI архиватора 7-zip. В нем открываем каталог E:sources, находим там файл install.wim
Правой кнопкой на этом файле вызываем контектстное меню и переходим по 7-zip -> Открыть архив. Появится содержимое образа.
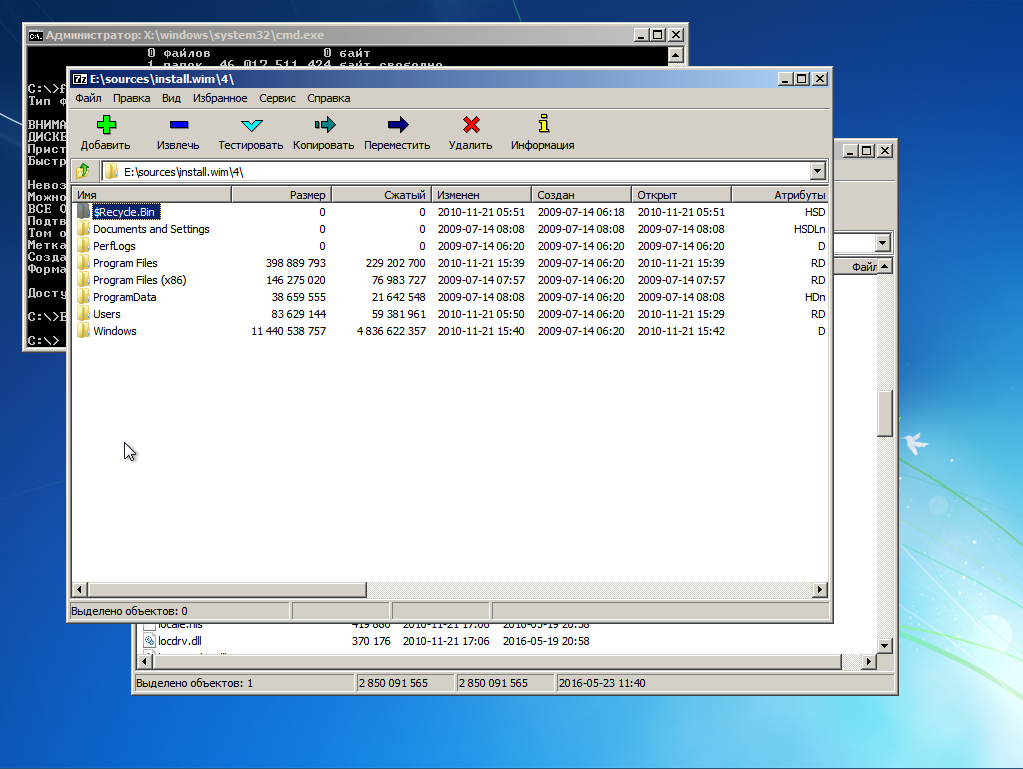
Лезем в папку 4 — там лежит Ultimate
Выделяем всё Ctrl + A и жмем кнопку «Извлечь». Появится окно, где нам предложат указать путь распаковки
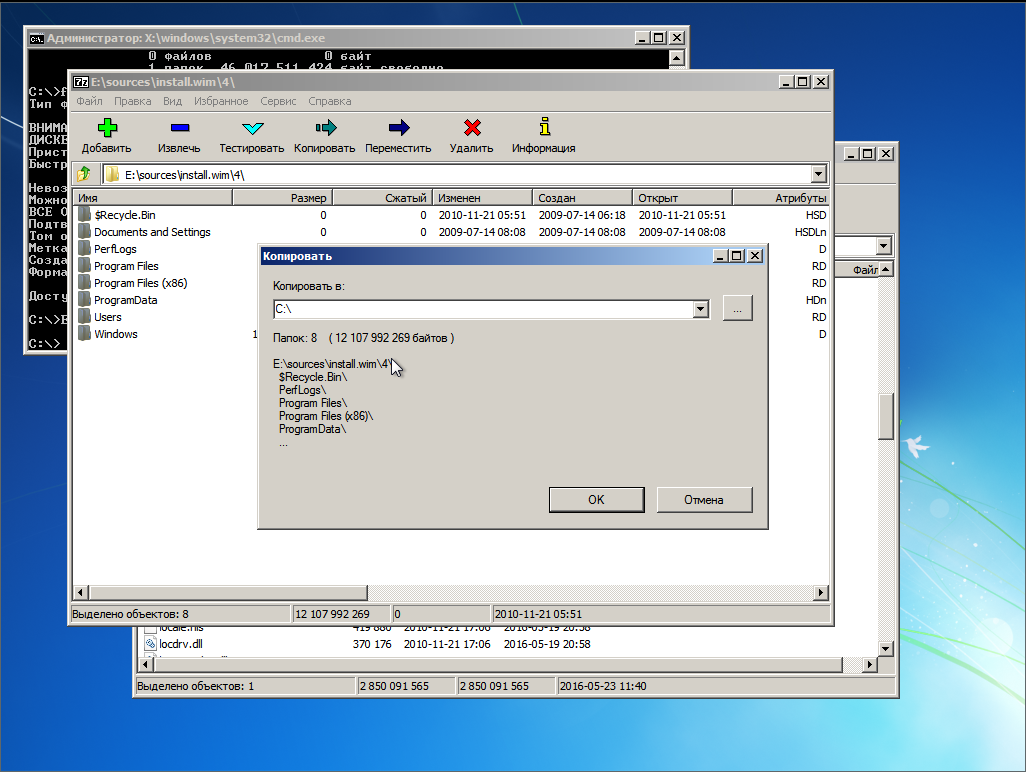
Указываем корень диска C: и жмем ОК.
Ну и теперь, как говорится: «Откиньтесь на спинку кресла и…»
4. Установка и настройка загрузчика
Итак, после некоторого время ожидания распаковка окончена. И вот тут, вот в этом месте винда обчно делает бяку, а именно портит MBR или перенастраивает NVRAM. Но мы не дадим ей этого сделать — мы установим загрузчик вручную.
В случае с EFI, переходим на раздел EFI, смонтированный к F: и создаем необходимые пути и копируем файлы загрузчика
E:> F:

F:> mkdir EFImicrosoftboot

F:> xcopy C:WindowsBootEFI* F:EFImicrosoftboot /s /e

F:> mkdir EFImicrosoftbootFonts

F:> xcopy C:WindowsBootFonts* F:EFImicrosoftbootFonts /s /e

F:> copy C:WindowsSystem32configBCD-Template F:EFImicrosoftbootBCD
Отлично, загрузчик скопирован. Теперь настроим его
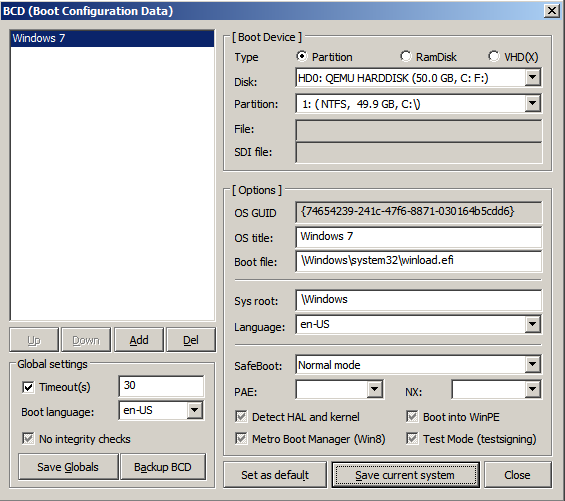
F:> E:utilsBOOTICEx64.exe
Открываем файл F:EFIMicrosoftBootBCD. В случае установки на раздел, его параметры задаются так
Если же мы устанавливали систему на VHD, то настройки будут такими
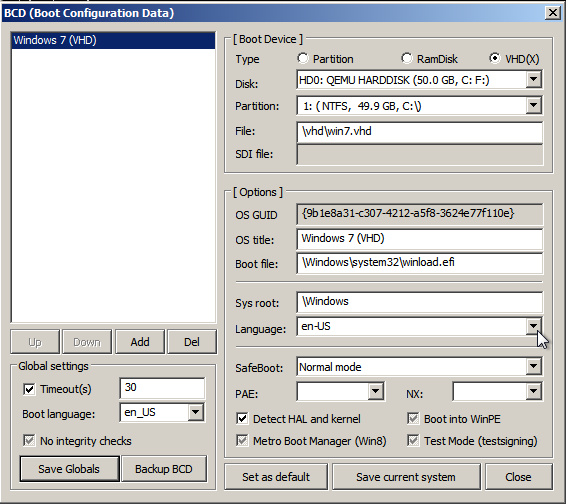
Важно! Имя вторичного загрузчика для EFI-системы winload.efi, для BIOS-системы — winload.exe.
В случае, если мы устанавливаем BIOS-систему установка загрузчика будет выглядеть так
F:> mkdir C:Boot

F:> xcopy C:WindowsBootPCAT* C:Boot /s /e

F:> mkdir C:BootFonts

F:> xcopy C:WindowsBootFonts* C:BootFonts /s /e

F:> copy C:Bootbootmgr C:bootmgr

F:> copy C:WindowsSystem32configBCD-Template C:BootBCD
Важно! Раздел, смонтированный к C: (там где размещен загрузчик) обязан быть активным! Убедитесь в этом перед перезагрузкой!
Настройку выполняем так же точно, используя BootICE.
Ну, вроде все. Закрываем все окна и идем в ребут. Флешку можно вытащить из компа.
5. Скрестим пальцы да вознесем молитвы тебе, о Великий и Ужасный Sysprep…!
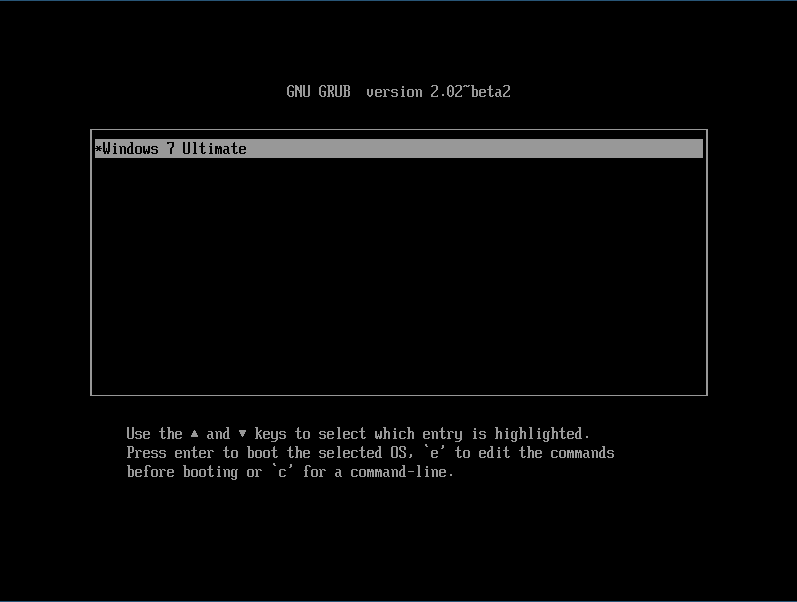
GRUB у нас еще не настроен пункта для винды в меню нет. Как только появится меню GRUB жмем «C». В консоли набираем
grub> set root=hdX,Y

grub> chainloader /EFI/Microsoft/Boot/bootmgfw.efi

grub> boot
X, Y — соответственно диск и раздел, где лежит загрузчик. Это в случае EFI. В случае с BIOS делаем так
grub> set root=hdX,Y

grub> ntldr /bootmgr

grub> boot
X, Y — диск и раздел с NTFS. Там где распакована винда и лежит её загрузчик.
В режиме EFI вместо логотипа винды я увидел черный экран, так как не нашел в дистрибутиве билиотеки bootres.dll, которую надо поместить в папку EFIMictosoftBootResourses. В случае с BIOS всё в порядке — знакомая эмблема «семерки». А потом в обоих случаях увидим это

Это работает Sysprep. На 57% моргнет экран — настраивается видяха. И если мы все сделали верно, то надпись «Применение параметров системы» повисит довольно долго, потом система сообщит, что установка будет продолжена после перезагрузки. Если мы где-то напортачили с установкой загрузчика — неправильный EFI раздел или неактивный NTFS, то тогда будет ошибка  Но мы молодцы и у нас все получится, и после очередной перезагрузки мы увидим это

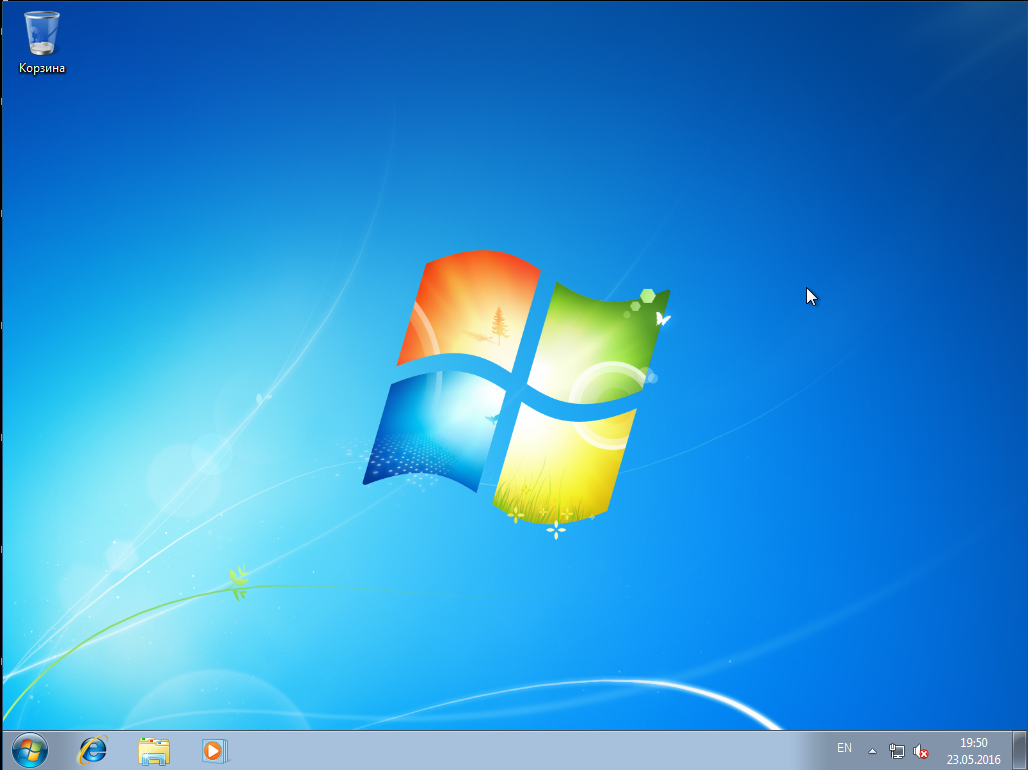
а потом, наконец вот это
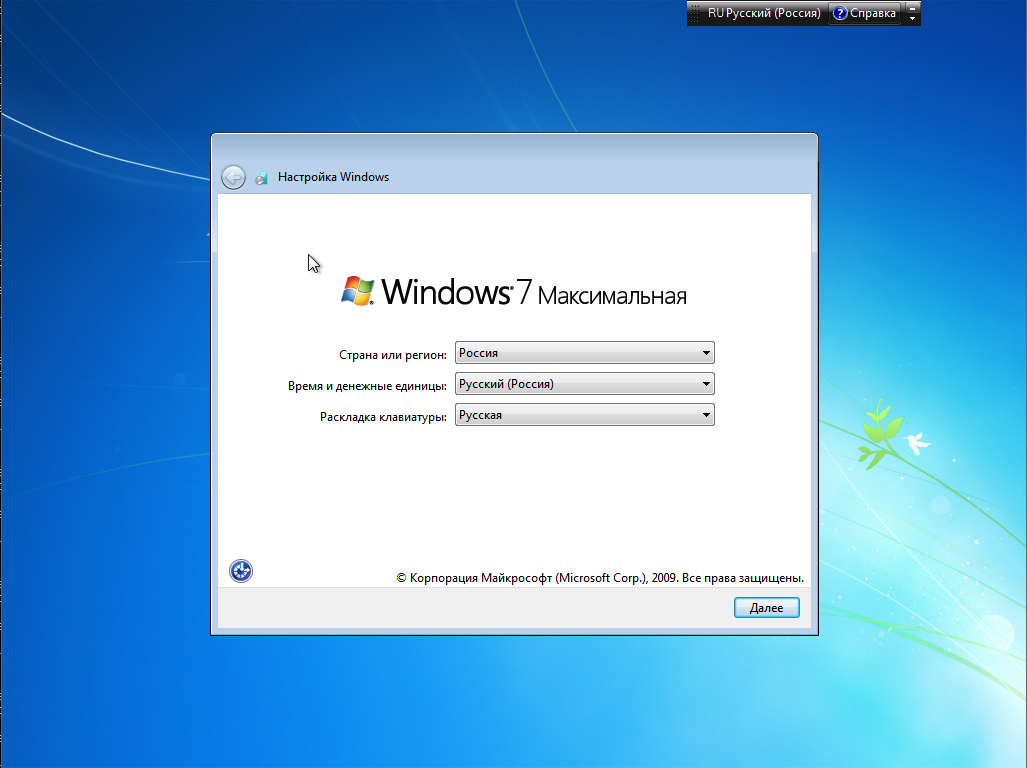
Дальше все как при обычной, штатной установке.
6. Настраиваем GRUB
Обратили внимание на то, что каждый раз мы грузим систему из консоли GRUB руками. Это очень хорошо — значит ни MBR ни NVRAM не перезаписаны коварным майкрософтом. Настало время грузится в арч и добавить в меню GRUB новый пункт
menuentry 'Windows 7 Ultimate SP1 (EFI)' {
set root=hdX,Y
chainloader /EFI/Microsoft/Boot/bootmgfw.efi
}
в случае EFI. Или
menuentry 'Windows 7 Ultimate SP1' {
set root=hdX,Y
ntldr /bootmgr
}
в случае BIOS. Применяем настройки GRUB и перезагружаемся и видем систему в пункте меню загрузки
после выбора которого получаем загруженную Windows
Заключение
Упреждая гнев профессиональных win-админов, скажу сразу — я знаю о DISM. Именно информация об этой системе и привела меня к описанному решению. Цель была одна — выяснить сколько нужно возможностей собственно Windows для установки Windows.
Оказалось вот что — для установки Windows её среда необходима только для одного — настройки BCD-хранилища. Всё. Остальное можно сделать из среды любой другой операционной системы.
Если написать аналог bcdedit.exe под Linux, то установить Windows можно будет с линуксового Live-носителя.
Ссылки по теме
- Arch boot process
- Boot debugging
- grub-gfx (Русский)
- Kernel parameters
GNU GRUB это Многосистемный загрузчик. Он является ответвлением от GRUB,(GRand Unified Bootloader), который был разработан Эриком Стефаном Болейном (Erich Stefan Boleyn).
Вкратце, загрузчик — это первая программа, которая загружается при старте компьютера. Она отвечает за загрузку и передачу управления ядру Linux. Ядро, в свою очередь, запускает остальную часть операционной системы.
В данный момент, GRUB де-факто является стандартным загрузчиком LINUX, и в скором времени будет заменён на GRUB2. Когда это случится, «GRUB» сменит свое текущее название на «GRUB Legacy».
Contents
- 1 Установка
- 2 Настройка
- 2.1 Определение корневой директории для GRUB
- 2.2 Двойная загрузка с Windows
- 2.3 Двойная загрузка с GNU/Linux
- 2.4 chainloader and configfile
- 3 Установка загрузчика
- 3.1 Установка в MBR
- 3.2 Установка в раздел
- 3.3 Альтернативный метод (grub-install)
- 4 Советы и трюки
- 4.1 Загрузка в графическом режиме
- 4.2 Видеорежим
- 4.2.1 vbetest
- 4.2.2 hwinfo
- 4.2.3 Видеорежимы, детектируемые GRUB
- 4.3 Метки разделов
- 4.4 Парольная защита
- 4.5 Перезагрузка в ОС по выбору
- 4.6 Взаимодействие LILO и GRUB
- 4.7 Загрузочная дискета GRUB
- 5 Решение проблем
- 5.1 GRUB Error 17
- 5.2 Случайная установка GRUB в раздел Windows
- 5.3 Редактирование параметров GRUB из меню загрузки
- 5.4 Ошибка device.map
- 5.5 Выбор ОС при перезагрузке KDE не работает
- 6 Внешние ресурсы
Установка
Пакет GRUB устанавливается по умолчанию в процессе установки Arch Linux. Если Вы первоначально не отметили для установки данный пакет, его можно установить с помощью:
После установки пакета дополнительно необходимо установить загрузчик GRUB в загрузочный сектор или на раздел диска, чтобы он смог выполнять загрузку операционной системы(систем). Этот процесс описан в главе Установка загрузчика.
Настройка
Файл настроек расположен в /boot/grub/menu.lst. Отредактируйте этот файл в соответствии с Вашими требованиями.
timeout #— время ожидания (в секундах) перед загрузкой операционной системы по умолчанию (default).default #— номер записи, соответствующий операционной системе, загружаемой по умолчанию по истечении времениtimeout.
Пример файла настроек (директория /boot расположена на отдельном разделе):
# Конфигурационный файл для GRUB - The GNU GRand Unified Bootloader
# /boot/grub/menu.lst

# ПРЕОБРАЗОВАНИЕ ИМЕН УСТРОЙСТВ
#
#  Linux           Grub
# -------------------------
#  /dev/fd0        (fd0)
#  /dev/sda        (hd0)
#  /dev/sdb2       (hd1,1)
#  /dev/sda3       (hd0,2)
#

#  ВИДЕОРЕЖИМ - РАЗРЕШЕНИЕ ФРЕЙМБУФЕРА (FRAMEBUFFER RESOLUTION)
#     +-------------------------------------------------+
#          | 640x480    800x600    1024x768   1280x1024
#      ----+--------------------------------------------
#      256 | 0x301=769  0x303=771  0x305=773   0x307=775
#      32K | 0x310=784  0x313=787  0x316=790   0x319=793
#      64K | 0x311=785  0x314=788  0x317=791   0x31A=794
#      16M | 0x312=786  0x315=789  0x318=792   0x31B=795
#     +-------------------------------------------------+
#  для более детальной информации о настройках видеорежима:
#  http://wiki.archlinux.org/index.php/GRUB#Framebuffer_Resolution
#
# Совет: Если Вам необходимо разрешение 1024x768, добавьте "vga=773" к строке kernel.
#

# Общие настройки:
timeout   5
default   0
color light-blue/black light-cyan/blue

# Неявная нумерация загрузочных секций начинается с 0

# (0) Arch Linux
title  Arch Linux
root   (hd0,0)
kernel /vmlinuz-linux root=/dev/sda3 ro
initrd /initramfs-linux.img

# (1) Windows
#title Windows
#rootnoverify (hd0,0)
#makeactive
#chainloader +1
Определение корневой директории для GRUB
GRUB должен обладать информацией о том, где в системе находятся его файлы. Это важно, поскольку таких мест может быть несколько (в случае с несколькими операционными системами). Файлы GRUB всегда располагаются в директории /boot, которая может находиться на отдельном разделе.
Примечание: GRUB присваивает имена устройствам хранения данных иначе, чем это делает ядро.
- Жесткие диски именуются как (hdX); также именуются и любые USB устройства хранения данных.
- Нумерация устройств и разделов начинается с нуля. Например, первый обнаруженный BIOS-ом жесткий диск будет иметь имя (hd0). Второе устройство будет иметь имя (hd1). Тот же принцип верен и для разделов. Например, второй раздел на первом жестком диске будет именоваться (hd0,1).
Если Вы не уверены где в Вашем случае находится /boot, используйте команду find во встроенной командной оболочке GRUB. Для того чтобы открыть командную оболочку, наберите:
Ниже приведен пример для систем без отдельного раздела под /boot, т.е. когда /boot является обычной директорией внутри корневой директории /:
grub> find /boot/grub/stage1
Следующий пример для систем с отдельным разделом /boot:
GRUB найдет нужный файл и выведет местоположение файла stage1, нарпимер:
Полученное значение должно быть указано в строке root в Вашем файле настроек. Для выхода из командной оболочки наберите quit.
Двойная загрузка с Windows
Добавьте следующие строки в конец Вашего /boot/grub/menu.lst (подразумевается, что Windows установлена на первый раздел первого диска):
title Windows
rootnoverify (hd0,0)
makeactive #если Вы используете Windows 7, закомментируйте эту строку
chainloader +1
Примечание: Windows, начиная с версии 2000, НЕ требует для нормальной загрузки, чтобы система располагалась на первом разделе диска (вопреки распространенному заблуждению). Если по какой-либо причине изменился номер раздела с уже установленной Windows (например, если Вы добавили раздел перед существующим разделом с Windows), Вам необходимо внести соответствующие изменения в файл boot.ini (см. эту статью для более детальной информации).
Если Windows расположена на другом жестком диске, необходимо использовать команду map. Тогда Windows будет считать, что она установлена на первый жесткий диск. Предположим, что Windows установлена на первый раздел второго диска:
title Windows
map (hd0) (hd1)
map (hd1) (hd0)
rootnoverify (hd1,0)
makeactive #если Вы используете Windows 7, закомментируйте эту строку
chainloader +1
Двойная загрузка с GNU/Linux
Вы можете указать настройки, подобные тем, которые определяет сам Arch Linux во время установки, например:
title Other Linux
root (hd0,2)
kernel /path/to/kernel root=/dev/sda3 ro
initrd /path/to/initrd
Однако могут потребоваться дополнительные параметры, или может не использоваться начальный RAM диск. Проверьте содержимое файла /boot/grub/menu.lst в других установленных дистрибутивах, чтобы выяснить корректные значения параметров загрузки, но лучшим решением будет использование команд chainloader and configfile
chainloader and configfile
Для облегчения процесса дальнейшего сопровождения системы, рекомендуется использовать команды chainloader и configfile для загрузки дистрибутивов, имеющих механизмы «автоматической» настройки параметров GRUB (например, Debian, Ubuntu, OpenSUSE). Таким образом, дистрибутивы будут самостоятельно управлять параметрами своей загрузки, в т.ч. и menu.lst.
-
Команда загрузки
chainloaderвыполнит вызов другого загрузчика, вместо того, чтобы загружать образ ядра. Эта функция удобна в случае, если в загрузочной записи раздела есть установленный загрузчик (например, GRUB). Таким образом, мы можем установить «главный» GRUB в главную загрузочную запись (MBR), и, дополнительно для каждого дистрибутива, установить GRUB в загрузочные записи разделов(PBR), на которых они установлены. -
Команда
configfileсообщает GRUB, что он должен загрузить определенный конфигурационный файл. Эта возможность используется для подгрузки файлаmenu.lst, который принадлежит другому дистрибутиву. При этом не требуется обязательное наличие отдельно установленного GRUB для этого дистрибутива. Однако главным недостатком такого подхода является возможная несовместимость установленного GRUB с «чужим»menu.lst, поскольку некоторые дистрибутивы вносят существенные модификации в свои версии GRUB.
Например, GRUB устанавливается в MBR, а другой загрузчик (это может быть GRUB или LILO) уже установлен в загрузочный сектор (hd0,2).
---------------------------------------------
|   |           |           |   %           |
| M |           |           | B %           |
| B |  (hd0,0)  |  (hd0,1)  | L %  (hd0,2)  |
| R |           |           |   %           |
|   |           |           |   %           |
---------------------------------------------
  |                           ^
  |       chainloading        |
  -----------------------------
В данном случае достаточно прописать в menu.lst:
title Other Linux
root (hd0,2)
chainloader +1
Если загрузчиком в (hd0,2) является GRUB, можно использовать команду configfile:
title Other Linux
root (hd0,2)
configfile /boot/grub/menu.lst
Команда chainloader также может быть использована для запуска загрузчика расположенного в MBR на другом диске.
title Other drive
rootnoverify (hd1)
chainloader +1
Установка загрузчика
GRUB может быть установлен с отдельного носителя (например, с LiveCD), или путем установки из-под запущенного Arch Linux. Переустановка загрузчика GRUB требуется довольно редко, в ней нет необходимости, когда:
- Изменился конфигурационный файл.
- Обновлен пакет GRUB.
Установка/переустановка загрузчика необходима когда:
- Загрузчик ещё не установлен.
- Другая операционная система при установке затерла существующий загрузчик.
- Загрузчик не стартует по неизвестным причинам.
Несколько замечаний, прежде чем мы продолжим:
- Убедитесь, что Ваш файл настройки
/boot/grub/menu.lstне содержит ошибок. Обратитесь к Определение корневой директории для GRUB для того, чтобы убедиться, что имена устройств заданы корректно. - Для того чтобы большинство версий BIOS корректно распознало наличие загрузчика, GRUB должен быть установлен в MBR (первый сектор жесткого диска), или в первом разделе первого устройства хранения данных. Для того чтобы позволить различным дистрибутивам управлять настройкой своих опций загрузки, можно использовать несколько экземпляров GRUB, см. chainloader and configfile .
- Для некоторых случаев потребуется установка загрузчика GRUB из-под
chrootокружения, например для установки загрузчика на RAID-тома, или в случае, когда загрузчик вышел из строя, и Вы не можете загрузить Вашу операционную систему. Для этого вам необходимо выполнить Change root из-под LiveCD, или другой инсталляции Linux. - Файлы
*stage*должны находиться в/boot/grub, что может не соответствовать действительности, если загрузчик не был установлен в процессе установки системы. Данное затруднение может быть разрешено путем копирования необходимых файлов:cp -a /usr/lib/grub/i386-pc/* /boot/grub.
Сначала откройте командную оболочку GRUB:
Используйте команду root с параметром, полученным в результате команды find (см.Определение корневой директории для GRUB ), чтобы указать GRUB, какой из разделов содержит stage1 (и, соответственно, там же находится и /boot):
Tip: Командная оболочка GRUB поддерживает автодополнение по клавише Tab. Если Вы наберете ‘root (hd’ и нажмете Tab дважды, Вы увидите список доступных устройств, аналогично можно получить список доступных разделов. Автодополнение также работает и в загрузочном меню GRUB. Например, если Вы допустили ошибку в конфигурационном файле, вы можете позже в загрузочном меню отредактировать запись, используя автодополнение по клавише Tab, чтобы получить подсказку, какое имя устройства/раздела нужно указать вместо ошибочного. См. Редактирование параметров GRUB из меню загрузки.
Установка в MBR
Следующий пример устанавливает загрузчик GRUB в MBR первого жесткого диска:
Установка в раздел
Следущий пример устанавливает загрзчик GRUB в первый раздел первого жесткого диска:
После выполнения команды setup, введите команду quit, для того, чтобы выйти из командной оболочки. Если Вы используете chroot, выйдите из chroot окружения и отмонтируйте разделы (см. exit your chroot and unmount partitions). Теперь выполните перезагрузку системы.
Альтернативный метод (grub-install)
Tip: Этот метод менее надежный, более предпочтительной является установка загрузчика из командной оболочки GRUB.
Используйте команду grub-install с именем целевого устройства для установки загрузчика. Например, для установки загрузчика в MBR первого диска:
grub-install сообщит, удачно ли прошел процесс установки. Если вонзникли проблемы, воспользуйтесь методом установки из командной оболочки GRUB.
Советы и трюки
Замечания по дополнительным параметрам.
Загрузка в графическом режиме
Для разного рода «украшений» можно использовать grub-gfx. GRUB2 также предлагает расширенные графические возможности, такие как фоновые изображения и растровые шрифты.
Видеорежим
Вы можете использовать один из видеорежимов, описанных в примере menu.lst, однако, если Вы решили задействовать широкоэкранный LCD монитор с использованием его родного разрешения, то нижеперечисленные советы помогут Вам достичь желаемого.
В статье Wikipedia, представлен расширенный список разрешений фреймбуфера (тех, которые не входят в стандарт VBE). Но при использовании разрешения 1440×900 (vga=867) возникают проблемы. Это связано с тем, что производители видеокарт не ограничены стандартом VBE 3, и они могут выбирать номера кодов для видеорежимов, как им заблагорассудится. Именно поэтому эти коды различаются для разных видеокарт (иногда даже и у одного и того же производителя).
Таким образом, вместо использования готовой таблицы, будет лучше воспользоваться методами, описанными ниже, для получения корректного кода видеорежима.
vbetest
- Установите пакет lrmi, который содержит утилиту vbetest (пользователи системы x86_64 должны использовать #hwinfo вместо vbetest)
- Запустите vbetest от имени суперпользователя
- Запомните значение в [ ], соответствующее выбранному Вами видеорежиму
- Нажмите
qдля выхода из vbetest- Вы можете проверить выбранный вами видеорежим, достаточно запустить от имени суперпользователя команду
vbetest -m <ваш_код>. Вы должны увидеть таблицу такого плана
- Вы можете проверить выбранный вами видеорежим, достаточно запустить от имени суперпользователя команду
- Прибавьте 512 к значению, которое Вы получили на предыдущем шаге, и пропишите его в параметр
vgaдля соответствующей записиmenu.lst - Перезагрузите машину и любуйтесь полученным результатом
Например, vbetest выдает на компьютере:
[356] 1440x900 (256 color palette)
[357] 1440x900 (8:8:8)
Значит искомое значение — это 357. Затем, 357 + 512 = 869, значит необходимо указать vga=869. Добавляем полученное значение к строке kernel в файле menu.lst, как показано ниже:
kernel /vmlinuz-linux root=/dev/sda1 ro **vga=869**
Примечание:
- (8:8:8) Глубина цвета 24-bit (то же и для 32bit)
- (5:6:5) Глубина цвета 16-bit
- (5:5:5) Глубина цвета 15-bit
hwinfo
- Установите пакет hwinfo из [AUR].
- Запустите команду
hwinfo --framebufferс правами пользователя root. - Выберите код, соответствующий желаемому разрешению.
- Используйте полученный 6-ти значный код с префиксом 0x для параметра
vga=в соотв. записи kernel вmenu.lst. Если Вы предпочитаете не использовать префикс 0x, тогда необходимо перевести значения кода из шестнадцатеричной системы в десятичную.
Пример вывода команды hwinfo:
Mode 0x0364: 1440x900 (+1440), 8 bits
Mode 0x0365: 1440x900 (+5760), 24 bits
Соответственно срока в menu.lst должна иметь вид:
kernel /vmlinuz-linux root=/dev/sda1 ro **vga=0x0365**
Примечание: vbetest выдает значения кодов в формате VESA, чтобы преобразовать их в соответствующие коды видеорежимов ядра — необходимо прибавить значение 512. Команда hwinfo, напротив, выдает коды видеорежимов ядра, и не требует дополнительных манипуляций с полученным значением (не считая необязательного перевода в десятичную систему).
Видеорежимы, детектируемые GRUB
Существует достаточно простой метод определения кода видеорежима с использованием соотв. возможностей самого GRUB.
В строке kernel укажите, что ядро должно предложить пользователю самостоятельно выбрать код видеорежима во время загрузки.
kernel /vmlinuz-linux root=/dev/sda1 ro **vga=ask**
Теперь перезапустите систему. GRUB предложит на выбор список доступных основных видеорежимов, также доступна опция сканирования, для детектирования дополнительных видеорежимов.
Вы можете выбрать любое значение (нужно запомнить это значение, оно понадобится на следующем шаге) и продолжить процесс загрузки.
Выбранное Вами значение кода видеорежима является шестнадцатеричным, чтобы использовать его как опцию в строке kernel, переведите данное значение в десятичную систему.
Теперь замените значение параметра vga ask на десятичное значение кода видеорежима. Например, строка kernel для режима [369] 1680x1050x32 будет выглядеть:
kernel /vmlinuz-linux root=/dev/sda1 ro **vga=873**
Метки разделов
Если Вы периодически меняете (или планируете менять) расположение разделов на диске, или меняете местами сами устройства жестких дисков (вообще, любые действия, которые приводят к тому, что у одного и того же устройства может меняться имя в системе), тогда для Вас имеет смысл адресовать загрузочные устройства не по именам вида (hdX,Y) а по меткам. Для установки метки раздела формата ext2, ext3, ext4 используется команда:
e2label </dev/drive|partition> label
Задайте для устройства метку длиной не более 16 символов, и не содержащую пробелов, в противном случае GRUB не сможет корректно распознать подобную метку. Затем пропишите в menu.lst строку вида:
kernel /boot/vmlinuz-linux root=/dev/disk/by-label/Arch_Linux ro
Парольная защита
Вы можете установить пароль в конфигурационном файле GRUB для тех операционных систем, которые необходимо защитить от несанкционированной загрузки. Пароль загрузчика GRUB удобно использовать, когда аналогичная возможность BIOS либо не доступна, либо не предоставляет необходимой функциональности.
Сначала выберите пароль (постарайтесь его не забыть в дальнейшем), затем зашифруйте его:
# grub-md5-crypt
Password:
Retype password:
$1$ZOGor$GABXUQ/hnzns/d5JYqqjw
Затем добавьте строку с зашифрованным паролем в конфигурационный файл GRUB (строка с паролем должна находиться в начальной части файла, чтобы GRUB корректно её обработал):
# general configuration
timeout   5
default   0
color light-blue/black light-cyan/blue

password --md5 $1$ZOGor$GABXUQ/hnzns/d5JYqqjw
Затем, для каждой операционной системы, которую Вы желаете защитить, добавьте команду lock:
# (0) Arch Linux
title  Arch Linux
lock
root   (hd0,1)
kernel /boot/vmlinuz-linux root=/dev/disk/by-label/Arch_Linux ro
initrd /boot/initramfs-linux.img
Важно: Если в BIOS отсутствует возможность загрузки с других устройств (таких как CD-привод), и паролем защищены все операционные системы, то будет достаточно проблематично возобновить загрузку в случае, если Вы забыли свой пароль.
Перезагрузка в ОС по выбору
Если Вам часто приходится перегружаться в другую ОС (например, Windows), иногда бывает утомительным следить за процессом перезагрузки, чтобы не пропустить момент выбора нужной ОС, и случайно, не загрузиться опять в систему по умолчанию. Для решения данной проблемы существует возможность назначения временной «ОС по умолчанию».
Предположим у нас есть файл menu.lst с подобными настройками:
# general configuration:
timeout 10
default 0
color light-blue/black light-cyan/blue

# (0) Arch
title  Arch Linux
root (hd0,1)
kernel /boot/vmlinuz-linux root=/dev/disk/by-label/ARCH ro
initrd /boot/initramfs-linux.img

# (1) Windows
title Windows XP
rootnoverify (hd0,0)
makeactive
chainloader +1
Текущей ОС по умолчанию является Arch (0). Измените значение default 0 на default saved — теперь при загрузке, номер ОС по умолчанию будет взят из файла default в папке GRUB. Запись в файл default выполняет команда savedefault, поэтому добавьте savedefault 0 в конец объявления параметров Windows. Таким образом, мы добьемся того, что когда загружается Windows — системой по умолчанию снова становится Arch (даже если до этого системой по умолчанию была Windows).
Теперь, всё, что нам нужно — это найти простой способ установки значения ОС по умолчанию. Такую возможность предоставляет команда grub-set-default. Например, чтобы из Arch перегрузиться сразу в Windows, наберите команду:
sudo grub-set-default 1 && sudo shutdown -r now
Возможно Вы захотите разрешить пользователям выключение системы без необходимости ввода пароля root. Такую же процедуру необходимо выполнить и для команды grub-set-default.
Взаимодействие LILO и GRUB
Если в ваше системе установлен пакет LILO, удалите его.
При выполнении некоторых задач (например при компилировании ядра с командой make all) пакет LILO может значиться в зависимостях, и может быть автоматически установлен в систему, при этом загрузчик GRUB будет затерт.
Примечание: Команда pacman -R lilo удалит пакет из системы, но не удалит загрузчик LILO из MBR. Загрузчик LILO, находящийся в MBR может быть перезаписан только в процессе установки другого загрузчика (например, GRUB).
Загрузочная дискета GRUB
Для начала отформатируйте дискету:
 fdformat /dev/fd0
 mke2fs /dev/fd0
Затем подмонтируйте её:
mount -t ext2 /dev/fd0 /mnt/fl
Установите GRUB на дискету:
grub-install --root-directory=/mnt/fl '(fd0)'
Скопируйте Ваш menu.lst на дискету:
cp /boot/grub/menu.lst /mnt/fl/boot/grub/menu.lst
И, в завершение, отмонтируйте дискету:
Теперь, в случае возникновения проблем с загрузкой, Вы можете загрузить Вашу систему используя загрузочную дискету GRUB.
Дополнительная информация: Super GRUB Disk
Решение проблем
GRUB Error 17
В случае неразберихи с таблицей разделов, всё что Вы можете наблюдать при попытке загрузки системы — это лаконичное сообщение «GRUB error 17». Существует несколько причин, которые могут привести к искажению таблицы разделов. Чаще всего подобные проблемы связаны с изменением порядка разделов, в результате работы пользователя с программой GParted. Например, Вы удалили раздел /dev/sda6, затем изменили размер раздела /dev/sda7, и, наконец, создали заново раздел, который, как ожидалось, снова должен стать /dev/sda6. Однако этот новый раздел получит, например, имя /dev/sda9.
Исправить таблицу разделов достаточно легко. Для этого загрузитесь с Live-CD, войдите в систему как root и запустите команду:
Затем войдите в режим e[x]tra/expert. Далее [f]ix the partition order, и сохраните таблицу [w]rite. Затем выйдите из программы fdisk. Проверить состояние таблицы разделов после исправления можно с помощью команды fdisk -l. Теперь осталось исправить параметры GRUB, см. предыдущую секцию Установка загрузчика.
Обычно, всё что Вам нужно — это указать корректное расположение директории /boot и перезаписать загрузчик, находящийся в MBR. Например:
grub> root (hd0,6)
grub> setup (hd0)
grub> quit
Более детальная информация о «GRUB Error 17» доступна по ссылке
Случайная установка GRUB в раздел Windows
Если Вы случайно установили GRUB на раздел с Windows, GRUB запишет определенные данные в загрузочный сектор раздела, затерев при этом ссылку на загрузчик Windows.
Для восстановления загрузочной записи Вам понадобится загрузочный диск с консолью восстановления (Windows Recovery Console) для вашей версии Windows. Поскольку многие поставщики не предоставляют загрузочные диски для восстановления (а создают скрытые разделы для восстановления системы), Microsoft предоставляет возможность скачать эти инструменты. Если Вы использете XP, перейдите по этой ссылке, чтобы получить возможность использовать дискету в качестве диска восстановления (Recovery CD). Загрузитесь с диска Recovery CD (или войдите в режим Recovery c установочного диска), и запустите команду fixboot, чтобы восстановить загрузочный сектор. После этого вам снова придется устанавливать GRUB, —только теперь установите его в MBR, а не в раздел с Windows—.
Более детальная информация: ссылка.
Редактирование параметров GRUB из меню загрузки
Выбрав один из пунктов в меню загрузки, Вы можете отредактировать его нажав клавишу e. Использйте автодополнение по клавише Tab, чтобы получить подсказку по доступным именам устройств/разделов, используте клавишу Esc для выхода. После того, как Вы отредактировали запись, можете попытаться загрузить её, нажав клавишу b. Внесенные Вами изменения не будут сохранены.
Ошибка device.map
Если во время устаноки, или во время загрузки появляются ошибки с упоминанием файла /boot/grub/device.map, необходимо выполнить команду:
# grub-install --recheck /dev/sda
для того, чтобы GRUB пересоздал таблицу устройств, даже если она уже существует. Это может потребоваться после изменения разделов, или добавления/удаления жесткик дисков.
Выбор ОС при перезагрузке KDE не работает
Если в окне перезагрузки KDE Вы открыли подменю со списком операционных систем, выбрали нужную ОС, перегрузили компьютер, и по прежнему загрузились в ОС по умолчанию, вместо выбранной, тогда проверьте наличие строки
В Вашем /boot/grub/menu.lst.
Внешние ресурсы
-
GNU GRUB
-
GRUB Grotto
-
Linux Kernel Documentation :: kernel-perameters.txt
-
List of kernel parameters with further explanation and grouped by similar options
-
Изучите также примеры конфигурации GRUB
Related articles
- Arch boot process
- Master Boot Record
- GUID Partition Table
- Unified Extensible Firmware Interface
- GRUB Legacy
- /EFI examples
- /Tips and tricks
- Multiboot USB drive
GRUB (GRand Unified Bootloader) is a boot loader. The current GRUB is also referred to as GRUB 2. The original GRUB, or GRUB Legacy, corresponds to versions 0.9x. This page exclusively describes GRUB 2.
Note: In the entire article esp denotes the mountpoint of the EFI system partition aka ESP.
UEFI systems
Note:
- It is recommended to read and understand the Unified Extensible Firmware Interface, Partitioning#GUID Partition Table and Arch boot process#Under UEFI pages.
- When installing to use UEFI it is important to boot the installation media in UEFI mode, otherwise efibootmgr will not be able to add the GRUB UEFI boot entry. Installing to the fallback boot path will still work even in BIOS mode since it does not touch the NVRAM.
- To boot from a disk using UEFI, an EFI system partition is required. Follow EFI system partition#Check for an existing partition to find out if you have one already, otherwise you need to create it.
- This whole article assumes that inserting additional GRUB2 modules via
insmodis possible. As discussed in Unified Extensible Firmware Interface/Secure Boot#shim with key and GRUB, this is not the case on UEFI systems with Secure Boot enabled. If you want to use any additional GRUB module that is not included in the standard GRUB EFI filegrubx64.efion a Secure Boot system, you have to re-generate the GRUB EFIgrubx64.efiwithgrub-mkstandalonewith the additional GRUB modules included.
Installation
Note:
- UEFI firmwares are not implemented consistently across manufacturers. The procedure described below is intended to work on a wide range of UEFI systems but those experiencing problems despite applying this method are encouraged to share detailed information, and if possible the workarounds found, for their hardware-specific case. A /EFI examples article has been provided for such cases.
- The section assumes you are installing GRUB for x86_64 systems. For IA32 (32-bit) UEFI systems (not to be confused with 32-bit CPUs), replace
x86_64-efiwithi386-efiwhere appropriate..
First, install the packages grub and efibootmgr: GRUB is the boot loader while efibootmgr is used by the GRUB installation script to write boot entries to NVRAM.
Then follow the below steps to install GRUB to your disk:
- Mount the EFI system partition and in the remainder of this section, substitute
espwith its mount point. - Choose a boot loader identifier, here named
GRUB. A directory of that name will be created inesp/EFI/to store the EFI binary and this is the name that will appear in the UEFI boot menu to identify the GRUB boot entry. - Execute the following command to install the GRUB EFI application
grubx64.efitoesp/EFI/GRUB/and install its modules to/boot/grub/x86_64-efi/.
-
-
Note:
- Make sure to install the packages and run the
grub-installcommand from the system in which GRUB will be installed as the boot loader. That means if you are booting from the live installation environment, you need to be inside the chroot when runninggrub-install. If for some reason it is necessary to rungrub-installfrom outside of the installed system, append the--boot-directory=option with the path to the mounted/bootdirectory, e.g--boot-directory=/mnt/boot. - Some motherboards cannot handle
bootloader-idwith spaces in it.
- Make sure to install the packages and run the
-
# grub-install --target=x86_64-efi --efi-directory=esp --bootloader-id=GRUB
-
https://wiki.archlinux.org/title/Unified_Extensible_Firmware_Interface/Secure_Boot#sbctl
After the above installation completed, the main GRUB directory is located at /boot/grub/. Read /Tips and tricks#Alternative install method for how to specify an alternative location. Note that grub-install also tries to create an entry in the firmware boot manager, named GRUB in the above example – this will, however, fail if your boot entries are full; use efibootmgr to remove unnecessary entries.
Remember to #Generate the main configuration file after finalizing the configuration.
Tip: If you use the option --removable then GRUB will be installed to esp/EFI/BOOT/BOOTX64.EFI (or esp/EFI/BOOT/BOOTIA32.EFI for the i386-efi target) and you will have the additional ability of being able to boot from the drive in case EFI variables are reset or you move the drive to another computer. Usually you can do this by selecting the drive itself similar to how you would using BIOS. If dual booting with Windows, be aware Windows usually places an EFI executable there, but its only purpose is to recreate the UEFI boot entry for Windows. If you are installing GRUB on a Mac, you will have to use this option.
Note:
--efi-directoryand--bootloader-idare specific to GRUB UEFI,--efi-directoryreplaces--root-directorywhich is deprecated.- You might note the absence of a device_path option (e.g.:
/dev/sda) in thegrub-installcommand. In fact any device_path provided will be ignored by the GRUB UEFI install script. Indeed, UEFI boot loaders do not use a MBR bootcode or partition boot sector at all.
See UEFI troubleshooting in case of problems. Additionally see /Tips and tricks#UEFI further reading.
Secure Boot support
Grub fully supports secure boot utilising either CA keys or shim, the installation command however is different depending on which you intend to use.
To make use of CA Keys the command is
# grub-install --target=x86_64-efi --efi-directory=esp --bootloader-id=GRUB --modules="tpm" --disable-shim-lock
To make use of shim-lock the command is
# grub-install --target=x86_64-efi --efi-directory=esp --bootloader-id=GRUB--modules="normal test efi_gop efi_uga search echo linux all_video gfxmenu gfxterm_background gfxterm_menu gfxterm loadenv configfile tpm"
After installation see Secure Boot for instructions on implementing it
Warning:
- Incorrectly configuring Secure Boot can render your system unbootable. If for any reason you cannot boot after enabling secure boot then you should disable it in firmware and reboot the system.
- Loading unnecessary modules in your bootloader has the potential to present a security risk, only use these commands if you need them.
BIOS systems
GUID Partition Table (GPT) specific instructions
On a BIOS/GPT configuration, a BIOS boot partition is required. GRUB embeds its core.img into this partition.
Note:
- Before attempting this method keep in mind that not all systems will be able to support this partitioning scheme. Read more on Partitioning#GUID Partition Table.
- The BIOS boot partition is only needed by GRUB on a BIOS/GPT setup. On a BIOS/MBR setup, GRUB uses the post-MBR gap for the embedding the
core.img. On GPT, however, there is no guaranteed unused space before the first partition. - For UEFI systems this extra partition is not required, since no embedding of boot sectors takes place in that case. However, UEFI systems still require an EFI system partition.
Create a mebibyte partition (+1M with fdisk or gdisk) on the disk with no file system and with partition type GUID 21686148-6449-6E6F-744E-656564454649.
- Select partition type
BIOS bootfor fdisk. - Select partition type code
ef02for gdisk. - For parted set/activate the flag
bios_grubon the partition.
This partition can be in any position order but has to be on the first 2 TiB of the disk. This partition needs to be created before GRUB installation. When the partition is ready, install the boot loader as per the instructions below.
The space before the first partition can also be used as the BIOS boot partition though it will be out of GPT alignment specification. Since the partition will not be regularly accessed performance issues can be disregarded, though some disk utilities will display a warning about it. In fdisk or gdisk create a new partition starting at sector 34 and spanning to 2047 and set the type. To have the viewable partitions begin at the base consider adding this partition last.
Master Boot Record (MBR) specific instructions
Usually the post-MBR gap (after the 512 byte MBR region and before the start of the first partition) in many MBR partitioned systems is 31 KiB when DOS compatibility cylinder alignment issues are satisfied in the partition table. However a post-MBR gap of about 1 to 2 MiB is recommended to provide sufficient room for embedding GRUB’s core.img (FS#24103). It is advisable to use a partitioning tool that supports 1 MiB partition alignment to obtain this space as well as to satisfy other non-512-byte-sector issues (which are unrelated to embedding of core.img).
Installation
Install the grub package. (It will replace grub-legacyAUR if that is already installed.) Then do:
# grub-install --target=i386-pc /dev/sdX
where i386-pc is deliberately used regardless of your actual architecture, and /dev/sdX is the disk (not a partition) where GRUB is to be installed. For example /dev/sda or /dev/nvme0n1, or /dev/mmcblk0. See Device file#Block device names for a description of the block device naming scheme.
Now you must generate the main configuration file.
If you use LVM for your /boot, you can install GRUB on multiple physical disks.
See grub-install(8) and GRUB Manual for more details on the grub-install command.
Configuration
On an installed system, GRUB loads the /boot/grub/grub.cfg configuration file each boot. You can follow #Generated grub.cfg for using a tool, or #Custom grub.cfg for a manual creation.
Generated grub.cfg
This section only covers editing the /etc/default/grub configuration file. See /Tips and tricks for more information.
Note: Remember to always generate the main configuration file after making changes to /etc/default/grub and/or files in /etc/grub.d/.
Warning: Update/reinstall the boot loader (see #UEFI systems or #BIOS systems) if a new GRUB version changes the syntax of the configuration file: mismatching configuration can result in an unbootable system.
Generate the main configuration file
After the installation, the main configuration file /boot/grub/grub.cfg needs to be generated. The generation process can be influenced by a variety of options in /etc/default/grub and scripts in /etc/grub.d/.
If you have not done additional configuration, the automatic generation will determine the root filesystem of the system to boot for the configuration file. For that to succeed it is important that the system is either booted or chrooted into.
Note:
- The default file path is
/boot/grub/grub.cfg, not/boot/grub/i386-pc/grub.cfg. - If you are trying to run grub-mkconfig in a chroot or systemd-nspawn container, you might notice that it does not work:
grub-probe: error: failed to get canonical path of /dev/sdaX. In this case, try using arch-chroot as described in the BBS post.
Use the grub-mkconfig tool to generate /boot/grub/grub.cfg:
# grub-mkconfig -o /boot/grub/grub.cfg
By default the generation scripts automatically add menu entries for all installed Arch Linux kernels to the generated configuration.
Tip:
- After installing or removing a kernel, you just need to re-run the above grub-mkconfig command.
- For tips on managing multiple GRUB entries, for example when using both linux and linux-lts kernels, see /Tips and tricks#Multiple entries.
To automatically add entries for other installed operating systems, see #Detecting other operating systems.
You can add additional custom menu entries by editing /etc/grub.d/40_custom and re-generating /boot/grub/grub.cfg. Or you can create /boot/grub/custom.cfg and add them there. Changes to /boot/grub/custom.cfg do not require re-running grub-mkconfig, since /etc/grub.d/41_custom adds the necessary source statement to the generated configuration file.
Tip: /etc/grub.d/40_custom can be used as a template to create /etc/grub.d/nn_custom, where nn defines the precedence, indicating the order the script is executed. The order scripts are executed determine the placement in the GRUB boot menu. nn should be greater than 06 to ensure necessary scripts are executed first.
See #Boot menu entry examples for custom menu entry examples.
Detecting other operating systems
To have grub-mkconfig search for other installed systems and automatically add them to the menu, install the os-prober package and mount the partitions from which the other systems boot. Then re-run grub-mkconfig. If you get the following output: Warning: os-prober will not be executed to detect other bootable partitions then edit /etc/default/grub and add/uncomment:
GRUB_DISABLE_OS_PROBER=false
Then try again.
Note:
- The exact mount point does not matter, os-prober reads the
mtabto identify places to search for bootable entries. - Remember to mount the partitions each time you run grub-mkconfig in order to include the other operating systems every time.
Windows
For Windows installed in UEFI mode, make sure the EFI system partition containing the Windows Boot Manager (bootmgfw.efi) is mounted. Run os-prober as root to detect and generate an entry for it.
For Windows installed in BIOS mode, mount the Windows system partition (its file system label should be System Reserved or SYSTEM). Run os-prober as root to detect and generate an entry for it.
Note: For Windows installed in BIOS mode:
- NTFS partitions may not always be detected when mounted with the default Linux drivers. If GRUB is not detecting it, try installing NTFS-3G and remounting.
![]() This article or section is out of date.
This article or section is out of date.![]()
Reason: Since Windows 7, bootmgr is placed in the system partition which is not encrypted. (Discuss in Talk:GRUB)
- Encrypted Windows partitions may need to be decrypted before mounting. For BitLocker, this can be done with cryptsetup or dislockerAUR. This should be sufficient for os-prober to add the correct entry.
Additional arguments
To pass custom additional arguments to the Linux image, you can set the GRUB_CMDLINE_LINUX + GRUB_CMDLINE_LINUX_DEFAULT variables in /etc/default/grub. The two are appended to each other and passed to kernel when generating regular boot entries. For the recovery boot entry, only GRUB_CMDLINE_LINUX is used in the generation.
It is not necessary to use both, but can be useful. For example, you could use GRUB_CMDLINE_LINUX_DEFAULT="resume=UUID=uuid-of-swap-partition quiet" where uuid-of-swap-partition is the UUID of your swap partition to enable resume after hibernation. This would generate a recovery boot entry without the resume and without quiet suppressing kernel messages during a boot from that menu entry. Though, the other (regular) menu entries would have them as options.
By default grub-mkconfig determines the UUID of the root filesystem for the configuration. To disable this, uncomment GRUB_DISABLE_LINUX_UUID=true.
For generating the GRUB recovery entry you have to ensure that GRUB_DISABLE_RECOVERY is not set to true in /etc/default/grub.
See Kernel parameters for more info.
By default, grub-mkconfig sorts the included kernels using sort -V and uses the first kernel in that list as the top-level entry. This means that, for example, since /boot/vmlinuz-linux-lts is sorted before /boot/vmlinuz-linux, if you have both linux-lts and linux installed, the LTS kernel will be the top-level menu entry, which may not be desirable. This can be overridden by specifying GRUB_TOP_LEVEL=path_to_kernel" in /etc/default/grub. For example, to make the regular kernel be the top-level menu entry, you can use GRUB_TOP_LEVEL="/boot/vmlinuz-linux".
LVM
![]() This article or section is a candidate for merging with #Installation.
This article or section is a candidate for merging with #Installation.![]()
Notes: grub-mkconfig is capable of detecting that it needs the lvm module, specifying it in GRUB_PRELOAD_MODULES is not required. Move warning to #Installation & #Installation_2 or create a Known issues section and document it there. (Discuss in Talk:GRUB)
Warning: GRUB does not support thin-provisioned logical volumes.
If you use LVM for your /boot or / root partition, make sure that the lvm module is preloaded:
/etc/default/grub
GRUB_PRELOAD_MODULES="... lvm"
RAID
![]() This article or section is a candidate for merging with #Installation.
This article or section is a candidate for merging with #Installation.![]()
Notes: grub-mkconfig is capable of detecting that it needs the mdraid09 and/or mdraid1x modules, specifying them in GRUB_PRELOAD_MODULES is not required. Summarize the double grub-install in a note and move it to #Installation; move set root stuff to #Custom grub.cfg. (Discuss in Talk:GRUB)
GRUB provides convenient handling of RAID volumes. You need to load GRUB modules mdraid09 or mdraid1x to allow you to address the volume natively:
/etc/default/grub
GRUB_PRELOAD_MODULES="... mdraid09 mdraid1x"
For example, /dev/md0 becomes:
set root=(md/0)
whereas a partitioned RAID volume (e.g. /dev/md0p1) becomes:
set root=(md/0,1)
To install grub when using RAID1 as the /boot partition (or using /boot housed on a RAID1 root partition), on BIOS systems, simply run grub-install on both of the drives, such as:
# grub-install --target=i386-pc --debug /dev/sda
# grub-install --target=i386-pc --debug /dev/sdb
Where the RAID 1 array housing /boot is housed on /dev/sda and /dev/sdb.
Note: GRUB supports booting from Btrfs RAID 0/1/10, but not RAID 5/6. You may use mdadm for RAID 5/6, which is supported by GRUB.
Encrypted /boot
GRUB also has special support for booting with an encrypted /boot. This is done by unlocking a LUKS blockdevice in order to read its configuration and load any initramfs and kernel from it. This option tries to solve the issue of having an unencrypted boot partition.
Tip: /boot is not required to be kept in a separate partition; it may also stay under the system’s root / directory tree.
Warning: GRUB 2.06 has limited support for LUKS2. See the #LUKS2 section below for details.
To enable this feature encrypt the partition with /boot residing on it using LUKS as normal. Then add the following option to /etc/default/grub:
/etc/default/grub
GRUB_ENABLE_CRYPTODISK=y
This option is used by grub-install to generate the grub core.img.
Make sure to install grub after modifying this option or encrypting the partition.
Without further changes you will be prompted twice for a passphrase: the first for GRUB to unlock the /boot mount point in early boot, the second to unlock the root filesystem itself as implemented by the initramfs. You can use a keyfile to avoid this.
Warning:
- If you want to generate the main configuration file, make sure that
/bootis mounted. - In order to perform system updates involving the
/bootmount point, ensure that the encrypted/bootis unlocked and mounted before performing an update. With a separate/bootpartition, this may be accomplished automatically on boot by using crypttab with a keyfile.
Note:
- If you use a special keymap, a default GRUB installation will not know it. This is relevant for how to enter the passphrase to unlock the LUKS blockdevice. See /Tips and tricks#Manual configuration of core image for early boot.
- If you experience issues getting the prompt for a password to display (errors regarding cryptouuid, cryptodisk, or «device not found»), try reinstalling GRUB and appending
--modules="part_gpt part_msdos"to the end of yourgrub-installcommand.
Tip: You can use pacman hooks to automount your /boot when upgrades need to access related files.
LUKS2
- GRUB 2.06 has limited support for LUKS2. See GRUB bug #55093.
- Argon2id (cryptsetup default) and Argon2i PBKDFs are not supported (GRUB bug #59409), only PBKDF2 is.
grub-installdoes not support creating a core image that could be used for unlocking LUKS2. See the comments below or on grub-gitAUR for a workaround.
Tip: You can use grub-improved-luks2-gitAUR that has been patched for LUKS2 as well as Argon support.
- Use
grub-installas described in the #Installation section to populate the GRUB module directory. Do not forget to edit/etc/default/gruband rungrub-mkconfig -o /boot/grub/grub.cfg, as described above. The generated EFI binary does not support LUKS2 and will be replaced in the next step.
- Create
/boot/grub/grub-pre.cfg. ReplaceUUIDwith the LUKS encrypted device UUID. Uselvm/NameOfVolumeGroup-NameOfLogicalVolumeinstead ofcrypto0if your root drive is on an LVM logical volume inside the LUKS volume, otherwise do not changecrypto0, this is how GRUB names encrypted volumes.
/boot/grub/grub-pre.cfg
set crypto_uuid=UUID
cryptomount -u $crypto_uuid
set root=crypto0
set prefix=($root)/boot/grub
insmod normal
normal
Note: Whenever you make changes to grub-pre.cfg, you will have to do the following steps again.
Warning: If using Btrfs and /boot/grub is located on a subvolume, the prefix must include the full path from the top level Btrfs subvolume (subvolid = 5). For example, if /boot/grub is located on a subvolume called my_subvolume (subvolid ≠ 5), set the line to set prefix=($root)/my_subvolume/boot/grub. This is true even if you have set my_subvolume as default with btrfs subvolume set-default before.
- Add
lvmif you use LVM. Replaceext2withbtrfsor another filesystem module, if needed. Depending on the settings of your key slot, replacegcry_sha256withgcry_sha512orgcry_whirlpoolif need be:
$ grub-mkimage -p /boot/grub -O x86_64-efi -c grub-pre.cfg -o /tmp/grubx64.efi luks2 part_gpt cryptodisk gcry_rijndael pbkdf2 gcry_sha256 ext2
If it cannot find grub-pre.cfg, simply change to -c /boot/grub/grub-pre.cfg above.
- Copy to ESP:
# install -v /tmp/grubx64.efi esp/EFI/GRUB/grubx64.efi
If you enter an invalid passphrase during boot and end up at the GRUB rescue shell, try cryptomount -a to mount all (hopefully only one) encrypted partitions or use cryptomount -u $crypto_uuid to mount a specific one. Then proceed with insmod normal and normal as usual.
If you enter a correct passphrase, but an Invalid passphrase error is immediately returned, make sure that the right cryptographic modules are specified. Use cryptsetup luksDump /dev/nvme0n1p2 and check whether the hash function (SHA-256, SHA-512) matches the modules (gcry_sha256, gcry_sha512) installed and the PBKDF algorithm is pbkdf2. The hash and PBDKDF algorithms can be changed for existing keys by using cryptsetup luksConvertKey --hash sha256 --pbkdf pbkdf2 /dev/nvme0n1p2. Under normal circumstances it should take a few seconds before the passphrase is processed.
Custom grub.cfg
![]() This article or section needs expansion.
This article or section needs expansion.![]()
This section describes the manual creation of GRUB boot entries in /boot/grub/grub.cfg instead of relying on grub-mkconfig.
A basic GRUB config file uses the following options:
(hdX,Y)is the partition Y on disk X, partition numbers starting at 1, disk numbers starting at 0set default=Nis the default boot entry that is chosen after timeout for user actionset timeout=Mis the time M to wait in seconds for a user selection before default is bootedmenuentry "title" {entry options}is a boot entry titledtitleset root=(hdX,Y)sets the boot partition, where the kernel and GRUB modules are stored (boot need not be a separate partition, and may simply be a directory under the «root» partition (/)
Tip: These boot entries can also be used when using a /boot/grub/grub.cfg generated by grub-mkconfig. Add them to /etc/grub.d/40_custom and re-generate the main configuration file or add them to /boot/grub/custom.cfg.
For tips on managing multiple GRUB entries, for example when using both linux and linux-lts kernels, see /Tips and tricks#Multiple entries.
For Archiso and Archboot boot menu entries see Multiboot USB drive#Boot entries.
GRUB commands
menuentry "System shutdown" {
	echo "System shutting down..."
	halt
}
menuentry "System restart" {
	echo "System rebooting..."
	reboot
}
if [ ${grub_platform} == "efi" ]; then
	menuentry 'UEFI Firmware Settings' --id 'uefi-firmware' {
		fwsetup
	}
fi
EFI binaries
When launched in UEFI mode, GRUB can chainload other EFI binaries.
Tip: To show these menu entries only when GRUB is launched in UEFI mode, enclose them in the following if statement:
if [ ${grub_platform} == "efi" ]; then
	place UEFI-only menu entries here
fi
UEFI Shell
You can launch UEFI Shell by placing it in the root of the EFI system partition and adding this menu entry:
menuentry "UEFI Shell" {
	insmod fat
	insmod chain
	search --no-floppy --set=root --file /shellx64.efi
	chainloader /shellx64.efi
}
gdisk
Download the gdisk EFI application and copy gdisk_x64.efi to esp/EFI/tools/.
menuentry "gdisk" {
	insmod fat
	insmod chain
	search --no-floppy --set=root --file /EFI/tools/gdisk_x64.efi
	chainloader /EFI/tools/gdisk_x64.efi
}
Chainloading a unified kernel image
If you have a unified kernel image generated from following Secure Boot or other means, you can add it to the boot menu. For example:
menuentry "Arch Linux" {
	insmod fat
	insmod chain
	search --no-floppy --set=root --fs-uuid FILESYSTEM_UUID
	chainloader /EFI/Linux/Arch-linux.efi
}
Dual-booting
GNU/Linux
Assuming that the other distribution is on partition sda2:
menuentry "Other Linux" {
	set root=(hd0,2)
	linux /boot/vmlinuz (add other options here as required)
	initrd /boot/initrd.img (if the other kernel uses/needs one)
}
Alternatively let GRUB search for the right partition by UUID or file system label:
menuentry "Other Linux" {
        # assuming that UUID is 763A-9CB6
	search --no-floppy --set=root --fs-uuid 763A-9CB6

        # search by label OTHER_LINUX (make sure that partition label is unambiguous)
        #search --no-floppy --set=root --label OTHER_LINUX

	linux /boot/vmlinuz (add other options here as required, for example: root=UUID=763A-9CB6)
	initrd /boot/initrd.img (if the other kernel uses/needs one)
}
If the other distribution has already a valid /boot folder with installed GRUB, grub.cfg, kernel and initramfs, GRUB can be instructed to load these other grub.cfg files on-the-fly during boot. For example, for hd0 and the fourth GPT partition:
menuentry "configfile hd0,gpt4"  {
        insmod part_gpt
        insmod btrfs
        insmod ext2
        set root='hd0,gpt4'
        configfile /boot/grub/grub.cfg
}
When choosing this entry, GRUB loads the grub.cfg file from the other volume and displays that menu. Any environment variable changes made by the commands in file will not be preserved after configfile returns. Press Esc to return to the first GRUB menu.
Windows installed in UEFI/GPT mode
This mode determines where the Windows boot loader resides and chain-loads it after GRUB when the menu entry is selected. The main task here is finding the EFI system partition and running the bootloader from it.
if [ "${grub_platform}" == "efi" ]; then
	menuentry "Microsoft Windows Vista/7/8/8.1 UEFI/GPT" {
		insmod part_gpt
		insmod fat
		insmod chain
		search --no-floppy --fs-uuid --set=root $hints_string $fs_uuid
		chainloader /EFI/Microsoft/Boot/bootmgfw.efi
	}
fi
where $hints_string and $fs_uuid are obtained with the following two commands.
The $fs_uuid command determines the UUID of the EFI system partition:
# grub-probe --target=fs_uuid esp/EFI/Microsoft/Boot/bootmgfw.efi
1ce5-7f28
Alternatively one can run lsblk --fs and read the UUID of the EFI system partition from there.
The $hints_string command will determine the location of the EFI system partition, in this case harddrive 0:
# grub-probe --target=hints_string esp/EFI/Microsoft/Boot/bootmgfw.efi
--hint-bios=hd0,gpt1 --hint-efi=hd0,gpt1 --hint-baremetal=ahci0,gpt1
These two commands assume the ESP Windows uses is mounted at esp. There might be case differences in the path to Windows’s EFI file, what with being Windows, and all.
Windows installed in BIOS/MBR mode
Note: GRUB supports booting bootmgr directly and chainloading of partition boot sector is no longer required to boot Windows in a BIOS/MBR setup.
Warning: It is the system partition that has /bootmgr, not your «real» Windows partition (usually C:). The system partition’s filesystem label is System Reserved or SYSTEM and the partition is only about 100 to 549 MiB in size. See Wikipedia:System partition and boot partition for more information.
Throughout this section, it is assumed your Windows partition is /dev/sda1. A different partition will change every instance of hd0,msdos1.
In both examples XXXX-XXXX is the filesystem UUID which can be found with command lsblk --fs.
For Windows Vista/7/8/8.1/10:
if [ "${grub_platform}" == "pc" ]; then
	menuentry "Microsoft Windows Vista/7/8/8.1/10 BIOS/MBR" {
		insmod part_msdos
		insmod ntfs
		insmod ntldr
		search --no-floppy --fs-uuid --set=root --hint-bios=hd0,msdos1 --hint-efi=hd0,msdos1 --hint-baremetal=ahci0,msdos1 XXXX-XXXX
		ntldr /bootmgr
	}
fi
For Windows XP:
if [ "${grub_platform}" == "pc" ]; then
	menuentry "Microsoft Windows XP" {
		insmod part_msdos
		insmod ntfs
		insmod ntldr
		search --no-floppy --fs-uuid --set=root --hint-bios=hd0,msdos1 --hint-efi=hd0,msdos1 --hint-baremetal=ahci0,msdos1 XXXX-XXXX
		ntldr /ntldr
	}
fi
Note: In some cases, GRUB may be installed without a clean Windows 8, in which case you cannot boot Windows without having an error with bootbcd (error code 0xc000000f). You can fix it by going to Windows Recovery Console (cmd.exe from install disk) and executing:
X:> bootrec.exe /fixboot
X:> bootrec.exe /RebuildBcd
Do not use bootrec.exe /Fixmbr because it will wipe GRUB out.
Or you can use Boot Repair function in the Troubleshooting menu — it will not wipe out GRUB but will fix most errors.
Also you would better keep plugged in both the target hard drive and your bootable device ONLY. Windows usually fails to repair boot information if any other devices are connected.
Using labels
It is possible to use file system labels, human-readable strings attached to file systems, by using the --label option to search. First of all, make sure your file system has a label.
Then, add an entry using labels. An example of this:
menuentry "Arch Linux, session texte" {
  search --label --set=root archroot
  linux /boot/vmlinuz-linux root=/dev/disk/by-label/archroot ro
  initrd /boot/initramfs-linux.img
}
Using the command shell
Since the MBR is too small to store all GRUB modules, only the menu and a few basic commands reside there. The majority of GRUB functionality remains in modules in /boot/grub/, which are inserted as needed. In error conditions (e.g. if the partition layout changes) GRUB may fail to boot. When this happens, a command shell may appear.
GRUB offers multiple shells/prompts. If there is a problem reading the menu but the bootloader is able to find the disk, you will likely be dropped to the «normal» shell:
grub>
If there is a more serious problem (e.g. GRUB cannot find required files), you may instead be dropped to the «rescue» shell:
grub rescue>
The rescue shell is a restricted subset of the normal shell, offering much less functionality. If dumped to the rescue shell, first try inserting the «normal» module, then starting the «normal» shell:
grub rescue> set prefix=(hdX,Y)/boot/grub
grub rescue> insmod (hdX,Y)/boot/grub/i386-pc/normal.mod
rescue:grub> normal
GRUB supports pager for reading commands that provide long output (like the help command). This works only in normal shell mode and not in rescue mode. To enable pager, in GRUB command shell type:
sh:grub> set pager=1
Using the command shell environment to boot operating systems
grub>
The GRUB’s command shell environment can be used to boot operating systems.
A common scenario may be to boot Windows / Linux stored on a drive/partition via chainloading.
Chainloading means to load another boot-loader from the current one, ie, chain-loading.
The other bootloader may be embedded at the start of a partitioned disk (MBR), at the start of a partition or a partitionless disk (VBR), or as an EFI binary in the case of UEFI.
Chainloading a partition’s VBR
set root=(hdX,Y)
chainloader +1
boot
X=0,1,2…
Y=1,2,3…
For example to chainload Windows stored in the first partition of the first hard disk,
set root=(hd0,1)
chainloader +1
boot
Similarly GRUB installed to a partition can be chainloaded.
Chainloading a disk’s MBR or a partitionless disk’s VBR
set root=hdX
chainloader +1
boot
Chainloading Windows/Linux installed in UEFI mode
insmod fat
set root=(hd0,gpt4)
chainloader (${root})/EFI/Microsoft/Boot/bootmgfw.efi
boot
insmod fat is used for loading the FAT file system module for accessing the Windows bootloader on the EFI system partition.
(hd0,gpt4) or /dev/sda4 is the EFI system partition in this example.
The entry in the chainloader line specifies the path of the .efi file to be chain-loaded.
Normal loading
See the examples in #Using the rescue console
Using the rescue console
See #Using the command shell first. If unable to activate the standard shell, one possible solution is to boot using a live CD or some other rescue disk to correct configuration errors and reinstall GRUB. However, such a boot disk is not always available (nor necessary); the rescue console is surprisingly robust.
The available commands in GRUB rescue include insmod, ls, set, and unset. This example uses set and insmod. set modifies variables and insmod inserts new modules to add functionality.
Before starting, the user must know the location of their /boot partition (be it a separate partition, or a subdirectory under their root):
grub rescue> set prefix=(hdX,Y)/boot/grub
where X is the physical drive number and Y is the partition number.
Note: With a separate boot partition, omit /boot from the path (i.e. type set prefix=(hdX,Y)/grub).
To expand console capabilities, insert the linux module:
grub rescue> insmod i386-pc/linux.mod
or simply
grub rescue> insmod linux
This introduces the linux and initrd commands, which should be familiar.
An example, booting Arch Linux:
set root=(hd0,5)
linux /boot/vmlinuz-linux root=/dev/sda5
initrd /boot/initramfs-linux.img
boot
With a separate boot partition (e.g. when using UEFI), again change the lines accordingly:
Note: Since boot is a separate partition and not part of your root partition, you must address the boot partition manually, in the same way as for the prefix variable.
set root=(hd0,5)
linux (hdX,Y)/vmlinuz-linux root=/dev/sda6
initrd (hdX,Y)/initramfs-linux.img
boot
Note: If you experienced error: premature end of file /YOUR_KERNEL_NAME during execution of linux command, you can try linux16 instead.
After successfully booting the Arch Linux installation, users can correct grub.cfg as needed and then reinstall GRUB.
To reinstall GRUB and fix the problem completely, changing /dev/sda if needed. See #Installation for details.
GRUB removal
![]() This article or section needs expansion.
This article or section needs expansion.![]()
Reason: Migrating from BIOS booting to UEFI is not the only case where GRUB could be removed. Section needs to either cover how to remove GRUB installed for UEFI booting or it should be removed altogether as too trivial. (Discuss in Talk:GRUB)
In general, in order to remove grub, one has to do the installation steps in reverse order. Perhaps cleaning any left over at the end. However, before doing anything, one has to decide if, and how, the machine will boot after the removal. Assuming one removes grub because they would like to use another boot loader, a safe, though a bit difficult, method is to make sure the other boot loader is working before removing grub.
In any case, even when removing grub before installing another boot loader, for the UEFI case, run:
$ efibootmgr
And verify the other boot loader is listed in the BootOrder line. If grub was not removed, the other boot loader should be listed before grub. If grub is already removed, grub should not be mentioned in that line. But note this is only a necessary, but not sufficient, condition for the machine to boot with the other boot loader. Neither it is a sufficient condition for the full removal of grub.
For both UEFI and non UEFI machines, grub-install was manually run as part of the installation of grub. One of its jobs for the UEFI case was to run the equivalent of efibootmgr --create. As part of grub removal, one has to remove the products of grub-install. The opposite of efibootmgr --create is efibootmgr --delete-bootnum, or an equivalent program. One way to obtain the number of the boot entry for the efibootmgr --delete-bootnum command is from the output of efibootmgr (with no arguments).
grub-install creates the /boot/grub directory that needs to be removed manually. Though some users will want to keep it, should they want to install grub again.
After migrating to GPT/UEFI one may want to remove the MBR boot code using dd:
# dd if=/dev/zero of=/dev/sdX bs=440 count=1
Troubleshooting
Unsupported file systems
In case that GRUB does not support the root file system, an alternative /boot partition with a supported file system must be created. In some cases, the development version of GRUB grub-gitAUR may have native support for the file system.
If GRUB is used with an unsupported file system it is not able to extract the UUID of your drive so it uses classic non-persistent /dev/sdXx names instead. In this case you might have to manually edit /boot/grub/grub.cfg and replace root=/dev/sdXx with root=UUID=XXXXXXXX-XXXX-XXXX-XXXX-XXXXXXXXXXXX. You can use the blkid command to get the UUID of your device, see Persistent block device naming.
While GRUB supports F2FS since version 2.0.4, it cannot correctly read its boot files from an F2FS partition that was created with the extra_attr flag enabled.
Enable debug messages
Note: This change is overwritten when #Generate the main configuration file.
Add:
set pager=1
set debug=all
to grub.cfg.
msdos-style error message
grub-setup: warn: This msdos-style partition label has no post-MBR gap; embedding will not be possible!
grub-setup: warn: Embedding is not possible. GRUB can only be installed in this setup by using blocklists.
            However, blocklists are UNRELIABLE and its use is discouraged.
grub-setup: error: If you really want blocklists, use --force.
This error may occur when you try installing GRUB in a VMware container. Read more about it here. It happens when the first partition starts just after the MBR (block 63), without the usual space of 1 MiB (2048 blocks) before the first partition. Read #Master Boot Record (MBR) specific instructions
UEFI
Common installation errors
- If you have a problem when running grub-install with sysfs or procfs and it says you must run
modprobe efivarfsor it returns an error likeCould not prepare Boot variable: Read-only file system, try mounting the efivarfs. Also see the Gentoo Wiki on installing the boot loader. - Without
--targetor--directoryoption, grub-install cannot determine for which firmware to install. In such casesgrub-installwill printsource_dir does not exist. Please specify --target or --directory. - If after running grub-install you are told your partition does not look like an EFI partition then the partition is most likely not
Fat32.
Create a GRUB entry in the firmware boot manager
grub-install automatically tries to create a menu entry in the boot manager. If it does not, then see UEFI#efibootmgr for instructions to use efibootmgr to create a menu entry. However, the problem is likely to be that you have not booted your CD/USB in UEFI mode, as in UEFI#Create UEFI bootable USB from ISO.
As another example of creating a GRUB entry in the firmware boot manager, consider efibootmgr -c. This assumes that /dev/sda1 is the EFI System Partition, and is mounted at /boot/efi. Which are the default behavior of efibootmgr. It creates a new boot option, called «Linux», and puts it at the top of the boot order list. Options may be passed to modify the default behavior. The default OS Loader is EFIarchgrub.efi.
Drop to rescue shell
If GRUB loads but drops into the rescue shell with no errors, it can be due to one of these two reasons:
- It may be because of a missing or misplaced
grub.cfg. This will happen if GRUB UEFI was installed with--boot-directoryandgrub.cfgis missing, - It also happens if the boot partition, which is hardcoded into the
grubx64.efifile, has changed.
GRUB UEFI not loaded
An example of a working UEFI:
# efibootmgr -v
BootCurrent: 0000
Timeout: 3 seconds
BootOrder: 0000,0001,0002
Boot0000* GRUB HD(1,800,32000,23532fbb-1bfa-4e46-851a-b494bfe9478c)File(EFIGRUBgrubx64.efi)
Boot0001* Shell HD(1,800,32000,23532fbb-1bfa-4e46-851a-b494bfe9478c)File(shellx64.efi)
Boot0002* Festplatte BIOS(2,0,00)P0: SAMSUNG HD204UI
If the screen only goes black for a second and the next boot option is tried afterwards, according to this post, moving GRUB to the partition root can help. The boot option has to be deleted and recreated afterwards. The entry for GRUB should look like this then:
Boot0000* GRUB HD(1,800,32000,23532fbb-1bfa-4e46-851a-b494bfe9478c)File(grubx64.efi)
Default/fallback boot path
Some UEFI firmwares require a bootable file at a known location before they will show UEFI NVRAM boot entries. If this is the case, grub-install will claim efibootmgr has added an entry to boot GRUB, however the entry will not show up in the VisualBIOS boot order selector. The solution is to install GRUB at the default/fallback boot path:
# grub-install --target=x86_64-efi --efi-directory=esp --removable
Alternatively you can move an already installed GRUB EFI executable to the default/fallback path:
# mv esp/EFI/grub esp/EFI/BOOT
# mv esp/EFI/BOOT/grubx64.efi esp/EFI/BOOT/BOOTX64.EFI
Invalid signature
If trying to boot Windows results in an «invalid signature» error, e.g. after reconfiguring partitions or adding additional hard drives, (re)move GRUB’s device configuration and let it reconfigure:
# mv /boot/grub/device.map /boot/grub/device.map-old
# grub-mkconfig -o /boot/grub/grub.cfg
grub-mkconfig should now mention all found boot options, including Windows. If it works, remove /boot/grub/device.map-old.
Boot freezes
If booting gets stuck without any error message after GRUB loading the kernel and the initial ramdisk, try removing the add_efi_memmap kernel parameter.
Arch not found from other OS
Some have reported that other distributions may have trouble finding Arch Linux automatically with os-prober. If this problem arises, it has been reported that detection can be improved with the presence of /etc/lsb-release. This file and updating tool is available with the package lsb-release.
Warning when installing in chroot
When installing GRUB on a LVM system in a chroot environment (e.g. during system installation), you may receive warnings like
/run/lvm/lvmetad.socket: connect failed: No such file or directory
or
WARNING: failed to connect to lvmetad: No such file or directory. Falling back to internal scanning.
This is because /run is not available inside the chroot. These warnings will not prevent the system from booting, provided that everything has been done correctly, so you may continue with the installation.
GRUB loads slowly
GRUB can take a long time to load when disk space is low. Check if you have sufficient free disk space on your /boot or / partition when you are having problems.
error: unknown filesystem
GRUB may output error: unknown filesystem and refuse to boot for a few reasons. If you are certain that all UUIDs are correct and all filesystems are valid and supported, it may be because your BIOS Boot Partition is located outside the first 2 TiB of the drive [1]. Use a partitioning tool of your choice to ensure this partition is located fully within the first 2 TiB, then reinstall and reconfigure GRUB.
This error might also be caused by an ext4 filesystem having unsupported features set:
large_dir— unsupported.metadata_csum_seed— will be supported in GRUB 2.11 (commit).
Warning: Make sure to check GRUB support for new file system features before you enable them on your /boot file system.
grub-reboot not resetting
GRUB seems to be unable to write to root Btrfs partitions [2]. If you use grub-reboot to boot into another entry it will therefore be unable to update its on-disk environment. Either run grub-reboot from the other entry (for example when switching between various distributions) or consider a different file system. You can reset a «sticky» entry by executing grub-editenv create and setting GRUB_DEFAULT=0 in your /etc/default/grub (do not forget grub-mkconfig -o /boot/grub/grub.cfg).
Old Btrfs prevents installation
If a drive is formatted with Btrfs without creating a partition table (eg. /dev/sdx), then later has partition table written to, there are parts of the BTRFS format that persist. Most utilities and OS’s do not see this, but GRUB will refuse to install, even with —force
# grub-install: warning: Attempting to install GRUB to a disk with multiple partition labels. This is not supported yet..
# grub-install: error: filesystem `btrfs' does not support blocklists.
You can zero the drive, but the easy solution that leaves your data alone is to erase the Btrfs superblock with wipefs -o 0x10040 /dev/sdx
Windows 8/10 not found
A setting in Windows 8/10 called «Hiberboot», «Hybrid Boot» or «Fast Boot» can prevent the Windows partition from being mounted, so grub-mkconfig will not find a Windows install. Disabling Hiberboot in Windows will allow it to be added to the GRUB menu.
VirtualBox EFI mode
For VirtualBox < 6.1, install GRUB to the default/fallback boot path.
See also VirtualBox#Installation in EFI mode on VirtualBox < 6.1.
GRUB rescue and encrypted /boot
When using an encrypted /boot, and you fail to input a correct password, you will be dropped in grub-rescue prompt.
This grub-rescue prompt has limited capabilities. Use the following commands to complete the boot:
grub rescue> cryptomount <partition>
grub rescue> insmod normal
grub rescue> normal
See this blog post for a better description.
Check /etc/default/grub if GRUB_TIMEOUT is set to 0, in which case set it to a positive number: it sets the number of seconds before the default GRUB entry is loaded. Also check if GRUB_TIMEOUT_STYLE is set to hidden and set it to menu, so that the menu will be shown by default. Then regenerate the main configuration file and reboot to check if it worked.
See also
- Wikipedia:GNU GRUB
- Official GRUB Manual
- Ubuntu wiki page for GRUB
- GRUB wiki page describing steps to compile for UEFI systems
- Wikipedia:BIOS Boot partition
- How to configure GRUB
- Detecting efi files and booting them from grub
I have Windows 10 HOME installed on my system. After I installed Windows 10 HOME, I installed Ubuntu 14.04 LTS on a separate partition so that I could dual boot.
I removed Ubuntu 14.04 LTS by deleting the partition it was installed on. Now I am unable to start my system. At boot, my system stops at the Grub command line.
I want to boot to my Windows 10 installation which I haven’t removed from my system.
This is displayed at startup:
GNU GRUB version 2.02 beta2-9ubuntu1.3 <br>
minimal BASH-like editing is supported.for the first word, TAB lists
possible commands completions.anywhere else TAB lists the possible device or file completion.
grub>
How can I boot my Windows partition from this grub command?
![]()
roaima
98.7k14 gold badges125 silver badges238 bronze badges
asked Feb 1, 2016 at 13:01
![]()
The following worked for me with a GPT partitioned disk.
insmod part_gpt
insmod chain
set root=(hd0,gpt1)
chainloader /EFI/Microsoft/Boot/bootmgfw.efi
boot
Note that you can enter a command line from the grub boot menu and just type commands as above to test out different combinations.
You need to enter the id of the EFI boot partition (not the windows partition) for the set root= command.
In the command line grub mode ls will list the hard drive partitions, help lists available commands.
Once you have set the root correctly you can ls / to view files and directories to find the correct path to the windows boot manager if it is not in the default location.
answered Mar 9, 2018 at 21:46
![]()
79E0979679E09796
6405 silver badges4 bronze badges
4
Just enter the command exit. It should take you to another menu that makes you select the Windows bootloader.
Worked on Lenovo Y50
![]()
AdminBee
20.8k17 gold badges47 silver badges69 bronze badges
answered Nov 7, 2017 at 18:44
![]()
adonayresomadonayresom
6395 silver badges6 bronze badges
7
Guesing you have an UEFI device, the windows bootloader is still installed. You can select it back in UEFI setup menu under boot, where you will prbably have two options (GRUB and the old default as the second), delete the first one or switch the order.
answered Feb 5, 2016 at 9:00
![]()
AlkoAlko
9121 gold badge7 silver badges17 bronze badges
1
This answer is for those with UEFI who have deleted the Ubuntu partitions before removing grub
You will be doing this from Windows 10. No bootable media required.
Where
bootrec /fixmbr,bootsect /nt60and the Ubuntu live with theboot-repairsuggestions have failed, this has worked for me:(This answer borrowed verbatim from here)
- Run a
cmd.exeprocess with administrator privileges- Run
diskpart- Type:
list diskthensel disk Xwhere X is the drive your boot files reside on- Type
list volto see all partitions (volumes) on the disk- Select the EFI volume by typing:
sel vol Ywhere Y is theSYSTEMvolume (this is almost always the EFI partition)- For convenience, assign a drive letter by typing:
assign letter=Z:where Z is a free (unused) drive letter- Type
exitto leave disk part- While still in the
cmdprompt, type:Z:and hit enter, where Z was the drive letter you just created.- Type
dirto list directories on this mounted EFI partition- If you are in the right place, you should see a directory called
EFI- Type
cd EFIand thendirto list the child directories insideEFI- Type
rmdir /S ubuntuto delete the ubuntu boot directoryAssuming you only ever had two operating systems (Win 10 & Ubuntu) you should now be able to boot directly to Windows without hitting the black grub screen.
Copied from https://askubuntu.com/questions/429610/uninstall-grub-and-use-windows-bootloader
![]()
answered Sep 4, 2018 at 22:58
![]()
sa mysa my
711 silver badge1 bronze badge
1
Just exit the grub by typing exit and go to bios setup and restore to default settings and restart the computer.
![]()
AdminBee
20.8k17 gold badges47 silver badges69 bronze badges
answered Dec 8, 2018 at 7:01
![]()
0
I recently bumped into the same problem. (i.e. originally have a a separate partition with Ubuntu installed, dual bootable from a grub menu. I then deleted that Ubuntu partition from Windows disk management, and when I rebooted, just the grub command menu).
What I did to get back to my Windows 10:
- Do a
Ctrl+Alt+Deleteto reboot. While rebooting, hold down theshiftbutton. - My PC then give me to option to press
F12for boot option. I clickedF12, and it gives me back a menu with Windows boot manager on it. - I selected the Windows boot manager and click enter. I’m now back to Windows 10.
answered May 29, 2017 at 16:35
![]()
Atlas7Atlas7
1113 bronze badges
This worked for me, now I have to find a way to permanently fix the mbr.
I recently bumped into the same problem. (i.e. originally have a a separate partition with Ubuntu installed, dual bootable from a grub menu. I then deleted that Ubuntu partition from Windows disk management, and when I rebooted, just the grub command menu).
What I did to get back to my Windows 10:
Do a Ctrl+Alt+Delete to reboot. While rebooting, hold down the shift button.
My PC then give me to option to press F12 for boot option. I clicked F12, and it gives me back a menu with Windows boot manager on it.
I selected the Windows boot manager and click enter. I’m now back to Windows 10.
![]()
answered Aug 26, 2017 at 19:18
![]()
Try this, its worked in my case:
grub> exit
You will get a list of operating systems installed. Select one.
answered Feb 21, 2020 at 4:37
![]()
2
Try this:
rootnoverify (hd0,0)
chainloader +1
makeactive
boot
![]()
techraf
5,64710 gold badges33 silver badges50 bronze badges
answered Nov 23, 2016 at 1:10
![]()
Для выбора и запуска операционной системы во время загрузки компьютера используется специализированная программа — загрузчик. Самый популярный загрузчик — Grub. При установке нескольких операционных систем, например, Linux поверх Windows, в меню загрузчика первой будет последняя установленная ОС.
Это не вызовет проблем у пользователей, которые пользуются Linux как основной системой, для них это даже более предпочтительный вариант. Но если вы еще новичок, и хотите использовать Linux второй системой, а Windows пока еще основной, до тех пор, пока не освоитесь, то наверное захотите чтобы первой была Windows. В этой статье мы рассмотрим как сделать загрузку Windows первой в Grub. Рассмотрим два способа: с помощью программы Grub Customizer и вручную, через файлы конфигурации загрузчика Grub.
Grub Customizer
Grub Customizer — это программа, позволяющая настраивать различные параметры загрузчика Grub. В том числе и положение и очередность пунктов загрузки. Установить программу можно из официальных репозиториев. Например, в Ubuntu нужно использовать ppa:
sudo add-apt-repository ppa:danielrichter2007/grub-customizer
sudo apt-get update
sudo apt-get install grub-customizer
Для запуска программы откройте терминал (Ctrl + Alt + T) и наберите grub-customizer:
grub-customizer
Для работы программы необходимы права root, в некоторых системах возможно придется использовать такую команду:
gksu grub-customizer
Также программу можно запустить из главного меню. Главное окно выглядит вот так:
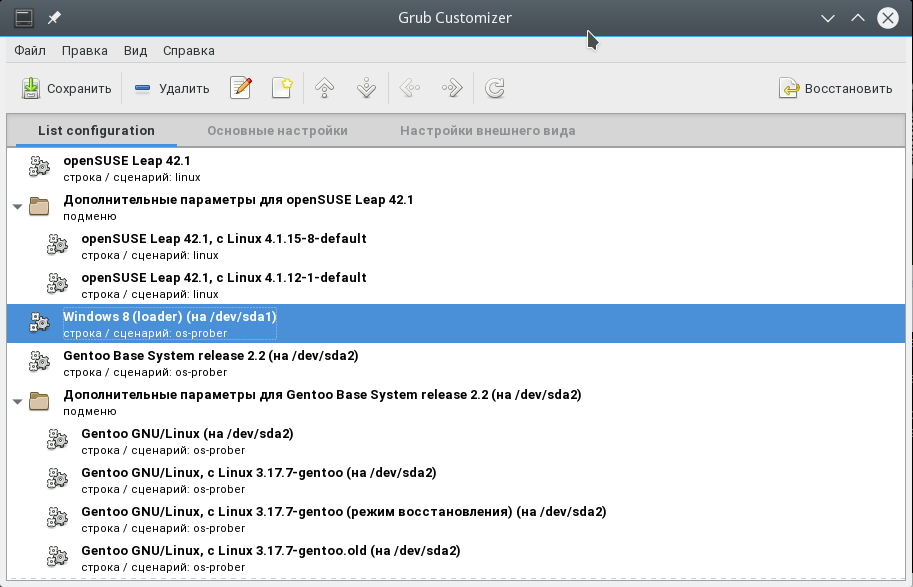
Несколько секунд после запуска программа будет сканировать установленные операционные системы, затем в этом же окне мы сможем перенести загрузку Windows на первое место. Для этого кликните на нужном пункте правой кнопкой чтобы открылось контекстное меню:
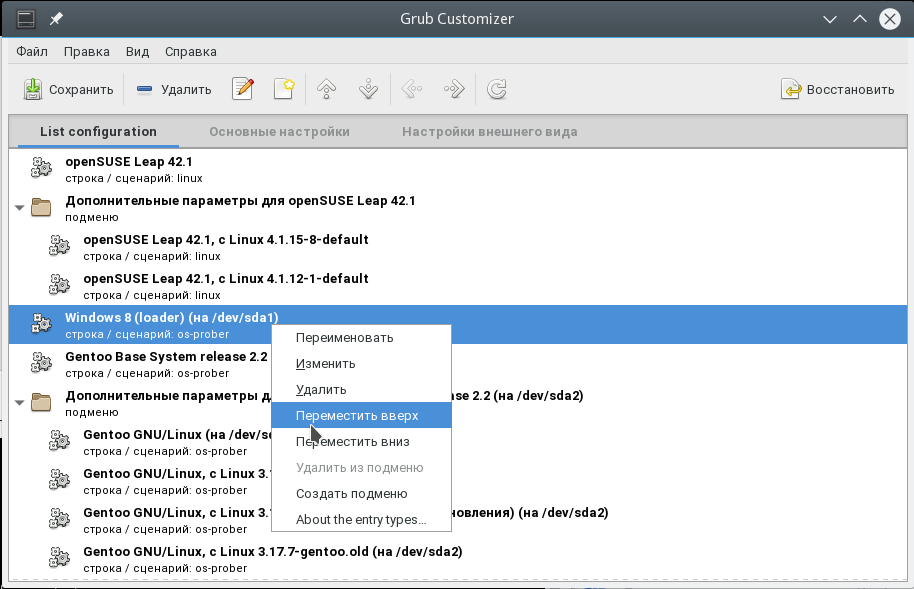
В меню выберите пункт Переместить вверх. Это действие нужно будет повторить несколько раз, пока Windows не будет первой в списке. Теперь будет выполняться загрузка windows по умолчанию grub.
Если потом вы захотите опустить Windows обратно вниз, есть обратное действие — Переместить вниз.
Для сохранения настроек просто нажмите кнопку Сохранить. Готово. Можете перезагружать компьютер и смотреть что получилось.
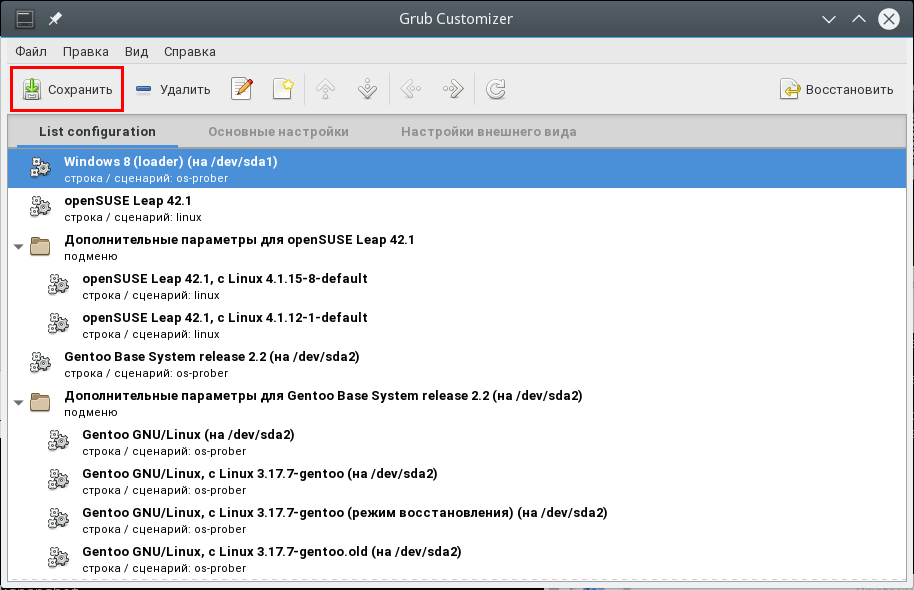
Но я хочу затронуть еще пару настроек, которые могут быть полезны. Вместо того чтобы делать загрузку Windows первой в Grub, можно изменить пункт запускаемый по умолчанию. Перейдите на вкладку Основные настройки:
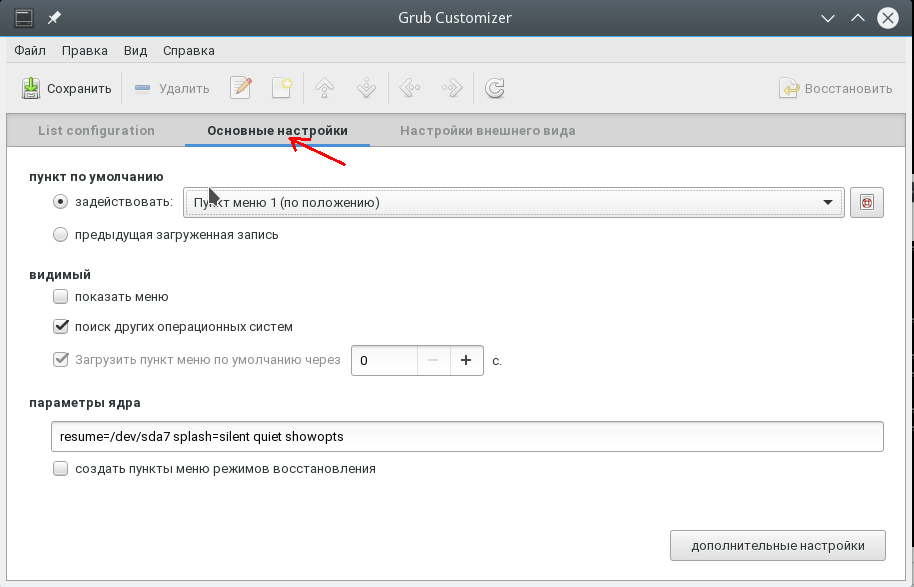
Здесь для выбора пункта по умолчанию используемого по умолчанию есть список Задействовать:
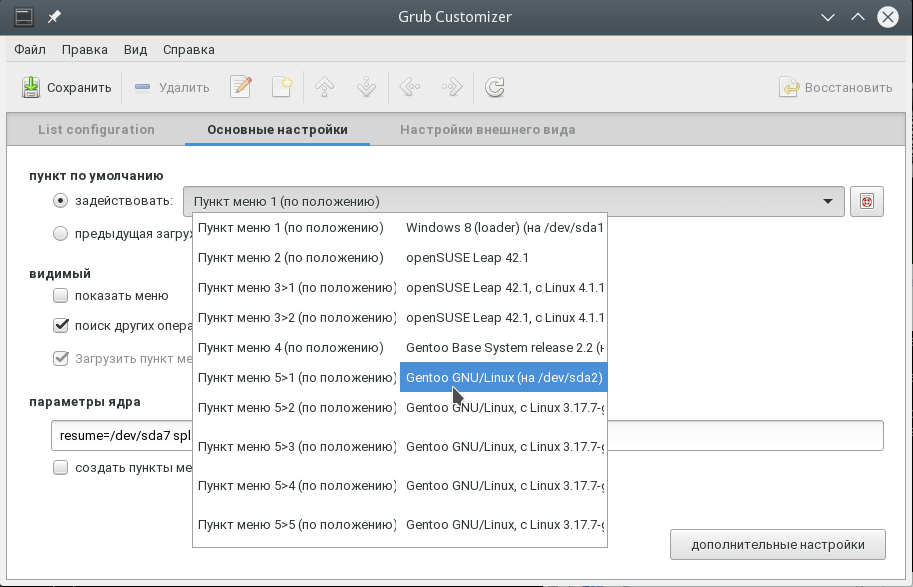
Кроме того, можно загружать по умолчанию последнюю загруженную ОС, для этого есть галочка:
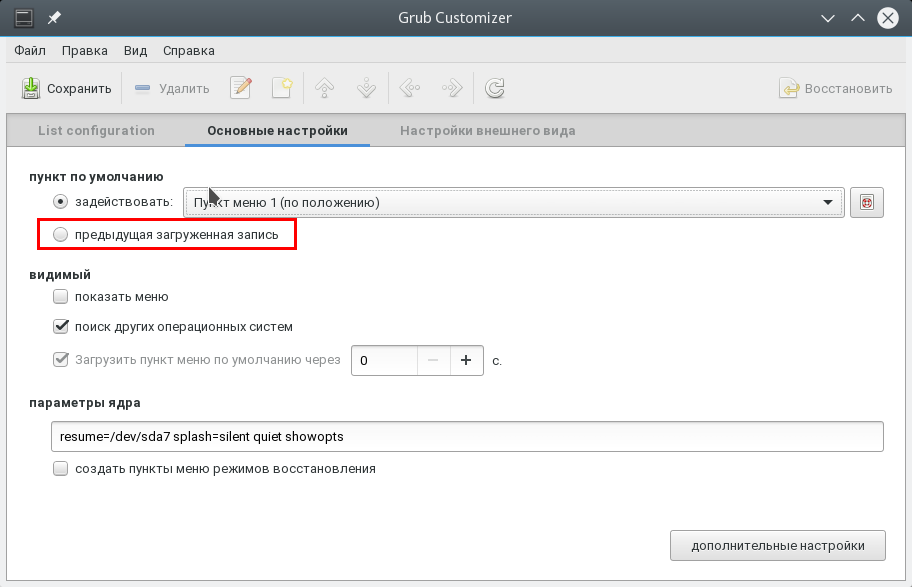
Не забудьте снова нажать кнопку сохранить.
Как я и обещал, теперь рассмотрим как сделать загрузку WIndows первой в Grub с помощью конфигурационных файлов. Конфигурация Grub находится в файле /boot/grub/grub.cfg.
sudo gedit /boot/grub/grub.cfg
Как правило, строки меню выглядят вот так:
menuentry имя_пункта --опции {

...

}
Например пункт Windows:
menuentry 'Windows 8 (loader) (on /dev/sda1)' --class windows --class os $menuentry_id_option 'osprob

er-chain-FC324E26324DE66C' {

....

}
Теперь чтобы изменить порядок пунктов меню достаточно вырезать все до обратной закрывающей скобочки, вместе с этой строкой, и вставить перед всеми другими пунктами. Затем можно сохранить файл и готово. Перезагружайте и смотрите. Загрузка Windows выполняется по умолчанию. Только минусом данного способа является то, что при обновлении конфигурации Grub все настройки собьются.
Аналогично тому как мы настраивали пункт, загружаемый по умолчанию в Grub Customizer, это можно сделать и в терминале. Откройте файл /etc/default/grub.
gksu gedit /etc/default/grub
Здесь нас интересует строчка:
GRUB_DEFAULT=0
Замените 0, на нужный пункт для загрузки, также вместо цифры можно указать имя пункта, например:
GRUB_DEFAULT="Windows 8 (loader) (on /dev/sda1)"
Посмотреть доступные пункты загрузки не открывая файл конфигурации можно командой:
sudo grep menuentry /boot/grub/grub.cfg
Еще можно настроить загрузку последней загруженной системы, для этого добавьте строчку
GRUB_SAVEDEFAULT=true
А в GRUB_DEFAULT укажите saved:
GRUB_DEFAULT=saved
Очевидным плюсом этого способа есть то, что настройки во время обновления конфигурации Grub не собьются, так как во время обновления информация берется из этого файла. Теперь давайте обновим конфигурацию и сохраним настройки командой:
grub-update
Не во всех системах работает такой вариант, поэтому можно использовать другую команду:
grub2-mkconfig -o /boot/grub/grub.cfg
Вот и все. Теперь вы знаете как сделать загрузку Windows первой в Grub. Но представленную в этой статье информацию можно использовать в более широких целях. Она будет полезна не только для Windows, но и для любых других нескольких систем, очередностью загрузки которых нужно управлять.

Статья распространяется под лицензией Creative Commons ShareAlike 4.0 при копировании материала ссылка на источник обязательна .
В этой статье расскажем новичкам, как настроить загрузчик GRUB, чтобы Windows была первой для загрузки, а также настроим таймер выбора ОС!
И так вы установили Ubuntu или другой Linux дистрибутив рядом с Windows? Наверняка вы заметили что при запуске компьютера теперь отображается меню со списком операционных систем, если ничего не выбрать, то начнет автоматически загружаться Ubuntu.
Как сделать загрузку Windows первой в Grub и таймер выбора операционных систем длился не 10 секунд, а например 5?
При включении компьютера сфотографируйте меню со списком операционных систем.
- Запустите Ubuntu и откройте программу «Терминал»
- Введите следующую команду
sudo nano /etc/default/grub - В терминале появиться текстовый файл отвечающий за запуск ОС
Строка GRUB_DEFAAULT — отвечает за то, какая операционная система будет загружена. Отчет начинается с 0, а не 1!
Поэтому смотрим на список ОС в меню GRUB при запуске, который вы сделали в начале и выставляем в GRUB_DEFAAULT= необходимую цифру.
Для того чтобы меню загрузчика Grub отображалось гораздо меньше, необходимо изменить строку GRUB_TIMEOUT=10, где 10 это количество секунд. Выставляем необходимое значение.
Чтобы сохранить изменения внесенные в текстовый файл Grub необходимо:
- Нажимаем комбинацию CTRL+O, а затем ENTER
- Нажимаем комбинацию CTRL+X
Теперь необходимо обновить загрузчик GRUB:
sudo update-grubТеперь при следующей загрузке. Windows будет загружаться первой.
Единственным недостатком такой настройки является то, что при установке новых ядер Linux, список будет сбиваться, придется все перенастраивать.
Способ 2 как сделать загрузку Windows первой в Grub
- Запустите Ubuntu и откройте программу «Терминал»
- Введите команду
grep menuentry /boot/grub/grub.cfgпосле чего у вас появиться список - Скопируйте значения ‘Windows …’ (вместо точек название ОС и путь подключения)

- Введите следующую команду
sudo nano /etc/default/grub - В строке GRUB_DEFAAULT= вместо цифры ставьте скопированные данные в двойных кавычках.
НапримерGRUB_DEFAAULT="Windows 7 (loader) (on /dev/sda1)"
- Сохраняем изменения:
- Нажимаем комбинацию CTRL+O, а затем ENTER
- Нажимаем комбинацию CTRL+X
- Теперь необходимо обновить загрузчик GRUB:


sudo update-grubТеперь при следующей загрузке. Windows будет загружаться первой.
У вас еще остались вопросы? Пишите их в комментариях, рассказывайте, что у вас получилось или наоборот!
Вот и все! Больше полезных статей и инструкций читайте в разделе Статьи и Хаки Android. Оставайтесь вместе с сайтом Android +1, дальше будет еще интересней!