Сегодня мы с Вами научимся устанавливать веб сервер IIS в операционной системе Windows Server 2016 нескольким способами, а именно с помощью графического инструмента и, конечно же, с помощью Windows PowerShell.
Содержание
- Что такое IIS 10?
- Версии веб сервера IIS
- Установка Web сервера IIS 10
- Установка веб сервера IIS с помощью мастера
- Установка web сервера IIS с помощью Windows PowerShell
- Размещаем HTML сайт на веб сервере IIS
- Удаление веб сервера IIS с помощью мастера
- Удаление web сервера IIS с помощью PowerShell
IIS (Internet Information Services) — это набор служб, предназначенный для реализации web сервера в операционной системе Windows с поддержкой сайтов HTML и приложений на ASP.NET или ASP. В Windows Server он распространяется в виде отдельной роли с достаточно большим количеством служб роли. Ранее в материале «Описание и назначение ролей сервера в Windows Server 2016» мы рассмотрели краткое описание всех ролей сервера и их служб, в том числе и роли «Веб-сервер (IIS)» поэтому повторяться сейчас, т.е. описывать каждую из служб роли, я не буду.
В актуальной на данный момент версии серверной операционной системе Windows Server 2016 присутствует также самая новая версия веб сервера, а именно – IIS 10.
Версии веб сервера IIS
| Версия IIS | Версия операционной системы |
| 10 | Windows 10; Windows Server 2016 |
| 8.5 | Windows 8.1; Windows Server 2012 R2 |
| 8.0 | Windows 8; Windows Server 2012 |
| 7.5 | Windows 7; Windows Server 2008 R2 |
| 7.0 | Windows Vista; Windows Server 2008 |
| 6.0 | Windows Server 2003 |
| 5.1 | Windows XP Professional |
| 5.0 | Windows 2000 |
Установка Web сервера IIS 10
Итак, давайте переходить к рассмотрению процесса установки, и для примера давайте просто установим основные компоненты, которые необходимы для функционирования веб сервера и его администрирования (средства управления), а также разместим на нем простую HTML страничку, т.е. по сути HTML сайт, для проверки работы web сервера. Если Вам необходимо размещать приложения, например на ASP.NET, то Вам необходимо также установить соответствующие службы роли из раздела «Разработка приложений».
Установка веб сервера IIS с помощью мастера
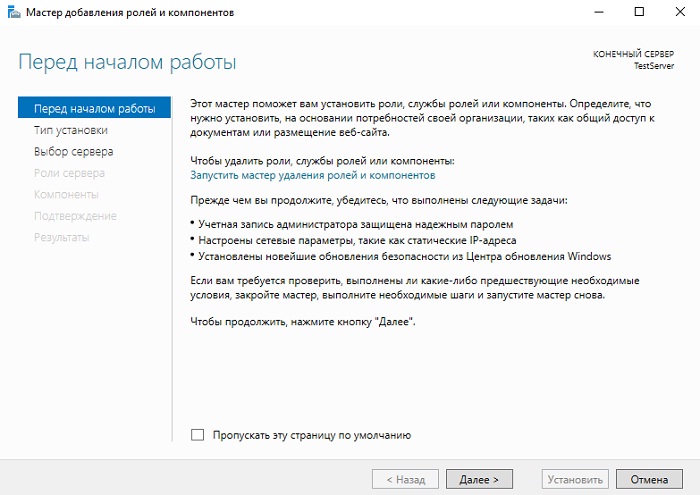
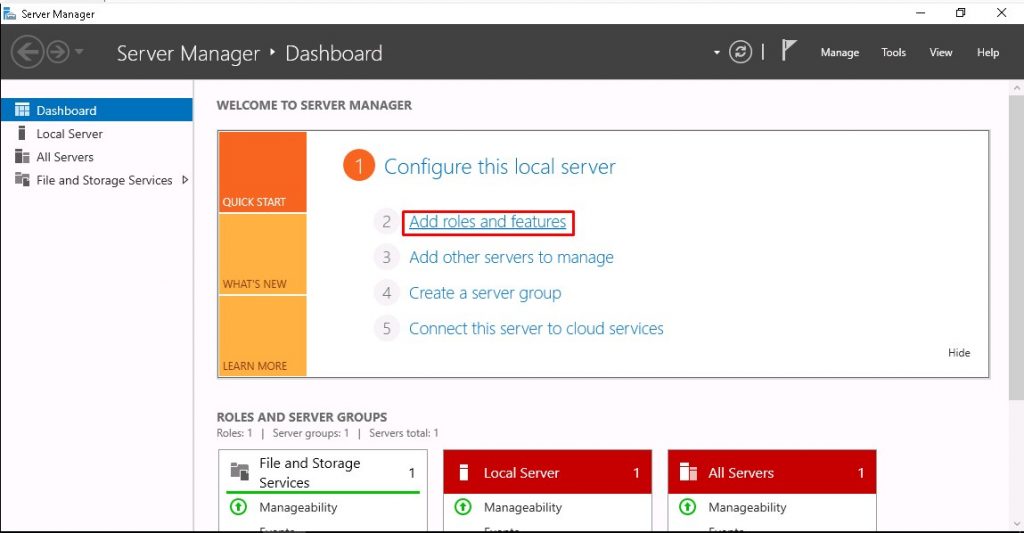
Сначала давайте разберем процесс установки web сервера IIS 10 с помощью «Диспетчера серверов», а конкретней «Мастера добавления ролей и компонентов».
Шаг 1
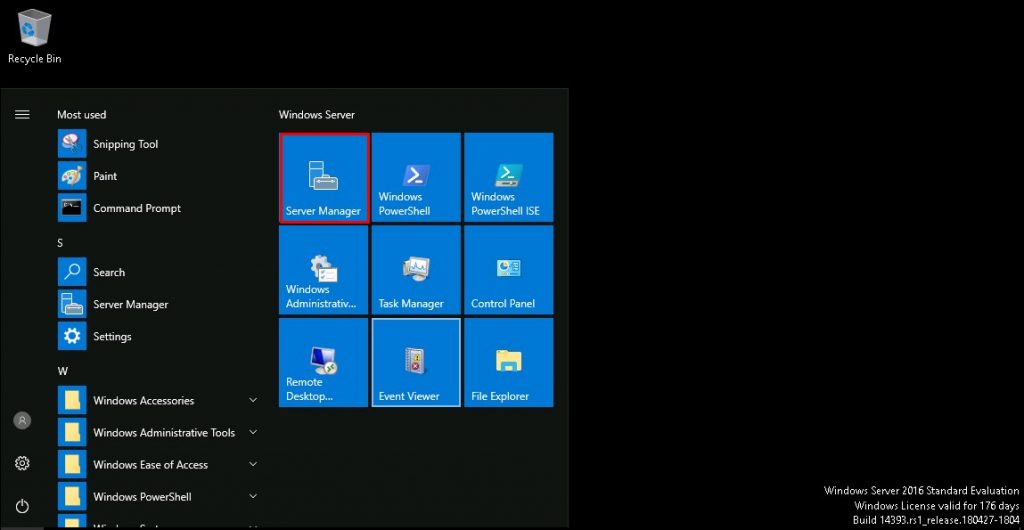
Открываем диспетчер серверов «Пуск ->Диспетчер серверов».
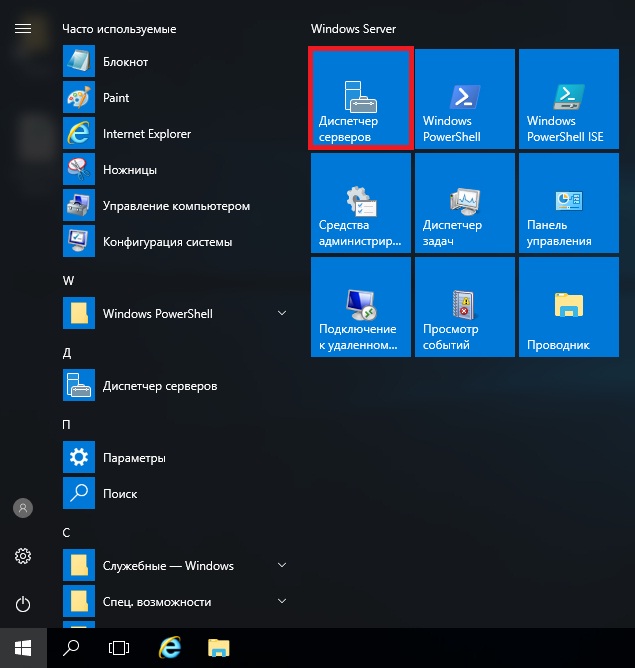
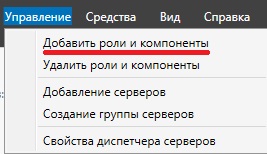
Затем запускаем «Мастер добавления ролей и компонентов», меню «Управление ->Добавить роли и компоненты».
Шаг 2
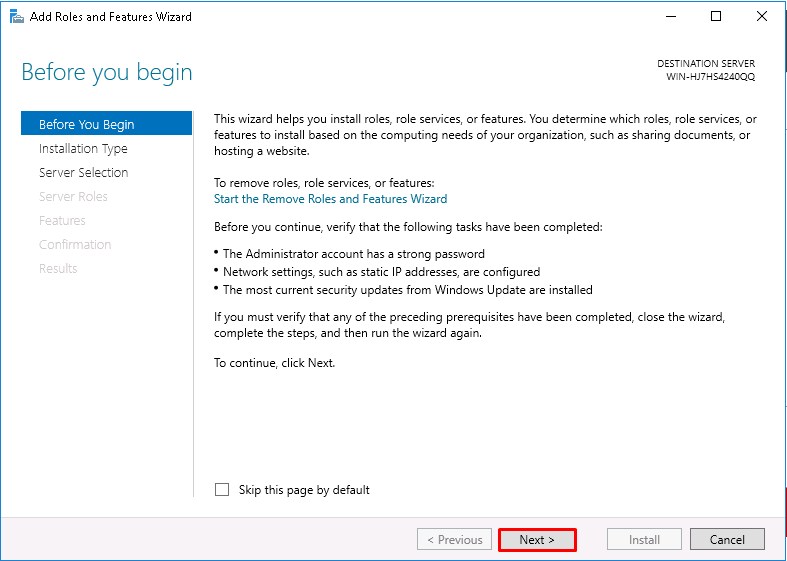
Затем жмем «Далее».
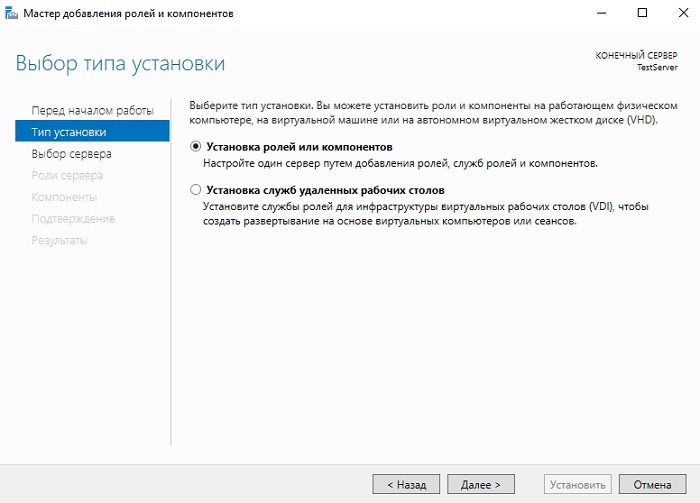
Шаг 3
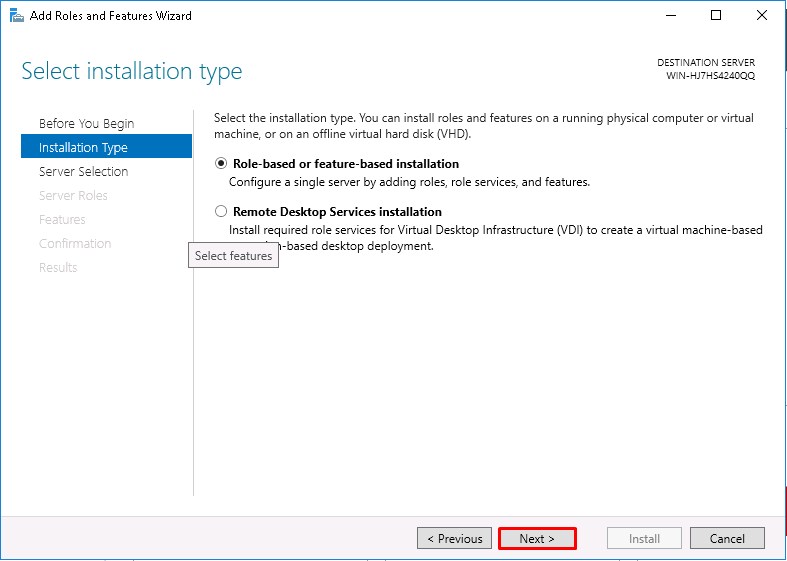
Потом выбираем тип установки «Установка ролей или компонентов», жмем «Далее».
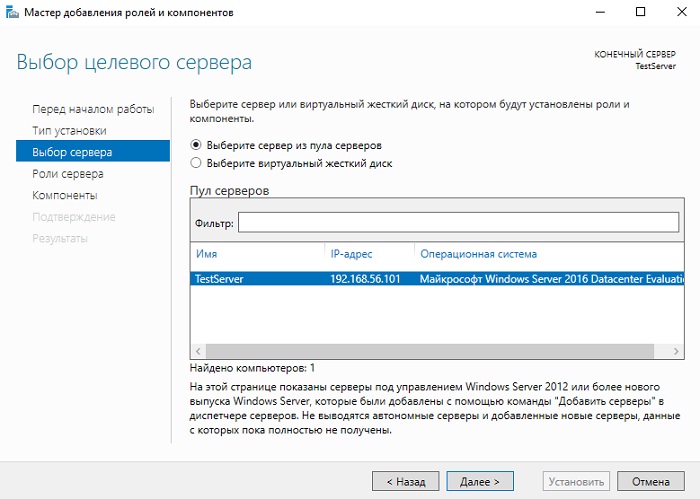
Шаг 4
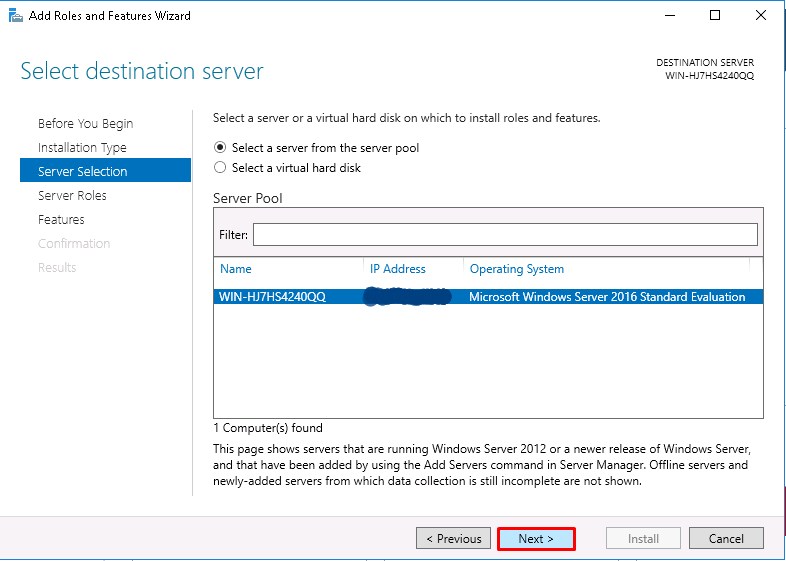
Затем выбираем целевой сервер и жмем «Далее».
Шаг 5
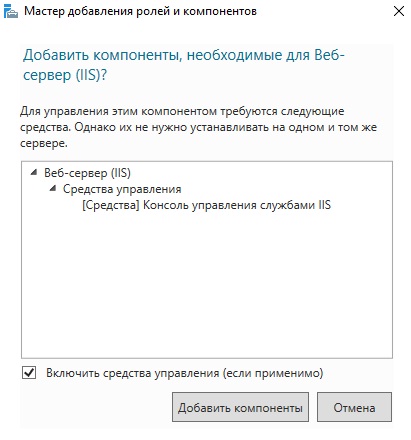
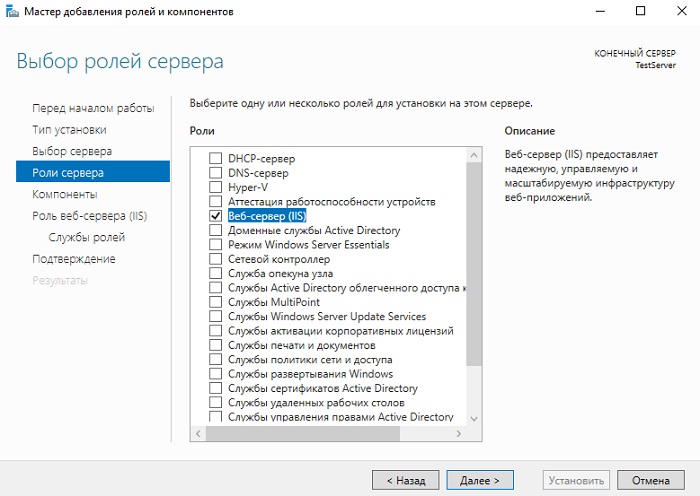
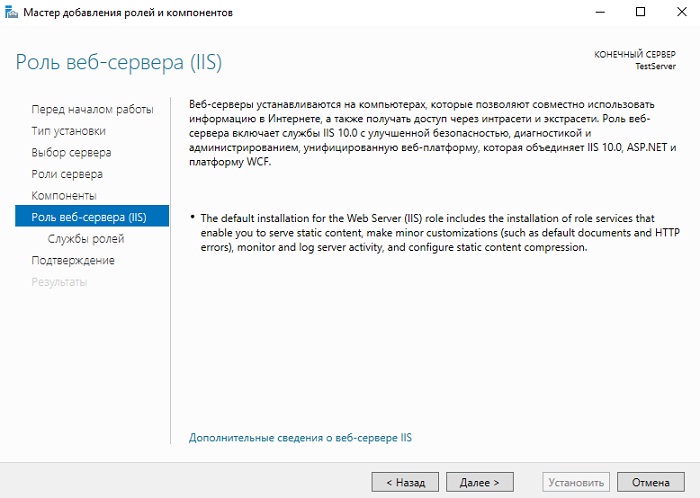
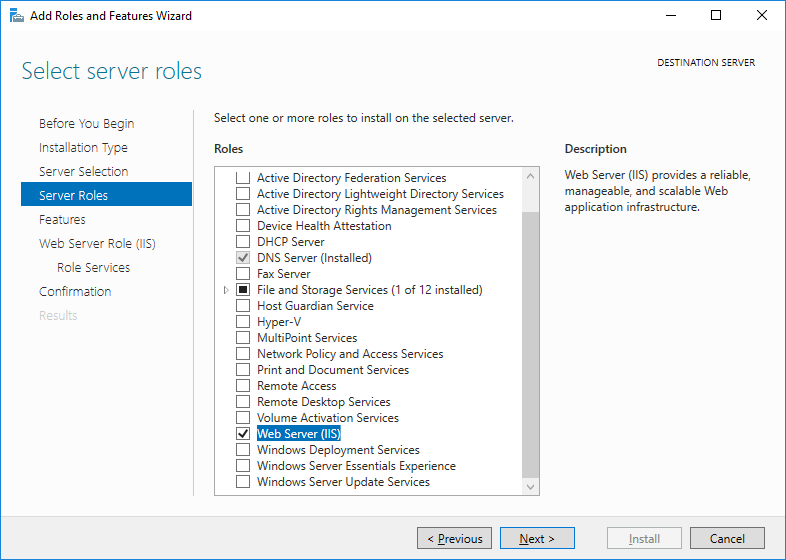
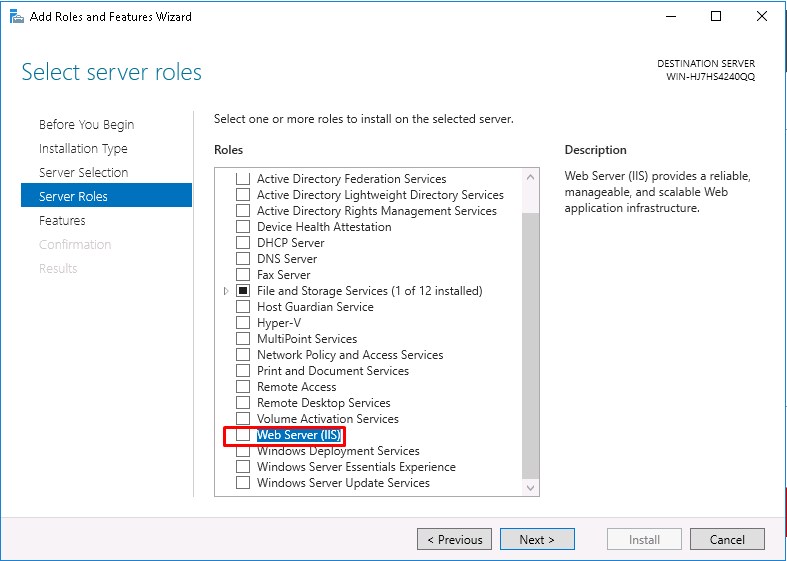
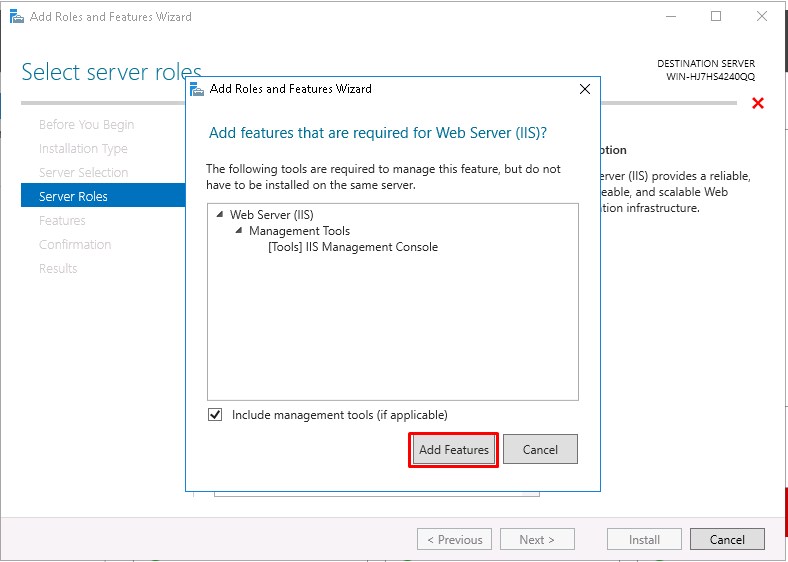
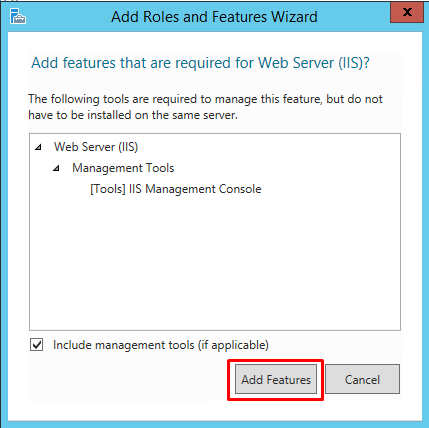
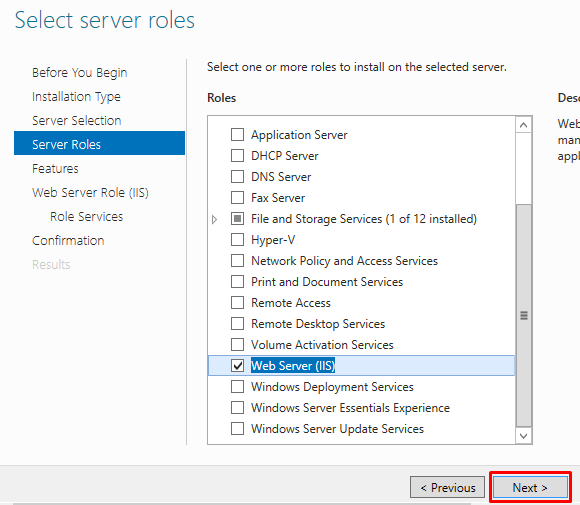
На шаге выбора ролей отмечаем роль «Веб-сервер (IIS)». Автоматически Вам сразу предложат установить компонент «Консоль управления службами IIS», мы соглашаемся и жмем «Добавить компоненты».
И сразу жмем «Далее».
Шаг 6
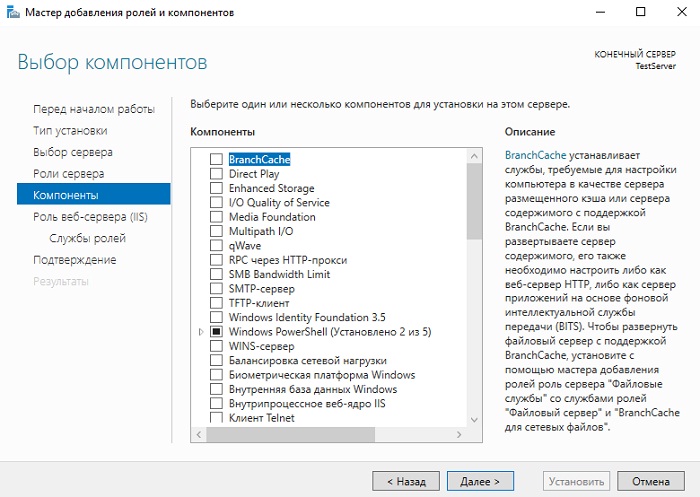
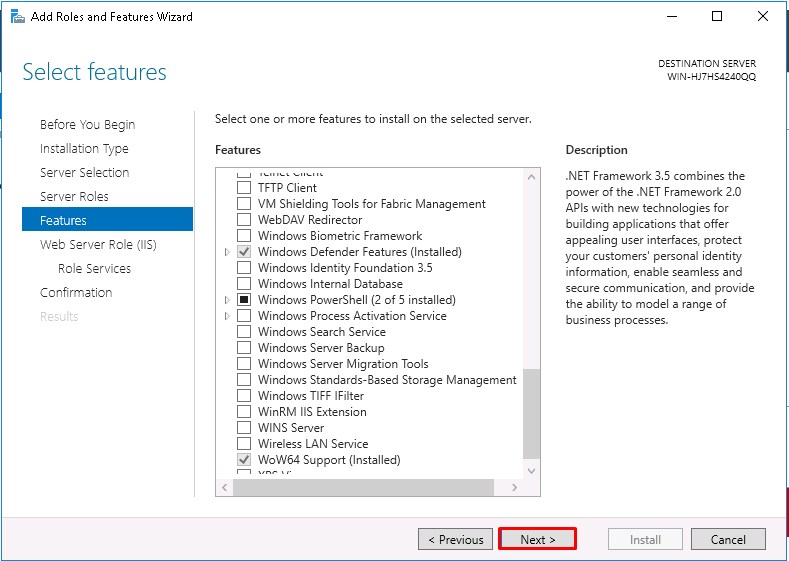
Все необходимые компоненты мы уже отметили, поэтому на этом шаге также сразу жмем «Далее».
Шаг 7
Теперь нам необходимо настроить установку роли «Веб-сервер IIS», сначала жмем «Далее».
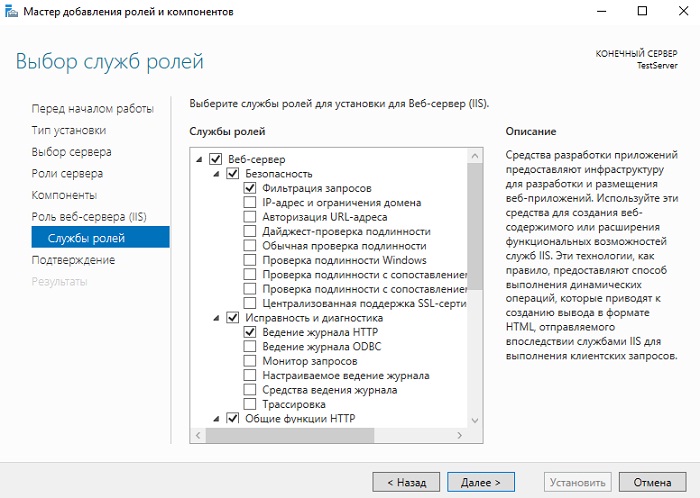
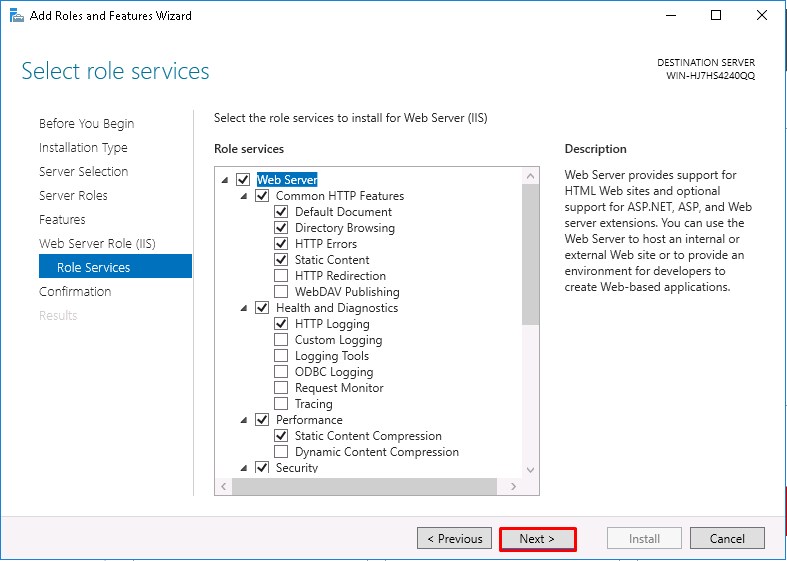
А потом выбираем необходимые службы роли, по умолчанию минимальное количество служб уже будет выбрано, но если Вам нужно что-то еще, то отмечаете их галочкой. Для нашей тестовой задачи, т.е. разместить простой статический HTML сайт, отмеченных по умолчанию служб будет достаточно, жмем «Далее».
Шаг 8
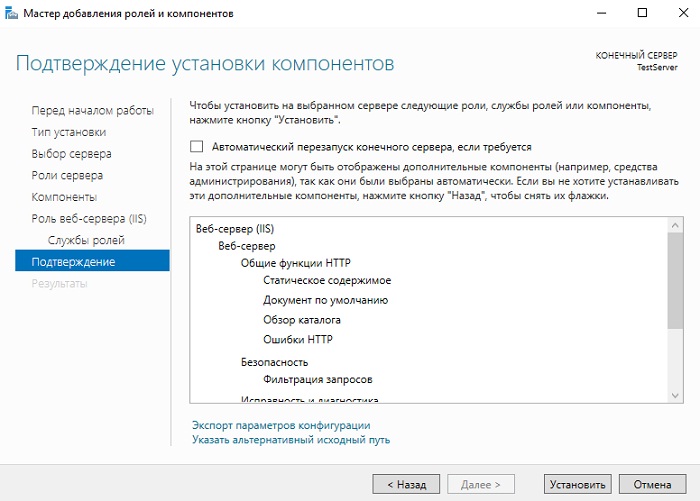
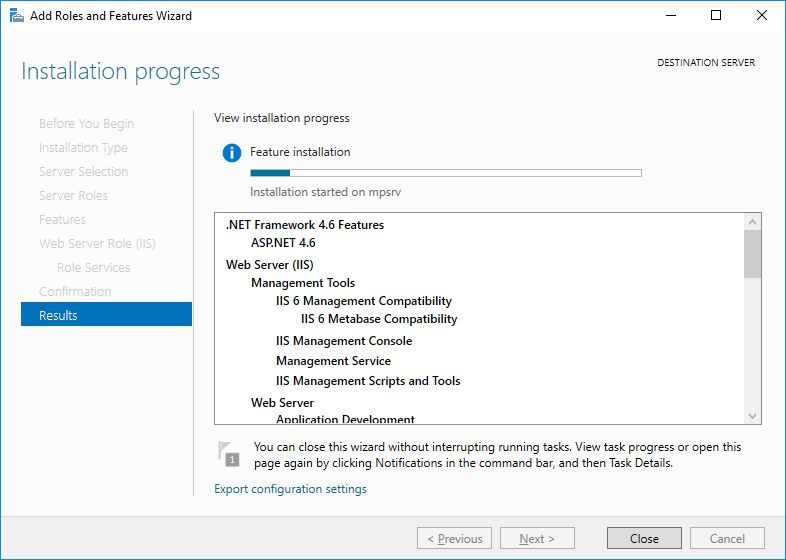
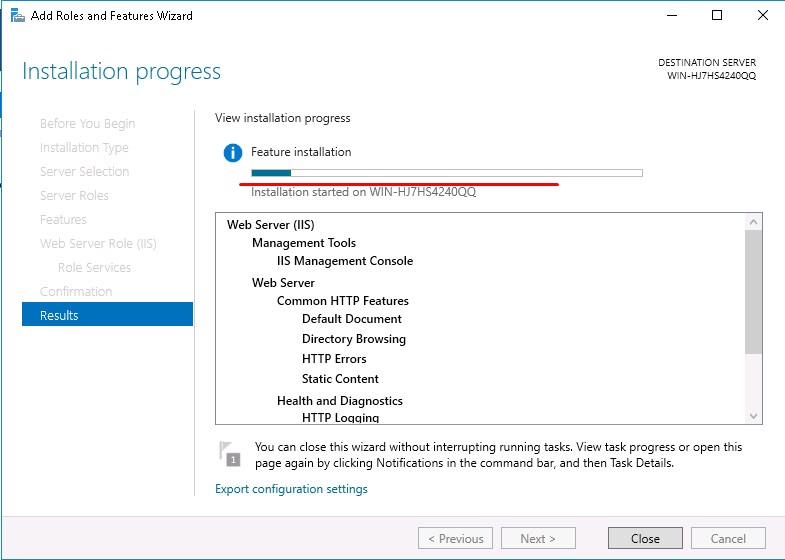
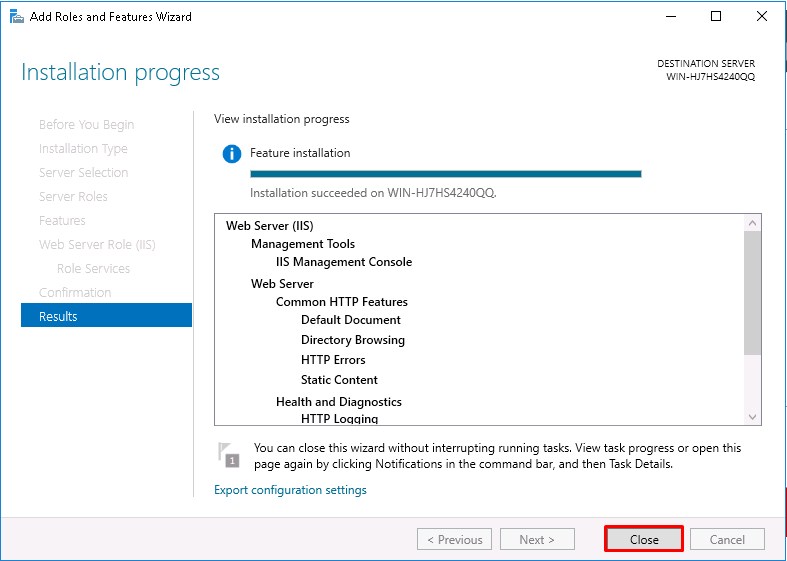
Проверяем выбранные роли, службы и компоненты и жмем «Установить».

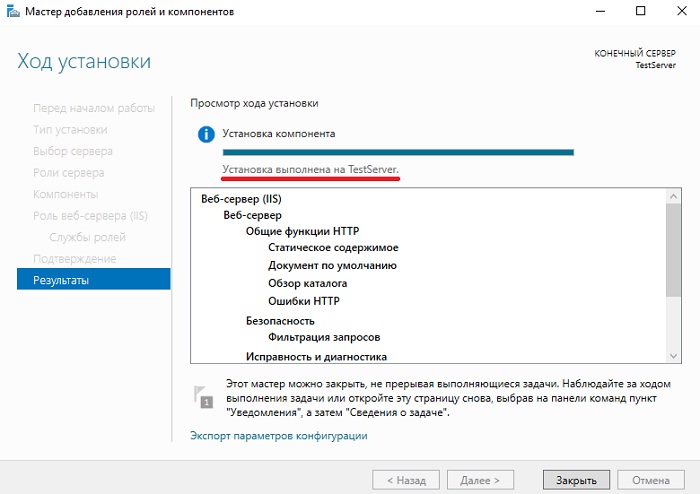
Установка будет завершена, как появится соответствующее сообщение.
Установка web сервера IIS с помощью Windows PowerShell
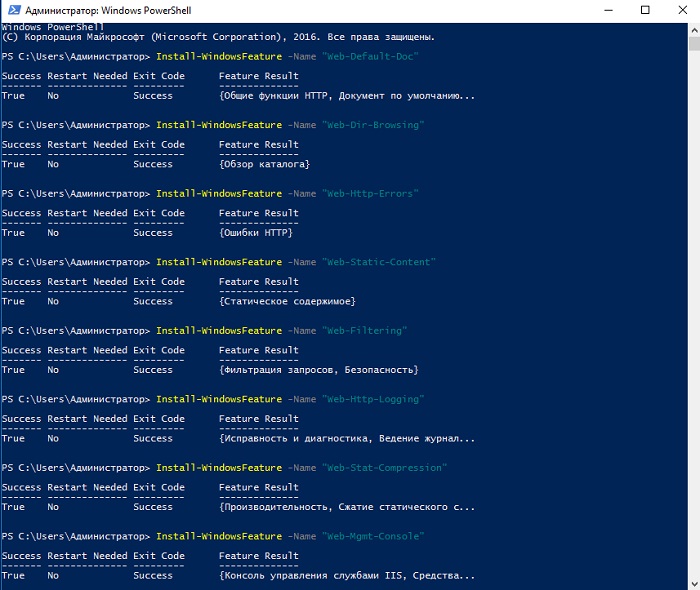
Для того чтобы установить web сервер IIS с помощью PowerShell запускайте оболочку Windows PowerShell и вводите следующие команды (перечисленные ниже команды установят все те же службы, которые мы установили с помощью мастера чуть выше).
Документ по умолчанию
Install-WindowsFeature -Name "Web-Default-Doc"
Обзор каталога
Install-WindowsFeature -Name "Web-Dir-Browsing"
Ошибки http
Install-WindowsFeature -Name "Web-Http-Errors"
Статическое содержимое
Install-WindowsFeature -Name "Web-Static-Content"
Фильтрация запросов
Install-WindowsFeature -Name "Web-Filtering"
Ведение журнала http
Install-WindowsFeature -Name "Web-Http-Logging"
Сжатие статического содержимого
Install-WindowsFeature -Name "Web-Stat-Compression"
Консоль управления службами IIS
Install-WindowsFeature -Name "Web-Mgmt-Console"
Размещаем HTML сайт на веб сервере IIS
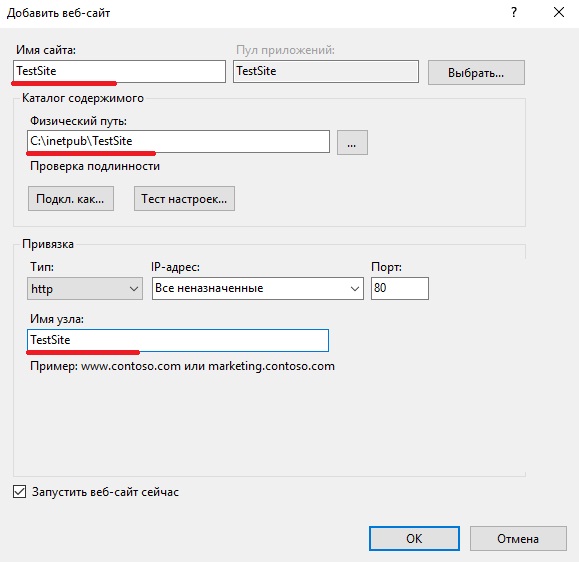
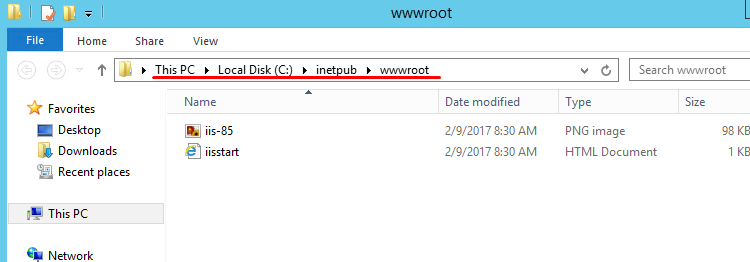
Первое что нужно сделать — это создать корневую директорию нашего тестового сайта, для этого в каталоге С:inetpub создаем папку TestSite и в нее для проверки добавляем файл index.html со следующим содержимым, например
<Н1>Тестовый сайт</Н1>
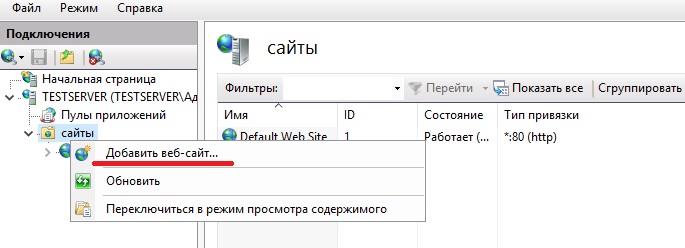
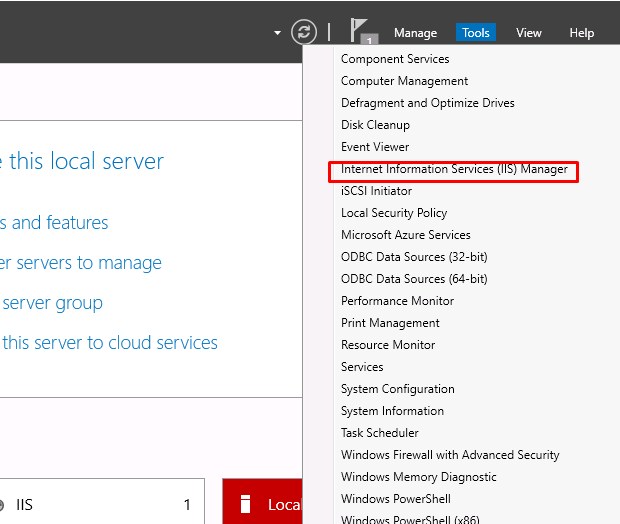
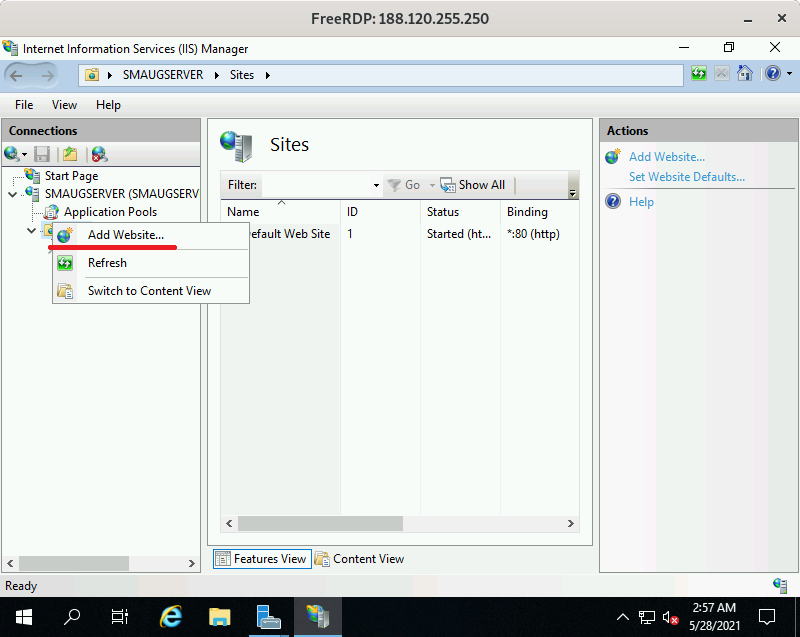
Затем открываем «Диспетчер служб IIS», это можно сделать, например, из диспетчера серверов «Средства ->Диспетчер служб IIS».

Потом щелкаем правой кнопкой мыши по пункту «Сайты ->Добавить веб-сайт».
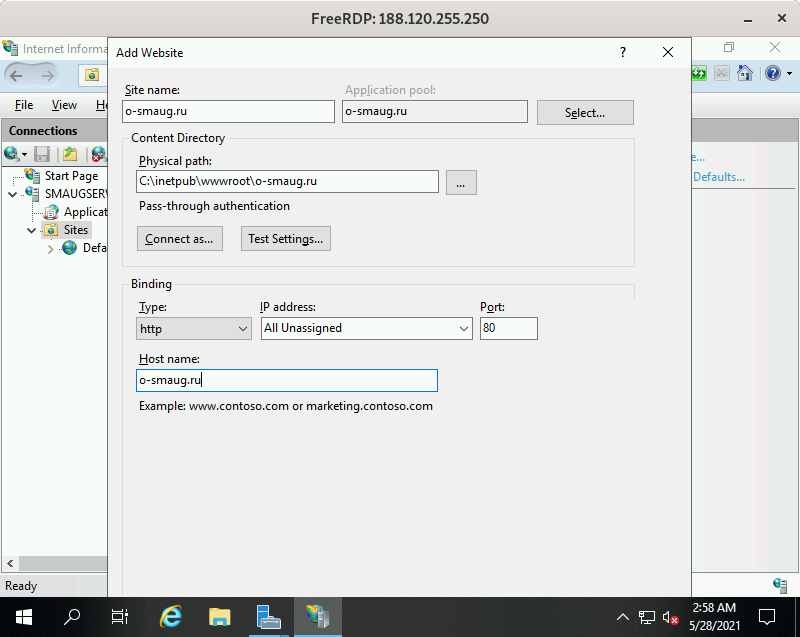
Откроется окно добавления веб сайта, заполняем необходимые поля и жмем «ОК» (TestSite в моем случае это название сайта).
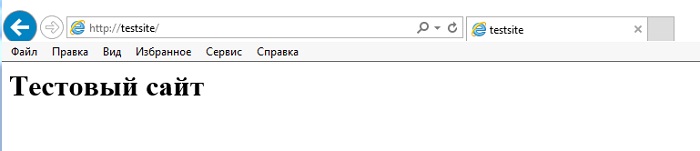
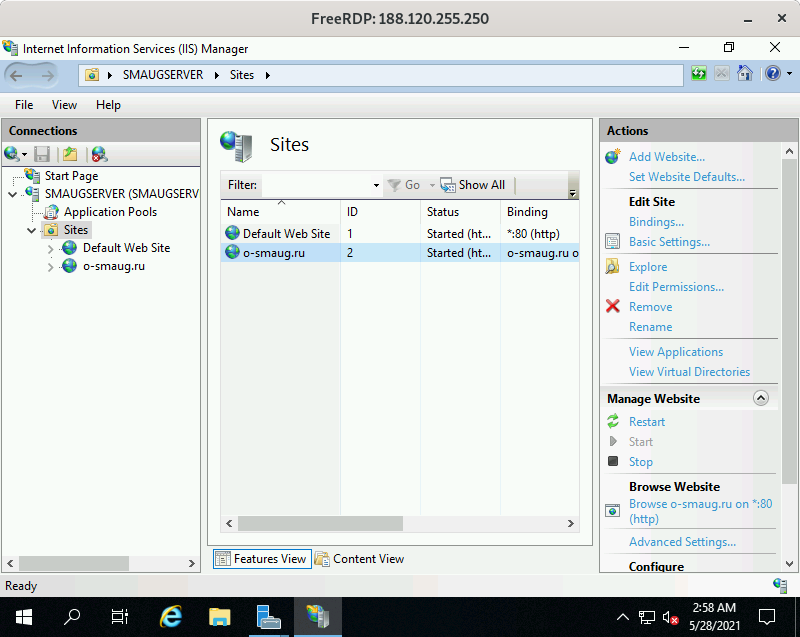
Теперь можем проверить работу веб сервера и только что созданного сайта, для этого открываем любой веб браузер и переходим на сайт TestSite (только помните, для того чтобы у Вас также как у меня открылся сайт по имени, он должен быть добавлен на DNS сервере (создана A запись) или хотя бы для тестов добавлена запись в файл HOSTS локального сервера).
Удаление веб сервера IIS с помощью мастера
Для удаления web сервера IIS открываем диспетчер серверов, затем в меню нажимаем «Управление ->Удалить роли и компоненты».
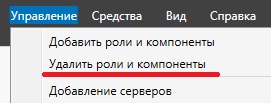
В итоге запустится «Мастер удаления ролей и компонентов», где мы делаем практически то же самое, что и при установке, только галочки мы не ставим, а снимаем.
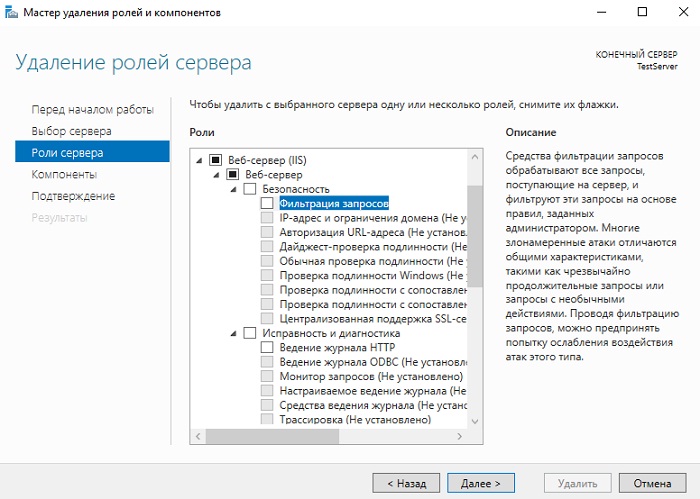
Затем мы жмем далее, далее и удалить. После окончания процесса удаления веб сервера сервер необходимо будет перезагрузить.
Удаление web сервера IIS с помощью PowerShell
Для удаления web сервера IIS на PowerShell запускаем оболочку Windows PowerShell и используем командлет Uninstall-WindowsFeature. Для удаления следующих служб ролей веб сервера IIS, можно использовать вот такие команды:
Документ по умолчанию
Uninstall-WindowsFeature -Name "Web-Default-Doc"
Обзор каталога
Uninstall-WindowsFeature -Name "Web-Dir-Browsing"
Ошибки http
Uninstall-WindowsFeature -Name "Web-Http-Errors"
Статическое содержимое
Uninstall-WindowsFeature -Name "Web-Static-Content"
Фильтрация запросов
Uninstall-WindowsFeature -Name "Web-Filtering"
Ведение журнала http
Uninstall-WindowsFeature -Name "Web-Http-Logging"
Сжатие статического содержимого
Uninstall-WindowsFeature -Name "Web-Stat-Compression"
Консоль управления службами IIS
Uninstall-WindowsFeature -Name "Web-Mgmt-Console"
Вот мы с Вами и научились устанавливать и удалять web сервер IIS в операционной системе Windows Server 2016 и на этом у меня все, пока!

![]()
Поднимаем IIS на Windows Server 2016. Настроим фичи по своему усмотрению.
Ссылки
Установка IIS в Windows 10
Установка IIS в Windows Server 2012 R2
Установка
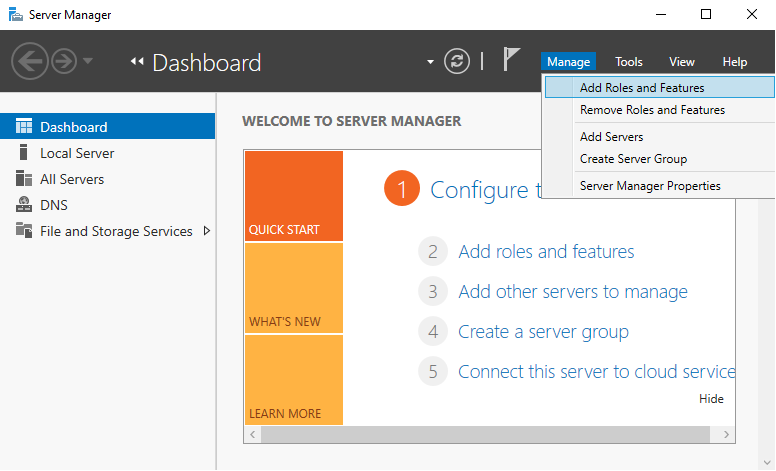
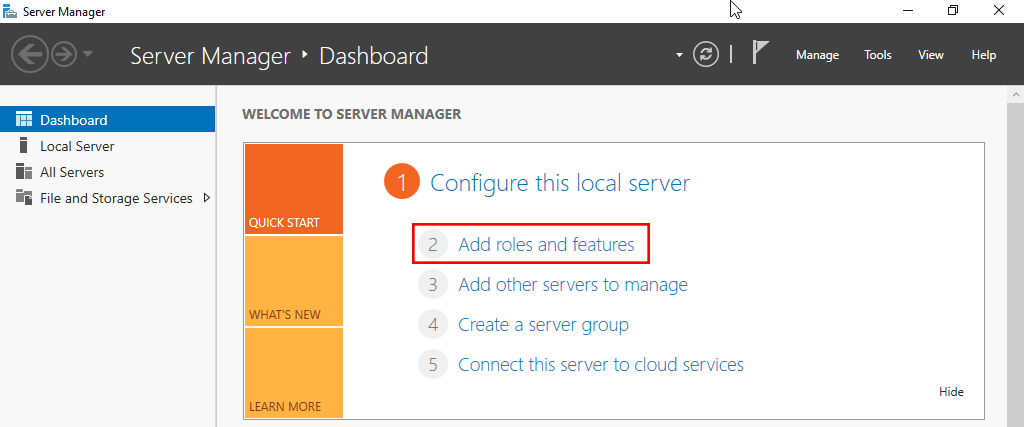
Запускаем Server Manager. Manage > Add Roles and Features.
Запускается мастер добавления ролей и фич.
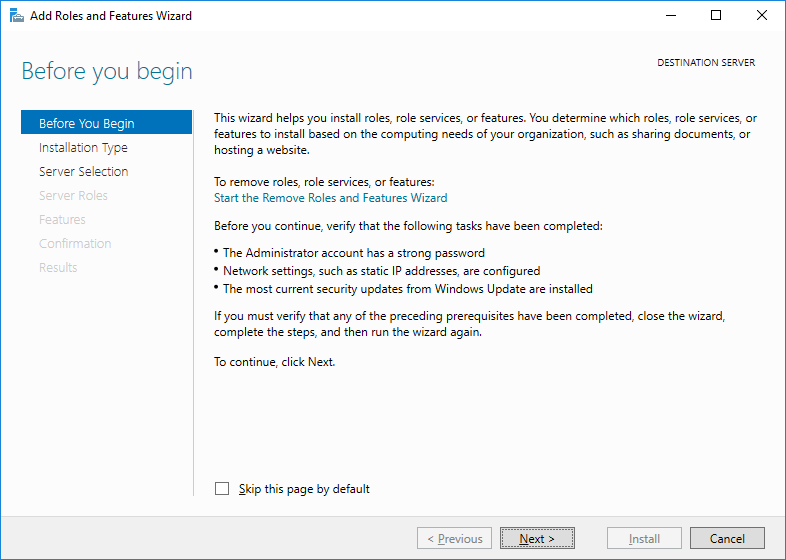
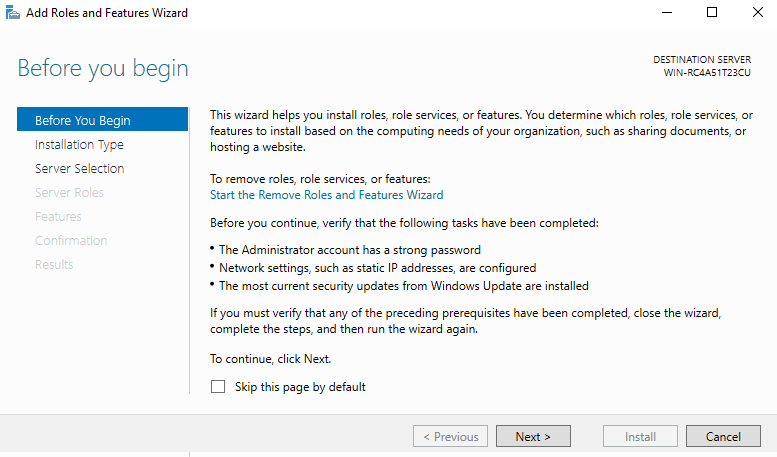
Открывается приветственная вкладка. Можно установить галку «Skip this page by default», чтобы не отображать эту страницу при последующих установках. Next.
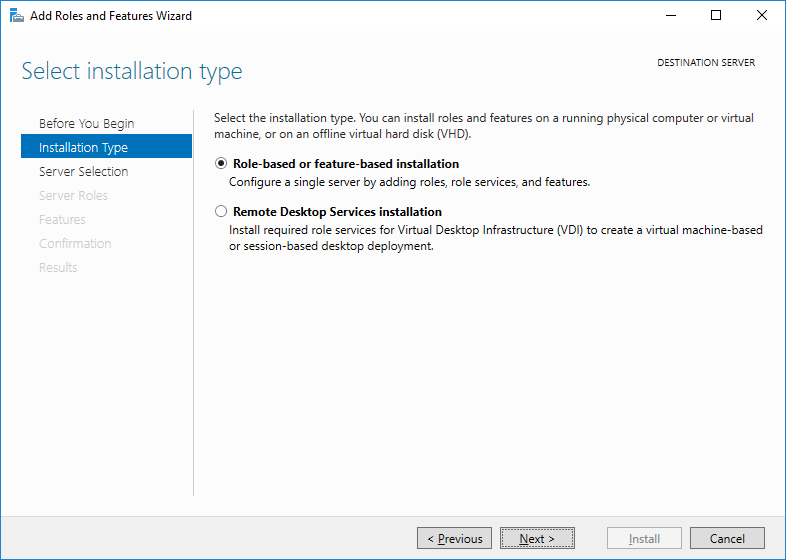
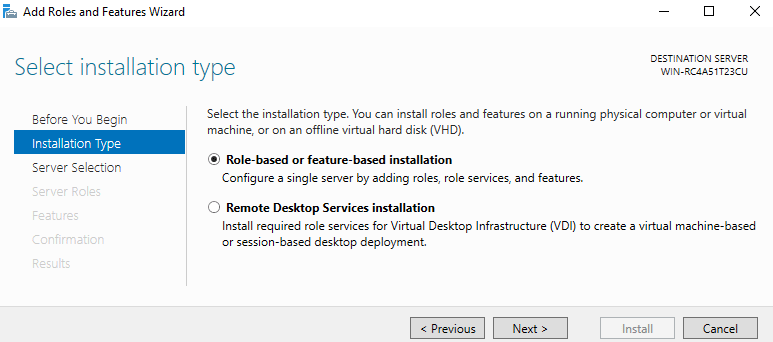
Открывается вкладка «Installation Type». Оставляем «Role-based or feature-based installation». Next.
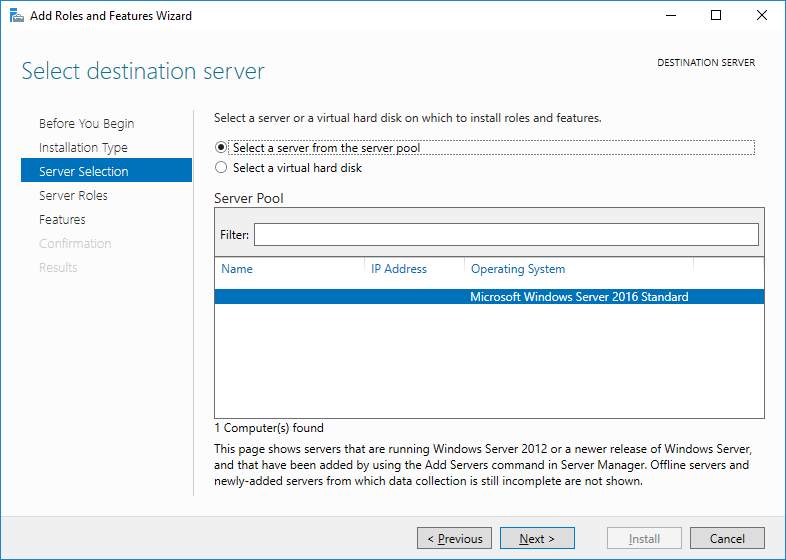
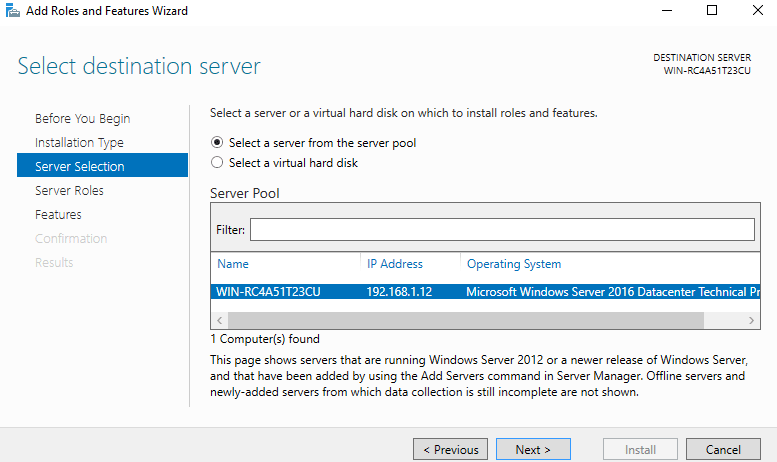
Открывается вкладка «Server Selection». Выбираем текущий сервер. Next.
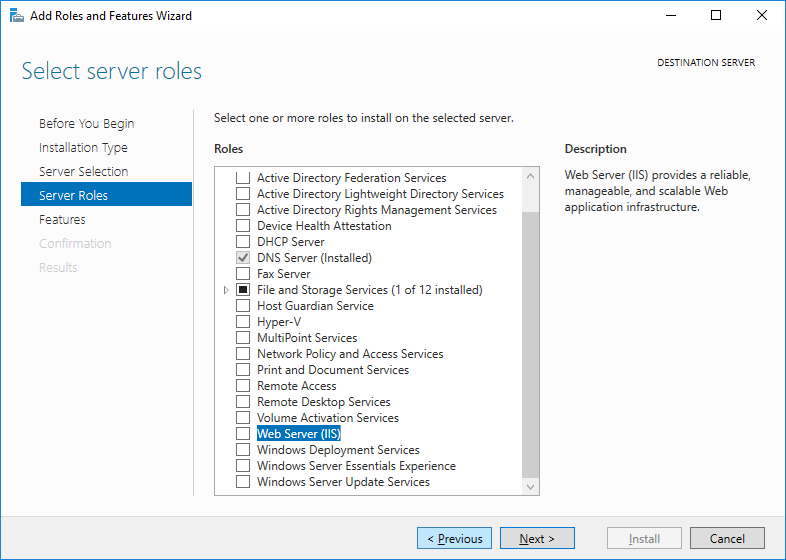
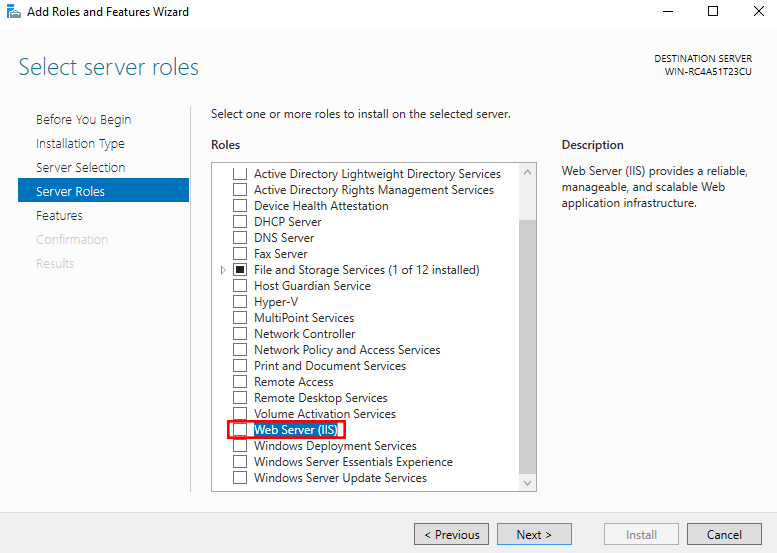
Открывается вкладка «Server Roles». Ставим галку на «Web Sever (IIS)». Всплывает окошко.
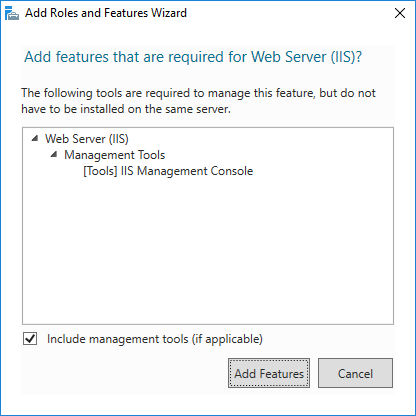
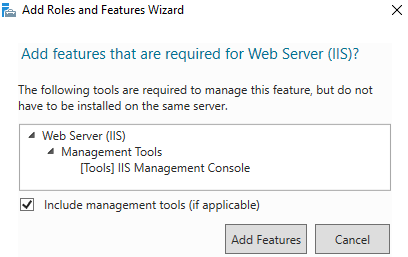
Нам предлагают установить обязательные фичи — это «IIS Management Console», поскольку сервером IIS нужно управлять. нажимаем «Add Features».
Next.
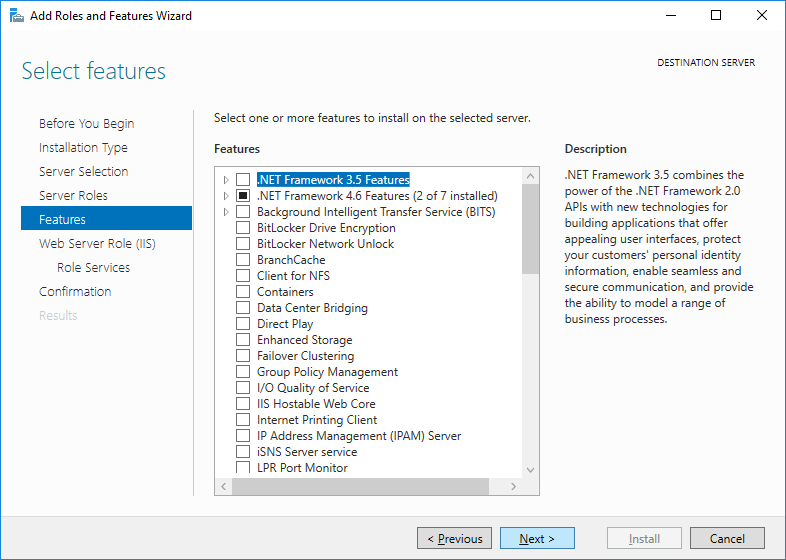
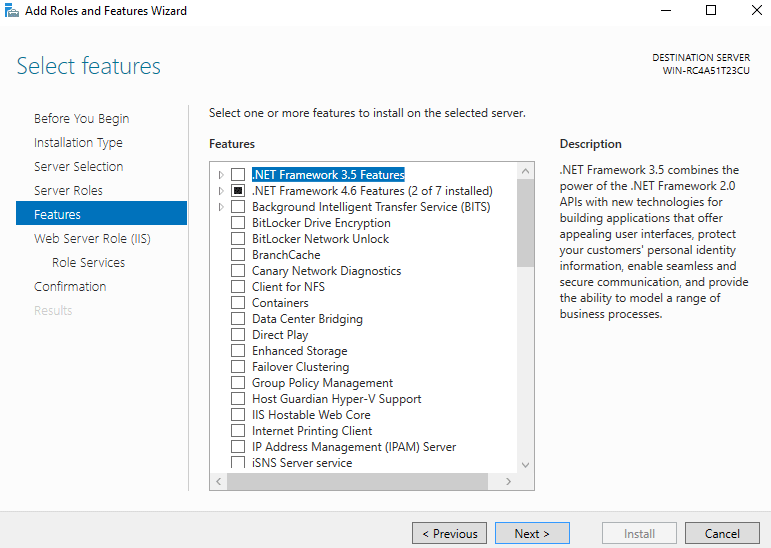
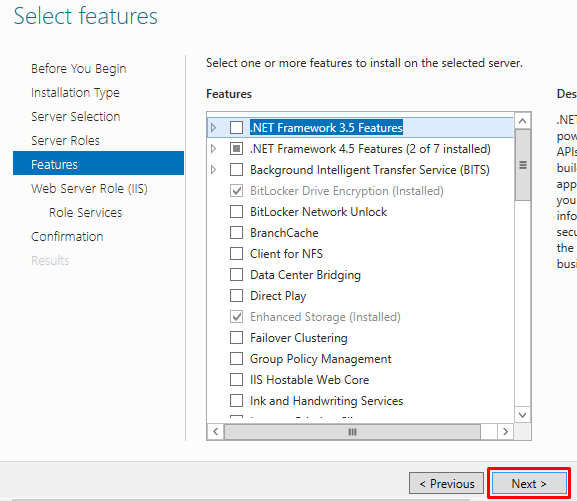
Открывается вкладка «Features». Next.
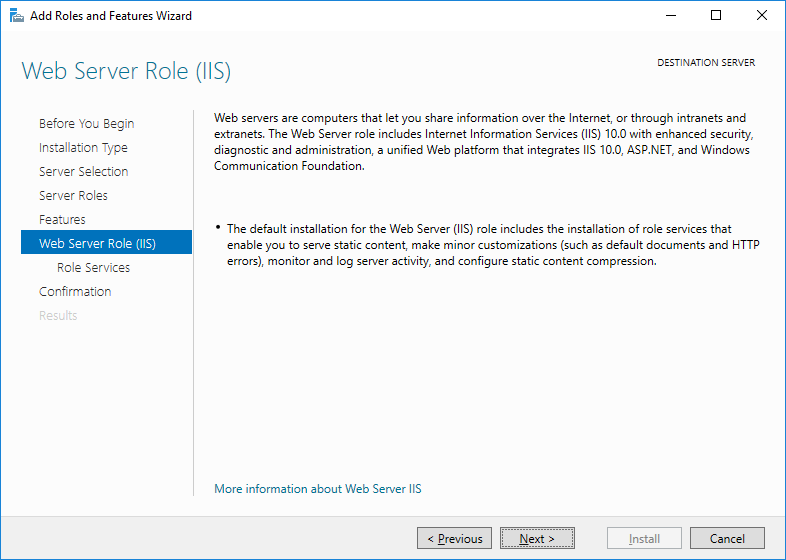
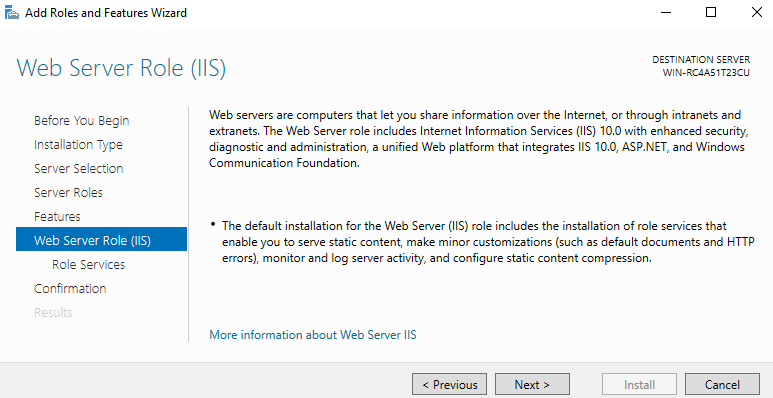
Открывается вкладка «Web Server Role (IIS)». Next.
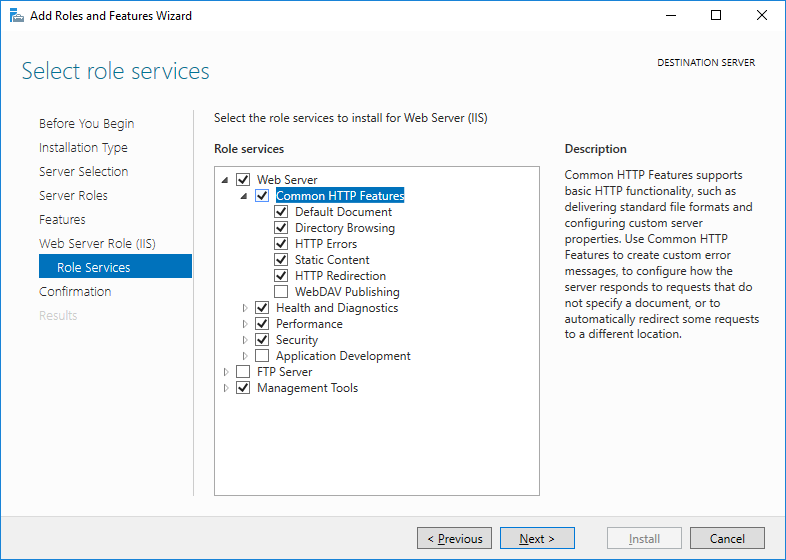
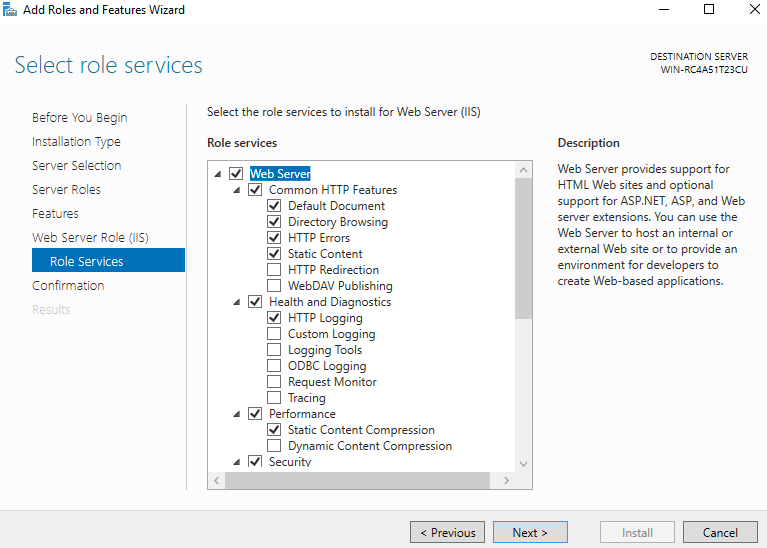
Открывается вкладка «Role Services». Здесь нужно выбрать компоненты, которые будут стоять в IIS. Настраиваем «Common HTTP Features».
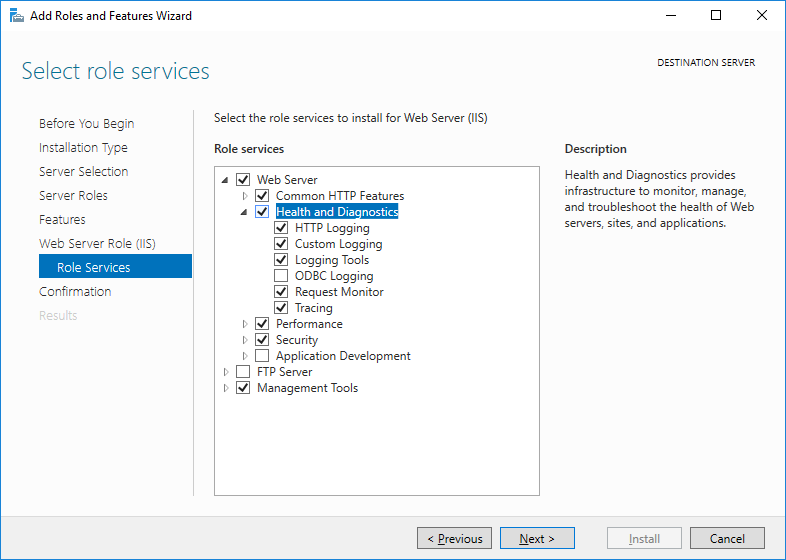
Настраиваем «Health and Diagnostics».
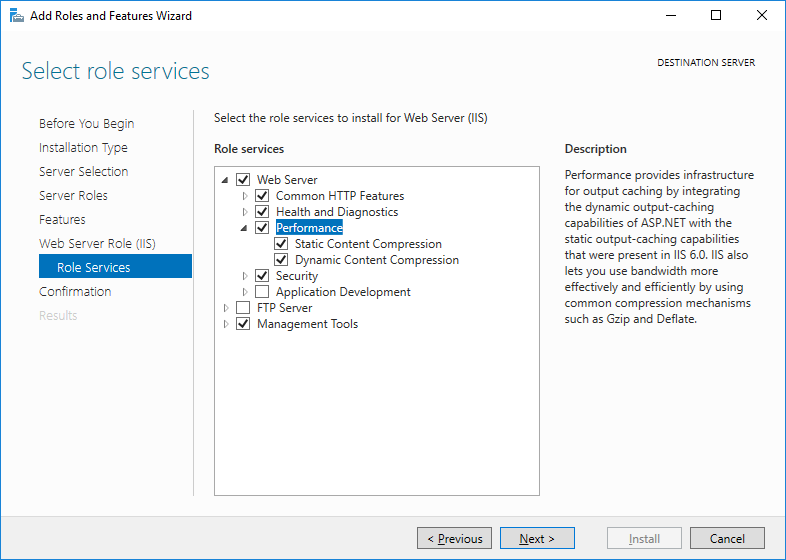
Настраиваем «Performance».
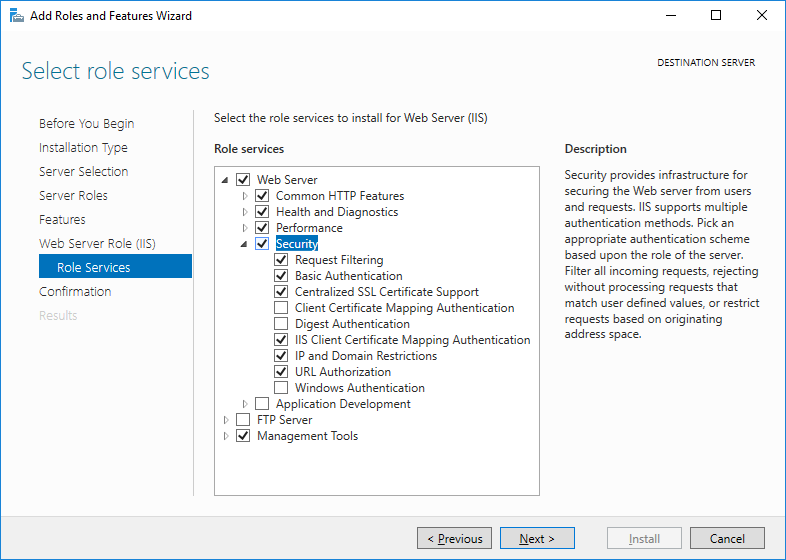
Настраиваем «Security».

Настраиваем «Application Development». При установке некоторых галок может потребоваться доставить некоторые фичи.
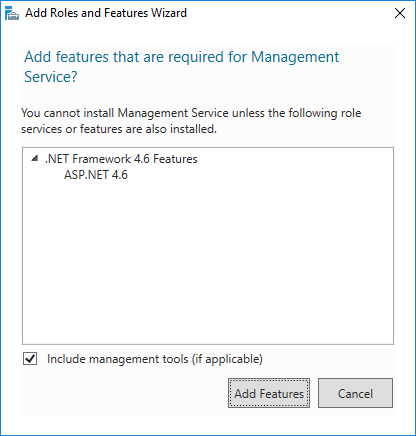
Add Features.

Настраиваем «Management Tools». Next.

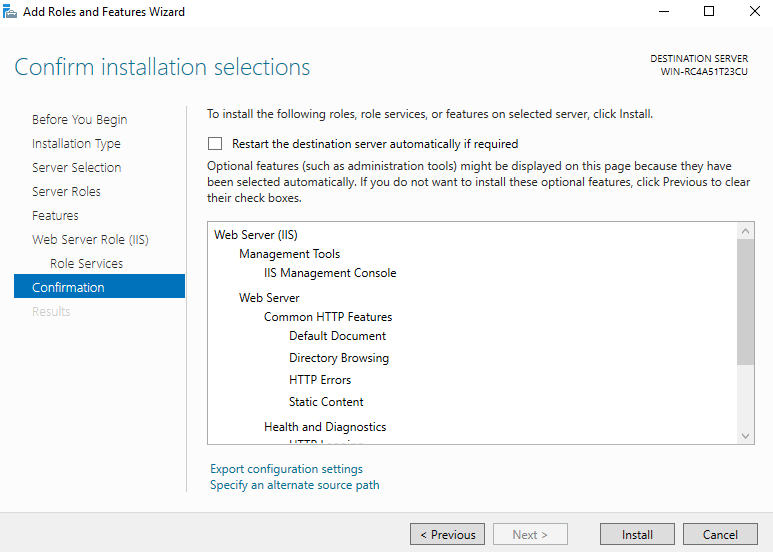
Открывается вкладка «Confirmation». Проверяем всё, если не против перезагрузить сервер. то устанавливаем галку «Restart the destination server automatically if required». Install.
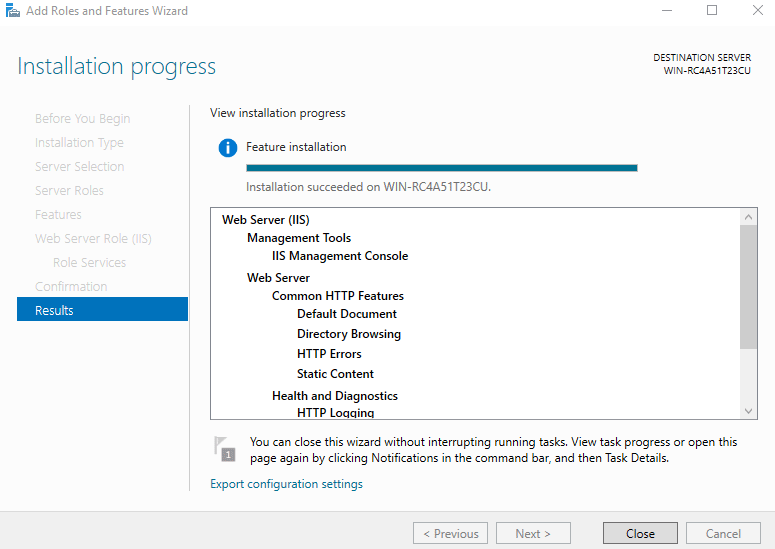
Начинается установка.
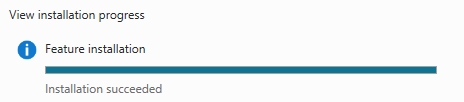
Installation succeeded.
Posted by
on August 24, 2016
Here we’re going to show you how to install the Internet Information Services (IIS) web server version 10.0 in Microsoft’s Windows Server 2016 operating system.
This can be done both with PowerShell or through the GUI, we’ll cover both methods here.
Install IIS With PowerShell
If you don’t have the GUI installed or just want to use the PowerShell command line interface (CLI) instead, follow these steps. This method is a lot faster than going through all of the GUI options.
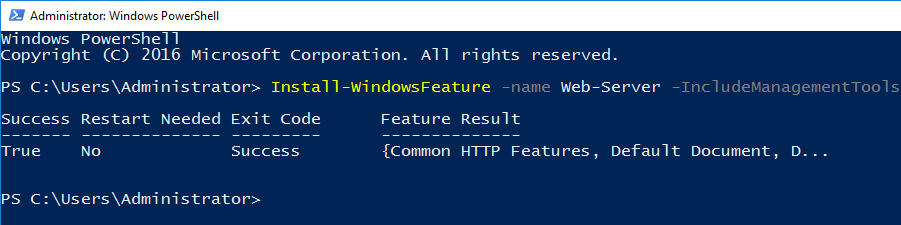
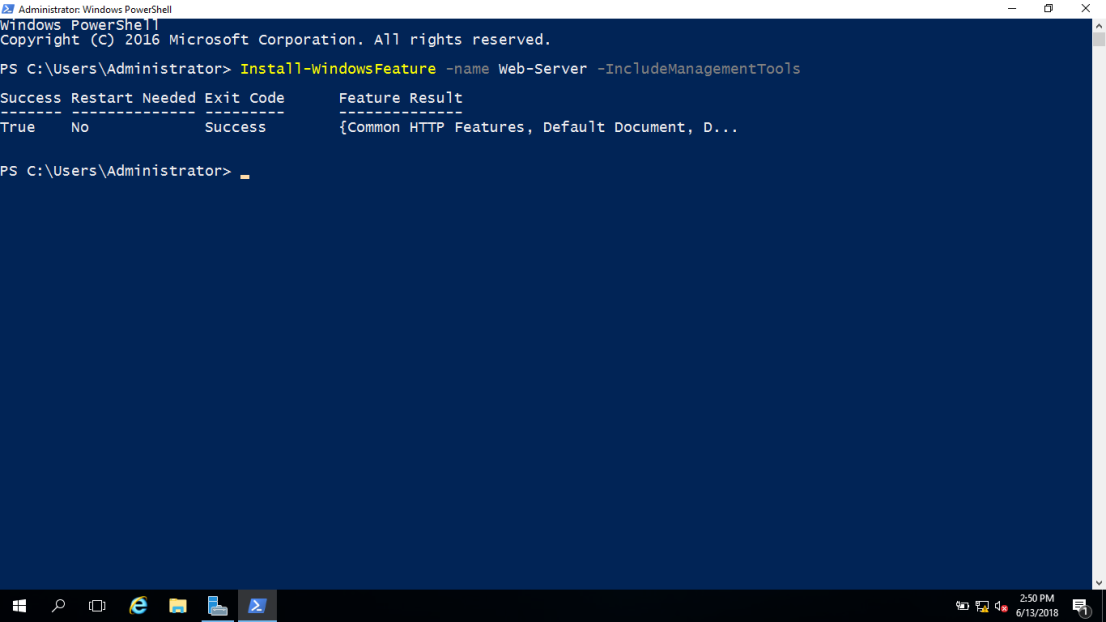
- Open PowerShell with administrative privileges and run the Install-WindowsFeature cmdlet as shown below.
Install-WindowsFeature -name Web-Server -IncludeManagementTools

Here we include the management tools so that you can manage IIS on this server, as these are generally installed when using the GUI, making this PowerShell command equivalent with the GUI method below. If you do not plan on managing IIS through this server then you may prefer to not include this option.
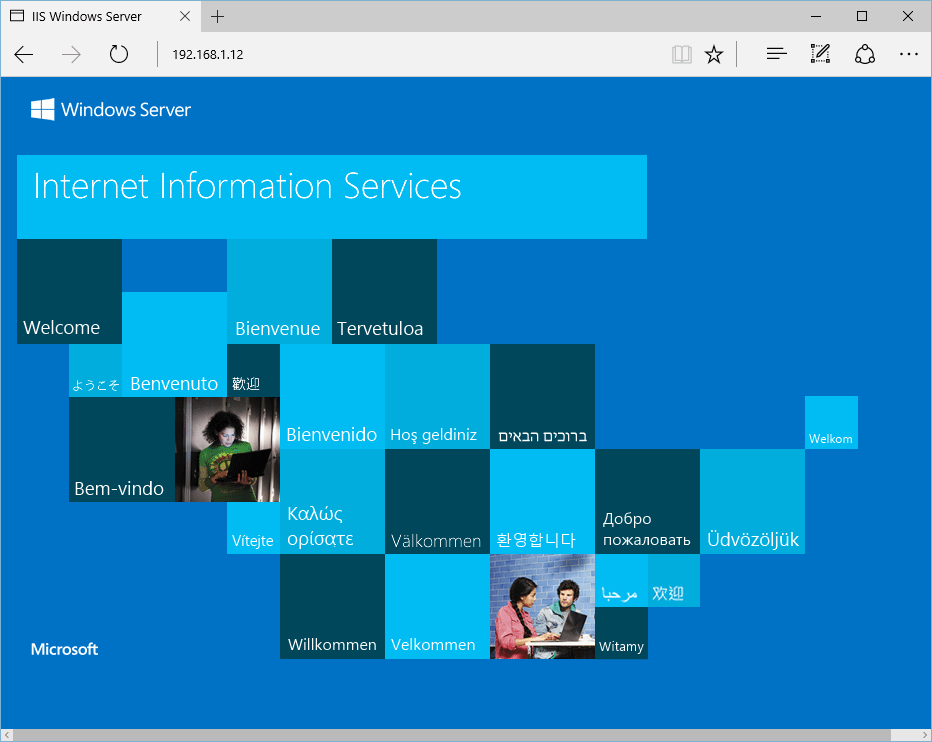
- Once the installation has succeeded, you’ll be returned to the PowerShell prompt. At this point IIS should be running on port 80 by default with the firewall rule “World Wide Web Services (HTTP Traffic-In)” enabled in Windows firewall automatically.
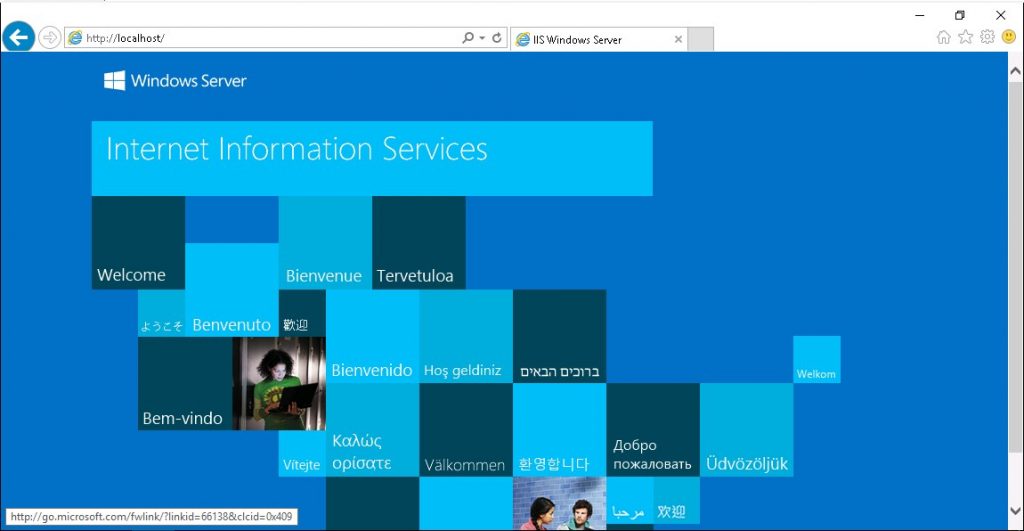
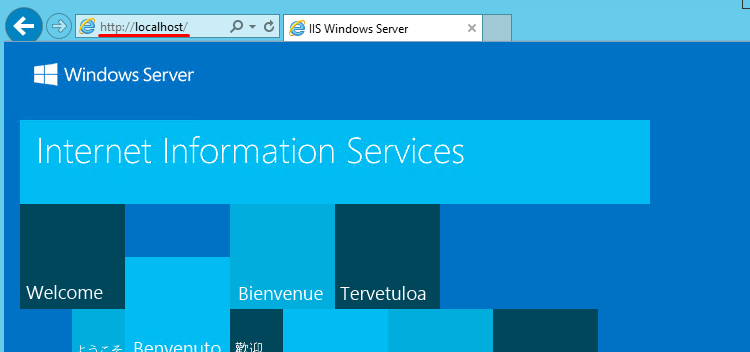
- We can perform a simple test by opening up a web browser and browsing to the server that we have installed IIS on. You should see the default IIS page.

Install IIS Through GUI
If your server has the graphical user interface component installed you can also install IIS by following these steps.
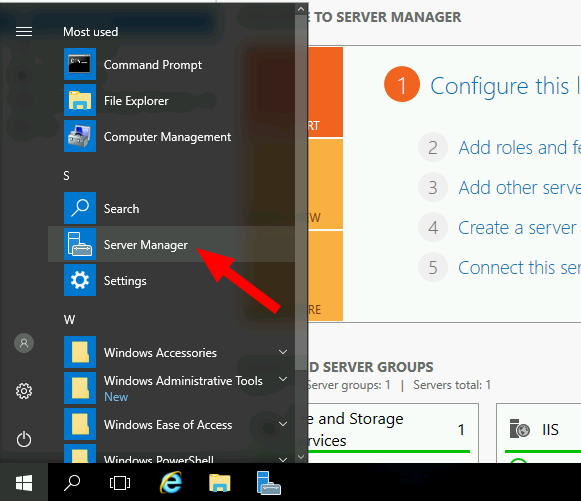
- Open Server Manager, this can be found in the start menu. If it’s not there simply type “Server Manager” with the start menu open and it should be found in the search.

- Click the “Add roles and features” text.

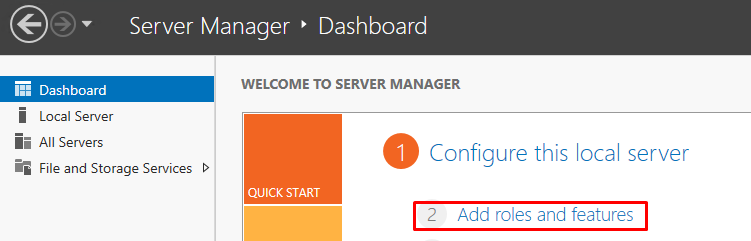
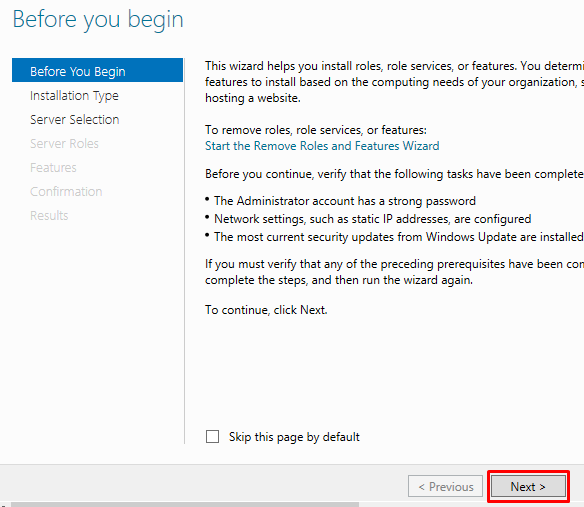
- On the “Before you begin” window, simply click the Next button.

- On the “Select installation type” window, leave “Role-based or feature-based installation” selected and click Next.

- As we’re installing to our local machine, leave “Select a server from the server pool” with the current machine selected and click Next. Alternatively you can select another server that you are managing from here, or a VHD.

- From the “Select server roles” window, check the box next to “Web Server (IIS)”. Doing this may open up a new window advising that additional features are required, simply click the “Add Features” button to install these as well. Click Next back on the Select server roles menu once this is complete.


- We will not be installing any additional features at this stage, so simply click Next on the “Select features” window.

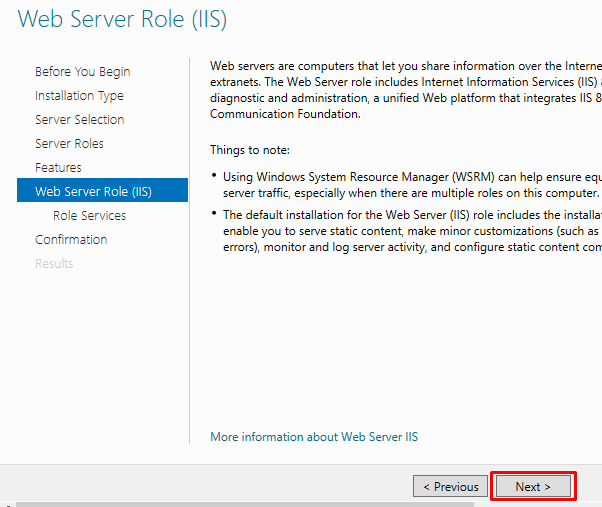
- Click Next on the “Web Server Role (IIS)” window after reading the information provided.

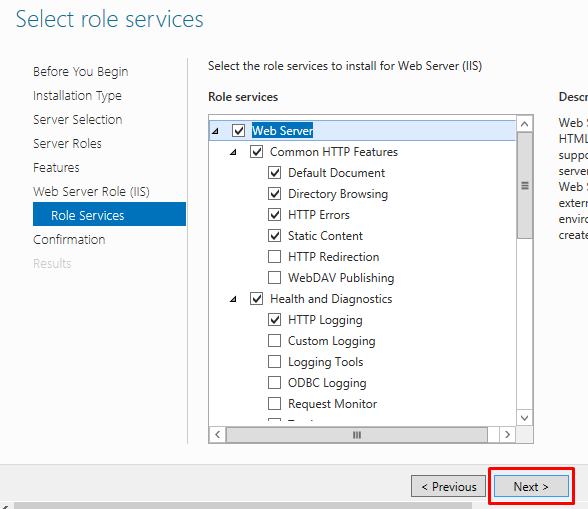
- At this point on the “Select role services” window you can install additional services for IIS if required. You don’t have to worry about this now as you can always come back and add more later, so just click Next for now to install the defaults.

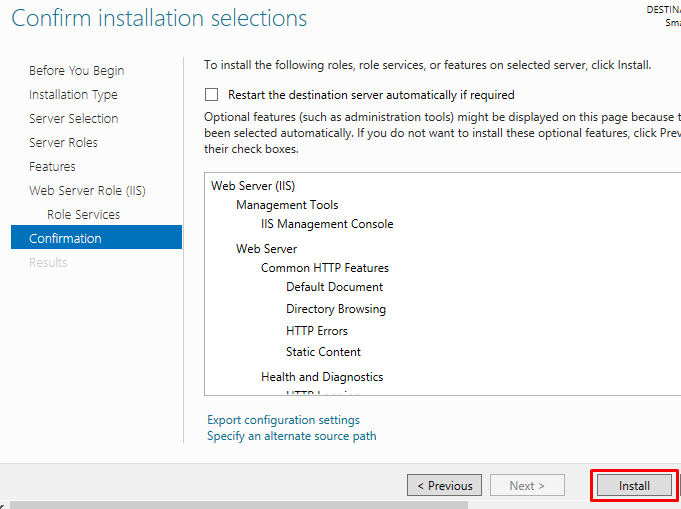
- Finally on the “Confirm installation selections” window , review the items that are to be installed and click Install when you’re ready to proceed with installing the IIS web server.

No reboot should be required with a standard IIS installation, however if you remove the role a reboot will be needed.
- Once the installation has succeeded, click the close button. At this point IIS should be running on port 80 by default with the firewall rule “World Wide Web Services (HTTP Traffic-In)” enabled in Windows firewall automatically.
- We can perform a simple test by opening up a web browser and browsing to the server that we have installed IIS on. You should see the default IIS page.

As you can hopefully see, it’s quite a lot faster to use PowerShell to perform the same task.
Summary
As shown we can easily install the IIS web server in Windows Server 2016 with both the PowerShell command line or the graphical user interface.
In this article, we will learn how to install the Internet Information Services (IIS) web server version 10.0 in Microsoft’s Windows Server 2016 operating system.
This can be done both with PowerShell or through the GUI, we’ll cover both methods here.
Install IIS In Windows Server 2016 With PowerShell
If you don’t have the GUI installed or just want to use the PowerShell command line interface (CLI) instead, follow these steps. This method is a lot faster than going through all of the GUI options.
Open PowerShell with administrative privileges and run the Install-WindowsFeature cmdlet as shown below.
|
Install—WindowsFeature —name Web—Server —IncludeManagementTools |

Here we include the management tools so that you can manage IIS on this server, as these are generally installed when using the GUI, making this PowerShell command equivalent with the GUI method below. If you do not plan on managing IIS through this server then you may prefer to not include this option.
Once the installation has succeeded, you’ll be returned to the PowerShell prompt. At this point, IIS should be running on port 80 by default with the firewall rule “World Wide Web Services (HTTP Traffic-In)” enabled in Windows firewall automatically.
We can perform a simple test by opening up a web browser and browsing to the server that we have installed IIS on. You should see the default IIS page.
Install IIS Through Graphical User Interface (GUI)
You can also install IIS by GUI through following these steps;
Open Server Manager, this can be found in the start menu. If it’s not there simply type “Server Manager” with the start menu open and it should be found in the search.
Click the “Add roles and features” text.
On the “Before you begin” window, simply click the Next button.
On the “Select installation type” window, leave “Role-based or feature-based installation” selected and click Next.
As we’re installing to our local machine, leave “Select a server from the server pool” with the current machine selected and click Next. Alternatively, you can select another server that you are managing from here or a VHD.
From the “Select server roles” window, check the box next to “Web Server (IIS)”.
Doing this may open up a new window advising that additional features are required, simply click the “Add Features” button to install these as well. Click Next back on the Select server roles menu once this is complete.
We will not be installing any additional features at this stage, so simply click Next on the “Select features” window.
Click Next on the “Web Server Role (IIS)” window after reading the information provided.

At this point on the “Select role services” window, you can install additional services for IIS if required. You don’t have to worry about this now as you can always come back and add later, so just click Next for now to install the defaults.
Finally on the “Confirm installation selections” window, review the items that are to be installed and click Install when you’re ready to proceed with installing the IIS web server.

No reboot should be required with a standard IIS installation, however, if you remove the role a reboot will be needed.
Once the installation has succeeded, click the close button. At this point, IIS should be running on port 80 by default with the firewall rule “World Wide Web Services (HTTP Traffic-In)” enabled in Windows firewall automatically.
We can perform a simple test by opening up a web browser and browsing to the server that we have installed IIS on. You should see the default IIS page.
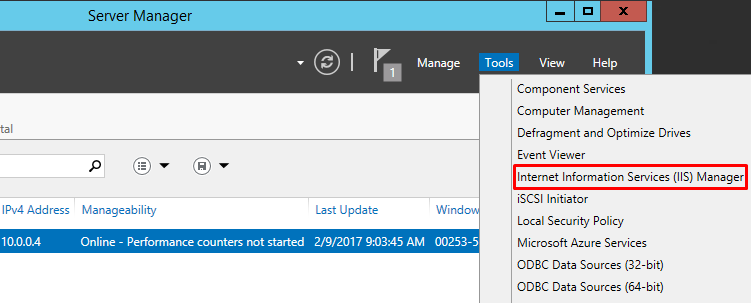
Once the installation has succeeded. Go back to the Server Manager. Select Internet Information Services (IIS) Manager from the Tools menu:
Click Add Website:
Specify at least the site name and path. Click Ok:
Your first site is ready to be accessed.
В статье расскажем, как установить службу Internet Information Services (IIS) на серверы с операционной системой Windows Server 2019. Инструкция подойдет и для ОС Windows Server 2016.
IIS (Internet Information Services) — набор сервисов от компании Microsoft для работы веб-сервера и других интернет служб. IIS устанавливается на сервер и работает с протоколами HTTP/HTTPS, POP3, SMTP, FTP, NNTP.
Чтобы приступить к установке, зайдите на сервер с правами администратора.
«Диспетчер серверов» (Server Manager) будет уже запущен (запускается автоматически при старте ОС) или запустите его вручную из меню «Пуск».
То же самое можно сделать через панель «Локальный сервер» (Local Server) — «Управление» (Manage).
 Выберите тип установки «Установка ролей или компонентов» (Role-based or feature-based installation) и нажмите «Далее» (Next).
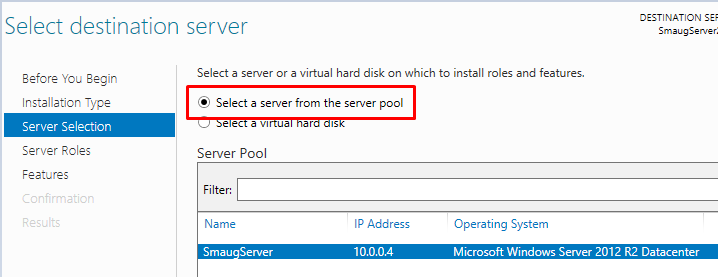 Выберите сервер из пула серверов (Select a server from the server pool) и отметьте имя вашего сервера. Нажмите «Далее» (Next).
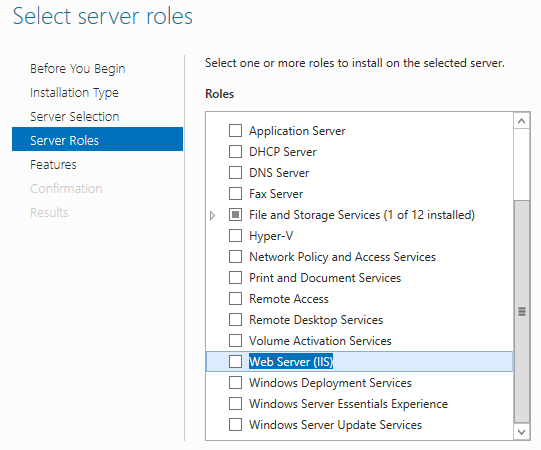
Обратите внимание, что служба FTP по умолчанию не устанавливается. Если в дальнейшем вам понадобятся новые роли, то вы сможете их добавить без переустановки IIS.
При необходимости отметьте «Автоматический перезапуск конечного сервера» (Restart the destination server automatically if required), если пункт не выбран, то перезагрузите сервер самостоятельно после окончания установки.
 Запустите «Диспетчер серверов» (Server Manager) из меню «Пуск» (Start).
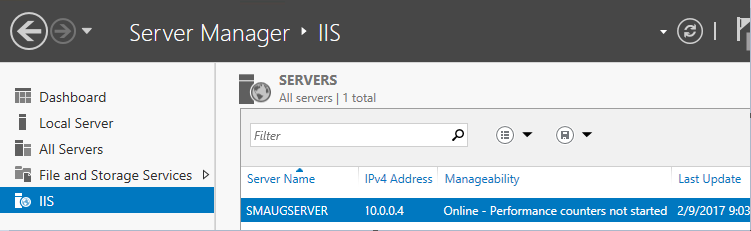
В списке содержимого появится установленная служба IIS.
 Панель «Просмотр возможностей» (Features View)
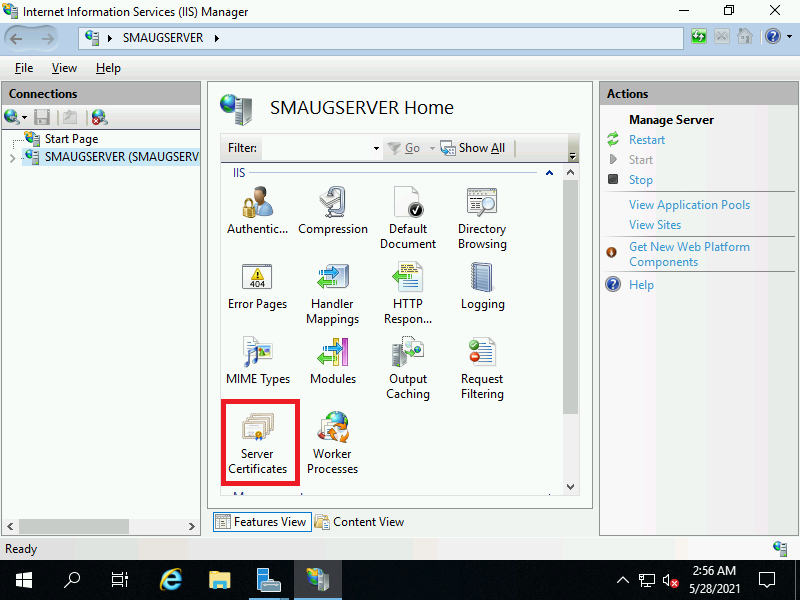
Возможности, доступные вам в службе IIS, перечислены на панели Просмотр возможностей (Features View). Отсюда управляйте возможностями IIS, настраивайте и перезапускайте. Например, настройте SSL-сертификаты.
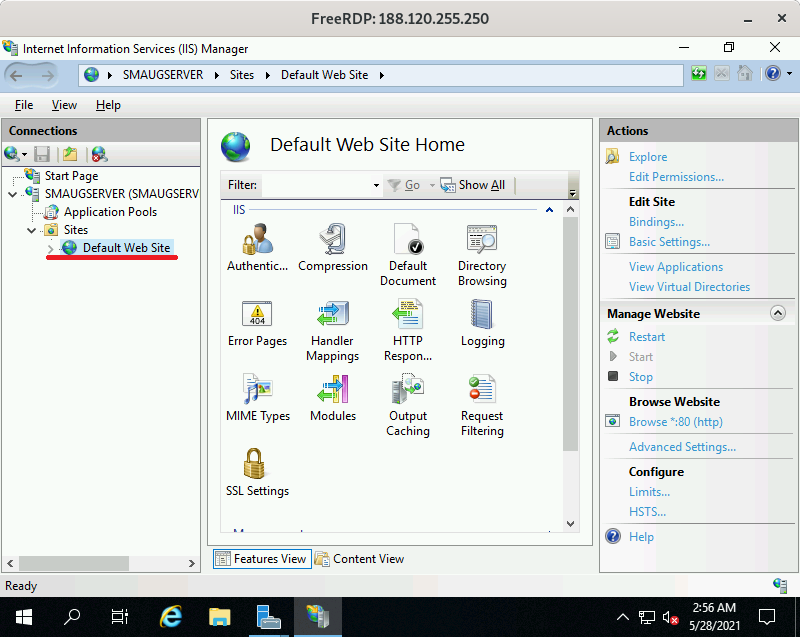 Сразу после установки IIS по умолчанию создается пустой сайт Default Web Site.
 Добавьте сайты, которые будут обслуживаться этим веб-сервером. Для этого в контекстном меню пункта «Сайты» (Sites) на вкладке «Подключения» (Connections) выберите «Добавить сайт» (Add Website).
 Заполните поля формы данными о сайте и нажмите ОК.
 В списке сайтов IIS появится только что добавленный.
Этот материал был полезен?
Introduction
When you want to publish content for access over the Internet or an intranet connection, you can add a Web site to your Web server to hold the content. During the installation of Internet Information Services (IIS), a default Web site configuration is created in the InetpubWwwroot directory on your Web server. You can either use this default directory to publish your Web content or create a directory at a file system location of your choice.
When you add a Web site in IIS, a site entry is created in the ApplicationHost.config file. The entry specifies the network binding for the site, maps the site to a location in the file system, and optionally specifies user credentials for content access.
What is Internet Information Services (IIS)?
Internet Information Services (IIS) is a flexible, general-purpose web server from Microsoft that runs on Windows systems to serve requested HTML pages or files.
An IIS web server accepts requests from remote client computers and returns the appropriate response.
This basic functionality allows web servers to share and deliver information across local area networks, such as corporate intranets, and wide area networks, such as the internet. A web server can deliver information to users in several forms, such as static web pages coded in HTML, through file exchanges as downloads and uploads; and text documents, image files and more.
New Features in IIS 10.0
- HTTP/2
- IIS on Nano Server
- IIS in Containers
- Managing IIS
- Wildcard Host Headers
- IIS Thread Pool Ideal CPU Optimization for NUMA hardware
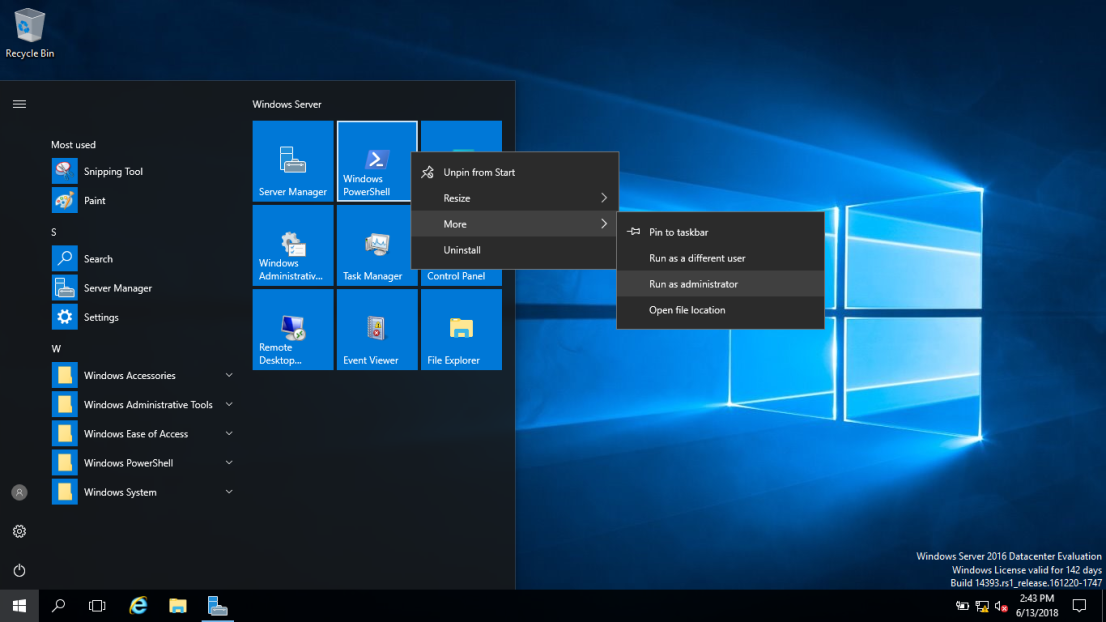
1 – Click Start, and then right-click Windows PowerShell, click more Run as Administrator
2 – Open PowerShell with administrative privileges and run the Install-WindowsFeature cmdlet as shown below.
Install-WindowsFeature -name Web-Server -IncludeManagementTools
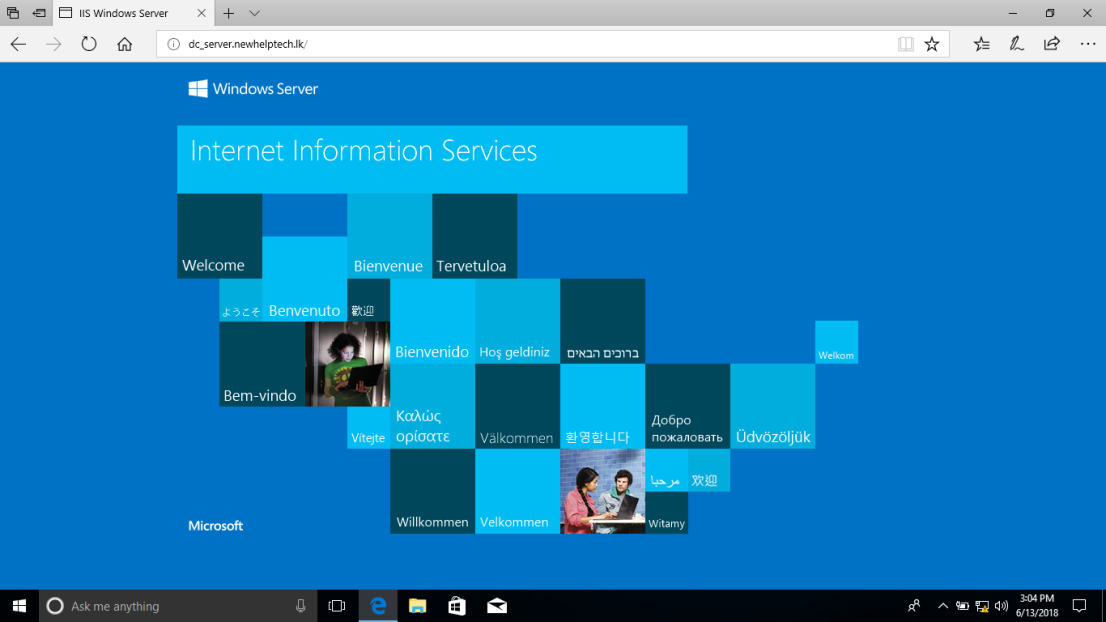
3 – Installation successfully completed then we can perform a simple test by opening up a web browser and browsing to the server that we have installed IIS on. You should see the default IIS page.
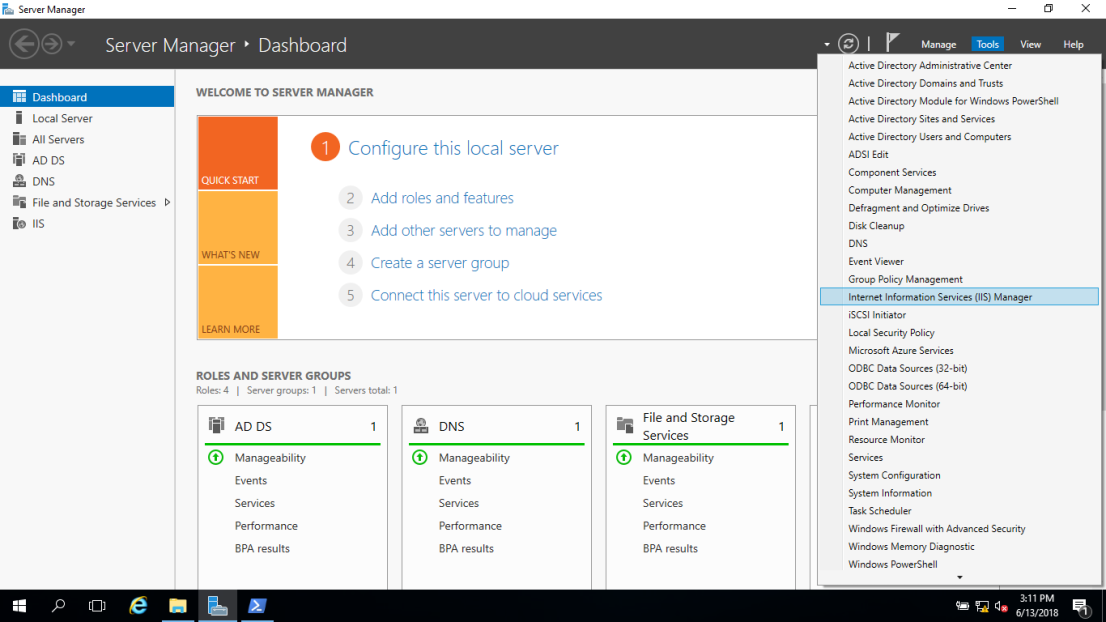
4 – Open your Server Manager, click Tools, and then click Internet Information Services (IIS), Manager
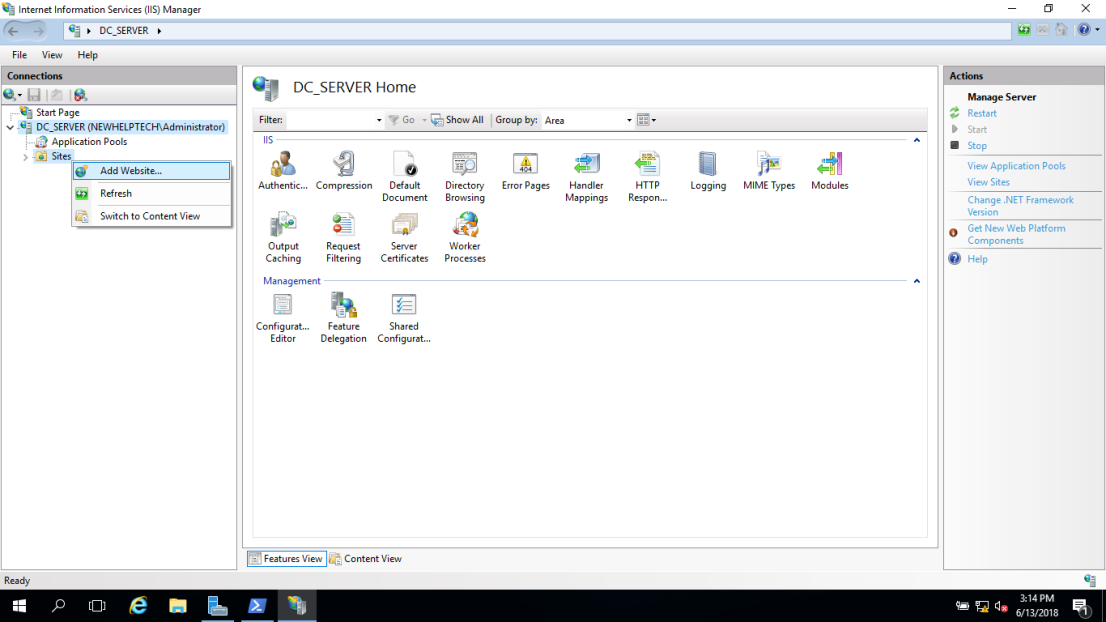
5 – In the Connections pane, right-click the Sites node in the tree, and then click Add Website
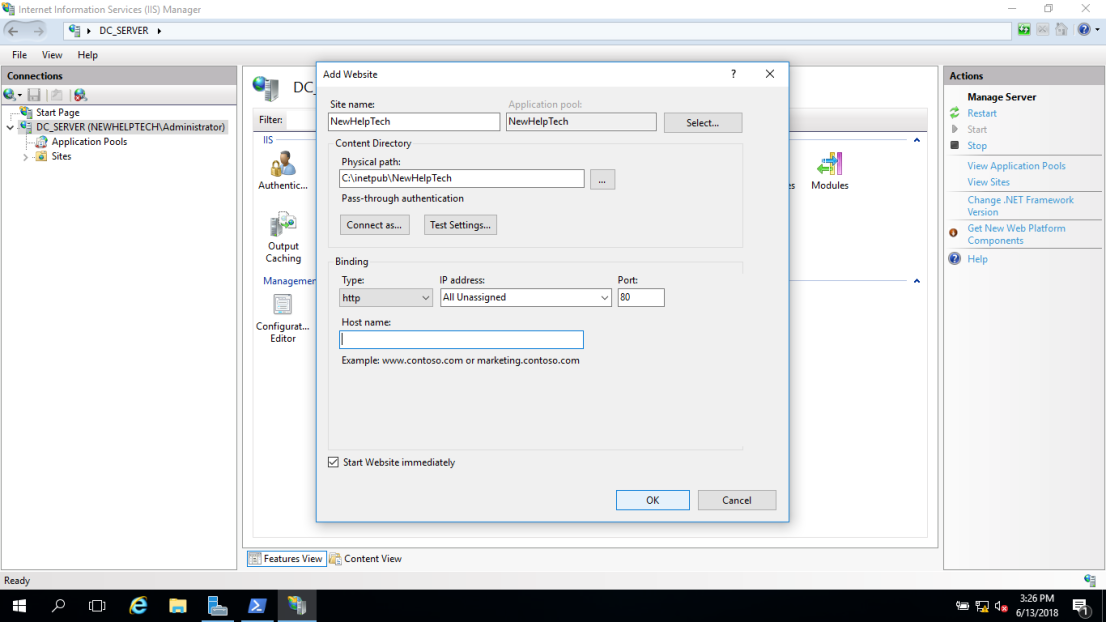
6 – In the Add Website dialog box, enter a friendly name for your website in the Site name box then Click Ok
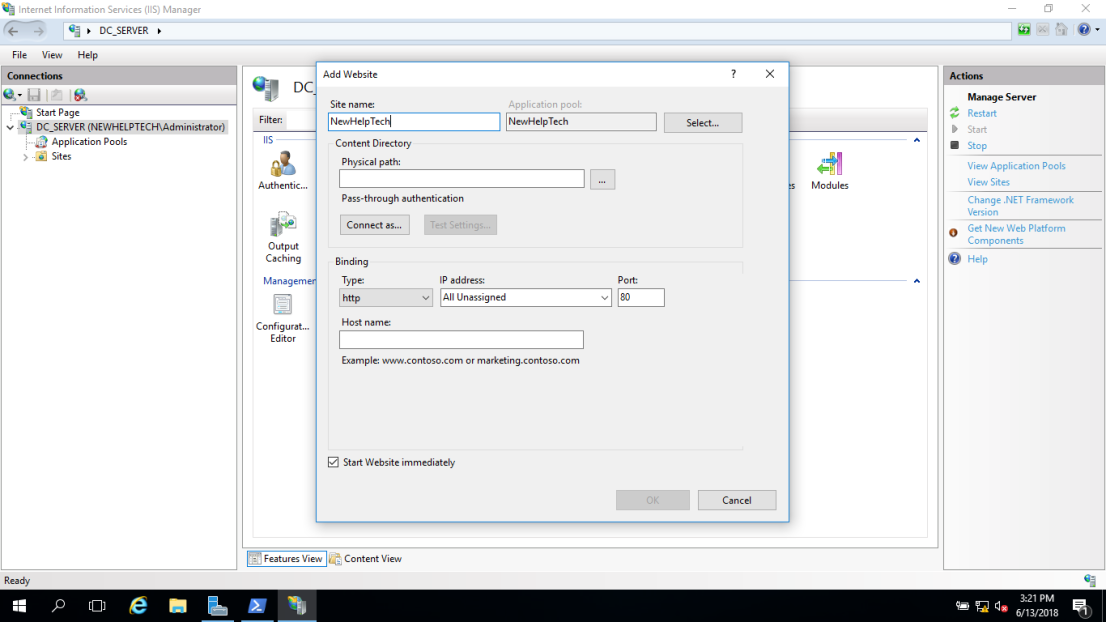
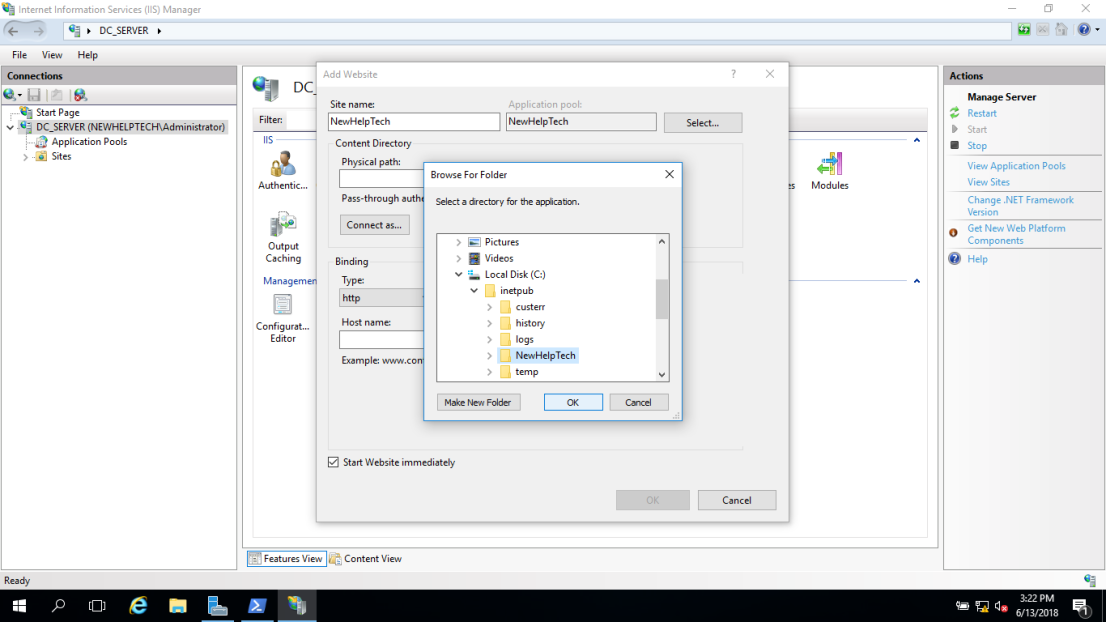
7 – In the Physical path box, enter the physical path of the website’s folder, or click the browse button (…) to navigate the file system to find the folder. (Note: It is best to make a folder in your C: specifically for your websites. I have named mine NewHelpTech)
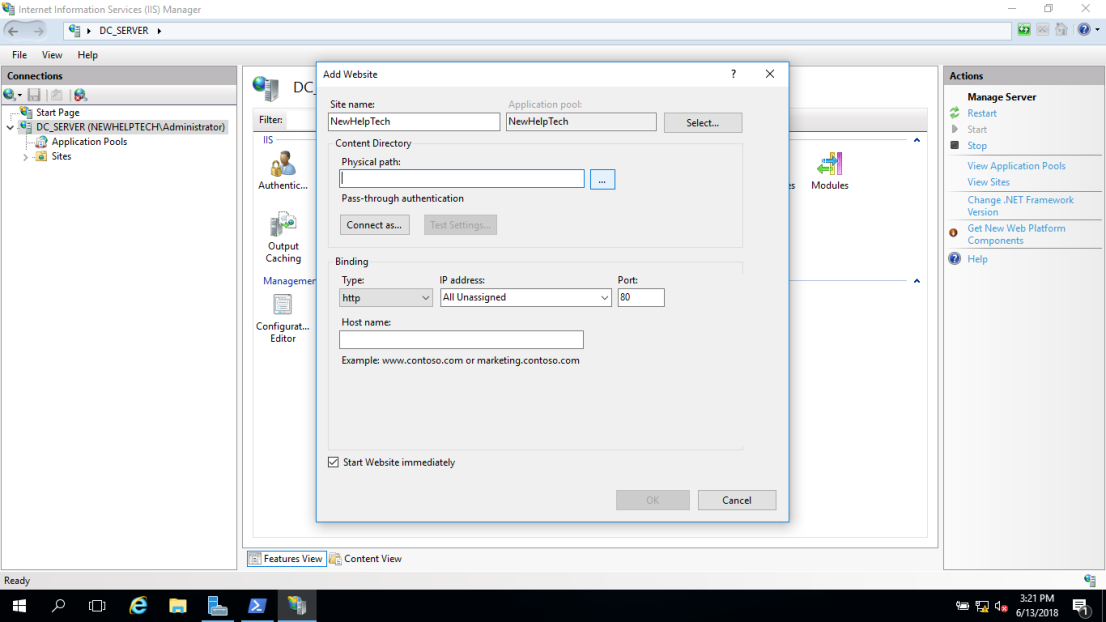
8 – If you do not have to make any changes to the site, and you want the website to be immediately available, select the Start Website immediately checkbox then
Click OK.
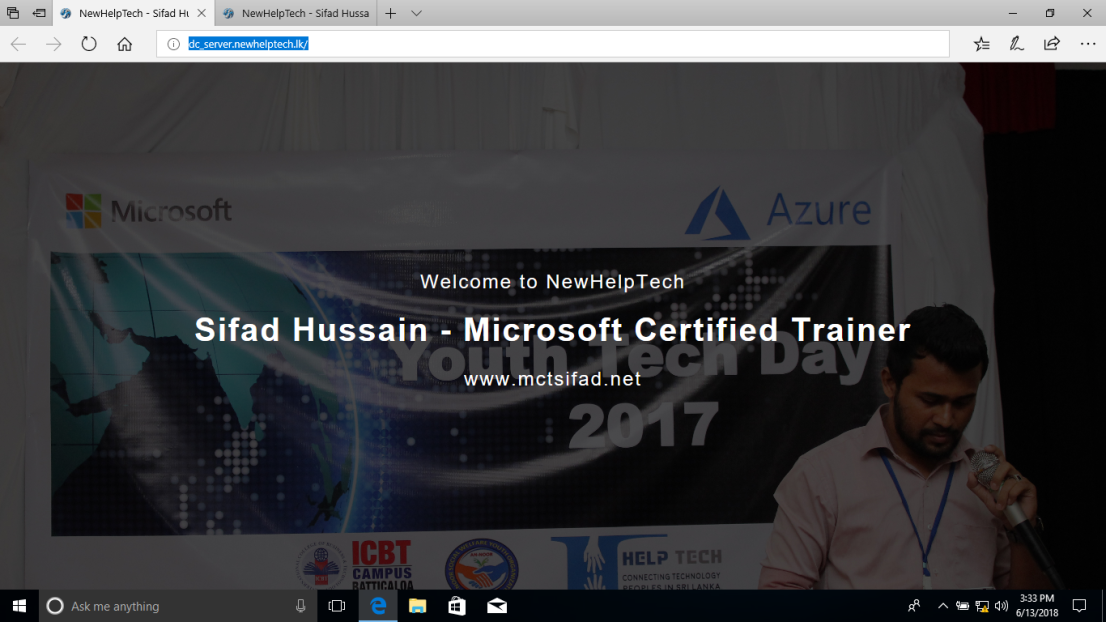
9 – You can now test your site by doing the following, Opening up a web browser and browsing enter your IIS Web Server IP address or Host FQDN Name
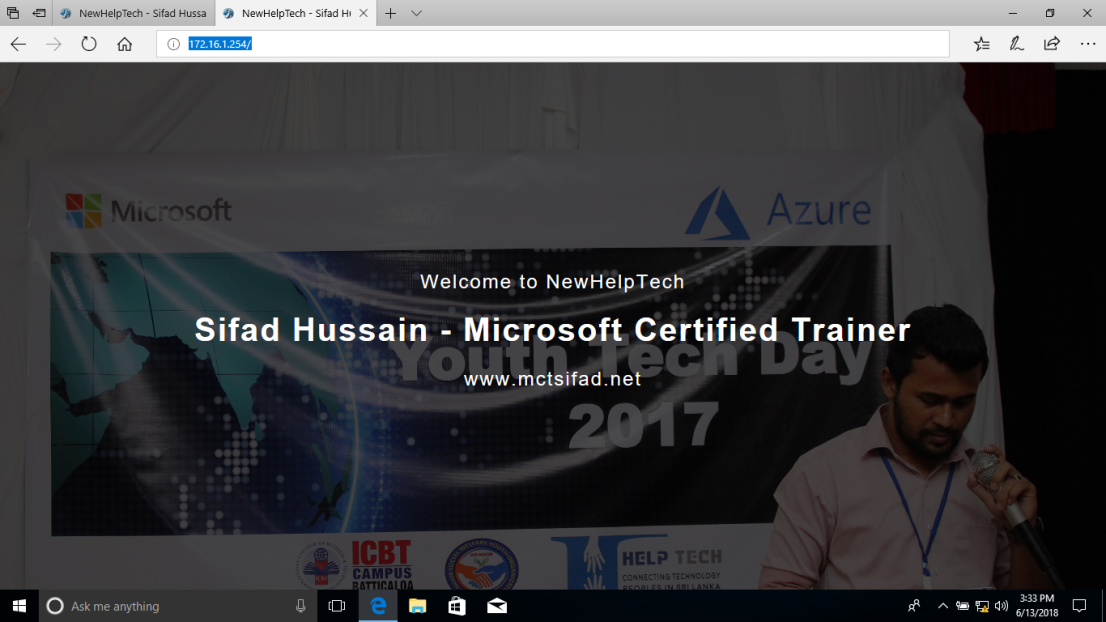
Good luck! Just give it try – I’m sure you’ll love it as well. If you have any comments or questions on feel free to contact me.
That’s all for now. 🙂
How to install Internet Information Services IIS 10 on Windows Server 2016 / 12 and 12R2
![clip_image001_thumb[2]](https://lh3.googleusercontent.com/-IeRilqMuzlc/WJUDGm0rlkI/AAAAAAAAAlI/uLlLY2N-g6I/clip_image001_thumb%25255B2%25255D_thumb.png?imgmax=800 "clip_image001_thumb[2]")
![clip_image002_thumb[2]](https://lh3.googleusercontent.com/-ASkdMGsmtZY/WJUDHNAy6uI/AAAAAAAAAlQ/TLMShLrLGYA/clip_image002_thumb%25255B2%25255D_thumb.png?imgmax=800 "clip_image002_thumb[2]")
There are lots of good New features provided by the IIS 10.0 web server in Windows Server 2016.
- Support for HTTP/2 protocol in the Networking stack and integrated with IIS 10.0, allowing IIS 10.0 websites to automatically serve HTTP/2 requests for supported configurations. This allows numerous enhancements over HTTP/1.1 such as more efficient reuse of connections and decreased latency, improving load times for web pages.
- Ability to run and manage IIS 10.0 in Nano Server. See IIS on Nano Server.
- Support for Wildcard Host Headers, enabling administratorss to set up a web server for a domain and then have the web server serve requests for any subdomain.
- A new PowerShell module (IISAdministration) for managing IIS.
More info https://technet.microsoft.com/en-us/windows-server-docs/get-started/what-s-new-in-windows-server-2016
Deploying Internet Information Services Step by Step
- On your Server Manager Dashboard go to Manage, Add Roles and Features.
![clip_image003_thumb[2]](https://lh3.googleusercontent.com/-P6FXoaTWouA/WJUDHiTGuLI/AAAAAAAAAlY/NuJ8hiCgeLU/clip_image003_thumb%25255B2%25255D_thumb.png?imgmax=800 "clip_image003_thumb[2]")
Once the Add Roles and Features Wizard opens click Next on the Before you Begin Page, on the installation type page select Role-Based or feature-based installation and Next.
![clip_image004_thumb[2]](https://lh3.googleusercontent.com/-hWbKGBSGtV8/WJUDICnus_I/AAAAAAAAAlg/9X9rRRBNSrc/clip_image004_thumb%25255B2%25255D_thumb.png?imgmax=800 "clip_image004_thumb[2]")
- On the Server Selection Page, select the server you will like to perform the installation then Next.
![clip_image005_thumb[2]](https://lh3.googleusercontent.com/-Iu9x6OPj5dI/WJUDIuZOk9I/AAAAAAAAAlo/V17l5D6ui8s/clip_image005_thumb%25255B2%25255D_thumb.png?imgmax=800 "clip_image005_thumb[2]")
- On the Server Roles page, select the Web Server (IIS) and any of the other required components then Next and Next again on the Features Page.
![clip_image006_thumb[2]](https://lh3.googleusercontent.com/-OUoI3uVvD78/WJUDJMuK-cI/AAAAAAAAAlw/azdDY51oG9M/clip_image006_thumb%25255B2%25255D_thumb.png?imgmax=800 "clip_image006_thumb[2]")
- On the Confirmation Page, review and then Install to complete the IIS installation
![clip_image007_thumb[2]](https://lh3.googleusercontent.com/-J-7BCQDaV9s/WJUDJgsLG6I/AAAAAAAAAl4/2YXL6Oa9TIQ/clip_image007_thumb%25255B2%25255D_thumb.png?imgmax=800 "clip_image007_thumb[2]")
- Once the role is installed then Browse for the IIS Manager on the Start menu or by just clicking on Tools
![clip_image008_thumb[2]](https://lh3.googleusercontent.com/-ub6KcZotZTI/WJUDKHADB5I/AAAAAAAAAmA/XReI3ILug6U/clip_image008_thumb%25255B2%25255D_thumb.png?imgmax=800 "clip_image008_thumb[2]")
- Now that you have installed the IIS role you can utilize the IIS manager to navigate and create your new website.
![clip_image009_thumb[5]](https://lh3.googleusercontent.com/-w0-rhy97GLo/WJUDKpGsXHI/AAAAAAAAAmI/4rztat4W_A8/clip_image009_thumb%25255B5%25255D_thumb.png?imgmax=800 "clip_image009_thumb[5]")
![image_thumb[7]](https://lh3.googleusercontent.com/-WOeUwf1Z6Fo/WJUDLH4x3sI/AAAAAAAAAmQ/JKnCRkwytGU/image_thumb%25255B7%25255D_thumb.png?imgmax=800 "image_thumb[7]")
That’s it, you have deployed your new IIS 10 on Windows Server 2016.