Были ли сведения полезными?
(Чем больше вы сообщите нам, тем больше вероятность, что мы вам поможем.)
(Чем больше вы сообщите нам, тем больше вероятность, что мы вам поможем.)
Насколько вы удовлетворены качеством перевода?
Что повлияло на вашу оценку?
Моя проблема решена
Очистить инструкции
Понятно
Без профессиональной лексики
Полезные изображения
Качество перевода
Не соответствует интерфейсу
Неверные инструкции
Слишком техническая информация
Недостаточно информации
Недостаточно изображений
Качество перевода
Добавите что-нибудь? Это необязательно
Спасибо за ваш отзыв!
×
Проводник Windows — это приложение, реализующее графический интерфейс доступа пользователя к файлам в операционной системе Microsoft Windows. Аналог Проводника имеется и в открытой графической оболочки пользователя Windows.
Содержание
- 1 Об оболочке Windows
- 2 Обзор
- 3 Развитие проводника Windows
- 3.1 Windows 95
- 3.2 Windows Desktop Update
- 3.3 Windows 2000 и Windows Me
- 3.4 Windows XP
- 3.4.1 Список задач
- 3.4.2 Помощник по поиску
- 3.4.3 Управление изображениями
- 3.4.4 Публикация в Интернете
- 3.4.5 Другие изменения
- 3.5 Windows Server 2003
- 3.6 Windows Vista
- 4 Расширения оболочки, написанные в .NET
- 5 Ссылки
Об оболочке Windows
В Windows одна из программ, которая запускается вместе с Windows, называется оболочкой (Windows shell).
Оболочка называлась:
- Windows 1 и 2 — MS-DOS Executive
- Windows 3 — Диспетчер программ
- Windows 95 и далее — Проводник Windows.
Программу-оболочку можно заменить на другую. Существуют замены оболочки Norton Desktop, Aston shell,
Обзор
Проводник Windows впервые появился в Windows 95 как замена диспетчера программ и диспетчера файлов Windows 3.x. Всё, что видит пользователь после загрузки Windows (иконки рабочего стола, панель задач, меню «Пуск» — кроме разве что «обоев») — это Проводник Windows.
Но иногда Проводником называют его часть, предназначенную для манипуляции файлами. Её можно вызвать двойным щелчком по иконке Мой компьютер, запустить из меню Пуск (которое заменило Program Manager из Windows 3.x), воспользоваться клавиатурным сокращением Win+E.
Последующие версии Windows, и в некоторых случаях, версии Internet Explorer, добавляли новые возможности, убирали другие, постепенно формируя из простой системы навигации по файлам полнофункциональную задаче-ориентированную систему управления файлами.
За функционирование Проводника Windows отвечает процесс explorer.exe. Функции explorer.exe:
- Отображение папок и файлов, включая «Панель управления», «Планировщик задач», «Принтеры и факсы», «Шрифты» и т. п.
- Отображение оболочки Windows: панели задач с кнопкой «Пуск» и значков рабочего стола.
Explorer.exe не является критическим процессом и может быть закрыт с помощью Диспетчера задач. После его закрытия на экране остается лишь фоновая картинка. Процесс может быть перезапущен с помощью Диспетчера задач.
Развитие проводника Windows
Windows 95
Проводник Windows предоставляет режим просмотра, в котором каждый каталог открывается в новом окне, показывая его содержимое в виде двумерного набора иконок. Размеры и способ представления автоматически выбираются исходя из характеристик только что открытого каталога. Например, каталог, содержащий два файла, будет меньшего размера, чем тот, который содержит 10 файлов. Если каталог содержит сотни файлов, то будет установлен режим представления Список. Примерно так же работал Program Manager в Windows 3.x.
В Windows 95 Проводник больше всего напоминал пространственно-ориентированный менеджер файлов наподобие Macintosh Finder. В следующих версиях Проводника большая часть этой функциональности была отключена по умолчанию, предпочтение было отдано однооконному режиму.
Windows Desktop Update
После выпуска обновления Рабочего Стола Windows (Windows Desktop Update), дополнительного компонента, который впоследствии был интегрирован в Windows 98, развитие Проводника было продолжено на базе технологии Internet Explorer. Необходимо отметить добавление навигации между недавно посещёнными каталогами (стрелочки вперёд/назад). Впоследствии эта особенность была перенята многими другими файловыми менеджерами.
В Проводник была добавлена панель ввода адреса, где пользователь может ввести путь к каталогу и перейти туда. Также можно ввести
Другим нововведённым средством, которое базировалось на технологии Internet Explorer, были настраиваемые каталоги. Такие каталоги содержали скрытые интернет-страницы, которая управляла способом представления содержимого каталога. Такая функциональность имела свои уязвимости, так как опиралась на скрипты и ActiveX-объекты, и поэтому была убрана из Windows XP.
Другие изменения:
- Возможность добавлять дополнительные панели в панель задач, наиболее заметной из них является панель Быстрого запуска .
- «Активный рабочий стол», который позволил превратить фон рабочего стола в интернет-страницу.
- Возможность запуска приложений по однократному щелчку (влияние парадигмы интернет-страницы).
- Новые виртуальные каталоги для запланированных задач и интернет-папок.
Windows 2000 и Windows Me
Был добавлен поиск документов и файлов, предоставляя полнотекстовый поиск, фильтрацию по дате, размеру и типу файла.
Кроме того, аудио- и видеофайлы можно просто просмотреть в панели предпросмотра Проводника Windows 2000. Эта возможность характерна только для Windows 2000, последующие версии Windows позволяют пользователю просматривать только первый кадр видеофайла, и ничего, кроме метаданных аудиофайлов.
Windows XP

Проводник Windows XP
В Windows XP Проводник подвергся значительным изменениям, как визуального представления, так и функциональности.
цифрового центра различного домашнего и, в первую очередь, развлекательного оборудования.
Список задач
Список задач
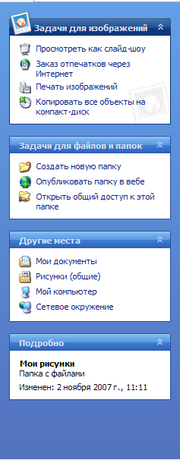
Одним из непосредственно заметных изменений стало появление панели список задач, которая отображается в левой части окна, вместо обычного вида дерева папок. Список задач предоставляет пользователю список общих действий и назначений, относительно к текущей папке и выбранному файлу. Например, для каталога, содержащего изображения, будет показан набор «Операции над изображениями», предлагая показать эти картинки как слайд-шоу, распечатать их или заказать в Интернете. Также, для папок с музыкой, будут предложены действия по проигрыванию файлов, либо их покупки.
Каждый каталог также содержит «Задачи для файлов и папок», предлагающих создать новые папки, открыть общий доступ, опубликовать в Интернете. А также другие обыкновенные действия, такие как копирование, удаление, переименование папок и файлов. Типы файлов, которые опознали себя как способные к печати, дополнительно получают действие по печати этого документа.
Ниже находится панель «Другие места», содержащая списки, которые указывают на другие папки, расположенные рядом, или имеющие какую-либо связь с данной. Например, папка «Мой компьютер», «Панель управления», «Мои документы». Выбор этих папок иногда нелогичен, что приводило к критике Microsoft за её выбор точек навигации.
Ещё ниже находится панель «Детали», которая предоставляет дополнительную информацию о папке или файлах, обычно размер и дату создания, но, в зависимости, от типа файла, может быть показан эскиз, автор, линейный размер изображения или другие детали.
Кнопкой «Папки» можно переключаться между обычной панелью дерева каталогов и списком задач. Панель может быть отключена в элементе управления «Свойства папки»: «Отображать простой вид папок»
Помощник по поиску
Помощник по поиску
Функциональность поиска в Windows XP была слегка расширена по отношению к предыдущим версиям. Весьма сомнительным новшеством было введение анимированного персонажа Microsoft Agent, который является полным аналогом помощника из Microsoft Office. Анимированный персонаж был введён в попытку сделать поиск более дружелюбным и увлекательным. Кроме персонажа по умолчанию, щенка Тузика (Rover), есть ещё три анимированных персонажа: Маг (Merlin the magician), Марина (Courtney) и Сан Саныч (Earl the surfer).
Функциональность поиска практически эквивалентна функциональности в Windows 2000 и Windows Me, за исключением того, что поиск можно ограничить только «Документами» или «Изображение, музыку или видео». Эта особенность достойна упоминания только по следующей причине: чтобы определить список типов файлов, соответствующих этой категории, Проводник соединяется с сервером Microsoft и скачивает набор
Управление изображениями
Для улучшения предпросмотра изображений в Windows XP ввёден режим Диафильм. Кнопками «Вперёд», «Назад» можно пролистывать изображения, просматривая текущее в большом разрешении, при этом доступны к обозрению близлежащие изображения. Также есть режим просмотра эскизов, в котором реализована метафора пространственно-ориентированного менеджера файлов. Каталог представляется как набор эскизов документов, содержащихся в нём. Также каталог, в котором есть изображения будет представлен четыремя первыми эскизами изображений, которые есть в нём.
Публикация в Интернете
Интернет сайты, которые предоставляют услуги хранения изображений, могут быть подключены к Проводнику Windows, после чего пользователь может загрузить выбранные изображения или папки в Интернет, без необходимости использования
Другие изменения
- Проводник стал способен понимать метаданные многих типов файлов. Например, у изображений, сделанных цифровой камерой, можно просмотреть информацию из блока
- Добавлен режим Плитка, в котором иконка файла представляется в увеличенном разрешении (48×48), и справа размещается дополнительная информация: имя, тип, размер, производитель.
- Панели инструментов могут быть заблокированы от случайного изменения/перемещения.
- Теперь Проводник может записывать DVD-RAM диски без привлечения сторонних программ.
Windows Server 2003
Проводник в Windows Server 2003 поддерживает ту же функциональность, как и в Windows XP, но панель списка задач и помощник поиска по-умолчанию выключены.
Windows Vista
Меню «Поиск» исчезло, на смену ему пришла панель поиска в правом верхнем углу «Поиск». «Папки» теперь является панелью и размещена вместе с избранными папками. Панель слева является областью дополнительных папок. Верхняя панель приобрела более современный вид. Добавилась возможность просматривать эскизы таких файлов, как документы Microsoft Office Word, таблиц Microsoft Office Excel, презентаций Microsoft Office PowerPoint, документов
Расширения оболочки, написанные в .NET
Не рекомендуется писать расширения оболочки в языках .NET, так как позволяется только одна среда выполнения CLR для одного процесса, поэтому может возникнуть конфликт между двумя расширениями оболочки, использующим разные версии CLR.
Ссылки
- Explorer.exe Command-Line Options for Windows XP (англ.)
|
Компоненты Microsoft Windows |
||
|---|---|---|
| Ядро |
Aero • Desktop Window Manager • Проводник (Explorer) • Панель задач • Меню «Пуск» • Shell (namespace • Special Folders • File associations) • Search (Saved search • iFilters) • Graphics Device Interface • WIM • Next Generation TCP/IP stack () • .NET Framework • Audio • Printing (XML Paper Specification) • Active Scripting (WSH • VBScript • COM (OLE • OLE Automation • DCOM • ActiveX • ActiveX Document • Structured storage • Transaction Server) • Previous Versions • WDDM • UAA • Win32 console |
|
| Службы управления |
Backup and Restore Center • Панель управления (Applets) • Диспетчер устройств • Очистка диска • Дефрагментация диска • Event Viewer • Management Console • Problem Reports and Solutions • Sysprep • • Диспетчер задач • System File Checker • Восстановление системы • Windows Installer • Windows PowerShell • Windows Update • WinSAT • Windows Easy Transfer |
|
| Приложения |
Калькулятор • Calendar • Таблица символов • Contacts • DVD Maker • Fax and Scan • Internet Explorer • Journal • Outlook Express • Почта Windows • Magnifier • Media Center • Meeting Space • Mobile Device Center • Mobility Center • Movie Maker • Narrator • Notepad • Paint • Фотоальбом • Private Character Editor • Remote Assistance • Sidebar • Snipping Tool • Звукозапись • Windows Media Player • Windows Speech Recognition • Игры |
Chess Titans • Hold ‘Em • InkBall • Mahjong Titans • Purble Place • Пасьянс «Косынка» • Пасьянс «Паук» • Сапёр • Пасьянс «Свободная ячейка» • Пинбол • Червы |
| Ядро ОС |
hal.dll • System Idle Process • Registry (реестр) • Windows service • Service Control Manager • EXE • Boot Manager • Recovery Console • I/O • WinRE • WinPE • Kernel Patch Protection |
|
| Службы |
Autorun • BITS • Task Scheduler • Wireless Zero Configuration • Shadow Copy • Windows Error Reporting • Multimedia Class Scheduler • CLFS |
|
| Файловые системы |
Hard link • Junction point • Mount Point • Reparse point • Symbolic link • TxF • FAT • CDFS • UDF • DFS • IFS |
|
| Сервер |
Domains • Active Directory • DNS • Групповая политика • Roaming user profiles • Folder redirection • Координатор распределённых транзакций • MSMQ • Windows SharePoint Services • Windows Media Services • Rights Management Services • IIS • Terminal Services • WSUS • Network Access Protection • DFS Replication • Remote Differential Compression • Print Services for UNIX • Remote Installation Services • Windows Deployment Services • Windows System Resource Manager • Hyper-V |
|
| Архитектура |
NT series architecture • Object Manager • Startup process (Vista) • I/O request packets • Kernel Transaction Manager • Logical Disk Manager • Security Accounts Manager • Windows Resource Protection • LSASS • CSRSS • SMSS |
|
| Безопасность |
UAC • BitLocker • Defender • DEP • Protected Media Path • Mandatory Integrity Control • UIPI • Windows Firewall • Security Center |
|
| Совместимость |
Unix subsystem (Interix) • Virtual DOS Machine • Windows on Windows • |
|
|
Файловые менеджеры |
||
| Мультиплатформенные | File Arranger • Midnight Commander |  |
| Для Unix-подобных ОС | BSCommander • Demos Commander • Dolphin • GNOME Commander • Krusader • Nautilus • Thunar • Tux Commander • Xfe | |
| Для Mac OS X | 2finder • Disk Order • Finder • FlyPath • ForkLift • Path Finder • Xfolder | |
| Для Microsoft Windows | A43 • Altap Salamander • Directory Opus • DOS Navigator Open Source • EF Commander • FAR Manager • FileCommander • File Navigator • Free Commander • Frigate • Gyula’s Navigator • JExplorer • NexusFile • Nomad.NET • SpeedCommander • Total Commander • Unreal Commander • xplorer2 • Проводник | |
| Для DOS Navigator • Norton Commander • PIE Commander • Sparrow Commander • Volkov Commander | ||
| Для Navi Tracker • Tracker • Tracker.NewFS | ||
| Symbian OS (Series 60) | FileMan • SeleQ • Symbian Commander | |
| Windows Mobile | Bynarys Smart Explorer • Pocket Total Commander | |
| Для других платформ | Advanced Explorer (muCommander (Java) |
Wikimedia Foundation.
2010.
This article is about the Microsoft Windows file listing browser. For exploring file system listings, see file browser. For exploring inside files, see file viewer.

File Explorer on Windows 11 in Light App Mode showing special folders on Home, with the new command bar and tabs feature. |
|
| Developer(s) | Microsoft |
|---|---|
| Initial release | August 15, 1995; 27 years ago |
| Stable release |
22H2 (10.0.22621.1194) (January 26, 2023; 9 days ago[1]) [±] |
| Preview release |
;Release Preview Channel 22H2 (10.0.22621.1194) (January 26, 2023; 9 days ago[2][3]) [±]
22H2 (10.0.22623.1250) (February 2, 2023; 2 days ago[4]) [±]
10.0.25290.1000 (February 1, 2023; 3 days ago[5]) [±] |
| Included with | Windows 95 and later |
| Predecessor | Program Manager, File Manager |
| Type | Shell, file manager |
File Explorer, previously known as Windows Explorer, is a file manager application that is included with releases of the Microsoft Windows operating system from Windows 95 onwards. It provides a graphical user interface for accessing the file systems. It is also the component of the operating system that presents many user interface items on the screen such as the taskbar and desktop. Controlling the computer is possible without Windows Explorer running (for example, the File ▸ Run command in Task Manager on NT-derived versions of Windows will function without it, as will commands typed in a command prompt window).
Overview[edit]
Windows Explorer was first included with Windows 95 as a replacement for File Manager, which came with all versions of Windows 3.x operating systems. Explorer could be accessed by double-clicking the new My Computer desktop icon or launched from the new Start Menu that replaced the earlier Program Manager. There is also a shortcut key combination: Windows key+E. Successive versions of Windows (and in some cases, Internet Explorer) introduced new features and capabilities, removed other features, and generally progressed from being a simple file system navigation tool into a task-based file management system.
While «Windows Explorer» or «File Explorer» is a term most commonly used to describe the file management aspect of the operating system, the Explorer process also houses the operating system’s search functionality and File Type associations (based on filename extensions), and is responsible for displaying the desktop icons, the Start Menu, the Taskbar, and the Control Panel. Collectively, these features are known as the Windows shell.
After a user logs in, the explorer process is created by the userinit process. Userinit performs some initialization of the user environment (such as running the login script and applying group policies) and then looks in the registry at the Shell value and creates a process to run the system-defined shell – by default, Explorer.exe. Then Userinit exits. This is why Explorer.exe is shown by various process explorers with no parent – its parent has exited.
History[edit]
In 1995, Microsoft first released test versions of a shell refresh, named the Shell Technology Preview, and often referred to informally as «NewShell».[6] The update was designed to replace the Windows 3.x Program Manager/File Manager based shell with Windows Explorer. The release provided capabilities quite similar to that of the Windows «Chicago» (codename for Windows 95) shell during its late beta phases, however was intended to be nothing more than a test release.[7] There were two public releases of the Shell Technology Preview, made available to MSDN and CompuServe users: May 26, 1995 and August 8, 1995. Both held Windows Explorer builds of 3.51.1053.1. The Shell Technology Preview program never saw a final release under NT 3.51. The entire program was moved across to the Cairo development group who finally integrated the new shell design into the NT code with the release of NT 4.0 in July 1996.
Windows 98 and Windows Desktop Update[edit]
With the release of the Windows Desktop Update (packaged with Internet Explorer 4 as an optional component, and included in Windows 98), Windows Explorer became «integrated» with Internet Explorer, most notably with the addition of navigation arrows (back and forward) for moving between recently visited directories, as well as Internet Explorer’s Favorites menu.
An address bar was also added to Windows Explorer, which a user could type in directory paths directly, and be taken to that folder.
Another feature that was based on Internet Explorer technology was customized folders. Such folders contained a hidden web page that controlled the way the Windows Explorer displayed the contents of the folder.
Windows ME and Windows 2000[edit]

The integrated media player in Windows Explorer in Windows 2000, playing a MIDI sequence on Media folder
The «Web-style» folders view, with the left Explorer pane displaying details for the object currently selected, is turned on by default. For certain file types, such as pictures and media files, a preview is also displayed in the left pane.[8] The Windows 2000 Explorer featured an interactive media player as the previewer for sound and video files. However, such a previewer can be enabled in Windows ME through the use of folder customization templates.[9] Windows Explorer in Windows 2000 and Windows ME allows for custom thumbnail previewers and tooltip handlers. The default file tooltip displays file title, author, subject and comments;[10] this metadata may be read from a special NTFS stream, if the file is on an NTFS volume, or from a COM Structured Storage stream, if the file is a structured storage document. All Microsoft Office documents since Office 95[11] make use of structured storage, so their metadata is displayable in the Windows 2000 Explorer default tooltip. File shortcuts can also store comments which are displayed as a tooltip when the mouse hovers over the shortcut.
The right-hand pane, which usually just lists files and folders, can also be customized. For example, the contents of the system folders aren’t displayed by default, instead showing in the right pane a warning to the user that modifying the contents of the system folders could harm their computer. It’s possible to define additional Explorer panes by using DIV elements in folder template files.[12] This feature was abused by computer viruses that employed malicious scripts, Java applets, or ActiveX controls in folder template files as their infection vector. Two such viruses are VBS/Roor-C[13] and VBS.Redlof.a.[14]
Other Explorer UI elements that can be customized include columns in «Details» view, icon overlays, and search providers: the new DHTML-based search pane is integrated into Windows 2000 Explorer, unlike the separate search dialog found in all previous Explorer versions.[15]
Search capabilities were added, offering full-text searches of documents, with options to filter by date (including arbitrary ranges like «modified within the last week»), size, and file type. The Indexing Service has also been integrated into the operating system and the search pane built into Explorer allows searching files indexed by its database.[16] The ability to customize the standard buttons was also added.
Windows XP and Windows Server 2003[edit]

Windows Explorer in Windows XP, showing All Users folder contents
There were significant changes made to Windows Explorer in Windows XP, both visually and functionally. Microsoft focused especially on making Explorer more discoverable and task-based, as well as adding several new features to reflect the growing use of a computer as a digital hub.
Windows Explorer in Windows Server 2003 contains all the same features as Windows XP, but the task panes and search companion are disabled by default.
Task pane[edit]
The task pane is displayed on the left-hand side of the window instead of the traditional folder tree view. It presents the user with a list of common actions and destinations that are relevant to the current directory or file(s) selected. For instance, when in a directory containing mostly pictures, a set of «Picture tasks» is shown, offering the options to display these pictures as a slide show, to print them out, or to go online to order prints. Conversely, a folder containing music files would offer options to play those files in a media player or to go online to purchase music. Windows XP had a Media bar but it was removed with SP1. The Media Bar was only available with Windows XP RTM.
Every folder also has «File and Folder Tasks», offering options to create new folders, share a folder on the local network, publish files or folders to a website, and other common tasks like copying, renaming, moving, and deleting files or folders. File types that have identified themselves as being printable also have an option listed to print the file.
Underneath «Other Places» is a «Details» pane which gives additional information – typically file size and date, but depending on the file type, a thumbnail preview, author, image dimensions, or other details.
The «Folders» button on the Windows Explorer toolbar toggles between the traditional tree view of folders, and the task pane. Users can get rid of the task pane or restore it using the sequence: Tools – Folder Options – General – Show Common Tasks/Use Windows Classic Folders.
Search companion[edit]
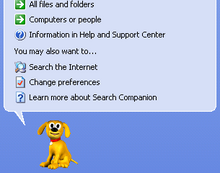
Windows Explorer’s default Search Companion, Rover, in Windows XP
Microsoft introduced animated «Search Companions» in an attempt to make searching more engaging and friendly; the default character is a puppy named Rover (previously used in Microsoft Bob), with three other characters (Merlin the magician, Earl the surfer, and Courtney) also available. These search companions use the same technology as Microsoft Office’s Office Assistants, even incorporating «tricks» and sound effects, and they can be used as Office Assistants if their files are copied into the C:Windowsmsagentchars folder.[17]
The search capability itself is fairly similar to Windows ME and Windows 2000, with one major addition: Search can also be instructed to search only files that are categorical «Documents» or «Pictures, music and video»; this feature is noteworthy largely because of how Windows determines what types of files can be classified under these categories. In order to maintain a relevant list of file types, Windows Explorer connects to Microsoft and downloads a set of XML files that define what these file types are. The Search Companion can be disabled in favor of the classic search pane used in Windows 2000 by using the Tweak UI applet from Microsoft’s PowerToys for Windows XP, or by manually editing the registry.
Image handling[edit]

Windows XP improves image preview in Explorer by offering a Filmstrip view. «Back» and «Previous» buttons facilitate navigation through the pictures, and a pair of «Rotate» buttons offer 90-degree clockwise and counter-clockwise (lossy)[18] rotation of images. Aside from the Filmstrip view mode, there is a ‘Thumbnails’ mode, which displays thumbnail-sized images in the folder. A Folder containing images will also show thumbnails of four of the images from that folder overlaid on top of a large folder icon.
Web publishing[edit]
Web sites that offer image hosting services can be plugged into Windows Explorer, which the user can use to select images on their computer, and have them uploaded correctly without dealing with comparatively complex solutions involving FTP or web interfaces.[citation needed]
Other changes[edit]
- Explorer gained the ability to understand the metadata of a number of types of files. For example, with images from a digital camera, the Exif information can be viewed, both in the Properties pages for the photo itself, as well as via optional additional Details View columns.
- A Tile view mode was added, which displays the file’s icon in a larger size (48 × 48), and places the file name, descriptive type, and additional information (typically the file size for data files, and the publisher name for applications) to the right.
- The Details view also presented an additional option called «Show in Groups» which allows the Explorer to separate its contents by headings based on the field which is used to sort the items.
- The taskbar can be locked to prevent it from accidentally being moved.
- Windows Explorer also gained the ability to burn CDs and DVD-RAM discs in Windows XP.
- Ability to create and open ZIP files called «compressed folders».[19][20]
- Ability to open Cabined (.cab) files.[21]
- If a
.HTMor.HTMLfile is copied or moved, the accompanying_filessuffix folder is copied or moved among it automatically.[22]
Removed and changed features[edit]
|
This section needs expansion. You can help by adding to it. (December 2012) |
- The sort order has changed compared to the one in Windows 2000. For file names containing numbers Windows Explorer now tries to sort based on numerical value rather than just comparing each number digit by digit.[23]
Windows Vista and Windows Server 2008[edit]

Windows Explorer in Windows Vista, showing Public folder contents
Search, organizing and metadata[edit]
Windows Explorer includes significant changes from previous versions of Windows such as improved filtering, sorting, grouping and stacking. Combined with integrated desktop search, Windows Explorer allows users to find and organize their files in new ways, such as stacks.[24][25] The new Stacks viewing mode groups files according to the criterion specified by the user.[25] Stacks can be clicked to filter the files shown in Windows Explorer. There is also the ability to save searches as virtual folders or search folders.[26] A search folder is simply an XML file, which stores the query in a form that can be used by the Windows search subsystem.[27] When accessed, the search is executed and the results are aggregated and presented as a virtual folder.[26] Windows Vista includes six search folders by default: recent documents, recent e-mail, recent music, recent pictures and videos, recent changed, and «Shared by Me».[28] Additionally, search operators for properties were introduced, such as kind:music. [29] Since at least Windows 7, comparison operators «greater than» and «less than» are supported to search for any supported attribute such as date ranges and file sizes, like size:>100MB to search for all files that are greater than 100MB.[30] Attributes sortable and searchable in Windows Explorer include pictures’ dimensions, Exif data such as aperture and exposure, video duration and framerate and width.[31]
When sorting items, the sort order no longer remains consistently Ascending or Descending. Each property has a preferred sort direction. For example, sort by date defaults to descending order, as does size. But name and type default to ascending order.
Searching for files containing a given text string became problematic with Vista unless the files had been indexed. An alternative is to use the findstr command-line function.[32] After right-clicking on a folder one can open a command-line prompt in that folder.
Windows Explorer also contains modifications in the visualization of files on a computer. A new addition to Windows Explorer in Vista and Server 2008 is the details pane, which displays metadata and information relating to the currently selected file or folder. The details pane will also display a thumbnail of the file or an icon of the filetype if the file does not contain visual information. Furthermore, different imagery is overlaid on thumbnails to give more information about the file, such as a picture frame around the thumbnail of an image file, or a filmstrip on a video file.
![]()
The details pane also allows for the change of some textual metadata such as author and title in files that support them within Windows Explorer. A new type of metadata called tags allows users to add descriptive terms to documents for easier categorization and retrieval. Some files support open metadata, allowing users to define new types of metadata for their files. Out-of-the-box, Windows Vista and Windows Server 2008 supports Microsoft Office documents and most audio and video files. Support for other file types can however be added by writing specialized software to retrieve the metadata at the shell’s request. Metadata stored in a file’s alternate data stream only on NTFS volumes cannot be viewed and edited through the summary tab of the file’s properties anymore. Instead, all metadata is stored inside the file, so that it will always travel with the file and not be dependent on the file system.[33]
Layout and icons[edit]
Windows Explorer in Windows Vista and Windows Server 2008 also introduces a new layout. The task panes from Windows XP are replaced with a toolbar on top and a navigation pane on the left. The navigation pane contains commonly accessed folders and preconfigured search folders. Eight different views are available to view files and folders, including extra large, large, medium, small, list, details, tiles, and content. In addition, column headers now appear in all icon viewing modes,[25] unlike Windows XP where they only appear in the details icon viewing mode.[24] File and folder actions such as cut, copy, paste, undo, redo, delete, rename and properties are built into a dropdown menu which appears when the Organize button is clicked. It is also possible to change the layout of the Explorer window by using the Organize button. Users can select whether to display classic menus, a search pane, a preview pane, a reading pane, and the navigation pane. The preview pane enables users to preview files (e.g., documents or media files) without opening them. If an application, such as Office 2007, installs preview handlers for file types, then these files can also be edited within the preview pane itself.[34]
Windows Vista saw the introduction of the breadcrumb bar for easier navigation. As opposed to the prior address bar which displayed the current folder in a simple editable combobox, this new style structures the path into clickable levels of folder hierarchy (though falls back to the classic edit mode when a blank area is clicked), enabling the user to skip as many levels as desired in one click rather than repeatedly clicking «Up». It is also possible to navigate to any subfolder of the current folder using the arrow to the right of the last item. The menu bar is now hidden by default but reappears temporarily when the user presses Alt.
Check boxes in Windows Explorer allow the selection of multiple files.[35] Free and used space on all drives is shown in horizontal indicator bars. Icons of various sizes are supported: 16 x 16, 24 x 24, 32 x 32, 48 x 48, 64 x 64, 96 x 96, 128 x 128 and 256 x 256. Windows Explorer can zoom the icons in and out using a slider or by holding down the Ctrl key and using the mouse scrollwheel.[36] Live icons can display the content of folders and files themselves rather than generic icons.[37]
Other changes[edit]
With the release of Windows Vista and Server 2008 and Windows Internet Explorer 7 for Windows XP, Internet Explorer is no longer integrated with Windows Explorer. In Windows Vista and Server 2008 (and in Windows XP as well if IE7 or 8 is installed), Windows Explorer no longer displays web pages, and IE7 does not support use as a file manager, although one will separately launch the other as necessary.
When moving or copying files from one folder to another, if two files have the same name, an option is now available to rename the file; in previous versions of Windows, the user was prompted to choose either a replacement or cancel moving the file. Also, when renaming a file, Explorer only highlights the filename without selecting the extension. Renaming multiple files is quicker as pressing Tab automatically renames the existing file or folder and opens the file name text field for the next file for renaming. Shift+Tab allows renaming in the same manner upwards.
Support for burning data on DVDs (DVD±R, DVD±R DL, DVD±R RW) in addition to CDs and DVD-RAM using version 2.0 of the Image Mastering API, as well as Live File System support was added.[38]
If a file is in use by another application, Windows Explorer tells users to close the application and retry the file operation. Also, a new interface IFileIsInUse is introduced into the API which developers can use to let other applications switch to the main window of the application that has the file open or simply close the file from the «File in Use» dialog. If the running application exposes these operations by means of the IFileIsInUse interface, Windows Explorer, upon encountering a locked file, allows the user to close the file or switch to the application from the dialog box itself.[39]
Windows Vista introduced precluded support for the Media Transfer Protocol.[citation needed]
Removed and changed features[edit]
The ability to customize the layout and buttons on the toolbars has been removed in Windows Vista’s Explorer, as has the ability to add a password to a zip file (compressed folder). The Toolbar button in Explorer to go up one folder from the current folder has been removed (the function still exists however, one can move up a folder by pressing Alt + ↑). Although still fully available from the menus and keyboard shortcuts, toolbar buttons for Cut, Copy, Paste, Undo, Delete, Properties and some others are no longer available. The Menu Bar is also hidden by default but is still available by pressing the Alt key or changing its visibility in the layout options. Several other features are removed such as showing the size on the status bar without selecting items, storing metadata in NTFS alternate data streams,[40] the IColumnProvider interface which allowed addition of custom columns to Explorer[41] and folder background customization using desktop.ini.
The option «Managing pairs of Web pages and folders» is also removed, and the user has no way of telling Vista that a .html file and the folder with the same name that was created when saving a complete web page from IE should be treated separately, that is, they cannot delete the folder without deleting the html file as well.[42]
The ability to right-click a folder and hit «Search» was removed in Windows Vista Service Pack 1. Users must open the folder they wish to search in and enter their keywords in the search field located on the top right corner of the window. Alternatively, users can specify other search parameters through the «Advanced Search» UI, which can be accessed by clicking on the Organize Bar and selecting Search Pane under the Layout submenu. Pressing F3 also opens the «Advanced Search» interface.
Windows 7 and Windows Server 2008 R2[edit]

Windows Explorer in Windows 7, showing Libraries
Libraries[edit]
Windows Explorer in Windows 7 and Windows Server 2008 R2 supports libraries, virtual folders described in a .library-ms file that aggregates content from various locations – including shared folders on networked systems if the shared folder has been indexed by the host system – and present them in a unified view. Searching in a library automatically federates the query to the remote systems, in addition to searching on the local system, so that files on the remote systems are also searched. Unlike search folders, Libraries are backed by a physical location which allows files to be saved in the libraries. Such files are transparently saved in the backing physical folder. The default save location for a library may be configured by the user, as can the default view layout for each library. Libraries are generally stored in the libraries special folder, which allows them to be displayed on the navigation pane.
By default, a new user account in Windows 7 contains four libraries, for different file types: Documents, Music, Pictures, and Videos. They are configured to include the user’s profile folders for these respective file types, as well as the computer’s corresponding Public folders.
In addition to aggregating multiple storage locations, Libraries enable Arrangement Views and Search Filter Suggestions. Arrangement Views allow users to pivot their views of the library’s contents based on metadata. For example, selecting the «By Month» view in the Pictures library will display photos in stacks, where each stack represents a month of photos based on the date they were taken. In the Music library, the «By Artist» view will display stacks of albums from the artists in their collections, and browsing into an artist stack will then display the relevant albums.
Search Filter Suggestions are a new feature of the Windows 7 and Windows Server 2008 R2 Explorer’s search box. When the user clicks in the search box, a menu shows up below it showing recent searches as well as suggested Advanced Query Syntax filters that the user can type. When one is selected (or typed in manually), the menu will update to show the possible values to filter by for that property, and this list is based on the current location and other parts of the query already typed. For example, selecting the «tags» filter or typing «tags:» into the search box will display the list of possible tag values which will return search results.
The metadata written within the file, implemented in Vista, is also utilized in Windows 7. This can sometimes lead to long wait times displaying the contents of a folder. For example, if a folder contains many large video files totaling hundreds of gigabytes, and the Window Explorer pane is in Details view mode showing a property contained within the metadata (for example Date, Length, Frame Height), Windows Explorer might have to search the contents of the whole file for the meta data. Some damaged files can cause a prolonged delay as well. This is due to metadata information being able to be placed anywhere within the file, beginning, middle, or end, necessitating a search of the whole file. Lengthy delays also occur when displaying the contents of a folder with many different types of program icons. The icon is contained in the metadata. Some programs cause the activation of a virus scan when retrieving the icon information from the metadata, hence producing a lengthy delay.[33]
Arrangement Views and Search Filter Suggestions are database-backed features that require that all locations in the Library be indexed by the Windows Search service. Local disk locations must be indexed by the local indexer, and Windows Explorer will automatically add locations to the indexing scope when they are included in a library. Remote locations can be indexed by the indexer on another Windows 7 and Windows Server 2008 R2 machine, on a Windows machine running Windows Search 4 (such as Windows Vista or Windows Home Server), or on another device that implements the MS-WSP remote query protocol.[43]
Federated search[edit]
Windows Explorer also supports federating search to external data sources, such as custom databases or web services, that are exposed over the web and described via an OpenSearch definition. The federated location description (called a Search Connector) is provided as a .osdx file. Once installed, the data source becomes queryable directly from Windows Explorer. Windows Explorer features, such as previews and thumbnails, work with the results of a federated search as well.
Other changes[edit]
- Windows 7 and Windows Server 2008 R2 support showing icons in the context menu and creating cascaded context menus with static verbs in submenus using the Registry instead of a shell extension.[44]
- The search box in the Explorer window and the address bar can be resized.
- Certain folders in the navigation pane can be hidden to reduce clutter.
- Progress bars and overlay icons on an application’s button on the taskbar.
- Content view which shows thumbnails and metadata.
- Buttons to toggle the preview pane and create a new folder.
Removed or changed features[edit]
In Windows 7, several features have been removed from Windows Explorer, including the collapsible folder pane, overlay icon for shared items, remembering individual folder window sizes and positions, free disk space on the status bar, icons on the command bar, ability to disable Auto Arrange and Align to Grid, sortable column headings in other views except details view, ability to disable full row selection in details view, automatic horizontal scrolling and scrollbar in the navigation pane and maintaining selection when sorting from the Edit menu.
Windows 8 and Windows Server 2012[edit]
The new File Explorer with ribbon in Windows 8
The file manager on Windows 8 and Windows Server 2012 is renamed File Explorer and introduces new features such as a redesigned interface incorporating a ribbon toolbar, and a redesigned file operation dialog that displays more detailed progress and allows for file operations to be paused and resumed. The details pane from Windows Vista and 7 was removed and replaced with a narrower pane with no icons and fewer detail columns. But other details are displayed by hovering over the file’s name.[45][46]
Windows 10 and Windows Server 2016[edit]
The icons in File Explorer have been redesigned. They are flatter and simpler in design. The window border padding is thinner than previous versions. Windows 10 Creators Update and later versions come with a new Universal File Explorer (also known as the UWP File Explorer). Although hidden, it can be opened by creating a shortcut pointing to «explorer shell:AppsFolderc5e2524a-ea46-4f67-841f-6a9465d9d515_cw5n1h2txyewy!App» [47][48]
Windows 10, version 1809 and Windows Server 2019[edit]
A «dark mode» has been added to File Explorer in Windows 10, version 1809 and Windows Server 2019.[49] The Universal File Explorer also includes new features.[50][51]
Windows 10, version 1909[edit]
Windows Search and OneDrive have been integrated into File Explorer’s search feature in Windows 10, version 1909.[52]
Windows 11[edit]
In Windows 11, File Explorer had undergone significant UI changes with the Ribbon Interface simplified into a command bar. Translucency, shadows, and rounded geometry have also been added, following the Fluent Design System. In March 2022, Microsoft introduced adverts into the file explorer, but later stated that these were ‘not intended to be published externally’[53] after significant negative media coverage.
Windows 11 2022 Update[edit]
On April 5, 2022, Microsoft announced that it would be adding tabs, favorites, and a new homepage to File Explorer.[54] These features were eventually introduced via an update to the Windows 11 2022 Update on October 18, 2022.[55]
Extensibility[edit]
File Explorer can be extended to support non-default functionality by means of Windows shell extensions, which are COM objects that plug the extended functionality into Windows Explorer.[56] Shell extensions can be in the form of shell extension handlers, toolbars or even namespace extensions that allow certain folders (or even non-filesystem objects such as the images scanned by a scanner) to be presented as a special folder. File Explorer also allows metadata for files to be added as NTFS alternate data streams, separate from the data stream for the file.
Shell extension handlers are queried by the shell beforehand for modifying the action the shell takes. They can be associated on a per file type – where they will show up only when a particular action takes place on a particular file type – or on a global basis – which are always available. The shell supports the following extension handlers:
| Handler | Description | Can be implemented on | Required shell version |
|---|---|---|---|
| Context menu handler | Adds menu items to the context menu. It is called before the context menu is displayed. | Per file type | Windows 95 and later. Windows 7 introduced IExecuteCommand |
| Drag-and-drop handler | Controls the action upon right-click drag and drop and modifies the context menu that appears. | Global | Windows 95 and later |
| Drop target handler | Controls the action after a data object is dragged and dropped over a drop target such as a file. | Per file type | Windows 95 and later |
| Data object handler | Controls the action after a file is copied to the clipboard or dragged and dropped over a drop target. It can provide additional clipboard formats to the drop target. | Per file type | Windows 95 and later |
| Icon handler | Assigns a custom icon to an individual file amongst a class of file types. It is called before file icons are displayed. | Per file type | Windows 95 and later |
| Property sheet handler | Replaces or adds pages to the property sheet dialog box of an object. | Per file type | Windows 95 and later |
| Copy hook handler | Allows running, modifying or denying the action when a user or application tries to copy, move, delete, or rename an object. | Not associated with a file type | Windows 95 and later |
| Search handler | Allows shell integration of a custom search engine. | Not associated with a file type | Windows 95 through Windows XP |
| Infotip handler | Allows retrieving flags and infotip information for an item and displaying it inside a popup tooltip upon mouse hover. | Per file type | Windows Desktop Update and later |
| Thumbnail image handler | Provides for a thumbnail image to be generated and displayed along with its alpha type when a file is selected or the thumbnail view is activated. | Per file type | Windows Desktop Update and later. Windows Vista introduced a newer IThumbnailProvider interface that also shows thumbnails in the Details pane. The older IExtractImage is still supported but not in the Details pane.[57] |
| Disk Cleanup handler | Add a new entry to the Disk Cleanup application and allows specifying additional disk locations or files to clean up. | Per folder | Windows 98 and later |
| Column handler | Allows creating and displaying custom columns in Windows Explorer details view. It can be used to extend sorting and grouping. | Per folder | Windows 2000 and later |
| Icon overlay handler | Allows displaying an overlay icon over a shell object (a file or folder icon). | Per file type | Windows 2000 and later |
| Metadata handler | Allows viewing and modifying metadata stored in a file. It can be used to extend details view columns, infotips, property pages, sorting and grouping. | Per file type | Windows 2000 and later |
| Filter handler (IFilter) | Allows file properties and its contents to be indexed and searched by Indexing Service or Windows Search | Per file type | Windows 2000 and later |
| AutoPlay handler | Examines newly discovered removable media and devices and, based on content such as pictures, music or video files, launches an appropriate application to play or display the content. | Per file type category Windows XP only: per device and per file type category |
Windows XP and later |
| Property handler | Allows viewing and modifying system-defined and custom properties of a file. | Per file type | Windows Vista and later; on Windows XP if Windows Search is installed. |
| Preview handler | Renders enhanced previews of items without launching the default application when a file is selected. It can also provide file type-specific navigation such as browsing a document, or seeking inside a media file. | Per file type | Windows Vista and later |
Namespace extensions are used by Explorer and Common Dialogs to either display some data – which are not necessarily persisted as files – in a folder-like view or to present data in a way that is different from their organization on the file system. This feature can be exploited by a any hierarchical data source that can be represented as a file system like the Windows one, including Cloud-based implementation. Special folders, such as My Computer and Network Places in Windows Explorer are implemented this way, as are Explorer views that let items in a mobile phone or digital camera be explored. Source-control systems that use Explorer to browse source repositories also use Namespace extensions to allow Explorer to browse the revisions. To implement a namespace extension, the IPersistFolder, IShellView, IShellFolder, IShellBrowser and IOleWindow interfaces need to be implemented and registered. The implementation needs to provide the logic for navigating the data store as well as describing the presentation. Windows Explorer will instantiate the COM objects as required.[58]
While Windows Explorer natively exposes the extensibility points as COM interfaces, .NET Framework can also be used to write some types of extensions, using the COM Interop functionality of .NET Framework.[58] While Microsoft itself makes available extensions – such as the photo info tool[59] – which are authored using .NET Framework, they currently recommend against writing managed shell extensions, as only one instance of the CLR (prior to version 4.0) can be loaded per-process. This behavior will cause conflicts if multiple managed add-ins, targeting different versions of the CLR, are attempted to be run simultaneously.[60][61]
See also[edit]
- Comparison of file managers
- List of alternative shells for Windows
Notes and references[edit]
- ^ «January 26, 2023—KB5022360 (OS Build 22621.1194) Preview». Microsoft Support. Microsoft.
- ^ «Releasing Windows 11 Build 22621.1192 to the Release Preview Channel». Windows Insider Blog. January 17, 2023.
- ^ «January 26, 2023—KB5022360 (OS Build 22621.1194) Preview». Microsoft Support. Microsoft.
- ^ «Announcing Windows 11 Insider Preview Build 22621.1250 and 22623.1250». Windows Insider Blog. February 2, 2023.
- ^ «Announcing Windows 11 Insider Preview Build 25290». Windows Insider Blog. February 1, 2023.
- ^ Lineback, Nathan. «Misc Windows». toastytech.com. Archived from the original on July 3, 2018. Retrieved June 19, 2018.
- ^ John D. Ruley (September 1995). «NT Gets the Look But Not the Logo». How-To Columns. WinMag. Archived from the original on March 14, 2006. Retrieved September 4, 2009. Internet Archive
- ^ «Managing Files, Folders, and Search Methods: Microsoft TechNet». microsoft.com. Archived from the original on January 12, 2009. Retrieved June 19, 2018.
- ^ «Serenity Macros Home Page – Resources for MS Word». www.mvps.org. Archived from the original on June 27, 2018. Retrieved June 19, 2018.
- ^ Windows 2000 Registry: Latest Features and APIs Provide the Power to Customize and Extend Your Apps, MSDN Magazine, November 2000, archived from the original on April 15, 2003, retrieved August 26, 2007
- ^ «COM Objects and Structured Storage» Archived 2018-12-18 at the Wayback Machine, Windows Dev Center, May 31, 2018
- ^ Esposito, Dino (June 2000), More Windows 2000 UI Goodies: Extending Explorer Views by Customizing Hypertext Template Files, MSDN Magazine, archived from the original on August 24, 2007, retrieved August 26, 2007
- ^ Sophos, VBS/Roor-C threat analysis Archived 2007-11-30 at the Wayback Machine. Accessed August 26, 2007.
- ^ «Virus.VBS.Redlof.a», Virus Encyclopedia, Viruslist.com, January 15, 2004, archived from the original on October 28, 2007, retrieved August 26, 2007
- ^ Figure 1 Windows Shell Extensions, MSDN Magazine, June 2000, archived from the original on August 31, 2004, retrieved August 26, 2007
- ^ «What is Indexing Service?». msdn.microsoft.com. Archived from the original on January 1, 2011. Retrieved June 19, 2018.
- ^ «Is Microsoft Office 2003 still decent for general use on Windows 7, 8.1 and 10». answers.microsoft.com. Archived from the original on February 7, 2016. Retrieved June 19, 2018.
- ^ «What is Windows XP?». www.computerhope.com. Retrieved August 12, 2022.
- ^ «Windows XP – What’s new with files and folders». Windows. Microsoft. Archived from the original on May 23, 2007.
- ^ How to create and extract a Zip File in Windows ME/XP/2003
- ^ How To: Open a Cab file – Quote: «If you’re using Windows XP or Windows Vista, then your operating system has built-in support for opening Cab files.»
- ^ «Moving web pages saved by IE (HTM file & _FILES folder)». Directory Opus Resource Centre. May 4, 2009. Archived from the original on December 16, 2020. Retrieved December 16, 2020.
When Windows Explorer […] move a Web page both the HTML file and the directory are automatically moved together. […] Moreover, the user only has to drag EITHER part—the file or the directory and the other part will follow automatically. This way the page is kept intact irrespective of where Windows stores it.
- ^ The sort order for files and folders whose names contain numerals is different in Windows Vista, Windows XP, and Windows Server 2003 than it is in Windows 2000, support.microsoft.com, August 28, 2007, archived from the original on September 27, 2010, retrieved July 6, 2009
- ^ a b Shultz, Greg (August 10, 2006). «Examine the filtering, grouping, and stacking features in Windows Vista’s Windows Explorer». TechRepublic. CBS Interactive. Archived from the original on December 22, 2015. Retrieved December 19, 2015.
- ^ a b c Reid, Rory (January 30, 2007). «Seven days of Vista — day 4: Stacking and filtering». CNET. CBS Interactive. Archived from the original on December 22, 2015. Retrieved December 19, 2015.
- ^ a b Kaelin, Mark (July 17, 2007). «How do I… Save and refine desktop searches in Microsoft Windows Vista?». TechRepublic. CBS Interactive. Archived from the original on November 17, 2015. Retrieved November 11, 2015.
- ^ Microsoft. «Saved Search File Format». MSDN. Archived from the original on December 10, 2015. Retrieved December 21, 2015.
- ^ Bentz, Ben (October 31, 2006). «Query Composition: Building a search upon another search». Shell: Revealed Blog. Microsoft. Archived from the original on December 15, 2006. Retrieved December 21, 2015.
- ^ Using search operators to find pictures, music and videos in Windows Vista
- ^ Windows 7: Find/Search Files By Date And Size
- ^ Windows Explorer Columns — Are you Fully Using Them?
- ^ «How to Search for Contents in Any File Type Without Indexing Service Enabled in Windows Vista and Windows 7». Wikihow.com. January 27, 2014. Archived from the original on March 19, 2017. Retrieved January 31, 2014.
- ^ a b Microsoft. «Add tags or other properties to a file». Windows How-to. Archived from the original on December 22, 2015. Retrieved December 21, 2015.
- ^ White, Nick (July 13, 2007). «10 Things – Windows Explorer Has a New Preview Pane». Windows Vista Team Blog. Microsoft. Archived from the original on July 15, 2007. Retrieved December 14, 2015.
- ^ Microsoft. «Pen and Touch Input in Windows Vista». MSDN. Archived from the original on December 22, 2015. Retrieved December 21, 2015.
- ^ Oiaga, Marius (September 27, 2006). «Quick Zoom on the Windows Vista Desktop and in Explorer». Softpedia. Archived from the original on December 22, 2015. Retrieved December 21, 2015.
- ^ McFedries, Paul (2008). Microsoft Windows Vista Unleashed. Sams Publishing. p. 87. ISBN 978-0-672-33013-1. Retrieved December 21, 2015.
- ^ Mangefeste, Tony; Walp, David (2006). «Optical Platform: Windows Vista and Beyond». Microsoft. Archived from the original (PPT) on June 4, 2011. Retrieved December 21, 2015.
- ^ Davis, Christopher (March 29, 2007). «Your File Is In Use… Demystified». Shell: Revealed Blog. Microsoft. Archived from the original on April 29, 2007. Retrieved December 21, 2015.
- ^ «Properties». msdn2.microsoft.com. Archived from the original on October 9, 2007. Retrieved June 19, 2018.
- ^ «IColumnProvider interface (Windows)». msdn2.microsoft.com. Archived from the original on April 17, 2008. Retrieved June 19, 2018.
- ^ A solution to this is provided on http://windowsxp.mvps.org/webpairs.htm Archived 2010-12-24 at the Wayback Machine. After the webpairs.reg file has been merged into the registry, the «Managing pairs of Web pages and folders» option is available in the Folder Options View tab.
- ^ «MS-WSP: Windows Search Protocol», MSDN Library, Microsoft, December 18, 2006, archived from the original on May 16, 2010, retrieved June 10, 2009
- ^ «Creating Shortcut Menu Handlers (Windows)». msdn.microsoft.com. Archived from the original on November 22, 2010. Retrieved June 19, 2018.
- ^ «Improvements in Windows Explorer». Archived from the original on November 7, 2011. Retrieved October 30, 2011.
- ^ «Microsoft switches to File Explorer name in Windows 8, bids farewell to Windows Explorer». The Verge. June 29, 2012. Archived from the original on August 17, 2012. Retrieved August 3, 2012.
- ^ «How to open UWP File Explorer on Windows 10 – Step by step». Windows Latest. May 7, 2017. Archived from the original on August 24, 2018. Retrieved August 24, 2018.
- ^ «Windows 10 Tip: Unlock the UWP File Explorer – Thurrott.com». Thurrott.com. May 6, 2017. Archived from the original on August 24, 2018. Retrieved August 24, 2018.
- ^ «Inspired by Insiders – Dark Theme in File Explorer». August 8, 2018. Archived from the original on August 12, 2018. Retrieved August 23, 2018.
- ^ «Microsoft updates universal File Explorer with new features in Windows 10 version 1809». Windows Central. Archived from the original on August 25, 2018. Retrieved August 24, 2018.
- ^ «UWP File Explorer has got new features in Windows 10 version 1809». Winaero. August 23, 2018. Archived from the original on August 25, 2018. Retrieved August 24, 2018.
- ^ «Windows 10 version 1909: new and changed features — gHacks Tech News». www.ghacks.net. October 2019. Archived from the original on October 25, 2019. Retrieved October 25, 2019.
- ^ Warren, Tom (March 15, 2022). «Microsoft says Windows 11’s File Explorer ads were ‘not intended to be published externally’«. The Verge. Retrieved July 28, 2022.
- ^ Warren, Tom (April 5, 2022). «Windows 11’s refreshed File Explorer gets tabs, favorites, and a new homepage». The Verge. Retrieved August 12, 2022.
- ^ Warren, Tom (October 18, 2022). «Windows 11’s new tabbed File Explorer and taskbar improvements are available today». The Verge. Retrieved October 18, 2022.
- ^ ShellExView v1.19 – Shell Extensions Manager for Windows, archived from the original on October 24, 2010, retrieved March 31, 2008
- ^ «Thumbnail Handlers (Windows)». msdn.microsoft.com. Archived from the original on June 19, 2018. Retrieved June 19, 2018.
- ^ a b Rensin, Dave (January 2004). «Create Namespace Extensions for Windows Explorer with the .NET Framework». msdn.microsoft.com. Archived from the original on May 8, 2008. Retrieved March 31, 2008.
- ^ «Microsoft Download Center: Windows, Office, Xbox & More». www.microsoft.com. Archived from the original on May 13, 2008. Retrieved June 19, 2018.
- ^ «MSDN Magazine Issues». msdn.microsoft.com. Archived from the original on May 21, 2008. Retrieved June 19, 2018.
- ^ Zhang, Junfeng (November 18, 2005). «Don’t do Shell Extension Handlers in .NET». msdn.com. Archived from the original on January 5, 2010. Retrieved June 19, 2018.
External links[edit]
- Sullivan, Kent. «The Windows 95 User Interface: A Case Study in Usability Engineering» (1996) for Association for Computing Machinery. (Sullivan was a developer on the Windows 95 UI team)
- How To Customize the Windows Explorer Views in Windows XP
- MSDN: Creating Shell Extension Handlers, Windows Dev Center, May 31, 2018
- The Complete Idiot’s Guide to Writing Shell Extensions, by Michal Dunn, March 15, 2006
- Namespace extensions – the undocumented Windows Shell, by Henk Devos, November 30, 1999
This article is about the Microsoft Windows file listing browser. For exploring file system listings, see file browser. For exploring inside files, see file viewer.
|
File Explorer on Windows 11 in Light App Mode showing special folders on Home, with the new command bar and tabs feature. |
|
| Developer(s) | Microsoft |
|---|---|
| Initial release | August 15, 1995; 27 years ago |
| Stable release |
22H2 (10.0.22621.1194) (January 26, 2023; 9 days ago[1]) [±] |
| Preview release |
;Release Preview Channel 22H2 (10.0.22621.1194) (January 26, 2023; 9 days ago[2][3]) [±]
22H2 (10.0.22623.1250) (February 2, 2023; 2 days ago[4]) [±]
10.0.25290.1000 (February 1, 2023; 3 days ago[5]) [±] |
| Included with | Windows 95 and later |
| Predecessor | Program Manager, File Manager |
| Type | Shell, file manager |
File Explorer, previously known as Windows Explorer, is a file manager application that is included with releases of the Microsoft Windows operating system from Windows 95 onwards. It provides a graphical user interface for accessing the file systems. It is also the component of the operating system that presents many user interface items on the screen such as the taskbar and desktop. Controlling the computer is possible without Windows Explorer running (for example, the File ▸ Run command in Task Manager on NT-derived versions of Windows will function without it, as will commands typed in a command prompt window).
Overview[edit]
Windows Explorer was first included with Windows 95 as a replacement for File Manager, which came with all versions of Windows 3.x operating systems. Explorer could be accessed by double-clicking the new My Computer desktop icon or launched from the new Start Menu that replaced the earlier Program Manager. There is also a shortcut key combination: Windows key+E. Successive versions of Windows (and in some cases, Internet Explorer) introduced new features and capabilities, removed other features, and generally progressed from being a simple file system navigation tool into a task-based file management system.
While «Windows Explorer» or «File Explorer» is a term most commonly used to describe the file management aspect of the operating system, the Explorer process also houses the operating system’s search functionality and File Type associations (based on filename extensions), and is responsible for displaying the desktop icons, the Start Menu, the Taskbar, and the Control Panel. Collectively, these features are known as the Windows shell.
After a user logs in, the explorer process is created by the userinit process. Userinit performs some initialization of the user environment (such as running the login script and applying group policies) and then looks in the registry at the Shell value and creates a process to run the system-defined shell – by default, Explorer.exe. Then Userinit exits. This is why Explorer.exe is shown by various process explorers with no parent – its parent has exited.
History[edit]
In 1995, Microsoft first released test versions of a shell refresh, named the Shell Technology Preview, and often referred to informally as «NewShell».[6] The update was designed to replace the Windows 3.x Program Manager/File Manager based shell with Windows Explorer. The release provided capabilities quite similar to that of the Windows «Chicago» (codename for Windows 95) shell during its late beta phases, however was intended to be nothing more than a test release.[7] There were two public releases of the Shell Technology Preview, made available to MSDN and CompuServe users: May 26, 1995 and August 8, 1995. Both held Windows Explorer builds of 3.51.1053.1. The Shell Technology Preview program never saw a final release under NT 3.51. The entire program was moved across to the Cairo development group who finally integrated the new shell design into the NT code with the release of NT 4.0 in July 1996.
Windows 98 and Windows Desktop Update[edit]
With the release of the Windows Desktop Update (packaged with Internet Explorer 4 as an optional component, and included in Windows 98), Windows Explorer became «integrated» with Internet Explorer, most notably with the addition of navigation arrows (back and forward) for moving between recently visited directories, as well as Internet Explorer’s Favorites menu.
An address bar was also added to Windows Explorer, which a user could type in directory paths directly, and be taken to that folder.
Another feature that was based on Internet Explorer technology was customized folders. Such folders contained a hidden web page that controlled the way the Windows Explorer displayed the contents of the folder.
Windows ME and Windows 2000[edit]
The integrated media player in Windows Explorer in Windows 2000, playing a MIDI sequence on Media folder
The «Web-style» folders view, with the left Explorer pane displaying details for the object currently selected, is turned on by default. For certain file types, such as pictures and media files, a preview is also displayed in the left pane.[8] The Windows 2000 Explorer featured an interactive media player as the previewer for sound and video files. However, such a previewer can be enabled in Windows ME through the use of folder customization templates.[9] Windows Explorer in Windows 2000 and Windows ME allows for custom thumbnail previewers and tooltip handlers. The default file tooltip displays file title, author, subject and comments;[10] this metadata may be read from a special NTFS stream, if the file is on an NTFS volume, or from a COM Structured Storage stream, if the file is a structured storage document. All Microsoft Office documents since Office 95[11] make use of structured storage, so their metadata is displayable in the Windows 2000 Explorer default tooltip. File shortcuts can also store comments which are displayed as a tooltip when the mouse hovers over the shortcut.
The right-hand pane, which usually just lists files and folders, can also be customized. For example, the contents of the system folders aren’t displayed by default, instead showing in the right pane a warning to the user that modifying the contents of the system folders could harm their computer. It’s possible to define additional Explorer panes by using DIV elements in folder template files.[12] This feature was abused by computer viruses that employed malicious scripts, Java applets, or ActiveX controls in folder template files as their infection vector. Two such viruses are VBS/Roor-C[13] and VBS.Redlof.a.[14]
Other Explorer UI elements that can be customized include columns in «Details» view, icon overlays, and search providers: the new DHTML-based search pane is integrated into Windows 2000 Explorer, unlike the separate search dialog found in all previous Explorer versions.[15]
Search capabilities were added, offering full-text searches of documents, with options to filter by date (including arbitrary ranges like «modified within the last week»), size, and file type. The Indexing Service has also been integrated into the operating system and the search pane built into Explorer allows searching files indexed by its database.[16] The ability to customize the standard buttons was also added.
Windows XP and Windows Server 2003[edit]
Windows Explorer in Windows XP, showing All Users folder contents
There were significant changes made to Windows Explorer in Windows XP, both visually and functionally. Microsoft focused especially on making Explorer more discoverable and task-based, as well as adding several new features to reflect the growing use of a computer as a digital hub.
Windows Explorer in Windows Server 2003 contains all the same features as Windows XP, but the task panes and search companion are disabled by default.
Task pane[edit]
The task pane is displayed on the left-hand side of the window instead of the traditional folder tree view. It presents the user with a list of common actions and destinations that are relevant to the current directory or file(s) selected. For instance, when in a directory containing mostly pictures, a set of «Picture tasks» is shown, offering the options to display these pictures as a slide show, to print them out, or to go online to order prints. Conversely, a folder containing music files would offer options to play those files in a media player or to go online to purchase music. Windows XP had a Media bar but it was removed with SP1. The Media Bar was only available with Windows XP RTM.
Every folder also has «File and Folder Tasks», offering options to create new folders, share a folder on the local network, publish files or folders to a website, and other common tasks like copying, renaming, moving, and deleting files or folders. File types that have identified themselves as being printable also have an option listed to print the file.
Underneath «Other Places» is a «Details» pane which gives additional information – typically file size and date, but depending on the file type, a thumbnail preview, author, image dimensions, or other details.
The «Folders» button on the Windows Explorer toolbar toggles between the traditional tree view of folders, and the task pane. Users can get rid of the task pane or restore it using the sequence: Tools – Folder Options – General – Show Common Tasks/Use Windows Classic Folders.
Search companion[edit]
Windows Explorer’s default Search Companion, Rover, in Windows XP
Microsoft introduced animated «Search Companions» in an attempt to make searching more engaging and friendly; the default character is a puppy named Rover (previously used in Microsoft Bob), with three other characters (Merlin the magician, Earl the surfer, and Courtney) also available. These search companions use the same technology as Microsoft Office’s Office Assistants, even incorporating «tricks» and sound effects, and they can be used as Office Assistants if their files are copied into the C:Windowsmsagentchars folder.[17]
The search capability itself is fairly similar to Windows ME and Windows 2000, with one major addition: Search can also be instructed to search only files that are categorical «Documents» or «Pictures, music and video»; this feature is noteworthy largely because of how Windows determines what types of files can be classified under these categories. In order to maintain a relevant list of file types, Windows Explorer connects to Microsoft and downloads a set of XML files that define what these file types are. The Search Companion can be disabled in favor of the classic search pane used in Windows 2000 by using the Tweak UI applet from Microsoft’s PowerToys for Windows XP, or by manually editing the registry.
Image handling[edit]
Windows XP improves image preview in Explorer by offering a Filmstrip view. «Back» and «Previous» buttons facilitate navigation through the pictures, and a pair of «Rotate» buttons offer 90-degree clockwise and counter-clockwise (lossy)[18] rotation of images. Aside from the Filmstrip view mode, there is a ‘Thumbnails’ mode, which displays thumbnail-sized images in the folder. A Folder containing images will also show thumbnails of four of the images from that folder overlaid on top of a large folder icon.
Web publishing[edit]
Web sites that offer image hosting services can be plugged into Windows Explorer, which the user can use to select images on their computer, and have them uploaded correctly without dealing with comparatively complex solutions involving FTP or web interfaces.[citation needed]
Other changes[edit]
- Explorer gained the ability to understand the metadata of a number of types of files. For example, with images from a digital camera, the Exif information can be viewed, both in the Properties pages for the photo itself, as well as via optional additional Details View columns.
- A Tile view mode was added, which displays the file’s icon in a larger size (48 × 48), and places the file name, descriptive type, and additional information (typically the file size for data files, and the publisher name for applications) to the right.
- The Details view also presented an additional option called «Show in Groups» which allows the Explorer to separate its contents by headings based on the field which is used to sort the items.
- The taskbar can be locked to prevent it from accidentally being moved.
- Windows Explorer also gained the ability to burn CDs and DVD-RAM discs in Windows XP.
- Ability to create and open ZIP files called «compressed folders».[19][20]
- Ability to open Cabined (.cab) files.[21]
- If a
.HTMor.HTMLfile is copied or moved, the accompanying_filessuffix folder is copied or moved among it automatically.[22]
Removed and changed features[edit]
|
This section needs expansion. You can help by adding to it. (December 2012) |
- The sort order has changed compared to the one in Windows 2000. For file names containing numbers Windows Explorer now tries to sort based on numerical value rather than just comparing each number digit by digit.[23]
Windows Vista and Windows Server 2008[edit]
Windows Explorer in Windows Vista, showing Public folder contents
Search, organizing and metadata[edit]
Windows Explorer includes significant changes from previous versions of Windows such as improved filtering, sorting, grouping and stacking. Combined with integrated desktop search, Windows Explorer allows users to find and organize their files in new ways, such as stacks.[24][25] The new Stacks viewing mode groups files according to the criterion specified by the user.[25] Stacks can be clicked to filter the files shown in Windows Explorer. There is also the ability to save searches as virtual folders or search folders.[26] A search folder is simply an XML file, which stores the query in a form that can be used by the Windows search subsystem.[27] When accessed, the search is executed and the results are aggregated and presented as a virtual folder.[26] Windows Vista includes six search folders by default: recent documents, recent e-mail, recent music, recent pictures and videos, recent changed, and «Shared by Me».[28] Additionally, search operators for properties were introduced, such as kind:music. [29] Since at least Windows 7, comparison operators «greater than» and «less than» are supported to search for any supported attribute such as date ranges and file sizes, like size:>100MB to search for all files that are greater than 100MB.[30] Attributes sortable and searchable in Windows Explorer include pictures’ dimensions, Exif data such as aperture and exposure, video duration and framerate and width.[31]
When sorting items, the sort order no longer remains consistently Ascending or Descending. Each property has a preferred sort direction. For example, sort by date defaults to descending order, as does size. But name and type default to ascending order.
Searching for files containing a given text string became problematic with Vista unless the files had been indexed. An alternative is to use the findstr command-line function.[32] After right-clicking on a folder one can open a command-line prompt in that folder.
Windows Explorer also contains modifications in the visualization of files on a computer. A new addition to Windows Explorer in Vista and Server 2008 is the details pane, which displays metadata and information relating to the currently selected file or folder. The details pane will also display a thumbnail of the file or an icon of the filetype if the file does not contain visual information. Furthermore, different imagery is overlaid on thumbnails to give more information about the file, such as a picture frame around the thumbnail of an image file, or a filmstrip on a video file.
![]()
The details pane also allows for the change of some textual metadata such as author and title in files that support them within Windows Explorer. A new type of metadata called tags allows users to add descriptive terms to documents for easier categorization and retrieval. Some files support open metadata, allowing users to define new types of metadata for their files. Out-of-the-box, Windows Vista and Windows Server 2008 supports Microsoft Office documents and most audio and video files. Support for other file types can however be added by writing specialized software to retrieve the metadata at the shell’s request. Metadata stored in a file’s alternate data stream only on NTFS volumes cannot be viewed and edited through the summary tab of the file’s properties anymore. Instead, all metadata is stored inside the file, so that it will always travel with the file and not be dependent on the file system.[33]
Layout and icons[edit]
Windows Explorer in Windows Vista and Windows Server 2008 also introduces a new layout. The task panes from Windows XP are replaced with a toolbar on top and a navigation pane on the left. The navigation pane contains commonly accessed folders and preconfigured search folders. Eight different views are available to view files and folders, including extra large, large, medium, small, list, details, tiles, and content. In addition, column headers now appear in all icon viewing modes,[25] unlike Windows XP where they only appear in the details icon viewing mode.[24] File and folder actions such as cut, copy, paste, undo, redo, delete, rename and properties are built into a dropdown menu which appears when the Organize button is clicked. It is also possible to change the layout of the Explorer window by using the Organize button. Users can select whether to display classic menus, a search pane, a preview pane, a reading pane, and the navigation pane. The preview pane enables users to preview files (e.g., documents or media files) without opening them. If an application, such as Office 2007, installs preview handlers for file types, then these files can also be edited within the preview pane itself.[34]
Windows Vista saw the introduction of the breadcrumb bar for easier navigation. As opposed to the prior address bar which displayed the current folder in a simple editable combobox, this new style structures the path into clickable levels of folder hierarchy (though falls back to the classic edit mode when a blank area is clicked), enabling the user to skip as many levels as desired in one click rather than repeatedly clicking «Up». It is also possible to navigate to any subfolder of the current folder using the arrow to the right of the last item. The menu bar is now hidden by default but reappears temporarily when the user presses Alt.
Check boxes in Windows Explorer allow the selection of multiple files.[35] Free and used space on all drives is shown in horizontal indicator bars. Icons of various sizes are supported: 16 x 16, 24 x 24, 32 x 32, 48 x 48, 64 x 64, 96 x 96, 128 x 128 and 256 x 256. Windows Explorer can zoom the icons in and out using a slider or by holding down the Ctrl key and using the mouse scrollwheel.[36] Live icons can display the content of folders and files themselves rather than generic icons.[37]
Other changes[edit]
With the release of Windows Vista and Server 2008 and Windows Internet Explorer 7 for Windows XP, Internet Explorer is no longer integrated with Windows Explorer. In Windows Vista and Server 2008 (and in Windows XP as well if IE7 or 8 is installed), Windows Explorer no longer displays web pages, and IE7 does not support use as a file manager, although one will separately launch the other as necessary.
When moving or copying files from one folder to another, if two files have the same name, an option is now available to rename the file; in previous versions of Windows, the user was prompted to choose either a replacement or cancel moving the file. Also, when renaming a file, Explorer only highlights the filename without selecting the extension. Renaming multiple files is quicker as pressing Tab automatically renames the existing file or folder and opens the file name text field for the next file for renaming. Shift+Tab allows renaming in the same manner upwards.
Support for burning data on DVDs (DVD±R, DVD±R DL, DVD±R RW) in addition to CDs and DVD-RAM using version 2.0 of the Image Mastering API, as well as Live File System support was added.[38]
If a file is in use by another application, Windows Explorer tells users to close the application and retry the file operation. Also, a new interface IFileIsInUse is introduced into the API which developers can use to let other applications switch to the main window of the application that has the file open or simply close the file from the «File in Use» dialog. If the running application exposes these operations by means of the IFileIsInUse interface, Windows Explorer, upon encountering a locked file, allows the user to close the file or switch to the application from the dialog box itself.[39]
Windows Vista introduced precluded support for the Media Transfer Protocol.[citation needed]
Removed and changed features[edit]
The ability to customize the layout and buttons on the toolbars has been removed in Windows Vista’s Explorer, as has the ability to add a password to a zip file (compressed folder). The Toolbar button in Explorer to go up one folder from the current folder has been removed (the function still exists however, one can move up a folder by pressing Alt + ↑). Although still fully available from the menus and keyboard shortcuts, toolbar buttons for Cut, Copy, Paste, Undo, Delete, Properties and some others are no longer available. The Menu Bar is also hidden by default but is still available by pressing the Alt key or changing its visibility in the layout options. Several other features are removed such as showing the size on the status bar without selecting items, storing metadata in NTFS alternate data streams,[40] the IColumnProvider interface which allowed addition of custom columns to Explorer[41] and folder background customization using desktop.ini.
The option «Managing pairs of Web pages and folders» is also removed, and the user has no way of telling Vista that a .html file and the folder with the same name that was created when saving a complete web page from IE should be treated separately, that is, they cannot delete the folder without deleting the html file as well.[42]
The ability to right-click a folder and hit «Search» was removed in Windows Vista Service Pack 1. Users must open the folder they wish to search in and enter their keywords in the search field located on the top right corner of the window. Alternatively, users can specify other search parameters through the «Advanced Search» UI, which can be accessed by clicking on the Organize Bar and selecting Search Pane under the Layout submenu. Pressing F3 also opens the «Advanced Search» interface.
Windows 7 and Windows Server 2008 R2[edit]
Windows Explorer in Windows 7, showing Libraries
Libraries[edit]
Windows Explorer in Windows 7 and Windows Server 2008 R2 supports libraries, virtual folders described in a .library-ms file that aggregates content from various locations – including shared folders on networked systems if the shared folder has been indexed by the host system – and present them in a unified view. Searching in a library automatically federates the query to the remote systems, in addition to searching on the local system, so that files on the remote systems are also searched. Unlike search folders, Libraries are backed by a physical location which allows files to be saved in the libraries. Such files are transparently saved in the backing physical folder. The default save location for a library may be configured by the user, as can the default view layout for each library. Libraries are generally stored in the libraries special folder, which allows them to be displayed on the navigation pane.
By default, a new user account in Windows 7 contains four libraries, for different file types: Documents, Music, Pictures, and Videos. They are configured to include the user’s profile folders for these respective file types, as well as the computer’s corresponding Public folders.
In addition to aggregating multiple storage locations, Libraries enable Arrangement Views and Search Filter Suggestions. Arrangement Views allow users to pivot their views of the library’s contents based on metadata. For example, selecting the «By Month» view in the Pictures library will display photos in stacks, where each stack represents a month of photos based on the date they were taken. In the Music library, the «By Artist» view will display stacks of albums from the artists in their collections, and browsing into an artist stack will then display the relevant albums.
Search Filter Suggestions are a new feature of the Windows 7 and Windows Server 2008 R2 Explorer’s search box. When the user clicks in the search box, a menu shows up below it showing recent searches as well as suggested Advanced Query Syntax filters that the user can type. When one is selected (or typed in manually), the menu will update to show the possible values to filter by for that property, and this list is based on the current location and other parts of the query already typed. For example, selecting the «tags» filter or typing «tags:» into the search box will display the list of possible tag values which will return search results.
The metadata written within the file, implemented in Vista, is also utilized in Windows 7. This can sometimes lead to long wait times displaying the contents of a folder. For example, if a folder contains many large video files totaling hundreds of gigabytes, and the Window Explorer pane is in Details view mode showing a property contained within the metadata (for example Date, Length, Frame Height), Windows Explorer might have to search the contents of the whole file for the meta data. Some damaged files can cause a prolonged delay as well. This is due to metadata information being able to be placed anywhere within the file, beginning, middle, or end, necessitating a search of the whole file. Lengthy delays also occur when displaying the contents of a folder with many different types of program icons. The icon is contained in the metadata. Some programs cause the activation of a virus scan when retrieving the icon information from the metadata, hence producing a lengthy delay.[33]
Arrangement Views and Search Filter Suggestions are database-backed features that require that all locations in the Library be indexed by the Windows Search service. Local disk locations must be indexed by the local indexer, and Windows Explorer will automatically add locations to the indexing scope when they are included in a library. Remote locations can be indexed by the indexer on another Windows 7 and Windows Server 2008 R2 machine, on a Windows machine running Windows Search 4 (such as Windows Vista or Windows Home Server), or on another device that implements the MS-WSP remote query protocol.[43]
Federated search[edit]
Windows Explorer also supports federating search to external data sources, such as custom databases or web services, that are exposed over the web and described via an OpenSearch definition. The federated location description (called a Search Connector) is provided as a .osdx file. Once installed, the data source becomes queryable directly from Windows Explorer. Windows Explorer features, such as previews and thumbnails, work with the results of a federated search as well.
Other changes[edit]
- Windows 7 and Windows Server 2008 R2 support showing icons in the context menu and creating cascaded context menus with static verbs in submenus using the Registry instead of a shell extension.[44]
- The search box in the Explorer window and the address bar can be resized.
- Certain folders in the navigation pane can be hidden to reduce clutter.
- Progress bars and overlay icons on an application’s button on the taskbar.
- Content view which shows thumbnails and metadata.
- Buttons to toggle the preview pane and create a new folder.
Removed or changed features[edit]
In Windows 7, several features have been removed from Windows Explorer, including the collapsible folder pane, overlay icon for shared items, remembering individual folder window sizes and positions, free disk space on the status bar, icons on the command bar, ability to disable Auto Arrange and Align to Grid, sortable column headings in other views except details view, ability to disable full row selection in details view, automatic horizontal scrolling and scrollbar in the navigation pane and maintaining selection when sorting from the Edit menu.
Windows 8 and Windows Server 2012[edit]
The new File Explorer with ribbon in Windows 8
The file manager on Windows 8 and Windows Server 2012 is renamed File Explorer and introduces new features such as a redesigned interface incorporating a ribbon toolbar, and a redesigned file operation dialog that displays more detailed progress and allows for file operations to be paused and resumed. The details pane from Windows Vista and 7 was removed and replaced with a narrower pane with no icons and fewer detail columns. But other details are displayed by hovering over the file’s name.[45][46]
Windows 10 and Windows Server 2016[edit]
The icons in File Explorer have been redesigned. They are flatter and simpler in design. The window border padding is thinner than previous versions. Windows 10 Creators Update and later versions come with a new Universal File Explorer (also known as the UWP File Explorer). Although hidden, it can be opened by creating a shortcut pointing to «explorer shell:AppsFolderc5e2524a-ea46-4f67-841f-6a9465d9d515_cw5n1h2txyewy!App» [47][48]
Windows 10, version 1809 and Windows Server 2019[edit]
A «dark mode» has been added to File Explorer in Windows 10, version 1809 and Windows Server 2019.[49] The Universal File Explorer also includes new features.[50][51]
Windows 10, version 1909[edit]
Windows Search and OneDrive have been integrated into File Explorer’s search feature in Windows 10, version 1909.[52]
Windows 11[edit]
In Windows 11, File Explorer had undergone significant UI changes with the Ribbon Interface simplified into a command bar. Translucency, shadows, and rounded geometry have also been added, following the Fluent Design System. In March 2022, Microsoft introduced adverts into the file explorer, but later stated that these were ‘not intended to be published externally’[53] after significant negative media coverage.
Windows 11 2022 Update[edit]
On April 5, 2022, Microsoft announced that it would be adding tabs, favorites, and a new homepage to File Explorer.[54] These features were eventually introduced via an update to the Windows 11 2022 Update on October 18, 2022.[55]
Extensibility[edit]
File Explorer can be extended to support non-default functionality by means of Windows shell extensions, which are COM objects that plug the extended functionality into Windows Explorer.[56] Shell extensions can be in the form of shell extension handlers, toolbars or even namespace extensions that allow certain folders (or even non-filesystem objects such as the images scanned by a scanner) to be presented as a special folder. File Explorer also allows metadata for files to be added as NTFS alternate data streams, separate from the data stream for the file.
Shell extension handlers are queried by the shell beforehand for modifying the action the shell takes. They can be associated on a per file type – where they will show up only when a particular action takes place on a particular file type – or on a global basis – which are always available. The shell supports the following extension handlers:
| Handler | Description | Can be implemented on | Required shell version |
|---|---|---|---|
| Context menu handler | Adds menu items to the context menu. It is called before the context menu is displayed. | Per file type | Windows 95 and later. Windows 7 introduced IExecuteCommand |
| Drag-and-drop handler | Controls the action upon right-click drag and drop and modifies the context menu that appears. | Global | Windows 95 and later |
| Drop target handler | Controls the action after a data object is dragged and dropped over a drop target such as a file. | Per file type | Windows 95 and later |
| Data object handler | Controls the action after a file is copied to the clipboard or dragged and dropped over a drop target. It can provide additional clipboard formats to the drop target. | Per file type | Windows 95 and later |
| Icon handler | Assigns a custom icon to an individual file amongst a class of file types. It is called before file icons are displayed. | Per file type | Windows 95 and later |
| Property sheet handler | Replaces or adds pages to the property sheet dialog box of an object. | Per file type | Windows 95 and later |
| Copy hook handler | Allows running, modifying or denying the action when a user or application tries to copy, move, delete, or rename an object. | Not associated with a file type | Windows 95 and later |
| Search handler | Allows shell integration of a custom search engine. | Not associated with a file type | Windows 95 through Windows XP |
| Infotip handler | Allows retrieving flags and infotip information for an item and displaying it inside a popup tooltip upon mouse hover. | Per file type | Windows Desktop Update and later |
| Thumbnail image handler | Provides for a thumbnail image to be generated and displayed along with its alpha type when a file is selected or the thumbnail view is activated. | Per file type | Windows Desktop Update and later. Windows Vista introduced a newer IThumbnailProvider interface that also shows thumbnails in the Details pane. The older IExtractImage is still supported but not in the Details pane.[57] |
| Disk Cleanup handler | Add a new entry to the Disk Cleanup application and allows specifying additional disk locations or files to clean up. | Per folder | Windows 98 and later |
| Column handler | Allows creating and displaying custom columns in Windows Explorer details view. It can be used to extend sorting and grouping. | Per folder | Windows 2000 and later |
| Icon overlay handler | Allows displaying an overlay icon over a shell object (a file or folder icon). | Per file type | Windows 2000 and later |
| Metadata handler | Allows viewing and modifying metadata stored in a file. It can be used to extend details view columns, infotips, property pages, sorting and grouping. | Per file type | Windows 2000 and later |
| Filter handler (IFilter) | Allows file properties and its contents to be indexed and searched by Indexing Service or Windows Search | Per file type | Windows 2000 and later |
| AutoPlay handler | Examines newly discovered removable media and devices and, based on content such as pictures, music or video files, launches an appropriate application to play or display the content. | Per file type category Windows XP only: per device and per file type category |
Windows XP and later |
| Property handler | Allows viewing and modifying system-defined and custom properties of a file. | Per file type | Windows Vista and later; on Windows XP if Windows Search is installed. |
| Preview handler | Renders enhanced previews of items without launching the default application when a file is selected. It can also provide file type-specific navigation such as browsing a document, or seeking inside a media file. | Per file type | Windows Vista and later |
Namespace extensions are used by Explorer and Common Dialogs to either display some data – which are not necessarily persisted as files – in a folder-like view or to present data in a way that is different from their organization on the file system. This feature can be exploited by a any hierarchical data source that can be represented as a file system like the Windows one, including Cloud-based implementation. Special folders, such as My Computer and Network Places in Windows Explorer are implemented this way, as are Explorer views that let items in a mobile phone or digital camera be explored. Source-control systems that use Explorer to browse source repositories also use Namespace extensions to allow Explorer to browse the revisions. To implement a namespace extension, the IPersistFolder, IShellView, IShellFolder, IShellBrowser and IOleWindow interfaces need to be implemented and registered. The implementation needs to provide the logic for navigating the data store as well as describing the presentation. Windows Explorer will instantiate the COM objects as required.[58]
While Windows Explorer natively exposes the extensibility points as COM interfaces, .NET Framework can also be used to write some types of extensions, using the COM Interop functionality of .NET Framework.[58] While Microsoft itself makes available extensions – such as the photo info tool[59] – which are authored using .NET Framework, they currently recommend against writing managed shell extensions, as only one instance of the CLR (prior to version 4.0) can be loaded per-process. This behavior will cause conflicts if multiple managed add-ins, targeting different versions of the CLR, are attempted to be run simultaneously.[60][61]
See also[edit]
- Comparison of file managers
- List of alternative shells for Windows
Notes and references[edit]
- ^ «January 26, 2023—KB5022360 (OS Build 22621.1194) Preview». Microsoft Support. Microsoft.
- ^ «Releasing Windows 11 Build 22621.1192 to the Release Preview Channel». Windows Insider Blog. January 17, 2023.
- ^ «January 26, 2023—KB5022360 (OS Build 22621.1194) Preview». Microsoft Support. Microsoft.
- ^ «Announcing Windows 11 Insider Preview Build 22621.1250 and 22623.1250». Windows Insider Blog. February 2, 2023.
- ^ «Announcing Windows 11 Insider Preview Build 25290». Windows Insider Blog. February 1, 2023.
- ^ Lineback, Nathan. «Misc Windows». toastytech.com. Archived from the original on July 3, 2018. Retrieved June 19, 2018.
- ^ John D. Ruley (September 1995). «NT Gets the Look But Not the Logo». How-To Columns. WinMag. Archived from the original on March 14, 2006. Retrieved September 4, 2009. Internet Archive
- ^ «Managing Files, Folders, and Search Methods: Microsoft TechNet». microsoft.com. Archived from the original on January 12, 2009. Retrieved June 19, 2018.
- ^ «Serenity Macros Home Page – Resources for MS Word». www.mvps.org. Archived from the original on June 27, 2018. Retrieved June 19, 2018.
- ^ Windows 2000 Registry: Latest Features and APIs Provide the Power to Customize and Extend Your Apps, MSDN Magazine, November 2000, archived from the original on April 15, 2003, retrieved August 26, 2007
- ^ «COM Objects and Structured Storage» Archived 2018-12-18 at the Wayback Machine, Windows Dev Center, May 31, 2018
- ^ Esposito, Dino (June 2000), More Windows 2000 UI Goodies: Extending Explorer Views by Customizing Hypertext Template Files, MSDN Magazine, archived from the original on August 24, 2007, retrieved August 26, 2007
- ^ Sophos, VBS/Roor-C threat analysis Archived 2007-11-30 at the Wayback Machine. Accessed August 26, 2007.
- ^ «Virus.VBS.Redlof.a», Virus Encyclopedia, Viruslist.com, January 15, 2004, archived from the original on October 28, 2007, retrieved August 26, 2007
- ^ Figure 1 Windows Shell Extensions, MSDN Magazine, June 2000, archived from the original on August 31, 2004, retrieved August 26, 2007
- ^ «What is Indexing Service?». msdn.microsoft.com. Archived from the original on January 1, 2011. Retrieved June 19, 2018.
- ^ «Is Microsoft Office 2003 still decent for general use on Windows 7, 8.1 and 10». answers.microsoft.com. Archived from the original on February 7, 2016. Retrieved June 19, 2018.
- ^ «What is Windows XP?». www.computerhope.com. Retrieved August 12, 2022.
- ^ «Windows XP – What’s new with files and folders». Windows. Microsoft. Archived from the original on May 23, 2007.
- ^ How to create and extract a Zip File in Windows ME/XP/2003
- ^ How To: Open a Cab file – Quote: «If you’re using Windows XP or Windows Vista, then your operating system has built-in support for opening Cab files.»
- ^ «Moving web pages saved by IE (HTM file & _FILES folder)». Directory Opus Resource Centre. May 4, 2009. Archived from the original on December 16, 2020. Retrieved December 16, 2020.
When Windows Explorer […] move a Web page both the HTML file and the directory are automatically moved together. […] Moreover, the user only has to drag EITHER part—the file or the directory and the other part will follow automatically. This way the page is kept intact irrespective of where Windows stores it.
- ^ The sort order for files and folders whose names contain numerals is different in Windows Vista, Windows XP, and Windows Server 2003 than it is in Windows 2000, support.microsoft.com, August 28, 2007, archived from the original on September 27, 2010, retrieved July 6, 2009
- ^ a b Shultz, Greg (August 10, 2006). «Examine the filtering, grouping, and stacking features in Windows Vista’s Windows Explorer». TechRepublic. CBS Interactive. Archived from the original on December 22, 2015. Retrieved December 19, 2015.
- ^ a b c Reid, Rory (January 30, 2007). «Seven days of Vista — day 4: Stacking and filtering». CNET. CBS Interactive. Archived from the original on December 22, 2015. Retrieved December 19, 2015.
- ^ a b Kaelin, Mark (July 17, 2007). «How do I… Save and refine desktop searches in Microsoft Windows Vista?». TechRepublic. CBS Interactive. Archived from the original on November 17, 2015. Retrieved November 11, 2015.
- ^ Microsoft. «Saved Search File Format». MSDN. Archived from the original on December 10, 2015. Retrieved December 21, 2015.
- ^ Bentz, Ben (October 31, 2006). «Query Composition: Building a search upon another search». Shell: Revealed Blog. Microsoft. Archived from the original on December 15, 2006. Retrieved December 21, 2015.
- ^ Using search operators to find pictures, music and videos in Windows Vista
- ^ Windows 7: Find/Search Files By Date And Size
- ^ Windows Explorer Columns — Are you Fully Using Them?
- ^ «How to Search for Contents in Any File Type Without Indexing Service Enabled in Windows Vista and Windows 7». Wikihow.com. January 27, 2014. Archived from the original on March 19, 2017. Retrieved January 31, 2014.
- ^ a b Microsoft. «Add tags or other properties to a file». Windows How-to. Archived from the original on December 22, 2015. Retrieved December 21, 2015.
- ^ White, Nick (July 13, 2007). «10 Things – Windows Explorer Has a New Preview Pane». Windows Vista Team Blog. Microsoft. Archived from the original on July 15, 2007. Retrieved December 14, 2015.
- ^ Microsoft. «Pen and Touch Input in Windows Vista». MSDN. Archived from the original on December 22, 2015. Retrieved December 21, 2015.
- ^ Oiaga, Marius (September 27, 2006). «Quick Zoom on the Windows Vista Desktop and in Explorer». Softpedia. Archived from the original on December 22, 2015. Retrieved December 21, 2015.
- ^ McFedries, Paul (2008). Microsoft Windows Vista Unleashed. Sams Publishing. p. 87. ISBN 978-0-672-33013-1. Retrieved December 21, 2015.
- ^ Mangefeste, Tony; Walp, David (2006). «Optical Platform: Windows Vista and Beyond». Microsoft. Archived from the original (PPT) on June 4, 2011. Retrieved December 21, 2015.
- ^ Davis, Christopher (March 29, 2007). «Your File Is In Use… Demystified». Shell: Revealed Blog. Microsoft. Archived from the original on April 29, 2007. Retrieved December 21, 2015.
- ^ «Properties». msdn2.microsoft.com. Archived from the original on October 9, 2007. Retrieved June 19, 2018.
- ^ «IColumnProvider interface (Windows)». msdn2.microsoft.com. Archived from the original on April 17, 2008. Retrieved June 19, 2018.
- ^ A solution to this is provided on http://windowsxp.mvps.org/webpairs.htm Archived 2010-12-24 at the Wayback Machine. After the webpairs.reg file has been merged into the registry, the «Managing pairs of Web pages and folders» option is available in the Folder Options View tab.
- ^ «MS-WSP: Windows Search Protocol», MSDN Library, Microsoft, December 18, 2006, archived from the original on May 16, 2010, retrieved June 10, 2009
- ^ «Creating Shortcut Menu Handlers (Windows)». msdn.microsoft.com. Archived from the original on November 22, 2010. Retrieved June 19, 2018.
- ^ «Improvements in Windows Explorer». Archived from the original on November 7, 2011. Retrieved October 30, 2011.
- ^ «Microsoft switches to File Explorer name in Windows 8, bids farewell to Windows Explorer». The Verge. June 29, 2012. Archived from the original on August 17, 2012. Retrieved August 3, 2012.
- ^ «How to open UWP File Explorer on Windows 10 – Step by step». Windows Latest. May 7, 2017. Archived from the original on August 24, 2018. Retrieved August 24, 2018.
- ^ «Windows 10 Tip: Unlock the UWP File Explorer – Thurrott.com». Thurrott.com. May 6, 2017. Archived from the original on August 24, 2018. Retrieved August 24, 2018.
- ^ «Inspired by Insiders – Dark Theme in File Explorer». August 8, 2018. Archived from the original on August 12, 2018. Retrieved August 23, 2018.
- ^ «Microsoft updates universal File Explorer with new features in Windows 10 version 1809». Windows Central. Archived from the original on August 25, 2018. Retrieved August 24, 2018.
- ^ «UWP File Explorer has got new features in Windows 10 version 1809». Winaero. August 23, 2018. Archived from the original on August 25, 2018. Retrieved August 24, 2018.
- ^ «Windows 10 version 1909: new and changed features — gHacks Tech News». www.ghacks.net. October 2019. Archived from the original on October 25, 2019. Retrieved October 25, 2019.
- ^ Warren, Tom (March 15, 2022). «Microsoft says Windows 11’s File Explorer ads were ‘not intended to be published externally’«. The Verge. Retrieved July 28, 2022.
- ^ Warren, Tom (April 5, 2022). «Windows 11’s refreshed File Explorer gets tabs, favorites, and a new homepage». The Verge. Retrieved August 12, 2022.
- ^ Warren, Tom (October 18, 2022). «Windows 11’s new tabbed File Explorer and taskbar improvements are available today». The Verge. Retrieved October 18, 2022.
- ^ ShellExView v1.19 – Shell Extensions Manager for Windows, archived from the original on October 24, 2010, retrieved March 31, 2008
- ^ «Thumbnail Handlers (Windows)». msdn.microsoft.com. Archived from the original on June 19, 2018. Retrieved June 19, 2018.
- ^ a b Rensin, Dave (January 2004). «Create Namespace Extensions for Windows Explorer with the .NET Framework». msdn.microsoft.com. Archived from the original on May 8, 2008. Retrieved March 31, 2008.
- ^ «Microsoft Download Center: Windows, Office, Xbox & More». www.microsoft.com. Archived from the original on May 13, 2008. Retrieved June 19, 2018.
- ^ «MSDN Magazine Issues». msdn.microsoft.com. Archived from the original on May 21, 2008. Retrieved June 19, 2018.
- ^ Zhang, Junfeng (November 18, 2005). «Don’t do Shell Extension Handlers in .NET». msdn.com. Archived from the original on January 5, 2010. Retrieved June 19, 2018.
External links[edit]
- Sullivan, Kent. «The Windows 95 User Interface: A Case Study in Usability Engineering» (1996) for Association for Computing Machinery. (Sullivan was a developer on the Windows 95 UI team)
- How To Customize the Windows Explorer Views in Windows XP
- MSDN: Creating Shell Extension Handlers, Windows Dev Center, May 31, 2018
- The Complete Idiot’s Guide to Writing Shell Extensions, by Michal Dunn, March 15, 2006
- Namespace extensions – the undocumented Windows Shell, by Henk Devos, November 30, 1999


Важнейшим из системных приложений компьютера является Проводник. Он предназначен для отображения и поиска файлов. Но далеко не все владельцы ПК знают, как открыть Проводник в операционной системе Windows 10, ведь ярлык приложения отсутствует на Рабочем столе. Это сильно затрудняет процесс взаимодействия с компьютером, однако существуют очень простые способы запуска нужной программы.

Комбинация клавиш
Слово «Проводник» переводится на английский язык как «Explorer». Эта, казалось бы, бесполезная информация поможет вам запомнить комбинацию клавиш «Win» + «E» (E – Explorer). Ее нужно включить, чтобы сделать вызов нужного приложения. Нажав соответствующие кнопки на клавиатуре, пользователь увидит перед собой окно Проводника и сможет заняться поиском интересующих файлов.

С помощью ярлыка на Панели задач
Если компьютер работает исправно, владельцу ПК даже не придет в голову использовать комбинацию клавиш для перехода в Проводник. Ведь иконка приложения, выполненная в желтом цвете, по умолчанию располагается на Панели задач. Один клик левой кнопкой компьютерной мышки по указанному логотипу запустит программу.
![]()
Поиск через Проводник
Если иконка отсутствует в Панели задач, открыть приложение можно будет при помощи разных альтернативных вариантов. Первый из них – поиск программы по запросу «Проводник». Чтобы найти раздел компьютера с файлами, потребуется сделать несколько простых шагов, а именно:
- Щелкнуть ЛКМ по иконке в виде лупы, которая вызывает поисковую строку.

- Ввести название приложения.
- Кликнуть левой кнопкой мыши по названию искомой программы, чтобы открыть ее.

На заметку. Если вы не видите в Панели задач иконку с лупой, попробуйте вызвать окно комбинацией клавиш «Win» + «S».
После завершения поиска Проводник должен выпасть первым в списке. Также из этого меню можно изменить настройки приложения и, например, создать его ярлык на Рабочем столе.
Из меню WinX
Еще один альтернативный способ вызвать приложение заключается в использовании комбинации клавиш «Win» + «X». Она запускает контекстное меню кнопки «Пуск», которое также вызывается щелчком ЛКМ по соответствующей иконке в Панели задач. В данном случае нас интересует всплывающее окно, где присутствует пункт «Проводник». Один клик ЛКМ приводит к тому, что рядом запускается необходимая программа.

Через меню Пуск
Стандартное меню Пуск тоже нельзя обойти стороной. Если его контекстная область вызывается комбинацией клавиш «Win» + «X» или щелчком правой кнопкой мыши по иконке, то главный раздел можно открыть, кликнув ЛКМ. Но найти Проводник в общем списке не получится. Нужно сначала раскрыть вкладку «Служебные – Windows».
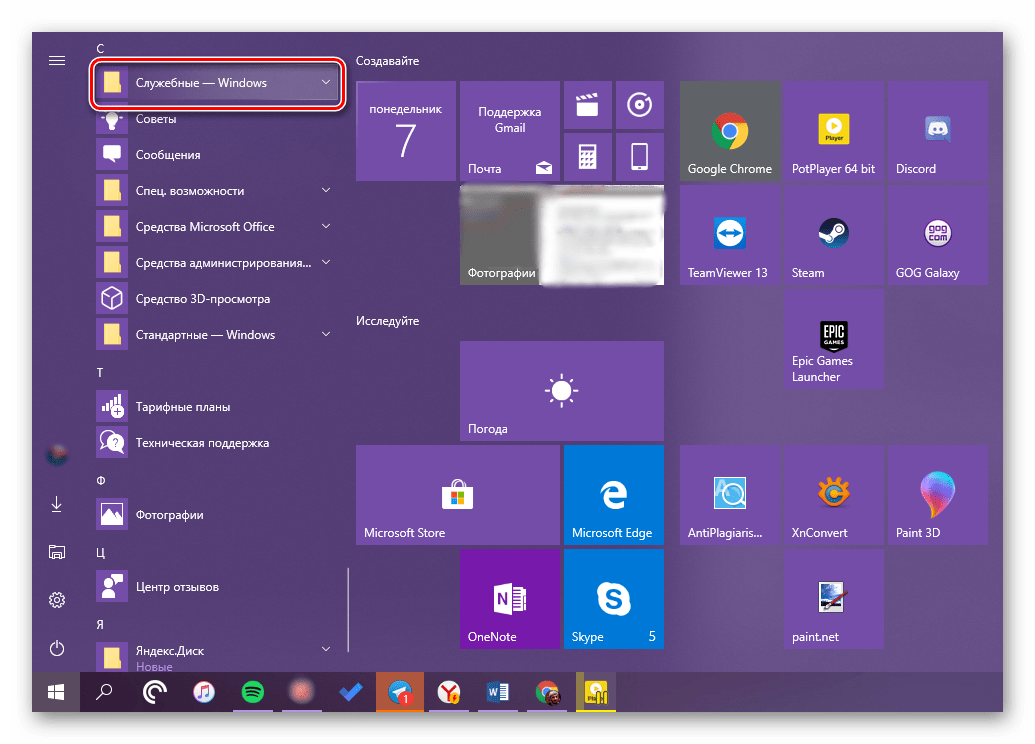
Здесь и находится нужная нам программа. Теперь от запуска вас отделяет один клик левой кнопкой мыши.

Запустить explorer.exe
Поскольку название менеджера переводится на английский язык как «Explorer», то у него должен быть одноименный исполняемый файл. И действительно, «explorer.exe» отвечает за запуск Проводника и находится в директории «C:Windows». Правда, найти его будет непросто, ведь для поиска файлов, как известно, используется сам Проводник. В качестве альтернативного варианта можно предложить любой другой файловый менеджер или поисковую строку Windows 10.

Командная строка
Этот метод точно нельзя назвать самым удобным. Но раз уж он существует, то давайте рассмотрим и его. Командная строка – стандартный инструмент Windows 10, который необходим для обработки пользовательских запросов. Если вы хотите открыть Проводник, то выполните шаги из инструкции:
- Вызовите контекстное меню Пуск.
- Откройте Командную строку с правами Администратора.
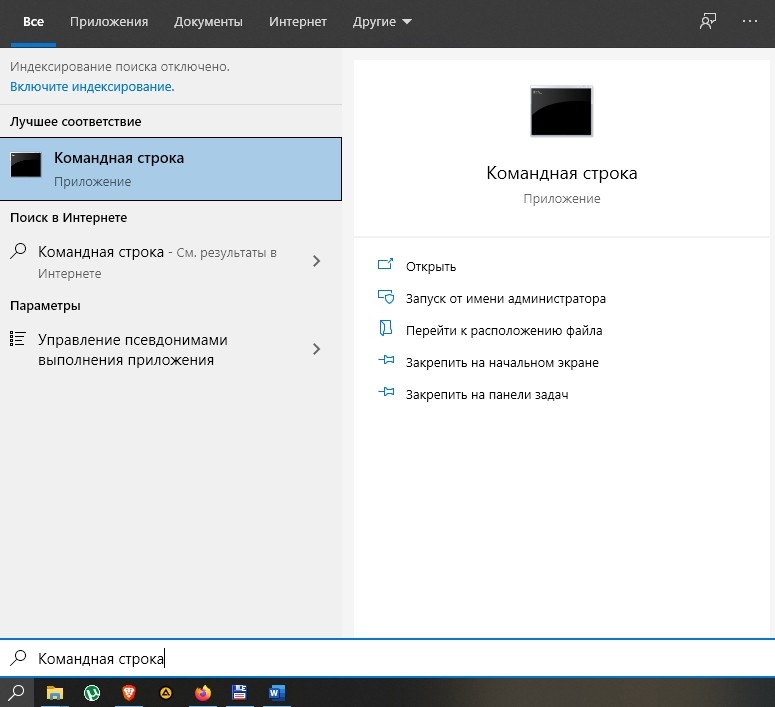
- Введите запрос «start explorer.exe».
- Нажмите клавишу «Enter».

Далее на экране появится знакомый интерфейс менеджера файлов. А если он не откроется, то рекомендуется перезапустить его, используя ту же самую Командную строку. Но на этот раз нужно ввести запрос «taskkill /F /IM explorer.exe».
Через Диспетчер задач
Заключительный вариант тоже не является самым удобным, однако он помогает при запуске, когда в работе компьютера возникает сбой:
- Одновременно нажмите клавиши «Ctrl» + «Shift» + «Esc», чтобы открыть Диспетчер задач.

- Кликните ЛКМ по вкладке «Файл», а затем нажмите – «Запустить новую задачу».

- В открывшееся окно введите «explorer».
- Нажмите «ОК».
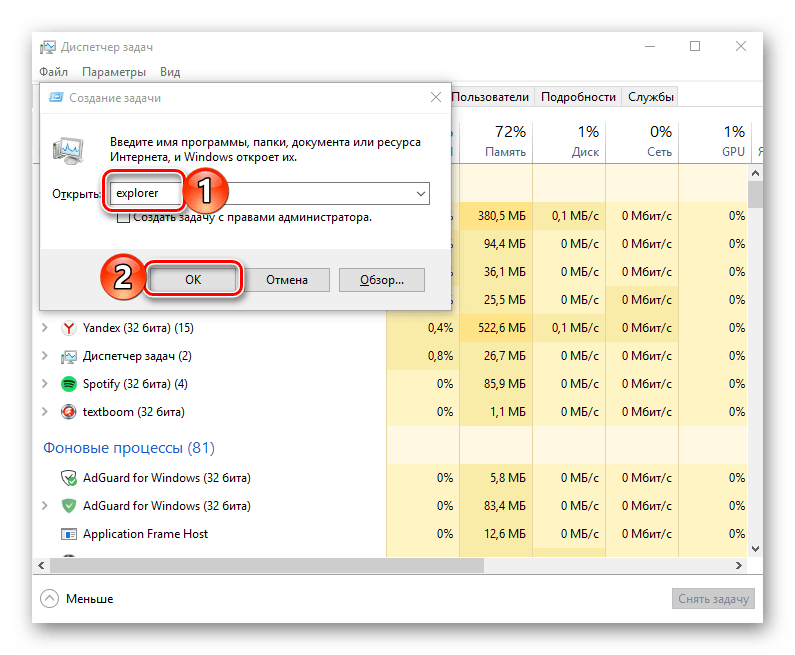
Теперь Проводник не просто откроется, но и будет отображаться в Диспетчере задач до того момента, пока пользователь не решит его закрыть.
Настройка быстрого доступа
Наиболее простым способом запуска менеджера файла является использование ярлыка на Панели задач. Увы, но он не всегда отображается в положенном месте. Поэтому для отображения значка нужно немного изменить настройки. Данная процедура окажется крайне полезной, поскольку вы сможете задать параметры быстрого доступа к Проводнику и через другие разделы меню.
Панель задач
Чтобы иконка отображалась на привычном месте, нужно запустить менеджер любым из рассмотренных ранее способов. Как только откроется соответствующее окно, потребуется кликнуть по иконке приложения ЛКМ и отметить пункт «Закрепить на панели задач». Теперь программа никогда не пропадет.
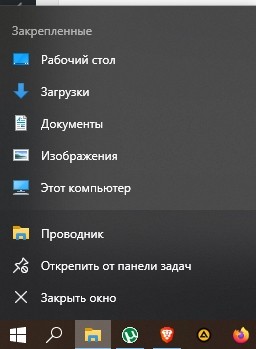
Пуск
При рассмотрении альтернативных вариантов запуска отмечалось, что открыть Проводник через меню Пуск тоже не очень просто, поскольку иконка приложения располагается во вкладке «Системные – Windows». Чтобы она отображалась на главном экране, необходимо выполнить следующее:
- Откройте «Параметры» через меню «Пуск».
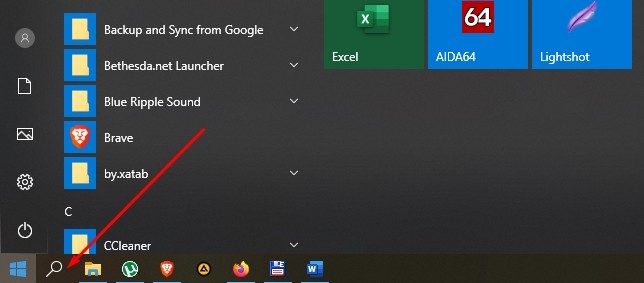
- Перейдите в раздел «Персонализация», а затем – во вкладку «Пуск».

- Щелкните по надписи «Выберите, какие папки будут отображаться в меню».

- Переведите ползунок напротив пункта «Проводник» в положение «Вкл.».

После сохранения настроек иконка менеджера файлов будет отображаться в «Пуске» неподалеку от значка «Параметров». Вы никогда не потеряете нужное приложение.
Проводник — важное приложение для управления файлами. Независимо от того, используете вы мышь или вы просто предпочитаете использовать командную строку, есть много способов открыть проводник в Windows 10.
С помощью значка на панели задач
ПК с Windows поставляются с определенным набором приложений, предварительно закреплёнными на панели задач, включая проводник; просто кликните значок проводника на панели задач, чтобы открыть его.
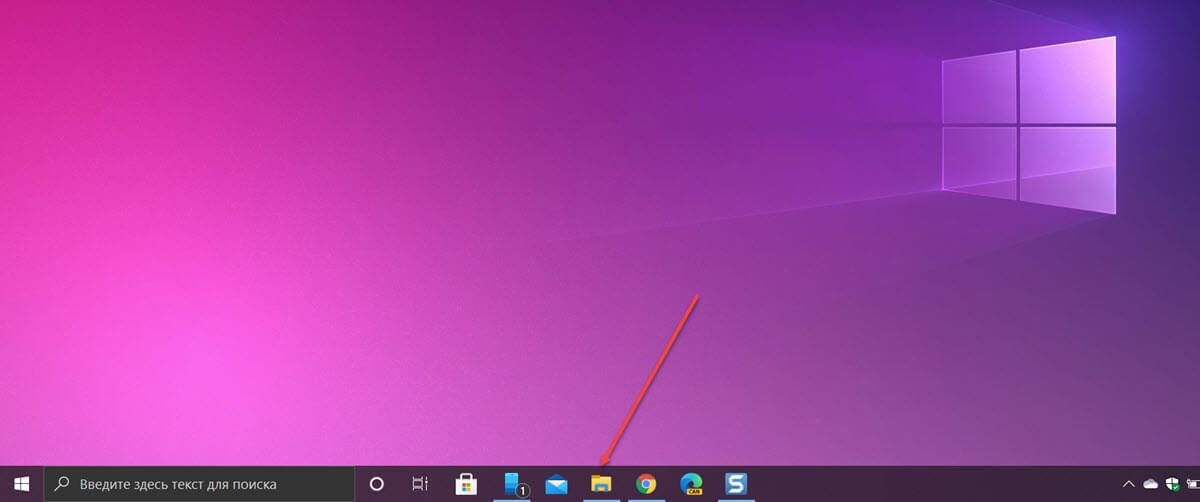
Если вы удалили значок проводника с панели задач, вы можете использовать один из других способов ниже, чтобы запустить его, а затем повторно закрепить его на панели задач.
Для этого после того, как вы открыли проводник, нажмите его значок на панели задач правой кнопкой мыши и выберите «Закрепить на панели задач», чтобы он был там всегда. Затем вы можете перетащить его в любое место на панели задач.
Используйте сочетание клавиш
Почти на каждой клавиатуре ПК с Windows есть клавиша Windows (та, что со логотипом Windows). Вы можете открыть проводник, нажав одновременно Windows E.
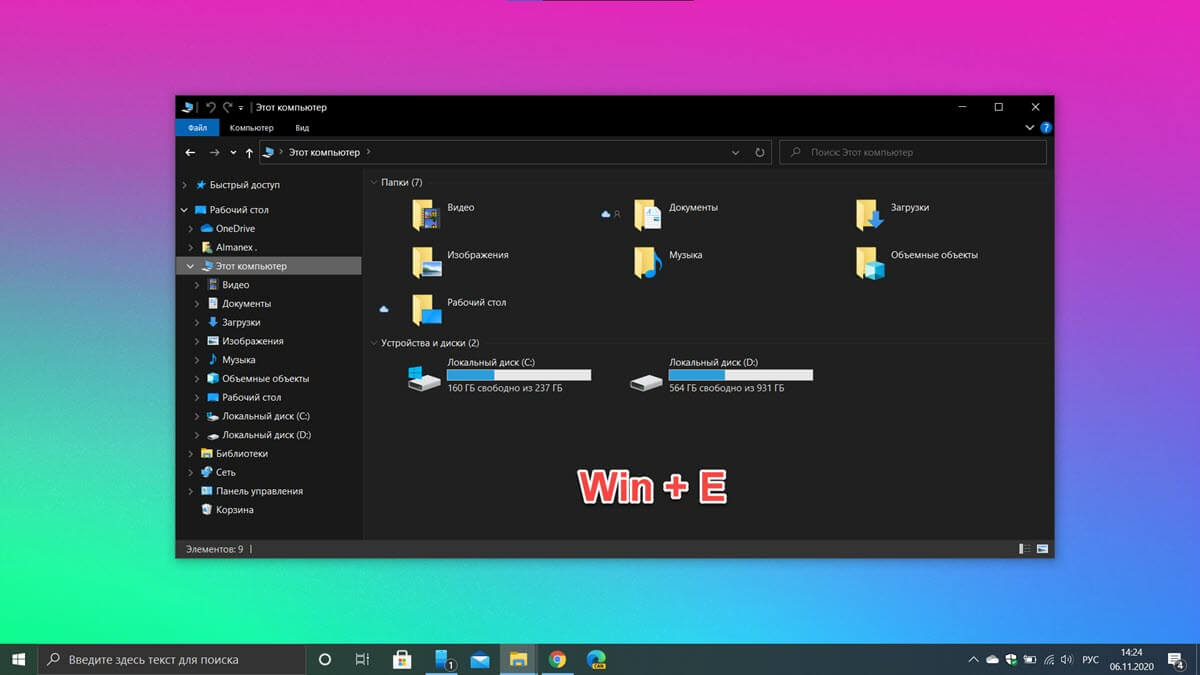
Вы можете найти любое приложение на своем компьютере используя поиск. В поле поиска слева на панели задач просто введите «Проводник», а затем кликните (или используйте клавиши со стрелками для выбора) «Проводник» в результатах поиска, чтобы запустить его.
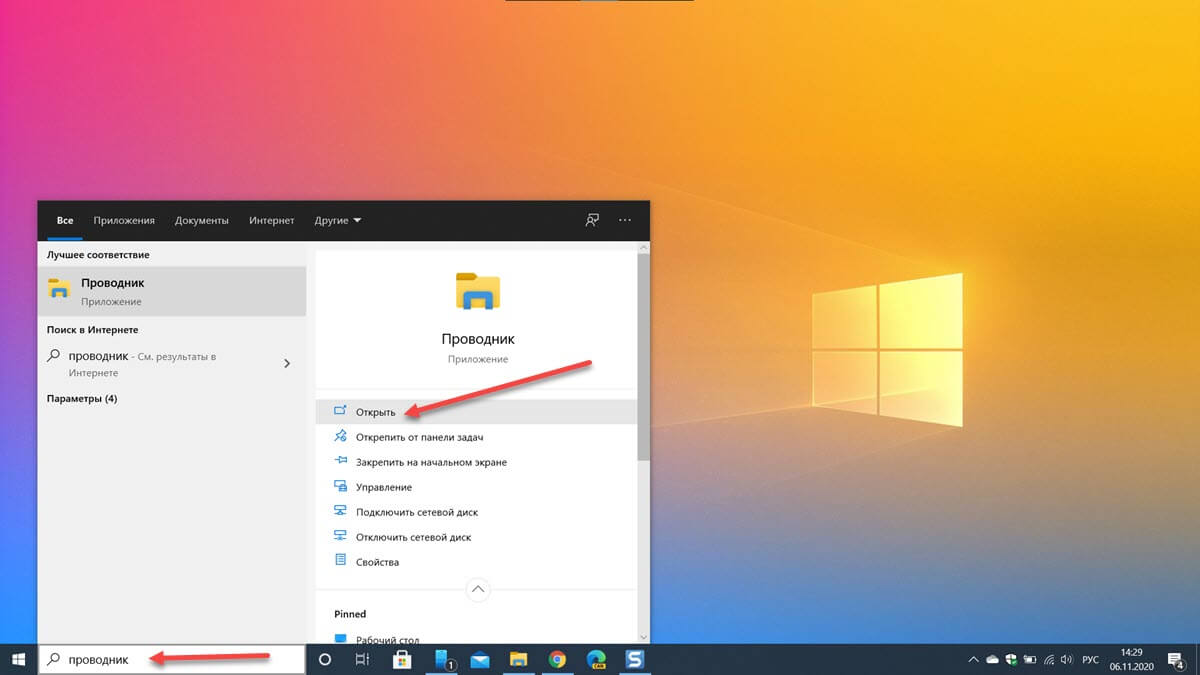
С помощью меню «Пуск»
Есть три способа открыть проводник из меню «Пуск». Во-первых, нажмите кнопку «Пуск», затем прокрутите список приложений и откройте папку «Служебные — Windows». В подменю нажмите «Проводник», чтобы открыть его.
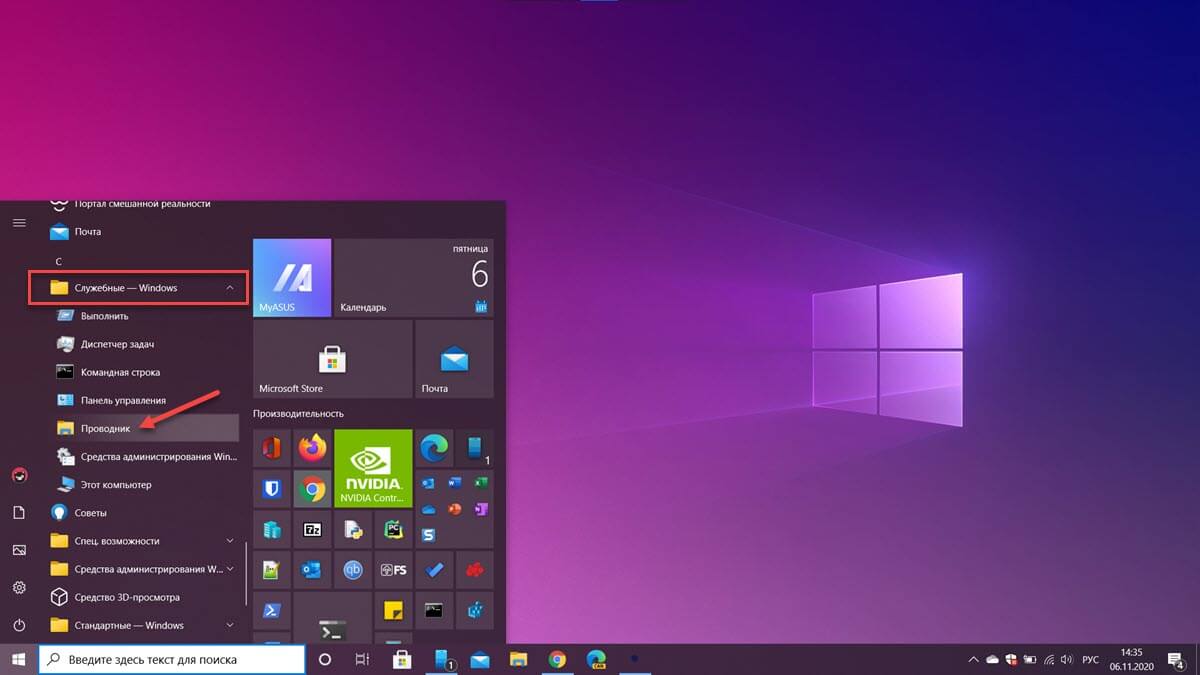
Вы также можете закрепить проводник на боковой панели над кнопкой «Пуск». Для этого нажмите «Параметры» → «Персонализация» → «Пуск», а затем нажмите «Выбрать, какие папки будут отображаться в меню «Пуск».
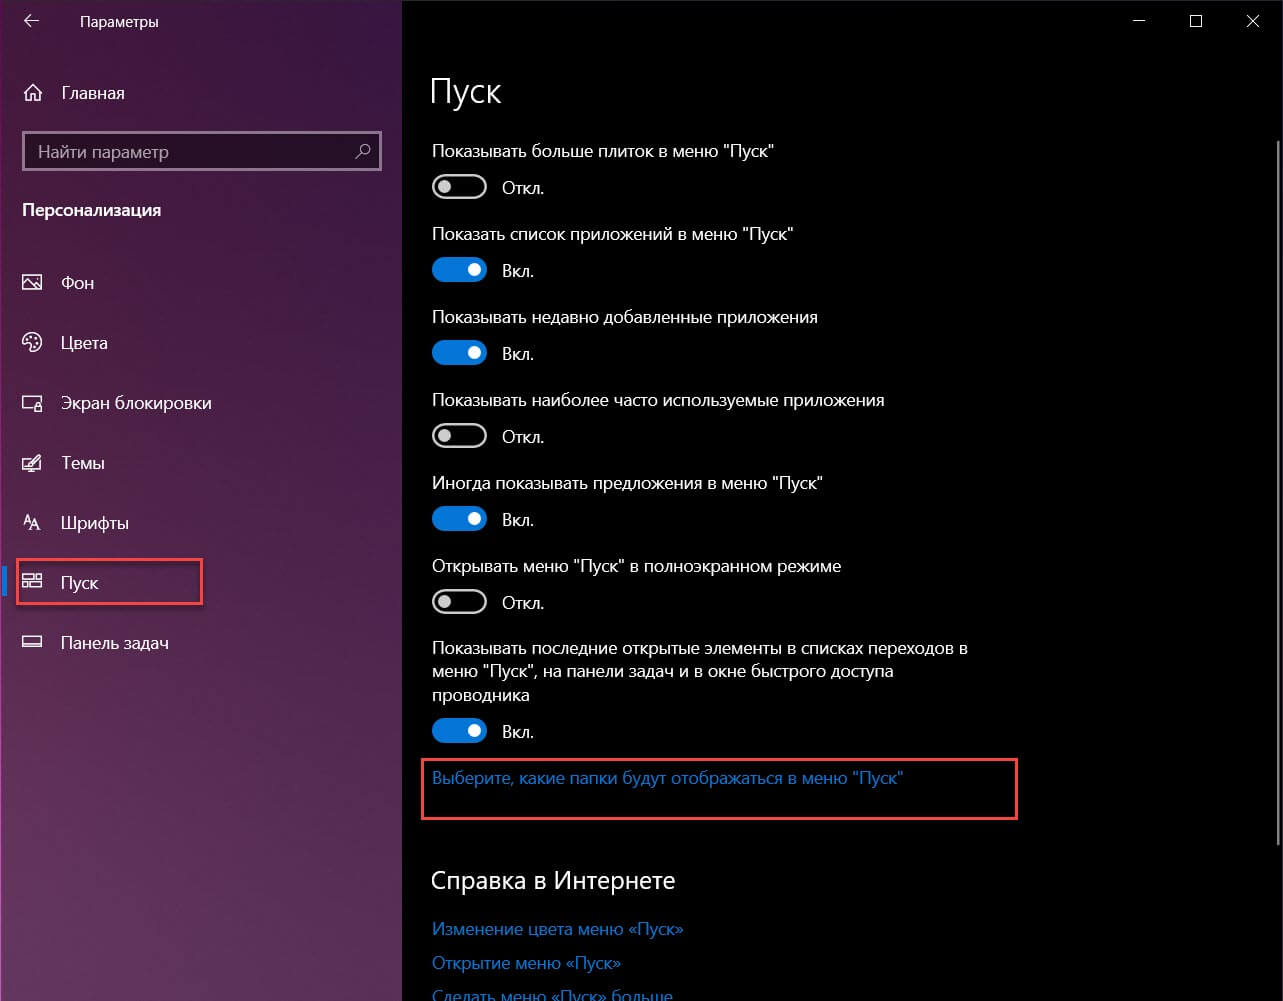
На следующем экране включите опцию «Проводник» передвинув ползунок переключателя в положение «Вкл.».
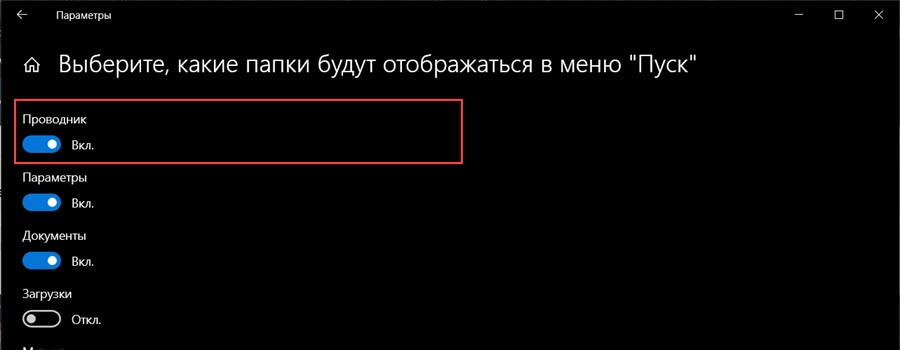
Проводник теперь появится на боковой панели меню «Пуск»; кликните на нем, чтобы запустить проводник.
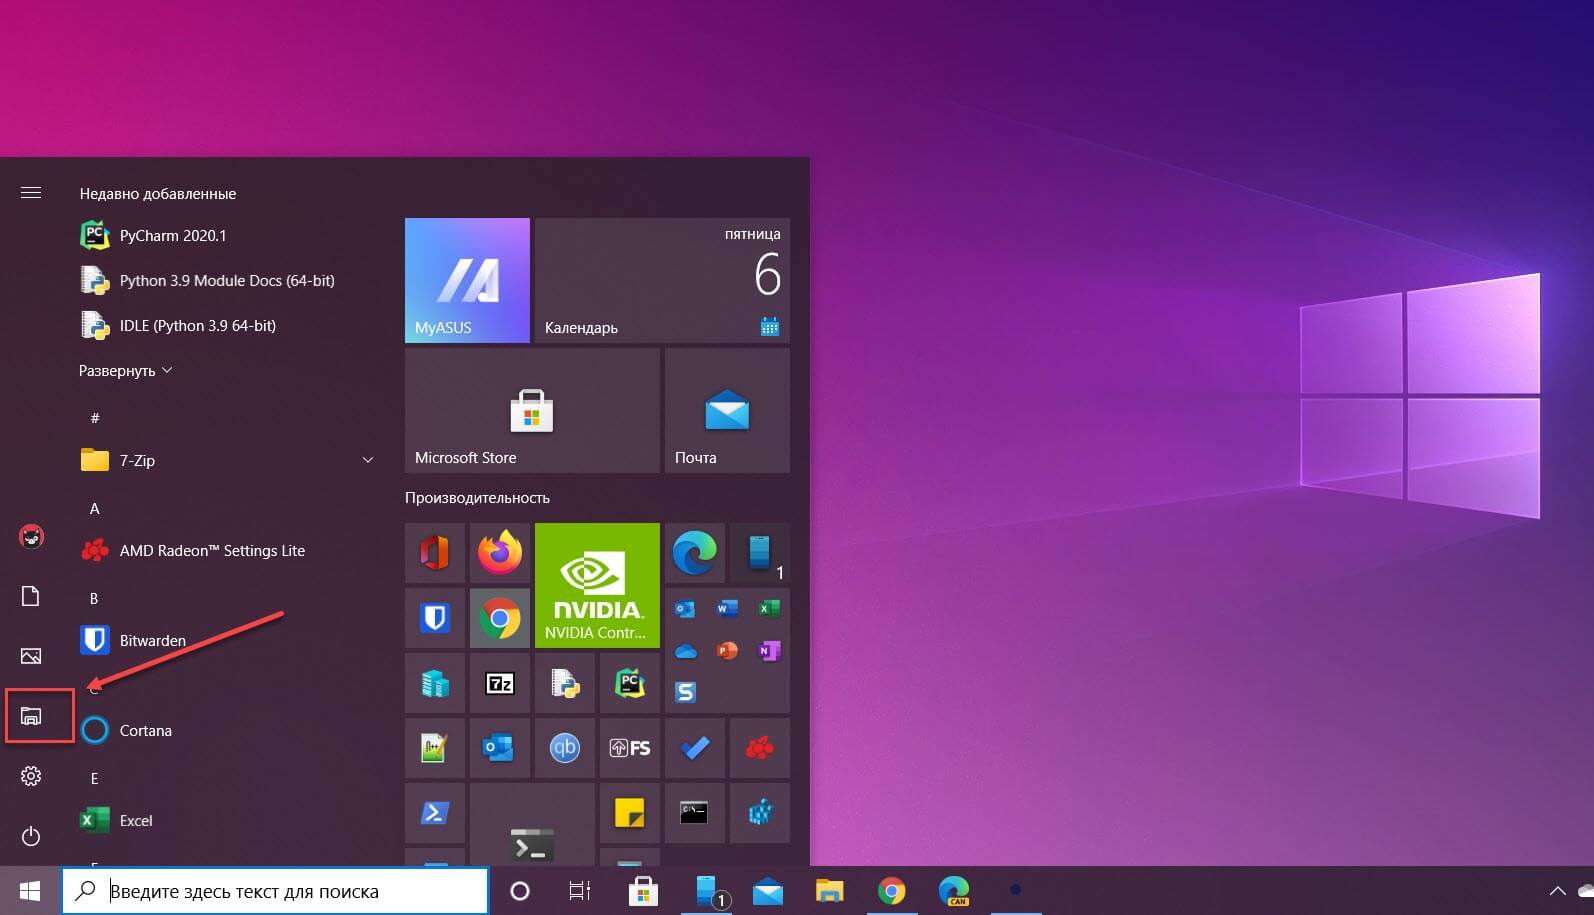
Вы также можете добавить плитку проводника на начальный экран меню «Пуск». Для этого откройте меню «Пуск», введите «Проводник» в поле поиска, а затем на панели, которая появляется справа от результатов поиска, нажмите «Закрепить на начальном экране».
В качестве альтернативы, если вы закрепили проводник на боковой панели меню «Пуск», вы можете кликнуть правой кнопкой мыши значок проводника и выбрать «Закрепить на начальном экране».
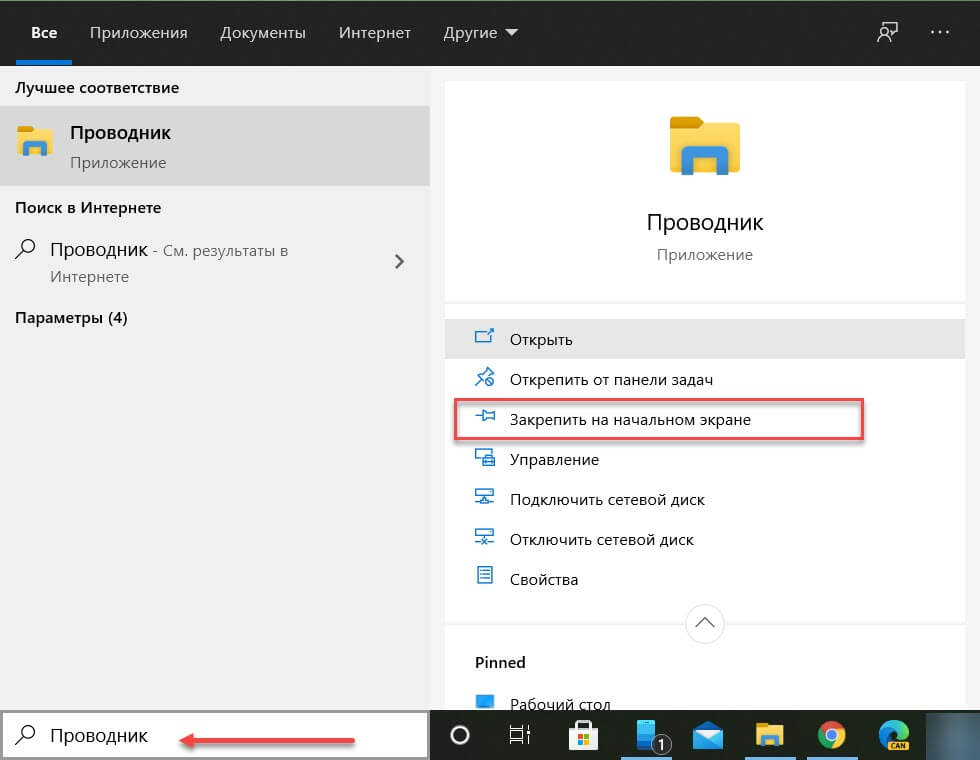
Проводник теперь появится в меню «Пуск»; просто кликните на плитке, чтобы запустить его.
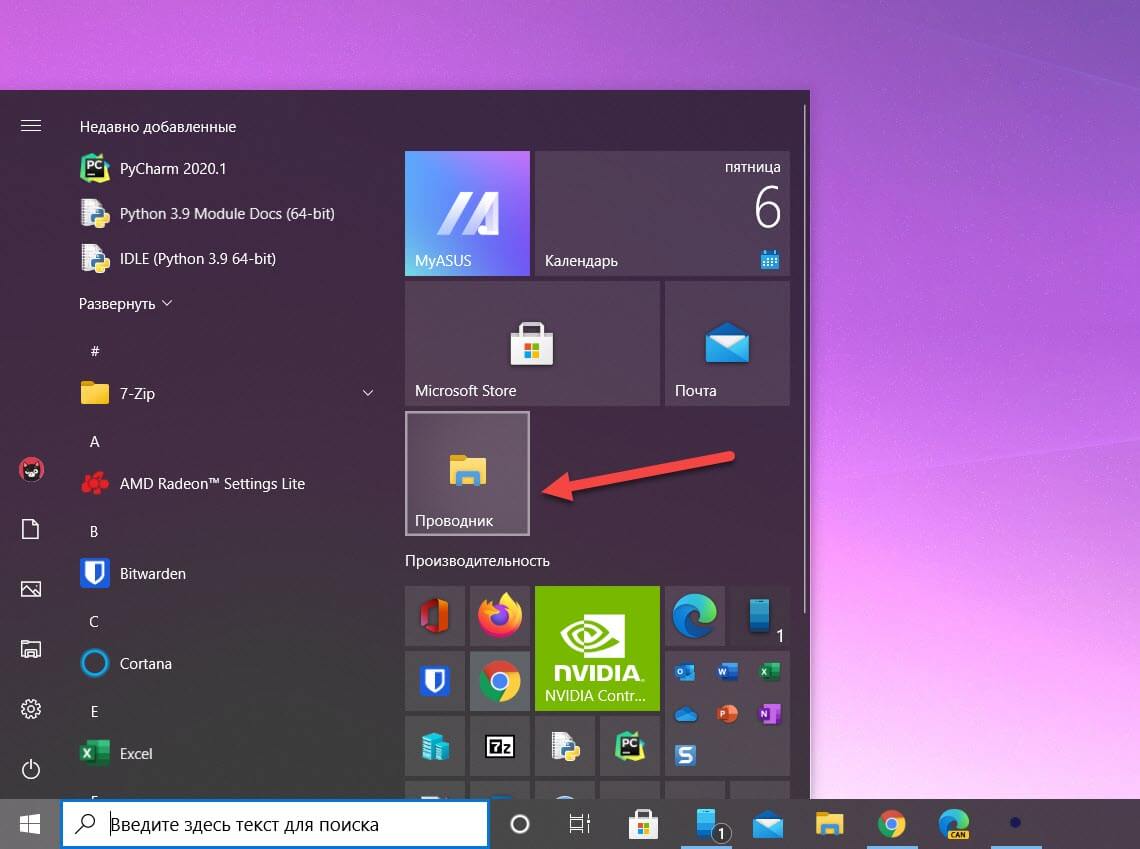
Из меню опытного пользователя
Вы также можете открыть проводник из меню опытного пользователя. Чтобы получить к нему доступ, нажмите Windows X или кликните правой кнопкой мыши кнопку «Пуск» и выберите «Проводник».
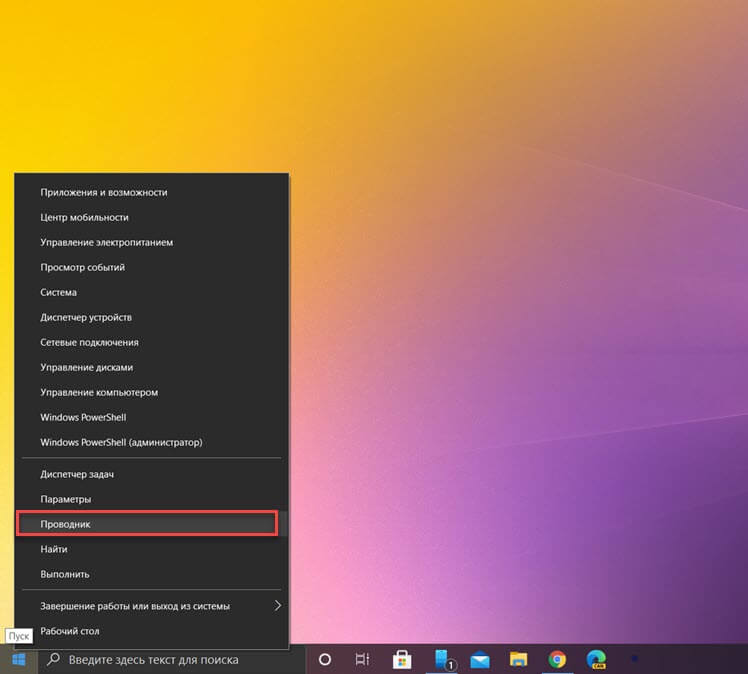
Спросите Кортану
Если на вашем компьютере есть микрофон, и вы можете использовать Кортану, попросите ее открыть проводник. Для этого нажмите значок Кортаны (кружок) на панели задач.
Нажмите значок микрофона и произнесите «Open File Explorer» (то, что вы говорите, также отобразится на экране).
Если у вас нет микрофона, вы можете просто ввести «File Explorer» в поле поиска Кортаны.
Используйте приложение «Выполнить»
Вы также можете запустить проводник в диалоговом окне выполнить «Выполнить». Нажмите Windows R, чтобы открыть окно «Выполнить». В поле «Открыть:» введите «Explorer», нажмите «ОК», и проводник откроется.
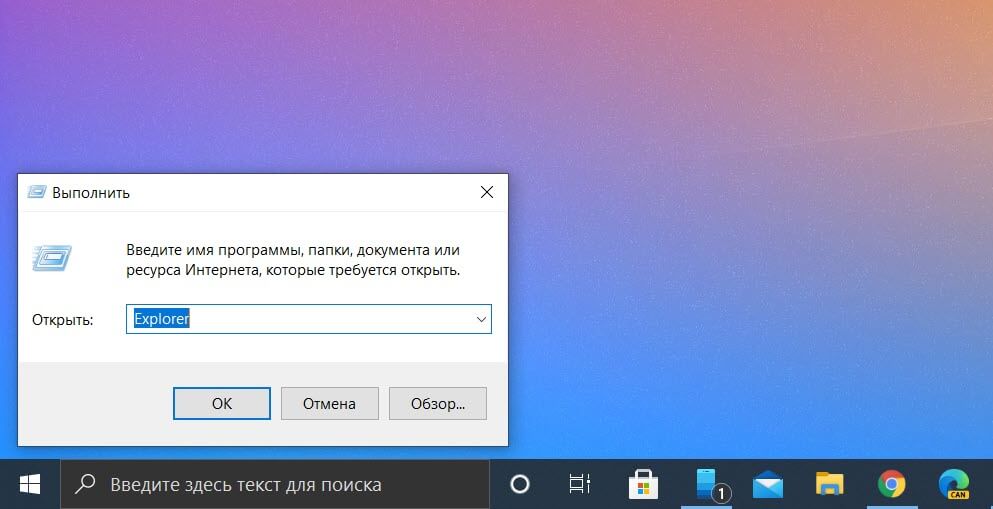
Запустите исходный файл
По умолчанию Windows хранит EXE-файл проводника в папке «Windows» на диске C :. Перейдите в папку «Windows», найдите «Explorer.exe» в длинном списке, а затем дважды кликните его, чтобы открыть проводник.
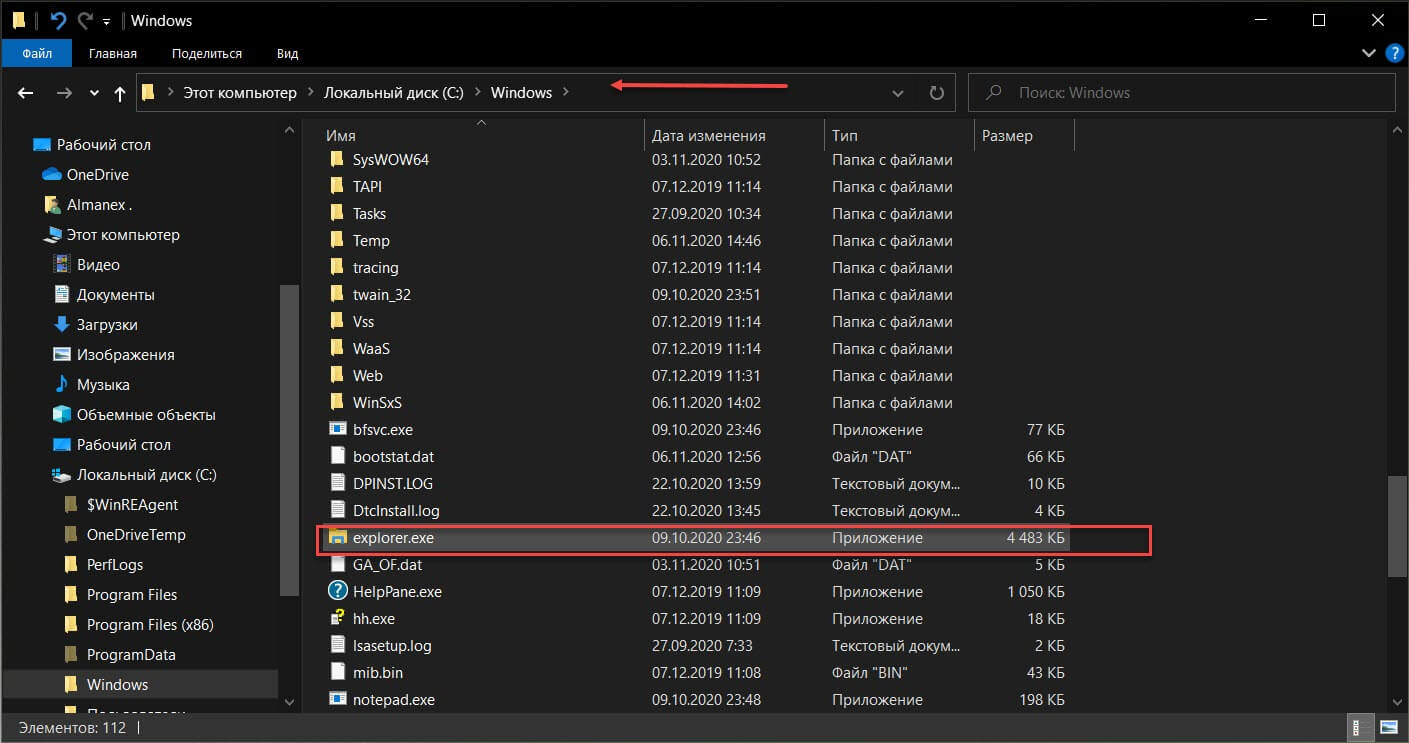
Добавить ярлык на рабочий стол
Для более быстрого доступа к проводнику вы можете создать ярлык на рабочем столе. Для этого нажмите кнопку «Пуск» в левом нижнем углу.
Прокрутите список приложений вниз и откройте папку «Служебные — Windows». В подменю с помощью мыши перетащите «Проводник» на рабочий стол. Вы также можете перетащить проводник из закрепленных плитки на начальном экране меню «Пуск».
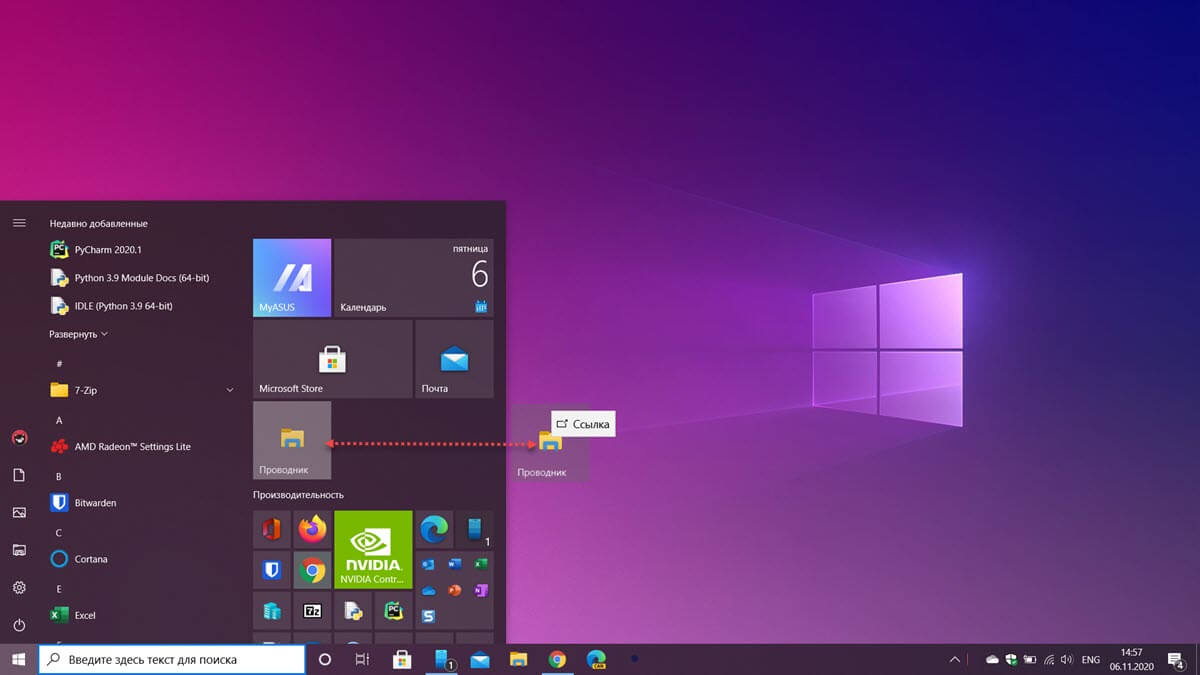
Теперь вы можете просто дважды кликнуть ярлык на рабочем столе, чтобы открыть проводник в любое время.
Из диспетчера задач
Диспетчер задач предназначен не только для завершения работы приложений или мониторинга процессов и производительности – с его помощью можно запускать приложения. Чтобы запустить проводник таким образом, нажмите Ctrl Shift Esc, чтобы открыть диспетчер задач. Затем нажмите «Файл» и выберите «Запустить новую задачу».
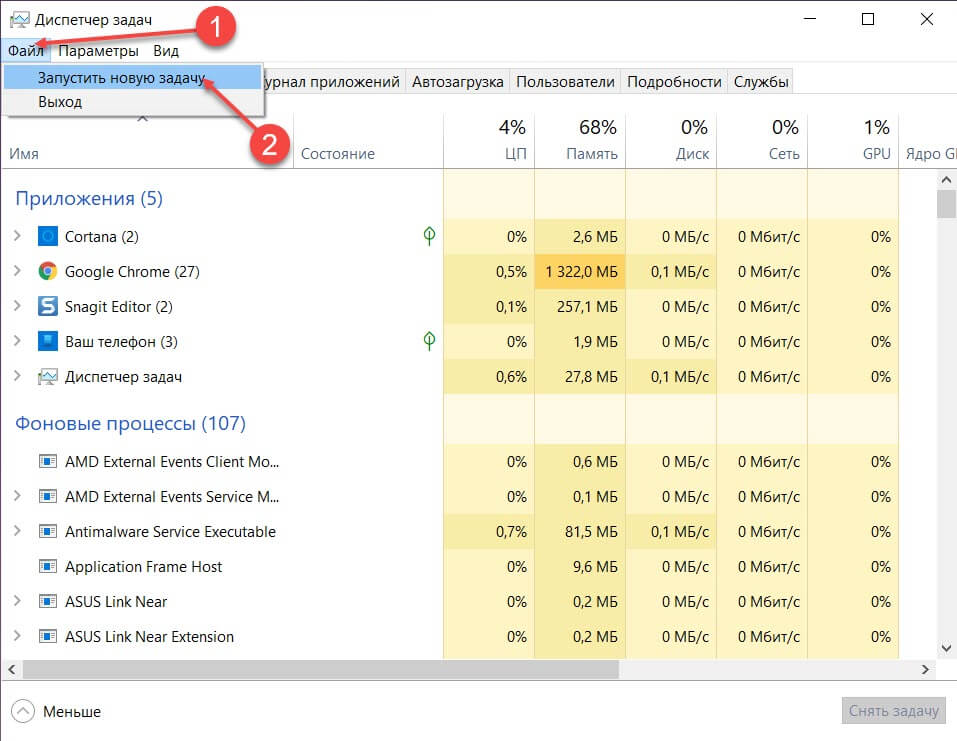
Появится окно «Создать новую задачу». Введите «Explorer» в текстовое поле «Открыть:», и нажмите «ОК», откроется проводник.
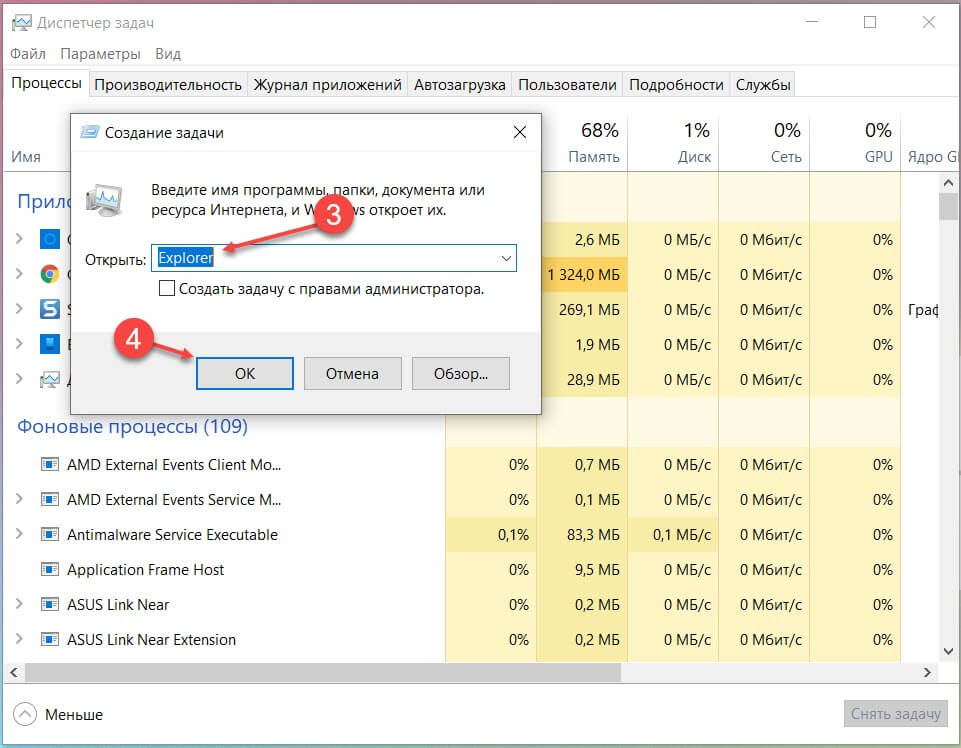
С помощью командной строки
Вы можете запустить практически любое приложение на своем ПК, включая проводник, из командной строки. Для этого введите «cmd» в поле поиска Windows, а затем выберите «Командная строка» в результатах поиска, чтобы открыть его.
В командной строке введите следующую команду и нажмите Enter:
Откроется проводник.
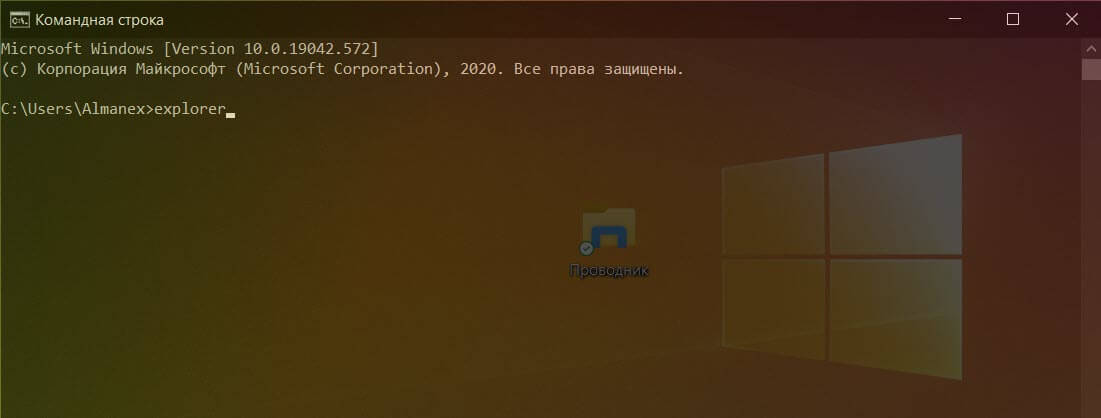
С помощью PowerShell
Вы также можете запустить проводник из PowerShell. Для этого введите «PowerShell» в поле поиска Windows, а затем выберите «Windows PowerShell» в результатах поиска, чтобы открыть его.
В PowerShell введите следующую команду и нажмите Enter:
После этого откроется проводник.

Все! Если вы знаете другие способы открыть проводник в Windows 10, поделитесь с нами в комментариях ниже.
Рекомендуем: Сочетания клавиш для Проводника Windows 10.
проводник в Windows 11 помогает быстро и легко получить нужные файлы.
Чтобы извлечь его в Windows 11, выберите его на панели задач или в меню Пуск или нажмите клавишу с логотипом Windows + E на клавиатуре.
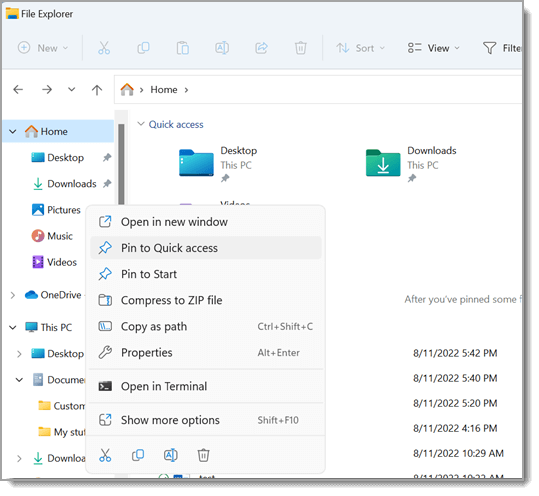
Как использовать проводник:
-
Чтобы закрепить папку в быстром доступе, щелкните правой кнопкой мыши (или нажмите и удерживайте) папку и выберите Пункт Закрепить в быстром доступе.
-
Чтобы предоставить общий доступ к файлу, выберите его, а затем выберите Поделиться на ленте.
-
Чтобы переместить расположение файла или папки, выберите их, а затем выберите Вырезать на ленте. Перейдите к новому расположению, а затем выберите Вставить .
Примечание: Для файлов и папок в режиме быстрого доступа необходимо щелкнуть правой кнопкой мыши (или нажать и удерживать) и выбрать команду Открыть, прежде чем вы сможете вырезать и вставить.
-
Чтобы изменить способ отображения элементов в проводник, выберите Вид на ленте и выберите между отображением значков, списков, сведений и многого другого.
-
Чтобы уменьшить пространство между файлами, выберите Вид > Компактное представление.
-
Чтобы найти нужные файлы на компьютере и в облаке, выполните поиск на проводник Home.
Примечание: Войдите в свои облачные учетные записи из меню «Пуск > Параметры» > учетные записи, чтобы включить облачный поиск.
проводник имеет новое упрощенное контекстное меню, упрощая работу с популярными командами. Щелкните файл правой кнопкой мыши, чтобы открыть новое контекстное меню. Дополнительные сведения см. в разделе Поиск элементов в контекстном меню проводник.
Как и многие другие точные инструменты, с годами проводник улучшается. Чтобы извлечь его в Windows 10, щелкните его значок на панели задач или в меню Пуск или нажмите клавишу с логотипом Windows + E на клавиатуре.
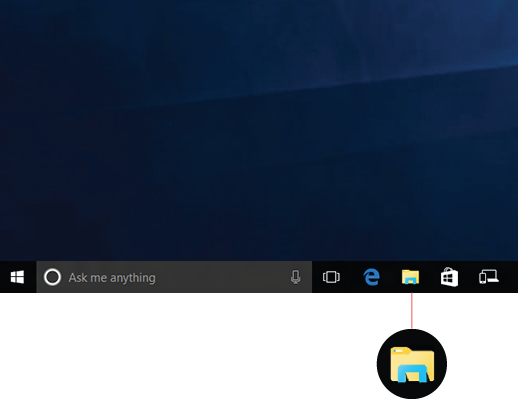
Ниже описаны некоторые особо важные изменения в Windows 10.
-
Служба OneDrive теперь является частью проводника. Чтобы узнать, как это работает, ознакомьтесь с OneDrive на компьютере.
-
После открытия проводника вы попадаете в меню быстрого доступа. В этом меню указаны часто используемые вами папки и последние использованные файлы, поэтому вам не придется долго искать их в папках. Закрепите любимые папки в меню быстрого доступа, чтобы они всегда были под рукой. Дополнительные сведения см. в разделе Закрепление, удаление и настройка элементов в области быстрого доступа.

-
Теперь вы можете использовать приложения для отправки файлов и фотографий прямо из проводника. Выберите файлы, к которым вы хотите предоставить общий доступ, перейдите на вкладку Общий доступ , нажмите кнопку Общий доступ и выберите приложение. Дополнительные сведения о параметрах общего доступа см. в разделе Предоставление общего доступа к файлам в проводнике.
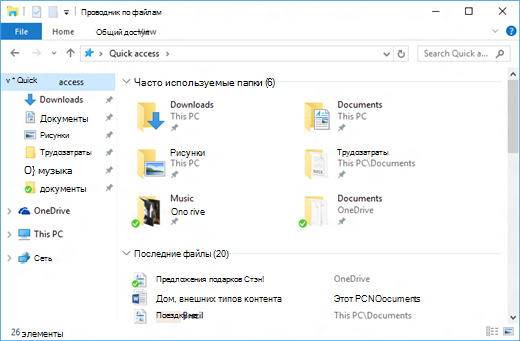
Если вы раньше использовали Windows 7, вот еще несколько отличий.
-
Папка «Мой компьютер» теперь называется «Этот компьютер» и не отображается на рабочем столе по умолчанию. Чтобы узнать, как добавить папку «Этот компьютер» на рабочий стол или в меню «Пуск», см. раздел Название папки «Мой компьютер» изменено на «Этот компьютер».
-
Библиотеки не будут отображаться в проводнике, если вы не включите их. Чтобы добавить их в левую область, выберите вкладку Вид > области навигации > Показать библиотеки.
Как открыть Проводник в Windows 10. Различные способы открыть File Explorer
Проводник (File Explorer) — это приложение для управления файлами по умолчанию, которое входит в состав Windows, начиная с Windows 95. Помимо операций управления файлами, Explorer.exe также реализует оболочку — рабочий стол, панель задач, значки рабочего стола, а также меню «Пуск» являются частями приложения Explorer.
Начиная с Windows 8, Проводник получил Ленточный пользовательский интерфейс (Ribbon UI) и панель быстрого доступа. Хотя у него нет возможности избавиться от ленты Windows 10 поставляется с той же версией проводника, что и Windows 8, за исключением нескольких изменений, таких как папка Быстрый доступ, заменяющий Избранное. В этой статье мы рассмотрим способы, как открыть Проводник в Windows 10
Можно открыть Проводник с помощью значка на панели задач
Панель задач Windows имеет ряд закрепленных приложений по умолчанию, в том числе и Проводник. Просто щёлкните иконку Проводника на панели задач, чтобы запустить его.
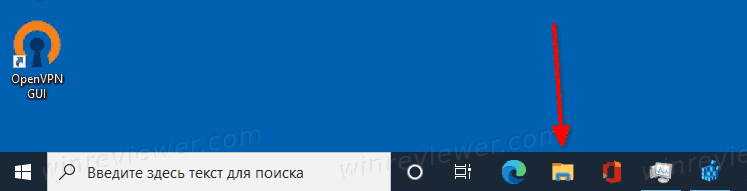
Если же вы или ваш системный администратор открепили значок Проводника с панели задач, вы можете использовать один из других способов, рассмотренных ниже, чтобы открыть его. Кроме того, вы можете закрепить запущенный Проводник обратно на панель задач! Вот как это сделать.
Для этого после того, как вы запустили Проводник, щелкните правой кнопкой мыши на его значке в панели задач и выберите «Закрепить на панели задач» в контекстном меню, чтобы он там остался даже после выхода из программы. После этого вы сможете переместить его в любое удобное место на панели задач.
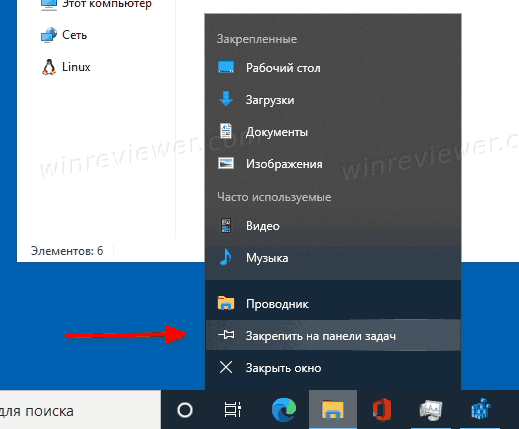
Откройте Проводник сочетанием клавиш
Практически на каждой клавиатуре современных компьютеров с Windows есть клавиша Win с соотвествующим логотипом. Используя её, вы можете открыть Проводник, нажав одновременно Win + E.
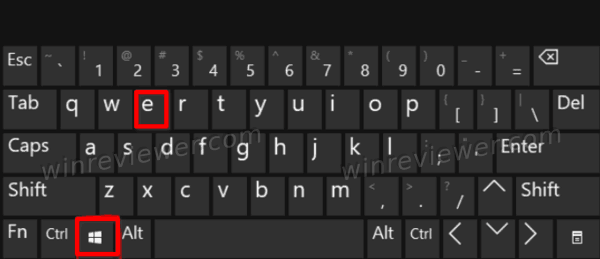
Windows позволяет найти любое установленное приложение, используя поиск. В поле поиска на панели задач введите Проводник, а затем выберите программу Проводник в результатах поиска, чтобы запустить его.
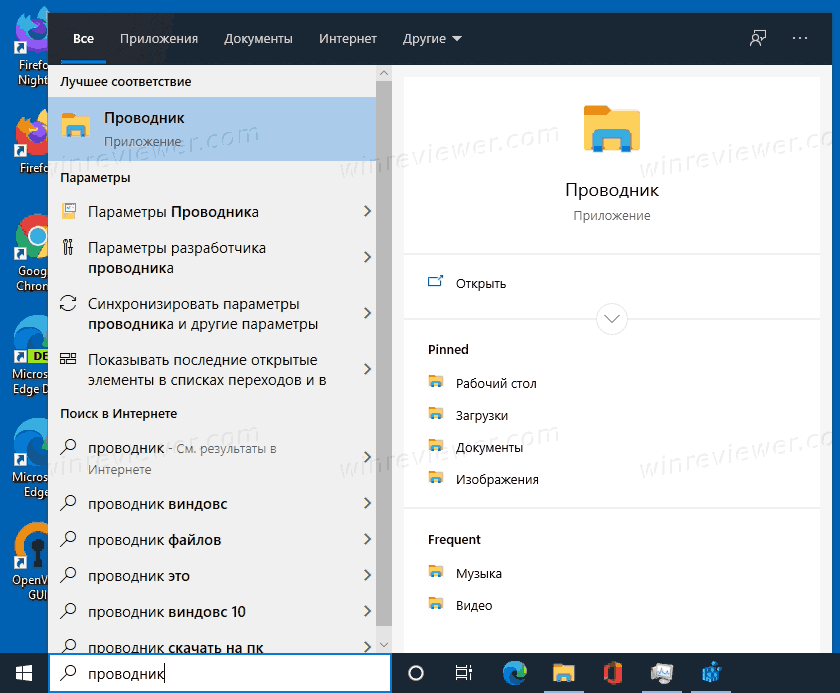
- Откройте меню Пуск, щелкнув на логотипе Windows в Панели задач, или нажав клавишу
Winна клавиатуре. - В списке приложений слева перейдите к папке Служебные — Windows.
- В этой папке нажмите на Проводник, чтобы его запустить.

- Кроме того, если нажать на значки Документы, Изображения, и т.п. в левой панели меню Пуск, эти папки также открываются в Проводнике.
- Наконец, можно добавить плитку Проводника в правую область (начальный экран) меню Пуск. Для этого найдите Проводник поиском, как указано выше, в результатах поиска выберите Закрепить на начальном экране.
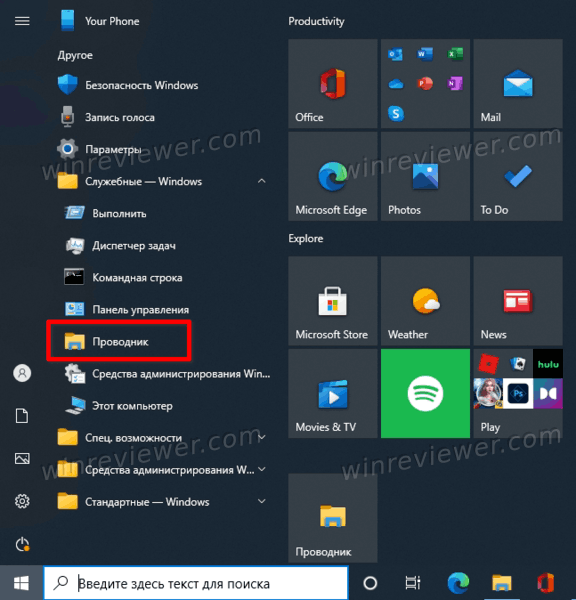
В качестве альтернативы, если вы закрепили проводник на боковой панели меню «Пуск», вы можете кликнуть правой кнопкой мыши значок проводника и выбрать «Закрепить на начальном экране».
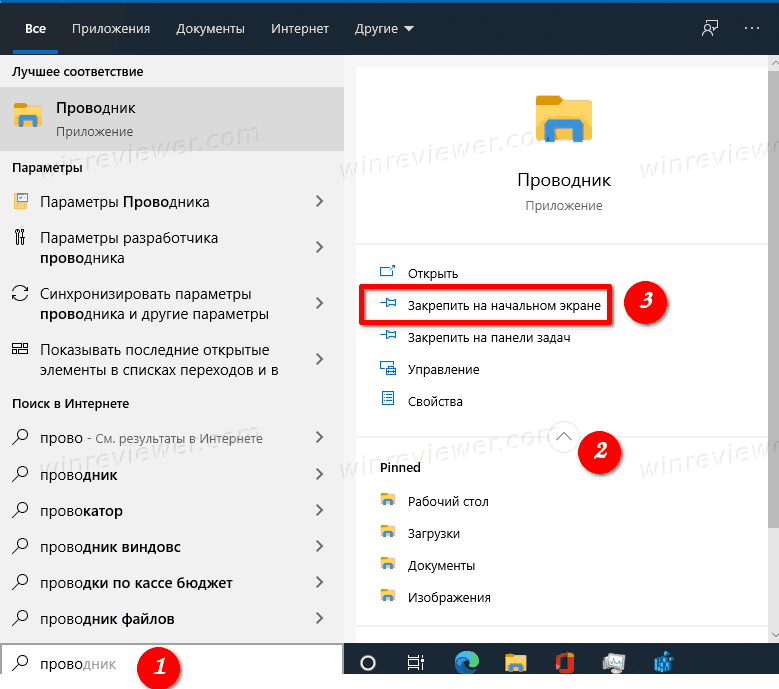
Плитка «Проводник» теперь появится в меню «Пуск». щёлкните на плитке, чтобы его открыть.
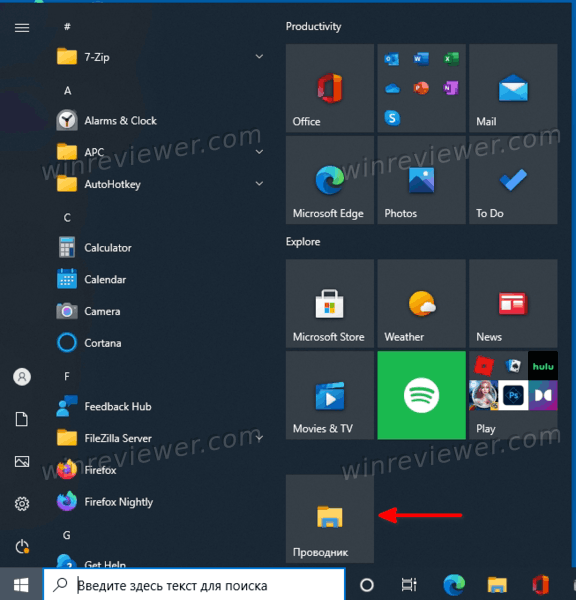
Вы также можете открыть Проводник из контекстного меню кнопки Пуск на панели задач. Это меню также известно как меню Win+X или меню опытного пользователя. Чтобы открыть это меню, нажмите на клавиатуре Win + X или щёлкните правой кнопкой мыши кнопку Пуск и выберите Проводник.
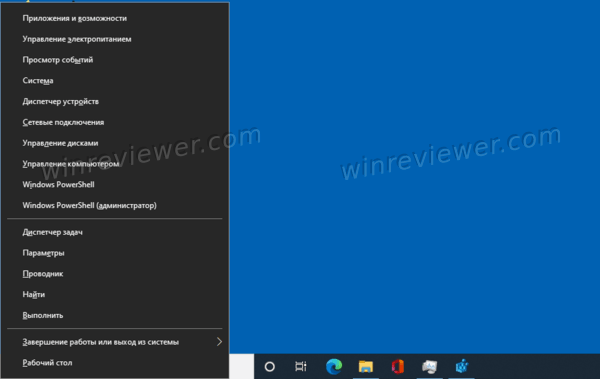
Попросите Кортану запустить Проводник
Если к вашему компьютеру подключен микрофон, например, на нотубуке, то вы можете использовать Кортану, попросив ее открыть Проводник. Для этого нажмите круглый значок Кортаны на панели задач.
Нажмите значок микрофона и произнесите Открыть Проводник .. Кортана при этом отобразит слова, которые она смогла распознать.
Если у вас нет микрофона, вы также можете просто ввести Проводник в поле поиска Кортаны.
С помощью диалога Выполнить в Windows 10
- Нажмите сочетание
Win+R. - В открывшемся диалоговом окне «Выполнить» введите explorer в поле «Открыть».

- Нажмите
Enterна клавиатуре, или щелкните кнопку ОК, чтобы открыть Проводник.
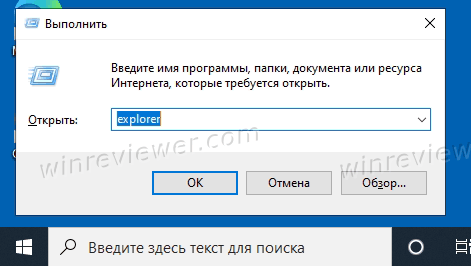
Запустите файл explorer.exe напрямую
Исполняемый файл проводника в Windows 10 доступен по адресу C:Windowsexplorer.exe
Чтобы открыть Проводник в Windows 10
- Откройте командую строку и введите
C:Windowsexplorer.exe. Нажмите Enter. При этом полный путь к файлу указывать не обязательно, можно ввести простоexplorer.exe. - В окне PowerShell тоже можно ввести
explorer.exe.
- В любом файловом менеджере перейдите в папку Windows и выберите там файл
explorer.exe.
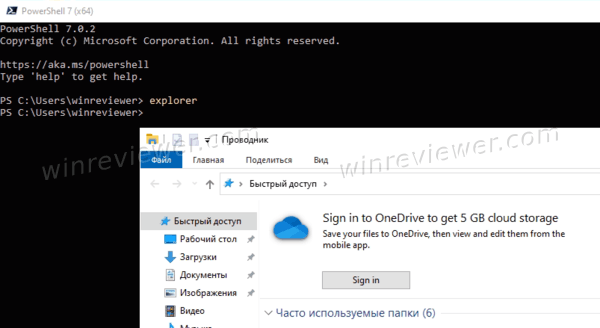
Папка Windows — один из «известных» путей в операционной системе. Она исторически включена в переменную среды (окружения) Path, поэтому все исполняемые файлы из этой папки можно запускать откуда угодно. Другой пример — Редактор реестра. Его исполняемый файл — regedit.exe, и он тоже доступен в папке C:Windows. Его также аналогичным образом можно запускать из диалога выполнить, из классической командной строки, или из PowerShell. Также, можно перейти в каталог c:Windows и запустить его оттуда, используя любой альтернативный файловый менеджер, такой как Total Commander.
Кроме этого, можно создать ярлык на рабочем столе для более быстрого доступа к Проводнику.
Добавить ярлык Проводника на рабочий стол
- Откройте меню Пуск, щелкнув на логотипе Windows в Панели задач, или нажав клавишу
Winна клавиатуре. - В списке приложений слева перейдите к папке Служебные — Windows.
- Перетащите Проводник, из этой папки на рабочий стол.
- Вы также можете перетащить плитку Проводника, если у вас она есть на начальном экране (справа) в меню Пуск. Плитку мы рассмотрели чуть выше.
- Теперь достаточно дважды кликнуть ярлык на рабочем столе, чтобы быстро открыть Проводник.
Используя Диспетчер задач
Диспетчер задач позволяет запускать различные приложения.
- Откройте Диспетчер задач. Например, нажмите
Ctrl+Shift+Esc, чтобы открыть его. - Затем в меню выберите Файл > Запустить новую задачу.

- Появится окно Создание задачи.
- Введите
explorerв текстовое поле «Открыть:».
- Нажмите
Enterна клавиатуре, или щелкните кнопку ОК, чтобы открыть Проводник.
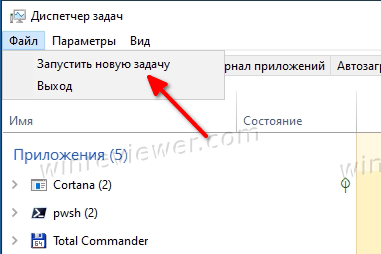
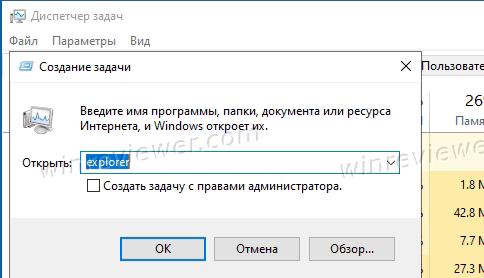
На этом — всё. Если вы знаете другие способы открыть проводник в Windows 10 — поделитесь ими в комментариях.
💡Узнавайте о новых статьях быстрее. Подпишитесь на наши каналы в Telegram и Twitter.
Судя по тому, что вы читаете этот текст, вы дочитали эту статью до конца. Если она вам понравилась, поделитесь, пожалуйста, с помощью кнопок ниже. Спасибо за вашу поддержку!
Содержание
- Открываем «Проводник» в Виндовс 10
- Способ 1: Комбинация клавиш
- Способ 2: Поиск по системе
- Способ 3: «Выполнить»
- Способ 4: «Пуск»
- Способ 5: Контекстное меню кнопки «Пуск»
- Способ 6: «Диспетчер задач»
- Способ 7: Исполняемый файл
- Дополнительно: Настройка быстрого доступа
- Заключение
- Вопросы и ответы
Одним из важнейших компонентов любой версии Windows является «Проводник», ведь именно через него можно получить доступ ко всем файлам и папкам, которые есть на диске. «Десятка», несмотря на ощутимое изменение ее интерфейса и общую переработку функциональности, тоже не лишена данного элемента, и в нашей сегодняшней статье мы расскажем о различных вариантах его запуска.
По умолчанию «Проводник» или, как он называется на английском, «Explorer» закреплен на панели задач Windows 10, но ради экономии места или просто по неосторожности он может быть удален оттуда. Именно в таких случаях, а также просто для общего развития, будет полезно знать, какие существуют способы открытия этого системного компонента в «десятке».
Способ 1: Комбинация клавиш
Самый простой, удобный, да и наиболее быстрый (при условии отсутствия ярлыка на панели задач) вариант запуска «Эксплорера» заключается в использовании горячих клавиш «WIN+E». Буква E – логичное сокращение от Explorer, и зная это, наверняка вам будет проще запомнить данную комбинацию.
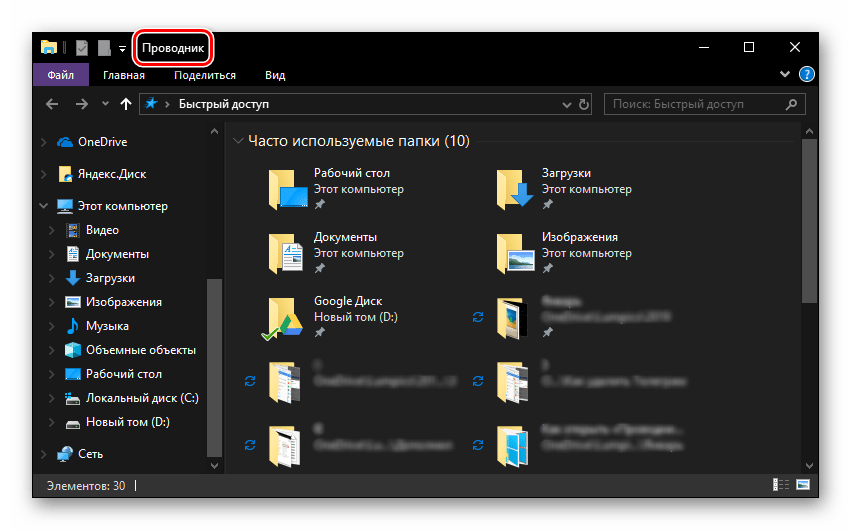
Способ 2: Поиск по системе
Одним из ключевых достоинств Виндовс 10 является ее проработанная функция поиска, благодаря которой можно не только находить различные файлы, но и запускать приложения и компоненты системы. Открыть с ее помощью «Проводник» тоже не составит большого труда.
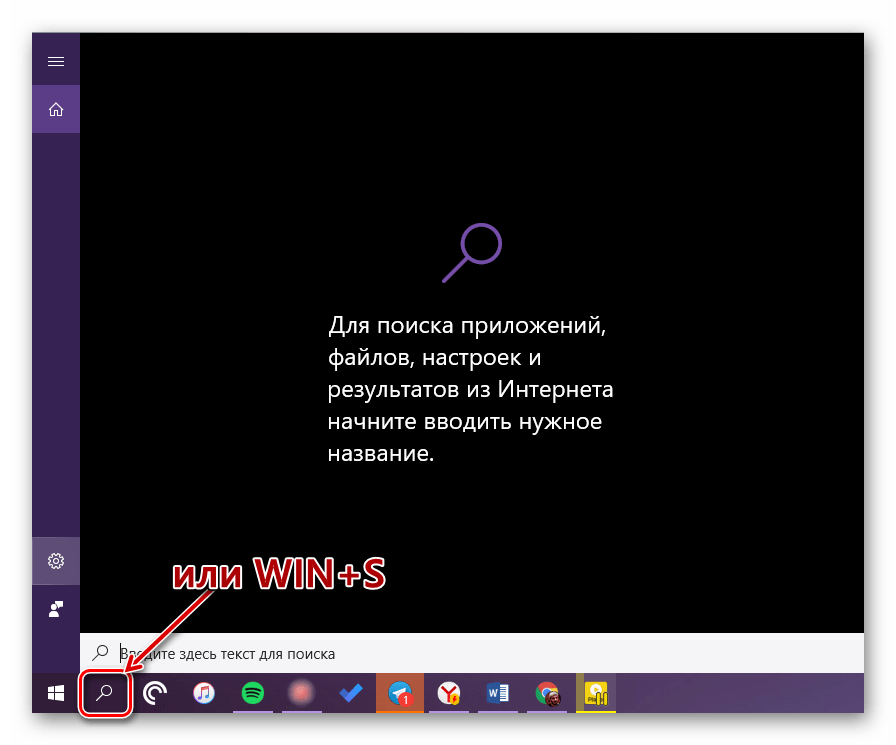
Воспользуйтесь кнопкой поиска на панели задач или клавишами «WIN+S» и начните вводить в строку запрос «Проводник» без кавычек. Как только он появится в поисковой выдаче, вы сможете запустить его одинарным кликом.
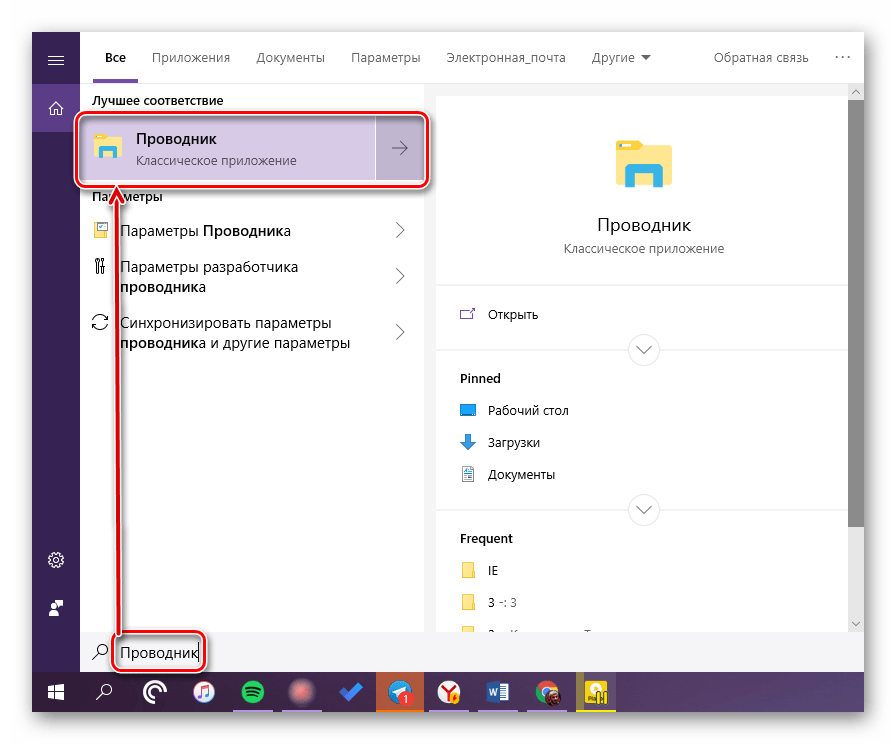
Способ 3: «Выполнить»
В отличие от упомянутого выше поиска, окно «Выполнить» используется исключительно для запуска стандартных приложений и компонентов системы, к коим и относится герой нашей сегодняшней статьи. Нажмите «WIN+R» и введите в строку представленную ниже команду, после чего нажмите «ENTER» или кнопку «ОК» для подтверждения.
explorer

Как видите, для запуска «Explorer» можно воспользоваться и одноименной командой, главное, вводить ее без кавычек.
Способ 4: «Пуск»
Конечно же, «Проводник» есть в списке всех установленных приложений, просмотреть который можно через меню «Пуск». Оттуда же мы с вами можем его открыть.
- Запустите стартовое меню Windows, нажав по соответствующей кнопке на панели задач, или воспользуйтесь аналогичной клавишей на клавиатуре – «WIN».
- Пролистайте перечень представленных там программ вплоть до папки «Служебные Windows» и разверните ее, воспользовавшись указывающей вниз стрелкой.
- В открывшемся списке найдите «Проводник» и запустите его.
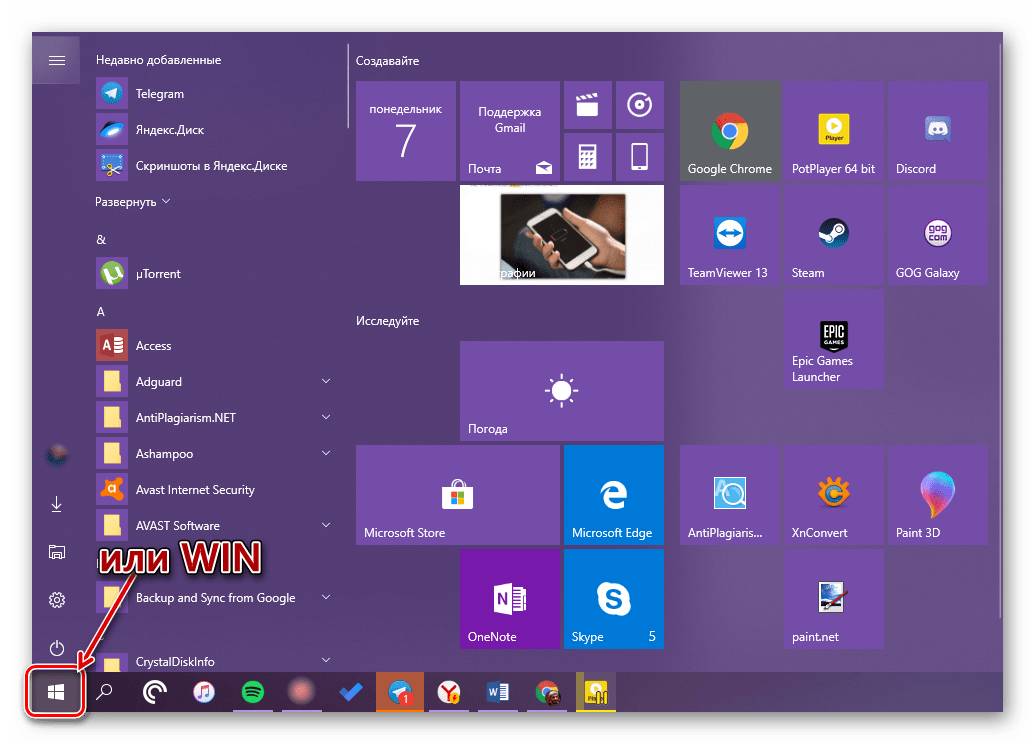


Способ 5: Контекстное меню кнопки «Пуск»
Многие стандартные программы, системные утилиты и прочие важные элементы ОС могут быть запущены не только через «Пуск», но и через его контекстное меню, вызываемое нажатием правой кнопки мышки по данному элементу. Можно воспользоваться и исключительно клавишами «WIN+X», которые вызывают это же меню. Какой бы из способов открытия вы не использовали, просто найдите в представленном списке «Проводник» и запустите его.
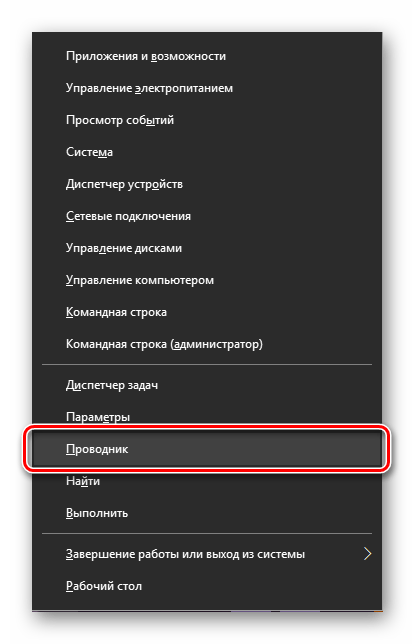
Способ 6: «Диспетчер задач»
Если вы хотя бы время от времени обращаетесь к «Диспетчеру задач», то наверняка видели в списке активных процессов и «Проводник». Так вот, из данного раздела системы можно не только завершить его работу, но и инициировать запуск. Делается это следующим образом.
- Правой кнопкой мышки нажмите по пустому месту на панели задач и выберите в открывшемся меню пункт «Диспетчер задач». Вместо этого можно просто нажать клавиши «CTRL+SHIFT+ESC».
- В открывшемся окне кликните по вкладке «Файл» и выберите пункт «Запустить новую задачу».
- Введите в строку команду
«explorer», но без кавычек, и нажмите «ОК» или «ENTER».
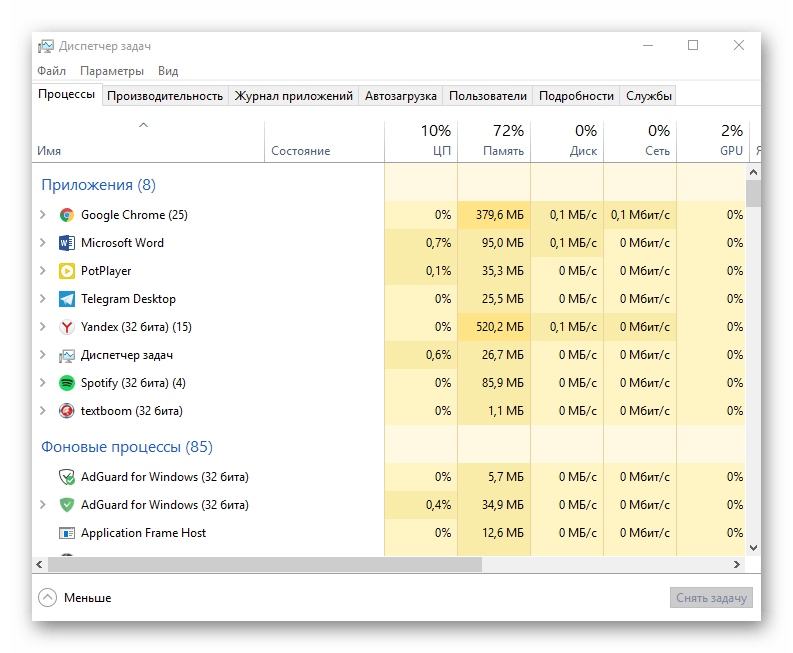
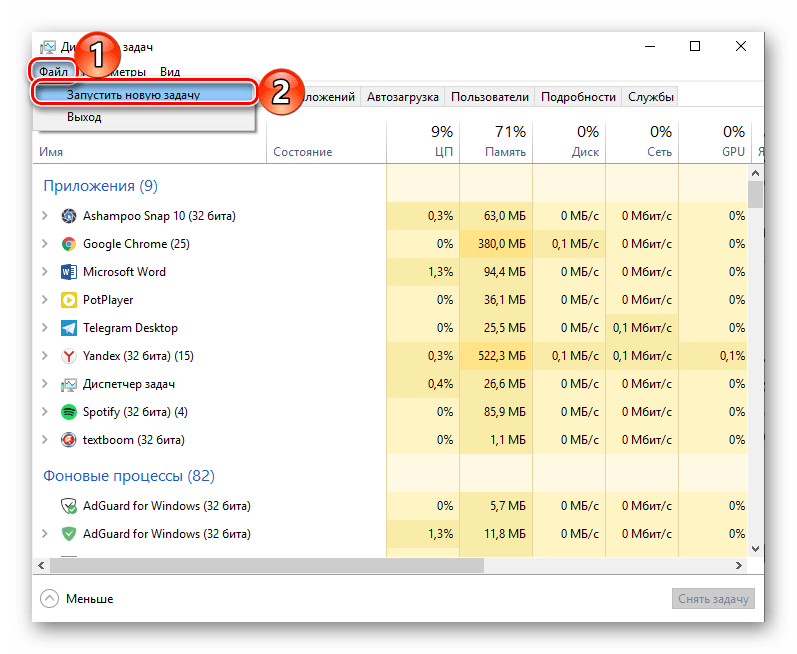


Как видите, здесь работает та же логика, что и с окном «Выполнить» — для запуска нужного нам компонента используется его оригинальное название.
Способ 7: Исполняемый файл
«Проводник» мало чем отличается от обычных программ, поэтому у него тоже есть свой исполняемый файл, который и может использоваться для запуска. explorer.exe находится по представленному ниже пути, практически в самом низу этой папки. Отыщите его там и откройте двойным кликом ЛКМ
C:Windows
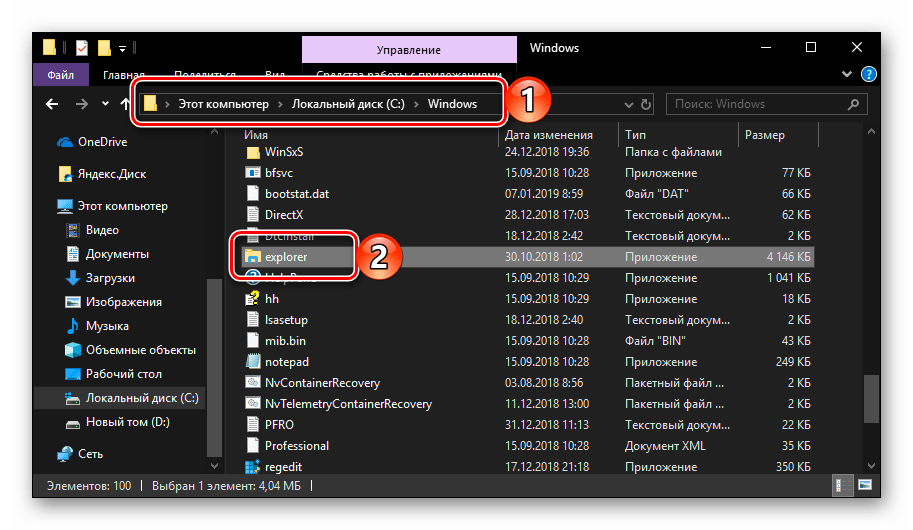
Как вы могли заметить из всего вышесказанного, в Windows 10 существует довольно много способов запуска «Проводника». Вам достаточно запомнить всего один или два из них и пользоваться ими по мере необходимости.
Дополнительно: Настройка быстрого доступа
Ввиду того, что «Explorer» приходится вызывать постоянно, помимо запоминания представленных выше способов, можно и нужно закрепить данное приложение на самом видном и просто доступном месте. Таковых в системе как минимум два.
Панель задач
Любым из описанных выше способов запустите «Проводник», а затем нажмите по его значку на панели задач правой кнопкой мышки. Выберите в контекстном меню пункт «Закрепить на панели задач» и, если посчитаете нужным, переместите его в наиболее удобное место.
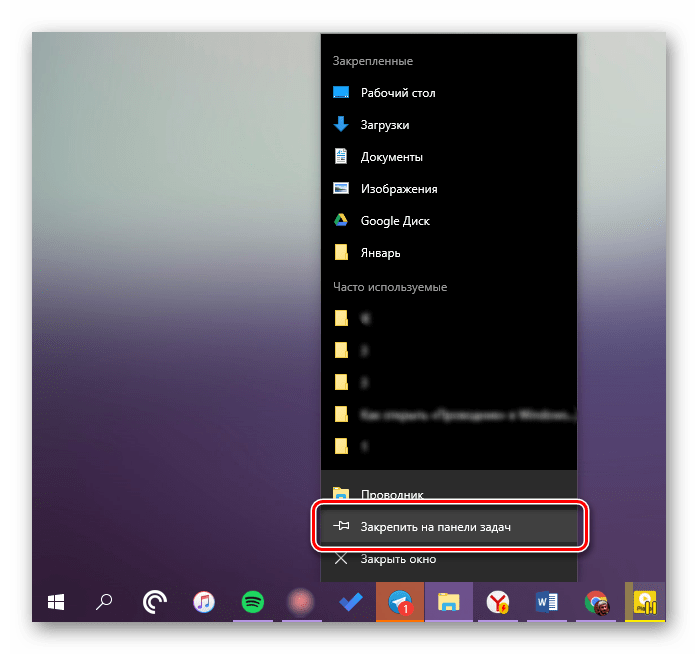
Стартовое меню «Пуск»
Если вы не хотите постоянно искать «Explorer» в данном разделе системы, можно закрепить ярлык для его запуска на боковой панели, рядом с кнопками «Завершение работы» и «Параметры». Делается это следующим образом:
- Откройте «Параметры», воспользовавшись меню «Пуск» или клавишами «WIN+I».
- Перейдите к разделу «Персонализация».
- В боковом меню переместитесь во вкладку «Пуск» и нажмите по ссылке «Выберите, какие папки будут отображаться в меню…».
- Переведите в активное положение переключатель напротив «Проводника».
- Закройте «Параметры» и повторно откройте «Пуск», чтобы убедиться в наличии там ярлыка для быстрого запуска «Эксплорера».
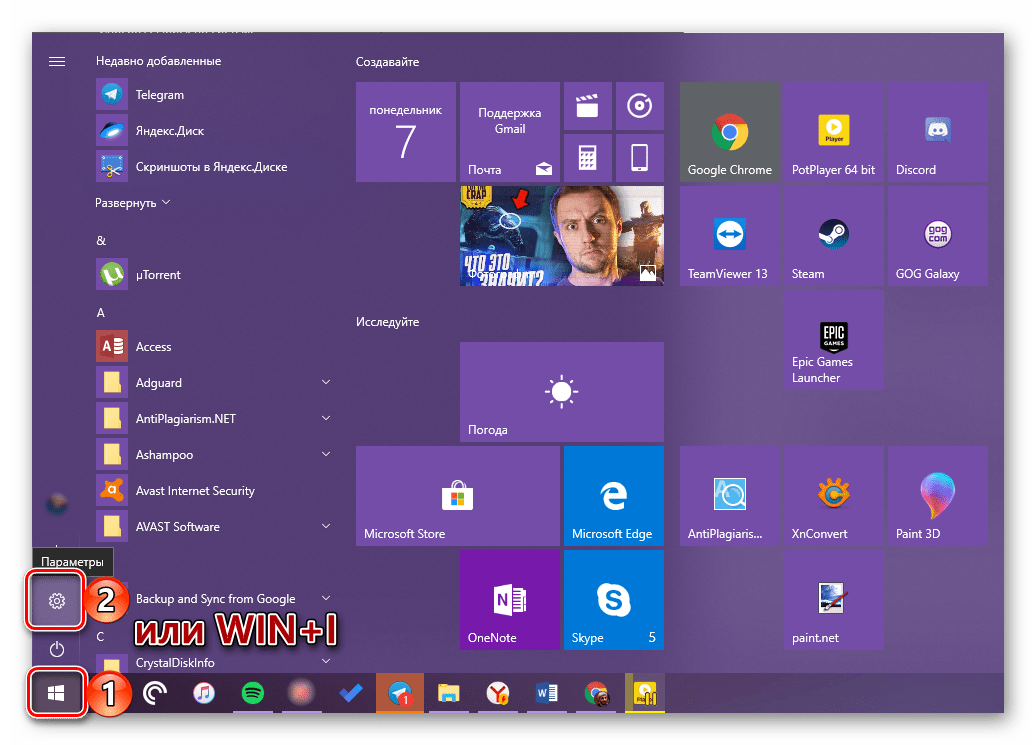
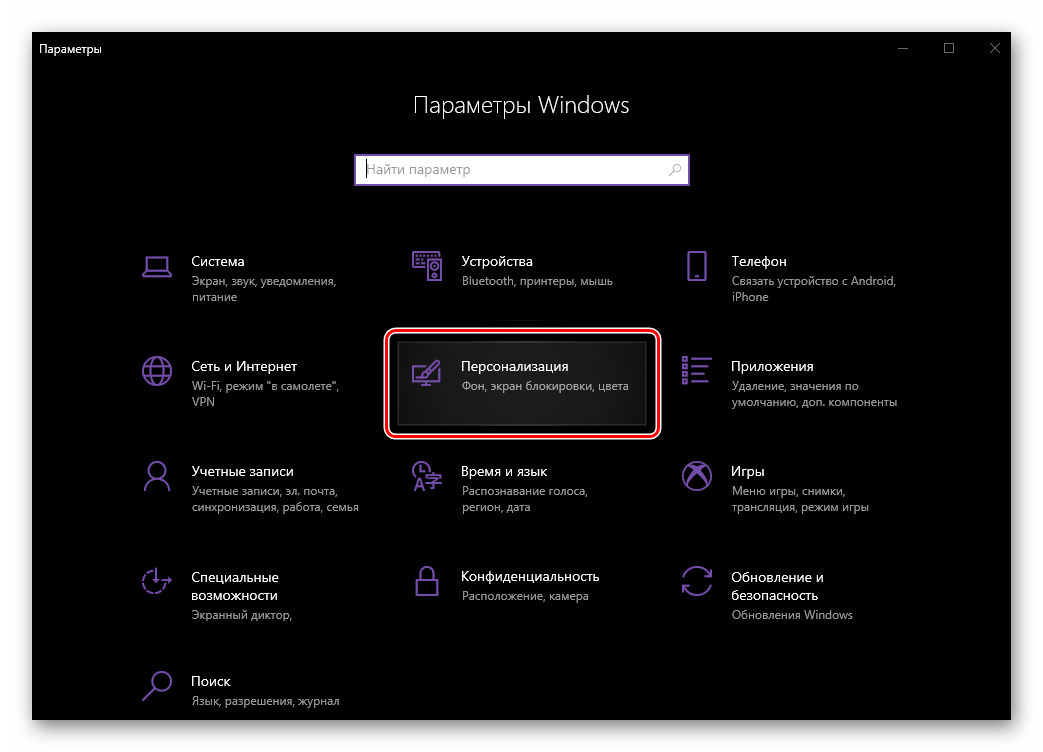
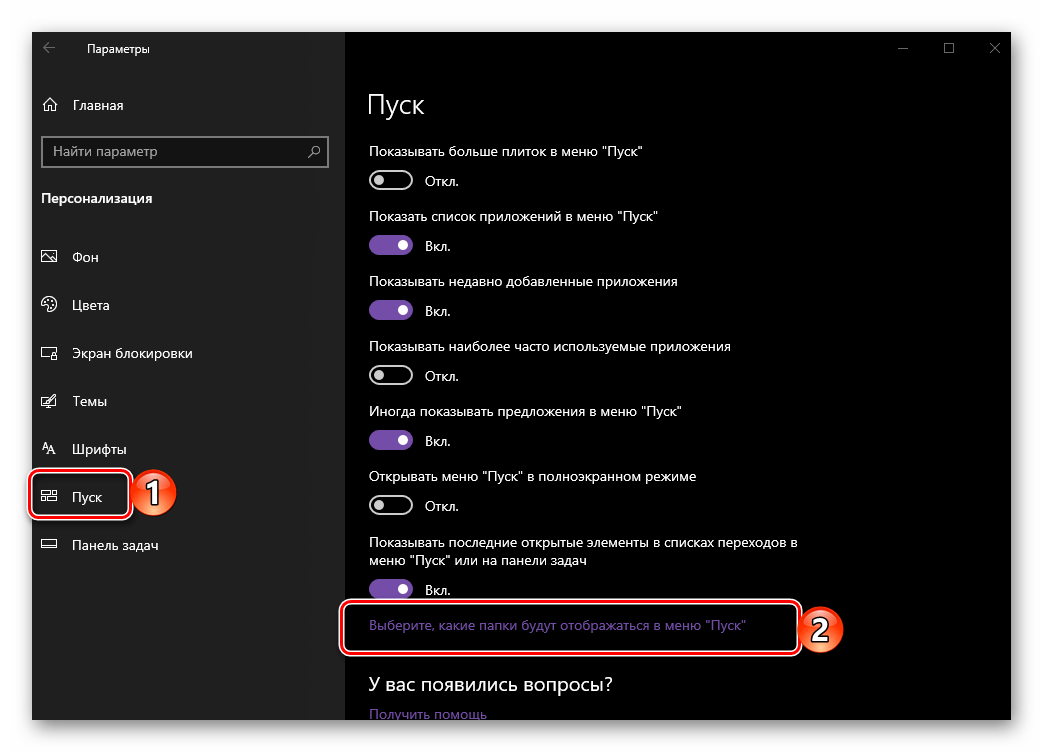
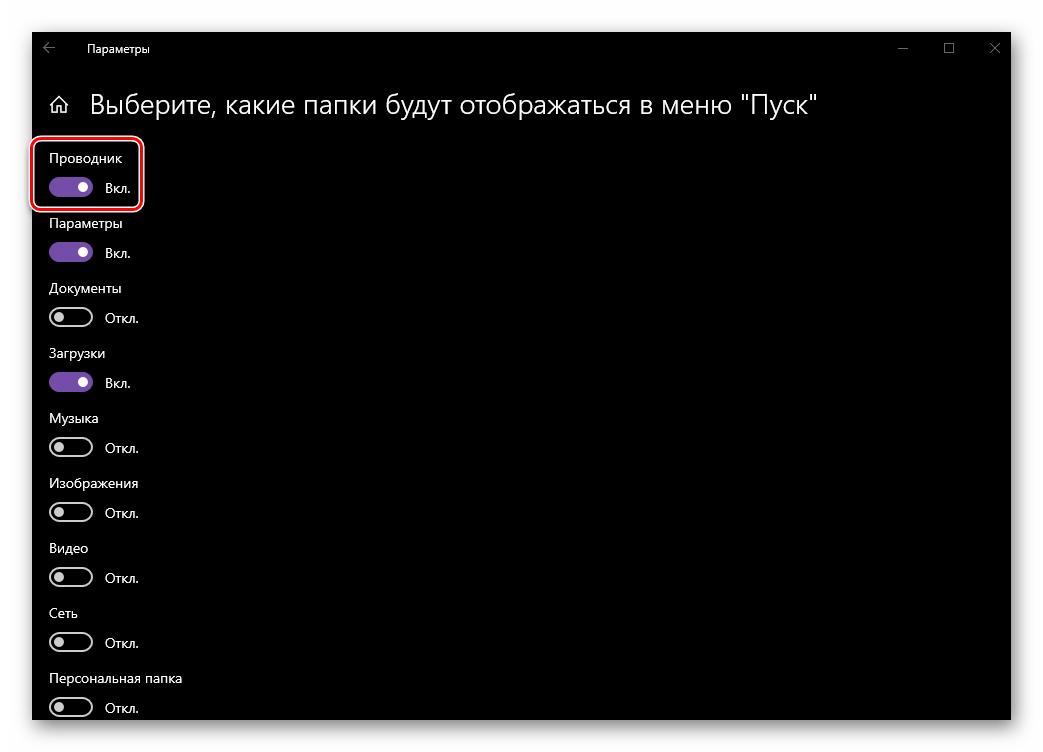
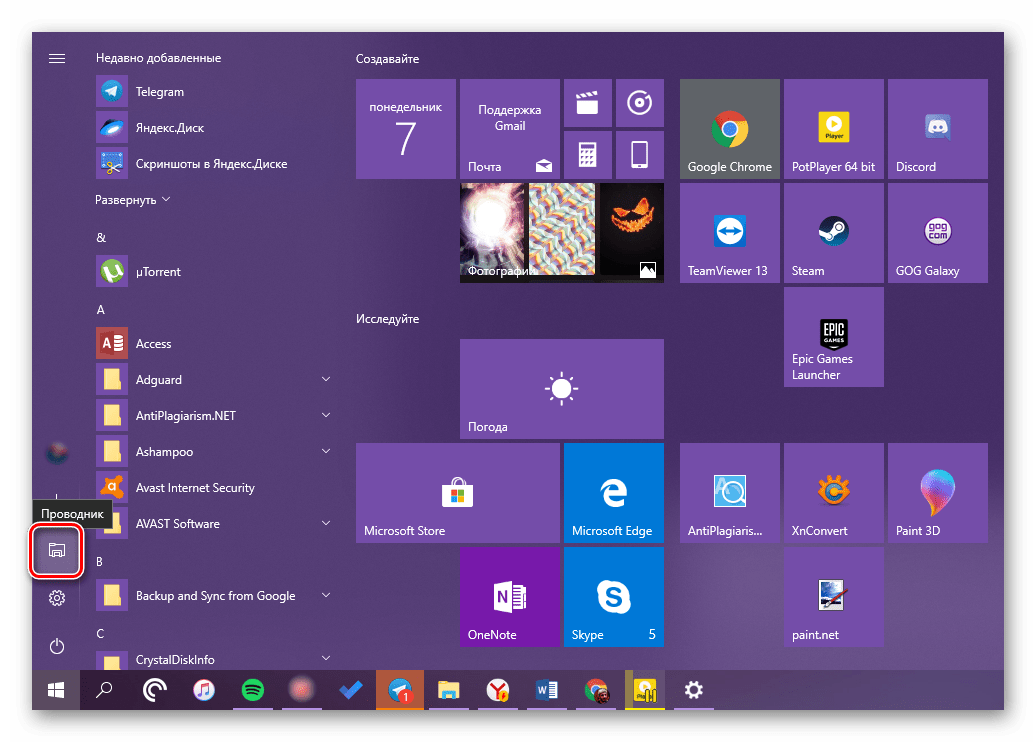
Читайте также: Как сделать панель задач прозрачной в Windows 10
Заключение
Теперь вы знаете не только обо всех возможных вариантах открытия «Проводника» на компьютере или ноутбуке с Виндовс 10, но и о том, как не потерять его из виду ни при каких обстоятельствах. Надеемся, эта небольшая статья была полезна для вас.
В этой статье мы расскажем о том, как открыть Проводник семью различными способами. Это одно из основных системных приложений в Windows 10 и крайне важно знать, как запускать Проводник. Ведь с его помощью открывается доступ к содержимому всех ваших дисков, файлам и папкам на компьютере.
C помощью иконки на панели задач
Проводник является одним из самых популярных приложений в операционной системе Windows. Иконка Проводника изначально закреплена на панели задач. Вам остаётся только нажать по иконке, чтобы открыть Проводник. Если иконки Проводника на панели задач нет, переходите к следующему способу.

C помощью кнопки или строки поиска
Если вы не нашли иконку Проводника на панели задач и предыдущий способ вам не помог, воспользуйтесь системным поиском в Windows 10.
- Нажмите на кнопку поиска с лупой на панели задач или на строку поиска с текстом «Введите здесь текст для поиска».
- Начните набирать текст
Проводник. - Система установит, что вы хотите открыть приложение «Проводник» и предложит вам его в начале списка найденных соответствий.
- Нажмите на приложение «Проводник» в списке найденных элементов, чтобы открыть его.

C помощью горячих клавиш
Пользователи, которые хотят ускорить процесс взаимодействия с компьютером, могут воспользоваться горячими клавишами.
Нажмите на клавиатуре клавиши Windows (с логотипом Windows) + E, чтобы открыть Проводник. Почему клавиша E? Потому что Проводник на английском называется Explorer и горячая клавиша E означает первую букву запускаемого приложения. Раскладку клавиатуры для вызова Проводника переключать не требуется. Даже если активирован русский язык, при нажатии на эти горячие клавиши откроется Проводник.

C помощью кнопки Пуск
- Наведите курсор мыши на кнопку «Пуск» и нажмите правой кнопкой мыши.
- Появится контекстное меню самых популярных приложений и команд операционной системы Windows 10.
- Найдите в списке элементов «Проводник» и нажмите на него, чтобы открыть.

C помощью поиска по всем установленным приложениям в меню Пуск
- Нажмите на кнопку «Пуск».
- Далее перейдите к списку всех установленных приложений, нажав на элемент «Все приложения».
- Прокрутите список до буквы «С» и откройте папку «Служебные — Windows». В раскрывшейся папке вы найдете приложение «Проводник». Нажмите на него, чтобы запустить.

C помощью приложения «Выполнить»
- Нажмите на клавиатуре горячие клавиши Windows (клавиша с логотипом Windows) + R, чтобы открыть системное приложение «Выполнить».
- Введите текст
Explorerи нажмите кнопку «ОК». - После этого откроется Проводник.

C помощью командной строки
- Откройте командную строку (можно запустить её как с правами администратора, так и в обычном режиме).
Как открыть командную строку в Windows 10? Несколько удобных способов
Наша инструкция поможет вам, если возникли сложности с запуском командной строки.
- Введите текст
Explorerи нажмите на клавиатуре кнопку «Enter». - Откроется новое окно приложения «Проводник».

Получилось ли у вас открыть Проводник?
Какой способ оказался удобнее? Расскажите в комментариях 😉
Опубликовано в Windows
Вряд ли найдётся такой владелец компьютера под управлением Windows, который не использует «Проводник». Данная статья подскажет как открыть «Проводник» в Windows 10 несколькими несложными способами.

1. Открытие «Проводника» комбинацией клавиш на клавиатуре Win + E
С помощью клавиатуры можно быстро запустить «Проводник». Нужно просто нажать клавиши + и «Проводник» будет перед глазами.
2. Запустить «Проводник» с помощью ярлыка на панели задач
По умолчанию в Windows 10 ярлык «Проводника» закреплён на панели задач. Если он не был изъят с неё ранее, то его можно увидеть, он похож на папку. Нажатие на значок быстро его откроет.

3. Поиск «Проводника» в Windows 10
На панели задач Windows 10 есть значок лупы, открывающий поиск. Нажав на него, откроется окно поиска, в котором нужно написать «Проводник». Когда появятся результаты поиска, в них нужно выбрать надпись .

4. Как открыть «Проводника» из меню WinX?
Меню можно открыть при нажатии комбинации клавиш + на клавиатуре. Хоть это не единственный способ открытия меню WinX, но вероятно самый простой.
Через данное меню можно запустить «Проводник», щёлкнув по одноимённой ссылке.

5. Использование меню «Пуск» для запуска «Проводника»
После открытия меню «Пуск», в его левой стороне можно найти папку «Проводник», нажатие подразумевает его запуск. Читать о том, как добавить папки в меню «Пуск».

6. Запустить explorer.exe
Исполняемым файлом для запуска «Проводника» является explorer.exe. Находится он в корне папки Windows, практически в самом низу.

7. Запуск «Проводника» через командную строку, «PowerShell» и окно «Выполнить».
Для того чтобы открылся «Проводник», нужно ввести команду explorer в любое из приложений. К примеру окно «Выполнить» открывается при нажатии комбинации клавиш + на клавиатуре.

Читайте: способы запуска командной строки в Windows 10.
8. Новая задача explorer через «Диспетчер задач»
Одним из способов использования «Диспетчера задач» является открытие «Проводника». Для открытия Диспетчера задач в Windows 10, можно использовать комбинацию + + . После его открытия нужно нажать .

В диспетчере задач нужно выбрать в правом верхнем углу и в появившемся меню .

Появится окно «Создание задачи», в котором подобно окну «Выполнить» нужно ввести explorer, а для подтверждения нажать кнопку или клавишу на клавиатуре.
Все эти методы вряд ли являются единственными, которые помогут в открытие «Проводника» в Windows 10. Вероятно, некоторым компьютерным пользователям, будет удобнее создать ярлык «Проводника», что тоже является одним из способов его запуска. Кроме управления файлами, в функцию Проводника входит и запуск команд через адресную строку Windows.
На чтение 4 мин Просмотров 248 Опубликовано 11.11.2022
Проводник Windows — это важный инструмент управления файлами. Он всегда пригодится, когда вы хотите скопировать, переместить или удалить файлы на вашем устройстве. Во многих руководствах шаги часто начинаются с «Открыть проводник» без дополнительных советов или отсутствия доступных опций для вашего ПК. Далее рассмотрим 10 способов как открыть проводник в Windows 10.
Полное руководство по Windows 10
Как открыть проводник в Windows 10
Используйте сочетание клавиш
Нажмите Windows + E на клавиатуре одновременно. Появится ваш Проводник.
Если сочетание клавиш не работает:
- Щелкните правой кнопкой мыши значок Windows на панели задач и выберите «Выполнить» из списка.
- Введите gpedit.msc в поле и нажмите OK.
- Перейдите по этому пути, чтобы развернуть вкладку: «Конфигурация пользователя» > «Административные шаблоны» > «Компоненты Windows» > «Проводник» > Найдите «Отключить горячие клавиши Windows».

- Дважды щелкните «Отключить горячие клавиши Windows» > выберите «Отключено» или «Не настроено».
- Нажмите «Применить» и «ОК».

Найдите проводник на панели задач
Независимо от того, какую версию Windows вы используете, значок Проводника по умолчанию будет закреплен на панели задач. Этот значок имеет форму папки. Нажмите на нее, чтобы открыть.
![]()
Откройте проводник через меню WinX
Windows группирует некоторые основные функции в меню, поэтому вы можете напрямую перейти к проводнику, диспетчеру устройств, диспетчеру задач, управлению дисками и т. д.

- Для пользователей рабочего стола щелкните правой кнопкой мыши значок «Пуск» в левом нижнем углу и выберите «Проводник».
- Для пользователей с сенсорным экраном перейдите на рабочий стол и удерживайте значок «Пуск».
Используйте окно поиска
Всякий раз, когда вы не знаете, как получить File Explorer, вы можете написать слова в поле поиска. Щелкните поле поиска и введите «Проводник». И тогда вы можете проверить лучший результат матча. Нажмите «Проводник», чтобы открыть его.

Щелкните правой кнопкой мыши «Проводник» и выберите «Закрепить на панели задач» или «Пуск». В следующий раз вы можете напрямую перейти к месту назначения, набрав слово.

Проверьте меню «Пуск», чтобы запустить проводник
Если вы когда-либо закрепляли File Explorer в меню «Пуск», пришло время его использовать. Вы можете щелкнуть значок Windows на панели задач и проверить Проводник справа.

Примените поле «Выполнить»
Вы также можете применить поле «Выполнить», чтобы разбудить целевое приложение:
- Нажмите Windows + R, чтобы запустить окно «Выполнить».
- Введите Explorer и нажмите «ОК». Затем откроется Проводник.

Запустите командную строку
Если вы знакомы с командной строкой, то легко сможете запустить любое приложение на своих устройствах.
- Откройте окно поиска и введите cmd. Нажмите, чтобы открыть его.
- Введите командную строку — explorer и нажмите Enter.


Затем вы можете открыть проводник.
Используйте PowerShell
Как и в случае с cmd, вы можете ввести командную строку в Powershell, чтобы получить доступ к приложению.
- Введите PowerShell в поле поиска Windows.
- Когда откроется PowerShell, введите explorer и нажмите Enter.


Затем откроется Проводник.
Доступ к проводнику файлов из диспетчера задач
- Щелкните правой кнопкой мыши значок Windows и выберите «Диспетчер задач».
- Перейдите на вкладку «Файл» в левом верхнем углу. Выберите «Запустить новую задачу».

- Затем появится окно «Создать новую задачу», введите Explorer в поле. Нажмите OK, чтобы продолжить.


Запустите «Этот компьютер»
«Этот компьютер» — полезное приложение для доступа ко всем вашим файлам, папкам и приложениям, хранящимся на компьютере. Таким образом, это также распространенный способ найти и открыть проводник.
- Откройте этот компьютер с рабочего стола.
- Щелкните диск C и прокрутите вниз, чтобы найти файл explorer.exe.

- Нажмите explorer.exe, и вы сможете открыть проводник.

Читайте также:
- Диспетчер задач: как открыть, использовать и решить проблемы
- Как открыть диспетчер устройств в Windows 10
- Как удалить программу в Windows 10
- Как показать скрытые папки в Windows 10?
- Официальная информация от производителя
В Windows 10 он называется проводником. Открыть его можно тремя способами. Нажмите кнопку «Пуск» и найдите его в меню «Пуск».
Альтернативно упоминается как Проводник Windows или Explorer, File Explorer — это файловый браузер, который есть во всех версиях Microsoft Windows, начиная с Windows 95. Он используется для навигации и управления дисками, папками и файлами на вашем компьютере. На изображении ниже показан проводник в Windows 10.
Где находится проводник Windows в Windows 10?
Чтобы открыть проводник, щелкните значок проводника, расположенный на панели задач. Кроме того, вы можете открыть проводник, нажав кнопку «Пуск», а затем — «Проводник».
Какое имя у исполняемого файла Windows Explorer?
Запустите explorer.exe
Исполняемый файл для проводника — explorer.exe. Вы найдете его в папке Windows.
Что случилось с проводником в Windows 10?
Вот некоторые примечательные изменения для Windows 10: Один диск теперь является частью проводника. … Теперь вы можете использовать приложения для обмена файлами и фотографиями прямо из проводника. Выберите файлы, которыми хотите поделиться, перейдите на вкладку «Поделиться», нажмите кнопку «Поделиться» и выберите приложение.
Выпускает ли Microsoft Windows 11?
Дата объявлена: Microsoft начнет предлагать Windows 11 на Октябрь 5 к компьютерам, полностью отвечающим его аппаратным требованиям.
Почему Microsoft удалила проводник?
Приложение File Explorer будет удалено с Xbox One. Команда Xbox Insider сообщает, что удаление из-за «ограниченного использования. » Людям придется использовать альтернативные способы доступа к локальным файлам.
Есть ли альтернатива проводнику Windows?
Q-Dir — еще одна альтернатива проводнику Windows, которую стоит рассмотреть. Ключевой особенностью приложения являются четыре панели, каждая из которых поддерживает просмотр с вкладками. … Q-Dir также исключительно легкий; он почти не использует системные ресурсы. Если у вас старый компьютер, это отличный выбор.
Почему исчезла моя панель задач в Windows 10?
Запустите приложение настроек Windows 10 (с помощью Win + I) и перейдите в раздел Персонализация> Панель задач. Убедитесь, что в основном разделе установлен параметр Автоматически скрывать панель задач в режиме рабочего стола. переключен в положение ВЫКЛ.. Если он уже выключен, и вы не можете видеть свою панель задач, просто попробуйте другой метод.
Для чего нужен проводник Windows 10?
Проводник приложение для управления файлами, используемое операционными системами Windows для просмотра папок и файлов. Он предоставляет пользователю графический интерфейс для навигации и доступа к файлам, хранящимся на компьютере.
Где должен находиться explorer.exe?
Файл explorer.exe находится в папка C: Windows.
Где на моем компьютере находится проводник Windows?
Объяснение проводника Windows: где его найти
- Нажмите Windows-E на клавиатуре (определенно один из моих любимых сочетаний клавиш).
- Щелкните правой кнопкой мыши кнопку «Пуск» и выберите «Обзор». …
- Перемещайтесь по меню «Программы», пока не найдете папку «Стандартные»; Внутри него можно найти проводника.
С помощью какой комбинации клавиш можно открыть проводник Windows?
Если вы хотите открыть проводник с помощью сочетания клавиш, нажмите Windows + E, и появится окно проводника. Оттуда вы можете управлять своими файлами как обычно. Чтобы открыть другое окно проводника, снова нажмите Windows + E или нажмите Ctrl + N, если проводник уже открыт.
Почему файловый менеджер такой медленный?
Одновременный запуск слишком большого количества программ на ПК может влияют на скорость проводника. Фактически, это может замедлить работу всего вашего ПК. Чтобы решить эту проблему, попробуйте минимизировать количество программ, работающих на вашем компьютере. Для начала откройте Диспетчер задач, нажав Ctrl + Shift + Esc.
File Explorer уходит?
Сегодня мы объявляем, что приложения и службы Microsoft 365 больше не будут поддерживать Internet Explorer 11 (IE 11) к этому времени в следующем году. Начало 30 ноября 2020, веб-приложение Microsoft Teams больше не будет поддерживать IE 11.
Содержание
- Открываем «Проводник» в Виндовс 10
- Способ 1: Комбинация клавиш
- Способ 2: Поиск по системе
- Способ 3: «Выполнить»
- Способ 4: «Пуск»
- Способ 5: Контекстное меню кнопки «Пуск»
- Способ 6: «Диспетчер задач»
- Способ 7: Исполняемый файл
- Дополнительно: Настройка быстрого доступа
- Заключение
- Вопросы и ответы
Одним из важнейших компонентов любой версии Windows является «Проводник», ведь именно через него можно получить доступ ко всем файлам и папкам, которые есть на диске. «Десятка», несмотря на ощутимое изменение ее интерфейса и общую переработку функциональности, тоже не лишена данного элемента, и в нашей сегодняшней статье мы расскажем о различных вариантах его запуска.
По умолчанию «Проводник» или, как он называется на английском, «Explorer» закреплен на панели задач Windows 10, но ради экономии места или просто по неосторожности он может быть удален оттуда. Именно в таких случаях, а также просто для общего развития, будет полезно знать, какие существуют способы открытия этого системного компонента в «десятке».
Способ 1: Комбинация клавиш
Самый простой, удобный, да и наиболее быстрый (при условии отсутствия ярлыка на панели задач) вариант запуска «Эксплорера» заключается в использовании горячих клавиш «WIN+E». Буква E – логичное сокращение от Explorer, и зная это, наверняка вам будет проще запомнить данную комбинацию.
Способ 2: Поиск по системе
Одним из ключевых достоинств Виндовс 10 является ее проработанная функция поиска, благодаря которой можно не только находить различные файлы, но и запускать приложения и компоненты системы. Открыть с ее помощью «Проводник» тоже не составит большого труда.
Воспользуйтесь кнопкой поиска на панели задач или клавишами «WIN+S» и начните вводить в строку запрос «Проводник» без кавычек. Как только он появится в поисковой выдаче, вы сможете запустить его одинарным кликом.
Способ 3: «Выполнить»
В отличие от упомянутого выше поиска, окно «Выполнить» используется исключительно для запуска стандартных приложений и компонентов системы, к коим и относится герой нашей сегодняшней статьи. Нажмите «WIN+R» и введите в строку представленную ниже команду, после чего нажмите «ENTER» или кнопку «ОК» для подтверждения.
explorer
Как видите, для запуска «Explorer» можно воспользоваться и одноименной командой, главное, вводить ее без кавычек.
Способ 4: «Пуск»
Конечно же, «Проводник» есть в списке всех установленных приложений, просмотреть который можно через меню «Пуск». Оттуда же мы с вами можем его открыть.
- Запустите стартовое меню Windows, нажав по соответствующей кнопке на панели задач, или воспользуйтесь аналогичной клавишей на клавиатуре – «WIN».
- Пролистайте перечень представленных там программ вплоть до папки «Служебные Windows» и разверните ее, воспользовавшись указывающей вниз стрелкой.
- В открывшемся списке найдите «Проводник» и запустите его.
Способ 5: Контекстное меню кнопки «Пуск»
Многие стандартные программы, системные утилиты и прочие важные элементы ОС могут быть запущены не только через «Пуск», но и через его контекстное меню, вызываемое нажатием правой кнопки мышки по данному элементу. Можно воспользоваться и исключительно клавишами «WIN+X», которые вызывают это же меню. Какой бы из способов открытия вы не использовали, просто найдите в представленном списке «Проводник» и запустите его.
Способ 6: «Диспетчер задач»
Если вы хотя бы время от времени обращаетесь к «Диспетчеру задач», то наверняка видели в списке активных процессов и «Проводник». Так вот, из данного раздела системы можно не только завершить его работу, но и инициировать запуск. Делается это следующим образом.
- Правой кнопкой мышки нажмите по пустому месту на панели задач и выберите в открывшемся меню пункт «Диспетчер задач». Вместо этого можно просто нажать клавиши «CTRL+SHIFT+ESC».
- В открывшемся окне кликните по вкладке «Файл» и выберите пункт «Запустить новую задачу».
- Введите в строку команду
«explorer», но без кавычек, и нажмите «ОК» или «ENTER».
Как видите, здесь работает та же логика, что и с окном «Выполнить» — для запуска нужного нам компонента используется его оригинальное название.
Способ 7: Исполняемый файл
«Проводник» мало чем отличается от обычных программ, поэтому у него тоже есть свой исполняемый файл, который и может использоваться для запуска. explorer.exe находится по представленному ниже пути, практически в самом низу этой папки. Отыщите его там и откройте двойным кликом ЛКМ
C:Windows
Как вы могли заметить из всего вышесказанного, в Windows 10 существует довольно много способов запуска «Проводника». Вам достаточно запомнить всего один или два из них и пользоваться ими по мере необходимости.
Дополнительно: Настройка быстрого доступа
Ввиду того, что «Explorer» приходится вызывать постоянно, помимо запоминания представленных выше способов, можно и нужно закрепить данное приложение на самом видном и просто доступном месте. Таковых в системе как минимум два.
Панель задач
Любым из описанных выше способов запустите «Проводник», а затем нажмите по его значку на панели задач правой кнопкой мышки. Выберите в контекстном меню пункт «Закрепить на панели задач» и, если посчитаете нужным, переместите его в наиболее удобное место.
Стартовое меню «Пуск»
Если вы не хотите постоянно искать «Explorer» в данном разделе системы, можно закрепить ярлык для его запуска на боковой панели, рядом с кнопками «Завершение работы» и «Параметры». Делается это следующим образом:
- Откройте «Параметры», воспользовавшись меню «Пуск» или клавишами «WIN+I».
- Перейдите к разделу «Персонализация».
- В боковом меню переместитесь во вкладку «Пуск» и нажмите по ссылке «Выберите, какие папки будут отображаться в меню…».
- Переведите в активное положение переключатель напротив «Проводника».
- Закройте «Параметры» и повторно откройте «Пуск», чтобы убедиться в наличии там ярлыка для быстрого запуска «Эксплорера».
Читайте также: Как сделать панель задач прозрачной в Windows 10
Заключение
Теперь вы знаете не только обо всех возможных вариантах открытия «Проводника» на компьютере или ноутбуке с Виндовс 10, но и о том, как не потерять его из виду ни при каких обстоятельствах. Надеемся, эта небольшая статья была полезна для вас.
Важнейшим из системных приложений компьютера является Проводник. Он предназначен для отображения и поиска файлов. Но далеко не все владельцы ПК знают, как открыть Проводник в операционной системе Windows 10, ведь ярлык приложения отсутствует на Рабочем столе. Это сильно затрудняет процесс взаимодействия с компьютером, однако существуют очень простые способы запуска нужной программы.
Комбинация клавиш
Слово «Проводник» переводится на английский язык как «Explorer». Эта, казалось бы, бесполезная информация поможет вам запомнить комбинацию клавиш «Win» + «E» (E – Explorer). Ее нужно включить, чтобы сделать вызов нужного приложения. Нажав соответствующие кнопки на клавиатуре, пользователь увидит перед собой окно Проводника и сможет заняться поиском интересующих файлов.
С помощью ярлыка на Панели задач
Если компьютер работает исправно, владельцу ПК даже не придет в голову использовать комбинацию клавиш для перехода в Проводник. Ведь иконка приложения, выполненная в желтом цвете, по умолчанию располагается на Панели задач. Один клик левой кнопкой компьютерной мышки по указанному логотипу запустит программу.
![]()
Поиск через Проводник
Если иконка отсутствует в Панели задач, открыть приложение можно будет при помощи разных альтернативных вариантов. Первый из них – поиск программы по запросу «Проводник». Чтобы найти раздел компьютера с файлами, потребуется сделать несколько простых шагов, а именно:
- Щелкнуть ЛКМ по иконке в виде лупы, которая вызывает поисковую строку.
- Ввести название приложения.
- Кликнуть левой кнопкой мыши по названию искомой программы, чтобы открыть ее.
На заметку. Если вы не видите в Панели задач иконку с лупой, попробуйте вызвать окно комбинацией клавиш «Win» + «S».
После завершения поиска Проводник должен выпасть первым в списке. Также из этого меню можно изменить настройки приложения и, например, создать его ярлык на Рабочем столе.
Из меню WinX
Еще один альтернативный способ вызвать приложение заключается в использовании комбинации клавиш «Win» + «X». Она запускает контекстное меню кнопки «Пуск», которое также вызывается щелчком ЛКМ по соответствующей иконке в Панели задач. В данном случае нас интересует всплывающее окно, где присутствует пункт «Проводник». Один клик ЛКМ приводит к тому, что рядом запускается необходимая программа.
Через меню Пуск
Стандартное меню Пуск тоже нельзя обойти стороной. Если его контекстная область вызывается комбинацией клавиш «Win» + «X» или щелчком правой кнопкой мыши по иконке, то главный раздел можно открыть, кликнув ЛКМ. Но найти Проводник в общем списке не получится. Нужно сначала раскрыть вкладку «Служебные – Windows».
Здесь и находится нужная нам программа. Теперь от запуска вас отделяет один клик левой кнопкой мыши.
Запустить explorer.exe
Поскольку название менеджера переводится на английский язык как «Explorer», то у него должен быть одноименный исполняемый файл. И действительно, «explorer.exe» отвечает за запуск Проводника и находится в директории «C:Windows». Правда, найти его будет непросто, ведь для поиска файлов, как известно, используется сам Проводник. В качестве альтернативного варианта можно предложить любой другой файловый менеджер или поисковую строку Windows 10.
Командная строка
Этот метод точно нельзя назвать самым удобным. Но раз уж он существует, то давайте рассмотрим и его. Командная строка – стандартный инструмент Windows 10, который необходим для обработки пользовательских запросов. Если вы хотите открыть Проводник, то выполните шаги из инструкции:
- Вызовите контекстное меню Пуск.
- Откройте Командную строку с правами Администратора.
- Введите запрос «start explorer.exe».
- Нажмите клавишу «Enter».
Далее на экране появится знакомый интерфейс менеджера файлов. А если он не откроется, то рекомендуется перезапустить его, используя ту же самую Командную строку. Но на этот раз нужно ввести запрос «taskkill /F /IM explorer.exe».
Через Диспетчер задач
Заключительный вариант тоже не является самым удобным, однако он помогает при запуске, когда в работе компьютера возникает сбой:
- Одновременно нажмите клавиши «Ctrl» + «Shift» + «Esc», чтобы открыть Диспетчер задач.
- Кликните ЛКМ по вкладке «Файл», а затем нажмите – «Запустить новую задачу».
- В открывшееся окно введите «explorer».
- Нажмите «ОК».
Теперь Проводник не просто откроется, но и будет отображаться в Диспетчере задач до того момента, пока пользователь не решит его закрыть.
Настройка быстрого доступа
Наиболее простым способом запуска менеджера файла является использование ярлыка на Панели задач. Увы, но он не всегда отображается в положенном месте. Поэтому для отображения значка нужно немного изменить настройки. Данная процедура окажется крайне полезной, поскольку вы сможете задать параметры быстрого доступа к Проводнику и через другие разделы меню.
Панель задач
Чтобы иконка отображалась на привычном месте, нужно запустить менеджер любым из рассмотренных ранее способов. Как только откроется соответствующее окно, потребуется кликнуть по иконке приложения ЛКМ и отметить пункт «Закрепить на панели задач». Теперь программа никогда не пропадет.
Пуск
При рассмотрении альтернативных вариантов запуска отмечалось, что открыть Проводник через меню Пуск тоже не очень просто, поскольку иконка приложения располагается во вкладке «Системные – Windows». Чтобы она отображалась на главном экране, необходимо выполнить следующее:
- Откройте «Параметры» через меню «Пуск».
- Перейдите в раздел «Персонализация», а затем – во вкладку «Пуск».
- Щелкните по надписи «Выберите, какие папки будут отображаться в меню».
- Переведите ползунок напротив пункта «Проводник» в положение «Вкл.».
После сохранения настроек иконка менеджера файлов будет отображаться в «Пуске» неподалеку от значка «Параметров». Вы никогда не потеряете нужное приложение.
Обновлено 07.06.2017

Добрый день уважаемые читатели и гости блога, сегодня продолжаем наше с вами изучение компонентов операционной системы Windows, в прошлый раз я вам рассказал, про «Панель управления Windows», на очереди следующий компонент, история которого, далеко уходит в историю и сегодня мы поговорим про «Проводник Windows 10» или как он еще известен под названием процесса explorer.exe, мы разберем вопросы о его запуске, перезапуске, модификации и многое другое, уверен вам это понравится, особенно тем, кто только начинает разбираться в новой ОС.
Что такое проводник Windows
Если обратиться к истории и вспомнить определение, то получается так, что «Проводник Windows» — это приложение (небольшая программа), необходимая для того, чтобы пользователь с помощью графического интерфейса (GUI) мог получать доступ и пользоваться файлами в операционной системе виндоус. Как я и писал выше, его еще называют explorer проводник, именно так он фигурирует в процессах системы. Когда речь идет о манипуляции с файлами, все сразу вспоминают оснастку «Мой компьютер» или как он уже называет в десятке «Этот компьютер»
Как открыть Проводник в Windows 10
Для того, чтобы открыть explorer.exe (Этот компьютер) вы можете это сделать четыремя способами:
- Самый простой метод, это запустить его через прикрепленную иконку в виде папки.
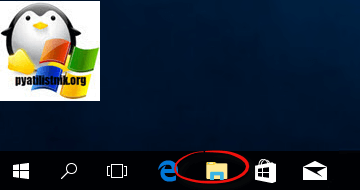
- Запускаем проводник через поиск, для этого нажмите значок лупы, находящийся справа от кнопки «Пуск» и в открывшейся форме, введите первые буквы.
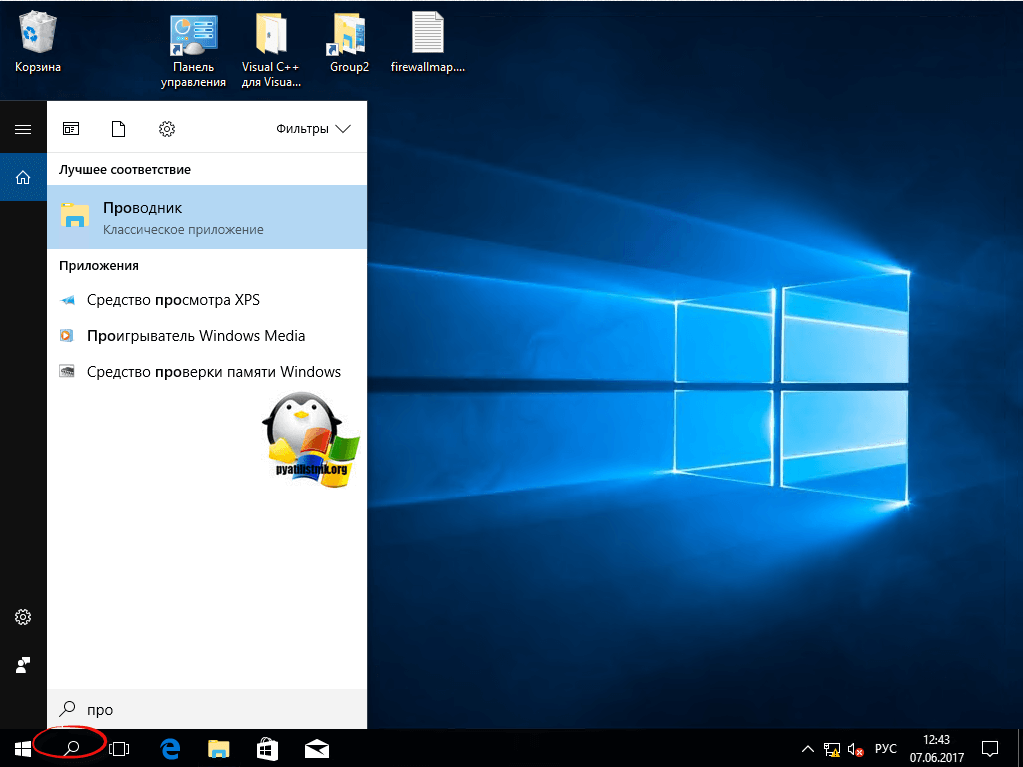
- Можно нажать комбинацию горячих клавиш Win+E и у вас откроется привычное окно проводника (Быстрый доступ)
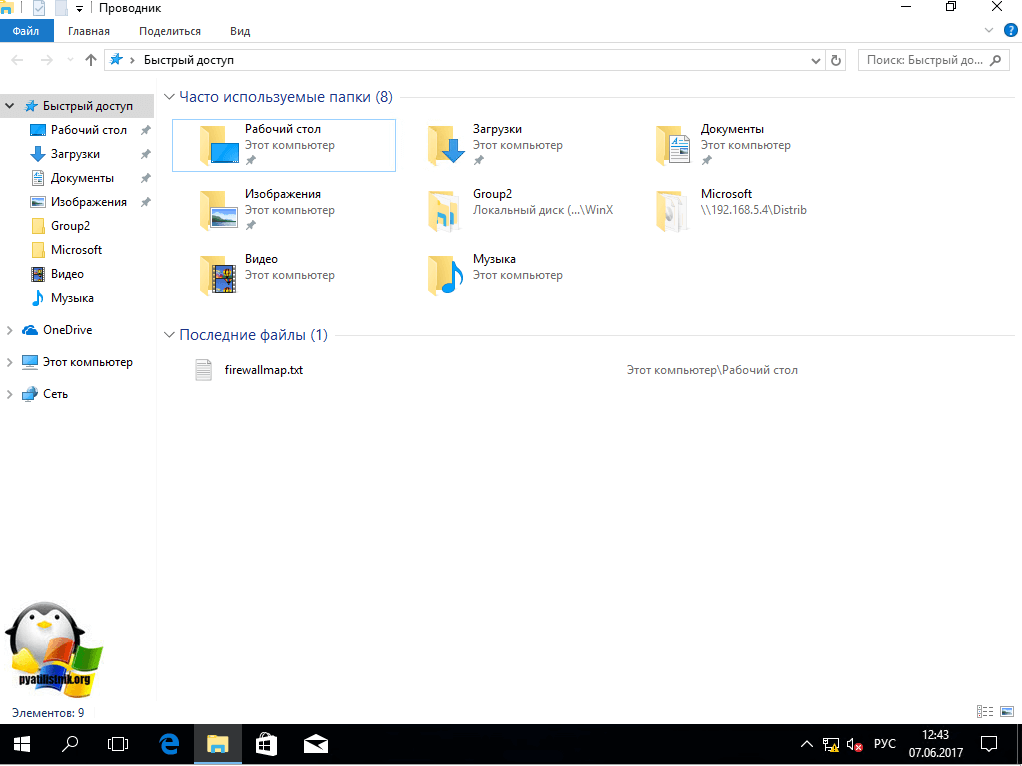
- Очень быстрым вариантом является меню WinX, найти его можно кликнув правой кнопкой мыши по кнопке «Пуск» и выбрав из контекстного меню нужный пункт.

- Через меню «Пуск». В котором вам необходимо найти пункт «Служебные — Windows»
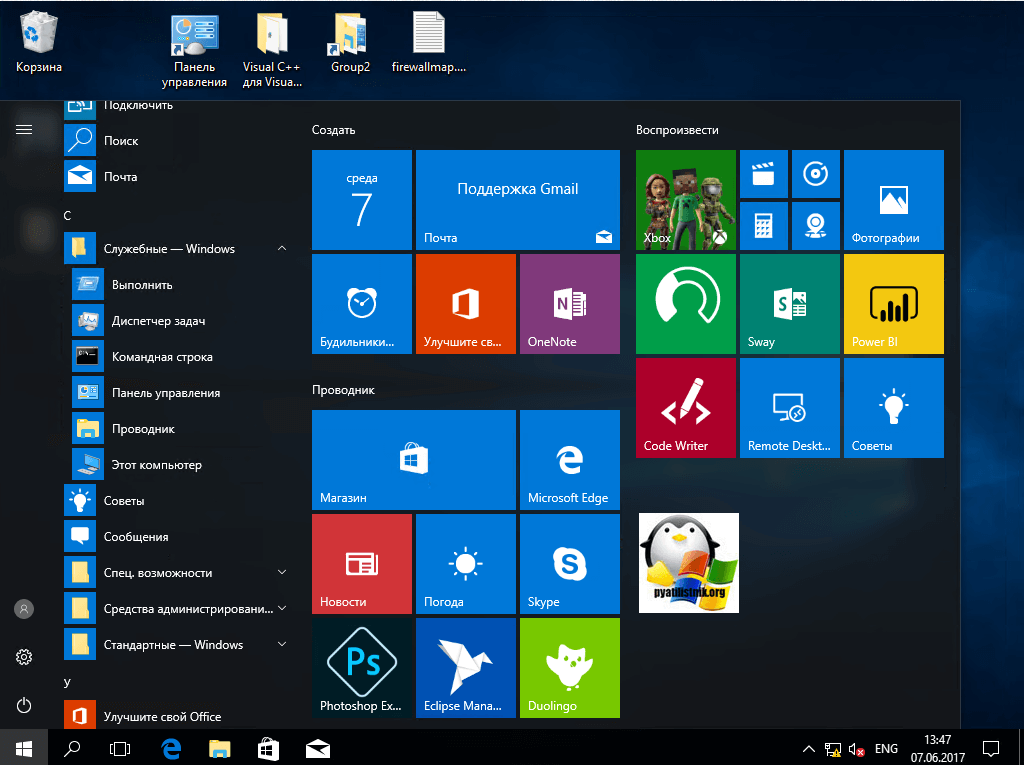
- Открыть explorer.exe можно и через командную строку и powershell. Открываем нужную оболочку и вводим там:
explorer.exe и нажимаем Enter
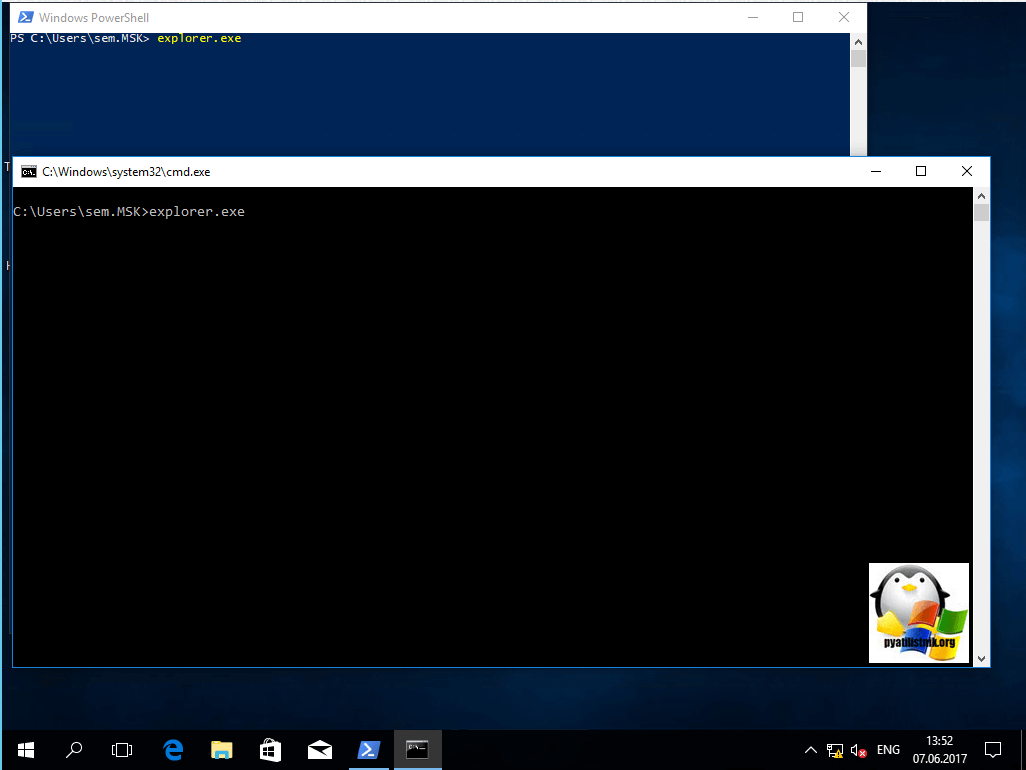
Все в плане запуска и открытия мы с вами разобрались и можем двигаться дальше и разобрать моменты решения различных проблем, возможных при эксплуатации системы.
Как перезпустить проводник windows explorer
Бывают ситуации, что вам необходимо перезагрузить процесс проводник explorer.exe, по ряду причин, самая распространенная это интеграция новой программы в него или может зависнуть рабочий стол и системе требуется перезапустить процесс, в любом случае вы должны это уметь и я вас научу.
Самый быстрый и правильный метод это через диспетчер задач. Щелкаем по области задач правым кликом и из контекстного меню выбираем «Диспетчер задач»
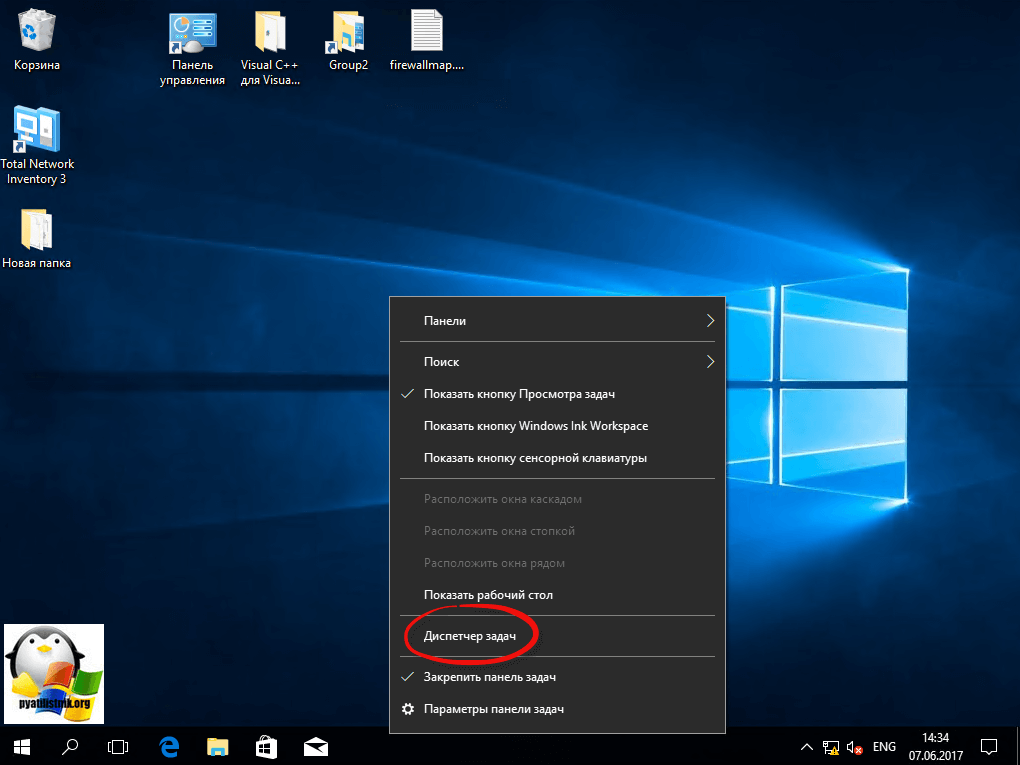
Ищем процесс «Проводник», выбираем его и в правом нижнем углу есть кнопка «Перезапустить», она все сделает как нужно.
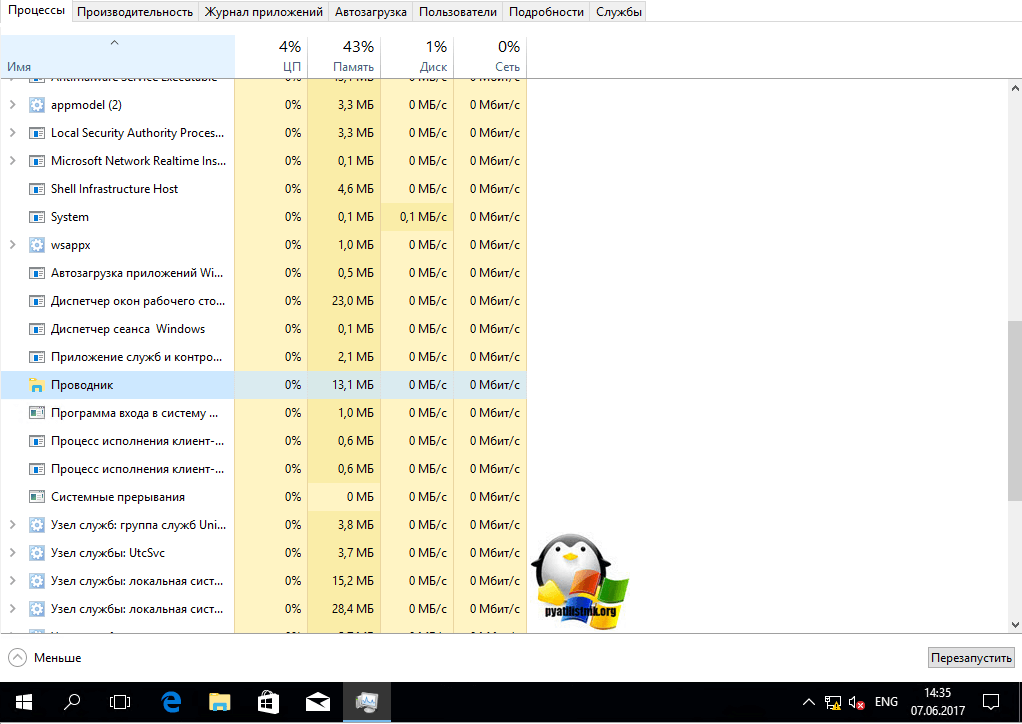
Если нужно просто вернуть проводник в windows 10, вовремя глюка он не перезапустился, то так же можете сделать задачу через «Диспетчер задач», чуть ниже об этом рассказывается.
В Windows 7 мы использовали такой метод. Открывали кнопку «Пуск» и зажмите клавиши Ctrl + Shift на клавиатуре, затем щелкните правым кликом мыши на любом свободном месте меню «Пуск» в результате вы увидите дополнительное меню, в котором будет пункт «Выход из Проводника», он и закроет процесс explorer.exe. В десятке и Windows 8.1 в меню «Пуск» этот номер не пройдет, там немного другая область клика.
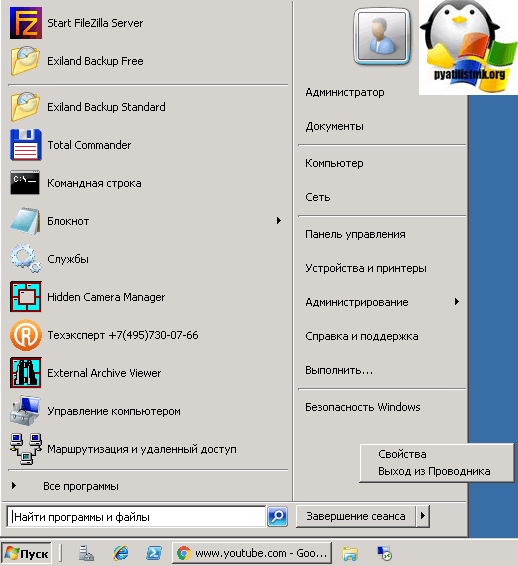
В восьмерке или Windows 10 найти пункт «Выход из Проводника» можно в области панели задач, удерживайте клавиши Ctrl и Shift и в пустом месте щелкните правым кликом, у вас появится меню с заветным пунктом.
Но не спешите радоваться, данный пункт не просто перезапускает «Проводник Windows», а напрочь из него выходит. Чревато это тем, что у вас с экрана пропадает кнопка «Пуск»
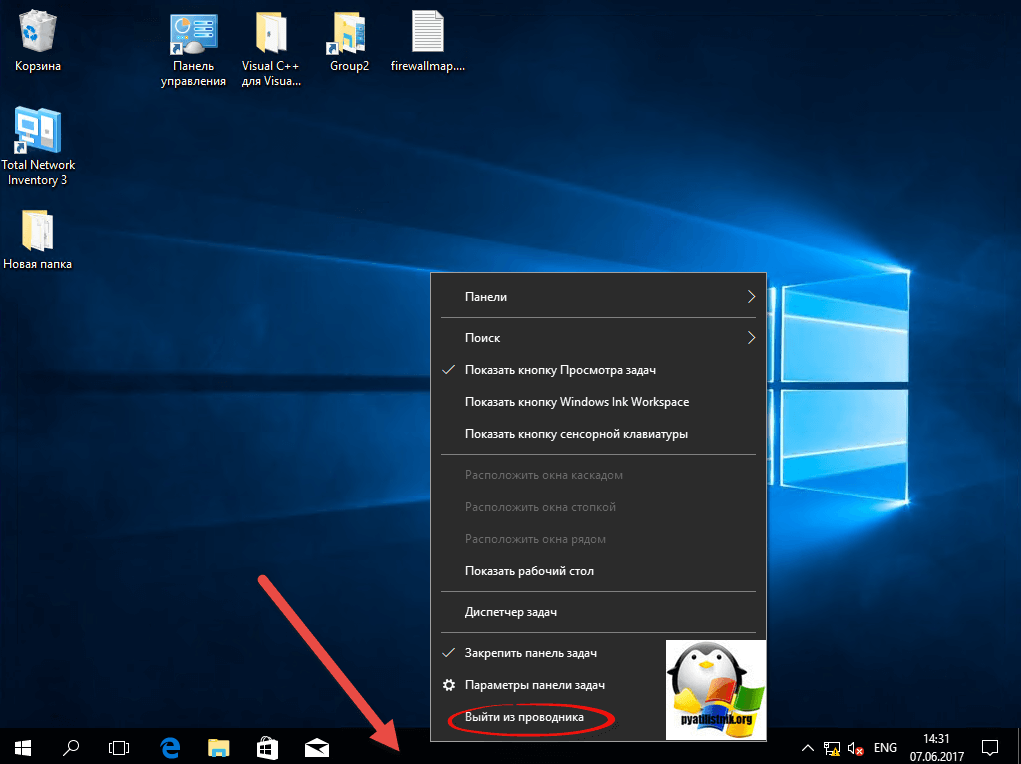
Как я и писал выше у вас будет отсутствовать кнопка «Пуск»

Выйти из этой ситуации можно таким образом, вам необходимо нажать CTRL+ALT+Delete и в открывшемся окне выбрать пункт «Диспетчер задач»

В меню «Файл» выберите пункт «Создать задачу» и в открывшемся окне напишите explorer.exe и нажмите Enter, это вернет рабочий стол в нормальное состояние.
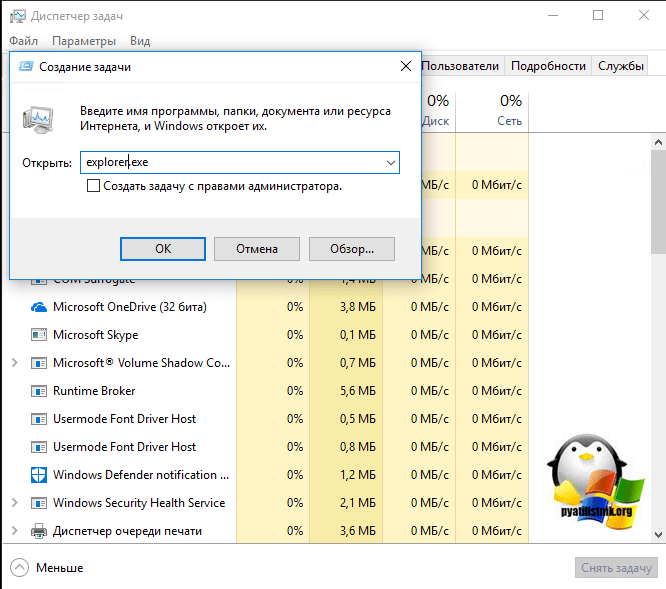
Теперь если у вас тормозит проводник windows 10 или пропадает, вы знаете что нужно сделать.
Параметры проводника в windows 10
Еще хочу показать несколько полезных настроек и функций, которые могут вам понравиться. Первое, на что я хочу обратить ваше внимание, это пункт «Отправить» в контекстном меню любого файла или папки.
- Я для примера, взял обычный файл и решил посмотреть какие пункты в нем доступны при попытке его отправить.
Теперь проделаем тоже самое. но перед этим зажмем клавишу Shift и вы удивитесь на сколько много у вас теперь пунктов.
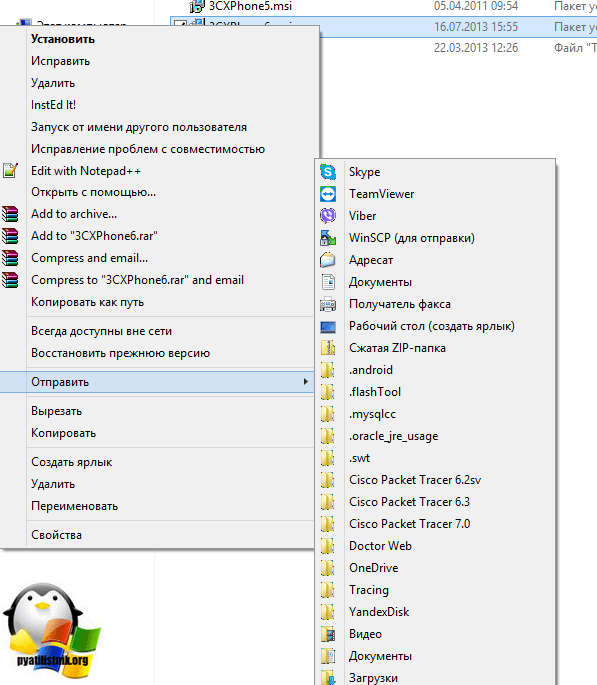
- Как сделать, чтобы при вызове проводника, у вас открывался «»Этот компьютер» а не «Панель быстрого доступа». Для этого откройте любую папку, выберите вкладку «Вид» и «Параметры»
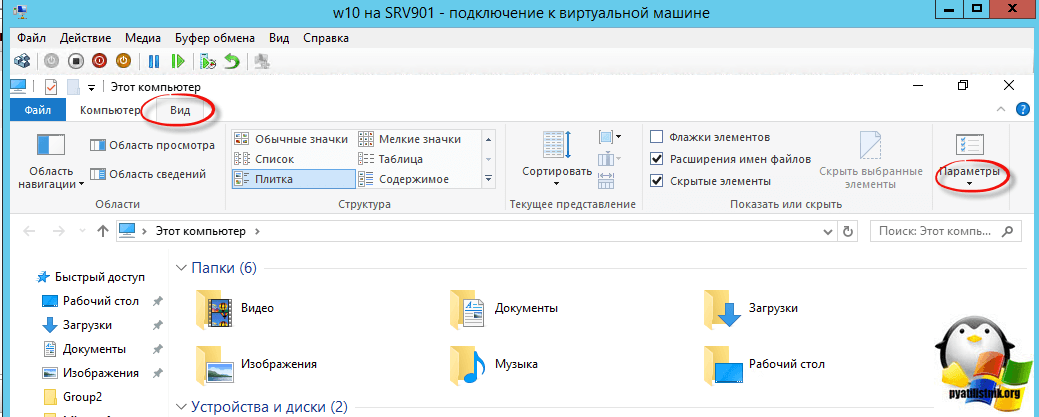
В пункте «Обзор папок» выбираем пункт «Этот компьютер»
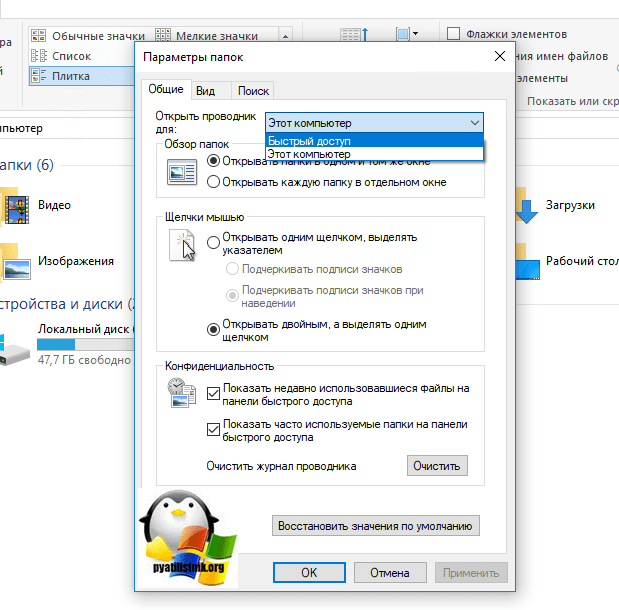
- Восстановление открытых папок после выключения компьютера. Бывают ситуации, что у вас открыто много папок, день подходит к концу и вам нужно выключать компьютер, а завтра включив его вам нужно вручную все открывать, Windows 10 вам поможет это автоматизировать и открывать все папки в том виде в котором они были. Делается это так же через пункт «Параметры». На вкладке «Вид» найдите пункт «Восстанавливать прежние окна папок при входе в систему»
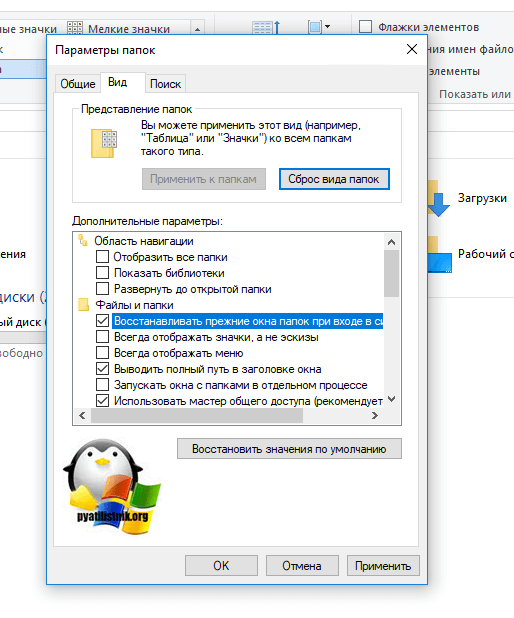
Главная · Редакторы · Что такое windows explorer. Internet Explorer что это за программа и нужна ли она? Об оболочке Windows
Доступа пользователя к файлам в операционной системе Microsoft Windows
.
Проводник в настоящее время фактически является основой графической оболочки пользователя Windows
. Всё, что видит пользователь после загрузки Windows
— пиктограммы рабочего стола , панель задач , меню «Пуск» (кроме «обоев ») — это Проводник Windows
.
Об оболочке Windows
В Windows
одна из программ является оболочкой
(англ. Windows shell
). Оболочка запускается вместе с Windows
, в ранних версиях Windows
выход из оболочки приводил к выходу из операционной системы . Современные версии Windows
, если оболочка завершит работу крахом, могут загружать новую копию.
Оболочка называлась:
- Windows 1 и — MS-DOS Executive
- Windows 3 — Диспетчер программ
- Windows 95 и далее — Проводник Windows
.
Программу-оболочку можно заменить на другую. Существуют альтернативные оболочки Windows
: Emerge Desktop
, Aston
, SharpE
, Talisman Desktop
, GreenGnome
и другие .
Обзор
Проводник Windows
впервые появился в Windows 95
как замена диспетчера программ и диспетчера файлов Windows 3.x .
Иногда Проводником называют его часть, предназначенную для манипуляции файлами.
Её можно вызвать двойным щелчком по иконке «Мой компьютер », запустить из «меню Пуск », воспользоваться клавиатурным сокращением ⊞ Win + E .
Последующие версии Windows
, и в некоторых случаях, версии Internet Explorer
, добавляли новые возможности, убирали другие, постепенно формируя из простой системы навигации по файлам полнофункциональную задаче-ориентированную систему управления файлами .
За функционирование Проводника Windows
отвечает процесс explorer.exe .
Папки
Понятие папки в проводнике Windows несколько отличается от понятия каталога. Большинство папок отображает содержимое определённого каталога файловой системы, но существуют и специальные папки, содержимое которых не имеет реального расположения на диске, а зависит от настроек операционной системы. К таким папкам можно отнести:
- «Мой компьютер»* — содержит доступные пользователю устройства хранения данных, а также ссылки на папки «Мои документы»* разных пользователей, на папку «Панель управления», а также на некоторые устройства ввода информации (сканеры, камеры и т. д.)
- «Панель управления» — содержит список ссылок на программы, с помощью которых осуществляется настройка операционной системы.
- «Корзина»* — системная папка для предотвращения случайного удаления файлов. Файлы, перемещённые в «Корзину», удаляются после выполнения команды «Очистить корзину».
- «Рабочий стол» — содержит как список файлов, находящихся в каталоге «Рабочий стол» текущего пользователя, так и отсутствующие в этом каталоге папки: «Мой компьютер», «Мои документы», «Корзина» и «Сетевое окружение».
* — здесь указаны первоначальные наименования системных папок. Их названия меняются от версии к версии (Vista + — «Компьютер», «Документы», 8.1 + — «Этот компьютер», «Документы») и могут быть переименованы пользователем.
Библиотеки
Перечень библиотек
- «Избранное» — используется для организации быстрого доступа к часто посещаемым папкам компьютера.
- «Документы» — используется для упорядочивания текстовых документов, электронных таблиц, презентаций и других текстовых файлов.
По умолчанию файлы, которые пользователь перемещает, копирует или сохраняет в библиотеку «Документы», хранятся в папке «Мои документы».
- Библиотека «Изображения» предназначена для упорядочивания цифровых фотографий, полученных с фотоаппарата, сканера или по электронной почте от других людей.
По умолчанию файлы, которые пользователь перемещает, копирует или сохраняет в библиотеку «Изображения», хранятся в папке «Мои рисунки».
- Библиотека «Музыка» предназначена для упорядочивания цифровой музыки, например, песен, скопированных со звуковых компакт-дисков или загруженных из Интернета.
По умолчанию файлы, которые пользователь перемещает, копирует или сохраняет в библиотеку «Музыка», хранятся в папке «Моя музыка».
- Библиотека «Видео» предназначена для упорядочивания видеозаписей, например, клипов с цифровой камеры, камкордера, или видеофайлов, загруженных из Интернета.
По умолчанию файлы, которые пользователь перемещает, копирует или сохраняет в библиотеку «Видео», хранятся в папке «Мои видеозаписи».
Развитие проводника Windows
Windows 95
Проводник Windows предоставляет режим просмотра, в котором каждый каталог открывается в новом окне,
показывая его содержимое в виде двумерного набора иконок. Размеры и способ представления автоматически выбираются, исходя из характеристик только что открытого каталога.
Например, каталог, содержащий два файла, будет меньшего размера, чем тот, который содержит 10 файлов.
Если каталог содержит сотни файлов, то будет установлен режим представления Список
.
Примерно так же работал Program Manager в Windows 3.x.
В Windows 95 Проводник больше всего напоминал пространственно-ориентированный менеджер файлов наподобие ранних версий Macintosh Finder
.
В следующих версиях Проводника большая часть этой функциональности была отключена по умолчанию, предпочтение было отдано однооконному режиму.
Также в Windows 95 был однооконный проводник, отображающий в левой части дерево папок.
Windows Desktop Update
После выпуска обновления Рабочего Стола Windows
(Windows Desktop Update), дополнительного компонента, который впоследствии был
интегрирован в Windows 98 , развитие Проводника было продолжено на базе технологии Internet Explorer.
Необходимо отметить добавление навигации между недавно посещёнными каталогами (стрелочки вперёд/назад).
Впоследствии эта особенность была перенята многими другими файловыми менеджерами.
В Проводник была добавлена панель ввода адреса, где пользователь может ввести путь к каталогу и перейти туда.
Также можно ввести URL , после чего в главной части окна откроется интернет-страница.
Другим нововведённым средством, которое базировалось на технологии Internet Explorer, были настраиваемые каталоги.
Такие каталоги содержали скрытые интернет-страницы, которые управляли способом представления содержимого каталогов.
Такая функциональность имела свои уязвимости, так как опиралась на скрипты и ActiveX -объекты, и поэтому была убрана из Windows XP .
Другие изменения:
- Возможность добавлять дополнительные элементы в панель задач, наиболее заметной из них является панель Быстрого запуска
. - «Активный рабочий стол», который позволил превратить фон рабочего стола в интернет-страницу.
- Возможность запуска приложений по однократному щелчку (влияние парадигмы интернет-страницы).
- Новые виртуальные каталоги для запланированных задач и интернет-папок.
Windows NT 4
Windows 7
Произошли кардинальные изменения с панелью задач. Привычная панель быстрого запуска по умолчанию скрыта — вместо этого программы можно закреплять на панели задач, как в меню пуск. Свернуть все окна теперь можно, нажав кнопку в правом конце панели. Меню пуск собирает информацию
о последних открытых файлах и доступных действиях для каждой программы. Классический вид меню Пуск не предусмотрен.
Структура дерева проводника переработана. Папка Избранное стала обычным корневым узлом, как и Мой компьютер Сеть и Библиотеки — рабочий стол съехал с пьедестала. Новый элемент библиотеки позволяет собрать в одном узле все папки одной тематики.
Windows 8
Изменения коснулись иконок, которые были переделаны под стиль интерфейса Metro. Также был добавлен интерфейс Ribbon . Также можно закрепить любое окно проводника на экране «Пуск». В остальном проводник практически ничем не отличается от такового в Windows 7 .
Вернулась кнопка «Вверх», расположенная между кнопками навигации и адресной строкой.
На месте области сведений находится строка состояния, показывающая информацию о количестве выделенных файлов и папок, объёме выделенных файлов, а также общее число файлов и папок в открытой папке. В правой части строки состояния размещены две кнопки для переключения между режимами отображения «Таблица» и «Крупные значки».
Область сведений теперь по умолчанию отключена и размещается справа (по этой причине её нельзя включить одновременно с областью просмотра), информация на ней расположена по вертикали. Старая область сведений, однако, осталась в таких местах, как «Игры», «Устройства и принтеры», «Программы и компоненты».
Появилась возможность отключения списка «Избранное» из области навигации.
- Explorer.exe Command-Line Options for Windows XP (англ.)
 Всем привет Поговорим о такой программе как Internet Explorer, которая есть в каждой винде, я также расскажу для чего она нужна. Значит Internet Explorer это браузер, однако не всеми любимый, даже можно сказать что самый НЕ популярный браузер, хотя он есть в любой винде. Никто его почему-то не любит, нет, ну есть конечно те, кто пользуются им, но многие им все таки недовольны..
И вы знаете почему? Потому что Internet Explorer это очень тормозной браузер, непонятно вообще почему он так тормозит даже в Windows 10! Или вы думали, что тут его нет? Есть он и тут, есть, куда он делся. Правда, если я не ошибаюсь, то разработка его прекращена, ибо на его смену пришел его величество Microsoft Edge, это типа супер-пупер быстрый браузер..
Хотя не все так просто. Дело в том, что даже когда появился Microsoft Edge, то Internet Explorer не был убран их винды. И как мне кажется сделано это потому, что Internet Explorer это не просто браузер, это системная программа, обьект которой может быть использован в другой программе. Ну то есть я имею ввиду, что любой программист может написать программу, которая будет использовать Internet Explorer в своих целях. И вот чтобы такие программы работали, а они существуют как бы, то вот для этого данный браузер и остался в Windows 10.
Вот как выглядит Internet Explorer:

Поддерживает почти все то, что и современные браузеры. Однако такую мелочь как Вставить и перейти, ну когда вы скопировали ссылку, то такого в этом браузере нет, это косяк так косяк
Кстати, как быстро запустить Internet Explorer, вы знаете? Я сейчас покажу! Значит зажимаете Win + R и пишите туда такую команду:

И все, потом нажимаете ОК и все, Internet Explorer запустится! А вот если в окошке написать не iexplore, а iexplore -private, то он запустится сразу в приватном режиме
Можно ли удалить Internet Explorer? Ну, вообще-то нельзя. Настройками винды его можно максимум отключить. Но все таки удалить его можно, хотя это немного и опасно.. Ладно, давайте сначала я покажу как его можно отключить. Значит смотрите ребята, нажимаете правой кнопкой по значку Пуск и там выбираете самый верхний пункт, то есть Программы и компоненты:

Теперь в окне будет такая штука как включение или отключение компонентов Windows, вот это и нажимаем:

Появится окошко, вот тут и нужно найти Internet Explorer 11 и снять с него галочку:

Когда вы снимите галочку, то будет такое сообщение, тут нажимаете Да:

Потом нажимаете ОК и будет такое окно поиска каких-то файлов, ну это типа отключается Internet Explorer:

А потом нужно будет перезагрузить комп еще, ну так нужно короче говоря:

Советую перезагрузку не откладывать, а довести дело до конца
Потом я попробовал запустить Internet Explorer и вот какую ошибку я увидел, как будто он реально удален:

Но папка Internet Explorer в Program Files все таки осталась, вот ее содержимое:

То есть видите, тут нет файла iexplorer.exe, а ведь именно он и запускает браузер! Нет файла ни в просто Program Files ни в Program Files (x86). То есть это пахнет реальным отключением и можно даже сказать удалением, ибо браузер запустить нельзя и самого главного файла, то есть iexplorer.exe, то его нет, а ведь это по сути и есть браузер.. Вот такие пироги ребята
Ну так вот, теперь по поводу удаления Internet Explorer. Если хотите удалить, то я покажу как это сделать, вы можете тоже попробовать. Но перед удалением, так бы сказать для лучшего эффекта, ну я напишу просто на всякий случай, перед удалением, браузер лучше чтобы таки был отключен. Ну то есть так, как я показывал выше, через компоненты Windows.
Перед удалением обязательно сделайте сначала точку восстановления. Но зачем создавать эту точку и как вообще это сделать? Я уже однажды удалял системную программу под названием MSXML 4.0 SP3 Parser, и вот чтобы не было косяков, то я сначала создал точку восстановления на всякий случай. Об этом всем я писал вот , советую таки глянуть
Значит честно говоря я не знаю получится ли у меня удалить Internet Explorer или нет, но надеюсь что таки получится, и сейчас я это буду делать. Для начала нам нужна утилита Unlocker, без нее никак. Ее легко найти можно в интернете, ибо утилита достаточно известная. Вроде бы это и есть официальный сайт, откуда можно скачать утилиту, там есть даже портативная версия.
Только будьте осторожны, когда будете ее устанавливать, вместе с ней часто ставится еще какая-то левая прога, поэтому будьте внимательны и смотрите при установке на наличие левых галочек. Вот когда я себе ставил Unlocker, то была вот такая галочка по установке какого-то левака непонятного:

В общем поставил я утилиту Unlocker, ну и что теперь будем делать? А будем делать вот что, будем удалять папку Internet Explorer как из Program Files, так и из Program Files (x86). Утилита Unlocker как раз для таких дел и создана, она умеет удалять то, что в принципе удалить нельзя. Поэтому осторожно будьте с Unlocker и не удалите что-то лишнее, а то потом будут глюки, винда еще вдруг не загрузится!
Итак, идем сначала в эту папку:
C:Program Files
Нажимаем правой кнопкой по папке Internet Explorer и выбираем пункт Unlocker:

Все, потом вам нужно выбрать в меню Удалить и нажать кнопку ОК:

После этого папка Internet Explorer должна успешно удалится:

Теперь тоже самое вы делаете и с той папкой Internet Explorer, которая находится в Program Files (x86), то есть тоже удаляете при помощи Unlocker.
После того как удалил, то я сделал перезагрузку, чтобы проверить что все будет работать как надо. Включилась винда, папки открывалась нормально и без приколов, то есть Проводник работал как положено. Дело в том, что я таким же способом удалял Internet Explorer в Windows 7, но там был косяк, у меня потом все папки открывались в новом окне, тут вроде такого нет.
Я надеюсь что вы понимаете, что обратно вернуть Internet Explorer уже не получится. Потому что мы его удалили с корнями. Хотя, с другой стороны, можно папки Internet Explorer не удалять, а перенести куда-то, чтобы потом вы смогли их обратно при необходимости поставить. И потом останется только включить компонент, ну в том окошке Компоненты Windows, и вполне возможно что Internet Explorer восстановится. Но может это и не прокатит. В общем точку восстановления перед удалением нужно делать обязательно..
Ну вот и все на этом ребята, теперь вы знаете не только то, что это за программа Internet Explorer, но и как удалить эту прогу. Надеюсь тут все вам было понятно, удачи вам в жизни и чтобы все у вас было хорошо
20.11.2016
Версии Internet Explorer были выпущены для других операционных систем, включая Internet Explorer для Xbox 360 и Internet Explorer Mobile для мобильных устройств (для Windows CE , Windows Mobile и Windows Phone 7), Internet Explorer для Mac и Internet Explorer для UNIX (разрабатывался компанией Microsoft для использования в ОС Solaris и HP-UX; разработка прекращена с версией IE 5 в 2001 году, а поддержка прекращена в 2002).
Internet Explorer имеет вкладки, блокировщик всплывающих окон, фишинг -фильтр, встроенный RSS -агрегатор, поддержку интернациональных доменных имён, средств групповой политики и возможность автообновления через Windows Update.
История
Разработка и ранние версии
Проект по разработке Internet Explorer был основан в 1994 году Томасом Риардоном. Согласно данным обзора в 2003 году, он использовал исходный код программы Mosaic разработчика Spyglass, Inc., который формально связан с браузером NCSA Mosaic .
Первая версия Internet Explorer, Microsoft Internet Explorer (позже названа Internet Explorer 1), вышла 16 августа 1995 года и представляла собой переработанную версию браузера Spyglass Mosaic , лицензия на который была выкуплена Microsoft. Она шла в комплекте с Microsoft Plus! для Windows 95 и OEM-релиза для Windows 95 . Через несколько месяцев был выпущен Internet Explorer 1.5 для Windows NT , который поддерживал функцию отображения таблиц HTML на веб-страницах.
Ряд инноваций, предложенных Internet Explorer, стали впоследствии использоваться другими браузерами. Среди них — элемент HTML