Давайте подключим контроллер от Xbox One к компьютеру под управлением Windows 10 и поиграем!
Проводной режим
Контроллер из коробки можно сразу подключить к компу по проводу. Даже батарейки не нужны. Микро-разъем в контроллер, обычный USB — в комьпьютер.
Десятая Винда знает, что вы ей подсунули и почти сразу распознает устройство.
Кабель достаточно длинный. Можно удобно развалиться в кресле, и даже ноги закинуть на стол.
Беспроводной режим
Если вы решите подключить контроллер к компьютеру без проводов, то нужен блютус. Обычно все современные ноуты оснащены таким приемо-передатчиком. А вот для компа скорее всего придется покупать внешний USB-«свисток». Смотрите только, чтобы это был блютус хотя бы версии 4.1.
Нажимаем кнопку Пуск (ту, что с логотипом Винды) и шестеренку Параметров. Раздел Устройства. Наверху кнопка с плюсиком Добавление Bluetooth или другого устройства.

Теперь берем геймпад, включаем его нажатием кнопки с лого, а потом придавливаем кнопку связи на заднем торце. Контроллер перейдет в режим подключения, лого начнет быстро мерцать.
Ждем, пока в списке обнаруженных устройств появится название Xbox Wireless Controller. Щелкаем по нему и ждем подключения. В следующий раз, когда решите поиграть, достаточно будет просто включить контроллер нажатием на кнопку с логотипом, подцепится к компу он уже автоматически.
Беспроводной режим потребует батареек, а еще лучше аккумуляторов, потому что встроенного аккумулятора в контроллере нет.
Когда у меня появился этот контроллер, я просто взял четыре пальчиковых аккума на 2100 мАч. Одна пара работала в геймпаде, воторая либо заряжалась, либо ждала на подмене.
В магазинах сейчас есть много вариантов литий-ионных аккумов, которые вставляются в батарейный отсек или даже заменяют собой крышку. Такие аккумы удобны тем, что их можно заряжать через USB-разъем на самом контроллере или поставить геймпад на специальную зарядную станцию. А вот емкость у них совсем смешная — 600 — 1 400 мАч.
Если уж играть по серьезному, то за те же полторы-две тысячи рублей выгоднее купить комплект из 4 пальчиковых аккумов на 2600 мАч и зарядник. Да, их надо вынимать из геймпада, чтобы зарядить, но зато заряд они держат раз в 5-10 дольше.
Как обновить геймпад Xbox One
Для стабильной работы геймпада, Микрософт рекомендует обновить прошивку девайса. Для этого скачиваем из магазина приложений программу, которая называется Аксессуары Xbox. Запускаем.
Подключаем контроллер к компу через кабель. Вылезет оповещение «Требуется обновление». Нажимаем, обновляем.
Вроде всё. Можно играть.
Keep your controller up to date with the newest updates
by Sagar Naresh
Sagar is a web developer and technology journalist. Currently associated with WindowsReport and SamMobile. When not writing, he is either at the gym sweating it out or playing… read more
Updated on October 24, 2022
Reviewed by
Vlad Turiceanu

Passionate about technology, Windows, and everything that has a power button, he spent most of his time developing new skills and learning more about the tech world. Coming… read more
- You can update your Xbox One controller drivers automatically on Windows 10 by using the built-in solutions.
- Keeping the firmware of your Xbox One controller is highly advised as it will prevent issues such as lag, freeze, or stutter during gameplay.
- The process is almost identical on both Windows 11 and Windows 10 due to their many similarities.
XINSTALL BY CLICKING THE DOWNLOAD FILE
This software will keep your drivers up and running, thus keeping you safe from common computer errors and hardware failure. Check all your drivers now in 3 easy steps:
- Download DriverFix (verified download file).
- Click Start Scan to find all problematic drivers.
- Click Update Drivers to get new versions and avoid system malfunctionings.
- DriverFix has been downloaded by 0 readers this month.
Keeping your controller up to date is important, and speaking of which, it’s important to know how to update Xbox One controller drivers on Windows.
However, imagine a scenario where you connect your Xbox controller to your Windows 10 or Windows 11 PC, only to find out there’s an Xbox controller driver error.
This is where this guide comes into the picture. Because in this post, we will be explaining to you how you can install the latest Xbox One controller drivers on Windows 10 or Windows 11. Let us check out the guide.
Does Windows 10/11 have Xbox One controller drivers?
To answer this, in short, is that neither Windows 10 nor 11 comes pre-installed with Xbox One or Xbox controller drivers, for that matter.
However, as soon as you plug in your Xbox One or any other Xbox controller, Windows 10/11 OS will automatically detect the device and install compatible drivers.
This negates the need to install drivers for your Xbox One controller separately on your Windows 10 or 11 PCs.
But just like every other Windows problem, there are several user reports claiming that their Windows 11 PC did not recognize the Xbox controller when connected.
Fortunately, we have a comprehensive guide on how you can fix the Xbox controller not recognized in Windows 11, which would possibly help you fix the problem.
Windows 10 users are no different, and they have been complaining about this issue for quite some time. Don’t worry as this guide has you covered.
How can I update my Xbox One controller drivers on Windows 10 & 11?
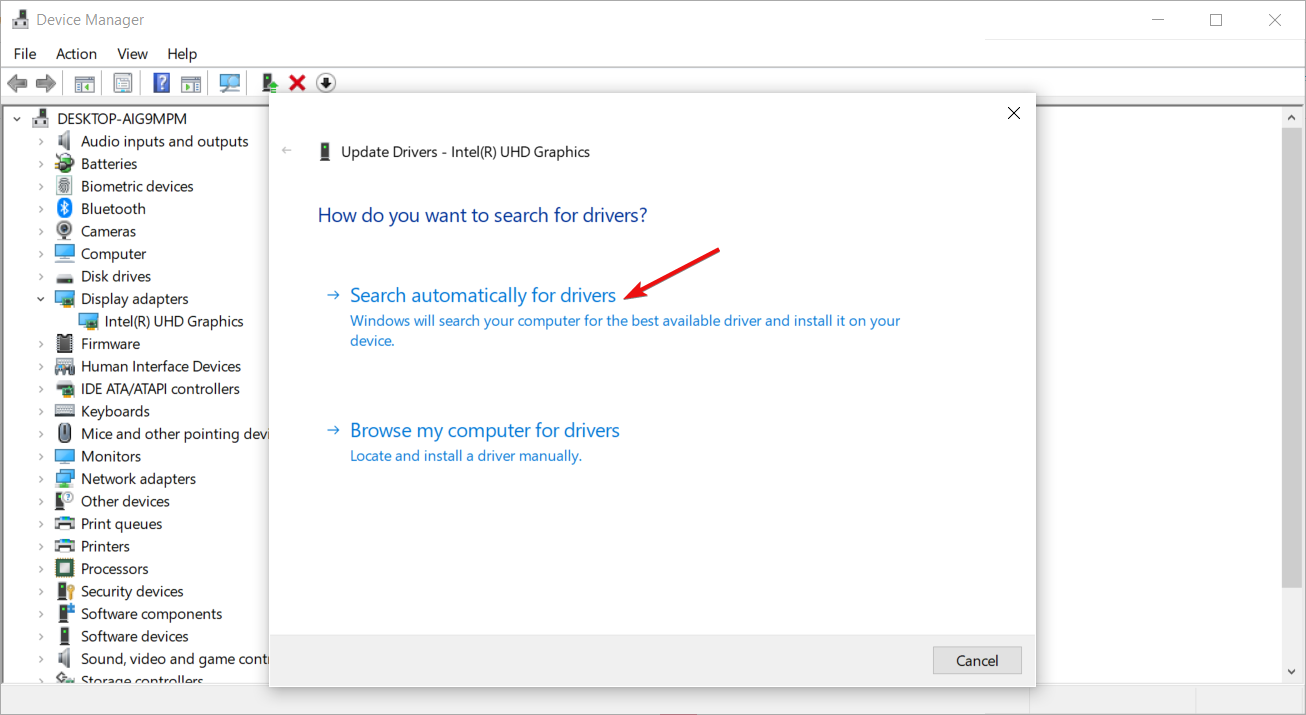
1. Via Device Manager
1.1 Update your controller driver on Windows 11
- Connect your Xbox One controller to your PC with a USB cable.
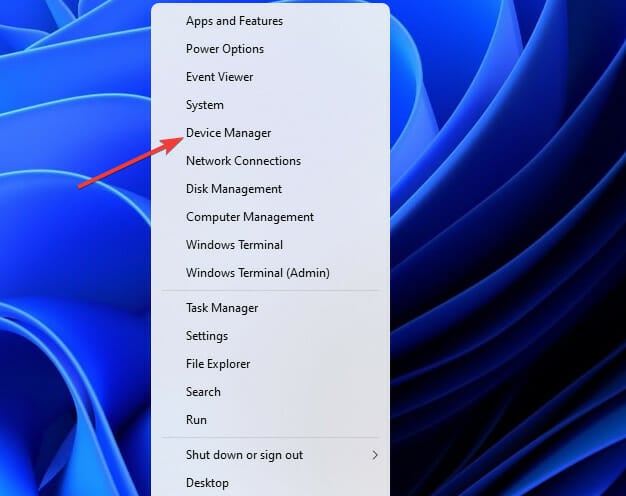
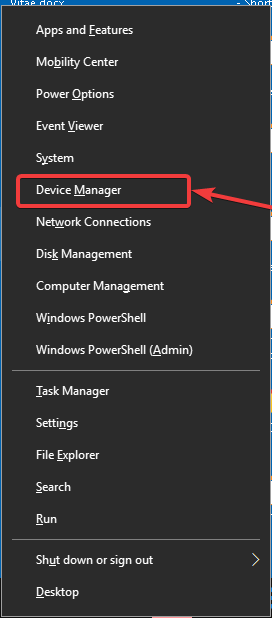
- Press the Win + X buttons to open the Device Manager.

- Expand the Microsoft Xbox One Controller category.
- Right-click on it and select Update driver.

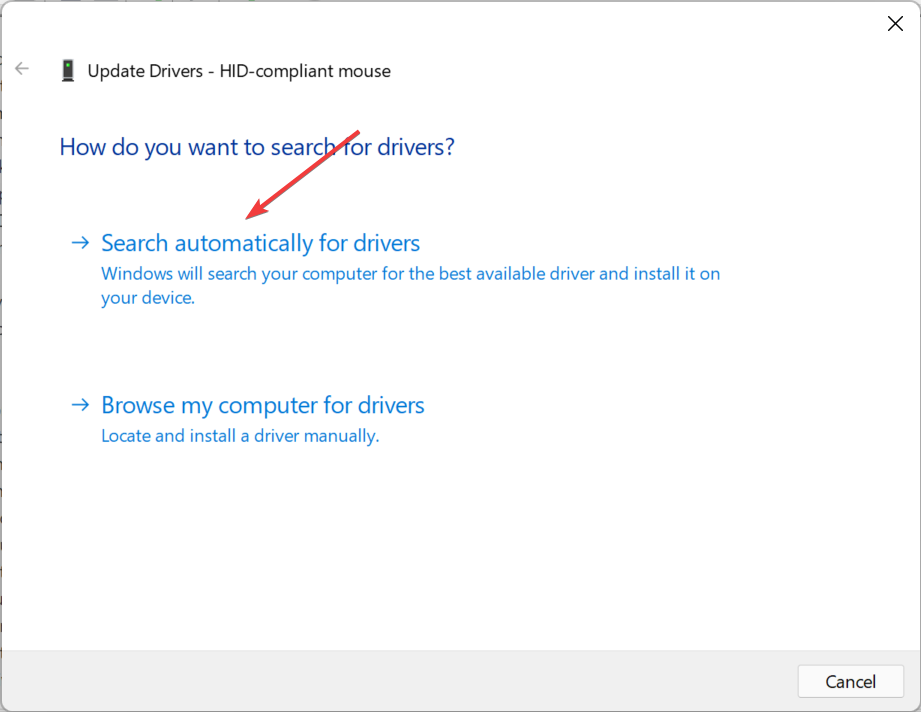
- Click on the Search automatically for updated drivers.

- Your system will look for the updated drivers, and if it detects one, it will prompt you to update.
- Restart the PC.

2. Update your controller driver on Windows 10
1. Make sure your controller is connected with a USB cable.
2. Press Windows key + X and select Device Manager from the menu that opens.
Some PC issues are hard to tackle, especially when it comes to corrupted repositories or missing Windows files. If you are having troubles fixing an error, your system may be partially broken.
We recommend installing Restoro, a tool that will scan your machine and identify what the fault is.
Click here to download and start repairing.
3. Locate your Xbox controller in the list, right-click it and choose Update driver.
4. Select Search automatically for drivers.
5. Wait while Windows downloads the appropriate driver for your Xbox One controller.
The easiest way to update your Xbox One Controller driver on a Windows 10 PC is via the built-in Device Manager tool.
You need to connect your controller to your PC via USB, and then configure Device Manager to automatically look for drivers for it.
Using the above steps to look for updated drivers via the Device Manager is one of the easiest ways to update your Xbox One wired controller driver on Windows 10 or 11.
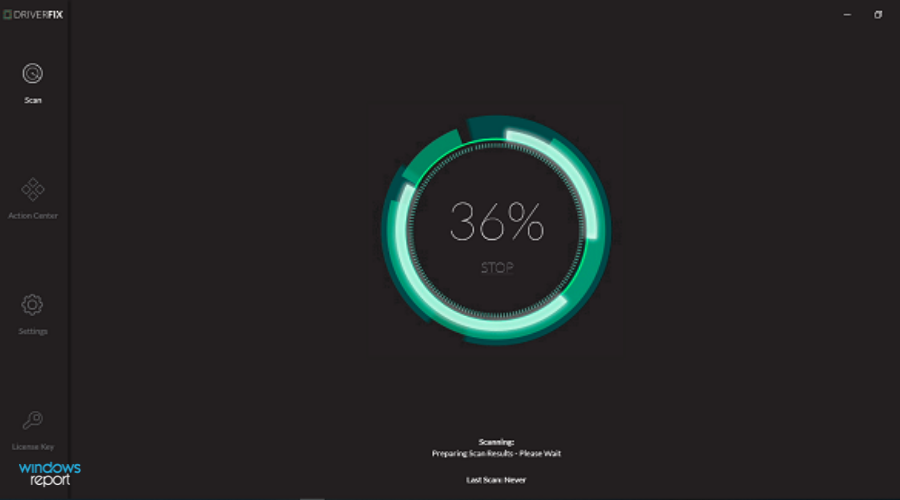
2. Use dedicated software
- Download and install DriverFix.
- Launch DriverFix software.
- The software will perform an initial analysis of your PC.

- Select all the drivers to update or fix. In our case, it is the Xbox One controller driver.
- Wait for DriverFix to download the selected drivers for you.
- Click on Install Driver.
- Follow the driver’s installation instructions.
- Reboot your PC for the changes to take effect.
DriverFix is a one-stop solution for all your driver-related needs. It not only lets you keep all of your drivers on your Windows PC up to date, but also helps you with multiple other scenarios.
You can use this trusted third-party tool to fix faulty or broken drivers, locate missing drivers, perform driver backups, schedule scans, and much more. For more information, you can check out our dedicated DriverFix review.
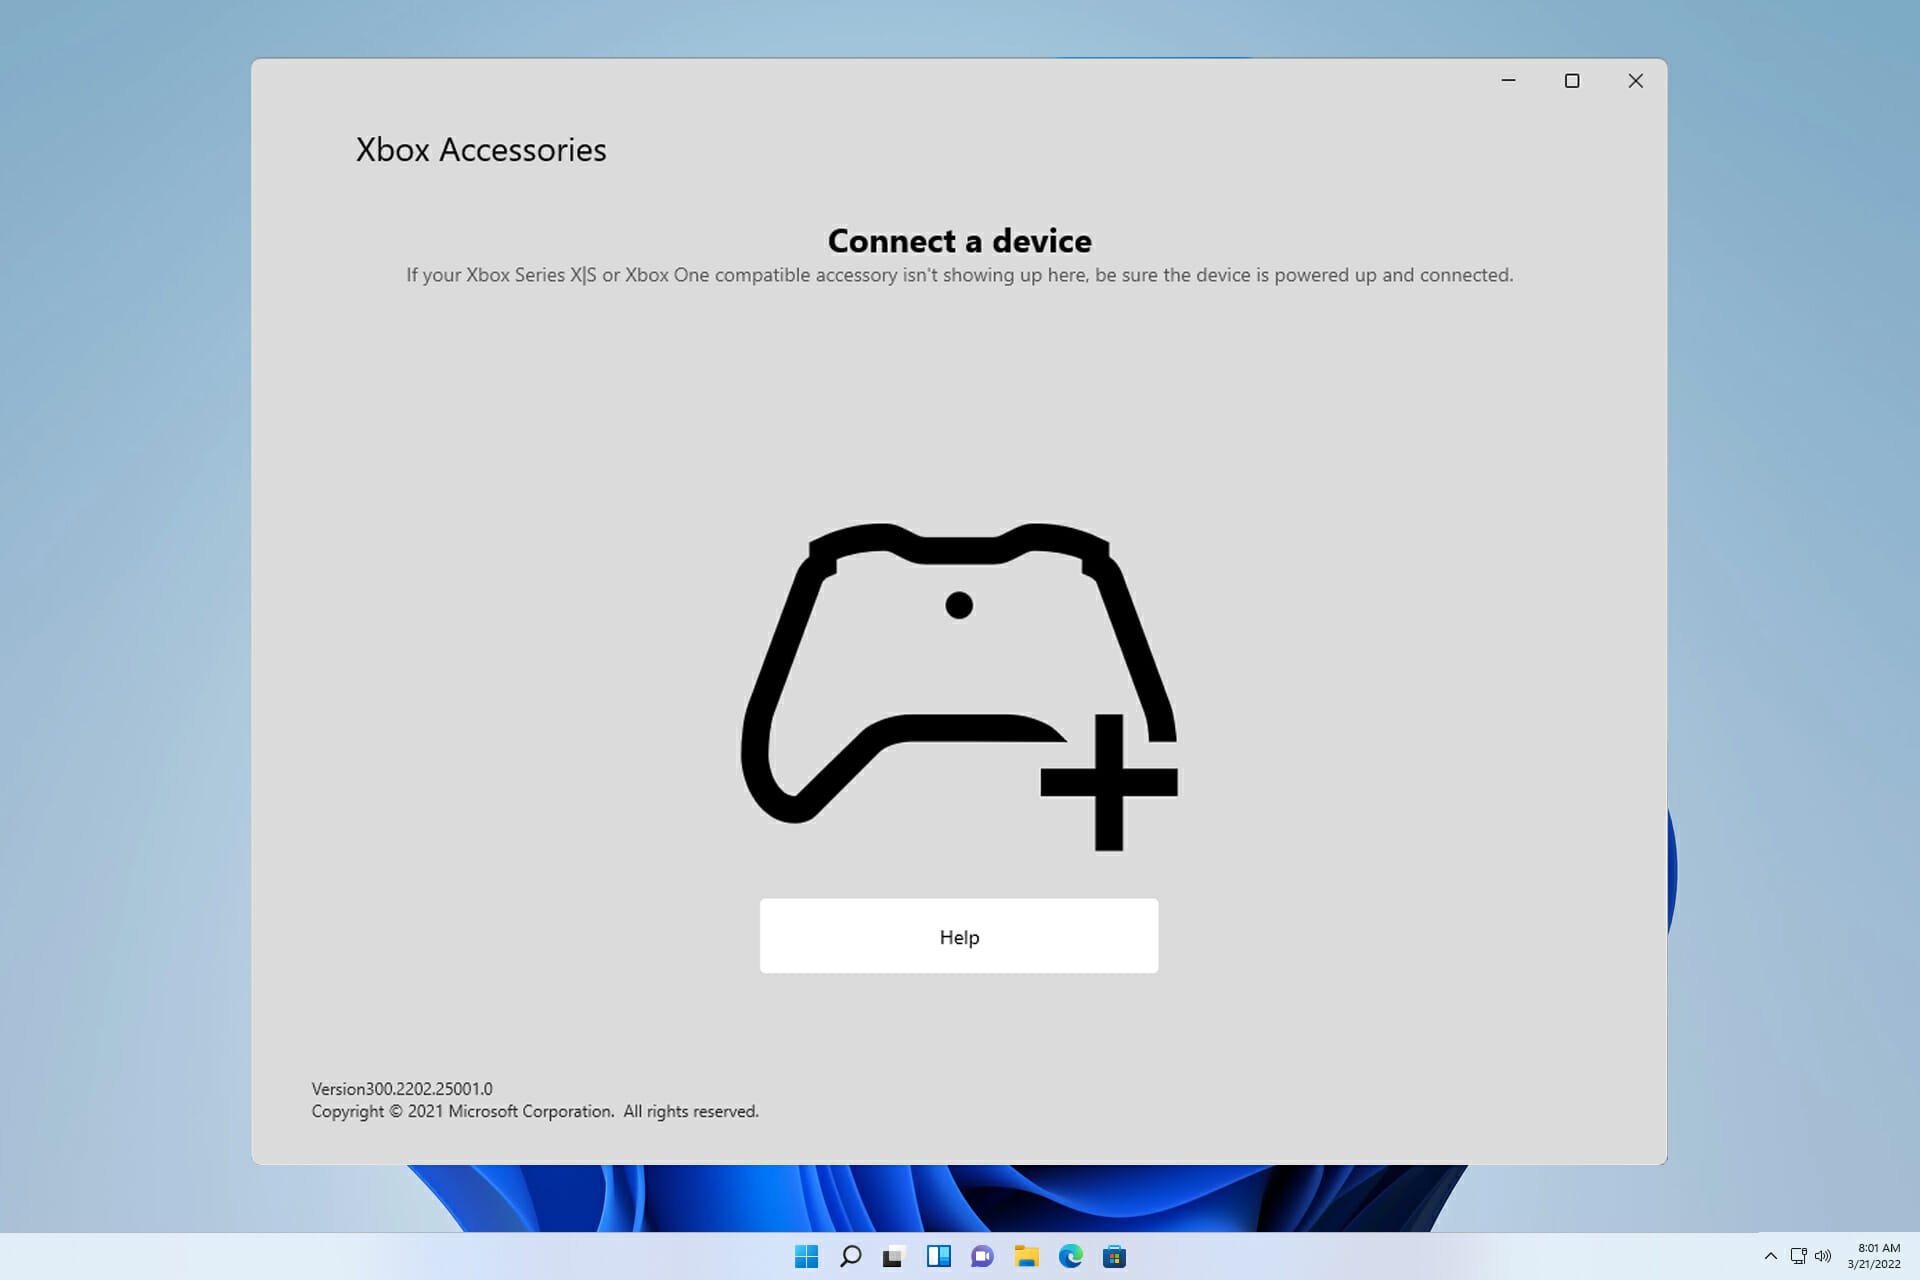
3. Use the Xbox Accessories app
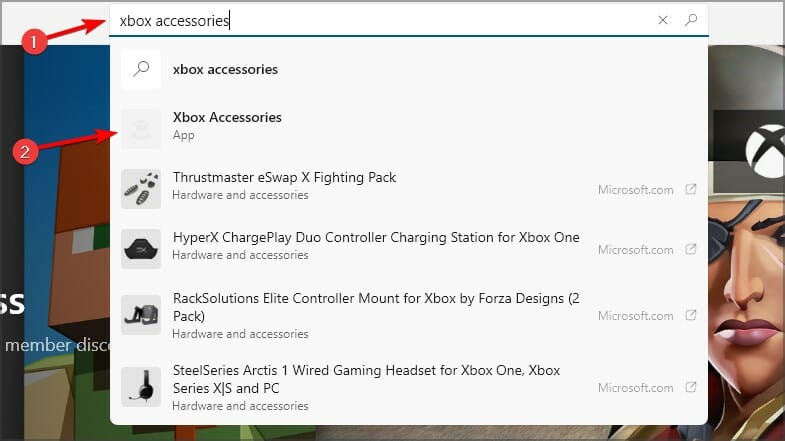
- Open Microsoft Store on your PC.
- Search for Xbox Accessories. Select Xbox Accessories from the list of results.

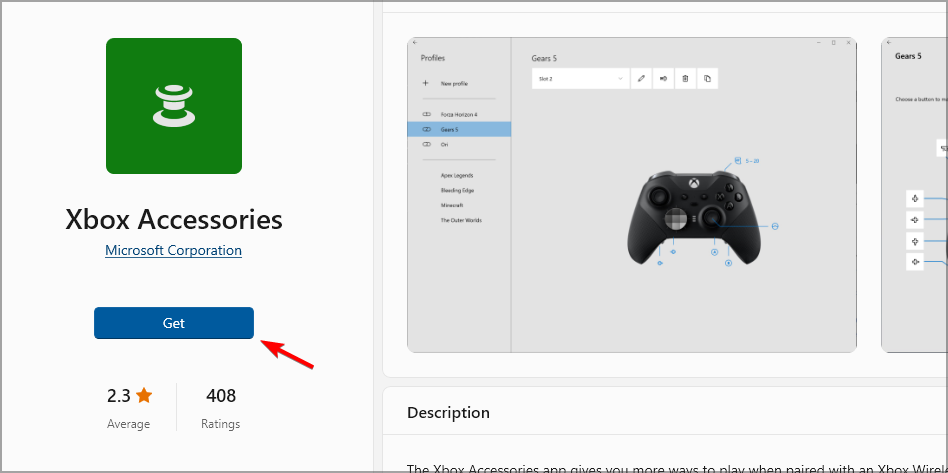
- Click Get and wait for the app to download.

- Plugin your Xbox One controller to your Windows 10 or 11 PC using the USB cable, and start the app.
- The Xbox Accessories app will detect your controller.
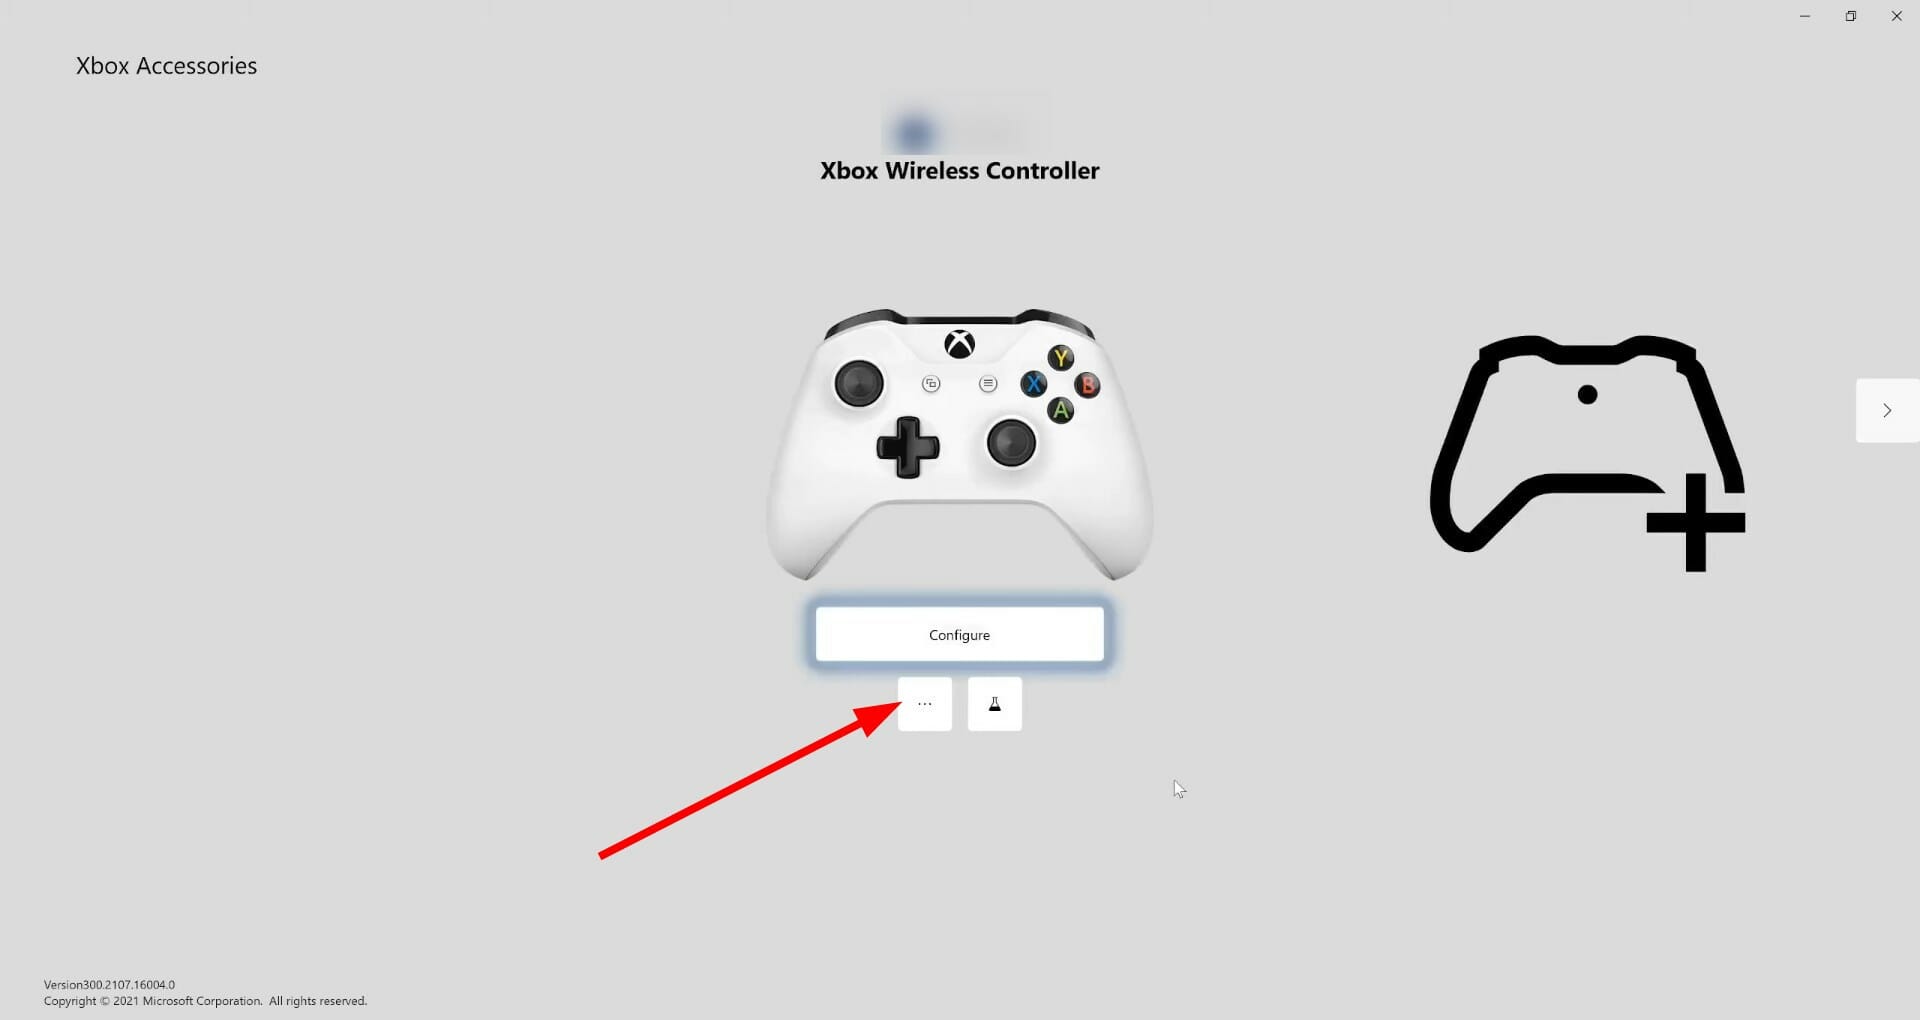
- Press the 3-dot icon below the Configure button on the Xbox Accessories home page.

- If a new update is available, you will see the Update required button. For some users, even though the update is available, the app says No update available. But you need to click on it continuously to force the app to check for updates.
- Click Continue.
- The Xbox Accessories app will begin the update process.
- Once the process is complete, you will see a green tick mark above your controller’s image.
- Click Next.

This is a simple solution, and it will help you update Xbox One controller Bluetooth driver on Windows 10 and 11.
- What are the R1 and L1 Buttons on Your Xbox Controller?
- FIX: Xbox controller goes to player 2 on PC
- Fix: Windows Wireless Service is Not Running on This Computer
Using the above methods, you can easily install the latest Xbox One controller drivers on your Windows 10 or Windows 11 PC.
We have to mention that sometimes you can encounter a problem while connecting your Xbox controller, but we covered this issue in our Xbox controller not recognized on Windows 11 guide.
Let us know in the comments section below which one of the above-mentioned methods you followed to update the firmware of your Xbox One controller on your Windows PC.
![]()
Newsletter
Keep your controller up to date with the newest updates
by Sagar Naresh
Sagar is a web developer and technology journalist. Currently associated with WindowsReport and SamMobile. When not writing, he is either at the gym sweating it out or playing… read more
Updated on October 24, 2022
Reviewed by
Vlad Turiceanu
Passionate about technology, Windows, and everything that has a power button, he spent most of his time developing new skills and learning more about the tech world. Coming… read more
- You can update your Xbox One controller drivers automatically on Windows 10 by using the built-in solutions.
- Keeping the firmware of your Xbox One controller is highly advised as it will prevent issues such as lag, freeze, or stutter during gameplay.
- The process is almost identical on both Windows 11 and Windows 10 due to their many similarities.
XINSTALL BY CLICKING THE DOWNLOAD FILE
This software will keep your drivers up and running, thus keeping you safe from common computer errors and hardware failure. Check all your drivers now in 3 easy steps:
- Download DriverFix (verified download file).
- Click Start Scan to find all problematic drivers.
- Click Update Drivers to get new versions and avoid system malfunctionings.
- DriverFix has been downloaded by 0 readers this month.
Keeping your controller up to date is important, and speaking of which, it’s important to know how to update Xbox One controller drivers on Windows.
However, imagine a scenario where you connect your Xbox controller to your Windows 10 or Windows 11 PC, only to find out there’s an Xbox controller driver error.
This is where this guide comes into the picture. Because in this post, we will be explaining to you how you can install the latest Xbox One controller drivers on Windows 10 or Windows 11. Let us check out the guide.
Does Windows 10/11 have Xbox One controller drivers?
To answer this, in short, is that neither Windows 10 nor 11 comes pre-installed with Xbox One or Xbox controller drivers, for that matter.
However, as soon as you plug in your Xbox One or any other Xbox controller, Windows 10/11 OS will automatically detect the device and install compatible drivers.
This negates the need to install drivers for your Xbox One controller separately on your Windows 10 or 11 PCs.
But just like every other Windows problem, there are several user reports claiming that their Windows 11 PC did not recognize the Xbox controller when connected.
Fortunately, we have a comprehensive guide on how you can fix the Xbox controller not recognized in Windows 11, which would possibly help you fix the problem.
Windows 10 users are no different, and they have been complaining about this issue for quite some time. Don’t worry as this guide has you covered.
How can I update my Xbox One controller drivers on Windows 10 & 11?
1. Via Device Manager
1.1 Update your controller driver on Windows 11
- Connect your Xbox One controller to your PC with a USB cable.
- Press the Win + X buttons to open the Device Manager.
- Expand the Microsoft Xbox One Controller category.
- Right-click on it and select Update driver.
- Click on the Search automatically for updated drivers.
- Your system will look for the updated drivers, and if it detects one, it will prompt you to update.
- Restart the PC.
2. Update your controller driver on Windows 10
1. Make sure your controller is connected with a USB cable.
2. Press Windows key + X and select Device Manager from the menu that opens.
Some PC issues are hard to tackle, especially when it comes to corrupted repositories or missing Windows files. If you are having troubles fixing an error, your system may be partially broken.
We recommend installing Restoro, a tool that will scan your machine and identify what the fault is.
Click here to download and start repairing.
3. Locate your Xbox controller in the list, right-click it and choose Update driver.
4. Select Search automatically for drivers.
5. Wait while Windows downloads the appropriate driver for your Xbox One controller.
The easiest way to update your Xbox One Controller driver on a Windows 10 PC is via the built-in Device Manager tool.
You need to connect your controller to your PC via USB, and then configure Device Manager to automatically look for drivers for it.
Using the above steps to look for updated drivers via the Device Manager is one of the easiest ways to update your Xbox One wired controller driver on Windows 10 or 11.
2. Use dedicated software
- Download and install DriverFix.
- Launch DriverFix software.
- The software will perform an initial analysis of your PC.
- Select all the drivers to update or fix. In our case, it is the Xbox One controller driver.
- Wait for DriverFix to download the selected drivers for you.
- Click on Install Driver.
- Follow the driver’s installation instructions.
- Reboot your PC for the changes to take effect.
DriverFix is a one-stop solution for all your driver-related needs. It not only lets you keep all of your drivers on your Windows PC up to date, but also helps you with multiple other scenarios.
You can use this trusted third-party tool to fix faulty or broken drivers, locate missing drivers, perform driver backups, schedule scans, and much more. For more information, you can check out our dedicated DriverFix review.
3. Use the Xbox Accessories app
- Open Microsoft Store on your PC.
- Search for Xbox Accessories. Select Xbox Accessories from the list of results.
- Click Get and wait for the app to download.
- Plugin your Xbox One controller to your Windows 10 or 11 PC using the USB cable, and start the app.
- The Xbox Accessories app will detect your controller.
- Press the 3-dot icon below the Configure button on the Xbox Accessories home page.
- If a new update is available, you will see the Update required button. For some users, even though the update is available, the app says No update available. But you need to click on it continuously to force the app to check for updates.
- Click Continue.
- The Xbox Accessories app will begin the update process.
- Once the process is complete, you will see a green tick mark above your controller’s image.
- Click Next.
This is a simple solution, and it will help you update Xbox One controller Bluetooth driver on Windows 10 and 11.
- What are the R1 and L1 Buttons on Your Xbox Controller?
- FIX: Xbox controller goes to player 2 on PC
- Fix: Windows Wireless Service is Not Running on This Computer
- Brusbsib.sys Incompatible Driver: How to Fix This Error
- How to Make Sticky Notes Stay on Top in Windows 11
Using the above methods, you can easily install the latest Xbox One controller drivers on your Windows 10 or Windows 11 PC.
We have to mention that sometimes you can encounter a problem while connecting your Xbox controller, but we covered this issue in our Xbox controller not recognized on Windows 11 guide.
Let us know in the comments section below which one of the above-mentioned methods you followed to update the firmware of your Xbox One controller on your Windows PC.
![]()
Newsletter
Xbox One controllers use something called firmware, which is a special kind of software that’s designed to run on hardware devices. Microsoft makes changes to this firmware every so often, which is why your Xbox One controller sometimes needs to be updated.
You can update Xbox One controller firmware with an Xbox One or a Windows 10 PC, and you can do it through a wireless connection or with a micro USB cable. The process doesn’t take very long, and it can take care of a lot of annoying problems like dropped connections.
How to Update an Xbox One Controller Wirelessly
Xbox One controllers are designed to connect to the Xbox One console through a wireless connection, and most of them are capable of receiving updates wirelessly as well. Some older Xbox One controllers can only be updated over a wired USB connection.
If you aren’t sure which type of controller you have, check the part of the controller that points toward you when you’re holding it.
If you see a small circular jack that’s designed for use with a headset or headphones, you can update your controller wirelessly. If you don’t see this jack, then you have an older controller that needs to be updated through a wired USB connection.
Here’s how to update an Xbox One controller wirelessly:
-
Turn on your Xbox One, and sign in to Xbox Network.
If you have a stereo headset adapter for your Xbox one controller, plug it in at this time so that it will also receive any available updates. You also need to have a headset plugged into the adapter for it to turn on and receive updates.
-
Press the Xbox button on your controller to open the guide.
-
Navigate to System > Settings.
-
Navigate to Kinect & devices > Devices & accessories.
-
Select … (three dots) to access more options.
-
Select the box that says Firmware version, followed by a version number.
If this box says no update available, your controller is up to date already.
-
Select Update now.
Make sure you have fully charged batteries in your controller. If your batteries are low, either replace them or connect the controller via USB before proceeding.
-
Wait for the update process to finish.
-
Select Close.
-
Your controller is now done updating.
How to Update an Xbox One Controller With USB
In some cases, you may find that your Xbox One controller fails to update via the normal wireless connection. When this happens, you can perform the update by connecting your controller to your Xbox One with a micro USB cable.
This process is exactly the same as updating your controller over a wireless connection, but it’s designed to initiate automatically when you connect a controller that’s in need of an update with a USB cable.
If the process doesn’t initiate automatically, you can proceed with a manual update, which works the same as the wireless updating process that was outlined in the previous section.
Here’s how updating an Xbox One controller through a USB connection works:
-
Turn your Xbox One on, and sign in to Xbox Network.
-
If you have a stereo headset adapter, plug it into the controller.
-
Connect your controller to your Xbox One with a micro USB cable.
If the update starts automatically, follow the on-screen prompts to complete the process. If it doesn’t start automatically, you will need to get it started manually using the same basic process that’s used to update a wireless controller.
-
Press the Xbox button on your controller to open the guide.
-
Navigate to System > Settings.
-
Navigate to Kinect & devices > Devices & accessories.
-
Select … (three dots) to access more options.
-
Select the Firmware version box.
-
Select Update now.
-
Wait for the update to complete.
Do not unplug the USB cable during this process.
-
Select Close.
-
Your controller is done updating.
How to Update an Xbox One Controller With a Windows 10 PC
The Xbox One controller is designed to work with Windows 10, which means you can connect your controller to any Windows 10 computer with a USB cable, Bluetooth, or the Xbox Wireless Adapter for Windows.
Due to the Xbox One controller being designed for use with Windows 10 in addition to the Xbox One, these controllers can also be updated using any Windows 10 computer.
You can only update your Xbox One controller using your computer if you have Windows 10.
Here’s how to update an Xbox One controller using your Windows 10 computer:
-
Download and install the Xbox Accessories app from Microsoft.
-
Launch the Xbox Accessories app.
-
Connect your Xbox One controller to your computer using a USB cable.
If you have the Xbox Wireless Adapter for Windows, you can connect using that. However, using a USB cable is less prone to failure and other issues.
-
If your controller requires a mandatory update, you will see a message to that effect as soon as you connect it.
-
If you don’t see an automatic message, click … (three dots) to access more options.
-
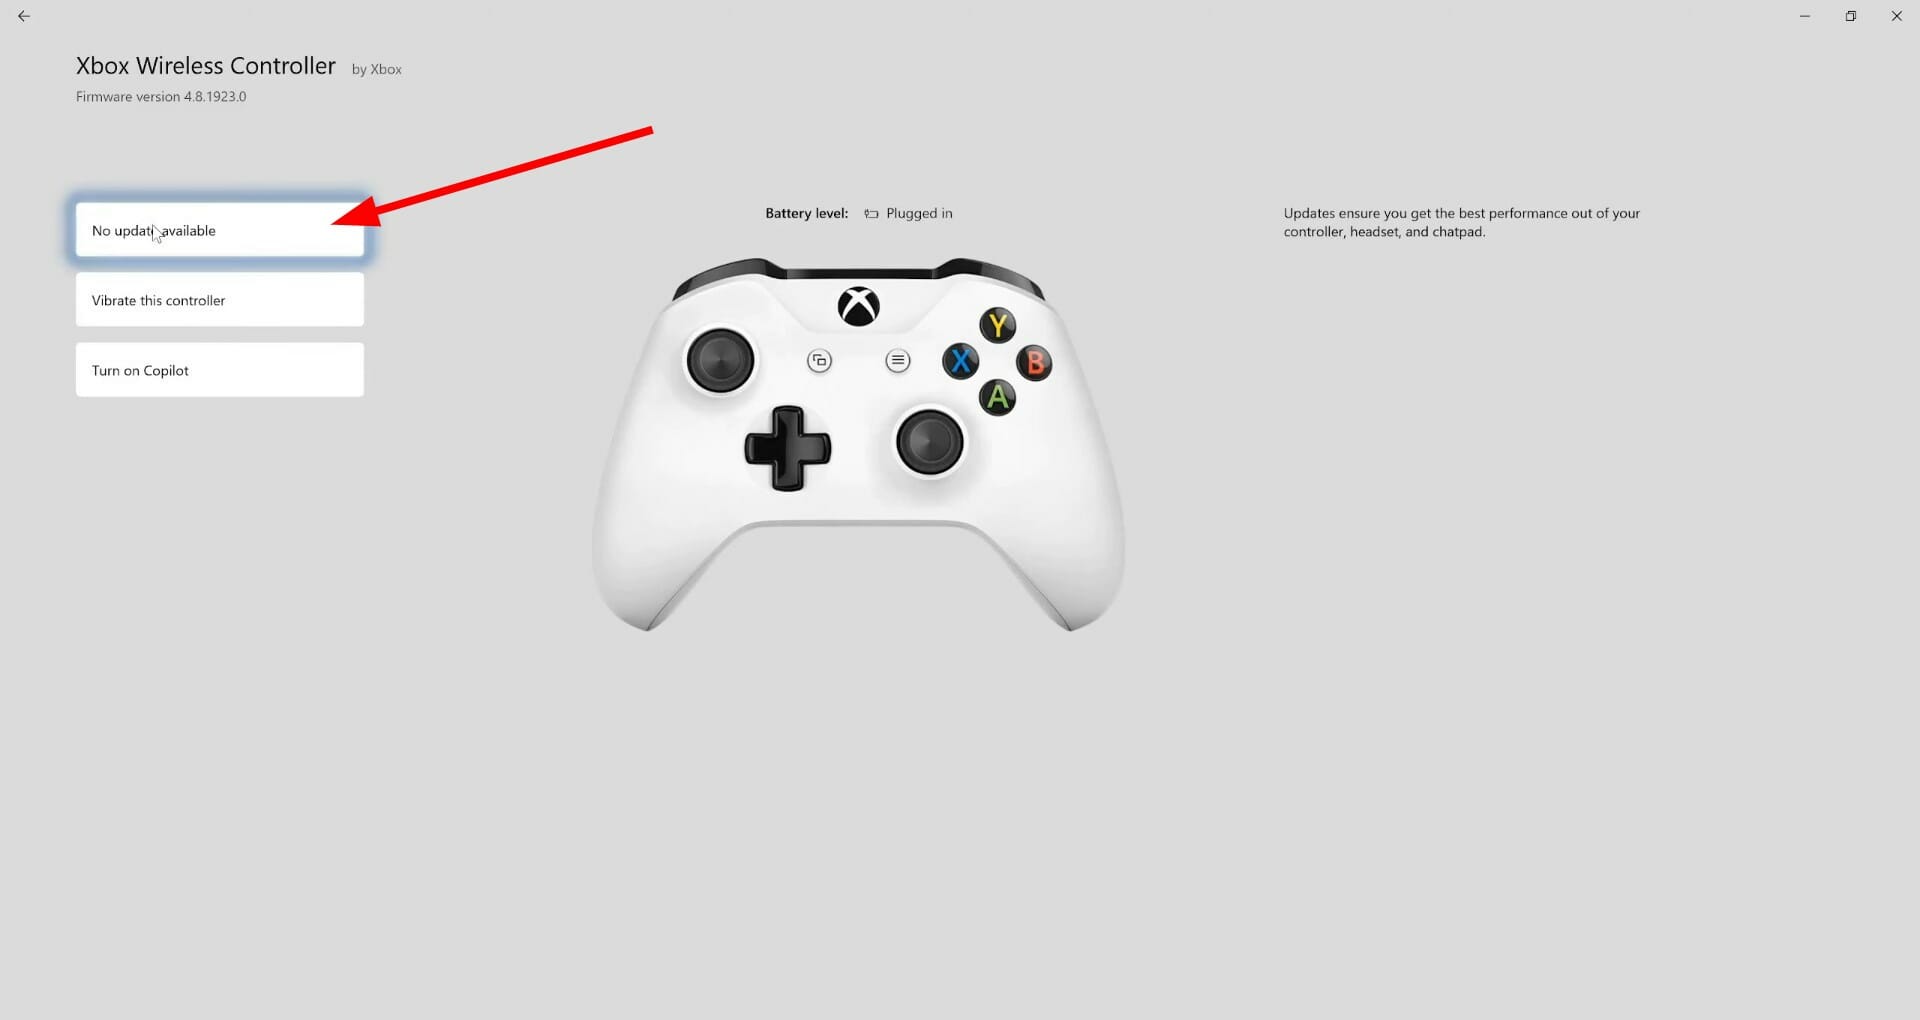
Click the box that says Firmware version followed by a number.
If this box says No update available, your controller is already up to date.
-
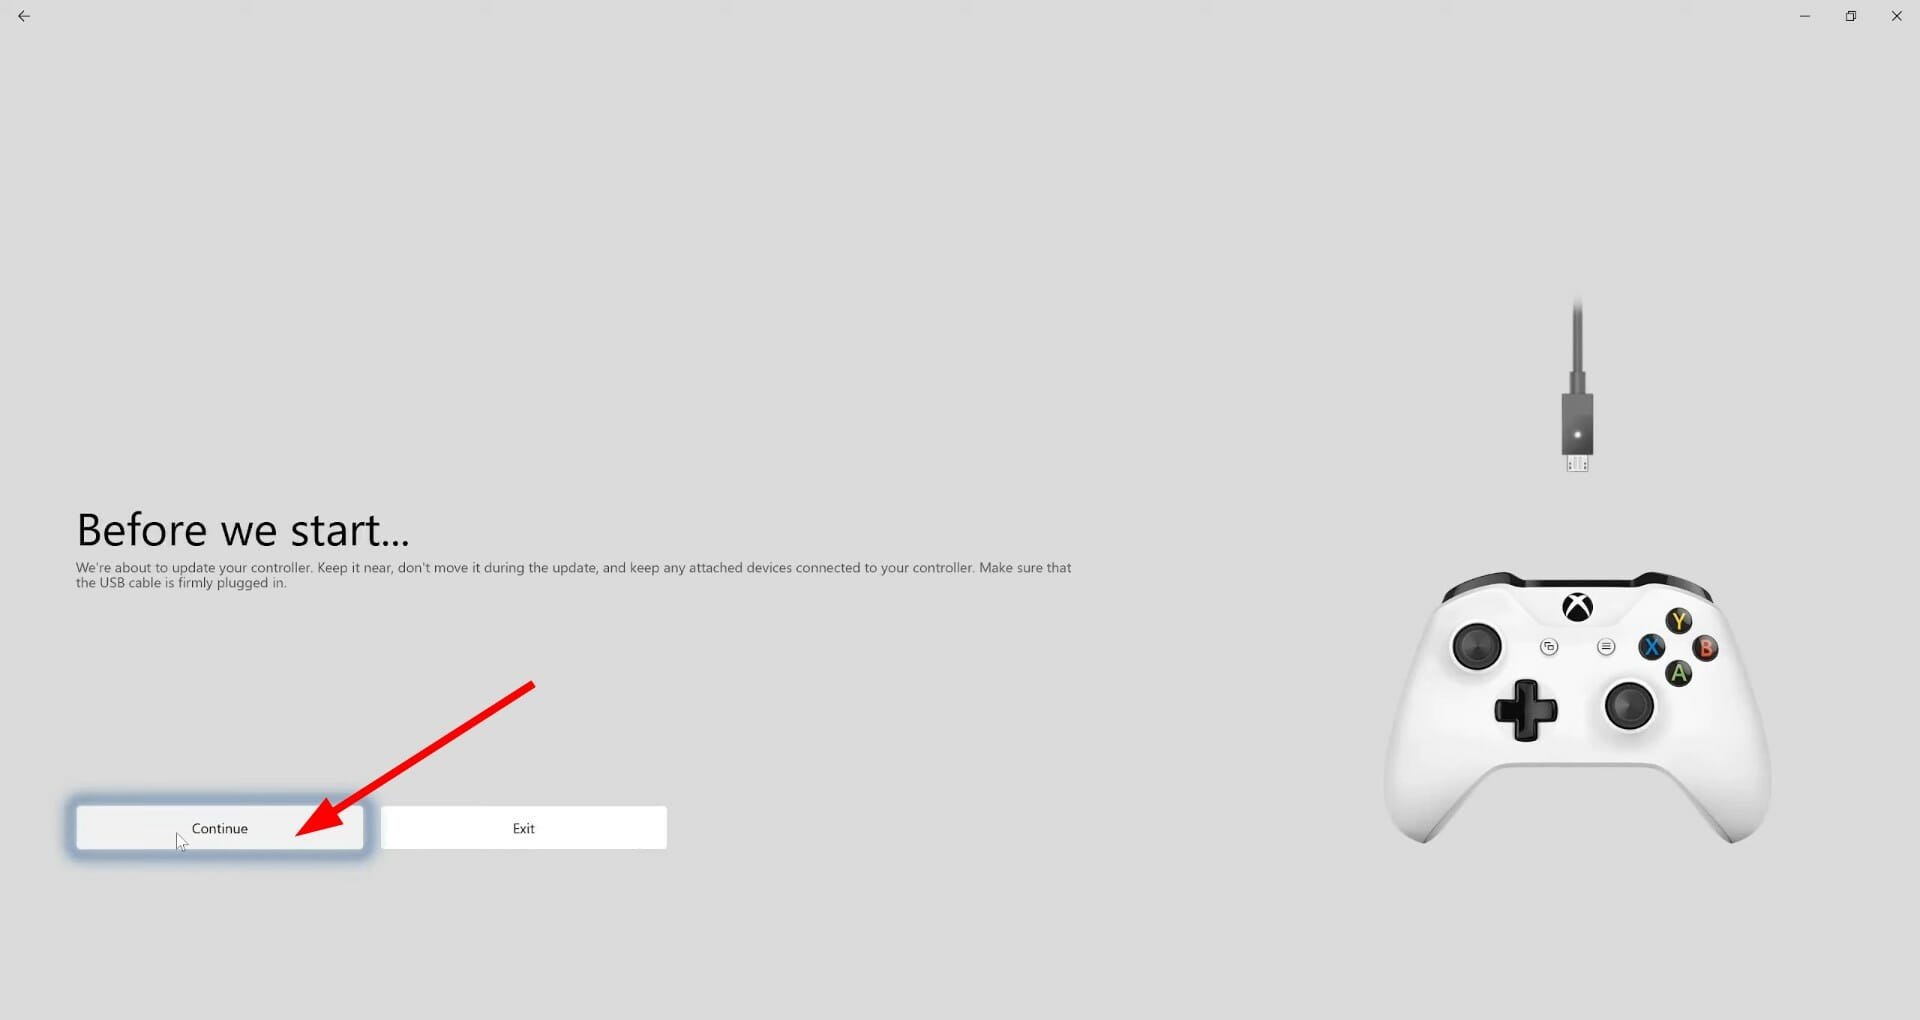
Click Continue.
-
Wait for the process to complete.
Do not disconnect the USB cable during this process.
-
Click Close.
-
Your controller is now updated.
How to Update Your Xbox One Console
Before you can update your Xbox One controller, you Xbox One console may need to be updated. Most Xbox One consoles are set to update automatically, but if yours isn’t, or an issue like an internet or power outage interrupted an update, you’ll have to do it manually.
Here’s how to update your Xbox One console manually:
-
Turn on your Xbox One, and make sure it’s connected to the internet.
-
Press the Xbox button on your controller to open the guide.
-
Navigate to System > Settings.
-
Navigate to System > Updates & downloads.
-
Select Update available.
If you see No update available, then your console is already up to date.
-
Wait for your console to finish updating.
-
Once your console has finished updating, you can try updating your controller again.
Thanks for letting us know!
Get the Latest Tech News Delivered Every Day
Subscribe
Xbox One controllers use something called firmware, which is a special kind of software that’s designed to run on hardware devices. Microsoft makes changes to this firmware every so often, which is why your Xbox One controller sometimes needs to be updated.
You can update Xbox One controller firmware with an Xbox One or a Windows 10 PC, and you can do it through a wireless connection or with a micro USB cable. The process doesn’t take very long, and it can take care of a lot of annoying problems like dropped connections.
How to Update an Xbox One Controller Wirelessly
Xbox One controllers are designed to connect to the Xbox One console through a wireless connection, and most of them are capable of receiving updates wirelessly as well. Some older Xbox One controllers can only be updated over a wired USB connection.
If you aren’t sure which type of controller you have, check the part of the controller that points toward you when you’re holding it.
If you see a small circular jack that’s designed for use with a headset or headphones, you can update your controller wirelessly. If you don’t see this jack, then you have an older controller that needs to be updated through a wired USB connection.
Here’s how to update an Xbox One controller wirelessly:
-
Turn on your Xbox One, and sign in to Xbox Network.
If you have a stereo headset adapter for your Xbox one controller, plug it in at this time so that it will also receive any available updates. You also need to have a headset plugged into the adapter for it to turn on and receive updates.
-
Press the Xbox button on your controller to open the guide.
-
Navigate to System > Settings.
-
Navigate to Kinect & devices > Devices & accessories.
-
Select … (three dots) to access more options.
-
Select the box that says Firmware version, followed by a version number.
If this box says no update available, your controller is up to date already.
-
Select Update now.
Make sure you have fully charged batteries in your controller. If your batteries are low, either replace them or connect the controller via USB before proceeding.
-
Wait for the update process to finish.
-
Select Close.
-
Your controller is now done updating.
How to Update an Xbox One Controller With USB
In some cases, you may find that your Xbox One controller fails to update via the normal wireless connection. When this happens, you can perform the update by connecting your controller to your Xbox One with a micro USB cable.
This process is exactly the same as updating your controller over a wireless connection, but it’s designed to initiate automatically when you connect a controller that’s in need of an update with a USB cable.
If the process doesn’t initiate automatically, you can proceed with a manual update, which works the same as the wireless updating process that was outlined in the previous section.
Here’s how updating an Xbox One controller through a USB connection works:
-
Turn your Xbox One on, and sign in to Xbox Network.
-
If you have a stereo headset adapter, plug it into the controller.
-
Connect your controller to your Xbox One with a micro USB cable.
If the update starts automatically, follow the on-screen prompts to complete the process. If it doesn’t start automatically, you will need to get it started manually using the same basic process that’s used to update a wireless controller.
-
Press the Xbox button on your controller to open the guide.
-
Navigate to System > Settings.
-
Navigate to Kinect & devices > Devices & accessories.
-
Select … (three dots) to access more options.
-
Select the Firmware version box.
-
Select Update now.
-
Wait for the update to complete.
Do not unplug the USB cable during this process.
-
Select Close.
-
Your controller is done updating.
How to Update an Xbox One Controller With a Windows 10 PC
The Xbox One controller is designed to work with Windows 10, which means you can connect your controller to any Windows 10 computer with a USB cable, Bluetooth, or the Xbox Wireless Adapter for Windows.
Due to the Xbox One controller being designed for use with Windows 10 in addition to the Xbox One, these controllers can also be updated using any Windows 10 computer.
You can only update your Xbox One controller using your computer if you have Windows 10.
Here’s how to update an Xbox One controller using your Windows 10 computer:
-
Download and install the Xbox Accessories app from Microsoft.
-
Launch the Xbox Accessories app.
-
Connect your Xbox One controller to your computer using a USB cable.
If you have the Xbox Wireless Adapter for Windows, you can connect using that. However, using a USB cable is less prone to failure and other issues.
-
If your controller requires a mandatory update, you will see a message to that effect as soon as you connect it.
-
If you don’t see an automatic message, click … (three dots) to access more options.
-
Click the box that says Firmware version followed by a number.
If this box says No update available, your controller is already up to date.
-
Click Continue.
-
Wait for the process to complete.
Do not disconnect the USB cable during this process.
-
Click Close.
-
Your controller is now updated.
How to Update Your Xbox One Console
Before you can update your Xbox One controller, you Xbox One console may need to be updated. Most Xbox One consoles are set to update automatically, but if yours isn’t, or an issue like an internet or power outage interrupted an update, you’ll have to do it manually.
Here’s how to update your Xbox One console manually:
-
Turn on your Xbox One, and make sure it’s connected to the internet.
-
Press the Xbox button on your controller to open the guide.
-
Navigate to System > Settings.
-
Navigate to System > Updates & downloads.
-
Select Update available.
If you see No update available, then your console is already up to date.
-
Wait for your console to finish updating.
-
Once your console has finished updating, you can try updating your controller again.
Thanks for letting us know!
Get the Latest Tech News Delivered Every Day
Subscribe
Контроллер Xbox One является одним из лучших, которые мы видели за очень долгое время. Скорее всего, это лучший контроллер на рынке на сегодняшний день. Он поставляется с совершенно новым дизайном от версии для Xbox 360 и имеет возможность получать обновления, чтобы сделать его еще лучше. Теперь, не все могут поверить, что контроллер когда-либо требует обновлений, но мы просим отличаться Обновления могут повысить удобство использования контроллера для лучшей работы с самим Xbox One.
Как обновить контроллер Xbox One
Когда дело доходит до обновления контроллера Xbox One, это довольно легко. Просто подключите его к Xbox One и наблюдайте, как происходит волшебство. Имейте в виду, что, несмотря на наличие беспроводного контроллера, его все равно необходимо подключить для получения обновлений.
Но что, если что-то не так с вашим Xbox One или у вас нет настроения включить его по какой-либо причине. Как тогда обновить контроллер вручную? Это довольно просто, если поблизости есть компьютер с Windows 10.
Да, контроллер Xbox One можно использовать в Windows 10 для игр на ПК, но его также можно обновлять через ПК.
Давайте поговорим о том, как это сделать
Во-первых, вам нужно открыть Магазин Windows и загрузить приложение Xbox Accessories . Беспроводной контроллер Xbox Elite и приложение Xbox Accessories предоставят вам неограниченные возможности для игры. После установки подключите контроллер Xbox One к компьютеру под управлением Windows 10 через USB и включите его.
Чтобы проверить наличие обновлений вручную, откройте «Настройки»> «Устройство и аксессуары»> «Выберите контроллер» и выберите «Обновить».
Если доступно обновление, вы увидите нужную кнопку Обновить , просто нажмите на нее и следуйте указаниям мастера. Приложение начнет устанавливать обновление, поэтому откиньтесь на спинку кресла и дождитесь его завершения.

Если кнопки Update нет, то это просто означает, что на контроллере установлено последнее обновление, и это нормально.
После завершения обновления вы увидите кнопку контроллера Обновить другой или Настроить .
Нам нравится то, что Microsoft здесь сделала, просто жаль, что Windows 8 и Windows 7 не поддерживаются, поэтому людям без Windows 10 придется каким-то образом получить операционную систему, если они захотят обновить прошивку контроллера Xbox One.
В конце концов, это хороший способ обновить контроллер, когда Xbox One недоступен. Вы можете скачать приложение Xbox Accessories прямо здесь, в Магазине Windows.

Беспроводной геймпад Microsoft (для Xbox Series X | S) легко обновить с помощью ПК с Windows 10. Вам просто нужно загрузить приложение Microsoft, подключить контроллер и следовать инструкциям на экране. Вот как это сделать.
Беспроводной геймпад Xbox — это контроллер, который поставляется с консолями Xbox Series X и Series S, но он также работает с ПК с Windows, устройствами Apple и т. Д. Microsoft регулярно выпускает обновления прошивки, которые улучшают производительность контроллера или устраняют проблемы совместимости со Steam, телефонами Android, Apple TV и iPhone. Поэтому, если у вас возникла проблема с вашим контроллером Xbox, обновление программного обеспечения может решить ее.
Как обновить беспроводной геймпад Xbox через ПК
Поскольку вы можете приобрести беспроводной геймпад Xbox отдельно и использовать его со своим смартфоном или ПК, вы также можете использовать компьютер с Windows 10 для его обновления.
Для этого запустите свой компьютер с Windows и загрузите Аксессуары Xbox приложение из Microsoft Store.
После загрузки запустите приложение и подключите беспроводной геймпад Xbox к компьютеру, используя порт USB, расположенный между кнопками LB и RB. Для этого вам понадобится кабель USB Type-C.
После подключения приложение Xbox Accessories обнаружит контроллер. Если прошивка внутри контроллера не последней версии, вы увидите кнопку «Требуется обновление» под изображением контроллера на вашем экране. Щелкните это.
Затем вы увидите предупреждение с просьбой убедиться, что контроллер подключен правильно, и предупреждение не перемещать устройство во время обновления. Прочитав его и выполнив инструкции, нажмите «Продолжить».
Приложение Xbox Accessories начнет загрузку и установку обновления.
Как только это будет сделано, вы увидите зеленую галочку над фотографией контроллера. Нажмите «Далее.»
Это оно! Теперь ваш контроллер обновлен.
Теперь, когда вы узнали, как обновить беспроводной геймпад Xbox с помощью ПК, возможно, вам понравится читать о том, как подключить его сразу к нескольким устройствам. Повеселись!
Многие спрашивают «Как обновить прошивку геймпада Xbox One»? Если вы пользователь Windows 10, тогда для вас есть простой и быстрый способ это сделать. В этой статье я покажу, как обновить прошивку контроллера Xbox One с помощью компьютера с Windows 10.
Обновления прошивки могут помочь улучшить производительность геймпада и исправить существующие проблемы. Но к сожалению в Windows 10 нет встроенного механизма, позволяющего узнать, доступна ли новая прошивка.
Как обновить прошивку геймпада Xbox One?
Описанный в статье метод будет полезен владельцам Xbox, которые хотят проверять наличие обновлений прошивки контроллера, находясь вдали от своей консоли. Чтобы проверить наличие обновлений прошивки, вам необходимо установить приложение Аксессуары Xbox (Xbox Accessories).
Для этого перейдите на страницу приложения в магазине Microsoft Store и нажмите «Получить (Get)», чтобы начать загрузку. После чего запустите приложение.

Убедитесь, что ваш геймпад подключен к вашему компьютеру. На самом деле подойдет любой способ подключения — USB, беспроводной адаптер или Bluetooth для современных версий оборудования контроллера Xbox. Но для обновления прошивки всегда лучше использовать кабель USB — это намного безопаснее.
После подключения контроллера нажмите кнопку «…» на главном экране приложения Аксессуары Xbox.

Это позволяет вам просмотреть состояние вашего гейпада, включая уровень заряда батареи и текущую версию прошивки. Если доступно обновление прошивки, вы увидите подробности в левом верхнем углу экрана.

Нажмите кнопку «Обновить сейчас (Update now)», чтобы начать процесс обновления прошивки, внимательно следуя инструкциям.
Не используйте контроллер во время обновления!
После завершения процесса вы вернетесь к экрану состояния, на котором должна отображаться новая версия прошивки. Если у вас уже установлена последняя версия прошивки, вы все равно можете нажать кнопку «Версия прошивки» и снова «обновить».

Это может понадобиться для устранения неполадок связанных с прошивкой в случае, если ваш контроллер работает со сбоями.
РЕКОМЕНДУЕМ:
Как изменить настройки DNS на Xbox One
Странно, что Microsoft заставляет пользователей устанавливать дополнительный софт в виде отдельного приложения Аксессуары Xbox. В идеале обновление прошивки должно быть встроенной функцией Windows 10.

 (10 оценок, среднее: 4,30 из 5)
![]() Загрузка…
Загрузка…