Introduction
Node.js is an open-source JavaScript runtime environment. Since Node.js has an active community of users, minor updates of the software come out every few weeks.
You may be using Node.js as a layer of the MEAN stack or in a different JS framework. Either way, make sure to update Node.js regularly to ensure system security.
There are several ways to install Node.js and NPM. Likewise, there are several ways to update your Node.js version, depending on the operating system running on your machine.
In this article, you will learn how to update to the latest Node.js version on Linux, Windows, and macOS.
3 Ways to Update Node.js to Latest Version on Linux Systems
There are different ways to update Node.js if you are using a Linux-based system. Although using the Node Version Manager is the easiest and most recommended option, you can also update with the local package manager or by downloading the binary packages.
Option 1: Update Node.js with NVM (Node Version Manager)
The best way to upgrade Node.js is with NVM, a practical tool for managing multiple Node.js versions.
1. Start by updating the package repository with the command:
sudo apt update2. Install NVM using the curl command:
curl -o- https://raw.githubusercontent.com/nvm-sh/nvm/v0.38.0/install.sh | bashNote: If you don’t have curl, install the utility by running the command: sudo apt install curl.
Alternatively, you use wget and run the command:
wget -q0- https://raw.githubusercontent.com/nvm-sh/nvm/v0.38.0/install.sh | bash3. Close and reopen the terminal for system to recognize the changes or run the command:
source ~/.bashrc5. Then, verify if you have successfully installed NVM:
nvm --version6. Before upgrading Node.js, check which version you have running on the system:
nvm ls7. Now you can check for newly available releases with:
nvm ls-remote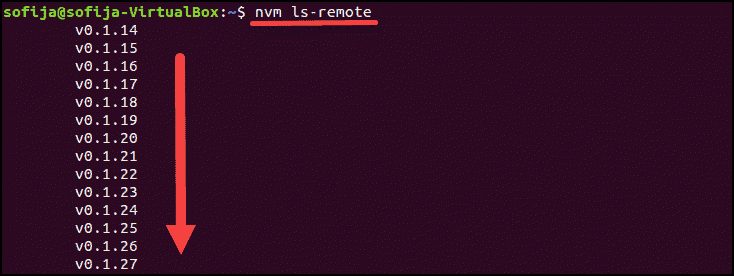
8. To install the latest version, use the nvm command with the specific Node.js version:
nvm install [version.number]Option 2: Update Node.js with NPM (Node Package Manager)
As an alternative, you can use Node’s official package manager to update Node.js. NPM is a tool for installing and managing package dependencies.
If you have Node on your system, you have NPM, as well. With the npm command, you can check running Node.js versions and install the latest release.
By adding the n module, you can interactively manage Node.js versions.
1. First, clear the npm cache:
npm cache clean -f
2. Install n, Node’s version manager:
npm install -g n
3. With the n module installed, you can use it to:
Install the latest stable version:
sudo n stable
Note: Some Ubuntu distros may respond with the command not found output after running the n command. To fix this issue run sudo -E env "PATH=$PATH" [command]. For example, to install the latest stable version, as in the example above, you would run sudo -E env "PATH=$PATH" n stable.
Install the latest release:
sudo n latest
Install a specific version:
sudo n [version.number]
Option 3: Update Node.js with Binary Packages
Updating Node.js with binary packages is the least recommended option. However, if it is the only way you can upgrade to the latest Node.js version, follow the steps outlined below.
1. Navigate to Node’s official downloads page where you can find all available packages. There you can download the source code or pre-built installer for the LTS versions or the latest release.
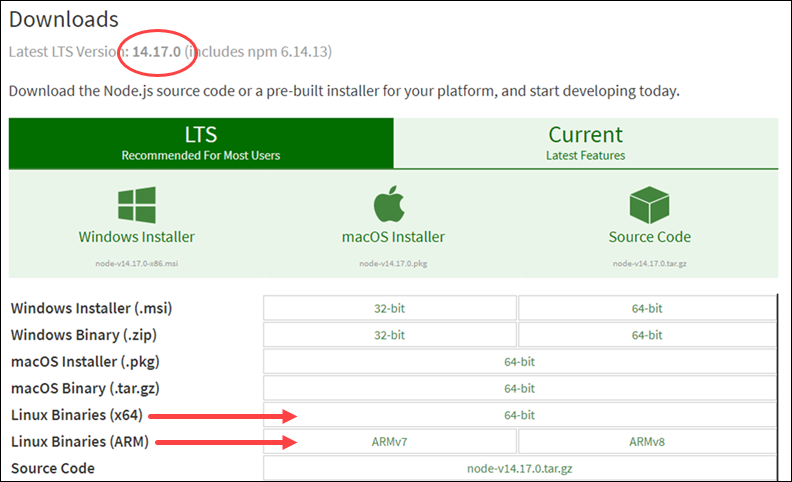
2. You can either download the package from your browser or find the version number you need and add it to the wget command:
wget https://nodejs.org/dist/v14.17.0/node-v14.17.0-linux-x64.tar.xz3. Next, install xz-utils used to extract the binary package:
sudo apt-get install xz-utils4. Extract and install the package with the command:
sudo tar -C /usr/local --strip-components 1 -xJf node-v14.17.0-linux-x64.tar.xzUpdating Node.js on Windows and macOS follows the same principles.
There are two simple ways to upgrade:
- Download the latest Node.js release from its official download page and install the new Node.js release.
- Install the n module and update Node.js inside the terminal window.
Option 1: Update Node.js on Windows and macOS with Installer
One way to update your Node.js is to go to its official download page and install the newest release. Bz doing so, the system should overwrite the older version with the updated one.
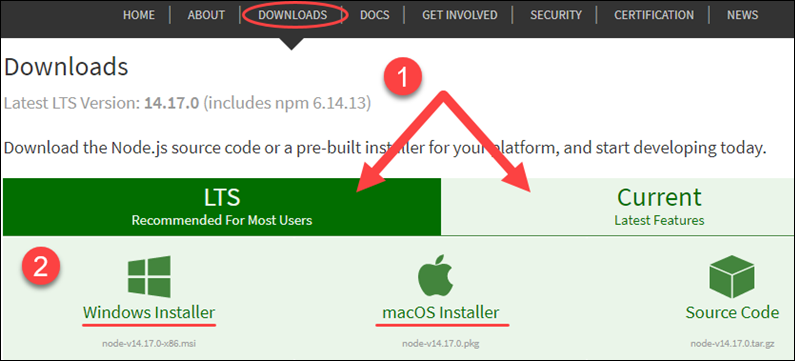
1. Navigate to the Node.js website and click on the latest stable version or the newest current release (with the latest features).
2. After deciding the version, click on the Windows or the macOS Installer, depending on the system you are using. The system downloads the package and stores it in the specified directory.
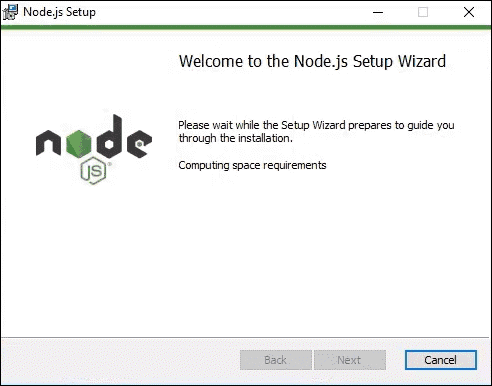
3. Once the download is complete, run the installer.
4. The Node.js Setup Wizard appears and guides you through the installation.
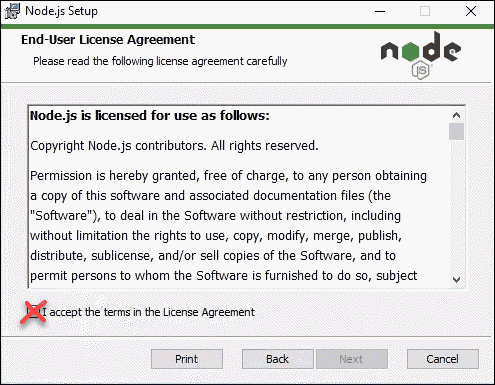
5. Accept the License Agreement by checking the box and click Next.
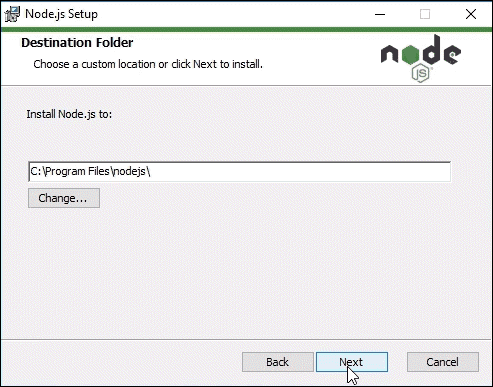
6. Choose the destination folder where you want to install Node.js.
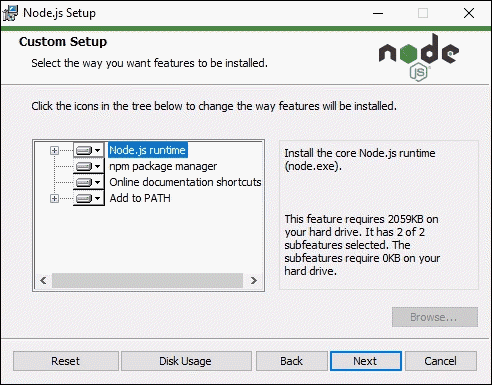
7. Node.js allows you to select how you want to install the Node features. Change the way the features are installed by clicking on the icons in the tree.
8. With that, the latest Node.js is ready to install. Click Install to confirm, wait until the installation completes, and click Finish.
9. Check the Node.js version with the command:
node -vNote: Sometimes, the system fails to overwrite the older Node.js release and you may end up with two versions. If such problems occur, you may want to consider updating with NPM, outlined in the section below.
Option 2: Update Node.js on Windows and macOS with NPM
If you want to upgrade Node.js from the command line, use the n model within the npm command. The n feature allows you to interact with different Node.js versions.
1. Before updating the Node.js release, check which version you are currently using with:
node -v2. Next, clear npm cache with the command:
npm cache clean -f3. Install n globally:
npm install -g n4. Now that you have n installed, you can use the module to install the latest stable release of Node.js:
sudo n stableAlternatively, you can install the Node.js release with the latest features:
sudo n latestOr, install a specific version number with:
n [version.number]Conclusion
The best part of open-source technology is its strong community of users constantly working on upgrading the software.
Node.js is a good example of such software as new versions come out regularly. Users can choose whether they want to work with the LTS (the long-term supported version) or the latest version with the newest features.
This article should have helped you update Node.js on any operating system.
All Platforms (Mac, Linux & Windows) 2023
If you just need to upgrade your old version of Node.js to the latest one and don’t need multiple versions, simply over-write your existing executable with the new one.
Download the Latest Node.js from nodejs.org/en/download

This Just Works! TM on all platforms and is the easiest/fastest method.
When you run node -v in your terminal you will see the the latest version.
Mac
If you originally installed Node.js using brew then run:
brew upgrade node
Managing Multiple Versions of Node.js:
If you need to run multiple versions of Node.js on your machine e.g. if you have an older project that targets a specific version on AWS Lambda, then NVM (Node Version Manger) is your friend!
Step 1 — Get NVM
curl -o- https://raw.githubusercontent.com/nvm-sh/nvm/v0.39.1/install.sh | bash
If you’re curious about the installation command read the source code
… its been reviewed by several node.js security experts
Step 2 — Install the version of node.js you need
Once you’ve got NVM you can install a specific version of Node.js using the nvm command:
nvm install v18.12.1
Note: you may need to close & re-open your terminal window for nvm command to be available.
You should expect to see something like this in your terminal:
Now using node v18.12.1
You now have the latest Node.js on your machine.
And if you need to temporarily switch to a different/previous version, you can do it with a simple nvm command.
Note: avoid using
sudowith Node/NPM as it violates the security principal of least privilege
NVM is considered «better» than N for managing multiple Node.js versions because the verbose commands mean it is much easier to keep track of what you are doing in your Terminal/SSH Log. It is used by the team at NPM the creators/custodians of the Node.js World!
All Platforms (Mac, Linux & Windows) 2023
If you just need to upgrade your old version of Node.js to the latest one and don’t need multiple versions, simply over-write your existing executable with the new one.
Download the Latest Node.js from nodejs.org/en/download
This Just Works! TM on all platforms and is the easiest/fastest method.
When you run node -v in your terminal you will see the the latest version.
Mac
If you originally installed Node.js using brew then run:
brew upgrade node
Managing Multiple Versions of Node.js:
If you need to run multiple versions of Node.js on your machine e.g. if you have an older project that targets a specific version on AWS Lambda, then NVM (Node Version Manger) is your friend!
Step 1 — Get NVM
curl -o- https://raw.githubusercontent.com/nvm-sh/nvm/v0.39.1/install.sh | bash
If you’re curious about the installation command read the source code
… its been reviewed by several node.js security experts
Step 2 — Install the version of node.js you need
Once you’ve got NVM you can install a specific version of Node.js using the nvm command:
nvm install v18.12.1
Note: you may need to close & re-open your terminal window for nvm command to be available.
You should expect to see something like this in your terminal:
Now using node v18.12.1
You now have the latest Node.js on your machine.
And if you need to temporarily switch to a different/previous version, you can do it with a simple nvm command.
Note: avoid using
sudowith Node/NPM as it violates the security principal of least privilege
NVM is considered «better» than N for managing multiple Node.js versions because the verbose commands mean it is much easier to keep track of what you are doing in your Terminal/SSH Log. It is used by the team at NPM the creators/custodians of the Node.js World!
As you may already know, npm is currently bundled with node.js. It means that if you have installed node.js, you’ve already installed npm as well.
Also, pay attention to the node.js and npm release versions table that shows us approximate versions compatibility. Sometimes, versions discrepancy may cause incompatibility errors.
So, if you’re a developer, it’s kinda «best practice» to manage your development environment using one of the node.js version managers.
Here is a list and usage notes of some of the most popular:
Homebrew (macOS)
If you’re on macOS, you can use Homebrew.
Actually, it’s not just a node.js version manager.
To install Homebrew to your Mac:
$ ruby -e "$(curl -fsSL https://raw.github.com/Homebrew/homebrew/go/install)"
To install node.js and npm using Homebrew, run:
$ brew install node
Later, you will be able to update them using:
$ brew update && brew upgrade node
Also, you can switch between node.js versions as well:
$ brew switch node 0.10.26
npm will be upgraded/downgraded automatically.
n (macOS, Linux)
n is most likely to rvm (Ruby Version Manager), and is used to manage node.js and npm versions simultaneously. It is written on pure Linux shell, and available as an npm module. So, if you already have any node.js version installed, you can install/update the n package through npm:
$ npm install -g n
Downloading, installing and switching to node.js and npm versions is as easy as:
$ n 0.10.26
$ n 0.8.17
$ n 0.9.6
To download, install, and switch to the latest official release, use:
$ n latest
To download, install, and switch to the latest stable official release, use:
$ n stable
To switch to the previously active version (aka $ cd -), use:
$ n prev
If you want to see the list of installed node.js versions, just run n from your command line. The output will be something like the following:
$ n

  0.10.26
• 0.8.17
  0.9.6
Where the dot (•) means that it’s a currently active version. To select another node.js version from the list, use Up/Down arrow keys and activate using the Enter key.
To list the versions available to install:
$ n lsr
nvm (macOS, Linux)
nvm is also like rvm, even the command names and usage are very similar.
To install nvm you can use the installation script (requires git) using cURL:
$ curl https://raw.github.com/creationix/nvm/master/install.sh | sh
or wget:
$ wget -qO- https://raw.github.com/creationix/nvm/master/install.sh | sh
To download and install a specific node.js and npm version, use:
$ nvm install 0.10
Then, you can switch to the installed version, using:
$ nvm use 0.10
Also, you can create the .nvmrc file containing the version number, then switch to the specified version using the following command:
$ nvm use
To see the list of installed node.js versions, use:
$ nvm ls
To list the versions available to install:
$ nvm ls-remote
nvm-windows (Windows)
nvm-windows is a node.js version management utility for Windows, ironically written in Go.
It is not the same thing as nvm. However, the usage as a node.js version manager is very similar.
To install nvm-windows, it is required to uninstall any existing versions of node.js and npm beforehand. Then, download and run the latest installer from releases.
To upgrade nvm-windows, run the new installer. It will safely overwrite the files it needs to update without touching your node.js installations.
nvm-windows runs in an Admin shell. You’ll need to start Powershell or Command Prompt as Administrator to use nvm-windows.
Before using, you may also need to enable nvm-windows with the following command:
C:> nvm on
To download and install a specific node.js and npm version, use:
C:> nvm install 0.12
Then, you can switch to the installed version, using:
C:> nvm use 0.12
If you want to see the list of installed node.js versions, use:
C:> nvm list
To list the versions available to install:
C:> nvm list available
Node.js is an extremely vast, server-side open-source JavaScript environment that runs on Chrome’s V8 JS engine. This enormousness of Node.js has resulted in a huge and active community of users, flooding contributions every second.
Although, not exactly to the point, this makes some sense as to why it is quite important to keep updating our version of Node.js.
Well, that’s not all. It is eminent for technologies like this, to stay up to date by enhancing security and introducing better features considering the increasing threats and changing demands out there.
You must have come across Node.js through the MEAN or MERN stack or any other JavaScript framework. It becomes important for a Node.js developer to keep Node.js updated for system security reasons as well.
In this tutorial, I am going to walk you through various ways of updating Node.js on MacOS, Windows and Linux.
Before we begin, let’s start by checking our version of Node.js, like this:
OR
Different Ways to Update NodeJS on MacOS
1. npm
NPM is an online open source repository for publishing Node.js projects. It is also a command-line utility for interacting with those repositories and helps in package installations.
If you are a MacOS user, this simple update method with npm, is relevant for you.
To update Node.js via command line we can make use of the n model in npm command. This will help us interact with different versions of Node.
Let us first clear any cache that’s present:
Installing n globally:
Now that we have n installed, let’s install the latest stable version of Node:
You may even choose to install the latest features by:
To download a specific version, you can simply do this:
2. Homebrew
Homebrew is made for MacOS and is a popular package management tool.
Let us use it for installing Node.js on our Mac machine.
Start by running this command in our MacOS terminal:
Update Homebrew before updating Node, run:
Update node:
To easily switch between Node.js versions:
1. nvm-windows
On Windows, we can make use of the nvm-windows, Node Version Manager (nvm) tool. Although there are several usage similarities, NVM and nvm-windows aren’t the same.
It is required that you uninstall any existing Node and npm versions, otherwise there’s a chance for versions to conflict. Make sure you also delete any existing installation directories for example (%ProgramFiles%nodejs)
Click here to download the nvm-setup.zip file and run the latest installer.
Now, jump to your Command Prompt or PowerShell terminal. Remember to Run it as Administrator because the utility runs in an Admin shell.
Start by installing the LTS (long-term supported) version, let’s say we want to install 14.17.1:
Next, switch to the version you just installed:
Or, you can choose to simply install whatever is the latest version:
To view a list of installed Node.js versions, run this:
To view a list of versions available for download, run this:
Different Ways to Update NodeJS on Linux (or macOS)
1. Node Version Manager
A Node version manager is tool or a utility so to say, that enables developers to install different versions of Node.js and switch impeccably between them.
There are two Node version managers to choose from for Linux or MacOS, nvm or n.
nvm
nvm is nothing but a script-based version manager of Node.js. You can update your version of Node.js on Linux or MacOS with Wget or cURL.
Let’s say we want to install the 38.0 version of nvm, in this this example.
To update with Wget, run this command:
wget -qO- https://raw.githubusercontent.com/nvm-sh/nvm/v0.38.0/install.sh | bash
To update with cURL, run this command:
curl -o- https://raw.githubusercontent.com/nvm-sh/nvm/v0.38.0/install.sh | bash
These commands will also let you clone the repo to ~/.nvm in a way to let you make changes to your bash profile and giving you to access to nvm globally around your system.
Let us check if installation was successful:
If installed properly, it will spit out nvm.
n
We have already seen how we can upgrade Node.js on MacOS with n. These steps that follow are for Linux.
Let us first clear any cache that’s present:
Installing n globally:
Now that we have n installed, let’s install the latest stable version of Node:
You may even choose to install the latest features by:
To download a specific version, you can simply do this:
To see a list of downloaded versions on your machine:
To upgrade to the latest LTS version:
Updating NodeJS using a Node Installer
Although this is the least recommended way to perform a version update for Node.js, it is still a possible solution if for some reason you face issues with any steps above.

Updating Node.js with Installer on Linux
Simply jump to the official downloads website where you will find many Linux binary packages. Select your preferred installer.
Updating Node.js with Installer on Windows & MacOS
Based on your system, you can select from any of the two highlighted installers for Windows and MacOS.
Run the installation wizard. Normally, there’s nothing of the defaults that you would have to change. You can choose to not install Chocolatey.
After you’re done, it will have flawlessly completed installing Node.js and upgrading your version of Node.js by replacing it with the new one.
I hope that you will find Node version 12 new capabilities compelling and soon you will upgrade your app to it.
In turn, you will get advanced debugging, intelligent coding with the powerful IntelliSense engine, interactive window, quick tracking of performance issues, unit testing, typescript integration, source control, cloud integration, and npm integration.
To get started in this walkthrough, this post captures the steps on how to update Node.js in Visual Studio, Windows/macOS, and NPM.
First, see a couple of useful tricks to check which Node.js npm version you have installed:
Write the command line to update Node.js npm:
“node -v” or “npm -v” simply type the one you want to check.
If the installed version of npm is not the latest one, you can update it using the syntax code:
npm npm@latest -g(Note: The -g flag is used to update npm globally.)
Secondly, see which Node/Npm version Visual Studio you are using.
Now, use Visual Studio Command Prompt that is also called Visual Studio plugin. It can help you open a command line.
If you are not able to use Visual Studio Command Prompt, you can use the “Task Runner Explorer” by adding a task and running it in this way:
"check": "node -v && npm -v"
Another way is using C:Program Files (x86)Microsoft Visual Studio 14.0WebExternal” on your Window’s.
(Note: This way you will come to know about the local version of your Visual Studio.)
If you have any issues with these steps, you can call for help from the industry’s best Node.js developers on a particular project on which you happen to be working.
All of this is fine. A developer is expecting to have Node.js updated on Microsoft Visual Studio that supports all those new features.
Steps to Update Node.js in Visual Studio
Development teams usually build one or two node.js update strategy that can be sometimes using an automated process. Or, sometimes updates can be based on the goodwill of the developer. The second one seems to be the riskiest approach. Consider applying the first strategy by using automated tools to update node.js.
For Example:
The tool like greenkeeper offers automatic dependency management for node.js npm dependencies. It improves your code quality, catches problems that you would have missed, easy to use, and reliable.
So, if you wish to get an update Node.js, there’re actually simple ways to do so. Here are the ways how to update node.js in Visual Studio and various operating systems.
Start by installing the new global version on node.js on your computer. Simply visit the Node.js download page and start installing the new version. Like the newest version, Node 12 is packed with notable features.
- Node 12 runs on the V8 engine for faster JavaScript execution
- Improved startup time by 30%
- Node 12 supports TLS 1.3 for increased security of codes
- N-API improvements to prevent libraries from breaking
To tell Visual Studio to use the global version follow the command:
Go to Tools > Options > Projects and Solutions > External Web Tools
Visual Studio uses the $(PATH) to look for its external tools. When performing node.js installation make sure that the $(PATH) should be first on your list.
If that doesn’t work, you can restart the Visual Studio. Or, you can add the usual path directly to the list in which node.js is installed by clicking on “Add” and set “C:Program Filesnodejs.” Now, restart the system and recheck the node.js update process.
(Note: If it doesn’t work, make sure node.js is actually installed in that folder. If it is there, but still not work, try uninstalling, remove that folder manually, and install it again.)
How to Update Node.js on Windows and Mac Operating System?
Already familiar with the Node.js updating steps on Windows. Great, these are the foundation of a successful development strategy. However, in the past decade, the node.js development world had gone through dramatic changes but the updating processes were left intact. Some modern node.js update techniques can even replace the traditional ones to give you a better and leaner update strategy with a better ROI.
Example:
If you wish to upgrade Node.js on Windows and Mac OS, then simply visit the Node.js homepage and select your operating system.
From there, a wizard will magically update your Node, and replace the older version with the new one.
Now, See How to Update Node.js Using npm (Node Package Manager)
To update node.js you can use Node Package Manager (npm) that is already preinstalled. But before you start updating node.js, make sure your npm is of the latest version. Here are a few simple steps to follow to update your npm.
First, you need to find out the version of your Node Package Manager (npm), by running npm -v command.
After checking the version, you can run the command npm install npm@latest -g to install the latest version of Node Package Manager.
Finally, use the command npm -v to check whether your new version of npm was successfully installed or not.
Further, to update node.js using npm, use n module. Also, use the following code to clear cache memory from your Node Package Manager and install the latest version of node.js:
sudo npm cache clean -f
sudo npm install -g n
sudo n stable
(Note: If you are looking for a specific version of node.js, you can also use the command n #.#.#.)
Also, See the Steps for Updating NPM (Node Package Manager) in Visual Studio
This will not take much of your time. If you have installed node.js from their official website, you probably have installed NPM with it. To check it, you can use the command line: “npm-v”.
To upgrade npm in Visual Studio, you can follow the command:
cd C:Program Files (x86)Microsoft Visual Studio 14.0WebExternal npm install npm@latestThis is how you can update Visual Studio’s NPM version to the latest one.
Final Words — Improve Your Skills with the Right Knowledge
There are various other techniques to update node.js that can help you take the right steps at the right time. Nevertheless, many developers neither having a strategy for effectively performing node.js update. Spending a few hours on reading the steps I have shared here can make a great difference to your knowledge on node.js updates and development processes.
Этим вопросом задаются многие новички. Они не знают правильного и эффективного способа, и именно для них наш сегодняшний материал. Стоит отметить, что вариантов, как обновить Node.js достаточно много. Я постараюсь рассмотреть каждый из них в отдельности, включая, кстати, операционные системы, на которых будут производиться нужные действия.
Оглавление
- 1 Как обновить Node.js на Windows
-
- 1.0.1 Другие способы установки и обновления Node.js на Windows
-
- 2 Как обновить Node.js на Linux
- 3 Как обновить Node.js на Mac
- 4 В заключение
Самым простым и очевидным способом здесь будет использование готового Bash-скрипта для Windows. С его помощью можно не только установить актуальную версию Node.js, но и произвести другие, не менее важные операции. Например, вы можете установить сразу несколько версий Node.js, и переключать их в зависимости от своих потребностей. Реализуется это через специальные команды:
nvm list
 * 4.6.9
   0.17.0

node -v
   v4.6.9

nvm use 0.17.0
   Now using node v0.17.0

node -v
   v0.17.0
Само обновление же можно воспроизвести и с помощью такой последовательности действий:
Очищаем кэш NPM:
npm cache clean -f
Устанавливаем менеджер версий Node.js n:
npm install -g n
Выбираем нужную версию Node.js:
1. Стабильная версия
n stable
2. Последняя версия
n latest
3. Установка определенной версии
n 0.9.17
4. Удаление определенной версии
n rm 0.9.17
или
n - 0.8.14
Помимо всего прочего, вы можете загрузить актуальную версию Node.js на официальном ресурсе Node.js. Там доступны установочные пакеты MSI, архивы zip и tar.gz, также версии для Linux и Mac.

Другие способы установки и обновления Node.js на Windows
В 2017 году на разных ресурсах описывают еще один, более актуальный способ, который был рекомендован одним из зарубежных “гуру” в своем блоге. Чтобы обновить Node.js нам нужно воспользоваться таким алгоритмом:
Узнаем какую версию Node мы используем:
node --version
Просмотрим доступные для установки версии, а также используемую:
nvm ls
Выведем список доступных версий:
nvm ls available
Установим нужную версию (предположительно 1.1.1):
nvm install 1.1.1
Для включения более старой версии используем команду:
nvm use 0.1
Не могу ничего сказать по поводу эффективности данного метода, однако вы можете самостоятельно проверить его, после чего отписать в комментариях о результате.
Также вы можете использовать этот, самый простой, по моему мнению, способ:
1. Запускаем cmd от имени администратора
2. Последовательно выполняем две команды:
npm install -g npm-windows-upgrade

npm-windows-upgrade
Данный способ рекомендован разработчиками npm, поэтому вам стоит обратить внимание на него.
Как обновить Node.js на Linux
Как и в случае с Windows, здесь мы будем использовать менеджер npm. Здесь он доступен по другому адресу на GitHub. Большая часть команд совпадает с вышеописанными, поэтому вам следует лишь повторить их, предварительно установив NPM на свою версию Linux.
Кстати говоря, если вы используете Arch Linux (или производные дистрибутивы), обновление для Node.js будет установлено автоматически при следующем апгрейде системы.
Как обновить Node.js на Mac
И снова здесь актуален способ с NPM, вы можете использовать абсолютно те же команды, что и для Windows с Linux. Однако сейчас мы рассмотрим альтернативной вариант, подразумевающий работу с менеджером пакетов Homebrew.
После установки вам достаточно будет выполнить одну единственную команду:
$ brew upgrade node
Готово! Node.js обновлена, а вы прекрасны.
В заключение
Какой бы способ вы не выбрали (а я настоятельно рекомендую прочитать и ознакомиться с каждым из них), в большинстве случаев обновление должно пройти успешно. С помощью менеджера пакетов npm можно управлять версия Node.js на Windows, Linux и MacOS. Я не думаю, что у вас возникнут проблемы с этим.
![How to Update Node.js To Latest Version [Updated]](https://monovm.com/wp-content/uploads/2021/05/cover653-847xAuto.webp)
List of content you will read in this article:
- 1. What is Node.js? [Definition]
- 2. History of Node.js
- 3. Node.js Highlights
- 4. Why Update Node.js?
- 5. How to Update Node.js Version?
- 6. Conclusion
Node.js has gained popularity due to its various advantages. Node.js has taken over web development among small and large enterprises. After the introduction of JavaScript, developers mostly preferred it due to its ubiquity in web development. It offers rich libraries for creating interactive and advanced interfaces but never deployed anything from the backend platform. However, Node.js is an alternative that multiple startups and enterprises have widely adopted. This article will guide you on how to update Node JS version to the latest version with screenshots.
Node.js has been introduced as a JavaScript runtime environment that helps build and run an infrastructure application. It provides a cross-platform and scalable way of executing the code. It is extremely efficient due to its event-driven I/O model. Before learning the different ways to upgrade Node, we should have basic information about Node.JS, like what Node.JS is, its advantages, history, and various versions.
What is Node.js? [Definition]
Node.js is a cross-platform JavaScript environment that allows server-side scripting. It ensures a non-blocking workflow, thus making it popular amongst developers to create dynamic web-based applications.
It provides a node package manager that is also known as npm. You can use its command-line feature to interact with the npm online repository for installing packages, version management, and dependency management. It is better to use the updated or the latest Node and npm to ensure improved performance and added functionalities. It is spreading its ways in creating real-time web-based applications, the Internet of Things, and managing microservices. It is being downloaded by over billions of developers and users globally. Due to its immense advantages, most developers are being adopted, and the skill is in great demand.
The essential advantages of Node are mentioned below:
- You can create real-time and high-traffic applications with great ease and efficiency.
- You can use Node.js to build JavaScript code for both the client and server sides.
- It enhances the development process efficiency by bridging the gap between frontend and backend developers.
- Npm offers various tools and modules for the developers to use and helps enhance productivity.
- It ensures that the code will run much faster than any other alternative language.
- Use for running microservices, which is considered the perfect solution among enterprise applications.
You will choose Node.js over other alternatives as it was developed for scalable applications. It provides a modern tooling solution and can create complex applications from other languages.
History of Node.js
However, this language is just 12 years old compared to JavaScript (26 years old) and the Internet (32 years old). Node.js language was written in 2009 by Ryan Dahl, which he initially introduced for Mac OS X and Linux systems. Node.js was developed and maintained by Dahl, and after some time, it got sponsored by Joyent.
In 2009, Dahl strongly criticized the Apache HTTP server’s limited possibility for managing thousands of multiple concurrent connections simultaneously. The blocked code within the simultaneous connections process might have led to various issues; that could be resolved by creating a code through sequential programming.
Dahl demonstrated the Node.js project at the inaugural European JSConf for the first time on November 8, 2009.
Node.js Highlights
|
2009 |
|
|
2010 |
|
|
2011 |
|
|
2012 |
|
|
2013 |
|
|
2014 |
|
|
2015 |
|
|
2016 |
|
|
2017 |
|
|
2018 |
|
|
2019 |
|
|
2020 |
|
Why Update Node.js?
If you’re using Node.js in your web development, keeping it up to date is important. Not only will this ensure that you have the latest features and bug fixes, but it will also help keep your application secure. Here are a few reasons why you should upgrade Node.js to the latest version:
1. New features and bug fixes: As new versions of Node.js are released, they include new features and bug fixes. You’ll get access to these new features and bug fixes by updating to the latest version.
2. Security: As security vulnerabilities are discovered in older versions of Node.js, they are patched in newer versions. You’ll ensure your application is as secure as possible by updating it to the latest version.
3. compatibility: If you’re using an older version of Node.js, there’s a chance that it might not be compatible with newer versions of dependencies (such as Express). By updating to the latest version of Node.js, you can avoid any compatibility issues.
So if you’re looking to upgrade Node.js to the latest version, follow the steps in this guide, and you’ll be up and running in no time!
How to Update Node.js Version?
If you are working on Node.js, make sure you should have the latest Node.js version and packages installed on your system. If you already have Node.js installed and want to upgrade it to the newest available stable version, you can follow the steps below. As it is cross-platform, you can be installed on various platforms like Windows, Mac, and Linux.
Below are the different ways to upgrade Node version to its latest version according to your system.
- Update Node.js on the Linux system
- Update Node.js on Windows and macOS
1. How to Update Node.js on the Linux system
You can adopt any of the methods listed below to update node js version on a Linux-based system.
1.1 Using NVM (Node Version Manager)
NVM is a practical tool that helps manage multiple versions of Node.js. You can update the version by following the below steps.
Step 1: before the node update command, update the package repository using the below command.
sudo apt update
Step 2: Then, download the required dependencies by running the following command.
sudo apt install build-essential checkinstall libssl-dev
Step 3: Now, run this command to download the NVM.
curl -o- https://raw.githubusercontent.com/creationix/nvm/v0.35.1/install.sh | bash
Step 4: Restart the terminal by closing and opening it again.
Step 5: Now you need to verify the success of the NVM installation using the command listed below:
nvm --version

Step 6: Before you upgrade Node.js version, check the existing version of your Node.js.
nvm ls
Step 7: To check the newly available releases for Node.js, you can run the following command.
nvm ls-remote

Step 8: You can now use the below command to install the latest version of Node.js, specifying the particular version.
nvm install [version.number]
1.2 Using NPM (Node Package Manager)
To update Node.js, you can use the official package manager of Node. It is a tool that enables you to install and manage the dependencies of the Node package. The npm command will help you check the existing Node version and install the latest release. You can follow the below-given steps and commands to upgrade Node.js version.
Step 1: Before moving ahead, clear the cache of the NPM using the following command:
npm cache clean -f

Step 2: Using the following command, you can install the version manager for the Node, where n is the Node’s version manager.
npm install -g n
1.3 Using Binary Packages
This method is least preferred unless it is the only way left to update the version. You can follow the below-mentioned steps:
Step 1: Navigate to Node’s official download page, and you will find a list of available packages to download. You can either download the source code or a pre-built installer for the installation of the latest version.

Step 2: If you are not comfortable with the above step for updating the version, then you can add the required version to the wget command mentioned below.
wget https://nodejs.org/dist/v12.13.1/node-v12.13.1-linux-x64.tar.xz
Step 3: You can install the ‘xz-utils’ for extracting the binary package using the command:
sudo apt-get install xz-utils
Step 4: You can run the following command to install the required package.
tar -C /usr/local –strip-components 1 -xJf node-v12.13.1-linux-x64.tar.xz
2. How to Update Node.js on Windows and macOS
You can follow the same ways to update Node version on Windows and macOS. There are two different ways to update the version.
- Using installer
- Using NPM
2.1 Using Installer
You can navigate to the official download site of the Node and install the latest version, as it will overwrite the existing version on your system.
Step 1: Visit the official site of Node.js to download and install the latest stable version.

Step 2: Once you decide which version to install, you can choose the required system (Windows or macOS) accordingly. The system will download and store the downloaded files in the specified directory.
Step 3: After the completion of the downloading process, you can run the installer.
Step 4: The Node.js prompt will open, and you can follow the steps.

Step 5: Now, accept the license and click next to proceed.

Step 6: You can fill in the path in the destination folder as per your choice where you want to install the Node.js.

Step 7: Now select how you want to install the Node feature and click next.

Step 8: Now click install, start the installation process, and then click finish.
Step 9: Run the following command to check the installed version of Node.js.
node -v
2.2 Using NPM
Another way to update the Node.js version is by using a command prompt with the npm command. The ‘n’ feature of Node.js allows you to interact with different versions of Node.js.
Step 1: Before you update, check the existing Node.js version using the command:
node -v
Step 2: Then clear the cache using this command:
npm cache clean -f
Step 3: Now install the ‘n’ globally using the command:
npm install -g n
Step 4: Use the ‘n’ module to install the latest stable version using any of the following commands.
sudo n stable
sudo n latest
n [version.number]
Conclusion
Node.js has been a very popular programming language for creating web-based applications over the years. To work with Node.js, you must have the latest stable version to experience new functionalities and make your web application more interactive. We hope that we can clear or help you to Update Node version to the latest version with various methods on the various operating systems. It is not cumbersome and can be done in a few simple steps.
If you have any suggestions or any other methods to do so, please share those with us via the comment box listed below.
People Are Also Reading:
- What is Node.js?
- How to Install Node.js and NPM
- How to Check NPM Version?
- How to update npm package to latest version?