Обновлено 14.05.2019
Ограничения Windows Server 2008 R2
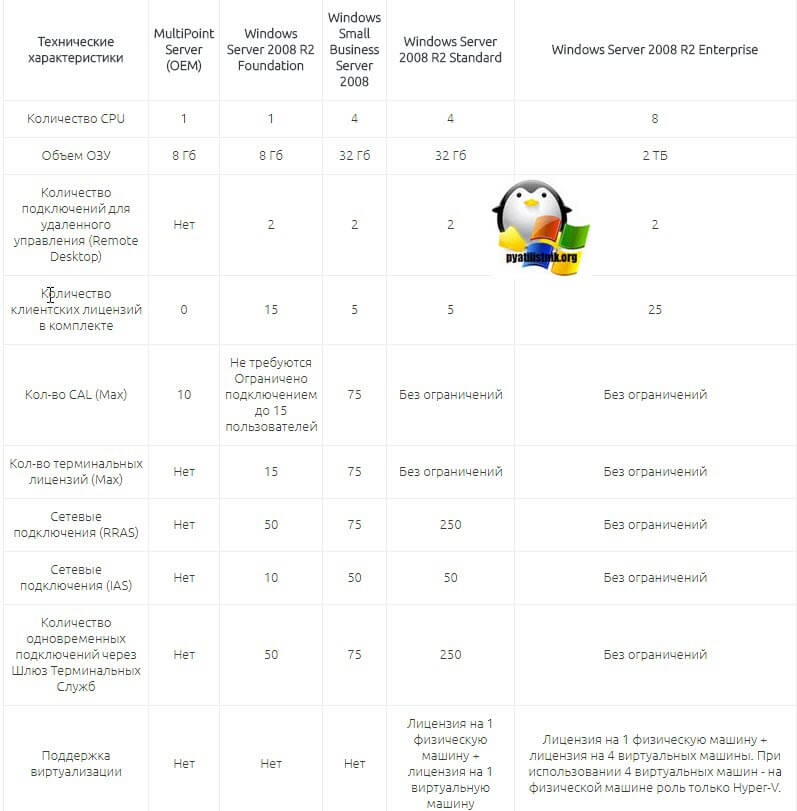
Во времена уже Windows Server 2019, я уже совсем забыл, что ранее до Windows Server 2012 R2, редакции имели какие-то физические ограничения на работу с оборудованием, а не просто лицензирование функций или количества виртуальных машин. Вот вам сравнительная таблица в которой указаны все ограничения, которые накладываются на определенную редакцию Windows Server 2008 R2. Как видно версия Standard имеет ограничение на объем поддерживаемой оперативной памяти в 32 ГБ, а вот Enterprise уже имеет до 2 ТБ.
Чтобы решить нашу задачу и заставить виртуальную машину увидеть 64 ГБ памяти, нам необходимо провести Обновление Windows Server 2008 R2 Standard до Enterprise. Хорошо, что разработчики подумали, о такой возможности, без переустановки операционной системы и сервисов.
Хочу отметить, что есть некоторые ограничения и нюансы, которые не позволят вам провести обновление Windows Server 2008 R2 Standard до Enterprise.
- Во первых вы не сможете таким образов обновить редакцию на сервере, который несет на себе роль контроллера домена, это такая защита от дурака. При таком раскладе, вам с начало нужно передать роли FSMO на данном сервере, если они есть, затем понизить контроллер домена до обычного сервера, при условии, что у вас в сети еще есть сервера с ролью AD DS.Затем произвести процедуру обновления Windows Server 2008 R2 Standard до Enterprise, и далее установить заново роль Active Directory Domain Services. В противном случае вы получите ошибку:
Error: 50. Setting an Edition is not supported with online images
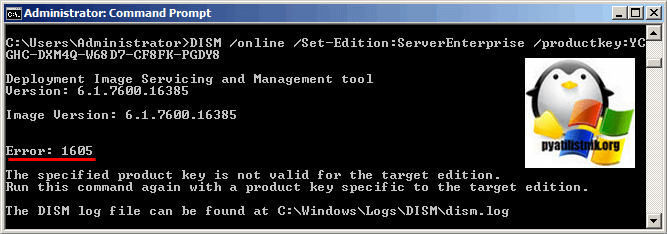
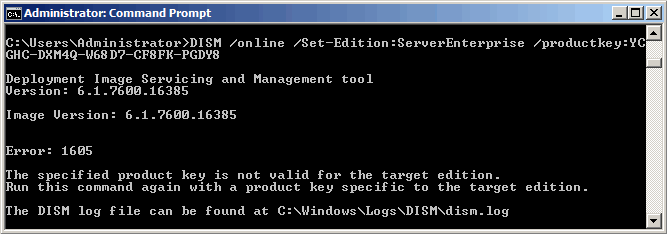
- Вторая ошибка, это «Указанный ключ продукта недопустим для целевой версии. Повторите эту команду еще раз с ключом продукта, специфичным для целевой версии. (Error 1605. The specified product key is not valid for the target edition. Run this command again with a product key specific to the target edition)». Тут вам явно говорят, что у вас явно не валидный ключ, причины простые у вас редакция Volume, требующая GVLK ключа, а вы ему подсовываете MAC ключ. Читайте подробнее про типы ключей по ссылке слева. В обход проблемы можно использовать временный ключ:
489J6-VHDMP-X63PK-3K798-CPX3Y
Данный ключ позволит обновить редакцию, но затем попросит активацию системы.
- Если вы в момент повышения редакции используете KMS ключ, то вам нужно будет чистить старые хвосты KMS записи, как при ошибке активации Windows 0x800700B и 0x87E10BC6. Единственное перед удаление ключей продукта нужно будет выполнить очистку KMS записи через вот такую конструкцию (slmgr.vbs -ckms).
Так же нужно учитывать, что после повышения редакции вы не можете понизить ее, даунгрейда нет
Методы обновления редакции Windows Server 2008 R2
Существует два метода, позволяющие вам провести переход от версии Standard к Enterprise:
- Использование утилиты командной строки DISM, онлайн или оффлайн
- Использование дистрибутива Windows Server 2008 R2 и мастера обновления системы
Оба метода позволяют вам обновлять так Windows Server 2008 R2 в графическом режиме, так и в Core версии.
Учтите, что версию Core нельзя обновить до графической версии
Напоминаю возможные пути обновления редакций:
- С Windows Server 2008 R2 Standard до Windows Server 2008 R2 Enterprise или Windows Server 2008 R2 Datacenter
- С Windows Server 2008 R2 Standard Server Core до Windows Server 2008 R2 Enterprise Server Core или Windows Server 2008 R2 Datacenter Server Core
- С Windows Server 2008 R2 Foundation до Windows Server 2008 R2 Standard
Учитывайте это при своей стратегии перехода от редакции к редакции.
Обновление редакции через утилиту DISM
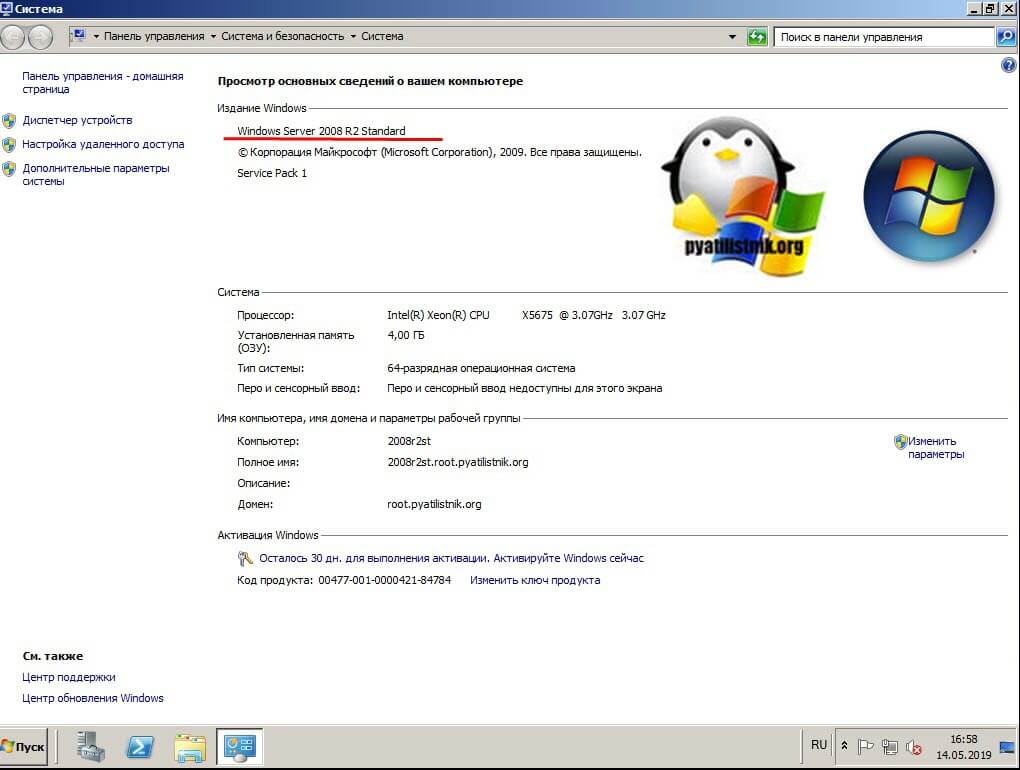
Чем хорош данный метод, так это тем, что все необходимые файлы он скачает из интернета и вам потребуется всего одна перезагрузка. Что делаем, первым делом нам нужно идентифицировать вашу текущую редакцию Windows, для этого вы можете открыть окно свойств системы, через оснастку control /name Microsoft.System или сочетания клавиш WIN+Pause Break.
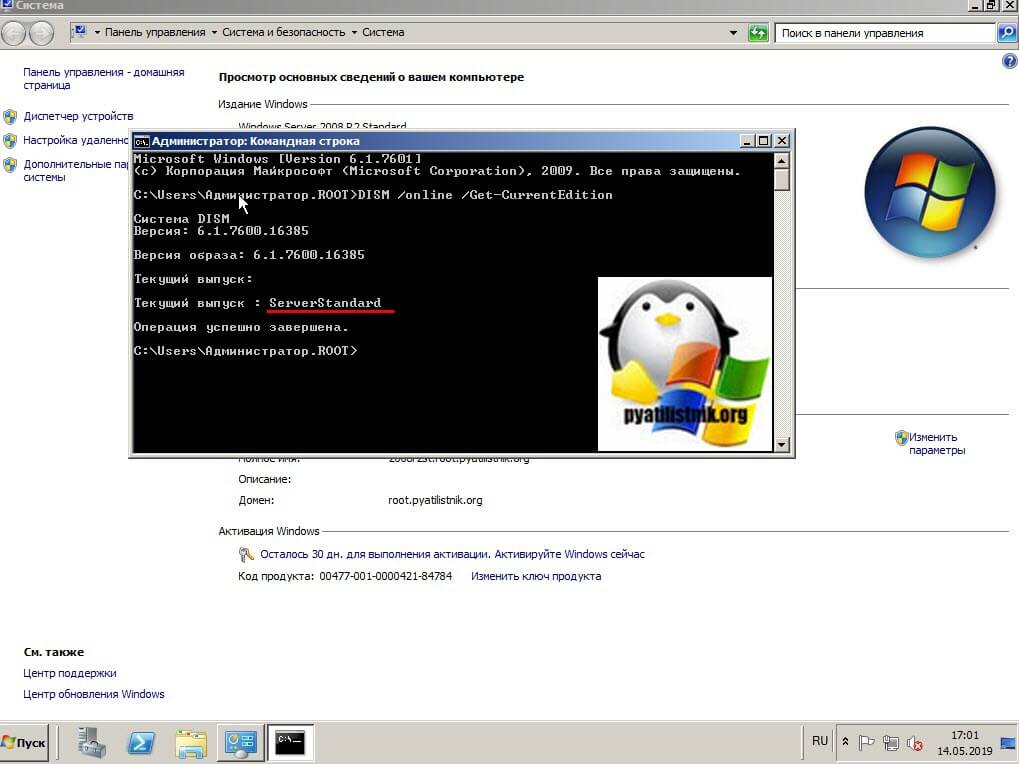
Но можно и самой утилитой DISM, если речь идет про Server Core версию. Для этого откройте командную строку или запустите оболочку PowerShell, после чего введите:
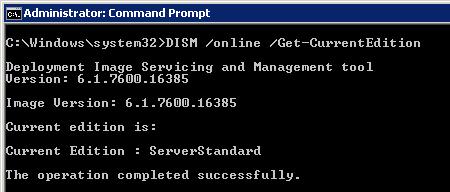
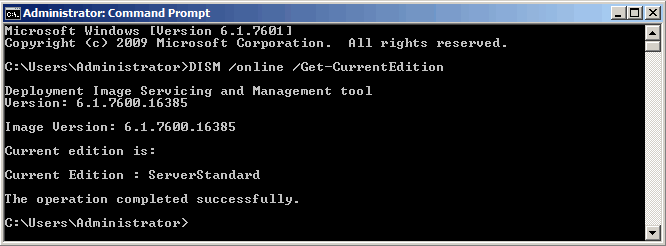
DISM /online /Get-CurrentEdition
Видно, что текущий выпуск ServerStandard.
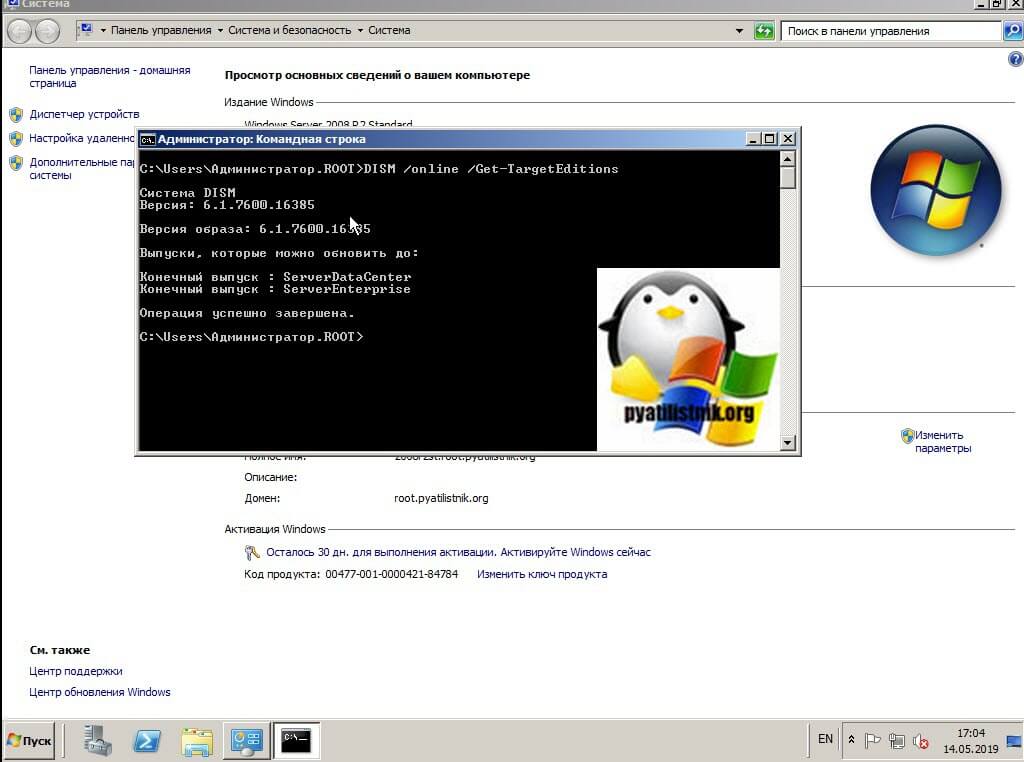
Теперь давайте мы удостоверимся, до каких выпусков мы можем обновиться, для этого введите:
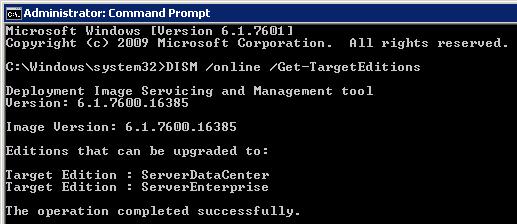
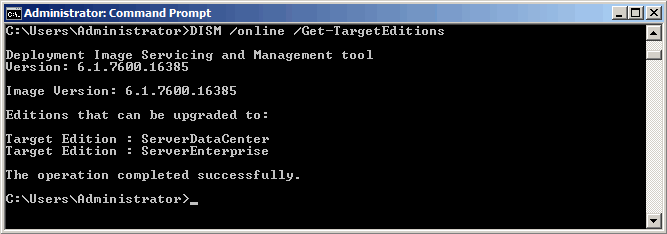
DISM /online /Get-TargetEditions
Видно, что я могу провести обновление до двух выпусков, это
- Конечный выпуск : ServerDataCenter
- Конечный выпуск : ServerEnterprise
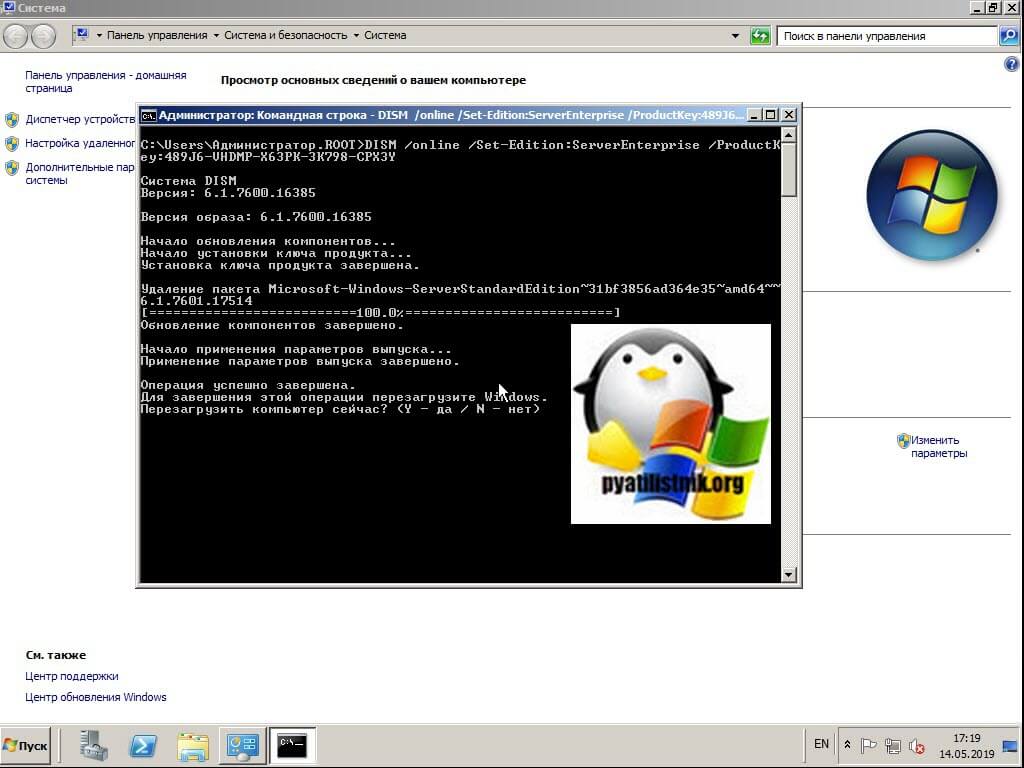
Я буду обновляться до ServerEnterprise, выше я приводил временный ключ или GVLK ключ, они потребуются для команды:
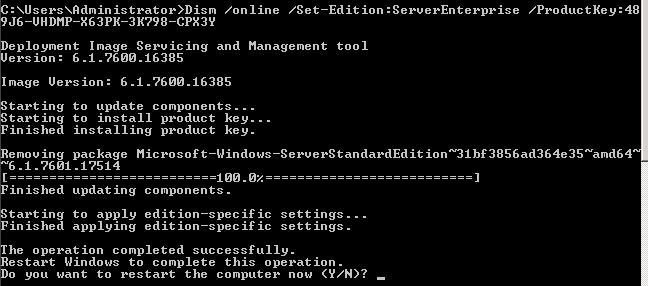
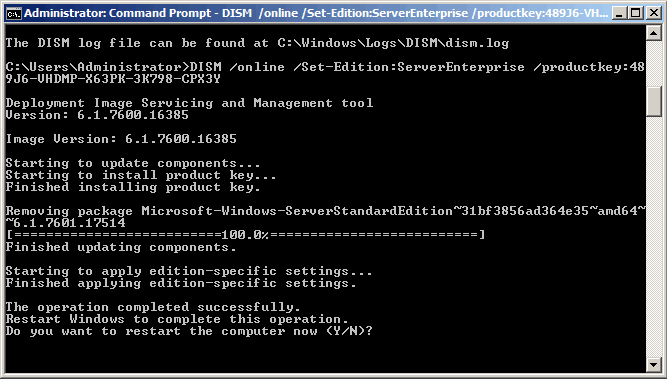
DISM /online /Set-Edition:ServerEnterprise /ProductKey: 489J6-VHDMP-X63PK-3K798-CPX3Y (ваш ключ приобретенный Вами для соответствующей редакции Windows 2008 R2).
KMS — Windows Server 2008 R2 Enterprise — 489J6-VHDMP-X63PK-3K798-CPX3Y
KMS — Windows Server 2008 R2 Datacenter — 74YFP-3QFB3-KQT8W-PMXWJ-7M648
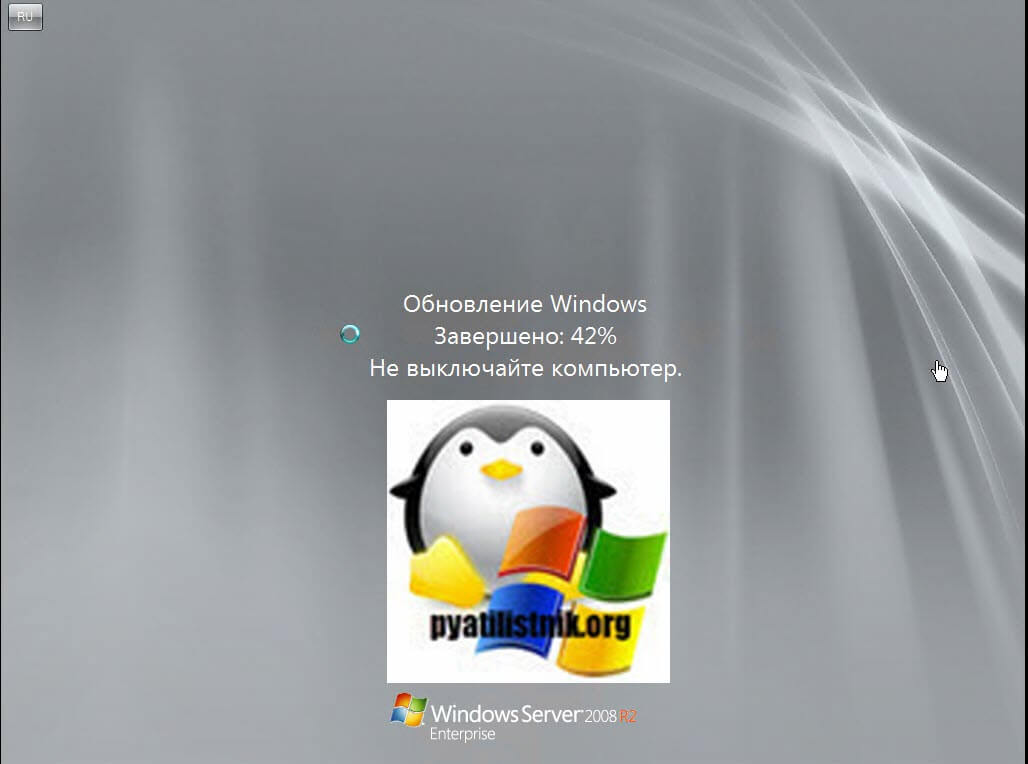
Соглашаемся с с выполнением обновления выпуска и пишем «Y», учтите, что нужен будет доступ к интернету и потребуется потом перезагрузка
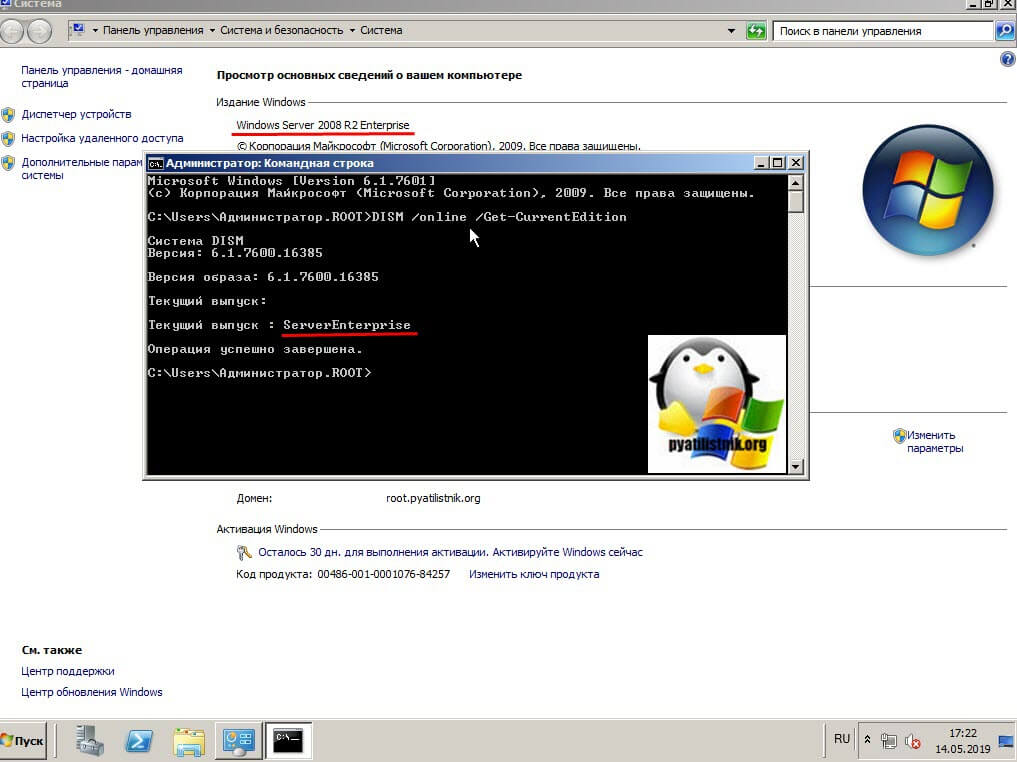
Проверяем после перезагрузки редакцию системы.
Обновление редакции через диск с дистрибутивом
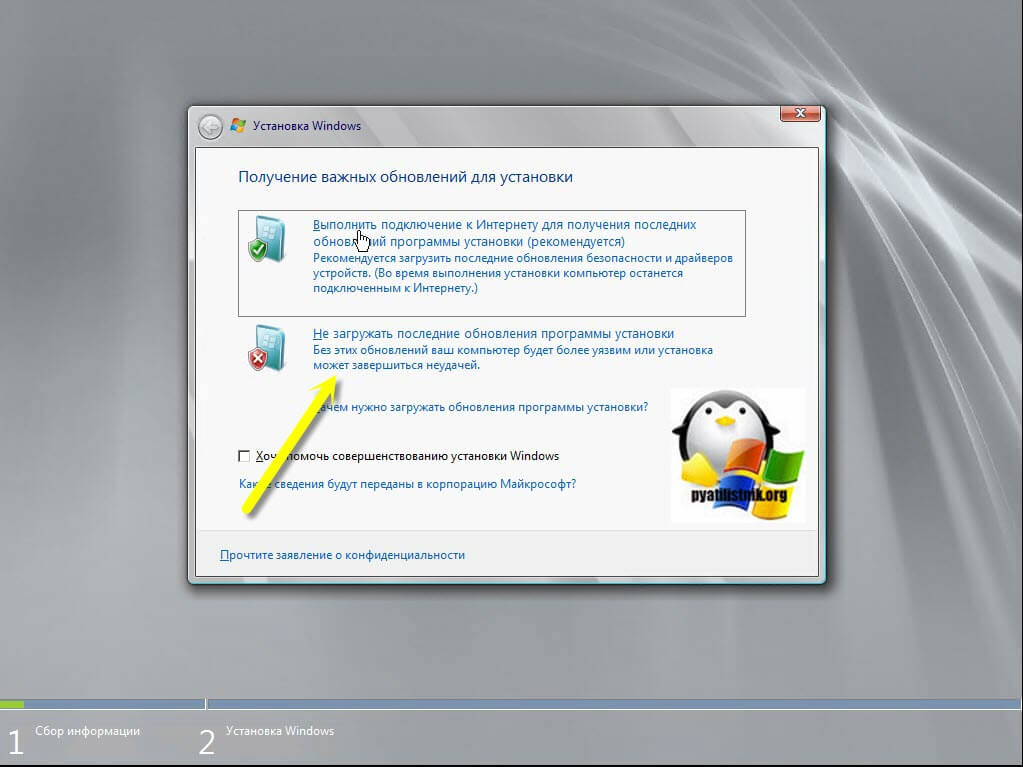
Данный метод хорош тем, что не требует интернет соединения, подойдет для автономных сетей, но за то более длительный и требует иметь скачанный Windows Server 2008 R2. Выясняем, как я показывал выше текущий выпуск и до каких редакций вы можете обновиться. Далее монтируете ваш дистрибутив с нужным выпуском. Запускаем setup.exe и новую установку, пропускаем поиск обновлений Windows.
Принимаем лицензию и до ходим до момента выбора типа установки, выбираем верхний пункт «Обновление».
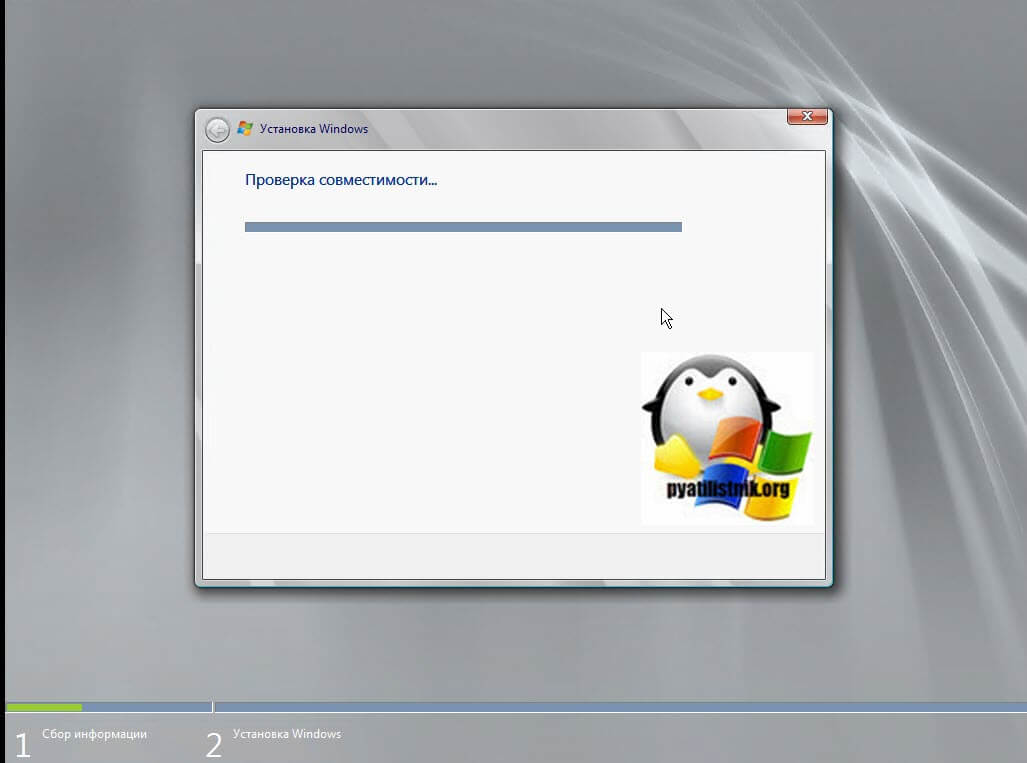
Начнется проверка совместимости.
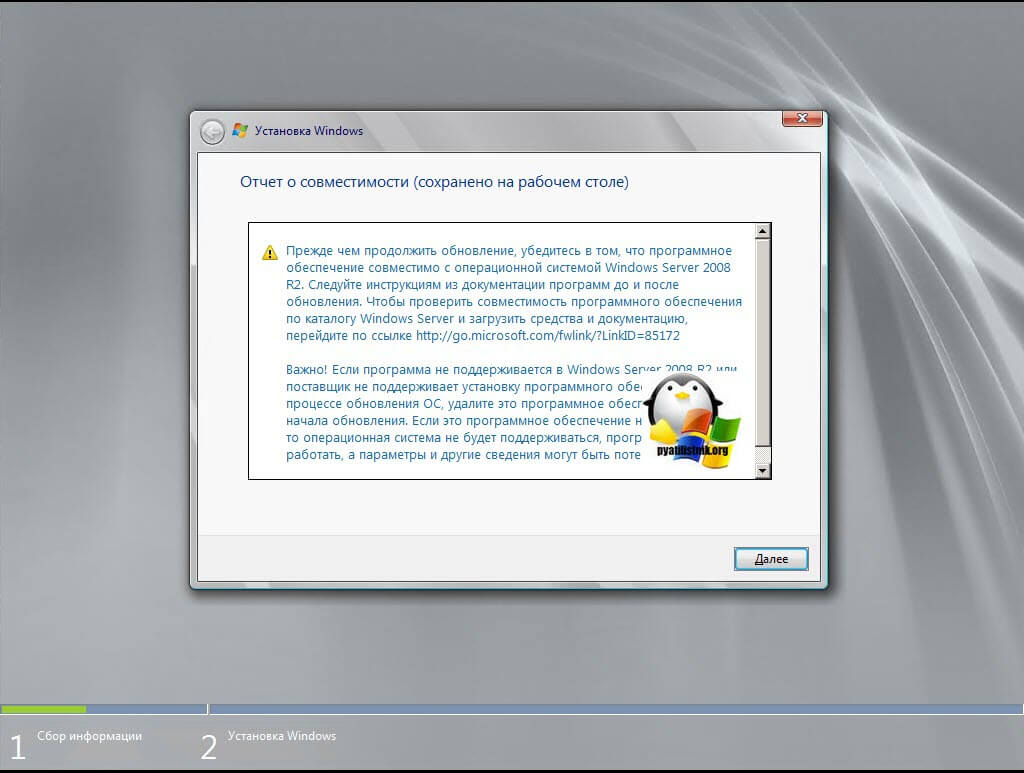
Если в отчете нет критических ошибок, то нажимаем далее.
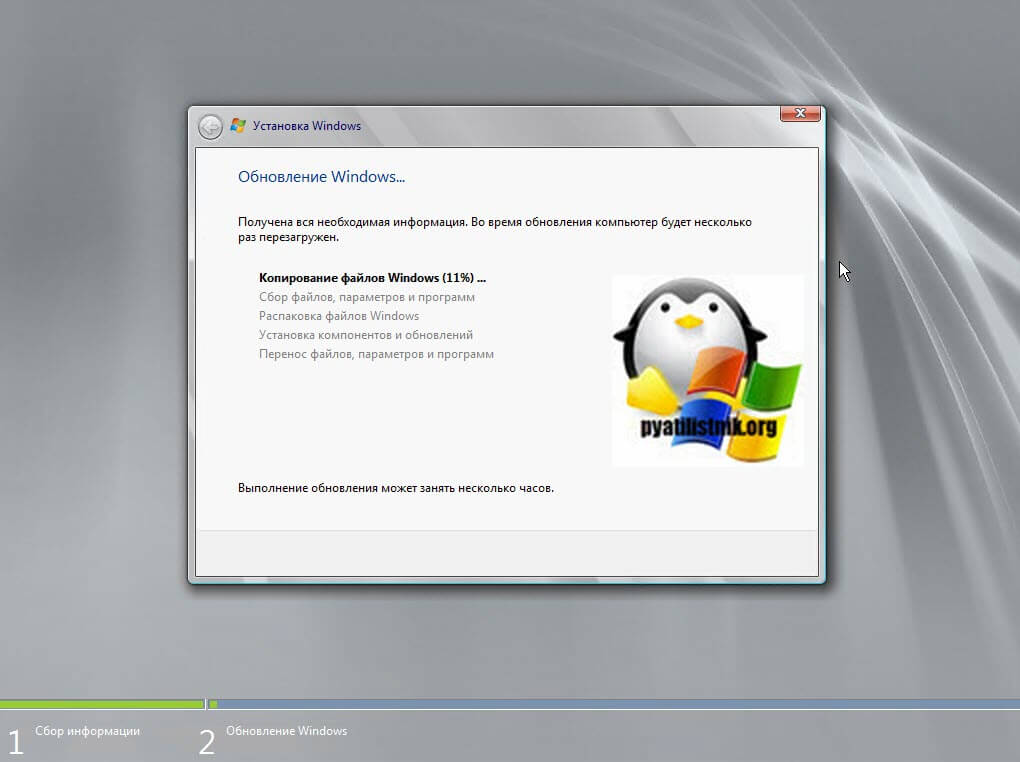
Начнется процесс распаковки и установки файлов обновления, после двух перезагрузок вы получите результат. В среднем такое обновление занимает минут 15-20.
Надеюсь данная, небольшая инструкция оказалась для вас полезной. С вами был Иван Семин, автор и создатель IT блога Pyatilistnik.org.
В процессе эксплуатации Windows Server 2008 R2 системный администратор может столкнутся с ограничениями установленной редакции ОС, которые не позволяют воспользоваться тем или иным функционалом сервера, например в редакции 2008 R2 Standard нельзя использовать более 32 Гб оперативной памяти, или развертывать решения Failover Cluster, RRAS, RDS и т.д. В предыдущих версиях Windows Server в такой ситуации приходилось полностью переустанавливать систему на «старшую» редакцию ОС. В Windows Server 2008 R2 из этой ситуации есть выход, т.к. в ней существует возможность обновиться до старшей версии ОС (например, с редакции Standard до Enterprise) без переустановки сервера.
Обновление выполняется при помощи утилиты DISM, и может быть выполнено как в автономном (офлайн) режиме, так и прямо в процессе работы сервера (онлайн режим). Обновление не требует переустановки системы, и текущие настройки сервера (роли, компоненты и другие приложения) сохраняются. Обновление возможно, как в режиме Server Core, так и в Full GUI версии Windows 2008 R2, однако следует понимать, что переход от версии Server Core к полной установке 2008 R2 невозможен (в Windows Server 2012 возможно переключатся между Full и Core режимами). Возможно обновление с младшей редакции Windows Server 2008 R2 до старшей версии, обратная процедура понижения редакции (даунгрейд) невозможна.
Доступные варианты обновления редакции Windows Server 2008 R2:
- Windows Server 2008 R2 Standard —> Windows Server 2008 R2 Enterprise —> Windows Server 2008 R2 Datacenter
- Windows Server 2008 R2 Standard Server Core —> Windows Server 2008 R2 Enterprise Server Core —> Windows Server 2008 R2 Datacenter Server Core
- Windows Server 2008 R2 Foundation —> Windows Server 2008 R2 Standard
Итак, утилита DISM.exe уже входит в комплект поставки Windows Server 2008 R2 и дополнительно устанавливать ничего не нужно.
Чтобы узнать текущую версию Windows Server 2008 R2, в командной строке выполните команду:
DISM /online /Get-CurrentEdition
Если команда вернет ServerStandard, это означает что текущая редакция установленной ОС — Windows Server 2008 R2 Standard.
Получим список редакций, до которых нам можно проапгрейдится:
DISM /online /Get-TargetEditions
В данном случае возможно обновление до версий:
- Windows Server 2008 R2 Datacenter (ServerDataCenter)
- Windows Server 2008 R2 Enterprise (ServerEnterprise)
Чтобы выполнить обновление до Windows 2008 R2 Enterprise выполните команду:
DISM /online /Set-Edition:ServerEnterprise /ProductKey:XXXXX-XXXXX-XXXXX-XXXXX-XXXXX
Где XXXXX-XXXXX-XXXXX-XXXXX-XXXXX – приобретенный Вами ключ продукта для соответствующей редакции Windows 2008 R2.
В том случае, если для активации планируется использовать сервер KMS, воспользуйтесь KMS ключом для Windows Server 2008 R2 Enterprise (так называемый GVLK ключ).
| Windows Server 2008 R2 Enterprise | 489J6-VHDMP-X63PK-3K798-CPX3Y |
| Windows Server 2008 R2 Datacenter | 74YFP-3QFB3-KQT8W-PMXWJ-7M648 |
KMS ключ поможет также в том случае, если с помощью Вашего MAK / retail ключа от соответствующей версии Windows Server обновиться не получается. Не забудьте после обновления изменить KMS ключ на ваш с помощью команды:
slmgr /ipk XXXXX-XXXXX-XXXXX-XXXXX-XXXXX
В том случае если сервер, который планируется обновить, является контроллером домена Active Directory, необходимо перед обновлением версии ОС выполнить с помощью команды DCPROMO понижение роли сервера до рядового сервера домена, и лишь затем выполнить апгрейд версии ОС. После этого сервер нужно перезагрузить и опять поднять на нем контроллер домена.
В процессе обновления версий могут появиться такие ошибки:
- Setting an Edition is not supported with online images – скорее всего на сервере развернута роль контроллера домена Active Directory (роль AD DS). Как мы уже говорили выше – необходимо понизить роль сервера для рядового сервера домена.
- The specified product key is not valid for the target edition. Run this command again with a product key specific to the target edition – по какой-то причине ОС не принимает указанный ключ, если вы уверены, что ключ валидный и соответствует редакции Windows Server, до которой проводится обновление, проведите обновление с KMS ключом (список ключей выше)
Прочитано:
2 704
Случалось ли Вам такое наблюдать, что до Вас в организации куда вы пришли работать большинство серверных операционных систем имеют в своем случае редакцию Standard – я говорю про систему Windows Server 2008 R2, но вот эта редакция Вас не устраивает в ней в отличии от Enterprise не достает такой важной роли как роли создания Кластера систем, еще память — раньше 32Gb считалось достаточно, но со временем запросы выросли и добавление больше не приводит к положительному результату. Сейчас я это дело поправлю, рассмотрев как же все-таки произвести обновление Windows Server 2008 R2 с редакции Standard до редакции Enterprise.
Чтобы текущая заметка у Вас удалась, Вам потребуется лицензионный ключ применительно к редакции Windows Server 2008 R2 Enterprise, а хотя он вообще-то даже не понадобится, справимся и без него.
Текущая система:
C:UsersAdministrator>systeminfo | findstr "OS Name"
Host Name: SRV-DC
OS Name: Microsoft Windows Server 2008 R2 Standard
OS Version: 6.1.7600 N/A Build 7600
OS Manufacturer: Microsoft Corporation
OS Configuration: Standalone Server
OS Build Type: Multiprocessor Free
BIOS Version: innotek GmbH VirtualBox, 12/1/2006
Connection Name: Local Area Connection
Открываем консоль командной строки с правами Администратора и уточняем консольными командами текущую версию оси:
C:UsersAdministrator>dism /online /get-currentedition
Deployment Image Servicing and Management tool
Version: 6.1.7600.16385
Image Version: 6.1.7600.16385
Current edition is:
Current Edition : ServerStandard
The operation completed successfully.
Получаем отчет о доступных версия для обновления:
C:UsersAdministrator>dism /online /get-targeteditions
Deployment Image Servicing and Management tool
Version: 6.1.7600.16385
Image Version: 6.1.7600.16385
Editions that can be upgraded to: (Редакции доступные после обновления)
- Target Edition : ServerDataCenter
- Target Edition : ServerEnterprise
The operation completed successfully.
Из вывода видно, что текущую систему при наличии лицензионного ключа можно произвести обновление до нужной редакции, в моем случае меня интересует редакция Enterprise уровня:
ключ ниже: 489J6-VHDMP-X63PK-3K798-CPX3Y → Это дефолтный KMS ключ от Microsoft
На заметку:
Существую две разновидности ключей от Microsoft: это MAK ключ — по сути это точно такой же ключ который Вы получаете покупая/видя на задней части системного блока компьютера, ноутбука посредством которого можно выполнить активацию приобретенной операционной системы, но с одним лишь отличием что один MAK ключ может позволять активировать несколько компьютеров в локальной или глобальной сети. Себе, другу, подруге.
И также есть KMS ключ — данный ключ позволяет в локальной сети предприятия развернуть свое персональный сервер активации, имея такой ключ и сервис развернутый на его основе можно не заботиться о ручном способе активирования новых систем, системы сами найдут его и активируются.
Произвожу активацию посредством KMS ключа от Microsoft текущей системы до редакции Enterprise:
C:UsersAdministrator>dism /online /set-edition:ServerEnterprise /ProductKey:48
9J6-VHDMP-X63PK-3K798-CPX3Y
Deployment Image Servicing and Management tool
Version: 6.1.7600.16385
Image Version: 6.1.7600.16385
Starting to update components…
Starting to install product key…
Finished installing product key.
Removing package Microsoft-Windows-ServerStandardEdition~31bf3856ad364e35~amd64~
~6.1.7600.16385
[==========================100.0%==========================]
Finished updating components.
Starting to apply edition-specific settings…
Finished applying edition-specific settings.
The operation completed successfully.
Restart Windows to complete this operation.
Do you want to restart the computer now (Y/N)? Y
После подтверждения, система сразу же перезагрузится и начнется обновление системы до редакции Enterprise, скорость в которую все это произойдет зависит от Вашего канала с интернетом, после того как процедура обновления завершится, на экране будет также красоваться надпись с просьбой ввести сочетания клавиш на разблокировку компьютера: Ctrl + Alt + Del, авторизовавшись, в моем случаем:
Login: Administrator
Password: 712mbddr@
А после вызвав консоль командной строки с целью убедиться какая редакция сейчас установлена на сервере:
C:UsersAdministrator>dism /online /get-currentedition
Deployment Image Servicing and Management tool
Version: 6.1.7600.16385
Image Version: 6.1.7600.16385
Current edition is:
Current Edition : ServerEnterprise
The operation completed successfully.
Видим, что текущая редакция системы Enteprise что собственно мне и требовалось. Изменилось еще то, что ранее существовавшая редакция Standard уже прослужившая мне очень долго исчерпала лимит тестового использования по заметке которую я ранее уже публиковал, а теперь имея редакцию Enterprise я могу еще раз использовать систему в течении этих дополнительных 240 дней — Отлично что сказать. А ключ лицензионный ключ я пока поберегу до лучших времен или до очередной проверки либо как некоторая безопасноть от других системных администраторов у меня в отделе, которые могут посредством стронних средств извлечь из системы лицензионный ключ и допустим продать его кому-либо или использовать в своих личных целях дома, а потом сиди гадай почему твоя система вдруг ни с того ни с сего заблокировалась. Но это уже тема отдельной заметки, а пока собственно все, с уважением автор блога — ekzorchik.
- Remove From My Forums
-
Вопрос
-
Имеется Windows Server 2008R2 SP1. Установлены роли: DC, DNS, DHCP, CA, IIS для CA; этот сервер — root CA.
Как правильно обновить этот сервер с его ролями до 2012? особенно переживаю за CA…
Ответы
-
Понимаете, любой процесс апгрейда — непредсказуем. Как двух одинаковых людей, так и двух одинаковых систем не бывает. Даже если Вы откатаете upgrade-in-place на тестовой машине, всё равно остаётся вероятность, что на рабочей что-то пойдёт не так. Если случаются
проблемы даже при установке рекомендованных патчей, то что уж говорить про обновление всей системы, да ещё с такими важными ролями?Да, Microsoft считает возможным такой апгрейд. Но он не гарантирует его успешность. Сколько рабочего времени Ваша компания готова потерять? Сколько времени она проживёт без этого AD, DHCP и root CA? Сколько времени у Вас уйдёт на восстановление убитой системы
из дампа? Если Вы готовы дать на все эти вопросы ответы, то заданный в начале темы вопрос получит ответ.Ну, а кратко так: сделайте надёжный бэкап. Подготовьтесь к восстановлению системы в случае неудачи. И — вперёд…
Сергей Панченко
-
Предложено в качестве ответа
5 мая 2013 г. 14:04
-
Помечено в качестве ответа
Petko KrushevMicrosoft contingent staff, Moderator
6 мая 2013 г. 10:30
-
Предложено в качестве ответа
-
Partition Wizard
-
Clone Disk
- How to Upgrade Windows Server 2008 before Support Ends
By Ariel | Follow |
Last Updated February 07, 2021
As you know, Windows Server 2008 will end its support on January 14th. It’s highly recommended that you upgrade Windows Server 2008. But you may wonder whether it’s complicated to upgrade Windows Server 2008. Take it easy, there are some useful tips.
Windows Server 2008 End of Life Is Looming
Microsoft announces that the date of Windows Server 2008 R2 and Windows server 2008 end of life is planned on January 14th, 2020. Once Windows Server 2018 end of life occurs, Windows Server 2008 will not provide these services such as free security updates on-premises, non-security updates, free support options, and online technical content updates.
So, it’s urgent for customers to make a decision. You can upgrade Windows Server 2008 to 2019 before Windows Server 2008 end of life, or migrate Windows Server to Microsoft Azure.
Tip: Windows Server 2008 upgrade requires lots of time and effort, which may bring some unexpected risks. So please be sure you back up important data in advance. Here we want to recommend you a professional backup software MiniTool software.
In-Place Upgrade Windows Server 2008 to Windows Server 2019
There are many ways you can upgrade Windows Server 2008 to a new version of Windows Server. This article mainly focuses on in-place upgrade Windows Server 2008 to 2019. Well, you can look for more information about Windows Server 2019 installation and upgrades on Microsoft Docs.
To help users upgrade Windows Server smoothly, Windows Server Upgrade Center provides you step-by-step guidance for the upgrade.
Here it’s recommended that you do an in-place upgrade to Windows Server 2019 from Windows Server 2016 and Windows Server 2012 (R2). In other words, there are three continuous upgrades that progress to upgrade from Windows Server 2008 to Windows Server 2019.
- First, upgrade Windows Server 2008 (R2) to Windows Server 2012 (R2).
- You need to upgrade Windows Server 2012 (R2) to Windows Server 2016.
- At last, you can upgrade Windows Server 2016 to Windows Server 2019.
Before you start this in-place upgrade, there are many requirements you should pay attention to:
- Take inventory of your servers. You should check whether the applications and roles installed are supported within newer versions of Windows Server.
- If it is a physical Server, you should check whether you have drivers and firmware for the new Windows Server.
- Make sure you have enough disk space to update Windows Server 2008 to 2019.
- Make sure your system information is collected before the upgrade.
- Make sure you have a backup of the Server before the update and make sure you can also restore it from that backup.
Migrate Windows Server 2008 into Microsoft Azure
In addition, to do an in-place upgrade, you can also Migrate Windows Server 2008 to Microsoft Azure, which enables you to get three years of extended security support freely. So that you have more time to upgrade your servers, and redeploy your apps.
There is a full range of tools available in Azure Migration Center that can help you estimate your current on-premises environment as well as migrate Windows Server 2008 into Azure, including the operating system, applications, and data into Azure.
It is easy to migrate your Windows Server 2008 machines to Azure. You just need to perform basic steps.
Step 1. You need to create a storage account in your Azure account.
Step 2.Then you can start to replicate the Server to your storage account with Azure Site Recovery.
Step 3. You can use Azure Site Recovery to make Server running on Hyper-V Servers, physical Servers, and VMware virtual machines.
Final Words
Well, all related information and helpful tips about Windows Server 2008 end of life has been told to you. Now, it’s high time to upgrade your Windows Server 2008 to a new version of Windows Server.
About The Author
Position: Columnist
Ariel is an enthusiastic IT columnist focusing on partition management, data recovery, and Windows issues. She has helped users fix various problems like PS4 corrupted disk, unexpected store exception error, the green screen of death error, etc. If you are searching for methods to optimize your storage device and restore lost data from different storage devices, then Ariel can provide reliable solutions for these issues.
-
Partition Wizard
-
Clone Disk
- How to Upgrade Windows Server 2008 before Support Ends
By Ariel | Follow |
Last Updated February 07, 2021
As you know, Windows Server 2008 will end its support on January 14th. It’s highly recommended that you upgrade Windows Server 2008. But you may wonder whether it’s complicated to upgrade Windows Server 2008. Take it easy, there are some useful tips.
Windows Server 2008 End of Life Is Looming
Microsoft announces that the date of Windows Server 2008 R2 and Windows server 2008 end of life is planned on January 14th, 2020. Once Windows Server 2018 end of life occurs, Windows Server 2008 will not provide these services such as free security updates on-premises, non-security updates, free support options, and online technical content updates.
So, it’s urgent for customers to make a decision. You can upgrade Windows Server 2008 to 2019 before Windows Server 2008 end of life, or migrate Windows Server to Microsoft Azure.
Tip: Windows Server 2008 upgrade requires lots of time and effort, which may bring some unexpected risks. So please be sure you back up important data in advance. Here we want to recommend you a professional backup software MiniTool software.
In-Place Upgrade Windows Server 2008 to Windows Server 2019
There are many ways you can upgrade Windows Server 2008 to a new version of Windows Server. This article mainly focuses on in-place upgrade Windows Server 2008 to 2019. Well, you can look for more information about Windows Server 2019 installation and upgrades on Microsoft Docs.
To help users upgrade Windows Server smoothly, Windows Server Upgrade Center provides you step-by-step guidance for the upgrade.
Here it’s recommended that you do an in-place upgrade to Windows Server 2019 from Windows Server 2016 and Windows Server 2012 (R2). In other words, there are three continuous upgrades that progress to upgrade from Windows Server 2008 to Windows Server 2019.
- First, upgrade Windows Server 2008 (R2) to Windows Server 2012 (R2).
- You need to upgrade Windows Server 2012 (R2) to Windows Server 2016.
- At last, you can upgrade Windows Server 2016 to Windows Server 2019.
Before you start this in-place upgrade, there are many requirements you should pay attention to:
- Take inventory of your servers. You should check whether the applications and roles installed are supported within newer versions of Windows Server.
- If it is a physical Server, you should check whether you have drivers and firmware for the new Windows Server.
- Make sure you have enough disk space to update Windows Server 2008 to 2019.
- Make sure your system information is collected before the upgrade.
- Make sure you have a backup of the Server before the update and make sure you can also restore it from that backup.
Migrate Windows Server 2008 into Microsoft Azure
In addition, to do an in-place upgrade, you can also Migrate Windows Server 2008 to Microsoft Azure, which enables you to get three years of extended security support freely. So that you have more time to upgrade your servers, and redeploy your apps.
There is a full range of tools available in Azure Migration Center that can help you estimate your current on-premises environment as well as migrate Windows Server 2008 into Azure, including the operating system, applications, and data into Azure.
It is easy to migrate your Windows Server 2008 machines to Azure. You just need to perform basic steps.
Step 1. You need to create a storage account in your Azure account.
Step 2.Then you can start to replicate the Server to your storage account with Azure Site Recovery.
Step 3. You can use Azure Site Recovery to make Server running on Hyper-V Servers, physical Servers, and VMware virtual machines.
Final Words
Well, all related information and helpful tips about Windows Server 2008 end of life has been told to you. Now, it’s high time to upgrade your Windows Server 2008 to a new version of Windows Server.
About The Author
Position: Columnist
Ariel is an enthusiastic IT columnist focusing on partition management, data recovery, and Windows issues. She has helped users fix various problems like PS4 corrupted disk, unexpected store exception error, the green screen of death error, etc. If you are searching for methods to optimize your storage device and restore lost data from different storage devices, then Ariel can provide reliable solutions for these issues.
As you know the Windows Server 2008 and Windows Server 2008 R2 are out of support on January 14th, 2020. Customer will need to upgrade their Windows Server 2008 and Windows Server 2008 R2 to a newer version of Windows Server or migrate these servers to Microsoft Azure and get three years of extended security support for free, which will give you more time to upgrade your servers, redeploy your apps or rearchitect your applications. If you want to have more information about how to migrate your servers to Azure, check out the Azure migration center. There are many ways you can migrate your server applications to a newer version of Windows Server. This blog post covers how you in-place upgrade Windows Server 2008 R2 to Windows Server 2019. You can find more information about Windows Server 2019 installations and upgrades on Microsoft Docs.
To help you with Windows Server upgrades, the Windows Server team created Windows Server Upgrade Center, which gives you step-by-step guidance for modernizing your datacenter.
Upgrade path
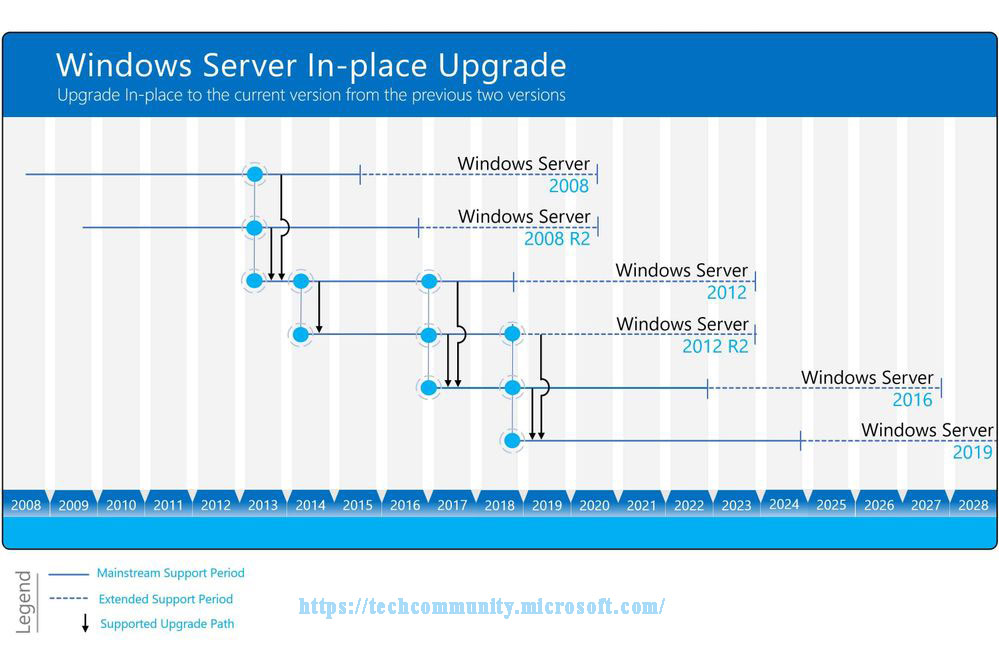
You can directly do an in-place upgrade to Windows Server 2019 from Windows Server 2016 and Windows Server 2012 R2. This means, to upgrade from Windows Server 2008 R2 to Windows Server 2019, you will have two consecutive upgrade processes.
- First, you upgrade Windows Server 2008 R2 to Windows Server 2012 R2
- Secondly, you will upgrade Windows Server 2012 R2 to Windows Server 2019

Not all server roles and applications are supported to be migrated in older versions of Windows Server. Read the specific documentation for your operating system scenario, for example upgrading roles to Windows Server 2016. As an alternative, you can also redeploy the applications on a fresh installation of Windows Server 2019.
Planning the Upgrade
Before you start in-place upgrade your servers, make sure you plan your upgrade and make sure you have all the information, to avoid surprises at the end of the migration. The Windows Server Upgrade Center helps you with a checklist which includes, for example, the following:
- What software and roles are installed on the server and are they supported and working with newer versions of Windows Server. I recommend doing a software inventory and check if the applications and roles are supported.
- Have some tests ready to check if the application still works after the upgrade. It is a good thing to run through these tests before the upgrade as well, so you can confirm everything is working correctly.
- If it is a physical server, do you have drivers and firmware updates for the new Windows Server version available?
- Think about backup software and antivirus, you might need to uninstall these during the update process and reinstall it after the upgrade is done.
- Make sure your server is up-to-date and fully patched before doing an in-place upgrade.
- Planning the timeframe for the upgrade. In-place upgrades take some time, make sure you have a long enough maintenance window planned. Also make sure you communicate the maintenance window, so users know that the application or service is not available.
- Make sure you have a backup of the server before you start the upgrade process, and make sure you can also restore from that specific backup.
- If possible, test the upgrade process with a non-production server.
- Make sure you have enough disk space for the upgrade.
- Gather your system information before the upgrade.
Collect system information
Before you start the upgrade process you should also collect the following system information. You can use the following to commands. Please save the output on another location.
mkdir C:info
systeminfo > C:infosysteminfo.txt
ipconfig /all > C:infoipconfig.txt
Please copy and save the systeminfo.txt and ipconfig.txt file on another system.

Before proceeding with the In-place Upgrade
I know I have mentioned it before, make sure you have a backup you can restore of the server you are performing the in-place upgrade. Also, make sure that you are aware that the following upgrade processes cause downtime.
Upgrade Windows Server 2008 R2 to Windows Server 2012 R2
Insert the setup media for Windows Server 2012 R2 and start the setup.exe.
Click Install now.
If your server is connected to the internet, make sure you click on Go online to install updates now (recommended). This will download the latest updates to the installer.
Enter the Windows Server License Key for Windows Server 2012 R2 if needed. If you are not asked for the license key, you can skip that step.
Select the right Windows Server edition you want to install. Also make sure you select Server with a GUI or Server Core Installation, depending on your needs.
Read and accept the license terms. Select I accept the license terms.
For an in-place upgrade select Upgrade: Install Windows and keep files, settings, and applications.
The setup will check the application compatibility and create a compatibility report.
Next, press Confirm to start upgrading Windows.
The setup will complete and automatically reboot. When the upgrade is done, you will see the Windows Server 2012 R2 logon screen.
Post Upgrade to Windows Server 2012 R2
After the upgrade to Windows Server 2012, log in and check if the server has been successfully upgraded. Make sure you test if the applications are running like expected and if users can access the application. Make sure that the IP and firewall configuration of your server still allows clients to access your system.
You can run the following command to see that you successfully upgraded to Windows Server 2012:
systeminfo

If there has been an issue with the upgrade, make a copy and zip the %SystemRoot%Panther (usually C:WindowsPanther) directory and contact support.
If everything works as expected, you can install the latest Windows Server 2012 R2 updates, and make sure your server is fully patched. Before you move to the Windows Server 2012 R2 to Windows Server 2019 upgrade, I also recommend that you create a backup of the server, in that case, you don’t lose the work you did from 2008 R2 to 2012 R2.
Upgrade Windows Server 2012 R2 to Windows Server 2019
Insert the setup media for Windows Server 2019 and start the setup.exe.
Click Install now.
If your server is connected to the internet, make sure you click Download and install updates, drivers and optional features (recommended). This will download the latest updates to the installer.

Enter the Windows Server License Key for Windows Server 2019 if needed. If you are not asked for the license key, you can skip that step.

Select the right Windows Server edition you want to install. Also make sure you select Windows Server 2019 Datacenter (Desktop Experience) or Windows Server 2019 Datacenter (Core), depending on your needs.

Read and accept the license terms. Select I accept the license terms.

For an in-place upgrade, select Keep personal files and app and click Next.

The setup will check the application compatibility and create a compatibility report.
Next, press Install to start upgrading Windows.

The setup will complete and automatically reboot. When the upgrade is done, you will see the Windows Server 2019 logon screen.

Post Upgrade to Windows Server 2019
After the upgrade to Windows Server 2019, log in and check if the server has been successfully upgraded. Make sure you test if the applications are running like expected and if users can access the application. Make sure that the IP and firewall configuration of your server still allows clients to access your system.
You can run the following command to see that you successfully upgraded to Windows Server 2019:
systeminfo
If there has been an issue with the upgrade, make a copy and zip the %SystemRoot%Panther (usually C:WindowsPanther) directory and contact support.
If everything works as expected, you can install the latest Windows Server 2019 updates, and make sure your server is fully patched. I also recommend that you create a backup of the server; in that case, you don’t lose the work you did.
I also highly recommend that you have a look at Windows Containers to modernize your applications. Check out our full video here on Microsoft Channel 9:
Conclusion
There are many ways you can upgrade or migrate your applications, in-place upgrade is just one of them, and might not always fit. However, in some scenarios, it is the easiest way to get to a newer version of Windows Server. I hope this gives you an overview about how you can do in-place upgrades from Windows Server 2008 R2 to Windows Server 2019. If you have any questions or tips for the upgrades, leave a comment below.
Одним из нововведений в Windows Server 2008 R2 является утилита DISM . Она пришла на смену программе OCSETUP и предназначена для установки и настройки ролей и компонентов сервера, причем ее можно использовать как с работающей операционной системой, так и с образами Windows (Windows image, WIM) и с виртуальными жесткими дисками (VHD).
Функционал DISM огромен, и одной из полезных функций утилиты является возможность изменения редакции операционной системы без использования установочного диска. Эта возможность — эквивалент Windows Anytime Upgrade в Windows 7. Обновление может быть выполнено в онлайн или автономном режиме в обеих вариантах установки — полная установка и установка в режиме ядра (Server Core).
Обновление с помощью DISM производится очень быстро и не требует полной переустановки операционной системы. Все роли и компоненты, развернутые на сервере, а также другие характеристики (имя компьютера, пользователи, настройки приложений, и т.д.) сохраняются.
Обновление редакции ограничивается текущей версией операционной системы и вариантом установки (нельзя перейти от полной установки к Server Core и наоборот). Вот возможные варианты обновления:
- Windows Server 2008 R2 Standard — > Windows Server 2008 R2 Enterprise — > Windows Server 2008 R2 Datacenter
- Windows Server 2008 R2 Standard Server Core — > Windows Server 2008 R2 Enterprise Server Core — > Windows Server 2008 R2 Datacenter Server Core
- Windows Server 2008 R2 Foundation — > Windows Server 2008 R2 Standard
Также имейте в виду, что изменения являются необратимыми, и вы не сможете понизить редакцию ОС после того, как произвели обновление.
Описание процесса
Утилита DISM.exe входит в комплект установки Windows Server 2008 R2, поэтому для обновления нам потребуется только действительный 25-значный продукт ключ для редакции, на которую мы планируем перейти.
Сначала определяем текущую редакцию ОС:
DISM /online /Get-CurrentEdition
Затем определяем редакции, на которые возможен переход:
DISM /online /Get-TargetEditions
И, наконец, запускаем обновление:
DISM /online /Set-Edition:<edition ID> /ProductKey:XXXXX-XXXXX-XXXXX-XXXXX-XXXXX
Так, например, для обновления Windows Server 2008 R2 Standart до Enterprise:
DISM /online /Set-Edition:ServerEnterprise /ProductKey:ABCDE-ABCDE-ABCDE-ABCDE-ABCDE
По завершению операции соглашаемся на требование перезагрузки и ждем минут 5-10. Система пару раз перезагружается, применяя сделанные изменения. Затем заходим на сервер и активируем Windows с новым ключом. Переход на новую редакцию состоялся.
Некоторые проблемы, с которыми можно столкнуться при обновлении:
1. Если сервер является контролером домена (DC), то его нельзя обновлять подобным образом. Сначала DC надо понизить до обычного сервера (передав перед этим роли FSMO другому DC), затем обновить редакцию, а потом снова повысить до контролера домена.
2. При обновлении вы можете получить сообщение о том, что указанный ключ продукта не подходит для выбранной редакции (The specified product key is not valid for the target edition).
В этом случае можно воспользоваться временным ключом от Microsoft: 489J6-VHDMP-X63PK-3K798-CPX3Y. С его помощью можно провести обновление, а затем зайти в систему и активировать ОС уже со своим ключом продукта.
3. При использовании KMS ключа для активации надо проделать следующие действия:
- Открыть cmd и перейти в директорию system32;
- slmgr.vbs -ckms — очистить текущую KMS запись;
- slmgr.vbs -upk — удалить другие установленные ключи продукта;
- slmgr.vbs -ipk xxxxx-xxxxx-xxxxx-xxxxx-xxxxx — установить новый ключ;
- slmgr.vbs -ato — активировать ОС.
Вот вроде и все. Удачного обновления 🙂
In this post we will see how to upgrade Windows Server 2008 R2 to Windows Server 2012. It’s been an year that Microsoft has released Windows Server 2012, when Windows Sever 2012 was released the IT professionals were eager to know what’s new in Windows Server 2012 and i was one of them. Microsoft releases all of its operating systems in multiple editions, which provides consumers with varying price points and feature sets. While choosing the edition make sure you choose the edition that suits your requirements. Before we go ahead and deploy Server 2012, let’s take a look at editions of Windows Server 2012.
1) Windows Server 2012 Datacenter Edition – The Datacenter edition is designed for large and powerful servers with up to 64 processors and fault-tolerance features such as hot add processor support. This edition is available only through the Microsoft volume licensing program and from original equipment manufacturers bundled with a server.
2) Windows Server 2012 Standard Edition – This is a fully functional edition of Windows Server 2012. Frankly speaking there is no much difference between Datacenter and Standard Edition of Windows Server 2012. What differentiates these 2 editions is the number of virtual machine instances that is permitted by the license. A Standard edition license will entitle you to run up to two VMs on up to two processors. A Datacenter edition license will entitle you to run an unlimited number of VMs on up to two processors.
3) Windows Server 2012 Essentials – The Essentials edition is suited for small organizations, this edition includes all the features of Standard and Datacenter edition except the Server Core, Hyper-v and ADFS (Active Directory Federation Services).
4) Windows Server 2012 Foundation – This edition is designed for small businesses that require only basic server features such as file and print services and application support. The edition includes no virtualization rights and is limited to 15 users.
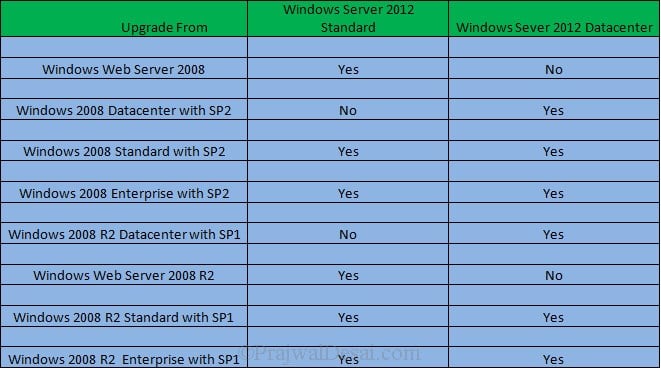
If i were to upgrade my existing windows server 2008 R2 Enterprise server to windows server 2012 i would first choose the edition and then i would check the upgrade paths. I have created a table which shows whether you can upgrade to windows server 2012 with you present operating system.
Lets take a look at hardware requirements for upgrading our server to windows server 2012. Windows Server 2012 requires minimum of 16 GB to 32 GB of disk space. When you install Windows Server 2012 it occupies 15.1 GB of space approximately but its good to allocate at least 32 GB of drive space for Windows Server 2012. You would require 1.4 GHz 64-bit processor, 512 MB of RAM, 32 GB of disk space, DVD Drive, Super VGA (800×600) or higher resolution monitor, keyboard and mouse.
The Windows Server 2012 evaluation software is available in Standard and Datacenter editions, you can download Windows Server 2012 from here :- http://technet.microsoft.com/en-in/evalcenter/hh670538.aspx.
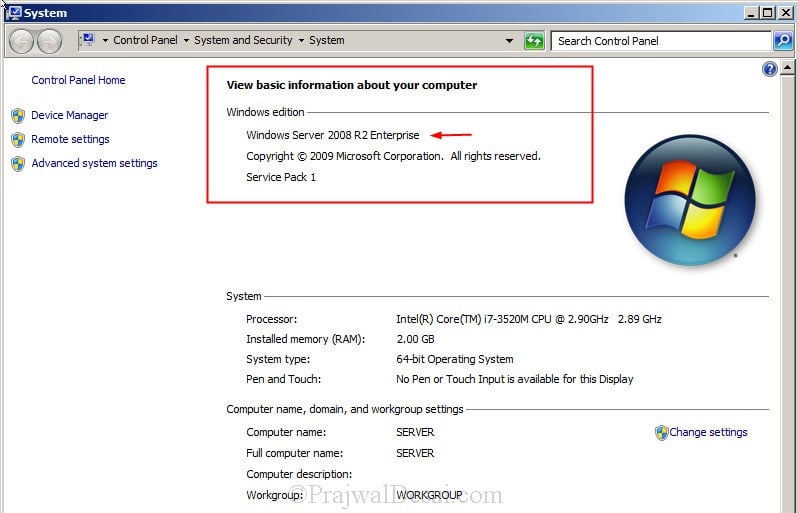
In this post i will be showing you how to upgrade a windows server 2008 R2 Enterprise SP1 to Windows Server 2012 Datacenter. Note that the existing server is in workgroup, do not consider this post to upgrade your domain controller to windows server 2012. I will be creating a separate post to show the upgrade of domain controller running on windows server 2008 r2 to windows server 2012.
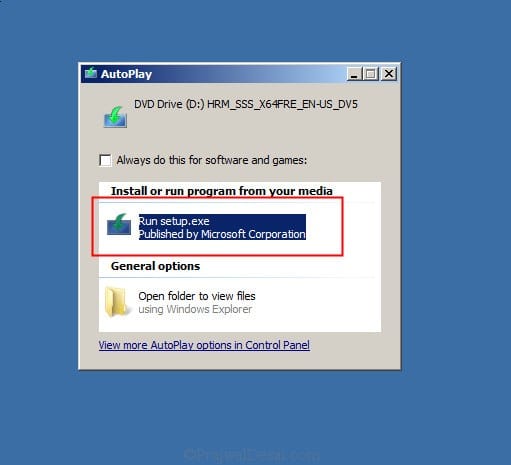
Insert the windows server 2012 DVD into the DVD-ROM and click on Run Setup.exe.
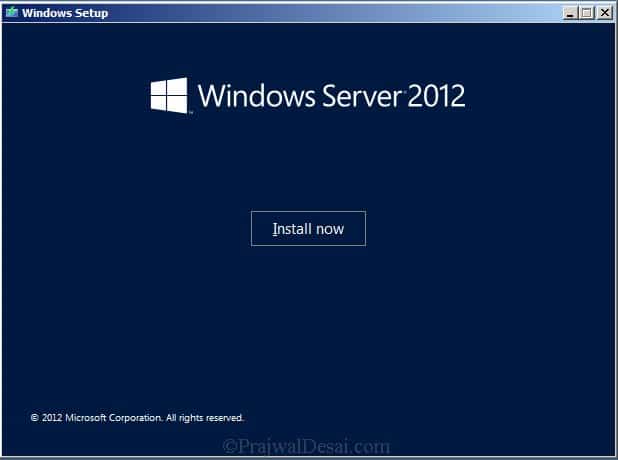
On the Windows Setup screen, click on Install now.
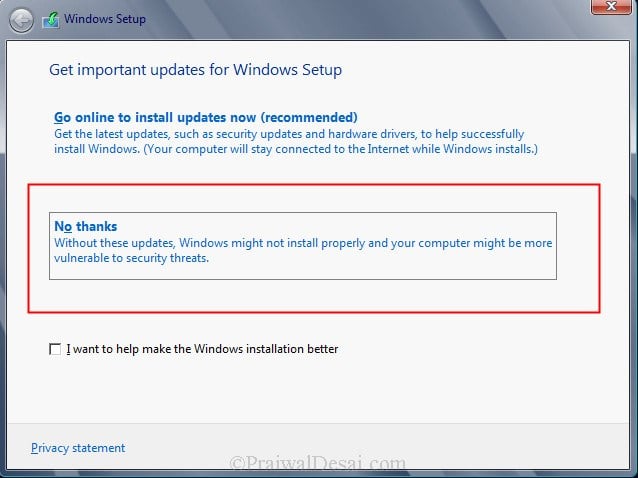
If you want to get security updates and latest drivers for your operating system select Go online to install updates now. We can also do a windows update once the upgrade is completed, so select No, Thanks.
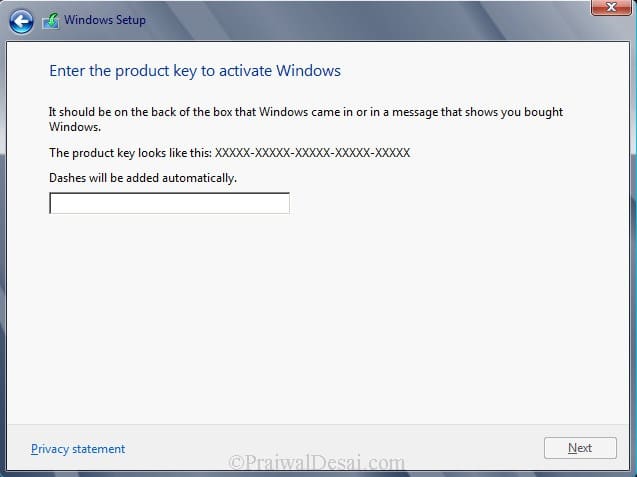
Enter your product key for windows server 2012 and click on Next. In this step i have entered server 2012 Datacenter edition key. Click on Next.
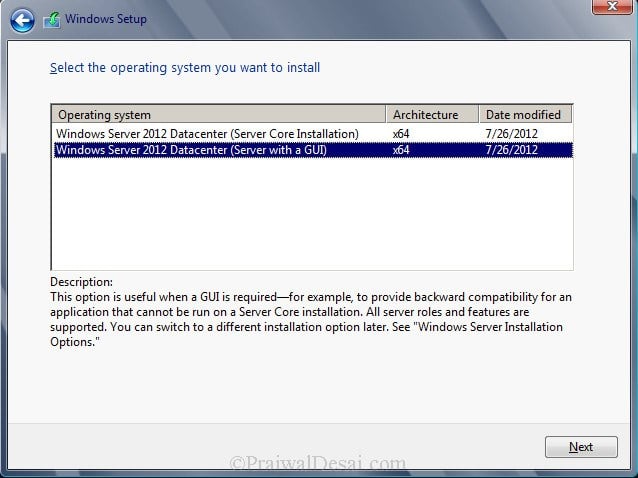
Server core installation has no Server Manager or any other MMCs to manage roles and features. The management must be done either remotely from a client machine or through the command prompt or Powershell at the console. There is no Start menu, no desktop Explorer shell, no Microsoft Management Console, and virtually no graphical applications. All you see when you start the computer is a single window with a command prompt. In this step i will select the second installation mode, Windows Server 2012 Datacenter (Server with a GUI). Click on Next.
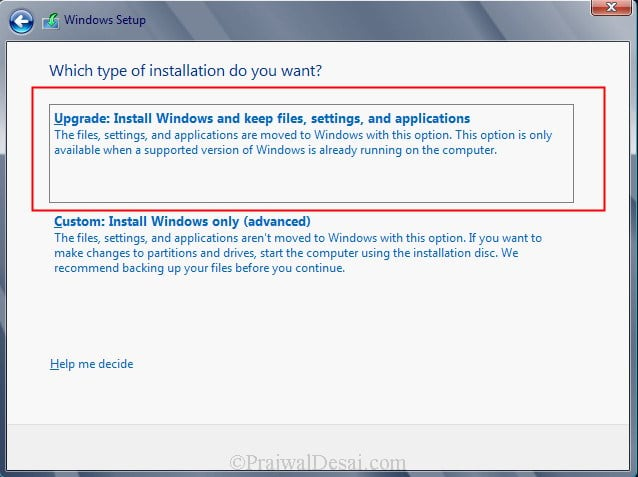
Select Upgrade: Install Windows and Keep files, settings and applications. This will keep existing files, settings and applications and upgrade our server to windows 2012.
The upgrade will take close to 20 minutes. Sit back and relax until the upgrade is complete.
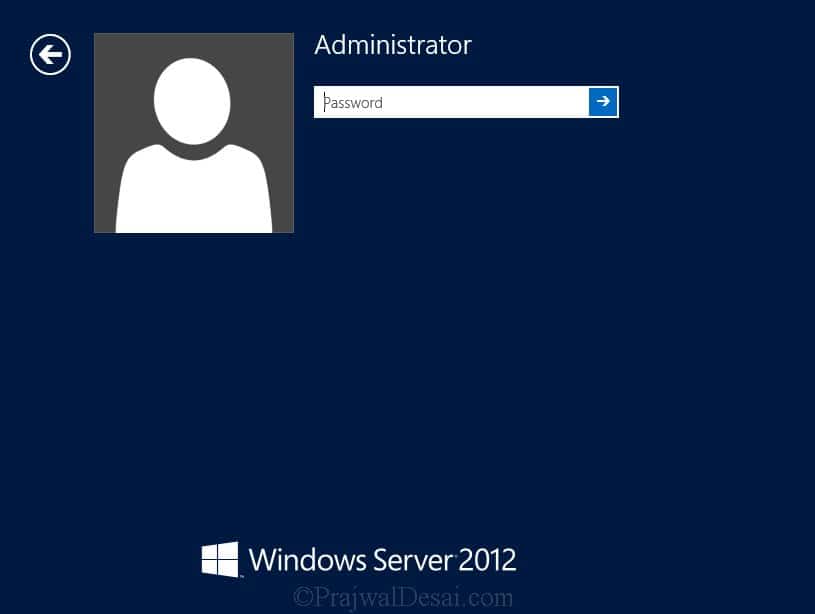
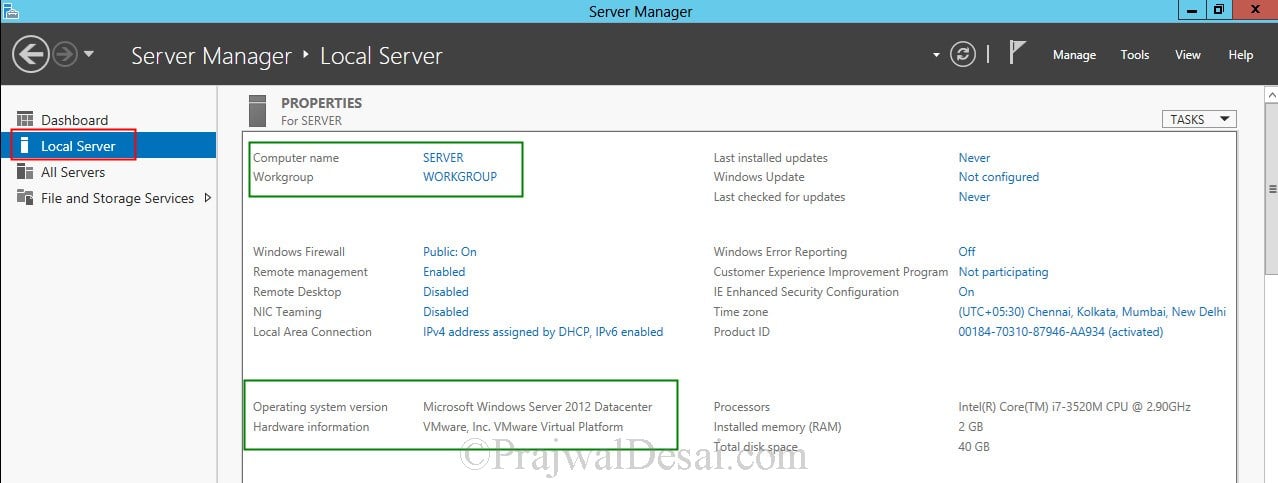
The upgrade from windows server 2008 R2 Enterprise to windows server 2012 Datacenter is complete. Let’s login to the server and check for the edition.
Click on Server Manager, Click on Local Server, check the properties of server. We see that the operating system version is Microsoft Windows Server 2012 Datacenter. The upgrade process has been completed successfully.

Prajwal Desai is a Microsoft MVP in Enterprise Mobility. He writes articles on SCCM, Intune, Configuration Manager, Microsoft Intune, Azure, Windows Server, Windows 11, WordPress and other topics, with the goal of providing people with useful information.

