На чтение 3 мин. Просмотров 451 Опубликовано 30.04.2021
В Windows 10, сборка 14352, Microsoft представила новую функцию безопасности, которая будет доступна в последнем юбилейном обновлении. Новая функция периодического сканирования – это опция Защитника Windows, которая позволяет Защитнику дополнять альтернативное антивирусное решение. Таким образом, пользователи, которые предпочитают устанавливать какое-либо другое антивирусное программное обеспечение, такое как Avast, Kaspersky, Symantec и т. Д., Могут получить дополнительную защиту. Давайте посмотрим, как это работает.
Когда вы только что установили Windows 10, операционная система предлагает Защитник Windows в качестве основного антивирусного программного обеспечения из коробки. Он включен по умолчанию, и его сложно отключить, даже если вы захотите. В разделе «Настройки» -> «Обновление и безопасность» – >> Защитник Windows он предлагает следующие параметры для управления параметрами безопасности: 
Обратите внимание на параметр Защита в реальном времени .
Когда пользователь устанавливает альтернативное антивирусное программное обеспечение, страница Защитника Windows меняет свой внешний вид и поведение в приложении “Настройки”. Все настройки отключаются, а опция «Постоянная защита» меняет свое название на Периодическое сканирование . См. Следующий снимок экрана: 
Обратите внимание, что этот новый параметр появляется только в том случае, если Windows 10 может обнаружить установленное вами антивирусное программное обеспечение. Это означает, что ваш антивирус должен быть совместим с Windows 10.
По умолчанию периодическое сканирование отключено. Когда он включен, Защитник Windows действует как дополнительный антивирусный сканер помимо вашего основного антивируса. Это должно повысить безопасность системы.
Как только Защитник Windows обнаружит угрозы, пользователь увидит уведомление. Хотя приложение в основном отключено в режиме периодического сканирования, его пользовательский интерфейс по-прежнему работает и может использоваться для просмотра истории обновлений, истории сканирования и действий, предпринятых против ранее обнаруженных угроз. 

Если вы заинтересованы в тестировании периодического сканирования в Windows 10, вот как вы можете это попробовать.
Как включить или выключить периодическое сканирование в Windows 10
Предполагается, что у вас установлено антивирусное программное обеспечение стороннего производителя. В моем случае это Avast! Бесплатно.

Вот как это можно сделать.
- Откройте приложение “Настройки” в Windows 10. Совет. Если на вашем устройстве есть клавиатура, нажмите Win + I , чтобы открыть это напрямую.

- Перейдите в раздел Система – Обновление и безопасность, как показано ниже.
- Щелкните Защитник Windows слева, чтобы открыть эту страницу.
- Включите периодическое сканирование в Windows 10 , включив параметр Периодическое сканирование: Отключите периодическое сканирование в Windows 10 , отключив параметр Периодическое сканирование:


 Отключите периодическое сканирование в Windows 10 , отключив параметр Периодическое сканирование:
Посмотрите следующее видео, чтобы увидеть эту функцию в действии:
Совет: вы можете подписаться на наш официальный канал YouTube ЗДЕСЬ .
Статья обновлена: 07 июля 2022
ID: 13341
Как отключить запланированные проверки Защитника Windows на Windows 10
- В левом нижнем углу рабочего стола нажмите Пуск → Параметры.

- Выберите Обновление и безопасность.

- Перейдите в раздел Безопасность Windows и нажмите Открыть службу «Безопасность Windows».

- Перейдите в раздел Защита от вирусов и угроз, нажмите Параметры антивирусной программы «Защитника Windows» и установите переключатель Периодическое сканирование
в выключенное положение.

Запланированные проверки Защитника Windows будут отключены на Windows 10.
Как отключить запланированные проверки Защитника Windows на Windows 11
- Нажмите на значок поиска в панели задач Windows.
- Введите в поле поиска Планировщик заданий и выберите Планировщик заданий.

- Перейдите в папку Библиотека планировщика заданий → Microsoft → Windows.

- Перейдите в папку Windows Defender.
- Откройте контекcтное меню файла Windows Defender Scheduled Scan и выберите Отключить.

Запланированные проверки Защитника Windows будут отключены на Windows 11.
Как удалить Защитник Windows
Для Windows 10
Вы можете удалить программу стандартными средствами Microsoft Windows. Инструкция на сайте поддержки Microsoft.
Если стандартными средствами удалить программу не удалось, воспользуйтесь утилитой Microsoft для устранения проблем, препятствующих установке или удалению программ.
Если утилита не помогла, удалите программу с помощью файла mseremoval.bat:
- Скачайте и распакуйте архив mseremoval.zip.
- Нажмите правой кнопкой мыши на файл mseremoval.bat, выберите Запустить от имени администратора и введите данные учетной записи администратора.
Откроется окно командной строки. - Удалите файл mseremoval.bat, когда нужные действия будут выполнены и окно командной строки закроется.
Программа Защитник Windows будет удалена.
Для Windows 11
Вы можете отключить Защиту в режиме реального времени. Инструкция на сайте поддержки Microsoft.
Как запретить Windows сканировать и восстанавливать диск?
- На панели задач выберите Проводник.
- Перейдите на этот компьютер и разверните Устройства и диски.
- Щелкните правой кнопкой мыши диск, который вы видели в сообщении Windows «Сканировать и восстановить», и выберите «Свойства».
- Перейдите в Инструменты и в разделе Проверка ошибок выберите Проверить.
Сколько времени нужно на сканирование и восстановление диска?
1. Сколько времени должно занять сканирование и восстановление диска? Если ваш компьютер находится в процессе сканирования и восстановления жесткого диска, этот процесс займет более 2 часов в зависимости от размера вашего диска и обнаруженных ошибок. Обычно он перестает обновляться примерно на 10 или 11% и внезапно переходит на 100, когда закончено.
Можно ли остановить CHKDSK?
Ты не можешь остановить chkdsk процесс после его запуска. В безопасный способ — дождаться его завершения. Остановка компьютер во время проверки может привести к повреждению файловой системы.
Как пропустить этап восстановления C?
Исправление (C) сообщения об ошибке этапа 1 во время загрузки
- Нажмите Win + R, чтобы открыть окно «Выполнить».
- Введите regedit и нажмите кнопку Enter.
- Щелкните вариант Да.
- Перейдите к диспетчеру сеансов в HKEY_LOCAL_MACHINE.
- Дважды щелкните BootExecute.
- Установите для параметра Value значение autocheck autochk / k: C *
- Нажмите кнопку ОК.
Как остановить восстановление диска?
Во время запуска Windows вам будет предоставлена пара секунд, в течение которых вы можете нажать любую клавишу, чтобы прервать запланированную проверку диска. Если это не помогает, отмените CHKDSK с помощью нажатие Ctrl + C и посмотреть, работает ли это для вас.
Сколько времени занимает исправление ошибок диска?
chkdsk исправление ошибок на диске 1 ТБ может занять до 4 часов и более, в зависимости от количества ошибок.
Почему происходит проверка диска?
Эта утилита командной строки, также называемая Check Disk, проверяет и устраняет проблемы файловой системы на жестких дисках. … Обычные автоматические триггеры для проверки диска: неправильные отключения системы, выход из строя жестких дисков и проблемы с файловой системой, вызванные заражением вредоносными программами.
Сколько времени занимает проверка диска в Windows 10?
Процесс chkdsk обычно завершается за 5 часов для дисков емкостью 1 ТБ, а если вы сканируете диск емкостью 3 ТБ, необходимое время увеличивается втрое. Как мы уже упоминали, сканирование chkdsk может занять некоторое время в зависимости от размера выбранного раздела.
Какие этапы chkdsk?
Когда chkdsk запущен, есть 3 основных этапа и 2 дополнительных этапа. Chkdsk будет отображать сообщения о состоянии для каждого этапа, например: CHKDSK проверяет файлы (этап 1 из 3)… проверка завершена.
Как обойти сканирование диска в Windows 10?
Чтобы пропустить проверку диска, нажмите любую клавишу в течение 10 секунд. Простое нажатие любой клавиши остановит запуск проверки диска, но когда вы перезагрузите компьютер, вы снова получите это сообщение, потому что Windows по-прежнему считает, что диск требует сканирования, и будет напоминать вам, пока он не будет проверен.
На чтение 2 мин. Просмотров 269 Опубликовано 03.09.2019
Как и большинство функций в Windows 10, Защитник Windows также получил несколько улучшений благодаря Anniversary Update. Наиболее заметная функция – это возможность выполнять сканирование компьютера в автономном режиме даже до загрузки компьютера.
Тем не менее, новая функция автономного сканирования – именно то, что вызывает у некоторых людей головную боль в Windows 10 версии 1607. А именно, один пользователь сообщил, что Защитник Windows постоянно просит его выполнить автономное сканирование, но когда он это делает, вредоносное ПО не обнаруживается.
«Начиная с обновления до юбилейной версии win 10. Защитник продолжает говорить, что нужно проводить сканирование в автономном режиме. Это постоянно, и когда я пытаюсь сделать самоконтроль, выдает всплывающее сообщение об ошибке. Сегодня запускали автономное сканирование 3 раза, и в хранилище вирусов не обнаружено ».
Хотя это не является серьезной проблемой, которая может помешать работе вашего компьютера или даже Защитника Windows, постоянное получение уведомлений о выполнении сканирования может быть очень неприятным и раздражающим. К счастью, есть простое решение, которое удаляет все нежелательные запросы на сканирование и все другие потенциально раздражающие уведомления Защитника Windows. Вот именно то, что вам нужно сделать:
- Открытая панель управления
- Перейдите в раздел «Безопасность и обслуживание»> «Изменить настройки безопасности и обслуживания».
-
Снимите флажок Защита от шпионского и нежелательного программного обеспечения, а также защита от вирусов
- Перезагрузите компьютер

Итак, после переключения этих параметров вас не будут беспокоить нежелательные уведомления Защитника Windows. Однако мы рекомендуем вам включить эти уведомления, потому что если вы их отключите, вы можете пропустить некоторые важные уведомления безопасности от Защитника Windows, которые вам, безусловно, не нужны.
Если у вас есть какие-либо комментарии или вопросы, просто сообщите нам об этом в комментариях ниже.
Find out all you need to know about this feature
by Madalina Dinita
Madalina has been a Windows fan ever since she got her hands on her first Windows XP computer. She is interested in all things technology, especially emerging technologies… read more
Updated on November 25, 2022
Reviewed by
Alex Serban

After moving away from the corporate work-style, Alex has found rewards in a lifestyle of constant analysis, team coordination and pestering his colleagues. Holding an MCSA Windows Server… read more
- Windows 10 Creators Update brings a bevy of new features and improvements, such as the Cloud-Delivered Protection for Windows Defender.
- However, if you want to disable the Cloud security scan, change the settings using Group Policy Editor.
- You can also deactivate the Defender’s Cloud-Based Protection by adding certain registry keys.
- Make sure to check the StartUp programs if you want to stop these features from opening alongside your OS.

While the Windows 10 Creators Update brings a bevy of new features and improvements, not all users actually like them.
As a matter of fact, many users don’t want to use Windows Defender‘s Cloud-Based Protection and also refuse to turn on Automatic Sample Submission.
However, if you don’t enable these features, Windows Defender displays a yellow triangle with an exclamation mark in the Notifications tray.
What is Cloud-delivered protection?
If you enable cloud protection, any patches for malware problems can be sent to your device over the cloud within minutes, rather than having to wait until the next update is released.
Actually, many users have been confused by this weird yellow triangle and couldn’t find a proper explanation as to why it constantly appeared on the screen.
Now that they know why the warning occurs, many want to simply disable Cloud-Based Protection and Automatic Submission notifications.
The problem is that turning off these warnings is a challenge in itself since there is no dedicated option for that.
We’ve scoured the almighty Internet and found a few solutions to disable Windows Defender’s Cloud-delivered protection notifications.
How do I turn off cloud-based and automatic submission?
- What is Cloud-delivered protection?
- How do I turn off cloud-based and automatic submission?
- 1. Disable them from Task Manager
- 2. Use the Group Policy Editor
- 3. Use the Registry Editor for Windows 10 Home
- 4. Prevent Defender from loading health reports
1. Disable them from Task Manager
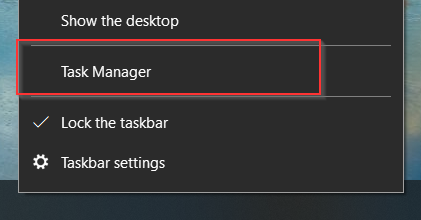
- To turn off Cloud-delivered protection is off managed by your administrator, right-click on the taskbar to open the Task Manager.

- Go to the Start-up tab – locate these two features.

- Disable them.
- Restart your computer.
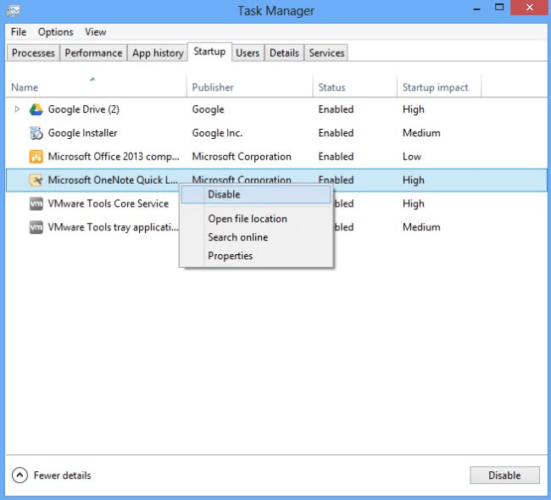
Because these features start once your computer is up and running, you should be able to find them in the StartUp tab from Task Manager.
Some PC issues are hard to tackle, especially when it comes to corrupted repositories or missing Windows files. If you are having troubles fixing an error, your system may be partially broken.
We recommend installing Restoro, a tool that will scan your machine and identify what the fault is.
Click here to download and start repairing.
If Task Manager is not working on your Windows 10 computer, don’t panic. Check our dedicated guide and fix the problem with ease.
2. Use the Group Policy Editor
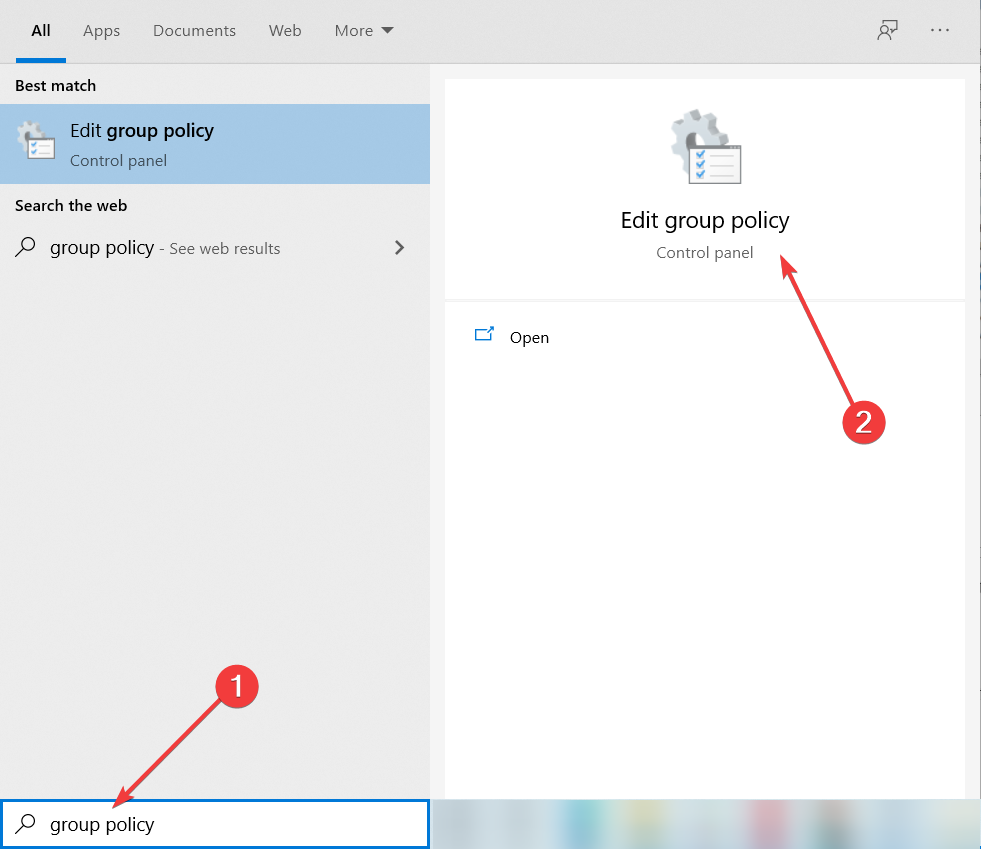
- Go to Start and type group policy.
- Select Edit Group Policy.

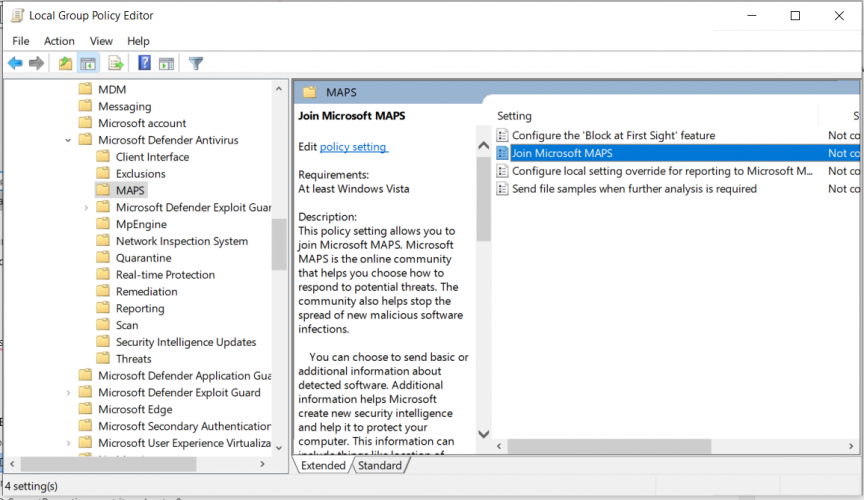
- Go to:
Computer Configuration - Administrative Templates - Windows Components - Windows Defender Antivirus - MAPS
- Disable the following features: Join Microsoft MAPS and Send file samples when further analysis is required.

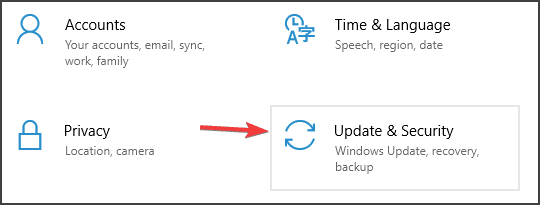
- Press Windows + I keys combination to open Settings.
- Go to Update and Security.

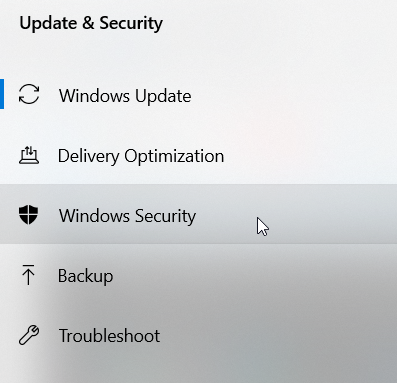
- From the left pane select Windows Security.

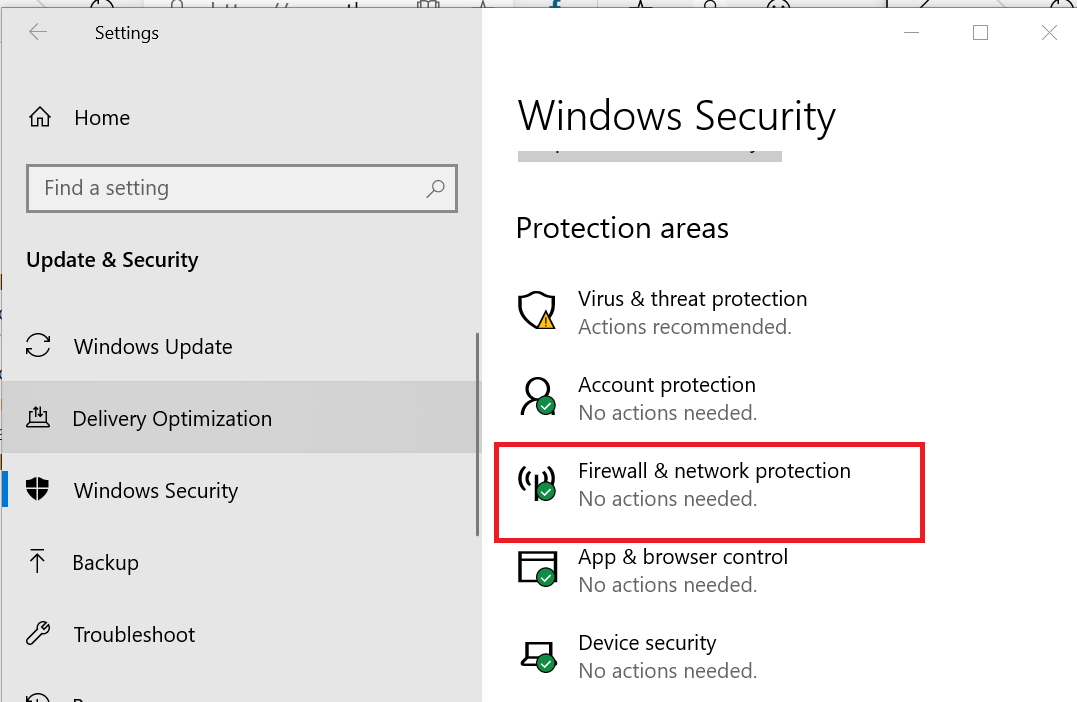
- Click on Firewall and network protection.

- Disable Firewall profiles( domain, private and public).
- Restart your computer.
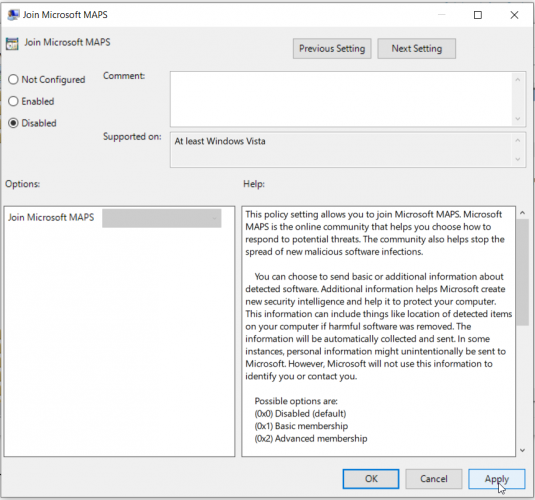
MAPS is the abbreviation for Microsoft Advanced Protection Service, and it is a cloud protection service, improving real-time protection.
It is also an online community, where users sent information about malicious software, PUPs, spyware, and other details to Microsoft. The purpose is to stop the spread of computer viruses.
Group Policy is an excellent method to modify computer settings. If you want to learn more about how to edit them, check our comprehensive guide.
3. Use the Registry Editor for Windows 10 Home
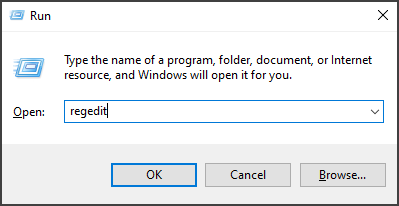
- Launch Run.
- Type regedit and hit Enter.

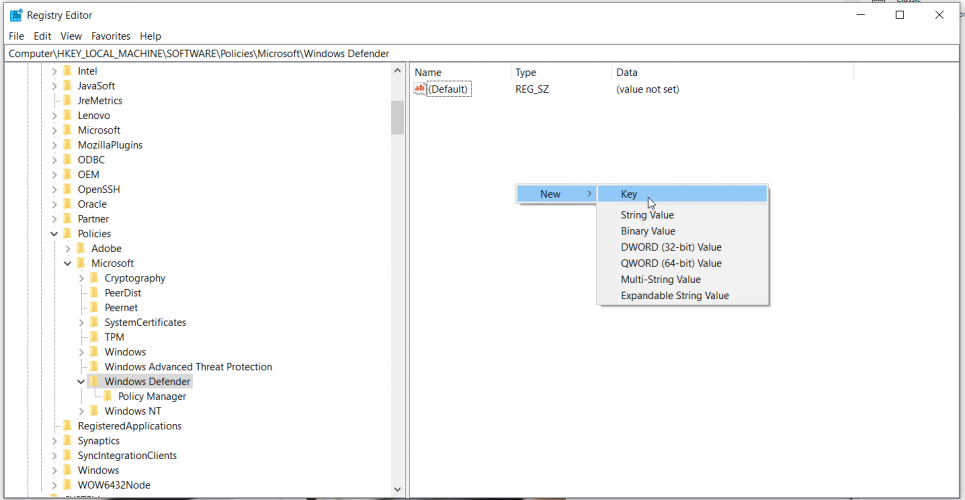
- Go to the following path:
HKEY_LOCAL_MACHINE/SOFTWARE/Policies/Microsof/tWindows Defender - Under the Windows Defender key, create a new key – name it Spynet.

- In the right-hand pane, create a new DWORD SubmitSamplesConsent – set its value to 2.
- Create a new DWORD SpynetReporting – set its value to 0
Windows 10 Home doesn’t support the Group Policy Editor. If you’re running this OS, use the Registry Editor for this task.
4. Prevent Defender from loading health reports
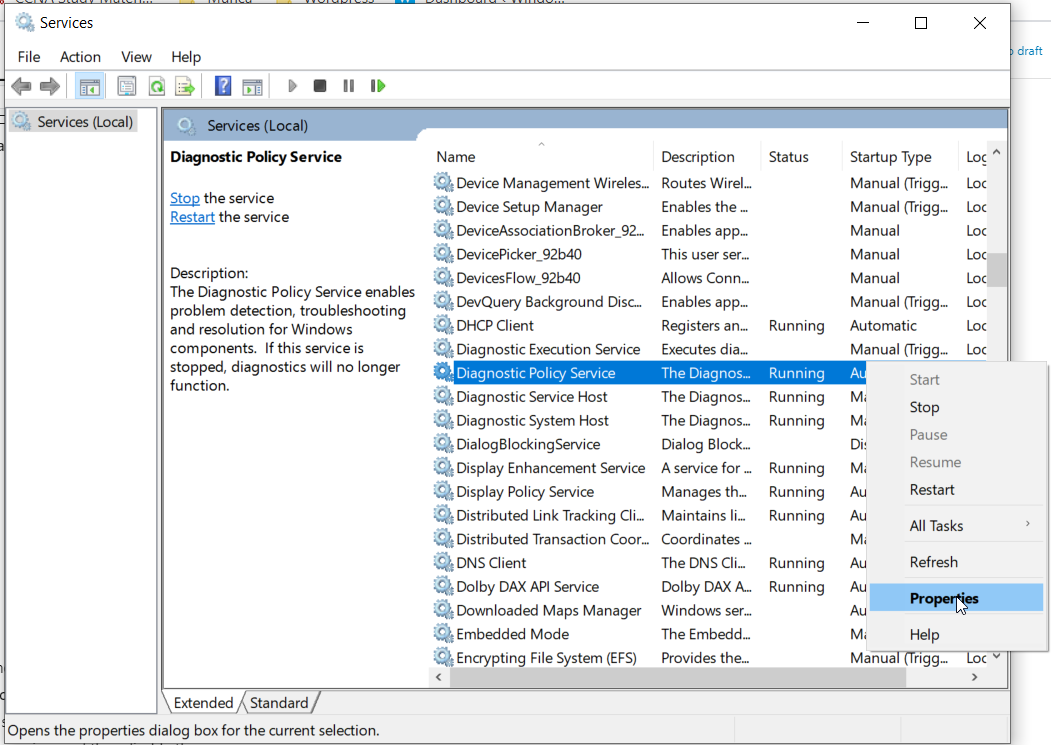
- Go to Start, type services, and launch Services.

- Locate these three services: Diagnostic Policy Service, Diagnostic Services Host, Diagnostic System Host.
- Right-click each service and select Properties.

- On each service, change Startup Type to disabled – click OK. If the services are currently running, click Stop to close the services and then disable them.
- Restart your computer.

These services aim to detect and troubleshoot the potential problems for the components of your Windows, and network connectivity issues.
We hope one of these solutions helps you get rid of Windows Defender’s yellow triangle warning along with the Cloud-Based and Automatic Sample Submission notifications.
Windows Defender is a great built-in security solution, but it offers only basic options. We recommend you to use any of these dedicated antiviruses compatible with Windows 10.
If you have any other solutions or suggestions that we should include in our guide, please feel free to write them in a comment below.
Still having issues? Fix them with this tool:
SPONSORED
If the advices above haven’t solved your issue, your PC may experience deeper Windows problems. We recommend downloading this PC Repair tool (rated Great on TrustPilot.com) to easily address them. After installation, simply click the Start Scan button and then press on Repair All.
![]()
Newsletter
Find out all you need to know about this feature
by Madalina Dinita
Madalina has been a Windows fan ever since she got her hands on her first Windows XP computer. She is interested in all things technology, especially emerging technologies… read more
Updated on November 25, 2022
Reviewed by
Alex Serban
After moving away from the corporate work-style, Alex has found rewards in a lifestyle of constant analysis, team coordination and pestering his colleagues. Holding an MCSA Windows Server… read more
- Windows 10 Creators Update brings a bevy of new features and improvements, such as the Cloud-Delivered Protection for Windows Defender.
- However, if you want to disable the Cloud security scan, change the settings using Group Policy Editor.
- You can also deactivate the Defender’s Cloud-Based Protection by adding certain registry keys.
- Make sure to check the StartUp programs if you want to stop these features from opening alongside your OS.
While the Windows 10 Creators Update brings a bevy of new features and improvements, not all users actually like them.
As a matter of fact, many users don’t want to use Windows Defender‘s Cloud-Based Protection and also refuse to turn on Automatic Sample Submission.
However, if you don’t enable these features, Windows Defender displays a yellow triangle with an exclamation mark in the Notifications tray.
What is Cloud-delivered protection?
If you enable cloud protection, any patches for malware problems can be sent to your device over the cloud within minutes, rather than having to wait until the next update is released.
Actually, many users have been confused by this weird yellow triangle and couldn’t find a proper explanation as to why it constantly appeared on the screen.
Now that they know why the warning occurs, many want to simply disable Cloud-Based Protection and Automatic Submission notifications.
The problem is that turning off these warnings is a challenge in itself since there is no dedicated option for that.
We’ve scoured the almighty Internet and found a few solutions to disable Windows Defender’s Cloud-delivered protection notifications.
How do I turn off cloud-based and automatic submission?
- What is Cloud-delivered protection?
- How do I turn off cloud-based and automatic submission?
- 1. Disable them from Task Manager
- 2. Use the Group Policy Editor
- 3. Use the Registry Editor for Windows 10 Home
- 4. Prevent Defender from loading health reports
1. Disable them from Task Manager
- To turn off Cloud-delivered protection is off managed by your administrator, right-click on the taskbar to open the Task Manager.
- Go to the Start-up tab – locate these two features.
- Disable them.
- Restart your computer.
Because these features start once your computer is up and running, you should be able to find them in the StartUp tab from Task Manager.
Some PC issues are hard to tackle, especially when it comes to corrupted repositories or missing Windows files. If you are having troubles fixing an error, your system may be partially broken.
We recommend installing Restoro, a tool that will scan your machine and identify what the fault is.
Click here to download and start repairing.
If Task Manager is not working on your Windows 10 computer, don’t panic. Check our dedicated guide and fix the problem with ease.
2. Use the Group Policy Editor
- Go to Start and type group policy.
- Select Edit Group Policy.
- Go to:
Computer Configuration - Administrative Templates - Windows Components - Windows Defender Antivirus - MAPS - Disable the following features: Join Microsoft MAPS and Send file samples when further analysis is required.
- Press Windows + I keys combination to open Settings.
- Go to Update and Security.
- From the left pane select Windows Security.
- Click on Firewall and network protection.
- Disable Firewall profiles( domain, private and public).
- Restart your computer.
MAPS is the abbreviation for Microsoft Advanced Protection Service, and it is a cloud protection service, improving real-time protection.
It is also an online community, where users sent information about malicious software, PUPs, spyware, and other details to Microsoft. The purpose is to stop the spread of computer viruses.
Group Policy is an excellent method to modify computer settings. If you want to learn more about how to edit them, check our comprehensive guide.
3. Use the Registry Editor for Windows 10 Home
- Launch Run.
- Type regedit and hit Enter.
- Go to the following path:
HKEY_LOCAL_MACHINE/SOFTWARE/Policies/Microsof/tWindows Defender - Under the Windows Defender key, create a new key – name it Spynet.
- In the right-hand pane, create a new DWORD SubmitSamplesConsent – set its value to 2.
- Create a new DWORD SpynetReporting – set its value to 0
Windows 10 Home doesn’t support the Group Policy Editor. If you’re running this OS, use the Registry Editor for this task.
4. Prevent Defender from loading health reports
- Go to Start, type services, and launch Services.
- Locate these three services: Diagnostic Policy Service, Diagnostic Services Host, Diagnostic System Host.
- Right-click each service and select Properties.
- On each service, change Startup Type to disabled – click OK. If the services are currently running, click Stop to close the services and then disable them.
- Restart your computer.
These services aim to detect and troubleshoot the potential problems for the components of your Windows, and network connectivity issues.
We hope one of these solutions helps you get rid of Windows Defender’s yellow triangle warning along with the Cloud-Based and Automatic Sample Submission notifications.
Windows Defender is a great built-in security solution, but it offers only basic options. We recommend you to use any of these dedicated antiviruses compatible with Windows 10.
If you have any other solutions or suggestions that we should include in our guide, please feel free to write them in a comment below.
Still having issues? Fix them with this tool:
SPONSORED
If the advices above haven’t solved your issue, your PC may experience deeper Windows problems. We recommend downloading this PC Repair tool (rated Great on TrustPilot.com) to easily address them. After installation, simply click the Start Scan button and then press on Repair All.
![]()