Часто ли вы случайно активируете клавишу CapsLock на клавиатуре? Хотите полностью отключить клавишу CapsLock на ПК с Windows 10? Вот три способа отключить клавишу CapsLock в Windows 10.
Прежде чем мы расскажем вам, как отключить клавишу CapsLock, важно отметить, что Windows 10 не предлагает простой метод отключения клавиши CapsLock.
Вам нужно либо вручную отредактировать реестр (хотя относительно легко), либо использовать сторонний инструмент, чтобы отключить CapsLock.
ПРИМЕЧАНИЕ. Когда клавиша CapsLock отключена, вы можете удерживать клавишу Shift, чтобы ввести заглавную букву.
Метод 1 из 3
Отключить ключ CapsLock через реестр в Windows 10
Этот метод, вероятно, является самым простым способом полностью отключить клавишу CapsLock в Windows 10.
Шаг 1. Откройте редактор реестра. Для этого введите Regedit в поле поиска «Пуск»/на панели задач и нажмите клавишу «Ввод».
Нажмите кнопку «Да», когда получите ключ управления учетными записями пользователей.
Шаг 2: В редакторе реестра перейдите к следующему ключу:
ComputerHKEY_LOCAL_MACHINESYSTEMCurrentControlSetControlKeyboard Layout
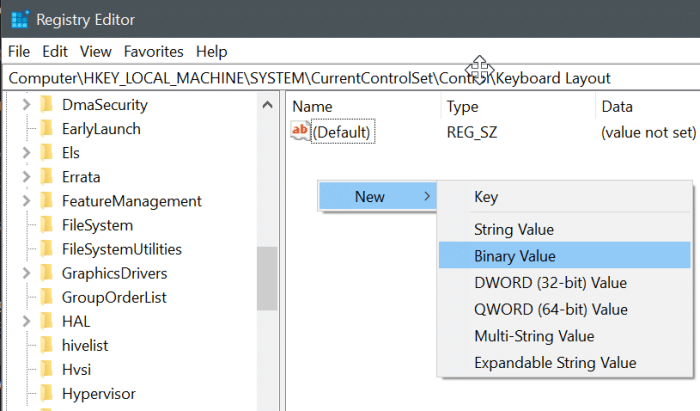
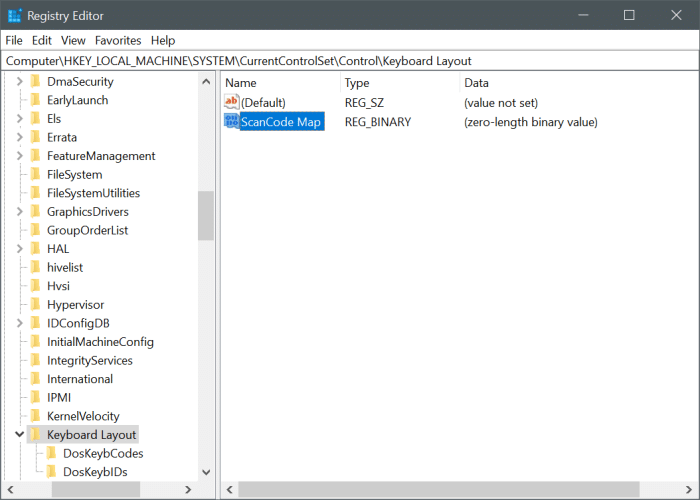
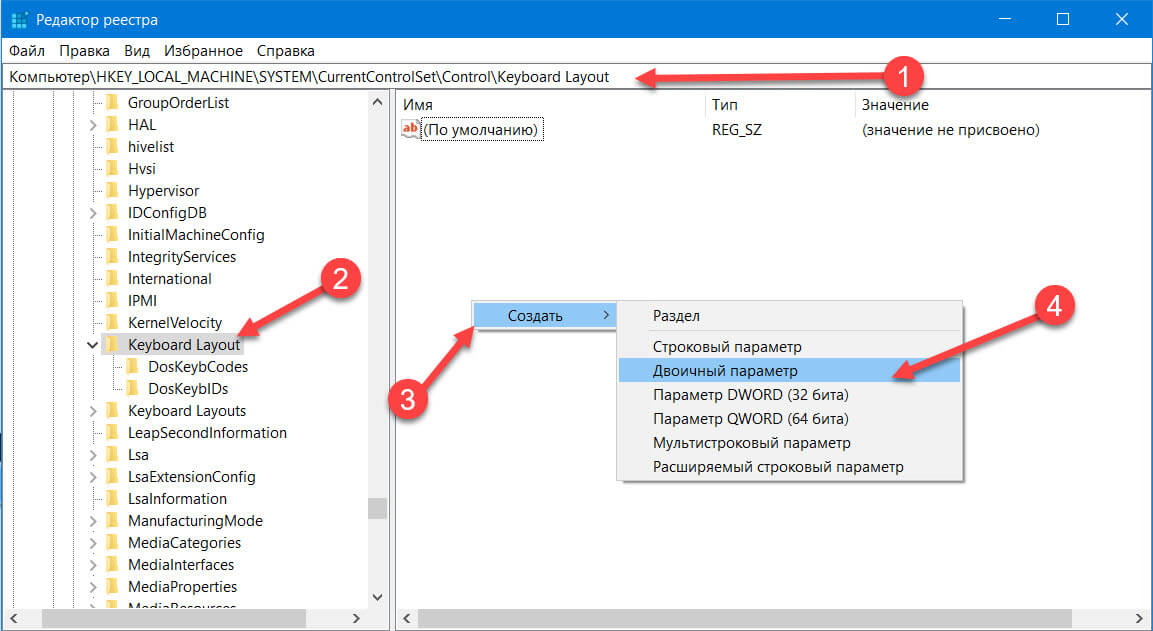
Шаг 3: Выберите клавишу раскладки клавиатуры на левой панели. На правой стороне, щелкните правой кнопкой мыши на пустом месте, нажмите Создать, а затем щелкните двоичное значение. Назовите новое двоичное значение как ScanCode Map.
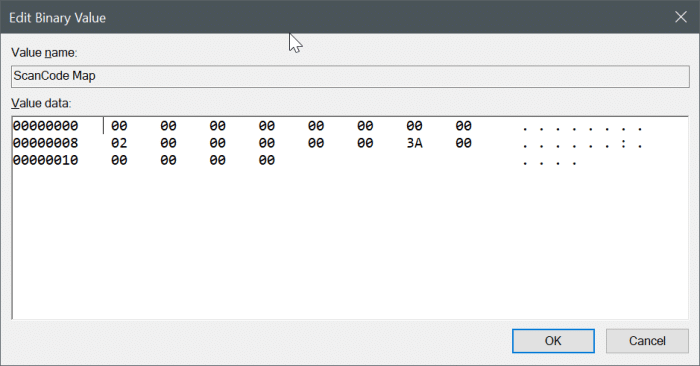
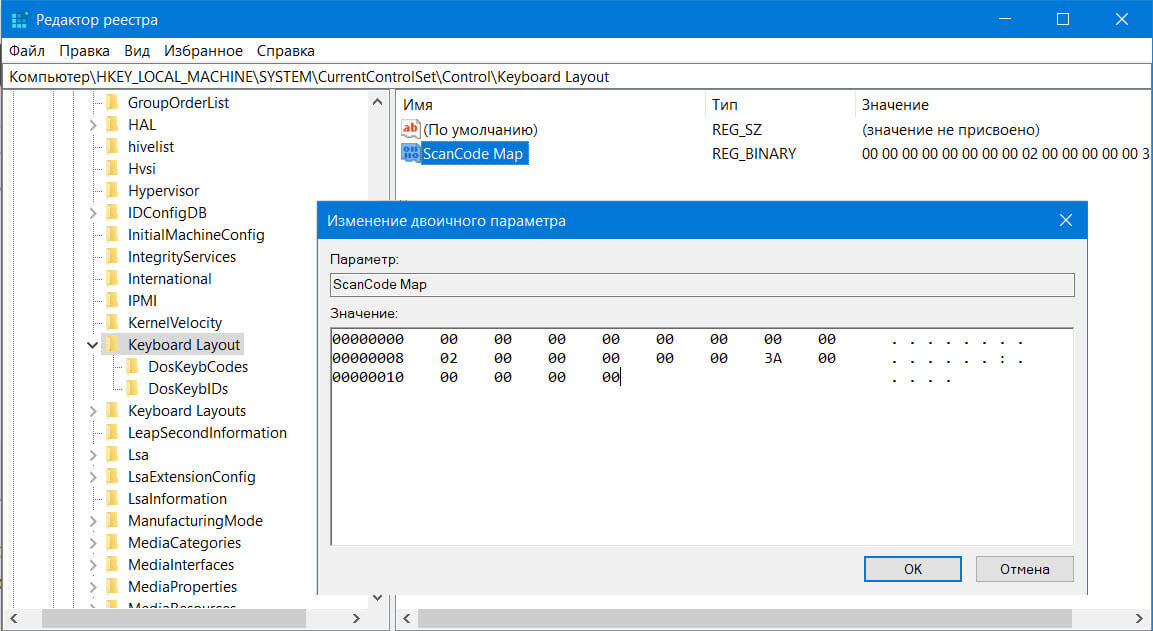
Шаг 4: Наконец, дважды щелкните на скан карте , чтобы изменить его двоичное значение по умолчанию. Добавьте следующее двоичное значение, чтобы отключить ключ CapsLock.
00 00 00 00 00 00 00 00 02 00 00 00 00 00 3A 00 00 00 00 00
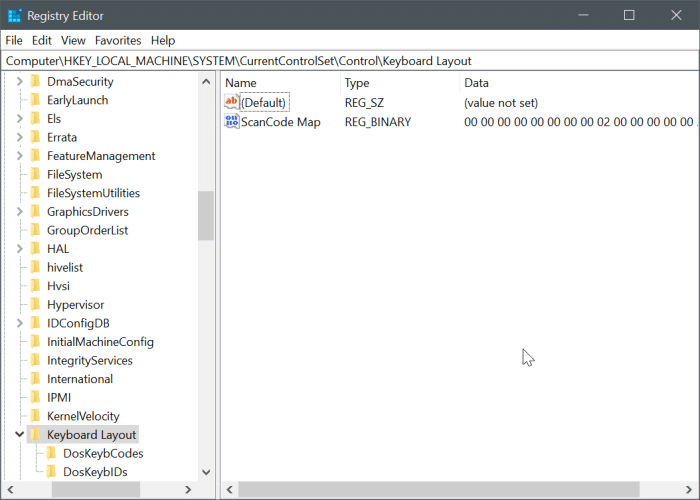
Нажмите кнопку ОК, чтобы сохранить.
Шаг 5: перезагрузите компьютер один раз, чтобы применить изменения. С этого момента Windows не будет включать CapsLock при нажатии клавиши CapsLock. Однако вы можете временно включить CapsLock, нажав клавишу Shift.
Включение клавиши CapsLock
Шаг 1. В редакторе реестра перейдите к следующему ключу:
ComputerHKEY_LOCAL_MACHINESYSTEMCurrentControlSetControlKeyboard Layout
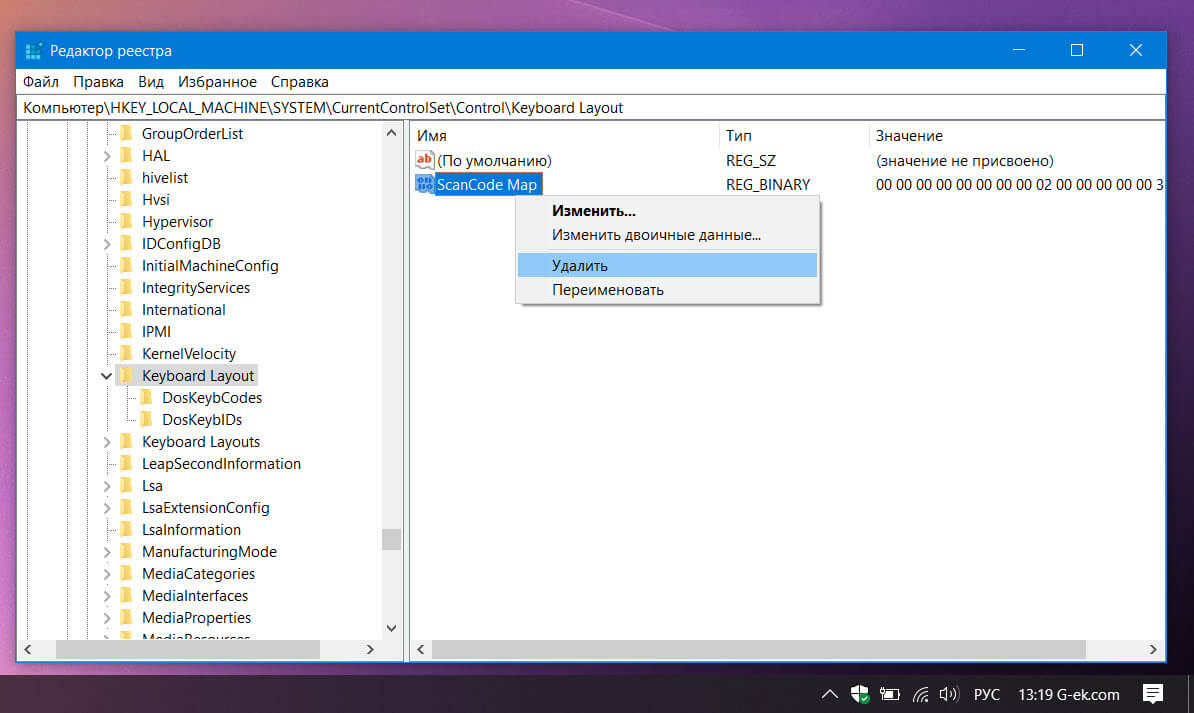
Шаг 2: Щелкните правой кнопкой мыши на скан карте двоичным значением и удалите его.
Шаг 3. Перезагрузите компьютер.
Способ 2 из 3
Используйте KeyTweak, чтобы отключить клавишу CapsLock в Windows 10
KeyTweak — это бесплатная утилита, призванная помочь пользователям ПК отключить любую клавишу на компьютере под управлением Windows 10. Вот как с его помощью отключить клавишу CapsLock.
Шаг 1. Загрузите и установите KeyTweak (бесплатно) на свой компьютер. Вы можете получить его на этой странице: majorgeeks.com/files/details/keytweak.html
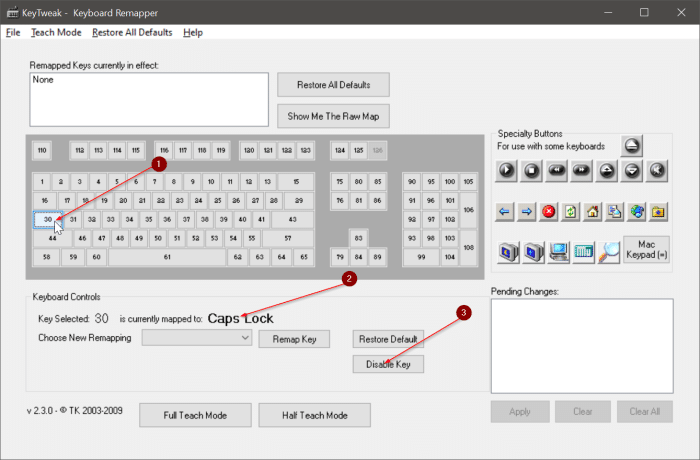
Шаг 2: Запустите программу KeyTweak. Выберите клавишу CapsLock на схеме клавиатуры, убедитесь, что выбранная клавиша является клавишей CapsLock, а затем нажмите кнопку «Отключить клавишу».
Наконец, нажмите кнопку Применить.
Метод 3 из 3
Переназначьте клавишу CapsLock на Shift или любую другую клавишу
Возможно, вы захотите переназначить клавишу CapsLock на любую другую клавишу вместо того, чтобы полностью отключать ее. Таким образом, вы все равно сможете использовать ключ. Например, вы можете захотеть переназначить клавишу CapsLock на клавишу Shift.
Для переназначения мы используем бесплатное приложение SharpKeys.
Шаг 1. Загрузите, установите и запустите SharpKeys на своем ПК. Вы можете получить его по этому URL-адресу: github.com/randyrants/sharpkeys/releases
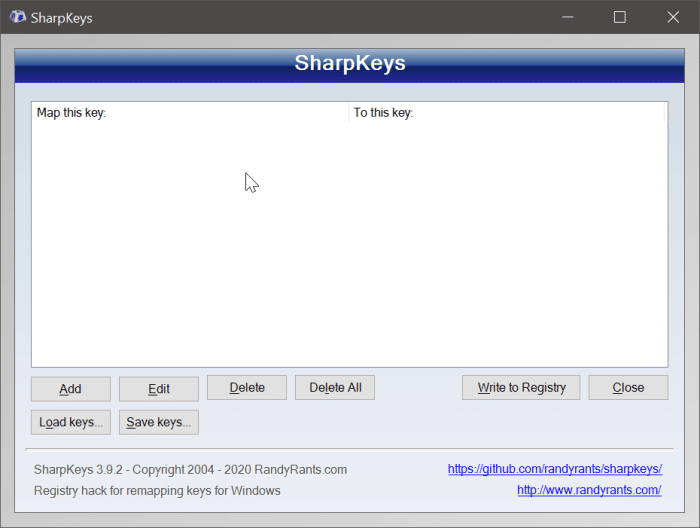
Шаг 2: После запуска нажмите кнопку «Добавить».
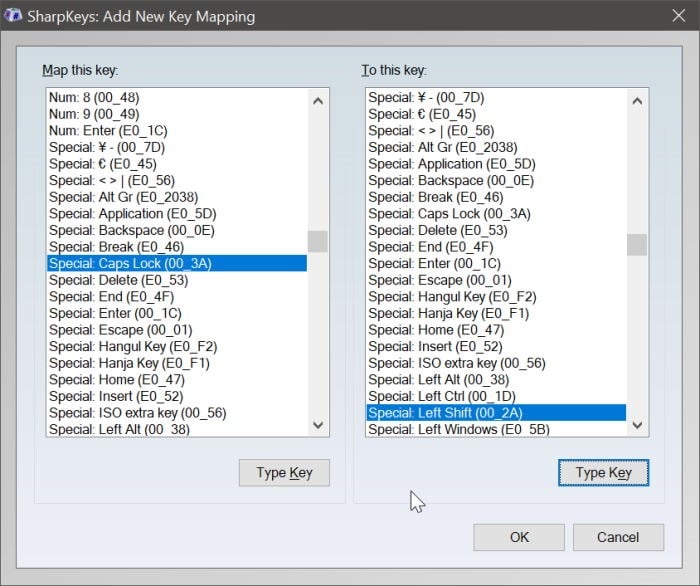
Шаг 3: Когда вы получите следующий экран, нажмите кнопку Type key слева, а затем нажмите клавишу CapsLock на клавиатуре, чтобы выбрать его.
Затем нажмите кнопку Type key справа, а затем нажмите клавишу Shift или любую другую клавишу, на которую вы хотите переназначить клавишу CapsLock. Щелкните кнопку ОК.
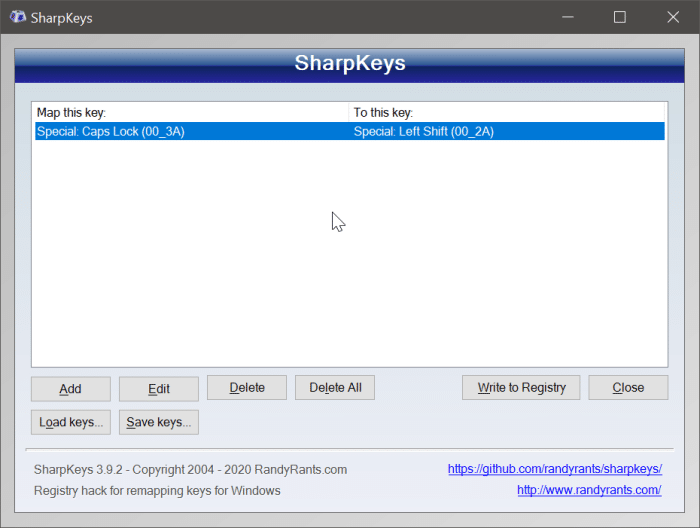
Шаг 4: Наконец, нажмите кнопку «Записать в реестр», чтобы сохранить изменения.
Шаг 5: Перезагрузите компьютер один раз, чтобы применить переназначение.
Как включить или отключить Caps Lock в Windows 10
Сегодня мы рассмотрим, как отключить клавишу Caps Lock в Windows 10. Если же Caps Lock не работает (из-за ошибки системы или вируса), то это пост расскажем вам, как её включить.
Мы рассмотрим два способа включения и выключения клавиши Caps Lock в Windows 10.
- Использование редактора реестра.
- Использование KeyTweak Software.
Прежде чем вы начнете, я рекомендую создать точку восстановления системы.
Использование редактора реестра
1. Нажмите комбинацию кнопок WINKEY + R, чтобы запустить утилиту Run, введите regedit и нажмите Enter. После открытия Редактора реестра перейдите к следующему ключевому ключу:
HKEY_LOCAL_MACHINESYSTEMCurrentControlSetControlKeyboard Layout2. Теперь щелкните правой кнопкой мыши на правой боковой панели и выберите New > Binary Value.
3. Установите имя только что созданного двоичного ключа: Scancode Map.
4. Дважды щелкните на только что созданном двоичном ключе и установите его значение:
00,00,00,00,00,00,00,00,02,00,00,00,00,00,3A,00,00,00,00,00
Это отключит клавишу Caps Lock. Если вы хотите снова включить клавишу Caps Lock, просто удалите только что созданное бинарный ключ.
5. В любом случае, перезагрузите компьютер, чтобы изменения вступили в силу.
Использование KeyTweak Software
1. Загрузите KeyTweak бесплатно отсюда. Не забудьте отказаться от предложений установки других приложений, которые вам попытаются пропихнуть.
2. После того, как вы скачали и установили его без лишнего барахла, запустите программу.

3. На карте клавиатуры выберите местоположение клавиши Caps Lock. В большинстве случаев она будет занимать 30 место, как показано на рисунке выше.
4. После того, как вы его выберете, на экране появится текущее назначение ключа.

5. Просто выберите кнопку Disable Key, чтобы отключить клавишу Caps Lock. Если вы хотите снова включить клавишу, вам нужно будет выполнить те же самые шаги и снова включить её.
6. В обоих случаях для вступления изменений в силу необходимо перезагрузить компьютер.
Спасибо, что читаете! На данный момент большинство моих заметок, статей и подборок выходит в telegram канале «Левашов». Обязательно подписывайтесь, чтобы не пропустить новости мира ИТ, полезные инструкции и нужные сервисы.
Респект за пост! Спасибо за работу!
Хотите больше постов в блоге? Подборок софта и сервисов, а также обзоры на гаджеты? Сейчас, чтобы писать регулярно и радовать вас большими обзорами, мне требуется помощь. Чтобы поддерживать сайт на регулярной основе, вы можете оформить подписку на российском сервисе Boosty. Или воспользоваться ЮMoney (бывшие Яндекс Деньги) для разовой поддержки:
Заранее спасибо! Все собранные средства будут пущены на развитие сайта. Поддержка проекта является подарком владельцу сайта.
- Опубликовано:
- 2011-03-12
Проблему случайного включения режима «Caps Lock» путём задевания одноимённой клавиши можно решить встроенными средствами Windows.
- Windows 10
-
- Пуск (щелчок правой кнопкой мыши)
- Панель управления
- Часы, язык и регион
- Язык
- Дополнительные параметры
- Переключение методов ввода
- Изменить сочетания клавиш языковой панели
- Переключение клавиатуры
- Отключение режима CAPS LOCK
- Клавишей SHIFT.
- Windows 10 (альтернативный вариант)
-
- Пуск
- Параметры
- Время и язык
- Регион и язык
- Сопутствующие параметры
- Дополнительные параметры даты и времени, региональные параметры
- Язык
- Дополнительные параметры
- Переключение методов ввода
- Изменить сочетания клавиш языковой панели
- Переключение клавиатуры
- Отключение режима CAPS LOCK
- Клавишей SHIFT.
- Windows 7:
-
- Пуск
- Панель управления
- Часы, язык и регион
- Смена раскладки клавиатуры или других способов ввода
- Языки и клавиатуры
- Клавиатуры и другие языки ввода
- Изменить клавиатуру
- Переключение клавиатуры
- Отключение режима Caps Lock
- Клавишей SHIFT.
- Windows XP:
-
- Пуск
- Панель управления
- Язык и региональные стандарты
- Языки
- Языки и службы текстового ввода
- Подробнее
- Настройка
- Параметры клавиатуры
- Отключение режима Caps Lock
- Клавишей SHIFT.
В результате, в отличие от использующегося по умолчанию переключения режима «Caps Lock» (включён/выключен), становится возможным удобное и гарантированное его выключение простым нажатием клавиши Shift вне зависимости от текущего состояния «Caps Lock».
Часто ли вы случайно нажимаете клавишу CapsLock на клавиатуре? Хотите полностью отключить клавишу CapsLock на ПК с Windows 10? Сегодня рассмотрим способ позволяющий отключить клавишу CapsLock в Windows 10.
Прежде чем начать, важно отметить, что Windows 10 не предлагает простой метод отключения клавиши CapsLock. Вам нужно либо вручную отредактировать реестр (хотя относительно легко), либо использовать сторонний инструмент.
Примечание: Когда клавиша CapsLock отключена, вы можете удерживать клавишу Shift, чтобы ввести заглавную букву.
Отключить клавишу Caps Lock с помощью реестра Windows 10
Этот способ, вероятно, самый простой он позволяет полностью отключить клавишу Caps Lock в Windows 10.
Шаг 1: Откройте редактор реестра. Для этого введите Regedit в поле поиска «Пуск» / на панели задач и нажмите клавишу Enter.
Нажмите кнопку «Да», когда получите запрос управления учетными записями пользователей.
Шаг 2: В редакторе реестра перейдите к следующему разделу:
HKEY_LOCAL_MACHINESYSTEMCurrentControlSetControlKeyboard Layout
Шаг 3: Выберите в левой панели «Keyboard Layout». На правой стороне, кликните правой кнопкой мыши на пустом месте, нажмите «Создать», а затем выберите «Двоичный параметр». Назовите созданный параметр как «ScanCode Map».
Шаг 4: Наконец, дважды кликните на «ScanCode Map», чтобы изменить его значение по умолчанию. Добавьте следующее значение, чтобы отключить клавишу CapsLock:
00 00 00 00 00 00 00 00 02 00 00 00 00 00 3A 00 00 00 00 00
Примечание: Внести значение можно только с клавиатуры, скопировать и вставить не выйдет.
Нажмите кнопку «ОК», чтобы сохранить.
Шаг 5: Перезагрузите компьютер, чтобы применить изменения. С этого момента Windows не будет включать CapsLock при нажатии клавиши CapsLock. Однако вы можете использовать клавишу Shift.
Включить клавишу CapsLock
Шаг 1: В редакторе реестра перейдите к следующему ключу:
HKEY_LOCAL_MACHINESYSTEMCurrentControlSetControlKeyboard Layout
Шаг 2: Кликните правой кнопкой мыши на «ScanCode Map» и удалите его.
Шаг 3: Перезагрузите компьютер.
Все!
Рекомендуем: [Windows 10] Как включить звуковой сигнал при нажатии клавиш Num Lock и Caps Lock.
Параметры Caps Lock скрыты в параметрах языковой панели в Windows 10. Перейдите на вкладку «Дополнительные параметры клавиатуры». В разделе «Чтобы отключить Caps Lock» выберите Нажмите клавишу SHIFT. Затем нажмите «Применить», а затем ОК.
Почему на моей клавиатуре все заглавные буквы?
Иногда клавиша Shift или Caps Lock может застрять внутри клавиатуры, или в простом процессоре управления на клавиатуре могут возникнуть проблемы, что приведет к странному поведению, включая ввод текста только заглавными буквами. … Если клавиатура беспроводная, убедитесь, что она полностью заряжена, или замените батареи.
Как мне выйти из заглавных букв?
Чтобы отменить изменение регистра, нажмите CTRL + Z. Чтобы использовать сочетание клавиш для переключения между строчными буквами, ВВЕРХ и заглавными буквами в каждом слове, выберите текст и нажмите SHIFT + F3 пока не будет применен нужный вам случай.
Вам просто нужно использовать Функция изменения регистра Microsoft Word. Выделите текст, регистр которого нужно изменить, с помощью мыши или клавиатуры. На вкладке «Главная» ленты перейдите к группе команд «Шрифты» и щелкните стрелку рядом с кнопкой «Изменить регистр».
Почему у меня не работает Caps Lock?
Если проблема «Индикатор Caps Lock не работает в Windows» продолжает беспокоить вас, значит скорее всего, ваши драйверы клавиатуры устарели. … Нажмите клавишу с логотипом Windows + сочетание клавиш X на клавиатуре. Затем выберите Диспетчер устройств из списка результатов поиска. Найдите свою клавиатуру и щелкните ее правой кнопкой мыши.
Загрузить PDF
Загрузить PDF
В этой статье мы расскажем вам, как на компьютере с Windows или Mac OS X отключить режим Caps Lock, в котором с клавиатуры вводятся прописные (заглавные) буквы. Для этого нужно просто нажать клавишу «Caps Lock», но если она не работает, придется отремонтировать ее. Также можно полностью деактивировать режим Caps Lock, если он вам не нужен.
-
1
Нажмите клавишу «Caps Lock» еще раз. Если вы включили режим Caps Lock, намеренно или случайно нажав клавишу «Caps Lock», еще раз нажмите эту клавишу, чтобы отключить режим Caps Lock.
- Зачастую пользователи случайно нажимают клавишу «Caps Lock», потому что она находится рядом с клавишам ⇧ Shift и Tab ↹. Если вас это раздражает, задумайтесь о том, чтобы полностью деактивировать указанную клавишу. Это можно сделать на компьютере с Windows и Mac OS X.
-
2
Почистите клавишу, если ее заклинило. Если клавиша «Caps Lock» застряла в нажатом положении, почистите ее сжатым воздухом или осторожно протрите ватным тампоном, смоченным в спирте.
- Будьте осторожны: если вы повредите клавишу, это может привести к аннулированию гарантии ноутбука.
-
3
Перезагрузите компьютер. Иногда этого достаточно, чтобы отключить режим Caps Lock (если одноименную клавишу заклинило). Для этого:
Реклама
-
1
Откройте меню «Пуск»
. Нажмите на логотип Windows в левом нижнем углу экрана.
-
2
Введите блокнот, чтобы найти программу «Блокнот». С ее помощью можно деактивировать Caps Lock.
-
3
Щелкните по Блокнот. Это значок в виде синего блокнота в верхней части меню «Пуск». Откроется Блокнот.
-
4
Введите код деактивации Caps Lock. Текстовый документ должен включать заголовок, пустую строку, строку, указывающую на место назначения, и код:[1]
- Введите Windows Registry Editor Version 5.00 (Редактор реестра Windows версии 5.00), а затем дважды нажмите ↵ Enter.
- Введите [HKEY_LOCAL_MACHINESYSTEMCurrentControlSetControlKeyboard Layout] и нажмите ↵ Enter.
- Введите
"Scancode Map"=hex:00,00,00,00,00,00,00,00,02,00,00,00,00,00,3a,00,00,00,00,00на последней строке текстового документа.
-
5
Откройте меню Файл. Оно находится в верхнем левом углу окна.
-
6
Щелкните по Сохранить как. Эта опция находится в нижней части меню. Откроется окно «Сохранить как».
-
7
Введите имя файла. Введите disable_caps_lock.reg в текстовом поле «Имя файла» в нижней части окна.
-
8
Откройте меню «Тип файла». Оно находится под текстовым полем «Имя файла».
-
9
Щелкните по Все файлы. Эта опция находится в меню.
-
10
Выберите папку для сохранения файла. Сделайте это на левой панели окна. Запомните, какую папку выбрали — вам придется открыть ее через минуту.
-
11
Щелкните по Сохранить. Эта кнопка расположена в правом нижнем углу окна. Файл будет сохранен в выбранной папке.
-
12
Запустите файл. Перейдите в папку, в которой сохранили файл (если вы выбрали папку «Рабочий стол», просто сверните все открытые окна), дважды щелкните по файлу, и несколько раз нажмите «Да», пока на экране не появится сообщение о том, что реестр изменен.
-
13
Нажмите OK, когда появится запрос. Вы найдете эту кнопка в сообщении об изменении реестра.
-
14
Перезагрузите компьютер. Нажмите «Пуск»
> «Выключение»
> «Перезагрузить». Как только компьютер перезагрузится, клавиша «Caps Lock» больше не будет работать.
- Когда компьютер перезагрузится, созданный файл можно удалить.
Реклама
-
1
Откройте меню Apple
. Нажмите на логотип Apple в верхнем левом углу экрана.
-
2
Щелкните по Системные настройки. Эта опция находится в меню. Откроется окно «Системные настройки».
-
3
Нажмите Клавиатура. Этот значок в виде клавиатуры находится в окне «Системные настройки». Откроется новое окно.
-
4
Перейдите на вкладку Клавиатура. Вы найдете ее в верхнем левом углу окна.
-
5
Щелкните Клавиши модификации. Эта опция находится в правом нижнем углу окна. Появится всплывающее окно.
-
6
Откройте меню Caps Lock. Вы найдете его посередине всплывающего окна.
-
7
Нажмите Отключить. Эта опция расположена в меню.
- Если на компьютере Mac есть сенсорная панель и нет функциональных клавиш, в меню выберите «Escape», чтобы присвоить функции клавиши «Escape» клавише «Caps Lock».
-
8
Щелкните по OK. Эта синяя кнопка находится внизу всплывающего окна. Изменения будут сохранены. Теперь клавиша Caps Lock работать не будет.
- Если указанная клавиша все еще работает, перезагрузите компьютер, чтобы изменения вступили в силу. Для этого откройте меню Apple и нажмите «Перезагрузка» > «Перезагрузить».
Реклама
Советы
- Чтобы в Windows снова активировать Caps Lock, в редакторе реестра удалите файл «disable_caps_lock.reg» из раздела «HKEY_LOCAL_MACHINESYSTEMCurrentControlSetControlKeyboard Layout», а затем перезагрузите компьютер.
Реклама
Предупреждения
- Если клавиша Caps Lock застряла в нажатом положении и у вас не получается деактивировать Caps Lock на своем компьютере, отнесите клавиатуру или ноутбук в мастерскую.
Реклама
Об этой статье
Эту страницу просматривали 39 177 раз.
Была ли эта статья полезной?
Download Article
Download Article
This wikiHow teaches you how to turn off Caps Lock, which causes you to type in all capital letters, on a Windows or Mac computer or Chromebook. Turning off Caps Lock on a functional keyboard is as simple as pressing the «Caps Lock» key again, but if your Caps Lock key is stuck, you’ll need to fix the key. You can also disable Caps Lock entirely if you don’t plan on using Caps Lock on your computer.
Things You Should Know
- Toggle Caps Lock using the Caps Lock key on your Windows PC or Mac keyboard. For Chromebooks, press Search + Alt to turn off Caps Lock.
- You might need to clean the Caps Lock button if it’s stuck.
- On Windows, you can permanently change the Caps Lock key to a Shift key or disable it entirely. On a Mac, you make the Caps Lock key do nothing.
-
1
Press the Caps Lock key again. If you turned on Caps Lock by pressing the Caps Lock key (accidentally or otherwise), pressing it a second time will turn off Caps Lock if the key itself is functioning properly.
- This can be annoying given Caps Lock’s proximity to the ⇧ Shift and Tab ↹ keys, so you may want to disable it entirely. This is possible on Windows and Mac computers.
- Shopping for a new keyboard or other office supplies? Check out our coupon site for Staples discounts or our coupon site for Office Depot.
-
2
Clean the stuck key. If the Caps Lock button doesn’t turn off when you press it a second time, it might be stuck in a lowered position. Clean it with a can of compressed air, or wipe it carefully with a cotton swab dipped in rubbing alcohol.
- Be careful when doing this, as harming the key or its underlying components may void your computer’s warranty.
Advertisement
-
3
Restart your computer. Sometimes restarting your computer will be enough to cancel out a stuck or broken Caps Lock key. To do so:
Advertisement
-
1
Press Search + Alt. Chromebooks don’t have a dedicated hardware key for toggling Caps Lock. Use this keyboard shortcut to turn off Caps Lock.[1]
-
1
Open the Windows Settings menu. You can find it by right-clicking on the Windows icon and selecting Settings. The Shift key can be set as the keyboard shortcut to turn off caps lock.
-
2
Go to Time & language. This menu includes categories for your computer’s date, time, language, typing, and speech.
-
3
Select Language in the menu options. There’s a globe symbol next to “Language.”
- This will be called “Language & region” on some versions of Windows.
-
4
Click Spelling, typing, & keyboard settings. This will be under “Related settings.”
- On Windows 11, this will be called “Typing” instead of “Spelling, typing, & keyboard settings.”
-
5
Navigate to Typing. If you’re using Windows 11, skip this step since you’ll already be in the Typing menu.
-
6
Click Advanced keyboard settings. This will open a menu with advanced options to change the way keyboard input works on your device.
-
7
Click Language bar options. The “Text Services and Input Languages” menu will open.
-
8
In the “Advanced Key Settings” tab, click Press the SHIFT key. This will allow you to use the Shift key to turn off caps lock.[2]
Advertisement
-
1
Back up the Registry. Incorrectly editing the Registry can permanently damage your computer. Follow our guide on backing up the Registry before starting this method. Here’s a quick overview of the backup process:
- Click Computer in the Registry Editor’s left side menu.
- Click File in the top left.
- Click Export… to open the Export Registry File window.
- Enter a name for your backup file.
- Select a save location.
- Click Save. This will export a copy of the Registry’s current settings, values, and other data.
-
2
Open Start
. Click the Windows logo in the bottom-left corner of the screen.
-
3
Type in notepad. This will search your computer for the Notepad program, which is what you’ll use to prevent Caps Lock from working on this computer.
-
4
Click Notepad. It’s a blue, notepad-shaped icon at the top of the Start window. A Notepad window will open.
-
5
Enter the Caps Lock termination code. The Notepad document that you’ll create consists of a heading, an empty line, a line indicating a destination, and the code itself:[3]
- Type in Windows Registry Editor Version 5.00 and then press ↵ Enter twice.
- Type in [HKEY_LOCAL_MACHINESYSTEMCurrentControlSetControlKeyboard Layout] and press ↵ Enter.
- Type
"Scancode Map"=hex:00,00,00,00,00,00,00,00,02,00,00,00,00,00,3a,00,00,00,00,00into the final line of Notepad.
-
6
Click File. It’s in the top-left corner of the Notepad window. Clicking it prompts a drop-down menu.
-
7
Click Save As…. This option is near the bottom of the drop-down menu. A «Save As» window will open.
-
8
Enter the file name. Type disable_caps_lock.reg into the «File name» text box that’s near the bottom of the window.
-
9
Click the «Save as type» drop-down box. It’s below the «File name» text box. Clicking it causes a drop-down menu to appear.
-
10
Click All Files. This option is in the drop-down menu.
-
11
Select a save location. Click an easy-to-get-to folder (e.g., Desktop) on the left side of the window. Remember the folder that you choose—you’ll be opening it in just a minute.
-
12
Click Save. It’s in the bottom-right corner of the window. This will save your file in your selected folder.
-
13
Install the file. Go to the folder in which you saved the file (if you selected the Desktop folder, just minimize any open windows), then double-click it to open it and click Yes until you receive a notification that the registry file was successfully merged.
-
14
Click OK when prompted. This will appear on a prompt notifying you that your changes to the registry were successful.
-
15
Restart your computer. Click Start
, click Power
, and click Restart in the resulting pop-up menu. Once your computer finishes restarting, you’ll notice that your Caps Lock key no longer works.
-
16
If you want to re-enable the Caps Lock key on Windows, restore the Registry backup you created in Step 1. To restore a Registry backup, you’ll click the File tab, click Import… in the drop-down menu, and then select your Registry backup file.
-
17
Alternatively, you can edit the Registry to re-enable the Caps Lock key. Erase the disable_caps_lock.reg file from the «HKEY_LOCAL_MACHINESYSTEMCurrentControlSetControlKeyboard Layout» section of the Registry Editor. Then, restart your computer.
Advertisement
-
1
Open the Apple menu
. Click the Apple logo in the top-left corner of the screen. A drop-down menu will appear.
-
2
Click System Preferences…. It’s in the drop-down menu. Doing so opens the System Preferences window.
-
3
Click Keyboard. This keyboard-shaped icon is in the System Preferences window. The Keyboard window will open.
-
4
Click the Keyboard tab. You’ll find this in the top-left corner of the Keyboard window.
-
5
Click Modifier Keys…. It’s in the bottom-right corner of the Keyboard window. A pop-up window will appear.
-
6
Click the Caps Lock drop-down box. You’ll find this in the middle of the pop-up window. Doing so prompts a drop-down menu.
-
7
Click No Action. It’s in the drop-down menu.
- If you have a Mac that has a Touch Bar instead of a row of function keys, you might want to click Escape here instead, as doing so will bind the «Escape» function to the Caps Lock key.
-
8
Click OK. This blue button is at the bottom of the pop-up window. Doing so will save your changes; your Caps Lock key will now result in no action when pressed.
- If you notice that you can still activate Caps Lock after doing this, restart your Mac to solidify the changes. You can do so by clicking the Apple menu, clicking Restart…, and clicking Restart when prompted.
Advertisement
Add New Question
-
Question
When I turn on my mini Laptop(DELL), I have to write my security question but My Laptop Keyboard is Locked and I can not type any thing. How can I unlock it?
Kyle Smith is a wikiHow Technology Writer, learning and sharing information about the latest technology. He has presented his research at multiple engineering conferences and is the writer and editor of hundreds of online electronics repair guides. Kyle received a BS in Industrial Engineering from Cal Poly, San Luis Obispo.
wikiHow Technology Writer
Expert Answer
Try clicking the «Ease of Access» icon and selecting «On-screen keyboard.» Then you should be able to turn off Caps Lock by clicking the Caps Lock button using the on-screen keyboard.
-
Question
What if your password is in lowercase and your computer is stuck on caps lock?
If you’re unable to turn off caps lock, you can hold Shift down for every key you type, or you can activate the on-screen keyboard.
-
Question
I can’t find «Advanced settings» on Windows 8.1. Where is it?
In the top right hand corner there is a button with three dots. Click it, then scroll down until you find settings. Click it, then scroll down until you find «Advanced settings.»
See more answers
Ask a Question
200 characters left
Include your email address to get a message when this question is answered.
Submit
Advertisement
Thanks for submitting a tip for review!
-
If your Caps Lock key is stuck in the «On» position and you can’t disable Caps Lock on your computer, you’ll have to take your computer into a tech repair service.
Advertisement
References
About This Article
Article SummaryX
Mac:
1. Open System Preferences.
2. Click Keyboard.
3. Click Modifier Keys.
4. Click Caps Lock.
5. Click No Action.
6. Click OK.
Windows:
1. Open Notepad.
2. Copy the provided registry code.
3. Save the file as disable_caps_lock.reg.
4. Double-click the saved file.
5. Follow the on-screen instructions.
6. Restart your PC.
Did this summary help you?
Thanks to all authors for creating a page that has been read 480,899 times.
Is this article up to date?
Download Article
Download Article
This wikiHow teaches you how to turn off Caps Lock, which causes you to type in all capital letters, on a Windows or Mac computer or Chromebook. Turning off Caps Lock on a functional keyboard is as simple as pressing the «Caps Lock» key again, but if your Caps Lock key is stuck, you’ll need to fix the key. You can also disable Caps Lock entirely if you don’t plan on using Caps Lock on your computer.
Things You Should Know
- Toggle Caps Lock using the Caps Lock key on your Windows PC or Mac keyboard. For Chromebooks, press Search + Alt to turn off Caps Lock.
- You might need to clean the Caps Lock button if it’s stuck.
- On Windows, you can permanently change the Caps Lock key to a Shift key or disable it entirely. On a Mac, you make the Caps Lock key do nothing.
-
1
Press the Caps Lock key again. If you turned on Caps Lock by pressing the Caps Lock key (accidentally or otherwise), pressing it a second time will turn off Caps Lock if the key itself is functioning properly.
- This can be annoying given Caps Lock’s proximity to the ⇧ Shift and Tab ↹ keys, so you may want to disable it entirely. This is possible on Windows and Mac computers.
- Shopping for a new keyboard or other office supplies? Check out our coupon site for Staples discounts or our coupon site for Office Depot.
-
2
Clean the stuck key. If the Caps Lock button doesn’t turn off when you press it a second time, it might be stuck in a lowered position. Clean it with a can of compressed air, or wipe it carefully with a cotton swab dipped in rubbing alcohol.
- Be careful when doing this, as harming the key or its underlying components may void your computer’s warranty.
Advertisement
-
3
Restart your computer. Sometimes restarting your computer will be enough to cancel out a stuck or broken Caps Lock key. To do so:
Advertisement
-
1
Press Search + Alt. Chromebooks don’t have a dedicated hardware key for toggling Caps Lock. Use this keyboard shortcut to turn off Caps Lock.[1]
-
1
Open the Windows Settings menu. You can find it by right-clicking on the Windows icon and selecting Settings. The Shift key can be set as the keyboard shortcut to turn off caps lock.
-
2
Go to Time & language. This menu includes categories for your computer’s date, time, language, typing, and speech.
-
3
Select Language in the menu options. There’s a globe symbol next to “Language.”
- This will be called “Language & region” on some versions of Windows.
-
4
Click Spelling, typing, & keyboard settings. This will be under “Related settings.”
- On Windows 11, this will be called “Typing” instead of “Spelling, typing, & keyboard settings.”
-
5
Navigate to Typing. If you’re using Windows 11, skip this step since you’ll already be in the Typing menu.
-
6
Click Advanced keyboard settings. This will open a menu with advanced options to change the way keyboard input works on your device.
-
7
Click Language bar options. The “Text Services and Input Languages” menu will open.
-
8
In the “Advanced Key Settings” tab, click Press the SHIFT key. This will allow you to use the Shift key to turn off caps lock.[2]
Advertisement
-
1
Back up the Registry. Incorrectly editing the Registry can permanently damage your computer. Follow our guide on backing up the Registry before starting this method. Here’s a quick overview of the backup process:
- Click Computer in the Registry Editor’s left side menu.
- Click File in the top left.
- Click Export… to open the Export Registry File window.
- Enter a name for your backup file.
- Select a save location.
- Click Save. This will export a copy of the Registry’s current settings, values, and other data.
-
2
Open Start
. Click the Windows logo in the bottom-left corner of the screen.
-
3
Type in notepad. This will search your computer for the Notepad program, which is what you’ll use to prevent Caps Lock from working on this computer.
-
4
Click Notepad. It’s a blue, notepad-shaped icon at the top of the Start window. A Notepad window will open.
-
5
Enter the Caps Lock termination code. The Notepad document that you’ll create consists of a heading, an empty line, a line indicating a destination, and the code itself:[3]
- Type in Windows Registry Editor Version 5.00 and then press ↵ Enter twice.
- Type in [HKEY_LOCAL_MACHINESYSTEMCurrentControlSetControlKeyboard Layout] and press ↵ Enter.
- Type
"Scancode Map"=hex:00,00,00,00,00,00,00,00,02,00,00,00,00,00,3a,00,00,00,00,00into the final line of Notepad.
-
6
Click File. It’s in the top-left corner of the Notepad window. Clicking it prompts a drop-down menu.
-
7
Click Save As…. This option is near the bottom of the drop-down menu. A «Save As» window will open.
-
8
Enter the file name. Type disable_caps_lock.reg into the «File name» text box that’s near the bottom of the window.
-
9
Click the «Save as type» drop-down box. It’s below the «File name» text box. Clicking it causes a drop-down menu to appear.
-
10
Click All Files. This option is in the drop-down menu.
-
11
Select a save location. Click an easy-to-get-to folder (e.g., Desktop) on the left side of the window. Remember the folder that you choose—you’ll be opening it in just a minute.
-
12
Click Save. It’s in the bottom-right corner of the window. This will save your file in your selected folder.
-
13
Install the file. Go to the folder in which you saved the file (if you selected the Desktop folder, just minimize any open windows), then double-click it to open it and click Yes until you receive a notification that the registry file was successfully merged.
-
14
Click OK when prompted. This will appear on a prompt notifying you that your changes to the registry were successful.
-
15
Restart your computer. Click Start
, click Power
, and click Restart in the resulting pop-up menu. Once your computer finishes restarting, you’ll notice that your Caps Lock key no longer works.
-
16
If you want to re-enable the Caps Lock key on Windows, restore the Registry backup you created in Step 1. To restore a Registry backup, you’ll click the File tab, click Import… in the drop-down menu, and then select your Registry backup file.
-
17
Alternatively, you can edit the Registry to re-enable the Caps Lock key. Erase the disable_caps_lock.reg file from the «HKEY_LOCAL_MACHINESYSTEMCurrentControlSetControlKeyboard Layout» section of the Registry Editor. Then, restart your computer.
Advertisement
-
1
Open the Apple menu
. Click the Apple logo in the top-left corner of the screen. A drop-down menu will appear.
-
2
Click System Preferences…. It’s in the drop-down menu. Doing so opens the System Preferences window.
-
3
Click Keyboard. This keyboard-shaped icon is in the System Preferences window. The Keyboard window will open.
-
4
Click the Keyboard tab. You’ll find this in the top-left corner of the Keyboard window.
-
5
Click Modifier Keys…. It’s in the bottom-right corner of the Keyboard window. A pop-up window will appear.
-
6
Click the Caps Lock drop-down box. You’ll find this in the middle of the pop-up window. Doing so prompts a drop-down menu.
-
7
Click No Action. It’s in the drop-down menu.
- If you have a Mac that has a Touch Bar instead of a row of function keys, you might want to click Escape here instead, as doing so will bind the «Escape» function to the Caps Lock key.
-
8
Click OK. This blue button is at the bottom of the pop-up window. Doing so will save your changes; your Caps Lock key will now result in no action when pressed.
- If you notice that you can still activate Caps Lock after doing this, restart your Mac to solidify the changes. You can do so by clicking the Apple menu, clicking Restart…, and clicking Restart when prompted.
Advertisement
Add New Question
-
Question
When I turn on my mini Laptop(DELL), I have to write my security question but My Laptop Keyboard is Locked and I can not type any thing. How can I unlock it?
Kyle Smith is a wikiHow Technology Writer, learning and sharing information about the latest technology. He has presented his research at multiple engineering conferences and is the writer and editor of hundreds of online electronics repair guides. Kyle received a BS in Industrial Engineering from Cal Poly, San Luis Obispo.
wikiHow Technology Writer
Expert Answer
Try clicking the «Ease of Access» icon and selecting «On-screen keyboard.» Then you should be able to turn off Caps Lock by clicking the Caps Lock button using the on-screen keyboard.
-
Question
What if your password is in lowercase and your computer is stuck on caps lock?
If you’re unable to turn off caps lock, you can hold Shift down for every key you type, or you can activate the on-screen keyboard.
-
Question
I can’t find «Advanced settings» on Windows 8.1. Where is it?
In the top right hand corner there is a button with three dots. Click it, then scroll down until you find settings. Click it, then scroll down until you find «Advanced settings.»
See more answers
Ask a Question
200 characters left
Include your email address to get a message when this question is answered.
Submit
Advertisement
Thanks for submitting a tip for review!
-
If your Caps Lock key is stuck in the «On» position and you can’t disable Caps Lock on your computer, you’ll have to take your computer into a tech repair service.
Advertisement
References
About This Article
Article SummaryX
Mac:
1. Open System Preferences.
2. Click Keyboard.
3. Click Modifier Keys.
4. Click Caps Lock.
5. Click No Action.
6. Click OK.
Windows:
1. Open Notepad.
2. Copy the provided registry code.
3. Save the file as disable_caps_lock.reg.
4. Double-click the saved file.
5. Follow the on-screen instructions.
6. Restart your PC.
Did this summary help you?
Thanks to all authors for creating a page that has been read 480,899 times.

