— Advertisement —
Hello! The Firewall performs an essential security task on any version of Windows Server. In fact, it has the mission of preventing connections that could be attackers from accessing the server. In this way it avoids damage or loss of information. Additionally, the firewall allows you to manage the security of your computer by applying access and exit filters. Similarly, the use of rules allows or denies the traffic of information on the computer. However, for some administrative or support tasks it is necessary to deactivate it. Well, in this post we will see how to disable the firewall in Windows Server 2019/2016.
How to disable Windows Server 2019/ 2016 Firewall using PowerShell
A quick and safe way to disable the Windows Server Firewall. To do this from the Start menu, go to PowerShell.

Then run the following command to enable the firewall:
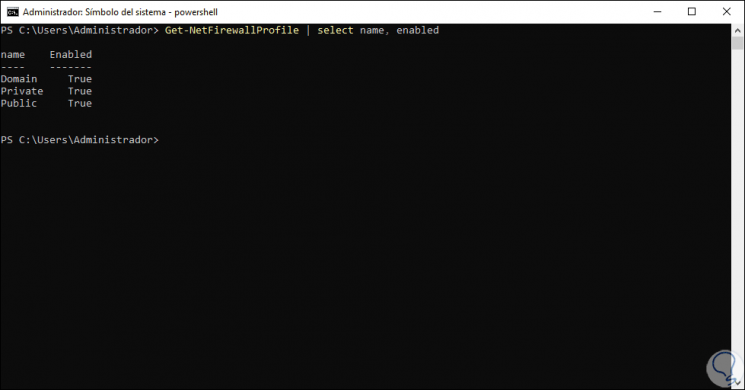
Get-NetFirewallProfile │select name, enabled

Then to disable the Firewall in Windows 10 we will run the following:
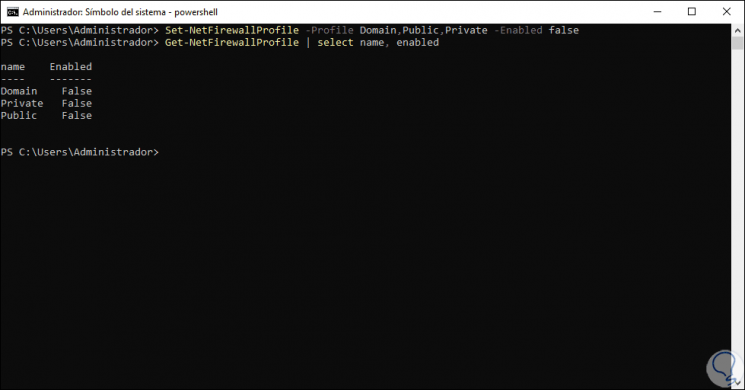
Set-NetFirewallProfile -Profile Domain,Public,Private -Enabled false
The false parameter indicates that the firewall is disabled in private, public and domain environments. Now, to re-enable the firewall on Windows Server, simply run the following command:
Set-NetFirewallProfile -Profile Domain,Public,Private -Enabled true

How to disable Windows Server 2019/2016 Firewall using GPO
It is also possible to disable the Firewall via GPO. If you want to know more about Group Policy Object, check out our post. With this in mind, from the Server Dashboard tools, enter the group management.

Once the editor is open, expand the domain and right click on Default Domain Policy and then on Edit.

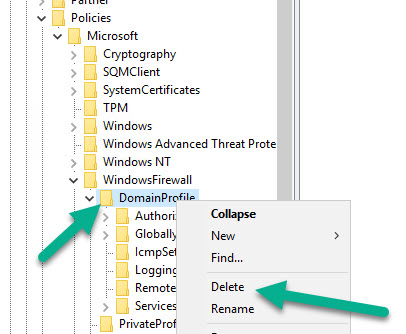
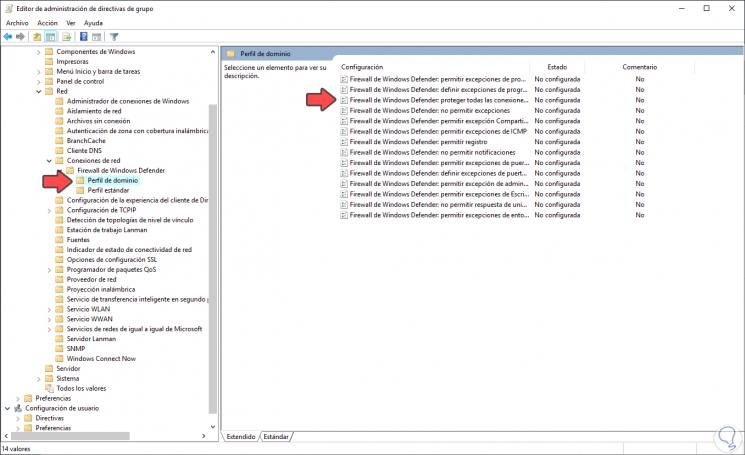
Then follow the next path: Windows Settings>Administrative Templates>Network>Network Connections>Windows Defender Firewall. Next, select Domain Profile and then double-click on: Windows Defender Firewall: Protect all network connections.

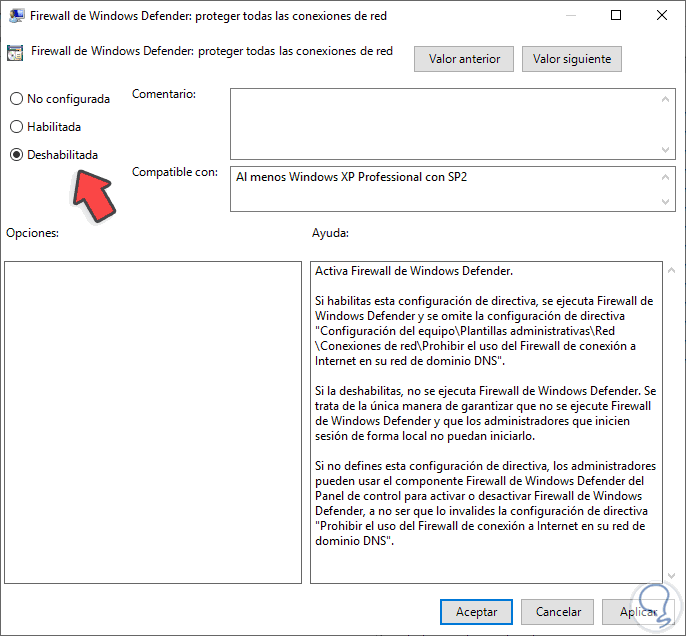
A window with the rule values is immediately displayed. Please select the Disabled value to configure the Firewall in this way. Then press OK to set the changes.

Now, please follow this path. Computer Settings>Windows Settings>Security Settings>Windows Defender Firewall with Advanced Security. On this last value, right click on the mouse and enter the Properties.

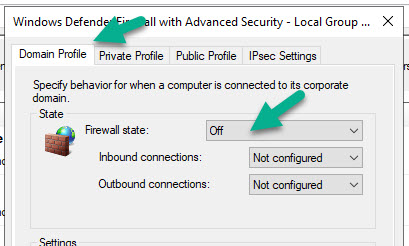
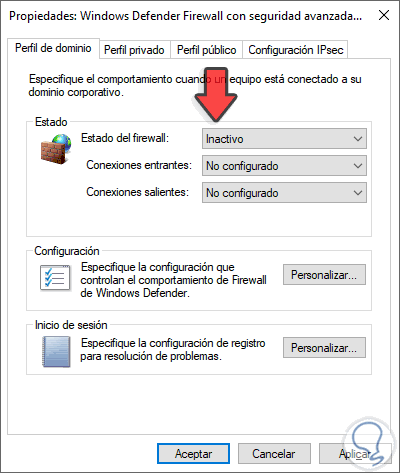
Consequently, a window will be displayed with the behavior of the Firewall in the different environments. Please click on the tabs corresponding to the domain profile, public profile and private profile. In each of them you must set the Firewall status to Off. Press OK and restart the system to set the changes.

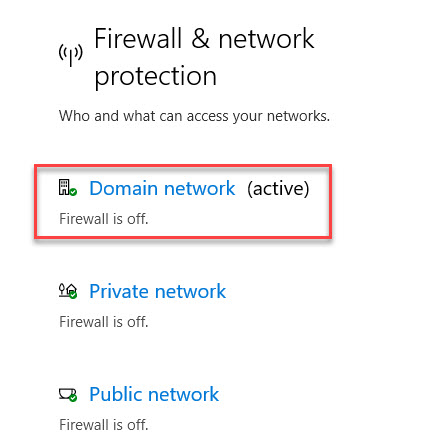
We will now validate that the Firewall is indeed disabled. To do this, follow the next path. Control Panel>System and Security>Windows Defender Firewall. On the next screen you can see that the firewall is disabled in all environments.

Conclusion
At the end of the day we have seen how to disable the Firewall in Windows Server 2019/2016. Also, we saw two ways to do it. That is, using PowerShell and also GPO. As you can see, it’s a simple and safe process to do. Bye!
- Remove From My Forums
-
Question
-
I’m trying to disable the Windows Firewall via GPO. Up until server 2019, the same GPO that had been used since Windows 7/2008R2 had worked just fine, but when we started deploying Server 2019, it causes a problem where the firewall is «disabled»
but still active and blocking things. Worse, attempts to manipulate the firewall fail because everything returns an error saying the firewall is disabled. This happens only on Server 2019, and 100% of the time.So, I want to know how to disable the Windows Defender Firewall component in 2019, but I also do not want to completely disable Windows Defender, as I still want to use its anti-virus capabilities.
Содержание
- How to disable Firewall in Windows Server 2019/2016
- How to disable Windows Server 2019/ 2016 Firewall using PowerShell
- How to disable Windows Server 2019/2016 Firewall using GPO
- Conclusion
- Управление правилами Windows Firewall с помощью PowerShell
- Управление сетевыми профилями брандмауэра Windows из PowerShell
- Создание, редактирование и удаление правил Windows Firewall из PowerShell
- Вывод правил Windows Firewall через PowerShell
- Как включить / отключить Ping в брандмауэре Windows Server 2019/2016/2012 R2
- Разрешить Ping в Windows Server 2019/2016 — графический интерфейс
- Включение / отключение проверки связи с помощью команд PowerShell
- Windows server 2019 отключить firewall
- Можно ли полностью удалить Защитник Windows?
- Методы удаления Windows Defender
- Удаление защитника Windows через диспетчер серверов
- Как удалить защитник виндовс через PowerShell
- Как удалить защитник windows через Windows Admin Center
- Windows server 2019 отключить firewall
- Question
- Answers
- All replies
How to disable Firewall in Windows Server 2019/2016

Hello! The Firewall performs an essential security task on any version of Windows Server. In fact, it has the mission of preventing connections that could be attackers from accessing the server. In this way it avoids damage or loss of information. Additionally, the firewall allows you to manage the security of your computer by applying access and exit filters. Similarly, the use of rules allows or denies the traffic of information on the computer. However, for some administrative or support tasks it is necessary to deactivate it. Well, in this post we will see how to disable the firewall in Windows Server 2019/2016.
How to disable Windows Server 2019/ 2016 Firewall using PowerShell
A quick and safe way to disable the Windows Server Firewall. To do this from the Start menu, go to PowerShell.
Run a PowerShell
Then run the following command to enable the firewall:
Then to disable the Firewall in Windows 10 we will run the following:
The false parameter indicates that the firewall is disabled in private, public and domain environments. Now, to re-enable the firewall on Windows Server, simply run the following command:
How to disable Windows Server 2019/2016 Firewall using GPO
It is also possible to disable the Firewall via GPO. If you want to know more about Group Policy Object, check out our post. With this in mind, from the Server Dashboard tools, enter the group management.
Enter Windows Server Group Management
Once the editor is open, expand the domain and right click on Default Domain Policy and then on Edit.
Right click to edit the group policy.
Then follow the next path: Windows Settings>Administrative Templates>Network>Network Connections>Windows Defender Firewall. Next, select Domain Profile and then double-click on: Windows Defender Firewall: Protect all network connections.
Double-click to edit the rule.
A window with the rule values is immediately displayed. Please select the Disabled value to configure the Firewall in this way. Then press OK to set the changes.
Set the value to Disabled.
Now, please follow this path. Computer Settings>Windows Settings>Security Settings>Windows Defender Firewall with Advanced Security. On this last value, right click on the mouse and enter the Properties.
Enter the Firewall properties
Consequently, a window will be displayed with the behavior of the Firewall in the different environments. Please click on the tabs corresponding to the domain profile, public profile and private profile. In each of them you must set the Firewall status to Off. Press OK and restart the system to set the changes.
Disables the firewall in different Windows Server environments
We will now validate that the Firewall is indeed disabled. To do this, follow the next path. Control Panel>System and Security>Windows Defender Firewall. On the next screen you can see that the firewall is disabled in all environments.
Control panel with firewall disabled on all domains.
Conclusion
At the end of the day we have seen how to disable the Firewall in Windows Server 2019/2016. Also, we saw two ways to do it. That is, using PowerShell and also GPO. As you can see, it’s a simple and safe process to do. Bye!
Источник
Управление правилами Windows Firewall с помощью PowerShell
Эта статья посвящена основам управления настройками и правилами встроенного Windows Firewall из командной строки PowerShell. Мы рассмотрим, как включать/отключать брандмауэр для различных профилей, создавать и удалять правила файервола, и рассмотрим небольшой скрипт, позволяющий сформировать удобную таблицу с текущим набором активных правил брандмауэра.
В модуле NetSecurity в Windows 10 доступно 85 команд. Вы можете вывести их список:

Управление сетевыми профилями брандмауэра Windows из PowerShell
В Windows Firewall есть три типа сетевых профилей:

Каждый профиль может отличаться используемым набором правил файервола. По умолчанию все сетевые интерфейсы компьютера защищены фаейрволом и к ним применяются все три типа профилей.
Чтобы включить все три сетевых профиля Domain, Public и Private, используйте команду:
Либо укажите конкретный профиль вместо All:
Чтобы отключить файервол для всех трех сетевых профилей, используется команда:
С помощью командлета Set-NetFirewallProfile вы можете изменить параметры профиля (действие по-умолчанию, журналирование, путь и размер файла журнала, настройки оповещений и т.д.).
Как вы вероятно знаете, по умолчанию Windows Firewall включен в современных ОС для всех профилей. В настройках профилей разрешены все исходящие подключения и блокируется входящие (кроме разрешенных).
Изменим действие по-умолчнию для профиля Public – заблокировать все входящие подключения.
Set-NetFirewallProfile –Name Public –DefaultInboundAction Block
Текущие настройки профиля можно вывести так:

Если вы управляете настройками Windows Firewall через GPO, вы можете вывести текущие результирующие настройки профилей так:
Проверим, что все параметры брандмауэра применяются ко всем сетевым интерфейса компьютера.
Если все интерфейсы защищены, команда должна вернуть:

Можно отключить определенный профиль для интерфейса (вывести список имен интерфейсов можно с помощью командлета Get-NetIPInterface).
Как вы видите, теперь профиль Public не применяется к интерфейсу Ethernet0:

Вы можете настроить параметры логирования сетевых подключений на уровне каждого профиля. По умолчанию журналы Windows Firewall хранятся в каталоге %systemroot%system32LogFilesFirewall, размер файла – 4 Мб. Вы можете изменить включить журналирование подключений и увеличить максимальный размер файла:
Создание, редактирование и удаление правил Windows Firewall из PowerShell
Для управления правилами брандмауэра есть 9 командлетов:
Рассмотрим несколко простых примеров открытия портов в Windows Firewall.
Например, вы хотите разрешить входящие TCP подключения на порты 80 и 443 для профилей Domain и Private, воспользуйтесь такой командой:

Вы можете разрешить или заблокировать трафик для конкретной программы. Например, вы хотите заблокировать исходящие соединения для FireFox:
Разрешим входящее RDP подключение по порту 3389 только с IP одного адреса:
Чтобы разрешить ping для адресов из указанной подсети, используйте команды:
$ips = @(«192.168.1.50-192.168.1.60», «192.165.2.22-192.168.2.200», ”10.10.0.0/16”)
Чтобы отредактировать имеющееся правило брандмауэра, используется командлет Set-NetFirewallRule. Например, вы хотите разрешить входящие подключения с указанного IP адреса для ранее созданного правила:
Если нужно добавить в правило файервола несколько IP адресов, используйте такой скрипт:
$ips = @(«192.168.1.50», «192.165.2.22»,”192.168.1.20”)
Вывести все IP адреса, которые содержатся в правиле брандмауэра:

Вы можете включать/отключать правила файервола с помощью командлетов Disable-NetFirewallRule и Enable-NetFirewallRule.
Disable-NetFirewallRule –DisplayName ‘WEB-Inbound’
Чтобы разрешить ICMP (ping), выполните команду:
Чтобы удалить правило брандмауэре используется командлет Remove-NetFirewallRule.
Вывод правил Windows Firewall через PowerShell
Список активных правил для входящего трафика можно вывести так:
Если, например, нам нужно вывести список блокирующих исходящих правил:
Если нужно отобразить имя программы в правиле:

Как вы видите командлет Get-NetFirewallRule не выводит порты сетевые порты и IP адреса для правил брандмауэра. Чтобы вывести всю информацию о разрешенных входящих (исходящих) подключениях в более удобном виде с отображением номеров портов, используйте такой скрипт:

PowerShell предоставляет широкие возможности по управлению правилами Windows Firewall из командной строки. Вы можете автоматически запускать скрипты PowerShell для открытия/закрытия портов при возникновении определенных событий. В следующей статье мы рассмотрим простую систему на базе PowerShell и Windows Firewall для автоматической блокировки IP адресов, с которых выполняется удаленный перебор паролей по RDP на Windows VDS сервере.
Источник
Как включить / отключить Ping в брандмауэре Windows Server 2019/2016/2012 R2
В этом руководстве мы узнаем, как включить (и отключить) ответ ping на серверах Windows 2019/2016 и 2012 R2. Хотя исходный пост был написан со снимками экрана с сервера Windows 2012 R2, те же шаги применимы к любым последним серверам Windows.
Включение ping поможет вам отслеживать и устранять сетевые проблемы в вашей сети. В зависимости от политик и настроек среды вашего домена запрос проверки связи будет работать соответствующим образом. Если он работает по умолчанию, мы также покажем вам, как отключить пинг на серверах Windows. Кстати, мы упомянули команды Powershell, если вы хотите работать в удаленной системе или в версии Core ОС Windows.
Разрешить Ping в Windows Server 2019/2016 — графический интерфейс
1) Перейдите в панель управления и откройте «Брандмауэр Windows». Есть много способов получить доступ к панели управления на сервере Windows.

2) Щелкните «Дополнительные настройки».

Кроме того, вы можете выполнить поиск «Брандмауэр» в поиске Windows, чтобы получить доступ к расширенным настройкам брандмауэра, как показано ниже.

3) В более ранних операционных системах нам нужно создать правило брандмауэра, разрешающее эхо-пакеты ICMP. К счастью, правило уже существует, и нам просто нужно его включить.
Чтобы включить входящее правило, разрешающее пакеты ICMP, выберите «Входящие правила». Найдите «Общий доступ к файлам и принтерам (эхо-запрос —ICMPv4-In»), щелкните его правой кнопкой мыши и выберите » Включить правило».

Это позволит принимать входящие запросы ping и отвечать на них без полного отключения службы брандмауэра Windows. Поскольку мы включили это правило только для пакетов IPv4, нам нужно включить отдельное аналогичное правило для ICMPv6-In для сети IPv6.
На скриншоте ниже показано, что сервер Windows начал отвечать на запрос ping, если было включено указанное выше правило.

В аналогичном сценарии, если сервер отвечает на запросы ping / ICMP, но вам нужно остановить его для повышения безопасности, вы можете просто отключить то же правило.
Посетите брандмауэр Windows, расширьте настройки и отключите правило » Общий доступ к файлам и принтерам (эхо-запрос —ICMPv4-In«).
Включение / отключение проверки связи с помощью команд PowerShell
Вундеркинды любят командные строки, особенно администраторы ОС Windows любят PowerShell. Ниже приведены команды, которые можно использовать для включения / отключения ping в Windows Server и клиентских операционных системах. Особенно, если вы работаете с удаленными системами через PowerShell или у вас есть Server Core OS без графического интерфейса.
Обязательно запускайте указанные ниже команды «от имени администратора» в командной строке или PowerShell.
Включить IPv4 — это создаст исключение в правиле брандмауэра Windows по умолчанию.
netsh advfirewall firewall add rule name = «ICMP Разрешить входящий эхо-запрос V4» protocol = «icmpv4: 8, any» dir = in action = allow
Для IPv6:
netsh advfirewall firewall add rule name = «ICMP Разрешить входящий эхо-запрос V6» protocol = «icmpv6: 8, any» dir = in action = allow
Чтобы отключить пинг на IPv4:
netsh advfirewall firewall add rule name = «ICMP Allow incoming V4 echo request» protocol = icmpv4: 8, any dir = in action = block
Для IPv6:
брандмауэр netsh advfirewall добавить правило name = «ICMP Разрешить входящий эхо-запрос V6» протокол = icmpv6: 8, любой dir = in action = block
Поскольку ping — полезная утилита для устранения неполадок и определения наличия сетевого устройства, ее включение или отключение полностью зависит от политик сетевой безопасности вашей среды. В этом руководстве мы упомянули простые шаги, которые вы можете выполнить с помощью графического интерфейса и командной строки.
Источник
Windows server 2019 отключить firewall

Добрый день! Уважаемые читатели и гости IT блога Pyatilistnik.org. Не так давно мы с вами установили Windows Server 2019 и произвели его базовую настройку. Развернули на сервере разные сервисы и запустили его в производственную среду. Идет время и на нем появляется проблема, что встроенный антивирус защитник Windows он же Windows Defender, начинает потреблять очень много процессорных мощностей и было принято решение его удалить. Или же у вас есть желание установить другой антивирус, а защитник Windows не отключать, а удалить совсем, как это сделать. Именно этот момент мы и разберем сегодня в данной заметке.
Можно ли полностью удалить Защитник Windows?
Методы удаления Windows Defender
Хоть разработчики и обошли данной возможностью Windows 10, но в Windows Server 2016 и 2019 она есть и вы полностью можете убрать из них защитник. Сделать это можно тремя методами:
Что конкретно мы деинсталлируем данными методами. Откройте через пуск «Параметры Windows», или просто нажмите сочетание клавиш WIN+I. Перейдите в раздел «Обновление и безопасность».

Находим пункт «Безопасность Windows» и нажимаем «Открыть службу безопасность Windows».

У вас откроется Windows Defender, в котором можно управлять четырьмя пунктами:

Если посмотреть службы в Windows Server 2019, то вы обнаружите вот такие две:

Удаление защитника Windows через диспетчер серверов

Выбираем сервер с которого мы планируем полностью удалить защитник Windows. Напоминаю, что «Диспетчер серверов» может управлять и удаленным сервером или целым пулом серверов. В моем примере я выберу свой локальный сервер, на котором я устанавливал WDS роль.


Снимаем галку «Windows Defender Antivirus», это позволит его полностью удалить с сервера. Нажимаем далее.

Нажимаем кнопку «Удалить». Сам процесс занимает около минуты.

После удаления компонента, нужна обязательная перезагрузка сервера. Выполните ее, когда у вас будет возможность, но лучше не затягивать, сервера начинают тупить в таком состоянии ожидания.

Все, теперь после перезагрузки защитник windows удален с сервера. Можете это проверить. Откройте пункт «Безопасность Windows» и убедитесь, что там пропал пункт «Защита от вирусов и угроз»

Как удалить защитник виндовс через PowerShell
Windows PowerShell, не зря называют мощным средством по управлению серверов, его возможности практически бесконечны. Полностью удалить защитник в Windows Server 2019, можно специальным командлетом. Для этого для начала проверьте состояние службы и есть ли у вас вообще в системе Windows Defender. Для этого в командной строке введите команду:
Как видите состояние у Windefend «RUNNING», что означает, что она запущена.

Можно посмотреть ее состояние и через оснастку PowerShell, лучше ее открыть от имени администратора. Введите команду:

Чтобы полностью удалить защитник виндовс, вам необходимо в PowerShell ввести вот такую команду:
Начнется процесс деинсталляции компонента Windows Server 2019, вы будите видеть шкалу прогресса.

Вы увидите сообщение, что служба Windows Defender Antivirus успешно удалена, и чтобы завершить удаление, вам необходимо перезапустить этот сервер.

Как удалить защитник windows через Windows Admin Center

Появится всплывающее окно, где будут проверенны зависимости, если их нет, нажмите кнопку «Да», чтобы запустить процесс деинсталляции.

В оповещениях вы можете следить за процессом удаления, после чего вам потребуется перезагрузка.
Источник
Windows server 2019 отключить firewall

Question
Windows Server 2019 Strd
Как создать правило Windows FireWall чтоб заблокировать внешний IP адрес на все возможные подключения?
Не могу найти в настройках правил нужного пункта чтоб заблокировать некому внешнему IP доступ абсолютно ко всему!?
Answers
Да, если мне надо запретить протоколы RDP, мне использовать вот это готовое правило: Удаленный рабочий стол — пользовательский режим (входящий трафик TCP)? и во вкладке Область, Удалённый IP адрес за место галочки любой, указать именно те IP с которых будет разрешено такое подключение всё верно?
Создаётся правило, там выбирается All Protocols, указывается DENY и указывается Remote Scope (сюда и нужно вписать с какого адреса будут дропаться все сессии к этому хосту).
Внешний IP 91.241.19.177 с которого была зафиксирована атака на наш сервер.
Создаем правило для вход подкл, далее Настраиваемое, далее Все программы, далее тип протокола любые порты любые, далее указывается Локальный и удалённый адрес (что значит локальный? В какое поле нужно вбить этот IP в локальный или удалённый?), далее Блокировать подкл, далее Имя и создание. Всё верно?
Или можно в первом пункте сразу выбрать Для программ и далее?
любой IP адрес в интернете.
Добавить другие адреса можно с помощью:
Не забываейте, что настройка фаервола на удалённом сервере может потребовать последующую поездку для восстановления доступа к серверу в случае неверной настройки.
Вопрос задан неспроста.
Если сервер опубликован через reverse-proxy, шлюз и т.п., а не торчит одним местом наружу, то в логах Firewall вы такого «внешнего» адреса скорее всего не увидите (там будет адрес вашего пограничного устройства) и подобное правило ничем не поможет.
Дополнительно рассмотрите решения fail2ban, ибо подобные атаки будут не с одного адреса.
Коллеги, подскажите как создать правило для блокировки всех входящих соединений на firewall`е?
Поясню: Стоит задача, дать доступ к серверу только с определенных ip адресов, всем остальным доступ нужно закрыть.
т.е. нужно создать два правила, одно для запрета всего, другое чтоб разрешала доступ только тем адресам что есть в списке.
Подскажите как создать эти правила, было бы здорово если бы с помощью powershell.
А в чём у вас сложность? Есть RTFM с примерами.
В разрешающем правиле нужно указать Remote IP, а в запрещающем эти IP внести в исключения.
речь идет про все подключения или про какой-то конкретный протокол (rdp/smb/. )?
если про конкретный, то находите разрешающее правило и вписываете те хосты с которых можно подключаться
Если же вы хотите закрыть все, то отключите все входящие правила, и включите только нужные указав в них ваши хосты. Если сервер в домене эта задача геморная и грозит рандомными проблемами
The opinion expressed by me is not an official position of Microsoft
А в чём у вас сложность? Есть RTFM с примерами.
В разрешающем правиле нужно указать Remote IP, а в запрещающем эти IP внести в исключения.
The opinion expressed by me is not an official position of Microsoft
А в чём у вас сложность? Есть RTFM с примерами.
В разрешающем правиле нужно указать Remote IP, а в запрещающем эти IP внести в исключения.
по умолчанию запрещено все что не разрешено, поэтому достаточно отредактировать только входящее правило
The opinion expressed by me is not an official position of Microsoft
По умолчанию есть куча включенных предопределенных правил в FW, у которые Remote IP = All. Вот их либо отключать, либо нужно делать единое правило запрета.
Ну и не забывать, что если в домене, то нужна связность с КД и т.п.
The opinion expressed by me is not an official position of Microsoft
Ваш сегодняшний вопрос чем-то отличается от прошлого?
The opinion expressed by me is not an official position of Microsoft
речь идет про все подключения или про какой-то конкретный протокол (rdp/smb/. )?
если про конкретный, то находите разрешающее правило и вписываете те хосты с которых можно подключаться
Если же вы хотите закрыть все, то отключите все входящие правила, и включите только нужные указав в них ваши хосты. Если сервер в домене эта задача геморная и грозит рандомными проблемами
The opinion expressed by me is not an official position of Microsoft
Да, если мне надо запретить протоколы RDP, мне использовать вот это готовое правило: Удаленный рабочий стол — пользовательский режим (входящий трафик TCP)? и во вкладке Область, Удалённый IP адрес за место галочки любой, указать именно те IP с которых будет разрешено такое подключение всё верно?
Да и ещё, если Локальные IP адреса стоит галка Любой, то это значит что любые адреса в локальной сети смогу без проблем по RDP постучаться к этому серверу? Просто это важно т.к. внутри локальной сети такие подкл запрещать не нужно.
Источник
- Remove From My Forums
-
Question
-
I’m trying to disable the Windows Firewall via GPO. Up until server 2019, the same GPO that had been used since Windows 7/2008R2 had worked just fine, but when we started deploying Server 2019, it causes a problem where the firewall is «disabled»
but still active and blocking things. Worse, attempts to manipulate the firewall fail because everything returns an error saying the firewall is disabled. This happens only on Server 2019, and 100% of the time.So, I want to know how to disable the Windows Defender Firewall component in 2019, but I also do not want to completely disable Windows Defender, as I still want to use its anti-virus capabilities.
If you need to install some third-party applications on Windows 2019 server, which require connectivity among other clients and servers, you need to check the status of the built-in firewall. In few cases, you can open/allow certain ports in the firewall policy, but in other cases, you need to disable the firewall to make the application work properly.
Disabling Windows firewall used to be an easy option on earlier Operating Systems by just switching off the ‘Windows Firewall’ service in computer management. Unfortunately, you will not find the same ‘Windows Firewall’ service in Windows 2019 server. Since Windows Defender manages the network firewall on Windows 2019 server, we can’t see a separate service to disable it.
That doesn’t mean we can’t disable the Windows firewall on the 2019 server. There are plenty of ways to do it from GUI, CMD and Powershell. I’m not going to cover those steps here. I’m mainly targeting the steps you may need to perform if the Windows firewall policy is managed by your administrator (via the Domain policy). In this case, whatever actions you perform on the local computer to disable the firewall will not work if the server is part of the domain network.
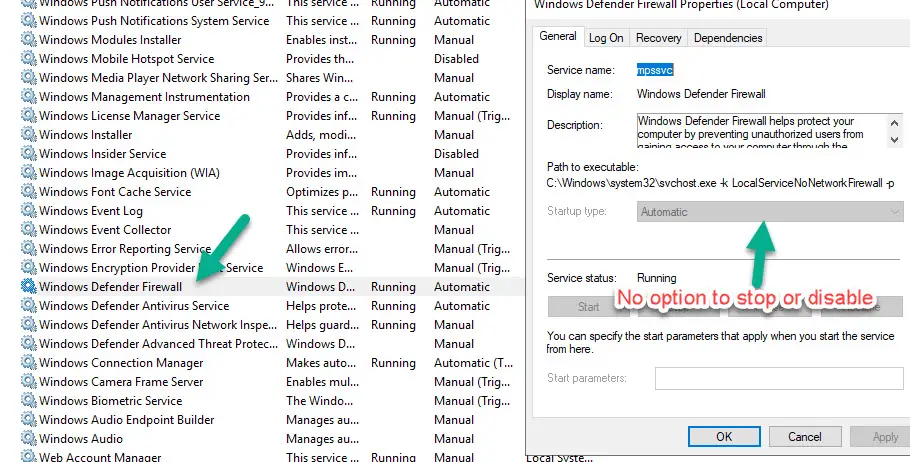
Windows Firewall Service in Windows 2019:
As shown below, it was replaced with Windows Defender Firewall, and we will not have the option to stop and change the state to Disable/Manual.
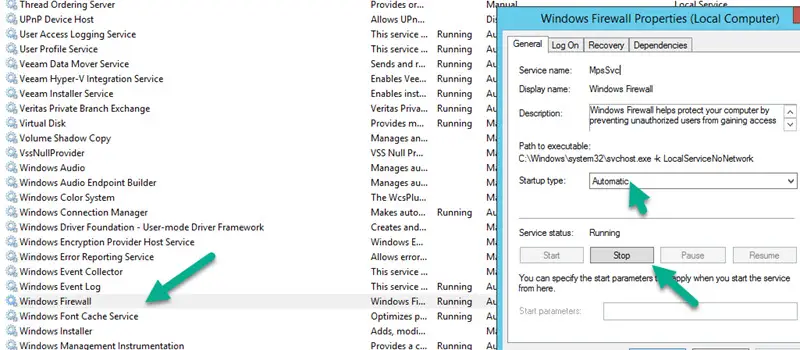
Meanwhile, here is the state from Windows 2012 R2 server where we can stop the service and disable it. So, the Windows firewall will be disabled permanently on the server for any type of network profile.
The Trick to Disable Firewall on Windows 2019 Server – When it is managed by your administrator
Let’s dive to the working steps.
Find out the correct network profile server connected.
If you have joined the domain and domain policies are applied correctly, I’m sure your server network profile will be ‘Domain network’.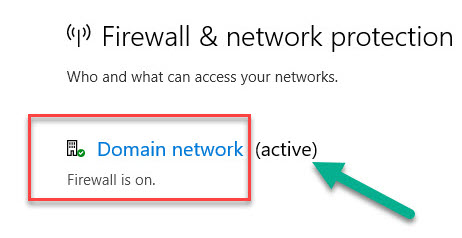
The real trick is to do a few registry modifications, but before doing that, you can try the below steps.
Open ‘Local Security Policy’ on the server and select the ‘Windows Defender Firewall…’ option as shown below. Then click on the properties of the settings.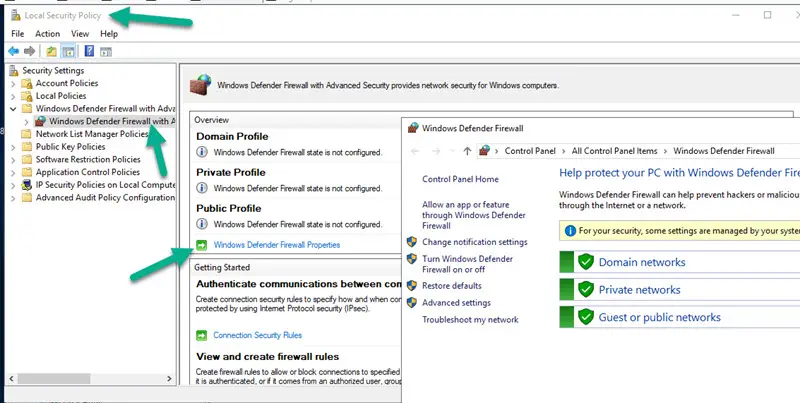
This will open a box where you should turn off the Firewall for ‘Domain Profile’ and optionally for Private and Public profiles.
Once you make it off, it will show the status like below in Local Security Policy.
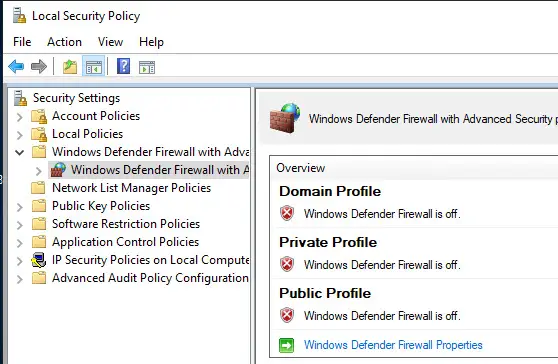
Even though this screen shows that the firewall is turned off for the domain profile, but it will not work.
Still, the Windows defender will show that ‘Firewall is on’ for the domain network. By clicking the domain network in Windows Defender settings will not allow you to off the firewall because it was managed by the organization policy.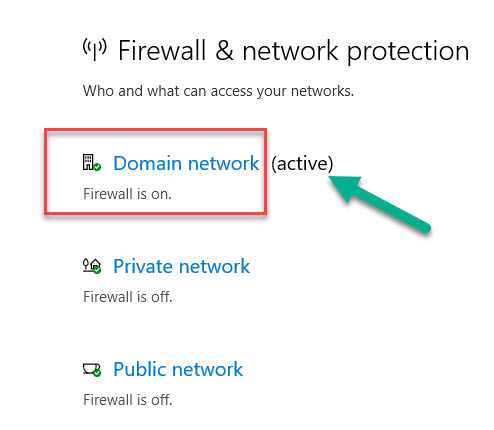
For your satisfaction, reboot the server and see if the above steps are useful. If not, let’s go to the final working solution.
Registry modification.
As mentioned earlier, this can be done by registry modification. Open the registry and access the below location.
ComputerHKEY_LOCAL_MACHINESOFTWAREPoliciesMicrosoftWindowsFirewall
Before proceeding with anything, it is recommended to export the registry settings.
We have two options to achieve our goal here (Do any of it only).
Click on ‘Domain Profile’ and change the value from 1 to 0 for ‘EnableFirewall’. Restart the server to take effect.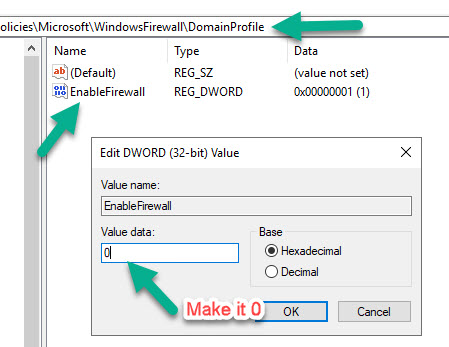
OR….
Select the ‘Domain Profile’ and delete the entry completely. Reboot the server.
With the reboot, you will notice that the firewall for the domain network profile is completely off. And for whatever reason you wanted to disable the firewall, now those services will communicate to this Windows 2019 server.
This is the only simple and working method I found out to disable the Windows firewall on Windows 2019 server when managed by an organization/administrator in a domain environment. We do not need to modify the common group policy or give an exception for this server in policy that may require additional steps and implications at the domain level.
The Firewall in Windows Server 2016 and Windows Server 2019 fulfills an essential role of security since the Firewall has the mission of preventing that attacking connections can access the server and cause damage or loss of information which in a server environment can trigger multiple failures, hence the importance of the Firewall there, now, for some administrative or support tasks, we can temporarily disable the Firewall either through CMD or GPO..
Thanks to the Firewall or firewall we can manage and control the security of our equipment by having the possibility of applying access and exit filters . Through the use of rules we can allow or deny the information traffic by our team, something that allows much more control of everything that happens on the PC. With TechnoWikis you will learn to disable Firewall Windows Server 2019 and Server 2016 using one of these methods.
Then we also leave you the video tutorial to be able to disable the Firewall in Windows Server 2019 or Server 2016..
To stay up to date, remember to subscribe to our YouTube channel! SUBSCRIBE
1. Disable Windows Server 2019 and 2016 CMD Firewall
To make use of this method in Windows Server we go to the command prompt and there we access the PowerShell sequence by executing «powershell».
Step 1
After this we enable the Firewall by executing:
Get-NetFirewallProfile │select name, enabled
Step 2
Then to disable the Firewall in Windows 10 we will execute the following:
Set-NetFirewallProfile -Profile Domain, Public, Private -Enabled false
Step 3
With the parameter «false» it has been indicated that the Firewall in public, private and domain environments is disabled, we can check the status by executing again:
Get-NetFirewallProfile │select name, enabled
Step 4
If at any time we want to enable the Firewall again in Windows Server 2016 or 2019 we will execute the following:
Set-NetFirewallProfile -Profile Domain, Public, Private -Enabled true
2. Disable Windows Server 2019 and 2016 GPO Firewall
Local group policies are another of the mechanisms available to enable or disable Firewall in Windows Server
Step 1
For this we go to the Start menu and in the group «Windows Administrative Tools» we select «Group Policy Management»:

Step 2
In the displayed editor we expand the domain and right-click on the “Default Domain Policy†option and select Edit: 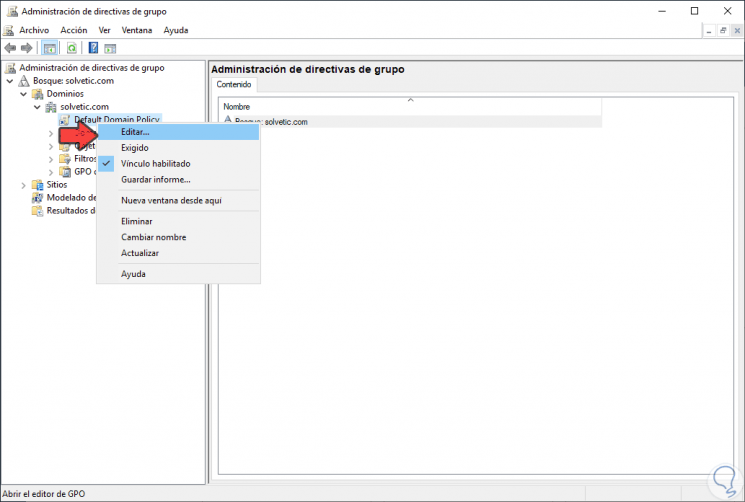
Step 3
Now we go to the path:
- Equipment Configuration
- Administrative Templates
- Net
- Network connections
- Windows Defender Firewall
Step 4
We select «Domain Profile» and then we select the policy called «Windows Defender Firewall: protect all network connections»: 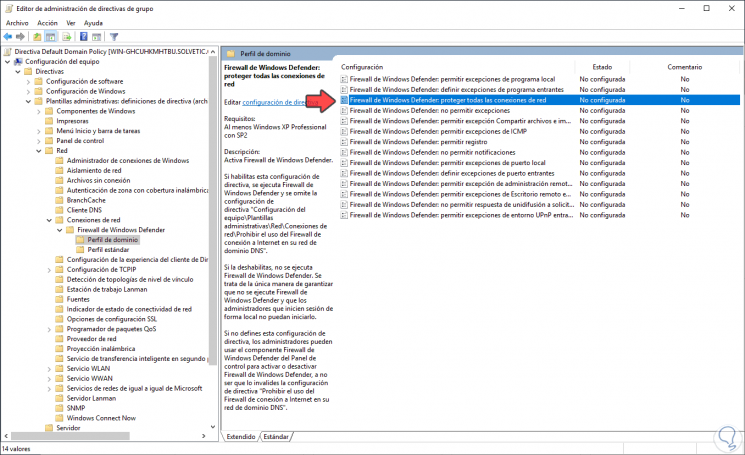
Step 5
We double click on this policy and activate the «Disable» box to configure the Windows Server Firewall in this way. We click Apply and OK to save the changes.
Step 6
Now we go to the following route:
- Equipment Configuration
- Windows settings
- Security settings
- Windows Defender
- Firewall with advanced security
Step 7
We right click on «Windows Defender Firewall with advanced security» and select «Properties»: 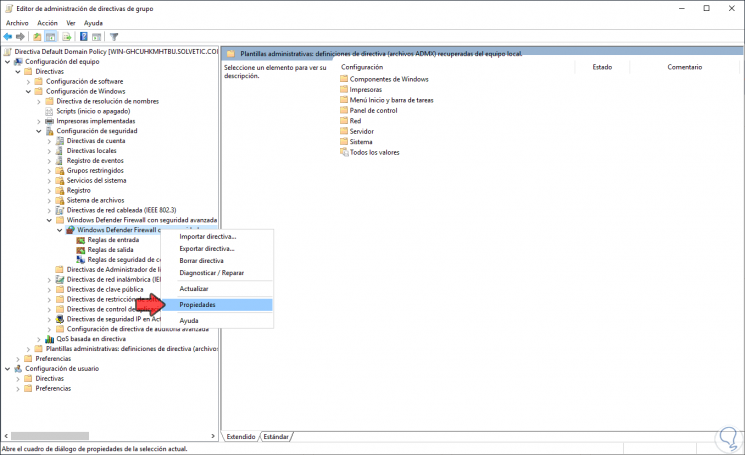
Step 8
In the displayed window we will go to each of the profiles (public, private and domain) and set the «Firewall Status» field to «Inactive». We click on Apply and OK to save the changes and restart the system to apply the changes.
Step 9
After this we will go to the following route:
- Control Panel
- Security system
- Windows Defender Firewall
Step 10
There we validate that the Firewall in Windows Server 20106 or 2019 is disabled: 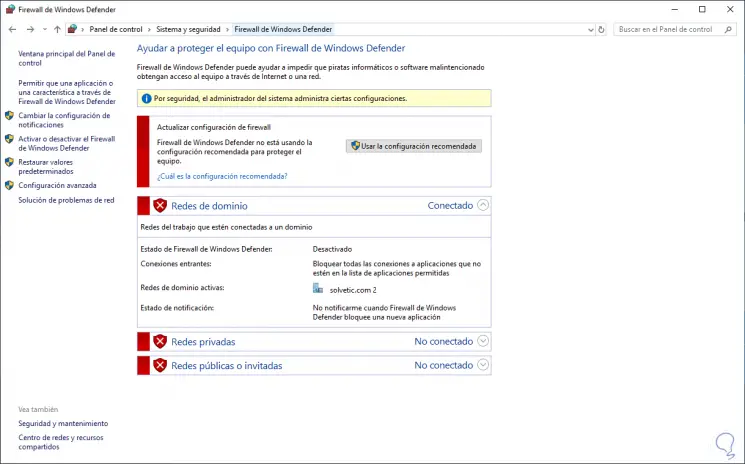
With these simple steps we can disable Firewall Windows Server 2019 and Server 2016 when necessary..
Windows Server 2019 contains a firewall program called Windows Defender Firewall with Advanced Security. The firewall filters incoming and outgoing traffic on your Windows Server 2019 instance to safeguard it from common network attacks. By default, the firewall is configured to allow access to all pre-installed system programs.
However, several programs may use multiple different ports for operation, and these will be automatically blocked because they don’t match with the rules in your firewall configuration. In this case, you need to open the specific port on Windows Server.
Prerequisites
-
Deploy a Windows Server 2019 Instance on Vultr
-
A Remote Desktop Connection App
Establish a connection to your server by logging in through any remote desktop app or click the console on your Vultr dashboard to access your server. After you connect you can start configuring your Windows server 2019 firewall rules.
By default, Windows Defender Firewall is turned on, but in any case, you should confirm the current status and turn on firewall. To do this, click the tools node under server manager and select Windows Defender Firewall with Advanced Security from the drop down list.

From the open group policy management window, check the current status of Windows Firewall profiles if it is set to ON; otherwise, click the Windows Defender Firewall properties option and turn the service on per profile.

Firewall Rules
Windows Firewall rules allow you to either permit or block specific incoming and outgoing network packets on your server. You can choose multiple parameters for each inbound or outbound rule. A rule can consist of a TCP or UDP port, program name, service, or a protocol to filter for every server profile.
Windows server profiles are grouped into, Domain, Private and Public. Domain represents your server’s connection to a corporate domain network, Private applies to your home or workplace network connection, and Public represents non-secure public network locations.
Open an Inbound Port (Incoming connections)
Launch windows defender firewall from the tools sub-menu under server manager. Then, select Inbound Rules on the left panel of the Firewall console.
A list of current rules will be displayed. Now, on the left Inbound Rules sub-menu under actions, click New Rule.

Select Port as the rule type in the rule wizard and click Next.

Now, choose whether the new rule applies to a TCP or UDP port on your server. Then, select specific ports and enter your target port number, you can enter a ports range, or multiple ports separated by - and , respectively, then click Next.

Define your TCP or UDP port rule.

-
Allow the connectionwill allow incoming connections to the specified server port -
Allow the connection if it is securewill authenticate with IP security and either deny or allow the connection. For example,httpsconnections will be allowed andhttpblocked. -
Block the connectionwill block all incoming connections to your server through the specified port
In this case, choose Allow the connection to open the port.
Click Next to assign the new rule to one or more profiles. You can select between Domain, Private, and Public, or choose all to apply the firewall rule on multiple profiles.
Next, give your new firewall rule a custom name and description for easy identification. Then, Click finish to enable the new rule. Your new Inbound (Incoming) port rule will be enabled, and all connections to the server that match the port will be accepted.
Open an Outbound Port (Outgoing connection)
From the Windows Defender Firewall console, click Outbound Rules on the left pane, and a list of available outgoing connection rules will be displayed.
Now, click New Rule on the right pane under the outbound rules node.
In the new outbound rule wizard, select Port as the rule type and click Next.

Now, let’s choose whether the new rule applies to a TCP or UDP port. Then, select specific remote ports and enter the target server port number; you can enter a range of ports, a single port, or multiple different ports you intend to open.

Next, on the Action page, select Allow the connection, then click next to select the server profile on which the rule should be enabled.
Give the new outbound rule a name and description that uniquely describes it. Then, click Finish to enable the outbound rule for the target port to be open on all selected server profiles.

Open a Port through Windows PowerShell
From the Windows start menu, open PowerShell. Then, edit the following command and replace it with your settings.
New-NetFirewallRule -Enabled:True -LocalPort 21 -Protocol TCP -Direction Inbound -Profile Domain -Action Allow -DisplayName example opening a port rule"
-
New-NetFirewallRuleCreates a new Firewall rule. -
EnabledThis enables the new rule, by default, it will be set to True. -
LocalPortYour target port number. -
ProtocolSpecifies the protocol associated with your port number. -
DirectionSets your target direction to either Inbound (Incoming) or Outbound (Outgoing). -
ProfileAssigns the new rule to a server profile; you can choose domain, private, or public. -
Actiondefines the state for the new firewall rule, enter allow. -
DisplayNamesets a custom name for the new firewall rule
Your Output should be similar to the one below.
PS C:UsersAdministrator> New-NetFirewallRule  -Enabled:True  -LocalPort 21  -Protocol TCP  -Direction Inbound  -Profile Domain  -Action Allow  -DisplayName "example opening a port rule"


Name                  : {427a1b12-ece6-4d54-847d-de482b227c6c}

DisplayName           : example opening a port rule

Description           :

DisplayGroup          :

Group                 :

Enabled               : True

Profile               : Domain

Platform              : {}

Direction             : Inbound

Action                : Allow

EdgeTraversalPolicy   : Block

LooseSourceMapping    : False

LocalOnlyMapping      : False

Owner                 :

PrimaryStatus         : OK

Status                : The rule was parsed successfully from the store. (65536)

EnforcementStatus     : NotApplicable

PolicyStoreSource     : PersistentStore

PolicyStoreSourceType : Local
Congratulations, you just opened a network port on your Windows Server 2019. The server will accept incoming and outgoing connections through the selected ports, but the firewall will block connections from a profile that doesn’t match the port rule.
Эта статья посвящена основам управления настройками и правилами встроенного Windows Firewall из командной строки PowerShell. Мы рассмотрим, как включать/отключать брандмауэр для различных профилей, создавать и удалять правила файервола, и рассмотрим небольшой скрипт, позволяющий сформировать удобную таблицу с текущим набором активных правил брандмауэра.
Содержание:
- Управление сетевыми профилями брандмауэра Windows из PowerShell
- Создание, редактирование и удаление правил Windows Firewall из PowerShell
- Вывод правил Windows Firewall через PowerShell
Вы можете управлять настройками Windows Firewall из графической консоли Control Panel -> System and Security -> Windows Defender Firewall. Однако начиная с Windows 8.1 (Windows Server 2012R2) для управления встроенным брандмауэром в систему был добавлен встроенный PowerShell модуль NetSecurity.
Раньше для управления правилами и настройками Брандмауэра Windows использовалась команда
netsh advfirewall firewall
.
В модуле NetSecurity в Windows 10 доступно 85 команд. Вы можете вывести их список:
Get-Command -Module NetSecurity
Управление сетевыми профилями брандмауэра Windows из PowerShell
В Windows Firewall есть три типа сетевых профилей:
- Domain (Доменный) – применяется к компьютерам, включенным в домен Active Directory;
- Private (Частный) – домашние или рабочие сети;
- Public (Общий) – общедоступные сети.
Информация о типах сетей хранится службой Network Location Awareness (NLA) в базе данных. Вы можете изменить профиль сети, если он определился некорректно.
Каждый профиль может отличаться используемым набором правил файервола. По умолчанию все сетевые интерфейсы компьютера защищены фаейрволом и к ним применяются все три типа профилей.
Чтобы включить все три сетевых профиля Domain, Public и Private, используйте команду:
Set-NetFirewallProfile -All -Enabled True
Либо укажите конкретный профиль вместо All:
Set-NetFirewallProfile -Profile Public -Enabled True
Чтобы отключить файервол для всех трех сетевых профилей, используется команда:
Set-NetFirewallProfile -All -Enabled False
С помощью командлета
Set-NetFirewallProfile
вы можете изменить параметры профиля (действие по-умолчанию, журналирование, путь и размер файла журнала, настройки оповещений и т.д.).
Как вы вероятно знаете, по умолчанию Windows Firewall включен в современных ОС для всех профилей. В настройках профилей разрешены все исходящие подключения и блокируется входящие (кроме разрешенных).
Изменим действие по-умолчнию для профиля Public – заблокировать все входящие подключения.
Set-NetFirewallProfile –Name Public –DefaultInboundAction Block
Текущие настройки профиля можно вывести так:
Get-NetFirewallProfile -Name Public
Если вы управляете настройками Windows Firewall через GPO, вы можете вывести текущие результирующие настройки профилей так:
Get-NetFirewallProfile -policystore activestore
Проверим, что все параметры брандмауэра применяются ко всем сетевым интерфейса компьютера.
Get-NetFirewallProfile -Name Public | fl DisabledInterfaceAliases
Если все интерфейсы защищены, команда должна вернуть:
DisabledInterfaceAliases : {NotConfigured}
Можно отключить определенный профиль для интерфейса (вывести список имен интерфейсов можно с помощью командлета Get-NetIPInterface).
Set-NetFirewallProfile -Name Public -DisabledInterfaceAliases "Ethernet0"
Как вы видите, теперь профиль Public не применяется к интерфейсу Ethernet0:
DisabledInterfaceAliases : {Ethernet0}
Вы можете настроить параметры логирования сетевых подключений на уровне каждого профиля. По умолчанию журналы Windows Firewall хранятся в каталоге %systemroot%system32LogFilesFirewall, размер файла – 4 Мб. Вы можете изменить включить журналирование подключений и увеличить максимальный размер файла:
Set-NetFireWallProfile -Profile Domain -LogBlocked True -LogMaxSize 20000 -LogFileName ‘%systemroot%system32LogFilesFirewallpfirewall.log’
Создание, редактирование и удаление правил Windows Firewall из PowerShell
Для управления правилами брандмауэра есть 9 командлетов:
- New-NetFirewallRule
- Copy-NetFirewallRule
- Disable-NetFirewallRule
- Enable-NetFirewallRule
- Get-NetFirewallRule
- Remove-NetFirewallRule
- Rename-NetFirewallRule
- Set-NetFirewallRule
- Show-NetFirewallRule
Рассмотрим несколко простых примеров открытия портов в Windows Firewall.
Например, вы хотите разрешить входящие TCP подключения на порты 80 и 443 для профилей Domain и Private, воспользуйтесь такой командой:
New-NetFirewallRule -DisplayName 'WEB-Inbound' -Profile @('Domain', 'Private') -Direction Inbound -Action Allow -Protocol TCP -LocalPort @('80', '443')
Вы можете разрешить или заблокировать трафик для конкретной программы. Например, вы хотите заблокировать исходящие соединения для FireFox:
New-NetFirewallRule -Program “C:Program Files (x86)Mozilla Firefoxfirefox.exe” -Action Block -Profile Domain, Private -DisplayName “Block Firefox” -Description “Block Firefox” -Direction Outbound
Разрешим входящее RDP подключение по порту 3389 только с IP одного адреса:
New-NetFirewallRule -DisplayName "AllowRDP" –RemoteAddress 192.168.1.55 -Direction Inbound -Protocol TCP –LocalPort 3389 -Action Allow
Чтобы разрешить ping для адресов из указанной подсети, используйте команды:
$ips = @("192.168.1.50-192.168.1.60", "192.165.2.22-192.168.2.200", ”10.10.0.0/16”)
New-NetFirewallRule -DisplayName "Allow inbound ICMPv4" -Direction Inbound -Protocol ICMPv4 -IcmpType 8 -RemoteAddress $ips -Action Allow
New-NetFirewallRule -DisplayName "Allow inbound ICMPv6" -Direction Inbound -Protocol ICMPv6 -IcmpType 8 -RemoteAddress $ips -Action Allow
В предыдущей статье мы показывали как с помощью PowerShell можно заблокировать доступ к сайтам не только по IP адресу, но и по DNS имени домена/сайта.
Чтобы отредактировать имеющееся правило брандмауэра, используется командлет Set-NetFirewallRule. Например, вы хотите разрешить входящие подключения с указанного IP адреса для ранее созданного правила:
Get-NetFirewallrule -DisplayName 'WEB-Inbound' | Get-NetFirewallAddressFilter | Set-NetFirewallAddressFilter -RemoteAddress 192.168.1.20
Если нужно добавить в правило файервола несколько IP адресов, используйте такой скрипт:
$ips = @("192.168.1.50", "192.165.2.22",”192.168.1.20”)
Get-NetFirewallrule -DisplayName 'WEB-Inbound'|Set-NetFirewallRule -RemoteAddress $ips
Вывести все IP адреса, которые содержатся в правиле брандмауэра:
Get-NetFirewallrule -DisplayName 'Allow inbound ICMPv4'|Get-NetFirewallAddressFilter
Вы можете включать/отключать правила файервола с помощью командлетов Disable-NetFirewallRule и Enable-NetFirewallRule.
Disable-NetFirewallRule –DisplayName 'WEB-Inbound'
Чтобы разрешить ICMP (ping), выполните команду:
Enable-NetFirewallRule -Name FPS-ICMP4-ERQ-In
Чтобы удалить правило брандмауэре используется командлет Remove-NetFirewallRule.
Вывод правил Windows Firewall через PowerShell
Список активных правил для входящего трафика можно вывести так:
Get-NetFirewallRule | where {($_.enabled -eq $True) -and ($_.Direction -eq "Inbound")} |ft
Если, например, нам нужно вывести список блокирующих исходящих правил:
Get-NetFirewallRule -Action Block -Enabled True -Direction Outbound
Если нужно отобразить имя программы в правиле:
Get-NetFirewallRule -Action Block -Enabled True -Direction Outbound | %{$_.Name; $_ | Get-NetFirewallApplicationFilter}
Как вы видите командлет Get-NetFirewallRule не выводит порты сетевые порты и IP адреса для правил брандмауэра. Чтобы вывести всю информацию о разрешенных входящих (исходящих) подключениях в более удобном виде с отображением номеров портов, используйте такой скрипт:
Get-NetFirewallRule -Action Allow -Enabled True -Direction Inbound |
Format-Table -Property Name,
@{Name='Protocol';Expression={($PSItem | Get-NetFirewallPortFilter).Protocol}},
@{Name='LocalPort';Expression={($PSItem | Get-NetFirewallPortFilter).LocalPort}},
@{Name='RemotePort';Expression={($PSItem | Get-NetFirewallPortFilter).RemotePort}},
@{Name='RemoteAddress';Expression={($PSItem | Get-NetFirewallAddressFilter).RemoteAddress}},
Enabled,Profile,Direction,Action
Чтобы сбросить все правила Microsoft Defender Firewall и восстановить настройки по умолчанию, выполните команду:
netsh advfirewall reset
или
(New-Object -ComObject HNetCfg.FwPolicy2).RestoreLocalFirewallDefaults()
После этого все пользовательские настройки и правила Microsoft Defender удалены. В списке правил останутся только стандартные правила сетевого доступа Windows.
Перед сбросом можно экспортировать текущие настройки в файл. В дальнейшем вы можете вернуться к этой резевной копии.
netsh advfirewall export "C:Backupfirewall-config.wfw"
PowerShell предоставляет широкие возможности по управлению правилами Windows Firewall из командной строки. Вы можете автоматически запускать скрипты PowerShell для открытия/закрытия портов при возникновении определенных событий. В следующей статье мы рассмотрим простую систему на базе PowerShell и Windows Firewall для автоматической блокировки IP адресов, с которых выполняется удаленный перебор паролей по RDP на Windows VDS сервере.