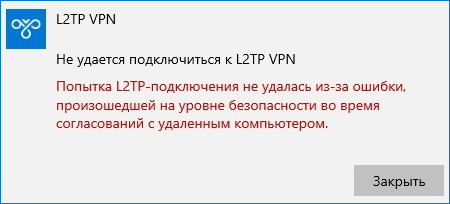
Ошибка «Попытка L2TP-подключения не удалась из-за ошибки, произошедшей на уровне безопасности…» при подключении к VPN в Windows 10

В Windows 10 вы можете настроить VPN -сеть средствами операционной системы, не прибегая к помощи сторонних программ. Для удобного создания VPN-подключения в Windows 10 и 11 разработчиками был реализован соответствующий графический интерфейс раздела приложения «Параметры», в котором пользователю предлагается ввести данные провайдера VPN . К сожалению, данная функция не отшлифована до конца.
На что указывают разные ошибки, время от времени выдаваемые системой при подключении к виртуальной сети.
Наиболее распространённой неполадкой при подключении к VPN в Windows 10 является сбой соединения L2TP , при этом система выдает сообщение «Попытка L2TP-подключения не удалась из-за ошибки, произошедшей на уровне безопасности…» . Неполадка может быть вызвана некорректными настройками одного или нескольких сетевых устройств, однако, если вы не вносили изменений в их конфигурацию и до появления первого сбоя всё работало нормально, высока вероятность того, что причиной сбоя стали баги в обновлениях операционной системы.
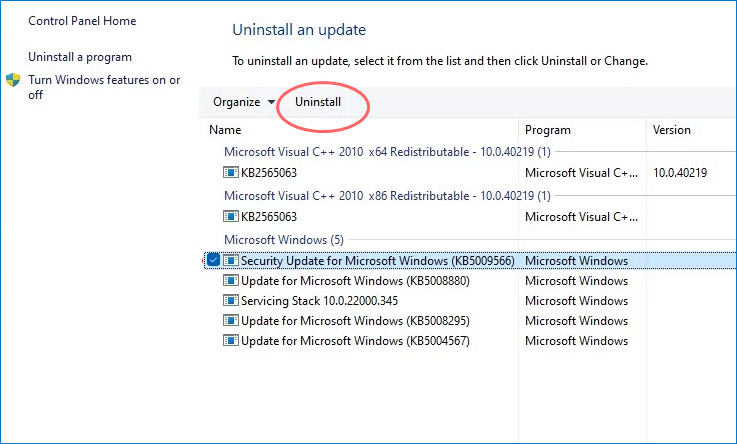
Так, было замечено, что указанная ошибка в Windows 10 стала появляться после установки накопительных обновлений безопасности KB5009543 и KB5009566 .
Откройте журнал обновлений и посмотрите, имеются ли эти апдейты на вашем ПК.
Если да, удалите их и перезагрузите компьютер.
Если решение не дало положительного результата или обновления не установлены, переходим к другим способам устранения неполадки.
Проверьте настройки виртуального адаптера
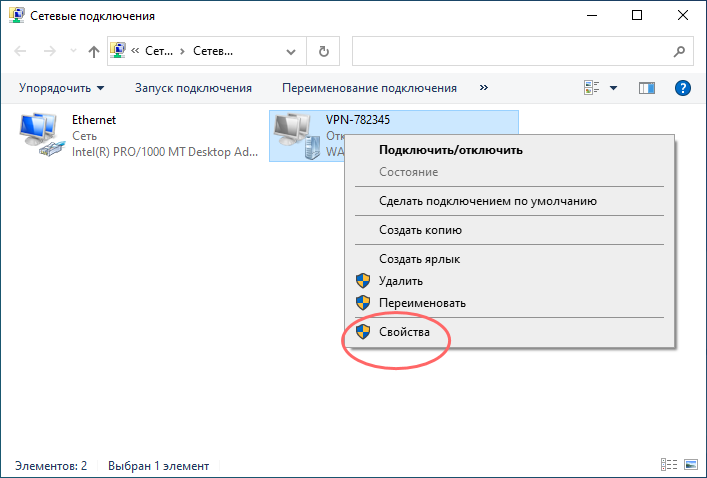
- Откройте командой ncpa.cpl настройки сетевых подключений, кликните по вашему виртуальному адаптеру правой кнопкой мыши и выберите «Свойства»;
- Переключитесь в окошке свойств на вкладку «Безопасность», активируйте радиокнопку «Разрешить следующие протоколы» и отметьте флажком пункт «Протокол Microsoft CHAP версии 2»;
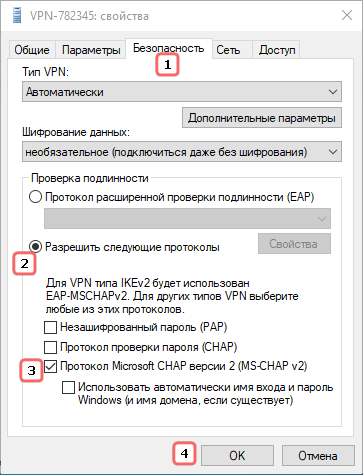
- Переключитесь на вкладку «Параметры» и нажмите кнопку «Параметры PPP»;
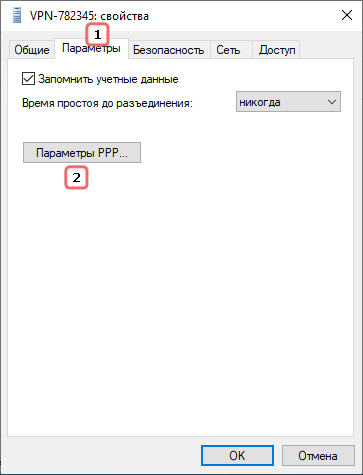
- Откроется диалоговое окошко параметров PPP. Убедитесь, что в пункте «Включить расширения LCP» установлена галочка. Если ее нет, поставьте и сохраните настройки.

Отсутствие или неверные настройки ключей реестра
Ошибка подключения L2TP может быть вызвана отсутствием или неверным значением предварительных ключей ProhibitIPSec и AllowL2TPWeakCrypto , обеспечивающих соединение с использованием протокола L2TP/IPSec .
Если в свойствах VPN-подключения у вас выставлен тип L2TP, стоит проверить записи ветки реестра:
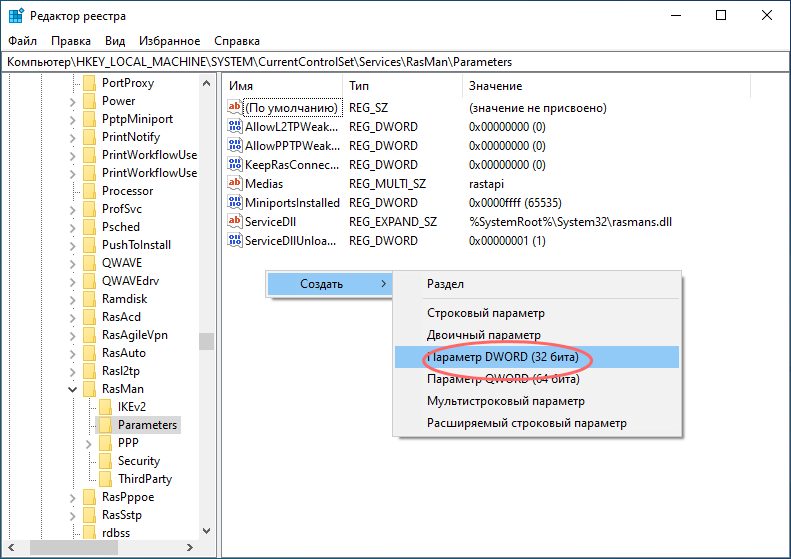
HKLMSystemCurrentControlSetServicesRasmanParameters
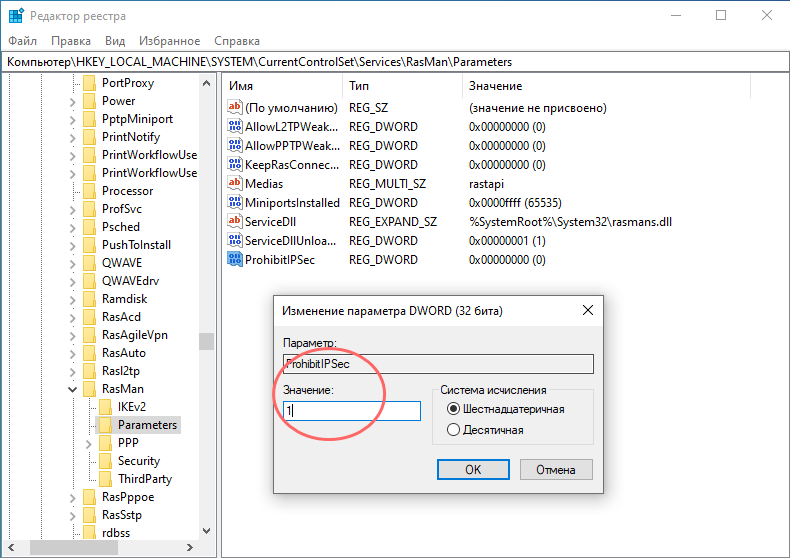
Откройте редактор реестра командой regedit , перейдите к указанной ветке и проверьте наличие в правой колонке DWORD -параметра ProhibitIPSec. Если таковой отсутствует, создайте его вручную.
И установите в качестве его значения 1.
Заодно проверяем наличие DWORD -параметра AllowL2TPWeakCrypto, он также должен иметь значение 1.
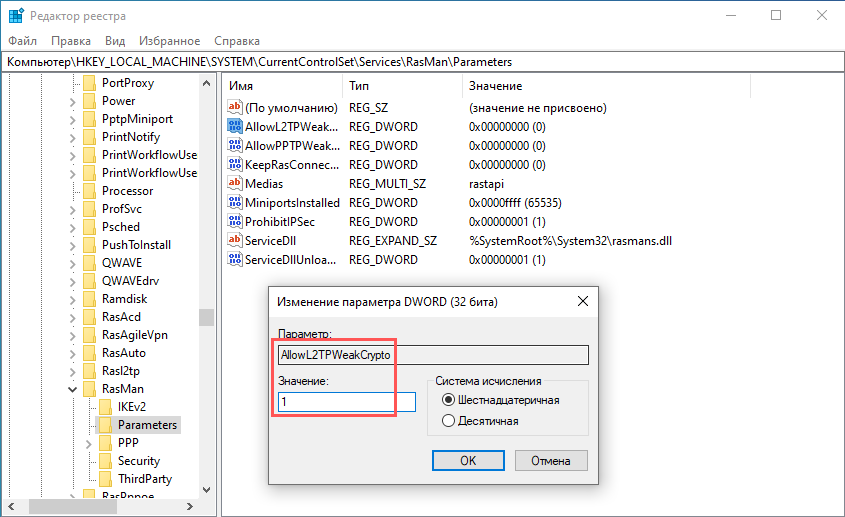
Если параметр отсутствует, создаем его, сохраняем настройки, перезагружаем компьютер и пробуем подключиться к VPN .

Не так давно мы опубликовали статью, посвященную NAS — персональному устройству для хранения файлов и .

Чтобы обеспечить более быстрое соединение устройств в локальной сети, Windows сохраняет установленные при первом подключении .

Просмотреть, а при необходимости и сконфигурировать подключения к сети в Windows можно разделе «Сетевые подключения», .

Уровень мощности сигнала Wi-Fi оказывает самое непосредственное влияние не только на скорость соединения, но и .
Источник
Исправляем проблему подключения к L2TP/IPSec VPN серверу за NAT
Столкнулись с интересной проблемой у одного из заказчиков после перенастройки VPN сервера Windows Server 2012 с PPTP на L2TP/ IPSec (из за отключения поддержки PPTP VPN в iOS). Изнутри корпоративной сети VPN клиенты без каких-либо проблем подключаются к VPN серверу, а вот внешние Windows клиенты при попытке установить соединение с L2TP VPN сервером, выдают такую ошибку:
The network connection between your computer and the VPN server could not be established because the remote server is not responding. This could be because one of the network devices (e.g. firewalls, NAT, routers, etc) between your computer and the remote server is not configured to allow VPN connections. Please contact your Administrator or your service provider to determine which device may be causing the problem.

В других версиях Windows о наличии аналогичной проблемы могут свидетельствовать ошибки VPN подключения 800, 794 или 809.
Стоит отметить, что данный VPN сервер находится за NAT, а на маршрутизаторе настроен проброс портов, необходимых для работы L2TP:
- UDP 1701 — Layer 2 Forwarding Protocol (L2F) & Layer 2 Tunneling Protocol(L2TP)
- UDP 500
- UDP 4500 NAT-T – IPSec Network Address Translator Traversal
- Protocol 50 ESP
В правилах Windows Firewall VPN сервера эти порты также открыты. Т.е. используется классическая конфигурация. Для подключения используется встроенный VPN клиент Windows.
VPN ошибка 809 для L2TP/IPSec в Windows за NAT
Как оказалось, проблема эта уже известна и описана в статье https://support.microsoft.com/en-us/kb/926179. По умолчанию встроенный VPN клиент Windows не поддерживает подключение к L2TP/IPsec через NAT. Дело в том, что IPsec использует протокол ESP (Encapsulating Security Payload) для шифрования пакетов, а протокол ESP не поддерживает PAT (Port Address Translation). Если вы хотите использовать IPSec для коммуникации, Microsoft рекомендует использовать белые IP адреса на VPN сервере.
Но есть и обходное решение. Можно исправить этот недостаток, включив поддержку протокола NAT—T, который позволяет инкапсулировать пакеты протокола ESP 50 в UDP пакеты по порту 4500. NAT-T включен по-умолчанию почти во всех операционных системах (iOS, Android, Linux), кроме Windows.
Если VPN сервер L2TP/IPsec находится за NAT, то для корректного подключения внешних клиентов через NAT необходимо на стороне Windows сервера и клиента внести изменение в реестр, разрешающее UDP инкапсуляцию пакетов для L2TP и поддержку (NAT-T) для IPsec.
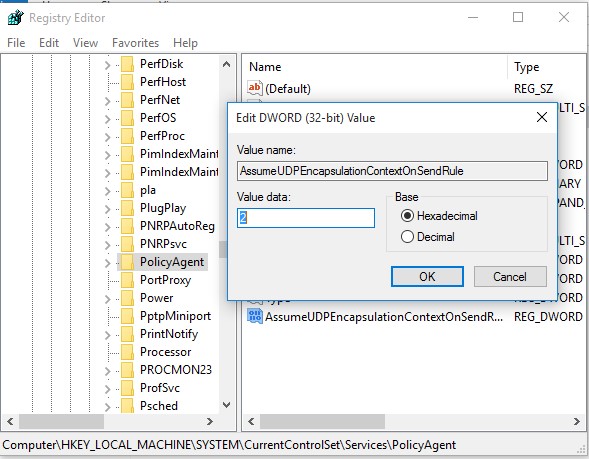
- Откройте редактор реестра regedit.exe и перейдите в ветку:
- Для Windows 10,8.1,7 и Windows Server 2016,2012R2,2008R2 — HKEY_LOCAL_MACHINESYSTEMCurrentControlSetServicesPolicyAgent
- Для Windows XP/Windows Server 2003 — HKEY_LOCAL_MACHINESYSTEMCurrentControlSetServicesIPSec
- Создайте DWORD параметр с именем AssumeUDPEncapsulationContextOnSendRule и значением 2;

- – (значение по-умолчанию), предполагается, что VPN сервер подключен к интернету без NAT;
- 1 – VPN сервер находится за NAT;
- 2 — и VPN сервер и клиент находятся за NAT.
Set-ItemProperty -Path «HKLM:SYSTEMCurrentControlSetServicesPolicyAgent» -Name «AssumeUDPEncapsulationContextOnSendRule» -Type DWORD -Value 2 –Force;
После включения поддержки NAT-T, вы сможете успешно подключаться к VPN серверу с клиента через NAT (в том числе двойной NAT).
L2TP VPN не работает на некоторых Windows компьютерах в локальной сети
Есть еще один интересный баг. Если в вашей локальной сети несколько Windows компьютеров, вы не сможете установить более одного одновременного подключения к внешнему L2TP/IPSec VPN серверу. Если при наличии активного VPN туннеля с одного клиента, вы попытаетесь подключиться к тому же самому VPN серверу с другого компьютера, появится ошибка с кодом 809 или 789:
По информации на TechNet проблема связана с некорректной реализацией клиента L2TP/IPSec клиента в Windows (не исправляется уже много лет).
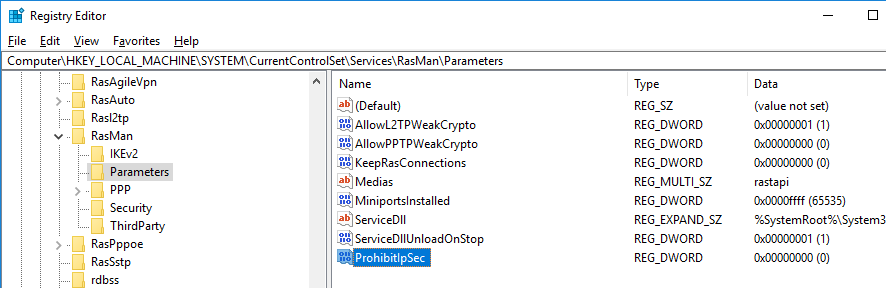
Для исправления этого бага нужно изменить два параметра реестра в ветке HKEY_LOCAL_MACHINESYSTEMCurrentControlSetServicesRasManParameters и перезагрузите компьютре:
- AllowL2TPWeakCrypto – изменить на 00000001 (ослабляет уровень шифрования, для L2TP/IPSec используются алгоритмы MD5 и DES)
- ProhibitIPSec – изменить на 00000000 (включает шифрование IPsec, которое часто отключается некоторыми VPN клиентами или утилитами)
Для изменения этих параметров реестра достаточно выполнить команды:
reg add «HKEY_LOCAL_MACHINESystemCurrentControlSetServicesRasmanParameters» /v AllowL2TPWeakCrypto /t REG_DWORD /d 1 /f
reg add «HKEY_LOCAL_MACHINESystemCurrentControlSetServicesRasmanParameters» /v ProhibitIpSec /t REG_DWORD /d 0 /f
Это включает поддержку нескольких одновременных L2TP/IPSec-подключений в Windows через общий внешний IP адрес (работает на всех версиях, начиная с Windows XP и заканчивая Windows 10).
Источник
How to troubleshoot a Microsoft L2TP/IPSec virtual private network client connection
This article describes how to troubleshoot L2TP/IPSec virtual private network (VPN) connection issues.
Applies to: В Windows 10 — all editions
Original KB number: В 325034
Summary
You must have an Internet connection before you can make an L2TP/IPSec VPN connection. If you try to make a VPN connection before you have an Internet connection, you may experience a long delay, typically 60 seconds, and then you may receive an error message that says there was no response or something is wrong with the modem or other communication device.
When you troubleshoot L2TP/IPSec connections, it’s useful to understand how an L2TP/IPSec connection proceeds. When you start the connection, an initial L2TP packet is sent to the server, requesting a connection. This packet causes the IPSec layer on your computer to negotiate with the VPN server to set up an IPSec protected session (a security association). Depending on many factors including link speed, the IPSec negotiations may take from a few seconds to around two minutes. When an IPSec security association (SA) has been established, the L2TP session starts. When it starts, you receive a prompt for your name and password (unless the connection has been set up to connect automatically in Windows Millennium Edition.) If the VPN server accepts your name and password, the session setup completes.
A common configuration failure in an L2TP/IPSec connection is a misconfigured or missing certificate, or a misconfigured or missing preshared key. If the IPSec layer can’t establish an encrypted session with the VPN server, it will fail silently. As a result, the L2TP layer doesn’t see a response to its connection request. There will be a long delay, typically 60 seconds, and then you may receive an error message that says there was no response from the server or there was no response from the modem or communication device. If you receive this error message before you receive the prompt for your name and password, IPSec didn’t establish its session. If that occurs, examine your certificate or preshared key configuration, or send the isakmp log to your network administrator.
A second common problem that prevents a successful IPSec session is using a Network Address Translation (NAT). Many small networks use a router with NAT functionality to share a single Internet address among all the computers on the network. The original version of IPSec drops a connection that goes through a NAT because it detects the NAT’s address-mapping as packet tampering. Home networks frequently use a NAT. This blocks using L2TP/IPSec unless the client and the VPN gateway both support the emerging IPSec NAT-Traversal (NAT-T) standard. For more information, see the «NAT Traversal» section.
If the connection fails after you receive the prompt for your name and password, the IPSec session has been established and there’s probably something wrong with your name and password. Other server settings may also be preventing a successful L2TP connection. In this case, send the PPP log to your administrator.
NAT Traversal
With the IPSec NAT-T support in the Microsoft L2TP/IPSec VPN client, IPSec sessions can go through a NAT when the VPN server also supports IPSec NAT-T. IPSec NAT-T is supported by Windows Server 2003. IPSec NAT-T is also supported by Windows 2000 Server with the L2TP/IPSec NAT-T update for Windows XP and Windows 2000.
For third-party VPN servers and gateways, contact your administrator or VPN gateway vendor to verify that IPSec NAT-T is supported.
More information
The configuration utility also provides a check box that enables IPSec logging. If you can’t connect, and your network administrator or support personnel have asked you to provide them a connection log, you can enable IPSec logging here. When you do so, the log (Isakmp.log) is created in the C:Program FilesMicrosoft IPSec VPN folder. When you create a connection, also enable logging for the PPP processing in L2TP. To do so:
- Right-click the Dialup Networking folder, and then click Properties.
- Click the Networking tab, and then click to select the Record a log file for this connection check box.
Источник
Столкнулись с интересной проблемой у одного из заказчиков после перенастройки VPN сервера Windows Server 2012 с PPTP на L2TP/ IPSec (из за отключения поддержки PPTP VPN в iOS). Изнутри корпоративной сети VPN клиенты без каких-либо проблем подключаются к VPN серверу, а вот внешние Windows клиенты при попытке установить соединение с L2TP VPN сервером, выдают такую ошибку:
The network connection between your computer and the VPN server could not be established because the remote server is not responding. This could be because one of the network devices (e.g. firewalls, NAT, routers, etc) between your computer and the remote server is not configured to allow VPN connections. Please contact your Administrator or your service provider to determine which device may be causing the problem.
В других версиях Windows о наличии аналогичной проблемы могут свидетельствовать ошибки VPN подключения 800, 794 или 809.
Стоит отметить, что данный VPN сервер находится за NAT, а на маршрутизаторе настроен проброс портов, необходимых для работы L2TP:
- UDP 1701 — Layer 2 Forwarding Protocol (L2F) & Layer 2 Tunneling Protocol(L2TP)
- UDP 500
- UDP 4500 NAT-T – IPSec Network Address Translator Traversal
- Protocol 50 ESP
В правилах Windows Firewall VPN сервера эти порты также открыты. Т.е. используется классическая конфигурация. Для подключения используется встроенный VPN клиент Windows.
Если подключаться к этому же VPN серверу через PPTP, подключение успешно устанавливается.
VPN ошибка 809 для L2TP/IPSec в Windows за NAT
Как оказалось, проблема эта уже известна и описана в статье https://support.microsoft.com/en-us/kb/926179. По умолчанию встроенный VPN клиент Windows не поддерживает подключение к L2TP/IPsec через NAT. Дело в том, что IPsec использует протокол ESP (Encapsulating Security Payload) для шифрования пакетов, а протокол ESP не поддерживает PAT (Port Address Translation). Если вы хотите использовать IPSec для коммуникации, Microsoft рекомендует использовать белые IP адреса на VPN сервере.
Но есть и обходное решение. Можно исправить этот недостаток, включив поддержку протокола NAT—T, который позволяет инкапсулировать пакеты протокола ESP 50 в UDP пакеты по порту 4500. NAT-T включен по-умолчанию почти во всех операционных системах (iOS, Android, Linux), кроме Windows.
Если VPN сервер L2TP/IPsec находится за NAT, то для корректного подключения внешних клиентов через NAT необходимо на стороне Windows сервера и клиента внести изменение в реестр, разрешающее UDP инкапсуляцию пакетов для L2TP и поддержку (NAT-T) для IPsec.
- Откройте редактор реестра
regedit.exe
и перейдите в ветку:- Для Windows 10,8.1,7 и Windows Server 2016,2012R2,2008R2 — HKEY_LOCAL_MACHINESYSTEMCurrentControlSetServicesPolicyAgent
- Для Windows XP/Windows Server 2003 — HKEY_LOCAL_MACHINESYSTEMCurrentControlSetServicesIPSec
- Создайте DWORD параметр с именем AssumeUDPEncapsulationContextOnSendRule и значением 2;

Примечание. Возможные значения параметра AssumeUDPEncapsulationContextOnSendRule:
- 0 – (значение по-умолчанию), предполагается, что VPN сервер подключен к интернету без NAT;
- 1 – VPN сервер находится за NAT;
- 2 — и VPN сервер и клиент находятся за NAT.
- Осталось перезагрузить компьютер и убедиться, что VPN туннель успешно создается.
Если и Windows VPN сервер и клиент находятся за NAT, нужно изменить это параметре на обоих системах.
Можно использовать командлет PowerShell для внесения изменений в реестр:
Set-ItemProperty -Path "HKLM:SYSTEMCurrentControlSetServicesPolicyAgent" -Name "AssumeUDPEncapsulationContextOnSendRule" -Type DWORD -Value 2 –Force;
После включения поддержки NAT-T, вы сможете успешно подключаться к VPN серверу с клиента через NAT (в том числе двойной NAT).
В некоторых случаях для корректной работы VPN необходимо открыть дополнительное правило в межсетевом экране для порта TCP 1701 (в некоторых реализациях L2TP этот порт используется совмести с UDP 1701).
NAT-T не корректно работал в ранних редакциях Windows 10, например, 10240, 1511, 1607. Если у вас старая версия, рекомендуем обновить билд Windows 10.
L2TP VPN не работает на некоторых Windows компьютерах в локальной сети
Есть еще один интересный баг. Если в вашей локальной сети несколько Windows компьютеров, вы не сможете установить более одного одновременного подключения к внешнему L2TP/IPSec VPN серверу. Если при наличии активного VPN туннеля с одного клиента, вы попытаетесь подключиться к тому же самому VPN серверу с другого компьютера, появится ошибка с кодом 809 или 789:
Error 789: The L2TP connection attempt failed because the security layer encountered a processing error during initial negotiations with the remove computer.
Что интересно, эта проблема наблюдется только с Windows-устройствами. На устройствах с Linux/MacOS/Android в этой же локальной сети таких проблем нет. Можно без проблем одновременно подключиться к VPN L2TP серверу с нескольких устройств.
По информации на TechNet проблема связана с некорректной реализацией клиента L2TP/IPSec клиента в Windows (не исправляется уже много лет).
Для исправления этого бага нужно изменить два параметра реестра в ветке HKEY_LOCAL_MACHINESYSTEMCurrentControlSetServicesRasManParameters и перезагрузите компьютре:
- AllowL2TPWeakCrypto – изменить на 00000001 (ослабляет уровень шифрования, для L2TP/IPSec используются алгоритмы MD5 и DES)
- ProhibitIPSec – изменить на 00000000 (включает шифрование IPsec, которое часто отключается некоторыми VPN клиентами или утилитами)
Для изменения этих параметров реестра достаточно выполнить команды:
reg add "HKEY_LOCAL_MACHINESystemCurrentControlSetServicesRasmanParameters" /v AllowL2TPWeakCrypto /t REG_DWORD /d 1 /f
reg add "HKEY_LOCAL_MACHINESystemCurrentControlSetServicesRasmanParameters" /v ProhibitIpSec /t REG_DWORD /d 0 /f
Это включает поддержку нескольких одновременных L2TP/IPSec-подключений в Windows через общий внешний IP адрес (работает на всех версиях, начиная с Windows XP и заканчивая Windows 10).
Use a reliable L2TP/IPsec VPN client and quickly set it up to your PC
by Elena Constantinescu
Elena started writing professionally in 2010 and hasn’t stopped exploring the tech world since. With a firm grasp of software reviewing and content editing, she is always trying… read more
Updated on September 26, 2022
Reviewed by
Edgar Nicov

Since the dial-up Internet era, Edgar was interested in online resources. From forums to e-commerce websites, he started digging into how those resources could generate revenue. Today he… read more
- You create an IPsec VPN connection on a PC without having to install anything.
- But you still need the IPsec connection details of a VPN client.
- Follow our step-by-step guide to quickly install an IPsec VPN client in Windows.
- Learn how to find your L2TP/IPSec credentials and configure it from Settings.

If you need to set up an IPsec VPN client on Windows 10 PC, we’re here to help. Using a virtual private network, you can hide your IP address, encrypt your data traffic, and ultimately protect your online privacy.
There are numerous benefits to using a VPN, such as finding cheaper flights online, fixing network congestion, or reducing ping in multiplayer games.
You can also watch unlimited streaming by using a VPN to circumvent geoblocks and unblock Netflix libraries that aren’t normally available in your country.
What’s an IPsec VPN client?
An IPsec VPN client is a virtual private network service that supports the IPsec protocol. IPsec is used by the VPN to encrypt and protect your data across the Internet.
IPsec (Internet Protocol security) is a VPN protocol that authenticates and encrypts data transferred over the web. It supports multiple encryption methods, including 256-bit AES.
An IPsec VPN client is a virtual private network client that uses the IPsec protocol. However, IPsec can’t be used standalone because it’s only an encryption protocol that provides data security and privacy.
A VPN connection also requires a tunneling protocol to deliver data. As such, IPsec is typically accompanied by L2TP or IKEv2, resulting in the L2TP/IPsec and IKEv2/VPN protocols.
Does Windows 10 support IPsec VPN?
Windows 10 has native support for L2TP/IPsec. You can also set up a VPN on Windows Vista or older editions if you can find one that’s still compatible.
You can use this protocol to set up the built-in Windows VPN (for Windows 10 and 11). It is also compatible with third-party VPN clients that support it.
It’s possible to create a VPN connection in Windows 10 using the built-in OS settings and then add the VPN client’s login information, but it’s recommended to use a dedicated client for best performance.
How do I set up an IPsec VPN client on Windows 10?
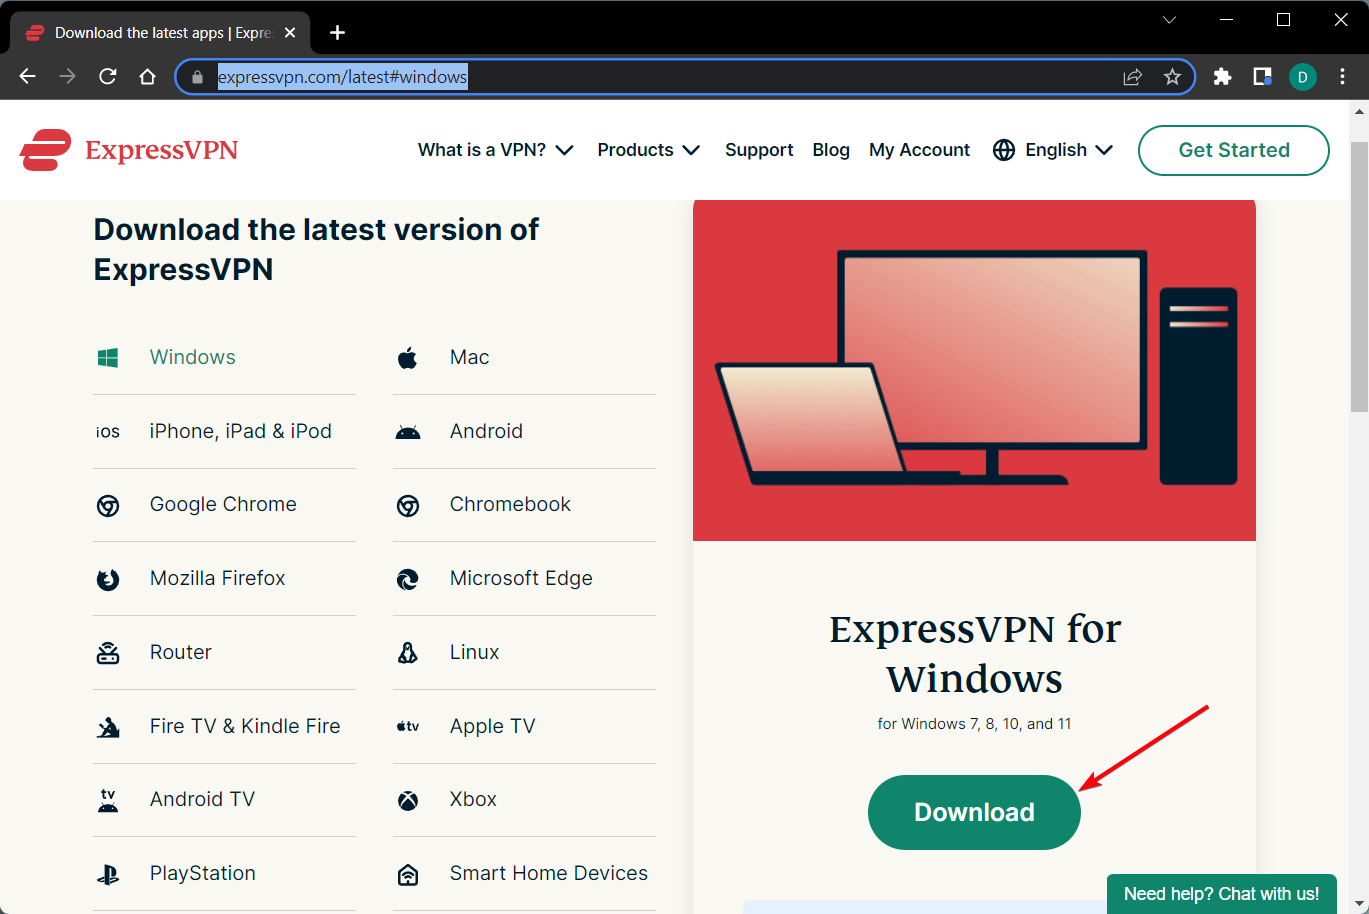
To set up a VPN with IPsec on Windows, you need a client that offers you the possibility to connect using this protocol, and our top choice in this regard is ExpressVPN.
The VPN has thousands of fast servers all around the world and industry-leading VPN security to make sure your data stays completely private: military-grade encryption,
1.Get IPsec VPN client credentials
- Sign up for an ExpressVPN subscription.

- In your browser, open the ExpressVPN manual configuration page.
- Enter your credentials and select L2TP/IPsec.

- You’ll get information about your username and password + IPsec server addresses.
- Save this information so you can add it to your VPN connection.

The user name and password for the IPsec connection will be necessary once you configure your VPN connection using Windows settings.
2. Create a VPN connection
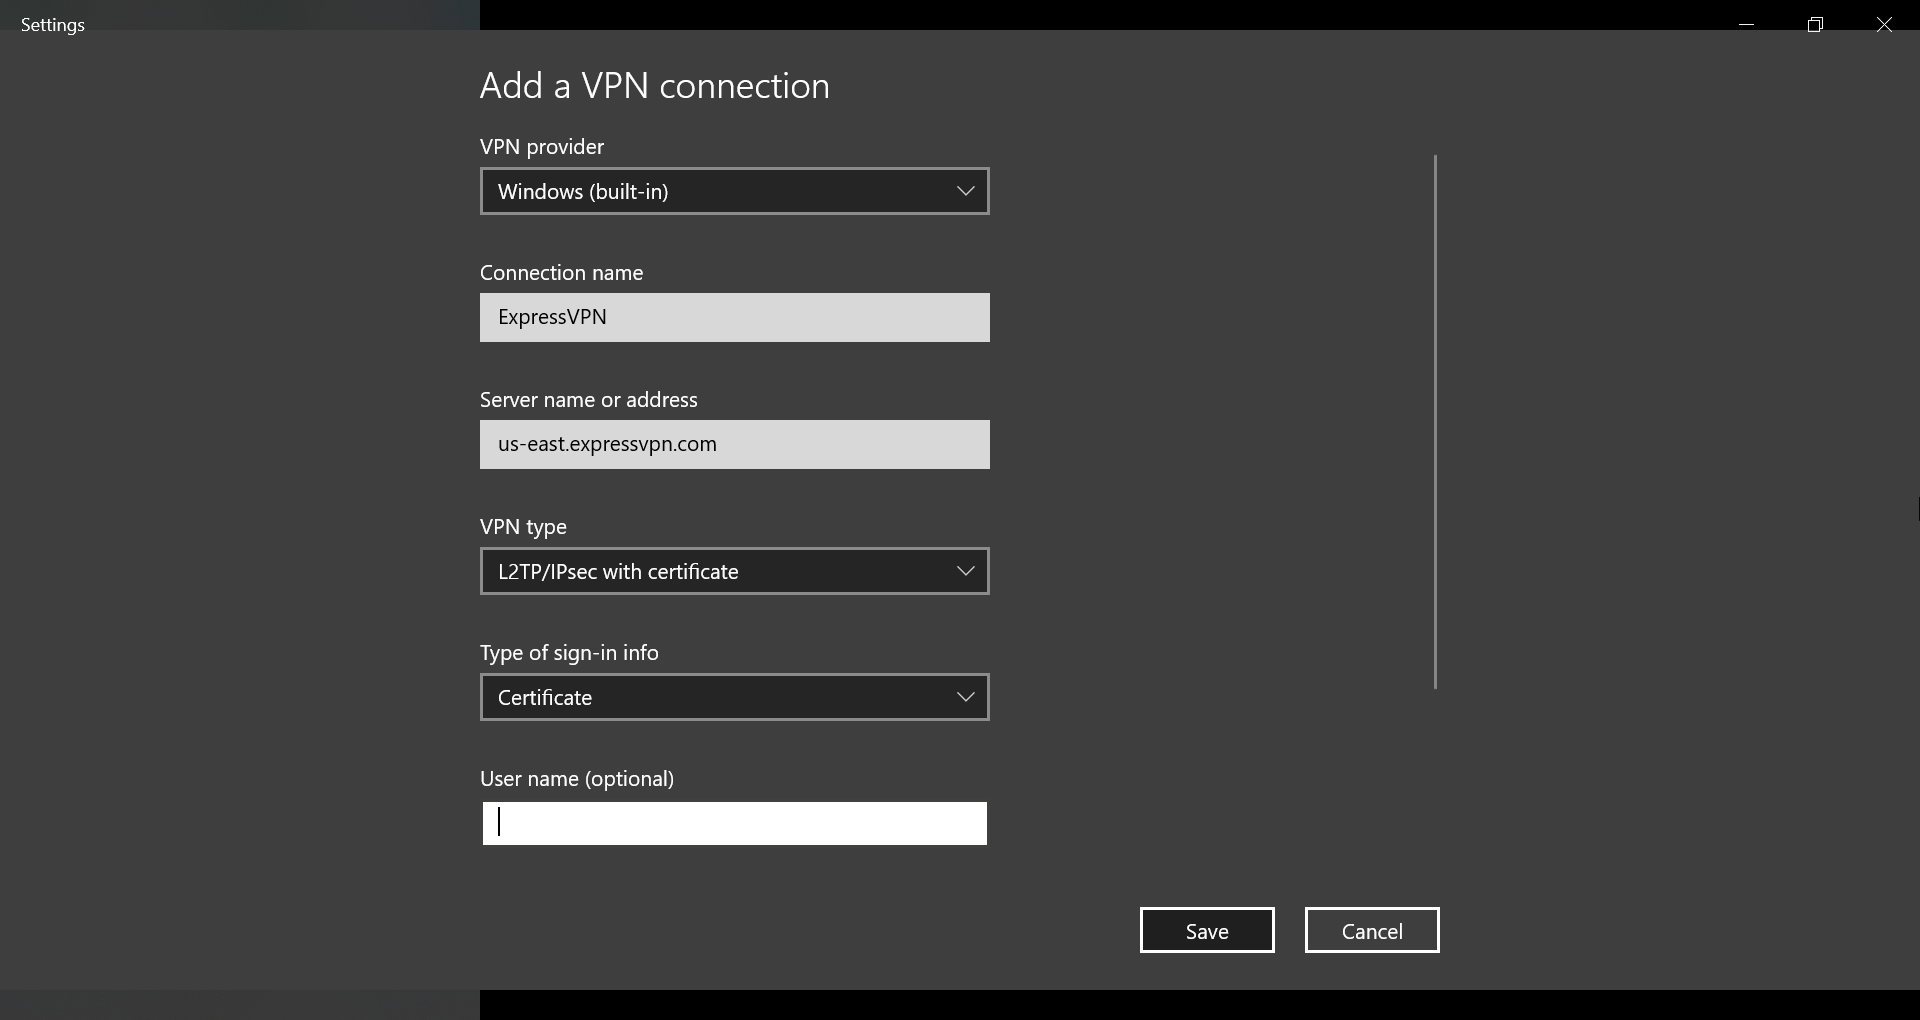
- Right-click the Start button and go to Network Connections.
- Select VPN on the left side and click Add a VPN connection.
- Set VPN provider to Windows (built-in) and write a Connection name.
- At Server name or address, type one of the server addresses provided by the ExpressVPN configuration page.
- Set VPN type to L2TP/IPsec with certificate.
- At Type of sign-in info, select User name and password.
- At User name (optional) and Password (optional), paste the ExpressVPN credentials you previously obtained.
- Enable Remember my sign-in info and click Save.
3. Connect and disconnect from the IPsec VPN

- Click the Network icon in the systray.
- Select the IPsec VPN connection.
- Click Connect or Disconnect.
4. Change IPsec VPN settings
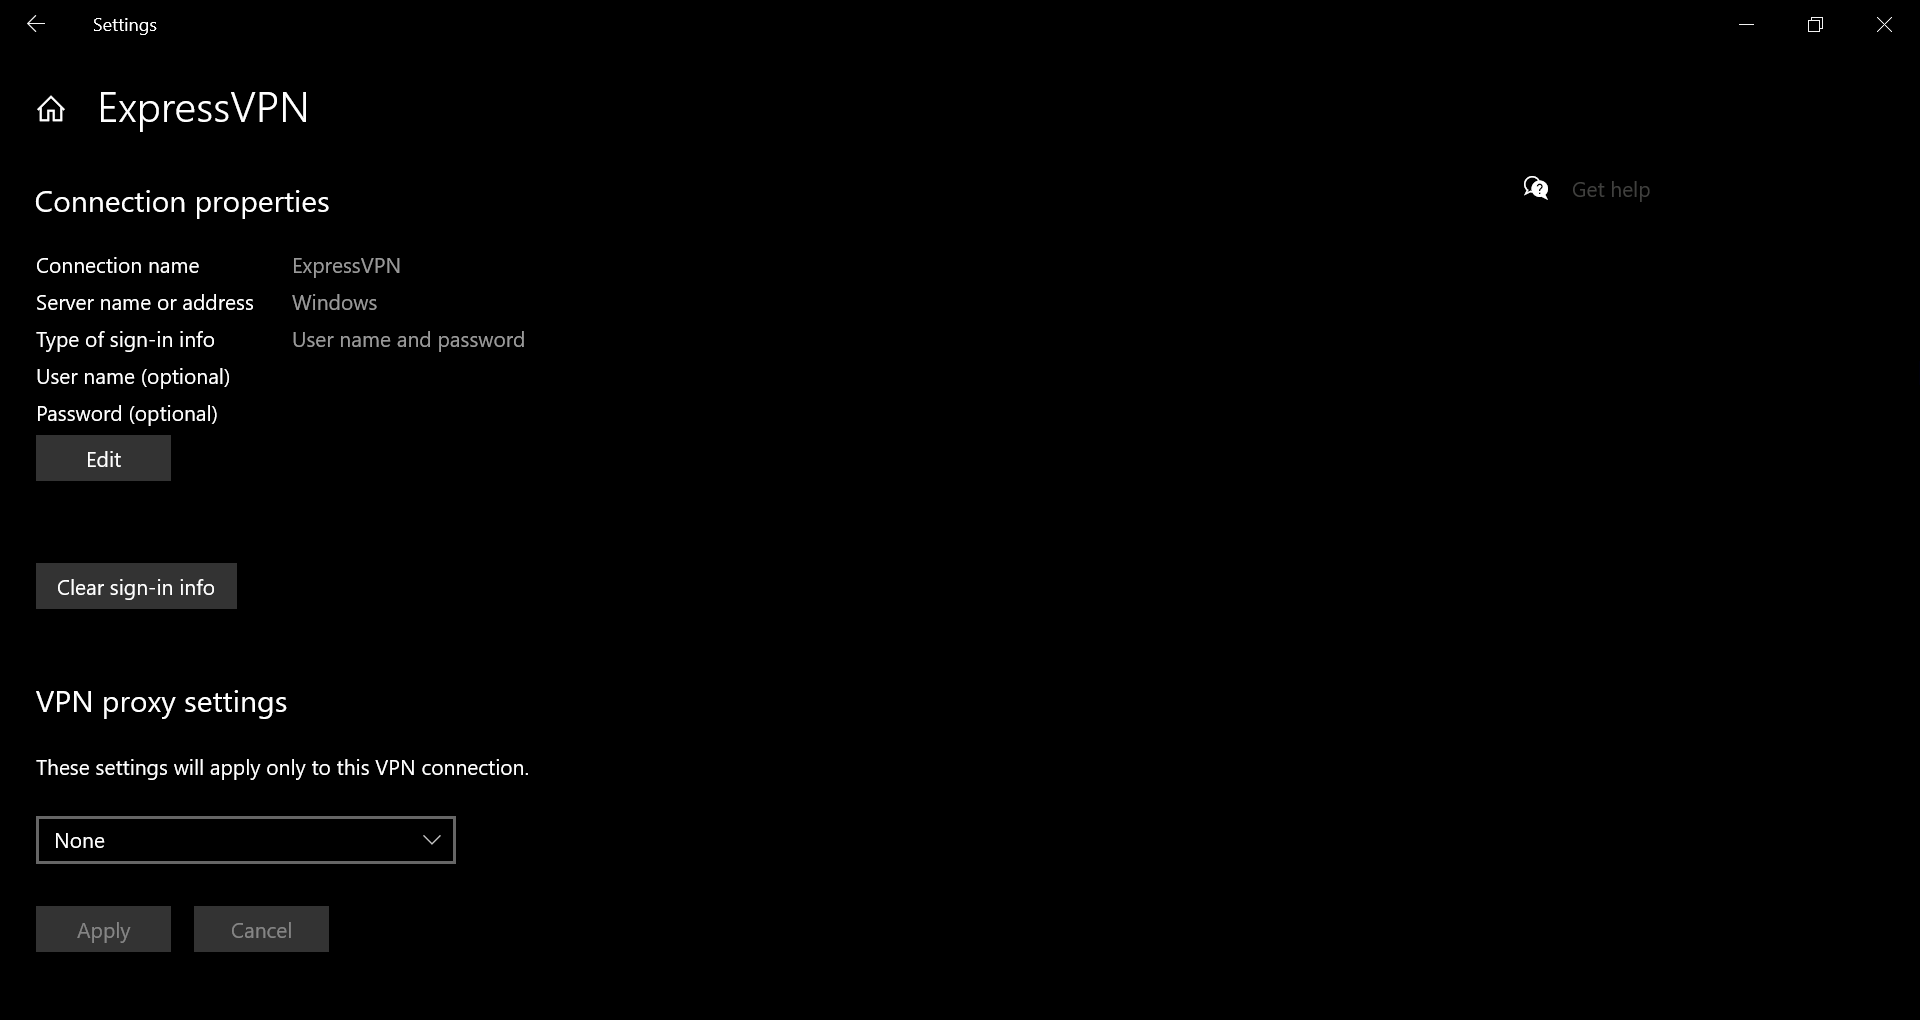
- Right-click the Start button and go to Network Connections > VPN.
- Select the IPsec VPN connection and click Advanced options.
- At Connection properties, click Edit.
- Change VPN connection details and click Save.
If you want to connect to a different VPN server, you can either edit VPN connection details to set the new address or create a new VPN connection for each address.
5. Remove the IPsec VPN connection
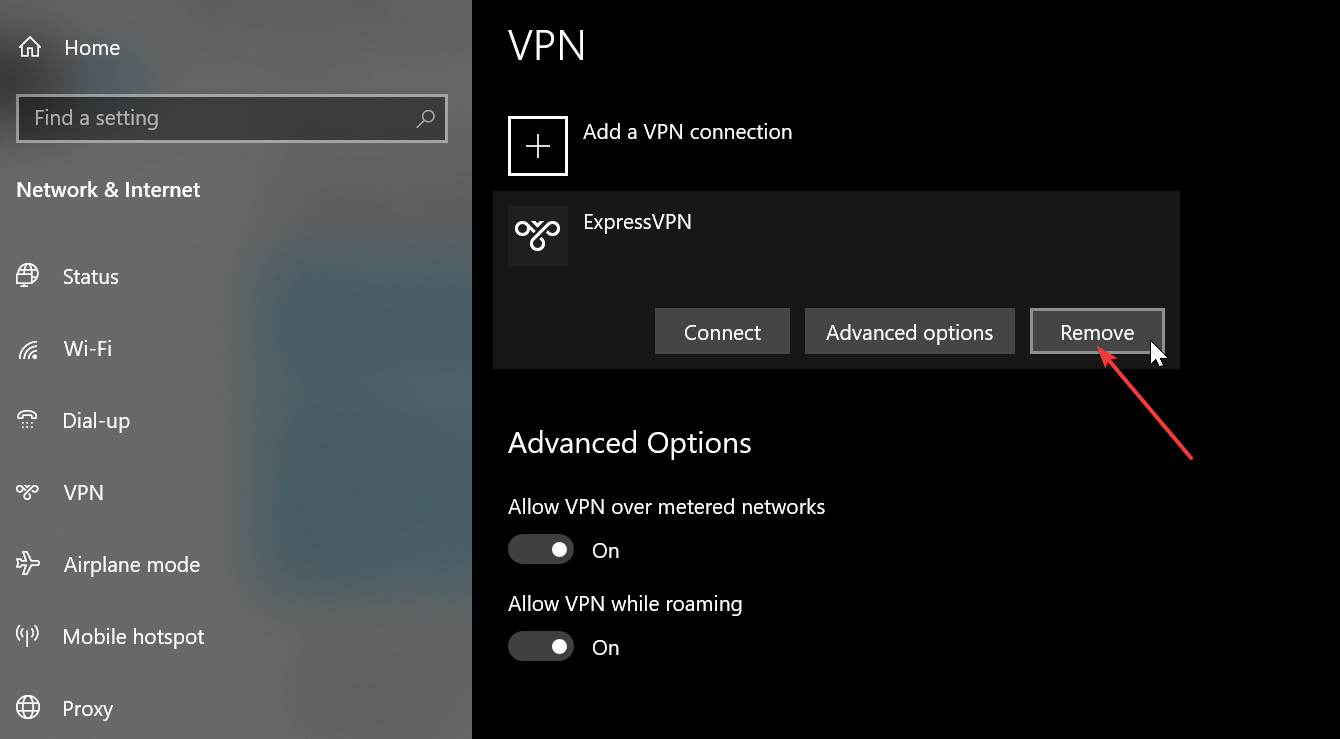
- Right-click the Start button and go to Network Connections > VPN.
- Select the IPsec VPN connection.
- Click Remove.
Why use ExpressVPN
ExpressVPN is compatible with all popular platforms, including Mac, Linux, Android, and iOS.
You can even set it up on a router to share VPN access with all connected devices. Otherwise, up to 5 devices can share the VPN account for ExpressVPN.
Furthermore, ExpressVPN supports OpenVPN and Lightway, in addition to PPTP and L2TP with IPsec.
It comes with private DNS, gaming optimized servers, SOCKS5 and Shadowsocks proxy servers, port forwarding, split tunneling, and a kill switch.
What else you should know about ExpressVPN:
- +4000+ servers in 94 countries
- No traffic logs
- 24/7 live chat support
- 30-days money-back guarantee
- 7-day free trial (mobile)
ExpressVPN
Quickly set up an IPsec VPN client connection on Windows 10 using this fast and secure VPN app.
In conclusion, you can easily set up an IPsec VPN client on Windows 10 in order to protect your online privacy and computer security, as well as to unblock streaming services and minimize jitter. You can even set up an IPsec connection on XP by using the best VPN for Windows XP.
You just need to get equipped with a premium VPN that not only supports the IPsec protocol but also comes with high-speed VPN servers and superior security features, like ExpressVPN.
Your connection is not secure — websites you visit can find out your details:
-
- Your IP Address:
loading

Companies can sell this information, alongside your location and internet provider name, and profit from it by serving targeted ads or monitoring your data usage.
We recommend Private Internet Access, a VPN with a no-log policy, open source code, ad blocking and much more; now 79% off.
![]()
Newsletter
Use a reliable L2TP/IPsec VPN client and quickly set it up to your PC
by Elena Constantinescu
Elena started writing professionally in 2010 and hasn’t stopped exploring the tech world since. With a firm grasp of software reviewing and content editing, she is always trying… read more
Updated on September 26, 2022
Reviewed by
Edgar Nicov
Since the dial-up Internet era, Edgar was interested in online resources. From forums to e-commerce websites, he started digging into how those resources could generate revenue. Today he… read more
- You create an IPsec VPN connection on a PC without having to install anything.
- But you still need the IPsec connection details of a VPN client.
- Follow our step-by-step guide to quickly install an IPsec VPN client in Windows.
- Learn how to find your L2TP/IPSec credentials and configure it from Settings.
If you need to set up an IPsec VPN client on Windows 10 PC, we’re here to help. Using a virtual private network, you can hide your IP address, encrypt your data traffic, and ultimately protect your online privacy.
There are numerous benefits to using a VPN, such as finding cheaper flights online, fixing network congestion, or reducing ping in multiplayer games.
You can also watch unlimited streaming by using a VPN to circumvent geoblocks and unblock Netflix libraries that aren’t normally available in your country.
What’s an IPsec VPN client?
An IPsec VPN client is a virtual private network service that supports the IPsec protocol. IPsec is used by the VPN to encrypt and protect your data across the Internet.
IPsec (Internet Protocol security) is a VPN protocol that authenticates and encrypts data transferred over the web. It supports multiple encryption methods, including 256-bit AES.
An IPsec VPN client is a virtual private network client that uses the IPsec protocol. However, IPsec can’t be used standalone because it’s only an encryption protocol that provides data security and privacy.
A VPN connection also requires a tunneling protocol to deliver data. As such, IPsec is typically accompanied by L2TP or IKEv2, resulting in the L2TP/IPsec and IKEv2/VPN protocols.
Does Windows 10 support IPsec VPN?
Windows 10 has native support for L2TP/IPsec. You can also set up a VPN on Windows Vista or older editions if you can find one that’s still compatible.
You can use this protocol to set up the built-in Windows VPN (for Windows 10 and 11). It is also compatible with third-party VPN clients that support it.
It’s possible to create a VPN connection in Windows 10 using the built-in OS settings and then add the VPN client’s login information, but it’s recommended to use a dedicated client for best performance.
How do I set up an IPsec VPN client on Windows 10?
To set up a VPN with IPsec on Windows, you need a client that offers you the possibility to connect using this protocol, and our top choice in this regard is ExpressVPN.
The VPN has thousands of fast servers all around the world and industry-leading VPN security to make sure your data stays completely private: military-grade encryption,
1.Get IPsec VPN client credentials
- Sign up for an ExpressVPN subscription.
- In your browser, open the ExpressVPN manual configuration page.
- Enter your credentials and select L2TP/IPsec.
- You’ll get information about your username and password + IPsec server addresses.
- Save this information so you can add it to your VPN connection.
The user name and password for the IPsec connection will be necessary once you configure your VPN connection using Windows settings.
2. Create a VPN connection
- Right-click the Start button and go to Network Connections.
- Select VPN on the left side and click Add a VPN connection.
- Set VPN provider to Windows (built-in) and write a Connection name.
- At Server name or address, type one of the server addresses provided by the ExpressVPN configuration page.
- Set VPN type to L2TP/IPsec with certificate.
- At Type of sign-in info, select User name and password.
- At User name (optional) and Password (optional), paste the ExpressVPN credentials you previously obtained.
- Enable Remember my sign-in info and click Save.
3. Connect and disconnect from the IPsec VPN
- Click the Network icon in the systray.
- Select the IPsec VPN connection.
- Click Connect or Disconnect.
4. Change IPsec VPN settings
- Right-click the Start button and go to Network Connections > VPN.
- Select the IPsec VPN connection and click Advanced options.
- At Connection properties, click Edit.
- Change VPN connection details and click Save.
If you want to connect to a different VPN server, you can either edit VPN connection details to set the new address or create a new VPN connection for each address.
5. Remove the IPsec VPN connection
- Right-click the Start button and go to Network Connections > VPN.
- Select the IPsec VPN connection.
- Click Remove.
Why use ExpressVPN
ExpressVPN is compatible with all popular platforms, including Mac, Linux, Android, and iOS.
You can even set it up on a router to share VPN access with all connected devices. Otherwise, up to 5 devices can share the VPN account for ExpressVPN.
Furthermore, ExpressVPN supports OpenVPN and Lightway, in addition to PPTP and L2TP with IPsec.
It comes with private DNS, gaming optimized servers, SOCKS5 and Shadowsocks proxy servers, port forwarding, split tunneling, and a kill switch.
What else you should know about ExpressVPN:
- +4000+ servers in 94 countries
- No traffic logs
- 24/7 live chat support
- 30-days money-back guarantee
- 7-day free trial (mobile)
ExpressVPN
Quickly set up an IPsec VPN client connection on Windows 10 using this fast and secure VPN app.
In conclusion, you can easily set up an IPsec VPN client on Windows 10 in order to protect your online privacy and computer security, as well as to unblock streaming services and minimize jitter. You can even set up an IPsec connection on XP by using the best VPN for Windows XP.
You just need to get equipped with a premium VPN that not only supports the IPsec protocol but also comes with high-speed VPN servers and superior security features, like ExpressVPN.
Your connection is not secure — websites you visit can find out your details:
-
- Your IP Address:
loading
Companies can sell this information, alongside your location and internet provider name, and profit from it by serving targeted ads or monitoring your data usage.
We recommend Private Internet Access, a VPN with a no-log policy, open source code, ad blocking and much more; now 79% off.
![]()