Статья обновлена: 07 июля 2022
ID: 13341
Как отключить запланированные проверки Защитника Windows на Windows 10
- В левом нижнем углу рабочего стола нажмите Пуск → Параметры.

- Выберите Обновление и безопасность.

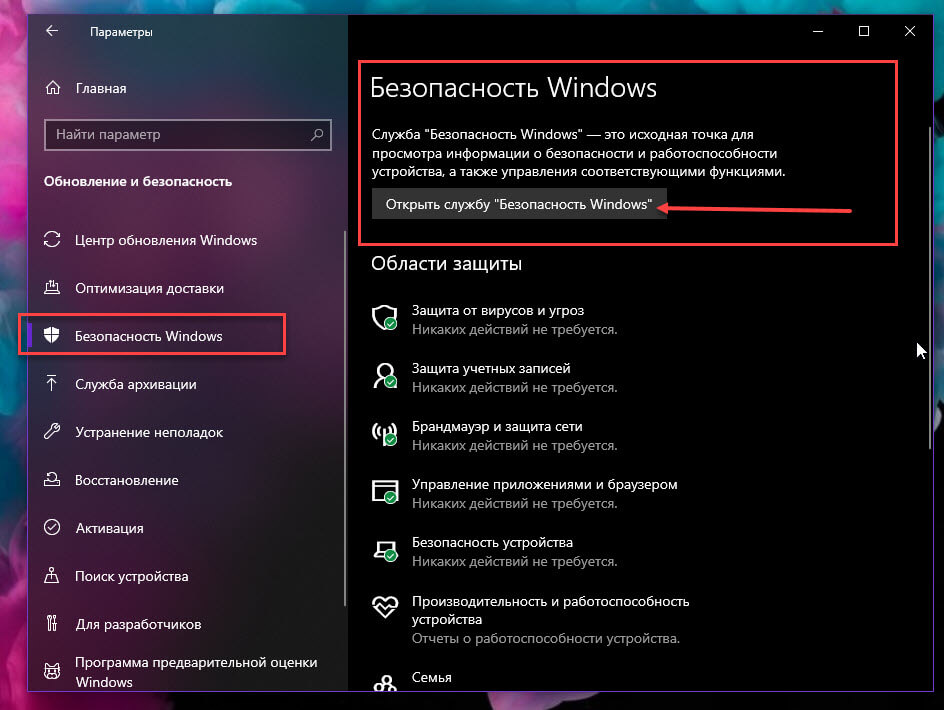
- Перейдите в раздел Безопасность Windows и нажмите Открыть службу «Безопасность Windows».

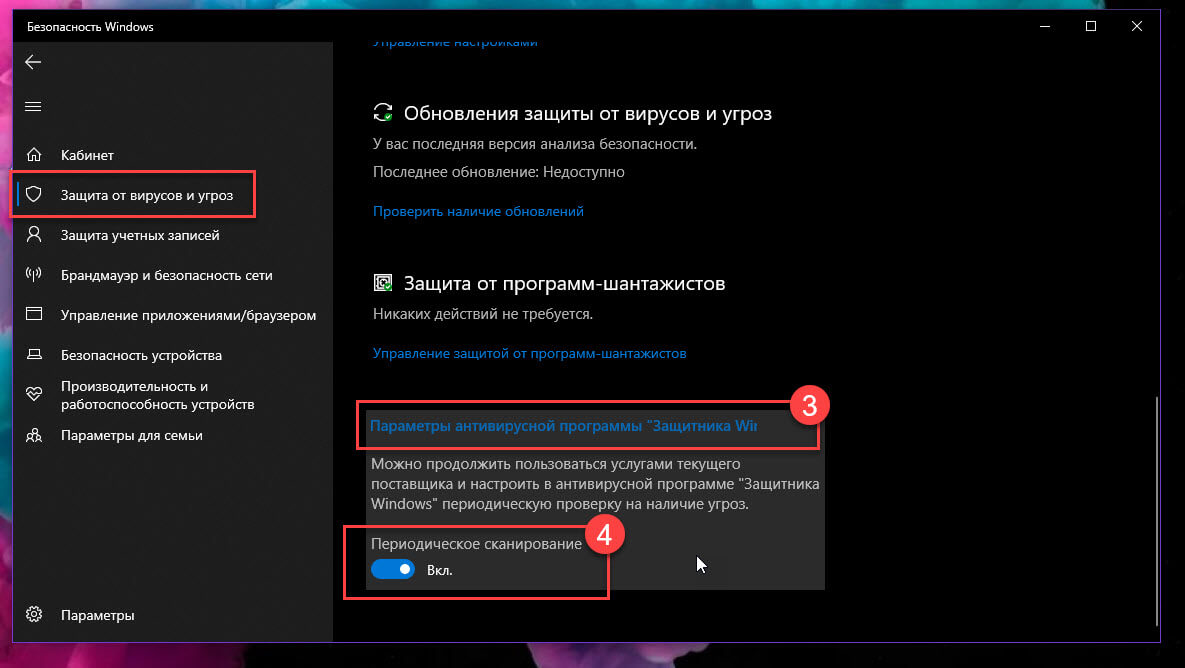
- Перейдите в раздел Защита от вирусов и угроз, нажмите Параметры антивирусной программы «Защитника Windows» и установите переключатель Периодическое сканирование
в выключенное положение.

Запланированные проверки Защитника Windows будут отключены на Windows 10.
Как отключить запланированные проверки Защитника Windows на Windows 11
- Нажмите на значок поиска в панели задач Windows.
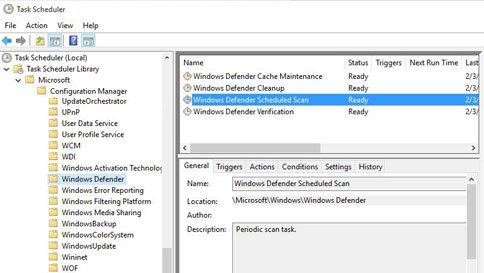
- Введите в поле поиска Планировщик заданий и выберите Планировщик заданий.

- Перейдите в папку Библиотека планировщика заданий → Microsoft → Windows.

- Перейдите в папку Windows Defender.
- Откройте контекcтное меню файла Windows Defender Scheduled Scan и выберите Отключить.

Запланированные проверки Защитника Windows будут отключены на Windows 11.
Как удалить Защитник Windows
Для Windows 10
Вы можете удалить программу стандартными средствами Microsoft Windows. Инструкция на сайте поддержки Microsoft.
Если стандартными средствами удалить программу не удалось, воспользуйтесь утилитой Microsoft для устранения проблем, препятствующих установке или удалению программ.
Если утилита не помогла, удалите программу с помощью файла mseremoval.bat:
- Скачайте и распакуйте архив mseremoval.zip.
- Нажмите правой кнопкой мыши на файл mseremoval.bat, выберите Запустить от имени администратора и введите данные учетной записи администратора.
Откроется окно командной строки. - Удалите файл mseremoval.bat, когда нужные действия будут выполнены и окно командной строки закроется.
Программа Защитник Windows будет удалена.
Для Windows 11
Вы можете отключить Защиту в режиме реального времени. Инструкция на сайте поддержки Microsoft.
На чтение 3 мин. Просмотров 451 Опубликовано 30.04.2021
В Windows 10, сборка 14352, Microsoft представила новую функцию безопасности, которая будет доступна в последнем юбилейном обновлении. Новая функция периодического сканирования – это опция Защитника Windows, которая позволяет Защитнику дополнять альтернативное антивирусное решение. Таким образом, пользователи, которые предпочитают устанавливать какое-либо другое антивирусное программное обеспечение, такое как Avast, Kaspersky, Symantec и т. Д., Могут получить дополнительную защиту. Давайте посмотрим, как это работает.
Когда вы только что установили Windows 10, операционная система предлагает Защитник Windows в качестве основного антивирусного программного обеспечения из коробки. Он включен по умолчанию, и его сложно отключить, даже если вы захотите. В разделе «Настройки» -> «Обновление и безопасность» – >> Защитник Windows он предлагает следующие параметры для управления параметрами безопасности: 
Обратите внимание на параметр Защита в реальном времени .
Когда пользователь устанавливает альтернативное антивирусное программное обеспечение, страница Защитника Windows меняет свой внешний вид и поведение в приложении “Настройки”. Все настройки отключаются, а опция «Постоянная защита» меняет свое название на Периодическое сканирование . См. Следующий снимок экрана: 
Обратите внимание, что этот новый параметр появляется только в том случае, если Windows 10 может обнаружить установленное вами антивирусное программное обеспечение. Это означает, что ваш антивирус должен быть совместим с Windows 10.
По умолчанию периодическое сканирование отключено. Когда он включен, Защитник Windows действует как дополнительный антивирусный сканер помимо вашего основного антивируса. Это должно повысить безопасность системы.
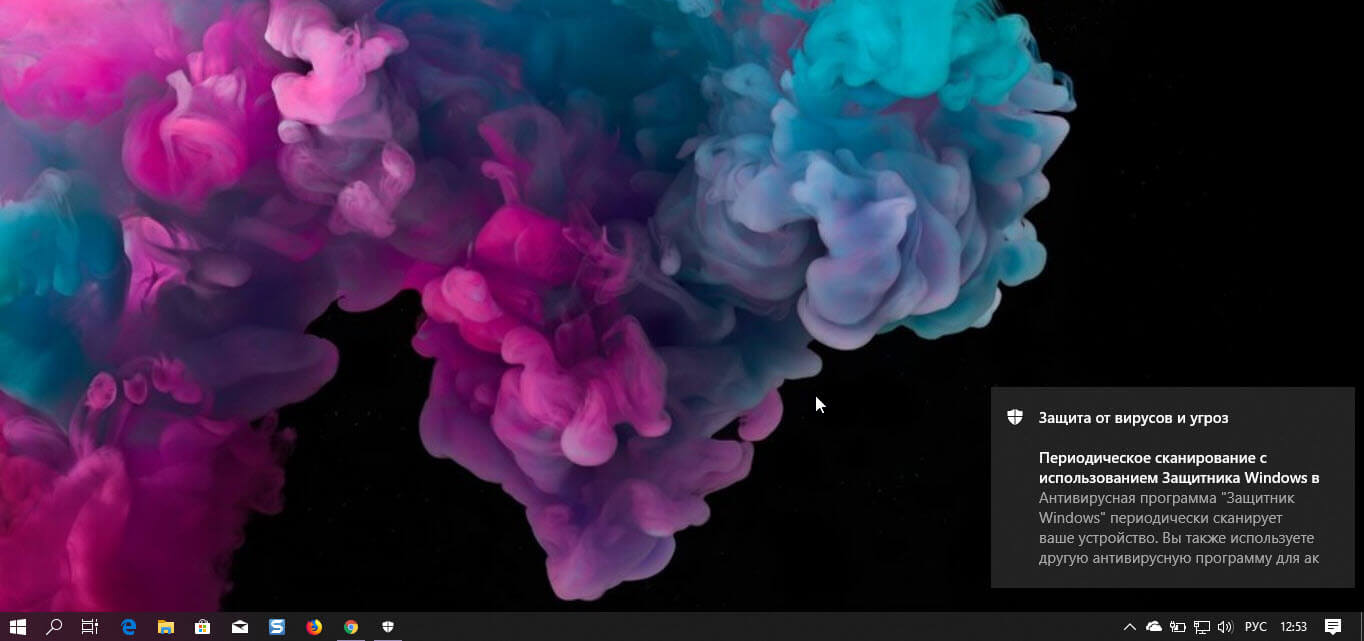
Как только Защитник Windows обнаружит угрозы, пользователь увидит уведомление. Хотя приложение в основном отключено в режиме периодического сканирования, его пользовательский интерфейс по-прежнему работает и может использоваться для просмотра истории обновлений, истории сканирования и действий, предпринятых против ранее обнаруженных угроз. 

Если вы заинтересованы в тестировании периодического сканирования в Windows 10, вот как вы можете это попробовать.
Как включить или выключить периодическое сканирование в Windows 10
Предполагается, что у вас установлено антивирусное программное обеспечение стороннего производителя. В моем случае это Avast! Бесплатно.

Вот как это можно сделать.
- Откройте приложение “Настройки” в Windows 10. Совет. Если на вашем устройстве есть клавиатура, нажмите Win + I , чтобы открыть это напрямую.

- Перейдите в раздел Система – Обновление и безопасность, как показано ниже.
- Щелкните Защитник Windows слева, чтобы открыть эту страницу.
- Включите периодическое сканирование в Windows 10 , включив параметр Периодическое сканирование: Отключите периодическое сканирование в Windows 10 , отключив параметр Периодическое сканирование:


 Отключите периодическое сканирование в Windows 10 , отключив параметр Периодическое сканирование:
Посмотрите следующее видео, чтобы увидеть эту функцию в действии:
Совет: вы можете подписаться на наш официальный канал YouTube ЗДЕСЬ .
Антивирусная программа Microsoft Defender регулярно сканирует устройство, чтобы обеспечить его безопасность. Мы стараемся это делать в те моменты, когда вы не пользуетесь устройством, чтобы не мешать вашей работе. Вы также можете установить любое удобное время и периодичность проверки, проводимой антивирусной программой Microsoft Defender.
-
В поле поиска на панели задач введите Планировщик заданий и откройте приложение.
-
На левой панели разверните узел Библиотека планировщика заданий > Microsoft > Windows, а затем прокрутите вниз и выберите папку Windows Defender.
-
На центральной панели дважды щелкните пункт Windows Defender Scheduled Scan.
-
В окне Свойства запланированной проверки Защитником Windows (локальный компьютер) откройте вкладку Триггеры, перейдите в нижнюю часть окна и выберите Новый.
-
Укажите периодичность проверок и желаемое время начала.
Нужна дополнительная помощь?
В Windows 10 Microsoft продолжает выпускать бесплатное антивирусное программное обеспечение Защитник Windows для сканирования, обнаружения и удаления вредоносных программ с вашего компьютера. Однако многие пользователи предпочитают устанавливать стороннее антивирусы для обеспечения безопасности, такое как Norton Antivirus, AVG, Avira или McAfee от Symantec и многие другие.
Периодическое сканирование будет доступно только на устройствах, на которых установлен сторонний антивирус, и когда он включен, Защитник Windows будет оставаться отключенным, но периодически будет сканировать и удалять любые угрозы, которые другие антивирусные программы, которые вы установили, возможно, не смогли обнаружить.
Основная идея заключается в повышении безопасности системы с помощью Защитника Windows, как сканера второй линии безопасности на устройствах с Windows 10.
В этом руководстве вы узнаете, как включить ограниченное периодическое сканирование на устройствах с Windows 10, если у вас уже установлен сторонний антивирус, просто добавьте дополнительный уровень безопасности.
Как включить периодическое сканирование (Periodic Scanning) в Windows 10
Используйте эти шаги, чтобы включить «Периодическое сканирование» после добавления стороннего антивируса в Windows 10:
Шаг 1: Откройте Центр безопасности Windows, для этого перейдите в приложение «Параметры» → «Обновление и безопасность» → «Безопасность Windows» и нажмите кнопку «Открыть службу Безопасность Windows».
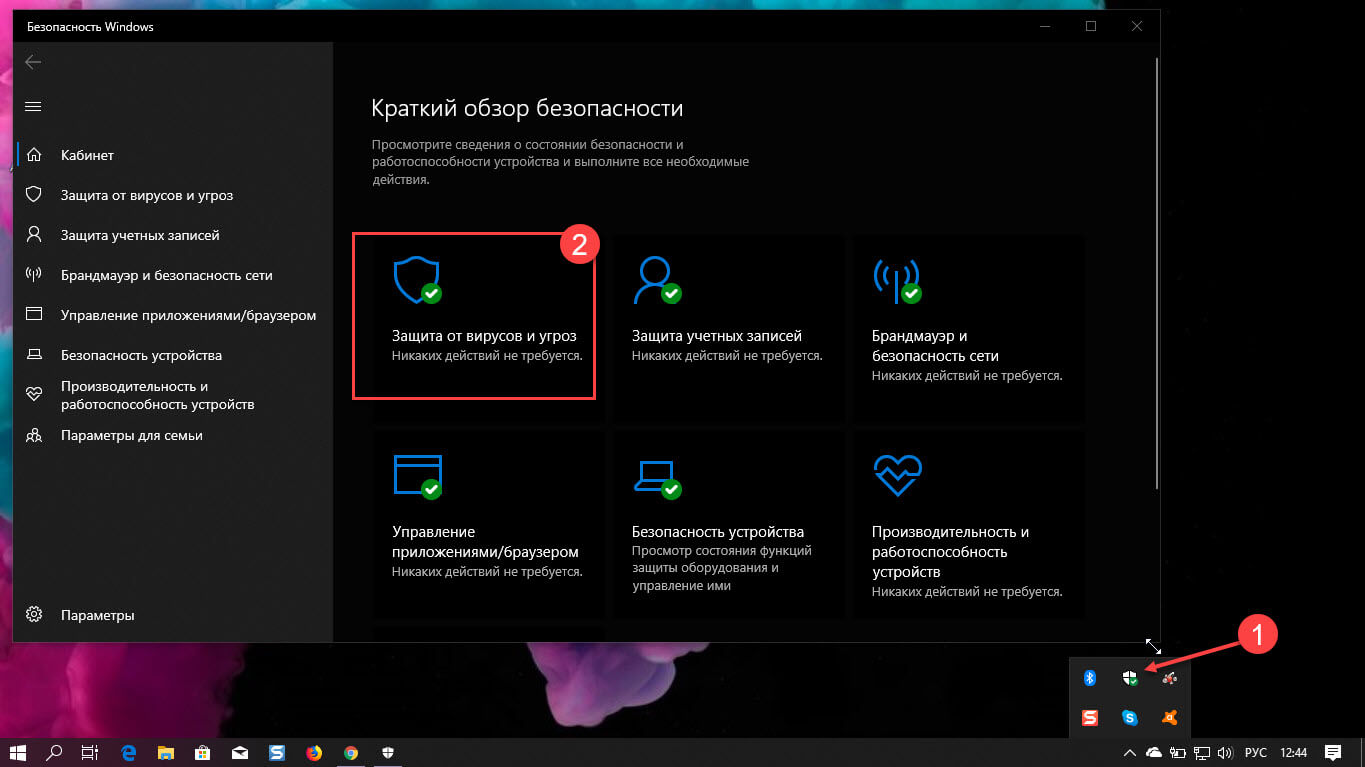
Шаг 2: Нажмите «Защита от вирусов и угроз».
Шаг 3: Нажмите «Параметры антивирусной программы Защитник Windows».
Шаг 4: Передвиньте ползунок переключателя Периодического сканирования в положение «ВКЛ.»
Шаг 5: Подтвердите действие при запросе системы, после чего вы увидите уведомление — «Периодическое сканирование с использованием Защитника Windows включено»
Примечание: Периодическое сканирование является дополнительной функцией, которая не включена по умолчанию. Она становится доступной только тогда, когда Windows 10 обнаружит, что установлено и запущено другое антивирусное решение, и должно быть включена пользователем или администратором устройства в первую очередь.
При включении Периодическое сканирования в Windows 10, вы будете иметь возможность использовать пользовательский интерфейс Защитника для управления угрозами, даже если само приложение выключено. Кроме того, вы будете получать уведомления, если система безопасности обнаружит угрозы во время периодического сканирования, по которому можно кликнуть, чтобы открыть антивирусное программное обеспечение и предпринять дополнительные действия.
Если на вашем компьютере включено Периодическое сканирование, Windows 10 будет использовать функцию автоматического обслуживания, чтобы убедиться, что сканирование выполняется в оптимальное время, чтобы минимизировать влияние на производительность и срок службы батареи.
Заключительное слово
Периодическое сканирование предназначено только для того, чтобы обеспечить дополнительный уровень безопасности и повысить безопасность Windows 10 при использовании другого антивирусного решения, уже установленного на вашем устройстве.
Обновление 4 июня 2019 года. Это руководство было впервые опубликовано в 2016 году и обновлено с учетом новых изменений в приложении «Безопасность Windows».
Ограниченное периодическое сканирование в Защитнике Windows – это новое дополнение, доступное в Windows 10 Anniversary Update . Windows 10 – самая безопасная операционная система, которую когда-либо поставляла Microsoft, и она продолжает делать ее лучше и безопаснее. Начиная с Windows 10 Anniversary Update, доступного позднее в этом году, в Windows 10 появится новый параметр безопасности, который называется Ограниченное периодическое сканирование.

Ограниченное периодическое сканирование в Защитнике Windows
Эта новая функция ограниченного периодического сканирования повышает безопасность системы, используя встроенный Защитник Windows в качестве дополнительного сканера в Windows 10, если вы установили какой-либо сторонний антивирус. Эта функция предлагается только в том случае, если вы установили стороннее антивирусное программное обеспечение и Защитник Windows отключен.
В этих периодических проверках будет использоваться автоматическое обслуживание – чтобы система выбирала оптимальное время на основе минимального воздействия на пользователя, производительность ПК и энергоэффективность – или клиенты могут планировать эти проверки. По словам Microsoft, ограниченное периодическое сканирование призвано обеспечить дополнительную линию защиты для защиты существующей антивирусной программы в режиме реального времени.
С помощью этой функции ограниченного периодического сканирования можно настроить Защитник Windows на периодическое сканирование системы, даже если установлено другое стороннее антивирусное программное обеспечение, и обеспечит дополнительную защиту от вредоносных программ. Таким образом, Microsoft делает обнаружение и защиту от вредоносных программ плавными и легкими, даже если заказчик выбирает сторонний антивирус.
По умолчанию ограниченное периодическое сканирование не включено. При включении Windows 10 будет использовать встроенный механизм сканирования Защитника Windows, чтобы периодически сканировать ПК на наличие угроз и устранять их. Эти периодические сканирования будут использовать автоматическое обслуживание, гарантируя, что система выберет оптимальное время при минимальном влиянии на производительность пользователя и ПК. Клиенты также могут запланировать эти сканы. Ограниченное периодическое сканирование предлагает дополнительную линию защиты для существующей антивирусной программы.
Включить ограниченное периодическое сканирование
Ограниченное периодическое сканирование становится доступным после установки и запуска любого стороннего антивирусного решения. Это не включено по умолчанию. Поэтому, если вы не используете встроенный Защитник Windows в качестве антивирусной программы в Windows 10, можно включить Ограниченное периодическое сканирование в разделе Настройки :
- Настройки> Обновление и безопасность> Защитник Windows
-
Включите ограниченное периодическое сканирование

Когда эта функция включена и вы не используете Защитник Windows для защиты в режиме реального времени, на вкладке Пользовательский интерфейс и история Защитника Windows отобразятся все обнаруженные дополнительные угрозы. При нажатии на уведомление откроется Защитник Windows, где вы сможете дополнительно просмотреть обнаруженную угрозу и автоматически выполненное действие.

Нажав на вкладку «История», вы увидите историю:

В большинстве случаев Защитник Windows также автоматически принимает меры для устранения угрозы.

Если вы уже используете Защитника Windows в качестве антивирусной программы в Windows 10, вы должны убедиться, что эта функция включена.
В настоящее время Ограниченное периодическое сканирование Windows 10 предназначено для потребителей. Позже эта функция будет оценена и для коммерческих клиентов. Ограниченное периодическое сканирование применяется только к неуправляемым устройствам для Windows 10 Anniversary Update.
by Matthew Adams
Matthew is a freelancer who has produced a variety of articles on various topics related to technology. His main focus is the Windows OS and all the things… read more
Updated on May 17, 2021
- If the Windows Defender needs to scan your computer notifications keep popping up, you probably deleted its log files using a cleaning tool.
- To prevent this problem, you will need to change the settings from that program.
- You can also disable the notifications for the antivirus altogether and they will no longer show up.
- Installing a better security solution will bypass the default software and prevent this issue.

XINSTALL BY CLICKING THE DOWNLOAD FILE
This software will repair common computer errors, protect you from file loss, malware, hardware failure and optimize your PC for maximum performance. Fix PC issues and remove viruses now in 3 easy steps:
- Download Restoro PC Repair Tool that comes with Patented Technologies (patent available here).
- Click Start Scan to find Windows issues that could be causing PC problems.
- Click Repair All to fix issues affecting your computer’s security and performance
- Restoro has been downloaded by 0 readers this month.
Windows Defender is Windows 10’s built-in antivirus software. That utility scans as a part of the OS’s automatic maintenance.
However, Windows Defender needs to scan your computer Action Center notifications can still pop up with regularity for some users.
So, some users might wonder what they can do to ensure Windows Defender notifications don’t keep on popping up.
How can I eliminate Windows Defender scan notifications?
1. Install a better, third-party antivirus
The Windows Defender notifications problem leads us to one of the most obvious solutions, and that is installing a third-party antivirus that will automatically disable the default antivirus.
The solution recommended below not only that will help you get rid of the annoying notifications but will provide a superior level of protection for your PC and your other devices.
Exactly, with the same licence you will secure all your devices, including your webcam or your router.
Moreover, this multi-layered security tool will secure all your online payments and banking transactions so it’s the perfect solution for the modern person.

ESET Internet Security
This ESET solution will make you forget about scan notifications and possible threats to your PC.
2. Turn off the Action Center notifications
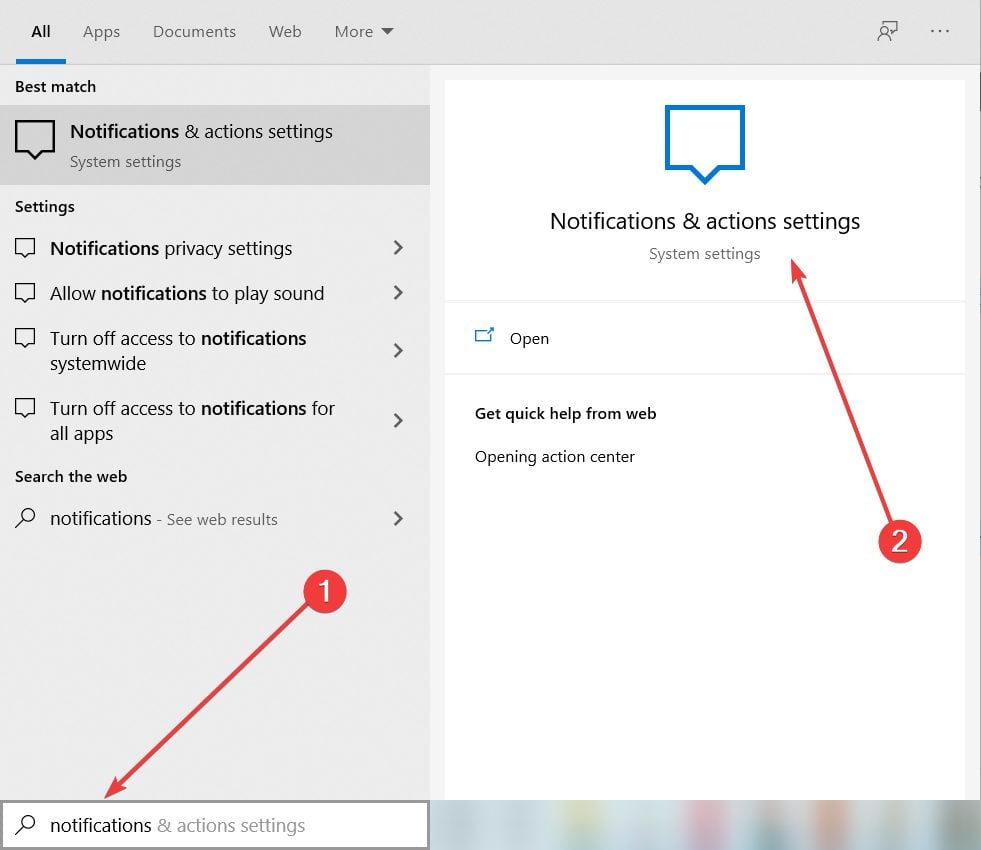
- Open the search box with the Windows key + S hotkey.
- Enter notifications in the search box and click on Notifications & actions settings.

- Then turn off the Get notifications from apps and other senders option. That will turn off all the Action Center notifications.

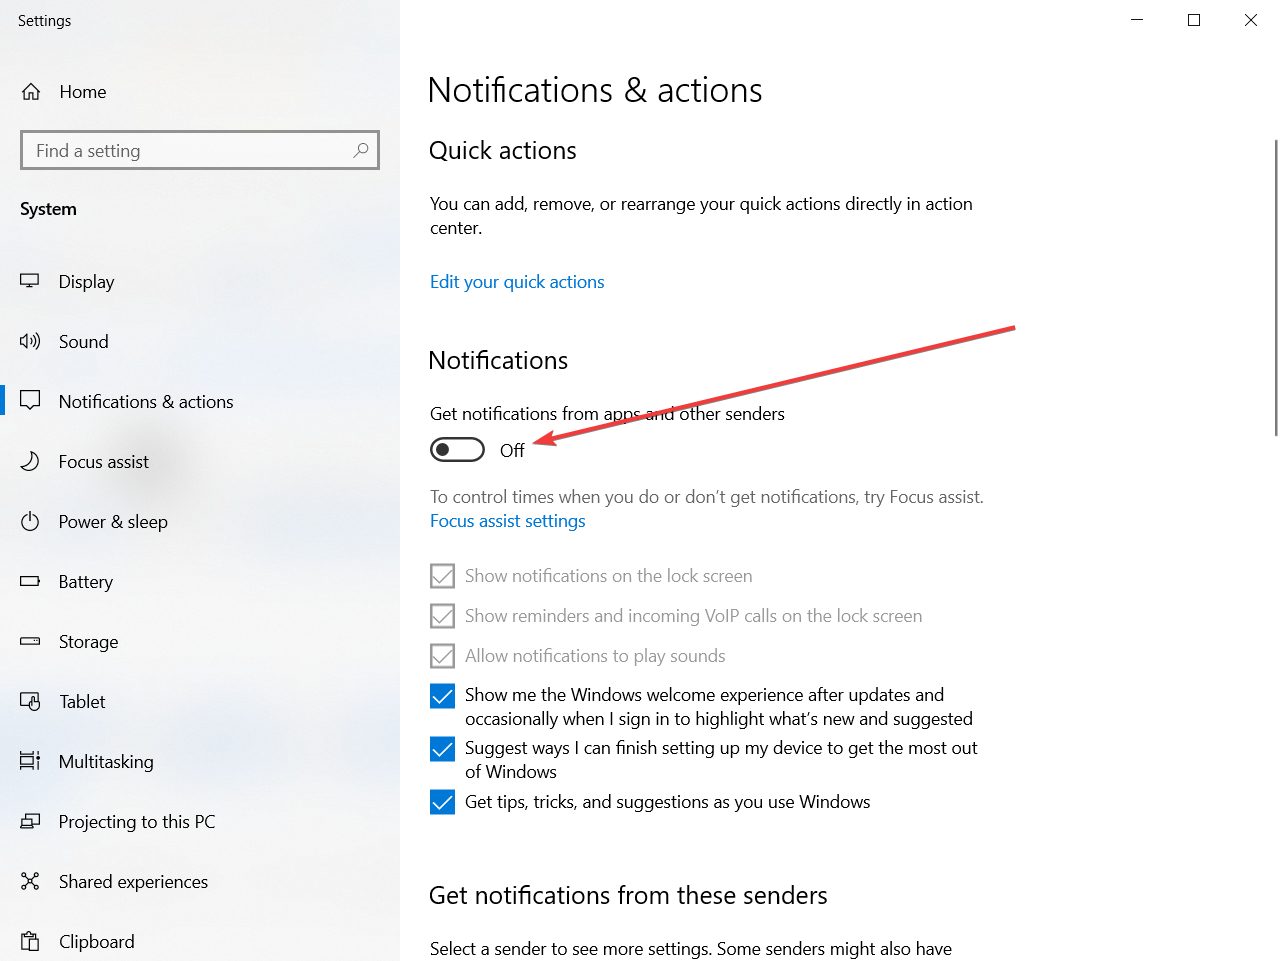
Users can turn off Action Center notifications, which will also turn off Windows Defender’s scan notifiers. You can do that by following the steps above.
3. Turn off Windows Defender notifications with the Group Policy Editor
- Right-click the Start button and select Run on the menu.
- Enter gpedit.msc in Run’s text box, and select the OK option.

- Thereafter, click Computer Configuration, Administrative Templates, Windows Components, Windows Defender, and Client Interface on the left of the Group Policy Editor window.
- Next, double-click the Suppress all notifications option on the right.
- Select the Enable option.
- Click the OK button.

Users can turn off Windows Defender scan notifications with the Group Policy Editor in Windows 10 Pro and Enterprise.
If you have a Windows 10 Home version installed, you can still use this expert guide to install the Group Policy Editor.
4. Don’t erase Windows Defender log files with your utility program
Some PC issues are hard to tackle, especially when it comes to corrupted repositories or missing Windows files. If you are having troubles fixing an error, your system may be partially broken.
We recommend installing Restoro, a tool that will scan your machine and identify what the fault is.
Click here to download and start repairing.
Some CCleaner users have said that Windows Defender notifications keep appearing within the Action Center because CCleaner deletes Windows Defender’s log files.
Thus, CCleaner can erase Windows Defender’s scan record. Consequently, the Action Center still displays Windows Defender scan notifications even though there have been recent scans.
Therefore, some CCleaner users might need to uncheck the Windows Defender check box within the Cleaner tab shown directly below.

Other disk cleaner utilities can also erase Windows Defender’s log files. That’s especially the case if users have configured them for scheduled disk cleaning.
Users should check that Windows Defender check boxes aren’t selected in whatever disk cleaners they utilize.
5. Set up a new Scheduled Task for daily Windows Defender scans
- Open the Run accessory by pressing the Windows key + R.
- Input taskschd.msc in Run and click OK to open the window shown directly below.

- Select Task Scheduler (Local) on the left of the window.
- Right-click Task Scheduler (Local) to select Create a Basic Task.

- Enter Windows Defender daily scan in the Name box and click the Next button.
- Select the Daily option and select the Next option.
- Users can leave the time settings at their default values if they wish.
- Press Next to go to the Action tab.
- Select the Start a program option and click the Next button.
- Click Browse to select the following path:
C:\Program FilesWindows DefenderMpCmdRun.exe - Press the Next button, and then click Finish to exit the wizard.


The new scheduled task will ensure there are daily Windows Defender scans so that the Action Center doesn’t blurt out scan notifications.
So, that’s how you can fix recurring Windows Defender needs to scan your computer notifications in Windows 10. You can also turn off Windows Defender’s scans with the Real-time protection option.
However, that isn’t recommended unless users have replacement third-party antivirus utilities for WD.
We hope that our solutions worked out just great and you managed to get rid of the notifications and you also learned how to turn off automatic scan for Windows Defender in Windows 10.
This whole problem with the scan notifications can be avoided completely with a third-party antivirus so check out one of the best antiviruses with unlimited validity to get the right one for your PC.
Tell us which one you chose. Also, if you have any other questions or suggestions, you can use the comments section below and leave us a message.
Still having issues? Fix them with this tool:
SPONSORED
If the advices above haven’t solved your issue, your PC may experience deeper Windows problems. We recommend downloading this PC Repair tool (rated Great on TrustPilot.com) to easily address them. After installation, simply click the Start Scan button and then press on Repair All.
![]()
Newsletter
by Matthew Adams
Matthew is a freelancer who has produced a variety of articles on various topics related to technology. His main focus is the Windows OS and all the things… read more
Updated on May 17, 2021
- If the Windows Defender needs to scan your computer notifications keep popping up, you probably deleted its log files using a cleaning tool.
- To prevent this problem, you will need to change the settings from that program.
- You can also disable the notifications for the antivirus altogether and they will no longer show up.
- Installing a better security solution will bypass the default software and prevent this issue.
XINSTALL BY CLICKING THE DOWNLOAD FILE
This software will repair common computer errors, protect you from file loss, malware, hardware failure and optimize your PC for maximum performance. Fix PC issues and remove viruses now in 3 easy steps:
- Download Restoro PC Repair Tool that comes with Patented Technologies (patent available here).
- Click Start Scan to find Windows issues that could be causing PC problems.
- Click Repair All to fix issues affecting your computer’s security and performance
- Restoro has been downloaded by 0 readers this month.
Windows Defender is Windows 10’s built-in antivirus software. That utility scans as a part of the OS’s automatic maintenance.
However, Windows Defender needs to scan your computer Action Center notifications can still pop up with regularity for some users.
So, some users might wonder what they can do to ensure Windows Defender notifications don’t keep on popping up.
How can I eliminate Windows Defender scan notifications?
1. Install a better, third-party antivirus
The Windows Defender notifications problem leads us to one of the most obvious solutions, and that is installing a third-party antivirus that will automatically disable the default antivirus.
The solution recommended below not only that will help you get rid of the annoying notifications but will provide a superior level of protection for your PC and your other devices.
Exactly, with the same licence you will secure all your devices, including your webcam or your router.
Moreover, this multi-layered security tool will secure all your online payments and banking transactions so it’s the perfect solution for the modern person.
ESET Internet Security
This ESET solution will make you forget about scan notifications and possible threats to your PC.
2. Turn off the Action Center notifications
- Open the search box with the Windows key + S hotkey.
- Enter notifications in the search box and click on Notifications & actions settings.
- Then turn off the Get notifications from apps and other senders option. That will turn off all the Action Center notifications.
Users can turn off Action Center notifications, which will also turn off Windows Defender’s scan notifiers. You can do that by following the steps above.
3. Turn off Windows Defender notifications with the Group Policy Editor
- Right-click the Start button and select Run on the menu.
- Enter gpedit.msc in Run’s text box, and select the OK option.
- Thereafter, click Computer Configuration, Administrative Templates, Windows Components, Windows Defender, and Client Interface on the left of the Group Policy Editor window.
- Next, double-click the Suppress all notifications option on the right.
- Select the Enable option.
- Click the OK button.
Users can turn off Windows Defender scan notifications with the Group Policy Editor in Windows 10 Pro and Enterprise.
If you have a Windows 10 Home version installed, you can still use this expert guide to install the Group Policy Editor.
4. Don’t erase Windows Defender log files with your utility program
Some PC issues are hard to tackle, especially when it comes to corrupted repositories or missing Windows files. If you are having troubles fixing an error, your system may be partially broken.
We recommend installing Restoro, a tool that will scan your machine and identify what the fault is.
Click here to download and start repairing.
Some CCleaner users have said that Windows Defender notifications keep appearing within the Action Center because CCleaner deletes Windows Defender’s log files.
Thus, CCleaner can erase Windows Defender’s scan record. Consequently, the Action Center still displays Windows Defender scan notifications even though there have been recent scans.
Therefore, some CCleaner users might need to uncheck the Windows Defender check box within the Cleaner tab shown directly below.
Other disk cleaner utilities can also erase Windows Defender’s log files. That’s especially the case if users have configured them for scheduled disk cleaning.
Users should check that Windows Defender check boxes aren’t selected in whatever disk cleaners they utilize.
5. Set up a new Scheduled Task for daily Windows Defender scans
- Open the Run accessory by pressing the Windows key + R.
- Input taskschd.msc in Run and click OK to open the window shown directly below.
- Select Task Scheduler (Local) on the left of the window.
- Right-click Task Scheduler (Local) to select Create a Basic Task.
- Enter Windows Defender daily scan in the Name box and click the Next button.
- Select the Daily option and select the Next option.
- Users can leave the time settings at their default values if they wish.
- Press Next to go to the Action tab.
- Select the Start a program option and click the Next button.
- Click Browse to select the following path:
C:\Program FilesWindows DefenderMpCmdRun.exe - Press the Next button, and then click Finish to exit the wizard.
The new scheduled task will ensure there are daily Windows Defender scans so that the Action Center doesn’t blurt out scan notifications.
So, that’s how you can fix recurring Windows Defender needs to scan your computer notifications in Windows 10. You can also turn off Windows Defender’s scans with the Real-time protection option.
However, that isn’t recommended unless users have replacement third-party antivirus utilities for WD.
We hope that our solutions worked out just great and you managed to get rid of the notifications and you also learned how to turn off automatic scan for Windows Defender in Windows 10.
This whole problem with the scan notifications can be avoided completely with a third-party antivirus so check out one of the best antiviruses with unlimited validity to get the right one for your PC.
Tell us which one you chose. Also, if you have any other questions or suggestions, you can use the comments section below and leave us a message.
Still having issues? Fix them with this tool:
SPONSORED
If the advices above haven’t solved your issue, your PC may experience deeper Windows problems. We recommend downloading this PC Repair tool (rated Great on TrustPilot.com) to easily address them. After installation, simply click the Start Scan button and then press on Repair All.
![]()