Windows Defender впервые появился как антивирусная утилита от MS еще в Windows XP, и начиная с Windows Vista он постоянно присутствует в операционных системах Windows в качестве встроенного средства защиты от зловредов. В Windows 8 Defender был объединен с другим антивирусным продуктом — Microsoft Security Essentials, так что на данный момент он является полноценным антивирусным решением.
Windows Defender достаточно производителен и не требователен к системным ресурсам, он может быть использован не только на домашних компьютерах, но и в сети небольших организаций. Антивирус можно обновлять как с сайтов Microsoft, так и с внутреннего WSUS сервера. Однако, основным плюсом Windows Defender является тот факт, что он уже предустановлен и активен в Windows, и практически не требует ручной донастройки.
Совет. На данный момент Windows Defender является частью системы только на пользовательских ОС, и не доступен в Windows Server. Однако в предрелизе Windows Server 2016, Windows Defender может быть установлен как отдельный компонент сервера командой:
Install-WindowsFeature-Name Windows-Server-Antimalware
В большинство случае Windows Defender хорошо работает и со стандартными настройками, но в случае необходимости их можно изменить. Большое количество настроек Defender можно изменить через PowerShell с помощью специального модуля Defender. Впервые он появился в PowerShell 4.0 и разработан специально для управления Windows Defender. Этот модуль содержит 11 командлетов.
Полный список командлетов модуля можно вывести с помощью команды:
Get-Command -Module Defender

- Add-MpPreferenc
- Get-MpComputerStatus
- Get-MpPreference
- Get-MpThreat
- Get-MpThreatCatalog
- Get-MpThreatDetection
- Remove-MpPreference
- Remove-MpThreat
- Set-MpPreference
- Start-MpScan
- Update-MpSignature
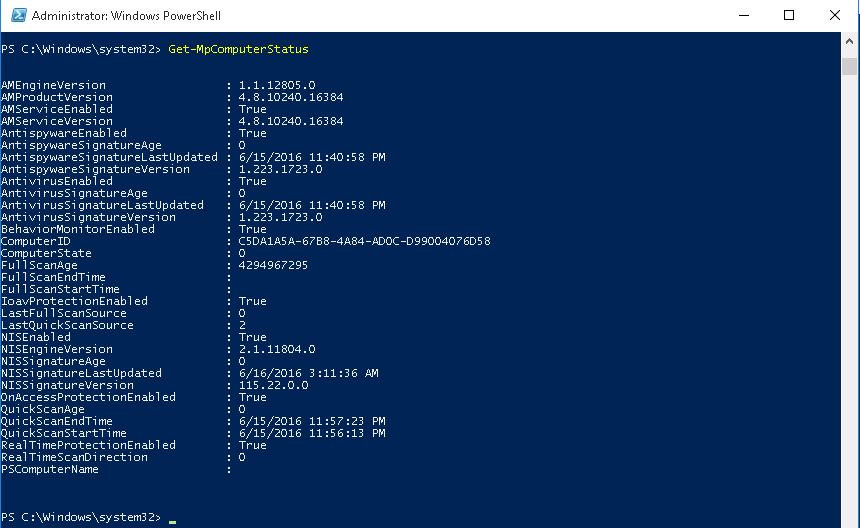
Get-MpComputerStatus – позволяет вывести текущий статус (включенные опции, дату и версию антивирусных баз, время последнего сканирования и т.д.)
Вывести текущие настройки Defender может командлет Get-MpPreference, чтобы их изменить используется — Set-MpPreference.
Например, нам требуется включить сканирование внешних USB накопителей. Получим текущие настройки командой:
Get-MpPreference | fl disable*
Как вы видит сканирование USB накопителей отключено (DisableRemovableDriveScanning = True). Включим сканирование командой:
Set-MpPreference -DisableRemovableDriveScanning $false
Также, чтобы изменить настройки антивируса можно использовать командлеты Add-MpPreference и Remove-MpPreference. Например, добавим несколько папок в список исключений антивируса (сканирование в них не будет выполняться):
Add-MpPreference -ExclusionPath C:Video, C:install
Полный список исключений Windows Defender можно вывести так:
Get-MpPreference | fl excl*
Удалим конкретную папку из списка исключений:
Remove-MpPreference -ExclusionPath C:install
Для обновления антивирусных сигнатур в базе используется команда Update-MpSignature. С помощью аргумента UpdateSource можно указать источник обновлений.
Возможны следующие источники обновлений:
- MicrosoftUpdateServer – сервера обновлений MS в интернете
- MMPC — Microsoft Malware Protection Center
- FileShares – сетевая папка
- InternalDefinitionUpdateServer — внутренний WSUS сервер
Для обновления из сетевой папки нужно предварительно скачать файлы с сигнатурами баз с сайта https://www.microsoft.com/security/portal/definitions/adl.aspx и поместить в сетевой каталог. Чтобы обновить базы Defender из сетевого каталога, нужно задать его UNC путь:
Set-MpPreference -SignatureDefinitionUpdateFileSharesSources \FileShare1Updates
Запустим обновление:
Update-MpSignature -UpdateSource FileShares
Update-MpSignature

Выполнить сканирование системы можно с помощью командлета Start-MpScan. Аргумент ScanType позволяет указать один из трех режимов сканирования.
- FullScan – полное сканирование всех файлов на компьютере, в том числе реестра и запушенных программ
- QuickScan – быстрый анализ наиболее частых мест, которые могут быть инфицированы
- CustomScan – пользователь сам может указать диски и папки для сканирования.
Например, чтобы просканировать каталог “C:Program Files”:
Start-MpScan -ScanType CustomScan -ScanPath ”C:Program Files”
![]()
Все командлеты модуля Defender могут быть использованы для управления как локальным, так и удаленным компьютером. Для подключения к удаленному компьютеру нужно использовать опцию CimSession. Например, чтобы получить время последнего сканирования на удаленном компьютере с именем msk-wks-1, запустите такую команду (WimRM на удаленном ПК должен быть включен):
$session = NewCimSession -ComputerName msk-wks-1
Get-MpComputerStatus -CimSession $session | fl fullscan*
Если нужно отключить защиту Defender в реальном времени:
Set-MpPreference -DisableRealtimeMonitoring $true
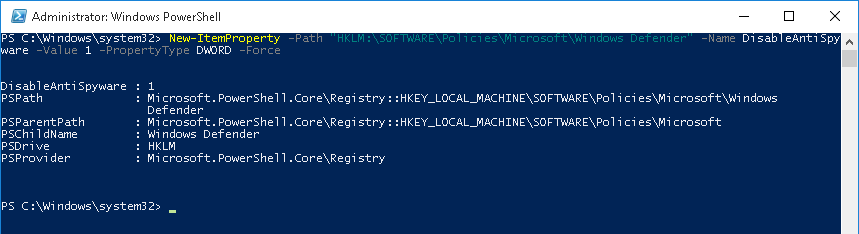
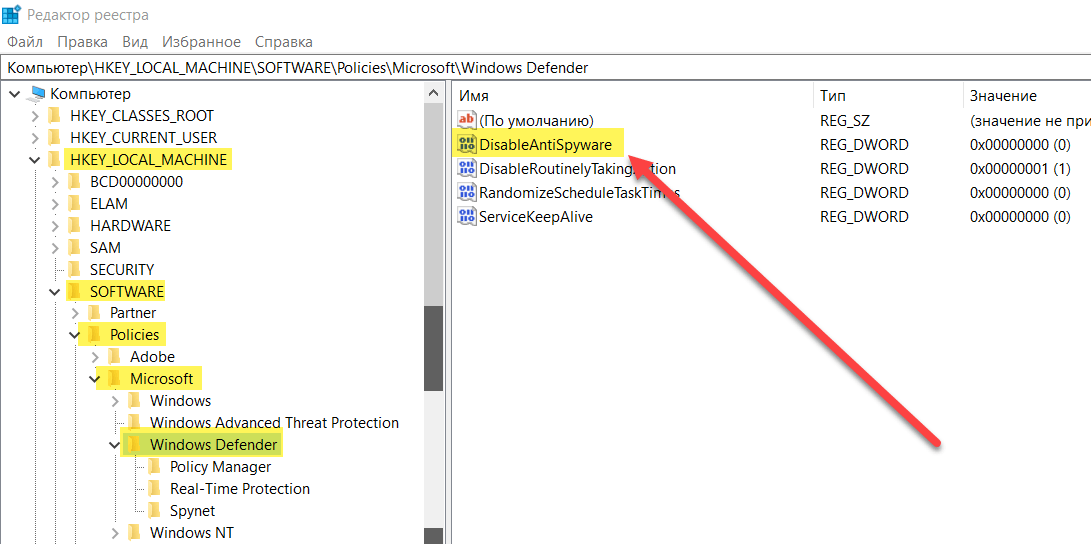
Полностью отключить Windows Defender на компьютере можно, добавив в реестр ключ с помощью команды PowerShell:
New-ItemProperty -Path “HKLM:SOFTWAREPoliciesMicrosoftWindows Defender” -Name DisableAntiSpyware -Value 1 -PropertyType DWORD -Force
Просмотров 17.3к. Опубликовано 4 ноября, 2018 Обновлено 4 ноября, 2018
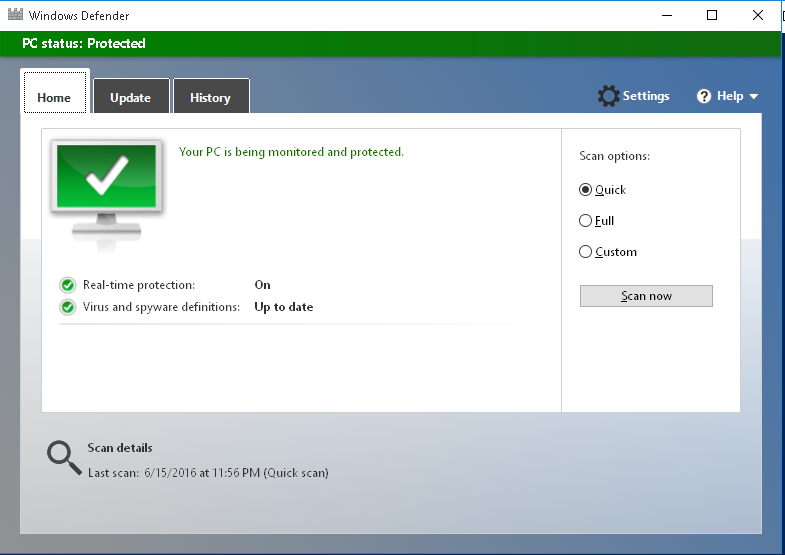
Защитник Windows — это средство защиты от вредоносных программ, которое входит в комплект Windows 10 для защиты вашего устройства и данных от вирусов, вымогательств, шпионских программ и многих других угроз безопасности.
Хотя это антивирус, который обеспечивает надежную защиту в режиме реального времени и даже автоматически отключает себя при обнаружении стороннего решения, невозможно окончательно отключить или удалить его полностью, как в предыдущих версиях.
Тем не менее, по-прежнему существует ряд сценариев, когда вы не можете использовать антивирус по умолчанию. Например, при настройке компьютера-киоска, который не будет подключаться к Интернету, никто не сможет подключаться к периферийным устройствам. Или при выполнении определенных задач, которые в противном случае будут заблокированы функцией безопасности. Если вы должны отключить антивирус Защитника Windows, несмотря на то, что ваш компьютер уязвим для угроз, существует несколько способов постоянно отключать антивирус с помощью редактора групповой политики и реестра.
В этом руководстве по Windows 10 мы покажем 3 способа, как навсегда отключить Антивирус Защитник Windows на вашем компьютере. (Также мы покажем вам инструкции по временному отключению антивируса.)
Как отключить защитник windows 10 навсегда
С помощью локальной групповой политики
Если вы используете Windows 10 Pro, Enterprise, ltsb или Education, вы можете использовать редактор локальной групповой политики, чтобы навсегда отключить антивирус защиты Windows на вашем компьютере, используя следующие шаги:
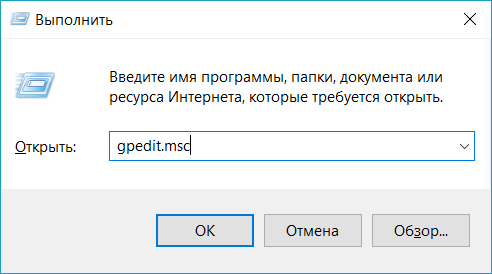
- Используйте комбинацию клавиш Windows + R, чтобы открыть команду «Выполнить».
- Введите gpedit.msc и нажмите «ОК», чтобы открыть редактор локальных групповых политик.

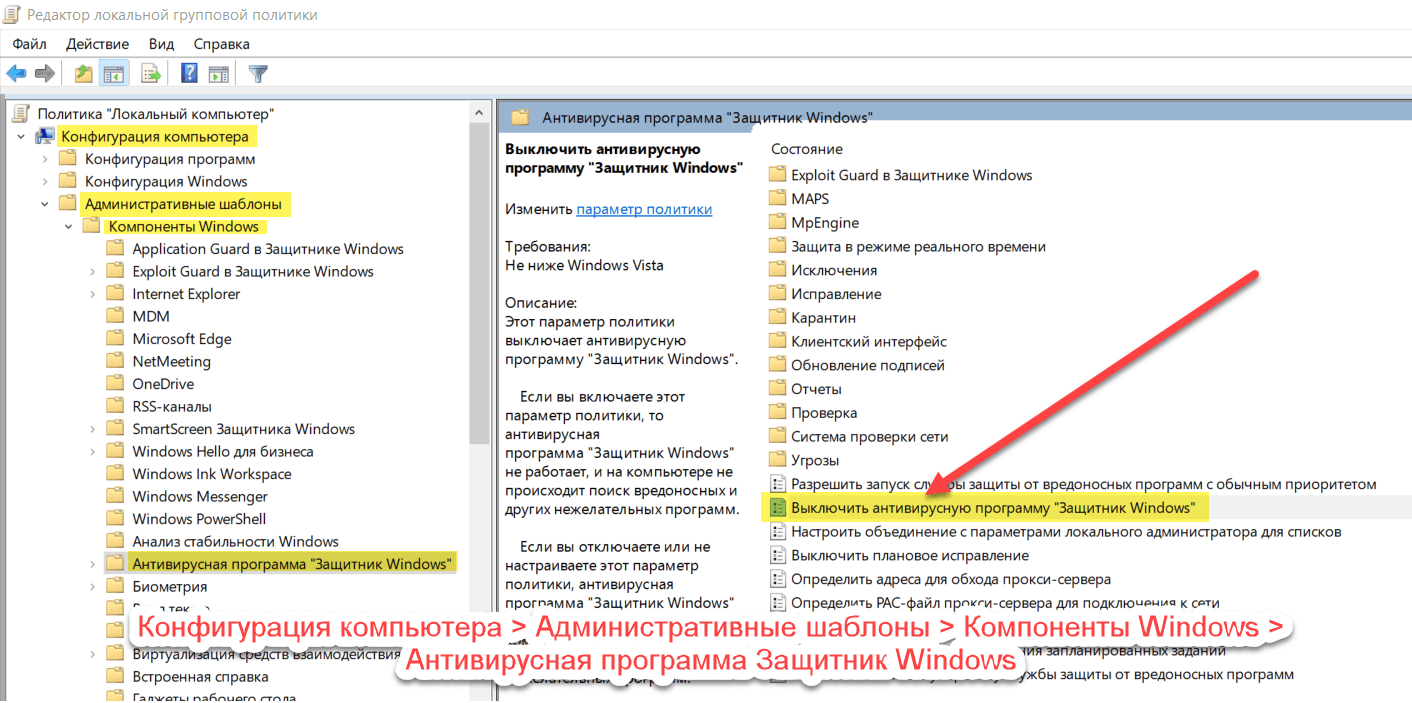
- Пройдите по следующему пути:
- Конфигурация компьютера > Административные шаблоны > Компоненты Windows > Антивирусная программа Защитник Windows

- Конфигурация компьютера > Административные шаблоны > Компоненты Windows > Антивирусная программа Защитник Windows
- Справа дважды щелкните по параметру «Выключить антивирусную программу Защитник Windows».
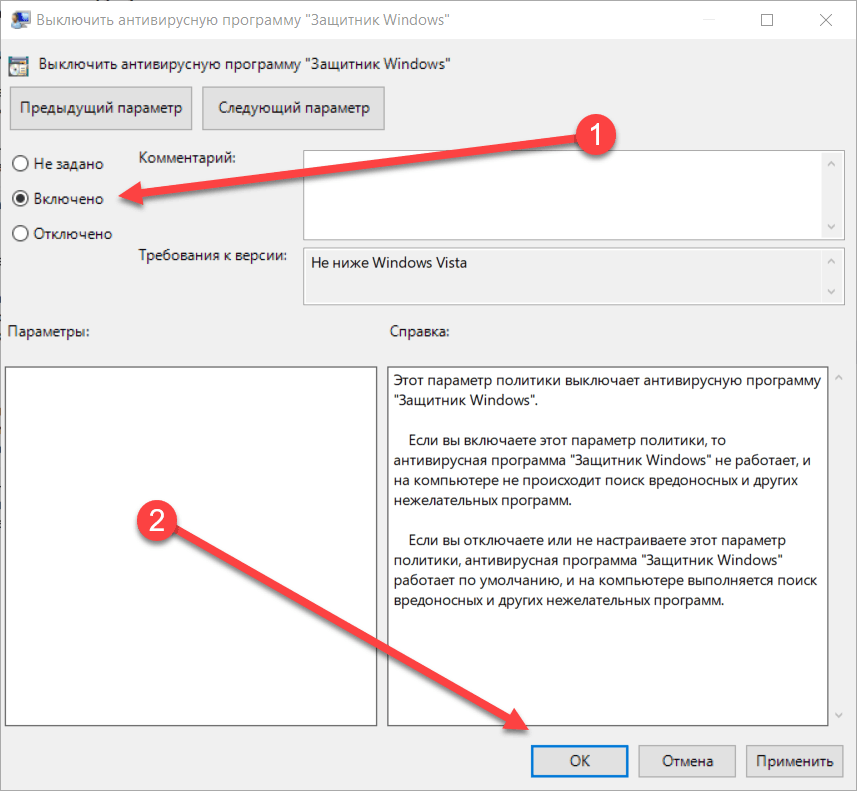
- Выберите параметр «Включено», чтобы отключить Защитник Windows.

- Нажмите «Применить».
- Нажмите «ОК».
После того, как вы выполнили эти шаги, перезагрузите компьютер, чтобы применить изменения.
Вы заметите, что значок экрана останется в области уведомлений панели задач, но это потому, что значок является частью Центра защиты Windows Defender, а не частью антивируса.
В любое время вы можете снова включить Защитник Windows Defender с помощью этапов, но на шаге № 5 обязательно выберите параметр «Не задано». Затем перезагрузите устройство, чтобы применить изменения.
Через реестр
Если вы используете Windows 10 Home (Домашняя), у вас не будет доступа к редактору локальных групповых политик. Тем не менее, вы можете изменить реестр, чтобы окончательно навсегда отключить антивирус по умолчанию, используя следующие шаги:
Предупреждение. Редактирование реестра является рискованным и может привести к необратимому повреждению вашей установки, если вы не сделаете это правильно. Перед продолжением рекомендуется создать точку восстановления системы.
- Используйте комбинацию клавиш Windows + R, чтобы открыть команду «Выполнить» .
- Введите regedit и нажмите OK, чтобы открыть реестр.

- Перейдите к HKEY_LOCAL_MACHINESOFTWAREPoliciesMicrosoftWindows Defender. Вы можете использовать стрелки слева.
Совет. Вы можете скопировать и вставить путь в адресную строку реестра, чтобы быстро перейти к пункту назначения.

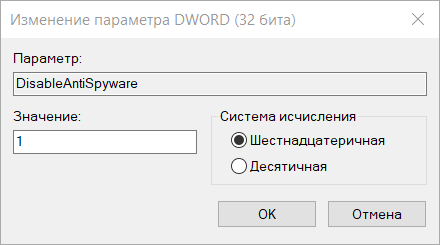
- Если вы не видите DisableAntiSpyware DWORD, щелкните правой кнопкой мыши значок Защитник Windows (папка), выберите «Создать» и нажмите «Значение DWORD (32-разрядное значение)» .
- Назовите ключ DisableAntiSpyware и нажмите Enter.

- Измените данные значения 1. Начальное значение будет 0, что означает, что защитник Windows включен. Измените его для повторного включения Защитника Windows. Вы также можете просто удалить его.

- Нажмите «ОК». Перезагрузите компьютер. Защитник Windows больше не будет защищать от вирусов и угроз. Лучше использовать другое антивирусное приложение для защиты.


После выполнения шагов перезагрузите устройство, чтобы применить настройки, а затем антивирус Защитника Windows теперь должен быть отключен.
Если вы больше не хотите, чтобы функция безопасности была отключена, вы можете включить ее снова, используя те же шаги, но на шаге 6 убедитесь, что вы щелкните правой кнопкой мыши на DisableAntiSpyware DWORD и выберите опцию Удалить.
Отключение защитника Windows через командную строку или PowerShell
- Запустите командную строку от имени администратор.
- Вы можете нажать комбинацию Windows + X и выбрать Windows PowerShell (администратор)
- В окне PowerShell введите команду
- Set-MpPreference -DisableRealtimeMonitoring $true
- Сразу после ее выполнения защита в реальном времени будет отключена.
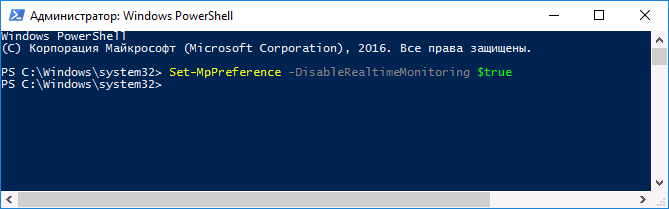
Чтобы использовать эту же команду в командной строке (также запущенной от имени администратора), просто введите powershell и пробел перед текстом команды.
Как отключить центр защитника windows 10 на время
- Откройте приложение «Настройки». Нажмите кнопку Пуск и выберите «Параметры»

- Перейти к «Обновление и безопасность«

- Выберите Защитник Windows из левой панели
- Перейдите на страницу настройки защитника Windows (иконка с изображением щита), а затем нажмите «Параметры защиты от вирусов и других угроз».
- Отключить «Защита в реальном времени».
Обратите внимание, что если переключатели тумблеров выделены серым цветом, это означает, что Защитник Windows отключен навсегда или не включен. Возможно, ваша сторонняя антивирусная программа отключила его.


Как отключить Защитник Windows с помощью программы O&O ShutUp10
- Скачайте программу O&O ShutUp10 . Установка не требуется, программа портативная.
- Запустите программу от имени администратора.
- Перейдите в раздел Windows Defender и Microsoft SpyNet и переключите тумблер Отключить Windows Defender в активное состояние. Остальные параметры можно отключить по желанию.


Примечание: после установки обновлений Windows, настройки системы могут быть снова изменены. Мы рекомендуем после установки обновлений снова запустить программу O&O ShutUp10, изменённые параметры будут выделены, и вы сможете вернуть их назад автоматически.
Я сделал не большую софтину, которая может отключать Windows 10 defender, кроме смарт фильтра. Это в дополнение к ответу. Есть определённые ключи реестра.
Статья
Только на видео ошибся. Нужно все параметры указывать без кавычек. Язык C#.
Ещё статья, где указано как исправить ошибки
Вот общий принцип того, что нужно будет сделать. Всё это (на видео) можно перевести в код (а в статье можно скачать программу и посмотреть как это будет работать).
1) В редакторе реестра перейдите к разделу HKEY_LOCAL_MACHINE SOFTWARE Policies Microsoft Windows Defender
2) В правой части редактора реестра нажмите правой кнопкой мыши, выберите «Создать» — «Параметр DWORD 32 бита» (даже если у вас 64-бит система) и задайте имя параметра DisableAntiSpyware
3) После создания параметра дважды нажмите по нему и задайте значение 1.
4) Там же создайте параметры AllowFastServiceStartup и ServiceKeepAlive — их значение должно быть 0 (ноль, задается по умолчанию).
5) В разделе Windows Defender выберите подраздел Real-Time Protection (или создайте его), а в нем создайте параметры с именами DisableIOAVProtection и DisableRealtimeMonitoring
6) Дважды кликните по каждому из этих параметров и задайте значение 1.
7) В разделе Windows Defender создайте подраздел Spynet, в нем создайте параметры DWORD32 с именами DisableBlockAtFirstSeen (значение 1), LocalSettingOverrideSpynetReporting (значение 0), SubmitSamplesConsent(значение 2).
Это действие отключает проверку в облаке и блокировку неизвестных программ.
Готово. После этого можно закрывать редактор реестра. Защитник Windows почти отключен. Осталось небольшое действие.
Переходим в «Диспетчер задач», вкладка «Автозагрузка» и отключаем «Windows Defender», перезагружаем компьютер и радуемся. Защитник полностью отключён.
По ошибкам:
Вы могли почитать статьи по ссылкам или я напишу ниже.
Код программы не идеален, но всё же работает и с результатом!
Программу запускать от имени Администратора ОБЯЗАТЕЛЬНО!
Ещё один момент. Если после выполнения всех действий блокируется только «Мониторинг», то при указании значений просто уберите кавычки.
Пример: Registry.SetValue(keyName1, «DisableBlockAtFirstSeen», «1»); заменить на Registry.SetValue(keyName1, «DisableBlockAtFirstSeen», 1); Последний параметр передаём без кавычек. От этого изменится тип данных в реестре на DWORD (Двойное слово).
Почему это дополнение к предыдущему ответу?
Потому, что в предыдущем ответе останавливают процесс не руками. В моём случае этого не избежать, но можно совместить оба ответа в единый. Тогда Защитник будет и остановлен и вообще заблокирован и никогда больше не включится (если Вы сами этого не захотите).
Вот пример кусочка кода для Visual C# Express 2010
Событие по щелчку на кнопку
public void button_Click(object sender, EventArgs e)
{
 const string userRoot = "HKEY_LOCAL_MACHINE";
 const string subkey = @"SOFTWAREPoliciesMicrosoftWindows Defender";
 const string keyName = userRoot + "\" + subkey;

 Registry.SetValue(keyName, "DisableAntiSpyware", 1);
 Registry.SetValue(keyName, "AllowFastServiceStartup", 0);
 Registry.SetValue(keyName, "ServiceKeepAlive", 0);

 //и так далее, как выше изложено, проходимся по оставшимся веткам и ключам
}
Ну и добавить автоматическую остановку процесса «защитника».
Внимание, если Вы будете использовать этот код, например, в Visual Studio, то можете столкнуться с ошибками т.к. там обращение к реестру происходит несколько иначе (я уже пробовал).
Windows Defender Antivirus is the built-in antimalware program in Windows. Windows Defender is installed by default on all Windows operating systems to protect from viruses, worms, Trojans, and other types of malicious software. Windows Defender is productive enough and has low system requirements. It can be updated online from the Microsoft website or an internal WSUS server. This allows you to use it not only on home computers but also on SMB and enterprise networks. In this article, we will take a closer look at how to manage different settings and enable/disable Windows Defender using PowerShell.
The main advantage of the Defender is that it is easy to use, it’s already pre-installed in Windows 10 and 11, enabled by default, and practically doesn’t need manual configuration.

In Windows 11, all Windows Defender features are available in the modern Settings panel through the Windows Security app (you can open it via Settings > Update & Security > Windows Security or by using the quick access UTI command ms-settings:windowsdefender).

To manage Windows Defender from the Windows Security GUI, you must have the Microsoft.SecHealthU UWP app installed on your computer. Check UWP application status using PowerShell:
Get-AppxPackage Microsoft.SecHealthUI -AllUsers|select Name, Status

Tip. At the moment, Windows Defender is a part of the only desktop Windows OS and not available in the current versions of Windows Server. Although, in the latest Windows Server 2016/2019, Windows Defender can be installed as an additional server feature using the command:
Install-WindowsFeature-Name Windows-Server-Antimalware
In most cases, Windows Defender works well with the default settings, but sometimes the user needs to change its behavior. A large number of settings available from the PowerShell console: through a built-in module Defender. It appeared first time in PowerShell 4.0 and was designed specifically for Windows Defender management. This module contains 11 cmdlets, which we are reviewing today.
To display a list of cmdlets contained in the Defender module, run the following command:
Get-Command -Module Defender

- Add-MpPreference — used to change Windows Defender settings;
- Get-MpComputerStatus — allows you to get the status of anti-virus software on your computer;
- Get-MpPreference — used to get Windows Defender scan and update options;
- Get-MpThreat — view the history of detected threats on your computer;
- Get-MpThreatCatalog — allows you to get known threats from the definitions directory;
- Get-MpThreatDetection — displays a list of active and recent threats detected on the computer;
- Remove-MpPreference — allows you to remove Windows Defender settings or exceptions;
- Remove-MpThreat — allows you to remove active threats from your computer;
- Set-MpPreference — used to change scan and update options;
- Start-MpScan — runs a computer scan;
- Update-MpSignature — anti-virus definition database update;
- Start-MpWDOScan — runs a Windows Defender offline scan;
To get full help on a specific cmdlet of the Defender module, use the Get-Help command:
Get-Help Start-MpScan –Full
If you need only examples of PowerShell commands, run:
Get-Help Add-MpPreference -Examples
How to Check if Windows Defender is Running?
Before using PowerShell cmdlets to control Windows Defender, it is advisable to check if the service is running. You can use PowerShell to check service status of Microsoft Defender Antivirus Service (WinDefend), Windows Security Service (SecurityHealthService), and Security Center (wscsvc):
Get-Service Windefend, SecurityHealthService, wscsvc| Select Name,DisplayName, Status

Get-MpComputerStatus allows you to display the current status of Windows Defender: enabled options, virus definition date and version, last scan time, and others.

AMEngineVersion : 1.1.19000.8
AMProductVersion : 4.18.2202.4
AMRunningMode : Normal
AMServiceEnabled : True
AMServiceVersion : 4.18.2202.4
AntispywareEnabled : True
AntispywareSignatureAge : 0
AntispywareSignatureLastUpdated : 3/24/2022 10:07:00 PM
AntispywareSignatureVersion : 1.361.711.0
AntivirusEnabled : True
AntivirusSignatureAge : 0
AntivirusSignatureLastUpdated : 3/24/2022 10:07:00 PM
AntivirusSignatureVersion : 1.361.711.0
BehaviorMonitorEnabled : True
ComputerID : 3DA6BCF53-D12A-2A2E-BA21-FE9C54C1092D
ComputerState : 0
DefenderSignaturesOutOfDate : False
DeviceControlDefaultEnforcement : Unknown
DeviceControlPoliciesLastUpdated : 3/22/2022 7:26:44 AM
DeviceControlState : Disabled
FullScanAge : 4294967295
FullScanEndTime :
FullScanOverdue : False
FullScanRequired : False
FullScanSignatureVersion :
FullScanStartTime :
IoavProtectionEnabled : True
IsTamperProtected : True
IsVirtualMachine : False
LastFullScanSource : 0
LastQuickScanSource : 2
NISEnabled : True
NISEngineVersion : 1.1.19000.8
NISSignatureAge : 0
NISSignatureLastUpdated : 3/24/2022 10:07:00 PM
NISSignatureVersion : 1.361.711.0
OnAccessProtectionEnabled : True
ProductStatus : 524288
QuickScanAge : 2
QuickScanEndTime : 3/22/2022 7:28:21 AM
QuickScanOverdue : False
QuickScanSignatureVersion : 1.361.478.0
QuickScanStartTime : 3/22/2022 7:26:43 AM
RealTimeProtectionEnabled : True
RealTimeScanDirection : 0
RebootRequired : False
TamperProtectionSource : Signatures
TDTMode : N/A
TDTStatus : N/A
TDTTelemetry : N/A
PSComputerName :
To quickly check if Windows Defender is running on your computer and find out the last antivirus definition update date, run the following PowerShell command:
Get-MpComputerStatus | Select-Object -Property Antivirusenabled,AMServiceEnabled,AntispywareEnabled,BehaviorMonitorEnabled,IoavProtectionEnabled,NISEnabled,OnAccessProtectionEnabled,RealTimeProtectionEnabled,AntivirusSignatureLastUpdated

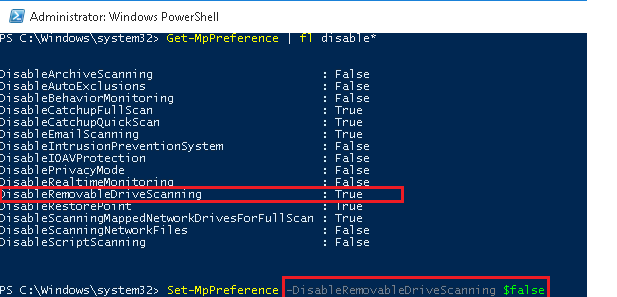
To display current Windows Defender settings, you can use cmdlet Get-MpPreference. To change the settings, use the Set-MpPreference.
In the Windows Defender settings, the IPS, removable disk check, email, and some other checks are disabled by default. For example, you need to enable the scanning of removable drives. Let’s get the current settings using the command:
Get-MpPreference | fl disable*
In Windows 11 the following Windows Defender features are disabled by default:
- DisableCatchupFullScan.
- DisableCatchupQuickScan.
- DisableCpuThrottleOnIdleScans.
- DisableEmailScanning.
- DisableRemovableDriveScanning.
- DisableRestorePoint.
- DisableScanningMappedNetworkDrivesForFullScan.
- EnableFileHashComputation.
- EnableFullScanOnBatteryPower.
- EnableLowCpuPriority.
As you can see, scanning of removable drives is disabled (DisableRemovableDriveScanning = True). Turn it on using the following command:
Set-MpPreference -DisableRemovableDriveScanning $false

Also, you can disable some types of Windows Defender scanning. By defaults, Windows Defender scans the archive files (RAR, ZIP, CAB), which can potentially contain malicious files. You can disable archive files scanning using the command:
Set-MpPreference -DisableArchiveScanning $True
 .
.
Make sure the new setting is applied:
Get-MpPreference|select DisableArchiveScanning

After that, the Windows Defender will stop scanning all opened archive files in real-time.
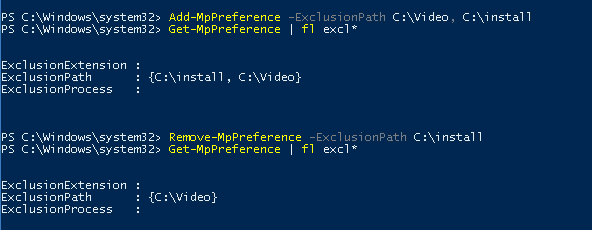
Also, to change or remove the antivirus exclusion settings, you can use the Add-MpPreference and Remove-MpPreference cmdlets. For example, let’s add some folder paths to the antivirus exclusions:
Add-MpPreference -ExclusionPath C:Video, C:install
Display a list of path exceptions for Windows Defender:
Get-MpPreference | fl excl*
To exclude anti-virus scanning of certain processes, run the following command:
Set-MpPreference -ExclusionProcess "word.exe", "vmwp.exe"
To remove an exception for a specific folder:
Remove-MpPreference -ExclusionPath C:install

Windows Defender has a hidden function to protect against unwanted programs (Potentially Unwanted Program — PUP, Potentially Unwanted Application — PUA). By default, it is accessible only in Windows 10/11 Enterprise edition, but with the help of the following command you can enable PUP/PUA protection in any Windows 10 edition:
Set-MpPreference -PUAProtection 1
After you turn on protection, when you try to launch or install potentially unwanted programs on your computer, you will receive the following notification from Defender in Windows 10.
Windows Defender took action
Your settings caused Windows Defender Antivirus to block an app that may potentially perform unwanted actions on your device.

Use PowerShell to Update Windows Defender Signatures
To start the antivirus signature update, you can use the command Update-MpSignature. By default, the Windows Defender receives updates from online Microsoft Update Servers. You can use the UpdateSource argument to specify where you want to receive the virus definition updates from.
The following virus definition sources are available:
- MicrosoftUpdateServer;
- MMPC Microsoft Malware Protection Center;
- FileShares;
- InternalDefinitionUpdateServer — internal WSUS server.
To update antivirus from a network shared folder on a Windows file server you need to download the necessary definition update files and place them into a shared network folder. Then you have to specify that Windows Defender should be updated from a file share source (use UNC path):
Set-MpPreference -SignatureDefinitionUpdateFileSharesSources \DESKTOP-V20E3POUpdates
To run virus update and malware definitions manually:
Update-MpSignature -UpdateSource FileShares

Update-MpSignature

In some cases, after receiving an incorrect update, Windows Defender may not work correctly. In this case, it is recommended to reset the current thread definition databases and reload them from source:
"%PROGRAMFILES%Windows DefenderMPCMDRUN.exe" -RemoveDefinitions -All

"%PROGRAMFILES%Windows DefenderMPCMDRUN.exe" –SignatureUpdate
How to Perform Virus Scan with Microsoft Defender?
To perform an antivirus scanning of your computer, use the Start-MpScan cmdlet. With the ScanType argument, you can choose one of three scan modes:
- FullScan — scan is performed for all files on your computer, as well as the system registry and currently running apps;
- QuickScan — analysis of only those areas that are most likely may be infected by malware (registry, active RAM, system folders);
- CustomScan — user selects the folders and drives to scan.
For example, run a custom scan to check the system folder “C:Program Files”:
Start-MpScan -ScanType CustomScan -ScanPath ”C:Program Files”
![]()
You can perform a full computer scan by Windows Defender using the command:
Start-MpScan -ScanType FullScan
Or quick threats scan:
Start-MpScan -ScanType QuickScan
To remove all active threat on your computer, use the command:
Remove-MpThreat
All Defender module cmdlets can be performed both for the local and remote computers. To connect to a remote computer, you need to use the CimSession option. For example, to get the date of the last scan from the remote computer with hostname lnd_wks21, run the following commands (WinRM must be enabled):
$session = NewCimSession -ComputerName lnd_wks21

Get-MpComputerStatus -CimSession $session | fl fullscan*
You can use the Start-MpWDOScan cmdlet to perform an offline scan with Windows Defender.
After executing this command, your operating system will automatically reboot. Windows Defender will start in a special boot environment and scan your device for threats before your Windows boots.

How to Disable and Remove Windows Defender using PowerShell?
If you want to disable Defender real-time protection:
Set-MpPreference -DisableRealtimeMonitoring $true
To completely disable Windows Defender on a computer, use the command:
New-ItemProperty -Path “HKLM:SOFTWAREPoliciesMicrosoftWindows Defender” -Name DisableAntiSpyware -Value 1 -PropertyType DWORD -Force

On Windows client-based operating system (like Windows 10/Windows 8.1) you cannot completely uninstall the Windows Defender feature. The only available option is to disable it using the registry key DisableAntiSpyware = 1 or using the Local Group Policy Editor.
- Run the gpedit.msc console;
- Go to the following GPO section: Computer Configuration > Administrative Templates > Windows Components > Microsoft Defender Antivirus;
- Find the parameter named Turn off Windows Defender Antivirus on the right pane;
- Change its value to Enabled;

- In the same way disable the following Group Policy setting in the Real-time Protection section: Turn off real time protection = Disabled;
- To apply new settings, update local Group Policy settings on a computer using the gpupdate command:
gpupdate /force

In Windows 11, before disabling Windows Defender through the registry or a GPO, you must manually disable the Tamper Protection feature. Tamper Protection prevents changes to Windows Defender security features via PowerShell, registry settings, and/or Group Policy options. Tamper Protection is enabled in Windows 11 by default. You can check this option state using PowerShell:
Get-MpComputerStatus | select IsTamperProtected
You can only disable it using the Windows Security app. Go to “Virus & Threat Protection” > click “Manage Settings” > scroll down to “Tamper Protection” and move the slider to the “Off” position.

Confirm this action at the UAC prompt. Note that the following message has appeared:
Tamper protection is off. Your device may be vulnerable.

You can uninstall Windows Defender on Windows Server 20162019 using PowerShell. Just run the following command in the elevated PowerShell session:
Uninstall-WindowsFeature -Name Windows-Defender –whatif
Or use the DISM tool:
Dism /online /Disable-Feature /FeatureName:Windows-Defender /Remove /NoRestart /quiet
How to Reset Windows Defender to Default?
You can reset all Windows Defender settings using the Windows Security App.
- Press the Start button and type: Windows Security;
- Select the App settings;

- Scroll down to the Reset button and click on it;
- The following warning will appear: “This will permanently delete the app’s data on this device, including your preferences and sign-in details”. Confirm it by pressing the Reset button.


- About
- Latest Posts

I enjoy technology and developing websites. Since 2012 I’m running a few of my own websites, and share useful content on gadgets, PC administration and website promotion.
Microsoft has integrated Microsoft Defender Anitvirus in Windows 11 or Windows 10, and while it is easy to turn off or disable Windows Defender or Microsoft Defender as it is now called, it is not possible to uninstall it.
If you install any other 3rd-party antivirus software, Microsoft Defender will automatically take a back seat and disable itself. If the 3rd-party antivirus stops functioning for some reason, it will automatically activate itself. This is good. Nevertheless, if you feel the need to disable it completely, you may do so via its Settings, Registry, GPEDIT as well as disable its Services.
You can disable or turn off Microsoft Defender via:
- Windows Security UI
- Windows Services Manager
- Group Policy
- Registry Editor
- PowerShell
- Command line
- Using free tool
- Windows Defender UI.
Let us see how to do it.
1] Using Windows Security
Windows 11/10 users have to do this. Open Windows Security.

Navigate to Virus & Threat Protection > Virus & Threat Protection settings and toggle the switch against Real-time protection.
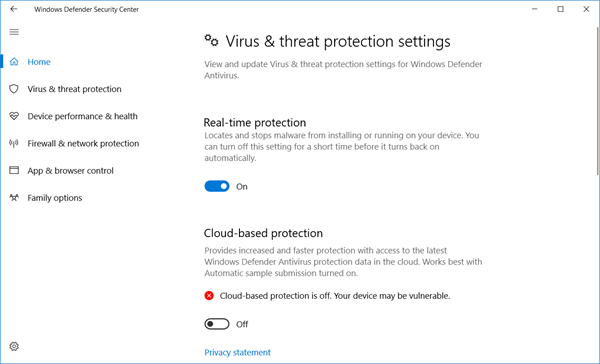
Make sure Real-time protection and Cloud-based Protection is turned off.
Also, toggle Tamper Protection and any other settings you see there to Off.
2] Disable Windows Defender Service using Service Manager
Type services.msc in taskbar search bar and hit Enter to open Services Manager.
Change the startup type of the Windows Defender Service from Automatic to Disabled.
Also, disable the WdNisSvc or Windows Defender Network Inspection Service.
3] Using Group Policy Editor
If your Windows has Group Policy Editor, Run gpedit.msc and navigate to and Enable the following setting:
Local Computer Policy > Computer Configuration > Administrative Templates > Windows Components > Microsoft Defender Antivirus > Turn off Windows Defender.
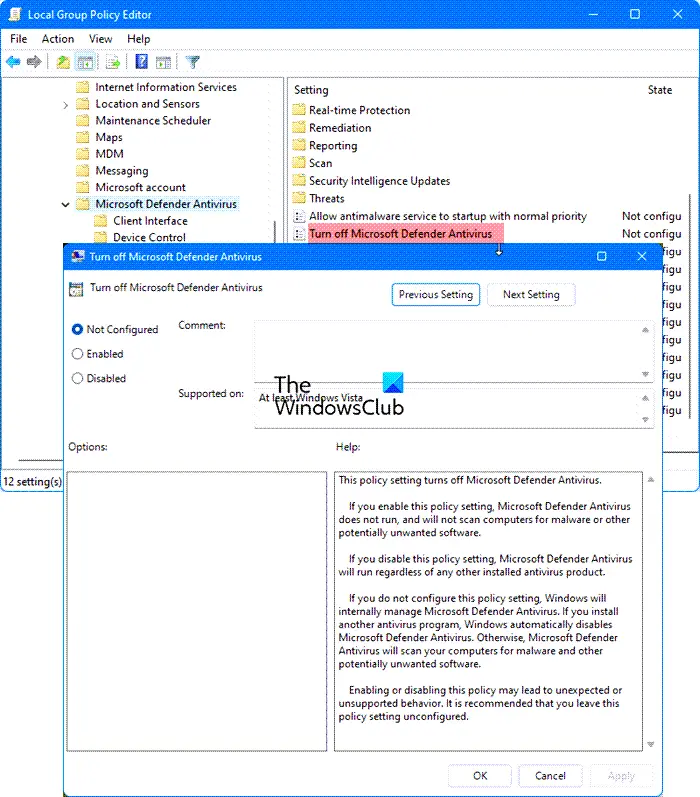
This policy setting turns off Microsoft Defender Antivirus.
If you enable this policy setting, Microsoft Defender Antivirus does not run, and will not scan computers for malware or other potentially unwanted software.
If you disable this policy setting, Microsoft Defender Antivirus will run regardless of any other installed antivirus product.
If you do not configure this policy setting, Windows will internally manage Microsoft Defender Antivirus. If you install another antivirus program, Windows automatically disables Microsoft Defender Antivirus. Otherwise, Microsoft Defender Antivirus will scan your computers for malware and other potentially unwanted software.
Enabling or disabling this policy may lead to unexpected or unsupported behavior. It is recommended that you leave this policy setting unconfigured.
Reboot your computer.
4] Using Registry Editor
UPDATE: It appears that Microsoft has disabled this DisableAntiSpyware Registry key and so this may not work now.
Run regedit and navigate to the following key:
HKEY_LOCAL_MACHINESOFTWAREPoliciesMicrosoftWindows Defender
Set the value of DWORD called DisableAntiSpyware to 1 to disable Windows Defender.
5] Using PowerShell command
Use the following Powershell command to disable Windows Defender:
Set-MpPreference -DisableRealtimeMonitoring $true
To re-enable it:
Set-MpPreference -DisableRealtimeMonitoring $false
6] Using Command line
To disable it in an elevated CMD use:
sc config WinDefend start= disabled
sc stop WinDefend
To re-enable it use:
sc config WinDefend start= auto
sc start WinDefend
7] Using a free tool
Defender Control and Confifyre Defender are two free tools that let you disable Microsoft Defender permanently on Windows 11/10.
8] Using Windows Defender Settings UI
To disable Windows Defender in Windows 8, Windows 7 and Windows Vista, open Windows Defender > Tools > Options.
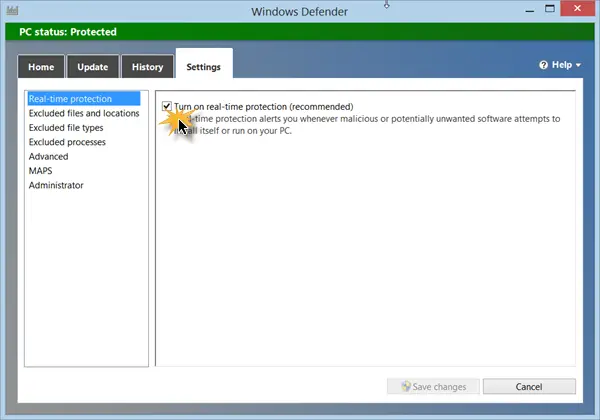
Now uncheck Use Real Time Protection checkbox and also Use Windows Defender under Administrative Options check box. Click on Save.
Uninstall Windows Defender
Though I have not tried this personally, there is one way being recommended on the internet. It is said to have worked, for some. This was known to work in Windows XP – but not in Windows 7 and later. Create a system restore point and the Run the following from an elevated command prompt:
msiexec /uninstall windowsdefender.msi /quiet /log uninstall.log
I must add that I do not advise trying to uninstall Windows Defender, as uninstalling/deleting Windows Defender in Windows is known to cause other irritants later on since it is well-integrated with the OS.
In Windows 11/10, Microsoft Defender is far improved and now includes complete anti-malware protection.
See this post if you want to know how to start Windows Defender manually and this one if Windows Defender will not turn off even when 3rd party AntiVirus is installed.
Ported from WVC.
Microsoft has integrated Microsoft Defender Anitvirus in Windows 11 or Windows 10, and while it is easy to turn off or disable Windows Defender or Microsoft Defender as it is now called, it is not possible to uninstall it.
If you install any other 3rd-party antivirus software, Microsoft Defender will automatically take a back seat and disable itself. If the 3rd-party antivirus stops functioning for some reason, it will automatically activate itself. This is good. Nevertheless, if you feel the need to disable it completely, you may do so via its Settings, Registry, GPEDIT as well as disable its Services.
You can disable or turn off Microsoft Defender via:
- Windows Security UI
- Windows Services Manager
- Group Policy
- Registry Editor
- PowerShell
- Command line
- Using free tool
- Windows Defender UI.
Let us see how to do it.
1] Using Windows Security
Windows 11/10 users have to do this. Open Windows Security.
Navigate to Virus & Threat Protection > Virus & Threat Protection settings and toggle the switch against Real-time protection.
Make sure Real-time protection and Cloud-based Protection is turned off.
Also, toggle Tamper Protection and any other settings you see there to Off.
2] Disable Windows Defender Service using Service Manager
Type services.msc in taskbar search bar and hit Enter to open Services Manager.
Change the startup type of the Windows Defender Service from Automatic to Disabled.
Also, disable the WdNisSvc or Windows Defender Network Inspection Service.
3] Using Group Policy Editor
If your Windows has Group Policy Editor, Run gpedit.msc and navigate to and Enable the following setting:
Local Computer Policy > Computer Configuration > Administrative Templates > Windows Components > Microsoft Defender Antivirus > Turn off Windows Defender.
This policy setting turns off Microsoft Defender Antivirus.
If you enable this policy setting, Microsoft Defender Antivirus does not run, and will not scan computers for malware or other potentially unwanted software.
If you disable this policy setting, Microsoft Defender Antivirus will run regardless of any other installed antivirus product.
If you do not configure this policy setting, Windows will internally manage Microsoft Defender Antivirus. If you install another antivirus program, Windows automatically disables Microsoft Defender Antivirus. Otherwise, Microsoft Defender Antivirus will scan your computers for malware and other potentially unwanted software.
Enabling or disabling this policy may lead to unexpected or unsupported behavior. It is recommended that you leave this policy setting unconfigured.
Reboot your computer.
4] Using Registry Editor
UPDATE: It appears that Microsoft has disabled this DisableAntiSpyware Registry key and so this may not work now.
Run regedit and navigate to the following key:
HKEY_LOCAL_MACHINESOFTWAREPoliciesMicrosoftWindows Defender
Set the value of DWORD called DisableAntiSpyware to 1 to disable Windows Defender.
5] Using PowerShell command
Use the following Powershell command to disable Windows Defender:
Set-MpPreference -DisableRealtimeMonitoring $true
To re-enable it:
Set-MpPreference -DisableRealtimeMonitoring $false
6] Using Command line
To disable it in an elevated CMD use:
sc config WinDefend start= disabled
sc stop WinDefend
To re-enable it use:
sc config WinDefend start= auto
sc start WinDefend
7] Using a free tool
Defender Control and Confifyre Defender are two free tools that let you disable Microsoft Defender permanently on Windows 11/10.
8] Using Windows Defender Settings UI
To disable Windows Defender in Windows 8, Windows 7 and Windows Vista, open Windows Defender > Tools > Options.
Now uncheck Use Real Time Protection checkbox and also Use Windows Defender under Administrative Options check box. Click on Save.
Uninstall Windows Defender
Though I have not tried this personally, there is one way being recommended on the internet. It is said to have worked, for some. This was known to work in Windows XP – but not in Windows 7 and later. Create a system restore point and the Run the following from an elevated command prompt:
msiexec /uninstall windowsdefender.msi /quiet /log uninstall.log
I must add that I do not advise trying to uninstall Windows Defender, as uninstalling/deleting Windows Defender in Windows is known to cause other irritants later on since it is well-integrated with the OS.
In Windows 11/10, Microsoft Defender is far improved and now includes complete anti-malware protection.
See this post if you want to know how to start Windows Defender manually and this one if Windows Defender will not turn off even when 3rd party AntiVirus is installed.
Ported from WVC.
Защитник Windows (Windows Defender) — программный продукт компании Microsoft, предназначенный для защиты от вредоносных программ. Впервые Defender появился как антивирусная утилита в Windows XP, а начиная с Vista он встроен в операционную систему и является ее неотъемлемой частью. В Windows 8 Defender объединен с другим антивирусным продуктом Microsoft Security Essentials, так что на данный момент он представляет собой полноценный антивирус.
Windows Defender достаточно производителен и нетребователен к ресурсам. Он умеет обновляться с внутреннего сервера обновлений WSUS, так что его вполне можно использовать не только на домашних компьютерах, но и в корпоративных сетях. Но основным достоинством Defender является простота использования, ведь он уже имеется в системе, включен по умолчанию и практически не требует настройки.
В большинстве случаев Defender неплохо работает с настройками по умолчанию, однако иногда их все же требуется изменить. Наибольшее количество настроек доступно из консоли PowerShell, где для этих целей есть специальный модуль Defender. Он появился в PowerShell 4.0 и предназначен для управления Windows Defender. В него входит 11 командлетов, которые мы сегодня и рассмотрим.

Get-MpComputerStatus выводит данные о состоянии антивируса — включенные опции, дату обновления и версии антивирусных баз, расписание и дату последней проверки и многое другое.

Для вывода настроек Defender можно использовать командлет Get-MpPreference, а для изменения — соответственно Set-MpPreference. Например, нам надо включить сканирование съемных дисков. Выведем текущие настройки сканирования командой:
Get-MpPreference | fl disable*
Параметр DisableRemovableDriveScanning имеет значение True, т.е. сканирование съемных дисков отключено. Включим его командой:
Set-MpPreference -DisableRemovableDriveScanning $false

Также для добавленияудаления новых параметров можно использовать командлеты Add-MpPreference и Remove-MpPreference. Для примера добавим в исключения антивируса пару папок:
Add-MpPreference -ExclusionPath C:Temp, C:Windows
А затем удалим одну:
Remove-MpPreference -ExclusionPath C:Windows

Запуск обновления производится командлетом Update-MpSignature. По умолчанию для обновления Defender использует дефолтные настройки компьютера, но с помощью параметра UpdateSource можно указать, откуда именно забирать обновления. Для него можно указать следующие значения:
InternalDefinitionUpdateServer — внутренний сервер обновлений (WSUS);
MicrosoftUpdateServer — сервер обновлений Microsoft;
MMPC — Microsoft Malware Protection Center;
FileShares — файловая шара.
Для примера запустим обновление и укажем в качестве источника Microsoft Malware Protection Center:
Update-MpSignature -UpdateSource MMPC

Примечание. Если вы хотите указать в качестве источника файловую шару, то надо предварительно скачать необходимые обновления в Microsoft Malware Protection Center и поместить их в сетевую папку, после чего прописать путь к папке в настройках антивируса. Сделать это можно командой:
Set-MpPreference -SignatureDefinitionUpdateFileSharesSources \servershare
Для запуска сканирования предназначен командлет Start-MpScan. Тип сканирования задается параметром ScanType, который может принимать одно из трех значений:
FullScan — полная проверка. Выполняется проверка всех файлов на компьютере, а также системного реестра и запущенных в текущий момент программ;
QuickScan — быстрая проверка. Производится анализ только тех областей, которые наиболее вероятно могут быть заражены вредоносными программами;
CustomScan — выборочная проверка. Предоставляется возможность выбрать область для сканирования.
Для примера запустим выборочную проверку системной папки Windows командой:
Start-MpScan -ScanType CustomScan -ScanPath C:Windows

Стоит упомянуть, что все командлеты могут выполняться не только локально, но и удаленно. Для этого он имеют параметр CimSession. Для примера посмотрим дату последней проверки на удаленном компьютере wks81:
$session = NewCimSession -ComputerName wks81
Get-MpComputerStatus -CimSession $session | fl fullscan*

В заключение несколько замечаний.
• На данный момент Windows Defender входит в состав только клиентских ОС. В текущих серверных версиях Windows он отсутствует, хотя в недавно появившейся бета-версии Windows Server его можно установить как серверную фичу (features);
• По умолчанию PowerShell 4.0 (в который входит модуль Defender) есть только в Windows 8.1Server 2012 R2. Для Windows 7, Windows Server 2008R22012 его можно загрузить здесь: http://www.microsoft.com/en-us/download/details.aspx?id=40855;
• Более подробное описание всех командлетов Windows Defender и их параметров можно найти здесь: http://technet.microsoft.com/en-us/library/dn433280.aspx.