Последнее обновление Ноя 12, 2021
Чтобы исправить различные проблемы с ПК, мы рекомендуем DriverFix: это программное обеспечение будет поддерживать ваши драйверы в рабочем состоянии, тем самым защищая вас от распространенных компьютерных ошибок и сбоев оборудования. Проверьте все свои драйверы сейчас за 3 простых шага:
- Загрузите DriverFix (проверенный файл загрузки).
- Нажмите «Начать сканирование», чтобы найти все проблемные драйверы.
- Нажмите «Обновить драйверы», чтобы получить новые версии и избежать сбоев в работе системы.
- DriverFix в этом месяце скачали 502 786 читателей.
Pro версии Windows, поставляется с Hyper-V, то собственная виртуальная машина решение от Microsoft встроенный в Windows. Однако, если вы включаете Hyper-V, он также включает Credential Guard в Защитнике Windows.
А что, если вы хотите отключить Credential Guard в Windows 10?
Вам может потребоваться отключить Credential Guard, чтобы убедиться, что другие решения виртуальных машин, такие как VMware, работают нормально, что невозможно при запущенной Credential Guard.
В этой статье мы расскажем, как отключить Credential Guard в Windows 10 для запуска VMware и Hyper-V.
Как отключить Credential Guard для запуска Hyper-V и VMware:
1 Отключите Credential Guard на панели управления.
Включить Hyper-V
Примечание. Если у вас уже включен Hyper-V, перейдите ко второму шагу ниже.
- Нажмите «Windows Key + R», чтобы открыть «Выполнить».
- Введите control и нажмите OK, чтобы открыть панель управления.
- В Панели управления выберите «Программы»> «Программы и компоненты».
- На левой панели щелкните ссылку «Включение или отключение компонентов Windows ».

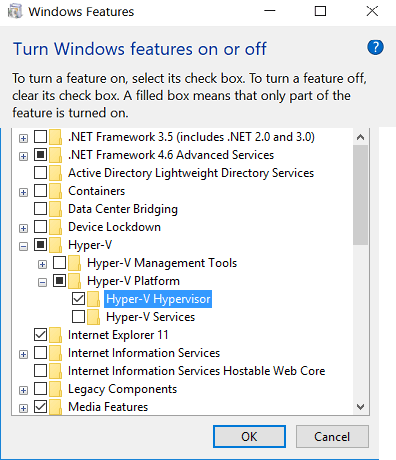
- В окне «Компоненты Windows» отметьте «Hyper-V» и нажмите «ОК».
- Если вы используете Windows 10 более ранней версии, чем 1607, установите флажок Hyper-V Hypervisor, а также вариант изолированного режима пользователя.
- Щелкните ОК, чтобы сохранить изменения.
- Windows предложит перезагрузить компьютер. Нажмите «Перезагрузить», чтобы установить Hyper-V.


Отключить Credential Guard
- Нажмите Windows Key + R, чтобы открыть Выполнить.
- Введите gpedit.msc и нажмите ОК. Откроется редактор групповой политики.
- В редакторе групповой политики перейдите в следующее расположение:
Конфигурация компьютера -> Административные шаблоны -> Система -> Device Guard. - Выберите Device Guard.
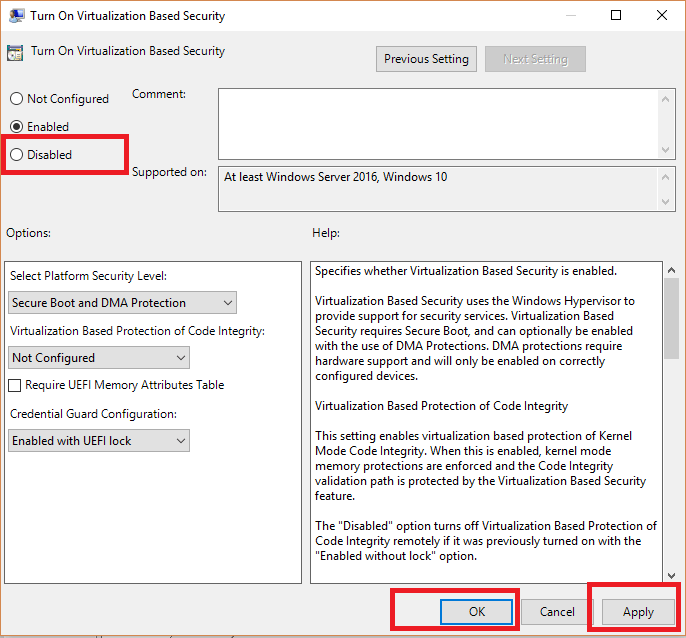
- На правой панели дважды щелкните политику «Включить безопасность на основе виртуализации ».
- В новом диалоговом окне выберите опцию Disabled / Not Configured.
- Щелкните ОК, чтобы сохранить изменения.
- Закройте редактор групповой политики.
- Перезагрузите компьютер, чтобы изменения вступили в силу.
- После перезагрузки вы можете без проблем работать как с Hyper-V, так и с VMware.

Если проблема не исчезнет, откройте окно «Возможности Windows» еще раз, начиная с шага 1, затем отмените выбор Hyper-V и перезагрузите компьютер.
Хотите узнать, как удалить виртуальные диски в Windows 10? Прочтите эту статью.
2 Diable Hyper-V с помощью команды PowerShell
- Если вы получаете сообщение «WMware Player и устройство / Credential Guard несовместимы. VMware Player можно запустить после отключения ошибки «Устройство / Credential Guard»; первый способ должен помочь.
- Однако, если проблема не исчезнет, вы можете отключить Hyper-V с помощью команды PowerShell.
- Щелкните правой кнопкой мыши «Пуск» и выберите «Windows PowerShell (Admin)».
- В окне PowerShell введите следующую команду, чтобы отключить Hyper-V.
bcdedit / установить гипервизор - Теперь попробуйте перезапустить VMware и проверьте, устранена ли ошибка.

Включение Hyper-V с помощью PowerShell
- Если вы хотите включить Hyper-V, используйте следующую команду.
bcdedit / установить гипервизор - Это включит Hyper-V на вашем компьютере.
Первый способ отключить Credential Guard рекомендуется, если вы хотите запускать на своем компьютере виртуальные машины Hyper-V и VMware.
Однако команда PowerShell может отключить Hyper-V без необходимости устанавливать / удалять его из компонентов Windows.
Источник записи: windowsreport.com

В последних обновлениях Windows 10 по умолчанию включен Windows Defender Credential Guard (Защитник Windows Защита учетной записи) и может получиться так, что ранее подготовленные виртуальные машины не запускаются в VMware Workstation или Hyper-V.
Не буду останавливаться на том, что это за технологии, т.к. цель данной заметки — просто и надежно отключить новый функуионал безопасности и тем самым исправить ошибку: «VMware Workstation and Device/Credential Guard are not compatible. VMware Workstation can be run after disabling Device/Credential Guard«.

При запуске несовместимой VM, появляется данное предупреждение и сразу же есть ссылка на официальный мануал по устранению этой проблемы. Там пошагово описан процесс включения и отключения Защиты учетной записи, но самый быстрый и безопасный вариант спрятан в самом конце заметки — что ж исправим ситуацию.
- Скачиваем официальны набор скриптов — Windows Defender Credential Guard hardware readiness tool — microsoft.com/en-us/download/details.aspx?id=53337 ;
- Распаковываем содержимое архива в удобную директорию;
- Запускаем Power Shell от имени администратора, переходим в папку с распакованным скриптом;
- Запускаем скрипт с нужными ключами (при необходимости подтверждаем выполнение операции — R).
В нашем примере используется ключ автоматической перезагрузки системы:
./DG_Readiness_Tool_v3.6.ps1 -Disable -AutoReboot

После перезагрузки можем как и прежде запускать виртуальные машины в VMware Workstation в нашей любимой Windows 10 😉
Today, in this post, we will see how to enable or turn on Credential Guard in Windows 11/10 using Group Policy. Credential Guard is one of the main security features available with Windows 11/10. It allows protection against the hacking of domain credentials, thereby preventing hackers from taking over the enterprise networks.
What does Credential Guard do?
Credential Guard is one of the main security features available with Windows 11/10. It allows protection against hacking of domain credentials thereby preventing hackers from taking over the enterprise networks. With features like Device Guard and Secure Boot, Windows 11/10 is more secure than any of the previous Windows operating systems.

Credential Guard is available only in Windows 11/10 Enterprise Edition. So if you are using Pro or Education, you won’t get to see this feature on your version of Windows. Moreover, Your machine should be supporting Secure Boot and 64-bit virtualization.
To enable or turn on Credential Guard, Open Run, type gpedit.msc and hit Enter to open the Group Policy Editor.
Now navigate to the following setting:
Computer Configuration > Administrative Templates > System > Device Guard
Now, double-click Turn On Virtualization Based Security, and then select Enabled.
Under Options, select Platform Security Level box, choose Secure Boot or Secure Boot and DMA Protection.
Under Virtual Based protection of Code Integrity, select Not configured
In the Credential Guard Configuration box, click Enabled with UEFI lock and then OK. If you want to turn off Credential Guard remotely, choose Enabled without lock.
Under Secure Launch Configuration, select Not configured
Under Kernal-mode Hardware-enforced Stack Protection, select Not configured
This policy specifies whether Virtualization Based Security is enabled.
Virtualization Based Security uses the Windows Hypervisor to provide support for security services. Virtualization Based Security requires Secure Boot, and can optionally be enabled with the use of DMA Protections. DMA protections require hardware support and will only be enabled on correctly configured devices.
Virtualization Based Protection of Code Integrity
This setting enables virtualization based protection of Kernel Mode Code Integrity. When this is enabled, kernel mode memory protections are enforced and the Code Integrity validation path is protected by the Virtualization Based Security feature.
The “Disabled” option turns off Virtualization Based Protection of Code Integrity remotely if it was previously turned on with the “Enabled without lock” option.
The “Enabled with UEFI lock” option ensures that Virtualization Based Protection of Code Integrity cannot be disabled remotely. In order to disable the feature, you must set the Group Policy to “Disabled” as well as remove the security functionality from each computer, with a physically present user, in order to clear configuration persisted in UEFI.
The “Enabled without lock” option allows Virtualization Based Protection of Code Integrity to be disabled remotely by using Group Policy.
The “Not Configured” option leaves the policy setting undefined. Group Policy does not write the policy setting to the registry, and so it has no impact on computers or users. If there is a current setting in the registry it will not be modified.
The “Require UEFI Memory Attributes Table” option will only enable Virtualization Based Protection of Code Integrity on devices with UEFI firmware support for the Memory Attributes Table. Devices without the UEFI Memory Attributes Table may have firmware that is incompatible with Virtualization Based Protection of Code Integrity which in some cases can lead to crashes or data loss or incompatibility with certain plug-in cards. If not setting this option the targeted devices should be tested to ensure compatibility.
Warning: All drivers on the system must be compatible with this feature or the system may crash. Ensure that this policy setting is only deployed to computers which are known to be compatible.
Credential Guard
This setting lets users turn on Credential Guard with virtualization-based security to help protect credentials.
The “Disabled” option turns off Credential Guard remotely if it was previously turned on with the “Enabled without lock” option.
The “Enabled with UEFI lock” option ensures that Credential Guard cannot be disabled remotely. In order to disable the feature, you must set the Group Policy to “Disabled” as well as remove the security functionality from each computer, with a physically present user, in order to clear configuration persisted in UEFI.
The “Enabled without lock” option allows Credential Guard to be disabled remotely by using Group Policy. The devices that use this setting must be running at least Windows 10 (Version 1511).
The “Not Configured” option leaves the policy setting undefined. Group Policy does not write the policy setting to the registry, and so it has no impact on computers or users. If there is a current setting in the registry it will not be modified.
Secure Launch
This setting sets the configuration of Secure Launch to secure the boot chain.
The “Not Configured” setting is the default, and allows configuration of the feature by Administrative users.
The “Enabled” option turns on Secure Launch on supported hardware.
The “Disabled” option turns off Secure Launch, regardless of hardware support.
Click Apply/OK and exit.
Restart your system.
Disable or Enable Credential Guard using Registry
You need to enable virtualization-based security first as follows:
Open Registry Editor and go to the following key:
HKEY_LOCAL_MACHINESYSTEMCurrentControlSetControlDeviceGuard.
Add a new DWORD value. name it EnableVirtualizationBasedSecurity and set its value as follows:
- To enable virtualization-based security, set it to 1
- To disable virtualization-based security set it to 0
Next, add a new DWORD value named RequirePlatformSecurityFeatures.
Set the value of this registry setting to 1
- To use Secure Boot only set its value to 1
- To use Secure Boot and DMA protection, set its value to 3
Now, to enable Windows Defender Credential Guard, go to the following key:
HKEY_LOCAL_MACHINESYSTEMCurrentControlSetControlLsa
Add a new DWORD value and name it LsaCfgFlags.
- To disable Windows Defender Credential Guard, set its value to 0
- To enable Windows Defender Credential Guard with UEFI lock, set it to 1
- To enable Windows Defender Credential Guard without UEFI lock, set it to 2
Close Registry Editor and restart your computer.
You have to remember that Credential Guard will offer protection against direct hacking attempts and malware-seeking credential information. If the credential information is already stolen before you could implement Credential Guard, it won’t prevent the hackers from using the hash key on other computers in the same domain.
How do I know if Credential Guard running?
You can view System Information to check that Windows Defender Credential Guard is running on your computer. To do so, Run msinfo32.exe, and select System Information. Next, select System Summary. If you see Credential Guard mentioned next to Virtualization-based Security Services, it means it is running.
TIP: The Remote Credential Guard in Windows 11/10 protects Remote Desktop credentials.
A comprehensive guide on removing this feature from your device
by Tashreef Shareef
Tashreef Shareef is a software developer turned tech writer. He discovered his interest in technology after reading a tech magazine accidentally. Now he writes about everything tech from… read more
Updated on September 19, 2022
Reviewed by
Vlad Turiceanu

Passionate about technology, Windows, and everything that has a power button, he spent most of his time developing new skills and learning more about the tech world. Coming… read more
- Credential Guard is a Windows 10 security feature.
- Users have reported that their VMware does not work properly as long as Credential Guard is enabled.
- You can turn off Credential Guard by editing your Group Policy.
XINSTALL BY CLICKING THE DOWNLOAD FILE
This software will repair common computer errors, protect you from file loss, malware, hardware failure and optimize your PC for maximum performance. Fix PC issues and remove viruses now in 3 easy steps:
- Download Restoro PC Repair Tool that comes with Patented Technologies (patent available here).
- Click Start Scan to find Windows issues that could be causing PC problems.
- Click Repair All to fix issues affecting your computer’s security and performance
- Restoro has been downloaded by 0 readers this month.
The Pro version of Windows comes with Hyper-V, the in-house virtual machine solution from Microsoft built into Windows. However, if you enable Hyper-V, it also enables the Windows Defender Credential Guard.
Now, what if you want to disable Credential Guard in Windows 10?
You may be required to disable Credential Guard to make sure that the other virtual machine solutions like VMware operate normally, which is not possible with the Credential Guard running.
In this article, we walk you through the steps required to disable Credential Guard in Windows 10 so that you can run VMware and Hyper-V.
How can I disable Credential Guard to run Hyper-V and VMware?
1. Disable Credential Guard
The Credential Guard can be disabled on your Windows 10 device via the built-in Group Policy Editor tool. You need to modify the specific policy responsible for enabling or disabling this feature.
1. Press the Windows key + R to open Run.
2. Type gpedit.msc and click OK. This will open the Group Policy Editor.
3. In the Group Policy Editor, navigate to the following location: Computer Configuration > Administrative Templates > System > Device Guard
4. Select Device Guard.
5. On the right pane, double-click the Turn on Virtualization Based Security policy.
6. In the new dialogue box, select the Disabled or Not Configured option.
7. Click OK to save the changes.
8. Close the Group Policy Editor.
9. Restart the computer to apply the changes.
2. Enable Hyper-V
2.1 Via Windows features
- Press Windows key + R to open Run.
- Type control and click OK to open the Control Panel.
- In the Control Panel, go to Programs > Programs and Features.
- On the left pane, click on the Turn Windows features on or off link.

- In the Windows Features window, check Hyper-V and click OK.
- If you are running Windows 10 version earlier than 1607, then check Hyper-V Hypervisor as well as the Isolated User Mode option.

- Click OK to save the changes.
- Windows will prompt you to restart the computer. Click on Restart to install Hyper-V.
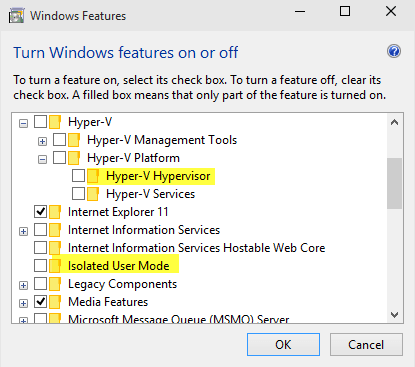
If the issue persists, open the Windows Features window again and then de-select Hyper-V and reboot the computer.
Want to know how to remove virtual drives in Windows 10? Check out our dedicated article.
2.2 Via Powershell
- If you want to turn on Hyper-V using Powershell, use the following command:
bcdedit /set hypervisorlaunchtype auto - This will enable Hyper-V on your machine.
- How to create Hyper-V virtual switch [Step-by-step guide]
- How to export Virtual Machine in VMware
- How to add network adapter to Windows 10 Hyper-V virtual machine
- 5+ best Hyper-V backup software [2022 Guide]
3. Disable Hyper-V using PowerShell command
If you get WMware Player and device/Credential Guard are not compatible. VMware Player can be run after disabling Device / Credential Guard” error, the first method should help.
However, if the issue persists, you can disable Hyper-V using a PowerShell command.
- Right-click on Start and select Windows PowerShell (Admin).
- In the PowerShell window, type the following command to disable Hyper-V:
bcdedit /set hypervisorlaunchtype off
- Now try relaunching VMware and check if the error is resolved.

The first method to disable Credential Guard is recommended if you want to run both Hyper-V and VMware virtual machines on your computer.
However, the PowerShell command can disable Hyper-V without having to install/uninstall it from Windows Features.
Let us know in the comments section below if you managed to disable the Credential Guard on your Windows 10 PC without any problems.
![]()
Newsletter
Credential Guard is one of the main security features in Windows 10. This post shows 2 ways to disable Credential Guard. In addition, you can visit MiniTool to look for more Windows solutions and tips.
What Is Credential Guard?
Credential Guard is a virtualization-based isolation technology for Local Security Authority Subsystem Service that can prevent attackers from stealing credentials. Hence, it can provide a kind of protection for your data.
The Windows Defender Credential Guard was introduced in Windows 10 Enterprise and Windows Server 2016, and Windows Server 2019. Windows Defender Credential Guard prevents these attacks by protecting NTLM password hashes, Kerberos Ticker Granting Tickets, and credentials stored by applications as domain credentials.
However, some users complain that the VMware may fail to work if the Windows Defender Credential Guard is running. Hence, they ask whether there is a possibility to disable Credential Guard.
Of course, you can do that. In the following section, we will show you 2 ways to disable Credential Guard Windows 10. Keep on your reading.
2 Ways to Disable Credential Guard
In this section, we will show 2 ways to disable device guard or Credential Guard.
Way 1. Disable Credential Guard Windows 10 via Group Policy
First of all, we will show you the first way to disable Credential Guard Windows 10. In this way, you can disable device guard or Credential Guard via Control Panel.
Now, here is the tutorial.
Enable Hyper-V
To disable Credential Guard, you need to enable Hyper-V first.
Step 1: Type Control Panel in the search box of Windows 10 and choose the best-matched one. Then choose Programs and Features to continue.
Step 2: In the left panel, choose Turn Windows features on or off to continue.

Step 3: In the Windows Feature window, check Hyper-V and click OK to continue.

Note: If your Windows 10 is earlier than Windows 10 Version 1607, you also need to check the options Hyper-V Hypervisor and Isolated User Mode.
Step 4: Then click OK to confirm the changes. After that, it may prompt you to restart your computer. So, restart the computer to continue.
After having enabled Hyper-V, you can begin to disable Credential Guard.
Disable Credential Guard
In this section, we will show you how to disable Credential Guard to continue.
Step 1: Press Windows key and R key together to open Run dialog, then type gpedit.msc in the box and click OK to continue.
Step 2: In the Local Group Policy Editor window, navigate to the following location.
Computer Configuration > Administrative Templates > System > Device Guard
Step 3: Then select Device Guard to continue.
Step 4: Then find the Turn on Virtualization Based Security on the right panel and double-click it to continue.

Step 5: Then in the pop-up window, choose Disabled to continue.

Step 6: After that, click Apply and OK to confirm the changes.
When it is finished, you have disabled Credential Guard and can work with Hyper-V as well as VMware without any issues.
Way 2. Disable Credential Guard via Registry Editor
Now, we will show you the second way to disable Credential Guard. In this way, you can disable Credential Guard via Registry Editor.
Now, here is the tutorial.
Step 1: Press Windows key and R key together to open Run dialog, then type regedit in the box and click OK to continue.
Step 2: In the Registry Editor window, navigate to the following registry key:
HKEY_LOCAL_MACHINESystemCurrentControlSetControlDeviceGuard
Step 3: Right-click on the DeviceGuard and choose New, then choose DWORD(32-bit) Value to continue.

Step 4: Name the newly created value as the EnableVirtualizationBasedSecurity and hit Enter to continue.
Step 5: Double-click it and then change its value data to 0.

Step 6: After that, right-click the DeviceGuard again, choose New, and choose DWORD(32-bit) Value to continue.
Step 7: Name the new key as RequirePlatformSecurityFeatures to continue.
Step 8: Double-click it to change its value data to 1 to use Secure Boot only or change value data to 3 to use Secure Boot and DMA protection.

Step 9: Returning to the Registry Editor window, and then navigate to the following folder.
HKEY_LOCAL_MACHINESystemCurrentControlSetControlLSA
Step 10: Right-click on LSA, select New, and choose DWORD(32-bit) Value to continue.
Step 11: Name it as the LsaCfgFlags to continue.
Step 12: Double-click it to change its value data to 0.
When you have finished all steps, close the Registry Editor window and you have successfully disabled the Credential Guard.
From above information, you can know that Credential Guard can provide protection for your data. But if it is disabled, computer would be in a risky status. So, in order to better keep computer safe, you can make a system image.
Final Words
To sum up, this post has introduced 2 ways to disable Credential Guard. So, if you want to disable Windows Defender Credential Guard for a Virtual Machine, these ways can help you out.
The Windows Defender Credential Guard, also known as Microsoft Defender Credential Guard, is a security feature in the Windows and Windows Server operating systems. Although it is there to make your credentials secure, some users are experiencing problems with it.
Some have reported that due to this feature, the Remote Desktop Connection now consistently asks for credentials, while others are experiencing problems running the VMWare hypervisor.
In this article, we are going to address what Windows Defender Credential Guard is, and how can you disable it, or enable it, if needed.
Table of contents
- What is Windows Defender Credential Guard
- Disable Windows Defender Credential Guard in Windows 10
- Enable Hyper-V
- Disable Credential Guard
- Enable Windows Defender Credential Guard in Windows 10
- Disable Windows Defender Credential Guard in Windows 11 using Group Policy
- Enable Windows Defender Credential Guard in Windows 11 using Group Policy
- Disable Windows Defender Credential Guard in Windows 11/10 from Windows Registry
- Enable Windows Defender Credential Guard in Windows 11/10 from Windows Registry
- How to Check if Windows Defender Credential Guard is Enabled or Disabled
- From System Information
- Using Windows PowerShell
- Closing Thoughts
The Credential Guard is part of Windows Security that was first introduced in Windows 10 Enterprise edition, which has now also been carried forward to Windows 11 Professional edition, amongst others.
The Windows Defender Credential Guard uses virtualization technology to isolate your credentials so that they cannot be stolen via unauthorized access. This feature prevents hackers from accessing vulnerable data and credential theft attacks, and only authorized systems can view or edit them.
It is because of this reason that users experience repeated credentials windows when trying to access remote computers via RDP.
In Windows 10, this feature is disabled by default but is automatically enabled when you enable Hyper-V. In Windows 11 Pro, this feature is enabled by default, provided that your system meets the minimum requirements.
Here is a list of the minimum hardware and software requirements for Credential Guard to be enabled:
- Support for Virtualization-based security
- Secure boot
- Trusted Platform Module (TPM) versions 1.2 or 2.0
- UEFI lock (preferred)
- 64-bit CPU
- CPU virtualization
- Windows hypervisor (does not require Hyper-V Windows Feature to be installed)
Below you’ll find the methods to enable Windows Defender Credential Guard or disable it in case it is causing.
The Credential Guard can be seen inside Windows Security inside “Device Security” under Core Isolation. However, there is no option to configure it.

Credential Guard can be enabled or disabled using Group Policy and the Windows Registry. However, in Windows 10, the method to enable it requires an additional step.
We have discussed the methods in detail below.
Disable Windows Defender Credential Guard in Windows 10
In Windows 10, the Credential Guard is automatically enabled when you enable Hyper-V, In the method below, we will show you how to disable Credential Guard while Hyper-V is still enabled.
To disable Credential Guard in Windows 10, we must first enable Hyper-V.
Enable Hyper-V
-
Open the Optional Features applet by typing in “optionalfeatures” in the Run Command box.

Open the Optional Features applet -
Select “Hyper-V” and click Ok.

Enable Hyper-V The wizard will now install Hyper-V and its components.
-
When installed, close the wizard.
Close the wizard


Now, it is time to disable Credential Guard. This can be done via the Group Policy.
Disable Credential Guard
-
Open the Group Policy editor by typing in “gpedit.msc” in the Run Command box.

Open the Group Policy editor -
Navigate to the following from the left pane:
Local Computer Policy >> Computer Configuration >> Administrative Templates >> System >> Device Guard
-
Double-click the policy “Turn On Virtualization Based Security.”

Edit VBS policy -
Select “Disabled,” then click Apply and Ok.
Disable the VBS policy -
Now run the following cmdlet in an elevated Command Prompt for the changes to take effect.
GPUpdate /Force
Enforce the Group Policies


The Windows Defender Credential Guard will now be disabled with the Hyper-V enabled.
However, if you wish to enable Credential Guard on Windows 10, follow the guide in the next section below.
Enable Windows Defender Credential Guard in Windows 10
To enable the Credential Guard in Windows 10, follow these steps:
-
First, enable Hyper-V as given in the method above.
-
Now open the Group Policy editor and navigate to the following:
Local Computer Policy >> Computer Configuration >> Administrative Templates >> System >> Device Guard
-
Double-click the policy “Turn On Virtualization Based Security.”
Edit policy -
Select “Enabled.”
-
Under the Options section, select the following settings from the drop-down menus:
-
Select Platform Security Level:
- Secure Boot and DMA Protection
-
Virtualization Based Protection of Code Integrity:
- Enabled with UEFI Lock – So the option cannot be disabled remotely, or
- Enabled without lock – Windows Defender Credential Guard can be disabled remotely.
-
Credential Guard Configuration:
- Enabled with UEFI Lock – So the option cannot be disabled remotely, or
- Enabled without lock – Windows Defender Credential Guard can be disabled remotely.
-
Secure Launch Configuration:
- Not Configured – If you choose it to be configured by your domain administrator, or
- Enabled – If you want to turn on Secure Launch, or
- Disabled – If you want to disable Secure Launch
Configure VBS to enable Credential Guard in Windows 10 -
-
Click Apply and Ok.
-
Now run the following cmdlet in an elevated Command Prompt for the changes to take effect.
GPUpdate /ForceEnforce Group Policies


Windows Defender Credential Guard will now be enabled.
There are also other methods to disable or enable the Credential Guard in Windows 10. The following methods also apply to Windows 11.
Disable Windows Defender Credential Guard in Windows 11 using Group Policy
As mentioned earlier, the Credential Guard is enabled by default in Windows 11. You can disable it using the Windows Group Policy editor, and through Windows Registry. You can use any of the following given methods to disable it or re-enable it if needed.
Follow these steps to disable the Credential Guard in Windows 11 or Windows 10 using the Group Policy editor:
-
Open the Group Policy editor by typing in “gpedit.msc” in the Run Command box.
Open the Group Policy editor -
Navigate to the following from the left pane:
Local Computer Policy >> Computer Configuration >> Administrative Templates >> System >> Device Guard
-
Double-click the policy “Turn On Virtualization Based Security.”
Edit VBS policy -
Select “Disabled,” then click Apply and Ok.
Disable the VBS policy -
Now run the following cmdlet in an elevated Command Prompt for the changes to take effect.
GPUpdate /ForceEnforce the Group Policies
The Windows Defender Credential guard will now be disabled. However, to enable it, perform the steps in the next section.
Enable Windows Defender Credential Guard in Windows 11 using Group Policy
-
Open the Group Policy editor and navigate to the following:
Local Computer Policy >> Computer Configuration >> Administrative Templates >> System >> Device Guard
-
Double-click the policy “Turn On Virtualization Based Security.”
Edit policy -
Select “Enabled.”
-
Under the Options section, select the following settings from the drop-down menus:
-
Select Platform Security Level:
- Secure Boot and DMA Protection
-
Virtualization Based Protection of Code Integrity:
- Enabled with UEFI Lock – So the option cannot be disabled remotely, or
- Enabled without lock – Windows Defender Credential Guard can be disabled remotely.
-
Credential Guard Configuration:
- Enabled with UEFI Lock – So the option cannot be disabled remotely, or
- Enabled without lock – Windows Defender Credential Guard can be disabled remotely.
-
Secure Launch Configuration:
- Not Configured – If you choose it to be configured by your domain administrator, or
- Enabled – If you want to turn on Secure Launch, or
- Disabled – If you want to disable Secure Launch
-
(Windows 11 22H2) Kernel-mode Hardware-enforced Stack Protection:
- Disabled – Turns off kernel-mode Hardware-enforced Stack Protection, or
- Enabled in audit mode – enables kernel-mode Hardware-enforced Stack Protection where shadow stack violations are not fatal and will be logged to the system event log, or
- Enabled in enforcement mode – enables kernel-mode Hardware-enforced Stack Protection where shadow stack violations are fatal, or
- Not Configured – leaves the policy setting undefined
Configure VBS to enable Credential Guard in Windows 11 -
-
Click Apply and Ok.
-
Now run the following cmdlet in an elevated Command Prompt for the changes to take effect.
GPUpdate /ForceEnforce Group Policies

Windows Defender Credential Guard will now be enabled.
You can also enable or disable the Credential Guard from Windows Registry.
Disable Windows Defender Credential Guard in Windows 11/10 from Windows Registry
If you are unable to disable the Windows Defender Credential Guard using the Group Policy editor, then you can use the Registry editor to get the job done. Here are the steps to disable the Credential Guard from Windows Registry:
Note: Misconfiguration of critical values in the system’s registry could be fatal for your operating system. Therefore, we insist that you create a system restore point before proceeding forward with the process.
You can also use our top selection of disk imaging and backup software so you never lose your data or operating system again.
-
Open the Registry Editor by typing in “regedit” in the Run Command box.
Open the Registry Editor -
Paste the following in the navigation bar for quick navigation and press Enter:
ComputerHKEY_LOCAL_MACHINESYSTEMCurrentControlSetControlDeviceGuard

Navigate to DeviceGuard -
Create a new DWORD and name it “EnableVirtualizationBasedSecurity”.
Create DWORD EnableVirtualizationBasedSecurity Right-click the DeviceGuard key, expand New, then click “DWORD (32-bit) Value,” and name this key “EnableVirtualizationBasedSecurity.”
Note: If this or any other value inside the Windows Registry already exists, then do not create a new one. Instead, perform the following action on the existing Registry.
-
Double-click the DWORD “EnableVirtualizationBasedSecurity” and set its Value Data to “0.”
Set Value Data for EnableVirtualizationBasedSecurity -
Now paste the following in the navigation bar to change the directory:
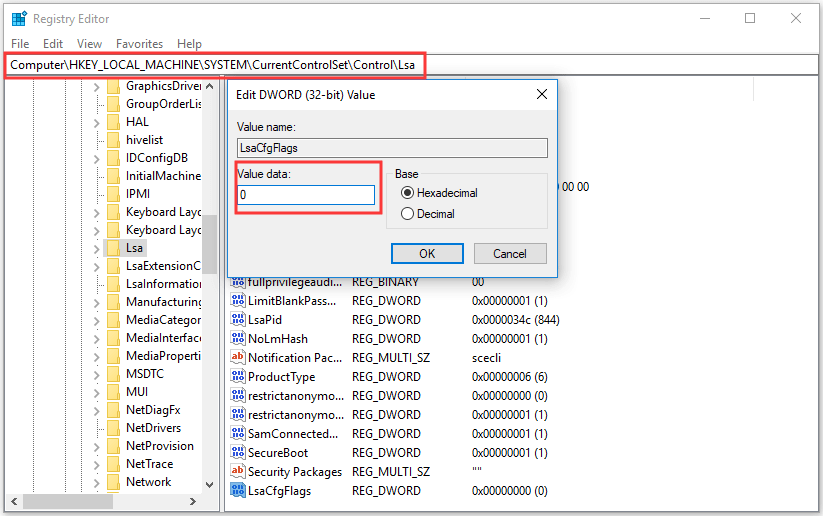
ComputerHKEY_LOCAL_MACHINESYSTEMCurrentControlSetControlLsa
Navigate to Lsa -
Create a new DWORD named “LsaCfgFlags.”
-
Set the Value Data for “LsaCfgFlags” to “0.”
Set Value Data for LsaCfgFlags -
Restart the computer for the changes to take effect.


When the computer restarts, you will find that the Windows Defender Credential Guard has been disabled.
Enable Windows Defender Credential Guard in Windows 11/10 from Windows Registry
If you want to enable Windows Defender Credential Guard from Windows Registry, then follow these steps. Note that these steps are a little different from the ones given above to disable the feature, as it involves an additional Registry value.
-
Open the Registry Editor by typing in “regedit” in the Run Command box.
Open the Registry Editor -
Paste the following in the navigation bar for quick navigation and press Enter:
ComputerHKEY_LOCAL_MACHINESYSTEMCurrentControlSetControlDeviceGuard
Navigate to DeviceGuard -
Create a new DWORD and name it “EnableVirtualizationBasedSecurity”.
Create DWORD EnableVirtualizationBasedSecurity Right-click the DeviceGuard key, expand New, then click “DWORD (32-bit) Value,” and name this key “EnableVirtualizationBasedSecurity.”
Note: If this or any other value inside the Windows Registry already exists, then do not create a new one. Instead, perform the action on the existing Registry.
-
Double-click the DWORD “EnableVirtualizationBasedSecurity” and set its Value Data to “1.”
Set Value Data for EnableVirtualizationBasedSecurity -
Create another DWORD within the same “DeviceGuard” key and name it “RequirePlatformSecurityFeatures”.
-
Set the Value Data for “RequirePlatformSecurityFeatures” to “1.”
Set Value Data for RequirePlatformSecurityFeatures -
Now paste the following in the navigation bar to change the directory:
ComputerHKEY_LOCAL_MACHINESYSTEMCurrentControlSetControlLsa
Navigate to Lsa -
Create a new DWORD named “LsaCfgFlags.”
-
Set the Value Data for “LsaCfgFlags” to “1.”
Set Value Data for LsaCfgFlags -
Restart the computer for the changes to take effect.


Windows Defender Credential Guard will now be enabled. This method can be adopted on both Windows 10 and Windows 11, as long as your PC meets the requirements.
How to Check if Windows Defender Credential Guard is Enabled or Disabled
Whether you have made changes to enable or disabled the Credential Guard, or just want to check its status, there are methods you can try.
From System Information
-
Open the System Information applet by typing in “msinfo32” in the Run Command box.
Open System Information -
Stay in the “System Summary” tab.
-
On the right side, look for the value in front of “Virtualization-based security Services Running.”

Check System Information for Credential Guard status If the value says “Credential Guard,” it means that Credential Guard is activated and running.


Using Windows PowerShell
Simply run the following cmdlet in an elevated PowerShell instance to check the current status of Credential Guard:
(Get-CimInstance -ClassName Win32_DeviceGuard -Namespace rootMicrosoftWindowsDeviceGuard).SecurityServicesRunning
One of the following outputs would then be generated, informing you of whether Windows Defender Credential Guard is running or not:
- 0 – Credential Guard is disabled
- 1 – Credential Guard is enabled
Closing Thoughts
The Windows Defender Credential Guard ought to be running at all times. It keeps your usernames and passwords safe from hackers.
However, if it causes any trouble, such as issues with VMWare, or the fact that you are annoyed by the constant credentials prompts, you can always disable it.
That said, we still recommend that you re-enable it once you are done with your work.
The methods to enable and disable Windows Defender Credential Guard are given in this post for both Windows 10 and 11 and can be done from the Group Policy Editor and the Registry Editor.
Also see:
Subhan Zafar is an established IT professional with interests in Windows and Server infrastructure testing and research, and is currently working with Itechtics as a research consultant. He has studied Electrical Engineering and is also certified by Huawei (HCNA & HCNP Routing and Switching).
Сегодня в этом посте мы увидим, как включить или включить Credential Guard в Windows 10 с помощью групповой политики. Credential Guard — одна из основных функций безопасности, доступных в Windows 10. Она обеспечивает защиту от взлома учетных данных домена, тем самым предотвращая проникновение хакеров в корпоративные сети.
Credential Guard доступен только в Windows 10 Enterprise Edition. Поэтому, если вы используете Pro или Education, вы не увидите эту функцию в своей версии Windows. Более того, ваша машина должна поддерживать безопасную загрузку и 64-битную виртуализацию.
Чтобы включить или включить Credential Guard, откройте Run, введите gpedit.msc и нажмите Enter, чтобы открыть редактор групповой политики.
Теперь перейдите к следующему параметру:
Конфигурация компьютера> Административные шаблоны> Система> Device Guard
Теперь дважды щелкните Включить безопасность на основе виртуализации, а затем выберите Включено.
Затем в разделе Параметры выберите поле Уровень безопасности платформы, выберите Безопасная загрузка или Безопасная загрузка и защита DMA.
в Конфигурация Credential Guard поле, щелкните Включено с блокировкой UEFI а потом ОК.
Если вы хотите отключить Credential Guard удаленно, выберите Включено без блокировки.
Нажмите Применить / ОК и выйдите.
Перезагрузите вашу систему.
Вы должны помнить, что Credential Guard предложит защиту от прямых попыток взлома и вредоносных программ, запрашивающих учетную информацию. Если учетная информация уже украдена до того, как вы сможете внедрить Credential Guard, это не помешает хакерам использовать хэш-ключ на других компьютерах в том же домене.
Remote Credential Guard в Windows 10 защищает учетные данные удаленного рабочего стола.
 .
.