Статья обновлена: 13 июля 2022
ID: 3580
В некоторых случаях вам могут понадобиться файлы и папки, которые по соображениям безопасности могут быть скрыты от просмотра. Проверьте, включен ли на вашем компьютере режим отображения скрытых файлов и папок.
Windows 11
- Откройте любую папку на вашем компьютере.

- Нажмите Просмотреть → Показать → Скрытые элементы.

Скрытые элементы будут показаны.
Windows 10
- Откройте любую папку на вашем компьютере.

- Перейдите на вкладку Вид.
- Нажмите Показать или скрыть.
- Убедитесь, что установлен флажок Скрытые элементы.

Скрытые элементы будут показаны.
Windows 8, 8.1
- Откройте любую папку на вашем компьютере.

- Перейдите на вкладку Вид.
- Нажмите Показать или скрыть.
- Убедитесь, что установлен флажок Скрытые элементы.

Скрытые элементы будут показаны.
Windows 7
- Нажмите Пуск → Панель управления.

- В правом верхнем углу нажмите Категория и выберите Мелкие значки.

- Нажмите Параметры папок.

- Перейдите на вкладку Вид.
- Убедитесь, что выбран пункт Показывать скрытые файлы, папки и диски.
- Нажмите Применить.

Скрытые элементы будут показаны.
Windows Vista
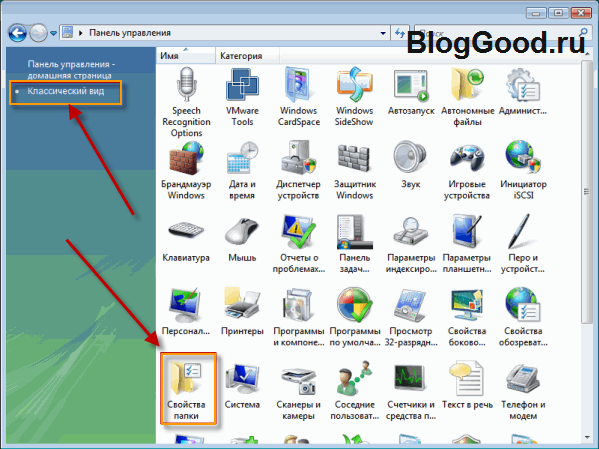
- Нажмите Пуск → Панель управления.

- В левом верхнем углу выберите Классический вид.
- Нажмите Свойства папки.

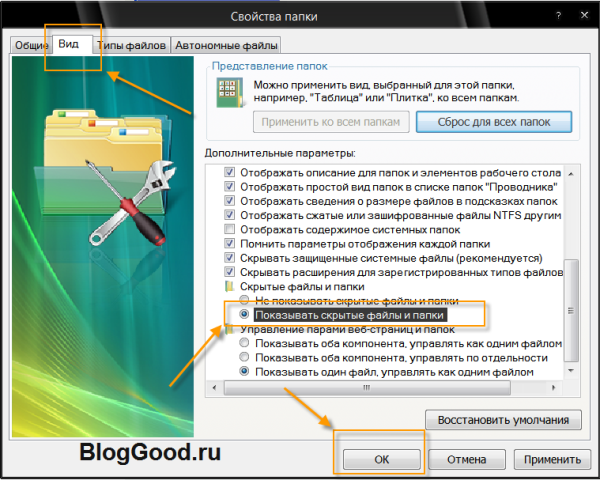
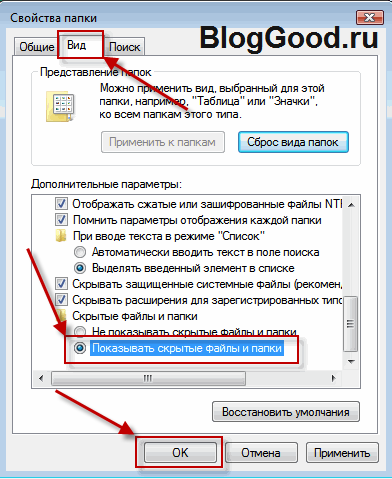
- Перейдите на вкладку Вид.
- Убедитесь, что выбран пункт Показывать скрытые файлы и папки.
- Нажмите ОК.

Скрытые элементы будут показаны.
Windows XP
- Нажмите Пуск → Панель управления.

- Нажмите Сервис и выберите Свойства папки.
14-118602.gif "Переход в Свойства папки в Windows XP")
- Перейдите на вкладку Вид.
- Убедитесь, что выбран пункт Показывать скрытые файлы и папки.
- Нажмите ОК.
14-118603.gif "Настройка отображения скрытых элементов в Windows XP")
Скрытые элементы будут показаны.
Как открыть скрытые папки в Висте
В операционной системе Windows Vista системные файлы и папки защищены от пользователя: он просто не видит такие папки и, соответственно, не может в них зайти или удалить их.

Вам понадобится
- — права администратора.
Инструкция
Но иногда возникает необходимость «увидеть» скрытые папки, например, чтобы найти загруженные файлы во временных папках браузера. Откройте «Мой компьютер» и зайдите в любую папку на жестком диске вашего компьютера. Зайдите в пункт «Сервис» основного меню окна. Для этого нажмите Alt на клавиатуре или кликните соответствующий пункт. Выберите раздел меню «Свойства папки». Откроется окно основных свойств выбранной папки. Оно имеет несколько вкладок. Перейдите по вкладке под названием «Вид». Просмотрите список свойств, представленный в данной вкладке.
Найдите пункт «Отображать скрытые файлы и папки» и установите рядом с ним флажок. Также обратите внимание на пункт «Скрывать защищенные системные файлы» — снимите отметку рядом с ним. Нажмите на кнопку «Применить», чтобы система внесла соответствующие изменения в вид папок «Моего компьютера». Чтобы проверить результат работы, зайдите на раздел «С:» вашего винчестера. Теперь вы увидите гораздо больше директорий, чем обычно: ранее скрытые папки добавятся к обычным. Отличить системные и обычные папки можно по их внешнему виду: системные папки полупрозрачные.
Не стоит оставлять такие настройки постоянно, если вашим компьютером пользуются дети или неопытные пользователи. Системные папки могут быть случайно удалены с жесткого диска по незнанию. Практически во всех операционных системах Windows открыть скрытые папки можно только после настроек отображения. Как правило, данные параметры устанавливаются по умолчанию при переустановке операционной системы. При этом все системные папки и файлы автоматически становятся скрытыми, и недоступны для пользователя, если не включить отображение системных файлов и папок.
Видео по теме
Войти на сайт
или
Забыли пароль?
Еще не зарегистрированы?
This site is protected by reCAPTCHA and the Google Privacy Policy and Terms of Service apply.
Перейти к содержанию
На чтение 2 мин Просмотров 9.8к. Опубликовано 13 декабря 2021 Обновлено 19 сентября 2022
Иногда бывает нужно просмотреть или найти скрытые файлы или папки в Windows XP, Vista и Windows 7. Сделать это несложно:
Как показать или убрать скрытые папки и файлы в Windows XP
Откройте какую-нибудь папку или «Мой компьютер«. В меню вверху окна пункт «Сервис» и клацните по нему левой клавишей мышки. В выпавшей менюшке вам нужен самый нижний пункт — «Свойства папки«:

Далее, в появившемся окне выберите закладку «Вид«. На этой вкладке установите галочку напротив пункта «Показывать скрытые файлы и папки«.
Также можно снять галочку напротив пункта «Скрывать защищенные системные файлы«.

Всё. Не забудьте нажать кнопку «Ок»
Как показать (открыть) или убрать (скрыть) скрытые папки и файлы в Windows Vista / Windows 7
В Windows 7 всё еще проще. Перейдите в меню «Пуск» «Панель управления» «Оформление и персонализация», и найдите раздел «Показ скрытых файлов и папок».

После нажатия на него откроется то же самое окно, что и в Windows XP.
На вкладке «Вид» установите галочку напротив пункта «Показывать скрытые файлы и папки«.
Также можно снять галочку напротив пункта «Скрывать защищенные системные файлы«.
Всё. Опять таки не забудьте нажать кнопку «Ок«.
Иногда возникает необходимость сделать доступными скрытые файлы или папки, отобразить их, сделать видимыми. Давайте рассмотрим, как это сделать в операционный системах Windows XP и Windows 7 (в Windows Vista и 8 аналогично). Само окно «Свойства папок» во всех версиях Windows одинаково, отличается лишь способ открытия данного окна.
Как показать скрытые папки и файлы в Windows 7, Vista
Заходим в Панель управления (через меню Пуск). Выбираем пункт Параметры папок. Если не нашли, то в правом верхнем углу Панели управления есть слово «Просмотр:» и рядом можно выбрать вариант отображения: «Категория», «Крупные значки», «Мелкие значки». Выбираем один из двух последних вариантов. Теперь вы точно найдете нужный пункт Параметры папок.

После этого во всех операционных системах перед вами откроется окно, где можно настроить отображение скрытых папок и файлов. Далее порядок действий будет одинаковый, несмотря на небольшие отличия во внешнем виде окон.
Переходим на вкладку Вид. Под надписью Дополнительные параметры находится список параметров, которые можно отметить. Прокручиваем этот список вниз до конца. Ставим точку напротив «Показывать скрытые файлы, папки и диски», снимаем галочку «Скрывать защищенные системные файлы» (здесь система выдаст предупреждение, отвечаем Да). Нажимаем «Применить» и «Ок».

Все готово. Теперь все скрытые и системные папки и файлы отображаются как обычные. Когда необходимость в этом исчезнет, можно снова зайти в Параметры папок и на вкладке Вид нажать «Восстановить умолчания».
Как показать скрытые папки и файлы в Windows XP
Способ 1. Открываем Проводник (или Мой компьютер). В верхнем левом углу ищем стандартную панель меню (Файл, Правка, Вид…). Нажимаем Сервис – Свойства папки….

Способ 2. Открываем Панель управления (через меню Пуск), выбираем Свойства папки. Если не нашли данный пункт, то слева нужно нажать «Переключение к классическому виду».


Далее выполняем действия, как было описано выше в разделе про Windows 7, Vista
Оцените статью. Вам не сложно, а автору приятно
Для чего нужно скрывать файлы и папки на компьютере? Обычно скрывают файлы и папки, которые редко используются на ПК, это помогает поддерживать порядок и чистоту вашего компьютера. Также можно скрывать файлы с информацией личного характера, которые не следует видеть посторонним лицам. В этом случае следует помнить, что скрытие файлов или папок не защищает вашу информацию на все 100%.
Для начала я расскажу, как отобразить скрытые файлы и папки для Windows 7/ XP/ Vista, а потом, если вам будет это интересно, покажу, как их можно скрыть.
Отображение скрытых файлов и папок для Windows XP
Чтобы показывать скрытые файлы и папки для Windows XP сделайте такие действия:
[1] – нажмите на кнопку «Пуск».
[2] – нажмите на пункт «Панель управления».

[3] – теперь нужно открыть окно «Свойство папки». Это можно сделать тремя способами. Какой способ вам нравиться больше, такой и выбирайте.
* первый способ:
После нажатия вкладки «Панель управления», откроется новое окно. Выберите там «Сервис» => «Свойство папки».

* второй способ:
Если на вашем компьютере «Панель управления» отображается в классическом виде, тогда двойным щелчком мышки нажмите на картинку «Свойства папки».

* третий способ:
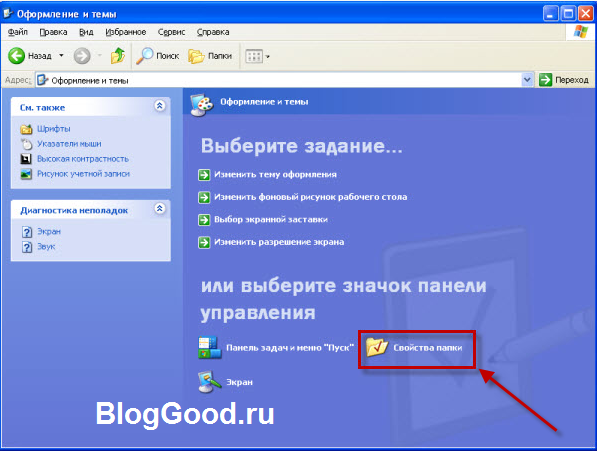
Этот способ применяется в тех случаях, если «Панель управления» отображается в виде категорий. Итак, нажмите на «Оформление темы».
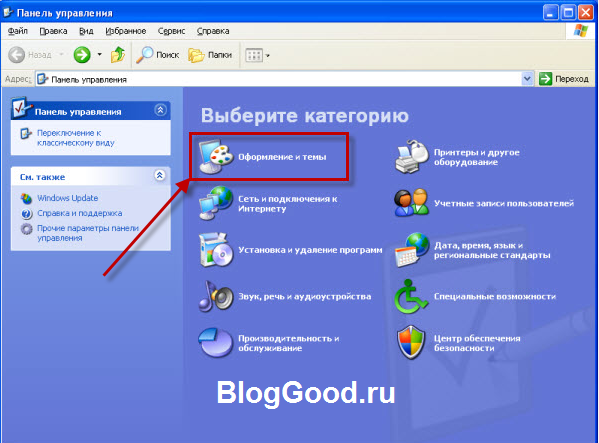
В открывшемся новом окне перейдите на «Свойства папки».
[4] – после того, как вы нажмете «Свойства папки», откроется новое окно. В этом окне нажмите на вкладку «Вид».
[5] –Выберите пункт «Показывать скрытые файлы и папки» и жмите «Ок».
Отображение скрытых файлов и папок для Windows Vista
Чтобы показывать скрытые файлы и папки для windows Vista сделайте такие действия:
[1] – нажмите на кнопку «Пуск».
[2] – нажмите на пункт «Панель управления».

[3] – откроется окно «Панель управления». Выберите в левой части экрана раздел «Классический вид».
[4] – в окне «Панель управления» кликните двойным щелчком мыши по картинке «Свойства папки».
[5] – откроется окно «Свойства папки». Перейдите на вкладку «Вид».
[6] –Выберите пункт «Показывать скрытые файлы и папки» и жмите «Ок».
Отображение скрытых файлов и папок для Windows 7
Чтобы показывать скрытые файлы и папки для Windows7 сделайте такие действия:
* первый способ
[1] – нажмите на кнопку «Пуск».
[2] – нажмите на пункт «Панель управления».

[3] – выберите вид просмотра «Мелкие значки» => «Параметры папок».

[4] – откроется новое окно. В этом окне перейдите на вкладку «Вид».
[5] –Выберите пункт «Показывать скрытые файлы и папки» и жмите «Ок».

* второй способ
[1] – откройте окно «Мой компьютер». В открывшемся окне нажмите на вкладку «Упорядочить» => «Параметры папок и поиска».
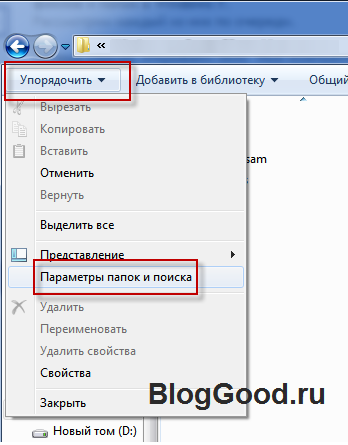
[2] – откроется окно «Параметры папок». Перейдите на вкладку «Вид».
[3] – Выберите пункт «Показывать скрытые файлы, папки и диски» и жмите «Ок».
Теперь вы знаете, как показывать скрытые файлы и папки на Windows 7/ XP/ Vista.
Чтобы скрыть файлы и папки, вам следует проделать все те же действия, что вы проделали для отображения скрытых файлов и папок, только при открытии окна «Параметры папок» выберите «Не показывать скрытые файлы, папки и диски».
Как создать невидимую папку.
Чтобы создать невидимую папку на Windows7/XP сделайте такие действия:
[1] – Выберите файл или папку, которую нужно скрыть.
[2] – Нажмите на папку или на файл правой кнопкой мышки и выберете вкладку «Свойства».

[3] – В открывшемся окне поставьте галочку напротив «Скрытый» и жмите кнопку «Ок».

Вот и все!!!
Дорогие читатели, подписывайтесь на мою RSS-ленту новостей, я всегда стараюсь добавлять новые интересные полезные статьи!
Понравился пост? Помоги другим узнать об этой статье, кликни на кнопку социальных сетей ↓↓↓
Последние новости категории:
Похожие статьи
Популярные статьи:
Добавить комментарий
Метки: windows XP/7, полезные статьи
Для отображения скрытых файлов и папок сделайте следующее:
Windows 10
-
В поле поиска на панели задач введите запрос папка и выберите пункт Показывать скрытые файлы и папки в результатах поиска.
-
В разделе Дополнительные параметрыустановите флажок Показывать скрытые файлы, папки и дискии нажмите кнопку ОК.
Windows 8.1
-
Проведите пальцем влево от правого края экрана и выберите команду Поиск (если вы используете мышь, наведите указатель на правый верхний угол экрана, переместите его вниз, а затем выберите команду Поиск).
-
Введите запрос папка в поле поиска, а затем выберите Параметры папок в результатах поиска.
-
Откройте вкладку Вид.
-
В разделе Дополнительные параметрыустановите флажок Показывать скрытые файлы, папки и дискии нажмите кнопку ОК.
Windows 7
-
Нажмите кнопку «Пуск» и выберите пункты Панель управления > Оформление и персонализация.
-
Выберите Параметры папок, а затем откройте вкладку Вид.
-
В разделе Дополнительные параметры выберите Показывать скрытые файлы, папки и диски, а затем нажмите кнопку ОК.
Нужна дополнительная помощь?
Перейти к содержанию
Как показать или скрыть скрытые папки

Просмотров 18.2к. Опубликовано 20 августа, 2018 Обновлено 20 августа, 2018
Скрытые файлы обычно скрыты по уважительной причине — они часто являются очень важными файлами и скрыты от просмотра, что затрудняет их изменение или удаление.
Но что, если вы хотите увидеть эти скрытые файлы?
Существует много веских причин, по которым вам нужно будет сделать видимыми скрытые файлы и папки в вашем поиске и представлениях в папке, но большую часть времени это связано с тем, что вы имеете дело с проблемой Windows, и вам нужен доступ к одному из этих важных файлов для редактирования или удаления.
С другой стороны, если скрытые файлы, уже видны, но вы вместо этого хотите скрыть их, это просто обратное действие.
К счастью, очень просто переключить, показать или скрыть скрытые файлы и папки в Windows. Это изменение делаются через панель управления.
Конкретные шаги, связанные с настройкой Windows для отображения или скрытия скрытых файлов, зависят от того, какую операционную систему вы используете:
Как показать или скрыть скрытые файлы и папки в Windows 10, 8 и 7
- Откройте панель управления.
Нажмите сочетание клавиш CTRL+R, введите control и нажмите Enter.
Либо введите в поиске Панель управления.
- Переключите просмотр на мелкие значки.

- Откройте Параметры проводника (Windows 10) или Параметры папок(Windows 8/7).
")
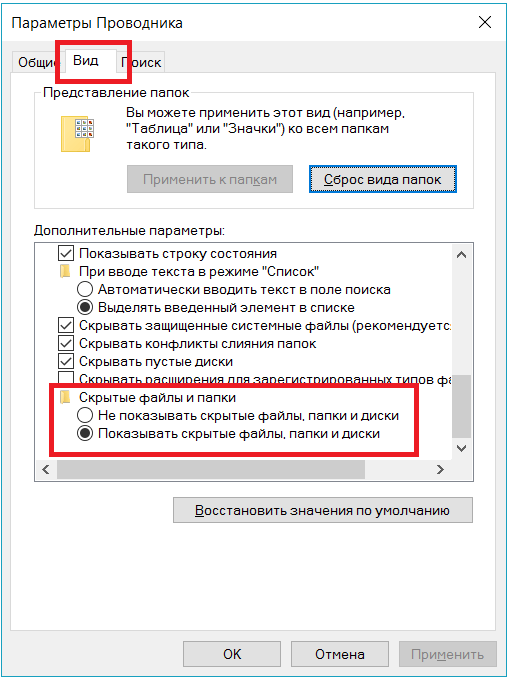
- Перейдете на вкладку Вид.
- Прокрутите в самый вниз до пункта Скрытые файлы, папки и диски.
- Выберите , какой вариант вы хотите применить.
Не показывать скрытые файлы, папки или диски будут скрывать файлы, папки и диски , которые имеют скрытый атрибут.
Если переключить на Показывать скрытые файлы, папки и диски позволяет увидеть скрытые данные.
- Нажмите ОК в нижней части окна «Параметры проводника».
- Вы можете проверить, скрыты ли скрытые файлы в Windows 10/8/7, перейдя на диск C: . Если вы не видите папку с именем ProgramData , скрытые файлы и папки скрываются от просмотра.


")
Быстрый способ переключения скрытых папок в Windows 10
- Откройте папку где хотели скрыть или показать папки и файлы.
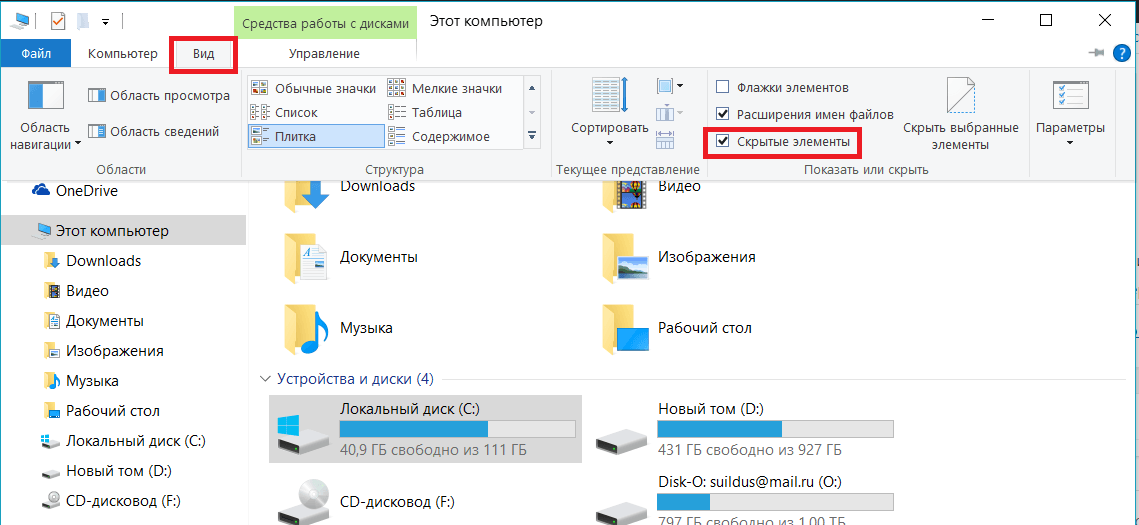
- В верхней панели нажмите Вид.
- Раскроется меню, найдите пункт Скрытые элементы.
- Поставьте галочку если хотите скрыть папки или снимите, что бы показать.

Как показать или скрыть скрытые файлы и папки в Windows Vista
- Нажмите кнопку «Пуск», а затем «Панель управления».
- Нажмите на Оформление и персонализация.
Примечание: Если вы просматриваете Классический вид Панели управления, вы не увидите эту ссылку. Просто откройте значок «Свойства папки» и перейдите к шагу 4 . - Нажмите ссылки «Параметры папок» .
- Нажмите вкладку «Вид» в окне «Свойства папки» .
- В дополнительных настройках: раздел, найдите скрытые файлы и папку категории.
- Выберите параметр , который вы хотите применить к Windows Vista. Не показывать скрытые файлы и папки будут скрывать файлы и папки с атрибутом скрытый ВКЛЮЧЕНО. Показывать скрытые файлы и папки позволит вам увидеть скрытые файлы и папки.
- Нажмите OK в нижней части окна «Свойства папки» .
- Вы можете проверить, отображаются ли скрытые файлы в Windows Vista, перейдя на диск C: . Если вы видите папку ProgramData , то вы можете просматривать скрытые файлы и папки.
Примечание: Иконки для скрытых файлов и папок, слегка затенены. Это простой способ отделить скрытые файлы и папки от ваших обычных незакрытых.
Как показать или скрыть скрытые файлы и папки в Windows XP
- Откройте «Мой компьютер» в меню «Пуск».
- Из инструментов меню выберите Свойства папки.
- Перейдите во вкладку «Вид» в окне «Свойства папки» .
- В дополнительных настройках: области текста, найдите скрытые файлы и папку категорию.
Примечание: Скрытые файлы и папки категория должна быть доступны для просмотра в нижней части меню Дополнительных настроек: текст область без прокрутки вниз. В папке вы увидите две опции. - Под Скрытые файлы и папки категории, выберите переключатель, который относится к тому, что вы хотите сделать. Не показывать скрытые файлы и папки будут скрывать файлы и папки с скрытый атрибут включен. Показывать скрытые файлы и папки , которые позволят вы видите скрытые файлы и папки.
- Нажмите OK в нижней части окна «Свойства папки» .
- Вы можете проверить, отображаются ли скрытые файлы, перейдя в папку C:/Windows. Если вы видите количество папок, начиная с $ NtUninstallKB, то вы можете просматривать скрытые файлы и папки, иначе они успешно скрыты.
Примечание: Эти $ NtUninstallKB папка содержит информацию , необходимую для удаления обновления вы получили от Microsoft. Хотя маловероятно, возможно, вы можете не видеть эти папки, но все равно можете правильно настроить скрытые папки и файлы. Это может быть так, если вы никогда не устанавливали какие-либо обновления для своей операционной системы .
Do you want to quickly show hidden files and folders on your computer or phone?
If you or any other users on your computer have ever hidden a file or folder, it can be easy to lose track of where that file has gone.
Thankfully, most operating systems have options to show these hidden files, provided you have the proper privileges.
Regardless of whether you’re a Windows, macOS, Linux, Android, or iOS user, we’ve got you covered. In this article, we’ll go over the quickest and easiest ways to show hidden files, no matter what your device is.
Let’s jump right in.
Prefer to watch the video version?
How Do I Show Hidden Files on My Windows Laptop?
In Windows 10, the easiest way to show hidden files or folders is to use the File Explorer’s View options.
First, open your File Explorer (WIN + E), and go to the folder you think has hidden files. Next, click the View tab, and then check the box next to the Hidden items text.

That should instantly show any hidden files in that folder. If you don’t see any hidden files, that means there aren’t any in that particular folder. You should note that hidden files are different from deleted files.
In older versions of Windows (and Windows 10), you can edit these settings in the Control Panel’s File Explorer Options.
Search for “folder” in the Windows toolbar and select the first result to get there. You can also search for “File Explorer Options” if “folder” doesn’t show you the option you need.

For versions older than Windows Vista with no search box, you can manually navigate to Folder Options under Appearance and Themes.
Next, navigate to the View tab and change the Hidden files and folders settings to Show.

Once you’ve checked the Show hidden files, folders, and drives radio button, you can see all hidden files.
Note: The vast majority of hidden files are Windows system files and software cache files, including browser cache files. Editing, moving, or deleting the wrong files can break your operating system. Make 100% sure you’re not in a system folder before you make any changes.
If you want to clear the cache of different programs, you can usually do that from within the program settings. You don’t need to look through them manually and delete the hidden files one by one.
Whether you’re a Windows, macOS, Linux, Android, or iOS user, finding hidden files just got a whole lot easier, thanks to this post 🗂 ✅Click to Tweet
What Is the Shortcut to Show Hidden Files in Windows?
Unfortunately, there’s no native keyboard shortcut for Windows to show hidden files. Even in the newest version of Windows 10, you’d need a custom script.
But on the flip side, it only takes a few seconds to show the files manually through the view settings.
First, press WIN + E to open the Windows File Explorer and navigate to the folder with the hidden files.
Then, click through to the View tab and check the Hidden items box.

It’s that easy.
If you’re a developer and want the ability to hide or display hidden files with a shortcut, you can easily create one with a custom AutoHotKey script.
How to Show Hidden Files in CMD
Windows Command Prompt (CMD) allows you to explore hidden files and directories differently. It’s similar to the Terminal tool found on Linux and related systems. You can use commands to single out only the hidden files and folders in a given directory.
To open CMD, you can either use the Windows Run tool by pressing WIN + R and then typing in CMD—or you can search for “CMD” in the Windows toolbar.
Then you can navigate to the folder of your choice by using the basic dir command.
That said, CMD also hides hidden files and folders by default. Because of that, it’s not enough to type in dir C:your-folder as this will only show visible files.
To show hidden files, you need to include the /a:h modifier in that command. So, dir /a:h C:your-folder will do the trick.

CMD also has specific commands for showing directories and folders.
/a:d shows all hidden directories, and /a shows hidden folders.
Note: Did you know that you can also use a command-line interface to work with your WordPress site? WP-CLI lets you manage all aspects from a similar terminal.
Use a Third-Party Software to Show Hidden and Deleted Files
The last option is to use a third-party file explorer or file recovery software to show hidden files. If you’re looking for files hidden using regular file options, this isn’t necessary.
But advanced recovery software can also get back files that aren’t just hidden, but deleted permanently. Some popular file recovery tools include:
- Recuva
- Remo
- EaseUS
- Disk Drill
When Windows File Explorer Won’t Be Enough
There are a few use cases where Windows File Explorer and CMD won’t help you.
Here are some examples:
- If another user has hidden the files from you specifically, and you don’t have administrator privileges.

- Suppose you’re looking for hidden malicious files and malware on an infected computer. To lower the risk of this happening, make sure your firewall and other security software and hardware are up to date.
- If the files are password-protected or encrypted and you forgot the password, provided you aren’t a system administrator.
How Do I Show Hidden Files on My Mac?
There are a few different ways you can show hidden files on a Mac, depending on how you’re browsing your files.
In the Mac Finder, the easiest way to toggle hidden files is with a keyboard shortcut. You can also show or hide files using the Terminal.
What is the Shortcut to Show Hidden Files on macOS?
You can use the CMD + SHIFT + PERIOD shortcut to show hidden files in a folder while using the Finder on any modern Apple computer.
Just open the Mac Finder (from the menu or press OPTION + CMD + SPACE), and navigate to the right place. Once there, you can use the hotkey mentioned above to display hidden files.

The hidden files and folders will stand out visually as semi-transparent entities.
Note: Like with Windows computers, you need to be careful with these hidden files. Please don’t make any changes to them unless you’re 100% sure that they aren’t system files.
How to Use the Terminal to Show Hidden Files
You can also use the Mac Terminal to find and show hidden files. The terminal is the command-line interface for all Mac computers (like CMD on Windows).
To open it, use the CMD + SPACE shortcut to open Spotlight Search. Once open, search for “terminal” and then click Enter.
Now you need to give Mac Terminal the command to show hidden files. Here are the steps:
- Type the following command:
defaults write com.apple.Finder AppleShowAllFiles true - Press Enter to execute it.
- Type
killall Finderand then press Enter again.

And you’re done! You can now explore the hidden files using either the Finder or the Terminal itself.
Use a Third-Party File Explorer to Show Hidden (and Deleted) Files
As with Windows, you can use third-party file explorers to show hidden files on your Mac, but it’s unnecessary.
Where you might find this type of software more useful is in finding files you have accidentally deleted—not items you have placed in the recycle bin, but the ones you’ve removed “permanently.”
The leading file recovery software options are mostly the same for Macs as for Windows machines:
- Disk Drill
- Recuva
- Remo
- EaseUS
When the Terminal or Finder Doesn’t Cut It
As in Windows, these default options aren’t universal, and in some cases, you’re better off relying on specialty software. Here’s a couple of examples:
- If a user hasn’t given you read permission, and you don’t have administrator privileges. If your user has “no access,” it doesn’t matter if you can see the folder.

- If you’re looking for hidden malicious files or viruses that you cannot unhide through standard methods.
How to Show Hidden Files in Linux
Do you have a computer or server running on Linux and want to show hidden files? You can accomplish this using the Linux Command Line or a GUI file explorer. For web servers, you can also use an FTP/SFTP client to reveal the hidden files.
Which option you use will depend on your exact Linux distro and use case. We’ve covered all the options below.
Using the Linux Command Line
If you’re not using a graphical user interface, which is common with most web servers, you can easily show hidden files with a single Linux command.
Using the -a modifier with the ls command will automatically display all files.

For example: $ ls -a /home/user/your-folder/
If you only want to show hidden files, you can use the special regex modifier below:
$ ls -dl .[^.]* /home/user/your-folder/With the File Explorer
You can easily show hidden files using the file explorer in Ubuntu-based Linux desktop environments (Gnome 3, Mate, etc.).
For the quickest option, you can show hidden files using the keyboard shortcut CTRL + H. You can also right-click anywhere in a folder and check the Show hidden files option at the bottom.

Whether or not the files are transparent depends on your specific installation of Linux.
With an FTP/SFTP Client (for Web Servers)
Sometimes, you may have to transfer hidden files or folders to and fro your web server (e.g. .htaccess file). It’s essential for troubleshooting WordPress errors.
In such a case, you can use an FTP/SFTP client like FileZilla to accomplish this task quickly. FileZilla is available for all major operating systems. We’ll be using its Mac variant for this demonstration.
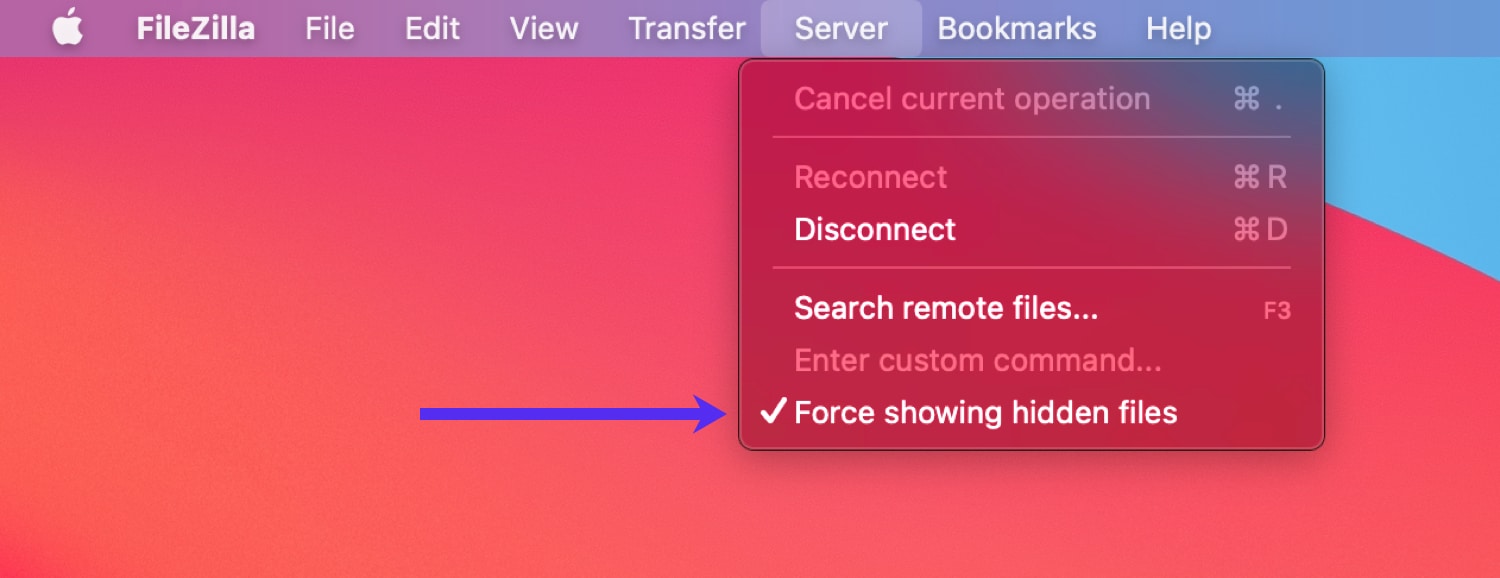
First, click on the Server tab in FileZilla’s menu bar and enable the Force showing hidden files option.
Now, connect to your web server via SFTP by entering the relevant details. You should now see all the hidden files and folders on your server.

In the above example, you can see two hidden files in the site’s ~/public folder: .hiddenfile and .htaccess.
As you can see, it’s a quick and straightforward process to reveal hidden files on your web server.
How to Show Hidden Files on a USB Stick
Another common question you might have is how to show hidden files on a USB flash drive. Unless it’s encrypted, you can use the same basic Windows Explorer or Mac Finder options to do so.
On a Windows PC
On a Windows computer, plug in the USB stick, and open a Windows Explorer window. It may happen automatically when you plug in the USB drive, depending on your settings.
Once the Explorer window is open, use it to navigate to the thumb drive directory. It’s typically located at the bottom of the expanded This PC menu.

Then, navigate to the View tab, and check the Hidden Items box to show all hidden folders and files.

As shown above, this immediately displays all the hidden folders in the base USB drive folder.
All hidden files within these folders will also now be visible.

And that’s all there is to it. You’ve successfully revealed all the hidden files on your USB drive.
On a Mac
On a Mac, it’s even more straightforward. Just plug in the USB, open the Mac Finder, and navigate to the USB directory. After you plug it in, it should show under the Devices menu.
Then you can immediately use the CMD + SHIFT + PERIOD keyboard shortcut to show the hidden files.

If the shortcut isn’t working, try triggering it again in a folder you’re 100% sure has hidden files. It may have started toggled on, which means that you’ll have just turned it off.
If that doesn’t work, check the language input settings. In some languages, the period key gets repurposed for extra letters not included in the English language.
What if the USB Is Encrypted?
If the whole thumb drive is encrypted using custom software like BitLocker or the default Mac USB encryption tools, and you no longer have the password, there’s no easy solution, but all is not necessarily lost.
The first thing you should do is search any physical (or digital) location where the password might be. Search as thoroughly as you can.
If you can’t find it, you can try a data recovery tool like RecoverIt or Disk Drill.
Only after you’re confident that you can’t find the password should you consult a professional data retrieval service. These can be pretty expensive, so be sure to exhaust all other efforts first.
How to Show Hidden Files in Google Chrome (for Both Mac and Windows)
If you don’t want to mess with the Terminal, CMD, or system settings, you can also use a browser to show hidden files.
If you use it as a file explorer for your computer, it’ll automatically show you all files, even if they’re set to “Hidden” in either the Mac Finder or Windows File Explorer.
Let’s check out a folder that includes a hidden file. The Windows File Explorer settings have the option to show hidden files unchecked:

That means you won’t see any of the hidden files in this folder using the File Explorer or the default CMD commands.
But with a web browser, you can immediately see all files in the folder, including the hidden ones:

This approach works on both Windows and Mac computers and other browsers. We chose to focus on Google Chrome because it’s the leader with over 77% of the global desktop browser market share.
How to Show Hidden Files on Your Smartphone
When it comes to files on your phone, you may not think you have the same kind of access as on your computer. But we’ll show you how you can show hidden files like photos, videos, and more on your iPhone or Android Phone.
For Android Phones
On Android phones, you can easily explore hidden files with the default Google Files app.
First, open the Files app (or another file manager), and go to the main settings menu by clicking the hamburger icon (≡).

Then all you need to do is scroll down until you see the Show hidden files option. Toggle this option on, and you’re good to go.

You can now explore all files on your phone.
Note: Most of the hidden files you can see are essential cache files for your different apps and Android system files (but not all). So unless you’re clearing out data from an uninstalled app, proceed with caution.
For iPhones
Unlike Android phones, iPhones don’t come with a default overall file manager. However, within the Photos application, you can hide photos and videos.
If you want to see these hidden photos and video files, you can follow these simple steps.
- Go to your Photos app and visit the Albums tab.
- Scroll down to the bottom until you see the Other Albums section and select the Hidden link.
- Here are displayed all the photos and videos hidden on your phone.
- To restore these files, you can select them one by one and then click the Unhide option.

If you want to explore hidden files used in apps and the OS itself, you’ll first need to jailbreak your phone. However, as it’s against the iOS end-user agreement to jailbreak your phone, this will void your warranty, so we don’t recommend it for the average user.
If you’re worried about hidden malicious files like malware or viruses, you’re much better off scanning your phone with anti-malware apps.
How to Use Anti-Malware Software to Find Hidden Malicious Files
If you suspect that you’ve gotten a virus or malware on your computer, manually checking for hidden files won’t help you.
The vast majority of hidden files are system files. There are hundreds of thousands of them out there. And you have no way of knowing which one doesn’t belong unless you know every single file in the operating system. You’ll also need to check the file size and usage patterns for irregularity.
The bottom line: it’s not realistic or even possible for anyone to do this manually. Instead, use up-to-date antivirus software to scan your computer for you.
Scan Your Computer With a Highly Trusted, Up-to-Date Antivirus Software
83% of all malware attacks in 2020 targeted Windows computers. So it’s safe to say that this step is most important if you’re a Windows user.
If you recently purchased your laptop, chances are you still have antivirus software with a valid license. For Windows computers, McAfee or Norton often come as part of the package.
If that’s the case, you can just run the scan without installing any new software. You can do so by opening the software itself and starting a scan.
Or you can right-click the folder you want to check in the file explorer and select the scan option.

You can also do this for a USB drive.
If you don’t have any antivirus software installed, you can download a free version or a free trial of software like Bitdefender or Malwarebytes.

Windows 10 also has a built-in security software called Microsoft Defender, and it’s good enough for most use cases. But it’s not perfect. So even for the latest Windows version, you should look into a highly trusted security suite.
Note: If you’re also worried about your website or business apps’ security, read our guide to cloud security. It includes a 10-step checklist to help you keep your data safe.
You Can Also Use a Mobile Phone App (Android Only)
Android phone users can install an antivirus app and scan their phones for malware regularly.
Note: iOS doesn’t allow third-party apps to scan your phone, so iOS mobile security apps only focus on blocking phishing sites and potential scammers.
Because of Android’s open nature, you may be concerned that some malicious apps or backdoors are running in the background. But this same openness also allows you to install third-party security applications that can do a full scan of all files on your mobile device—for example, Malwarebytes Security or any other reputable security app.

After installing your chosen app, you can quickly start a scan. You can also schedule ongoing regular scans to protect yourself moving forward.
iPhones are less likely to be the target of an attack, as its more restrictive iOS makes it much harder to download and install malicious software by accident.
But viruses aren’t the only things you should clean from your phone. If you’re also tired of constant pings and ads, learn how to turn off push notifications on your device.
Ever lost a file you swore you saved? 🔎🗂 If you or any other users on your computer have hidden files, this post has the solution to find them ✅Click to Tweet
Summary
Trying to find hidden files needn’t be challenging. If you’re trying to find files that you hid yourself or the ones hidden by default by your OS, it’s usually as easy as clicking a button or using a keyboard shortcut.
You can also use a browser as a file explorer to show hidden files on Windows and Mac computers.
If you want to see files hidden by other users, you may need to use specialized software (unless you have administrator privileges). For malware, viruses, and other malicious attacks, the best option is to use anti-malware software.
Are you still having trouble revealing the hidden files on your computer or smartphone? Let us know in the comments below.
Get all your applications, databases and WordPress sites online and under one roof. Our feature-packed, high-performance cloud platform includes:
- Easy setup and management in the MyKinsta dashboard
- 24/7 expert support
- The best Google Cloud Platform hardware and network, powered by Kubernetes for maximum scalability
- An enterprise-level Cloudflare integration for speed and security
- Global audience reach with up to 35 data centers and 275+ PoPs worldwide
Test it yourself with $20 off your first month of Application Hosting or Database Hosting. Explore our plans or talk to sales to find your best fit.
Do you want to quickly show hidden files and folders on your computer or phone?
If you or any other users on your computer have ever hidden a file or folder, it can be easy to lose track of where that file has gone.
Thankfully, most operating systems have options to show these hidden files, provided you have the proper privileges.
Regardless of whether you’re a Windows, macOS, Linux, Android, or iOS user, we’ve got you covered. In this article, we’ll go over the quickest and easiest ways to show hidden files, no matter what your device is.
Let’s jump right in.
Prefer to watch the video version?
How Do I Show Hidden Files on My Windows Laptop?
In Windows 10, the easiest way to show hidden files or folders is to use the File Explorer’s View options.
First, open your File Explorer (WIN + E), and go to the folder you think has hidden files. Next, click the View tab, and then check the box next to the Hidden items text.
That should instantly show any hidden files in that folder. If you don’t see any hidden files, that means there aren’t any in that particular folder. You should note that hidden files are different from deleted files.
In older versions of Windows (and Windows 10), you can edit these settings in the Control Panel’s File Explorer Options.
Search for “folder” in the Windows toolbar and select the first result to get there. You can also search for “File Explorer Options” if “folder” doesn’t show you the option you need.
For versions older than Windows Vista with no search box, you can manually navigate to Folder Options under Appearance and Themes.
Next, navigate to the View tab and change the Hidden files and folders settings to Show.
Once you’ve checked the Show hidden files, folders, and drives radio button, you can see all hidden files.
Note: The vast majority of hidden files are Windows system files and software cache files, including browser cache files. Editing, moving, or deleting the wrong files can break your operating system. Make 100% sure you’re not in a system folder before you make any changes.
If you want to clear the cache of different programs, you can usually do that from within the program settings. You don’t need to look through them manually and delete the hidden files one by one.
Whether you’re a Windows, macOS, Linux, Android, or iOS user, finding hidden files just got a whole lot easier, thanks to this post 🗂 ✅Click to Tweet
What Is the Shortcut to Show Hidden Files in Windows?
Unfortunately, there’s no native keyboard shortcut for Windows to show hidden files. Even in the newest version of Windows 10, you’d need a custom script.
But on the flip side, it only takes a few seconds to show the files manually through the view settings.
First, press WIN + E to open the Windows File Explorer and navigate to the folder with the hidden files.
Then, click through to the View tab and check the Hidden items box.
It’s that easy.
If you’re a developer and want the ability to hide or display hidden files with a shortcut, you can easily create one with a custom AutoHotKey script.
How to Show Hidden Files in CMD
Windows Command Prompt (CMD) allows you to explore hidden files and directories differently. It’s similar to the Terminal tool found on Linux and related systems. You can use commands to single out only the hidden files and folders in a given directory.
To open CMD, you can either use the Windows Run tool by pressing WIN + R and then typing in CMD—or you can search for “CMD” in the Windows toolbar.
Then you can navigate to the folder of your choice by using the basic dir command.
That said, CMD also hides hidden files and folders by default. Because of that, it’s not enough to type in dir C:your-folder as this will only show visible files.
To show hidden files, you need to include the /a:h modifier in that command. So, dir /a:h C:your-folder will do the trick.
CMD also has specific commands for showing directories and folders.
/a:d shows all hidden directories, and /a shows hidden folders.
Note: Did you know that you can also use a command-line interface to work with your WordPress site? WP-CLI lets you manage all aspects from a similar terminal.
Use a Third-Party Software to Show Hidden and Deleted Files
The last option is to use a third-party file explorer or file recovery software to show hidden files. If you’re looking for files hidden using regular file options, this isn’t necessary.
But advanced recovery software can also get back files that aren’t just hidden, but deleted permanently. Some popular file recovery tools include:
- Recuva
- Remo
- EaseUS
- Disk Drill
When Windows File Explorer Won’t Be Enough
There are a few use cases where Windows File Explorer and CMD won’t help you.
Here are some examples:
- If another user has hidden the files from you specifically, and you don’t have administrator privileges.
- Suppose you’re looking for hidden malicious files and malware on an infected computer. To lower the risk of this happening, make sure your firewall and other security software and hardware are up to date.
- If the files are password-protected or encrypted and you forgot the password, provided you aren’t a system administrator.
How Do I Show Hidden Files on My Mac?
There are a few different ways you can show hidden files on a Mac, depending on how you’re browsing your files.
In the Mac Finder, the easiest way to toggle hidden files is with a keyboard shortcut. You can also show or hide files using the Terminal.
What is the Shortcut to Show Hidden Files on macOS?
You can use the CMD + SHIFT + PERIOD shortcut to show hidden files in a folder while using the Finder on any modern Apple computer.
Just open the Mac Finder (from the menu or press OPTION + CMD + SPACE), and navigate to the right place. Once there, you can use the hotkey mentioned above to display hidden files.
The hidden files and folders will stand out visually as semi-transparent entities.
Note: Like with Windows computers, you need to be careful with these hidden files. Please don’t make any changes to them unless you’re 100% sure that they aren’t system files.
How to Use the Terminal to Show Hidden Files
You can also use the Mac Terminal to find and show hidden files. The terminal is the command-line interface for all Mac computers (like CMD on Windows).
To open it, use the CMD + SPACE shortcut to open Spotlight Search. Once open, search for “terminal” and then click Enter.
Now you need to give Mac Terminal the command to show hidden files. Here are the steps:
- Type the following command:
defaults write com.apple.Finder AppleShowAllFiles true - Press Enter to execute it.
- Type
killall Finderand then press Enter again.
And you’re done! You can now explore the hidden files using either the Finder or the Terminal itself.
Use a Third-Party File Explorer to Show Hidden (and Deleted) Files
As with Windows, you can use third-party file explorers to show hidden files on your Mac, but it’s unnecessary.
Where you might find this type of software more useful is in finding files you have accidentally deleted—not items you have placed in the recycle bin, but the ones you’ve removed “permanently.”
The leading file recovery software options are mostly the same for Macs as for Windows machines:
- Disk Drill
- Recuva
- Remo
- EaseUS
When the Terminal or Finder Doesn’t Cut It
As in Windows, these default options aren’t universal, and in some cases, you’re better off relying on specialty software. Here’s a couple of examples:
- If a user hasn’t given you read permission, and you don’t have administrator privileges. If your user has “no access,” it doesn’t matter if you can see the folder.
- If you’re looking for hidden malicious files or viruses that you cannot unhide through standard methods.
How to Show Hidden Files in Linux
Do you have a computer or server running on Linux and want to show hidden files? You can accomplish this using the Linux Command Line or a GUI file explorer. For web servers, you can also use an FTP/SFTP client to reveal the hidden files.
Which option you use will depend on your exact Linux distro and use case. We’ve covered all the options below.
Using the Linux Command Line
If you’re not using a graphical user interface, which is common with most web servers, you can easily show hidden files with a single Linux command.
Using the -a modifier with the ls command will automatically display all files.
For example: $ ls -a /home/user/your-folder/
If you only want to show hidden files, you can use the special regex modifier below:
$ ls -dl .[^.]* /home/user/your-folder/With the File Explorer
You can easily show hidden files using the file explorer in Ubuntu-based Linux desktop environments (Gnome 3, Mate, etc.).
For the quickest option, you can show hidden files using the keyboard shortcut CTRL + H. You can also right-click anywhere in a folder and check the Show hidden files option at the bottom.
Whether or not the files are transparent depends on your specific installation of Linux.
With an FTP/SFTP Client (for Web Servers)
Sometimes, you may have to transfer hidden files or folders to and fro your web server (e.g. .htaccess file). It’s essential for troubleshooting WordPress errors.
In such a case, you can use an FTP/SFTP client like FileZilla to accomplish this task quickly. FileZilla is available for all major operating systems. We’ll be using its Mac variant for this demonstration.
First, click on the Server tab in FileZilla’s menu bar and enable the Force showing hidden files option.
Now, connect to your web server via SFTP by entering the relevant details. You should now see all the hidden files and folders on your server.
In the above example, you can see two hidden files in the site’s ~/public folder: .hiddenfile and .htaccess.
As you can see, it’s a quick and straightforward process to reveal hidden files on your web server.
How to Show Hidden Files on a USB Stick
Another common question you might have is how to show hidden files on a USB flash drive. Unless it’s encrypted, you can use the same basic Windows Explorer or Mac Finder options to do so.
On a Windows PC
On a Windows computer, plug in the USB stick, and open a Windows Explorer window. It may happen automatically when you plug in the USB drive, depending on your settings.
Once the Explorer window is open, use it to navigate to the thumb drive directory. It’s typically located at the bottom of the expanded This PC menu.
Then, navigate to the View tab, and check the Hidden Items box to show all hidden folders and files.
As shown above, this immediately displays all the hidden folders in the base USB drive folder.
All hidden files within these folders will also now be visible.
And that’s all there is to it. You’ve successfully revealed all the hidden files on your USB drive.
On a Mac
On a Mac, it’s even more straightforward. Just plug in the USB, open the Mac Finder, and navigate to the USB directory. After you plug it in, it should show under the Devices menu.
Then you can immediately use the CMD + SHIFT + PERIOD keyboard shortcut to show the hidden files.
If the shortcut isn’t working, try triggering it again in a folder you’re 100% sure has hidden files. It may have started toggled on, which means that you’ll have just turned it off.
If that doesn’t work, check the language input settings. In some languages, the period key gets repurposed for extra letters not included in the English language.
What if the USB Is Encrypted?
If the whole thumb drive is encrypted using custom software like BitLocker or the default Mac USB encryption tools, and you no longer have the password, there’s no easy solution, but all is not necessarily lost.
The first thing you should do is search any physical (or digital) location where the password might be. Search as thoroughly as you can.
If you can’t find it, you can try a data recovery tool like RecoverIt or Disk Drill.
Only after you’re confident that you can’t find the password should you consult a professional data retrieval service. These can be pretty expensive, so be sure to exhaust all other efforts first.
How to Show Hidden Files in Google Chrome (for Both Mac and Windows)
If you don’t want to mess with the Terminal, CMD, or system settings, you can also use a browser to show hidden files.
If you use it as a file explorer for your computer, it’ll automatically show you all files, even if they’re set to “Hidden” in either the Mac Finder or Windows File Explorer.
Let’s check out a folder that includes a hidden file. The Windows File Explorer settings have the option to show hidden files unchecked:
That means you won’t see any of the hidden files in this folder using the File Explorer or the default CMD commands.
But with a web browser, you can immediately see all files in the folder, including the hidden ones:
This approach works on both Windows and Mac computers and other browsers. We chose to focus on Google Chrome because it’s the leader with over 77% of the global desktop browser market share.
How to Show Hidden Files on Your Smartphone
When it comes to files on your phone, you may not think you have the same kind of access as on your computer. But we’ll show you how you can show hidden files like photos, videos, and more on your iPhone or Android Phone.
For Android Phones
On Android phones, you can easily explore hidden files with the default Google Files app.
First, open the Files app (or another file manager), and go to the main settings menu by clicking the hamburger icon (≡).
Then all you need to do is scroll down until you see the Show hidden files option. Toggle this option on, and you’re good to go.
You can now explore all files on your phone.
Note: Most of the hidden files you can see are essential cache files for your different apps and Android system files (but not all). So unless you’re clearing out data from an uninstalled app, proceed with caution.
For iPhones
Unlike Android phones, iPhones don’t come with a default overall file manager. However, within the Photos application, you can hide photos and videos.
If you want to see these hidden photos and video files, you can follow these simple steps.
- Go to your Photos app and visit the Albums tab.
- Scroll down to the bottom until you see the Other Albums section and select the Hidden link.
- Here are displayed all the photos and videos hidden on your phone.
- To restore these files, you can select them one by one and then click the Unhide option.
If you want to explore hidden files used in apps and the OS itself, you’ll first need to jailbreak your phone. However, as it’s against the iOS end-user agreement to jailbreak your phone, this will void your warranty, so we don’t recommend it for the average user.
If you’re worried about hidden malicious files like malware or viruses, you’re much better off scanning your phone with anti-malware apps.
How to Use Anti-Malware Software to Find Hidden Malicious Files
If you suspect that you’ve gotten a virus or malware on your computer, manually checking for hidden files won’t help you.
The vast majority of hidden files are system files. There are hundreds of thousands of them out there. And you have no way of knowing which one doesn’t belong unless you know every single file in the operating system. You’ll also need to check the file size and usage patterns for irregularity.
The bottom line: it’s not realistic or even possible for anyone to do this manually. Instead, use up-to-date antivirus software to scan your computer for you.
Scan Your Computer With a Highly Trusted, Up-to-Date Antivirus Software
83% of all malware attacks in 2020 targeted Windows computers. So it’s safe to say that this step is most important if you’re a Windows user.
If you recently purchased your laptop, chances are you still have antivirus software with a valid license. For Windows computers, McAfee or Norton often come as part of the package.
If that’s the case, you can just run the scan without installing any new software. You can do so by opening the software itself and starting a scan.
Or you can right-click the folder you want to check in the file explorer and select the scan option.
You can also do this for a USB drive.
If you don’t have any antivirus software installed, you can download a free version or a free trial of software like Bitdefender or Malwarebytes.
Windows 10 also has a built-in security software called Microsoft Defender, and it’s good enough for most use cases. But it’s not perfect. So even for the latest Windows version, you should look into a highly trusted security suite.
Note: If you’re also worried about your website or business apps’ security, read our guide to cloud security. It includes a 10-step checklist to help you keep your data safe.
You Can Also Use a Mobile Phone App (Android Only)
Android phone users can install an antivirus app and scan their phones for malware regularly.
Note: iOS doesn’t allow third-party apps to scan your phone, so iOS mobile security apps only focus on blocking phishing sites and potential scammers.
Because of Android’s open nature, you may be concerned that some malicious apps or backdoors are running in the background. But this same openness also allows you to install third-party security applications that can do a full scan of all files on your mobile device—for example, Malwarebytes Security or any other reputable security app.
After installing your chosen app, you can quickly start a scan. You can also schedule ongoing regular scans to protect yourself moving forward.
iPhones are less likely to be the target of an attack, as its more restrictive iOS makes it much harder to download and install malicious software by accident.
But viruses aren’t the only things you should clean from your phone. If you’re also tired of constant pings and ads, learn how to turn off push notifications on your device.
Ever lost a file you swore you saved? 🔎🗂 If you or any other users on your computer have hidden files, this post has the solution to find them ✅Click to Tweet
Summary
Trying to find hidden files needn’t be challenging. If you’re trying to find files that you hid yourself or the ones hidden by default by your OS, it’s usually as easy as clicking a button or using a keyboard shortcut.
You can also use a browser as a file explorer to show hidden files on Windows and Mac computers.
If you want to see files hidden by other users, you may need to use specialized software (unless you have administrator privileges). For malware, viruses, and other malicious attacks, the best option is to use anti-malware software.
Are you still having trouble revealing the hidden files on your computer or smartphone? Let us know in the comments below.
Get all your applications, databases and WordPress sites online and under one roof. Our feature-packed, high-performance cloud platform includes:
- Easy setup and management in the MyKinsta dashboard
- 24/7 expert support
- The best Google Cloud Platform hardware and network, powered by Kubernetes for maximum scalability
- An enterprise-level Cloudflare integration for speed and security
- Global audience reach with up to 35 data centers and 275+ PoPs worldwide
Test it yourself with $20 off your first month of Application Hosting or Database Hosting. Explore our plans or talk to sales to find your best fit.
В Windows 7, Windows 8, Windows 10 и Vista в целях безопасности и сохранности можно скрывать важные файлы и папки, чтобы случайным образом другие пользователи не удалили/не изменили важные данные, или просто от просмотра чужих глаз. При необходимости эти же файлы довольно просто отобразить, что мы и рассмотрим далее в этой статье.
Также в последнее время очень часто наблюдается случай, когда у пользователей все файлы и папки становятся скрытыми, будто все, что было, удалено а вместо них создаются ярлыки с теми же названиями, что является последствием заражения компьютера/съемного носителя вирусом.
Также это может произойти после установки или проверки компьютера антивирусом. Если у вас именно такой случай связанный с вирусом, нижеприведенные инструкции также вам помогут отобразить скрытые файлы и папки. Но чтобы полностью удалить вирус, читайте статью Как удалить вирус с ярлыками.
Первый и самый простой метод, который я всегда использую — это с помощью программы Total Commander. Откройте программу, выберите нужный диск и просто нажмите кнопку «Скрытые элементы», и вы увидите все, что было скрыто (помеченные красным восклицательным знаком).

Если у вас не установлена программа, используйте также довольно простые способы, описанные ниже.
Используйте вкладку Вид и нажмите кнопку Параметры.

На вкладке Вид, отметьте опцию «Показывать скрытые файлы, папки и диски» в самом низу. Если вы хотите добраться до скрытых системных файлов Windows, снимите флажок с опции «Скрывать защищенные системные файлы»

Скрытые файлы отобразятся в полупрозрачном виде. Если нужно полностью убрать атрибут «скрытый» с файла или папки, нажмите на него правой кнопкой мыши и выберите свойства. На вкладке Общие снимите флажок с параметра Скрытый.

В большинстве случаев это помогает, но иногда бывает так, что флажок с опции невозможно убрать, т.к. атрибут скрытый неактивен. Если у вас так, пролистайте немного вниз и выполните приведенные инструкции.
Windows 7 или Vista
Откройте любую папку и выберите «Параметры папок и поиска» в меню Упорядочить.

Также как и в предыдущем примере отметьте или снимите флажки с нужных опций и нажмите Ок.

Что делать если у папки атрибут скрытый неактивен
В случае, если вы не можете убрать атрибут скрытый у папки вышеуказанным методом, код приведенный ниже может помочь вам в этой ситуации. Просто скопируйте его, вставьте в блокнот и сохраните его под именем folder с расширением .vbs вместо txt, чтобы получилось folder.vbs. Затем скопируйте и вставьте файл в нужный вам диск (USB флешка, SD карта или HDD), где нужно отобразить скрытые файлы и запустите его стандартным, двойным щелчком мыши.
Не забудьте изменить «d:» на букву вашего диска.
‘ Сброс файловых атрибутов для всех папок внутри определенного диска
‘ Измените d: на букву диска, в котором будет применен скрипт
cDrive = «d:»
Set FSO = CreateObject(«Scripting.FileSystemObject»)
ShowSubfolders FSO.GetFolder(cDrive)
WScript.Echo «Done with fix.»Sub ShowSubFolders(Folder)
str = «»
For Each Subfolder in Folder.SubFolders
str = str & » » & Subfolder.Path
subFolder.Attributes = 0
ShowSubFolders Subfolder
Next
End Sub
После запуска файла, вы должны увидеть все скрытые папки, но не файлы (обратите внимание), так как данный метод применим только к папкам. А для файлов используйте следующий метод:
- Откройте диалоговое окно «Выполнить», введите cmd и нажмите Enter.
- Введите букву вашего диска, к примеру d: и нажмите Enter.
- Затем введите следующую команду:
attrib d:*.* /d /s -h -r -s
Теперь, все скрытые файлы должны отобразиться.