- Download source code- 35.1 KB

Introduction
In this article, I will explain how to create UDP packets and then send them to a remote server through the Internet using WinPCap for Windows. The code has been tested to work with Windows XP SP2 and Vista SP1 on Linksys routers, and on Toshiba modems connected directly to the Internet. Please note that the code here is very minimalistic, and can be greatly expanded depending on your needs. The reason I use WinPCap in this article is that it solves the issue of Winsock for Windows (XP SP2 and above) not allowing raw UDP packets to be sent (in Linux, you can just use regular sockets). With WinPcap, it is possible to specify your own source IP and source hardware addresses in packets.
Background
You should know the basics of how computers communicate through the Internet; this includes knowing what packets, sockets, UDP, IP addresses, and MAC addresses are. Additionally, you might want to review the packet headers before reading over this material. The headers involved are Ethernet II, IP, and UDP. Also, know how memcpy() works; it’s used a lot. Lastly, you must know how to install headers and libraries for use with your compiler.
Before we begin
Getting WinPCap
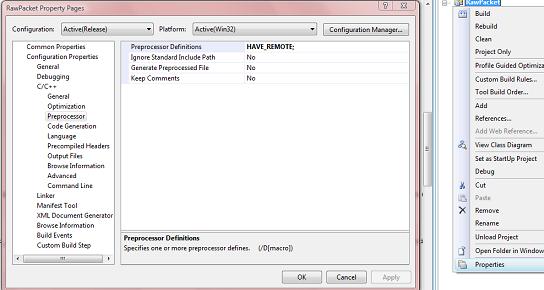
The WinPCap 4.02 libraries I use here can be downloaded here. Once the libraries are set up, you need to add «HAVE_REMOTE» to your preprocessor. In Visual Studio 2008, this can be done in the C++ Options of your project. Make sure you do this because I spent a good time wondering why my WinPCAp project would not compile despite me checking for errors many times. Also, if you want to run WinPCap applications, you will have to install the WinPcap binaries.
Windows SDK
Some functions and structures used in this article are from Winsock2 and the Iphlp API. These are included in the Windows SDK, and can be downloaded for free here (1.33 GB; good luck dial-up users).
How a UDP packet works
Headers
First part of the packet — Ethernet II header
A packet to be sent through the Internet usually starts with an Ethernet II header. This header consists of three main parts: the destination hardware address, the source hardware address, and the type. The most important thing here is the destination hardware address because it determines the first place the packet is sent after being created. In this article, I set the destination hardware address to that of my «Default Gateway». A default gateway is a modem/router/computer that connects a network to the Internet or another network. If you use this code in a network with more than one LAN, you will have to determine what default gateway address to use with GetIpNetTable and your own addresses. The «type» part of the Ethernet II header specifies what kind of packet is being used. In this case, «0x0800» is used to specify IPv4.

(An image showing the individual bytes we will have to fill in later. The packet was made using the example application and captured using Wireshark.)
Second part of the packet — IP header
The IP header stores the IP addresses of the source and the destination as well as other important data. Information about the IP header can be found here. We will have to fill all of this in after we fill in the Ethernet code.
Third part of the packet — UDP header
UDP is used by many applications, and so there has to be a way for an application to know which information is meant for it. Where an IP and MAC address are used to determine what computer the information is meant for, ports are used by UDP to determine what application the information is meant for. Information about UDP headers can be found here.
Checksums
The IP and UDP headers require a checksum to be calculated. This is probably the most annoying part of crafting UDP packets, but is fortunately pretty straightforward. In the IP header, the «Checksum is the 16-bit one’s complement of the one’s complement of the header».
In the UDP header, the Checksum is the 16-bit one’s complement of the one’s complement of the pseduoheader (described later).
Using the code
Choosing the correct device
The first thing we must code is a way to determine what device is to be used to send the packets. Most home computers today have a «loop-back interface» that is used to access the computer itself with «localhost». This device cannot be used for sending packets to remote servers, and so you must make sure to use another one. In the sample project, I use the «ShowDeviceList()» function in the «NetworkStuff.h» file to show a list of network devices installed on the computer, using WinPCap.
void ShowDeviceList(void)
{
        char Error[PCAP_ERRBUF_SIZE];
    pcap_if_t* Devices;pcap_findalldevs_ex(PCAP_SRC_IF_STRING,NULL,
                                           &Devices,Error);
    int i = 1;
    for(pcap_if_t* CurrentDevice = Devices;CurrentDevice != NULL;
        CurrentDevice = CurrentDevice->next)
    {
        cout<<i << ". "<<  CurrentDevice->description << endl;
        i++;
    }
}
The function first creates an error buffer for use by the pcap_findalldevs_Ex function. Remember that this buffer is not optional, and will result in a program crash if set to null. The pcap_findalldevs_ex function sets a «pcap_if_t» pointer at the beginning of a linked list of network devices. A loop is then executed to show the description of each device. (If you do not have an understanding of linked lists, I suggest you read this.)
Next, the user enters the number of his selection, and the program loops that number of times and sets the global «CurrentDevice» to the appropriate pcap_if_t* device.
cout << "Enter the number of your device (example: 2)" << endl;
ShowDeviceList();
int chosen;
cin >> chosen;

int i = 1;char Error[PCAP_ERRBUF_SIZE];
pcap_findalldevs_ex(PCAP_SRC_IF_STRING,NULL,&ChosenDevice,Error);

for(pcap_if_t* CurrentDevice = ChosenDevice;
    CurrentDevice != NULL;
    CurrentDevice = CurrentDevice->next)
{
    if(i == chosen)
    {
        ChosenDevice = CurrentDevice;
        break;
    }
    i++;
}
ChosenDevice should now be set to the device chosen by the user.
Getting the required device information
Now, we must find the required information about the chosen device. This is the MAC address of the device’s default gateway, and in the case that the user wants to use real information, it is also the device’s MAC and IP addresses. In the sample application, I created a structure called «DeviceInfo» to store this information, and the function «GetAdapterInfo()» to fill it in. The GetAdapterInfo() function uses the IP Helper API by Microsoft to greatly simplify getting device information. (Previously, I believe you had to use Windows Drivers to read NIC data.)
DeviceInfo GetAdapterInfo(pcap_if_t* Device)
{
    DeviceInfo DevInfo;
    ZeroMemory(&DevInfo,sizeof(DevInfo));

    IP_ADAPTER_INFO* AdapterInfo = new IP_ADAPTER_INFO [48];
    ULONG AIS = sizeof(IP_ADAPTER_INFO) * 48;
    GetAdaptersInfo(AdapterInfo,&AIS);     for(IP_ADAPTER_INFO* Current = AdapterInfo;Current != NULL;
        Current = Current->Next)
    {
        if(strstr(Device->name,Current->AdapterName)!=0)

        {
            DevInfo.DefaultGateway = inet_addr(Current->GatewayList.IpAddress.String);
                              DevInfo.IP = inet_addr(Current->IpAddressList.IpAddress.String);
                           memcpy((void*)DevInfo.PhysicalAddress,(void*)(Current->Address),6);
            ULONG MACSize = 6;
            if(SendARP(DevInfo.DefaultGateway,NULL,
                      (void*)DevInfo.GatewayPhysicalAddress,&MACSize)
                !=NO_ERROR){cout << "SendARP Failed. No default gatewayn"; }
                                        DevInfo.Exists = true;
            return DevInfo;
        }
    }
    DevInfo.Exists = false;
    return DevInfo;
}
We are now able to get the information of the pcap_if_t* device chosen earlier into a DeviceInfo structure for use in packets. Note that if you choose a loop-back interface, the DeviceInfo.Exists member will be set to false for error checking. (GetAdaptersInfo() does not get loopback interfaces, and so the if() condition will never be satisfied.)
Input
Next, we can get input for use in the RawPacket class. It is easier if all the input is in a char buffer and is then converted to a data type supported by the class.
DeviceInfo di;
di = GetAdapterInfo(ChosenDevice);
if(di.Exists == false)
{
    cout << "Invalid Selection (Try another device)n";
    return 0;
}

cout << "You chose: " << ChosenDevice->name << endl;

char SourceIP[16];
char SourcePort[6];
char SourceMAC[19];

char DestinationIP[16];
char DestinationPort[6];

char DataString[2048];

cout << "Enter source IP (or -1 for real)n";
cin >> SourceIP;
cout << "Enter source port (0-65535)n";
cin >> SourcePort;
cout << "Enter source MAC (or -1 for real) n";
cin >> SourceMAC;
cout << "Enter destination IPn";
cin >> DestinationIP;
cout << "Enter destination port(0-65535)n";
cin >> DestinationPort;
cout << "Enter data stringn";
cin >> DataString;
The way you handle input is, of course, dependent on your needs. Just remember that if you want to have an option to use real device data (real MAC or IP), it is stored in the DeviceInfo structure for ease of access.
The RawPacket class and how it works
The following code is executed in the sample application if neither the source MAC or the source IP were -1:
RawPacket RP;

RP.CreatePacket(MACStringToBytes(SourceMAC),
        di.GatewayPhysicalAddress,
        inet_addr(SourceIP),
        inet_addr(DestinationIP),
        atoi(SourcePort),
        atoi(DestinationPort),
        (UCHAR*)DataString,
        strlen(DataString));

    RP.SendPacket(ChosenDevice);
The usage of RawPacket.CreatePacket and RawPacket.SendPacket should be pretty straightforward. Just know that the inet_addr() function converts a string containing a decimal dot IP address to a 4 byte integer, and atoi converts a string representation of a number to an integer. DataString is the data carried at the end of the packet that is separate from the headers. The last argument is the length of DataString in bytes. MACStringToBytes converts a MAC address in the format of (xx:xx:xx:xx:xx:xx) (each xx represents a 2 digit hexadecimal number) to a 6 byte array. Its definition follows:
unsigned char* MACStringToBytes(LPSTR String)
{
    char* Tmp = new char[strlen(String)];
    memcpy((void*)Tmp,(void*)String,strlen(String));
        unsigned char* Returned = new unsigned char[6];
    for(int i = 0;i<6;i++)
    {
        sscanf(Tmp,"%2X",&Returned[i]);         memmove((void*)(Tmp),(void*)(Tmp+3),19-i*3);    }
    return Returned;
}
Inside the class
Now, here is the first function we call from RawPacket. This function basically creates a buffer big enough to hold the data plus the headers of the packet, and then appends the data to the buffer. Note that most of the hard coded values here can be changed depending on your needs. Also, you should know what the «Length» in each header means. In the IP header, it means the length of the IP header itself plus the length of the UDP header plus the length of the data at the end. In the UDP header, it means the length of the UDP header plus the length of the end data. Usually, IP headers are 20 bytes, and UDP headers are 8 bytes. Remember to put shorts and ints into network byte order using htons() or htonl() before copying them to the packet.
void RawPacket::CreatePacket
                     (unsigned char* SourceMAC,
                      unsigned char* DestinationMAC,
                      unsigned int   SourceIP,
                      unsigned int   DestIP,
                      unsigned short SourcePort,
                      unsigned short DestinationPort,
                      unsigned char* UserData,
                      unsigned int   UserDataLen)
{
    RawPacket::UserDataLen = UserDataLen;
        FinalPacket = new unsigned char [UserDataLen + 42];
        USHORT TotalLen = UserDataLen + 20 + 8;

        memcpy((void*)FinalPacket,(void*)DestinationMAC,6);    memcpy((void*)(FinalPacket+6),(void*)SourceMAC,6);     USHORT TmpType = 8;                                       memcpy((void*)(FinalPacket+12),(void*)&TmpType,2);
        memcpy((void*)(FinalPacket+14),(void*)"x45",1);

        memcpy((void*)(FinalPacket+15),(void*)"x00",1);
    TmpType = htons(TotalLen);
    memcpy((void*)(FinalPacket+16),(void*)&TmpType,2);
    TmpType = htons(0x1337);
    memcpy((void*)(FinalPacket+18),(void*)&TmpType,2);

        memcpy((void*)(FinalPacket+20),(void*)"x00",1);
        memcpy((void*)(FinalPacket+21),(void*)"x00",1);
        memcpy((void*)(FinalPacket+22),(void*)"x80",1);
        memcpy((void*)(FinalPacket+23),(void*)"x11",1);
    memcpy((void*)(FinalPacket+24),(void*)"x00x00",2);

        memcpy((void*)(FinalPacket+26),(void*)&SourceIP,4);
        memcpy((void*)(FinalPacket+30),(void*)&DestIP,4);
        TmpType = htons(SourcePort);
    memcpy((void*)(FinalPacket+34),(void*)&TmpType,2);
    TmpType = htons(DestinationPort);
    memcpy((void*)(FinalPacket+36),(void*)&TmpType,2);
    USHORT UDPTotalLen = htons(UserDataLen + 8);         memcpy((void*)(FinalPacket+38),(void*)&UDPTotalLen,2);
    /Finally append our own data
    memcpy((void*)(FinalPacket+42),(void*)UserData,UserDataLen);

    unsigned short UDPChecksum = CalculateUDPChecksum(UserData,
        UserDataLen,SourceIP,DestIP,htons(SourcePort),
        htons(DestinationPort),0x11);
    memcpy((void*)(FinalPacket+40),(void*)&UDPChecksum,2);

    unsigned short IPChecksum = htons(CalculateIPChecksum();
    memcpy((void*)(FinalPacket+24),(void*)&IPChecksum,2);

    return;
}
Checksums
Now, for the checksum functions. These are CalculateUDPChecksum and CalculateIPChecksum. I will go over the latter first.
unsigned short RawPacket::CalculateIPChecksum(void)
{
    unsigned short CheckSum = 0;
    for(int i = 14;i<34;i+=2)
    {
        unsigned short Tmp = BytesTo16(FinalPacket[i],FinalPacket[i+1]);
        unsigned short Difference = 65535 - CheckSum;
        CheckSum += Tmp;
        if(Tmp > Difference){CheckSum += 1;}
    }
    CheckSum = ~CheckSum;
    return htons(CheckSum);
}
The cool thing about calculating the IP checksum is that we don’t need items that are spread across the packet. The IP checksum is based only on the 20 bytes of the entire IP header. Since the IP header in our packet starts at the 15th byte, we set i to 14 (arrays start at zero) and stop at 14+20 (34). The checksum for the IP header is based on the 16 bit complement of the 16 bit one’s complement sum. This means that we must join every two bytes into one, then add it to the checksum, and if the addition causes the checksum total to go over 65535 (the maximum an unsigned short can hold), we add one to the checksum. In the function, BytesTo16() joins the two bytes and puts the result in Tmp, and then Difference holds the highest number Tmp can be without causing CheckSum to go over 65535. At the end of every loop, a check is made to see if Tmp is higher than Difference, and one is added accordingly. At the very end of the function, the ~ operator is used to get the One’s Complement of CheckSum. (The one’s complement of the one’s complement sum).
Here is the BytesTo16 function used to join two chars into a short:
unsigned short BytesTo16(unsigned char X,unsigned char Y)
{
     unsigned short Tmp = X;
     Tmp = Tmp << 8;
     Tmp = Tmp | Y;
     return Tmp;
}
The UDP checksum function is very similar to the IP checksum one, except that first a «pseduoheader» must be constructed. The pseudoheader is made up of the source IP, the destination IP, the source port, the destination port, the length (the length should be in the pseudoheader twice), the protocol, and the actual data. Note that if the length of the pseudoheader is an odd number, a zero should be added at the end for check sum purposes. Make sure that all things are in the network byte order because otherwise there will be problems.
unsigned short RawPacket::CalculateUDPChecksum(unsigned char* UserData,
                                               int UserDataLen,
                                               unsigned int SourceIP,
                                               unsigned int DestIP,
                                               unsigned short SourcePort,
                                               unsigned short DestinationPort,
                                               unsigned char Protocol)
{
    unsigned short CheckSum = 0;
    unsigned short PseudoLength = UserDataLen + 8 + 9;
    PseudoLength += PseudoLength % 2;
    unsigned short Length = UserDataLen + 8;
    unsigned char* PseudoHeader = new unsigned char [PseudoLength];
    for(int i = 0;i < PseudoLength;i++){PseudoHeader[i] = 0x00;}
    PseudoHeader[0] = Protocol;
    memcpy((void*)(PseudoHeader+1),(void*)(FinalPacket+26),8);
    Length = htons(Length);     memcpy((void*)(PseudoHeader+9),(void*)&Length,2);     memcpy((void*)(PseudoHeader+11),(void*)&Length,2);

    memcpy((void*)(PseudoHeader+13),(void*)(FinalPacket+34),2);    memcpy((void*)(PseudoHeader+15),(void*)(FinalPacket+36),2);
    memcpy((void*)(PseudoHeader+17),(void*)UserData,UserDataLen);


    for(int i = 0;i < PseudoLength;i+=2)
    {
        unsigned short Tmp = BytesTo16(PseudoHeader[i],PseudoHeader[i+1]);
        unsigned short Difference = 65535 - CheckSum;
        CheckSum += Tmp;
        if(Tmp > Difference){CheckSum += 1;}
    }
    CheckSum = ~CheckSum;     return CheckSum;
}
Woot, that’s about it. Just use these functions to place the UDP or IP checksum where they belong. Also, I am not yet sure why I need to do htons() on the IP checksum but not the UDP checksum.
Sending the information
The next function to look at is RawPacket.SendPacket(pcap_if_t* Device). This is where WinPCap sends the packets. Fortunately for us, this function is very simple.
void RawPacket::SendPacket(pcap_if_t* Device)
{
    char Error[256];
    pcap_t* t;
    t = pcap_open(Device->name,65535,PCAP_OPENFLAG_DATATX_UDP,1,NULL,Error);
    pcap_sendpacket(t,FinalPacket,UserDataLen + 42);
    pcap_close(t);
}
pcap_sendpacket sends packets, but first, we must get a pcap_t* for its first parameter. Since we already have the ChosenDevice variable, we can just pass its device->name to pcap_open so that pcap_t* t contains a handle to the device we want. pcap_open is described here. pcap_sendpacket just takes a pcap_t* variable, the data to send in an unsigned char buffer, and the length of the data. The length here is the length of the data plus 42 bytes of headers.
Improving the code
This class could use variables (instead of taking them all in one function), accessor functions, and perhaps some sort of division between headers.
Points of interest
I thought it was interesting that some ISPs don’t allow packets with spoofed source IPs or MAC addresses to be sent. I tried this myself, and could only send using my real IP and MAC (using spoofed values made the packets visible to me on Wireshark, but not at the target server), but my friend in Mexico was able to successfully send packets with both of these items being spoofed. (I was the server, and was able to see his packets coming from «11.33.33.77»). Just remember that if you are only using this in a local network, you should be able to use any IP or MAC address that exists in your LAN (192.168.1.0 — 192.168.1.100, for example). Another problem I had was knowing what the destination MAC was. At first, I thought it was the hardware address of the device at the destination IP. Then, I learned that it is actually just the hardware address of the next device to which the data should be sent. (For me, the default gateway.)
History
No changes yet.
- Download source code- 35.1 KB
Introduction
In this article, I will explain how to create UDP packets and then send them to a remote server through the Internet using WinPCap for Windows. The code has been tested to work with Windows XP SP2 and Vista SP1 on Linksys routers, and on Toshiba modems connected directly to the Internet. Please note that the code here is very minimalistic, and can be greatly expanded depending on your needs. The reason I use WinPCap in this article is that it solves the issue of Winsock for Windows (XP SP2 and above) not allowing raw UDP packets to be sent (in Linux, you can just use regular sockets). With WinPcap, it is possible to specify your own source IP and source hardware addresses in packets.
Background
You should know the basics of how computers communicate through the Internet; this includes knowing what packets, sockets, UDP, IP addresses, and MAC addresses are. Additionally, you might want to review the packet headers before reading over this material. The headers involved are Ethernet II, IP, and UDP. Also, know how memcpy() works; it’s used a lot. Lastly, you must know how to install headers and libraries for use with your compiler.
Before we begin
Getting WinPCap
The WinPCap 4.02 libraries I use here can be downloaded here. Once the libraries are set up, you need to add «HAVE_REMOTE» to your preprocessor. In Visual Studio 2008, this can be done in the C++ Options of your project. Make sure you do this because I spent a good time wondering why my WinPCAp project would not compile despite me checking for errors many times. Also, if you want to run WinPCap applications, you will have to install the WinPcap binaries.
Windows SDK
Some functions and structures used in this article are from Winsock2 and the Iphlp API. These are included in the Windows SDK, and can be downloaded for free here (1.33 GB; good luck dial-up users).
How a UDP packet works
Headers
First part of the packet — Ethernet II header
A packet to be sent through the Internet usually starts with an Ethernet II header. This header consists of three main parts: the destination hardware address, the source hardware address, and the type. The most important thing here is the destination hardware address because it determines the first place the packet is sent after being created. In this article, I set the destination hardware address to that of my «Default Gateway». A default gateway is a modem/router/computer that connects a network to the Internet or another network. If you use this code in a network with more than one LAN, you will have to determine what default gateway address to use with GetIpNetTable and your own addresses. The «type» part of the Ethernet II header specifies what kind of packet is being used. In this case, «0x0800» is used to specify IPv4.
(An image showing the individual bytes we will have to fill in later. The packet was made using the example application and captured using Wireshark.)
Second part of the packet — IP header
The IP header stores the IP addresses of the source and the destination as well as other important data. Information about the IP header can be found here. We will have to fill all of this in after we fill in the Ethernet code.
Third part of the packet — UDP header
UDP is used by many applications, and so there has to be a way for an application to know which information is meant for it. Where an IP and MAC address are used to determine what computer the information is meant for, ports are used by UDP to determine what application the information is meant for. Information about UDP headers can be found here.
Checksums
The IP and UDP headers require a checksum to be calculated. This is probably the most annoying part of crafting UDP packets, but is fortunately pretty straightforward. In the IP header, the «Checksum is the 16-bit one’s complement of the one’s complement of the header».
In the UDP header, the Checksum is the 16-bit one’s complement of the one’s complement of the pseduoheader (described later).
Using the code
Choosing the correct device
The first thing we must code is a way to determine what device is to be used to send the packets. Most home computers today have a «loop-back interface» that is used to access the computer itself with «localhost». This device cannot be used for sending packets to remote servers, and so you must make sure to use another one. In the sample project, I use the «ShowDeviceList()» function in the «NetworkStuff.h» file to show a list of network devices installed on the computer, using WinPCap.
void ShowDeviceList(void)
{
        char Error[PCAP_ERRBUF_SIZE];
    pcap_if_t* Devices;pcap_findalldevs_ex(PCAP_SRC_IF_STRING,NULL,
                                           &Devices,Error);
    int i = 1;
    for(pcap_if_t* CurrentDevice = Devices;CurrentDevice != NULL;
        CurrentDevice = CurrentDevice->next)
    {
        cout<<i << ". "<<  CurrentDevice->description << endl;
        i++;
    }
}
The function first creates an error buffer for use by the pcap_findalldevs_Ex function. Remember that this buffer is not optional, and will result in a program crash if set to null. The pcap_findalldevs_ex function sets a «pcap_if_t» pointer at the beginning of a linked list of network devices. A loop is then executed to show the description of each device. (If you do not have an understanding of linked lists, I suggest you read this.)
Next, the user enters the number of his selection, and the program loops that number of times and sets the global «CurrentDevice» to the appropriate pcap_if_t* device.
cout << "Enter the number of your device (example: 2)" << endl;
ShowDeviceList();
int chosen;
cin >> chosen;

int i = 1;char Error[PCAP_ERRBUF_SIZE];
pcap_findalldevs_ex(PCAP_SRC_IF_STRING,NULL,&ChosenDevice,Error);

for(pcap_if_t* CurrentDevice = ChosenDevice;
    CurrentDevice != NULL;
    CurrentDevice = CurrentDevice->next)
{
    if(i == chosen)
    {
        ChosenDevice = CurrentDevice;
        break;
    }
    i++;
}
ChosenDevice should now be set to the device chosen by the user.
Getting the required device information
Now, we must find the required information about the chosen device. This is the MAC address of the device’s default gateway, and in the case that the user wants to use real information, it is also the device’s MAC and IP addresses. In the sample application, I created a structure called «DeviceInfo» to store this information, and the function «GetAdapterInfo()» to fill it in. The GetAdapterInfo() function uses the IP Helper API by Microsoft to greatly simplify getting device information. (Previously, I believe you had to use Windows Drivers to read NIC data.)
DeviceInfo GetAdapterInfo(pcap_if_t* Device)
{
    DeviceInfo DevInfo;
    ZeroMemory(&DevInfo,sizeof(DevInfo));

    IP_ADAPTER_INFO* AdapterInfo = new IP_ADAPTER_INFO [48];
    ULONG AIS = sizeof(IP_ADAPTER_INFO) * 48;
    GetAdaptersInfo(AdapterInfo,&AIS);     for(IP_ADAPTER_INFO* Current = AdapterInfo;Current != NULL;
        Current = Current->Next)
    {
        if(strstr(Device->name,Current->AdapterName)!=0)

        {
            DevInfo.DefaultGateway = inet_addr(Current->GatewayList.IpAddress.String);
                              DevInfo.IP = inet_addr(Current->IpAddressList.IpAddress.String);
                           memcpy((void*)DevInfo.PhysicalAddress,(void*)(Current->Address),6);
            ULONG MACSize = 6;
            if(SendARP(DevInfo.DefaultGateway,NULL,
                      (void*)DevInfo.GatewayPhysicalAddress,&MACSize)
                !=NO_ERROR){cout << "SendARP Failed. No default gatewayn"; }
                                        DevInfo.Exists = true;
            return DevInfo;
        }
    }
    DevInfo.Exists = false;
    return DevInfo;
}
We are now able to get the information of the pcap_if_t* device chosen earlier into a DeviceInfo structure for use in packets. Note that if you choose a loop-back interface, the DeviceInfo.Exists member will be set to false for error checking. (GetAdaptersInfo() does not get loopback interfaces, and so the if() condition will never be satisfied.)
Input
Next, we can get input for use in the RawPacket class. It is easier if all the input is in a char buffer and is then converted to a data type supported by the class.
DeviceInfo di;
di = GetAdapterInfo(ChosenDevice);
if(di.Exists == false)
{
    cout << "Invalid Selection (Try another device)n";
    return 0;
}

cout << "You chose: " << ChosenDevice->name << endl;

char SourceIP[16];
char SourcePort[6];
char SourceMAC[19];

char DestinationIP[16];
char DestinationPort[6];

char DataString[2048];

cout << "Enter source IP (or -1 for real)n";
cin >> SourceIP;
cout << "Enter source port (0-65535)n";
cin >> SourcePort;
cout << "Enter source MAC (or -1 for real) n";
cin >> SourceMAC;
cout << "Enter destination IPn";
cin >> DestinationIP;
cout << "Enter destination port(0-65535)n";
cin >> DestinationPort;
cout << "Enter data stringn";
cin >> DataString;
The way you handle input is, of course, dependent on your needs. Just remember that if you want to have an option to use real device data (real MAC or IP), it is stored in the DeviceInfo structure for ease of access.
The RawPacket class and how it works
The following code is executed in the sample application if neither the source MAC or the source IP were -1:
RawPacket RP;

RP.CreatePacket(MACStringToBytes(SourceMAC),
        di.GatewayPhysicalAddress,
        inet_addr(SourceIP),
        inet_addr(DestinationIP),
        atoi(SourcePort),
        atoi(DestinationPort),
        (UCHAR*)DataString,
        strlen(DataString));

    RP.SendPacket(ChosenDevice);
The usage of RawPacket.CreatePacket and RawPacket.SendPacket should be pretty straightforward. Just know that the inet_addr() function converts a string containing a decimal dot IP address to a 4 byte integer, and atoi converts a string representation of a number to an integer. DataString is the data carried at the end of the packet that is separate from the headers. The last argument is the length of DataString in bytes. MACStringToBytes converts a MAC address in the format of (xx:xx:xx:xx:xx:xx) (each xx represents a 2 digit hexadecimal number) to a 6 byte array. Its definition follows:
unsigned char* MACStringToBytes(LPSTR String)
{
    char* Tmp = new char[strlen(String)];
    memcpy((void*)Tmp,(void*)String,strlen(String));
        unsigned char* Returned = new unsigned char[6];
    for(int i = 0;i<6;i++)
    {
        sscanf(Tmp,"%2X",&Returned[i]);         memmove((void*)(Tmp),(void*)(Tmp+3),19-i*3);    }
    return Returned;
}
Inside the class
Now, here is the first function we call from RawPacket. This function basically creates a buffer big enough to hold the data plus the headers of the packet, and then appends the data to the buffer. Note that most of the hard coded values here can be changed depending on your needs. Also, you should know what the «Length» in each header means. In the IP header, it means the length of the IP header itself plus the length of the UDP header plus the length of the data at the end. In the UDP header, it means the length of the UDP header plus the length of the end data. Usually, IP headers are 20 bytes, and UDP headers are 8 bytes. Remember to put shorts and ints into network byte order using htons() or htonl() before copying them to the packet.
void RawPacket::CreatePacket
                     (unsigned char* SourceMAC,
                      unsigned char* DestinationMAC,
                      unsigned int   SourceIP,
                      unsigned int   DestIP,
                      unsigned short SourcePort,
                      unsigned short DestinationPort,
                      unsigned char* UserData,
                      unsigned int   UserDataLen)
{
    RawPacket::UserDataLen = UserDataLen;
        FinalPacket = new unsigned char [UserDataLen + 42];
        USHORT TotalLen = UserDataLen + 20 + 8;

        memcpy((void*)FinalPacket,(void*)DestinationMAC,6);    memcpy((void*)(FinalPacket+6),(void*)SourceMAC,6);     USHORT TmpType = 8;                                       memcpy((void*)(FinalPacket+12),(void*)&TmpType,2);
        memcpy((void*)(FinalPacket+14),(void*)"x45",1);

        memcpy((void*)(FinalPacket+15),(void*)"x00",1);
    TmpType = htons(TotalLen);
    memcpy((void*)(FinalPacket+16),(void*)&TmpType,2);
    TmpType = htons(0x1337);
    memcpy((void*)(FinalPacket+18),(void*)&TmpType,2);

        memcpy((void*)(FinalPacket+20),(void*)"x00",1);
        memcpy((void*)(FinalPacket+21),(void*)"x00",1);
        memcpy((void*)(FinalPacket+22),(void*)"x80",1);
        memcpy((void*)(FinalPacket+23),(void*)"x11",1);
    memcpy((void*)(FinalPacket+24),(void*)"x00x00",2);

        memcpy((void*)(FinalPacket+26),(void*)&SourceIP,4);
        memcpy((void*)(FinalPacket+30),(void*)&DestIP,4);
        TmpType = htons(SourcePort);
    memcpy((void*)(FinalPacket+34),(void*)&TmpType,2);
    TmpType = htons(DestinationPort);
    memcpy((void*)(FinalPacket+36),(void*)&TmpType,2);
    USHORT UDPTotalLen = htons(UserDataLen + 8);         memcpy((void*)(FinalPacket+38),(void*)&UDPTotalLen,2);
    /Finally append our own data
    memcpy((void*)(FinalPacket+42),(void*)UserData,UserDataLen);

    unsigned short UDPChecksum = CalculateUDPChecksum(UserData,
        UserDataLen,SourceIP,DestIP,htons(SourcePort),
        htons(DestinationPort),0x11);
    memcpy((void*)(FinalPacket+40),(void*)&UDPChecksum,2);

    unsigned short IPChecksum = htons(CalculateIPChecksum();
    memcpy((void*)(FinalPacket+24),(void*)&IPChecksum,2);

    return;
}
Checksums
Now, for the checksum functions. These are CalculateUDPChecksum and CalculateIPChecksum. I will go over the latter first.
unsigned short RawPacket::CalculateIPChecksum(void)
{
    unsigned short CheckSum = 0;
    for(int i = 14;i<34;i+=2)
    {
        unsigned short Tmp = BytesTo16(FinalPacket[i],FinalPacket[i+1]);
        unsigned short Difference = 65535 - CheckSum;
        CheckSum += Tmp;
        if(Tmp > Difference){CheckSum += 1;}
    }
    CheckSum = ~CheckSum;
    return htons(CheckSum);
}
The cool thing about calculating the IP checksum is that we don’t need items that are spread across the packet. The IP checksum is based only on the 20 bytes of the entire IP header. Since the IP header in our packet starts at the 15th byte, we set i to 14 (arrays start at zero) and stop at 14+20 (34). The checksum for the IP header is based on the 16 bit complement of the 16 bit one’s complement sum. This means that we must join every two bytes into one, then add it to the checksum, and if the addition causes the checksum total to go over 65535 (the maximum an unsigned short can hold), we add one to the checksum. In the function, BytesTo16() joins the two bytes and puts the result in Tmp, and then Difference holds the highest number Tmp can be without causing CheckSum to go over 65535. At the end of every loop, a check is made to see if Tmp is higher than Difference, and one is added accordingly. At the very end of the function, the ~ operator is used to get the One’s Complement of CheckSum. (The one’s complement of the one’s complement sum).
Here is the BytesTo16 function used to join two chars into a short:
unsigned short BytesTo16(unsigned char X,unsigned char Y)
{
     unsigned short Tmp = X;
     Tmp = Tmp << 8;
     Tmp = Tmp | Y;
     return Tmp;
}
The UDP checksum function is very similar to the IP checksum one, except that first a «pseduoheader» must be constructed. The pseudoheader is made up of the source IP, the destination IP, the source port, the destination port, the length (the length should be in the pseudoheader twice), the protocol, and the actual data. Note that if the length of the pseudoheader is an odd number, a zero should be added at the end for check sum purposes. Make sure that all things are in the network byte order because otherwise there will be problems.
unsigned short RawPacket::CalculateUDPChecksum(unsigned char* UserData,
                                               int UserDataLen,
                                               unsigned int SourceIP,
                                               unsigned int DestIP,
                                               unsigned short SourcePort,
                                               unsigned short DestinationPort,
                                               unsigned char Protocol)
{
    unsigned short CheckSum = 0;
    unsigned short PseudoLength = UserDataLen + 8 + 9;
    PseudoLength += PseudoLength % 2;
    unsigned short Length = UserDataLen + 8;
    unsigned char* PseudoHeader = new unsigned char [PseudoLength];
    for(int i = 0;i < PseudoLength;i++){PseudoHeader[i] = 0x00;}
    PseudoHeader[0] = Protocol;
    memcpy((void*)(PseudoHeader+1),(void*)(FinalPacket+26),8);
    Length = htons(Length);     memcpy((void*)(PseudoHeader+9),(void*)&Length,2);     memcpy((void*)(PseudoHeader+11),(void*)&Length,2);

    memcpy((void*)(PseudoHeader+13),(void*)(FinalPacket+34),2);    memcpy((void*)(PseudoHeader+15),(void*)(FinalPacket+36),2);
    memcpy((void*)(PseudoHeader+17),(void*)UserData,UserDataLen);


    for(int i = 0;i < PseudoLength;i+=2)
    {
        unsigned short Tmp = BytesTo16(PseudoHeader[i],PseudoHeader[i+1]);
        unsigned short Difference = 65535 - CheckSum;
        CheckSum += Tmp;
        if(Tmp > Difference){CheckSum += 1;}
    }
    CheckSum = ~CheckSum;     return CheckSum;
}
Woot, that’s about it. Just use these functions to place the UDP or IP checksum where they belong. Also, I am not yet sure why I need to do htons() on the IP checksum but not the UDP checksum.
Sending the information
The next function to look at is RawPacket.SendPacket(pcap_if_t* Device). This is where WinPCap sends the packets. Fortunately for us, this function is very simple.
void RawPacket::SendPacket(pcap_if_t* Device)
{
    char Error[256];
    pcap_t* t;
    t = pcap_open(Device->name,65535,PCAP_OPENFLAG_DATATX_UDP,1,NULL,Error);
    pcap_sendpacket(t,FinalPacket,UserDataLen + 42);
    pcap_close(t);
}
pcap_sendpacket sends packets, but first, we must get a pcap_t* for its first parameter. Since we already have the ChosenDevice variable, we can just pass its device->name to pcap_open so that pcap_t* t contains a handle to the device we want. pcap_open is described here. pcap_sendpacket just takes a pcap_t* variable, the data to send in an unsigned char buffer, and the length of the data. The length here is the length of the data plus 42 bytes of headers.
Improving the code
This class could use variables (instead of taking them all in one function), accessor functions, and perhaps some sort of division between headers.
Points of interest
I thought it was interesting that some ISPs don’t allow packets with spoofed source IPs or MAC addresses to be sent. I tried this myself, and could only send using my real IP and MAC (using spoofed values made the packets visible to me on Wireshark, but not at the target server), but my friend in Mexico was able to successfully send packets with both of these items being spoofed. (I was the server, and was able to see his packets coming from «11.33.33.77»). Just remember that if you are only using this in a local network, you should be able to use any IP or MAC address that exists in your LAN (192.168.1.0 — 192.168.1.100, for example). Another problem I had was knowing what the destination MAC was. At first, I thought it was the hardware address of the device at the destination IP. Then, I learned that it is actually just the hardware address of the next device to which the data should be sent. (For me, the default gateway.)
History
No changes yet.


Понадобилось мне как-то проверить, работает ли UDP порт на компьютере. На получателе настраиваю прослушивание UDP порта с помощью PktMon:
PktMon — ловим UDP трафик в Windows 10
Слушаю, слушаю. Нет трафика. Нужно самому послать UDP пакет, а под рукой нет никаких подручных средств. На помощь приходит Powershell.
function Send-UdpDatagram
{
Param ([string] $EndPoint,
[int] $Port,
[string] $Message)
$IP = [System.Net.Dns]::GetHostAddresses($EndPoint)
$Address = [System.Net.IPAddress]::Parse($IP)
$EndPoints = New-Object System.Net.IPEndPoint($Address, $Port)
$Socket = New-Object System.Net.Sockets.UDPClient
$EncodedText = [Text.Encoding]::ASCII.GetBytes($Message)
$SendMessage = $Socket.Send($EncodedText, $EncodedText.Length, $EndPoints)
$Socket.Close()
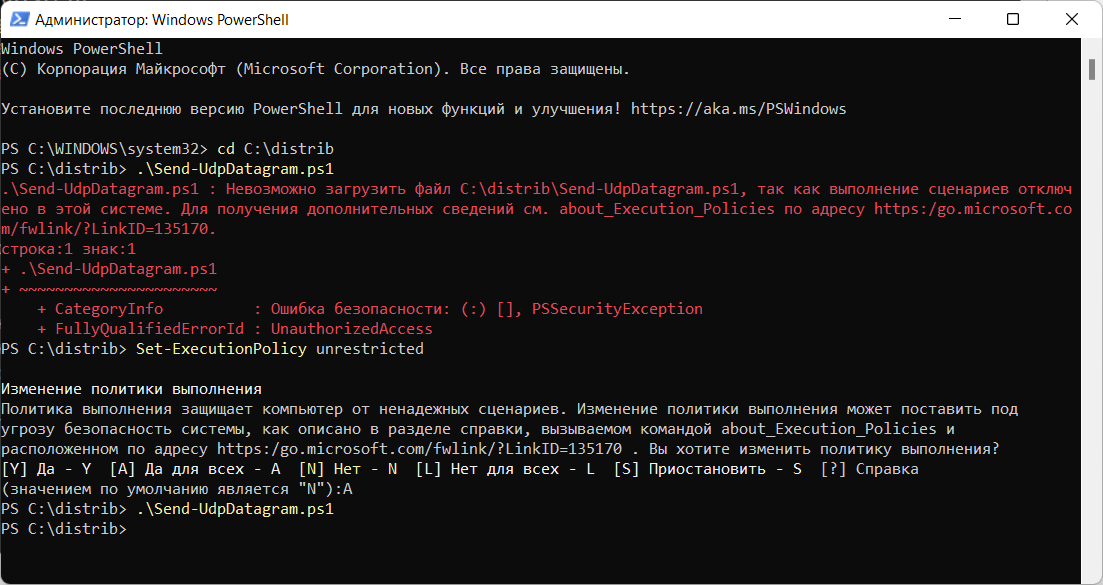
} Send-UdpDatagram -EndPoint "127.0.0.1" -Port 53 -Message "test.mymetric:0|c"Скрипт писал не сам, но проверил. Работает.
Примечание
Пришлось ещё разрешить выполнение PowerShell скриптов.
Powershell — невозможно загрузить файл ps1, так как выполнение сценариев отключено в этой системе
I have an app that listens on a localhost port. I want a minimal launcher to bring that app’s to the front.
My app is in Java. I don’t know how to write any exe files, but I can write bat files, and then make a shortcut that launches the bat file without showing the terminal. I would like to have the bat file send some data to a port (preferably UDP so there will not be any stream overhead).
How can I send data to a UDP port?
One of the things I thought of was nslookup, but that will only connect to port 53 as far as I know.
This only needs to work on Windows. Would like it to work on XP and up, but I can make a workaround if necessary.
asked Jun 13, 2011 at 22:02
![]()
700 Software700 Software
83.6k80 gold badges228 silver badges338 bronze badges
This is a job for netcat.
http://nc110.sourceforge.net/
After installing you can easily launch it from the command line or write a BAT script to execute it for you.
To send date through UDP rather than TCP, use the «-u» switch.
For example, to send the data to UPD port 2345 on localhost execute:
nc -u localhost 2345
Then type the data you want to send.
![]()
Jim Fell
13.4k34 gold badges124 silver badges200 bronze badges
answered Jun 13, 2011 at 22:57
![]()
0x900x90
6,0092 gold badges35 silver badges53 bronze badges
1
I was having quite a few problems sending a UDP command to a Brightsign digital sign with netcat. I ended up using Swiss File Knife. It is possible I had the syntex wrong with my netcat statement. (If anyone could suggest the correct syntax based on my working SFK statement, I would love to know)
I just wanted to send a few asci key words to my sign from a batch file.
My sign was 192.168.1.22 and listening on port 5000
Here are my working steps:
Download Swiss File Knife SKF: http://swissfileknife.sourceforge.net/
Copied the file to C:tools and renamed the sfk174.exe file to skf.exe(to make is shorter) and used the bellow syntax to send the UDP command Special
C:toolssfk udpsend 192.168.1.22 5000 “Special” (make sure you put your asci word in quotes. it will work without but not for words with spaces between)
I put the commands in a batch file and created a windows icon for the customer and they worked great.
![]()
Jim Fell
13.4k34 gold badges124 silver badges200 bronze badges
answered Apr 10, 2015 at 13:18
![]()
0
You can send an udp packet like this :
c:nemesisnemesis.exe udp -P do7on.txt -D 192.168.0.10 -y 1025
Nemesis : http://nemesis.sourceforge.net/
answered Jun 13, 2011 at 23:43
![]()
1
-

Funbit
Member
- Публикаций:
-
0
- Регистрация:
- 13 апр 2003
- Сообщения:
- 92
- Адрес:
- Russia
Можно ли как-нибудь послать udp сообщение (на указанный адрес и порт) стандартными средствами Windows XP/2000, т.е. используя только то, что поставляется вместе с ОС (без всяких portqry и т.п.) ? (никакого программирования, просто предположите, что кроме свежеустановленной ОС у вас ничего нет)
-
ganes
New Member
- Публикаций:
-
0
- Регистрация:
- 7 дек 2004
- Сообщения:
- 62
- Адрес:
- Ukraine
Никак! Развечто какойнибудь клиент типа ftp.exe и-то
собственный удп пакет он тебе незгенерит если даже
он и мог-бы их посылать…
П.С Надь хоть Doo.Mать-Вашу чо спрашивать, пошли-бь
занялись чам нябуДь!
-
Funbit
Member
- Публикаций:
-
0
- Регистрация:
- 13 апр 2003
- Сообщения:
- 92
- Адрес:
- Russia
ganes
лучше бы сам пошел и занялся чем-нибудь, чем умничать тут
-
ZENiTH
New Member
- Публикаций:
-
0
- Регистрация:
- 13 май 2003
- Сообщения:
- 16
легко:
слушаешь 69 ingress udp port
nc -L -u -p 69
посылаешь udp egress udp packet
tftp.exe 192.168.0.2 GET file.bin
получаешь приблизительно такой пакет
☺file.bin netascii
-
ZENiTH
New Member
- Публикаций:
-
0
- Регистрация:
- 13 май 2003
- Сообщения:
- 16
если хочешь произвольный порт измени его в этом файле
C:windowssystem32driversetcSERVICES
-
Flasher
Member
- Публикаций:
-
0
- Регистрация:
- 31 янв 2004
- Сообщения:
- 640
а у ftp и tftp — протоколы одинаковые ?
т.е. при get запросе сначало отправляется ip,port потом RETR filename.exe ?
Кажись не в тему, но имеет отношение к tftp
")
-
ash
New Member
- Публикаций:
-
0
- Регистрация:
- 9 ноя 2004
- Сообщения:
- 52
- Адрес:
- Latvia
Нет, не одинаковые.
hxxp://www.google.com/search?q=site:www.faqs.org+tftp
hxxp://www.google.com/search?q=site:www.faqs.org+ftp
-
Funbit
Member
- Публикаций:
-
0
- Регистрация:
- 13 апр 2003
- Сообщения:
- 92
- Адрес:
- Russia
ZENiTH
nc -L -u -p 69
что есть nc ?
-
ZENiTH
New Member
- Публикаций:
-
0
- Регистрация:
- 13 май 2003
- Сообщения:
- 16
nc это порт юниксовой утилитки, полное название netcat, здесь она используется просто для проверки что соединение было
-L слушать
-u слушать по udp
-p порт
могу залить если нужна (с исходниками)
-
Funbit
Member
- Публикаций:
-
0
- Регистрация:
- 13 апр 2003
- Сообщения:
- 92
- Адрес:
- Russia
ZENiTH
что-то я не понял, на чистом winXP откуда всё это ? =
-
ZENiTH
New Member
- Публикаций:
-
0
- Регистрация:
- 13 май 2003
- Сообщения:
- 16
nc просто показывает что факт входящего соединения был, вместо неё может быть любой ip и порт, а исходящее соединение делается с помощью встроенной утилиты XP tftp.exe как и было в исходных условиях задачи
-
Funbit
Member
- Публикаций:
-
0
- Регистрация:
- 13 апр 2003
- Сообщения:
- 92
- Адрес:
- Russia
да, спасибо, работает,
только жаль, что сообщение с нулевого байта начинается
-
Funbit
Member
- Публикаций:
-
0
- Регистрация:
- 13 апр 2003
- Сообщения:
- 92
- Адрес:
- Russia
да, спасибо, работает,
только жаль, что сообщение с нулевого байта начинается

")

|
|
|
|


Правила раздела Windows
1. Указывайте версию Вашей ОС.
2. Запрещается размещать запросы и ссылки на кряки, серийники и т.п., а также вопросы нарушения лицензии ПО и его взлома.
3. Не разрешается давать советы из разряда «Поставь Linux».
4. Переустановка ОС — крайнее и безотказное лекарство, которое знают все. В таких советах никто не нуждается.
5. При публикации скриптов пользоваться тегами code. Тип подсветки кода выбирать строго в соответствии с языком публикуемого кода.
6. Прежде чем задать вопрос, обязательно загляните в FAQ и следуйте написанным рекомендациям для устранения проблемы. И если не помогло, а поиск по разделу не дал результатов — только тогда задавайте вопрос на форуме.
7. Вопросы, связанные с проблемами ПО, задавайте в разделе Программное обеспечение

послать udp сообщение средствами windows
, как-нибудь можно?
- Подписаться на тему
- Сообщить другу
- Скачать/распечатать тему
|
|
|
|
Junior
Рейтинг (т): 1 |
Можно ли как-нибудь послать udp сообщение (на указанный адрес и порт) стандартными средствами Windows XP/2000, т.е. используя только то, что поставляется вместе с ОС (без всяких portqry и т.п.) ? Сообщение отредактировано: Funbit — 24.01.05, 18:00 |

|
shik |
|
|
Full Member
Рейтинг (т): 6 |
Любое сообщение будь то ТСР или UDP посылается при помощи спец функций, которые можно найти в стандартных библиотеках ОС. |
|
Funbit |
|
|
Junior
Рейтинг (т): 1 |
Цитата shik @ 24.01.05, 19:03 Любое сообщение будь то ТСР или UDP посылается при помощи спец функций, которые можно найти в стандартных библиотеках ОС.
спасибо, но программирование меня в данном случае не интересует то, что пакет нужно будет обрабатывать, это тоже понятно, сервер и клиент у меня есть, но я вот хочу узнать, можно ли отправить без всяких дополнительных самописных (или других утилит типа portqry) клиентов простое UDP сообщение ? т.е. мне нужно каким-то образом (может быть хитрым
$socket = socket_create (AF_INET, SOCK_DGRAM, SOL_UDP); $result = @socket_connect ($socket, $ip, $port); $packet_content = «%wake_up%»; socket_write ($socket, $packet_content, strlen($packet_content)); |
 здесь проблем нет,

0 пользователей читают эту тему (0 гостей и 0 скрытых пользователей)
0 пользователей:
- Предыдущая тема
- Windows
- Следующая тема
![]()
![]()
[ Script execution time: 0,0174 ] [ 15 queries used ] [ Generated: 6.02.23, 12:43 GMT ]
От переводчика: Это перевод второй статьи из цикла «Networking for game programmers». Мне очень нравится весь цикл статей, плюс всегда хотелось попробовать себя в качестве переводчика. Возможно, опытным разработчикам статья покажется слишком очевидной, но, как мне кажется, польза от нее в любом случае будет.
Первая статья — http://habrahabr.ru/post/209144/
Прием и передача пакетов данных
Введение
Привет, меня зовут Гленн Фидлер и я приветствую вас в своей второй статье из цикла “Сетевое программирование для разработчиков игр”.

В предыдущей статье мы обсудили различные способы передачи данных между компьютерами по сети, и в конце решили использовать протокол UDP, а не TCP. UDP мы решили использовать для того, чтобы иметь возможность пересылать данные без задержек, связанных с ожиданием повторной пересылки пакетов.
А сейчас я собираюсь рассказать вам, как на практике использовать UDP для отправки и приема пакетов.
BSD сокеты
В большинстве современных ОС имеется какая-нибудь реализация сокетов, основанная на BSD сокетах (сокетах Беркли).
Сокеты BSD оперируют простыми функциями, такими, как “socket”, “bind”, “sendto” и “recvfrom”. Конечно, вы можете обращаться к этим функциями напрямую, но в таком случае ваш код будет зависим от платформы, так как их реализации в разных ОС могут немного отличаться.
Поэтому, хоть я далее и приведу первый простой пример взаимодействия с BSD сокетами, в дальнейшем мы не будем использовать их напрямую. Вместо этого, после освоения базового функционала, мы напишем несколько классов, которые абстрагируют всю работу с сокетами, чтобы в дальнейшем наш код был платформонезависимым.
Особенности разных ОС
Для начала напишем код, который будет определять текущую ОС, чтобы мы могли учесть различия в работе сокетов:
    // platform detection

    #define PLATFORM_WINDOWS  1
    #define PLATFORM_MAC      2
    #define PLATFORM_UNIX     3

    #if defined(_WIN32)
    #define PLATFORM PLATFORM_WINDOWS
    #elif defined(__APPLE__)
    #define PLATFORM PLATFORM_MAC
    #else
    #define PLATFORM PLATFORM_UNIX
    #endif
Теперь подключим заголовочные файлы, нужные для работы с сокетами. Так как набор необходимых заголовочных файлов зависит от текущей ОС, здесь мы используем код #define, написанный выше, чтобы определить, какие файлы нужно подключать.
    #if PLATFORM == PLATFORM_WINDOWS

        #include <winsock2.h>

    #elif PLATFORM == PLATFORM_MAC || PLATFORM == PLATFORM_UNIX

        #include <sys/socket.h>
        #include <netinet/in.h>
        #include <fcntl.h>

    #endif
В UNIX системах функции работы с сокетами входят в стандартные системные библиотеки, поэтому никакие сторонние библиотеки нам в этом случае не нужны. Однако в Windows для этих целей нам нужно подключить библиотеку winsock.
Вот небольшая хитрость, как можно это сделать без изменения проекта или makefile’а:
    #if PLATFORM == PLATFORM_WINDOWS
    #pragma comment( lib, "wsock32.lib" )
    #endif
Мне нравится этот прием потому, что я ленивый. Вы, конечно, можете подключить библиотеку в проект или в makefile.
Инициализация сокетов
В большинстве unix-like операционных систем (включая macosx) не требуется никаких особых действий для инициализации функционала работы с сокетами, но в Windows нужно сначала сделать пару па — нужно вызвать функцию “WSAStartup” перед использованием любых функций работы с сокетами, а после окончания работы — вызвать “WSACleanup”.
Давайте добавим две новые функции:
    inline bool InitializeSockets()
    {
        #if PLATFORM == PLATFORM_WINDOWS
        WSADATA WsaData;
        return WSAStartup( MAKEWORD(2,2), &WsaData ) == NO_ERROR;
        #else
        return true;
        #endif
    }

    inline void ShutdownSockets()
    {
        #if PLATFORM == PLATFORM_WINDOWS
        WSACleanup();
        #endif
    }
Теперь мы имеем независимый от платформы код инициализации и завершения работы с сокетами. На платформах, которые не требуют инициализации, данный код просто не делает ничего.
Создаем сокет
Теперь мы можем создать UDP сокет. Это делается так:
    int handle = socket( AF_INET, SOCK_DGRAM, IPPROTO_UDP );

    if ( handle <= 0 )
    {
        printf( "failed to create socketn" );
        return false;
    }
Далее мы должны привязать сокет к определенному номеру порта (к примеру, 30000). У каждого сокета должен быть свой уникальный порт, так как, когда приходит новый пакет, номер порта определяет, какому сокету его передать. Не используйте номера портов меньшие, чем 1024 — они зарезервированы системой.
Если вам все равно, какой номер порта использовать для сокета, вы можете просто передать в функцию “0”, и тогда система сама выделит вам какой-нибудь незанятый порт.
    sockaddr_in address;
    address.sin_family = AF_INET;
    address.sin_addr.s_addr = INADDR_ANY;
    address.sin_port = htons( (unsigned short) port );

    if ( bind( handle, (const sockaddr*) &address, sizeof(sockaddr_in) ) < 0 )
    {
        printf( "failed to bind socketn" );
        return false;
    }
Теперь наш сокет готов для передачи и приема пакетов данных.
Но что это за таинственная функция “htons” вызывается в коде? Это просто небольшая вспомогательная функция, которая переводит порядок следования байтов в 16-битном целом числе — из текущего (little- или big-endian) в big-endian, который используется при сетевом взаимодействии. Ее нужно вызывать каждый раз, когда вы используете целые числа при работе с сокетами напрямую.
Вы встретите функцию “htons” и ее 32-битного двойника — “htonl” в этой статье еще несколько раз, так что будьте внимательны.
Перевод сокета в неблокирующий режим
По умолчанию сокеты находится в так называемом “блокирующем режиме”. Это означает, что если вы попытаетесь прочитать из него данные с помощью “recvfrom”, функция не вернет значение, пока не сокет не получит пакет с данными, которые можно прочитать. Такое поведение нам совсем не подходит. Игры — это приложения, работающие в реальном времени, со скоростью от 30 до 60 кадров в секунду, и игра не может просто остановиться и ждать, пока не придет пакет с данными!
Решить эту проблему можно переведя сокет в “неблокирующий режим” после его создания. В этом режиме функция “recvfrom”, если отсутствуют данные для чтения из сокета, сразу возвращает определенное значение, показывающее, что нужно будет вызвать ее еще раз, когда в сокете появятся данные.
Перевести сокет в неблокирующий режим можно следующим образом:
    #if PLATFORM == PLATFORM_MAC || PLATFORM == PLATFORM_UNIX

        int nonBlocking = 1;
        if ( fcntl( handle, F_SETFL, O_NONBLOCK, nonBlocking ) == -1 )
        {
            printf( "failed to set non-blocking socketn" );
            return false;
        }

    #elif PLATFORM == PLATFORM_WINDOWS

        DWORD nonBlocking = 1;
        if ( ioctlsocket( handle, FIONBIO, &nonBlocking ) != 0 )
        {
            printf( "failed to set non-blocking socketn" );
            return false;
        }

    #endif
Как вы можете видеть, в Windows нет функции “fcntl”, поэтому вместе нее мы используем “ioctlsocket”.
Отправка пакетов
UDP — это протокол без поддержки соединений, поэтому при каждой отправке пакета нам нужно указывать адрес получателя. Можно использовать один и тот же UDP сокет для отправки пакетов на разные IP адреса — на другом конце сокета не обязательно должен быть один компьютер.
Переслать пакет на определенный адрес можно следующим образом:
    int sent_bytes = sendto( handle, (const char*)packet_data, packet_size,
                             0, (sockaddr*)&address, sizeof(sockaddr_in) );

    if ( sent_bytes != packet_size )
    {
        printf( "failed to send packet: return value = %dn", sent_bytes );
        return false;
    }
Обратите внимание — возвращаемое функцией “sendto” значение показывает только, был ли пакет успешно отправлен с локального компьютера. Но оно не показывает, был ли пакет принят адресатом! В UDP нет средств для определения, дошел ли пакет по назначению или нет.
В коде, приведенном выше, мы передаем структуру “sockaddr_in” в качестве адреса назначения. Как нам получить эту структуру?
Допустим, мы хотим отправить пакет по адресу 207.45.186.98:30000.
Запишем адрес в следующей форме:
    unsigned int a = 207;
    unsigned int b = 45;
    unsigned int c = 186;
    unsigned int d = 98;
    unsigned short port = 30000;
И нужно сделать еще пару преобразований, чтобы привести его к форме, которую понимает “sendto”:
    unsigned int destination_address = ( a << 24 ) | ( b << 16 ) | ( c << 8 ) | d;
    unsigned short destination_port = port;

    sockaddr_in address;
    address.sin_family = AF_INET;
    address.sin_addr.s_addr = htonl( destination_address );
    address.sin_port = htons( destination_port );
Как видно, сначала мы объединяем числа a, b, c, d (которые лежат в диапазоне [0, 255]) в одно целое число, в котором каждый байт — это одно из исходных чисел. Затем мы инициализируем структуру “sockaddr_in” нашими адресом назначения и портом, при этом не забыв конвертировать порядок байтов с помощью функций “htonl” и “htons”.
Отдельно стоит выделить случай, когда нужно передать пакет самому себе: при этом не нужно выяснять IP адрес локальной машины, а можно просто использовать 127.0.0.1 в качестве адреса (адрес локальной петли), и пакет будет отправлен на локальный компьютер.
Прием пакетов
После того, как мы привязали UDP сокет к порту, все UDP пакеты, приходящие на IP адрес и порт нашего сокета, будут ставиться в очередь. Поэтому для приема пакетов мы просто в цикле вызываем “recvfrom”, пока он не выдаст ошибку, означающую, что пакетов для чтения в очерели не осталось.
Так как протокол UDP не поддерживает соединения, пакеты могут приходить с множества различных компьютеров сети. Каждый раз, когда мы принимаем пакет, функция “recvfrom” выдает нам IP адрес и порт отправителя, и поэтому мы знаем, кто отправил этот пакет.
Код приема пакетов в цикле:
    while ( true )
    {
        unsigned char packet_data[256];
        unsigned int maximum_packet_size = sizeof( packet_data );

        #if PLATFORM == PLATFORM_WINDOWS
        typedef int socklen_t;
        #endif

        sockaddr_in from;
        socklen_t fromLength = sizeof( from );

        int received_bytes = recvfrom( socket, (char*)packet_data, maximum_packet_size,
                                   0, (sockaddr*)&from, &fromLength );

        if ( received_bytes <= 0 )
            break;

        unsigned int from_address = ntohl( from.sin_addr.s_addr );
        unsigned int from_port = ntohs( from.sin_port );

        // process received packet
    }
Пакеты, размер которых больше, чем размер буфера приема, будут просто втихую удалены из очереди. Так что, если вы используете буфер размером 256 байтов, как в примере выше, и кто-то присылает вам пакет в 300 байт, он будет отброшен. Вы не получите просто первые 256 байтов из пакета.
Но, поскольку мы пишем свой собственный протокол, для нас это не станет проблемой. Просто всегда будьте внимательны и проверяете, чтобы размер буфера приема был достаточно большим, и мог вместить самый большой пакет, который вам могут прислать.
Закрытие сокета
На большинстве unix-like систем, сокеты представляют собой файловые дескрипторы, поэтому для того, чтобы закрыть сокеты после использования, можно использовать стандартную функцию “close”. Однако, Windows, как всегда, выделяется, и в ней нам нужно использовать “closesocket”.
    #if PLATFORM == PLATFORM_MAC || PLATFORM == PLATFORM_UNIX
    close( socket );
    #elif PLATFORM == PLATFORM_WINDOWS
    closesocket( socket );
    #endif
Так держать, Windows!
Класс сокета
Итак, мы разобрались со всеми основными операциями: создание сокета, привязка его к порту, перевод в неблокирующий режим, отправка и прием пакетов, и, в конце, закрытие сокета.
Но, как вы могли заметить, все эти операции немного отличаются от платформы к платформе, и, конечно, трудно каждый раз при работе с сокетами вспоминать особенности разных платформ и писать все эти #ifdef.
Поэтому мы сделаем класс-обертку “Socket” для всех этих операций. Также мы создадим класс “Address”, чтобы было проще работать с IP адресами. Он позволит не проводить все манипуляции с “sockaddr_in” каждый раз, когда мы захотим отправить или принять пакет.
Итак, наш класс Socket:
    class Socket
    {
    public:

        Socket();
        ~Socket();
        bool Open( unsigned short port );
        void Close();
        bool IsOpen() const;
        bool Send( const Address & destination, const void * data, int size );
        int Receive( Address & sender, void * data, int size );

    private:

        int handle;
    };
И класс Address:
    class Address
    {
    public:

        Address();
        Address( unsigned char a, unsigned char b, unsigned char c, unsigned char d, unsigned short port );
        Address( unsigned int address, unsigned short port );
        unsigned int GetAddress() const;
        unsigned char GetA() const;
        unsigned char GetB() const;
        unsigned char GetC() const;
        unsigned char GetD() const;
        unsigned short GetPort() const;
        bool operator == ( const Address & other ) const;
        bool operator != ( const Address & other ) const;

    private:

        unsigned int address;
        unsigned short port;
    };
Использовать их для приема и передачи нужно следующим образом:
    // create socket

    const int port = 30000;
    Socket socket;
    if ( !socket.Open( port ) )
    {
        printf( "failed to create socket!n" );
        return false;
    }

    // send a packet

    const char data[] = "hello world!";
    socket.Send( Address(127,0,0,1,port), data, sizeof( data ) );

    // receive packets

    while ( true )
    {
        Address sender;
        unsigned char buffer[256];
        int bytes_read = socket.Receive( sender, buffer, sizeof( buffer ) );
        if ( !bytes_read )
            break;
        // process packet
    }
Как видите, это намного проще, чем работать с BSD сокетами напрямую. И также этот код будет одинаков для всех ОС, потому весь платформозависимый функционал находится внутри классов Socket и Address.
Заключение
Теперь у нас есть независимый от платформы инструмент для отправки и према UDP пакетов.
UDP не поддерживает соединения, и мне хотелось сделать пример, который бы четко это показал. Поэтому я написал небольшую программу, которая считывает список IP адресов из текстового файла и рассылает им пакеты, по одному в секунду. Каждый раз, когда программа принимает пакет, она выводит в консоль адрес и порт компьютера-отправителя и размер принятого пакета.
Вы можете легко настроить программу так, чтобы даже на локальной машине получить несколько узлов, обменивающихся пакетами друг с другом. Для этого просто разным экземплярам программы задайте разные порты, например:
> Node 30000
> Node 30001
> Node 30002
И т.д…
Каждый из узлов будет пересылать пакеты всем остальным узлам, образуя нечто вроде мини peer-to-peer системы.
Я разрабатывал эту программу на MacOSX, но она должна компилироваться на любой unix-like ОС и на Windows, однако если вам для этого потребуется делать какие-либо доработки, сообщите мне.
Содержание
- Как отправить и получить сырые TCP и UDP данные
- Как передавать и получать сырые данные по протоколу UDP
- Как передавать и получать сырые данные по протоколу TCP
- Как отправить пользовательские пакеты tcp на windows?
- 3 ответа
- Похожие вопросы:
- Как отправить tcp пакет windows
Как отправить и получить сырые TCP и UDP данные
Передавать сырые данные TCP и UDP умеют программы Ncat, Netcat, nc.
В качестве сырых данных могут быть двоичные, для сохранения бинарных данных в файл можно использовать любой шестнадцатеричный редактор, например, Bless.
Как передавать и получать сырые данные по протоколу UDP
Чтобы не просто выполнить подключение, когда данные вводятся вручную (вводить шестнадцатеричные данные вручную затруднительно для нас), а чтобы подключиться и сразу передать данные, можно использовать команду вида:
Опция -u означает использовать UDP протокол (по умолчанию используется TCP).
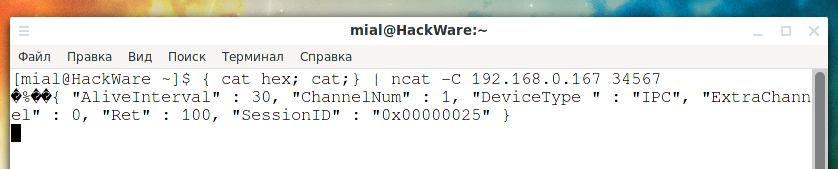
Пример команды, которая отправляет данные из файла hello-camera.bin на удалённый IP 255.255.255.255 на UDP порт 34569:
UDP протокол не дожидается ответа, он разрывает соединение. Для отправки ответа удалённых хост запускает новое UDP соединение, но дело в том, что для его подключения мы должны прослушивать порт. Ответ придёт на UDP порт 34569. Прослушивать порт можно также командой ncat. Для этого используется команда вида:
В этой команде опция -u означает использовать UDP протокол (по умолчанию используется TCP). Опция -l означает прослушивать входящие соединения. IP-АДРЕС — это IP сетевого интерфейса на локальной машине, где запущена утилита ncat. ПОРТ — это порт для прослушивания.
IP адрес компьютера, где будет запущена ncat, 192.168.0.88, нужно прослушивать на 34569 порту, тогда команда следующая:
Кажется, что ничего не происходит, но программа и не завершает работу — она просто ожидает входящее соединение.
Не закрывая это окно терминала, откроем другую консоль и вновь повторяем первую команду:
После этого в первой консоли будет показан полученный ответ:

Чтобы сохранить присланный ответ (вместо того, чтобы выводить его на экран), можно использовать следующую команду для прослушивания входящих подключений:
В результате присланный ответ будет сохранён в файле response.bin.
Как передавать и получать сырые данные по протоколу TCP
Чтобы просто отправить сырые данные протоколом TCP в ncat, достаточно убрать опцию -u. Но в этом случае вы не получите ответа. Для того чтобы отправить данные и получить ответ нужно использовать конструкцию:
- ФАЙЛ — это файл, содержащий данные для отправки
- IP-АДРЕС — IP удалённого хоста, куда мы хотим отправить данные
- ПОРТ — порт удалённого хоста, на который мы хотим отправить данные
Как можно увидеть, мы получили ответ.
Если вам нужно организовать «диалог» с удалённым хостом, то есть в рамках одной TCP сессии отправить несколько наборов данных, то данные для отправки запишите в отдельные файлы, например, если данные записаны в файлы ФАЙЛ1, ФАЙЛ2, ФАЙЛ3, ФАЙЛ4, тогда команда следующая:
Для своих целей я записал всех бинарные строки, которые отправляла программа CMS на камеру в отдельные файлы с именами hex1, hex2 и так далее до hex12. Для воспроизведения полного диалога с камерой можно использовать команду вида:
Как отправить пользовательские пакеты tcp на windows?
Я хочу отправить пакеты, в которых я определяю ip-адрес, порт, данные, .etc, сначала я подумал, что, возможно, я могу использовать raw-сокеты на windows, но после того, как я погуглил некоторое время, я обнаружил, что, похоже, ms отключила raw-сокеты из XP SP2 (это действительно так?), теперь я не знаю, как это сделать. Кто-то говорит мне использовать winPcap, затем я иду на домашнюю страницу этого программного обеспечения, только чтобы найти последнюю версию этого программного обеспечения, выпущенную 02 июля 10, которая слишком стара, я не знаю, работает ли она до сих пор. Если это возможно, я предпочел бы использовать Python для выполнения задачи , но кажется неудобным использовать python для реализации raw socket , теперь я не знаю, как это сделать. У кого-нибудь есть хорошая идея по этому поводу? любая помощь будет оценена по достоинству.
3 ответа
Как отправить JPG по TCP с одного телефона Windows на другой? Я нашел это в другой теме SO (ниже), показывающей, как отправить текст через TCP, но как превратить JPG в байты и отправить его? Большинство jpg больше 4 КБ, как с этим бороться?: private void sendMessage() < connectArgs = new.
Я пытаюсь определить, можно ли отправить пользовательские данные на данный порт TCP с веб-страницы с JavaScript (например, с библиотекой socket.io). Говорят, что WebSocket API требует рукопожатия с веб-сервером с заголовком HTTP/1.1 Connection: Upgrade , прежде чем позволить вам передавать.
скапи должен позволить тебе это сделать.
Вы пробовали что-то вроде
Документация для модуля socket гласит (последний пример): «пример требует прав администратора для изменения интерфейса», поэтому вы можете проверить, как это сделать.
Это работает, по крайней мере, на Win7, когда python запускается от имени администратора:
Я заметил удивительную вещь: когда есть приложения на основе udp и tcp, отправляющие пакеты, если приложение на основе upd отправляет пакеты так быстро, что полоса пропускания почти заполнена пакетами udp, то пакеты tcp будет очень трудно отправить. Удивительно то, что, хотя приложение на основе.
Я использую tcpdump/wireshark для захвата пакетов tcp, в то время как клиент tcp отправляет данные на сервер tcp. Клиент просто отправляет 4096 байт на сервер за один вызов send(). И я получаю разные пакеты tcp с двух сторон, два пакета на стороне отправителя кажутся compacted на стороне.
Похожие вопросы:
Я хотел бы иметь возможность общаться с контроллерами PLC, чтобы я мог отправлять и получать пользовательские команды на PLC. Моя идея сделать это состояла в том, чтобы иметь прослушиватель TCP на.
Мне нужно написать простой слушатель TCP, который сможет слушать TCP (получать пакеты ) в одном потоке, и в случае, если мне нужно отправить какой-то пакет, я смогу сделать это в каком-то другом.
Как я могу отправить свои собственные пакеты SYN и ACK на сервер в php? Я не хочу, чтобы система что-то делала, я хотел бы создать свои собственные пакеты и отправить их сам, чтобы установить.
Как отправить JPG по TCP с одного телефона Windows на другой? Я нашел это в другой теме SO (ниже), показывающей, как отправить текст через TCP, но как превратить JPG в байты и отправить его.
Я пытаюсь определить, можно ли отправить пользовательские данные на данный порт TCP с веб-страницы с JavaScript (например, с библиотекой socket.io). Говорят, что WebSocket API требует рукопожатия с.
Я заметил удивительную вещь: когда есть приложения на основе udp и tcp, отправляющие пакеты, если приложение на основе upd отправляет пакеты так быстро, что полоса пропускания почти заполнена.
Я использую tcpdump/wireshark для захвата пакетов tcp, в то время как клиент tcp отправляет данные на сервер tcp. Клиент просто отправляет 4096 байт на сервер за один вызов send(). И я получаю.
Я пытаюсь отправить пакеты MQTT connect через TCP. Я использую платформу windows и использую Экспресс-издание VC. Я успешно реализовал базовое серверно-клиентское приложение над TCP. Однако я.
Я разрабатываю программное обеспечение для фаззинга протокола TCP под Windows 7. Я хочу отправить самодельный пакет TCP, используя необработанные сокеты. Но, похоже, Microsoft запрещает это по.
Я разрабатываю драйвер kernel-mode для Win7 и более поздних версий. Я хочу отправить пользовательские пакеты IP в драйвере (я хочу указать все поля для слоя IP). Я нашел метод Winsock Kernel (WSK) .
Как отправить tcp пакет windows
[SSH]
sequence = 12345:tcp,54321:udp
seq_timeout = 20
tcpflags = syn
start_command = /sbin/iptables -I INPUT -s %IP% -p tcp —dport ssh -j ACCEPT
cmd_timeout = 30
stop_command = /sbin/iptables -D INPUT -s %IP% -p tcp —dport ssh -j ACCEPT
[FTP]
sequence = 12345:udp,54321:tcp
seq_timeout = 20
tcpflags = syn
start_command = /sbin/iptables -I INPUT -s %IP% -p tcp —dport 21 -j ACCEPT
cmd_timeout = 30
stop_command = /sbin/iptables -D INPUT -s %IP% -p tcp —dport 21 -j ACCEPT
�������, ��� ����� ���� ������� ��� tcp ����� � ��������� �� ����� telnet, �� ��� ��������� ���� ��������. ��� ������������ ����� ������� ���� (������������) � ����� �� ��� Win7, ��� �� ������� �� ����� telnet ������, ��� � �������� . 26 ��� 11, 11:35����[11500954] �������� | ���������� �������� ����������
 Re: �������� tcp/udp ������ �� ������������ ����/���� ����������� ���������� [new] Re: �������� tcp/udp ������ �� ������������ ����/���� ����������� ���������� [new] |
|||
| bremborg Member ������: |
������� ���� (������������) �� ����� �������� TCP/UDP ������� ��� ��� ?
� ��� ���� ������ ���������� � ��������������, �������:
� ������� ������ �� 20 �����. ������������ ���������� indy (��������� ��� 5 �����). |
||
| 26 ��� 11, 12:11����[11501348] �������� | ���������� �������� ���������� |
 Re: �������� tcp/udp ������ �� ������������ ����/���� ����������� ���������� [new] Re: �������� tcp/udp ������ �� ������������ ����/���� ����������� ���������� [new] |
|
| bremborg Member ������: |
� ������� ������� ��� UDP ���� �.�. � ������ �������. |
| 26 ��� 11, 12:15����[11501406] �������� | ���������� �������� ���������� |
| Re: �������� tcp/udp ������ �� ������������ ����/���� ����������� ���������� [new] |
|||
| Dimitry Sibiryakov Member ������: |
������� �������� ������ ��� ����, ����� ����� ���� ������������ SSH ������ � ���������� Posted via ActualForum NNTP Server 1.4 |
||
| 26 ��� 11, 12:26����[11501575] �������� | ���������� �������� ���������� |
| Re: �������� tcp/udp ������ �� ������������ ����/���� ����������� ���������� [new] |
|||||||||
| ALex_hha Member ������: �������. �������. |
php/html ������������ 😀
�� �������� �� � � ��� ���� �� �++ builder, ������ ��� ������ � ������� ���������. �� � ������ �� ����, � knockd ���� ���� ������ � ��� �����, ������ ����� ������� ��� ���� ����� ������ ����� ��� ����, ��� ��������� ��������
��� ��� ���� ������ ��� ����������� ��� ������� 😉 �������������� ����� �� ssh
� �� ��� ���������� �� ������� |
||||||||
| 26 ��� 11, 13:12����[11502209] �������� | ���������� �������� ���������� |
| Re: �������� tcp/udp ������ �� ������������ ����/���� ����������� ���������� [new] |
|||
| Dimitry Sibiryakov Member ������: |
���� ��� �������� ��������? Posted via ActualForum NNTP Server 1.4 |
||
| 26 ��� 11, 13:19����[11502286] �������� | ���������� �������� ���������� |
| Re: �������� tcp/udp ������ �� ������������ ����/���� ����������� ���������� [new] |
|
| ALex_hha Member ������: �������. �������. |
���� ���� ������ � OpenSSH_4.3p2 (CentOS-5.7). ���� �� ��� ����� ������ ���� ����� 1 ���, � ���� ���� ����� ������� 😀 |
| 26 ��� 11, 14:20����[11502937] �������� | ���������� �������� ���������� |
| Re: �������� tcp/udp ������ �� ������������ ����/���� ����������� ���������� [new] |
|||
| Dimitry Sibiryakov Member ������: |
����� �����? ���� �� �������, ��� ��� � ������� �� ���������� ���, � �� ��������� �� ��������. Posted via ActualForum NNTP Server 1.4 |
||
| 26 ��� 11, 14:39����[11503096] �������� | ���������� �������� ���������� |
| Re: �������� tcp/udp ������ �� ������������ ����/���� ����������� ���������� [new] |
||||||||||||||||||||||||||||||||||||||||||||||||||||||||||||||||||||||
| ALex_hha Member ������: �������. �������. |
|