
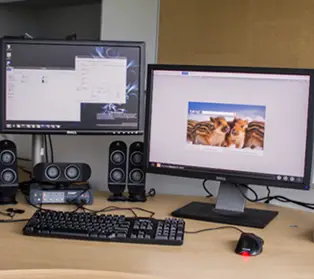
Windows 10 предлагает больше возможностей для работы с несколькими мониторами, по сравнению с более ранними версиями операционной системы от Microsoft. Панель задач в Windows 10 присутствует на всех мониторах, которые подключены к компьютеру, но только на основном доступны элементы управления, такие как пуск, звук, батарея, Wi-Fi и прочее. Как мы уже сказали, второй монитор имеет панель задач, но он отображает только время.
В настоящее время нет возможности установить панель задач на все мониторы, которые подключены к компьютеру. По умолчанию, панель задач отображается на основном дисплеем. Если вы хотите переместить панель задач на второй монитор, который не основной, вы можете использовать небольшую хитрость.
Начиная с Windows 7, операционная система позволяет пользователям перемещать панель задач на любой подключенный к компьютеру монитор. Если вы хотите переместить панель задач на второй монитор, щелкните правой кнопкой мыши на панель задач, и убедитесь, что он разблокирован. Иными словами, рядом с надписью «Закрепить панель задач» не должно быть галочки.
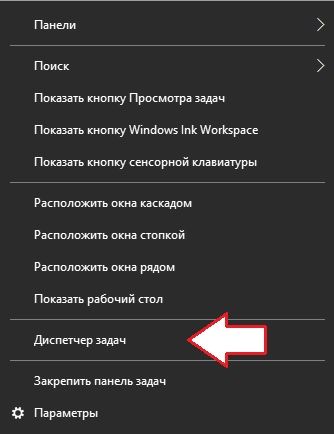
После этого перетащите панель задач на любой из подключенных мониторов. Теперь панель задач будет отображена на втором мониторе. На основном мониторе будет отображаться только время и дата.
Вы можете спросить – какой от этого смысл, если панель задач все равно на одном мониторе? Разница заключается в том, что панель задач отображается на втором мониторе, но он по-прежнему не является основным. Это означает, что новые программы будут открываться на основном мониторе.
![]() Загрузка…
Загрузка…
Download PC Repair Tool to quickly find & fix Windows errors automatically
Multi-monitor setup is bliss. It helps professionals with their work and be more productive. Over the past several years, Windows has managed to offer one of the best multi-monitor features. Users can plug in an additional monitor and seamlessly access their work on both displays. This is particularly useful for graphic designers, gamers, and other professionals who require a larger screen real estate.

The biggest annoyance for most of us is that the taskbar is switched on by default on both displays. This default arrangement is likely to cause clutter on the secondary display. In this article, we explain how you can move the taskbar (not copy) on a Second Monitor in Windows 11/10. Please follow the steps detailed below.
Windows 11
To move Taskbar to the second monitor in Windows 11, follow these steps:
- Press Win+I to open Windows Settings.
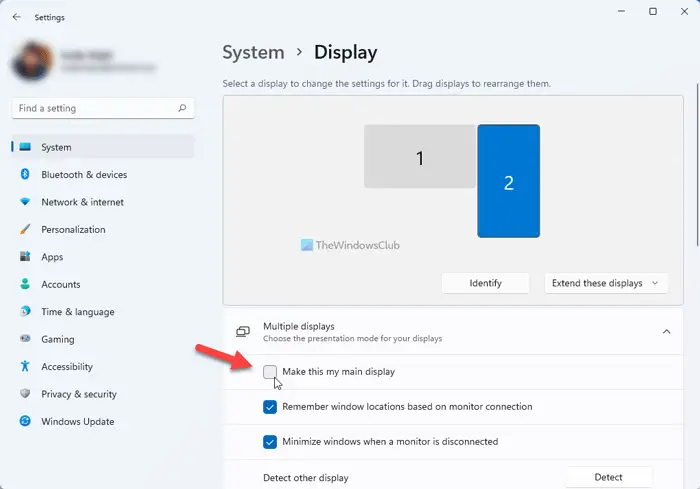
- Go to System > Display.
- Select the second monitor in the Windows Settings panel.
- Expand the Multiple displays section.
- Tick the Make this my main display checkbox.
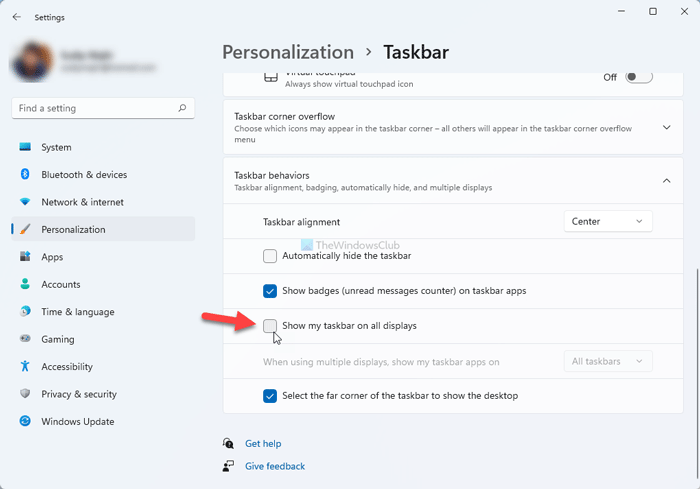
Note: For your information, you can display the Taskbar on both monitors. For that, you need to right-click on the Taskbar and select the Taskbar settings option. After that, click on the Taskbar behaviors option and tick the Show my taskbar on all displays checkbox.
Windows 10
Windows 10 users may follow these steps:
- Right-click on the Taskbar. Uncheck Lock the taskbar.
- Click and hold the taskbar. Drag it to the second monitor and voila there you go!
- Click the mouse button on the place where you want to place the taskbar
- Lock the taskbar by right-clicking on “Lock the Task Bar.”
Related: How to disable Windows taskbar on the second display.
Advanced Options
Thankfully, Windows 11/10 also offers an array of advanced options to fine-tune your multi-monitor experience. For example, you can choose to show the taskbar only on the active screen or combine buttons on other taskbars. I would advise you to try out different variations and stick with the best one. Additionally, you can also move the Taskbar from one display to another.
Related: How to show Taskbar across multiple monitors in Windows 11.
The taskbar is a very important part of Windows UI. It is here that you can pin your favorite apps, manage your calendar, and group taskbar buttons. Windows 10 also lets you lock the taskbar, hide the taskbar in desktop/tablet mode, and use Peek feature.
Read: Smart Taskbar is a free Dual or Multi-monitor software to manage multiple displays.
How do I move my Taskbar to my second monitor in Windows 11?
To move the Taskbar to your second monitor in Windows 11 or Windows 10, you need to change the primary monitor. For that, open Windows Settings and go to System > Display. Following that, choose the second monitor, expand the Multiple displays section, and tick the Make this my main display checkbox. After that, you can find the Taskbar on your second monitor.
How do I move Taskbar to primary monitor?
To move the Taskbar to the primary monitor or show the Taskbar only on the primary monitor, you need to disable a setting included in the Windows Settings panel. For that, open Windows Settings and go to Personalization > Taskbar. Expand the Taskbar behaviors option, and remove the tick from the Show my taskbar on all displays checkbox. Now, you can find your Taskbar only on the primary monitor.

Mahit Huilgol is a Windows enthusiast, a blogger & a keen follower of everything Microsoft. He loves to keep a track of the Windows ecosystem and enjoys covering Windows 10 features & freeware.
Download PC Repair Tool to quickly find & fix Windows errors automatically
Multi-monitor setup is bliss. It helps professionals with their work and be more productive. Over the past several years, Windows has managed to offer one of the best multi-monitor features. Users can plug in an additional monitor and seamlessly access their work on both displays. This is particularly useful for graphic designers, gamers, and other professionals who require a larger screen real estate.
The biggest annoyance for most of us is that the taskbar is switched on by default on both displays. This default arrangement is likely to cause clutter on the secondary display. In this article, we explain how you can move the taskbar (not copy) on a Second Monitor in Windows 11/10. Please follow the steps detailed below.
Windows 11
To move Taskbar to the second monitor in Windows 11, follow these steps:
- Press Win+I to open Windows Settings.
- Go to System > Display.
- Select the second monitor in the Windows Settings panel.
- Expand the Multiple displays section.
- Tick the Make this my main display checkbox.
Note: For your information, you can display the Taskbar on both monitors. For that, you need to right-click on the Taskbar and select the Taskbar settings option. After that, click on the Taskbar behaviors option and tick the Show my taskbar on all displays checkbox.
Windows 10
Windows 10 users may follow these steps:
- Right-click on the Taskbar. Uncheck Lock the taskbar.
- Click and hold the taskbar. Drag it to the second monitor and voila there you go!
- Click the mouse button on the place where you want to place the taskbar
- Lock the taskbar by right-clicking on “Lock the Task Bar.”
Related: How to disable Windows taskbar on the second display.
Advanced Options
Thankfully, Windows 11/10 also offers an array of advanced options to fine-tune your multi-monitor experience. For example, you can choose to show the taskbar only on the active screen or combine buttons on other taskbars. I would advise you to try out different variations and stick with the best one. Additionally, you can also move the Taskbar from one display to another.
Related: How to show Taskbar across multiple monitors in Windows 11.
The taskbar is a very important part of Windows UI. It is here that you can pin your favorite apps, manage your calendar, and group taskbar buttons. Windows 10 also lets you lock the taskbar, hide the taskbar in desktop/tablet mode, and use Peek feature.
Read: Smart Taskbar is a free Dual or Multi-monitor software to manage multiple displays.
How do I move my Taskbar to my second monitor in Windows 11?
To move the Taskbar to your second monitor in Windows 11 or Windows 10, you need to change the primary monitor. For that, open Windows Settings and go to System > Display. Following that, choose the second monitor, expand the Multiple displays section, and tick the Make this my main display checkbox. After that, you can find the Taskbar on your second monitor.
How do I move Taskbar to primary monitor?
To move the Taskbar to the primary monitor or show the Taskbar only on the primary monitor, you need to disable a setting included in the Windows Settings panel. For that, open Windows Settings and go to Personalization > Taskbar. Expand the Taskbar behaviors option, and remove the tick from the Show my taskbar on all displays checkbox. Now, you can find your Taskbar only on the primary monitor.
Mahit Huilgol is a Windows enthusiast, a blogger & a keen follower of everything Microsoft. He loves to keep a track of the Windows ecosystem and enjoys covering Windows 10 features & freeware.
Skip to content
Хотите переместить панель задач на другой монитор? Вот как это сделать
На чтение 2 мин. Просмотров 413 Опубликовано 03.09.2019
Существуют ситуации, в которых настройка нескольких мониторов может быть чрезвычайно полезна, но многие пользователи не знают, как переместить панель задач на другой монитор. Переместив панель задач на другой монитор, вы сможете лучше организовать рабочее пространство и получить больше места для работы.
Возможность сделать это укоренилась в Windows 10, так что это не должно быть проблемой. Проблема здесь в том, что некоторые параметры монитора могут сбить с толку. Итак, вот пошаговое руководство, которое поможет вам переместить панель задач на второй монитор.
Примечание. Настройка вашего нескольких мониторов уже должна работать для достижения этих результатов.
Как переместить панель задач на второй экран?
- Чтобы достичь этого результата, нам сначала нужно отключить панель задач на одном из экранов.
-
Щелкните правой кнопкой мыши Панель задач и убедитесь, что параметр Блокировать панель задач активирован не .

-
Затем нам нужно снова щелкнуть правой кнопкой мыши на Панели задач и выбрать Настройки панели задач.
-
Когда откроется окно Настройки панели задач , прокрутите вниз до раздела «Несколько дисплеев » и установите для параметра Показать панель задач на всех экранах значение «Выкл.».
- Эффект этого изменения можно наблюдать сразу.
- Теперь вы можете просто перетащить панель задач на любой из нескольких мониторов, подключенных к вашему ПК, и настроить ее в соответствии со своими потребностями.


В этом руководстве мы рассмотрели самый простой и быстрый способ перемещения панели задач на другой монитор. Как видите, этот процесс невероятно прост и легко выполняется, поэтому у вас не возникнет никаких проблем.
Не стесняйтесь сообщить нам, помогло ли вам это руководство с этой проблемой, используя раздел комментариев, найденный ниже.
Download PC Repair Tool to quickly find & fix Windows errors automatically
The Start Menu is one of the most important UI elements in Windows 11/10. In the recent past, Microsoft has added new features and redesigned the Start Menu several times. It is very common for professionals to use multiple monitors on Windows. In this article, we explain how you can move the Start Menu to the second monitor.

There are two easy ways you can do this in Windows 11/10-
- Unlock and drag the taskbar
- Change Setting – Use this device as the primary monitor.
Let us see how to do this in detail.
Using more than one display not only offers a better screen real estate but also helps in improving productivity. The taskbar and the Start Menu are usually present only on the original monitor. Most of the time it helps to move Start Menu to the secondary display. This will help us segregate tasks and use separate monitors for different tasks. Check out some of the best ways to move the Start Menu to a second monitor.
Read: How to make a program open on a specific monitor.
1] Unlock and drag the taskbar
This is one of the simpler methods. It is pretty effective too. What this method lacks are advanced features.
Follow the steps below to unlock and transfer the Start Menu to the second screen.
- Unlock the taskbar by clicking on the Taskbar.
- In the Taskbar Settings menu uncheck Lock the taskbar feature
- The taskbar is now free and you can move it around.
- Push the Start Menu to the furthermost corner and transfer the start menu to the other display
- Transfer Start Menu to the second monitor by using the keyboard
- Open the Start Menu by pressing the Windows key
- Close the Start Menu by hitting Esc
- Now the controls will shift back to the taskbar
- Open the taskbar context menu by pressing Alt and Space-bar together
Note: In Windows 11, there is no option to lock the Taskbar using Windows Settings. That is why you need to follow the second method as mentioned below.
2] Change Setting – Use this device as the primary monitor
Windows 11
If you are using Windows 11, follow these steps:
- Press Win+I to open Windows Settings.
- Go to System > Display.
- Select the monitor you want to show the Taskbar on.
- Expand the Multiple displays section.
- Tick the Make this my main display checkbox.
- Go to Personalization > Taskbar.
- Expand the Taskbar behaviors section.
- Remove the tick from the Show my taskbar on all displays checkbox.
However, if you are using Windows 10, follow these steps:
Windows 10
If the Taskbar is automatically moving to the wrong monitor or the program window does not start on the same monitor as the taskbar, then you can use this troubleshooting method.
- Click Start, click Run.
- Type desk.cpl and click OK.
- Alternatively, you can also right-click on the desktop and select Screen Resolution from the dropdown.
- Click on the monitor that you want to use as the primary monitor.
- Now select Make this my main display check box.
- Now you need to select Show desktop only on 1 from the Multiple displays drop-down menu.
- Select Keep Changes.
- Select Extend these displays from the Multiple displays drop-down menu, and then click Apply.
- Click Keep changes when the pop-up dialogue box appears.
TIP: You can use Ultramon Smart Taskbar to add a taskbar to every monitor.
How do I move something to my second monitor without dragging it?
To move a window to your second monitor without dragging it, you need to disable one monitor and choose the Show only on [n] option. To get started, press Win+I to open Windows Settings. Then, go to System > Display and choose the monitor you want to show your window on. Click on the Extend these displays option and choose the Show only on 2 or Show only on 1 option.
How do I move my taskbar to my second monitor in Windows 11?
To move Taskbar to the second monitor in Windows 11/10, you need to disable the Show my taskbar on all displays setting and choose your primary monitor correctly. Both are mentioned above, and you can do it using Windows Settings. You can also read this article to move Taskbar to the second display on Windows 11/10.
Were you able to Move Start following the steps above? Let us know about your experience in the comments below.
Mahit Huilgol is a Windows enthusiast, a blogger & a keen follower of everything Microsoft. He loves to keep a track of the Windows ecosystem and enjoys covering Windows 10 features & freeware.
Download PC Repair Tool to quickly find & fix Windows errors automatically
The Start Menu is one of the most important UI elements in Windows 11/10. In the recent past, Microsoft has added new features and redesigned the Start Menu several times. It is very common for professionals to use multiple monitors on Windows. In this article, we explain how you can move the Start Menu to the second monitor.
There are two easy ways you can do this in Windows 11/10-
- Unlock and drag the taskbar
- Change Setting – Use this device as the primary monitor.
Let us see how to do this in detail.
Using more than one display not only offers a better screen real estate but also helps in improving productivity. The taskbar and the Start Menu are usually present only on the original monitor. Most of the time it helps to move Start Menu to the secondary display. This will help us segregate tasks and use separate monitors for different tasks. Check out some of the best ways to move the Start Menu to a second monitor.
Read: How to make a program open on a specific monitor.
1] Unlock and drag the taskbar
This is one of the simpler methods. It is pretty effective too. What this method lacks are advanced features.
Follow the steps below to unlock and transfer the Start Menu to the second screen.
- Unlock the taskbar by clicking on the Taskbar.
- In the Taskbar Settings menu uncheck Lock the taskbar feature
- The taskbar is now free and you can move it around.
- Push the Start Menu to the furthermost corner and transfer the start menu to the other display
- Transfer Start Menu to the second monitor by using the keyboard
- Open the Start Menu by pressing the Windows key
- Close the Start Menu by hitting Esc
- Now the controls will shift back to the taskbar
- Open the taskbar context menu by pressing Alt and Space-bar together
Note: In Windows 11, there is no option to lock the Taskbar using Windows Settings. That is why you need to follow the second method as mentioned below.
2] Change Setting – Use this device as the primary monitor
Windows 11
If you are using Windows 11, follow these steps:
- Press Win+I to open Windows Settings.
- Go to System > Display.
- Select the monitor you want to show the Taskbar on.
- Expand the Multiple displays section.
- Tick the Make this my main display checkbox.
- Go to Personalization > Taskbar.
- Expand the Taskbar behaviors section.
- Remove the tick from the Show my taskbar on all displays checkbox.
However, if you are using Windows 10, follow these steps:
Windows 10
If the Taskbar is automatically moving to the wrong monitor or the program window does not start on the same monitor as the taskbar, then you can use this troubleshooting method.
- Click Start, click Run.
- Type desk.cpl and click OK.
- Alternatively, you can also right-click on the desktop and select Screen Resolution from the dropdown.
- Click on the monitor that you want to use as the primary monitor.
- Now select Make this my main display check box.
- Now you need to select Show desktop only on 1 from the Multiple displays drop-down menu.
- Select Keep Changes.
- Select Extend these displays from the Multiple displays drop-down menu, and then click Apply.
- Click Keep changes when the pop-up dialogue box appears.
TIP: You can use Ultramon Smart Taskbar to add a taskbar to every monitor.
How do I move something to my second monitor without dragging it?
To move a window to your second monitor without dragging it, you need to disable one monitor and choose the Show only on [n] option. To get started, press Win+I to open Windows Settings. Then, go to System > Display and choose the monitor you want to show your window on. Click on the Extend these displays option and choose the Show only on 2 or Show only on 1 option.
How do I move my taskbar to my second monitor in Windows 11?
To move Taskbar to the second monitor in Windows 11/10, you need to disable the Show my taskbar on all displays setting and choose your primary monitor correctly. Both are mentioned above, and you can do it using Windows Settings. You can also read this article to move Taskbar to the second display on Windows 11/10.
Were you able to Move Start following the steps above? Let us know about your experience in the comments below.
Mahit Huilgol is a Windows enthusiast, a blogger & a keen follower of everything Microsoft. He loves to keep a track of the Windows ecosystem and enjoys covering Windows 10 features & freeware.
Настройка нескольких мониторов – это счастье. Это помогает профессионалам в их работе и быть более продуктивным. За последние несколько лет Windows удалось предложить одну из лучших функций для нескольких мониторов. Пользователи могут подключить дополнительный монитор и беспрепятственно получать доступ к своей работе на обоих дисплеях. Это особенно полезно для графических дизайнеров, геймеров и других специалистов, которым требуется большой экран.
Переместить панель задач на второй монитор

Самым большим раздражением для большинства из нас является то, что панель задач по умолчанию включена на обоих дисплеях. Такое расположение по умолчанию может вызвать помехи на дополнительном дисплее. В этой статье мы объясним, как вы можете перемещать панель задач (не копировать) на второй монитор в Windows 10. Пожалуйста, следуйте инструкциям, описанным ниже:
- Щелкните правой кнопкой мыши на панели задач. Снимите флажок Блокировать панель задач.
- Нажмите и удерживайте панель задач. Перетащите его на второй монитор и вуаля!
- Нажмите кнопку мыши на том месте, где вы хотите разместить панель задач
- Заблокируйте панель задач, щелкнув правой кнопкой мыши «Блокировать панель задач».
Дополнительные параметры
К счастью, Windows 10 также предлагает множество расширенных опций для точной настройки работы с несколькими мониторами. Например, вы можете выбрать показ панели задач только на активном экране или комбинировать кнопки на других панелях задач. Я бы посоветовал вам попробовать разные варианты и выбрать лучший. Кроме того, вы также можете перемещать панель задач с одного дисплея на другой.
Панель задач является очень важной частью интерфейса Windows 10. Именно здесь вы можете закрепить ваши любимые приложения, управлять календарем и групповыми кнопками панели задач. Windows 10 также позволяет блокировать панель задач, скрывать панель задач в режиме рабочего стола/планшета и использовать функцию Peek.
Читать дальше . Smart Taskbar – это бесплатная программа для двух или нескольких мониторов, предназначенная для управления несколькими дисплеями.
Настройка нескольких мониторов — это благо для профессионалов. Это помогает быть более продуктивным. Новейшие операционные системы Windows 11 и 10 также позволяют добавлять дополнительные мониторы к вашему ПК. Можно подключить дополнительный монитор к основной системе и беспрепятственно получать доступ к своей работе на обоих дисплеях. Это особенно полезно для графических дизайнеров, геймеров и других профессионалов, которым нужен экран большего размера.
Однако при подключении дополнительных мониторов к компьютерам с Windows 11 или 10 панель задач остается видимой на всех дисплеях. Если вам не нравится такое поведение, вы можете изменить настройки по умолчанию и отображать панель задач только на дополнительном или основном мониторе.
В этой статье gearupwindows мы расскажем вам, как включить панель задач на дополнительном мониторе и отключить панель задач на основном дисплее на компьютерах с Windows 11 и 10.
Как переместить панель задач на второй монитор в Windows 11?
Чтобы переместить панель задач Windows 11 на второй монитор, выполните следующие действия:
Шаг 1. Откройте настройки Windows 11.
Шаг 2. Затем выберите Система категорию на левой боковой панели.
Шаг 3. После этого нажмите кнопку Отображать вкладка на правой боковой панели.

Шаг 4. Далее выберите монитор, на котором вы хотите видеть Панель задач.

Шаг 5. Затем нажмите кнопку Несколько дисплеев заголовок, чтобы расширить его.

Шаг 6. Теперь отметьте опцию «Сделать это моим основным дисплеем».

Шаг 7. Затем нажмите Персонализация в левой боковой панели.

Шаг 8. На правой боковой панели нажмите кнопку Панель задач вкладка

Шаг 9. После этого нажмите кнопку Поведение панели задач заголовок, чтобы расширить его.

Шаг 10. Наконец, снимите флажок «Показывать мою панель задач на всех дисплеях», чтобы отобразить панель задач на основном мониторе.

После выполнения вышеуказанных шагов панель задач появится только на том мониторе, который вы выбрали на шаге 4 выше.
Как показать панель задач на всех мониторах в Windows 11?
Если вы хотите отображать панель задач на всех подключенных мониторах в Windows 11, выполните следующие действия:
Шаг 1. Откройте настройки Windows 11.
Шаг 2. Выберите Персонализация в левой боковой панели.
Шаг 3. Нажмите кнопку Панель задач вкладка на правой боковой панели.
Шаг 4. Разверните Поведение панели задач настройки.
Шаг 5. Отметьте опцию «Показывать мою панель задач на всех дисплеях».
После выполнения вышеуказанных шагов панель задач появится на всех подключенных мониторах.
Как переместить панель задач на второй монитор в Windows 10?
Чтобы переместить панель задач Windows 10 на второй монитор, выполните следующие действия:
Шаг 1. Сначала щелкните правой кнопкой мыши Панель задачи снимите флажок Заблокировать панель задач опция, если она отмечена.

Шаг 2. Далее снова щелкните правой кнопкой мыши на Панель задач и выберите Настройки панели задач вариант.

Шаг 3. Когда Настройки панели задач появится окно, прокрутите вниз до Несколько дисплеев раздел и выключите тумблер Показывать панель задач на всех дисплеях.

Шаг 4. Наконец, перетащите Панель задач на любой монитор, подключенный к вашему ПК.
После того, как вы выполните вышеуказанные шаги, панель задач появится только на том мониторе, куда вы ее перетащили.
Меню «Пуск» — один из самых важных элементов пользовательского интерфейса в Windows 10. В недавнем прошлом Microsoft добавляла новые функции и несколько раз изменяла дизайн меню «Пуск». Профессионалы очень часто используют несколько мониторов в Windows. В этой статье мы объясним, как переместить меню «Пуск» на второй монитор.
Переместите меню «Пуск» на второй монитор.
Есть два простых способа сделать это в Windows 10:
- Разблокировать и перетащить панель задач
- Изменить настройку — используйте это устройство в качестве основного монитора.
Давайте посмотрим, как это сделать подробно.
Использование нескольких дисплеев не только увеличивает площадь экрана, но и помогает повысить производительность. Панель задач и меню «Пуск» обычно присутствуют только на исходном мониторе. В большинстве случаев это помогает переместить меню «Пуск» на дополнительный экран. Это поможет нам разделить задачи и использовать отдельные мониторы для разных задач. Ознакомьтесь с некоторыми из лучших способов переместить меню «Пуск» на второй монитор.
Читать: Как сделать так, чтобы программа открывалась на конкретном мониторе.
1]Разблокируйте и перетащите панель задач
Это один из самых простых способов. Это тоже довольно эффективно. Этому методу не хватает расширенных функций.
Выполните следующие действия, чтобы разблокировать и перенести меню «Пуск» на второй экран.
- Разблокируйте панель задач, щелкнув на панели задач.
- В меню настроек панели задач снимите флажок Заблокировать панель задач особенность
- Панель задач теперь свободна, и вы можете перемещать ее.
- Переместите меню «Пуск» в самый дальний угол и перенесите меню «Пуск» на другой дисплей.
- Перенести меню «Пуск» на второй монитор с помощью клавиатуры.
- Откройте меню «Пуск», нажав клавишу Windows.
- Закройте меню «Пуск», нажав Esc.
- Теперь элементы управления вернутся на панель задач.
- Откройте контекстное меню панели задач, одновременно нажав клавиши ALT и ПРОБЕЛ.
2]Изменить настройку — использовать это устройство в качестве основного монитора.
Если панель задач автоматически перемещается на неправильный монитор или окно программы не запускается на том же мониторе, что и панель задач, вы можете использовать этот метод устранения неполадок.
- Щелкните Пуск, щелкните Выполнить.
- Тип desk.cpl и нажмите ОК.
- Кроме того, вы также можете щелкнуть правой кнопкой мыши на рабочем столе и выбрать Разрешение экрана из раскрывающегося списка.
- Щелкните по монитору, который вы хотите использовать в качестве основного монитора.
- Теперь выберите Сделать это моим основным дисплеем флажок.
- Теперь вам нужно выбрать Показать рабочий стол только на 1 из Раскрывающийся список нескольких дисплеев меню.
- Выбирать Сохранить изменения.
- Выбирать Расширить эти дисплеи от Несколько дисплеев раскрывающееся меню, а затем щелкните Подать заявление.
- Нажмите Сохранить изменения когда появится всплывающее диалоговое окно.
КОНЧИК: Вы можете использовать Ultramon Smart Taskbar, чтобы добавить панель задач на каждый монитор.
Удалось ли вам переместить начало, выполнив описанные выше действия? Расскажите нам о своем опыте в комментариях ниже.
- Теги: Несколько мониторов, меню «Пуск»
- Remove From My Forums

Перемещение системного трея на второй монитор!
-
Вопрос
-
Доброго врмемени суток!
Есть станция с win10 pro 1607 bild…. К ней подключены два монитора, основной 24 дюйма, а второй 20 дюймов. Оба Philips…. Видеокарта NVidia GeForce GT 630…. Неожиданно у меня что то произошло с картинкой, она
стала моргать, IE стал перезапускать, и так пару раз, и трей оказался на втором мониторе. Это меня несказанно обрадовало, потому что это очень удобно! НО!!! Как воспроизвести эту ситуацию, я не знаю, потому, что всё произошло
без моего ведома, и быстро…. Переместить трей со значками вправо на второй монитор это очень удобно! Нашёл в Сети аналогичную ситуацию у товарищатут … Но там осталось всё без ответа… ПОдскажите, как это можно сделать руками в нужное мне время?
Adios Amigos
Ответы
-
Поробуйте снять с панели закрепление (убрать галочку закрепить панель задач) и перетащить её (панель задач) мышкой, она обязана вся, вместе с треем переехать на другой монитор.
-
Изменено
24 ноября 2016 г. 6:55
-
Помечено в качестве ответа
Joker Alvares
24 ноября 2016 г. 7:14
-
Изменено
-
Скорее всего вопрос уже не актуален, но все же… Правая клавиша по систрею(панель задач)-параметры панели задач-в открывшемся окне пролистываем вниз до раздела «Несколько дисплеев» и там можно менять значение
«Показать панель задач на всех дисплеях»-
Предложено в качестве ответа
Алекс115
4 января 2021 г. 8:52 -
Отменено предложение в качестве ответа
Vector BCOModerator
4 января 2021 г. 9:03 -
Помечено в качестве ответа
Vector BCOModerator
4 января 2021 г. 9:05
-
Предложено в качестве ответа