![]()
Download Article
![]()
Download Article
- iTunes or Finder
- iCloud Drive
- AirDrop
- Microsoft OneDrive
- Google Drive
- Q&A
- Tips
- Warnings
|
|
|
|
|
|
|
|
Need to transfer files from your computer to your iPad? Don’t worry—it’s a simple process, and you have a few different options depending on what kind of computer you have. This wikiHow tutorial will show you how to transfer files from a Mac or PC to your iPad.
-

1
Connect your iPad to your computer. Plug one end of your iPad’s charging cable into one of the computer’s USB ports, then plug the other end of the cable into your iPad’s charging port.[1]
- If you have a more recent iPad, like the iPad 11 Pro, you may have a USB-C to USB-C cord instead and will need an adapter so you can connect to your computer. These adapters are easy to find at any local retailer, like Target, Walmart, Amazon, or the Apple Store.
-
2
Open iTunes (Windows) or Finder (Mac) on your computer. Its app icon resembles a multicolored musical note on a white background.
- If iTunes prompts you to update it, click Download iTunes on the prompt and then restart your computer after the update completes.
- Apple has announced that they will retire the iTunes app with the launch of macOS Catalina in the fall of 2019. Instead of using iTunes for file transfers, use Finder if you’re on a Mac. Windows users will still be able to use the iTunes app.
Advertisement
-
3
Click the «Device» icon. It’s an iPad-shaped button on the upper-left side of the window. This will take you to your iPad’s page.
-
4
Click File Sharing. When you click the file «Device» icon in the upper-left corner, you can see the «File Sharing» option in the sidebar to the left. It’s next to an icon that resembles an «A».
-
5
Select an app. In the column of apps in the middle of the window, click an app to which you want to add a file. The file type doesn’t necessarily have to correspond to the app (for example, you could add a Microsoft Word file to the iMovie folder).
- Apple’s Pages, Keynote, Numbers, iMovie, and GarageBand apps all have folders for saved projects on your iPad, meaning that you can use them to store literally any file type.
-
6
Scroll down and click Add File…. This button is on the lower-right side of the page. Doing so will open your computer’s File Explorer (Windows) or Finder (Mac).
-
7
Select a file. Click the file that you want to add to your iPad to select it. You may first have to go to the file’s folder location by clicking the appropriate folder on the left side of the window.
-
8
Click Open. It’s in the bottom-right corner of the window. You should see the file’s name appear in the app’s window in iTunes or Finder.
-
9
Click Sync. This button is on the lower-right side of the iTunes window. Doing so will add the file to your selected app on the iPad. At this point, you can open the file on your iPad at any time, even if you aren’t connected to the Internet.
- You can click Done after the sync completes to return to the main page.


Advertisement
-
1
Go to https://www.icloud.com/ in your browser. This will open the iCloud login page.
- This is probably the easiest and fastest way to transfer files to and from your iPad from your Windows 10 computer.
-
2
Log into your iCloud account. Enter your Apple ID email address and password, then click the arrow icon to the right of the Apple ID and password bars.
- Skip this step if you’re already logged into iCloud.
- If you have two-factor authentication enabled, you’ll need to get the 6-digit number from your iPad to log in on your computer.
- If you are asked if you want to trust the device you are logging into, tap Trust on both your iPad and computer.
-
3
Click iCloud Drive
. It’s a blue app with white clouds on it. Doing so opens your iCloud Drive page.
-
4
Click the «Upload» icon. It’s at the top of the page. The icon resembles a cloud with an arrow pointing up. Doing so will open a File Explorer (Windows) or Finder (Mac) window.
-
5
Click the file that you want to upload to iCloud Drive. Use the file browser to navigate to the files you want to upload. Click a file to select it.
- You can also select all files in a given location by clicking one file and then pressing Ctrl+A (Windows) or ⌘ Command+A (Mac).
- To select open multiple files, hold down Ctrl (Windows) or ⌘ Command (Mac) while clicking each file you want to select
-
6
Click Open. It’s in the bottom-right corner of the window. Doing so will prompt your files to begin uploading to iCloud Drive.
-
7
Wait for your files to upload. This can take anywhere from a few seconds to a few hours depending on your files’ combined size. Once the files finish uploading, you can proceed.
-
8
Open your iPad’s Files app
. This app resembles a blue folder on a white background. The iCloud Drive app was replaced with Files in iOS 11, so this is where you’ll go to download the iCloud files onto your iPad.
-
9
Tap the Browse tab. It’s in the bottom-right corner of the screen.
-
10
Tap
iCloud Drive. You’ll see this below the «Locations» heading. Doing so will open your iCloud Drive’s contents.
- If you don’t see this option, first tap the Locations heading to prompt it to appear.
-
11
Tap Select in the top-right corner of the screen. This displays a blank circle next to each file.
-
12
Tap each file that you want to move onto your iPad. This displays a checkmark in the circle next to each file you tap.
-
13
Tap the Move. You’ll find this at the bottom of the screen.
-
14
Tap On My iPad. It’s next to an icon that resembles an iPad. This displays a list of folders on your iPad
-
15
Tap a folder you want to save your files to.
-
16
Tap Move. It’s in the top-right corner of the screen. Doing so will add the selected files to your selected folder, making them available on your iPad even when you aren’t connected to the Internet.
- You can open the files from within the Files app.


Advertisement
-
1
Open the Finder
on Mac. It’s the icon that resembles a blue and white smiley face.
-
2
Click Go. It’s in the menu bar at the top of the screen. This displays a drop-down menu of different common folders in the Finder.
-
3
Click AirDrop. It’s in the drop-down menu below «Go» in the Finder.
-
4
Select Contacts only or Everyone in the drop-down menu. The drop-down menu is at the bottom of the screen next to «Allow me to be discovered by:» This makes you discoverable through AirDrop.
-
5
Open Files app
on your iPhone or iPad. It’s in the app that resembles a blue folder in the Dock at the bottom of your home screen.
-
6
Tap Browse. It’s the second tab at the bottom of the Files app. This displays a sidebar menu to the left.
-
7
Tap On My iPad. It’s next to an icon that resembles an iPad in the menu to the left.
-
8
Tap the program that has files you want to transfer. Program files in the Files app are organized by app. Tap the app folder that corresponds to the files you want to transfer. This displays all the files for that app.
- For example, if you have some Pages documents you want to transfer to your app, tap Pages.
-
9
Tap Select. It’s in the upper-right corner of the Files app. This displays a circular button next to each file.
-
10
Tap the files you want to transfer. This displays a checkmark icon next to the files you select.
-
11
Tap Share. It’s in the lower-left corner of the Files app. This displays the Share menu.
-
12
Tap the AirDrop icon in the share menu. It’s the icon that has a number of concentric circles with an upside-down V at the bottom. This displays contacts that are available through AirDrop in the menu.
- In order for a contact to be available through AirDrop, they must be signed in to their Apple ID on their device. Both devices must be on the same Wi-Fi network and have Bluetooth turned on.
- AirDrop must be discoverable by «Contacts» or «Everyone» on the receiving device.
- Transferring files via AirDrop may not be available on some older iPhone, iPad, iMac, or Macbook models.
-
13
Tap a contact in the AirDrop section. The AirDrop section is the second section in the Share menu. It displays the profile image and devices for all contacts (including yourself) that are available through AirDrop. This starts sending the files to your Mac. Your Mac will make a sound when the file transfer is complete. You can find the files in the «Downloads» folder in the Finder on your Mac.


Advertisement
-
1
Open an Email app on your iPhone or iPad. Tap the email app you use to send an email on your iPhone or iPad. If you use Apple Mail, tap the blue icon with a white envelope at the bottom of the screen. If you use Gmail or Outlook, tap the app icon on your home screen.
- This is another easy solution that you can use to transfer files between your iPad and Windows 10 computer.
-
2
Tap the compose icon. This is the icon you tap the create a new email message. In Apple Mail and Outlook, it’s the icon that resembles a pencil and paper at the top of the screen. On Gmail, it’s the icon with the plus sign (+) in the lower-left corner.
-
3
Type your email address in the recipient line. This is usually the line that says «To:» or «Recipient» in the email composition form.
-
4
Type a subject for the email. Use the subject line to type a subject for the email. This can be the name of the files or just «Files».
-
5
Tap the attachment icon. This is usually an icon that resembles a paperclip. It’s at the top of the screen, or in the upper-right corner of the on-screen keyboard.
-
6
Tap Browse (if available). It’s the second tab at the bottom of the screen.
- If you are using Gmail, just tap the file you want to send in the list of files.
-
7
Tap On My iPad. It’s next to an icon that resembles an iPad in the menu to the left.
-
8
Tap the program that has files you want to transfer. Program files in the Files app are organized by app. Tap the app folder that corresponds to the files you want to transfer. This displays all the files for that app.
-
9
Tap the file you want to transfer. This uploads the file as an email attachment
- Some email services may limit the size of the file you can upload. If you are unable to attach a file, it may be too big.
-
10
Tap the Send icon. In Apple Mail, it’s the button that says Send in the upper-right corner. In Outlook and Gmail, it’s the icon that resembles a paper airplane in the upper-right corner.
-
11
Open your email app on your Mac. If you are using Outlook or Apple Mail, tap the icon in the Applications folder in the Finder or the Dock. If you are using Gmail, navigate to https://mail.google.com in a web browser.
- If you are not signed in to your email automatically, type your email address and password to sign in.
-
12
Open the email that you sent to yourself. Look for an email with the subject you typed and click it to open the email.
-
13
Double-click the attachments to download them. Attachments are usually listed at the bottom of the email. By default, you can find your Downloads folder in the Finder.


Advertisement
-
1
Go to https://onedrive.com/ in your browser. This will open your Microsoft OneDrive main page if you’re logged into your Microsoft account.
- If you aren’t logged into your Microsoft account, enter your email address and password before proceeding.
-
2
Click Upload. It’s at the top of the page. A drop-down menu will appear.
- If you’d like to save the file in a specific folder, first click the folder in which you’d like to save it.
-
3
Click Files. This option is in the drop-down menu. Doing so will open a File Explorer (Windows) or Finder (Mac) window.
- If you want to upload a folder full of files, click Folder here instead.
-
4
Select files. Click a file that you want to upload to OneDrive or hold down Ctrl (Windows) or ⌘ Command (Mac) while clicking individual files to select them independently.
- You can also select all files in a given location by clicking one file and then pressing Ctrl+A (Windows) or ⌘ Command+A (Mac).
- If you want to upload a folder, click the folder that you want to upload instead.
-
5
Click Open. It’s in the bottom-right corner of the window. This will prompt your files to begin uploading to OneDrive.
-
6
Wait for the files to finish uploading. The time needed for this step will vary depending on your files’ collective size. Once the upload is complete, you can proceed.
-
7
Open OneDrive
on your iPad. Tap the OneDrive app icon, which resembles two white clouds on a blue background. This will open your OneDrive main page if you’re logged in.
- Again, if you aren’t logged in, enter your email address and password.
-
8
Tap and hold a file to select it then tap any other files/folders that you want to download onto your iPad to select. This selects the file. To select multiple files, tap and hold the first file, then tap each other file that you want to select.
-
9
Tap the «Share» icon
. It’s the upward-facing arrow icon in the upper-left side of the screen. A menu will appear.
-
10
Tap Save to Files. This folder-shaped icon is in the menu at the bottom of the screen.
-
11
Tap On my iPad. This displays a list of folders on your iPad.
-
12
Tap a folder you want to save the files to. Below the «On My iPad» heading, tap a folder (e.g., Pages) to select it as the folder to which you want to save your OneDrive file.
-
13
Tap Add. It’s in the top-right corner of the screen. You can now open the file on your iPad even if you’re not connected to the Internet.


Advertisement
-
1
Go to https://www.drive.google.com/ in your browser. This will open your Google Drive account if you’re logged into your Google account.
- If you aren’t logged into Google Drive, click the blue Go to Google Drive button if available, then enter your email address and password before continuing.
-
2
Click NEW. It’s a blue button in the upper-left corner of the window. This will prompt a drop-down menu.
- If you’d like to save the file in a specific folder, first click the folder in which you’d like to save it..
-
3
Click File upload. This option is in the drop-down menu.
-
4
Click a file that you want to upload to Google Drive. To select multiple files, hold down Ctrl (Windows) or ⌘ Command (Mac) and click the files you want ot upload.[2]
- You can also select all files in a given location by clicking one file and then pressing Ctrl+A (Windows) or ⌘ Command+A (Mac).
-
5
Click Open. It’s in the bottom-right corner of the window. Doing so will prompt your files to begin uploading to Google Drive.
-
6
Wait for your files to upload. The time needed to complete this step will vary depending on how large your files are. Once the upload is complete, you can proceed.
-
7
Tap the Google Drive app icon. It resembles a green, blue, and yellow triangle on a white background. This will open the Google Drive main page if you’re logged in.
- Again, if you aren’t logged into Google Drive, enter the email address and password for the account on which you uploaded the files.
-
8
Tap and hold a file to select it. This selects the file. To select multiple files, tap and hold the first file, then tap each other file that you want to select.
-
9
Tap ⋯. It’s the icon with three dots next to each file in the Google Drive folder.
-
10
Tap Make available offline. This option is in the pop-up menu. Doing so means that you’ll be able to open the files within Google Drive even when your iPad isn’t connected to the Internet.
- There is a Google Drive option in the Files app, but you can’t download multiple files from Google Drive into your Files app like you can with other cloud storage apps.


Advertisement
Add New Question
-
Question
This does not work, clicking on that icon does not show Copy files…. it shows nothing other than Sync with Itunes. GOD I detest apple.

This answer was written by one of our trained team of researchers who validated it for accuracy and comprehensiveness.
wikiHow Staff Editor
Staff Answer
One of the more recent updates for Apple products removed iTunes functionality. You can do everything you used to do in iTunes using Finder.
-
Question
How do I transfer data from my PC back to my iPad?
This answer was written by one of our trained team of researchers who validated it for accuracy and comprehensiveness.
wikiHow Staff Editor
Staff Answer
To transfer data back from your computer to your iPad, you can follow the same steps with iCloud, email, One Drive, Cloud Drive, Google Drive, and AirDrop.
-
Question
I need to transfer a pdf file from PC to Ipad
This answer was written by one of our trained team of researchers who validated it for accuracy and comprehensiveness.
wikiHow Staff Editor
Staff Answer
To transfer data from your computer to your iPad, you can follow the same steps with iCloud, email, One Drive, Cloud Drive, Google Drive, and AirDrop.

See more answers
Ask a Question
200 characters left
Include your email address to get a message when this question is answered.
Submit
Advertisement
-
Most cloud storage apps have an «Offline» feature that you can use to make your files available offline. You can usually do so by selecting a file, tapping the menu icon (⋮), and selecting the Offline option.
-
Once you’ve downloaded a file to your iPad’s Files app, you can delete the file from the cloud storage service without the file disappearing from your iPad.
Advertisement
-
If you don’t have iOS 11 or higher on your iPad, you won’t have the Files app. If so, you’ll need to open files from within your selected app.
Advertisement
References
- ↑ Luigi Oppido. Computer & Tech Specialist. Expert Interview. 31 July 2019.
- ↑ Luigi Oppido. Computer & Tech Specialist. Expert Interview. 31 July 2019.
About This Article
Article SummaryX
1. Connect the iPad to the computer.
2. Open iTunes.
3. Click the iPad icon.
4. Click File Sharing.
5. Select an app.
6. Click Add File.
7. Select a file.
8. Click Open.
9. Click Sync.
Did this summary help you?
Thanks to all authors for creating a page that has been read 1,303,399 times.
Reader Success Stories
-

Adrian Lewis
Feb 20, 2017
«The description of various methods made sense, and created a relaxed and easygoing environment in which to learn…» more
Is this article up to date?
![]()
Download Article
![]()
Download Article
- iTunes or Finder
- iCloud Drive
- AirDrop
- Microsoft OneDrive
- Google Drive
- Q&A
- Tips
- Warnings
|
|
|
|
|
|
|
|
Need to transfer files from your computer to your iPad? Don’t worry—it’s a simple process, and you have a few different options depending on what kind of computer you have. This wikiHow tutorial will show you how to transfer files from a Mac or PC to your iPad.
-
1
Connect your iPad to your computer. Plug one end of your iPad’s charging cable into one of the computer’s USB ports, then plug the other end of the cable into your iPad’s charging port.[1]
- If you have a more recent iPad, like the iPad 11 Pro, you may have a USB-C to USB-C cord instead and will need an adapter so you can connect to your computer. These adapters are easy to find at any local retailer, like Target, Walmart, Amazon, or the Apple Store.
-
2
Open iTunes (Windows) or Finder (Mac) on your computer. Its app icon resembles a multicolored musical note on a white background.
- If iTunes prompts you to update it, click Download iTunes on the prompt and then restart your computer after the update completes.
- Apple has announced that they will retire the iTunes app with the launch of macOS Catalina in the fall of 2019. Instead of using iTunes for file transfers, use Finder if you’re on a Mac. Windows users will still be able to use the iTunes app.
Advertisement
-
3
Click the «Device» icon. It’s an iPad-shaped button on the upper-left side of the window. This will take you to your iPad’s page.
-
4
Click File Sharing. When you click the file «Device» icon in the upper-left corner, you can see the «File Sharing» option in the sidebar to the left. It’s next to an icon that resembles an «A».
-
5
Select an app. In the column of apps in the middle of the window, click an app to which you want to add a file. The file type doesn’t necessarily have to correspond to the app (for example, you could add a Microsoft Word file to the iMovie folder).
- Apple’s Pages, Keynote, Numbers, iMovie, and GarageBand apps all have folders for saved projects on your iPad, meaning that you can use them to store literally any file type.
-
6
Scroll down and click Add File…. This button is on the lower-right side of the page. Doing so will open your computer’s File Explorer (Windows) or Finder (Mac).
-
7
Select a file. Click the file that you want to add to your iPad to select it. You may first have to go to the file’s folder location by clicking the appropriate folder on the left side of the window.
-
8
Click Open. It’s in the bottom-right corner of the window. You should see the file’s name appear in the app’s window in iTunes or Finder.
-
9
Click Sync. This button is on the lower-right side of the iTunes window. Doing so will add the file to your selected app on the iPad. At this point, you can open the file on your iPad at any time, even if you aren’t connected to the Internet.
- You can click Done after the sync completes to return to the main page.
Advertisement
-
1
Go to https://www.icloud.com/ in your browser. This will open the iCloud login page.
- This is probably the easiest and fastest way to transfer files to and from your iPad from your Windows 10 computer.
-
2
Log into your iCloud account. Enter your Apple ID email address and password, then click the arrow icon to the right of the Apple ID and password bars.
- Skip this step if you’re already logged into iCloud.
- If you have two-factor authentication enabled, you’ll need to get the 6-digit number from your iPad to log in on your computer.
- If you are asked if you want to trust the device you are logging into, tap Trust on both your iPad and computer.
-
3
Click iCloud Drive
. It’s a blue app with white clouds on it. Doing so opens your iCloud Drive page.
-
4
Click the «Upload» icon. It’s at the top of the page. The icon resembles a cloud with an arrow pointing up. Doing so will open a File Explorer (Windows) or Finder (Mac) window.
-
5
Click the file that you want to upload to iCloud Drive. Use the file browser to navigate to the files you want to upload. Click a file to select it.
- You can also select all files in a given location by clicking one file and then pressing Ctrl+A (Windows) or ⌘ Command+A (Mac).
- To select open multiple files, hold down Ctrl (Windows) or ⌘ Command (Mac) while clicking each file you want to select
-
6
Click Open. It’s in the bottom-right corner of the window. Doing so will prompt your files to begin uploading to iCloud Drive.
-
7
Wait for your files to upload. This can take anywhere from a few seconds to a few hours depending on your files’ combined size. Once the files finish uploading, you can proceed.
-
8
Open your iPad’s Files app
. This app resembles a blue folder on a white background. The iCloud Drive app was replaced with Files in iOS 11, so this is where you’ll go to download the iCloud files onto your iPad.
-
9
Tap the Browse tab. It’s in the bottom-right corner of the screen.
-
10
Tap
iCloud Drive. You’ll see this below the «Locations» heading. Doing so will open your iCloud Drive’s contents.
- If you don’t see this option, first tap the Locations heading to prompt it to appear.
-
11
Tap Select in the top-right corner of the screen. This displays a blank circle next to each file.
-
12
Tap each file that you want to move onto your iPad. This displays a checkmark in the circle next to each file you tap.
-
13
Tap the Move. You’ll find this at the bottom of the screen.
-
14
Tap On My iPad. It’s next to an icon that resembles an iPad. This displays a list of folders on your iPad
-
15
Tap a folder you want to save your files to.
-
16
Tap Move. It’s in the top-right corner of the screen. Doing so will add the selected files to your selected folder, making them available on your iPad even when you aren’t connected to the Internet.
- You can open the files from within the Files app.
Advertisement
-
1
Open the Finder
on Mac. It’s the icon that resembles a blue and white smiley face.
-
2
Click Go. It’s in the menu bar at the top of the screen. This displays a drop-down menu of different common folders in the Finder.
-
3
Click AirDrop. It’s in the drop-down menu below «Go» in the Finder.
-
4
Select Contacts only or Everyone in the drop-down menu. The drop-down menu is at the bottom of the screen next to «Allow me to be discovered by:» This makes you discoverable through AirDrop.
-
5
Open Files app
on your iPhone or iPad. It’s in the app that resembles a blue folder in the Dock at the bottom of your home screen.
-
6
Tap Browse. It’s the second tab at the bottom of the Files app. This displays a sidebar menu to the left.
-
7
Tap On My iPad. It’s next to an icon that resembles an iPad in the menu to the left.
-
8
Tap the program that has files you want to transfer. Program files in the Files app are organized by app. Tap the app folder that corresponds to the files you want to transfer. This displays all the files for that app.
- For example, if you have some Pages documents you want to transfer to your app, tap Pages.
-
9
Tap Select. It’s in the upper-right corner of the Files app. This displays a circular button next to each file.
-
10
Tap the files you want to transfer. This displays a checkmark icon next to the files you select.
-
11
Tap Share. It’s in the lower-left corner of the Files app. This displays the Share menu.
-
12
Tap the AirDrop icon in the share menu. It’s the icon that has a number of concentric circles with an upside-down V at the bottom. This displays contacts that are available through AirDrop in the menu.
- In order for a contact to be available through AirDrop, they must be signed in to their Apple ID on their device. Both devices must be on the same Wi-Fi network and have Bluetooth turned on.
- AirDrop must be discoverable by «Contacts» or «Everyone» on the receiving device.
- Transferring files via AirDrop may not be available on some older iPhone, iPad, iMac, or Macbook models.
-
13
Tap a contact in the AirDrop section. The AirDrop section is the second section in the Share menu. It displays the profile image and devices for all contacts (including yourself) that are available through AirDrop. This starts sending the files to your Mac. Your Mac will make a sound when the file transfer is complete. You can find the files in the «Downloads» folder in the Finder on your Mac.
Advertisement
-
1
Open an Email app on your iPhone or iPad. Tap the email app you use to send an email on your iPhone or iPad. If you use Apple Mail, tap the blue icon with a white envelope at the bottom of the screen. If you use Gmail or Outlook, tap the app icon on your home screen.
- This is another easy solution that you can use to transfer files between your iPad and Windows 10 computer.
-
2
Tap the compose icon. This is the icon you tap the create a new email message. In Apple Mail and Outlook, it’s the icon that resembles a pencil and paper at the top of the screen. On Gmail, it’s the icon with the plus sign (+) in the lower-left corner.
-
3
Type your email address in the recipient line. This is usually the line that says «To:» or «Recipient» in the email composition form.
-
4
Type a subject for the email. Use the subject line to type a subject for the email. This can be the name of the files or just «Files».
-
5
Tap the attachment icon. This is usually an icon that resembles a paperclip. It’s at the top of the screen, or in the upper-right corner of the on-screen keyboard.
-
6
Tap Browse (if available). It’s the second tab at the bottom of the screen.
- If you are using Gmail, just tap the file you want to send in the list of files.
-
7
Tap On My iPad. It’s next to an icon that resembles an iPad in the menu to the left.
-
8
Tap the program that has files you want to transfer. Program files in the Files app are organized by app. Tap the app folder that corresponds to the files you want to transfer. This displays all the files for that app.
-
9
Tap the file you want to transfer. This uploads the file as an email attachment
- Some email services may limit the size of the file you can upload. If you are unable to attach a file, it may be too big.
-
10
Tap the Send icon. In Apple Mail, it’s the button that says Send in the upper-right corner. In Outlook and Gmail, it’s the icon that resembles a paper airplane in the upper-right corner.
-
11
Open your email app on your Mac. If you are using Outlook or Apple Mail, tap the icon in the Applications folder in the Finder or the Dock. If you are using Gmail, navigate to https://mail.google.com in a web browser.
- If you are not signed in to your email automatically, type your email address and password to sign in.
-
12
Open the email that you sent to yourself. Look for an email with the subject you typed and click it to open the email.
-
13
Double-click the attachments to download them. Attachments are usually listed at the bottom of the email. By default, you can find your Downloads folder in the Finder.
Advertisement
-
1
Go to https://onedrive.com/ in your browser. This will open your Microsoft OneDrive main page if you’re logged into your Microsoft account.
- If you aren’t logged into your Microsoft account, enter your email address and password before proceeding.
-
2
Click Upload. It’s at the top of the page. A drop-down menu will appear.
- If you’d like to save the file in a specific folder, first click the folder in which you’d like to save it.
-
3
Click Files. This option is in the drop-down menu. Doing so will open a File Explorer (Windows) or Finder (Mac) window.
- If you want to upload a folder full of files, click Folder here instead.
-
4
Select files. Click a file that you want to upload to OneDrive or hold down Ctrl (Windows) or ⌘ Command (Mac) while clicking individual files to select them independently.
- You can also select all files in a given location by clicking one file and then pressing Ctrl+A (Windows) or ⌘ Command+A (Mac).
- If you want to upload a folder, click the folder that you want to upload instead.
-
5
Click Open. It’s in the bottom-right corner of the window. This will prompt your files to begin uploading to OneDrive.
-
6
Wait for the files to finish uploading. The time needed for this step will vary depending on your files’ collective size. Once the upload is complete, you can proceed.
-
7
Open OneDrive
on your iPad. Tap the OneDrive app icon, which resembles two white clouds on a blue background. This will open your OneDrive main page if you’re logged in.
- Again, if you aren’t logged in, enter your email address and password.
-
8
Tap and hold a file to select it then tap any other files/folders that you want to download onto your iPad to select. This selects the file. To select multiple files, tap and hold the first file, then tap each other file that you want to select.
-
9
Tap the «Share» icon
. It’s the upward-facing arrow icon in the upper-left side of the screen. A menu will appear.
-
10
Tap Save to Files. This folder-shaped icon is in the menu at the bottom of the screen.
-
11
Tap On my iPad. This displays a list of folders on your iPad.
-
12
Tap a folder you want to save the files to. Below the «On My iPad» heading, tap a folder (e.g., Pages) to select it as the folder to which you want to save your OneDrive file.
-
13
Tap Add. It’s in the top-right corner of the screen. You can now open the file on your iPad even if you’re not connected to the Internet.
Advertisement
-
1
Go to https://www.drive.google.com/ in your browser. This will open your Google Drive account if you’re logged into your Google account.
- If you aren’t logged into Google Drive, click the blue Go to Google Drive button if available, then enter your email address and password before continuing.
-
2
Click NEW. It’s a blue button in the upper-left corner of the window. This will prompt a drop-down menu.
- If you’d like to save the file in a specific folder, first click the folder in which you’d like to save it..
-
3
Click File upload. This option is in the drop-down menu.
-
4
Click a file that you want to upload to Google Drive. To select multiple files, hold down Ctrl (Windows) or ⌘ Command (Mac) and click the files you want ot upload.[2]
- You can also select all files in a given location by clicking one file and then pressing Ctrl+A (Windows) or ⌘ Command+A (Mac).
-
5
Click Open. It’s in the bottom-right corner of the window. Doing so will prompt your files to begin uploading to Google Drive.
-
6
Wait for your files to upload. The time needed to complete this step will vary depending on how large your files are. Once the upload is complete, you can proceed.
-
7
Tap the Google Drive app icon. It resembles a green, blue, and yellow triangle on a white background. This will open the Google Drive main page if you’re logged in.
- Again, if you aren’t logged into Google Drive, enter the email address and password for the account on which you uploaded the files.
-
8
Tap and hold a file to select it. This selects the file. To select multiple files, tap and hold the first file, then tap each other file that you want to select.
-
9
Tap ⋯. It’s the icon with three dots next to each file in the Google Drive folder.
-
10
Tap Make available offline. This option is in the pop-up menu. Doing so means that you’ll be able to open the files within Google Drive even when your iPad isn’t connected to the Internet.
- There is a Google Drive option in the Files app, but you can’t download multiple files from Google Drive into your Files app like you can with other cloud storage apps.
Advertisement
Add New Question
-
Question
This does not work, clicking on that icon does not show Copy files…. it shows nothing other than Sync with Itunes. GOD I detest apple.
This answer was written by one of our trained team of researchers who validated it for accuracy and comprehensiveness.
wikiHow Staff Editor
Staff Answer
One of the more recent updates for Apple products removed iTunes functionality. You can do everything you used to do in iTunes using Finder.
-
Question
How do I transfer data from my PC back to my iPad?
This answer was written by one of our trained team of researchers who validated it for accuracy and comprehensiveness.
wikiHow Staff Editor
Staff Answer
To transfer data back from your computer to your iPad, you can follow the same steps with iCloud, email, One Drive, Cloud Drive, Google Drive, and AirDrop.
-
Question
I need to transfer a pdf file from PC to Ipad
This answer was written by one of our trained team of researchers who validated it for accuracy and comprehensiveness.
wikiHow Staff Editor
Staff Answer
To transfer data from your computer to your iPad, you can follow the same steps with iCloud, email, One Drive, Cloud Drive, Google Drive, and AirDrop.
See more answers
Ask a Question
200 characters left
Include your email address to get a message when this question is answered.
Submit
Advertisement
-
Most cloud storage apps have an «Offline» feature that you can use to make your files available offline. You can usually do so by selecting a file, tapping the menu icon (⋮), and selecting the Offline option.
-
Once you’ve downloaded a file to your iPad’s Files app, you can delete the file from the cloud storage service without the file disappearing from your iPad.
Advertisement
-
If you don’t have iOS 11 or higher on your iPad, you won’t have the Files app. If so, you’ll need to open files from within your selected app.
Advertisement
References
- ↑ Luigi Oppido. Computer & Tech Specialist. Expert Interview. 31 July 2019.
- ↑ Luigi Oppido. Computer & Tech Specialist. Expert Interview. 31 July 2019.
About This Article
Article SummaryX
1. Connect the iPad to the computer.
2. Open iTunes.
3. Click the iPad icon.
4. Click File Sharing.
5. Select an app.
6. Click Add File.
7. Select a file.
8. Click Open.
9. Click Sync.
Did this summary help you?
Thanks to all authors for creating a page that has been read 1,303,399 times.
Reader Success Stories
-
Adrian Lewis
Feb 20, 2017
«The description of various methods made sense, and created a relaxed and easygoing environment in which to learn…» more
Is this article up to date?
![]()
Вот подробные инструкции по синхронизации данных с ПК на iPad с помощью iTunes.
Шаг 1. Подключите iPad к компьютеру с помощью USB-кабеля и запустите iTunes.
Шаг 2: Перейдите в «Файлы»> «Добавить файл в библиотеку» или «Добавить папку в библиотеку», а затем выберите элементы, которые вы хотите перенести с компьютера на iPad.
Скопируйте файлы со своего компьютера в приложение iOS
- В iTunes выберите приложение из списка в разделе «Общий доступ к файлам».
- Перетащите файлы из папки или окна в список документов, чтобы скопировать их на свое устройство.
Как перенести файлы с Windows 10 на iPad?
Как перенести фотографии с iPhone и iPad с помощью приложения Windows 10 Photos
- Подключите iPhone или iPad к компьютеру с помощью подходящего USB-кабеля.
- Запустите приложение «Фото» из меню «Пуск», на рабочем столе или на панели задач.
- Нажмите «Импорт».
- Щелкните любую фотографию, которую не хотите импортировать; все новые фотографии будут выбраны для импорта по умолчанию.
Как передать файлы с Windows на iPad без iTunes?
Откройте EaseUS MobiMover и щелкните «С ПК на iDevice» в главном интерфейсе. Шаг 2: Нажмите «Добавить файл» или «Добавить папку», чтобы выбрать файлы или папку, которые вы хотите перенести с USB на свой iPad. Или вы можете напрямую использовать функцию «Перетащить и отпустить», чтобы перетащить файлы или папку с вашего ПК и перенести их на iPad.
Как передать файлы с ПК на iPad по беспроводной сети?
Следуя приведенным ниже инструкциям, вы можете подключить iPad к ПК по беспроводной сети.
- Скачать. Откройте Wi-Fi и подключайтесь. Зайдите в «App Store» и найдите «AirMore».
- Зайдите на сайт. Перейдите на сайт «web.airmore.com» на своем ПК.
- Получите соединение. Убедитесь, что ваш iPad и компьютер подключены к одной сети. Откройте приложение на своем iPad.
Как передать файлы с ПК на iPad через USB?
Шаг 1. Подключите iPad к компьютеру с помощью USB-кабеля и нажмите «Доверие» на своем устройстве, чтобы продолжить, если необходимо. Запустите EaseUS MobiMover и выберите режим «С ПК на iDevice» на экране «Передача в один клик». Шаг 1: Нажмите «Добавить файл» или «Добавить папку», чтобы выбрать файлы или папку, которые вы хотите перенести с ПК на iPad.
Как передать файлы с ноутбука на iPad?
Вот как это сделать.
- Откройте iTunes и подключите iPad к компьютеру.
- Щелкните iPad или iPad 2 на левой панели навигации.
- Прокрутите мимо «Синхронизация приложений» до «Общий доступ к файлам».
- Выберите приложение, которое может передавать документы между iPad и компьютером.
- В правом нижнем углу экрана нажмите «Добавить».
- Щелкните «Синхронизировать».
Как передать файлы с ПК на iPad MINI без iTunes?
Шаги по передаче файлов на iPad без iTunes. Шаг 1. Установите программное обеспечение TunesMate на свой ПК / Mac. После запуска программы подключите к ней свой iPad. Шаг 2: Выберите вкладку, на которую вы хотите перенести файлы с ПК на iPad вверху, например «Музыка».
Как перенести документы Word с ПК на iPad?
Перенос с вашего компьютера
- Подключите устройство iOS к компьютеру и откройте iTunes на своем компьютере, если он не открывается автоматически.
- В iTunes нажмите кнопку «Устройство», затем нажмите «Общий доступ к файлам» на боковой панели.
- В списке слева выберите приложение Pages и нажмите Добавить.
- Выберите документ и нажмите «Добавить».
Могу ли я копировать фотографии с ПК на iPad?
Легко переносите изображения на iPad с помощью iTunes
- Создайте папку, содержащую изображения, которые вы хотите перенести на iPad.
- Подключите iPad к компьютеру, запустите iTunes и выберите iPad из списка устройств.
- Щелкните вкладку «Фото».
- Установите флажок «Синхронизировать фотографии из» и выберите «Выбрать папку…»
Как перенести фотографии с ПК на iPad без iTunes?
Чтобы перенести фотографии с компьютера на iPad, на вашем компьютере должен быть установлен iTunes. Подключите iPad к компьютеру с помощью кабеля для передачи данных. Запустите iTunes и щелкните значок iPad в разделе «Устройства». Перейдите на вкладку «Фотографии» и установите флажок «Синхронизировать фотографии из».
Как я могу передавать файлы с ПК на iPhone без iTunes?
Шаги по переносу файлов приложения с ПК на iPhone
- Подключите ваш iPhone к ПК.
- Коснитесь значка устройства в iTunes.
- Нажмите «Приложения» в разделе «Настройки».
- В разделе «Общий доступ к файлам» вы можете увидеть список приложений и выбрать одно из них. Затем нажмите кнопку «Добавить».
- В правом списке выберите файл для передачи. Нажмите «Открыть», а затем «Синхронизировать».
Как перенести фильмы с ПК на iPad без iTunes?
Больше видео на YouTube
- Загрузите эту программу передачи фильмов и установите ее на компьютер. Скачать.
- Откройте эту программу и подключите iPad к ПК с помощью USB-кабеля.
- После подключения нажмите «Управление», а затем «Видео».
- Выберите те, которые вы хотите передать, и нажмите «Экспорт».
Как передавать файлы между двумя iPad?
Метод 2. Передача файлов между устройствами Apple с помощью программного обеспечения для передачи данных iOS.
- Шаг 1. Подключите iPad к компьютеру (Mac / ПК), откройте EaseUS MobiMover, затем выберите iDevice для iDevice.
- Шаг 2. Проверьте исходное и целевое устройства и выберите жанры, которые вы хотите скопировать с одного iPad на другой.
Как передать файлы с ПК на iPad pro?
Вот подробные инструкции по синхронизации данных с ПК на iPad с помощью iTunes. Шаг 1. Подключите iPad к компьютеру с помощью USB-кабеля и запустите iTunes. Шаг 2: Перейдите в «Файлы»> «Добавить файл в библиотеку» или «Добавить папку в библиотеку», а затем выберите элементы, которые вы хотите перенести с компьютера на iPad.
Как сделать зеркальное отображение iPad на моем компьютере по беспроводной сети?
Два приложения для дублирования экрана на выбор
- Загрузите и установите его на свой ПК с Windows. Скачать.
- Подключите iPad к компьютеру с помощью кабеля USB. Затем щелкните значок «iOS Recorder» в главном интерфейсе.
- Затем вы увидите анимацию, показывающую, как ее использовать.
- Проведите вверх от нижней части iPad.
Как передать файлы с компьютера Windows на iPhone через USB?
Шаг 1. Подключите iPhone к компьютеру с помощью USB-кабеля через любой из USB-портов, доступных на вашем компьютере. Шаг 2: Откройте iTunes, щелкните вкладку «Файлы» и установите флажки для синхронизации или передачи файлов. Шаг 3: Выберите желаемую папку назначения для файлов и нажмите «Синхронизировать», чтобы завершить передачу.
Как создать папку с файлами на iPad?
Как вручную создать папку в приложении «Файлы» на iPhone и iPad
- Откройте приложение «Файлы».
- Коснитесь iCloud Drive.
- Коснитесь значка «Новая папка» в верхнем левом углу.
- Назовите вашу новую папку.
- Нажмите «Готово».
Как передать файлы с компьютера на iPhone с помощью USB-кабеля?
Как перенести файлы на iPhone через USB-кабель
- Запустите iTunes, бесплатное приложение от Apple, которое вы используете для управления своим iPhone.
- Подключите один конец прилагаемого USB-шнура к iPhone, а другой конец — к USB-порту на вашем компьютере.
- Щелкните значок iPhone, а затем щелкните вкладку «Сводка» в окне iTunes.
Как вы загружаете файлы на iPad?
Как скачать файлы на iPhone и iPad
- На вашем iPhone или iPad перейдите в Safari и откройте файл, который вы пытаетесь загрузить.
- Нажмите на кнопку «Поделиться», чтобы открыть лист «Поделиться».
- Выберите «Сохранить в Dropbox».
- Теперь нажмите кнопку «Сохранить» или выберите другую папку для сохранения файла, затем нажмите «Сохранить».
Как перенести фильм с ноутбука на iPad?
Нажмите на файл, импортируйте в библиотеку, перейдите в папку «Мои видео» и выберите свои фильмы. iTunes импортирует их. Затем подключите iPad к компьютеру, откройте iTunes, щелкните имя своего iPad и перейдите на вкладку видео / фильмов.
Как синхронизировать мой ноутбук и iPad?
Синхронизируйте свой контент с помощью Wi-Fi
- Подключите устройство iOS к компьютеру с помощью USB-кабеля, затем откройте iTunes и выберите свое устройство.
- Нажмите «Сводка» в левой части окна iTunes.
- Выберите «Синхронизировать с этим [устройством] по Wi-Fi».
- Нажмите «Применить».
Могу ли я поместить текстовый документ на свой iPad?
В бесплатных версиях приложений вы можете читать документы Word, использовать данные Excel и проводить презентации в PowerPoint. Ваши документы будут выглядеть так же хорошо, как на вашем ПК и Mac, и лучше, чем когда-либо, на вашем iPad. С подпиской на Office 365 вы можете редактировать и создавать новые документы на iPad.
Как отправить документы Word с iPad?
- Нажмите значок «Поделиться», а затем нажмите «Отправить как вложение».
- Вы можете отправить файл в формате документа Office или в формате PDF. Коснитесь своего выбора; например, коснитесь «Документ».
- Приложение Office откроет приложение электронной почты и вложит файл в новое сообщение.
Могу ли я загрузить Word на свой iPad?
Приложения Microsoft Office можно бесплатно загрузить из App Store — Word, Excel, PowerPoint и Outlook — любому пользователю iPhone или iPad, работающему под управлением iOS 11 или более поздней версии — Microsoft заявляет, что они всегда будут поддерживать две самые последние версии iOS.
Могу ли я перетаскивать файлы с ПК на iPad?
Скопируйте файлы со своего компьютера в приложение для iOS. В iTunes выберите приложение из списка в разделе «Общий доступ к файлам». Перетащите файлы из папки или окна в список документов, чтобы скопировать их на свое устройство. Выбирайте только те файлы, которые будут работать с приложением.
Как перенести фотографии с ПК на iPad без использования iTunes?
Как перенести фотографии с ПК на iPad без iTunes
- Шаг 1 Запустите dr.fone — Transfer (iOS) Загрузите и установите dr.fone на свой компьютер.
- Шаг 2 Подключите iPad к компьютеру. Подключите iPad к компьютеру через USB-кабель.
- Шаг 3 Перенесите изображения с ПК на iPad.
Как перенести фотографии с Windows 10 на iPad?
Как перенести фотографии с iPhone и iPad с помощью приложения Windows 10 Photos
- Подключите iPhone или iPad к компьютеру с помощью подходящего USB-кабеля.
- Запустите приложение «Фото» из меню «Пуск», на рабочем столе или на панели задач.
- Нажмите «Импорт».
- Щелкните любую фотографию, которую не хотите импортировать; все новые фотографии будут выбраны для импорта по умолчанию.
Фото в статье «Wikimedia Commons» https://commons.wikimedia.org/wiki/File:Micro_Center%27s_Columbus_OH_store.jpg
Несмотря на закрытый принцип функционирования планшетных компьютеров от Apple, в плане переноса файлов они почти идентичны с Android.
Конечно, смотреть системные папки и файлы, как в случае с Андроид, не получится, но перекинуть с компьютера на iPad довольно легко, как и сделать обратный обмен.
К тому же, есть программы для передачи файлов на iPad, которые могут заменить стандартный способ. Именно о переносе файлов различными способами я расскажу в этой статье.

Как перенести файлы с компьютера на Айпад
Классический способ передать файлы с компьютера на Айпад подразумевает работу через программное обеспечение iTunes. Это официальный софт от Apple, с помощью которого можно воздействовать с мобильным устройством через компьютер.
В первую очередь, необходимо загрузить программное обеспечение iTunes. Вот ссылка на страницу с официального сайта. Поддерживается не только Mac, но и операционная система Windows.
Во-вторых, если на вашем компьютере iTunes уже установлен, рекомендую обновить его при наличии апдейта. Так работать с файлами, получать доступ к музыке, переносить данные и делать многое другое будет проще.
Когда все приготовления завершены, можно приступать к тому, как перенести файлы с компьютера на Айпад:
- Запустить iTunes на компьютере.
- Подключить iPad к компьютеру через USB-провод. Также можно осуществить подключение через беспроводную сеть Wi-Fi, если предварительно была настроена синхронизация устройств.
- В программе iTunes кликнуть на изображение Айпада в левом верхнем углу.

- В перечне “Настройки” кликнуть на пункт “Общие файлы”.

- Нажать на опцию “Добавить”.
- Выбрать файл, который надо переместить с компьютера на планшетник. Подтвердить выбор кликом на “Добавить”.


Процесс перемещения файлов с ПК на iPad проходит очень быстро даже в случае перемещения видео или фото высокого качества.
Чтобы посмотреть перенесенные файлы на планшете, надо запустить приложение “Файлы” и открыть папку “На iPad”.
Помимо стандартного метода для передачи файлов на планшетный компьютер Apple, существуют и варианты с использованием сторонних программ.
iTools

Это программное обеспечение является пользовательской версией iTunes. В нем чуть больше функций, но интерфейс и стабильность работы оставляют желать лучшего.
Главное преимущество перед Айтюнс в том, что через iTools можно переносить очень тяжелые файлы, в то время как программное обеспечение от Apple может блокировать подобные операции.
Как происходит перенос:
- Скачать и установить программу iTools на компьютер. Для этого надо перейти по данной ссылке, загрузить установщик, запустить его и инсталлировать программное обеспечение.
- Запустить программу.
- Подсоединить Айпад к компьютеру.
- Через раздел “Documents” выбрать файлы на ПК, нажать на них правой кнопкой мышки.
- Выбрать пункт “Import” и указать подключенный планшетник.
iCloud

Официальный облачный сервис и приложение от Apple, с помощью которого можно перемещать фотографии и видео.
Смысл этого способа в том, чтобы перенести медиафайлы с компьютера в облачное хранилище, а затем открыть приложение iCloud на планшетнике и загрузить оттуда перемещенные медиафайлы.
Кроме того, скачивать файлы в таком случае необязательно, можно просто посмотреть их в режиме онлайн.
Что нужно делать:
- На компьютере перейти на официальный сайт облачного хранилища iCloud.
- Авторизоваться в учетной записи Apple ID, введя логин и пароль.
- Перейти в хранилище.
- Перетащить в него необходимые фото и видео. Дождаться, пока процесс завершится. В случае с медиафайлами высокого качества он может занять немало времени, но все зависит от вашего интернета. Обычно скорость выгрузки значительно ниже, нежели скорость загрузки.
- Открыть приложение iCloud на Айпаде. Оно в числе предустановленных, так что инсталлировать его не понадобится. Можно обновить до последней версии, но это по желанию.
- Перейти в папку “internet”. Именно сюда по умолчанию помещаются все медиафайлы, перенесенные с компьютера.
- Выбрать медиафайлы, нажать на опцию “Загрузить”.
Все скачанные фотографии и видео будут доступны в приложении “Фото.
Google Drive

Еще один вариант, основывающийся на работе с облачным сервисом. Google Drive очень похож на iCloud.
Главное отличие программы от Гугл в том, что через нее можно передавать различные форматы, а не только фотографии и видеоролики. Например, текстовые документы, таблицы и т.д.
Пошаговая инструкция:
- На компьютере открыть браузер и перейти на официальный сайт Google Drive.
- Авторизоваться в учетной записи Гугл. Если у вас нет аккаунта Gmail, здесь же можно его создать.
- Перейти в раздел “Мой Диск”.
- Перенести любые файлы в облачное хранилище. Можно создать папки для более упорядоченного перемещения.
- Установить приложение Google Drive (Google Диск) на планшетник. Оно доступно бесплатно в App Store.
- Запустить приложение Google Drive.
- Свайпнуть с левого края направо, вызвав навигационную панель управления.
- Нажать на раздел “Мой Диск”.
- Отобразятся все файлы, сохраненные в облачном хранилище. Можно открыть и сохранить любой из них.
Точно такая же инструкция и у другого облачного сервиса Google — Google Фото. Обе службы используют одинаковые аккаунты, но Google Фото предназначен именно для медиафайлов, в то время как Google Диск для файлов разного формата.
FoneTrans

Отечественная программа для передачи файлов на iPad, которая работает очень просто. Скачать установочный файл на компьютер можно с официального сайта софта.
Поэтапные действия:
- Открыть программу на ПК.
- Подсоединить планшет к компьютеру. FoneTrans автоматически распознает устройство.
- В правом меню выбрать тип файлов, который вы хотите переместить. Например, “Музыка”.
- Выбрать треки для перемещения через опцию “Дополнительное”.
- Нажать на кнопку “Открыть”.
- Дождаться, пока процесс переноса завершится.
Софт FoneTrans автоматически конвертирует файлы для Айпада в тот тип, который поддерживается устройством.
![]()
Загрузить PDF
![]()
Загрузить PDF
В этой статье мы расскажем вам, как на iPad скопировать файлы, которые находятся на компьютере под управлением Windows или macOS; такими файлами можно пользоваться без подключения к интернету. Скопировать файлы можно через iTunes, iCloud Drive, Microsoft OneDrive и Google Диск.
-
1
Подсоедините iPad к компьютеру. Для этого зарядный кабель iPad подключите к зарядному порту iPad и к одному из портов USB компьютера.
-
2
Запустите iTunes на компьютере. Щелкните по значку, который выглядит как разноцветная музыкальная нота на белом фоне.
- Если появилось сообщение о том, что iTunes нуждается в обновлении, щелкните по «Скачать iTunes». Когда iTunes обновится, перезагрузите компьютер.
- Компания Apple намерена отказаться от iTunes, начиная с macOS Catalina (эта система выходит осенью 2019 года). На компьютерах Mac вместо iTunes появятся Apple Music, Apple TV и Apple Podcast.[1]
В Windows можно будет по-прежнему пользоваться iTunes (по крайней мере, некоторое время).[2]
-
3
Нажмите на значок «Устройство». Он имеет вид iPad и расположен в левой верхней части iTunes. Откроется страница iPad.
-
4
Щелкните по Общий доступ к файлам. Вы найдете эту опцию на левой панели iTunes; она отмечена значком в виде буквы «А».
-
5
Щелкните по приложению, в папку которого хотите скопировать файлы. Сделайте это на центральной панели iTunes. Имейте в виду, что приложение и тип файла могут не соответствовать друг другу (к примеру, документ Word можно перенести в папку приложения iMovie).
- У приложений Pages, Keynote, Numbers, iMovie и GarageBand есть папки, в которых хранятся проекты — это означает, что в такие папки можно перенести практически любые файлы.
-
6
Прокрутите вниз и щелкните по Добавить файл. Вы найдете эту опцию в правом нижнем углу. Откроется окно Проводника (Windows) или Finder (Mac).
-
7
Щелкните по нужному файлу. Чтобы открыть папку с файлом, нажмите на нее на левой панели.
-
8
Щелкните по Открыть. Вы найдете эту опцию в правом нижнем углу. Имя файла появится в окне iTunes.
-
9
Нажмите Синхронизация. Вы найдете эту опцию в нижнем правом углу. Файл будет добавлен в выбранное приложение на iPad. Отныне этот файл можно открывать на iPad в любой момент (даже без подключения к интернету).
- Когда процесс синхронизации завершится, щелкните по «Готово» — вы перейдете на главную страницу.
Реклама


-
1
Перейдите по адресу https://www.icloud.com/ в веб-браузере. Откроется страница входа в аккаунт iCloud.
-
2
Авторизуйтесь в iCloud. Для этого введите электронный адрес и пароль Apple ID, а затем щелкните по значку в виде стрелки, который находится справа от строк с адресом и паролем.
- Если вы уже вошли в свой аккаунт iCloud, пропустите данный шаг.
- Если активирована двухфакторная аутентификация, на iPad отобразится 6-значный код, который нужно ввести на компьютере.
- Если появится сообщение с просьбой подтвердить, что вы доверяете устройству, нажмите «Доверять» как на iPad, так и на компьютере.
-
3
Щелкните по «iCloud Drive»
. Этот значок выглядит как голубые облака на белом фоне. Вы перейдете на свою страницу iCloud Drive.
-
4
Щелкните по «Загрузить». Вы найдете этот значок вверху страницы; он выглядит как облако со стрелкой, направленной вверх. Откроется окно Проводника (Windows) или Finder (Mac).
-
5
Щелкните по файлу, который собираетесь загрузить в iCloud Drive. Найдите нужный файл в файловом браузере, а затем щелкните по нему.
- Чтобы выделить все файлы в одной папке, нажмите на любой файл и нажмите Ctrl+A (Windows) или ⌘ Command+A (Mac).
- Чтобы выбрать несколько файлов в одной папке, удерживайте Ctrl (Windows) или ⌘ Command (Mac) и нажмите на каждый нужный файл.
-
6
Щелкните по Открыть. Вы найдете эту опцию в правом нижнем углу. Будет запущен процесс копирования файлов в iCloud Drive.
-
7
Подождите, пока файлы загрузятся в iCloud Drive. Этот процесс займет несколько секунд или даже несколько часов, что зависит от общего размера файлов.
-
8
Запустите приложение «Файлы»
на iPad. Коснитесь значка, который выглядит как синяя папка на белом фоне. Вместо приложения iCloud Drive в системе iOS 11 есть приложение «Файлы» — воспользуйтесь им, чтобы скачать файлы из iCloud на iPad.
-
9
Коснитесь Обзор. Вы найдете эту вкладку в нижнем правом углу.
-
10
Нажмите «iCloud Drive»
. Эта опция находится в разделе «Расположения». На экране отобразится содержимое iCloud Drive.
- Если этой опции нет, сначала нажмите «Расположения».
-
11
Коснитесь Выбрать в правом верхнем углу. У каждого файла появится круглое окошко метки.
-
12
Коснитесь каждого нужного файла. В круглых окошках меток появятся галочки.
-
13
Коснитесь Переместить. Эта опция находится внизу экрана.
-
14
Нажмите На моем iPad. Эта опция отмечена значком в виде iPad. Отобразятся папки, которые есть на iPad.
-
15
Коснитесь папки, в которую хотите скопировать файлы.
-
16
Коснитесь Переместить. Вы найдете эту опцию в верхнем правом углу. Выбранные файлы будут скопированы в указанную папку — теперь ими можно пользоваться даже без подключения к интернету.
- Скопированные файлы можно открыть в приложении «Файлы».
Реклама


-
1
Откройте Finder
на компьютере Mac. Нажмите на значок в виде сине-белого смайлика в доке.
-
2
Щелкните по Переход. Это меню находится в строке меню вверху экрана. Откроется меню с опциями.
-
3
Нажмите AirDrop. Вы найдете эту опцию в меню.
-
4
Выберите Только контакты или Все. Сделайте это в меню в разделе «Разрешить мое обнаружение». Теперь компьютер будет обнаруживаться через AirDrop.
-
5
Запустите приложение «Файлы»
на iPhone/iPad. Нажмите на значок в виде синей папки внизу главного экрана.
-
6
Коснитесь Обзор. Это вторая вкладка внизу экрана. Откроется левая панель.
-
7
Нажмите На моем iPad. Этот значок выглядит как iPad и находится на левой панели.
-
8
Коснитесь папки с нужными файлами. Имена папок совпадают с именам соответствующих приложений. Нажмите на папку приложения, в которой хранятся нужные файлы. На экране отобразятся все файлы приложения.
- Например, если нужно скопировать документы приложения Pages, нажмите «Pages».
-
9
Нажмите Выбрать. Вы найдете эту опцию в верхнем правом углу приложения «Файлы». У каждого файла появится круглое окошко метки.
-
10
Нажмите на каждый нужный файл. В круглых окошках меток появятся галочки.
-
11
Нажмите Общий доступ. Эта опция находится в нижнем левом углу приложения «Файлы». Откроется меню общего доступа.
-
12
Коснитесь значка AirDrop в меню общего доступа. Он выглядит как ряд концентрических кругов с вырезанным сектором. В меню отобразятся контакты, которые доступны через AirDrop.
- Чтобы контакт был доступен через AirDrop, он должен авторизоваться на устройстве с помощью своего Apple ID. При этом оба устройства должны быть подключены к одной беспроводной сети и на обоих устройствах должен быть включен Bluetooth.
- На втором устройстве также откройте меню «Разрешить мое обнаружение» и выберите в нем «Только контакты» или «Все»
- Передача файлов через AirDrop может не поддерживаться на некоторых старых моделях iPhone, iPad, iMac или Macbook.
-
13
Коснитесь контакта в разделе AirDrop. Это второй раздел в меню общего доступа. В нем есть изображение профиля и список устройств всех контактов (включая вас), которые доступны через AirDrop. Будет запущено копирование файлов на компьютер Mac; когда процесс завершится, раздастся звуковой сигнал. Файлы будут скопированы в папку «Загрузки», которую можно найти с помощью Finder.
Реклама


-
1
Запустите приложение для обмена электронными письмами на iPhone/iPad. Для этого коснитесь значка соответствующего приложения. Если вы пользуетесь приложением «Почта» от Apple, нажмите на значок в виде белого конверта на синем фоне внизу экрана. Если же вы пользуетесь Gmail или Outlook, нажмите на значок одного из этих приложений на главном экране.
-
2
Нажмите на значок создания нового письма. В приложении «Почта» от Apple и в приложении Outlook этот значок выглядит как карандаш с листом бумаги и находится вверху экрана. В приложении Gmail это значок имеет вид символа «+» и расположен в левом нижнем углу.
-
3
Введите свой адрес электронной почты. Сделайте это в строке «Кому» или «Получатель» на странице нового письма.
-
4
Введите тему письма. Сделайте это в строке «Тема». Это может быть имя файла или просто слово «Файлы».
-
5
Коснитесь значка вложения. Как правило, он выглядит как скрепка и находится вверху экрана или в верхнем правом углу экранной клавиатуры.
-
6
Нажмите Обзор (если эта опция доступна). Это вторая вкладка внизу экрана.
- В Gmail просто нажмите на нужный файл в списке файлов.
-
7
Коснитесь На моем iPad. Эта опция отмечена значком в виде iPad и находится на левой панели.
-
8
Коснитесь папки с нужными файлами. Имена папок совпадают с именам соответствующих приложений. Нажмите на папку приложения, в которой хранятся нужные файлы. На экране отобразятся все файлы приложения.
-
9
Коснитесь файла, который хотите скопировать. Файл будет прикреплен к электронному письму.
- Некоторые почтовые службы ограничивают размер файла, который можно отправить с письмом. Если файл не прикрепляется, возможно, он слишком большой.
-
10
Нажмите на значок «Отправить». В приложении «Почта» от Apple этот значок находится в верхнем правом углу. В Outlook и Gmail этот значок имеет вид бумажного самолетика и находится в правом верхнем углу.
-
11
Запустите приложение для обмена письмами на компьютере Mac. В Outlook или «Почта» нажмите на соответствующий значок, который находится в папке «Программы» в Finder или в доке. Если вы пользуетесь Gmail, перейдите на страницу https://mail.google.com в веб-браузере.
- Если вы еще не авторизовались в своем почтовом ящике, введите адрес электронной почты и пароль.
-
12
Откройте письмо, которое отправили сами себе. Для этого найдите письмо с введенной вами темой и щелкните по нему.
-
13
Дважды щелкните по прикрепленному файлу, чтобы скачать его. Как правило, прикрепленные файлы отображаются внизу письма. По умолчанию файлы будут загружены в папку «Загрузки», которую можно найти через Finder.
Реклама
-
1
Перейдите по адресу https://onedrive.com/ в веб-браузере. Если вы уже вошли в свой аккаунт Microsoft, вы перейдете на главную страницу OneDrive.
- Если вы еще не авторизовались в Microsoft, введите электронный адрес и пароль.
-
2
Нажмите Загрузить. Вы найдете эту опцию вверху страницы. Раскроется меню.
- Чтобы скопировать файлы в конкретную папку, сначала нажмите на нее.
-
3
Нажмите Файлы. Вы найдете эту опцию в меню. Откроется окно Проводника (Windows) или Finder (Mac).
- Щелкните по «Папка», если собираетесь загрузить папку с файлами.
-
4
Выделите файлы. Для этого щелкните по нужному файлу или удерживайте Ctrl (Windows) или ⌘ Command (Mac), а затем щелкните по нескольким нужным файлам.
- Чтобы выделить все файлы в одной папке, нажмите на любой файл, а затем нажмите Ctrl+A (Windows) или ⌘ Command+A (Mac).
- Если нужно загрузить всю папку, щелкните по ней.
-
5
Щелкните по Открыть. Вы найдете эту опцию в правом нижнем углу. Файлы начнут загружаться в OneDrive.
-
6
Подождите, пока файлы загрузятся в OneDrive. Время загрузки зависит от общего размера файлов.
-
7
Запустите приложение OneDrive
на iPad. Для этого коснитесь значка, который выглядит как белые облака на синем фоне. Если вы уже вошли в свой аккаунт, вы перейдете на главную страницу OneDrive.
- Если вы еще не авторизовались, введите электронный адрес и пароль.
-
8
Выделите файлы, которые хотите скачать на iPad. Для этого коснитесь и удерживайте один нужный файл, а затем нажмите на другие нужные файлы/папки.
-
9
Нажмите «Общий доступ»
. Этот значок, который выглядит как стрелка, направленная вверх, расположен в верхнем левом углу. Раскроется меню.
-
10
Нажмите Сохранить в Файлы. Данный значок, который выглядит как папка, расположен в меню внизу экрана.
-
11
Коснитесь На моем iPad. Отобразится список папок, которые есть на iPad.
-
12
Коснитесь папки, в которую хотите скачать файлы из OneDrive. В разделе «На моем iPad» нажмите на нужную папку (например, «Pages»).
-
13
Коснитесь Добавить. Вы найдете эту опцию в верхнем правом углу. Отныне файлы можно открывать на iPad в любой момент (даже без подключения к интернету).
Реклама


-
1
Перейдите по адресу https://www.drive.google.com/ в веб-браузере. Если вы уже вошли в свой аккаунт Google, вы перейдете на главную страницу Диска.
- Если вы еще не авторизовались в Google, нажмите «Перейти в Google Диск» (если эта опция доступна) и введите электронный адрес и пароль.
-
2
Нажмите Создать. Эта синяя кнопка находится в левом верхнем углу. Раскроется меню.
- Чтобы скопировать файлы в конкретную папку, сначала нажмите на нее.
-
3
Щелкните по Загрузить файлы. Вы найдете эту опцию в меню.
-
4
Выделите файлы, которые собираетесь загрузить в Диск. Для этого щелкните по нужному файлу или удерживайте Ctrl (Windows) или ⌘ Command (Mac) и нажмите на несколько нужных файлов.
- Чтобы выделить сразу все файлы в одной папке, нажмите на любой файл и нажмите Ctrl+A (Windows) или ⌘ Command+A (Mac).
-
5
Щелкните по Открыть. Вы найдете эту опцию в правом нижнем углу. Будет запущена загрузка файлов в Диск.
-
6
Подождите, пока файлы загрузятся в Диск. Этот процесс займет некоторое время, зависящее от общего размера файлов.
-
7
Запустите приложение Google Диск на iPad. Коснитесь значка в виде треугольника с синей, зеленой и желтой сторонами. Если вы уже вошли в свой аккаунт Google, вы перейдете на главную страницу Диска.
- Если вы еще не авторизовались в аккаунте, в который загрузили файлы, введите электронный адрес и пароль.
-
8
Выделите файл. Для этого коснитесь и удерживайте его. Чтобы выбрать несколько файлов, коснитесь и удерживайте один нужный файл, а затем нажмите на другие нужные файлы.
-
9
Коснитесь ⋯. Этот значок расположен у каждого файла в Диске.
-
10
Коснитесь Сделать доступным офлайн. Вы найдете эту опцию во всплывающем меню. Отныне файлы можно открывать в приложении Google Диске, даже когда планшет не подключен к интернету.
- Опцию «Google Диск» можно найти в приложении «Файлы», но скачать несколько файлов из Диска в Файлы не получится (как в случае других приложений облачных хранилищ).
Реклама


Советы
- Большинство приложений облачных хранилищ включает функцию «Оффлайн», которая позволяет работать с файлами в автономном режиме. Для этого коснитесь файла, нажмите на значок «⋮» и в меню выберите «Оффлайн».
- Когда файлы будут загружены в приложение «Файлы» на iPad, их можно удалить из облачного хранилища (при этом файлы останутся на планшете).
Реклама
Предупреждения
- Если планшет управляется системой iOS 11 или новее, приложения «Файлы» на нем не будет. Поэтому файлы нужно открывать с помощью соответствующих приложений.
Реклама
Об этой статье
Эту страницу просматривали 94 731 раз.
Была ли эта статья полезной?
- IpadInsider.ru
- Советы и инструкции
Содержание
- Использование iPad в качестве флэшки
- Использование файловых менеджеров
- Используем iTools
- Использование облачных сервисов
- Перенос файлов по Wi-Fi
Как скопировать файлы с компьютера на iPad? Данный вопрос интересует каждого начинающего пользователя Apple-планшета, ведь его использование подразумевает наличие одних и тех же данных (фото, музыки, документов и так далее) как на домашнем ПК, так и непосредственно в памяти гаджета. Несмотря на то, что очень часто перенос файлов с компьютера на iPad сводится к синхронизации устройств посредством iTunes, существуют и другие более удобные и быстрые методы выполнения переноса данных.
Использование iPad в качестве флэшки
Многие пользователи и не догадываются. Но яблочный планшет можно применять в роли обыкновенной флэши для хранения или же копирования информации. Для этого достаточно подключить гаджет к компьютеру, зайти в проводник Windows и переместить необходимые файлы в память планшета. Таким образом, наш iPad выступит в качестве очень дорогой, но малоэффективной флэшки.
Такой метод хранения данных имеет один очень важный недостаток – без джейлбрейка доступ к перенесенным таким образом файлам на устройстве будет отсутствовать. То есть в таком случае iPad может выступать лишь в качестве флэш-накопителя для передачи файлов между ПК. Если же джейлбрейк на устройстве установлен, то данный метод копирования данных является наиболее быстрым и простым.
Использование файловых менеджеров
Многие пользователи ПК привыкли применять различные файловые менеджеры для хранения и использования необходимой им информации. Такие же программы разработаны и для iOS-устройств, а их использование может существенно облегчить процесс копирования данных с ПК в память Айпад.

Сегодня существует достаточно большое количество менеджеров данных для iPad, среди которых можно выделить такой бесплатный инструмент, как Documents 5. Использовать данное приложение очень просто. Для этого:
- скачиваем его из App Store;
- подключаем гаджет к ПК и запускаем iTunes;
- заходим в iTunes и в списке программ отыскиваем Documents;
- справа снизу кликаем по кнопке «Добавить» и копируем всю необходимую информацию в память планшета.
Остается зайти в программу на iPad, чтобы просмотреть список всех загруженных файлов и использовать их. Программа имеет массу встроенных сервисов, поэтому для работы со многими типами файлов устанавливать дополнительные приложения не потребуется.
Используем iTools
Данное приложения является оптимальным выходом из ситуации, когда в память iPad необходимо переместить не файлы, а папку. Сделать это с помощью описанного выше приложения невозможно. Для реализации данной задачи:
Использование облачных сервисов
Сегодня существует огромное количество различных облачных сервисов, начиная от Яндекс.Диск и заканчивая Dropbox. Стоит отметить, что при наличии Интернета данный способ хранения необходимой информации с целью ее использования на iPad является наиболее оптимальным, поскольку не требует выделения места в памяти яблочного гаджета.

Остается всего лишь выбрать наиболее удобный сервис, скачать его клиенты для ПК и iPad и выполнить синхронизацию необходимых файлов и папок.
Перенос файлов по Wi-Fi
Также владельцы iOS-планшетов и смартфонов могут воспользоваться таким оригинальным методом переноса файлов, как их копирование с помощью поддерживающих передачу данных через Wi-Fi приложений. Алгоритм действий в это случае выглядит так:

- Включаем функцию Wi-Fi Drive (в зависимости от приложения может иметь другое название).
- Запускаем в браузере на компьютере указанный приложением IP.
- Копируем необходимые файлы.
Оценка статьи:
![]() Загрузка…
Загрузка…
У меня есть обычный стационарный компьютер с Windows на борту, и я периодически им пользуюсь. Это, скажем, игровая машина, а также просто рудимент прошлого, от которого пока избавляться не хочется.
Иногда я за ним работаю и быстро вспоминаю, как хорошо всё-таки оставаться внутри экосистемы Apple. Взять тот же AirDrop: два тапа – и файлы с iPhone или iPad практически моментально улетают на ноутбук и обратно, без всяких кабелей.
На Windows сделать что-то подобное оказывается КРАЙНЕ проблематично. Протоколы AirDrop закрыты, а пользоваться сторонними программами-передатчиками я не хочу, это небезопасно (особенно для «винды»).
Поэтому при необходимости быстро закинуть на айфон несколько файлов с компьютера на Windows, или сбросить что-нибудь с айпэда на сам компьютер, приходится колхозить что-то ужасное. Вроде перекидывания файлов вначале в Telegram себе в «сохранёнки», а потом скачивания с десктопного клиента.
Но есть решение в десятки, если не сотни раз проще. Его достаточно один раз настроить за пару минут. И после этого у вас будет что-то похожее на AirDrop.
Никакими навыками для этого обладать не стоит. Нам даже Команды не понадобятся.
Что потребуется
▪ компьютер на Windows 10 (подозреваю, что и пара предыдущих версий подойдут)
▪ любое устройство на iOS или iPadOS, желательно с прошивкой от iOS 14 и новее
▪ локальная сеть Wi-Fi (подойдет и проводное подключение до ПК, если в итоге через него этот ПК выходит в одну локальную сеть вместе с iPhone или iPad).
То есть берём айфон в руки, садимся за компьютер с Windows – и поехали.
Как настроить сверхлёгкую передачу файлов с Windows на iPhone и iPad (и обратно)

Папку можете назвать как угодно, но рекомендую использовать латиницу.
1. В компьютере с Windows создаём папку, которая будет служить «свалкой» для файлов, предназначенных для передачи или скачивания с iPhone и iPad.
Свою я назвал iPhoneShare и поместил на Рабочий стол.
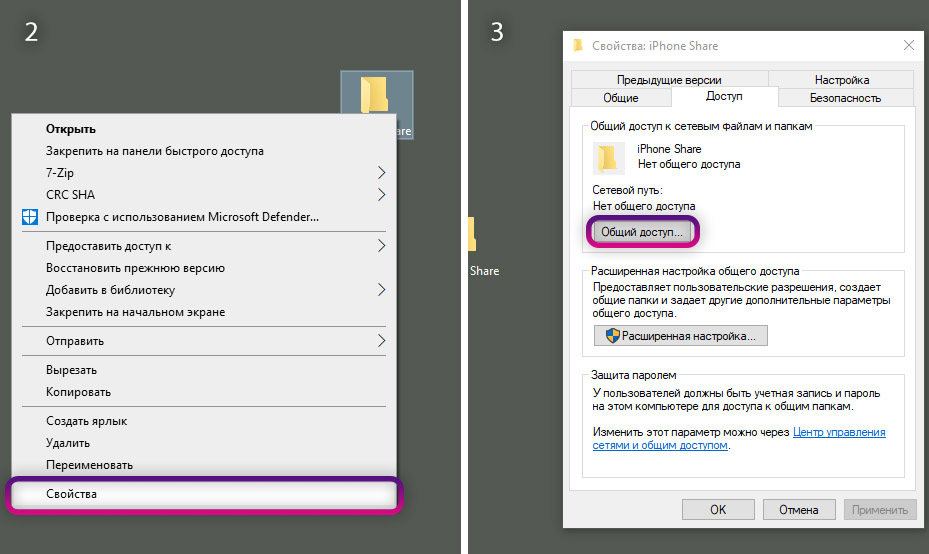
2. Щёлкаем правой кнопкой мыши на папке, в выпадающем меню выбираем Свойства. Во вкладках открывшегося окна нажимаем на Доступ.
3. В блоке Общий доступ к сетевым файлам и папкам кликаем на Общий доступ…
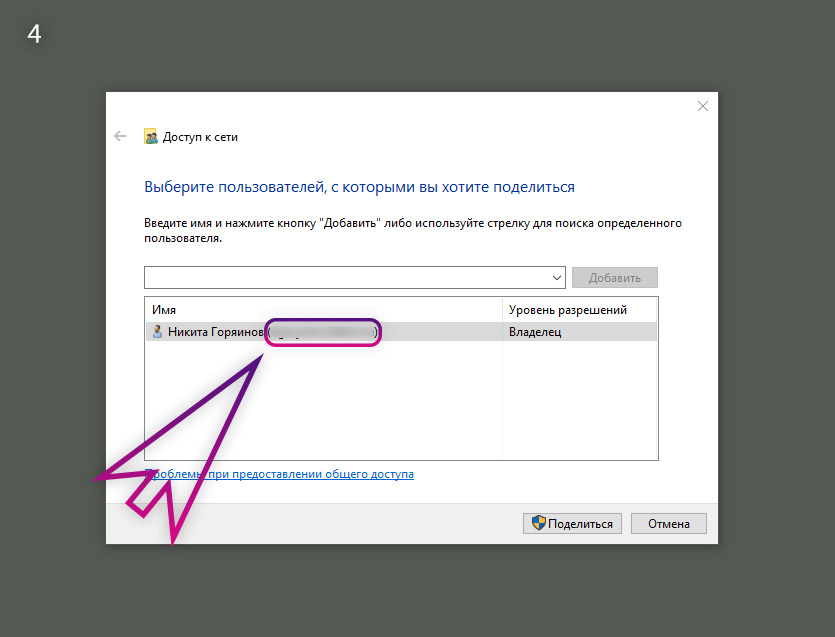
Тут будет ваш логин. Запомните его для пункта 8 инструкции.
4. В открывшемся окне запоминаем, что написано в скобках в подменю Имя. Это ваш полный логин аккаунта в Windows, и он нам скоро понадобится.
Затем жмём Поделиться.
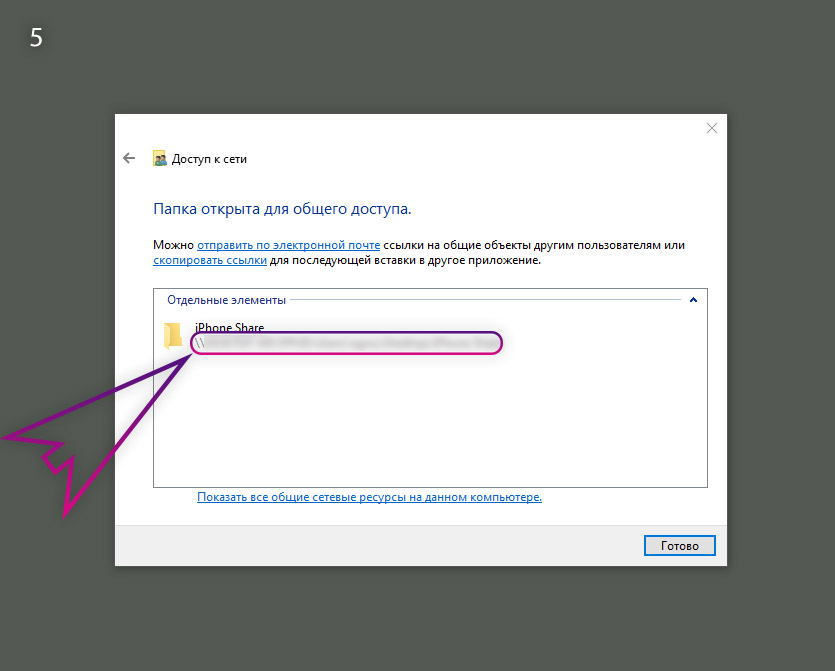
Это сетевой адрес вашей папки, его надо запомнить для пункта 7 инструкции. Лучше сделать скриншот или сфотографировать.
5. В появившемся окне запомните сетевой адрес для доступа к этой папке. Он написан светло-серым шрифтом.
Окно можно закрыть, а можно и временно оставить открытым, чтобы перед глазами было, с чего списывать путь в пункте 7 этой инструкции.
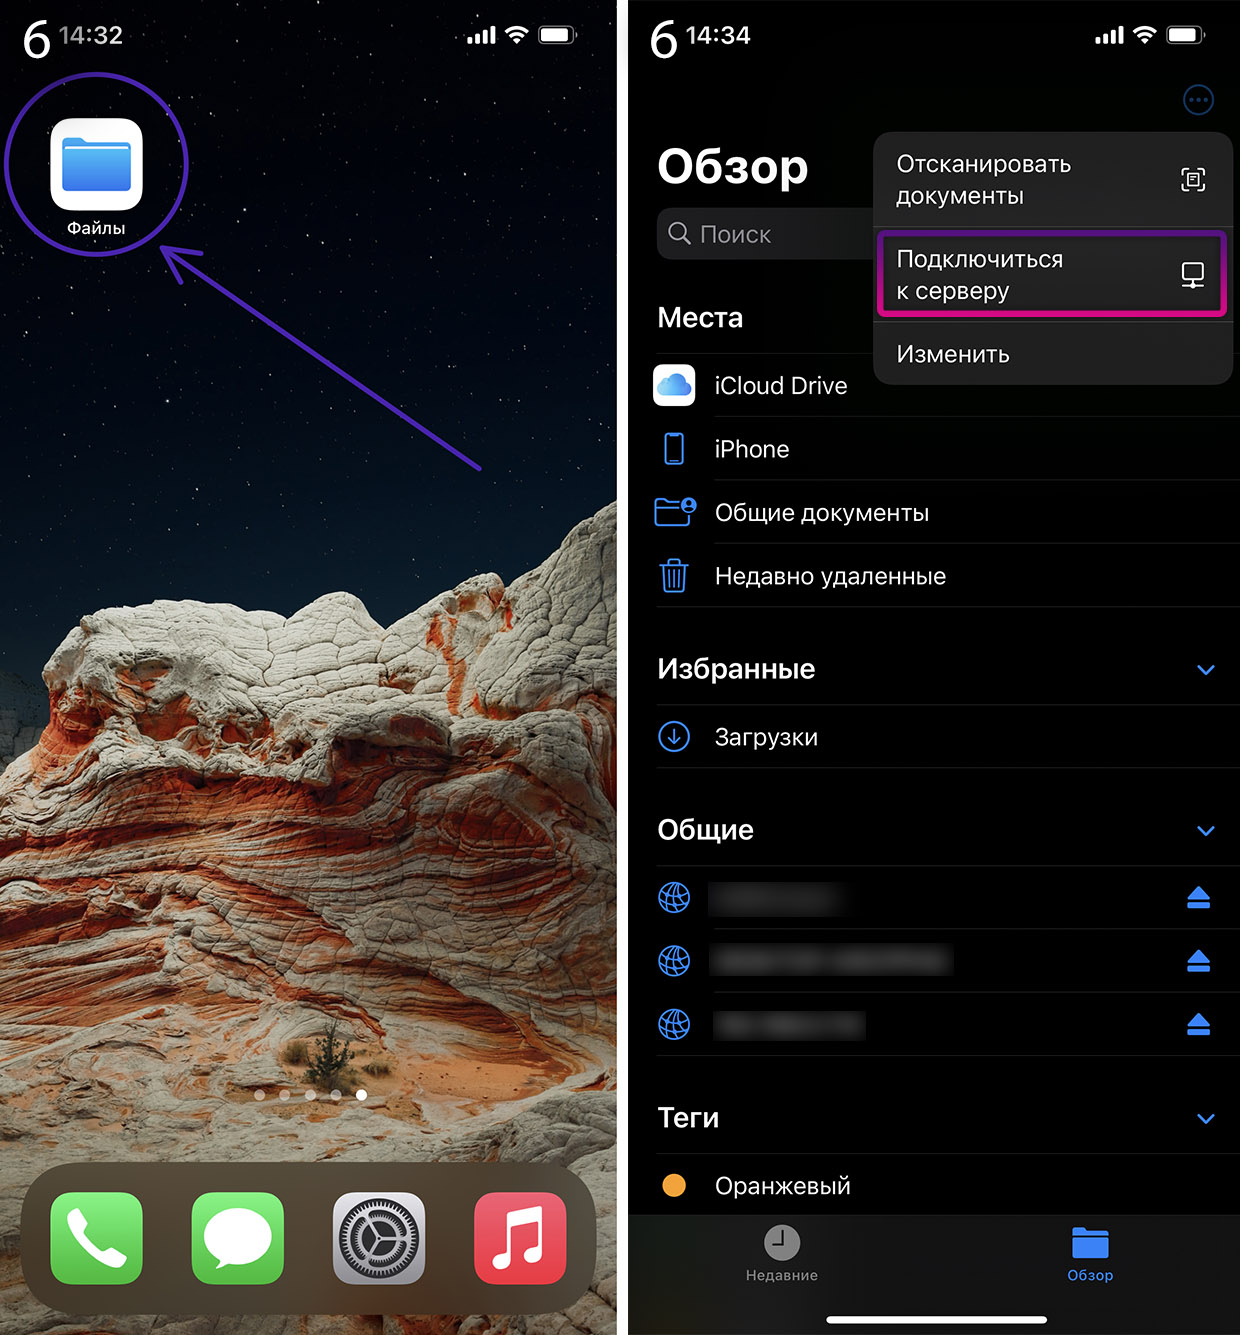
6. Берём iPhone или iPad в руки. Открываем встроенное приложение Файлы. Кто удалил, можете скачать заново из App Store.
В правом верхнем углу нажимаем на иконку с троеточием, в выпадающем меню тапаем на Подключиться к серверу.
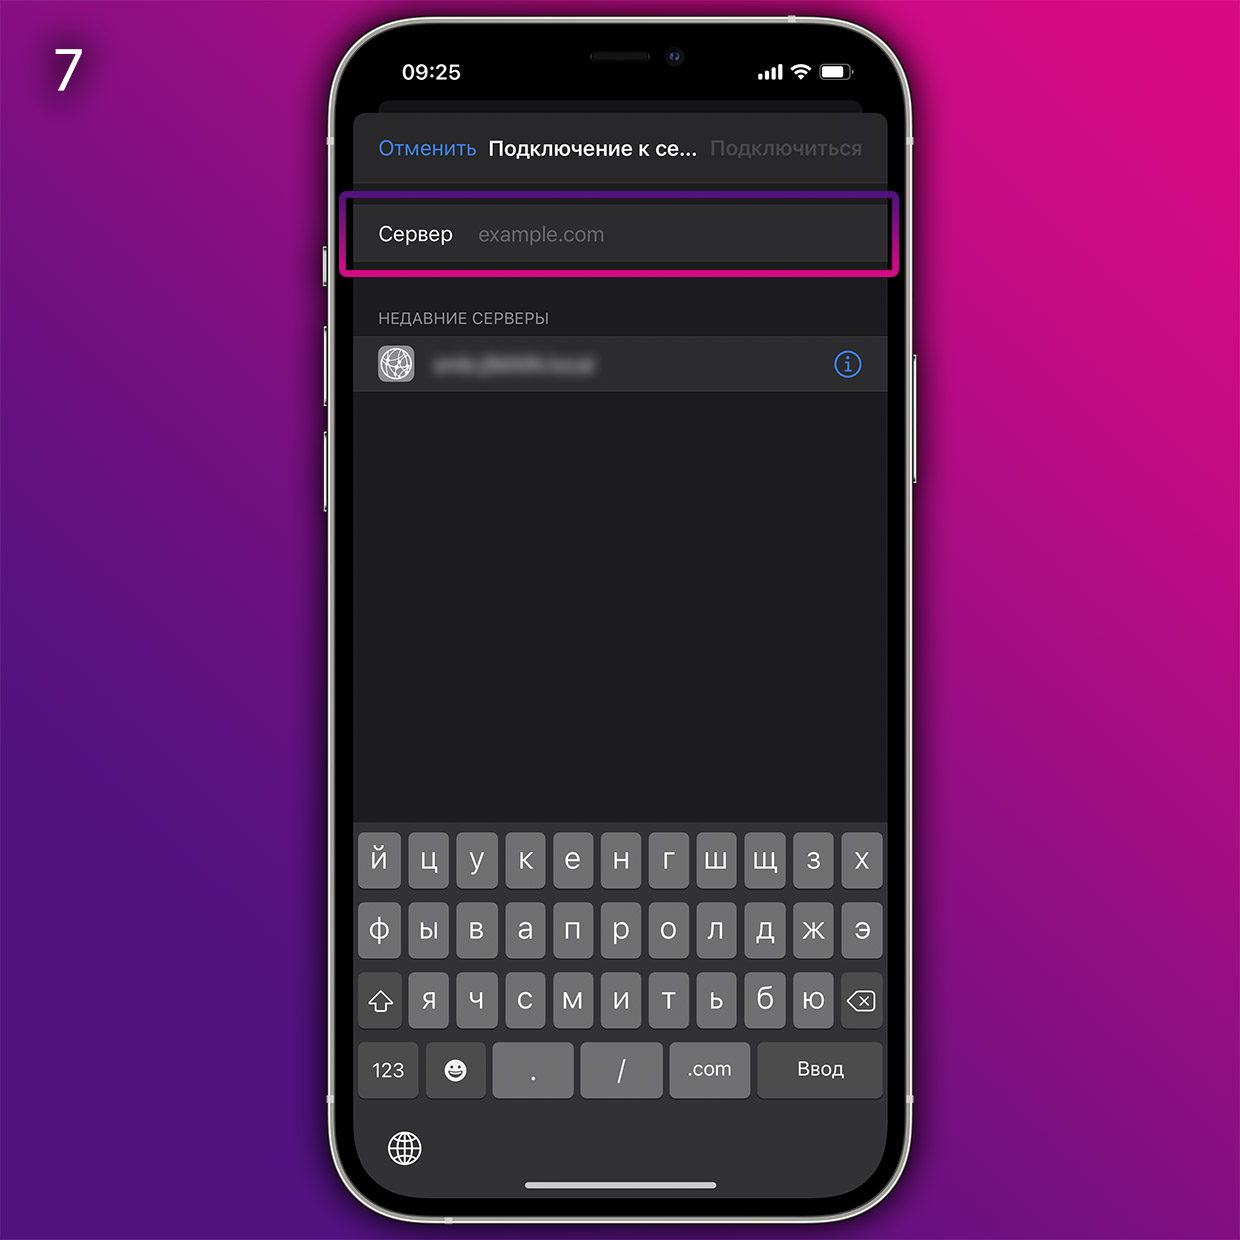
Сюда в приложении Файлы вписывайте то, что вам больше подходит: либо доступ ко всем Общим папкам Windows (если их много), либо только к специально созданной (тогда надо ввести полный путь).
7. Пишем в пункте Сервер что-то из нижеследующего, сверяясь с адресом, который был указан в Windows на пункте 5.
▶ если хочется получить доступ сразу ко всем Общим папкам на Windows, то пишем только часть сетевого пути доступа, дописывая в конце без пробела текст .local:
smb://*путь-до-первого-слэша*.local
например,
smb://DESKTOP-VASYAKRASAVCHIK.local
▶ если хочется получить доступ только к свежесозданной папке, то пишем весь путь доступа и добавляем в конце (снова без пробела) текст .local:
smb://*весь-путь-до-папки-как-вам-написал-windows*.local
например,
smb://DESKTOP-VASYAKRASAVCHIK/Users/Vasya/Desktop/iPhoneShare.local
▶ если хочется получать доступ ко всем папкам именно через IP-адрес вашего Windows-ПК, то заходим на компьютере в Настройки, Сеть, кликаем по активной и запоминаем текущий IP-адрес ПК (строка IPv4 адрес). Вот этот адрес и пишем в строку Сервер на iOS (например, 192.168.0.98).
Но в этом случае помните, что при смене IP-адреса компьютера (такое часто бывает, когда ПК подключен через Wi-Fi) вам придется повторять эту инструкцию заново с шестого пункта по последний.
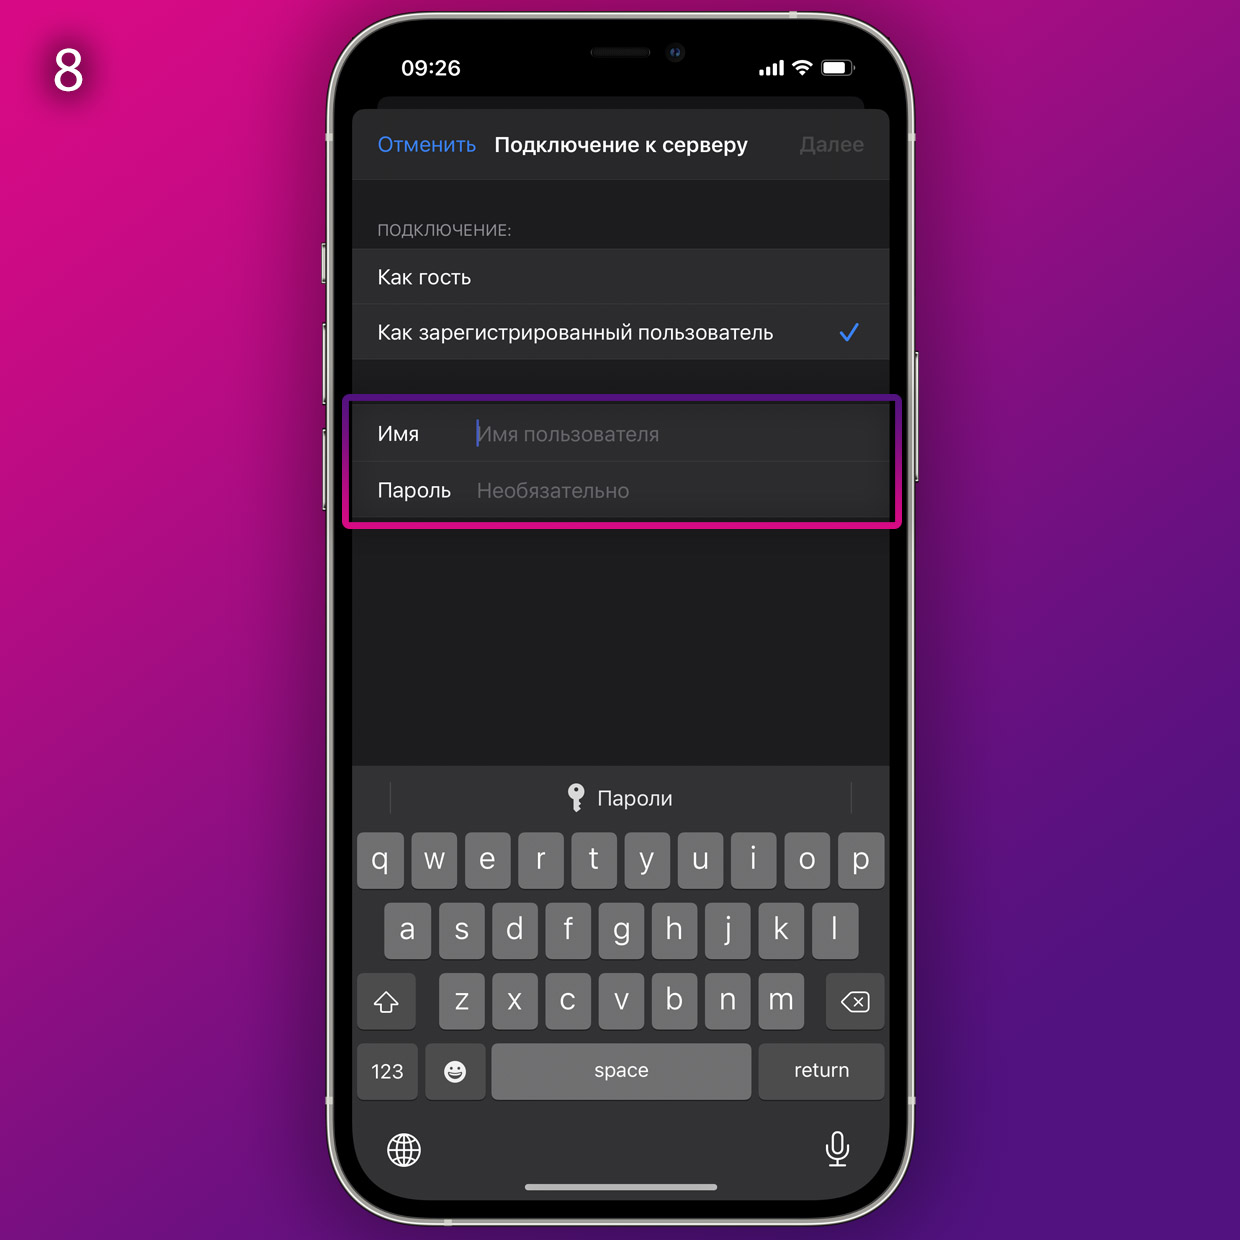
Здесь вписывайте ваш полный логин учётной записи в Windows и его пароль.
8. В следующем окне на iPhone или iPad выбираем пункт Как зарегистрированный пользователь, а в меню ниже указываем то, что запомнили в пункте 4 этой инструкции:
▪ Имя: это ваш логин в Windows
▪ Пароль: это пароль вашего логина в Windows
9. Нажимаем на Далее в правом верхнем углу и ждём подключения.
Если через некоторое время выскакивает ошибка про невозможность найти сервер, то проверьте корректность адреса, указанного вами в пункте 7 инструкции, а также попробуйте убрать .local с его конца. Если же в ошибке сказано про неверный пароль или логин, то вы ошиблись в имени или пароле.
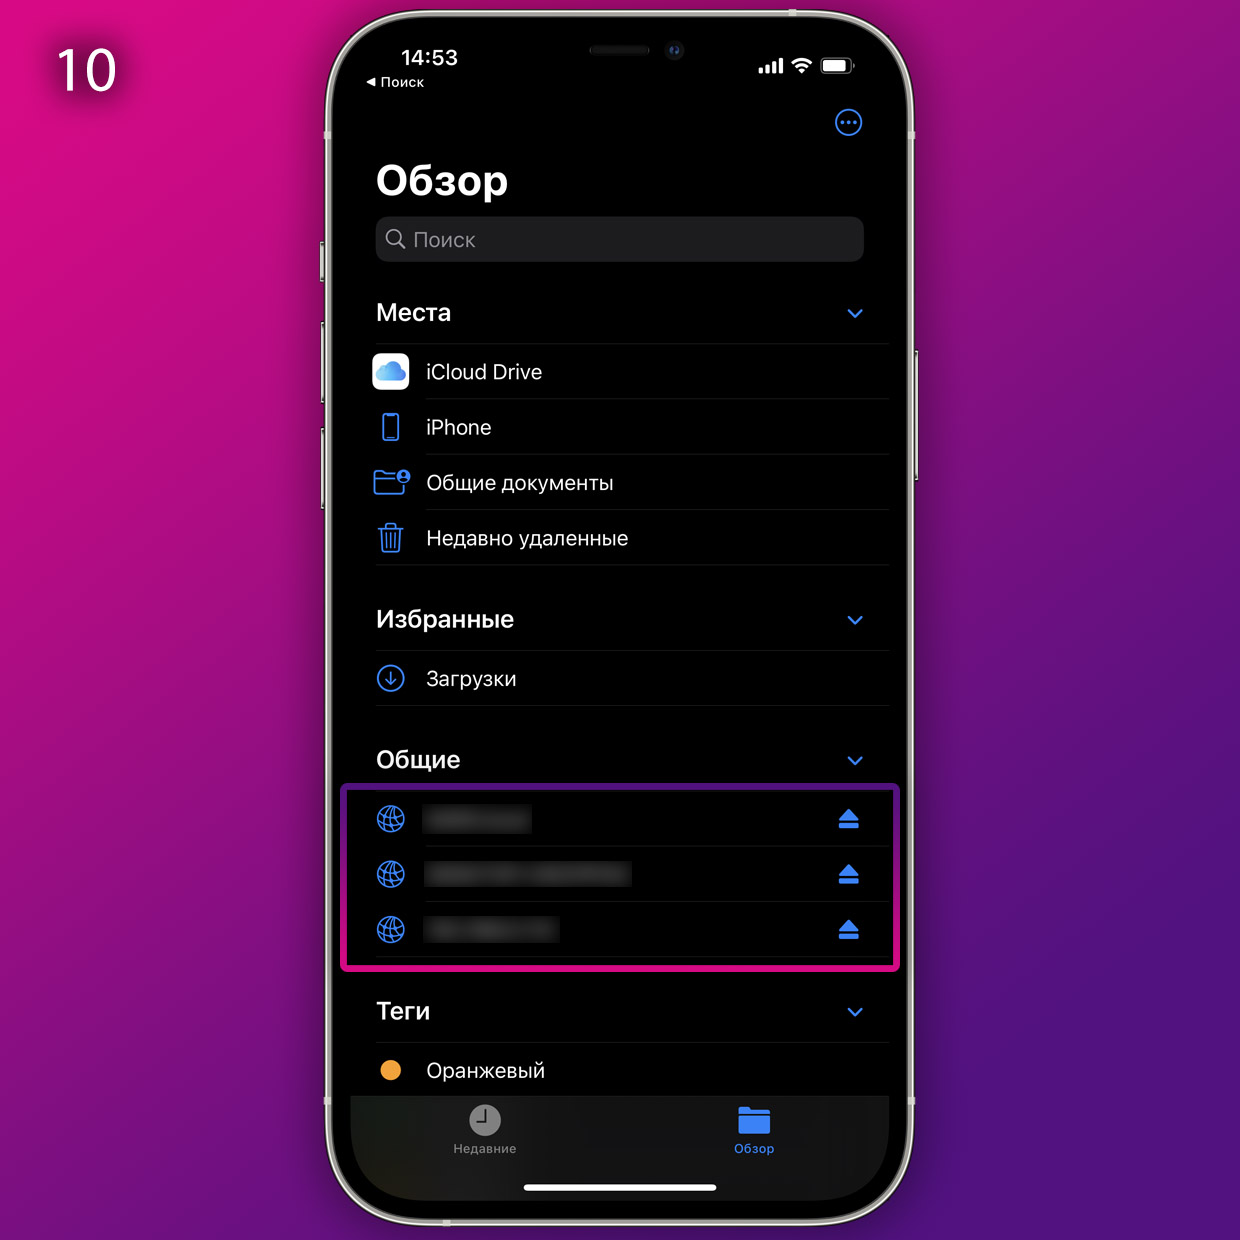
Теперь здесь вы можете открыть облачную папку в Windows.
10. Если всё получилось, то теперь в приложении Файлы у вас появилось подменю Общий доступ.
Это и есть доступ к файлам на Windows, а также любым другим облачным папкам с файлами внутри вашей сети. Открываете его и видите то, что лежит в папке на компьютере с Win. Туда же можно кидать любые файлы.
Как теперь всем этим пользоваться?
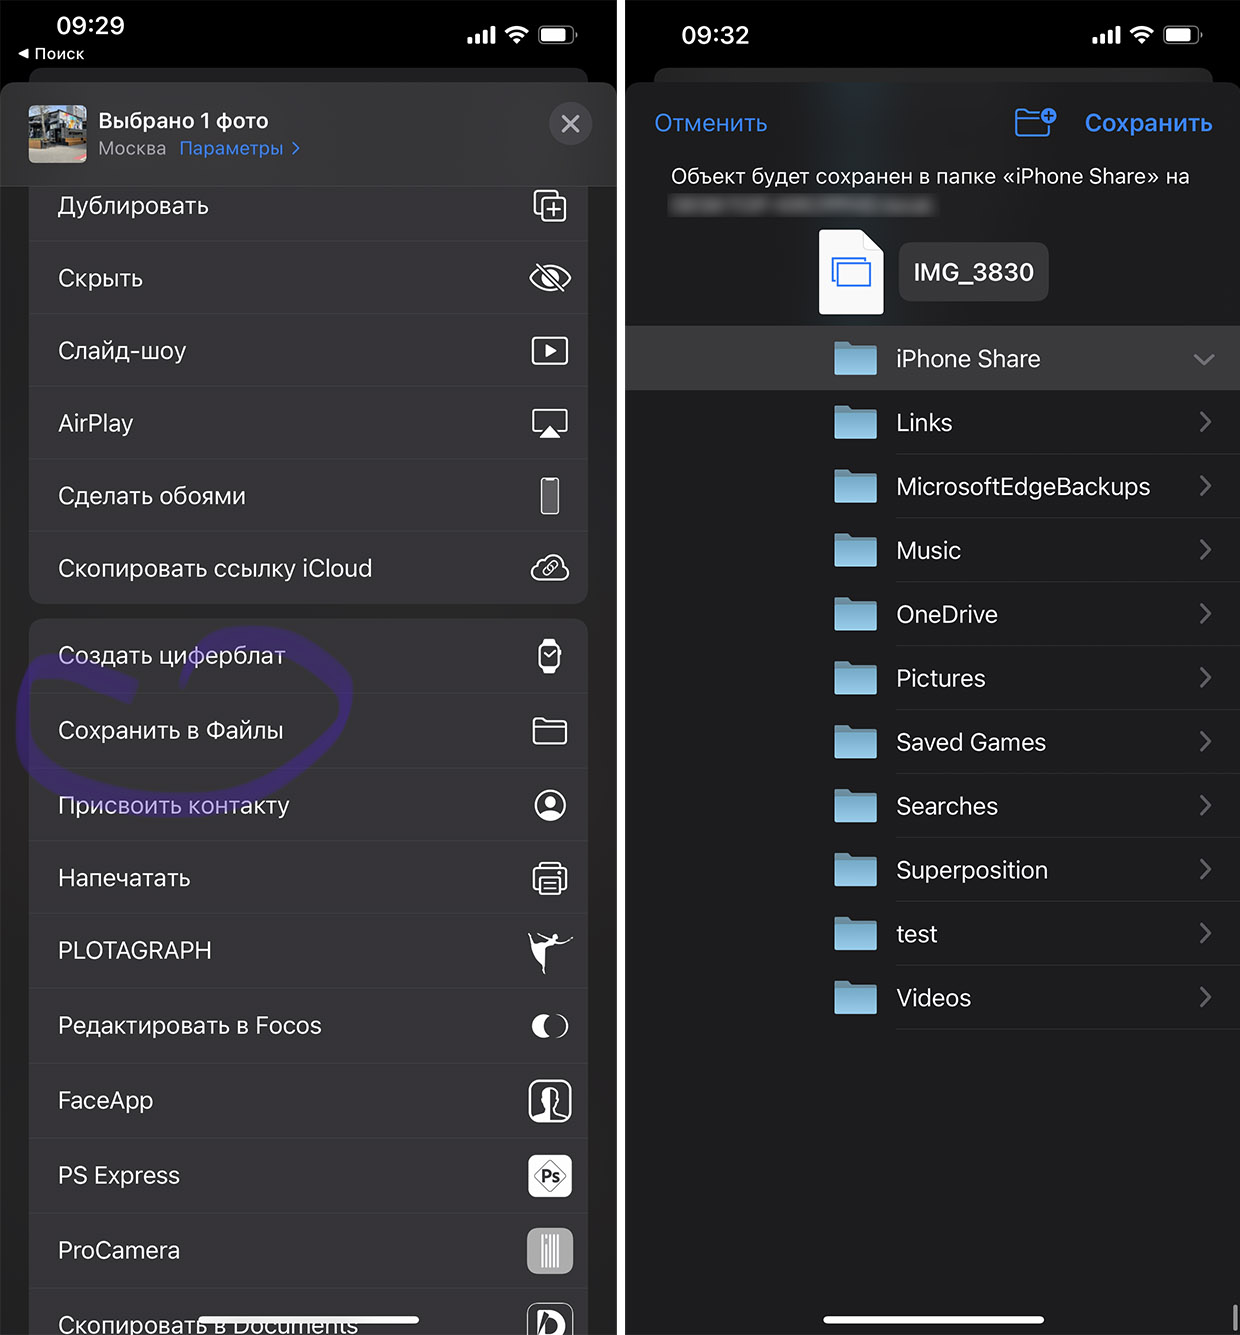
С iPhone можно перекидывать любые файлы в такую папку прямо через стандартный интерфейс Поделиться.
Через встроенное приложение Файлы в iPhone и iPad вы можете копировать, удалять, вставлять и переименовывать любые файлы, которые лежат в вашей новой папке на компьютере с Windows.
Например, если нужно передать на компьютер с Windows фотографию, вы просто копируете её в Фото на iOS, открываете Файлы, затем находите эту папку в общем меню приложения и вставляете в пустое место, прямо как текст (долгий тап пальцем -> Вставить).
То же самое работает в обратную сторону. Если понадобится забрать какие-то файлы с ПК, просто кидаете их в эту папку, а затем в приложении Файлы на iOS забираете всё в локальную память (долгий тап пальцем на файле -> Поделиться или Сохранить).
Всё это будет работать, пока вы находитесь в одной локальной сети с компьютером.
Конечно, способ и рядом не стоит с простотой использования AirDrop. Но в целом – сильно облегчает взаимодействие iPhone, iPad и Windows-компьютеров во всём, что касается передачи и приёма файлов. Пользуйтесь на здоровье.

 (69 голосов, общий рейтинг: 4.78 из 5)
🤓 Хочешь больше? Подпишись на наш Telegram.
![]()
iPhones.ru
Вот неплохая альтернатива, раз AirDrop для Windows в обозримом будущем не появится.
- iOS,
- iOS 14,
- iPad,
- iPhone,
- windows,
- Windows 10,
- Это интересно
![]()
Никита Горяинов
@ngoryainov
Главный редактор iPhones.ru. Спасибо, что читаете нас. Есть вопрос, предложение или что-то интересное? Пишите на [email protected]