В Windows 10 вы можете очень легко добавлять и удалять подключения VPN (виртуальная частная сеть) , но вы не найдете возможности экспортировать существующие подключения, которые можно использовать для импорта настроек на другой компьютер.
Хотя настройка VPN-соединения не является сложной задачей, возможность экспорта и импорта настроек всегда может ускорить процесс настройки одних и тех же соединений на нескольких компьютерах или когда вы хотите переместить VPN-соединение с конкретными настройками на другое устройство.
Если вы хотите перенести VPN-подключения на другой компьютер, существует способ обойти экспорт и импорт настроек.
В этом руководстве вы узнаете, как экспортировать и импортировать VPN-подключения в Windows 10.
Чтобы экспортировать VPN-подключения в Windows 10, подключите съемный диск к устройству и выполните следующие действия:
Краткое примечание: эти инструкции экспортируют все параметры конфигурации, но невозможно экспортировать имена пользователей и пароли. Вы должны добавить их вручную с помощью шагов ниже.
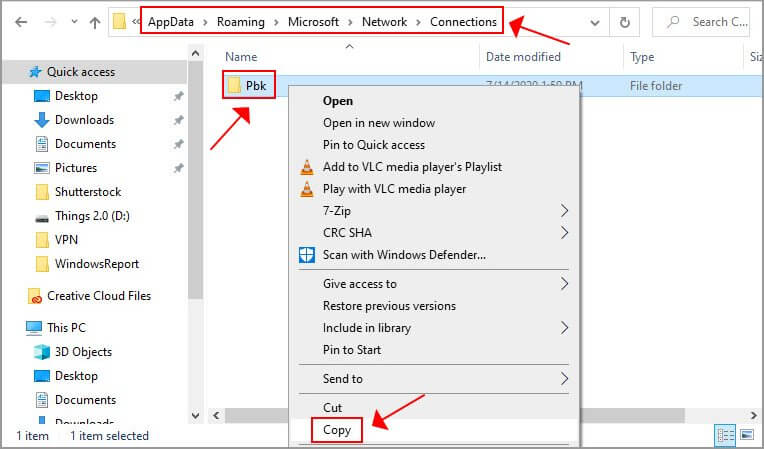
- Откройте проводник на Windows 10.
- Скопируйте и вставьте следующий путь в адресную строку и нажмите Enter:
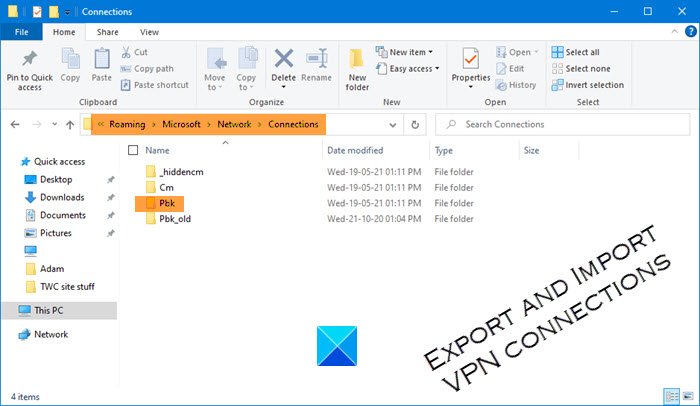
%AppData%MicrosoftNetworkConnections
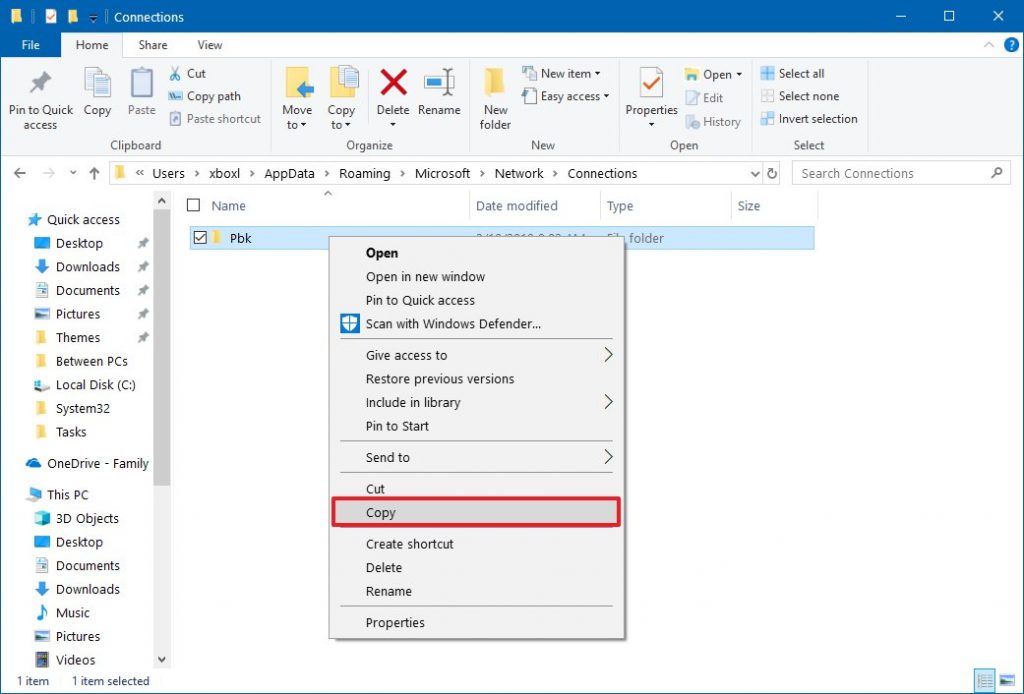
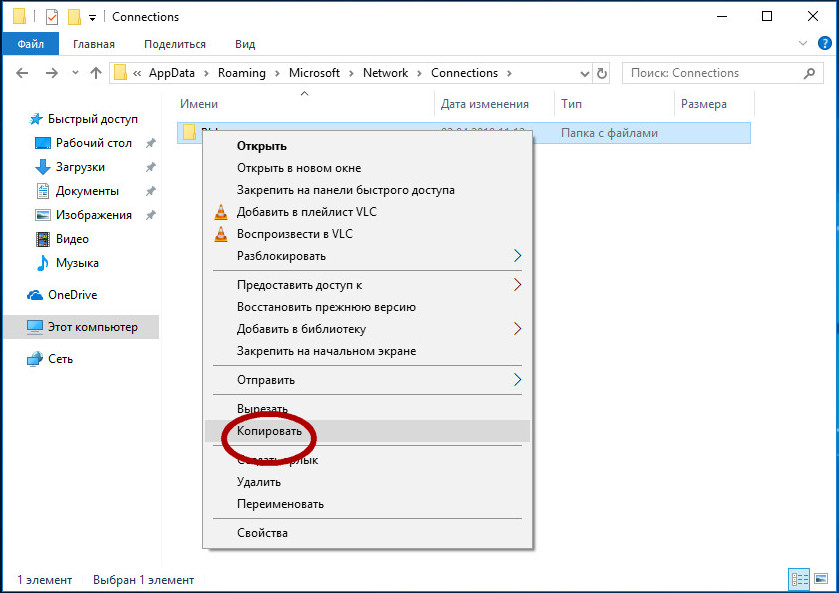
- Щелкните правой кнопкой мыши папку Pbk и выберите параметр «Копировать».

- Откройте местоположение, которое вы хотите использовать для экспорта настроек VPN.
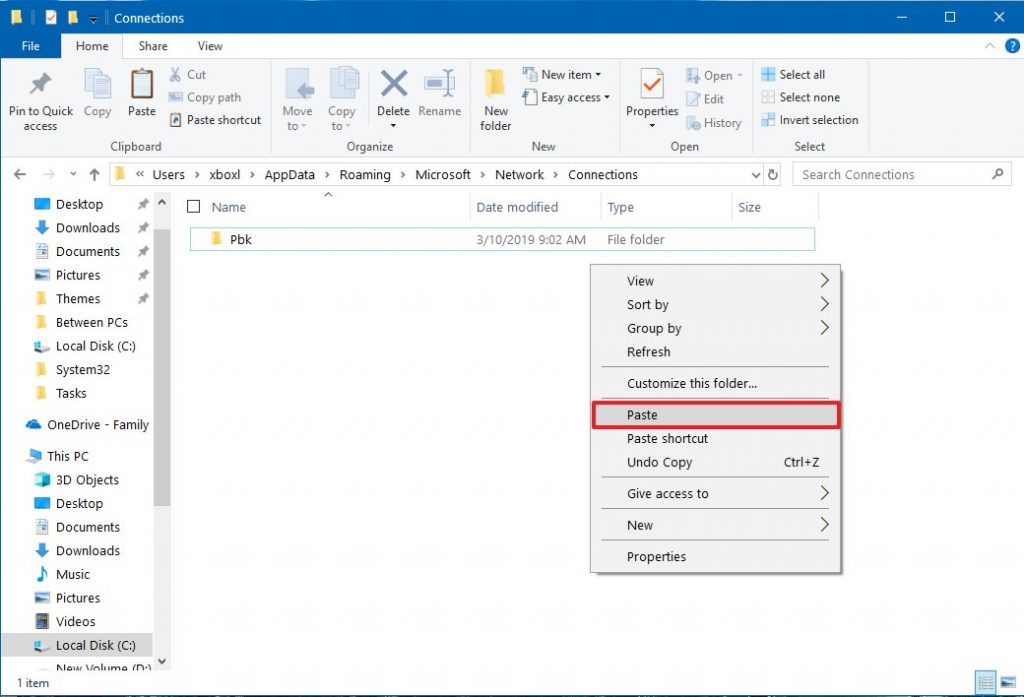
- Щелкните правой кнопкой мыши папку и выберите параметр «Вставить».
После выполнения этих действий вы можете перенести съемный носитель на другой компьютер для импорта настроек.
В этом руководстве мы используем съемный диск для экспорта и импорта VPN-подключений на другое устройство, но вы можете использовать сетевую общую папку или любой другой метод совместного использования.
Как импортировать VPN-соединения в Windows 10
Чтобы импортировать VPN-подключения на устройство Windows 10, подключите съемный диск с экспортированными файлами и выполните следующие действия:
Предупреждение. При импорте всех VPN-подключений с другого устройства предыдущие подключения на целевом устройстве будут удалены.
- Откройте съемный диск.
- Щелкните правой кнопкой мыши папку Pbk и выберите параметр «Копировать».
- Скопируйте и вставьте следующий путь в адресную строку File Explorer и нажмите Enter:
%AppData%MicrosoftNetworkConnections
- Щелкните правой кнопкой мыши папку и выберите параметр «Вставить».

- Нажмите кнопку Заменить файлы в пункте назначения. (Этот процесс удалит ранее настроенные соединения.)
После выполнения этих шагов VPN-подключения должны быть доступны в приложении «Настройки». Однако нет способа экспортировать и импортировать имена пользователей и пароли, поэтому вам необходимо вводить их вручную.
Как изменить имя пользователя и пароль VPN-подключения в Windows 10
Чтобы добавить или изменить имя пользователя и пароль VPN-подключения, выполните следующие действия:
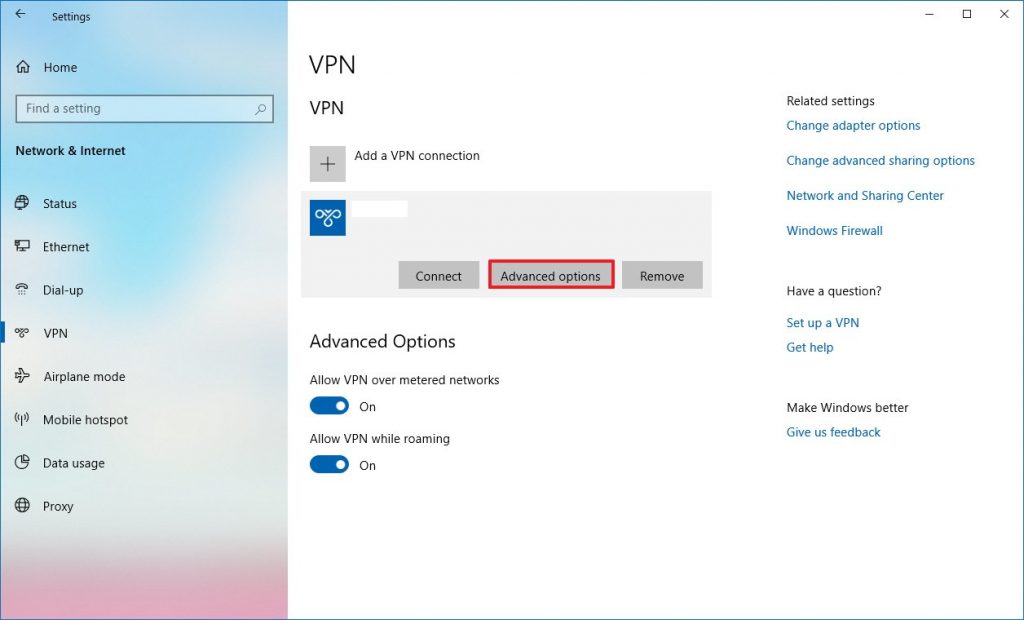
- Откройте Настройки.
- Нажмите на Сеть и Интернет.
- Нажмите на VPN.
- Выберите VPN-соединение.
- Нажмите кнопку Дополнительные параметры.

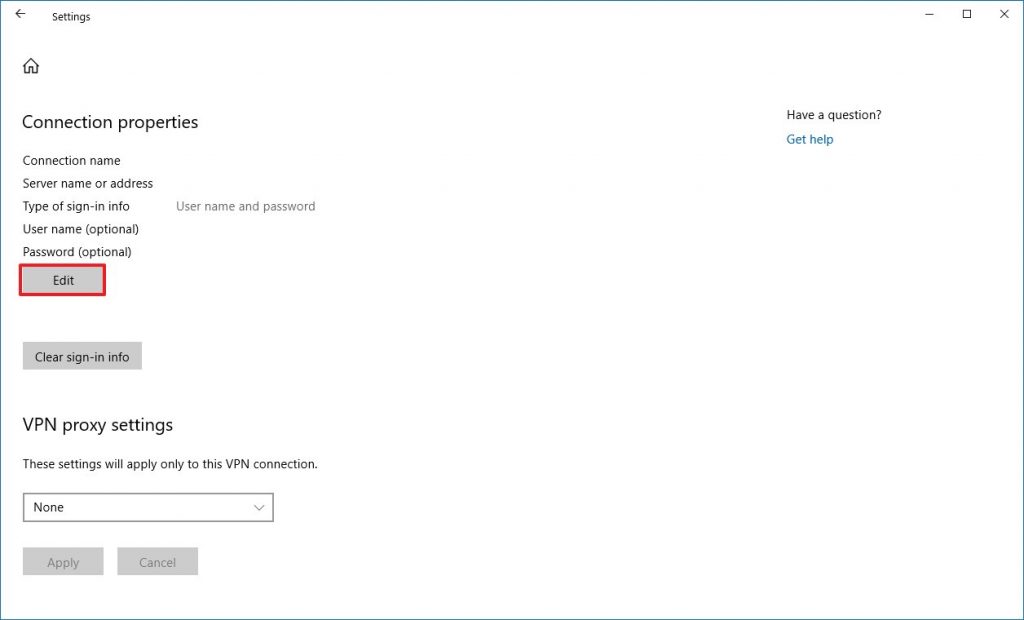
- В разделе «Свойства соединения» нажмите кнопку «Изменить».
- Введите имя пользователя и пароль.
- Нажмите кнопку Сохранить.
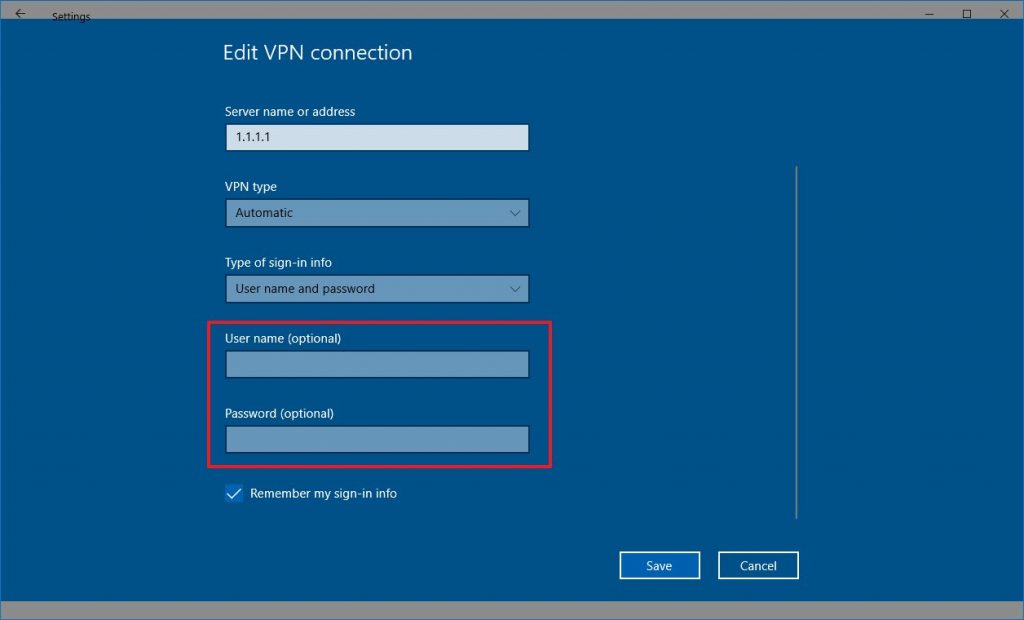
После того, как вы выполните эти шаги, VPN-соединение сможет автоматически подключаться без каких-либо дополнительных шагов.

В Windows 10 можно очень легко добавлять и удалять подключения по VPN, но при этом нет возможности экспортировать уже настроенные подключения. Зачем это может понадобиться? Сама по себе процедура настройки VPN в Windows 10 достаточно проста, но что, если вам потребуется создать VPN-подключения с теми же настройками на нескольких компьютерах, скажем, в одной локальной сети? Гораздо удобнее сделать это путем импорта конфигурации.
Также резервирование настроек туннелирования поможет вам быстро восстановить конфигурацию VPN-подключения после переустановки или полного сброса Windows. Как уже было сказано, встроенного механизма экспорта и импорта настроек VPN-соединений в Windows 10 нет, но это еще не означает, что их в принципе нельзя сохранить и перенести.
Вставьте в адресную строку Проводника путь %AppData%MicrosoftNetworkConnections и нажмите ввод. В каталоге Connections вы обнаружите папку Pbx, скопируйте ее на флешку или в облачное хранилище. Это и будет ваша резервная копия, экспортированные данные.
Точно так же, но в обратном порядке выполняется процедура импорта. Переносим с помощью флешки или облачной синхронизации папку Pbx на другие компьютеры, переходим в расположение %AppData%MicrosoftNetworkConnections и заменяем уже существующий там каталог Pbx своим.
После выполнения этих несложных шагов VPN-подключения станут доступны в соответствующем разделе приложения «Параметры».
Что же касается экспорта и импорта использующихся при подключении к сети VPN логинов и паролей, увы, никакого обходного способа их экспорта и импорта нет, вводить их вам придется вручную.
Оцените Статью:

 (1 оценок, среднее: 1,00 из 5)
![]() Загрузка…
Загрузка…
Download PC Repair Tool to quickly find & fix Windows errors automatically
Windows 11/10 is making our lives easier every day by adding every feature desired by the users. One of the most useful functions it offers is to import and export VPN in no time to the system. Virtual Private Network or VPN, offers a protected network connection to the user while working with the public network. VPN secures the private data by keeping the IP address access of the user confidential and therefore no one can put their hands on the user’s data even if the system is connected to a public network. This post will guide you on how to export and import your VPN connections to another computer on Windows 11/10.
VPN makes the user a source network by redirecting it to a remote server. This restricts the service provider or any third party to view the data transferred or web history of a VPN-assisted system. The easiest part of VPN connections is that it allows the user to export and import it from or to the removable drive. Let us learn how to export and import this useful program on Windows PC.
To export the VPN connection from your system, follow the below suggestions:
- Press the Windows+E keyboard shortcut to launch the File Explorer.
- In the File Explorer window, browse the following path – %AppData%MicrosoftNetworkConnections
- Inside the Connections folder, right-click on the Pbk folder and select the Copy option from the context menu.
- Now go to the place you want to export the VPN setup and paste it.
If you want to read the above steps in detail, here they are:
The first and foremost step is to connect a removable disk or drive, where you want to export it to. Then open the File Explorer using the Windows+E keyboard shortcut.
In the File Explorer window, browse the following path:
%AppData%MicrosoftNetworkConnections
Alternatively, you can just copy and paste the path in the address bar and press Enter.
Pressing the Enter key will take you to a folder named Pbk. Now simply right-click on the Pbk folder and select to copy. Then go to the removable space where you want to export the VPN setup and paste it.
After completing these above steps, you have successfully exported the VPN connection. So, now you can take the removable media to another device so that you can import the settings.
Once you complete the steps, you can take the removable media to a different computer to import the settings.
How to Import VPN connections on Windows 11/10
The method of importing the VPN folder is similar to that of export. Make sure that you have connected the removable drive from where you wish to import the files. So, to import VPN connections on your Windows PC, follow the below suggestions:
- First of all, connect the removable disk to your computer.
- Right-click on the Pbk folder and select Copy.
- Now open the File Explorer window.
- Then browse the following path – %AppData%MicrosoftNetworkConnections.
- Right-click on the free space and select paste.
Let’s see the above steps in detail:
Once the removable disk is connected, open it and copy the Pbk folder from it.
Then open the File Explorer window using the Windows+E keyboard shortcut and then browse the following path:
%AppData%MicrosoftNetworkConnections
In an alternative way, simply copy and paste the path in the address bar and press Enter.
Right-click on the free space and select the Paste option from the context menu. After completion of the above steps, the VPN is now imported to your system.
Related: Fix VPN not working problems and issues,

Digvijay is a Windows enthusiast who likes to write about the Windows OS and software in specific, and technology in general. When he is not working, he would either surf the web or dives into learning tech skills.
Download PC Repair Tool to quickly find & fix Windows errors automatically
Windows 11/10 is making our lives easier every day by adding every feature desired by the users. One of the most useful functions it offers is to import and export VPN in no time to the system. Virtual Private Network or VPN, offers a protected network connection to the user while working with the public network. VPN secures the private data by keeping the IP address access of the user confidential and therefore no one can put their hands on the user’s data even if the system is connected to a public network. This post will guide you on how to export and import your VPN connections to another computer on Windows 11/10.
VPN makes the user a source network by redirecting it to a remote server. This restricts the service provider or any third party to view the data transferred or web history of a VPN-assisted system. The easiest part of VPN connections is that it allows the user to export and import it from or to the removable drive. Let us learn how to export and import this useful program on Windows PC.
To export the VPN connection from your system, follow the below suggestions:
- Press the Windows+E keyboard shortcut to launch the File Explorer.
- In the File Explorer window, browse the following path – %AppData%MicrosoftNetworkConnections
- Inside the Connections folder, right-click on the Pbk folder and select the Copy option from the context menu.
- Now go to the place you want to export the VPN setup and paste it.
If you want to read the above steps in detail, here they are:
The first and foremost step is to connect a removable disk or drive, where you want to export it to. Then open the File Explorer using the Windows+E keyboard shortcut.
In the File Explorer window, browse the following path:
%AppData%MicrosoftNetworkConnections
Alternatively, you can just copy and paste the path in the address bar and press Enter.
Pressing the Enter key will take you to a folder named Pbk. Now simply right-click on the Pbk folder and select to copy. Then go to the removable space where you want to export the VPN setup and paste it.
After completing these above steps, you have successfully exported the VPN connection. So, now you can take the removable media to another device so that you can import the settings.
Once you complete the steps, you can take the removable media to a different computer to import the settings.
How to Import VPN connections on Windows 11/10
The method of importing the VPN folder is similar to that of export. Make sure that you have connected the removable drive from where you wish to import the files. So, to import VPN connections on your Windows PC, follow the below suggestions:
- First of all, connect the removable disk to your computer.
- Right-click on the Pbk folder and select Copy.
- Now open the File Explorer window.
- Then browse the following path – %AppData%MicrosoftNetworkConnections.
- Right-click on the free space and select paste.
Let’s see the above steps in detail:
Once the removable disk is connected, open it and copy the Pbk folder from it.
Then open the File Explorer window using the Windows+E keyboard shortcut and then browse the following path:
%AppData%MicrosoftNetworkConnections
In an alternative way, simply copy and paste the path in the address bar and press Enter.
Right-click on the free space and select the Paste option from the context menu. After completion of the above steps, the VPN is now imported to your system.
Related: Fix VPN not working problems and issues,
Digvijay is a Windows enthusiast who likes to write about the Windows OS and software in specific, and technology in general. When he is not working, he would either surf the web or dives into learning tech skills.
Windows 10 делает нашу жизнь проще с каждым днем, добавляя все функции, которые хотят пользователи. Одна из самых полезных функций, которые он предлагает, — это мгновенный импорт и экспорт VPN в систему. Виртуальная частная сеть или VPN, предлагает пользователю защищенное сетевое соединение при работе с общедоступной сетью. VPN защищает личные данные, сохраняя конфиденциальность доступа пользователя к IP-адресу, и поэтому никто не может получить доступ к данным пользователя, даже если система подключена к общедоступной сети. В этом посте вы узнаете, как экспортировать и импортировать ваши VPN-подключения на другой компьютер в Windows 10.
VPN делает пользователя исходной сетью, перенаправляя ее на удаленный сервер. Это ограничивает поставщика услуг или любую третью сторону для просмотра переданных данных или веб-истории системы с поддержкой VPN. Самая простая часть VPN-подключений заключается в том, что они позволяют пользователю экспортировать и импортировать данные со съемного диска или на него. Давайте узнаем, как экспортировать и импортировать эту полезную программу в Windows 10.
Как экспортировать VPN-соединения в Windows 10
Чтобы экспортировать VPN-соединение из вашей системы, следуйте приведенным ниже советам:
- Нажмите сочетание клавиш Windows + E, чтобы запустить проводник.
- В окне проводника перейдите по следующему пути — % AppData% Microsoft Network Connections
- Внутри папки Connections щелкните правой кнопкой мыши папку Pbk и выберите опцию Copy из контекстного меню.
- Теперь перейдите в то место, куда вы хотите экспортировать настройки VPN, и вставьте их.
Если вы хотите подробно прочитать вышеуказанные шаги, вот они:
Первым и самым важным шагом является подключение съемного диска или накопителя, на который вы хотите его экспортировать. Затем откройте проводник с помощью сочетания клавиш Windows + E.
В окне проводника перейдите по следующему пути:
% AppData% Microsoft Network Connections
Кроме того, вы можете просто скопировать и вставить путь в адресную строку и нажать Enter.
Нажав клавишу Enter, вы попадете в папку с именем Pbk. Теперь просто щелкните правой кнопкой мыши папку Pbk и выберите копирование. Затем перейдите в съемное пространство, куда вы хотите экспортировать настройку VPN, и вставьте ее.
После выполнения этих шагов вы успешно экспортировали VPN-соединение. Итак, теперь вы можете перенести съемный носитель на другое устройство, чтобы вы могли импортировать настройки.
Выполнив эти шаги, вы можете перенести съемный носитель на другой компьютер, чтобы импортировать настройки.
Как импортировать VPN-подключения в Windows 10
Метод импорта папки VPN аналогичен методу экспорта. Убедитесь, что вы подключили съемный диск, с которого хотите импортировать файлы. Итак, чтобы импортировать VPN-соединения на ваш ПК с Windows 10, следуйте приведенным ниже советам:
- Прежде всего, подключите съемный диск к компьютеру.
- Щелкните правой кнопкой мыши папку Pbk и выберите Копировать.
- Теперь откройте окно проводника.
- Затем просмотрите следующий путь — % AppData% Microsoft Network Connections.
- Щелкните правой кнопкой мыши свободное место и выберите «Вставить».
Давайте подробно рассмотрим вышеперечисленные шаги:
После подключения съемного диска откройте его и скопируйте из него папку Pbk.
Затем откройте окно проводника с помощью сочетания клавиш Windows + E и перейдите по следующему пути:
% AppData% Microsoft Network Connections
В качестве альтернативы просто скопируйте и вставьте путь в адресную строку и нажмите Enter.
Щелкните правой кнопкой мыши свободное место и выберите в контекстном меню пункт «Вставить». После выполнения вышеуказанных шагов VPN теперь импортирована в вашу систему.
Связанный: Исправить неработающие проблемы и проблемы с VPN,
.
Обновлено 2023 января: перестаньте получать сообщения об ошибках и замедлите работу вашей системы с помощью нашего инструмента оптимизации. Получить сейчас в эту ссылку
- Скачайте и установите инструмент для ремонта здесь.
- Пусть он просканирует ваш компьютер.
- Затем инструмент почини свой компьютер.
Если вы уже установили много VPN-подключений, зарегистрировав имя пользователя, пароль и VPN-адрес в Windows, вам следует искать автоматический способ экспортировать настройки VPN, а затем импортировать их на другой компьютер, чтобы вам не приходилось заново создавать подключения вручную. Вот как сделать резервную копию и восстановить настройки подключения в Windows.

Если вы хотите защитить VPN-соединения или перенести их на другой компьютер, продолжайте читать это руководство. Во всех версиях Windows нет очевидного способа экспортировать настройки VPN (имя сервера VPN, IP-адрес, имя пользователя, пароль и т. Д.), Чтобы импортировать их на другой компьютер, но вы можете легко это сделать, следуя инструкциям ниже.

- Нажмите клавиши Windows image_thumb8_thumb + R, чтобы открыть панель команд «Выполнить».
- Введите следующую команду (скопировать / вставить) и нажмите Enter:
- % AppData% Microsoft Network Connections
- Чтобы создать резервную копию настроек VPN, скопируйте папку Pbk в место для резервной копии. (например, на USB-накопитель).
Обновление за январь 2023 года:
Теперь вы можете предотвратить проблемы с ПК с помощью этого инструмента, например, защитить вас от потери файлов и вредоносных программ. Кроме того, это отличный способ оптимизировать ваш компьютер для достижения максимальной производительности. Программа с легкостью исправляет типичные ошибки, которые могут возникнуть в системах Windows — нет необходимости часами искать и устранять неполадки, если у вас под рукой есть идеальное решение:
- Шаг 1: Скачать PC Repair & Optimizer Tool (Windows 10, 8, 7, XP, Vista — Microsoft Gold Certified).
- Шаг 2: Нажмите «Начать сканирование”, Чтобы найти проблемы реестра Windows, которые могут вызывать проблемы с ПК.
- Шаг 3: Нажмите «Починить все», Чтобы исправить все проблемы.

Как импортировать или восстановить настройки VPN в Windows 10

Чтобы импортировать настройки в Windows 10, вы должны перейти в то же место и вставить папку Pbk. Поскольку папка довольно мала, вы можете сохранить ее в OneDrive или другом облачном хранилище или сохранить как черновик в своей учетной записи электронной почты.
Например, вы можете импортировать настройки VPN со своего домашнего компьютера, когда работаете в Windows 10. Помните, что все существующие профили VPN будут заменены новыми.
Если вы хотите сохранить несколько профилей VPN в режиме ожидания, создайте несколько папок на своем ПК, куда вы можете добавить папку Pbk с вашими любимыми настройками VPN.
Когда вам понадобится новый профиль с определенными Настройки VPN, просто замените существующую папку Pbk одной из копий.
Заключение
Сетевое взаимодействие в Windows стало намного проще с годами, и, вероятно, это проще всего сделать сегодня. Это не единственное, что также стало намного проще, конфигурация VPN-подключений также была доработана в Windows 10, и теперь VPN-подключения можно настроить за несколько простых шагов.
Однако, если вам нужно установить несколько разных VPN-подключений, настройка всех их вручную займет много времени. Однако, если вы уже настроили VPN-подключения на другое устройство с Windows 10, вы можете просто экспортировать все эти подключения на новое устройство, чтобы вам не пришлось снова проходить весь процесс настройки.
https://answers.microsoft.com/en-us/windows/forum/all/locating-and-exporting-network-sign-in-and-vpn/94fff86b-3a52-4f54-a538-c37292bd5a3c
Совет экспертов: Этот инструмент восстановления сканирует репозитории и заменяет поврежденные или отсутствующие файлы, если ни один из этих методов не сработал. Это хорошо работает в большинстве случаев, когда проблема связана с повреждением системы. Этот инструмент также оптимизирует вашу систему, чтобы максимизировать производительность. Его можно скачать по Щелчок Здесь

CCNA, веб-разработчик, ПК для устранения неполадок
Я компьютерный энтузиаст и практикующий ИТ-специалист. У меня за плечами многолетний опыт работы в области компьютерного программирования, устранения неисправностей и ремонта оборудования. Я специализируюсь на веб-разработке и дизайне баз данных. У меня также есть сертификат CCNA для проектирования сетей и устранения неполадок.
Сообщение Просмотров: 278
by Elena Constantinescu
Elena started writing professionally in 2010 and hasn’t stopped exploring the tech world since. With a firm grasp of software reviewing and content editing, she is always trying… read more
Updated on March 25, 2021
- Microsoft hasn’t implemented an option for easily exporting VPN settings in Windows 10.
- But you can export and save VPN settings by copying and pasting a folder of all VPN connections.
- It’s easy workaround for switching profiles with different VPN login credentials, server addresses, and other connection details.
- However, this method doesn’t compare to a premium VPN service, where you can easily customize settings.

There’s no option in Windows 10 to export VPN settings, but there’s an easy workaround.
Creating a VPN connection in Windows 10 using the operating system’s native settings is a great way to conceal your IP address, spoof your geo-location, access blocked websites, and improve your ping while gaming without having to install a desktop client.
But it’s also a bit more complicated than using the actual VPN client designed for Windows 10 because you have to create a new VPN connection or edit your existing profile every time you want to change the VPN protocol or connect to a different VPN server address.
Besides, you can’t export the VPN settings in Windows 10 as easily as clicking a button to save the profile to another location.
Although Microsoft’s operating system hasn’t come up with a simple solution for this, you can do it by copying and pasting the system folder that contains all VPN connections in Windows 10.
How do I export VPN settings in Windows 10?
- Open the Windows 10 File Explorer (Win key + E).
- Type the following in the address bar and press Enter:
%AppData%MicrosoftNetworkConnections - Select the Pbk folder, right-click and Copy (Ctrl + C).
- Choose a different location on your PC and Paste (Ctrl + V).
Is your VPN blocked in Windows 10? Check out this article to fix it in just a few easy steps.
To import settings in Windows 10, you have to go to the same location and paste the Pbk folder. Since the folder size is quite small, you can keep it stored in OneDrive or another cloud storage service as well as keep it saved as a draft in your email account.
For example, you can import the VPN settings from your home PC at work on Windows 10. Just keep in mind that any existing VPN profiles will be overwritten with the new ones.
If you’re interested in keeping multiple VPN profiles on standby, create multiple folders on your PC where you can paste the Pbk folder with your preferred VPN settings.
Whenever you need a new profile with specific VPN settings, simply swap the existing Pbk folder with one of the copies.
To conclude, it’s not exactly a walk in the park to export VPN settings in Windows 10. But it’s still possible by using the workaround above. We suggest investing in a premium VPN service for Windows 10 on the long run since it will save you a lot of headaches.
Your connection is not secure — websites you visit can find out your details:

- Your IP Address:
loading

Companies can sell this information, alongside your location and internet provider name, and profit from it by serving targeted ads or monitoring your data usage.
We recommend Private Internet Access, a VPN with a no-log policy, open source code, ad blocking and much more; now 79% off.
![]()
Newsletter
by Elena Constantinescu
Elena started writing professionally in 2010 and hasn’t stopped exploring the tech world since. With a firm grasp of software reviewing and content editing, she is always trying… read more
Updated on March 25, 2021
- Microsoft hasn’t implemented an option for easily exporting VPN settings in Windows 10.
- But you can export and save VPN settings by copying and pasting a folder of all VPN connections.
- It’s easy workaround for switching profiles with different VPN login credentials, server addresses, and other connection details.
- However, this method doesn’t compare to a premium VPN service, where you can easily customize settings.
There’s no option in Windows 10 to export VPN settings, but there’s an easy workaround.
Creating a VPN connection in Windows 10 using the operating system’s native settings is a great way to conceal your IP address, spoof your geo-location, access blocked websites, and improve your ping while gaming without having to install a desktop client.
But it’s also a bit more complicated than using the actual VPN client designed for Windows 10 because you have to create a new VPN connection or edit your existing profile every time you want to change the VPN protocol or connect to a different VPN server address.
Besides, you can’t export the VPN settings in Windows 10 as easily as clicking a button to save the profile to another location.
Although Microsoft’s operating system hasn’t come up with a simple solution for this, you can do it by copying and pasting the system folder that contains all VPN connections in Windows 10.
How do I export VPN settings in Windows 10?
- Open the Windows 10 File Explorer (Win key + E).
- Type the following in the address bar and press Enter:
%AppData%MicrosoftNetworkConnections - Select the Pbk folder, right-click and Copy (Ctrl + C).
- Choose a different location on your PC and Paste (Ctrl + V).
Is your VPN blocked in Windows 10? Check out this article to fix it in just a few easy steps.
To import settings in Windows 10, you have to go to the same location and paste the Pbk folder. Since the folder size is quite small, you can keep it stored in OneDrive or another cloud storage service as well as keep it saved as a draft in your email account.
For example, you can import the VPN settings from your home PC at work on Windows 10. Just keep in mind that any existing VPN profiles will be overwritten with the new ones.
If you’re interested in keeping multiple VPN profiles on standby, create multiple folders on your PC where you can paste the Pbk folder with your preferred VPN settings.
Whenever you need a new profile with specific VPN settings, simply swap the existing Pbk folder with one of the copies.
To conclude, it’s not exactly a walk in the park to export VPN settings in Windows 10. But it’s still possible by using the workaround above. We suggest investing in a premium VPN service for Windows 10 on the long run since it will save you a lot of headaches.
Your connection is not secure — websites you visit can find out your details:
-
- Your IP Address:
loading
Companies can sell this information, alongside your location and internet provider name, and profit from it by serving targeted ads or monitoring your data usage.
We recommend Private Internet Access, a VPN with a no-log policy, open source code, ad blocking and much more; now 79% off.
![]()