Один из простейших путей как установить Node.Js это пойти на официальный сайт, скачать установочный файл и установить его. Позже разработчики столкнулись с ситуацией, когда им нужно сменить версию Node.js на другую или обновить текущую версию.
Это все еще возможно — установить другую версию с официального сайта, но как много нод уже установлено в системе?
Может быть это хорошее время для удаления их всех и настроить возможность системе переключаться между нодами за секунды, всегда зная количество установленных версий и иметь возможность удалить любые из них одной простой командой.
Как удалить Node.Js с Mac OS
Обо всем по порядку, мы должны удалить старые версии ноды и все связанное с этим. Вы счастливчик, если вы установили прошлые версии с помощью Homebrew. Метод Homebrew это один из простейших вариантов для установки и удаления ноды на маке.
brew uninstall —force node
Напишите эту команду в терминале. Brew удалит все установленные версии Node.Js
После этого, лучше всего, запустить brew cleanup, это удалит все неиспользуемые зависимости и папки.
brew cleanup
Если ваша Node.js была установлена по другому, это не проблема. Вы можете удалить вручную. Есть куча папок, они могут быть удалены одна за одной через файндер или терминал.
Список папок, где находятся Node.js и npm
- node и/или node_modules в папке /usr/local/lib
- node и/или node_modules в папке /usr/local/include
- node, node-debug, и node-gyp в /usr/local/bin
- .npmrc в вашей домашней директории (Это настройки npm, не удаляйте этот файл, если хотите далее переустановить Node.js)
- .npm в вашей домашней директории
- .node-gyp в вашей домашней директории
- .node_repl_history в вашей домашней директории
- node* в /usr/local/share/man/man1/
- npm* в /usr/local/share/man/man1/
- node.d в /usr/local/lib/dtrace/
- node в /opt/local/bin/
- node в /opt/local/include/
- node_modules в /opt/local/lib/
- node в /usr/local/share/doc/
- node.stp в /usr/local/share/systemtap/tapset/
В случае, если вы не хотите вручную искать и удалять все эти папки и файлы, вы можете ввести одну простую команду в терминал:
sudo rm -rf /usr/local/{lib/node{,/.npm,_modules},bin,share/man}/{npm*,node*,man1/node*}
Эта команда не трогает вашу домашнюю директорию, так что в дальнейшем вы можете сами решить, что делать с сохранившимися файлами.
Сейчас мы можем удалить все глобальные пакеты, установленные с npm
rm -rf ~/.npm
После всех этих команд, Node.js и npm будут полностью удалены с вашего компьютера.
Как установить Node.js на Mac OS
После очистки, мы можем продолжить с установкой новой версии Node.js. Но мы сделаем это не прямым путем. Потому что если мы сделаем это по обычному, мы все еще будем иметь ту же проблему с кучей версий в будущем.
У данного скрипта есть единственная зависимость — установленная Command Line Tools. Если у вас все еще это не установлено, вы должны запустит команду в терминале:
xcode-select —install
Итак, мы готовы установить NVM. Простейший путь это сделать — .sh скрипт.
Скачать и установить данный скрипт мы можем с помощью следующей команды:
curl -o- https://raw.githubusercontent.com/nvm-sh/nvm/v0.37.2/install.sh | bash
0.37.2 — последняя версия на день написания статьи. Версия может быть проверена на странице NVM в GitHub
Конечно, это может быть установлено вручную. Вы нужно склонировать репозиторий и добавить необходимы файлы в PATH. Детальная инструкция описана в NVM ReadMe. Это будет полезно если вам нужно использовать NVM в CI пайплайн. Я бы рекомендовал добавить NVM в Docker image, который использует ваш пайплайн.
Не забудьте перезапустить окно терминала для обновления переменных окружения
Мы почти закончили. Сейчас мы легко можем установить любую версию Node.js. Для примера, эта команда установит самую свежую версию:
nvm install node
Если вы хотите установит LTS версию, но с последней версией npm, сделайте следующее:
nvm install —lts —latest-npm
Используя флаги, вроде —lts вы можете использовать любую версию.
nvm install 8.9.1 # or 10.10.0, 12, etc
Для того, что бы увидеть список установленных версий, вам нужно запустить команду:
nvm list
После установки, вам нужно выбрать дефолтную версию для вашей системы:
nvm use —lts
Что о пользователях Windows?
Для windows доступен похожий скрипт: Node Version Manager (nvm) for Windows. Это другой проект, который делает то же самое. Вы так-же можете устанавливать/удалять/выводить список и переключать любые версии Node.js
Итоги
С NVM вы получаете:
- Простую установку/удаление любой версии Node.js
- Лучший скрипт для переключения между нодами.
- Удаление такое же простое, как и установка
Вы почувствуете это в будущем, особенно, когда в следующий раз будете обновлять свою Node.js.
Спасибо за прочтение!
Переведено: Голдобин Антон
As you may already know, npm is currently bundled with node.js. It means that if you have installed node.js, you’ve already installed npm as well.
Also, pay attention to the node.js and npm release versions table that shows us approximate versions compatibility. Sometimes, versions discrepancy may cause incompatibility errors.
So, if you’re a developer, it’s kinda «best practice» to manage your development environment using one of the node.js version managers.
Here is a list and usage notes of some of the most popular:
Homebrew (macOS)
If you’re on macOS, you can use Homebrew.
Actually, it’s not just a node.js version manager.
To install Homebrew to your Mac:
$ ruby -e "$(curl -fsSL https://raw.github.com/Homebrew/homebrew/go/install)"
To install node.js and npm using Homebrew, run:
$ brew install node
Later, you will be able to update them using:
$ brew update && brew upgrade node
Also, you can switch between node.js versions as well:
$ brew switch node 0.10.26
npm will be upgraded/downgraded automatically.
n (macOS, Linux)
n is most likely to rvm (Ruby Version Manager), and is used to manage node.js and npm versions simultaneously. It is written on pure Linux shell, and available as an npm module. So, if you already have any node.js version installed, you can install/update the n package through npm:
$ npm install -g n
Downloading, installing and switching to node.js and npm versions is as easy as:
$ n 0.10.26
$ n 0.8.17
$ n 0.9.6
To download, install, and switch to the latest official release, use:
$ n latest
To download, install, and switch to the latest stable official release, use:
$ n stable
To switch to the previously active version (aka $ cd -), use:
$ n prev
If you want to see the list of installed node.js versions, just run n from your command line. The output will be something like the following:
$ n

  0.10.26
• 0.8.17
  0.9.6
Where the dot (•) means that it’s a currently active version. To select another node.js version from the list, use Up/Down arrow keys and activate using the Enter key.
To list the versions available to install:
$ n lsr
nvm (macOS, Linux)
nvm is also like rvm, even the command names and usage are very similar.
To install nvm you can use the installation script (requires git) using cURL:
$ curl https://raw.github.com/creationix/nvm/master/install.sh | sh
or wget:
$ wget -qO- https://raw.github.com/creationix/nvm/master/install.sh | sh
To download and install a specific node.js and npm version, use:
$ nvm install 0.10
Then, you can switch to the installed version, using:
$ nvm use 0.10
Also, you can create the .nvmrc file containing the version number, then switch to the specified version using the following command:
$ nvm use
To see the list of installed node.js versions, use:
$ nvm ls
To list the versions available to install:
$ nvm ls-remote
nvm-windows (Windows)
nvm-windows is a node.js version management utility for Windows, ironically written in Go.
It is not the same thing as nvm. However, the usage as a node.js version manager is very similar.
To install nvm-windows, it is required to uninstall any existing versions of node.js and npm beforehand. Then, download and run the latest installer from releases.
To upgrade nvm-windows, run the new installer. It will safely overwrite the files it needs to update without touching your node.js installations.
nvm-windows runs in an Admin shell. You’ll need to start Powershell or Command Prompt as Administrator to use nvm-windows.
Before using, you may also need to enable nvm-windows with the following command:
C:> nvm on
To download and install a specific node.js and npm version, use:
C:> nvm install 0.12
Then, you can switch to the installed version, using:
C:> nvm use 0.12
If you want to see the list of installed node.js versions, use:
C:> nvm list
To list the versions available to install:
C:> nvm list available
All Platforms (Mac, Linux & Windows) 2023
If you just need to upgrade your old version of Node.js to the latest one and don’t need multiple versions, simply over-write your existing executable with the new one.
Download the Latest Node.js from nodejs.org/en/download

This Just Works! TM on all platforms and is the easiest/fastest method.
When you run node -v in your terminal you will see the the latest version.
Mac
If you originally installed Node.js using brew then run:
brew upgrade node
Managing Multiple Versions of Node.js:
If you need to run multiple versions of Node.js on your machine e.g. if you have an older project that targets a specific version on AWS Lambda, then NVM (Node Version Manger) is your friend!
Step 1 — Get NVM
curl -o- https://raw.githubusercontent.com/nvm-sh/nvm/v0.39.1/install.sh | bash
If you’re curious about the installation command read the source code
… its been reviewed by several node.js security experts
Step 2 — Install the version of node.js you need
Once you’ve got NVM you can install a specific version of Node.js using the nvm command:
nvm install v18.12.1
Note: you may need to close & re-open your terminal window for nvm command to be available.
You should expect to see something like this in your terminal:
Now using node v18.12.1
You now have the latest Node.js on your machine.
And if you need to temporarily switch to a different/previous version, you can do it with a simple nvm command.
Note: avoid using
sudowith Node/NPM as it violates the security principal of least privilege
NVM is considered «better» than N for managing multiple Node.js versions because the verbose commands mean it is much easier to keep track of what you are doing in your Terminal/SSH Log. It is used by the team at NPM the creators/custodians of the Node.js World!
All Platforms (Mac, Linux & Windows) 2023
If you just need to upgrade your old version of Node.js to the latest one and don’t need multiple versions, simply over-write your existing executable with the new one.
Download the Latest Node.js from nodejs.org/en/download
This Just Works! TM on all platforms and is the easiest/fastest method.
When you run node -v in your terminal you will see the the latest version.
Mac
If you originally installed Node.js using brew then run:
brew upgrade node
Managing Multiple Versions of Node.js:
If you need to run multiple versions of Node.js on your machine e.g. if you have an older project that targets a specific version on AWS Lambda, then NVM (Node Version Manger) is your friend!
Step 1 — Get NVM
curl -o- https://raw.githubusercontent.com/nvm-sh/nvm/v0.39.1/install.sh | bash
If you’re curious about the installation command read the source code
… its been reviewed by several node.js security experts
Step 2 — Install the version of node.js you need
Once you’ve got NVM you can install a specific version of Node.js using the nvm command:
nvm install v18.12.1
Note: you may need to close & re-open your terminal window for nvm command to be available.
You should expect to see something like this in your terminal:
Now using node v18.12.1
You now have the latest Node.js on your machine.
And if you need to temporarily switch to a different/previous version, you can do it with a simple nvm command.
Note: avoid using
sudowith Node/NPM as it violates the security principal of least privilege
NVM is considered «better» than N for managing multiple Node.js versions because the verbose commands mean it is much easier to keep track of what you are doing in your Terminal/SSH Log. It is used by the team at NPM the creators/custodians of the Node.js World!
-
Главная
-
Инструкции
-
Node.js
-
Как установить Node.js на Windows: пошаговая инструкция
На JavaScript выполняется большая часть интерактивных элементов на сайтах и в мобильных приложениях. JavaScript отлично работает с HTML/CSS и интегрирован основные браузеры на рынке. Чистый JavaScript используется в вебе, а для общего применения JavaScript разработчики используют различные среды выполнения, например, Node.js.
Node.js — это среда выполнения кода JavaScript. Она позволяет использовать JavaScript как язык программирования общего назначения: создавать на нем серверную часть и писать полноценные десктопные приложения.
Основа Node.js — движок V8. Этот движок был разработан Google и используется в браузере Google Chrome. Он компилирует код JavaScript в машинный код, который понимает процессор. Однако, чтобы сделать из JavaScript язык общего назначения, одного движка недостаточно. Так, например, для создания серверной части нужно, чтобы язык умел работать с файлами, сетью и т.п. Для решения этой проблемы разработчики добавили к V8 дополнительные возможности, с помощью своего кода и сторонних библиотек. В итоге у них получился инструмент, который превращает JavaScript в язык общего назначения.
Node.js стала популярна среди разработчиков благодаря возможности создавать серверную и клиентскую часть на одном языке, скорости работы и NPM. В этом материале мы расскажем, как правильно установить Node.js на Windows 10.
Удаление старых версий
Перед установкой необходимо удалить старые версии среды выполнения, если они были ранее установлены. Наличие предыдущих версий может привести к возникновению конфликтов.
Проверим систему на наличие версий Node.js. Для этого в cmd (чтобы ее запустить, нажмите Win+R, введите cmd и нажмите Enter) выполняем команду nvm list:
C:UsersTimeweb>nvm list
    18.9.0
    18.8.0
    16.17.0
Как видим, у нас установлено несколько версий. Удалим их:
- Выполняем команду
npm cache clean --force. - В «Установка и удаление программ» удаляем Node.js.
- Перезагружаем компьютер.
- Удаляем следующие каталоги. Некоторые из них могут существовать, а некоторые, наоборот, отсутствовать:
- C:Program Files (x86)Nodejs
- C:Program FilesNodejs
- C:Users{User}AppDataRoamingnpm
- C:Users{User}AppDataRoamingnpm-cache
- C:Users{User}.npmrc
- C:Users{User}AppDataLocalTempnpm-*
- Возвращаемся в командную строку и выполняем
nvm uninstallк каждой версии, полученной с помощьюnvm list:
C:UsersTimeweb>nvm uninstall 18.9.0
Uninstalling node v18.9.0... doneC:UsersTimeweb>nvm uninstall 18.8.0
Uninstalling node v18.9.0... done
C:UsersTimeweb>nvm uninstall 16.17.0
Uninstalling node v18.9.0... done
Дополнительно проверим, что версии удалены:
C:UsersTimeweb>nvm list
No installations recognized.C:UsersTimeweb>where node
ИНФОРМАЦИЯ: не удается найти файлы по заданным шаблонам.
C:UsersTimeweb>where npm
ИНФОРМАЦИЯ: не удается найти файлы по заданным шаблонам.
С помощью nvm-windows
Node Version Manager или сокращенно NVM — это диспетчер версий Node.js. Возможно, во время работы вам придется использовать различные версии Node и переключаться между ними. Версии часто меняются, поэтому при работе рекомендуется использовать диспетчер версий.
NVM — самый распространенный диспетчер версий, но, к сожалению, в Windows он не доступен, и вместо него используется адаптированный вариант nvm-windows.
- Зайдите в репозиторий nvm-windows на github.
- Загрузите установщик
nvm-setup.exeпоследней версии диспетчера. - После загрузки осуществите установку.
- По окончании работы установщика откройте PowerShell от имени администратора и проверьте работоспособность NVM:
PS C:Windowssystem32 > nvm list
No installations recognized.
Теперь нужно выбрать версию Node.js, которую вы будете устанавливать на свой компьютер. Команда nvm list available покажет частичный список доступных для загрузки версий:

Если для вашего проекта не требуется определенная версия, то рекомендуется выбрать последний LTS-выпуск. Риск возникновения проблем при работе с такой версией минимален. Если же вы хотите протестировать нововведения и улучшенные возможности, то вы можете загрузить последнюю версию. При этом не стоит забывать, что риск возникновения проблем с новейшей версией выше.
Установим последний LTS. Возьмем номер версии из результата nvm list available и установим его с помощью nvm install:
PS C:Windowssystem32> nvm install 16.17.0
Downloading node.js version 16.17.0 (64-bit)...
Extracting...
Complete
Creating C:UsersTimewebAppDataRoamingnvmtempDownloading npm version 8.15.0… Complete
Installing npm v8.15.0…
Installation complete. If you want to use this version, type
nvm use 16.17.0
Установка завершена. В ряде случаев при установке nvm-windows может возникнуть проблема: nvm не загрузит диспетчер пакетов NPM. В этом случае рекомендуем воспользоваться следующим способом установки.
Как установить node.js с помощью официального установщика
- Зайдите на официальный сайт nodejs.org в раздел «Загрузка».
- Выберите и загрузите нужную версию.
- По завершению загрузки откройте файл, после чего начнется установка.
- Следуйте инструкциям установщика.
Установка node.js в WSL2
Если вы хотите использовать Node.js вместе с Docker, планируете работать с командной строке Bash или просто любите Linux, то имеет смысл задуматься об установке среды выполнения в WSL2.
WSL (Windows Subsystem for Linux) — это программная прослойка для запуска приложений, созданных под Linux-системы, на ОС Windows. Возможно, вам уже приходилось работать в WSL с приложениями, у которых нет Windows-версий. Ранее мы уже рассматривали установку Node.js на Ubuntu 20.04. Поэтому в этом разделе будет размещена инструкция по установке WSL 2 — об установке Node.js на Ubuntu читайте в статье «Как установить Node.js в Ubuntu 20.04».
Алгоритм установки WSL2 в Windows 10 зависит от версии операционной системы. Чтобы её узнать, нажмите Win+R и введите winver. После этого откроется такое окно:
Алгоритм для версий старше 2004
В PowerShell от имени администратора выполняем следующие команды:
wsl --install
wsl --set-version Ubuntu 2
Для проверки результата воспользуемся командой wsl.exe -l -v:
PS C:WINDOWSsystem32> wsl.exe -l -v
  NAME      STATE           VERSION
* Ubuntu    Stopped         2
Алгоритм для версий младше 2004 (как минимум потребуется ОС версии 1903)
В PowerShell (от имени администратора) активируем подсистему Windows для Linux.
dism.exe /online /enable-feature /featurename:Microsoft-Windows-Subsystem-Linux /all /norestartЗатем активируем функцию виртуальной машины:
dism.exe /online /enable-feature /featurename: VirtualMachinePlatform /all /norestart После выполнения этих действий нужно перезагрузить компьютер.
Когда компьютера запустится, скачиваем и устанавливаем пакет обновлений ядра Linux. Загрузить его можно по здесь.
В PowerShell выберем 2 версию WSL в качестве основной:
wsl --set-default-version 2Теперь скачаем какую-нибудь операционную систему на Linux. Сделать это можно прямо магазине приложений Microsoft Store:
По окончании установки вы сможете зайти в консоль установленной системы через меню поиска:
Заключение
Node.js — это популярная среда разработки, которая используется множеством крупных компаний: PayPal, Yahoo, Ebay, General Electric, Microsoft и Uber. В рамках этого материала мы рассмотрели способы как установить Node.js на Windows 10.
Этим вопросом задаются многие новички. Они не знают правильного и эффективного способа, и именно для них наш сегодняшний материал. Стоит отметить, что вариантов, как обновить Node.js достаточно много. Я постараюсь рассмотреть каждый из них в отдельности, включая, кстати, операционные системы, на которых будут производиться нужные действия.
Оглавление
- 1 Как обновить Node.js на Windows
-
- 1.0.1 Другие способы установки и обновления Node.js на Windows
-
- 2 Как обновить Node.js на Linux
- 3 Как обновить Node.js на Mac
- 4 В заключение
Самым простым и очевидным способом здесь будет использование готового Bash-скрипта для Windows. С его помощью можно не только установить актуальную версию Node.js, но и произвести другие, не менее важные операции. Например, вы можете установить сразу несколько версий Node.js, и переключать их в зависимости от своих потребностей. Реализуется это через специальные команды:
nvm list
 * 4.6.9
   0.17.0

node -v
   v4.6.9

nvm use 0.17.0
   Now using node v0.17.0

node -v
   v0.17.0
Само обновление же можно воспроизвести и с помощью такой последовательности действий:
Очищаем кэш NPM:
npm cache clean -f
Устанавливаем менеджер версий Node.js n:
npm install -g n
Выбираем нужную версию Node.js:
1. Стабильная версия
n stable
2. Последняя версия
n latest
3. Установка определенной версии
n 0.9.17
4. Удаление определенной версии
n rm 0.9.17
или
n - 0.8.14
Помимо всего прочего, вы можете загрузить актуальную версию Node.js на официальном ресурсе Node.js. Там доступны установочные пакеты MSI, архивы zip и tar.gz, также версии для Linux и Mac.

Другие способы установки и обновления Node.js на Windows
В 2017 году на разных ресурсах описывают еще один, более актуальный способ, который был рекомендован одним из зарубежных “гуру” в своем блоге. Чтобы обновить Node.js нам нужно воспользоваться таким алгоритмом:
Узнаем какую версию Node мы используем:
node --version
Просмотрим доступные для установки версии, а также используемую:
nvm ls
Выведем список доступных версий:
nvm ls available
Установим нужную версию (предположительно 1.1.1):
nvm install 1.1.1
Для включения более старой версии используем команду:
nvm use 0.1
Не могу ничего сказать по поводу эффективности данного метода, однако вы можете самостоятельно проверить его, после чего отписать в комментариях о результате.
Также вы можете использовать этот, самый простой, по моему мнению, способ:
1. Запускаем cmd от имени администратора
2. Последовательно выполняем две команды:
npm install -g npm-windows-upgrade

npm-windows-upgrade
Данный способ рекомендован разработчиками npm, поэтому вам стоит обратить внимание на него.
Как обновить Node.js на Linux
Как и в случае с Windows, здесь мы будем использовать менеджер npm. Здесь он доступен по другому адресу на GitHub. Большая часть команд совпадает с вышеописанными, поэтому вам следует лишь повторить их, предварительно установив NPM на свою версию Linux.
Кстати говоря, если вы используете Arch Linux (или производные дистрибутивы), обновление для Node.js будет установлено автоматически при следующем апгрейде системы.
Как обновить Node.js на Mac
И снова здесь актуален способ с NPM, вы можете использовать абсолютно те же команды, что и для Windows с Linux. Однако сейчас мы рассмотрим альтернативной вариант, подразумевающий работу с менеджером пакетов Homebrew.
После установки вам достаточно будет выполнить одну единственную команду:
$ brew upgrade node
Готово! Node.js обновлена, а вы прекрасны.
В заключение
Какой бы способ вы не выбрали (а я настоятельно рекомендую прочитать и ознакомиться с каждым из них), в большинстве случаев обновление должно пройти успешно. С помощью менеджера пакетов npm можно управлять версия Node.js на Windows, Linux и MacOS. Я не думаю, что у вас возникнут проблемы с этим.
I hope that you will find Node version 12 new capabilities compelling and soon you will upgrade your app to it.
In turn, you will get advanced debugging, intelligent coding with the powerful IntelliSense engine, interactive window, quick tracking of performance issues, unit testing, typescript integration, source control, cloud integration, and npm integration.
To get started in this walkthrough, this post captures the steps on how to update Node.js in Visual Studio, Windows/macOS, and NPM.
First, see a couple of useful tricks to check which Node.js npm version you have installed:
Write the command line to update Node.js npm:
“node -v” or “npm -v” simply type the one you want to check.
If the installed version of npm is not the latest one, you can update it using the syntax code:
npm npm@latest -g(Note: The -g flag is used to update npm globally.)
Secondly, see which Node/Npm version Visual Studio you are using.
Now, use Visual Studio Command Prompt that is also called Visual Studio plugin. It can help you open a command line.
If you are not able to use Visual Studio Command Prompt, you can use the “Task Runner Explorer” by adding a task and running it in this way:
"check": "node -v && npm -v"
Another way is using C:Program Files (x86)Microsoft Visual Studio 14.0WebExternal” on your Window’s.
(Note: This way you will come to know about the local version of your Visual Studio.)
If you have any issues with these steps, you can call for help from the industry’s best Node.js developers on a particular project on which you happen to be working.
All of this is fine. A developer is expecting to have Node.js updated on Microsoft Visual Studio that supports all those new features.
Steps to Update Node.js in Visual Studio
Development teams usually build one or two node.js update strategy that can be sometimes using an automated process. Or, sometimes updates can be based on the goodwill of the developer. The second one seems to be the riskiest approach. Consider applying the first strategy by using automated tools to update node.js.
For Example:
The tool like greenkeeper offers automatic dependency management for node.js npm dependencies. It improves your code quality, catches problems that you would have missed, easy to use, and reliable.
So, if you wish to get an update Node.js, there’re actually simple ways to do so. Here are the ways how to update node.js in Visual Studio and various operating systems.
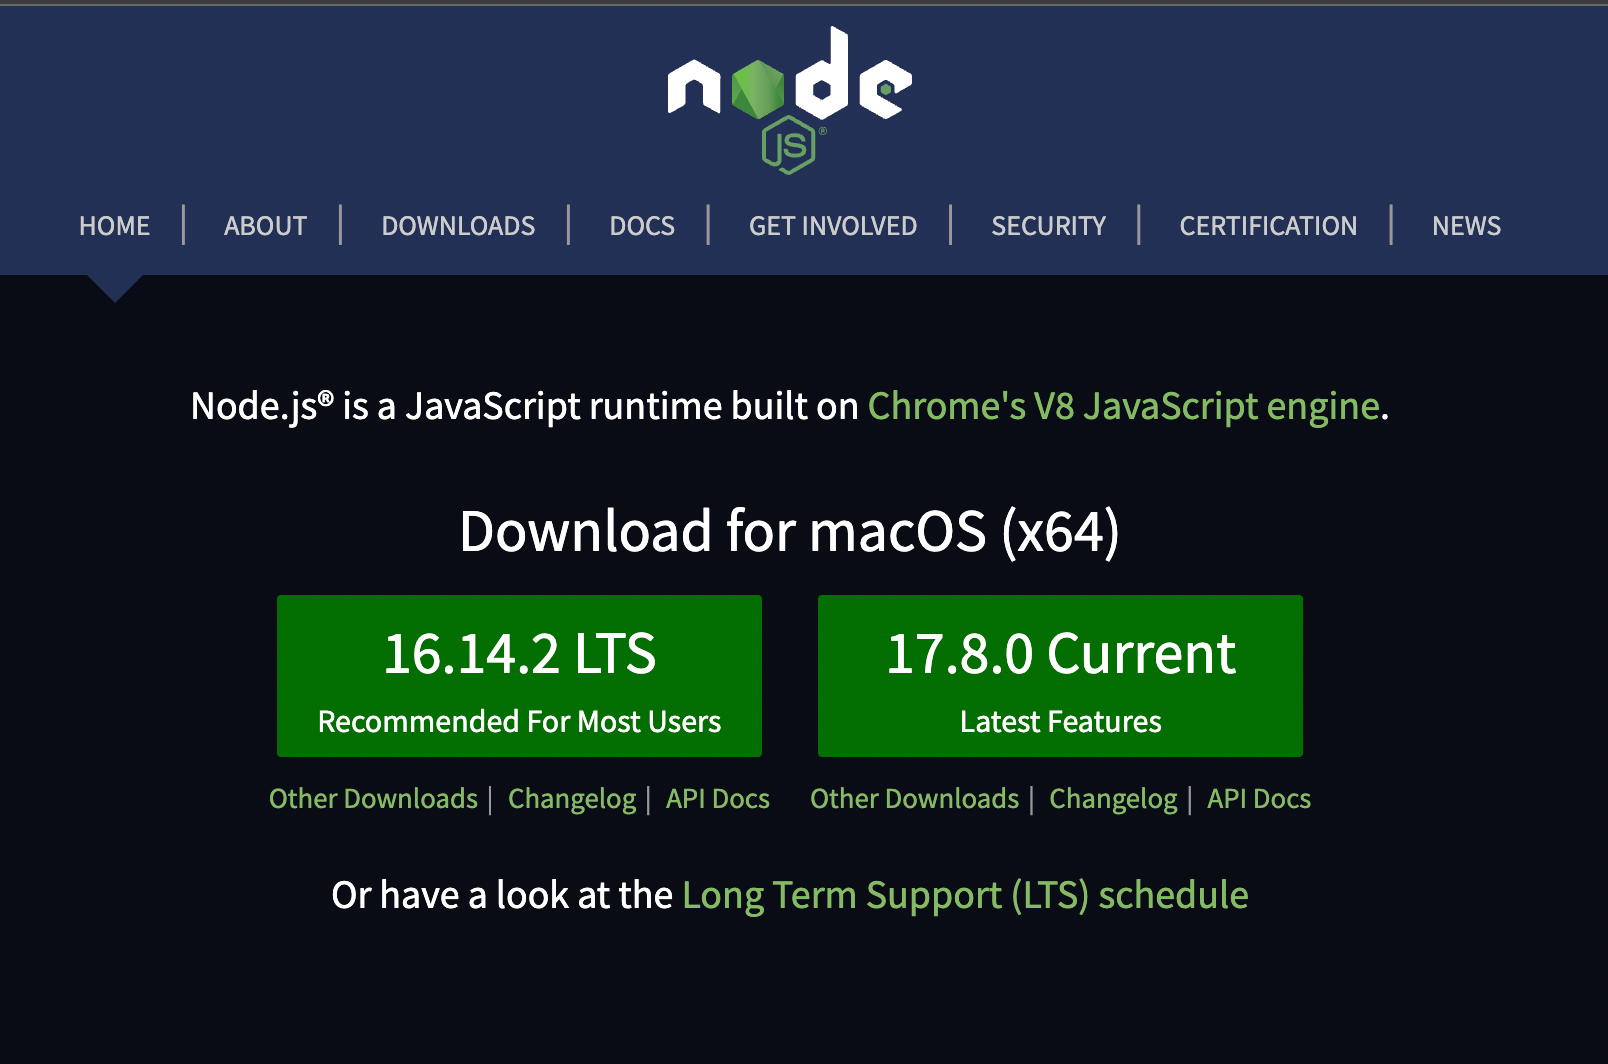
Start by installing the new global version on node.js on your computer. Simply visit the Node.js download page and start installing the new version. Like the newest version, Node 12 is packed with notable features.
- Node 12 runs on the V8 engine for faster JavaScript execution
- Improved startup time by 30%
- Node 12 supports TLS 1.3 for increased security of codes
- N-API improvements to prevent libraries from breaking
To tell Visual Studio to use the global version follow the command:
Go to Tools > Options > Projects and Solutions > External Web Tools
Visual Studio uses the $(PATH) to look for its external tools. When performing node.js installation make sure that the $(PATH) should be first on your list.
If that doesn’t work, you can restart the Visual Studio. Or, you can add the usual path directly to the list in which node.js is installed by clicking on “Add” and set “C:Program Filesnodejs.” Now, restart the system and recheck the node.js update process.
(Note: If it doesn’t work, make sure node.js is actually installed in that folder. If it is there, but still not work, try uninstalling, remove that folder manually, and install it again.)
How to Update Node.js on Windows and Mac Operating System?
Already familiar with the Node.js updating steps on Windows. Great, these are the foundation of a successful development strategy. However, in the past decade, the node.js development world had gone through dramatic changes but the updating processes were left intact. Some modern node.js update techniques can even replace the traditional ones to give you a better and leaner update strategy with a better ROI.
Example:
If you wish to upgrade Node.js on Windows and Mac OS, then simply visit the Node.js homepage and select your operating system.
From there, a wizard will magically update your Node, and replace the older version with the new one.
Now, See How to Update Node.js Using npm (Node Package Manager)
To update node.js you can use Node Package Manager (npm) that is already preinstalled. But before you start updating node.js, make sure your npm is of the latest version. Here are a few simple steps to follow to update your npm.
First, you need to find out the version of your Node Package Manager (npm), by running npm -v command.
After checking the version, you can run the command npm install npm@latest -g to install the latest version of Node Package Manager.
Finally, use the command npm -v to check whether your new version of npm was successfully installed or not.
Further, to update node.js using npm, use n module. Also, use the following code to clear cache memory from your Node Package Manager and install the latest version of node.js:
sudo npm cache clean -f
sudo npm install -g n
sudo n stable
(Note: If you are looking for a specific version of node.js, you can also use the command n #.#.#.)
Also, See the Steps for Updating NPM (Node Package Manager) in Visual Studio
This will not take much of your time. If you have installed node.js from their official website, you probably have installed NPM with it. To check it, you can use the command line: “npm-v”.
To upgrade npm in Visual Studio, you can follow the command:
cd C:Program Files (x86)Microsoft Visual Studio 14.0WebExternal npm install npm@latestThis is how you can update Visual Studio’s NPM version to the latest one.
Final Words — Improve Your Skills with the Right Knowledge
There are various other techniques to update node.js that can help you take the right steps at the right time. Nevertheless, many developers neither having a strategy for effectively performing node.js update. Spending a few hours on reading the steps I have shared here can make a great difference to your knowledge on node.js updates and development processes.

Node is a runtime environment that allows developers to execute JavaScript code outside the browser, on the server-side.
NPM, on the other hand, is a package manager for publishing JavaScript packages (also known as Node modules) to the npm registry. You can also use it to install packages to your applications.
To install Node, you have to go to the Nodejs website to download the installer. After downloading, you can run the installer, follow the steps, agree to the terms and conditions, and have the installer on your device.
When you install Node, you also get the npm CLI which you can use to manage packages in your applications.
However, Node and NPM can be updated separately to their latest versions, and in the rest of this article, I’ll show you how.
1. Use NPM to Update Your Node Version
To update Node with NPM, you will install the n package, which will be used to interactively manage node versions on your device.
Here are the steps:
Clear the NPM cache
When you install dependencies, some modules are cached to improve the speed of installation in subsequent downloads. So first, you want to clear the NPM cache.
Install n
npm install -g n
You’ll need to install this package globally as it manages the Node versions at the root.
Install a new version of Node
n lts
n latest
The two commands above install the long-term support and latest versions of Node.
Remove previously installed versions
n prune
This command removes the cached versions of the previously installed versions and only keeps the latest installed version.
2. Use NVM to Update Your Node Version
NVM stands for Node Version Manager, and as the name implies, it helps you manage your Node Versions. With NVM, you can install Node versions and specify the version of Node that a project uses.
NVM makes it easy to test projects across various Node versions.
To update a Node Version with NVM, you have to install NVM first.
Here is the installation guide for NVM.
When installed, you can install packages with:
nvm install [version]
You can install the latest version with:
nvm install node
And uninstall other versions with:
nvm uninstall [version]
With many versions installed, you may also want to specify the version to use at a particular time. One way to do this is by setting a default alias like this:
nvm alias default [version]
This way, Node executions will run with the specified version.
3. Download Updated Node Binaries
And you can also get the latest versions from the Node.js website. On it, you can find the latest and long-term support versions for your device.
Downloading the latest version also gives you the latest version of NPM.
How to Update NPM
Just as you use NPM to update packages, you can use NPM to update itself. Here’s the command to achieve this:
npm install -g npm@latest
This command will install the latest version of NPM globally.
On Mac, you may have to pass the sudo command before NPM, as this installs NPM at the root of your device, and you need privileges to do that.
Conclusion
In this article, we’ve seen how to update Node and NPM to their latest versions.
To reiterate, when you install Node, you automatically get NPM. If you also update Node by installing the binaries from the website, you get an updated NPM.
We also saw other ways to update Node and NPM globally on your device.
Learn to code for free. freeCodeCamp’s open source curriculum has helped more than 40,000 people get jobs as developers. Get started