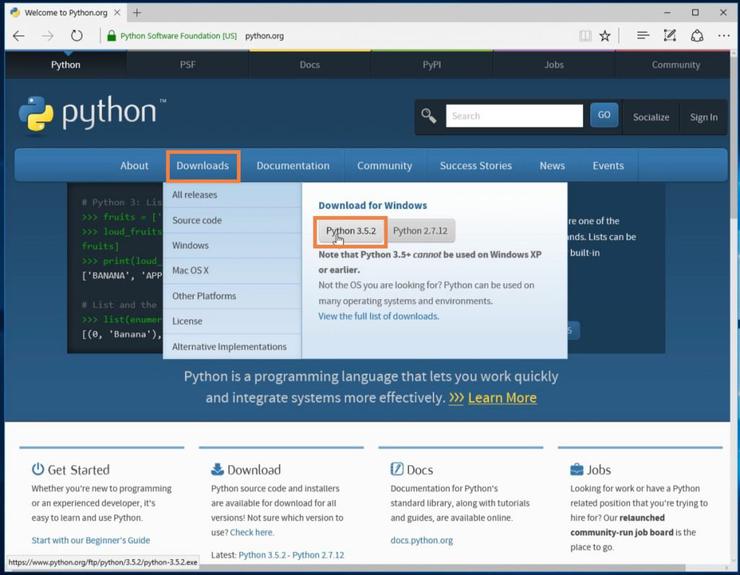
В данном разделе мы научимся устанавливать Python и менеджер пакетов pip на Windows 10 с нуля. Лучший способ установить Python на Windows — это скачать официальный установщик с сайта python.org. Чтобы сделать это, откройте браузер и перейдите по ссылке https://python.org/. После завершения загрузки установщика, откройте «Загрузки». Сайт обнаружит, что вы посетили его с Windows, и предложит скачать последнюю версию Python 3 или Python 2. Если вы не знаете, какую версию использовать, то я рекомендую Python 3. Если вам нужно работать с унаследованным кодом Python 2, тогда вам необходим Python 2. Под вкладками Downloads → Download for Windows нажмите кнопку “Python 3.X.X” (или “Python 2.X.X”), чтобы скачать установочный файл.
64-разрядный Python против 32-разрядного
Если вы гадаете, какую версию Python нужно использовать 64-разрядную или 32-разрядную, вам, скорее всего, понадобится 32-разрядная. Иногда достаточно тяжело найти бинарники для 64-разрядной версии, а это значит, что некоторые сторонние модули могут установиться неправильно на 64-разрядной версии Python. Мое мнение – использовать ту версию, которую конкретно рекомендуют на официальном сайте. Если вы кликните кнопку Python 3 или Python 2 под “Download for Windows”, вы получите именно ту версию, которую выбрали. Помните, Если вы в итоге сделаете неправильный выбор, и захотите перейти на другую версию Python, вы можете просто удалить существующую версию и переустановить его, скачав другой установщик с официального сайта.
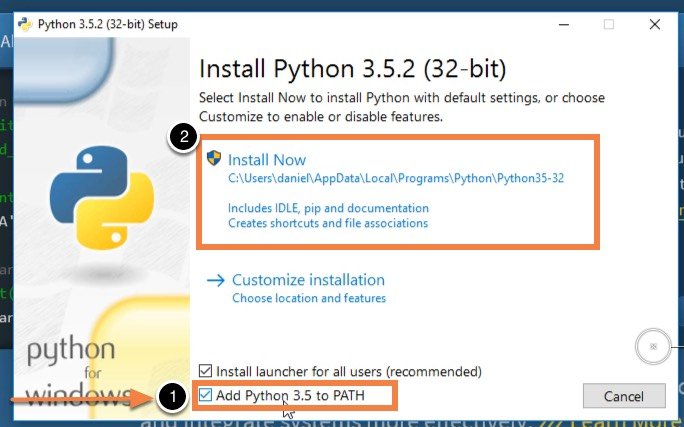
По окончанию загрузки установщика, запустите его двойным щелчком мыши, чтобы начать установку Python. Обязательно установите флажок на «Add Python X.Y to PATH» в мастере настройке. Убедитесь, что флажок “Add Python X.Y to PATH” поставлен в установщике, в противном случае у вас будут проблемы с доступом инсталлятора Python к командной стоке. Нажмите «Установить» для начала установки. Установка должна пройти быстро, после чего Python будет готов к запуску на вашей системе. К следующему шагу нужно убедиться, что все было выполнено надлежащим образом.
Подтверждаем, что Python был установлен правильно
По окончанию установки, Python должен быть установлен на вашем компьютере. Давайте убедимся в том, что все было выполнено правильно, протестировав, имеет ли Python доступ к командной строке (cmd) Windows:
- Откройте командную строку Windows, запустив cmd.exe
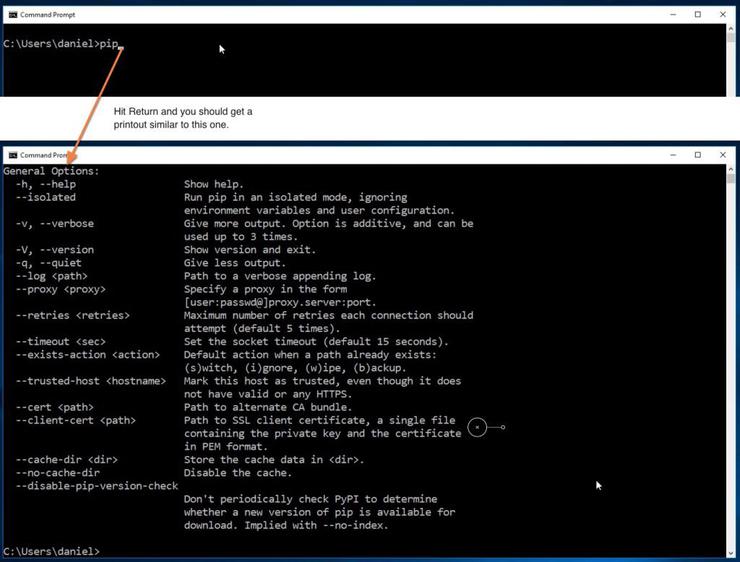
- Введите pip и нажмите «Enter»
- Вы увидите справочный текст менеджера пакетов Python под названием “pip”. Если вы получите уведомление об ошибке, повторите этапы установки Python, и убедитесь в том, что вы обладаете рабочей версией Python. Большая часть проблем, с которыми вы можете столкнуться, будут иметь то или иное отношение к неправильной настройке PATH. Переустановка и подтверждение того, что опция “Add Python to PATH” была активирована, должны исправить эту проблему.
Есть вопросы по Python?
На нашем форуме вы можете задать любой вопрос и получить ответ от всего нашего сообщества!
Telegram Чат & Канал
Вступите в наш дружный чат по Python и начните общение с единомышленниками! Станьте частью большого сообщества!
Паблик VK
Одно из самых больших сообществ по Python в социальной сети ВК. Видео уроки и книги для вас!
Что теперь?
Убедившись в том, что все сделано правильно, и убедившись в правильной работе Pip в вашей командной строке, вы можете смело заявить, что установили Python на вашей системе.
Являюсь администратором нескольких порталов по обучению языков программирования Python, Golang и Kotlin. В составе небольшой команды единомышленников, мы занимаемся популяризацией языков программирования на русскоязычную аудиторию. Большая часть статей была адаптирована нами на русский язык и распространяется бесплатно.
E-mail: vasile.buldumac@ati.utm.md
Образование
Universitatea Tehnică a Moldovei (utm.md)
- 2014 — 2018 Технический Университет Молдовы, ИТ-Инженер. Тема дипломной работы «Автоматизация покупки и продажи криптовалюты используя технический анализ»
- 2018 — 2020 Технический Университет Молдовы, Магистр, Магистерская диссертация «Идентификация человека в киберпространстве по фотографии лица»
Installing/Upgrading Python Using the Chocolatey Windows Package Manager
Let’s say you have Python 2.7.16:
C:Windowssystem32>python --version
python2 2.7.16
…and you want to upgrade to the (now current) 3.x.y version. There is a simple way to install a parallel installation of Python 3.x.y using a Windows package management tool.
Now that modern Windows has package management, just like Debian Linux distributions have apt-get, and RedHat has dnf: we can put it to work for us! It’s called Chocolatey.
What’s Chocolatey?
Chocolatey is a scriptable, command line tool that is based on .NET 4.0 and the nuget package manager baked into Visual Studio.
If you want to learn about Chocolatey and why to use it, which some here reading this might find particularly useful, go to https://chocolatey.org/docs/why
Installing Chocolatey
To get the Chocolatey Package Manager, you follow a process that is described at https://chocolatey.org/docs/installation#installing-chocolatey,
I’ll summarize it for you here. There are basically two options: using the cmd prompt, or using the PowerShell prompt.
CMD Prompt Chocolatey Installation
Launch an administrative command prompt. On Windows 10, to do this:
- Windows + R
- Type cmd
- Press Ctrl + ⇧ Shift + ↵ Return
If you don’t have administrator rights on the system, go to the Chocolatey website. You may not be completely out of luck and can perform a limited local install, but I won’t cover that here.
- Copy the string below into your command prompt and type Enter:
@"%SystemRoot%System32WindowsPowerShellv1.0powershell.exe" -NoProfile -InputFormat None -ExecutionPolicy Bypass -Command "iex ((New-Object System.Net.WebClient).DownloadString('https://chocolatey.org/install.ps1'))" && SET "PATH=%PATH%;%ALLUSERSPROFILE%chocolateybin"
Chocolatey will be downloaded and installed for you as below:
Getting latest version of the Chocolatey package for download.
Getting Chocolatey from https://chocolatey.org/api/v2/package/chocolatey/0.10.11.
Downloading 7-Zip commandline tool prior to extraction.
Extracting C:UsersblahblahblahAppDataLocalTempchocolateychocInstallchocolatey.zip to C:UsersblahblahblahAppDataLocalTempchocolateychocInstall...
Installing chocolatey on this machine
Creating ChocolateyInstall as an environment variable (targeting 'Machine')
  Setting ChocolateyInstall to 'C:ProgramDatachocolatey'
WARNING: It's very likely you will need to close and reopen your shell
  before you can use choco.
Restricting write permissions to Administrators
We are setting up the Chocolatey package repository.
The packages themselves go to 'C:ProgramDatachocolateylib'
  (i.e. C:ProgramDatachocolateylibyourPackageName).
A shim file for the command line goes to 'C:ProgramDatachocolateybin'
  and points to an executable in 'C:ProgramDatachocolateylibyourPackageName'.

Creating Chocolatey folders if they do not already exist.

WARNING: You can safely ignore errors related to missing log files when
  upgrading from a version of Chocolatey less than 0.9.9.
  'Batch file could not be found' is also safe to ignore.
  'The system cannot find the file specified' - also safe.
chocolatey.nupkg file not installed in lib.
 Attempting to locate it from bootstrapper.
PATH environment variable does not have C:ProgramDatachocolateybin in it. Adding...
WARNING: Not setting tab completion: Profile file does not exist at 'C:UsersblahblahblahDocumentsWindowsPowerShellMicrosoft.PowerShell_profile.ps1'.
Chocolatey (choco.exe) is now ready.
You can call choco from anywhere, command line or powershell by typing choco.
Run choco /? for a list of functions.
You may need to shut down and restart powershell and/or consoles
 first prior to using choco.
Ensuring chocolatey commands are on the path
Ensuring chocolatey.nupkg is in the lib folder
Either Exit the CMD prompt or type the following command to reload the environment variables:
refreshenv
PowerShell Chocolatey Installation
If you prefer PowerShell to the cmd prompt, you can do this directly from there, however you will have to tell PowerShell to run with a proper script execution policy to get it to work. On Windows 10, the simplest way I have found to do this is to type the following into the Cortana search bar next to the Windows button:
PowerShell.exe
Next, right click on the ‘Best Match’ choice in the menu that pops up and select ‘Run as Administrator’
Now that you’re in PowerShell, hopefully running with Administrator privileges, execute the following to install Chocolatey:
Set-ExecutionPolicy Bypass -Scope Process -Force; iex ((New-Object System.Net.WebClient).DownloadString('https://chocolatey.org/install.ps1'))
PowerShell will download Chocolatey for you and launch the installation. It only takes a few moments. It looks exactly like the CMD installation, save perhaps some fancy colored text.
Either Exit PowerShell or type the following command to reload the environment variables:
refreshenv
Upgrading Python
The choco command is the same whether you use PowerShell or the cmd prompt. Launch your favorite using the instructions as above. I’ll use the administrator cmd prompt:
C:WINDOWSsystem32>choco upgrade python -y
Essentially, chocolatey will tell you «Hey, Python isn’t installed» since you’re coming from 2.7.x and it treats the 2.7 version as completely separate. It is only going to give you the most current version, 3.x.y (as of this writing, 3.7.2, but that will change in a few months):
Chocolatey v0.10.11
Upgrading the following packages:
python
By upgrading you accept licenses for the packages.
python is not installed. Installing...

python3 v3.x.y [Approved]
python3 package files upgrade completed. Performing other installation steps.
Installing 64-bit python3...
python3 has been installed.
Installed to: 'C:Python37'
  python3 can be automatically uninstalled.
Environment Vars (like PATH) have changed. Close/reopen your shell to
 see the changes (or in powershell/cmd.exe just type `refreshenv`).
 The upgrade of python3 was successful.
  Software installed as 'exe', install location is likely default.

python v3.x.y [Approved]
python package files upgrade completed. Performing other installation steps.
 The upgrade of python was successful.
  Software install location not explicitly set, could be in package or
  default install location if installer.

Chocolatey upgraded 2/2 packages.
 See the log for details (C:ProgramDatachocolateylogschocolatey.log).
Either exit out of the cmd/Powershell prompt and re-enter it, or use refreshenv then type py —version
C:WindowsSystem32>refreshenv
Refreshing environment variables from registry for cmd.exe. Please wait...Finished..

C:Windowssystem32>py --version
Python 3.7.2
Note that the most recent Python install will now take over when you type Python at the command line. You can run either version by using the following commands:
py -2
Python 2.7.16 (v2.7.16:413a49145e, Mar  4 2019, 01:37:19) [MSC v.1500 64 bit (AMD64)] on win32
Type "help", "copyright", "credits" or "license" for more information.
>>> exit()

C:>py -3
Python 3.7.2 (tags/v3.7.2:9a3ffc0492, Dec 23 2018, 23:09:28) [MSC v.1916 64 bit (AMD64)] on win32
Type "help", "copyright", "credits" or "license" for more information.
>>>exit()
C:>
From here I suggest you use the Python pip utility to install whatever packages you need. For example, let’s say you wanted to install Flask. The commands below first upgrade pip, then install Flask
C:>py -3 -m pip install --upgrade pip
Collecting pip
  Downloading https://files.pythonhosted.org/packages/d8/f3/413bab4ff08e1fc4828dfc59996d721917df8e8583ea85385d51125dceff/pip-19.0.3-py2.py3-none-any.whl (1.4MB)
    100% |████████████████████████████████| 1.4MB 1.6MB/s
Installing collected packages: pip
  Found existing installation: pip 18.1
    Uninstalling pip-18.1:
      Successfully uninstalled pip-18.1
Successfully installed pip-19.0.3

c:>py -3 -m pip install Flask
…will do the trick. Happy Pythoning!
Let’s explore Python and Pip in this post and learn «How to install python on windows 10 properly«. We will discuss the latest version available today for Python (3.9.1) and pip (20.2.3). Also, I will explain how to modify and uninstall Python software. In case either additional feature needs to add/remove or you want to get rid of the old python version.
I am confident, even if you are new to Python, you will be able to install it easily, following this post step by step. So let’s deep dive in.
Table of Contents
- 1 What are Python and pip
- 2 Pre-requisite to install python on Windows 10
- 3 How to install Python on Windows 10 using GUI
- 4 How to Check Python and Pip version on Windows 10
- 5 How to install python on windows 10 (command line)
- 6 How to repair or modify Python in windows 10
- 7 How to uninstall Python in windows 10
- 8 Video tutorial
- 9 Conclusion
- 10 Frequently Asked Questions:-
What are Python and pip
Python is a simple, Object-oriented, interpreted, high-level programming language with dynamic semantics. Due to its non-complicated syntax and fast edit-test-debug cycle, the Programmer community loves it. Python also reduces the cost of software management due to its simple nature.
Pip is a package manager for python, it allows you to install and manage additional libraries and dependencies that are not distributed or part of the standard library.
Linux users can check out my post on «How to install the latest Python in Linux».
Pre-requisite to install python on Windows 10
- Windows 10 machine
- Internet connection
- Approx. 200MB of disk space (varies according to features and options selected).
Let’s find out the steps to install Latest Python and pip —
Step1- Python and pip download
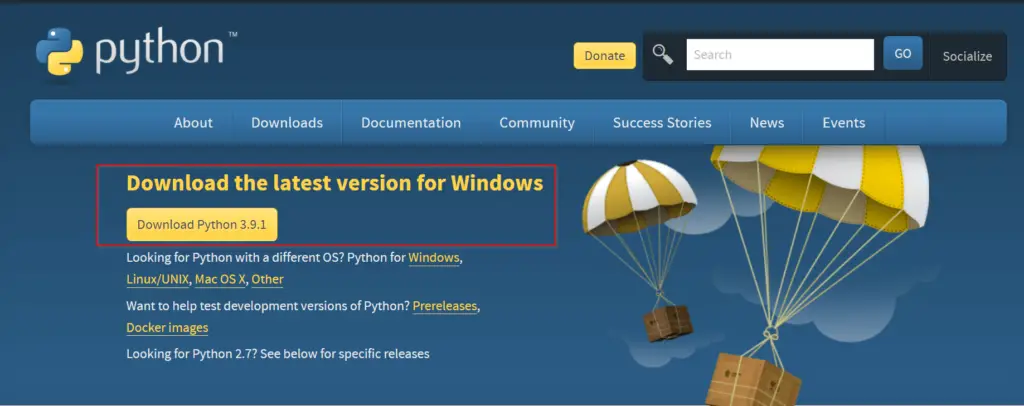
You can download the latest python version 3.9.1 for windows or your respective operating system from python.org website.
Otherwise, you can simply click on the below-mentioned button to download python for windows 10.
Click here to download an older release of Python like 3.8 or 2.7, for your project. Once you click on this link, scroll down and select your old python version as shown in the image.
You don’t need to download pip separately as it’s part of Python 3.9.1 software. You will know it while following this post further.
Step2- Run Python 3.9.1 (64-bit) installer
Once your download completes, visit your «download» directory. Then double click python-3.9.1-amd64 file to start the python setup wizard.
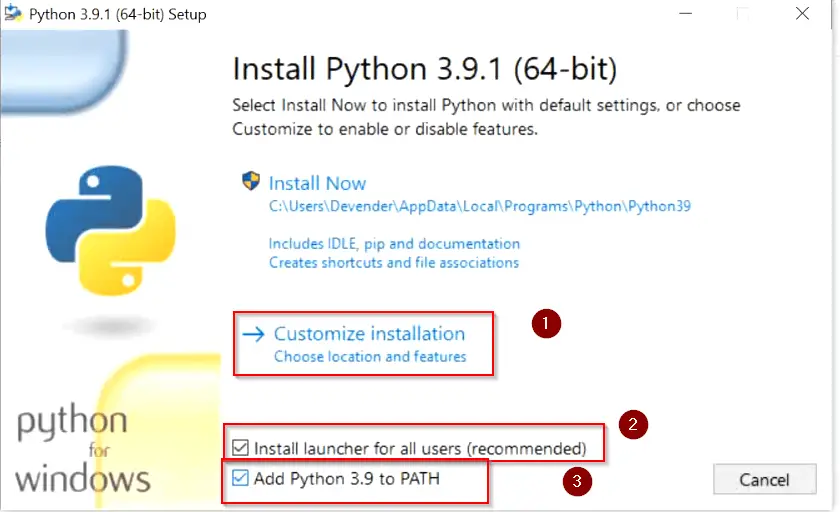
Step3- Choose «Install Now» or «Customize» installation
At this point, You will get two installation options —
- Install Now — This option is helpful if you are a newbie. Just select «Install now» and it will install Python 3.9 with default settings. Python default installation directory would be «C:users»your-username»AppDataProgramsPythonPython39». It will also install IDLE, pip, documentation and shortcuts.
- Customize installation — If you are a pro and need to know, what all features will be installed with python. Also, in case you already have python installed and want to test the latest version. Using the Customize installation option, you can choose a different installation folder and can keep both python versions.
Keep following this post, if you want to see options covered in Customize installation.
There are two more checkboxes to look into —
- «Install launcher for all users (recommended)» — Select this check box and it will make a python launcher shortcut for all user profiles exist in your machine. Whomsoever will login to your system will be able to use python 3.9.
- Add python 3.9 to path — Select this check box to add Python and pip «Path Variables» in the system environment automatically. If you will not select this option now, you need to add the path variable manually later after installation. My recommendation is to select it here itself.
So let’s click on «Customize installation» and check both the boxes as shown in the image.
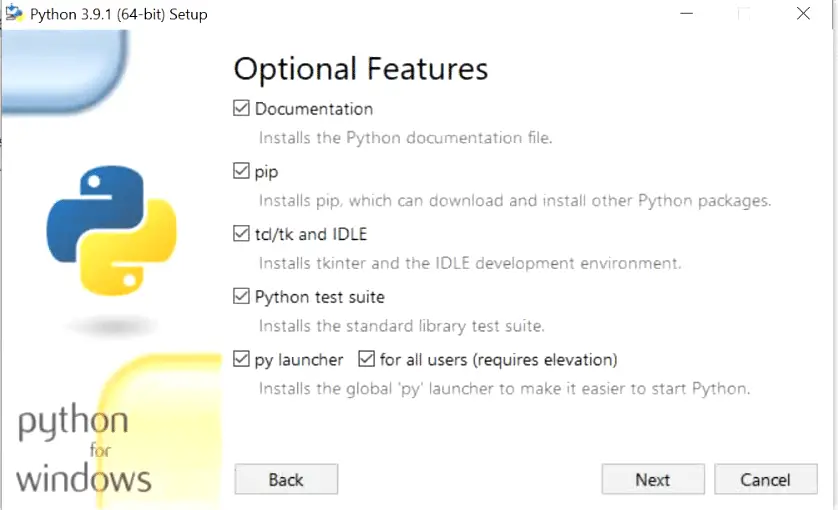
Step4- Add or remove «Optional Features«
On this window, you can add or remove optional features, available with python 3.9. Let’s see few details of each optional feature available —
- Documentation:- Selecting this box will install all the Python documentation and manuals.
- pip:- As I informed you in Step 1 download section. Pip is already part of python 3.9. Select this check box, If you want to install pip automatically with Python 3.9 (which I strongly recommend).
- tcl/tk and IDLE:- Selecting this check box will install Tkinter and the IDLE development environment. You don’t need to install it separately then.
- Python test suite:- Installs the standard library suite.
- py launcher for all users (requires elevation):- Installs the global ‘py launcher‘ for all users. It requires admin rights (elevation) to perform it. Because it will allow all users to launch python easily from their user profiles.
Choose your required optional features and click Next. I will suggest you to keep all options checked.
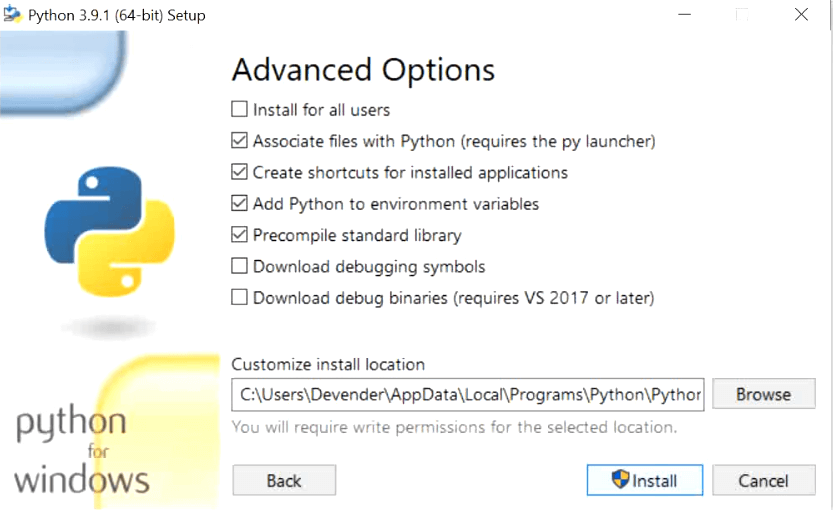
Step5- Choose «Advanced Options» of python 3.9
These are the advanced options available, which are self-explanatory.
- Install for all users — Python 3.9 will install for all users in your machine. In my case, I am the only user. So this option really doesn’t matter much for me.
- Associate files with Python (requires the py launcher) — Link associated files to the py launcher
- Create shortcuts for installed applications — Create shortcuts icons for Python, pip and installed optional features.
- Add python to environment variables — Add environment variable for python and pip
- Precompile standard library — Adds precompiled libraries.
- Download debugging symbols — You can download and install the debugging symbol, which attaches additional information to the symbol table.
- Download debug binaries (requires VS 2017 or later) — To install required and dependent debugging binaries.
If you are a pro and know your required options. Select those options as per your need. In case you are a newbie, you can proceed with default selected options as shown in the image.
Click Install —
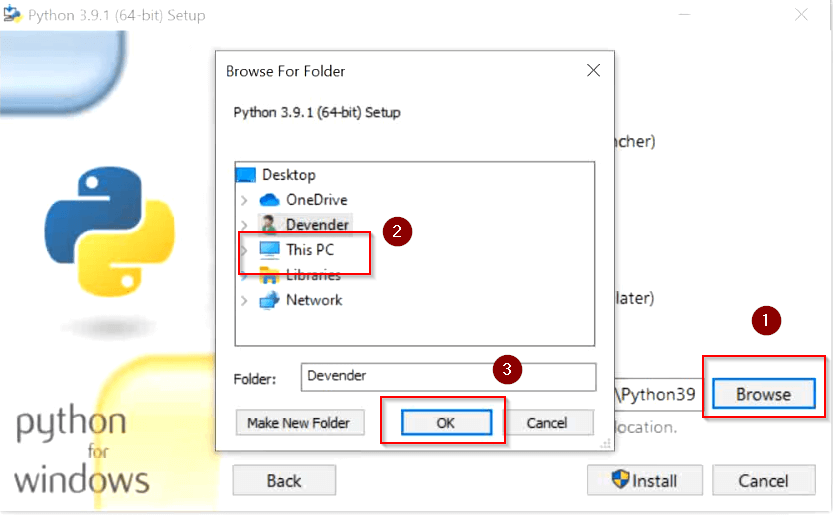
Step6 (optional)- Select custom install location folder
If you already have Python version installed and want to keep it safe. Also, you want to install a newer python version for testing. To make this happen, On Step 5, click Browse — Select your destination installation folder — click OK and click Install.
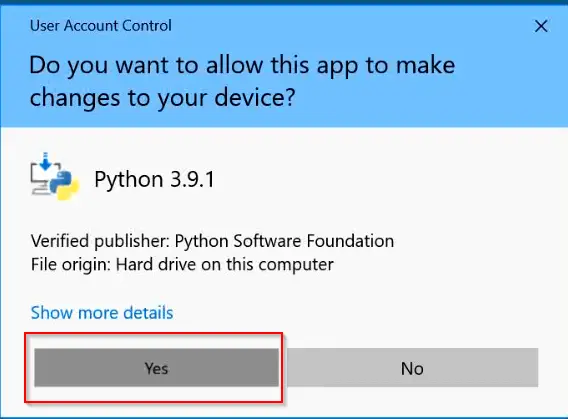
Step7- Allow Python 3.9.1 to make changes
Choose «Yes» to allow Python 3.9 to make changes to your system.
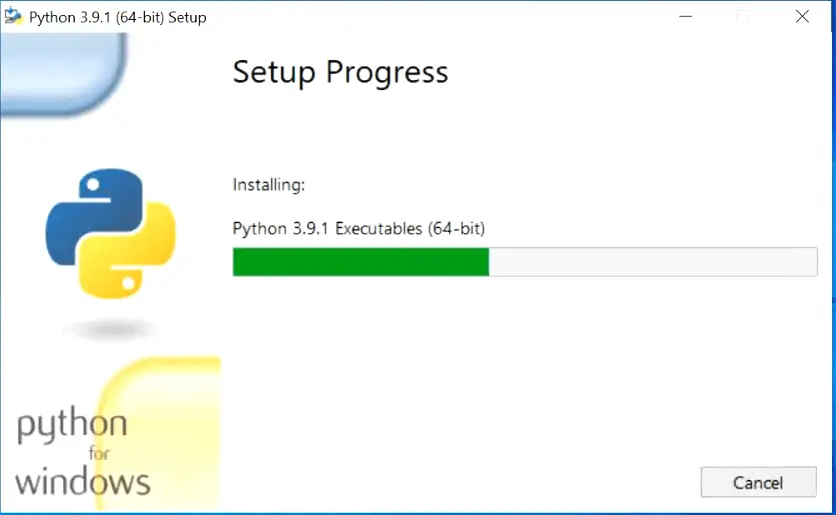
Step8- Let Python 3.9 and pip setup complete
Sit back and relax. Python and pip installation will take some time to complete.
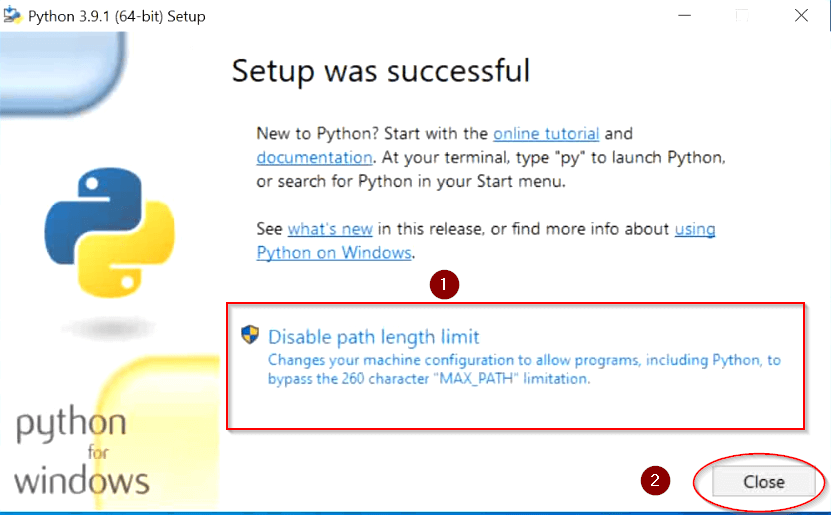
Step9- Select «Disable path length limit»
At this point, Python and pip have been installed successfully in windows 10. But you need to select «Disable path length limit» here. Because it allows python to bypass the 260 characters «MAX_PATH» limitation. Basically, it means, if the number of characters exceeds 260 in your installation directory path. Python will not be able to add it to the path variable. It’s a limitation of Windows 10.
Select «Disable path length limit» — then Allow Python 3.9 in user access control and Select Close.
How to Check Python and Pip version on Windows 10
Follow below mentioned steps to check python and pip version. Additionally, it will also validate path variable is added properly in system environment.
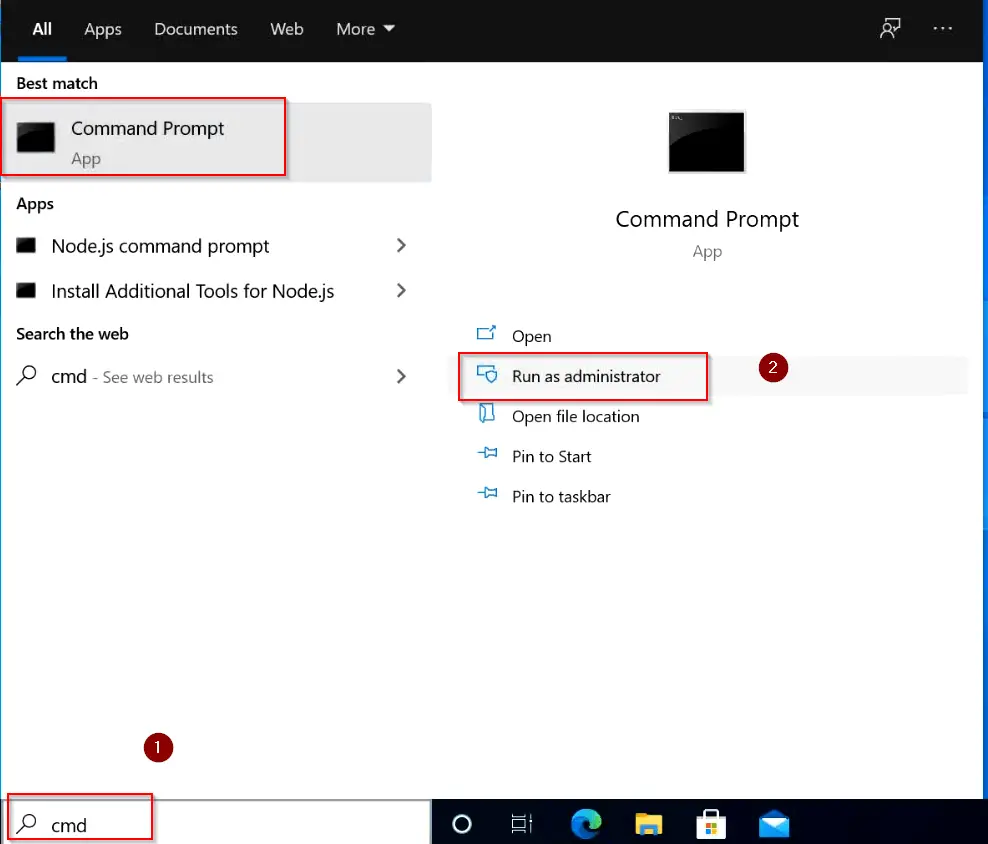
Step10- Validate Python and pip versions
- Open elevated command prompt «as administrator» by typing «cmd» in search bar of windows 10.
- Run python or py (short form) command to check Python version. You can see it’s version 3.9.1 installed in my case. You will see your installed version.
C:> py
### OR ###
C:> python
Type exit() or press «Ctrl + Z» on your keyboard to exit from python prompt.
- To check Python-pip version, type pip —version command. it will show you the pip version. it’s pip 20.2.3 in my case.
C:> pip --version
Running pip and python version command successfully also validates, that your python and pip path variables are added successfully in Windows 10. Check out this post, if you are still getting ‘pip’ is not recognized as an internal or external command, operable program or batch file.
Step11- Launch Python alternative method
I showed you how to get python prompt and version from the command prompt. Let me show you an alternate way to launch the Python console.
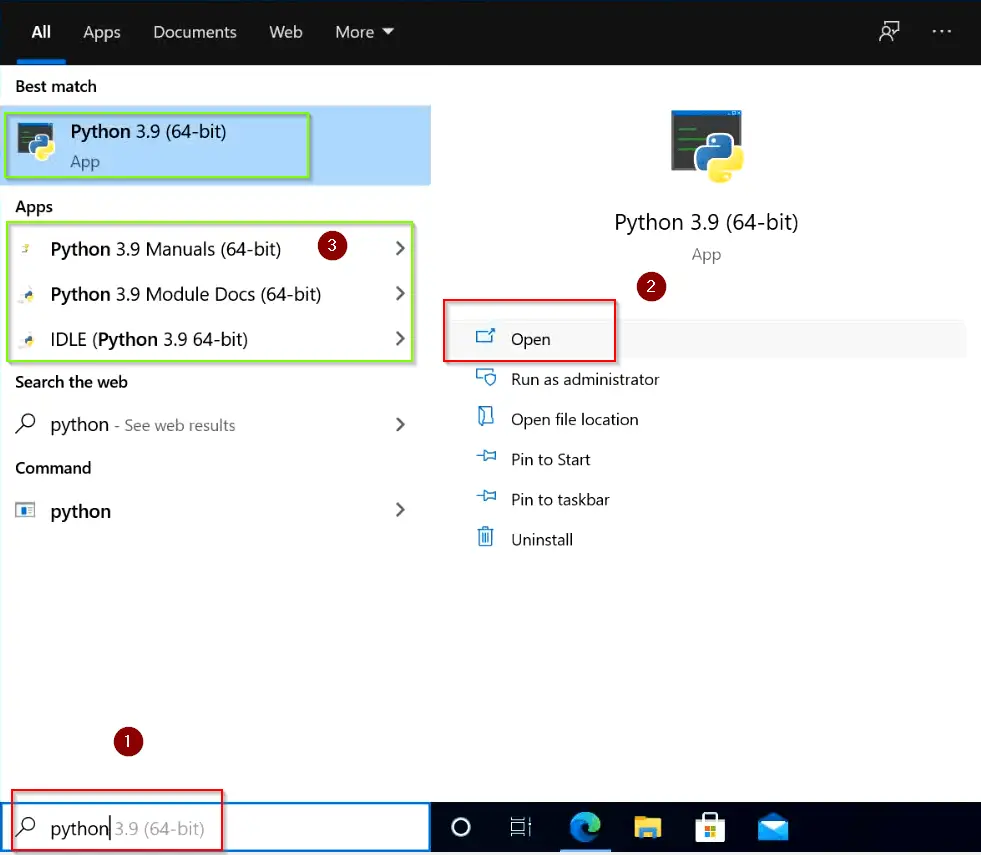
- Type «Python» in the search bar of windows 10. Click «open«.
- (optional) If you will check bullet 3 in the image, I have shown you that if you need open or check Python manuals or documentation. You select one of them and open. Additionally, you can open IDLE from the search bar.
- After opening, it will take you to python 3.9 window. Enjoy and start your python projects.
How to install python on windows 10 (command line)
Although preferred and recommended option to install Python and pip in windows 10 is through GUI. But in case you want to learn python 3.9 version installation from the command line. Follow these simple steps —
Step1 —
- Open elevated command prompt by typing «cmd» in search bar.
Step2 —
- Go to your Downloads directory and Run «Python-3.x.x exe» as shown. In my case, it’s Python 3.9.1-amd64.exe. Below mentioned are the arguments and options used in the command —
- /quiet — means no interactive wizard.
- InstallAllUsers=1 — Install for all users
- PrependPath=1 — Install Python variable path
- Include_test=0 — Don’t include or install test suite
0 — means disable (don’t install)
1 — enable (install)
C:> cd "path to your home directory"
C:> python-3.x.xexe /quiet InstallAllUsers=1 PrependPath=1 Include_test=0
For example —
C:> cd "usersdevenderDownloads"
C:> python-3.9.1-amd64.exe /quiet InstallAllUsers=1 PrependPath=1 Include_test=0
Just wait for a couple of minutes and latest python will install. Enjoy..
How to repair or modify Python in windows 10
There are some scenarios when you are not confident about additional features and options. Later you realize that you need that feature or advance option as shown in step4 and step5 in this post during installation. Then you don’t need to worry, it’s easy to add or remove features and advance options even after installation is done.
Follow these easy steps —
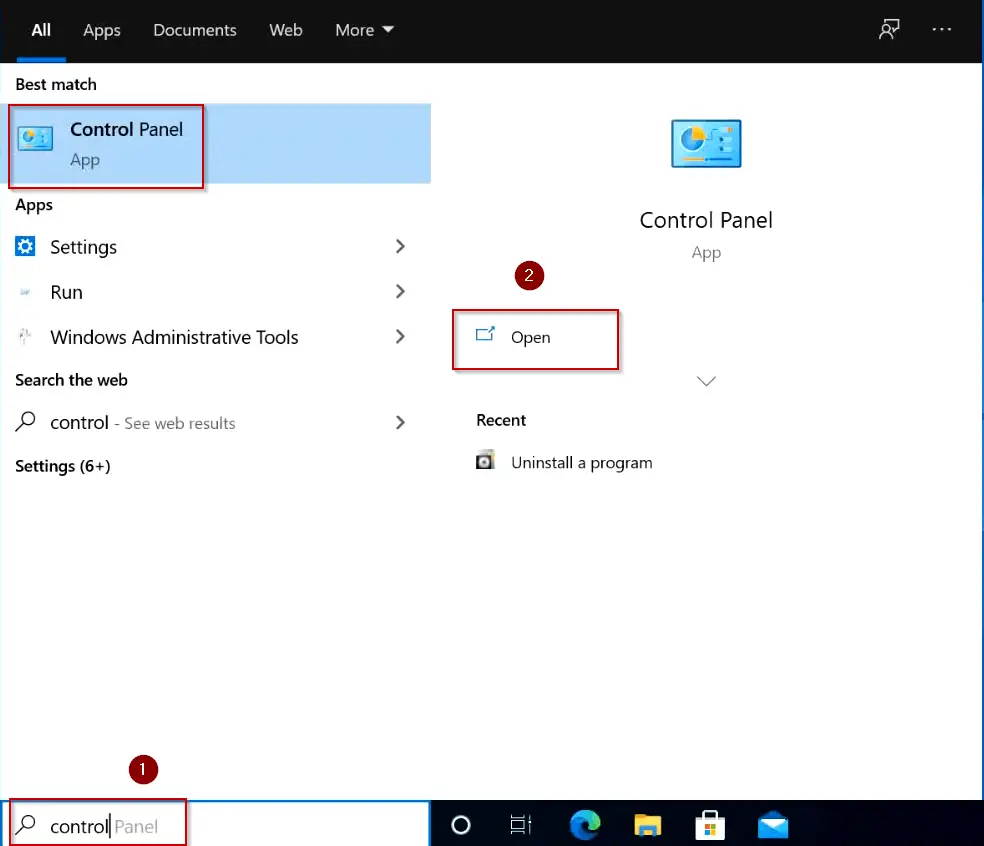
- You need to type «Control Panel» in the windows search bar. Click Open.
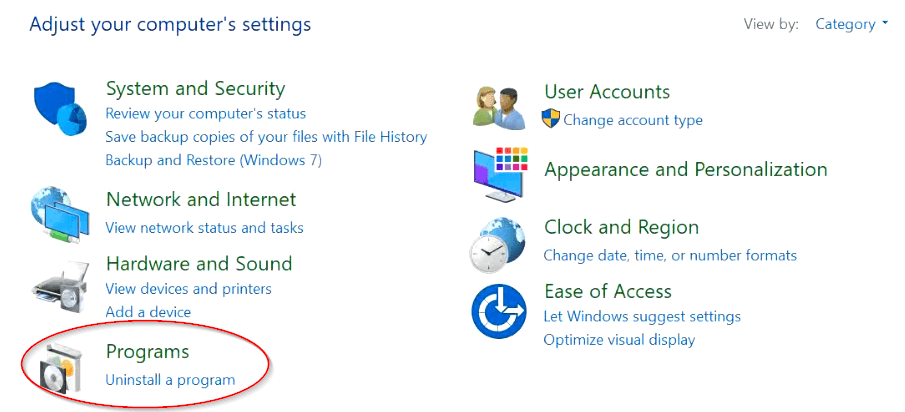
- Select «uninstall a program«
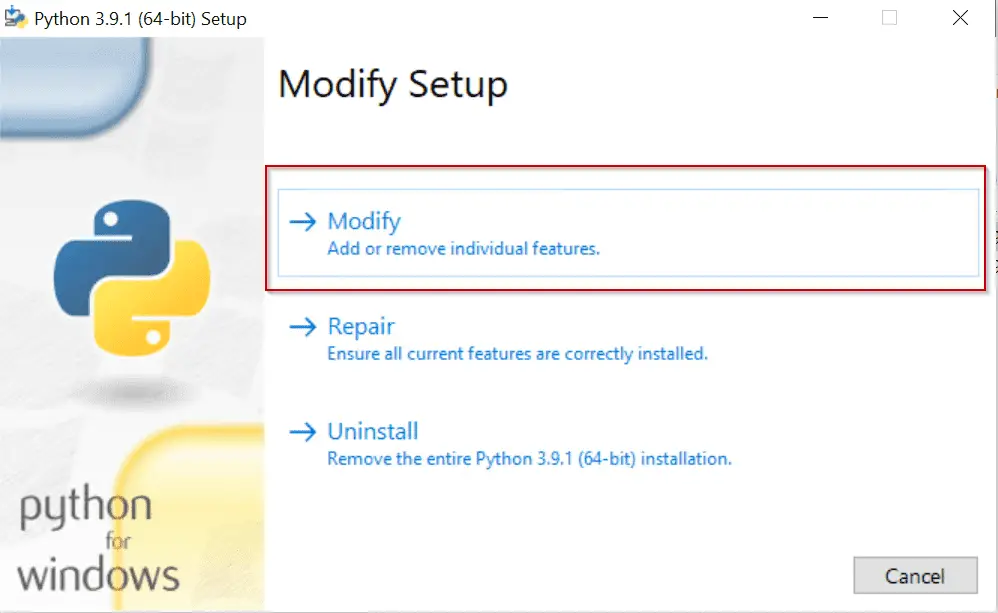
- Select «Python 3.9.1» or your version and click «Change«.
- Select «Modify» and press Next. You can also repair your installation using this wizard, in case installation issues.
Select Features and advanced option as per your need and complete installation. Refer Step4 and Step5 for further reference as shown in «How to install Python on Windows 10 using GUI» section.
How to uninstall Python in windows 10
If you have installed the latest Python and pip version by following this post. Now you want to get rid of your old Python version. Follow these simple steps to remove or uninstall Python in Windows 10.
Step1. Open Control panel from search bar
To start the uninstallation process of older Python and pip software from your windows 10. You need to type «Control Panel» in the windows search bar. Click Open.
Step2. Select «Uninstall a program«
Step3. Select Python and click «Uninstall or change a program».
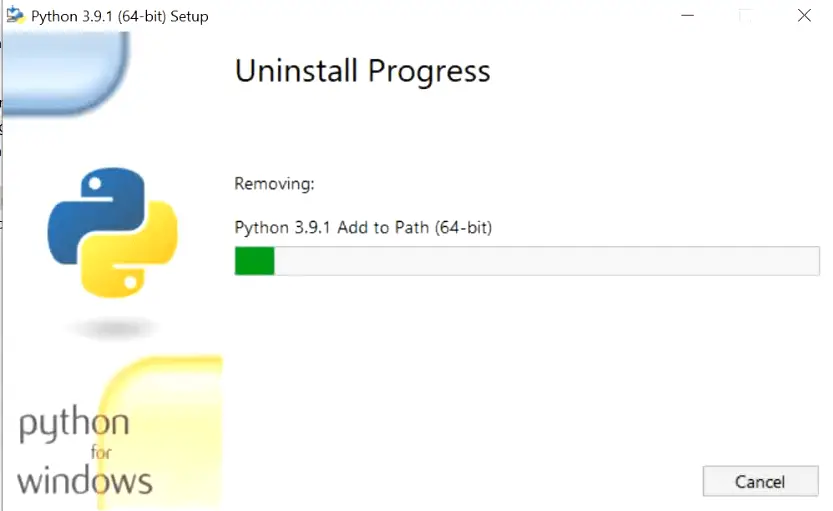
Step 3.1 — I have shown Python version 3.9.1, but you need to select your old Python version. Once you select, click «uninstall«.
- Wait for uninstallation progress bar to complete and click «Close«.
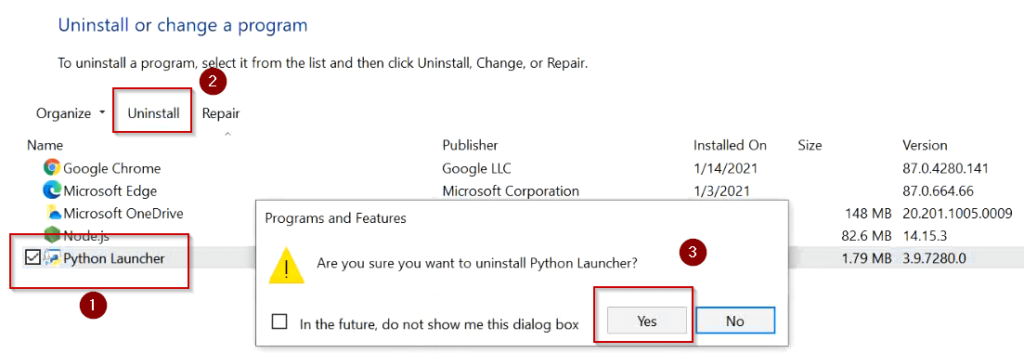
Step 3.2(optional) — Once python uninstallation completes and if you can see Python Launcher also.
- Then, Just select «Python launcher» and click «Uninstall«.
- Select «Yes» in «uninstall python launcher» dialogue box as shown in image.
- Permit in allow «User access control» box and uninstallation of Python will be done.
Hurray, You have got rid of old version of Python.
Video tutorial
If you don’t like reading, watch this tutorial to know «How to Install Python on Windows 10«. Also «Uninstallation of Python from windows 10«.
Conclusion
Congrats!! Now you know approximately everything on how to install, modify and uninstall Python in windows 10. Also, you must have a good idea of pip installation with Python3. Nowadays, Microsoft also recommends installing development software on WSL (windows subsystem for Linux).
If you like this post, you can share it on your social media wall to help others.
Frequently Asked Questions:-
Is Python EXE safe?
Yes, Python exe is completely safe. Make sure you download it from python.org website or from legitimate source only. Then you should be good with the installation. In case you have not installed it and still, you can see in your system. Go to control panel — click on «Uninstall a program» — Then check for Python software installation. If it is visible there and you don’t want, you can uninstall it. If you don’t found it in programs, then it may be a virus or malware. Scan your system and remove it.
Is Python free to download?
Yes, Python is free opensource software. You can download and install it in your system from https://www.python.org/downloads/ website.
How do I run Python on Windows 10 from the command line?
Open elevated command prompt — type py or python and hit enter.
Can I learn Python by myself?
Yes, it’s one of the easy languages with no complex syntax. There are many websites with free tutorials. Checkout free Python tutorials.
Why Python is not working?
May be either python is not installed or you have not set up Python path variable in the system environment.
-
Главная
-
Инструкции
-
Python
-
Как установить Python на Windows 10: пошаговая инструкция
Python — это высокоуровневый язык программирования, которым пользуются миллионы программистов и разработчиков. Он интуитивно понятен, предлагает обширный выбор полезных инструментов и библиотек. А работу с большими объемами данных и их анализом вообще сложно представить без Python. К сожалению, Python не входит в список предустановленных приложений в операционных системах Windows. В рамках этого материала мы подробно разберем, как правильно установить Python на Windows 10.
Какую версию выбрать
Существует две версии языка — вторая и третья. Они не совместимы между собой.
Python 3 был выпущен в 2008 году в качестве устранения имеющихся в Python 2 проблем. В сравнении со своим предшественником, он предлагает более простой и интуитивно понятный синтаксис, широкий спектр полезных библиотек (особенно для анализа данных) и поддерживается большим сообществом.
Python 2 сейчас не поддерживается, в отличие от Python 3. Поэтому вам понадобится только Python 3, если вы собираетесь работать с новыми проектами. Но если есть необходимость взаимодействия с проектами, написанными на Python 2, вам понадобится и эта версия, поэтому мы также опишем ее установку.
Ниже рассмотрим, как установить Python 2 на Windows 10:
- Откройте браузер и перейдите на официальный сайт python.org.
- Перейдите в раздел «Downloads».
- В разделе «Downloads» найдите раздел с «specific release» и в списке найдите нужную вам версию:
- Последний релиз — версия 2.7.18. Нажимаем на «Download» и спускаемся к связанным с этой версией файлам:
- Для нашей операционной системы понадобится 64-битный инсталлятор. Это последний файл в списке. Скачиваем его.
- После загрузки файла открываем его.
- Перед началом установки инсталлятор предложит выбрать путь установки и дополнительные инструменты. Выберите необходимое и начните установку.
Как установить Python 3.10 на Windows
Есть несколько вариантов установки со своими особенностями, плюсами и минусами:
- Полноценная инсталляция подразумевает установку всех компонентов языка, что является оптимальным вариантом для большинства проектов.
- Установка из магазина приложений Microsoft Store. Этот вариант подойдет для применения языка в средах разработки и запуска скриптов.
- Установка версии Nuget.org — такая версия представляет из себя ZIP-файл с расширением nupkg. Установка Python с помощью таких пакетов предназначена для систем непрерывной интеграции. В такой версии Python не будет пользовательского инструмента. Такой вариант подходит для сборки пакетов и запуска скриптов.
- Встраиваемый пакет — с помощью него устанавливается минимальная версия питона. Такая версия используется в рамках в более большого приложения или проекта.
Полная установка с помощью официального установщика
Инструкция для установки Python с помощью официального сайта аналогична описанной ранее. Вот как установить Python 3 на Windows 10:
- Откройте браузер и перейдите на официальный сайт python.org.
- Перейдите в раздел «Downloads».
- В разделе «Downloads» нажмите «Download Python 3.10.8»:
- После нажатия начнется загрузка файла инсталлятора.
- После загрузки открываем его.
Если у вас уже установлен Python 3, то инсталлятор предложит вам обновится до скачанной версии. Если же на вашем компьютере инсталлятор не обнаружит пайтон и предложит установку с нуля, то проставьте нужные галочки:
- Installing for all users (Установка для всех пользователей).
- Add Python to PATH (Добавление пайтон в PATH, для использования языка через командную строку).
Всего есть 2 варианта установки: Install now и Customize Installation.
Если выбрать Install now, то:
- Не потребуются права администратора;
- Пайтон будет размещен в вашем пользовательском каталоге;
- В процессе будут установлены стандартные библиотеки, наборы тестов, лаунчер и pip;
Если выбрать Customize Installation, то:
- Для установки могут потребоваться права администратора;
- Пайтон будет размещен в Program Files;
- Появится возможность установить дополнительные функции;
- Стандартная библиотека питона может быть предварительно скомпилирована в байт-код;
Выберите подходящий вам вариант и начните процесс установки. По её завершению отключите ограничение пути MAX_PATH (для избежания ошибок, связанных с длиной путей каталогов).
Для проверки работоспособности в командной строке выполните команду python --version. Если всё прошло без проблем, то вы увидите подобный вывод:
Python 3.10.8Python установлен и готов к работе.
С помощью Microsoft Store
Чтобы установить пакет Microsoft Store:
- Откройте приложение Microsoft Store.
- В поиске найдите «Python 3.10».
- Нажмите «Получить».
После этого начнется загрузка и установка приложения.
С помощью пакета nuget.org
Для установки инструмента nuget зайдите на официальный сайт nuget.org и перейдите в раздел «Downloads». В нем выберите рекомендуемую версию и загрузите её. После открытия скачанного файла начнется установка, которая займет пару секунд.
Для установки Python откройте PowerShell и выполните команду:
# Для 64-битной версии:
nuget.exe install python -ExcludeVersion -OutputDirectory # Для 32-битной версии:
nuget.exe install pythonx86 -ExcludeVersion -OutputDirectory
Встраиваемый пакет
В встраиваемый пакет вложено минимальное окружение Python. Сам он представляет собой ZIP-файл и нужен для интеграции Python в крупное приложение. Встраиваемый пакет не предназначен для прямого доступа пользователям.
При извлечении из архива вы получите практически полностью изолированное окружение Python. Оно будет изолировано от операционной системы пользователя, а именно от переменных окружения (в частности PATH), от системного реестра и уже установленных пакетов. Стандартная библиотека пайтона включена в встраиваемый пакет в виде скомпилированных и оптимизированных файлов. В такую версию пайтона не входят система управления пакета (pip) и документация.
Скачать встраиваемый пакет можно на сайте python.org:
- Зайдите на сайт python.org.
- Перейдите в раздел «Downloads».
- Нажатие на кнопку «Download» приведет к загрузке обычной версии, поэтому нажмите на гиперссылку «Python for Windows».
- В открывшейся вкладке нажмите «Latest Python 3 Release — Python 3.10.8».
- Спуститесь вниз страницы к разделу «Files» и выберите одну из embeddable-версий: для 64- или 32-битной системы.
Заключение
В рамках этого материала мы рассмотрели различные способы установки Python на Windows 10. Другие полезные материалы по Python вы можете найти в нашей базе знаний. Если вы решите создать на этом языке свой веб-сервис, то в timeweb.cloud вы можете арендовать облачный сервер по выгодным ценам.

На чтение 2 мин Просмотров 38.6к. Опубликовано 07.09.2020
Подробно рассмотрим как правильно обновить язык программирования Python.
Содержание
- Введение
- Узнаем текущую версию
- Скачиваем последнюю версию
- Установка
- Проверка установки
- Заключение
Введение
Технологии развиваются быстро, а языки программирования — это основной драйвер развития. Нередко выходят корректирующие релизы исправляющие найденные ошибки или версии с расширением функционала. Python в этом плане ничем не отличается от других языков программирования, но процесс его обновления не столь сложен, как может показаться сначала. Если у вас получится обновить один раз, вы уже не забудете как его повторить, потому что это не сложно и очень быстро.
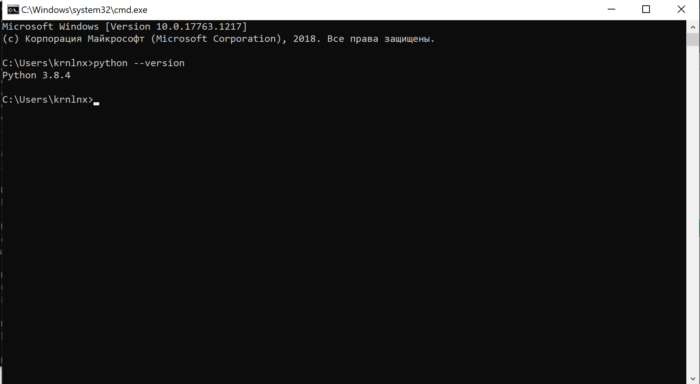
Узнаем текущую версию
Открываем пуск -> выполнить -> вводим команду cmd. В открывшемся окне пишем команду python —version и смотрим какая у нас версия.
Скачиваем последнюю версию
Переходим на официальный сайт www.python.org/downloads/ и скачиваем последнюю версию
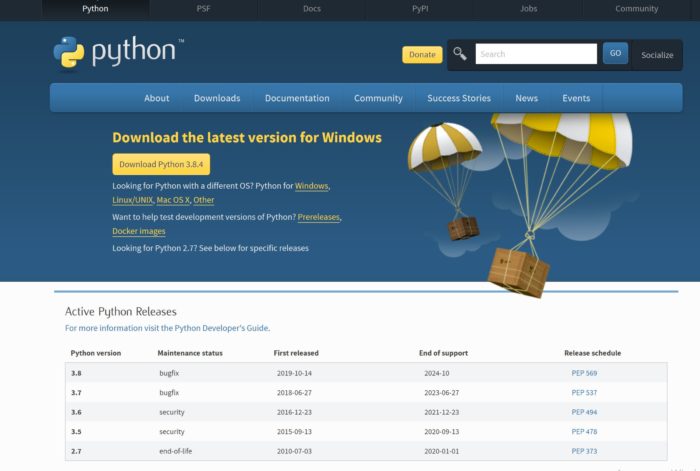
Нажимаем кнопочку Download Python и скачиваем дистрибутив

Установка
Так как у меня установлена уже последняя версия Python мне пришлось скачать beta версию для демонстрации процесса обновления. Не пугайтесь из за того, что на картинках другая версия, это не ошибка 🙂
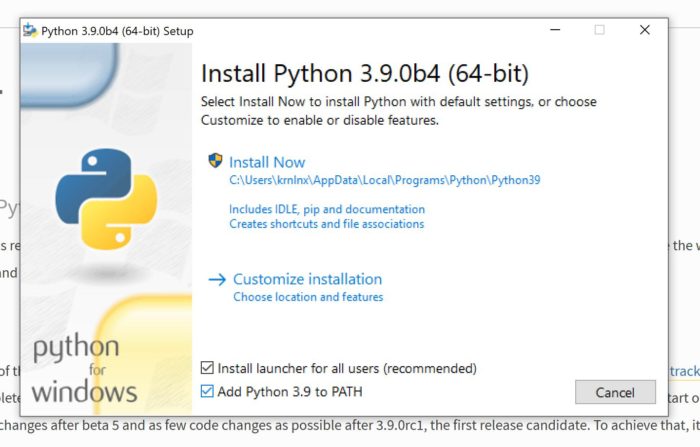
Ставим обязательно галочку перед пунктом Add Python 3.9 to PATH.
Нажимаем Install Now и переходим далее.
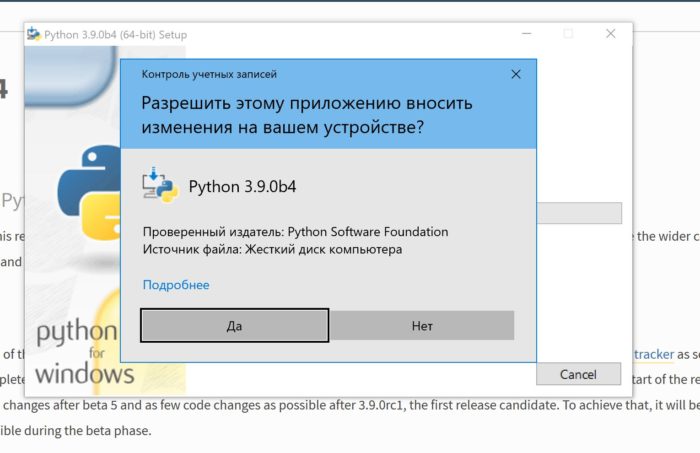
Обязательно предоставляем полные права приложению
Дожидаемся окончания процесса установки и в конце нажимаем Close
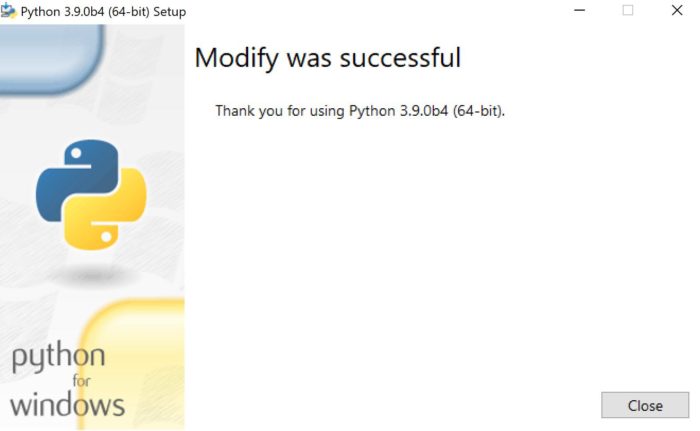
Проверка установки
В самом начале я описал процесс сверки текущий версии Python. Нам сейчас это необходимо повторить, только предварительно перезапустив окно cmd.exe иначе запуститься python старой версии 🙂
Заключение
В этой статье мы рассмотрели процесс обновления языка программирования Python, прошли от первого до последнего шага и успешно завершили обновление.
На это все. Поздравляю, теперь у вас установлена последняя версия Python.
Егор Егоров
Программирую на Python с 2017 года. Люблю создавать контент, который помогает людям понять сложные вещи. Не представляю жизнь без непрерывного цикла обучения, спорта и чувства юмора.
Ссылка на мой github есть в шапке. Залетай.
Windows не содержит Python в списке предустановленных программ. Вы можете скачать его и установить дополнительно. Во время первой установки Python 3 на Windows могут возникнуть трудности, поэтому мы создали этот туториал. Просто следуйте инструкции и у вас все получится.
Какую версию Python скачать — 2 или 3?
Больше 10 лет назад вышла новая версия python, которая разделила сообщество на 2 части. Сразу это вызывало много споров, новичкам приходилось выбирать: python 2 или python 3. Сегодня большая часть обучается третей версии. На этой версии мы и покажем как установить язык программирования python на Windows.
На этой странице вы можете скачать python для Windows.
В вверху разработчики предлагают выбрать версию.

Если вы не планируете работать с проектом, который написан на Python 2, а таких довольно много. Скачайте python 2+. Для веб разработки, анализа данных и многих других целей лучшим вариантом будет python 3 версии.
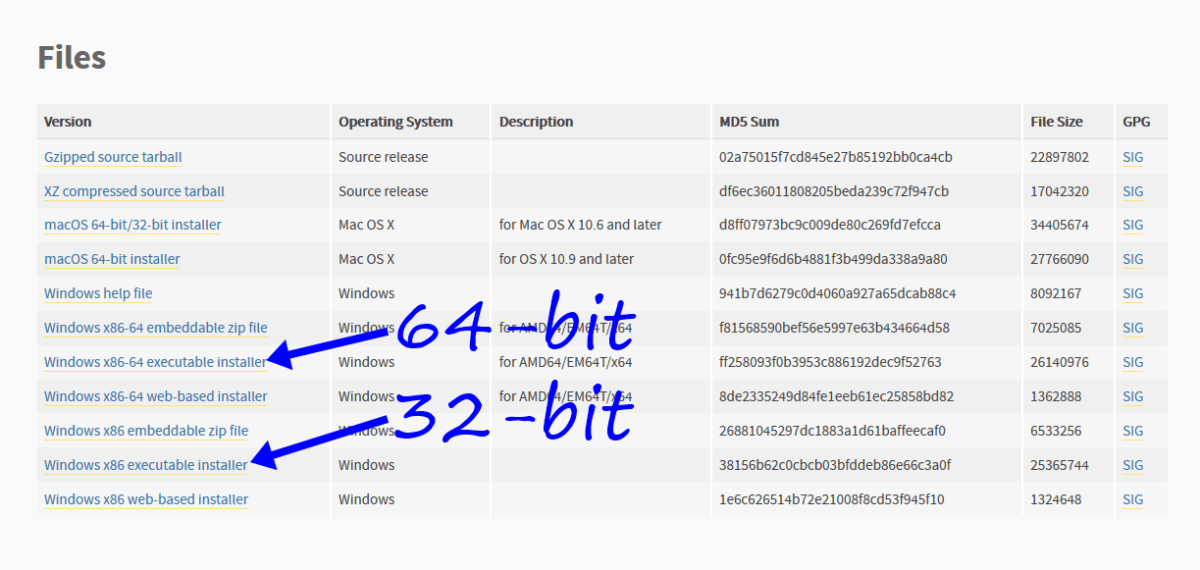
Внизу страницы версии ссылки на скачивание установщиков. Есть возможность скачать python под 64-битную и 32-битную Windows.
Вне зависимости от версии и страны, python на английском языке. Вы не сможете скачать python на русском с официального сайта (и с любого другого).
Скачайте и запустите установщик Python 3, он называется “python-3.****.exe”.
Если на компьютере уже установлена python 2, нет необходимости удалять его. На установку Python 3 она не повлияет.
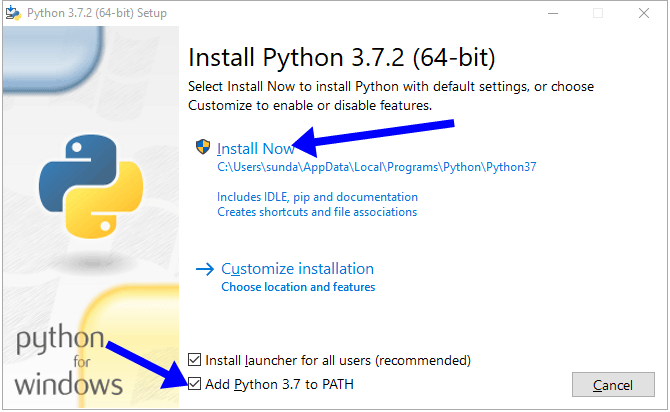
На первом экране отметьте пункт “Add Python 3.7 to PATH” и нажмите “Install Now”.
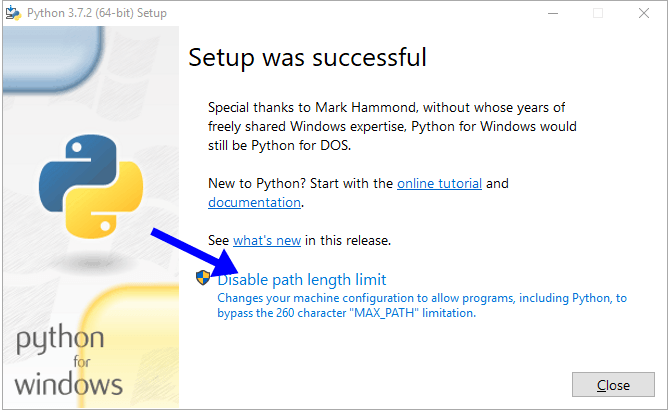
MAX_PATH. В системах Linux этих ограничений нет. Проигнорировав этот пункт, вы можете столкнуться с проблемой совместимости в будущем. Код созданный на Linux не запустится на Windows.
Как проверить уставился ли python
Самый быстрый и простой способ узнать, есть ли интерпретатор python на компьютере — через командную строку.
- Запустите
cmd.exeчерез диспетчер задач или поиск. - Введите
python
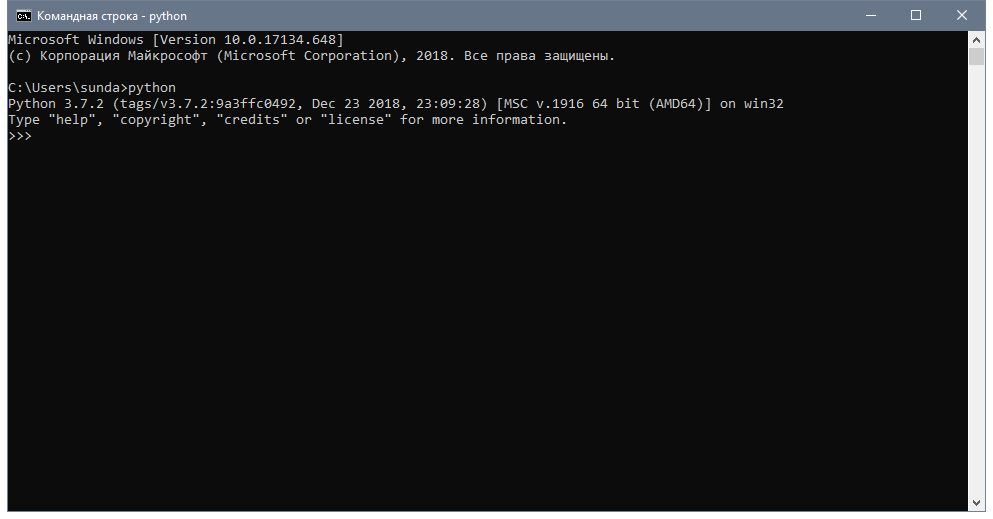
В результате командная строка выведет версию python, которая установлена в системе.
Если версия python 2 или вы получили ошибку:
"python" не является внутренней или внешней
командой, исполняемой программой или пакетным файлом.
Следуйте инструкциям ниже. Это легко исправить.
Как добавить python в переменную PATH (ADD to PATH)
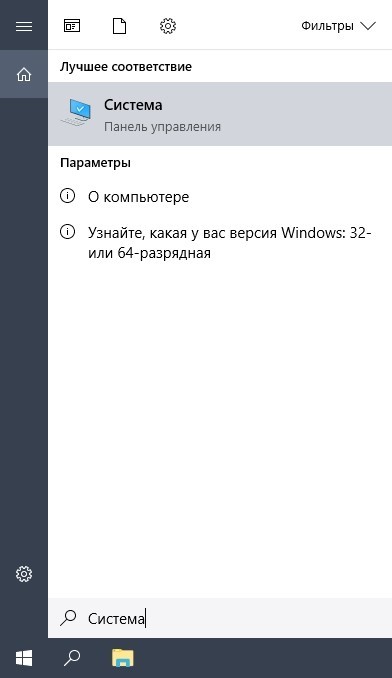
Откройте окно “Система” с помощью поиска.
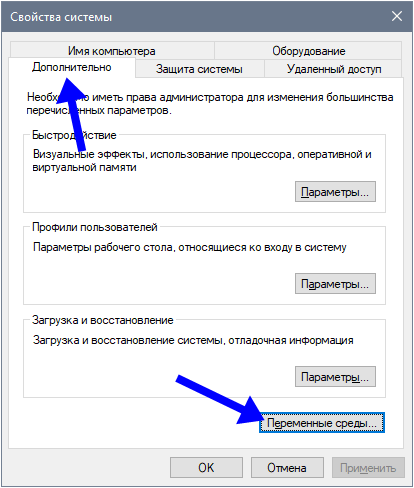
В окне “Система”, нажмите “Дополнительные параметры системы”. Откроется “Свойства системы”. Во вкладке “Дополнительно”, нажимайте “Переменные среды” как на фото ниже.
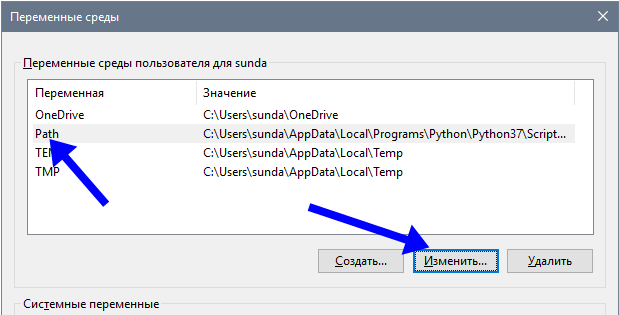
В открывшемся окне выберите Path -> “Изменить”. Откроется новое окно, куда вы должны добавить путь к интерпретатору python.
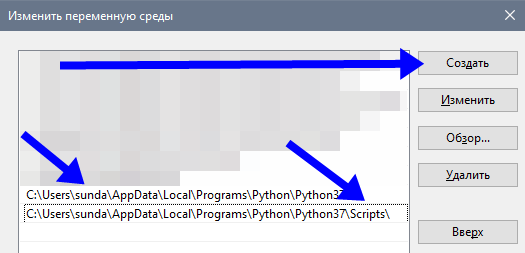
Путь у каждого свой, похож на C:UsersUserNameAppDataLocalProgramsPythonPython37. Где Python37 — папка с python.
Нажмите “Создать” и добавьте 2 пути. К папке python и pythonScripts
Как создать отдельную команду для python 2 и python 3
Чтобы использовать обе версии python, измените python.exe на python2.exe, в папке с python 2. А в папке с python 3 , python.exe на python3.exe.
Теперь проверьте обе версии:
>python2 -V
Python 2.7.14

>python3 -V
Python 3.7.2
После этих не сложных действий, python установлен на вашем Windows и готов к работе в любом текстовом редакторе.
Попробуйте создать свою первую программу:
Первая программа на Python «Hello world»
Содержание
- Способ 1: Microsoft Store
- Способ 2: Установка вручную
- Что делать, если Python не устанавливается
- Вопросы и ответы
Язык программирования Python представляет собой мощный инструмент, основой популярности которого стали лёгкость в освоении и свободный доступ к среде разработки. Сегодня мы расскажем о том, как её можно установить в Windows 10.
Способ 1: Microsoft Store
Команда разработчиков среды Python Software Foundation значительно упростила установку пользователям «десятки», добавив приложение в фирменный магазин ПО от Microsoft.
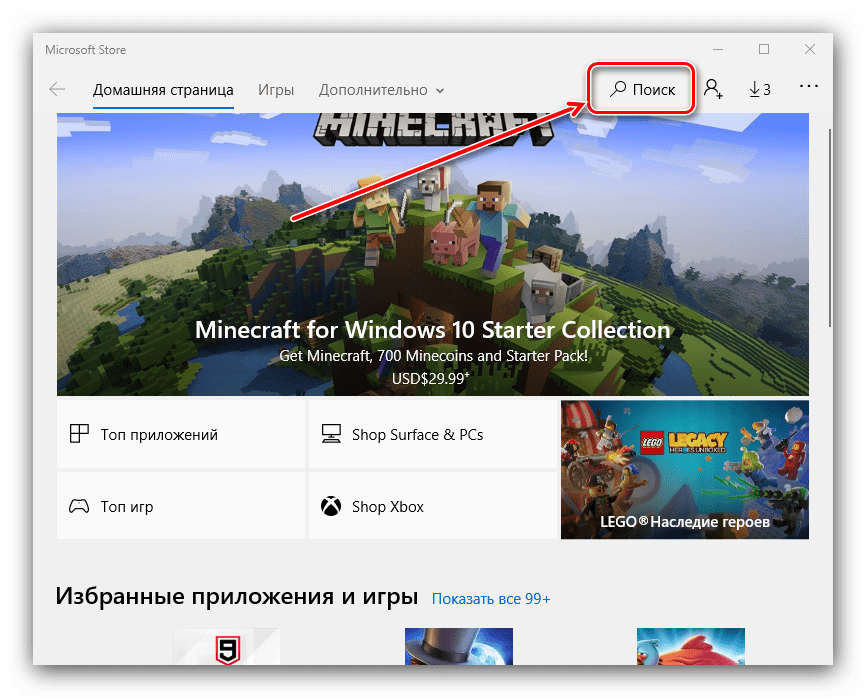
- Откройте Microsoft Store и нажмите на кнопку «Поиск».
- Напечатайте в строке
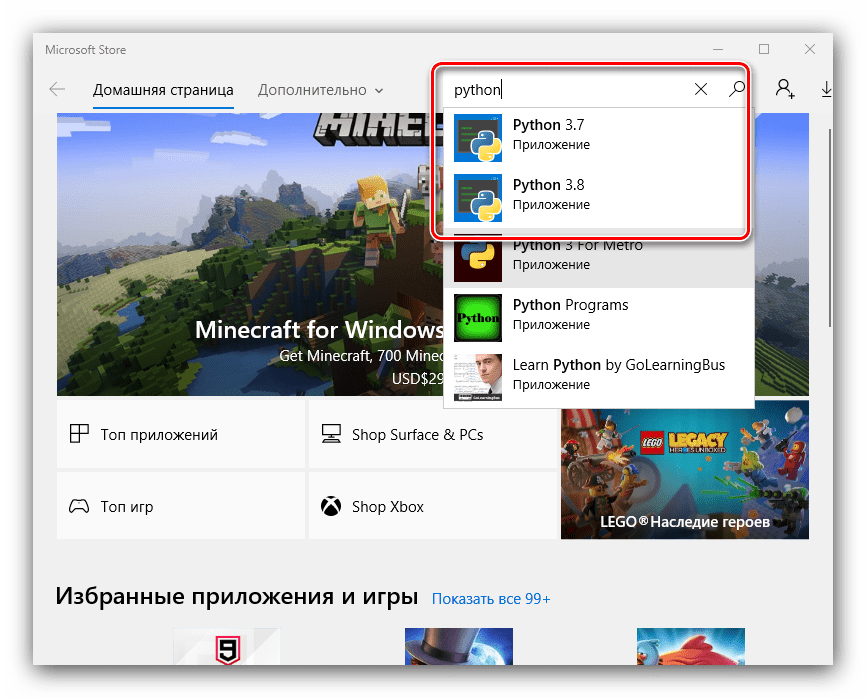
python, затем выберите результат из всплывающего меню ниже – для Windows 10 подходят варианты «Python 3.7» и «Python 3.8». - После загрузки страницы приложения нажмите «Получить» («Get»).
- Подождите, пока процесс будет завершен. По его окончании можете найти установленное приложение в меню «Пуск».
Данный вариант установки удобен, однако у него есть и минусы – например, вы не сможете пользоваться лончером py.exe. Также для скриптов, созданных в версии из Майкрософт Стор, недоступна запись в некоторые служебные каталоги вроде TEMP.
Способ 2: Установка вручную
Питон можно установить и более привычным методом — вручную из инсталлятора.
Важно! Для использования этого способа у используемой в системе учетной записи должны быть права администратора!
Урок: Как получить права администратора в Windows 10
Официальный сайт Python
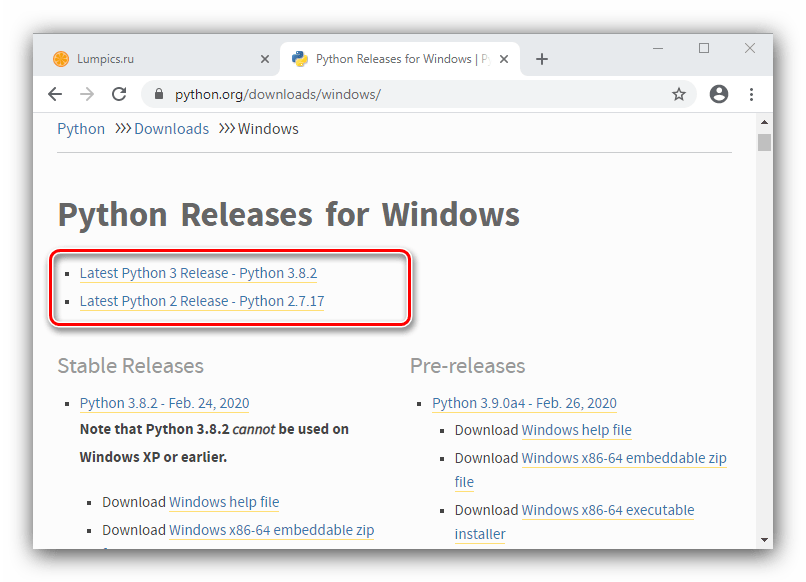
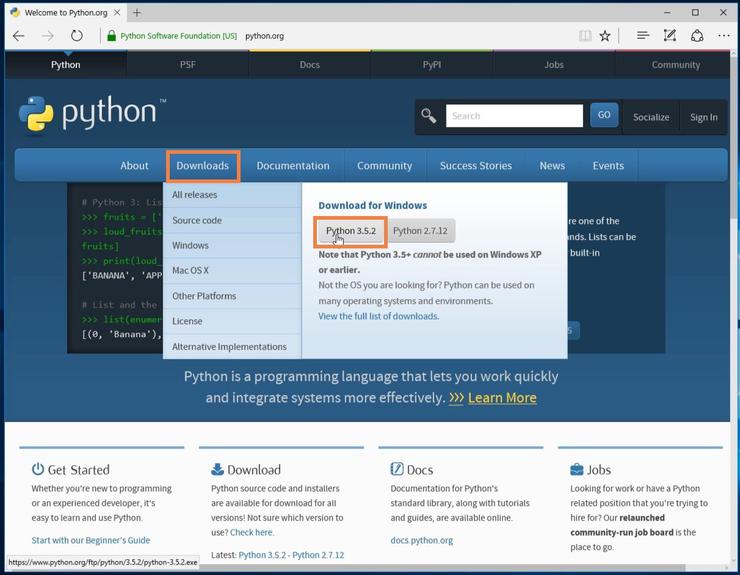
- Перейдите по ссылке выше. Наведите курсор на пункт «Downloads» и выберите «Windows».
- Для загрузки доступны среды второй и третьей версий. Последняя является предпочтительным вариантом в большинстве случаев, но если потребуется иметь дело с унаследованным кодом, качайте вторую.
- Прокрутите следующую страницу до списка файлов. Найдите там ссылки с именами «Windows x86 executable installer» либо «Windows x86-64 executable installer» – первая отвечает за 32-битную версию, вторая за 64-битную. Рекомендуется использовать первую, поскольку она является максимально совместимой, тогда как бинарные данные для 64-разрядной порой найти непросто. Кликните по ссылке для начала скачивания.
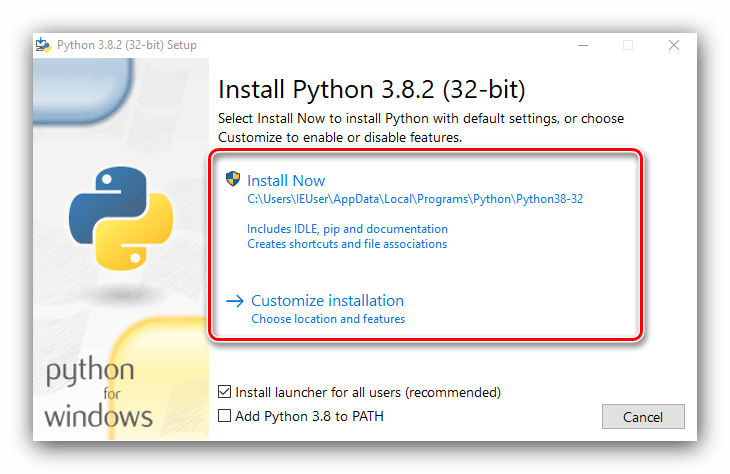
- Подождите, пока инсталлятор загрузится, после чего запустите полученный EXE-файл. В его стартовом окне первым делом обязательно отметьте пункт «Add Python to PATH».
Далее обратите внимание на установочные опции. Доступны два варианта:
- «Install now» – установка по умолчанию со всеми компонентами и документацией;
- «Customize installation» – позволяет тонко настроить местоположение и выбрать устанавливаемые компоненты, рекомендуется только опытным пользователям.
Выберите подходящий вам тип и кликните левой кнопкой мыши по соответствующей ссылке.
- Подождите, пока файлы среды будут установлены на компьютер. В последнем окне кликните по опции «Disable path length limit».
Для закрытия окна нажмите «Close» и перезагрузите компьютер.
Процесс инсталляции Питона вручную на этом закончен.
Что делать, если Python не устанавливается
Порой казалось бы элементарная процедура даёт сбой, и рассматриваемый пакет ПО отказывается устанавливаться. Рассмотрим самые частые причины этой проблемы.
Читайте также: Причины проблем с установкой программ в Windows 10
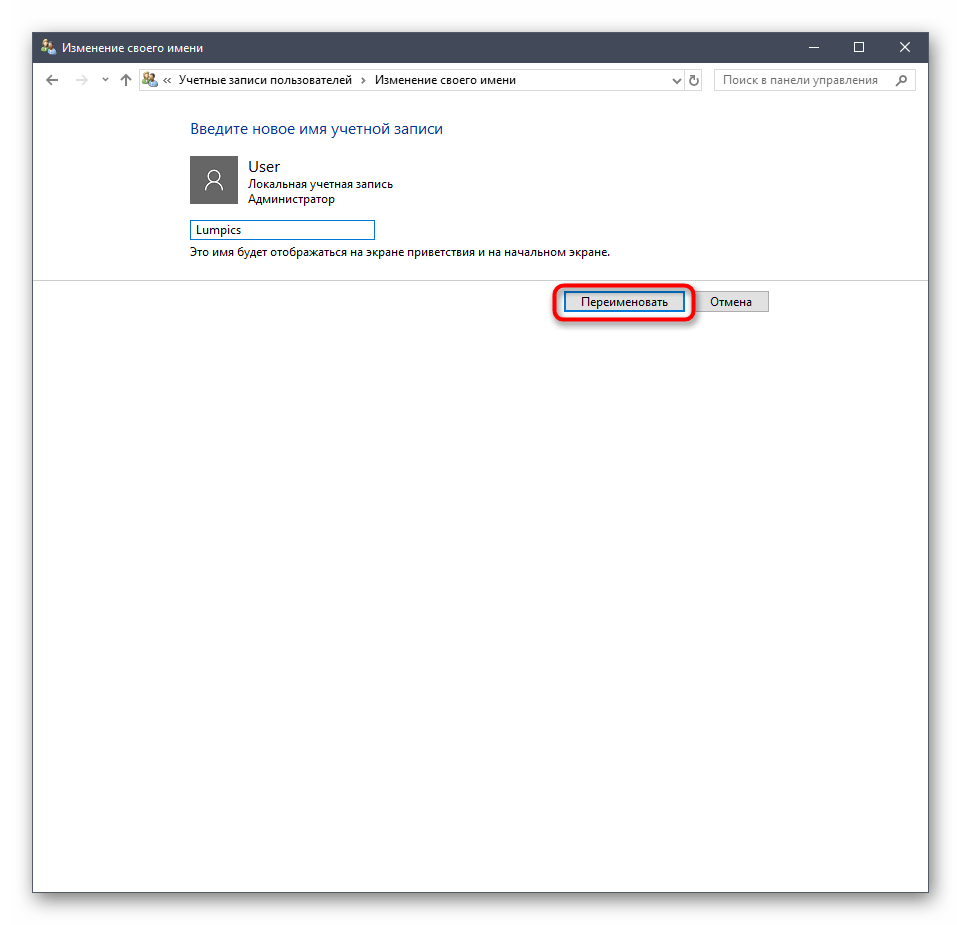
- Первая возможная причина – локальная учётная запись носит имя, которое содержит русские буквы. Решением в таком случае будет переименование папки пользователя, теперь уже с латинскими буквами.
Урок: Меняем имя папки обычного пользователя и администратора в Windows 10
- Также инсталляции Питона могут мешать конфликты в системе, в частности с обновлениями, поэтому при столкновении с рассматриваемой проблемой попробуйте деинсталлировать последние установленные.
Урок: Как удалить обновление Windows 10
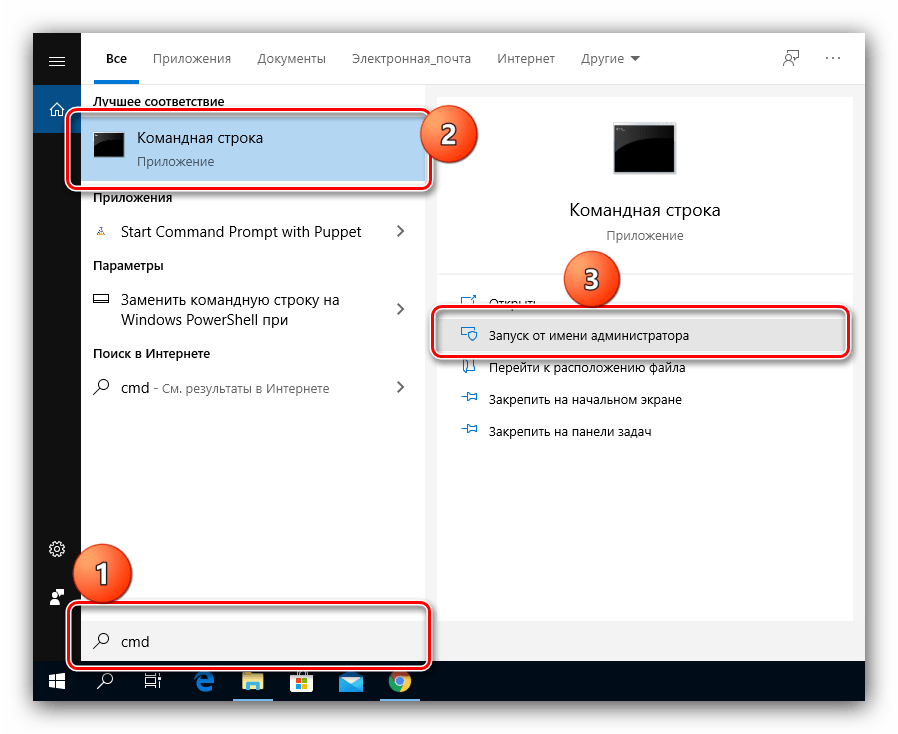
- В некоторых случаях после установки и последующей перезагрузки не запускается служба среды Python. Для её активации вручную запустите «Командную строку»: напишите в «Поиске» запрос
cmd, затем выберите вариант запуска от имени администратора.
Пропишите по очереди следующие команды, нажимая после каждой на клавишу Enter:
msiexec /unreg
msiexec /regserverПерезагрузите компьютер.
Мы рассказали вам о способах установки среды Python на компьютер под управлением Windows 10 и указали варианты решения проблем при выполнении этой процедуры.
Еще статьи по данной теме:

