Содержание
- Windows forms база данных sql
- Создание базы данных и добавление таблиц в Visual Studio
- Предварительные требования
- Создание проекта и файла локальной базы данных
- Добавление источника данных
- Просмотр свойств подключения к данным
- Создание таблиц и ключей с помощью конструктор таблиц
- Создание таблицы Customers
- Создание таблицы Orders
- Создание внешнего ключа
- Заполнение таблиц данными
- Создание формы Windows Forms для поиска данных
- Предварительные требования
- создание приложения Windows Forms
- Создание источника данных
- Создание источника данных
- Создание формы
- Добавление параметризации (функции поиска) в запрос
- Тестирование приложения
- Дальнейшие действия
- Работа с базами данных в Windows Forms с использованием языка программирования C++
- Создание простого приложения для работы с данными с помощью ADO.NET
- Предварительные требования
- Настройка образца базы данных
- Создание форм и добавление элементов управления
- Сохранение строки подключения
- Написание кода для форм
- Форма навигации
- Преобразование формы навигации в начальную форму
- Создание автоматически создаваемых обработчиков событий
- Добавление кода для логики формы навигации
- Форма NewCustomer
- Создание автоматически создаваемых обработчиков событий
- Добавление кода для логики формы NewCustomer
- Форма FillOrCancel
- Создание автоматически создаваемых обработчиков событий
- Добавление кода для логики формы Филлорканцел
- Тестирование приложения
Windows forms база данных sql
Ранее мы рассмотрели, как удобно загружать данные в приложении Windows Forms в элемент DataGridView через DataSet. Теперь определим полнофункциональную форму, через которую мы сможем производить все стандартные CRUD операции в базе данных.
Итак, определим форму, на которой будет элемент DataGridView и три кнопки для добавления, удаления и сохранения изменений. Форма в итоге будет выглядеть примерно следующим образом:

Код формы будет выглядеть следующим образом:
Здесь для добавления объекта мы будем обращаться к хранимой процедуре sp_CreateUser, которая была добавлена в базу данных в прошлой теме.
В конструкторе данные загружаются в DataSet, первая таблица которого устанавливается в качестве источника данных для dataGridView1:
Также в конструкторе устанавливается полное выделение строки и запрет на ручное добавление новых строк:
В обработчике кнопки добавления создается новая строка, которая добавляется в таблицу объекта DataSet. И так как мы ранее установили привязку к источнику данных, то автоматически новая строка также будет добавляться и в dataGridView1:
В обработчике кнопки удаления удаляются выделенные строки в dataGridView1. Опять же в силу привязки к источнику данных будет также происходить удаление и из таблицы в DataSet:
Для обновления на не нужна никакая кнопка, так как мы можем нажать на любую ячейку таблицы (кроме заблокированного для изменения столбца Id) и изменить в ней данные. Однако сами по себе добавление новой строки, удаление строк, изменение ячеек ни как автоматически не отразятся на базе данных. И чтобы бд синхронизировалась, пользователю надо будет нажать на кнопку сохранения, обработчик которой выглядит следующим образом:
Источник
Создание базы данных и добавление таблиц в Visual Studio
Visual Studio можно использовать для создания и обновления файла локальной базы данных в SQL Server Express LocalDB. можно также создать базу данных, выполнив инструкции Transact-SQL в окне инструментов обозревателя объектов SQL Server в Visual Studio. В этом разделе мы создадим MDF файл и добавим таблицы и ключи с помощью Конструктор таблиц.
Предварительные требования
Создание проекта и файла локальной базы данных
в строке меню выберите Project > добавить новый элемент.
В списке шаблонов элементов прокрутите вниз и выберите база данных на основе службы.
 базы данных на основе службы» data-linktype=»relative-path»>
 базы данных на основе службы» data-linktype=»relative-path»>
Присвойте базе данных имя сампледатабасе и нажмите кнопку Добавить.
Добавление источника данных
если окно источники данных не открыто, откройте его, нажав клавиши Shift + Alt + D или выбрав просмотреть > другие Windows > источники данных в строке меню.
В окне Источники данных выберите Добавить новый источник данных.


На странице Выбор подключения к данным выберите файл сампледатабасе. mdf в раскрывающемся списке и нажмите кнопку Далее.
На странице сохранить строку подключения в файле конфигурации приложения нажмите кнопку Далее.
На странице Выбор объектов базы данных появится сообщение о том, что база данных не содержит объектов. Нажмите кнопку Готово.
Просмотр свойств подключения к данным
Создание таблиц и ключей с помощью конструктор таблиц
В этом разделе вы создадите две таблицы, первичный ключ в каждой таблице и несколько строк образца данных. Вы также создадите внешний ключ, чтобы указать, как записи в одной таблице соответствуют записям в другой таблице.
Создание таблицы Customers
Щелкните правой кнопкой мыши таблицы и выберите команду Добавить новую таблицу.
Будет открыт Конструктор таблиц, отобразится сетка с одной строкой по умолчанию, которая представляет один столбец в создаваемой таблице. Путем добавления строк в сетку будут добавлены столбцы в таблицу.
В сетке добавьте строку для каждой из следующих записей.
| Имя столбца | Тип данных | Разрешить значения null |
|---|---|---|
| CustomerID | nchar(5) | False (не установлен) |
| CompanyName | nvarchar(50) | False (не установлен) |
| ContactName | nvarchar (50) | True (установлен) |
| Phone | nvarchar (24) | True (установлен) |
Щелкните строку правой кнопкой мыши CustomerID и выберите пункт Задать первичный ключ.
Щелкните строку по умолчанию () правой кнопкой мыши Id и выберите пункт Удалить.
Назовите таблицу «Клиенты» путем обновления первой строки в области скриптов, как показано в следующем примере:
Отобразятся примерно следующие сведения:


В левом верхнем углу Конструктор таблиц выберите Обновить или нажмите клавиши SHIFT + ALT + U.
В диалоговом окне Предварительный просмотр обновлений базы данных выберите обновить базу данных.
Таблица Customers создается в файле локальной базы данных.
Создание таблицы Orders
Создайте еще одну таблицу, а затем добавьте строку для каждой записи следующей таблицы.
| Имя столбца | Тип данных | Разрешить значения null |
|---|---|---|
| OrderID | int | False (не установлен) |
| CustomerID | nchar(5) | False (не установлен) |
| OrderDate | datetime | True (установлен) |
| OrderQuantity | int | True (установлен) |
Задайте OrderID в качестве первичного ключа, а затем удалите строку по умолчанию.
Назовите таблицу «Заказы» путем обновления первой строки в области скриптов, как показано в следующем примере:
В левом верхнем углу Конструктор таблиц выберите Обновить или нажмите клавиши SHIFT + ALT + U.
В диалоговом окне Предварительный просмотр обновлений базы данных выберите обновить базу данных.
Таблица Orders создается в файле локальной базы данных. Если развернуть узел таблицы в обозреватель сервера, отобразятся две таблицы:


Если вы не видите его, нажмите кнопку Обновить на панели инструментов.
Создание внешнего ключа
В контекстной области в правой части сетки конструктор таблиц для таблицы Orders щелкните правой кнопкой мыши внешние ключи и выберите Добавить новый внешний ключ.

В появившемся текстовом поле замените текст ToTable на Customers.
в области T-SQL обновите последнюю строку, чтобы она соответствовала следующему примеру:
В левом верхнем углу Конструктор таблиц выберите Обновить (SHIFT + ALT + U).
В диалоговом окне Предварительный просмотр обновлений базы данных выберите обновить базу данных.
Создается внешний ключ.
Заполнение таблиц данными
в обозреватель сервера или SQL Server обозревателе объектов разверните узел образца базы данных.
Откройте контекстное меню таблицы Customers и выберите Просмотреть данные.
Добавьте необходимые данные для некоторых клиентов.
Можно указать любые пять символов как ИД клиентов, но хотя бы один нужно выбрать и запомнить для дальнейшего использования в этой процедуре.
Откройте контекстное меню таблицы Orders и выберите пункт отобразить данные таблицы.
Добавление данных для некоторых заказов. При вводе каждой строки она сохраняется в базе данных.
Убедитесь, что все идентификаторы заказов и количества заказов — целые числа, и каждый идентификатор клиента соответствует значению, указанному в столбце CustomerID таблицы клиентов.
Поздравляем! Теперь вы умеете создавать таблицы, связывать их с внешним ключом и добавлять данные.
Источник
Создание формы Windows Forms для поиска данных
Довольно распространенным сценарием приложения является отображение выбранных данных на форме. Например, вам может потребоваться отобразить заказы для определенного клиента или сведения о конкретном заказе. В таком сценарии пользователь вводит в форму информацию, после чего выполняется запрос, включающий в себя эти введенные пользователем данные в качестве параметра; таким образом, данные выбираются на основе параметризированного запроса. Запрос возвращает только те данные, которые удовлетворяют введенным пользователем условиям. Это пошаговое руководство показывает, как создать запрос, возвращающий клиентов из определенного города, и изменить пользовательский интерфейс, чтобы пользователи могли ввести название города и нажать кнопку для выполнения запроса.
Использование параметризованных запросов помогает сделать приложение эффективным, так как позволяет базе данных заниматься своей непосредственной задачей — быстрой фильтрацией записей. И наоборот, если запросить всю таблицу базы данных, передать ее по сети и использовать логику приложения для поиска записей, ваше приложение станет медленным и неэффективным.
В данном пошаговом руководстве представлены следующие задачи.
Создание отображающих данные элементов управления с помощью перетаскивания элементов из окна Источники данных на форму.
Добавление элементов управления для отображения данных на форме.
Ввод параметров в форму и выполнение параметризованного запроса.
Предварительные требования
Необходимо установить рабочую нагрузку » Хранение и обработка данных «. См. раздел Изменение Visual Studio.
в этом пошаговом руководстве используется SQL Server Express LocalDB и образец базы данных Northwind.
если у вас нет SQL Server Express LocalDB, установите его на странице загрузки SQL Server Expressили с помощью Visual Studio Installer. в Visual Studio Installer можно установить SQL Server Express LocalDB как часть рабочей нагрузки хранения и обработки данных или как отдельный компонент.
Установите учебную базу данных Northwind, выполнив следующие действия.
Откроется окно редактора запросов.
скопируйте скрипт Transact-SQL Northwind в буфер обмена. этот сценарий T-SQL создает базу данных Northwind с нуля и заполняет ее данными.
По истечении короткого времени выполнение запроса завершается и создается база данных Northwind.
создание приложения Windows Forms
Создание источника данных
На этом шаге Мастер настройки источника данных используется для создания источника данных из базы данных.
В окне Источники данных выберите Добавить новый источник данных, чтобы запустить Мастер настройки источника данных.
На странице Выбор типа источника данных выберите элемент База данных и нажмите Далее.
На странице Выбор подключения к базе данных выполните одно из следующих действий:
Если подключение к учебной базе данных Northwind доступно в раскрывающемся списке, то выберите его.
Выберите Новое подключение для открытия диалогового окна Добавить/изменить подключение.
Если базе данных требуется пароль, выберите параметр для включения конфиденциальных данных и нажмите кнопку Далее.
На странице Сохранение подключения в файле конфигурации приложения нажмите кнопку Далее.
Разверните узел Таблицы на странице Выбор объектов базы данных.
Выберите таблицу Клиенты и нажмите Готово.
Объект NorthwindDataSet добавляется в проект, и таблица Клиенты отображается в окне Источники данных.
Создание источника данных
На этом шаге Мастер настройки источника данных используется для создания источника данных из базы данных.
В окне Источники данных выберите Добавить новый источник данных, чтобы запустить Мастер настройки источника данных.
На странице Выбор типа источника данных выберите элемент База данных и нажмите Далее.
На экране Выбор модели базы данных выберите набор данных, а затем нажмите кнопку Далее.
На странице Выбор подключения к базе данных выполните одно из следующих действий:
Если подключение к учебной базе данных Northwind доступно в раскрывающемся списке, то выберите его.
Выберите Новое подключение для открытия диалогового окна Добавить/изменить подключение.
На странице Сохранение подключения в файле конфигурации приложения нажмите кнопку Далее.
Разверните узел Таблицы на странице Выбор объектов базы данных.
Выберите таблицу Клиенты и нажмите Готово.
Объект NorthwindDataSet добавляется в проект, и таблица Клиенты отображается в окне Источники данных.
Создание формы
Можно создать элементы управления с привязкой к данным, перетащив элементы из окна Источники данных на форму:
убедитесь, что конструктор Windows Forms имеет активное фокус, а окно источники данных открыто и закреплено.
Разверните узел Customers в окне Источники данных.
Перетащите узел Клиенты из окна Источники данных на свою форму.
На форме появляются DataGridView и полоса инструментов (BindingNavigator) для перемещения по записям. В области компонентов появляется NorthwindDataSet, CustomersTableAdapter, BindingSource и BindingNavigator.
Добавление параметризации (функции поиска) в запрос
Предложение WHERE можно добавить в исходный запрос с помощью диалогового окна Построитель условий поиска :
Добавьте WHERE City = @City в запрос в области Текст запроса.
Запрос должен выглядеть примерно следующим образом:
Нажмите кнопку ОК, чтобы закрыть диалоговое окно Построитель условий поиска.
На форму добавляется FillByCityToolStrip.
Тестирование приложения
При запуске приложения открывается форма, и она готова принять параметр в качестве входных данных:
Нажмите клавишу F5 для запуска приложения.
Введите Лондон в текстовом поле Город и щелкните FillByCity.
Сетка данных заполняется клиентами, которые удовлетворяют критериям. В этом примере сетка данных отображает только клиентов, для которых в столбце Город задано значение Лондон.
Дальнейшие действия
В зависимости от требований приложения существуют несколько шагов, которые, возможно, потребуется выполнить после создания параметризованной формы. Ниже приводится перечень рекомендаций, позволяющих улучшить полученный результат.
Добавление элементов управления, отображающих связанные данные. Дополнительные сведения см. в разделе связи в наборах данных.
Изменение набора данных для добавления или удаления объектов базы данных. Дополнительные сведения см. в разделе, посвященном созданию и настройке наборов данных.
Источник
Работа с базами данных в Windows Forms с использованием языка программирования C++
Как известно, начиная с версии 2008, работа с базами данных (БД) в Windows Forms средствами Microsoft Visual C++ (VC++) невозможна. Однако это не совсем так.
Начиная с версии 2008, стала недоступна работа с БД с помощью уже привычного графического интерфейса. То есть, для работы с ними нельзя создать и настроить, а, следовательно, и использовать, не визуальные элементы управления DataSet, BindingSource и TableAdapter. В то же время возможно работы с БД при помощи «обычных» классов ADO.NET полностью сохранилась.
Для реализации взаимодействия с БД служат «обычные» классы OleDbConnection, OleDbCommand и OleDbDataReader. Но, в виду того, что в Windows Forms используется управляемый код с привязкой C++/CLI, их использование имеет некоторые особенности.
Рассмотрим пример. Есть БД Microsoft Office Access, которая содержит список авторов книг в таблице Author.

Создадим простое приложение, которое будет загружать данные из этой таблицы (надписи элементов управления, включая заголовки столбцов DataGridView, предварительно настроены с помощью визуального конструктора).

Данные будем загружать в элемент управления DataGridView при нажатии на кнопку «Получить данные».
Создадим в обработчике события нажатия этой кнопки подключение к БД.
Источник
Создание простого приложения для работы с данными с помощью ADO.NET
В этой статье демонстрируется простой способ быстрого получения данных из базы данных. Если приложению необходимо изменить данные с помощью нетривиальных способов и обновить базу данных, следует рассмотреть возможность использования Entity Framework и привязки данных для автоматической синхронизации элементов управления пользовательского интерфейса с изменениями в базовых данных.
С целью упрощения код не включает обработку исключений для выполнения в рабочей среде.
Предварительные требования
Для создания приложения вам потребуются следующие компоненты.
SQL Server Express LocalDB. если у вас нет SQL Server Express LocalDB, его можно установить на странице загрузки SQL Server Express.
Настройка образца базы данных
Создайте образец базы данных, выполнив следующие действия.
щелкните правой кнопкой мыши подключения к данным и выберите команду создать новую базу данных SQL Server.
В текстовом поле имя сервера введите (LocalDB) mssqllocaldb.
В текстовом поле имя новой базы данных введите Sales, а затем нажмите кнопку ОК.
Пустая база данных Sales создается и добавляется в узел подключения к данным в обозреватель сервера.
Щелкните правой кнопкой мыши подключение к данным о продажах и выберите создать запрос.
Откроется окно редактора запросов.
По истечении короткого времени выполнение запроса завершается и создаются объекты базы данных. База данных содержит две таблицы: Customer и Orders. Эти таблицы изначально не содержат данных, но их можно добавить при запуске создаваемого приложения. База данных также содержит четыре простые хранимые процедуры.
Создание форм и добавление элементов управления
Создайте проект для приложения Windows Forms и назовите его SimpleDataApp.
Visual Studio создает проект и несколько файлов, включая пустую форму Windows Forms с именем Form1.
Добавьте две формы Windows Forms в проект, чтобы он включал три формы, и назначьте им следующие имена:
Навигация
NewCustomer
FillOrCancel
Для каждой формы добавьте текстовые поля, кнопки и другие элементы управления, которые отображаются на рисунках ниже. Для каждого элемента управления задайте свойства, указанные в таблицах.
Элементы управления «группа» и «надпись» обеспечивают большую ясность, но не используются в коде.
Форма навигации

| Элементы управления формы навигации | Элемент Property |
|---|---|
| Кнопка | Name = btnGoToAdd |
| Кнопка | Name = btnGoToFillOrCancel |
| Кнопка | Name = btnExit |
Форма NewCustomer

| Элементы управления формы NewCustomer | Элемент Property |
|---|---|
| TextBox | Name = txtCustomerName |
| TextBox | Name = txtCustomerID
Readonly = True |
| Кнопка | Name = btnCreateAccount |
| NumericUpDown | DecimalPlaces = 0
Name = numOrderAmount |
| DateTimePicker | Format = Short
Name = dtpOrderDate |
| Кнопка | Name = btnPlaceOrder |
| Кнопка | Name = btnAddAnotherAccount |
| Кнопка | Name = btnAddFinish |
Форма FillOrCancel

| Элементы управления формы FillOrCancel | Элемент Property |
|---|---|
| TextBox | Name = txtOrderID |
| Кнопка | Name = btnFindByOrderID |
| DateTimePicker | Format = Short
Name = dtpFillDate |
| DataGridView | Name = dgvCustomerOrders
RowHeadersVisible = False |
| Кнопка | Name = btnCancelOrder |
| Кнопка | Name = btnFillOrder |
| Кнопка | Name = btnFinishUpdates |
Сохранение строки подключения
Когда приложение пытается открыть подключение к базе данных, оно должно иметь доступ к строке подключения. Чтобы не вводить строку вручную в каждой форме, сохраните строку в файле App.config в проекте и создайте метод, возвращающий строку при вызове метода из любой формы в приложении.
В списке тип выберите (строка подключения).
В списке область выберите приложение.
В столбце значение введите строку подключения (без кавычек), а затем сохраните изменения.
В реальных приложениях строку подключения следует хранить безопасно, как описано в разделе строки подключения и файлы конфигурации.
Написание кода для форм
Этот раздел содержит краткие обзоры того, что делает каждая форма. Он также предоставляет код, определяющий базовую логику при нажатии кнопки на форме.
Форма навигации
Форма навигации открывается при запуске приложения. Кнопка Добавить учетную запись открывает форму NewCustomer. Кнопка Выполнение или отмена заказов открывает форму FillOrCancel. Кнопка Выход закрывает приложение.
Преобразование формы навигации в начальную форму
При использовании C# в обозревателе решений откройте файл Program.cs и измените строку Application.Run на следующую: Application.Run(new Navigation());
Создание автоматически создаваемых обработчиков событий
Дважды щелкните три кнопки в форме навигации, чтобы создать пустые методы обработчика событий. При двойном щелчке кнопки также добавляется автоматически созданный код в файл кода конструктора, который позволяет нажать кнопку для вызова события.
Добавление кода для логики формы навигации
На странице кода для формы навигации заполните основные тексты методов для трех обработчиков событий нажатия кнопки, как показано в следующем коде.
Форма NewCustomer
Создание автоматически создаваемых обработчиков событий
Создайте пустой обработчик событий щелчка для каждой кнопки в форме NewCustomer, дважды щелкнув каждую из четырех кнопок. При двойном щелчке кнопки также добавляется автоматически созданный код в файл кода конструктора, который позволяет нажать кнопку для вызова события.
Добавление кода для логики формы NewCustomer
Чтобы завершить логику формы NewCustomer, выполните следующие действия.
Перенесите System.Data.SqlClient пространство имен в область, чтобы не указывать полные имена его членов.
Добавьте в класс некоторые переменные и вспомогательные методы, как показано в следующем коде.
Заполните основные тексты методов для четырех обработчиков событий нажатия кнопки, как показано в следующем коде.
Форма FillOrCancel
Создание автоматически создаваемых обработчиков событий
Создайте пустые обработчики событий щелчка для четырех кнопок в форме Филлорканцел, дважды щелкнув кнопки. При двойном щелчке кнопки также добавляется автоматически созданный код в файл кода конструктора, который позволяет нажать кнопку для вызова события.
Добавление кода для логики формы Филлорканцел
Чтобы завершить логику формы Филлорканцел, выполните следующие действия.
Перенесите следующие два пространства имен в область, чтобы не указывать полные имена их членов.
Добавьте в класс переменную и вспомогательный метод, как показано в следующем коде.
Заполните основные тексты методов для четырех обработчиков событий нажатия кнопки, как показано в следующем коде.
Тестирование приложения
Нажмите клавишу F5 для сборки и тестирования приложения после написания кода для каждого обработчика события нажатия кнопки и общего кода программы.
Источник
Table of Contents
- Introduction
- Creating connections
- Writing out code for connections.
- Dealing with secure connections
- Changing server and or initial catalog at runtime
- User interface consideration
- Changing server and or initial catalog in code
- TableAdapter example
- User interface example
- Helper methods
- Container classes
- Implementing in a Visual Studio solution
- Alternate method to change connections at runtime
- Summary
- See also
- Related resources
- Source code
Introduction


When working with SQL-Server databases in Windows Forms projects using conventional data providers like
System.Data. SqlClient to access tables a connection object is required with a well-formed
connection string which may be stored in a string variable or a
configuration file.
Depending on the developer, connection strings can be written directly in code, create a connection string using
SqlConnectionStringBuilder (there is an example in the accompanying source code) or create temporary project, use the Data wizard to generated a classes access via a TableAdapter or using Entity Framework 6 code first with an existing database.
This setup works well for personal use applications while distributing an application to friends, co-workers or customers or changing from a development environment to a production environment (and in many cases a test environment)
quickly causes using string variables useless and with configuration files when changes to the server name requires updating from the developer’s server name to another server name in the wild it’s best to have a method to change a connection string without
user intervention.
In this article these issues along with other common challenges with creating connections to server-based databases will be covered along with dynamically changing a connection string stored in an application configuration file
where connections are in Project.Settings.
Creating connections


Writing out code for connections.
When a developer first starts out writing code to access database data they usually will write the connection directly in a form as follows.
private
void
button5_Click(object
sender, EventArgs e)
{
SqlConnection cn =
new
SqlConnection();
cn.ConnectionString =
"Data Source=KARENS-PC;"
+
"Initial Catalog=NorthWind;"
+
"Integrated Security=True";
cn.Open();
}
In the code snippet above disregarding that all data operations should reside in a class when the Data Source (the name or network address of the instance of SQL Server to connect to) and Initial Catalog (The name of the database associated with the connection)
exists and the user at runtime has permissions to access the data there are no true issues.
Although the above connection works as a project grows in size with more operations needed to access data many developers tire of creating a connection each time it’s needed so this evolves into either a private connection object in a form or another class
and is generally scoped as globe. This means each time the connection is needed an assertion is required to see if the connection object state is open e.g.
if
(_connection.State != ConnectionState.Open)
{
_connection.Open();
}
Simply executing
Open or
OpenAsync method may not resolve why the connection is not open along with in general leading to more code than needed. The next step is to work with a
using statement as per below which will dispose of the connection once done with working data.
using
(var cn = new
SqlConnection())
{
cn.ConnectionString =
"Data Source=KARENS-PC;"
+
"Initial Catalog=NorthWind;"
+
"Integrated Security=True";
cn.Open();
}
A simple example for proper connection object which is in a button click event.
private
void
button5_Click(object
sender, EventArgs e)
{
using
(var cn = new
SqlConnection())
{
cn.ConnectionString =
"Data Source=KARENS-PC;"
+
"Initial Catalog=NorthWind;"
+
"Integrated Security=True";
var selectStatement =
"SELECT FirstName, LastName "
+
"FROM Customers "
+
"WHERE ID = @Identifier";
using
(var cmd = new
SqlCommand() {Connection = cn, CommandText = selectStatement})
{
cmd.Parameters.AddWithValue("@Identifier", 100);
cn.Open();
var reader = cmd.ExecuteReader();
if
(reader.HasRows)
{
reader.Read();
string
firstName = reader.GetString(0);
string
lastName = reader.GetString(1);
}
}
}
}
Unfortunately the code is only good for the event it resides in, a better idea is to place the code into a public class with a public method. First, since two values are needs let’s create a class named Customer.
public
class
Customer
{
public
int
Identifier { get;
set; }
public
string
FirstName { get;
set; }
public
string
LastName { get;
set; }
public
string
FullName => $"{FirstName} {LastName}";
public
override
stringToString()
{
return
$"{Identifier}";
}
}
Note there is a property to provide first and last name together and ToString is is overridden so when in a debug session the primary key will be displayed by default.
Below code was removed from the button click event and refactored into a method.
using
System.Data.SqlClient;
namespace
WindowsFormsApp1
{
public
class
CustomerOperations
{
public
Customer GetCustomerByPrimaryKey(int
identifier)
{
var customer =
new
Customer();
using
(var cn = new
SqlConnection())
{
cn.ConnectionString =
"Data Source=KARENS-PC;"
+
"Initial Catalog=NorthWind;"
+
"Integrated Security=True";
var selectStatement =
"SELECT FirstName, LastName "
+
"FROM Customers "
+
"WHERE ID = @Identifier";
using
(var cmd = new
SqlCommand() { Connection = cn })
{
cmd.CommandText = selectStatement;
cmd.Parameters.AddWithValue("@Identifier", identifier);
cn.Open();
var reader = cmd.ExecuteReader();
if
(reader.HasRows)
{
reader.Read();
customer.Identifier = identifier;
customer.FirstName = reader.GetString(0);
customer.LastName = reader.GetString(1);
}
}
}
return
customer;
}
}
}
Keeping with what has been covered, the connection string may also be stored in the project’s application configuration file which is done under project settings, settings, add a new setting as type ConnectionString. In the following example the connection
string name is NorthWind.
using
(var cn = new
SqlConnection())
{
cn.ConnectionString = Properties.Settings.Default.NorthWind;
cn.Open();
}
When working with TableAdapter approach to accessing data the wizard which generated data classes also generated a connection string within the current project’s configuration file which means the Framework knows how to connection to the underlying data. In
the designer file for the dataset is where the connection string is set by referencing a connection string set under project properties.
This is an example where a typed dataset gets it’s connection string.
[global::System.Diagnostics.DebuggerNonUserCodeAttribute()]
[global::System.CodeDom.Compiler.GeneratedCodeAttribute(
"System.Data.Design.TypedDataSetGenerator",
"15.0.0.0")]
private
void
InitConnection() {
this._connection =
new
global::System.Data.SqlClient.SqlConnection();
this._connection.ConnectionString = global::ConnectionStrings2.
Properties.Settings.Default.NorthWindAzureConnectionString;
}
Both in typed data sets and when using the first examples shown this is how a connection string is stored in app.config.
<?xml
version="1.0"
encoding="utf-8"
?>
<configuration>
<configSections>
</configSections>
<connectionStrings>
<add
name="ConnectionStrings2.Properties.Settings.NorthWindAzureConnectionString"
connectionString="Data Source=KARENS-PC;Initial Catalog=NorthWindAzure1;Integrated
Security=True;MultipleActiveResultSets=True;Application Name=EntityFramework"
providerName="System.Data.SqlClient"
/>
</connectionStrings>
<startup>
<supportedRuntime
version="v4.0"
sku=".NETFramework,Version=v4.7.2"
/>
</startup>
</configuration>
Normally an application requires one database but in more complex applications several connections may be needed and are stored as shown below.
<?xml
version="1.0"
encoding="utf-8"
?>
<configuration>
<configSections>
</configSections>
<connectionStrings>
<add
name="ConnectionStrings1.Properties.Settings.North1"
connectionString="Data Source=KARENS-PC;Initial Catalog=NorthWindAzure;Integrated Security=True"
/>
<add
name="ConnectionStrings1.Properties.Settings.SomeConnection"
connectionString="Data Source=KARENS-PC;Initial Catalog=NorthWindAzureForInserts;Integrated
Security=True"
providerName="System.Data.SqlClient"
/>
</connectionStrings>
</configuration>
Accessing North connection.
Properties.Settings.Default.North1;
Accessing SomeConnection.
Properties.Settings.Default.SomeConnection;
Dealing with secure connections
In the examples above connections are made with windows authentication, no user name or user password is needed, in this case encrypting the connection string within the configuration file is needed as per the following
Microsoft documentation. Moving up a level, configure an instance of
SqlCredential class to the connection which requires a fair amount of code which should be done when a user has been created in SQL-Server with appropriate permissions assigned to the user to access data. For a easy to following code sample see the following
TechNet article with full source code. Note, when using SqlCredential class it’s not possible to stored connection properties in the application configuration file when a user password expires as the algorithm used to encrypt the connection section of the
application configuration file will break, also it’s better to prompt users for name and password.
Changing server and or initial catalog at runtime
There are several reasons for changing connection strings stored in the application configuration file after the application has been installed.
The main reason, the customer has data for the application in a server with a different server name then the developer server or that a server is renamed is another reason and the user has no technical ability to change the configuration file.
The following works with Entity Framework 6 Code First, database exists when the connection string is stored in the application configuration file.
User interface consideration
Customers with some technical ability should still be shielded from making changes that may break an application. One option is to create a interface to shield them and the program from making incorrect changes.
An interface (and included in the article’s source code) is a basic template.

Dialog to change, in this case the server name.

To ensure a server exists from the server name entered methods shown below can assist to
- Ensure SQL-Server is currently running.
- The server name is available.
public
class
Helpers : BaseExceptionProperties
{
/// <summary>
/// Determine if a specific SQL-Server is available
/// </summary>
/// <param name="pServerName"></param>
/// <returns></returns>
public
async Task<bool> SqlServerIsAvailable(string
pServerName)
{
mHasException =
false;
bool
success = false;
try
{
await Task.Run(() =>
{
var sqlDataSourceEnumeratorInstance = SqlDataSourceEnumerator.Instance;
DataTable dt = sqlDataSourceEnumeratorInstance.GetDataSources();
// ReSharper disable once ConditionIsAlwaysTrueOrFalse
// ReSharper disable once InvertIf
if
(dt != null)
{
if
(dt.Rows.Count > 0)
{
var row = dt.AsEnumerable().FirstOrDefault(
dataRow =>
dataRow.Field<string>("ServerName")
== pServerName.ToUpper());
success = row !=
null;
}
else
{
success =
false;
}
}
});
}
catch
(Exception ex)
{
mHasException =
true;
mLastException = ex;
}
return
success;
}
public
async Task<List<string>> ServerNames()
{
mHasException =
false;
var serverNames =
new
List<string>();
try
{
await Task.Run(() =>
{
var sqlDataSourceEnumeratorInstance = SqlDataSourceEnumerator.Instance;
DataTable dt = sqlDataSourceEnumeratorInstance.GetDataSources();
// ReSharper disable once ConditionIsAlwaysTrueOrFalse
// ReSharper disable once InvertIf
if
(dt != null)
{
if
(dt.Rows.Count > 0)
{
foreach
(DataRow row in
dt.Rows)
{
serverNames.Add(row.Field<string>("ServerName"));
}
}
}
});
}
catch
(Exception ex)
{
mHasException =
true;
mLastException = ex;
}
return
serverNames;
}
/// <summary>
/// Determine if a specific service is running e.g.
/// SQL-Server: MSSQLServer
/// MSSQLSERVER
/// SQL Server Agent: SQLServerAgent
/// SQL Server Analysis Services: MSSQLServerOLAPService
/// SQL Server Browser: SQLBrowser
/// </summary>
/// <param name="serviceName">Service name to find</param>
/// <returns>True if found, false if not</returns>
public
static
boolIsWindowsServiceRunning(string
serviceName)
{
var isRunning =
false;
var services = ServiceController.GetServices().Where(sc => sc.ServiceName.Contains("SQL")).ToList();
foreach
(var service in
services)
{
if
(service.ServiceName == serviceName)
{
if
(service.Status == ServiceControllerStatus.Running)
{
isRunning =
true;
}
}
}
return
isRunning;
}
}
Example of calling SqlServerisAvailable from a button click event.
private
async void
ServerIsAvailableButton_Click(object
sender, EventArgs e)
{
var builder =
new
SqlConnectionStringBuilder
{
ConnectionString = Properties.Settings.Default.NorthWind
};
var ops =
new
Helpers();
var result = await ops.SqlServerIsAvailable(builder.DataSource).ConfigureAwait(true);
}
Changing server and or initial catalog in code
The following uses several classes provided in the accompanying source code which resides in class project which by adding these class projects to a Visual Studio solution make it easy to change connection strings stored in the application file.
TableAdapter example
In this example a single connection string is stored in the application configuration file.
<?xml
version="1.0"
encoding="utf-8"
?>
<configuration>
<configSections>
</configSections>
<connectionStrings>
<add
name="ConnectionStrings2.Properties.Settings.NorthWindAzureConnectionString"
connectionString="Data Source=KARENS-PC;Initial Catalog=NorthWindAzure1;Integrated
Security=True;MultipleActiveResultSets=True;Application Name=EntityFramework"
providerName="System.Data.SqlClient"
/>
</connectionStrings>
<startup>
<supportedRuntime
version="v4.0"
sku=".NETFramework,Version=v4.7.2"
/>
</startup>
</configuration>
Step 1 is to get a list of connections in the configuration file using the following method.
public
List<ProjectConnection> Connections => ConnectionStrings.Cast<ConnectionStringSettings>().Select((item) =>
new
ProjectConnection
{
Name = item.Name.Replace($"{this.GetType().Namespace}.Properties.Settings.",
""),
Provider = item.ProviderName,
ConnectionString = item.ConnectionString
}).ToList();
ProjectConnection class will store details about each connection in the list along with a method to assist populating a ListView
control.
Connections method is called in form load event of the form accessing data.
var ops =
new
ConnectionHelper();
_projectConnections = ops.Connections;
/*
* Get connection name
*/
var connectionName = DefaultConnectionPath(CurrentNamespace(), _projectConnections[1].RealName());
Since TableAdapter components create strong typed classes when changing the initial catalog both databases must have the same table with the same column definitions. One may be for test while the other development environment. In the following button click
event the code will toggle between two databases, display the current database, restart the app and load data from the selected database table.
private
void
ToggleCatalogButton_Click(object
sender, EventArgs e)
{
var ops =
new
ConnectionHelper();
_projectConnections = ops.Connections;
var connectionName = DefaultConnectionPath(CurrentNamespace(), _projectConnections[1].RealName());
/*
* Get connection properties for the current connection string in connectionName
*/
var properties = ops.Properties(connectionName);
/*
* Toggle between two databases - both must match for the TableAdapter classes
*/
ops.ChangeInitialCatalog(connectionName, properties.InitialCatalog ==
"NorthWindAzure1"
?
"NorthWindAzure3"
:
"NorthWindAzure1");
connectionName = DefaultConnectionPath(CurrentNamespace(), _projectConnections[1].RealName());
InitialCatalogLabel.Text = $"Current catalog '{ops.Properties(connectionName).InitialCatalog}'";
// restart app to use no catalog
Application.Restart();
}
User interface example
This example uses the example shown above with a listview with buttons which open a secondary form to obtain a server name. Step 1 is to create an instance of the class
ConnectionHelper. Next call
ChangeServer method with the connection string for the first parameter and the server name for the second parameter.
If both server name and initial catalog need to be changed, call the overload of
ChangeServer method. First parameter is the connection name, second parameter is the server name while the last parameter is the catalog name.
Helper methods
When working with connection strings stored in a Windows Form project and the modifications to that project’s configuration file are performed in a class project with a different namespace then the Windows Form project’s namespace conventional methods
to access and modify the connection string must keep this in consideration by using method which can get the Window Form project namespace and open it’s application configuration file rather than when using conventional methods which would attempt to access
connection strings in the class project configuration file.
The following method which resides in the class project gets the namespace of the calling Window Form project’s namespace.
[MethodImpl(MethodImplOptions.NoInlining)]
public
static
stringCurrentNamespace()
{
return
Assembly.GetCallingAssembly().EntryPoint.DeclaringType.Namespace;
}
The following method creates a string path to the connection string in the Windows Form project configuration file.
/// <summary>
/// Create path to specific setting in caller's configuration file
/// </summary>
/// <param name="projectNamespace">Namespace where configuration file resides</param>
/// <param name="sender"></param>
/// <returns></returns>
public
static
stringDefaultConnectionPath(string
projectNamespace,string
sender)
{
return
$"{projectNamespace}.Properties.Settings.{sender}";
}
The following method asserts if a specific connection string exists in the Windows Form project from the class project.
/// <summary>
/// Determine if a connection string exists
/// </summary>
/// <param name="value"></param>
/// <param name="key">ConnectionString name</param>
/// <returns>true if connection string exists, false if not found</returns>
/// <remarks>
/// Throws an exception if not found, we ignore this.
/// </remarks>
public
static
boolHasConnectionString(this
ConnectionStringSettingsCollection value, string
key)
{
try
{
var location = Assembly.GetEntryAssembly().Location;
return
value[$"{Path.GetFileNameWithoutExtension(location)}.Properties.Settings.{key}"].ConnectionString.Length > 0;
}
catch
{
return
false;
}
}
Container classes
The following class is responsible to store information for a connection string read from a application configuration file used in all examples provided.
using
System.Data.SqlClient;
namespace
DataConnectionLibrary
{
public
class
ConnectionProperties
{
/// <summary>
/// Server name
/// </summary>
public
string
DataSource { get;
set; }
/// <summary>
/// Database to access
/// </summary>
public
string
InitialCatalog { get;
set; }
/// <summary>
/// User id (not used)
/// </summary>
public
string
UserId { get;
set; }
/// <summary>
/// User password (not used)
/// </summary>
public
string
Password { get;
set; }
/// <summary>
/// Name of local database such as one stored for a database
/// stored in the application folder.
/// </summary>
public
string
AttachDbFilename { get;
set; }
/// <summary>
/// True if the database is an attached database, false if not
/// </summary>
public
bool
IsAttached => !string.IsNullOrWhiteSpace(AttachDbFilename);
/// <summary>
/// Describes the different SQL authentication methods that can be used
/// by a client connecting to Azure SQL Database.
/// </summary>
/// <remarks>
/// </remarks>
public
SqlAuthenticationMethod Authentication { get;
set; }
/// <summary>
/// True if integrated security is used, false if not
/// </summary>
public
bool
IntegratedSecurity { get;
set; }
/// <summary>
/// Indicates if the object is valid
/// </summary>
public
bool
IsValid { get;
set; }
}
}
Implementing in a Visual Studio solution
Add the class project DataConnectionLibrary to a Visual Studio solution followed by checking that the .NET Framework uses in projects which will use code in the DataConnectionLibrary class project match.
Add the following NuGet package
BaseConnectionLibrary to the solution when working with the
SqlServerUtilityLibrary where this library is optional
Alternate method to change connections at runtime
When creating a TableAdapter in Visual Studio the following dialog appears when a new connection is required. While there is no dialog in the Visual Studio toolbox the following will explain how to implement in a Windows Form project.
Important note: All code in the class projects are copyrighted to Microsoft while the form example project is not copyrighted to Microsoft.

For experience developers who are interested in modifying the code this is possible as the source code is available in the following
GitHub repository. In the following example a context menu has been added to insert a default server name.

The following method creates the dialog with a parameter passed in which will be the connection string to work with.
public
bool
GetConnection(ref
stringDataSource, bool
SaveConfiguration = false)
{
var success =
false;
var dcd =
new
DataConnectionDialog();
var dcs =
new
DataConnectionConfiguration(null);
dcs.LoadConfiguration(dcd);
if
(DataConnectionDialog.Show(dcd) == DialogResult.OK)
{
DbProviderFactory factory = DbProviderFactories.GetFactory(dcd.SelectedDataProvider.Name);
using
(var connection = factory.CreateConnection())
{
connection.ConnectionString = dcd.ConnectionString;
DataSource = connection.DataSource;
connection.Open();
var cmd = connection.CreateCommand();
cmd.CommandType = CommandType.Text;
cmd.CommandText =
"SELECT * FROM INFORMATION_SCHEMA.TABLES";
var dt =
new
DataTable();
dt.Load(cmd.ExecuteReader());
TableNames = dt.AsEnumerable()
.Select(row => row.Field<string>("table_name"))
.OrderBy(field => field)
.ToList();
}
var builder =
new
SqlConnectionStringBuilder() { ConnectionString = dcd.ConnectionString };
ServerName = builder.DataSource;
InitialCatalog = builder.InitialCatalog;
if
(SaveConfiguration)
{
dcs.SaveConfiguration(dcd);
}
if
(TableNames.Count > 0)
{
success =
true;
}
}
return
success;
}
When the method returns true the following properties will contain the server name and default catalog to create a connection string.
/// <summary>
/// SQL-Server name returned in GetConnection method
/// </summary>
public
string
ServerName { get;
set; }
/// <summary>
/// SQL-Server database returned in GetConnection method
/// </summary>
public
string
InitialCatalog { get;
set; }
Summary
In this article basics of setting up connection strings in code both using hard coded connections string and connection strings stored in an application configuration file. How to change connection strings stored in an application configuration file at
runtime using classes provided in the accompanying source code and finally the Microsoft Connection dialog to use in your projects.
TableAdapter component should only be used to get up and running for simple projects and should be avoided in general unless time is taken to completely learn the component and ramifications when working with a relation database.
See also
Related resources
Source code
Приветствую всех, в этом примере я покажу как просто создать приложения позволяющее, изменять, обновлять и удалять запись в базе данных SQL.
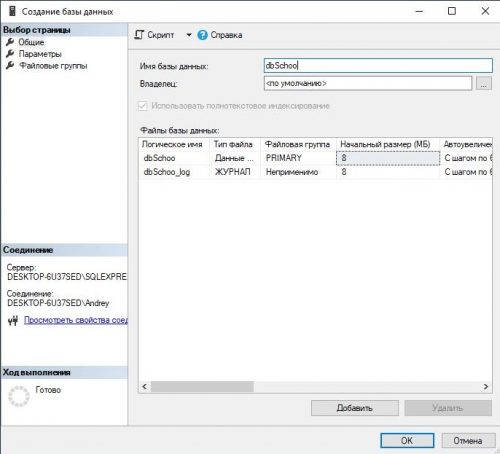
Шаг 1: Откройте менеджер Sql Server, нажмите на новую базу данных . Дайте базе данных имя «dbSchool».
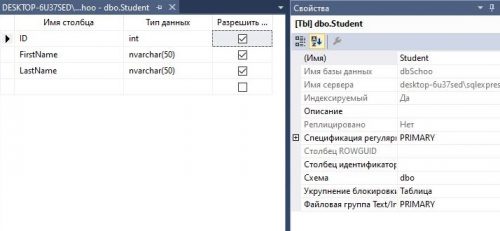
Шаг 2: Теперь создайте таблицу в базе данных, вы можете назвать таблицу как хотите, здесь я назвал его “Student”. Существует три столбца в таблице ID, FirstName и LastName, как показано ниже
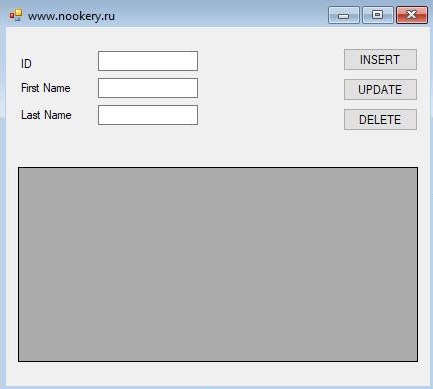
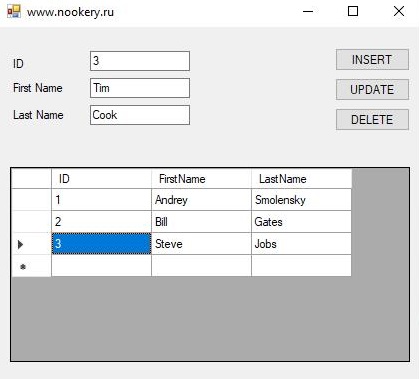
Дизайн Формы:
Код C# :
|
1 2 3 4 5 6 7 8 9 10 11 12 13 14 15 16 17 18 19 20 21 22 23 24 25 26 27 28 29 30 31 32 33 34 35 36 37 38 39 40 41 42 43 44 45 46 47 48 49 50 51 52 53 54 55 56 57 58 59 60 61 62 63 64 65 66 67 68 69 70 71 72 73 74 75 |
using System; using System.Collections.Generic; using System.ComponentModel; using System.Data; using System.Drawing; using System.Linq; using System.Text; using System.Threading.Tasks; using System.Windows.Forms; using System.Data.SqlClient; //For SQL Connection namespace Пример_SQL_Server_приложения { public partial class Form1 : Form //www.nookery.ru { public Form1() { InitializeComponent(); } SqlConnection con; SqlDataAdapter da; SqlCommand cmd; DataSet ds; void GetList() { con = new SqlConnection(@»Data Source=.SQLEXPRESS; Initial Catalog=dbSchool; Integrated Security=True»); da = new SqlDataAdapter(«Select *From Student», con); ds = new DataSet(); con.Open(); da.Fill(ds, «Student»); dataGridView1.DataSource = ds.Tables[«Student»]; con.Close(); } private void Form1_Load(object sender, EventArgs e) { GetList(); } private void button1_Click(object sender, EventArgs e) // Insert Button { cmd = new SqlCommand(); con.Open(); cmd.Connection = con; cmd.CommandText = «insert into Student(ID,FirstName,LastName) values (« + textBox1.Text + «,'» + textBox2.Text + «‘,'» + textBox3.Text + «‘)»; cmd.ExecuteNonQuery(); con.Close(); GetList(); } private void button2_Click(object sender, EventArgs e)//Update Button { cmd = new SqlCommand(); con.Open(); cmd.Connection = con; cmd.CommandText = «update Student set FirstName='» + textBox2.Text + «‘,LastName='» + textBox3.Text + «‘ where ID=» + textBox1.Text + «»; cmd.ExecuteNonQuery(); con.Close(); GetList(); } private void button3_Click(object sender, EventArgs e)//Delete Button { cmd = new SqlCommand(); con.Open(); cmd.Connection = con; cmd.CommandText = «delete from Student where ID=» + textBox1.Text + «»; cmd.ExecuteNonQuery(); con.Close(); GetList(); } } } |
Introduction
In this article, we’ll learn to connect the MySQL Database with the C# .NET Framework application in Visual Studio. This is a foundational hands-on article that will help beginners to connect a widely used freely available database like MySQL in C# through other freely available tools. This article doesn’t require any paid applications or software.
Step 1
First of all, let us start with the installation of XAMPP. XAMPP makes it possible to create a local server with Apache and MySQL databases with other features.
Once the installation is done, the control panel should look something like this.
Step 2
Click on Start on Apache, MySQL, and FileZilla. The buttons turn the labels into Stop.
Step 3
Open your browser and type, localhost/phpmyadmin/
The page will look something like as follows. This is where the database can be accessed, and viewed and instructions can be performed right away. This is the location to access, the MySQL database.
Step 4
Click on Databases.
Now, Under Create Database, Type the name of the new database we are going to create.
Type, TestDB, leave the Collation as it is, and then click on Create.
Step 5
The Database TestDB has now been created. Let us create a Table now.
Step 6
Run the SQL Query
CREATE TABLE PhoneBook
{
    Id int,
    Name varchar(255),
    MobileNo int
};
Step 7
The Table has been created with an empty set and zero rows.
Step 8
You can view the table on the database from the Structure Option in the bar.
Click to browse and see the contents of the table.
Step 9
Now, let us install Visual Studio. The Community Edition is free and can be accessed from the Microsoft Official Website.
Once installed, the Visual Studio Installer can be opened. Now, click on Launch.

Step 10
Click on Create a New Project.
Create the project for Windows Forms App in C#, .NET Framework with the Solution name of your choice.
Step 11
You can see the solution Explorers as shown below with the references and resources all set up for the Framework.
Step 12
Now, let us go to Tools on the Menu Bar and select Connect to Database. There are numerous but no MySQL Database Options. This can be resolved by installing the MySQL Connector and MySQL for Visual Studio.

Step 13
Next, we need to install MySQL Connectors and MySQL for Visual Studio. Visit the following sites to obtain the download file for the respective installations, ADO.NET Driver for MySQL (Connector/NET) and MySQL Installer for Visual Studio.
Download the ADO.NET Driver for MySQL (Connector/NET) and MySQL Installer for Visual Studio 1.2.10 – Microsoft Windows – x86 MSI Installer.
Step 14
Once the MySQL Installations are done, restart Visual Studio.
Step 15
Now, go to Solution Explorer. Right-click on the project, click on Add, and select the Reference.

Step 16
Click on MySql.Data and MySql.DataEntityFramework for EF6 primarily. And then Click on Ok.
Step 17
Now, let us go back to Server Explorer. Double-Click on Data Connections and Choose Add Connections. You’ll be taken to Choose Data Source Option.
Under Data Source, Now, we can see the MySQL Database option. This wasn’t there primarily when we hadn’t installed MySQL Connector and MySQL for Visual Studio.
Step 18
Now, Click on Continue. The Server Name, User Name, Password, and Database Name are to be filled in.
Remember, this is the same as that of your database on the localhost/phpmyadmin
I’ve put in my Server name which is “localhost”, a User name that is “root” and my password. Remember, above we made the Database TestDB for this very experiment. Here, we can use the lowercase name “testdb”.
Click on Test Connection and as the success is prompted, choose OK.
Note
In case any issues occur that prompt an error for database connection, choose the Advanced option and under the SSL Mode, Choose None. This would solve the error.

Step 19
Now, we can see the localhost(testdb) database on our DataConnections with its tables. Remember, the PhoneBook table that we created earlier in phpmyadmin? See, it’s here now.
Step 20
Right Click on the table, and we can see the options for Trigger, Table Script Generation, Query, Designing, and Retrieving Data.

When we choose the generate Table Script, the following script will pop up.
Similarly, if we choose to retrieve data, the data can be seen. Here, since, we haven’t entered any data, NULL is seen.
Step 21
To test, if the connection has been made, let’s go back to localhost/phpmyadmin and insert some data on the table PhoneBook.
When we reload, we can see the NULL has now changed to numerous data on Id, Name, and MobileNo in the phonebook.
Step 22
Moreover, to connect using MySQL Connector/NET for Windows Applications, we can do it through the following code.
MySql.Data.MySqlClient.MySqlConnection conn;
string myConnectionString;

myConnectionString = "server=localhost;uid=root;" +
    "pwd=null;database=testdb";

try
{
    conn = new MySql.Data.MySqlClient.MySqlConnection();
    conn.ConnectionString = myConnectionString;
    conn.Open();
}
catch (MySql.Data.MySqlClient.MySqlException ex)
{
    MessageBox.Show(ex.Message);
}
The above code can be used to integrate MySQL in C# in the native Windows authentication and CRUD operations can then be performed on top of it. We’ll learn more about it in our next article.
Conclusion
Thus, in this article, we learned in step by step process the method to connect the MySQL Database in Visual Studio for C# .NET Framework. We set up XAMPP, Visual Studio, MySQL Connector, and MySQL for Visual Studio and then created a Windows Form App in C# .NET Framework. Lastly, we connected the MySQL database to our Windows Form Application.
Introduction
In this article, we’ll learn to connect the MySQL Database with the C# .NET Framework application in Visual Studio. This is a foundational hands-on article that will help beginners to connect a widely used freely available database like MySQL in C# through other freely available tools. This article doesn’t require any paid applications or software.
Step 1
First of all, let us start with the installation of XAMPP. XAMPP makes it possible to create a local server with Apache and MySQL databases with other features.
Once the installation is done, the control panel should look something like this.
Step 2
Click on Start on Apache, MySQL, and FileZilla. The buttons turn the labels into Stop.
Step 3
Open your browser and type, localhost/phpmyadmin/
The page will look something like as follows. This is where the database can be accessed, and viewed and instructions can be performed right away. This is the location to access, the MySQL database.
Step 4
Click on Databases.
Now, Under Create Database, Type the name of the new database we are going to create.
Type, TestDB, leave the Collation as it is, and then click on Create.
Step 5
The Database TestDB has now been created. Let us create a Table now.
Step 6
Run the SQL Query
CREATE TABLE PhoneBook
{
    Id int,
    Name varchar(255),
    MobileNo int
};
Step 7
The Table has been created with an empty set and zero rows.
Step 8
You can view the table on the database from the Structure Option in the bar.
Click to browse and see the contents of the table.
Step 9
Now, let us install Visual Studio. The Community Edition is free and can be accessed from the Microsoft Official Website.
Once installed, the Visual Studio Installer can be opened. Now, click on Launch.
Step 10
Click on Create a New Project.
Create the project for Windows Forms App in C#, .NET Framework with the Solution name of your choice.
Step 11
You can see the solution Explorers as shown below with the references and resources all set up for the Framework.
Step 12
Now, let us go to Tools on the Menu Bar and select Connect to Database. There are numerous but no MySQL Database Options. This can be resolved by installing the MySQL Connector and MySQL for Visual Studio.
Step 13
Next, we need to install MySQL Connectors and MySQL for Visual Studio. Visit the following sites to obtain the download file for the respective installations, ADO.NET Driver for MySQL (Connector/NET) and MySQL Installer for Visual Studio.
Download the ADO.NET Driver for MySQL (Connector/NET) and MySQL Installer for Visual Studio 1.2.10 – Microsoft Windows – x86 MSI Installer.
Step 14
Once the MySQL Installations are done, restart Visual Studio.
Step 15
Now, go to Solution Explorer. Right-click on the project, click on Add, and select the Reference.
Step 16
Click on MySql.Data and MySql.DataEntityFramework for EF6 primarily. And then Click on Ok.
Step 17
Now, let us go back to Server Explorer. Double-Click on Data Connections and Choose Add Connections. You’ll be taken to Choose Data Source Option.
Under Data Source, Now, we can see the MySQL Database option. This wasn’t there primarily when we hadn’t installed MySQL Connector and MySQL for Visual Studio.
Step 18
Now, Click on Continue. The Server Name, User Name, Password, and Database Name are to be filled in.
Remember, this is the same as that of your database on the localhost/phpmyadmin
I’ve put in my Server name which is “localhost”, a User name that is “root” and my password. Remember, above we made the Database TestDB for this very experiment. Here, we can use the lowercase name “testdb”.
Click on Test Connection and as the success is prompted, choose OK.
Note
In case any issues occur that prompt an error for database connection, choose the Advanced option and under the SSL Mode, Choose None. This would solve the error.
Step 19
Now, we can see the localhost(testdb) database on our DataConnections with its tables. Remember, the PhoneBook table that we created earlier in phpmyadmin? See, it’s here now.
Step 20
Right Click on the table, and we can see the options for Trigger, Table Script Generation, Query, Designing, and Retrieving Data.
When we choose the generate Table Script, the following script will pop up.
Similarly, if we choose to retrieve data, the data can be seen. Here, since, we haven’t entered any data, NULL is seen.
Step 21
To test, if the connection has been made, let’s go back to localhost/phpmyadmin and insert some data on the table PhoneBook.
When we reload, we can see the NULL has now changed to numerous data on Id, Name, and MobileNo in the phonebook.
Step 22
Moreover, to connect using MySQL Connector/NET for Windows Applications, we can do it through the following code.
MySql.Data.MySqlClient.MySqlConnection conn;
string myConnectionString;

myConnectionString = "server=localhost;uid=root;" +
    "pwd=null;database=testdb";

try
{
    conn = new MySql.Data.MySqlClient.MySqlConnection();
    conn.ConnectionString = myConnectionString;
    conn.Open();
}
catch (MySql.Data.MySqlClient.MySqlException ex)
{
    MessageBox.Show(ex.Message);
}
The above code can be used to integrate MySQL in C# in the native Windows authentication and CRUD operations can then be performed on top of it. We’ll learn more about it in our next article.
Conclusion
Thus, in this article, we learned in step by step process the method to connect the MySQL Database in Visual Studio for C# .NET Framework. We set up XAMPP, Visual Studio, MySQL Connector, and MySQL for Visual Studio and then created a Windows Form App in C# .NET Framework. Lastly, we connected the MySQL database to our Windows Form Application.