09.03.2017
Просмотров: 48402
Ранее мы писали о том, как подключить Bluetooth гарнитуру к ПК и какие проблемы при выполнении данного действия могут возникнуть. На этот раз мы рассмотрим способы, как подключить блютуз мышь к ноутбуку с Windows 10. Заранее стоит отметить, что подключить беспроводную мышку можно двумя способами: при наличии приемопередатчика и при его отсутствии.
Подключение устройства с помощью приемопередатчика Bluetooth
Беспроводной девайс, который имеет приемопередатчик, подключается к ПК или ноутбуку под управлением Windows 10 следующим способом:
- Подключаем приемопередатчик к разъёму USB. Он может выглядеть как маленький USB-коннектор и как база с кабелем и специальным разъёмом.

- Включаем блютуз в «Параметрах» Windows
- Вставляем батарейки в мышку и включаем на ней специальную кнопку.

- Зажимаем и удерживаем в течение 3-5 секунд кнопку подключения Bluetooth на приемопередатчике.

- Запустится Мастер-установщик драйверов к мишке. Нужно, чтобы компьютер имел доступ к сети и мог загрузить программное обеспечение. Далее рекомендуем следовать подсказкам.
Если мышку ПК не видит, стоит в параметрах блютуза включить «Разрешить устройствам Bluetooth обнаруживать этот компьютер».

После перезагрузки ПК стоит повторить попытку подключения устройства. Подключенный девайс отобразится в списке гаджетов.
Подключаем мышку через Bluetooth без приемопередатчика
Если у вас в мышке встроенный приемопередатчик, способ подключения устройства ввода информации будет следующим:
- Переключаем на мышке тумблерок в положение «Включено».
- Жмём «Пуск», «Параметры», выбираем «Устройства».

- В новом окне в меню слева нужно выбрать раздел «Bluetooth». Перетаскиваем ползунок в положение «Включено». Сразу запустится поиск устройств.

- После появится мышка в списке устройств. Выделяем её и нажимаем на кнопку «Подключиться».
- Запустится мастер. Следуем подсказкам.
ВАЖНО! Если при подключении мышки появляется запрос на задание ключа доступа, стоит выбрать вариант «Без ключа доступа». Bluetooth-мыши на Windows 10 не работают с ключом доступа.
О том, как подключить Bluetooth-мышку к ПК с Windows 10 смотрите в видео:
Microsoft Bluetooth Mouse — это идеальная мышь для точной прокрутки и навигации. Компактный дизайн упрощает работу в дороге.
Требования
Для настройки вам понадобится компьютер под управлением Windows 11 с поддержкой Bluetooth 4.0 или более поздней версии. Эта мышь поддерживает функцию быстрой связи в Windows 11.
Какая версия Bluetooth на моем компьютере?
Подключение мыши
Чтобы включить мышь, нажмите кнопку Bluetooth в нижней части мыши. Для отключения нажмите кнопку снова.
Связывание мыши с помощью Bluetooth
Включите мышь, а затем следуйте указаниям, чтобы связать ее с компьютером.
-
Нажмите и удерживайте кнопку связывания в нижней части мыши до тех пор, пока индикатор не начнет мигать (около пяти секунд).
-
При появлении уведомления для мыши на компьютере с Windows 11 нажмите Подключить и дождитесь ее настройки.
Не отображается уведомление? Перейдите в> Параметры > Bluetooth &> Добавить устройство >Bluetooth > Microsoft Bluetooth Mouse> Done.
После связывания мыши индикатор перестанет мигать. Индикатор останется включенным до выключения мыши.
Сведения о батарее
Мышь Microsoft Bluetooth использует 1 АА. Если вам нужно заменить батарею, переверните мышь, нажмите маленький язычок, чтобы открыть крышку отсека для батареек, а затем замените батарею. Чтобы экономить заряд батареи, нажимайте кнопку Bluetooth в нижней части для отключения мыши, если вы не используете ее.
Совет: Чтобы в любой момент проверить уровень заряда батареи, выберитеПоиск , введитеBluetooth и откройте Bluetooth & других устройств. Уровень заряда батареи будет показан рядом с мышью.
Скачивание Центра управления мышью и клавиатурой (Майкрософт)
Чтобы изменить основные параметры мыши, нажмите Пуск > Параметры > Bluetooth и устройства > Мышь.
Если вы хотите изменить функции кнопок, параметры прокрутки и другие параметры, скачайте Центр управления мышью и клавиатурой (Майкрософт). Чтобы скачать приложение, см. раздел Скачивание приложения «Центр управления мышью и клавиатурой».
Windows пакеты тем
Заполните внешний вид Windows с помощью эксклюзивных пакетов тем с изображениями, отлично согласованными с мышью Microsoft Bluetooth® Special Edition. Вы можете скачать их при первой настроили мышь или позже, посетив страницу Microsoft Store ниже.
Forest Camo Special Edition
Антаполия Camo Special Edition
Nightfall Camo Special Edition
Microsoft Bluetooth Mouse — это идеальная мышь для точной прокрутки и навигации. Компактный дизайн упрощает работу в дороге.
Требования
Для настройки вам понадобится компьютер под управлением Windows 10 с поддержкой Bluetooth 4.0 или более поздней версии. Эта мышь поддерживает функцию быстрой связи в Windows 10.
Какая версия Bluetooth на моем компьютере?
Подключение мыши
Чтобы включить мышь, нажмите кнопку Bluetooth в нижней части мыши. Для отключения нажмите кнопку снова.
Связывание мыши с помощью Bluetooth
Включите мышь, а затем следуйте указаниям, чтобы связать ее с компьютером.
-
Нажмите и удерживайте кнопку связывания в нижней части мыши до тех пор, пока индикатор не начнет мигать (около пяти секунд).
-
При появлении уведомления для мыши на компьютере с Windows 10 нажмите Подключить и дождитесь ее настройки.
Не отображается уведомление? Выберите Пуск > Параметры > Устройства > Bluetooth и другие устройства > Добавление Bluetooth или другого устройства > Bluetooth > Мышь Microsoft Bluetooth Mouse > Готово.
После связывания мыши индикатор перестанет мигать. Индикатор останется включенным до выключения мыши.
Сведения о батарее
Мышь Microsoft Bluetooth использует 1 АА. Если вам нужно заменить батарею, переверните мышь, нажмите маленький язычок, чтобы открыть крышку отсека для батареек, а затем замените батарею. Чтобы экономить заряд батареи, нажимайте кнопку Bluetooth в нижней части для отключения мыши, если вы не используете ее.
Совет: Чтобы в любой момент проверить уровень заряда батареи, введите в панели поиска Bluetooth иоткройте параметры Bluetooth & других устройств. Уровень заряда батареи будет показан рядом с мышью.
Скачивание Центра управления мышью и клавиатурой (Майкрософт)
Чтобы изменить основные параметры мыши, выберите Пуск > Параметры > Устройства > Мышь .
Если вы хотите изменить функции кнопок, параметры прокрутки и другие параметры, скачайте Центр управления мышью и клавиатурой (Майкрософт). Чтобы скачать приложение, см. раздел Скачивание приложения «Центр управления мышью и клавиатурой».
Windows пакеты тем
Заполните внешний вид Windows с помощью эксклюзивных пакетов тем с изображениями, отлично согласованными с мышью Microsoft Bluetooth® Special Edition. Вы можете скачать их при первой настроили мышь или позже, посетив страницу Microsoft Store ниже.
Forest Camo Special Edition
Антаполия Camo Special Edition
Nightfall Camo Special Edition
Как подключить беспроводную мышь к ноутбуку или компьютеру?
Уже достаточно долго пользуюсь исключительно беспроводными мышками. Их очень удобно использовать как с ноутбуком, так и со стационарным компьютером. Сменил уже наверное штук пять. Правда, приходилось тратится на батарейки, но последнюю модель взял с возможностью зарядки и очень доволен. Сегодня статья не о моих гаджетах, а о том, как подключить беспроводную мышь к ПК, или ноутбуку на Windows. Сам процесс подключения не очень сложный, но раз народ спрашивает, значит не всегда получается подключить. Постараюсь сделать универсальную инструкцию, которая подойдет для разных мышке (Logitech, Rapoo, Trust, Microsoft, Maxxter, Defender, HP, A4Tech, Razer, Speedlink и т. д.), с разным интерфейсом подключения. Беспроводным, разумеется.
Сегодня на рынке в основном представлены беспроводные мышки с такими интерфейсами беспроводного подключения:
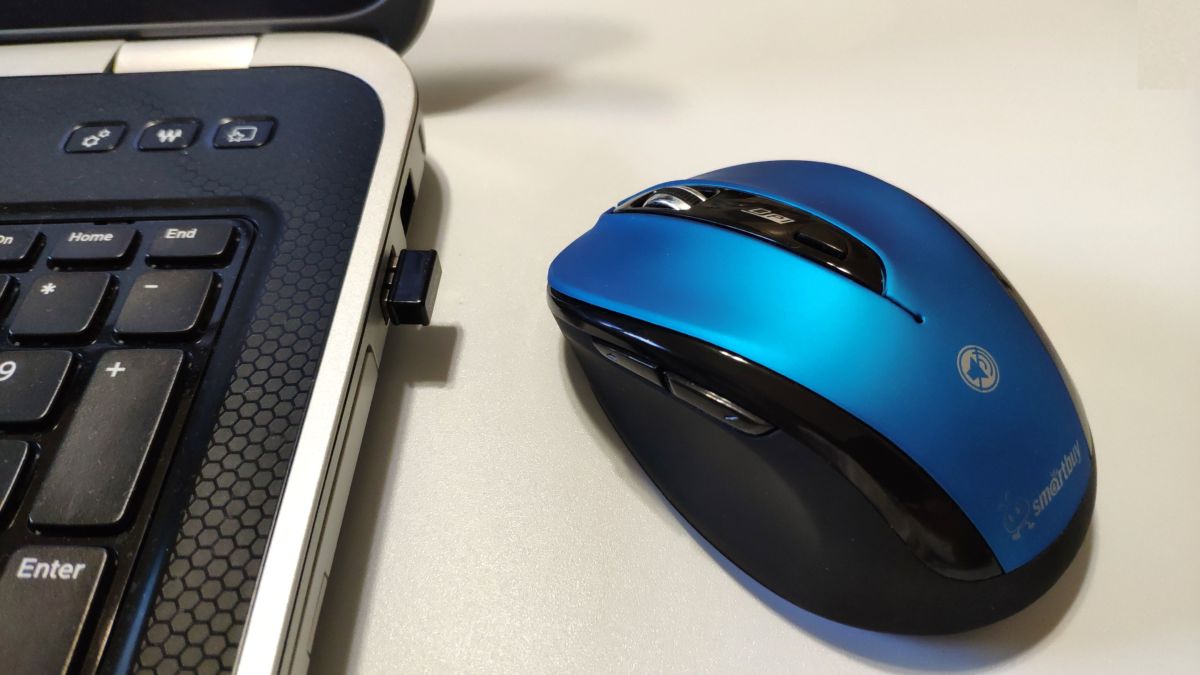
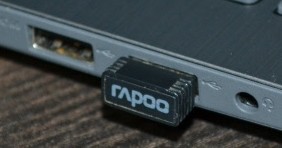
- Радио интерфейс (Wireless) – это те мышки, которые подключаются через специальный USB-адаптер (приемник). Он идет в комплекте с мышкой. Само соединение чаще всего работает на частоте 2.4 ГГц и не редко страдает от помех (от тех же Wi-Fi роутеров). Подключение очень простое: вставили приемник в USB-порт компьютера/ноутбука, включили мышку и все работает. Это самый популярный интерфейс подключения беспроводных манипуляторов.
- Bluetooth – мышек с этим интересом подключения намного меньше по сравнению с обычным радио интерфейсом (которые с приемником). В основном это более дорогие модели. Их очень удобно использовать с ноутбуками, так как в них есть встроенный Bluetooth-модуль. И такая мышка подключается без приемника. А вот для ПК придется покупать USB Bluetooth-адаптер.
- Wireless + Bluetooth – это когда мышка поддерживает два варианта подключения. Через обычный USB радио-адаптер и через Bluetooth (без адаптера на ноутбуках). На выбор.
Думаю, вы знаете, какой интерфейс подключения поддерживает ваша беспроводная мышка. Если нет – смотрите инструкцию и информацию на официальном сайте.

Отдельно рассмотрим процесс подключения через радио интерфейс (USB-адаптер) и отдельно через Bluetooth на примере ноутбука с Windows 10. Там есть отличия. Я имею введу при подключении по Bluetooth.
Подключаем беспроводную радио мышь через USB-адаптер
Если в комплекте с вашей мышкой идет USB-приемник, и это единственный интерфейс подключения (или Bluetooth на вашем компьютере нет/не работает), то нужно этот приемник подключить в USB-порт ноутбука, или стационарного компьютера.

После подключения Windows должна установить драйвера. Я уже сколько беспроводных мышек подключал, еще ни разу не сталкивался с проблемой, когда Windows не может найти, или установить нужный драйвер. Если так случилось, что система не распознает устройство, то можно попробовать скачать драйвер, или ПО с сайта производителя. Пишем в поиске название и модель нашей мышки. Например, «Logitech M185» и в результатах поиска переходим на официальный сайт Logitech. Там уже ищем раздел с загрузками и скачиваем необходимый драйвер. Но вам вряд ли придется этим заниматься.
В мышку вставляем батарейку, или заряжаем ее и включаем. Возможно, после этого загорится индикатор (но его может и не быть).

После этого мышка сразу должна заработать. Если окажется, что после подключения беспроводная мышь не работает, то первым делом:
- Убедитесь в том, что не села батарейка (заменив ее) и она установлена правильно.
- Отключите и снова подключите USB-приемник.
- Перезагрузите компьютер.
- Можно зайти в диспетчер устройств, и посмотреть, появился ли адаптер в разделе «Устройства HID». Если мы подключаем адаптер от мышки Logitech, то там должен появится адаптер «Logitech USB Input Device». Название может отличаться.
- Можно проверить адаптер и мышь на другом компьютере/ноутбуке. Возможно, вам попался брак. Такое тоже бывает.
В большинстве случаев эти устройства подключаются и работают вообще без проблем. Особенно в Windows 10, Windows 8, Windows 7.
Подключение беспроводной мышки через Блютуз (без приемника/адаптера)
Сразу хочу пояснить, что подключить мышку к стационарному компьютеру без адаптера скорее всего не получится. Так как на ПК обычно нет встроенного Bluetooth-модуля. Поэтому, сначала нам необходимо выбрать Bluetooth адаптер для компьютера, затем подключить и настроить Блютуз и только после этого можно подключать Bluetooth-мышку по инструкции. Или использовать Wireless-адаптер, который идет в комплекте (если ваша модель поддерживает этот интерфейс).
С ноутбуками проще, там Блютуз есть встроенный. Правда, он не всегда работает, так как не установлены нужные драйвера. Если на вашем ноутбуке в трее нет иконки Bluetooth и нет адаптера в диспетчере устройств, соответствующих настроек в параметрах, то нужно сначала настроить и включить Bluetooth (на примере Windows 10). А в этой статье есть инструкция для Windows 7.
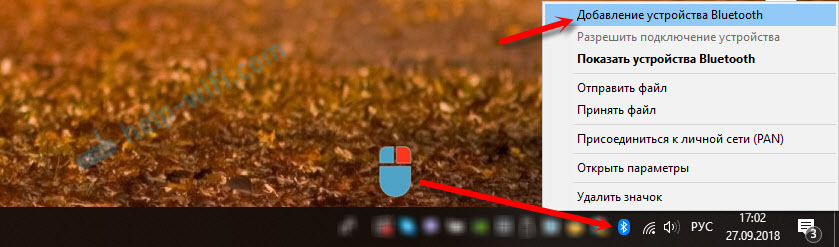
Для подключения нажмите правой кнопкой мыши на иконку Bluetooth и выберите «Добавление устройства».
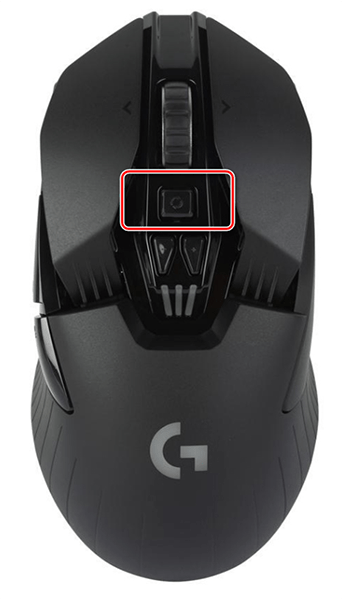
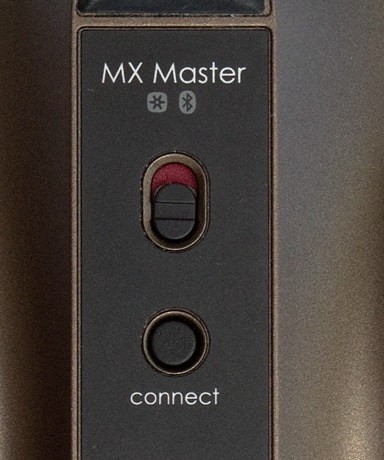
Включите мышку. Дальше нужно активировать режим подключения. Там для этого должна быть кнопка. На моей мышке она подписана как «Connect». Ее нужно нажать (возможно, нажать и подержать). Должен начать активно мигать индикатор. Процесс активации режима подключения конечно же может отличаться в зависимости от производителя и модели мышки. Смотрите инструкцию.

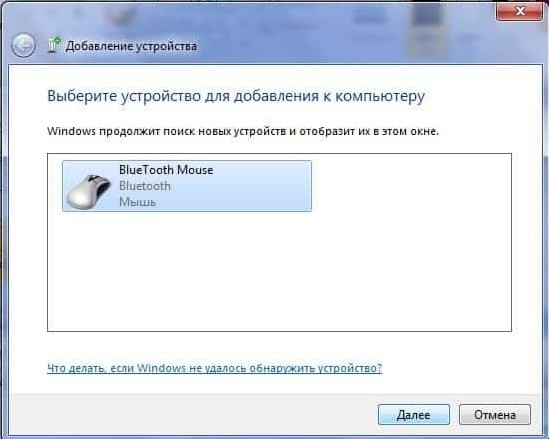
На компьютере, в уже открывшемся окне выбираем пункт «Добавление Bluetooth или другого устройства». Дальше нажимаем на пункт «Bluetooth». Когда в списке появится наша мышка, просто нажмите на нее. В Windows 7 сразу откроется окно, в котором будут отображаться доступные для подключения устройства.

Должно появится сообщение, что устройство готово к использованию.

Мышка уже должна работать. Нажимаем «Готово». Подключение завершено.
В Windows 7 все примерно так же, только сами окна и элементы меню выглядят иначе.
Совет! После подключения рекомендую скачать и установить программное обеспечение с сайта производителя вашей беспроводной мышки. Или установить его с диска, если он есть. Например, для мышек Logitech – «Logitech Options».
Это программа, с помощью которой можно настроить дополнительные функции. Например, назначить действия на дополнительные кнопки, настроить скорость указателя и т. д. Все зависит от того, какая у вас мышка. Если самая простая, то эта программа вам может и не нужна.
Если компьютер не находит Bluetooth мышь, то первым делом убедитесь, что она включена и активирован режим подключения. Попробуйте подключить ее к другому устройству. Можно даже к телефону или планшету (на Android).
Автоматическое отключение тачпада после подключения беспроводной мыши
На ноутбуках можно все настроить таким образом, что после подключения мышки (беспроводной, или проводной) тачпад будет отключаться автоматически. И это очень удобно, ведь он только мешает. Например, при наборе текста.
Насколько я понимаю, это можно сделать только когда на вашем ноутбуке установлен драйвер на тачпад с сайта производителя ноутбука. Проверил на Lenovo, все работает.
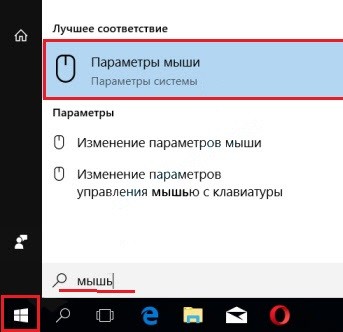
Открываем Пуск (или поиск) и пишем «мышь». Открываем «Параметры мыши».

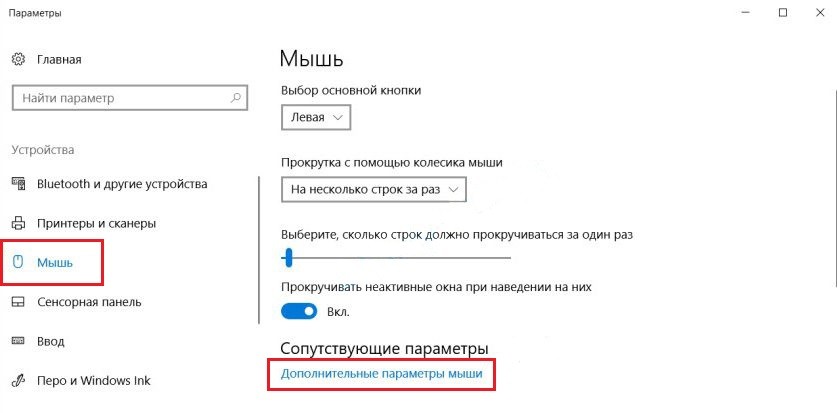
Переходим в «Дополнительные параметры мыши».

В новом окне должна быть вкладка «ELAN» (у вас может быть другая). Нужно перейти на нее и поставить галочку возле пункта «Отключение при подсоединении внешней USB-мыши». Нажимаем «Применить».

Все готово! Теперь тачпад не будет работать, когда мышь подключена.
Если у вас не получилось подключить мышь, возникли какие-то вопросы, или вы хотите поделится полезной информацией по теме статьи – оставляйте свои сообщения в комментариях.

Работа на персональном компьютере подразумевает использование дополнительных, периферийных, устройств. Пользователю необходимо знать, как подключить беспроводную мышь к ноутбуку или стационарному компьютеру, работающему на базе Windows 10. Существуют некоторые особенности подключения беспроводного механизма, с которыми нужно ознакомиться заблаговременно.
Подключаем беспроводную радиомышь через USB-адаптер
В большинстве случаев для соединения необходим дополнительный элемент – адаптер, который поставляется в комплекте с основным объектом (располагается в коробке или в корпусе).
Для работы нужно выполнить несколько простых шагов:
- распаковать комплект элементов;
- вставить адаптер в USB-порт на корпусе персонального компьютера;
- проверить наличие работоспособных батареек;
- на корпусе переключить ползунок в положение «Вкл.».
Если устройство предполагает лазерный тип соединения, появится красноватое свечение. Необходимо пару раз кликнуть любой клавишей мышки по пустому пространству на рабочем столе.
Внимание! Если соединение не установлено, нужно, в первую очередь, проверить работоспособность подключенного порта – вставить другое устройство и флешку, например.

Bluetooth-мышка
Другой вариант соединения – без использования дополнительных элементов, через Bluetooth. Инструкция для пользователей:
- на панели задач найти значок блютуса, кликнуть по иконке правой клавишей мышки, чтобы вызвать контекстное меню объекта;
![]()
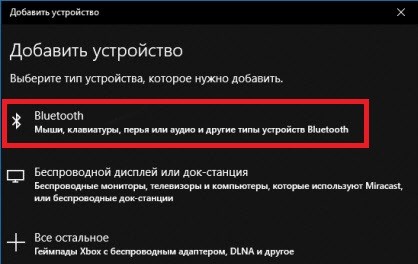
- в представленном списке выбрать строку «Добавление устройства»;
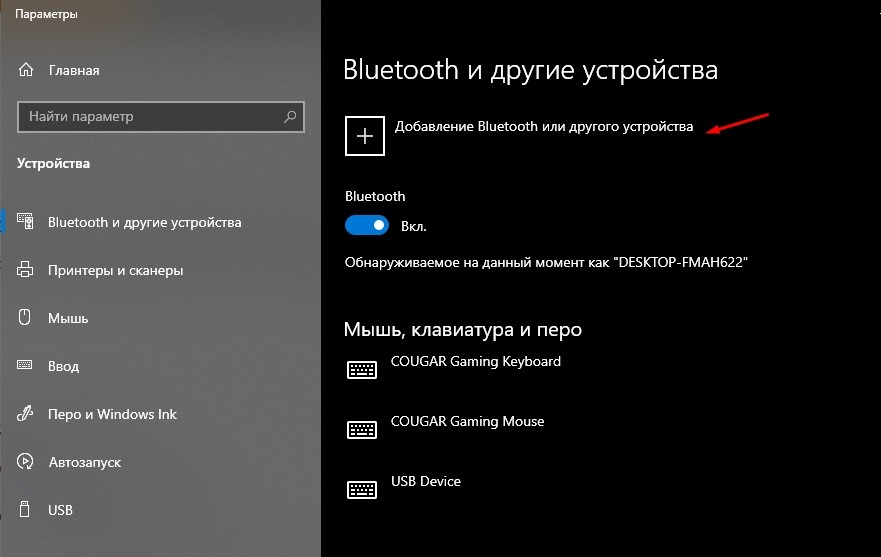
- на мониторе появится дополнительное рабочее окно, где нужно кликнуть по пункту «Добавление Bluetooth или другого устройства»;
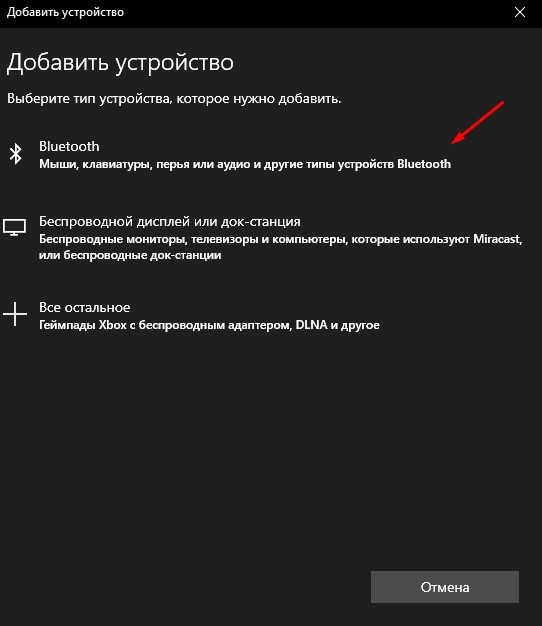
- затем выбрать строку нужного подключения.
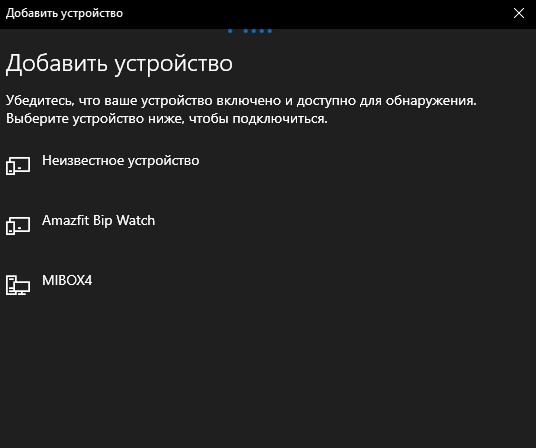
На экране появится список доступных к соединению объектов. Юзеру нужно выбрать мышь, нажать дважды. На ноутбуке пока можно использовать панель сенсорного управления.
После выполнения указанных шагов на экране персонального устройства (стационарного или портативного) появится отдельное уведомление о том, что элемент установлен корректно и полностью готов к работе. Нужно нажать кнопку «Готово» в открытом окне, начать взаимодействие мыши и ПК.
Настройка мыши
После подключения характеристики соединения можно настроить в том порядке, который будет подходить пользователю. Хотя, в большинстве случаев, дополнительной настройки не требуется – после соединения тачпад автоматически отключается, а устройство работает в стандартном порядке. Этапы действий юзера:
- проверить наличие драйверов (на диске в коробке, через сайт производителя ПК или мыши);
- открыть раздел «Диспетчер задач» – если напротив названия элемента стоит желтый треугольник, «дрова» придется переустановить или обновить (кликнуть правой клавишей мышки, выбрать нужный пункт).

Если мышь работает, но пользователя не устраивают некоторые моменты – скорость, чувствительность, иное – можно перенастроить указанные характеристики «под себя». Инструкция:
- по кнопке «Пуск» на мониторе рабочего стола кликнуть правой клавишей тачпада;
- выбрать раздел «Панель управления», затем подраздел «Мышь»;
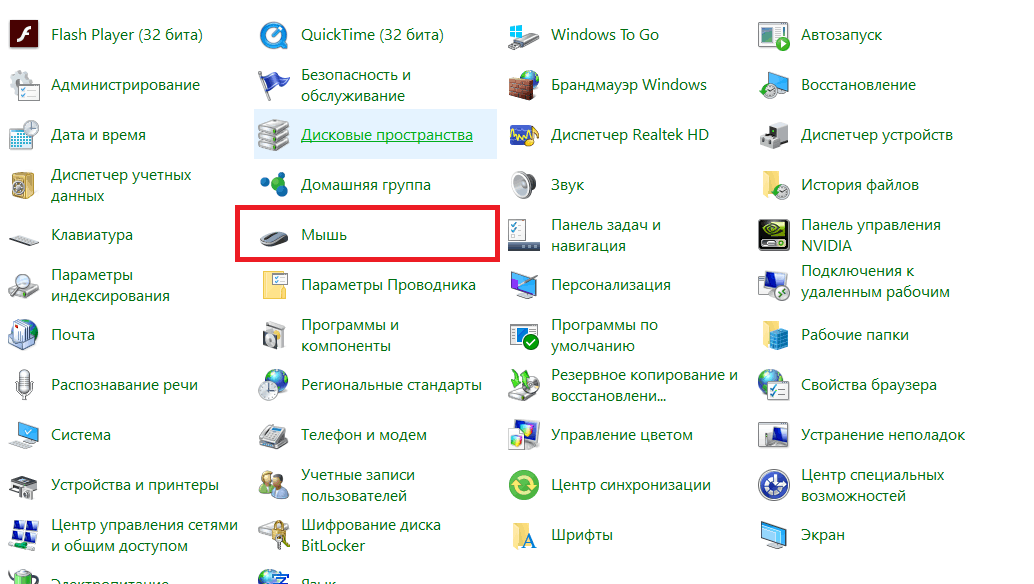
- откроется дополнительное рабочее окно с несколькими вкладками – кнопки, указатели, параметры, колесико.
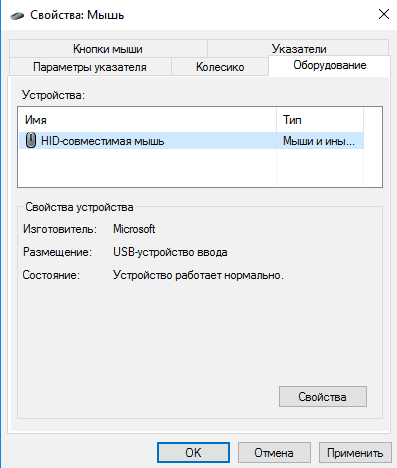
Во вкладке «Оборудование» можно проверить соединение – должна отображаться строка «Устройство работает нормально». В других – можно изменить характеристики движения и чувствительности отображения.
Подключение беспроводных устройств – несложная процедура, инструкции подойдут начинающим пользователям. Стоит обратить внимание на некоторые разделы и настройки в том случае, если успешное соединение не было установлено сразу.
![]()
Download Article
Setup instructions for your wireless mouse
![]()
Download Article
- Wireless Receiver
- Windows 11
- Windows 10
- Mac
- Chromebook
- Windows 7
- Q&A
- Tips
- Warnings
|
|
|
|
|
|
|
|
This wikiHow will show you how to connect a wireless mouse.
Want to use a wireless mouse with your laptop or desktop computer? Whether you have a Bluetooth mouse or a radio frequency (RF) mouse with a receiver, connecting it to your computer will be quick and easy. This wikiHow will walk you through hooking up any wireless mouse to your Windows PC, Mac, or Chromebook.
Things You Should Know
- If using a USB receiver, plug it in to your computer.
- On Windows, turn on Bluetooth in the settings menu.
- On Mac, turn on Bluetooth in the System Preferences menu.
-

1
Plug in your mouse’s receiver. The receiver should fit into one of your computer’s USB ports. You can typically find USB ports, which are thin, rectangular slots, on the sides of laptops and on the front of desktops’ CPU boxes.
- Plugging in the receiver before turning on the mouse will allow your computer to install any drivers or software needed to use the mouse.
-
2
Make sure that your mouse has batteries or is charged. To add batteries, you’ll typically flip the mouse over and remove a panel on the bottom, though some mice instead have their batteries in a compartment in the back of the mouse.
- If you haven’t used the mouse in several months, consider replacing the batteries even if they were new when you inserted them.
- Some mice, such as the Apple Magic Mouse 2, require charging instead of new batteries.
Advertisement
-
3
Turn on your mouse. This typically involves shifting or pressing a button on the bottom of the mouse, though you may need to look for the On/Off switch on the side of the mouse.
- If you can’t find the On/Off switch, consult your mouse’s manual.
-
4
Press your mouse’s «Connect» button. This button’s location will vary based on your mouse’s developer, but you’ll usually be able to find this button either between the two mouse buttons or on the mouse’s side.
- Some mice come listed as «plug and play», meaning that you don’t need to manually connect them or download any software.
-
5
Move your mouse around to test the connection. Once you see the cursor begin to move on-screen, your mouse is connected. You’re ready to start using your computer mouse!
- If your mouse doesn’t start moving, try turning it off and then back on. If applicable, you may also want to change the USB port into which the receiver is plugged.
- See our guide on how to extend the wireless range of a wireless mouse for more troubleshooting tips.


Advertisement
-
1
Turn on your mouse. To do so, you’ll need to locate the «On/Off» switch, which is typically found on the underside of the mouse, and slide it to the «On» position.
- If your mouse uses batteries, you should also make sure it has a fresh set. The battery compartment is also usually on the underside of the mouse.
-
2
Open the Start
menu on your computer. You can do so either by clicking the Windows icon in the bottom-left corner of the screen, or by pressing the ⊞ Win key on your computer’s keyboard.
-
3
Open Settings. Search for “settings” in the Windows search box, then select the Settings app.
-
4
Click Bluetooth & devices. It’s in the sidebar.
-
5
Switch on Bluetooth. Click the switch next to “Bluetooth” so that it says “On.”
-
6
Click Add device. This button is at the top of the Bluetooth & devices page, and has a large plus sign.
-
7
Click Bluetooth
. It’s the first option at the top of the «Add a device» menu. This starts scanning for nearby Bluetooth devices.
-
8
Press and hold the ‘Pairing’ button on your mouse. Most Bluetooth mouses have a pairing button that you must press and hold for a second to make the mouse discoverable via Bluetooth. Typically, an LED light will flash when the mouse is in pairing mode.
- Consult the user manual to find out if your mouse has a pairing button and where it is located.
-
9
Look for the mouse’s name. When Windows detects the Bluetooth mouse, it appears in the list of devices in the «Add a device» window.
- If the mouse doesn’t appear, press and hold the pairing button on your mouse again. Then turn your computer’s Bluetooth off and then on again.
-
10
Click the mouse’s name. Doing so will add your mouse to your computer’s Devices list, and you’ll be able to use it without re-pairing it from then on.


Advertisement
-
1
Turn on your mouse. To do so, you’ll need to locate the «On/Off» switch, which is typically found on the underside of the mouse, and slide it to the «On» position.
- If your mouse uses batteries, you should also make sure it has a fresh set. The battery compartment is also usually on the underside of the mouse.
-
2
Open the Start
menu on your computer. You can do so either by clicking the Windows icon in the bottom-left corner of the screen, or by pressing the ⊞ Win key on your computer’s keyboard.
-
3
Click the Settings icon
. It’s the icon that resembles a gear. It’s near the bottom-left corner of the Start window.
-
4
Click Devices. It’s next to an icon that resembles a keyboard and an iPod. It’s the second option in the Windows Settings menu.
-
5
Click Bluetooth & other devices. It’s the first option in the left sidebar on the page.
-
6
Click the switch
beneath the «Bluetooth» heading. Doing so will enable Bluetooth on your Windows 10 computer.
- If the switch is blue, Bluetooth is already on.
-
7
Click + Add Bluetooth or other device. It’s the first button at the top of the «Bluetooth & Other Devices» menu. This displays the «Add a device» window.
-
8
Click Bluetooth
. It’s the first option at the top of the «Add a device» menu. This starts scanning for nearby Bluetooth devices.
EXPERT TIP
«Your computer will begin searching for a broadcast signal from the mouse, which allows you to pair the two devices.»

Spike Baron
Computer Repair Technician
Spike Baron is the Owner of Spike’s Computer Repair based in Los Angeles, California. With over 25 years of working experience in the tech industry, Spike specializes in PC and Mac computer repair, used computer sales, virus removal, data recovery, and hardware and software upgrades. He has his CompTIA A+ certification for computer service technicians and is a Microsoft Certified Solutions Expert.
Spike Baron
Computer Repair Technician -
9
Press and hold the ‘Pairing’ button on your mouse. Most Bluetooth mouses have a pairing button that you must press and hold for a second to make the mouse discoverable via Bluetooth. Typically, a light will flash when the mouse is in pairing mode.
- Consult the user manual to find out if your mouse has a pairing button and where it is located.
-
10
Look for the mouse’s name. When Windows detects the Bluetooth mouse, it appears in the list of devices in the «Add a device» window.
- If the mouse doesn’t appear, press and hold the pairing button on your mouse again. Then turn your computer’s Bluetooth off and then on again.
-
11
Click the mouse’s name. Doing so will add your mouse to your computer’s Devices list, and you’ll be able to use it without re-pairing it from then on.[1]


Advertisement
-
1
Turn on your mouse. To do so, you’ll need to locate the «On/Off» switch, which is typically found on the underside of the mouse, and slide it to the «On» position.
- If your mouse uses batteries, you should also make sure it has a fresh set. The battery compartment is also usually on the underside of the mouse.
-
2
Click the Apple icon
. It’s the apple-shaped icon in the top-left corner of the screen. This displays the Apple menu.
- If you see the Bluetooth icon in the top-right side of the menu bar, click it instead.
-
3
Click System Preferences. This option is toward the top of the drop-down menu.
- In macOS Ventura, this is called “System Settings.”
-
4
Click Bluetooth
. It’s a blue icon with the white Bluetooth symbol on it.
- For macOS Ventura, Bluetooth is located in the sidebar.
-
5
Click Turn Bluetooth On. It’s on the left side of the window. Doing so will enable your Mac’s Bluetooth.
- Alternatively, you can click the Bluetooth icon in the menu bar in the top-right corner. Then click Turn Bluetooth On in the Bluetooth menu.
-
6
Press and hold the ‘Pairing’ button on your mouse. Most Bluetooth mouses have a pairing button that you must press and hold for a second to make the mouse discoverable via Bluetooth. Typically, a light will flash when the mouse is in pairing mode.
- Consult the user manual to find out if your mouse has a pairing button and where it is located.
-
7
Wait for the mouse’s name to appear. Your Mac constantly scans for nearby Bluetooth devices. When one is detected, it appears in the list of devices in the Bluetooth window [2]
- The Magic Mouse 2 must be turned on and then plugged into your Mac via its USB Lightning charger cable to pair.
-
8
Click Connect next to the mouse’s name. When you see the mouse appear in the list of Bluetooth devices, click Connect next to the device’s name to pair your mouse. Once a connection is established, your mouse is ready to use.


Advertisement
-
1
Turn on your mouse. To do so, you’ll need to locate the «On/Off» switch, which is typically found on the underside of the mouse, and slide it to the «On» position.
- If your mouse uses batteries, you should also make sure it has a fresh set. The battery compartment is also usually on the underside of the mouse.
-
2
Click the time on your Chromebook. It’s in the lower-right corner of the screen.
-
3
Click the Bluetooth
icon. It’s in the menu that appears when you click on the time in the lower-right corner of the screen. This will turn on Bluetooth and take you to a list of devices nearby.[3]
-
4
Click the Bluetooth switch. If Bluetooth is not already turned on, click the switch at the top of the menu. This turns Bluetooth on and starts scanning for nearby Bluetooth devices.
-
5
Press and hold the ‘Pairing’ button on your mouse. Most Bluetooth mouses have a pairing button that you must press and hold for a second to make the mouse discoverable via Bluetooth. Typically, a light will flash when the mouse is in pairing mode.
- Consult the user manual to find out if your mouse has a pairing button and where it is located.
-
6
Click the mouse’s name in the Bluetooth menu. This pairs your Chromebook with the mouse. Once a connection is made, your Bluetooth mouse is ready to use. [4]
[5]


Advertisement
-
1
Turn on your mouse. To do so, you’ll need to locate the «On/Off» switch, which is typically found on the underside of the mouse, and slide it to the «On» position.
- If your mouse uses batteries, you should also make sure it has a fresh set. The battery compartment is also usually on the underside of the mouse.
-
2
Open the Start menu. You can do so either by clicking the Windows icon in the bottom-left corner of the screen, or you can press the ⊞ Win key on your computer’s keyboard.
-
3
Click Devices and Printers. This option should be on the right side of the Start window, just below the Control Panel option.
- If you don’t see this option, type devices and printers into the «Search» field at the bottom of the Start window, then click Devices and Printers when it appears.
-
4
Click Add a device. It’s in the top-left side of the Devices and Printers window.
-
5
Press and hold the ‘Pairing’ button on your mouse. Most Bluetooth mouses have a pairing button that you must press and hold for a second to make the mouse discoverable via Bluetooth. Typically, a light will flash when the mouse is in pairing mode.
- Consult the user manual to find out if your mouse has a pairing button and where it is located.
-
6
Click your mouse’s name. It should appear in the window here.
- If you don’t see your mouse’s name, your Windows 7 computer might not support Bluetooth. You can fix this by purchasing a Bluetooth adapter.
-
7
Click Next. This option is in the lower-right corner of the window.
-
8
Wait for your mouse to finish connecting. This process may take a few minutes. Once it completes, you should be able to move the on-screen cursor with your mouse.


Advertisement
Add New Question
-
Question
What could cause my wireless mouse to stop working?

They all stop working eventually. Try unplugging and replugging the receiver if it has one, maybe into a different port. If it’s a Bluetooth mouse, try turning Bluetooth on and off on your computer. Try restarting your computer. Try the mouse with a different computer and see if it works. Try replacing the batteries if possible. If you’ve done all this and it doesn’t work, it’s just time to replace your mouse.
-
Question
Where is the connect button on a laptop for a wireless mouse when there is no USB key?
The mouse may be Bluetooth, in which case you’ll need to determine if your laptop is Bluetooth-enabled. If so, go through the Bluetooth device connection wizard via Control Panel.
-
Question
Do I need to pay money to do this?
Other than the cost of the mouse, you can install a wireless mouse by yourself and at no cost.
See more answers
Ask a Question
200 characters left
Include your email address to get a message when this question is answered.
Submit
Advertisement
-
You may see a blinking light on your mouse when it is in «pairing» mode.
-
Make sure you replace the batteries on your mouse often, or charge it when it’s not in use.
Advertisement
-
Always turn off your mouse and your computer’s Bluetooth when you’re done using them.
Advertisement
About This Article
Article SummaryX
1. Enable Bluetooth on your computer.
2. Turn on the mouse.
3. Put the mouse into pairing mode.
4. Click Pair on the computer.
Did this summary help you?
Thanks to all authors for creating a page that has been read 2,320,422 times.
Is this article up to date?
![]()
Download Article
Setup instructions for your wireless mouse
![]()
Download Article
- Wireless Receiver
- Windows 11
- Windows 10
- Mac
- Chromebook
- Windows 7
- Q&A
- Tips
- Warnings
|
|
|
|
|
|
|
|
This wikiHow will show you how to connect a wireless mouse.
Want to use a wireless mouse with your laptop or desktop computer? Whether you have a Bluetooth mouse or a radio frequency (RF) mouse with a receiver, connecting it to your computer will be quick and easy. This wikiHow will walk you through hooking up any wireless mouse to your Windows PC, Mac, or Chromebook.
Things You Should Know
- If using a USB receiver, plug it in to your computer.
- On Windows, turn on Bluetooth in the settings menu.
- On Mac, turn on Bluetooth in the System Preferences menu.
-
1
Plug in your mouse’s receiver. The receiver should fit into one of your computer’s USB ports. You can typically find USB ports, which are thin, rectangular slots, on the sides of laptops and on the front of desktops’ CPU boxes.
- Plugging in the receiver before turning on the mouse will allow your computer to install any drivers or software needed to use the mouse.
-
2
Make sure that your mouse has batteries or is charged. To add batteries, you’ll typically flip the mouse over and remove a panel on the bottom, though some mice instead have their batteries in a compartment in the back of the mouse.
- If you haven’t used the mouse in several months, consider replacing the batteries even if they were new when you inserted them.
- Some mice, such as the Apple Magic Mouse 2, require charging instead of new batteries.
Advertisement
-
3
Turn on your mouse. This typically involves shifting or pressing a button on the bottom of the mouse, though you may need to look for the On/Off switch on the side of the mouse.
- If you can’t find the On/Off switch, consult your mouse’s manual.
-
4
Press your mouse’s «Connect» button. This button’s location will vary based on your mouse’s developer, but you’ll usually be able to find this button either between the two mouse buttons or on the mouse’s side.
- Some mice come listed as «plug and play», meaning that you don’t need to manually connect them or download any software.
-
5
Move your mouse around to test the connection. Once you see the cursor begin to move on-screen, your mouse is connected. You’re ready to start using your computer mouse!
- If your mouse doesn’t start moving, try turning it off and then back on. If applicable, you may also want to change the USB port into which the receiver is plugged.
- See our guide on how to extend the wireless range of a wireless mouse for more troubleshooting tips.
Advertisement
-
1
Turn on your mouse. To do so, you’ll need to locate the «On/Off» switch, which is typically found on the underside of the mouse, and slide it to the «On» position.
- If your mouse uses batteries, you should also make sure it has a fresh set. The battery compartment is also usually on the underside of the mouse.
-
2
Open the Start
menu on your computer. You can do so either by clicking the Windows icon in the bottom-left corner of the screen, or by pressing the ⊞ Win key on your computer’s keyboard.
-
3
Open Settings. Search for “settings” in the Windows search box, then select the Settings app.
-
4
Click Bluetooth & devices. It’s in the sidebar.
-
5
Switch on Bluetooth. Click the switch next to “Bluetooth” so that it says “On.”
-
6
Click Add device. This button is at the top of the Bluetooth & devices page, and has a large plus sign.
-
7
Click Bluetooth
. It’s the first option at the top of the «Add a device» menu. This starts scanning for nearby Bluetooth devices.
-
8
Press and hold the ‘Pairing’ button on your mouse. Most Bluetooth mouses have a pairing button that you must press and hold for a second to make the mouse discoverable via Bluetooth. Typically, an LED light will flash when the mouse is in pairing mode.
- Consult the user manual to find out if your mouse has a pairing button and where it is located.
-
9
Look for the mouse’s name. When Windows detects the Bluetooth mouse, it appears in the list of devices in the «Add a device» window.
- If the mouse doesn’t appear, press and hold the pairing button on your mouse again. Then turn your computer’s Bluetooth off and then on again.
-
10
Click the mouse’s name. Doing so will add your mouse to your computer’s Devices list, and you’ll be able to use it without re-pairing it from then on.
Advertisement
-
1
Turn on your mouse. To do so, you’ll need to locate the «On/Off» switch, which is typically found on the underside of the mouse, and slide it to the «On» position.
- If your mouse uses batteries, you should also make sure it has a fresh set. The battery compartment is also usually on the underside of the mouse.
-
2
Open the Start
menu on your computer. You can do so either by clicking the Windows icon in the bottom-left corner of the screen, or by pressing the ⊞ Win key on your computer’s keyboard.
-
3
Click the Settings icon
. It’s the icon that resembles a gear. It’s near the bottom-left corner of the Start window.
-
4
Click Devices. It’s next to an icon that resembles a keyboard and an iPod. It’s the second option in the Windows Settings menu.
-
5
Click Bluetooth & other devices. It’s the first option in the left sidebar on the page.
-
6
Click the switch
beneath the «Bluetooth» heading. Doing so will enable Bluetooth on your Windows 10 computer.
- If the switch is blue, Bluetooth is already on.
-
7
Click + Add Bluetooth or other device. It’s the first button at the top of the «Bluetooth & Other Devices» menu. This displays the «Add a device» window.
-
8
Click Bluetooth
. It’s the first option at the top of the «Add a device» menu. This starts scanning for nearby Bluetooth devices.
EXPERT TIP
«Your computer will begin searching for a broadcast signal from the mouse, which allows you to pair the two devices.»
Spike Baron
Computer Repair Technician
Spike Baron is the Owner of Spike’s Computer Repair based in Los Angeles, California. With over 25 years of working experience in the tech industry, Spike specializes in PC and Mac computer repair, used computer sales, virus removal, data recovery, and hardware and software upgrades. He has his CompTIA A+ certification for computer service technicians and is a Microsoft Certified Solutions Expert.
Spike Baron
Computer Repair Technician -
9
Press and hold the ‘Pairing’ button on your mouse. Most Bluetooth mouses have a pairing button that you must press and hold for a second to make the mouse discoverable via Bluetooth. Typically, a light will flash when the mouse is in pairing mode.
- Consult the user manual to find out if your mouse has a pairing button and where it is located.
-
10
Look for the mouse’s name. When Windows detects the Bluetooth mouse, it appears in the list of devices in the «Add a device» window.
- If the mouse doesn’t appear, press and hold the pairing button on your mouse again. Then turn your computer’s Bluetooth off and then on again.
-
11
Click the mouse’s name. Doing so will add your mouse to your computer’s Devices list, and you’ll be able to use it without re-pairing it from then on.[1]
Advertisement
-
1
Turn on your mouse. To do so, you’ll need to locate the «On/Off» switch, which is typically found on the underside of the mouse, and slide it to the «On» position.
- If your mouse uses batteries, you should also make sure it has a fresh set. The battery compartment is also usually on the underside of the mouse.
-
2
Click the Apple icon
. It’s the apple-shaped icon in the top-left corner of the screen. This displays the Apple menu.
- If you see the Bluetooth icon in the top-right side of the menu bar, click it instead.
-
3
Click System Preferences. This option is toward the top of the drop-down menu.
- In macOS Ventura, this is called “System Settings.”
-
4
Click Bluetooth
. It’s a blue icon with the white Bluetooth symbol on it.
- For macOS Ventura, Bluetooth is located in the sidebar.
-
5
Click Turn Bluetooth On. It’s on the left side of the window. Doing so will enable your Mac’s Bluetooth.
- Alternatively, you can click the Bluetooth icon in the menu bar in the top-right corner. Then click Turn Bluetooth On in the Bluetooth menu.
-
6
Press and hold the ‘Pairing’ button on your mouse. Most Bluetooth mouses have a pairing button that you must press and hold for a second to make the mouse discoverable via Bluetooth. Typically, a light will flash when the mouse is in pairing mode.
- Consult the user manual to find out if your mouse has a pairing button and where it is located.
-
7
Wait for the mouse’s name to appear. Your Mac constantly scans for nearby Bluetooth devices. When one is detected, it appears in the list of devices in the Bluetooth window [2]
- The Magic Mouse 2 must be turned on and then plugged into your Mac via its USB Lightning charger cable to pair.
-
8
Click Connect next to the mouse’s name. When you see the mouse appear in the list of Bluetooth devices, click Connect next to the device’s name to pair your mouse. Once a connection is established, your mouse is ready to use.
Advertisement
-
1
Turn on your mouse. To do so, you’ll need to locate the «On/Off» switch, which is typically found on the underside of the mouse, and slide it to the «On» position.
- If your mouse uses batteries, you should also make sure it has a fresh set. The battery compartment is also usually on the underside of the mouse.
-
2
Click the time on your Chromebook. It’s in the lower-right corner of the screen.
-
3
Click the Bluetooth
icon. It’s in the menu that appears when you click on the time in the lower-right corner of the screen. This will turn on Bluetooth and take you to a list of devices nearby.[3]
-
4
Click the Bluetooth switch. If Bluetooth is not already turned on, click the switch at the top of the menu. This turns Bluetooth on and starts scanning for nearby Bluetooth devices.
-
5
Press and hold the ‘Pairing’ button on your mouse. Most Bluetooth mouses have a pairing button that you must press and hold for a second to make the mouse discoverable via Bluetooth. Typically, a light will flash when the mouse is in pairing mode.
- Consult the user manual to find out if your mouse has a pairing button and where it is located.
-
6
Click the mouse’s name in the Bluetooth menu. This pairs your Chromebook with the mouse. Once a connection is made, your Bluetooth mouse is ready to use. [4]
[5]
Advertisement
-
1
Turn on your mouse. To do so, you’ll need to locate the «On/Off» switch, which is typically found on the underside of the mouse, and slide it to the «On» position.
- If your mouse uses batteries, you should also make sure it has a fresh set. The battery compartment is also usually on the underside of the mouse.
-
2
Open the Start menu. You can do so either by clicking the Windows icon in the bottom-left corner of the screen, or you can press the ⊞ Win key on your computer’s keyboard.
-
3
Click Devices and Printers. This option should be on the right side of the Start window, just below the Control Panel option.
- If you don’t see this option, type devices and printers into the «Search» field at the bottom of the Start window, then click Devices and Printers when it appears.
-
4
Click Add a device. It’s in the top-left side of the Devices and Printers window.
-
5
Press and hold the ‘Pairing’ button on your mouse. Most Bluetooth mouses have a pairing button that you must press and hold for a second to make the mouse discoverable via Bluetooth. Typically, a light will flash when the mouse is in pairing mode.
- Consult the user manual to find out if your mouse has a pairing button and where it is located.
-
6
Click your mouse’s name. It should appear in the window here.
- If you don’t see your mouse’s name, your Windows 7 computer might not support Bluetooth. You can fix this by purchasing a Bluetooth adapter.
-
7
Click Next. This option is in the lower-right corner of the window.
-
8
Wait for your mouse to finish connecting. This process may take a few minutes. Once it completes, you should be able to move the on-screen cursor with your mouse.
Advertisement
Add New Question
-
Question
What could cause my wireless mouse to stop working?
They all stop working eventually. Try unplugging and replugging the receiver if it has one, maybe into a different port. If it’s a Bluetooth mouse, try turning Bluetooth on and off on your computer. Try restarting your computer. Try the mouse with a different computer and see if it works. Try replacing the batteries if possible. If you’ve done all this and it doesn’t work, it’s just time to replace your mouse.
-
Question
Where is the connect button on a laptop for a wireless mouse when there is no USB key?
The mouse may be Bluetooth, in which case you’ll need to determine if your laptop is Bluetooth-enabled. If so, go through the Bluetooth device connection wizard via Control Panel.
-
Question
Do I need to pay money to do this?
Other than the cost of the mouse, you can install a wireless mouse by yourself and at no cost.
See more answers
Ask a Question
200 characters left
Include your email address to get a message when this question is answered.
Submit
Advertisement
-
You may see a blinking light on your mouse when it is in «pairing» mode.
-
Make sure you replace the batteries on your mouse often, or charge it when it’s not in use.
Advertisement
-
Always turn off your mouse and your computer’s Bluetooth when you’re done using them.
Advertisement
About This Article
Article SummaryX
1. Enable Bluetooth on your computer.
2. Turn on the mouse.
3. Put the mouse into pairing mode.
4. Click Pair on the computer.
Did this summary help you?
Thanks to all authors for creating a page that has been read 2,320,422 times.
Is this article up to date?
Содержание
- Как подключить беспроводную мышь к ПК
- Вариант 1: Bluetooth-мышь
- Вариант 2: Радиочастотная мышь
- Вариант 3: Индукционная мышь
- Вопросы и ответы

Беспроводная мышь — это компактный манипулятор с поддержкой Wireless-соединения. В зависимости от используемого типа подключения может работать с компьютером или ноутбуком с помощью индукционного, радиочастотного или Bluetooth-интерфейса.
Как подключить беспроводную мышь к ПК
Ноутбуки с операционной системой Windows поддерживают технологию Wi-Fi и Bluetooth по умолчанию. Наличие беспроводного модуля на материнской плате стационарного компьютера можно проверить через «Диспетчер устройств». Если его нет, то для подключения Wireless-мышки придется докупить специальный адаптер.
Вариант 1: Bluetooth-мышь
Наиболее часто встречающийся тип устройств. Мышки отличаются минимальной задержкой и высокой скоростью отклика. Могут работать на расстоянии до 10 метров. Порядок подключения:
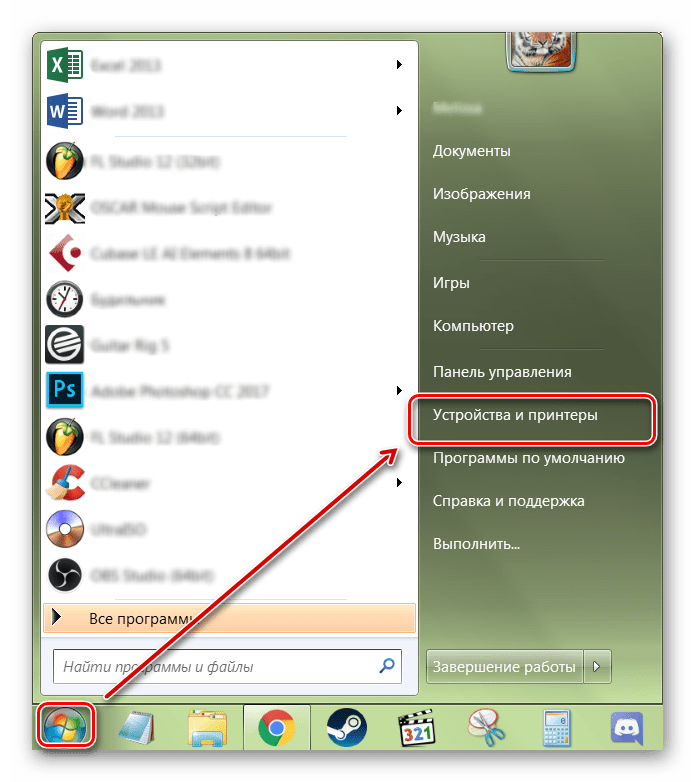
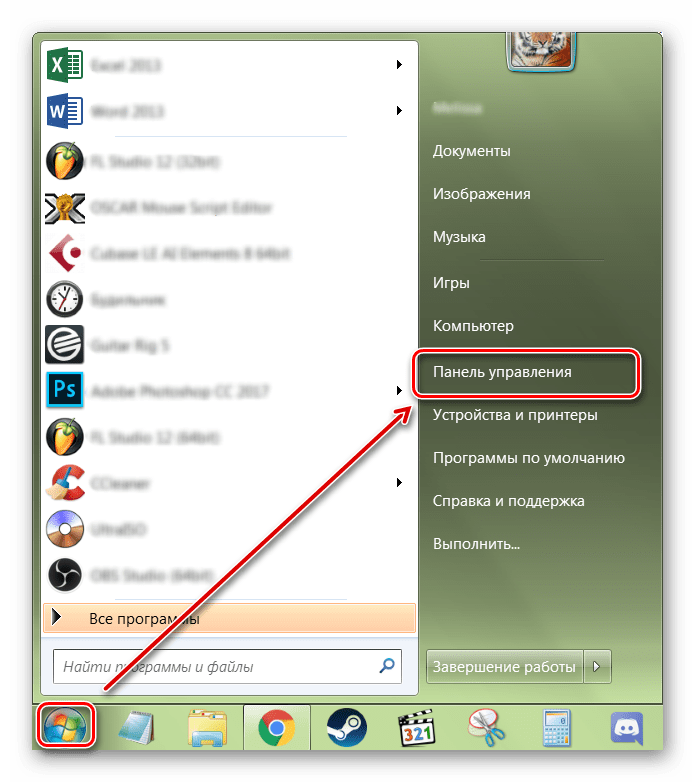
- Откройте «Пуск» и в списке справа выберите «Устройства и принтеры».
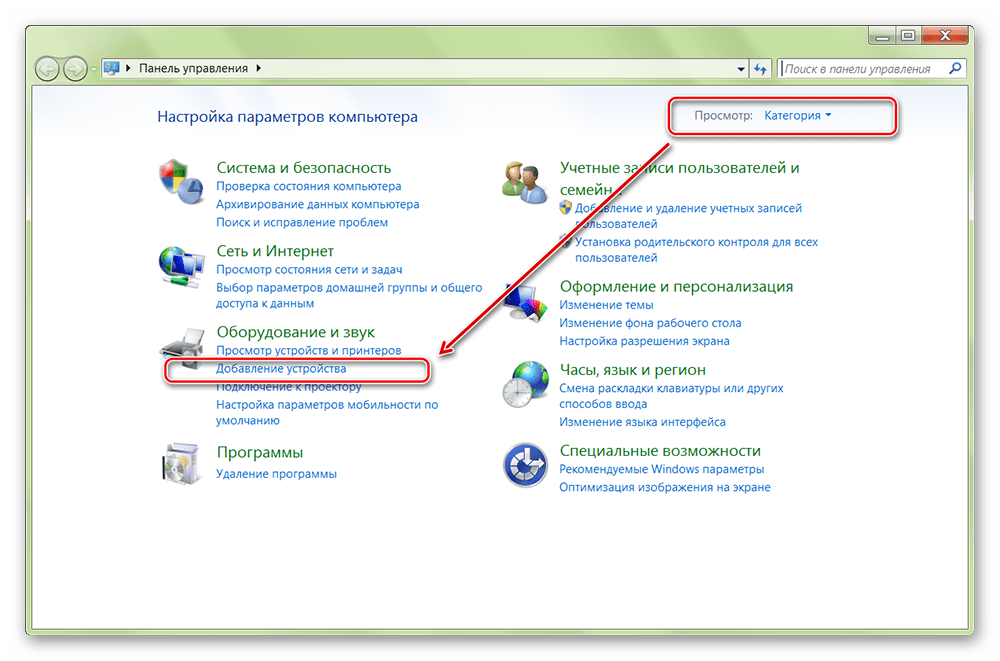
- Если вы не видите эту категорию, то выберите «Панель управления».
- Отсортируйте значки по категории и выберите «Просмотр устройств и принтеров».
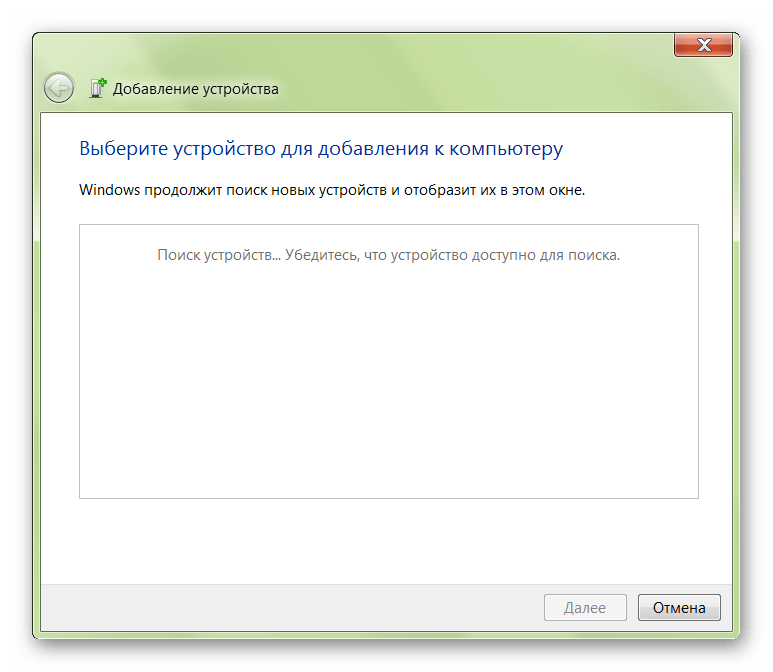
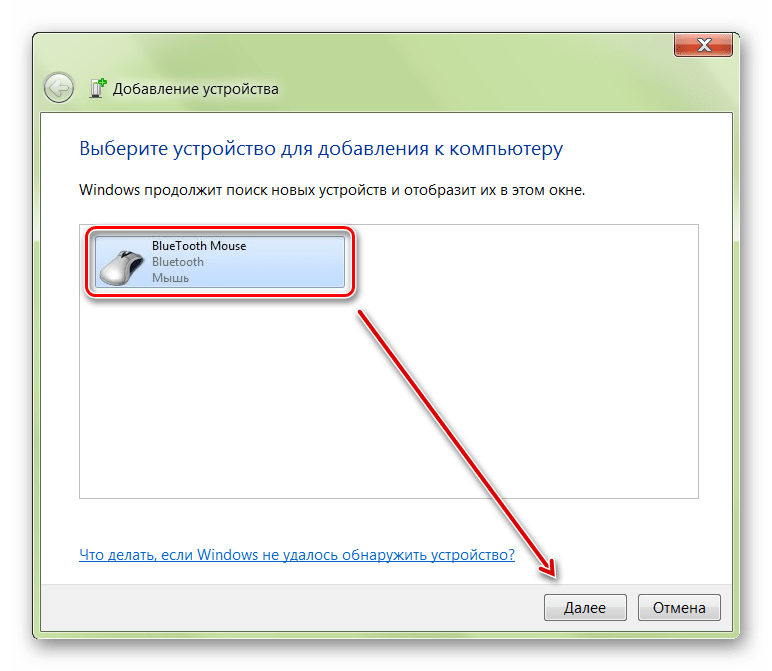
- Отобразится список подключенных принтеров, клавиатур и других манипуляторов. Нажмите «Добавление устройства».
- Включите мышку. Для этого передвиньте переключатель в положение «ON». При необходимости зарядите аккумулятор или замените батарейки. Если на мышке есть кнопка для сопряжения, то нажмите ее.
- В меню «Добавление устройства» отобразится имя мышки (название фирмы, модели). Кликните по нему и нажмите «Далее».
- Дождитесь, пока Windows установит на компьютере или ноутбуке все необходимое программное обеспечение, драйверы и нажмите «Готово».
После этого беспроводная мышка появится в списке доступных устройств. Подвигайте ей и проверьте, перемещается ли курсор по экрану. Теперь манипулятор будет автоматически подключаться к ПК сразу после включения.
Вариант 2: Радиочастотная мышь
Устройства поставляются в комплекте с радиочастотным приемником, поэтому могут использоваться с современными ноутбуками и относительно старыми стационарными компьютерами. Порядок подключения:
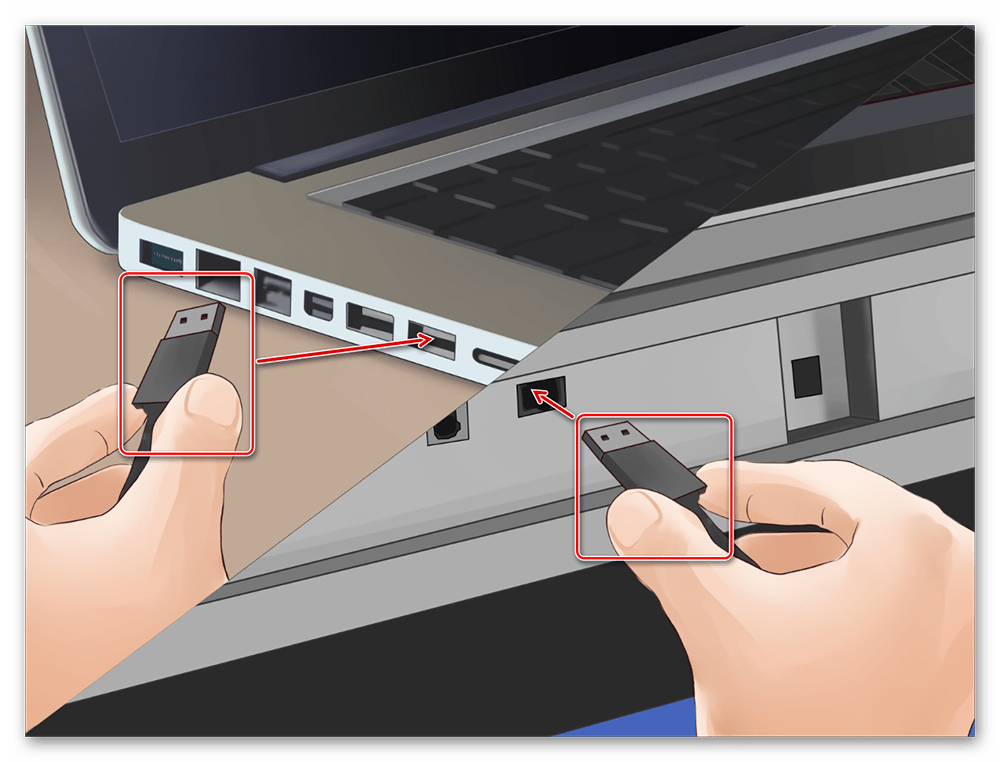
- Подсоедините радиочастотный приемник к компьютеру или ноутбуку через USB-порт. Windows автоматически определит устройство и установит необходимое программное обеспечение, драйверы.
- Установите батарейки через заднюю или боковую панель. Если используете мышку с аккумулятором, то убедитесь, что устройство заряжено.
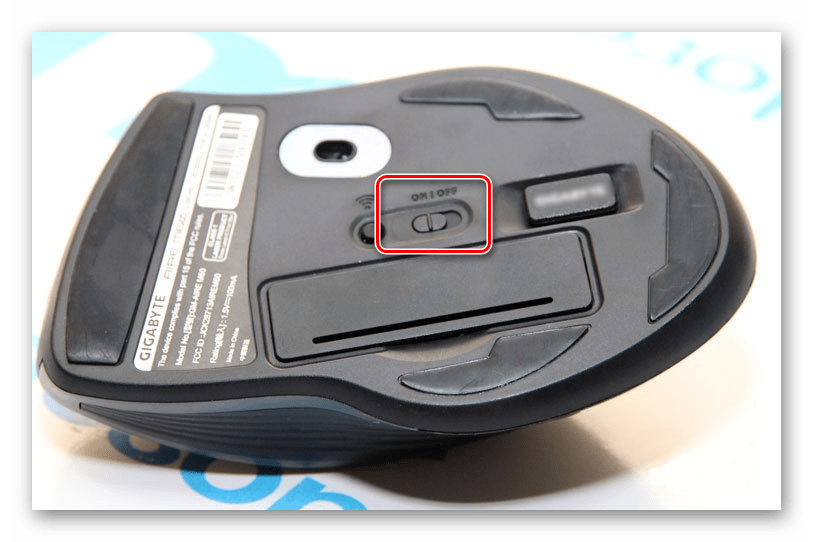
- Включите мышку. Для этого нажмите кнопку на передней панели или переместите переключатель в положение «ON». На некоторых моделях клавиша может находиться сбоку.
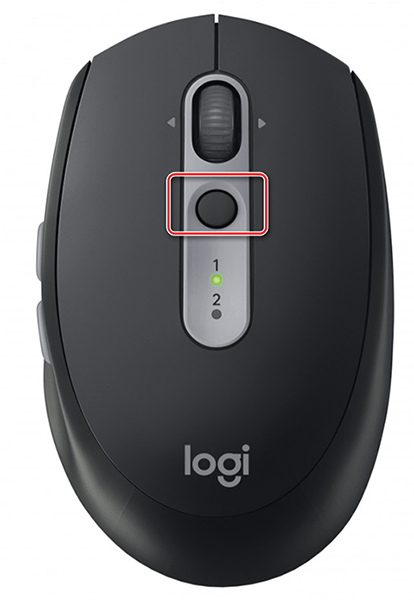
- При необходимости нажмите кнопку «Подключиться» (находится на верхней части). На некоторых моделях она отсутствует. На этом подключение радиочастотной мыши заканчивается.
Если на устройстве есть световой индикатор, то после нажатия кнопки «Подключиться» он начнет мигать, а после успешного подсоединения изменит цвет. Чтобы не тратить заряд аккумулятора, по завершении работы на компьютере передвиньте переключатель в состояние «OFF».
Вариант 3: Индукционная мышь
Мышки с индукционным питанием уже не выпускаются и практически не используются. Манипуляторы работают с помощью специального планшета, который выполняет роль коврика и поставляется в комплекте. Порядок сопряжения:
- С помощью USB-кабеля подключите к компьютеру планшет. При необходимости передвиньте ползунок в состояние «Включено». Дождитесь, пока будут установлены драйверы.
- Установите мышку на центр коврика и не передвигайте ее. После этого на планшете должен загореться индикатор включения.
- Нажмите кнопку «Tune» и начните сопряжение. Индикатор должен сменить цвет и начать мигать.
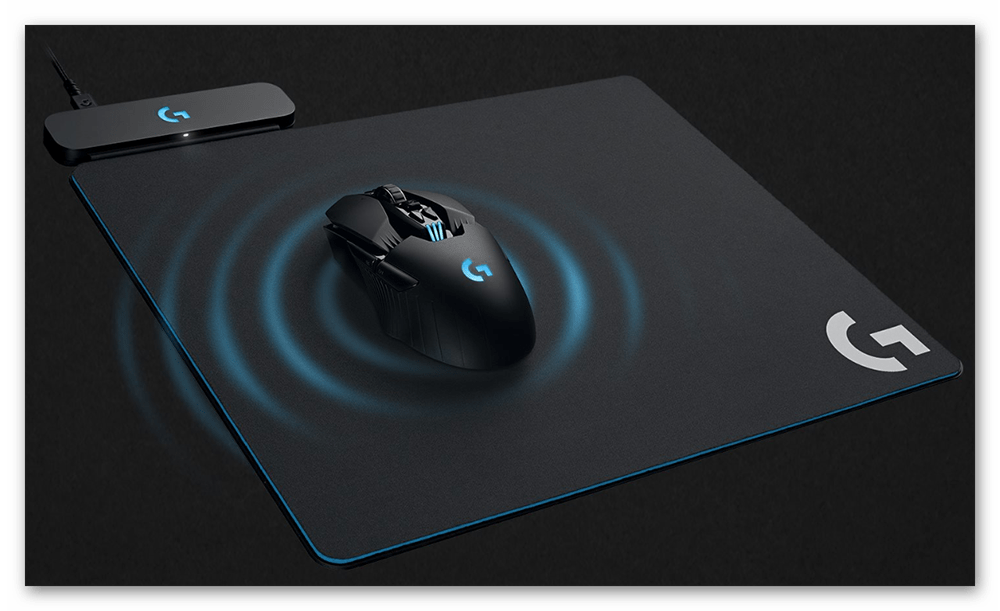

Как только лампочка загорится зеленым цветом, мышку можно использовать для управления компьютером. Устройство нельзя перемещать с планшета и помещать на другие поверхности.
В зависимости от технических особенностей, беспроводные мыши могут подключаться к компьютеру по Bluetooth, с помощью радиочастотного или индукционного интерфейса. Для сопряжения необходим Wi-Fi или Bluetooth-адаптер. Он может быть встроен в ноутбук или приобретен отдельно.
Еще статьи по данной теме:
Помогла ли Вам статья?
Пользуюсь подобными мышами постоянно, так как они достаточно удобные в использовании, но не будем вдаваться в подробности удобства. В статье я подробно расскажу про то, как подключить мышку к компьютеру. Также рассмотрим некоторые проблемы, с которыми может столкнуться каждый из пользователей.
Сначала давайте рассмотрим типы подключения. Самый популярный – это коннект при помощи специального внешнего адаптера. Он работает с помощью радиоволн на частоте 2.4 ГГц. Второй тип обычно использует Bluetooth передачу и дополнительного модуля у него нет. Благо у ноутбуков почти у всех есть «Голубой зуб». Ну и третий тип – это совмещение двух этих подключений.
Посмотреть ТОП-12 лучших беспроводных мышей, вы можете в этой статье!
В статье я рассмотрю оба варианта: при подключении с помощью адаптера и при помощи Bluetooth. Если у вас будут какие-то вопросы, то пишите в комментариях.
ПРИМЕЧАНИЕ! Инструкции подходят для всех моделей: SD Connexion, A4Tech, Abkoncore, ASUS, Aceline, Acer, Apple, Canyon, CoolerMaster, Corsair, Cougar, DEXP, Dark Project, Defender, Fellowes, GAMDIAS, GIGABYTE, Gembird, Genesis, Genius, Glorious, HP, Harper, Huawei, HyperX, Jet.A, Kensington, Lenovo, Logitech, MSI, Mad Catz, Marvo, Microsoft, Oklick, Petriot Memory, QUMO, Qcyber, RITMIX, Razer, Redragon, SPEED-LINK, SVEN, Satechi, Sharkoon, Smartbuy, SteelSeries, ThunderX3, Trust, Tt eSPORTS, Xiaomi, ZET, Zowie.
С адаптером
Данный тип мышей – самый популярный, поэтому скорее всего у вас именно такая мышь. Подключается она также достаточно просто, как к ноутбуку, так и к обычному стационарному компьютеру без Bluetooth. И подключение беспроводной мыши к ноутбуку происходит в один этап.

Найдите под корпусом беспроводной модуль и подключите его к одному из USB разъёмов на ноуте или компе. ПК должен при этом быть включен.
На дне мышки найдите переключатель и передвинет его в состояние «ON». Для выключения, наверное, вы уже поняли, нужно передвинуть в состояние «OFF». Но обычно мышь автоматически выключается и делать это постоянно не нужно.
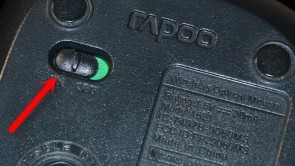
Драйвера должны установиться автоматически, а в правом нижнем углу экрана в трее вы увидите соответствующее уведомление о подключении. Если курсор после этого не двигается, то делаем следующее:
- Можно вытащить и вставить батарейку, которая питает мышку. Возможно, она отошла. Также их можно поменять – возможно, она просто села.
- Перезапустите ПК.
- Переподключите адаптер – просто вытащите и вставьте его обратно. Если ничего не происходит, то просто вставьте его в соседний USB порт – возможно, этот вход не работает.
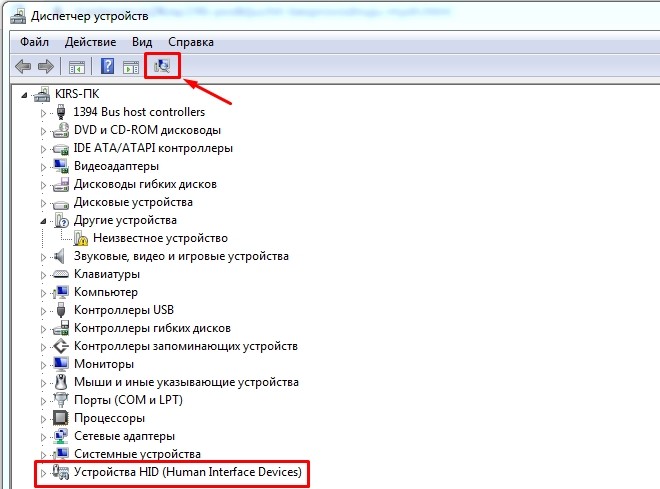
Также можно зайти в «Диспетчер устройств»:
- Нажмите на клавиатуре клавиши «Win» и «R».
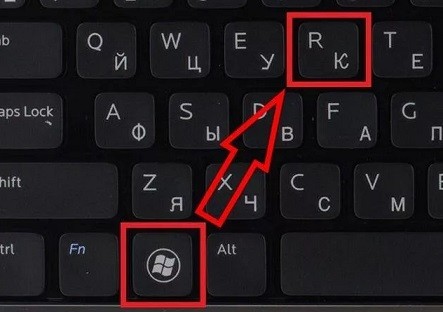
- Прописываем команду: «devmgmt.msc».

- Возможно, у вас отключена функция автоматического поиска драйверов. Нажимаем на значок «Компьютера с лупой» в самом верху. Если это не поможет, то найдите вашу мышку в разделе «Устройства HID (Human Interface Devices)». Устройство должно называться абсолютно также. Нажмите правой кнопкой и далее выберите «Обновить драйверы». Желательно при этом быть подключенным к интернету.
Обычно проблем с подключением не происходит, и драйвера автоматом находятся на всех версиях Windows: 7, 8, 8.1 и 10. Если у вас возникли какие-то трудности, то попробуйте подключить её к другому компьютеру или ноутбуку. В другом случае нужно нести её обратно в магазин.
Подключение по Bluetooth (мышь без адаптера)
Чтобы подключить оптическую Блютуз мышь к ноутбуку – в первую очередь убедитесь, что ваша мышь поддерживает данное подключение. Обычно на дне или сбоку должен быть логотип «Голубого зуба». Также данная информация есть на коробке от мышки.
ВНИМАНИЕ! Если вы собираетесь подключать данную мышку к компьютеру, то убедитесь, что на материнской плате есть поддержка Bluetooth. В другом случае вам нужно будет прикупить дополнительный адаптер
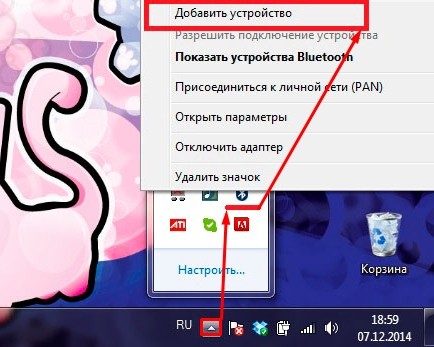
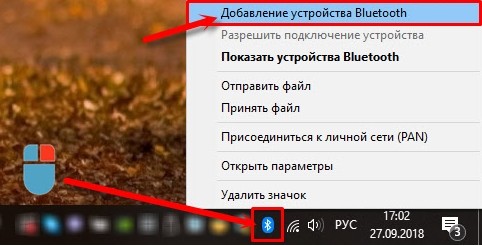
В трее найдите значок «Bluetooth» и нажмите на него правой кнопкой. Далее выбираем кнопку для добавления устройства.
ПРИМЕЧАНИЕ! Если вы не видите данный значок у себя, то нажмите на стрелочку, которая указывает вверх – возможно, он просто скрыт. Если его все равно нет, то проверьте его наличие в диспетчере устройств. Если он отсутствует – то значит скорее всего у вас он не включен и на него не установлены драйвера – по установке Bluetooth есть отдельная подробная статья от моего коллеги тут.
Windows 7
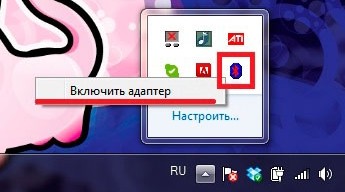
Найдите «Блутус» в трее и включите его, если он ещё не активен – нажимаем правой кнопкой и выбираем «Включить адаптер».
Опять нажимаем правой кнопкой и выбираем «Добавить устройство».
Выбираем вашу мышь из списка. Если вы её не видите, то ещё раз проделайте действия, о которых я написал чуть выше – возможно вы её не включили, или не активировали режим соединения.
Так как мы используем именно мышь, то выбираем «Связывание без кода».
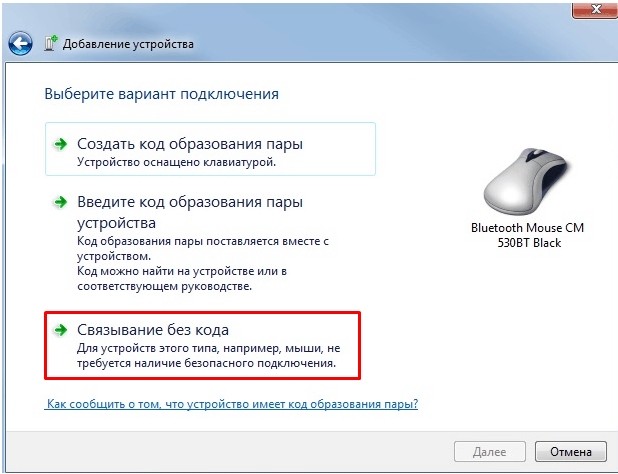
После этого подключение должно быть установлено.
Windows 10
На мышке на дне должна быть кнопка, которая включает «Bluetooth» – вы должны её заметить по соответствующему значку. После включения данной кнопки мышка начнет искать к кому бы подключиться. Чтобы активировать сопряжение, нужно нажать ещё на одну кнопку – чаще всего она называет как «Connect». Понажимайте на неё несколько раз.
Соединение должно уже быть установлено, теперь его надо настроить на ПК. Выбираем пункт «Добавление Bluetooth или другого устройства». Далее выбираем именно подключение по «Блютус».
Теперь среди всех предложенных устройств, вы должны увидеть именно свою мышь – нажмите на неё.

После этого ноутбук и мышь должны приконектиться друг к другу, и вы увидите сообщение об успехе. Попробуйте пошевелить мышкой.

Также я советую дополнительно установить программное обеспечение специально для вашей мыши. Особенно это актуально для крутых игровых устройств, на которых можно настроить более детально чувствительность или запрограммировать некоторые клавиши. Скачать данное ПО можно с официального сайта производителя. Вы можете или зайти на оф. сайт и поискать там вашу мышь, или просто вбить в поисковик полное наименование модели. Точное название модели можно посмотреть на коробке, в инструкции или под корпусом.
Как отключить тачпад (touchpad) на ноутбуке?
Тачпад при работе доставляет много хлопот, так как при печати текста, ты ненароком постоянно соприкасаешься с ним. Но его можно отключить, если у вас на ноутбуке установлена официальная утилита от производителя.
Нажмите на меню «Пуск» и в поиске введите «Мышь» – далее нужно нажать на «Параметры мыши».
В разделе устройства нажимаем на «Дополнительные параметры…».
На одной из вкладок должна быть галочка, которая будет отключать тачпад при подключении подобного устройства. При этом не важно какой аппарат – проводное или беспроводное. В самом конце нажимаем «Применить». Я показал вам на примере бука «Леново», но данная функция есть на всех ноутбуках.

Материалы взяты из следующего источника:
https://wifigid.ru/raznye-sovety-dlya-windows/kak-podklyuchit-besprovodnuyu-myshku-k-noutbuku
Иллюстрация:
https://wifigid.ru/raznye-sovety-dlya-windows/kak-podklyuchit-besprovodnuyu-myshku-k-noutbuku