Если вы настраиваете отказоустойчивый кластер Windows Server 2016 или вы строите кластер Hyper-V Windows Server 2016, вам понадобится общее хранилище для размещения файлов виртуальных машин, т.к. хранение данных и файлов на локальных дисках не очень хорошо с точки зрения отказоустойчивости кластера. Довольно популярным протоколом для доступа к сетевым хранилищам, который используется сегодня повсюду, является iSCSI (Internet Small Computer System), который позволяет передавать команды SCSI через обычную TCP/IP сеть и разработан для установления взаимодействия и управления системами хранения данных, серверами и клиентами. Давайте рассмотрим, как подключить общее хранилище iSCSI на Windows Server 2016.
- Как подключить iSCSI диск по сети в Windows Server 2016
- Инициализация iSCSI диска в консоли управления дисками Windows Server 2016
Содержание:
Как подключить iSCSI диск по сети в Windows Server 2016
В качестве iSCSI initiator в нашем случае будет использоваться наш сервер Windows Server 2016, а в качестве сетевого хранилища — виртуальное устройство FreeNAS, которое используется как iSCSI target. Необходимо проверить настройки брандмауэра, чтобы исключить все возможные проблемы с блокировкой портов и трафика между устройствами. Как правило, для связи, протокол iSCSI использует 860 и 3260 TCP-порты.
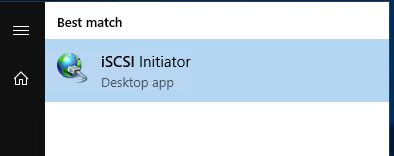
В Windows Server 2016 есть приложение «iSCSI initiator», открыть его можно перейдя в окно поиска и набрав «iSCSI initiator». Запустить приложение можно так же набрав iscsicpl.exe.
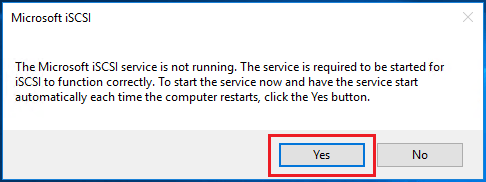
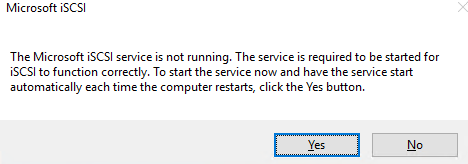
При первом запуске «iSCSI initiator» появится диалоговое окно с информацией о том, что служба Microsoft iSCSI не запущена. Если вы нажмете «Yes», то служба запустится и, в дальнейшем, будет запускаться автоматически.
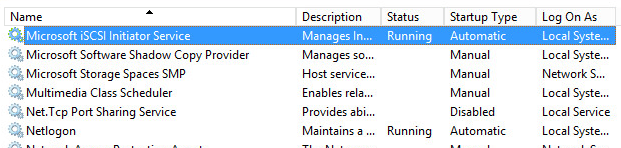
После нажатия в диалоговом окне кнопки «Yes» запустится служба Microsoft iSCSI Initiator Service, это можно увидеть, открыв консоль управления службами (services.msc), а тип ее запуска изменился на «Automatic».
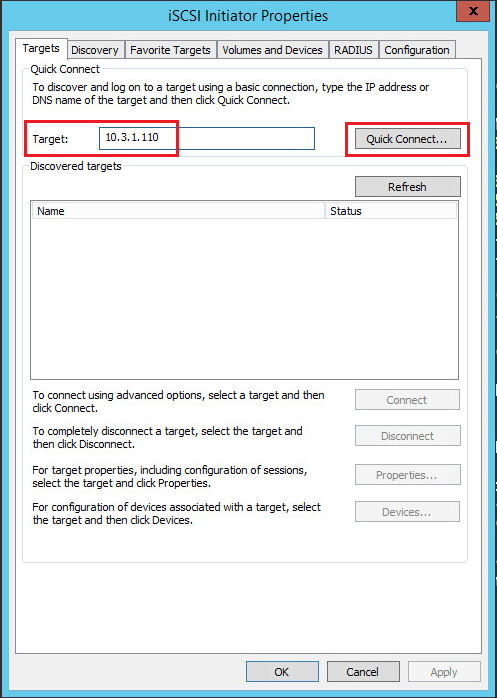
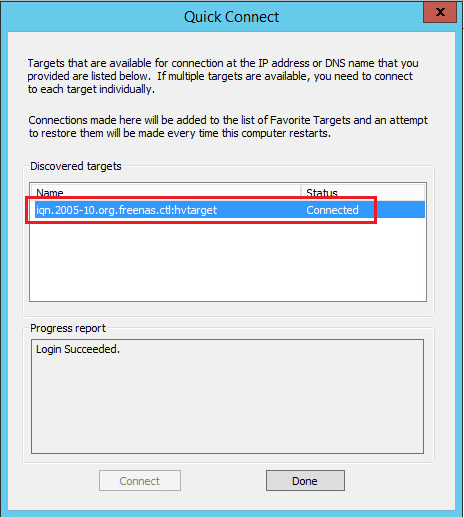
Теперь, когда у нас открыто диалоговое окно свойств iSCSI инициатора, мы можем указать IP-адрес нашего хранилища iSCSI Target. В нашем случае особых настроек для FreeNAS target не потребуется, поэтому нужно только указать его IP адрес и нажать на кнопку «Quick Connect». В результате вы автоматически подключитесь к iSCSI target.
Обратите внимание, что при нажатии кнопки «Quick Connect» можно увидеть статус подключения и target name, которая совпадает с настройками target в FreeNAS.
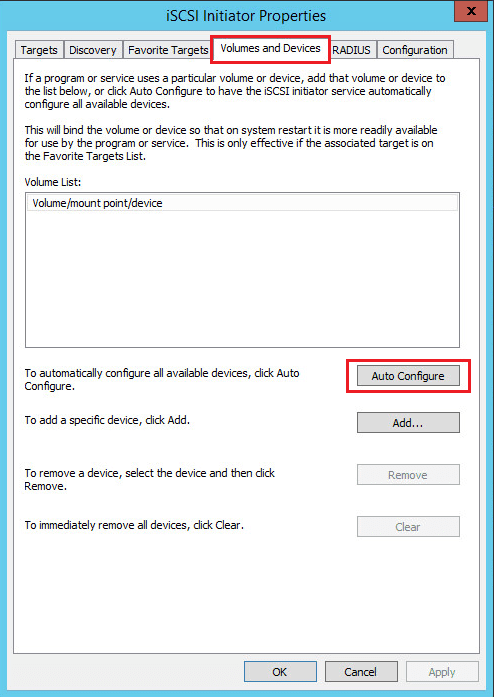
Затем вам нужно щелкнуть по вкладке «Volumes and Devices», чтобы настроить том iSCSI. Здесь также необходимо выбрать параметр «Auto Configure», после этого будут автоматически добавлены и настроены все доступные устройства.

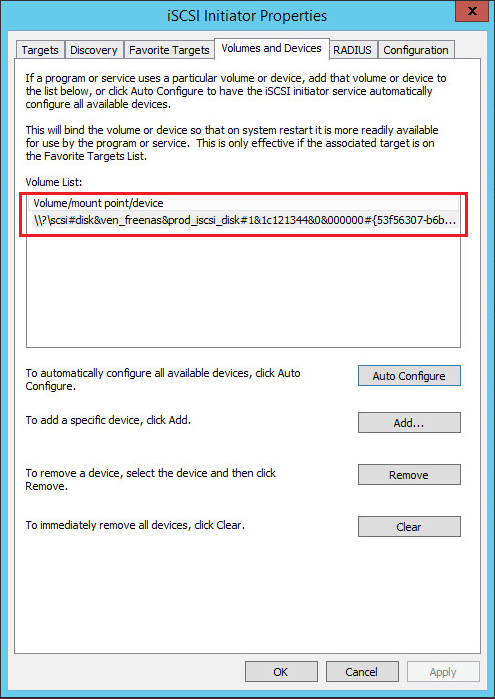
Теперь можно увидеть, что iSCSI диск подключен.

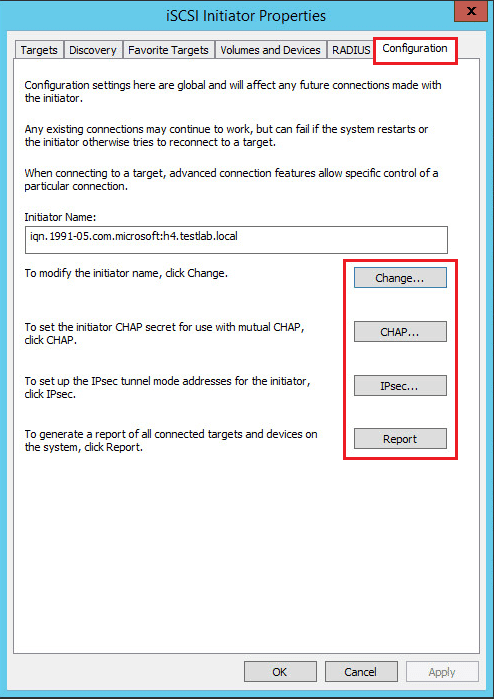
Если необходимо поменять определенные параметры или значения в конфигурации подключения iSCSI, их можно настроить, перейдя на вкладку Configuration. К ним относятся учетные данные CHAP, настройки IPsec и т.д. Вы также можете формировать отчеты о подключенных объектах и устройствах, а также изменять имя инициатора на вкладке Configuration.

Инициализация iSCSI диска в консоли управления дисками Windows Server 2016
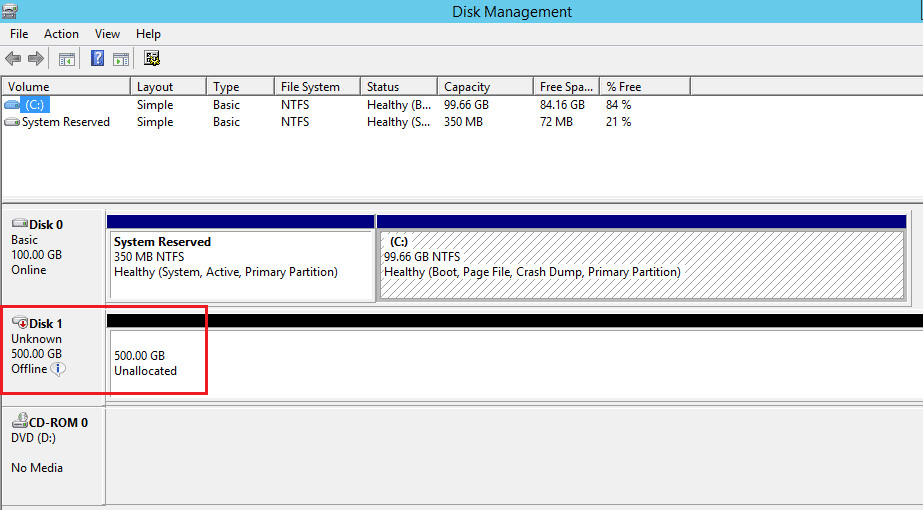
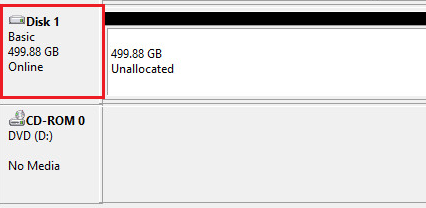
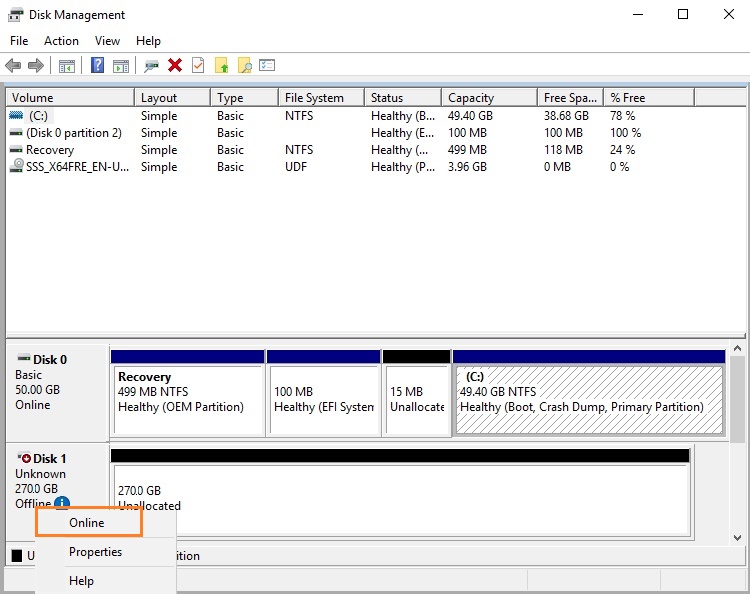
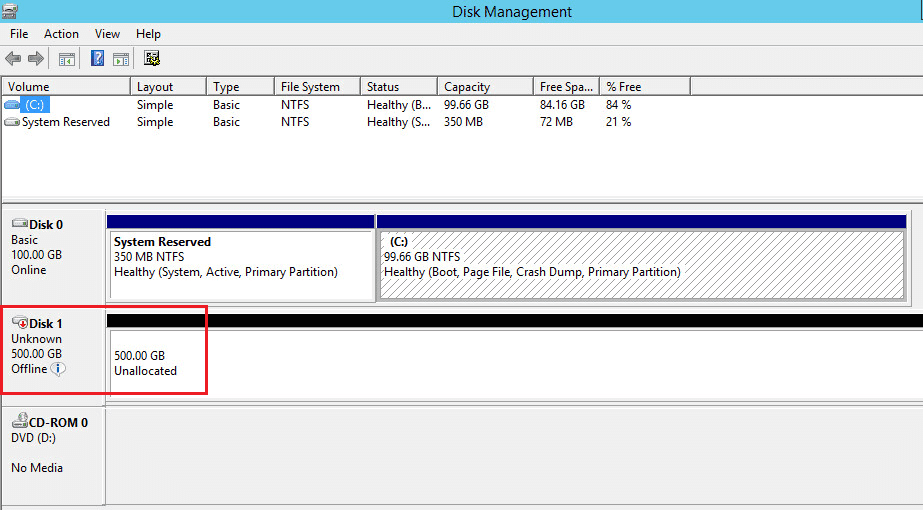
Нам осталось сделать ещё кое-что. Необходимо добавить дисковый раздел в Windows Server 2016 в консоли управления дисками (Disk Management), чтобы этот раздел мог использоваться в системе . Обратите внимание, что после повторного сканирования подключенных устройств хранения появился ещё один диск (с индексом Disk1). Изначально после добавления он находится в статусе «Offline».
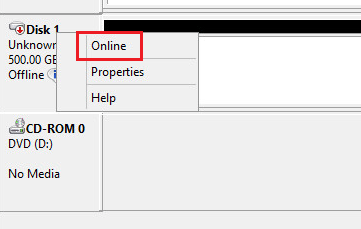
Щелкните правой кнопкой мыши по новому тому с неразмеченной областью) и выберите пункт меню «Online». После этого диск станет активным.
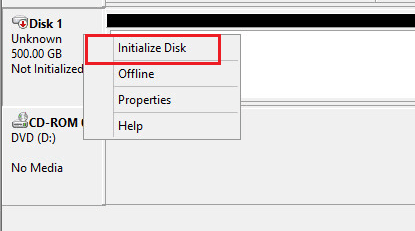
Затем нам нужно инициализировать диск. Для этого снова щелкните правой кнопкой мыши и выберите пункт «Initialize Disk».

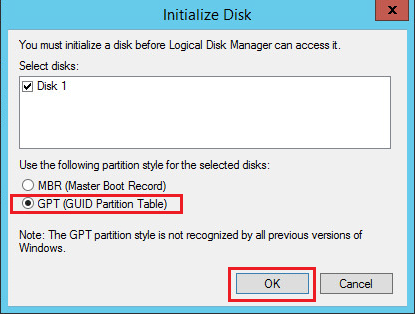
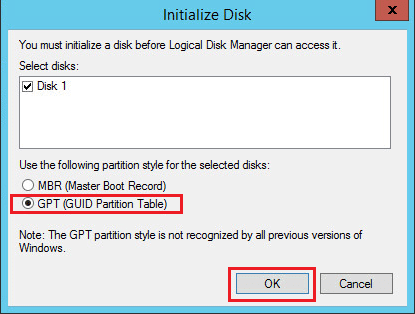
Далее в появившемся окне «Initialize disk» нужно выбрать таблицу разделов, MBR или GPT. Если вам нужна поддержка больших дисков (более 2 Тб), выберите пункт GPT.
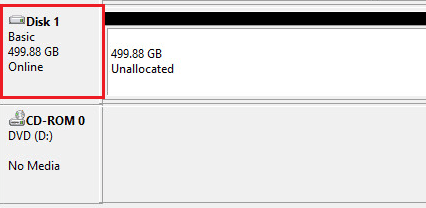
Итак, мы добавили новый диск, который был отформатирован и теперь готов к работе.
Процесс добавления общего хранилища iSCSI в Windows Server 2016 очень прост. После того, как было организовано соединение между initiator и iSCSI- target, нам необходимо выполнить определенные настройки в графическом интерфейсе. Затем, нам остается добавить новый том в консоли управления дисками (Disk management) в Windows, после чего сетевое дисковое хранилище можно использовать.
Это инструкция по подключению iSCSI диска в Windows Server 2016. При заказе услуги iSCSI хранилище в SIM-Networks вы получите сообщение, подобное приведенному ниже (учтите, что значения чисел в адресе сервера могут отличаться от примера-иллюстрации, а вместо букв X,Y или Z в сообщении будут указаны реальные значения для настройки вашего доступа):
Услуга «iSCSI Backup» активирована.
Параметры доступа:
- Адрес сервера (iscsi-target): 185.59.101.184
- Логин: YYY
- Пароль: ZZZ
- Доступ к услуге на данный момент ограничен всего одним IP-адресом — XXX.XXX.XXX.XXX
Подключение диска iSCSI
1. Зайдите в «Панель Управления -> Администрирование» и запустите Инициатор iSCSI.

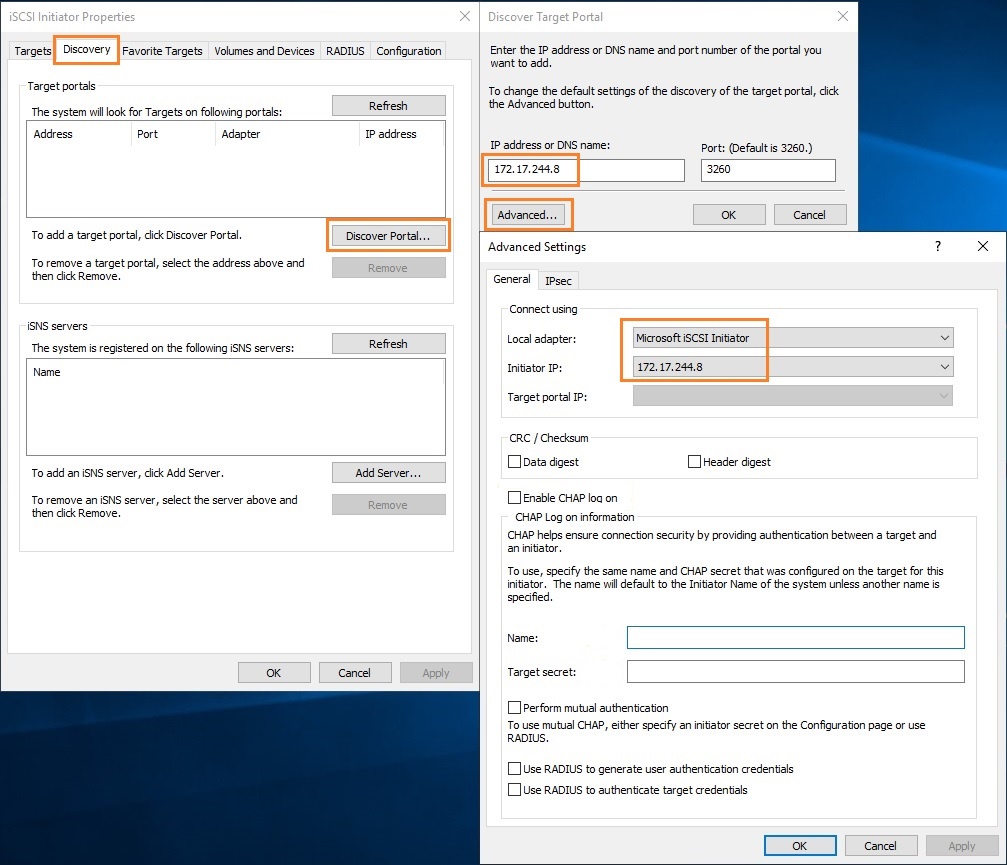
2. В разделе «Свойства» инициатора iSCSI перейдите на вкладку «Обнаружение» и нажмите кнопку «Обнаружить портал».

3. В открывшемся окне заполните поле «IP адрес» сервера iSCSI.

4. Откройте раздел дополнительных параметров подключения к серверу (нажмите кнопку «Дополнительно»). Выберите значения полей «Локальный адаптер» и «IP-адрес инициатора», как на рисунке ниже (где IP-адрес инициатора — это IP вашего локального сетевого адаптера, через который разрешено подключение к серверу iSCSI).

5. Сохраните настройки, убедитесь в получении изображения, подобного приведенному ниже:

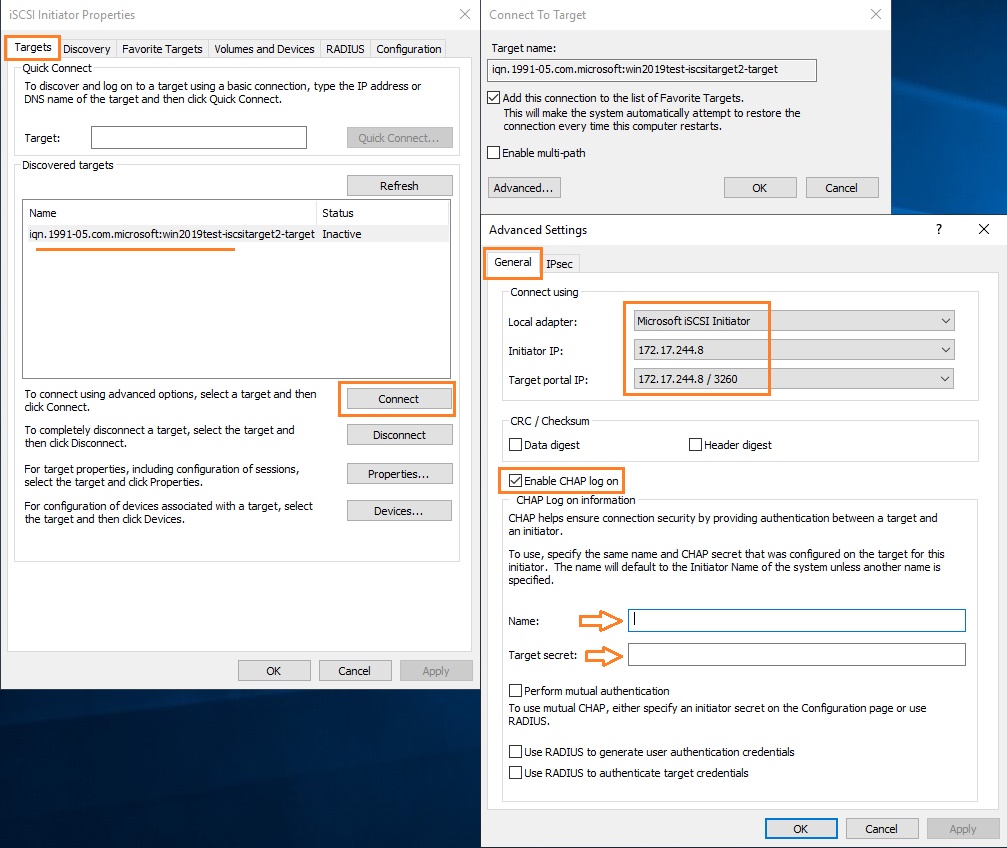
6. В разделе «Свойства» инициатора iSCSI перейдите на вкладку «Конечные объекты», выберите появившийся объект с неактивным состоянием и нажмите кнопку «Подключить».

7. В открывшемся окне «Подключение к конечному объекту», нажмите кнопку «Дополнительно…»

8. Заполните поля раздела, как на рисунке ниже. Параметры «Имя» и «Секрет» — это «Логин» и «Пароль» из письма, отправленного вам при активации услуги.

9. Сохраните настройки. Убедитесь, что значение поля «Состояние» обнаруженного конечного объекта – «Подключено», как на рисунке ниже. Выйдите из раздела «Свойства» Инициатора iSCSI, сохранив настройки.

Инициализация и форматирование диска iSCSI
Подключенный iSCSI диск необходимо подготовить к работе (инициализировать и отформатировать).
10. В разделе «Администрирование» откройте вкладку «Управление компьютером».

11. Перейдите в раздел «Управление дисками».

12. Убедитесь, что ваш диск отображается, его состояние – «Вне сети».

13. Выберите из контекстного меню пункт «В сети».

14. Выполните инициализацию диска.


15. Проверьте, что статус диска изменился на «В сети», но на нём отсутствуют разделы и файловая система.

16. Из контекстного меню на не размеченном диске выберите «Создать простой том».

17. После открытия «Мастера создания простого тома» нажмите кнопку «Далее».

18. Укажите в соответствующем поле размер раздела, или оставьте без изменений значение «по умолчанию» (если необходимо использовать весь диск под один раздел).

19. Назначьте букву диска для нового раздела.

20. Выберите тип файловой системы и метку тома.

21. Нажмите кнопку «Готово» и убедитесь в завершении форматирования тома.

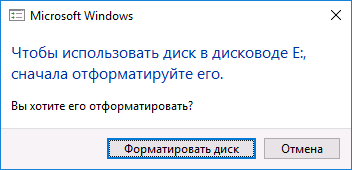
Важно! Во время форматирования может возникнуть окно с предложением отформатировать диск. Необходимо игнорировать этот запрос, закрыть окно и дождаться окончания форматирования.
22. Проверьте, что новый том находится в состоянии «Исправен».

23. Убедитесь, что новый том отображается среди дисков в «Проводнике».

Проверка доступности диска iSCSI для записи
24. Для проверки тома, перейдите к соответствующему диску в «Проводнике» и создайте, к примеру, текстовый файл, как на рисунке ниже:

25. Убедитесь, что при создании файла проблем не возникло – это означает, что новый том iSCSI подключен, отформатирован и работает исправно.

На чтение 3 мин Просмотров 251 Опубликовано 01.07.2022
В этой статье мы разберем как настроить инициатор iSCSI и использовать его для подключения к виртуальному диску iSCSI на target сервере.
В моей предыдущей статье «Настройка и установка iSCSI target Server в Windows Server 2016/2019 объяснил следующее:
- как установить роль iSCSI на Windows Server 2016.
- как создать новый виртуальный диск iSCSI и настроить доступ к серверу.
iSCSI initiator — используется для подключения к внешнему хранилищу на основе iSCSI. Рабочие станции и серверы используют его для монтирования целевого тома в качестве локального тома. Он использует сеть Ethernet на основе IP для связи с target server iSCSI.
Содержание
- Устанавливаем MPIO (multipath i/o)
- Включаем iSCSI initiator
- Настройка iSCSI initiator
- Настройка MPIO
- Включение виртуальных дисков
Устанавливаем MPIO (multipath i/o)
MPIO нужно настраивать на сервере к которому мы будет подключать диски. К серверу на котором будет стоять Роль iSCSI initiator


После добавления поддержки iSCSI устройств , сервер потребует перезагрузку!
Включаем iSCSI initiator
По умолчанию служба iSCSI остановлена. Чтобы использовать его, мы должны запустить службу. Чтобы запустить службу, откройте « Диспетчер серверов » -> Нажмите « Инструменты » и выберите « Инициатор iSCSI ». См. следующее изображение:


start-service MSiSCSI
Настройка iSCSI initiator
Перед настройкой , на всех интерфейсах которые будут взимодействовать с iscsi target сервером отключите IPV6

Чтобы настроить инициатор, откройте Диспетчер серверов -> Нажмите Инструменты и нажмите « Инициатор iSCSI ». Откроется диалоговое окно для его настройки. Здесь вы можете указать IP-адрес или DNS-имя целевого сервера iSCSI ИЛИ целевого портала iSCSI. См. следующее изображение:


Настройка MPIO


Здесь нам надо настроить политику использования путей. Выбирать можно из следующих вариантов:
• Fail Over Only — используется только один путь, указанный в качестве основного (active), остальные пути находятся в режиме ожидания (standby). При недоступности основного пути все подключения переводятся на резервный путь. Как только основной путь становится доступен, все подключения возвращаются обратно на основной путь;
• Round Robin — все возможные пути используются по очереди, для балансировки нагрузки;
• Round Robin with Subset — можно указать несколько основных путей, используемых как в предыдущем режиме Round Robin, а также один или несколько дополнительных путей. Пока доступен хотя бы один из основных путей, система использует их в режиме Round Robin. Если же ни один из основных путей недоступен, то используются дополнительные пути в порядке уменьшения приоритета. Когда восстанавливается работоспособность хотя бы одного из основных путей, система возвращается в режим балансировки.
• Least Queue Depth — запросы направляются на тот путь, который в данный момент имеет наименьшее число запросов в очереди;
• Weighted Paths — для каждого пути назначается некий вес (или стоимость), которая обозначает приоритет использования данного пути. Чем больше вес, тем ниже приоритет, соответственно для операций выбирается доступный путь с наименьшим приоритетом;
• Least Blocks — все запросы направляются на тот путь, в очереди которого на передачу стоит наименьшее число блоков данных.
Для обеспечения отказоустойчивости выберем самый простой вариант — политику Fail Over Only.
Включение виртуальных дисков


Протокол iSCSI (Internet Small Computer System) представляет собой протокол SCSI, работающий с системами хранения данных поверх протокола IP. С помощью iSCSI вы сможете подключать ваши сервера к сетевым хранилищам по обычной TCP/IP сеть без использования FC. В этой статье мы рассмотрим, как настроить iSCSI-хранилище на одном Windows Server 2019 и использовать его на других серверах(в Windows Server 2016 и 2012 R2 все настраивается аналогично). Первый пример использования iSCSI: файловому серверу необходимо дополнительное место, и мы по сети подключаем к нему виртуальный диск с другого сервера-хранилища по iSCSI. Другой пример – построение отказоустойчивого кластера, когда для нескольких серверов необходимо общее хранилище.
Для использования ISCSI-диска нужно на сервере-хранилище настроить виртуальный диск (это обычный vhd/vhdx файл) и опубликовать его в виде iSCSI таргета, к которому подключаются iSCSI инициаторы (другие сервера и устройства).
Содержание:
- Настройка iSCSI target в Windows Server
- Настройка iSCSI Initiator в Windows Server 2019
Настройка iSCSI target в Windows Server
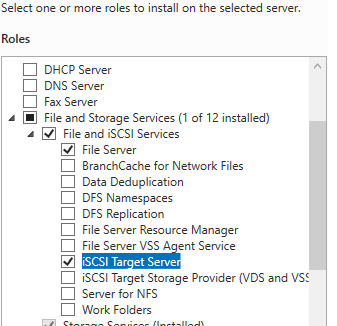
Сначала нужно включить iSCSI target (активировать роль iSCSI Target Server), зайдя в File and Storage Services -> File and iSCSI Services.
Теперь на iSCSI сервере нужно создать виртуальный диск. Для этого необходимо зайти в Server Manager -> File and Storage Services -> iSCSI, нажать To create an iSCSI virtual disk, start the New iSCSI Virtual Disk Wizard.

В мастере создания виртуального iSCSI диска нужно выбрать физический раздел, на котором его нужно разместить. Далее нужно присвоить имя iSCSI диска, указать размер диска и его тип (Fixed Size, Dynamically expanding или Differencing), имя iSCSI таргета.
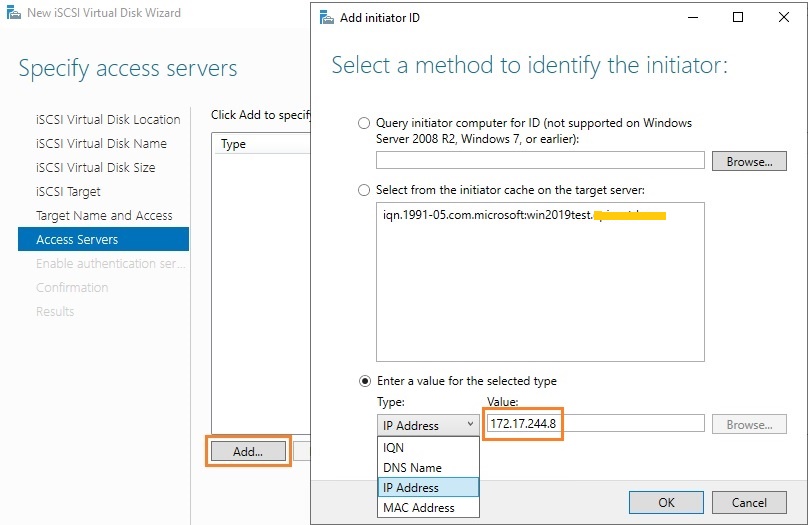
На шаге Access Servers нужно указать серверы (iSCSI инициаторы), которые смогут подключаться к данному iSCSI таргет, выбрав один из вариантов подключения:
- IQN (придется сначала включить iSCSI initiator на сервере и скопировать IQN);
- DNS Name
- IP Address;
- MAC Address.
Пусть используется вариант с IP-адресом.
Следующий шаг в этом мастере – это настройка протокола аутентификации CHAP. Его следует использовать, если необходимо проверять подлинность подключения от инициатора. Далее он включается, вписывается имя пользователя и 12-значный пароль (или длиннее), затем Next -> Next -> Finish. Проверьте, что виртуальный диск iscsiDisk2.vhdx создался в каталоге D:iSCSIVirtualDisks.
Можно создать iSCSI диск с помощью PowerShell. Создадим виртуальный диск размером 200 Гб:
New-IscsiVirtualDisk -Path С:iSCSIVirtualDisksiscsiDisk2.vhdx -Size 200GB.
По умолчанию создается динамический диск размером 4,096 Кб, независимо от того, сколько было указано параметром Size. Динамический диск будет расширяться по мере необходимости.
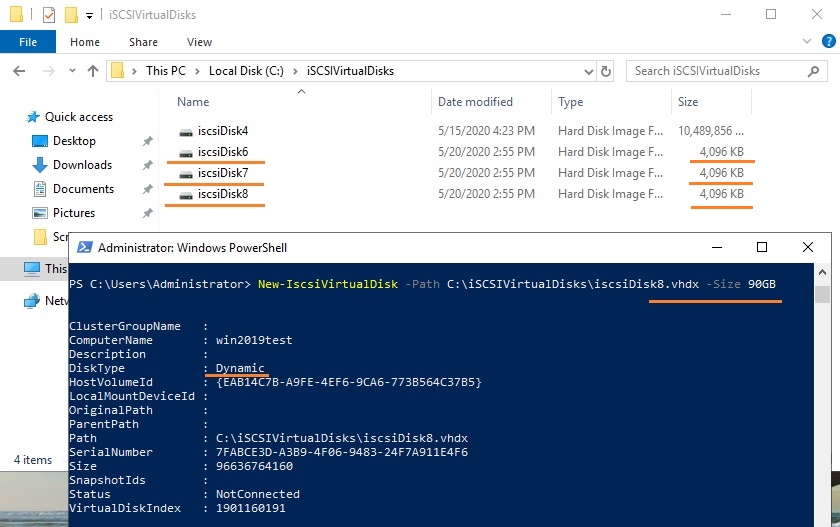
Если нужно использовать диск фиксированного размера (такие диске резервируют место на физическом носителе при создании), то его создать той же командой с дополнительным параметром UseFixed:
New-IscsiVirtualDisk -Path С:iSCSIVirtualDisksiscsiDisk2.vhdx -Size 200GB –UseFixed
Для дисков с высокой активностью и повышенными требованиями к IOPS нужно использовать диски фиксированного размера, т.к. для динамических дисков расходуются дополнительные ресурсы на операции приращения.
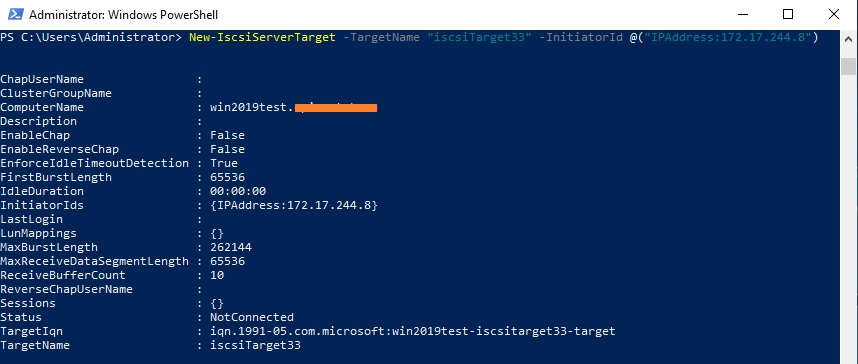
Далее таргету присваивается имя, здесь же можно разрешить к нему доступ с IP-адреса сервера-инициатора:
New-IscsiServerTarget -TargetName "iscsiTarget33" -InitiatorId @("IPAddress:172.17.244.8")
При желании вместо IP-адреса можно использовать IQN имя (iSCSI Qualified Name – уникальный идентификатор iSCSI устройства в сети):
New-IscsiServerTarget -TargetName iscsiTarget33 -InitiatorIds “IQN: 1991-05.com.microsoft:win2019test.ddd.com”
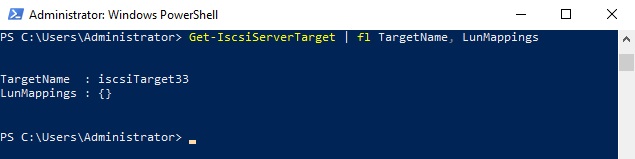
Затем желательно проверить результат:
Get-IscsiServerTarget | fl TargetName, LunMappings
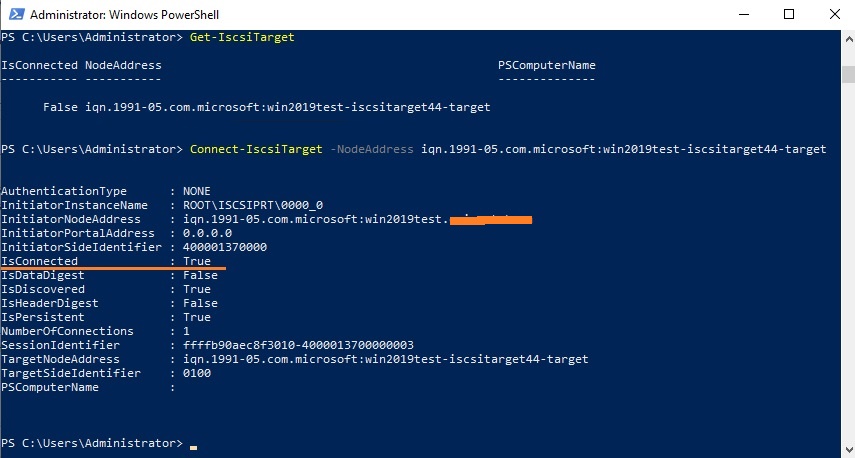
Получить полное имя таргета можно с помощью командлета
Get-IscsiTarget
, а затем подключить таргет:
Connect-IscsiTarget -NodeAddress iqn.1991-05.com.microsoft:win2019test-iscsitarget33-target
Настройка iSCSI Initiator в Windows Server 2019
Следующий шаг – подключение к созданному iSCSI диску со второго сервера-инициатора. Перейдите в панель управления Control Panel, запустите iSCSI initiator (или выполните команду
iscsicpl.exe
).
В консоли управления службами services.msc поставьте автоматический тип запуска для службы Microsoft iSCSI Initiator Service, Или используйте команду:
Set-Service -Name MSiSCSI -StartupType Automatic
Перейдите на вкладку Discovery, нажмите на кнопку Discover Portal и введите ввести IP-адрес первого сервера (iSCSI-таргет). Чтобы трафик ходил только через определённый сетевой интерфейс, нужно нажать кнопку Advanced, и изменить значения по умолчанию в выпадающих списках: Local Adapter –> Microsoft iSCSI Initiator, Initiator IP –> 172.17.244.8.
Для подключения к iSCSI хранилищу необходимо открыть порты 860 и 3260 в Windows Firewall.
Теперь переключитесь на первую вкладку Targets, на ней появится новое подключение. Чтобы включить его, нажмите Connect -> Advanced, выберите значения из выпадающих полей, включите галочку Enable CHAP log on, укажите имя пользователя и 12-значный пароль.
Осталось инициализировать сам iSCSI-диск, который сначала находится в состоянии Offline. Для этого на сервере-инициаторе необходимо в консоли Disk Management в контекстном меню нового диска выбрать пункт Online, а затем – Initialize Disk. Создайте на новом диске один или несколько разделов, присвойте метку и букву диска. Отформатируйте в файловой системе NTFS.
Для быстрой инициализации и форматирования нового диска можно использовать следующий однострочный PowerShell (см. пример в статье об управления дисками и разделами из PowerShell):
Get-Disk |Where-Object PartitionStyle -eq 'RAW' |Initialize-Disk -PartitionStyle MBR -PassThru |New-Partition -AssignDriveLetter -UseMaximumSize |Format-Volume -FileSystem NTFS -Confirm:$false
Примечание: iSCSI-диски не поддерживают файловую систему ReFS.
Теперь этот виртуальный диск, подключенный с другого сервера по протоколу iSCSI можно использовать как обычный локально подключенный диск.
Также вы можете подключить iSCSI диск на инициаторе из PowerShell. Чтобы получить IQN таргета, используйте командлет
Get-iSCSITarget
.
Чтобы подключится к iSCSI таргет выполните команду:
Connect-IscsiTarget –IsPersistent $False и введите IQN.

Если использовалась дополнительная проверка аутентификации CHAP, то необходимо будет это указать, используя следующую конструкцию:
Get-iScsiTarget | Connect-iScsitarget –AuthenticationType ONEWAYCHAP –ChapUserName <username> -ChapSecret <secret>
Если вы хотите обеспечить высокую доступность и балансировку нагрузки для iSCSI дисков, можно использовать несколько избыточные сетевые компоненты (сетевые карты, коммутаторы) и модуль MPIO.
I frequently used FreeNAS for all my LABs and testing. Mostly because I need iSCSI functionality in lot of scenarios with DR and HA functionality. After lot of thinking I decided to try out iSCSI target service on Windows Server 2016.
In this scenario I will be using two machines, both Windows Server 2016 Standard in trial mode.
ISCSI Target:
First one is WS2016iSCSI and that one will be iSCSI target with storage locally attached. Machine is on IP address 10.30.30.5/24
This machine also has two virtual disks attached. One is for the OS and the second one will be used for iSCSI and network storage.
iSCSI Initiator:
Machine that will be using storage provided by iSCSI Target is named WS2016CL2. Machine is on IP address 10.30.30.20/24
There is no domain or any other services configured on these VMs.
First we need to configure iSCSI Target on VM called VM2016iSCSI.
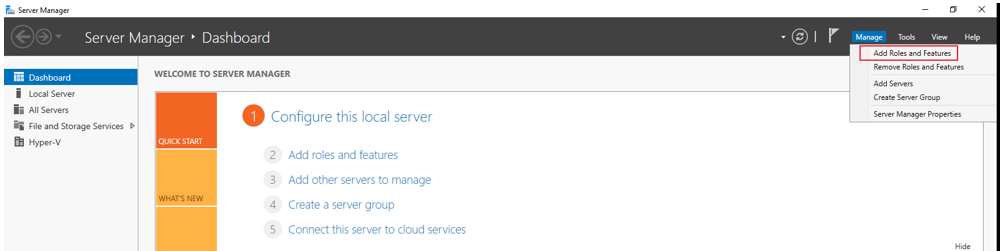
Go to Server Manager | Manage | Add Roles and Features
I will not be going through every screen, just the ones that matter for this LAB.
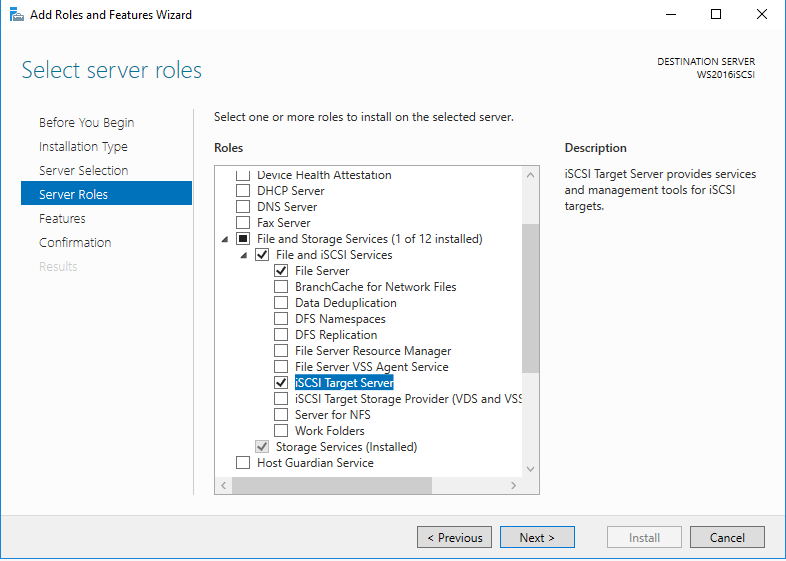
Advance to the Server Roles screen and select File and Storage Services | select File and iSCSI Services | choose iSCSI Target Server
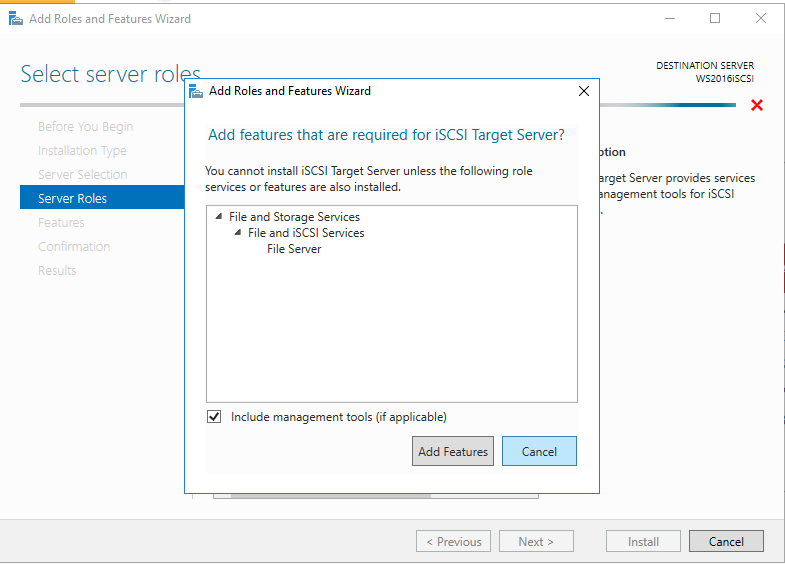
Additional Window will pop-up | select Add Features and then advance with Next when you get back to main screen.
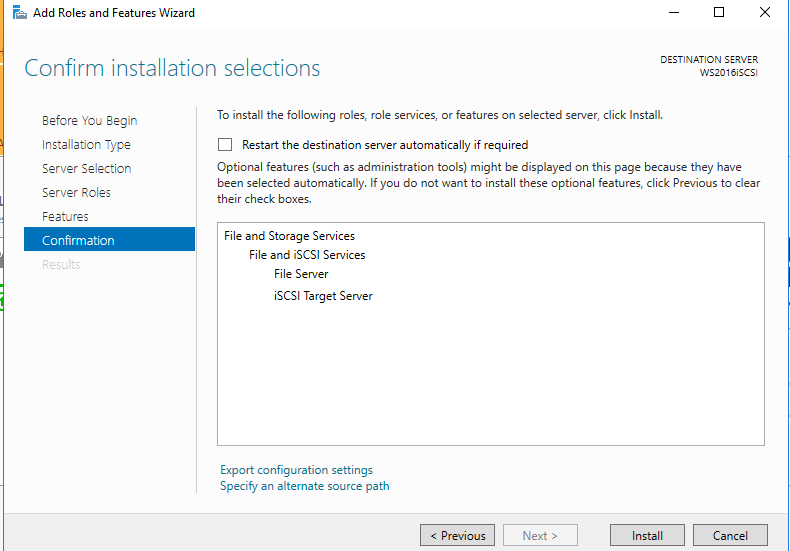
Confirm selection and click on the Install
…
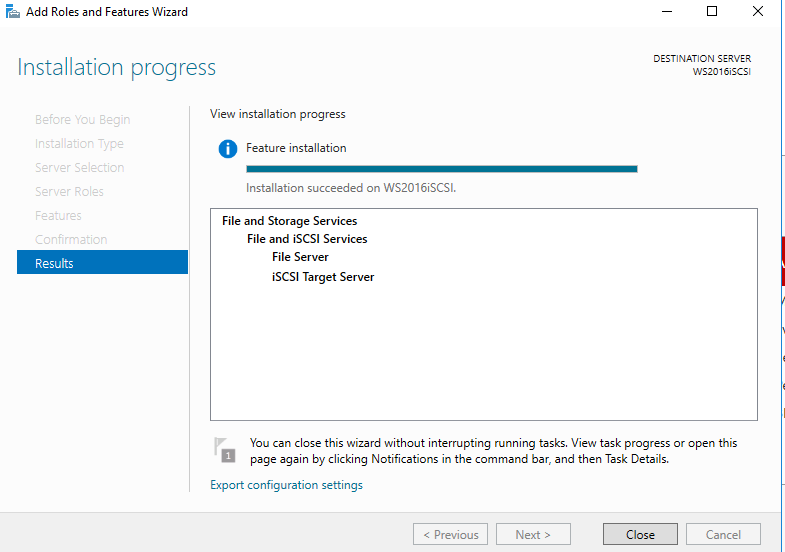
Close. Installation of the role is done.
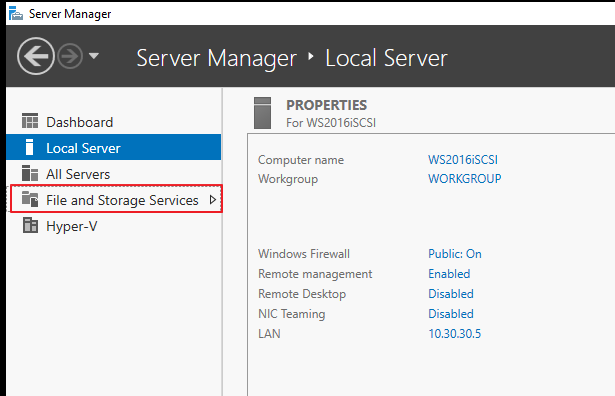
Now, back to the Server Manager, because we need to configure iSCSI Target we just installed.
Server Manager | Local Server | File and Storage Services
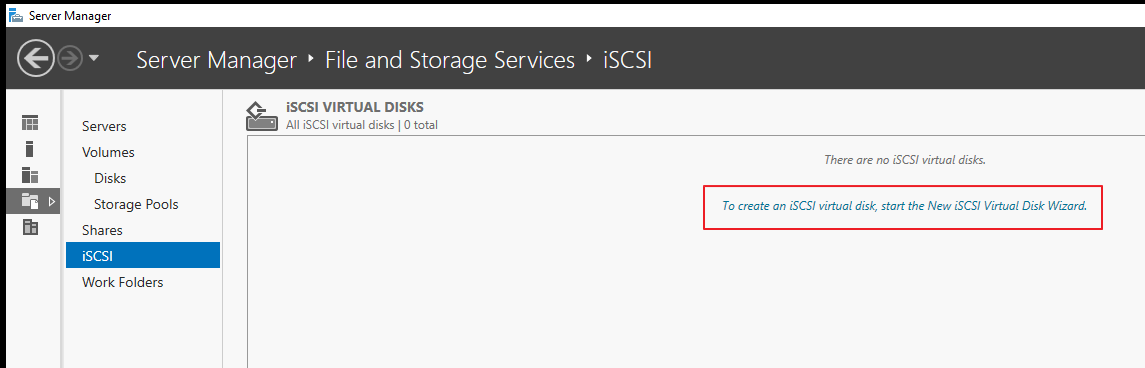
Select iSCSI and click on “To create an iSCSI virtual disk, start the New iSCSI Virtual Disk Wizard” dialog.
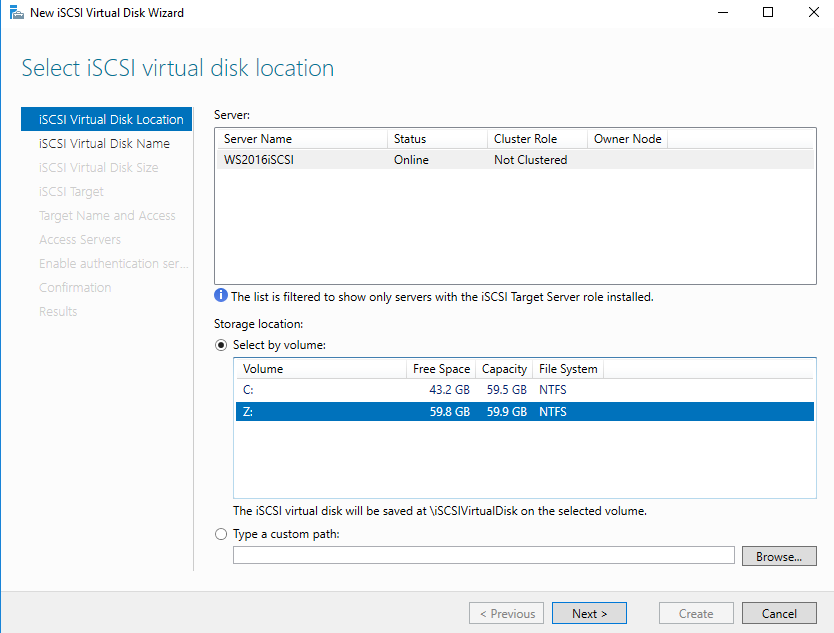
Wizard starts. On the iSCSI Virtual Disk Location screen I will choose local server (SW2016iSCSI) and the Storage labeled with Z:
Z: is a local disk that will be assigned to iSCSI and then used by computer in a network, connected by iSCSI. It is recommended that you use separate disk for iSCSI and that there is no local data on it. Next
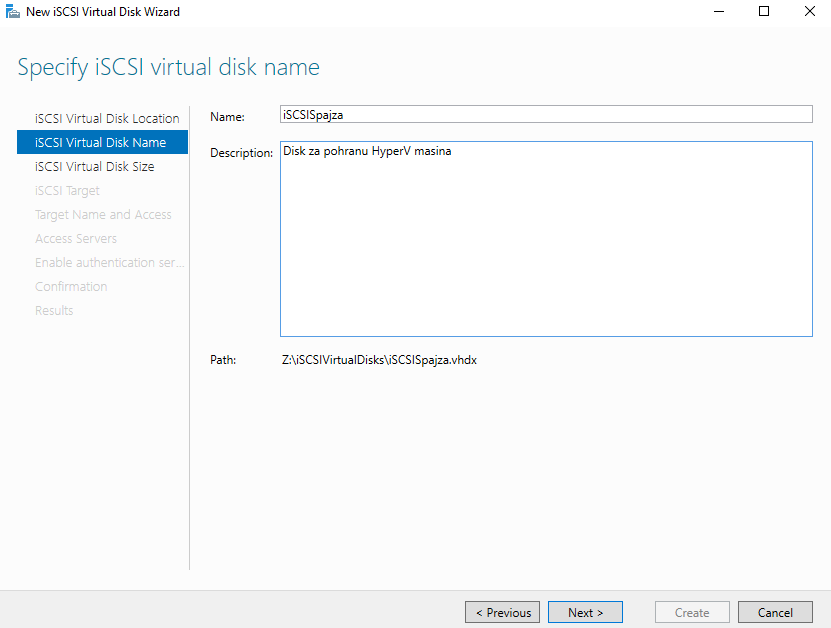
ISCSI Virtual Disk Name | Give a meaningful name to the storage so you can recognize it. Next
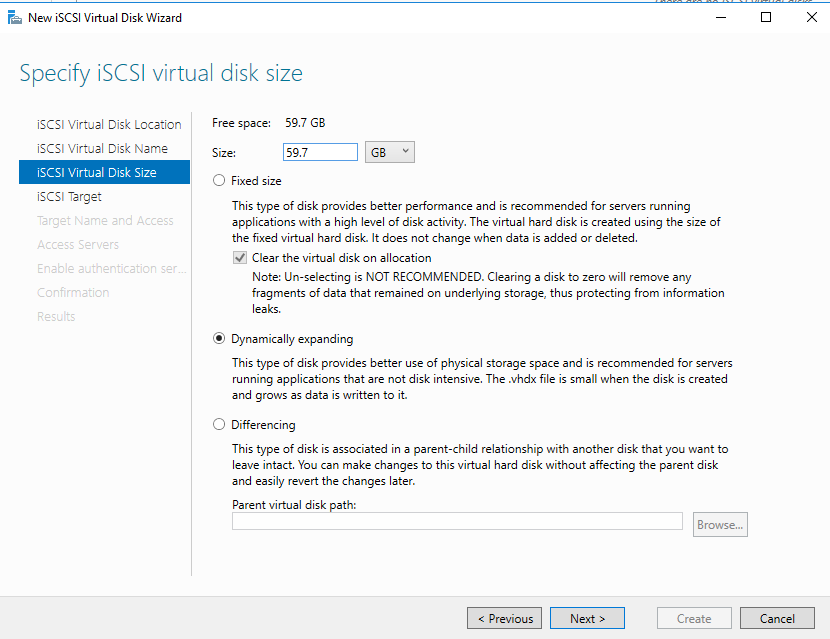
iSCSI Virtual Disk Size. I will give full free space to this iSCSI target. You don’t have to assign full disk to one iSCSI target. I will also choose Dynamically expanding since that suits me best in my testing environment. Next
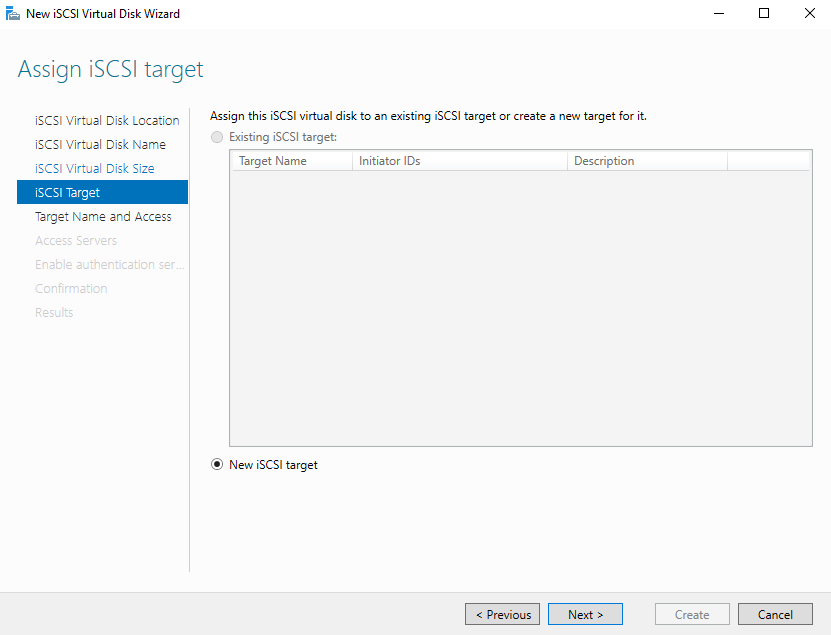
New iSCSI target. Next
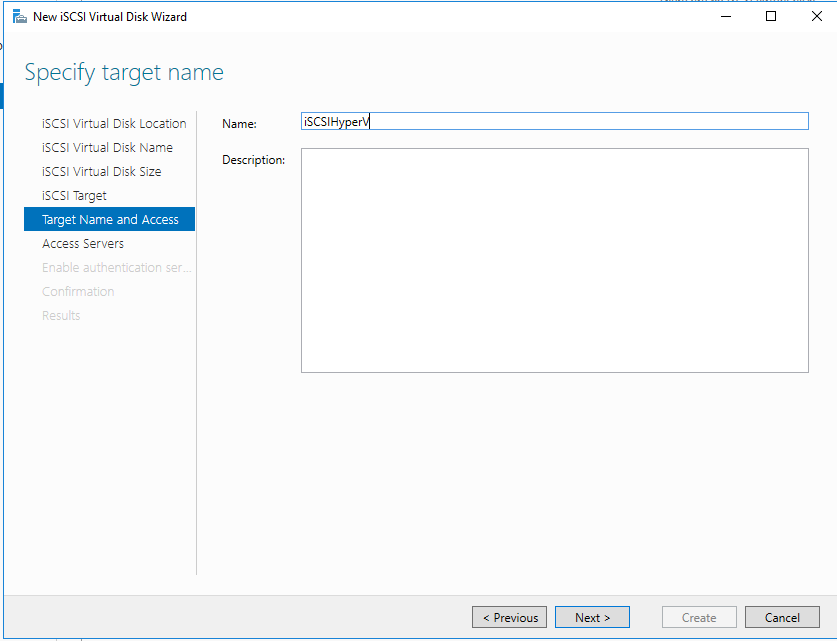
iSCSI Name and Access. Thsi is the name that iSCSI initators will see when connecting to iSCSI Target. Give a name that is meaningful to you. Next
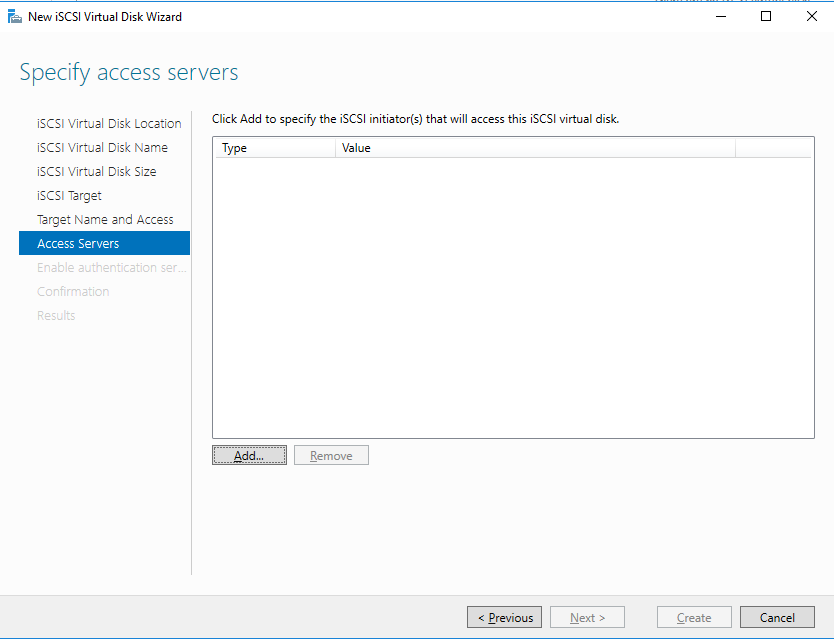
Access Servers | Add
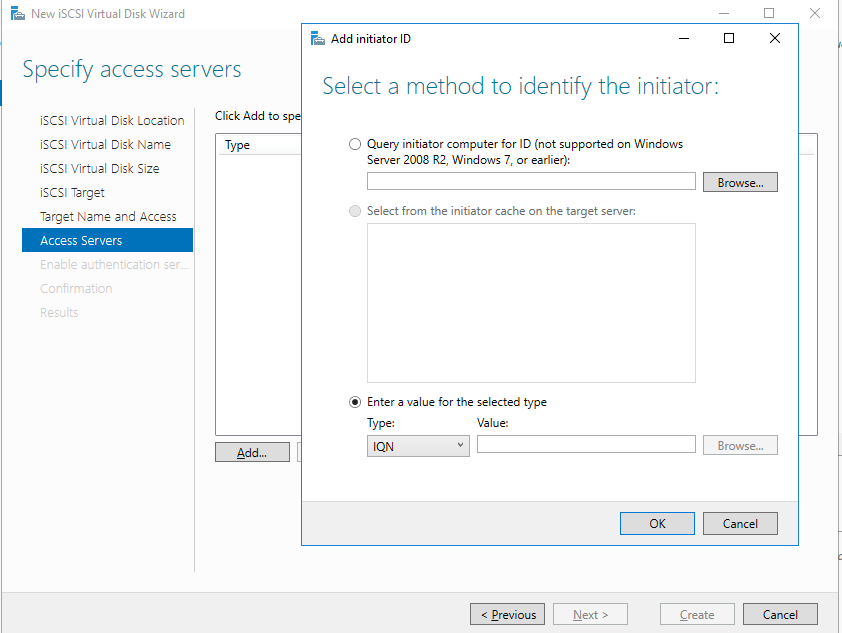
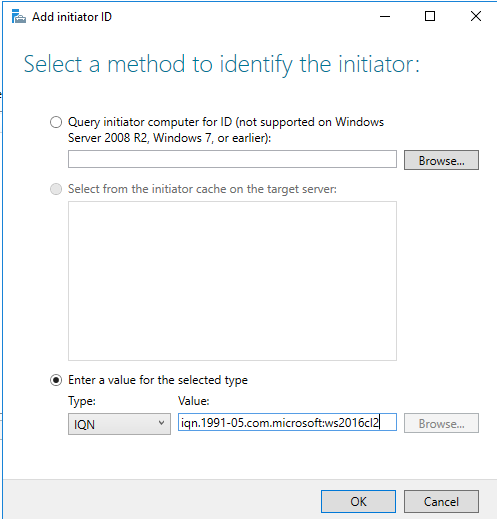
After we clicked on Add, new screen will open, we need to select “Enter a value for the selected type” Type should be IQN.
Now, we need to know IQN of the server that is going to connect to this iSCSI Target.
This short step will be performed on the iSCSI initiator (WS2016CL2). If you haven’t already activated ISCSI Initator, you will be asked when you click on ISCSI Initiator in Control Panel.
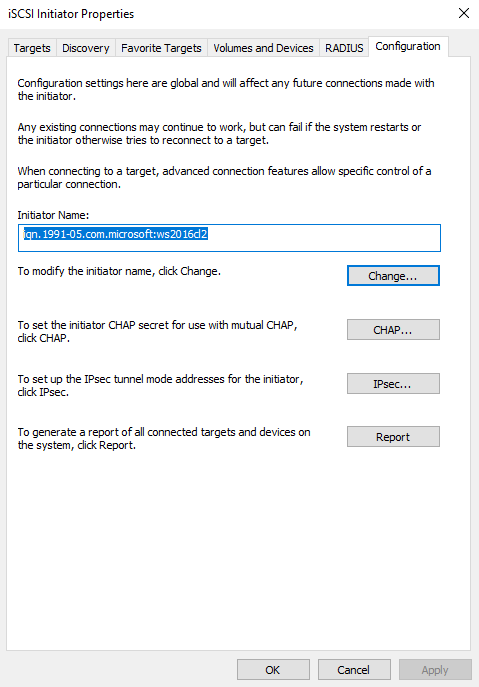
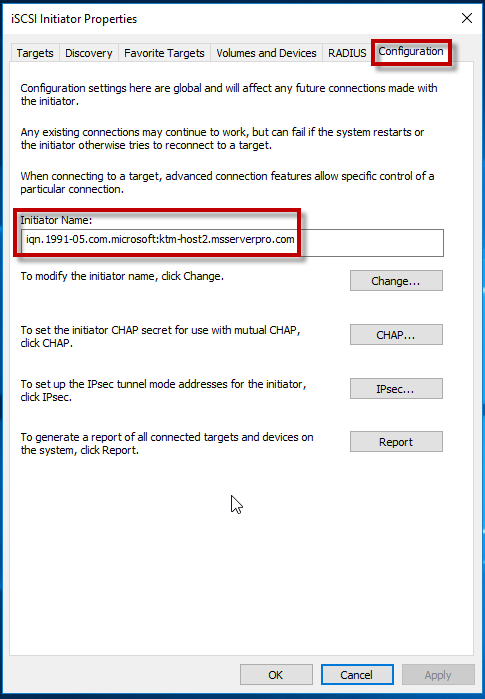
Control Panel | ISCSI initiator | Configuration tab | Initiator Name – copy everything in that field.
Paste that info into “Add Initiator ID” screen that we left opened on iSCSI Target. OK
Now, lets advance with wizard on iSCSI Target.
We added one iSCSI target, you can repeat Add procedure if you have more Initiators you want to connect. You can also connect new Initiators at later time. Next

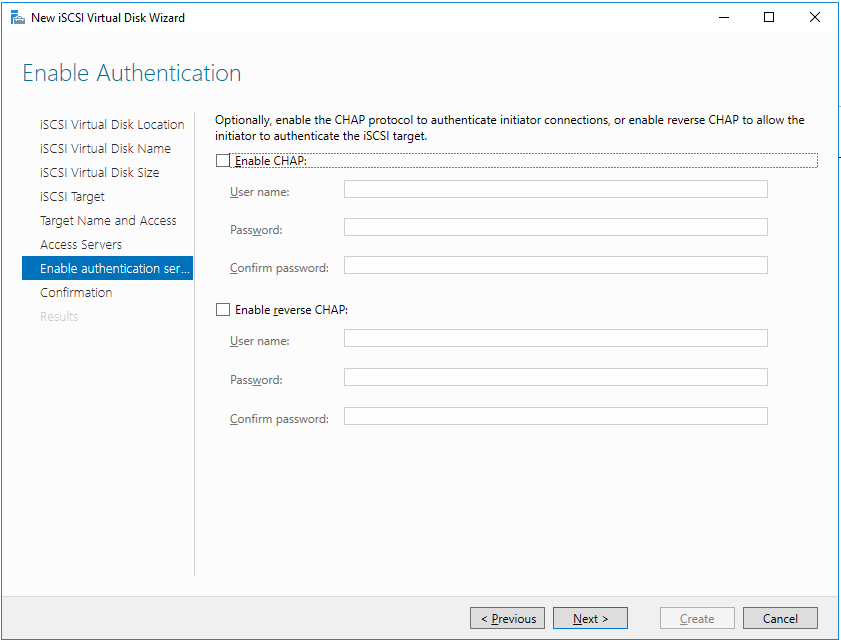
You can also enable authentication for iSCSI but I wont do it in this LAB. Next
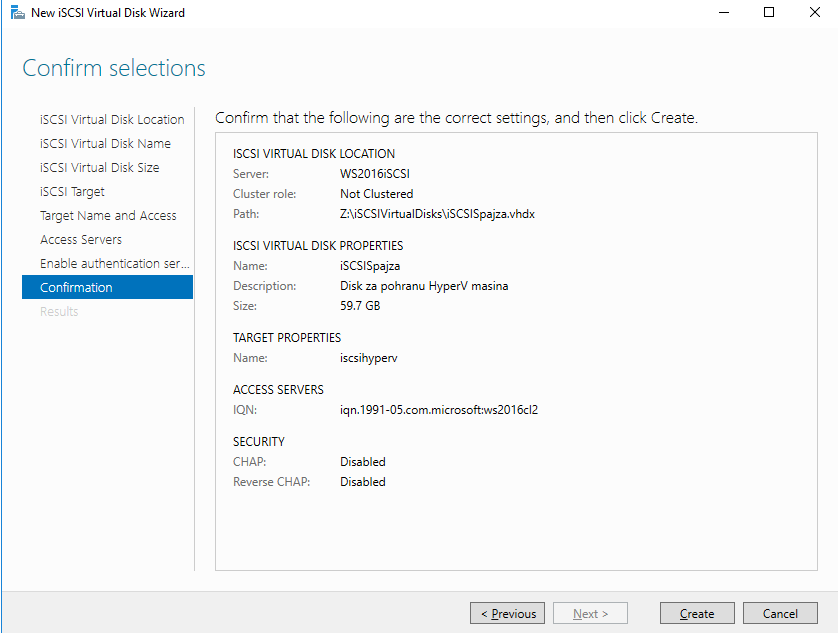
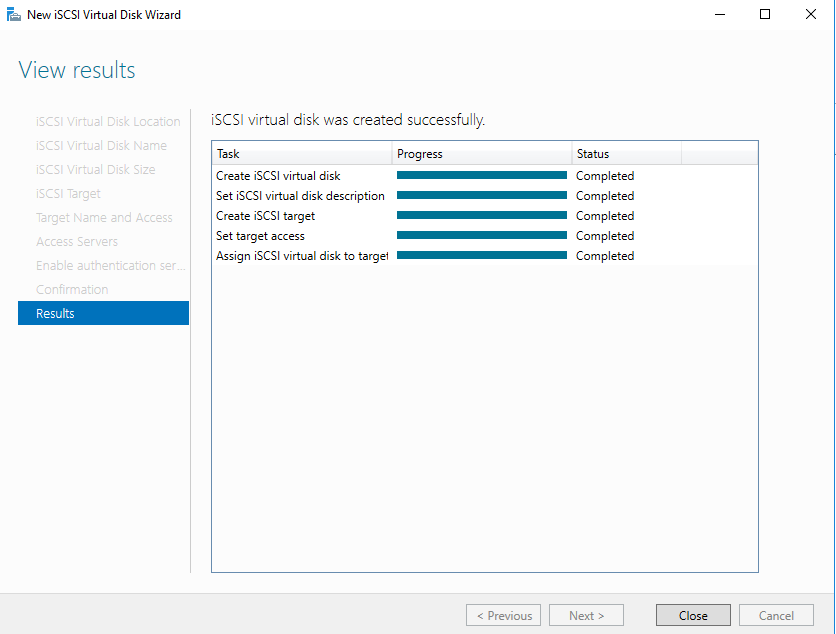
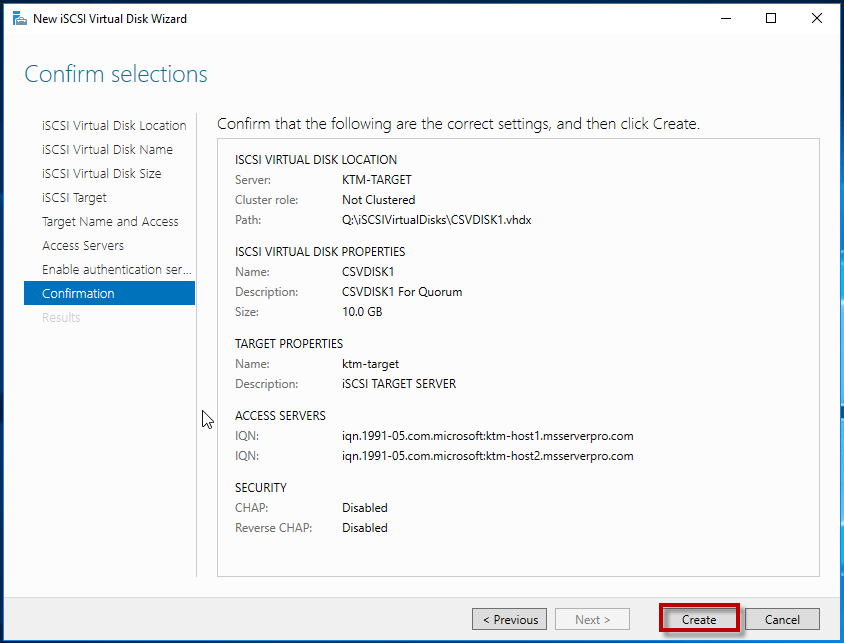
Confirmation screen, check your settings and confirm if you are ok with everything.
Create
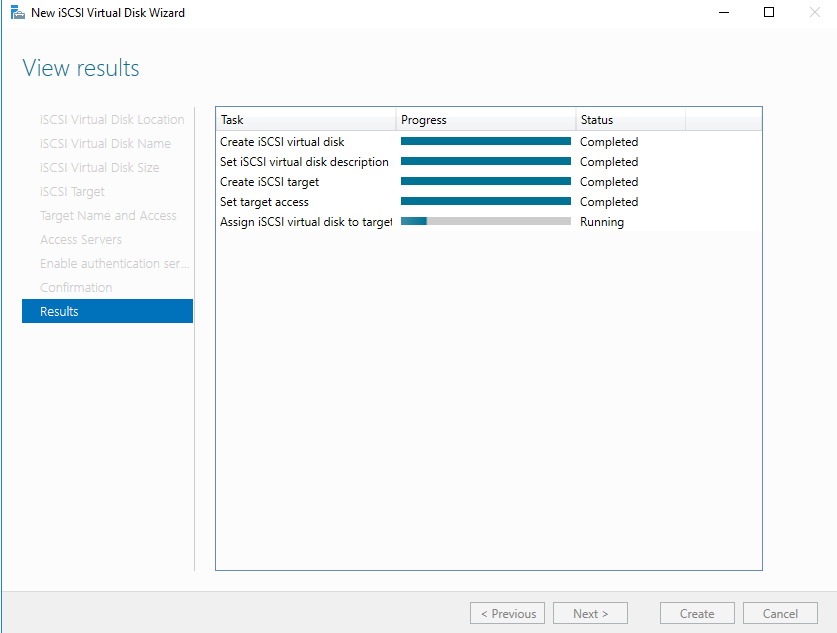
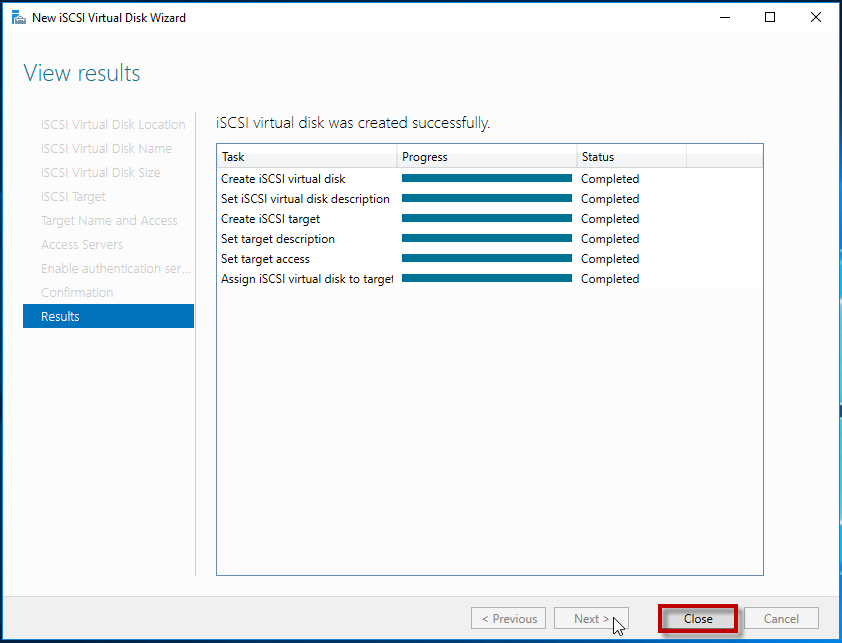
Success | Close
Server Manager is showing all data for iSCSI Target.
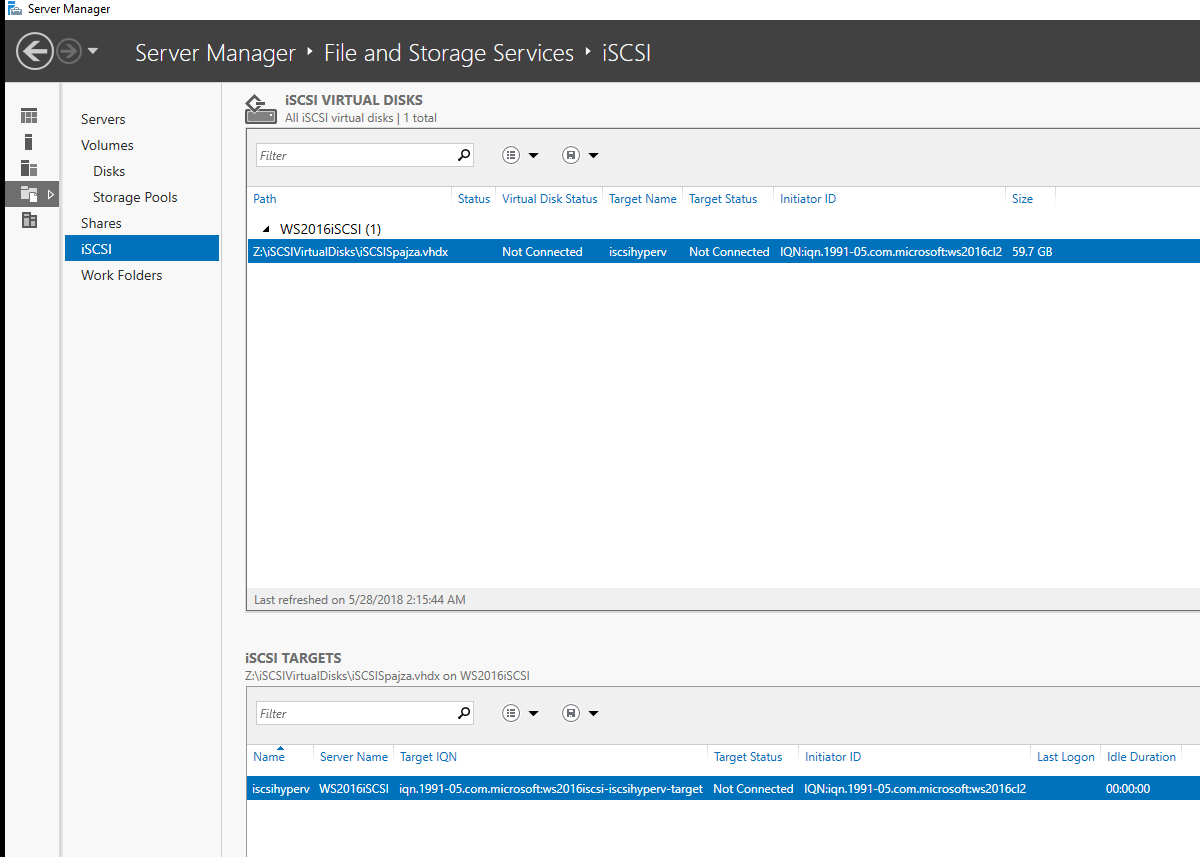
That is it for the iSCSI Target “Server” part, lets just check if it work on our “client” machine which is iSCSI Initiator
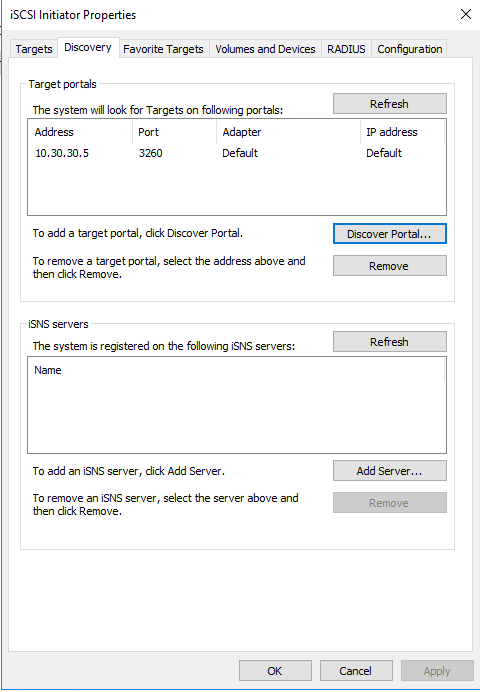
Initiator managed to discover iSCSI Target
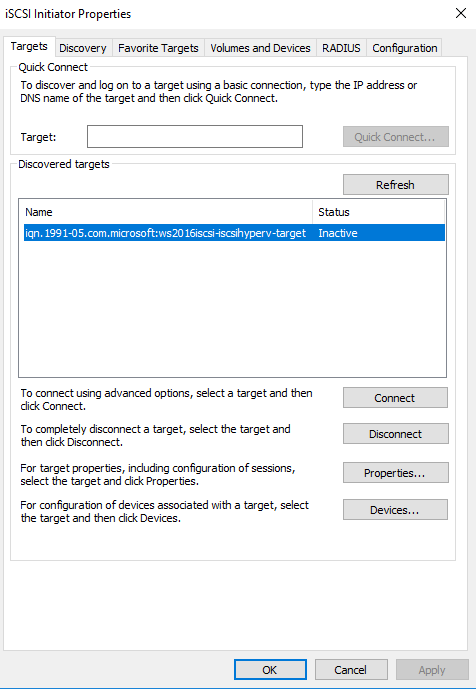
Now lets see Targets tab.
Iscsihyperv that we created earlier on iSCSI Target is visible and ready for mounting.
Overall, setting up iSCSI Target on Windows Server 2016 is quick and easy, and in my experience works with all kind of storage.
Disclaimer

If you are configuring a Windows Server 2016 Failover cluster or you are building a Windows Server 2016 Hyper-V cluster, you will need shared storage so that either the file or virtual machine resources don’t live on local storage which would negate the high availability benefits of a Windows Server 2016 cluster. A very popular and useful storage protocol in use everywhere today is iSCSI or Internet Small Computer System Interface that allows SCSI messages to be sent end to end in conjunction with the TCP protocol. Let’s take a look at how to add iSCSI shared storage in Windows server 2016.
Before we begin, let’s talk about prerequisites. We need to have connectivity from the iSCSI initiator which will be our Windows Server 2016 server and the iSCSI target, which in this demonstration will be a FreeNAS appliance. You need to take into consideration any firewall or filtering issues that would prevent communication between the devices. Typically, iSCSI uses TCP ports 860 and 3260 for communication.
In Windows Server 2016, you can find the iSCSI Initiator application by clicking the Windows button and then starting to type iSCSI to initiate the search. It should populate. However, you can also launch the application by simply typing iscsicpl.exe in the run or search menu.
You will see a dialog box pop up when you first launch the iSCSI initiator application. This dialog lets you know that the Microsoft iSCSI service is not running. If you click Yes, it will start the service and it will set the service to start automatically. When thinking about mounting storage, we definitely want the Microsoft iSCSI service to start automatically as this will allow any storage targets to mount when the server is started or rebooted, etc.


After clicking Yes on the dialog box, we can check the services console and see the Microsoft iSCSI Initiator Service is now Running and also set to the Automatic Startup Type.

Now that we have the iSCSI Initiator Properties dialog box open, we can enter the IP address of the iSCSI Target. In my case there are no special connection considerations that I have setup for the FreeNAS target, so I can simply hit the Quick Connect button which will automatically connect to the iSCSI target.
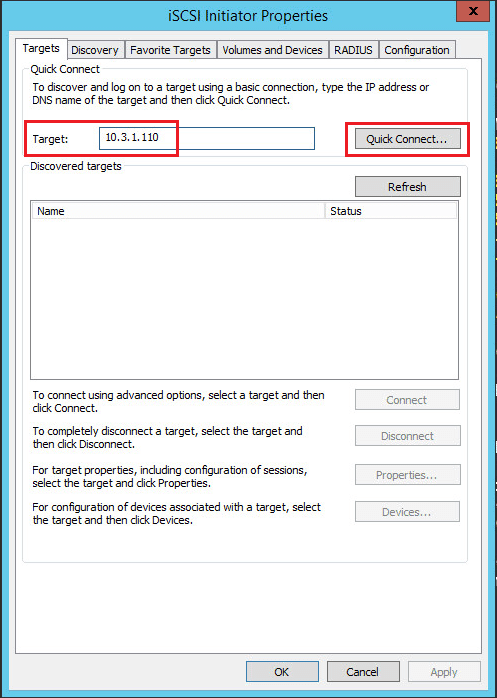
Notice when clicking the Quick Connect button, I see the Status of Connected and the target name matches the target setup in FreeNAS.

Next, we need to click the Volumes and Devices tab to setup the iSCSI volume. Again, here I click the Auto Configure option as this will automatically add and configure all available devices in the target.
Now, I see the device volume mounted.
If you have any special considerations to be made in the configuration of the iSCSI connection, those can be setup under the Configuration tab. These include CHAP or IPsec credentials, etc. You can also generate reports about the connected targets and devices as well as change the initiator name from the configuration tab.
Adding iSCSI Storage in Disk Management Windows Server 2016
Our work is not done yet. We still need to add the volume in Windows Server 2016 Disk Management so the volume can actually be used by Windows. Notice below, after rescanning the disks we see our iSCSI volume now showing up. It will be added as Offline when it is brought in initially.
Right-click the new volume and select Online. This will bring the disk online.

Next, we need to Initialize the disk. So again, we right-click and select Initialize Disk.
We have the option here for either MBR or GPT which for all volumes to support large volumes sizes, etc, we want to choose GPT.
Now we have a new disk that is ready to be provisioned, formatted, etc.
Thoughts
The process to Add iSCSI Shared Storage in Windows Server 2016 is very straightforward. After we have network connectivity between our initiator and the iSCSI target, we can use the GUI setup shown above to actually setup the connection between the two. Additionally, we have to add the storage in disk management to Windows so that it has the storage provisioned and ready to use.
In this article, you are configuring Windows Server 2016 Server as an iSCSI (Internet Small Computer System Interface) target server for the purpose of centralized storage for the Hyper-V Failover Cluster test environment. In the production environment, organizations are using NAS or SAN devices for the centralized storage for the Hyper-V Failover Cluster. Some small organizations, they are using Windows Server 2016 as an iSCSI Target Server to decrease the cost and complexity of configuring centralized storage. To configure iSCSI target on Windows Server 2016 do the following steps:
- Installing the iSCSI Target Server role service
- Creating iSCSI virtual disks
- Configuring MPIO
- Connect to and configure the iSCSI targets
- Initialize the iSCSI disks

Perform the following steps to install and configure an iSCSI Target Server in Windows Server 2016:
You can install iSCSI Target Server role using either Server Manager or Windows PowerShell. Here, you are installing iSCSI Target Server role using Server Manager. Here, you are installing iSCSI Target Server role on KTM-TARGET server.
Installing the iSCSI Target Server Role Service:
1. On KTM-TARGET, in Server Manager, click on Manage, and select Add Roles and Features.

2. In the Add roles and Features Wizard, on the Before to Begin page, click Next.

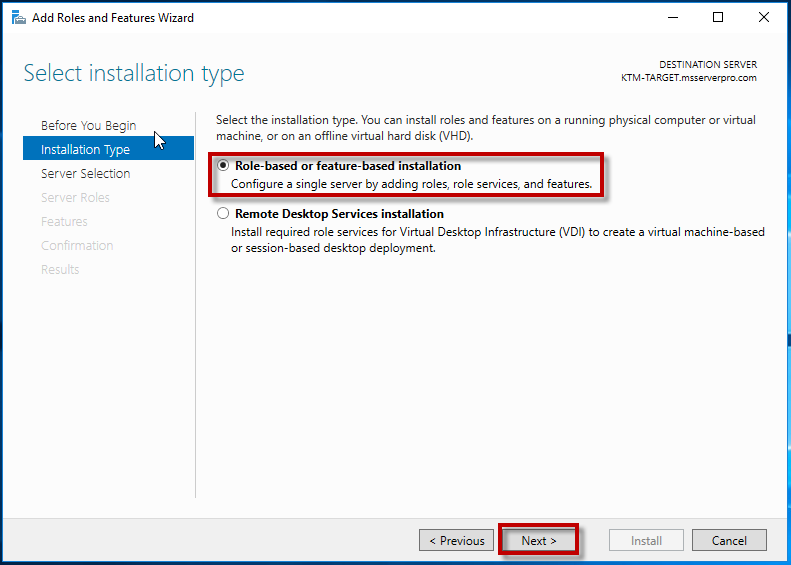
3. On the Select Installation type page, accept the default and click on Next.
4. On the Select destination Server page, ensure that Select server from the server pool is selected. In the Server Pool KTM-TARGET is highlighted and click on Next.

5. On the Select Server roles page, expand the File and Storage Services | File and iSCSI Services and select iSCSI Target Server check box. On the Add Roles and Features Wizard window, click on Add Features. Then click on Next.


6. On the Select Features page, click on Next.

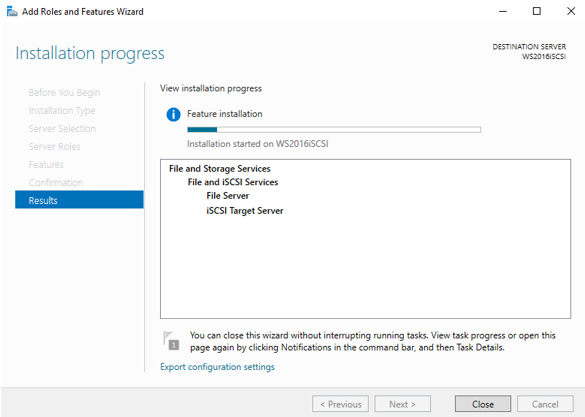
7. On the Confirm installation selections page, click on Install. Wait for the installation…


8. Verify the feature Installation progress succeeded and click on Close.

Configure the iSCSI Targets:
1. On KTM-TARGET, in the Server Manager, in the navigation pane, click File and Storage Services.

2. In the File and Storage Services pane, click iSCSI. In the iSCSI VIRTUAL DISKS pane, click TASKS, and then click New iSCSI Virtual Disk.

3. In the New iSCSI Virtual Disk Wizard, on the Select iSCSI virtual disk location page, under Storage location, click volume Q:, and then click Next.

4. On the Specify iSCSI virtual disk name page, in the Name text box, type CSVDISK1, and then click Next.

5. On the Specify Iscsi virtual disk size page, in the Size text box, type 10, ensure that GB is selected, and then click Next.

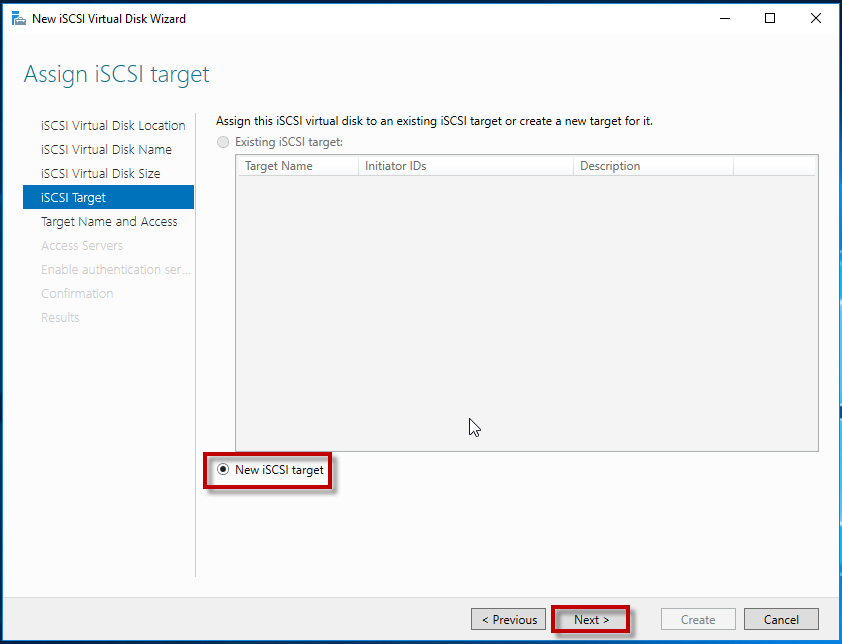
6. On the Assign Iscsi target page, ensure that the New Iscsi target radio button is selected, and then click Next.
7. On the Specify target name page, in the Name box, type KTM-TARGET, and then click Next.

8. On the Specify access servers page, click Add.

9. Log On KTM –HOST1, In the Server Manager, on the menu bar, click Tools, and then, in the Tools list, click iSCSI Initiator.

10. In the Microsoft iSCSI dialog box, click Yes.

11. In the iSCSI Initiator Properties dialog box, on the Configuration tab, in the Initiator Name: copy the iSCSI qualified name (IQN).

Switch to KTM-HOST2, in the iSCSI Initiator Properties dialog box, on the Configuration tab, in the Initiator Name: copy the iSCSI qualified name (IQN).
12. On the Specify access servers page, click Add. In the Select a method to identify the initiator dialog box, click Enter a value for the selected type, in the Type list, click IQN, in the Value text box, type KTM-HOST1 iSCSI qualified name (IQN) and click OK.

13. On the Specify access server page, click In the Select a method to identify the initiator dialog box, click Enter a value for the selected type, in the Type list, click IQN, in the Value text box, type KTM-HOST2 iSCSI qualified name (IQN) and click OK.

14. On the Specify access servers page, click Next.

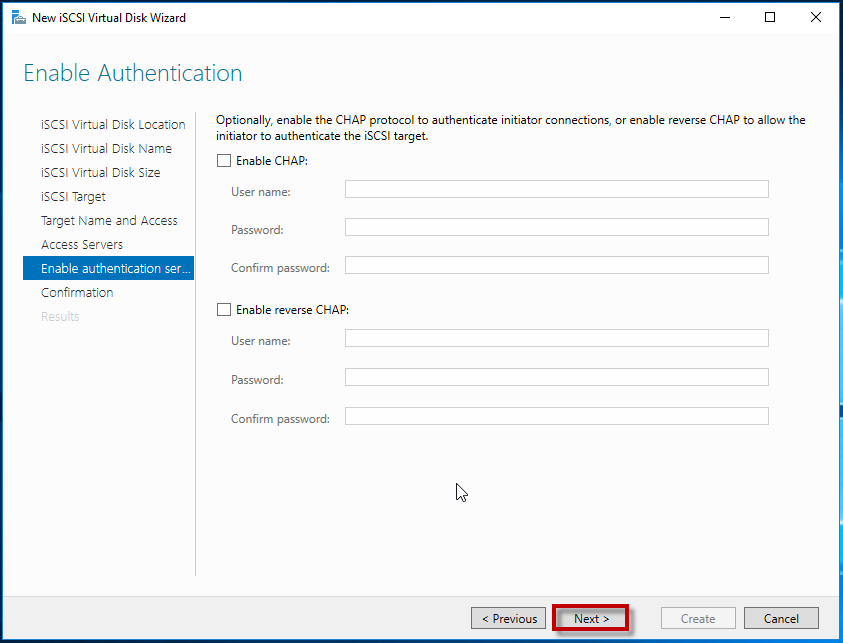
15. On the Enable Authentication page, click Next.
16. On the Confirm selection page, click Next.
17. On the View results page, wait until the virtual disk is created and then click Close.
18. On the iSCSI VIRTUAL DISKS pane, click TASKS, and then click New iSCSI Virtual Disk.

19. In the New iSCSI Virtual Disk Wizard, on the Select iSCSI virtual disk location page, under Storage location, click volume D, and then click Next.

20. On the Specify iSCSI virtual disk name page, in the Name box, type CSVDISK2, and then click Next.

21. On the Specify iSCSI virtual disk size page, in the Size box, type 200, ensure that GB is selected, and then click Next.

22. On the Assign iSCSI target page, select Existing iSCSI target, under Target Name verify KTM-TARGET, and then click Next.

23. On the Confirm selections page, click Create.

24. On the View results page, wait until the virtual disk is created, and then click Close.

Configure Multipath I/O (MPIO):
Log on to Hyper-V Hosts (KTM-HOST1 & KTM-HOST2), in Server Manager, add the Multipath I/O features.

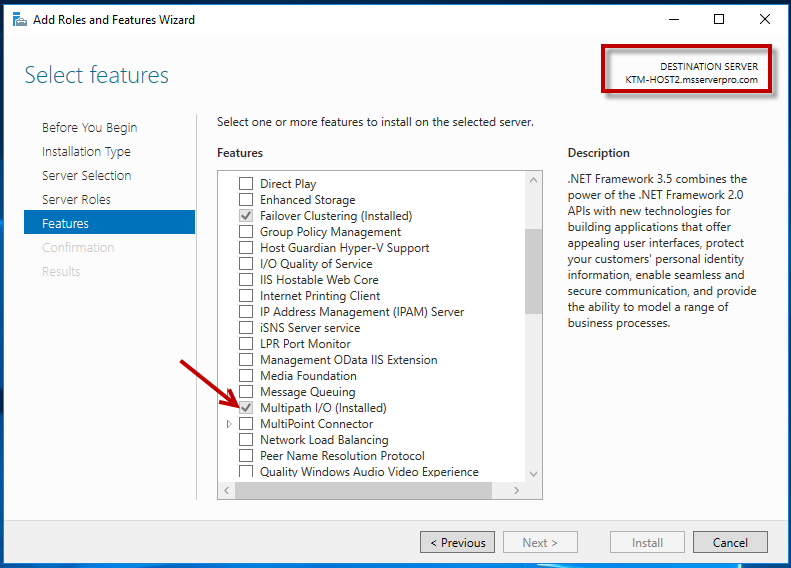
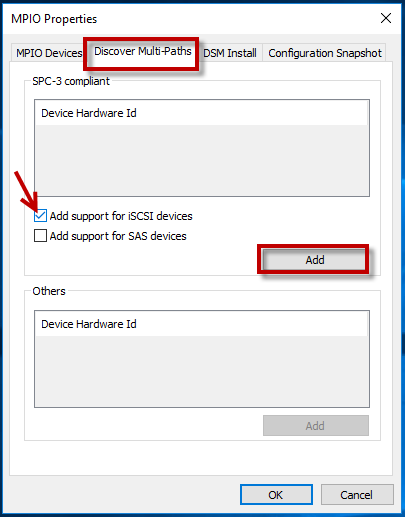
Open MPIO, and then configure the following:
- Enable Add support for iSCSI devices on the Discover Multi-paths tab
After the computer restarts, in Server Manager, on the Tools menu, click MPIO, and then verity that Device Hardware ID MSFT2005iSCSIBusType_0x9 is added to the list.


Connect to and configure the iSCSI Target:
1. On the KTM-HOST1, in Server Manager, click Tools and then click iSCSI Initiator.
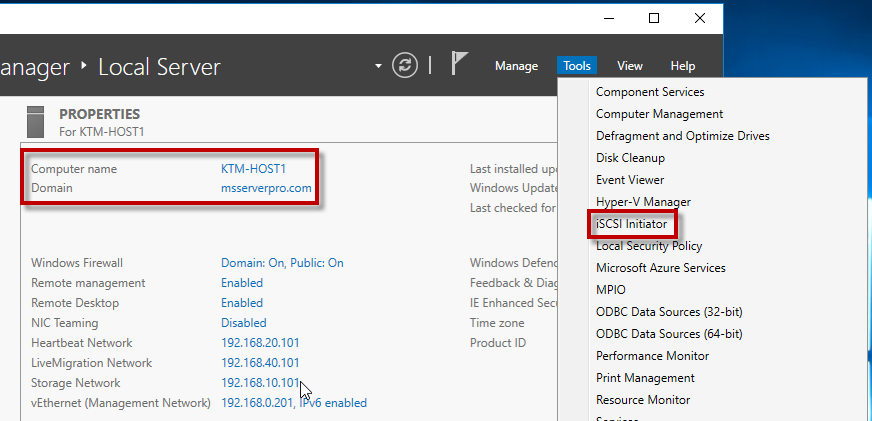
2. In the iSCSI Initiator Properties dialog box, on the Target tab, click Quick Connect..

3. On the Quick Connect dialog box, verified Discovered targets status is Connected and click on Done.

4. In the iSCSI Initiator Properties dialog box, on the Targets tab, click Connect.

5. In the Connect to Target dialog box, click Enable multi-path, verify that the Add this connection to the list of Favorite Targets check box is selected, and then click Advanced.

6. In the Advanced Settings dialog box, on the General tab, change the Local Adapter from Default to Microsoft iSCSI Initiator. In the Initiator IP list, click 192.168.10.101, and in the Target Portal IP list, click 192.168.10.100/3260. Then Click OK.

7. In the iSCSI Initiator Properties dialog box, on the Volumes and Devices tab, click Auto Configure.

8. In the iSCSI Initiator Properties dialog box, on the Targets tab, Discovered targets status is Connected and click OK.

Do the same on KTM-HOST2.

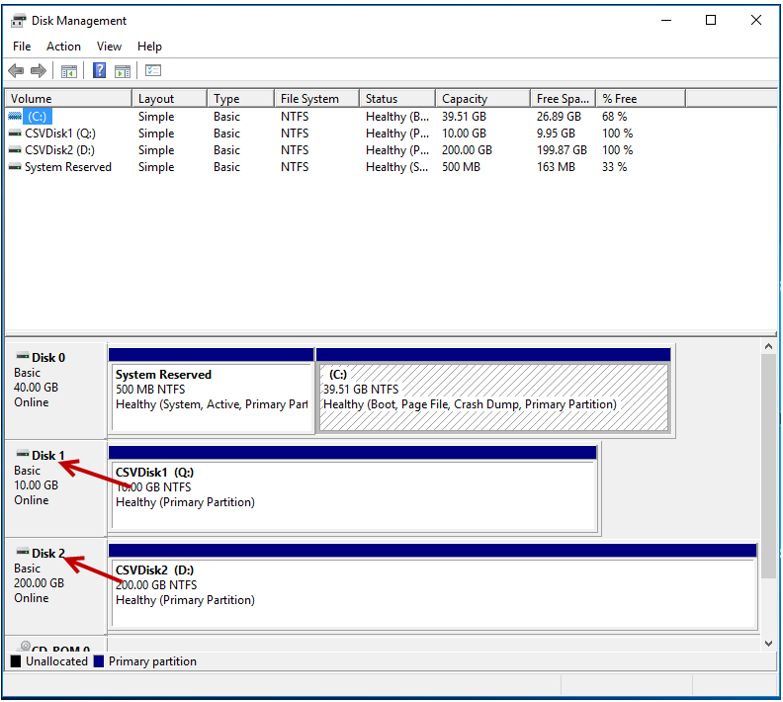
After connected to iSCSI virtual disk, log on to the KTM-TARGET, Open the Disk Management verify that iSCSI virtual Disks are listed as given below. Right-click on the new disks and click on Online.

Summary:
You have installed the iSCSI Target Server features, configured iSCSI targets, installed and configure Multipath I/O feature, connected to the iSCSI targets and initialized the iSCSI disks. I hope this article will help to install and configure Windows Server 2016 server as an iSCSI Storage and initiator in Windows Server 2016.
- About the Author
- Latest Posts

- Deploy and Configure VM Scale Sets (VMSS) in the Azure Portal — February 24, 2019
- Configuring an Availability Set with the Azure Load Balancer — February 9, 2019
- Creating and Connecting Linux Ubuntu VM in Azure — December 29, 2018
- My Precious IT Books Collections — March 1, 2018
- Configuring Azure Traffic Manager using Performance Based Routing Method — January 20, 2018
- Configuring a Point-to-Site Connection to a VNet using Azure Portal — November 28, 2017
- Configuring a VNet-to-VNet VPN Gateway Connection Using the Azure Portal — October 27, 2017
- Configuring Azure VNet Peering by using the Azure Portal — October 19, 2017
- Using the Azure Portal to Create Virtual Networks, Add Subnets and Setting up a DNS Server Address — October 17, 2017
- Extend Azure Virtual Machine OS drive using Azure Portal — June 30, 2017
View All Posts

In this time, I will show you how to create and configure an iSCSI target server on Windows Server 2016. Internet Small Computer System Interface (iSCSI) is a way of connecting storage devices over a network using TCP/IP. It can be used over a local area network (LAN), a wide area network (WAN), or the Internet. iSCSI devices are disks, tapes, CDs, and other storage devices on another networked computer that you can connect to.
Install iSCSI Role on Windows Server 2016
Using Server Manager (GUI)
iSCSI Target can be enabled using Add roles and features in the Server Manager:

- Choose the Role-based or feature-based installation option.
- Select the server you want to enable iSCSI Target.
- Select the iSCSI Target Role. Select “File Server” Role and “iSCSI Target Server” role.
- Confirm the installation.
Using PowerShell
Open the PowerShell cmdlet window, and run the following cmdlet:
Install-WindowsFeature -Name FS-Fileserver, FS-iSCSITarget-Server
Create iSCSI LUN
To share storage, the first thing is to create an iSCSI LUN (aka. iSCSI virtual disk).
Using Server Manager (GUI)
On the Server Manager, select “File and Storage Services” on the left panel and click “iSCSI” menu. On the main panel, you click the link “To create an iSCSI virtual disk, start the new iSCSI virtual Disk Wizard”

Select the virtual disk location.

Specify the Virtual Disks Name.

Specify the iSCSI virtual disk size.

Now, you will need to create or use the existing iSCSI target. To create a new iSCSI target, select “New iSCSI Target” option.

Give the Target a name. This name will be discovered by the iSCSI initiator, and use for the connection.

This page allows you to specify the initiators which can access the virtual disk, by allowing the Target to be discovered by defined list of initiators. You can use IQN, DNS Name, or IP Address.

CHAP is an authentication mechanism defined by the iSCSI standard to secure access to the target. It allows the initiator to authenticate to the Target, and in reverse allowing the Target to authenticate against the initiator.

Note: You cannot retrieve the CHAP information once it is set. If you lose the CHAP information, it will need to be set again.
Confirm the setup.

Using PowerShell
Create LUN
New-IscsiVirtualDisk -Path "C:iSCSIiscsi.vhdx" -Size 10GB.
Create iSCSI Target
New-IscsiServerTarget –TargetName iSCSI-target –InitiatorIds “IQN:iqn.1991-05.com.Microsoft:VM1.contoso.com”
Assign the VHDX to the iSCSI Target
Add-IscsiVirtualDiskTargetMapping -TargetName iSCSI-target –Path "C:iSCSIiscsi.vhdx"
And the iSCSI Target server is ready to use. You can set the iSCSI Initator and connect to the iSCSI Target Server