09.03.2017
Просмотров: 48402
Ранее мы писали о том, как подключить Bluetooth гарнитуру к ПК и какие проблемы при выполнении данного действия могут возникнуть. На этот раз мы рассмотрим способы, как подключить блютуз мышь к ноутбуку с Windows 10. Заранее стоит отметить, что подключить беспроводную мышку можно двумя способами: при наличии приемопередатчика и при его отсутствии.
Подключение устройства с помощью приемопередатчика Bluetooth
Беспроводной девайс, который имеет приемопередатчик, подключается к ПК или ноутбуку под управлением Windows 10 следующим способом:
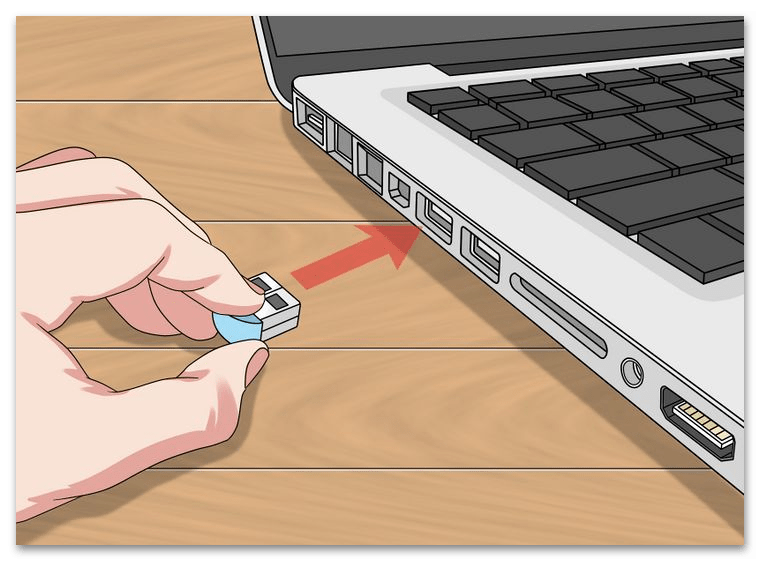
- Подключаем приемопередатчик к разъёму USB. Он может выглядеть как маленький USB-коннектор и как база с кабелем и специальным разъёмом.

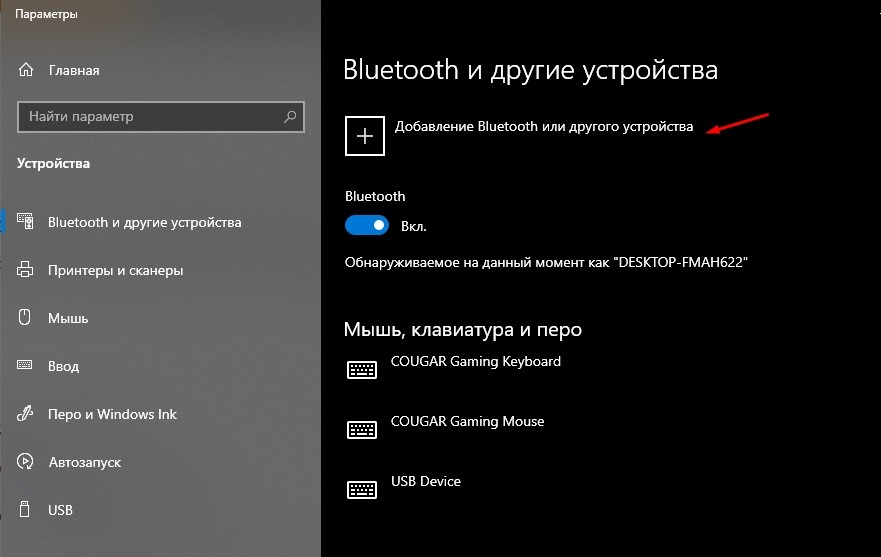
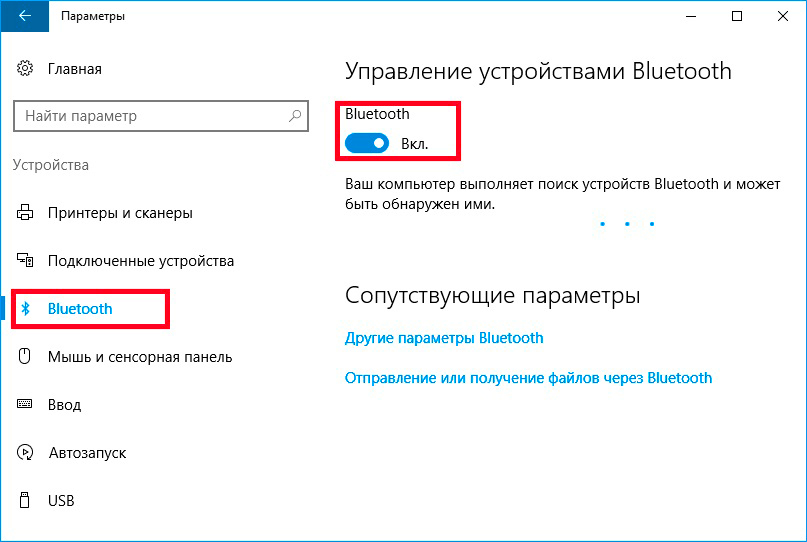
- Включаем блютуз в «Параметрах» Windows
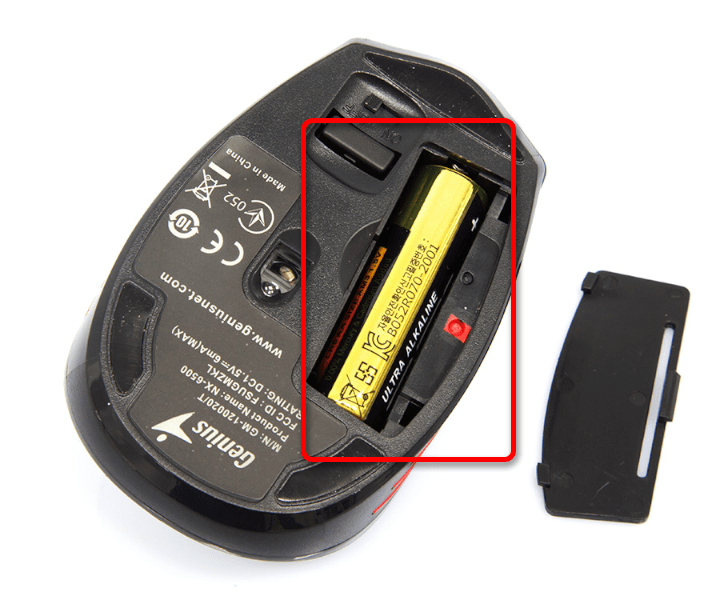
- Вставляем батарейки в мышку и включаем на ней специальную кнопку.

- Зажимаем и удерживаем в течение 3-5 секунд кнопку подключения Bluetooth на приемопередатчике.

- Запустится Мастер-установщик драйверов к мишке. Нужно, чтобы компьютер имел доступ к сети и мог загрузить программное обеспечение. Далее рекомендуем следовать подсказкам.
Если мышку ПК не видит, стоит в параметрах блютуза включить «Разрешить устройствам Bluetooth обнаруживать этот компьютер».

После перезагрузки ПК стоит повторить попытку подключения устройства. Подключенный девайс отобразится в списке гаджетов.
Подключаем мышку через Bluetooth без приемопередатчика
Если у вас в мышке встроенный приемопередатчик, способ подключения устройства ввода информации будет следующим:
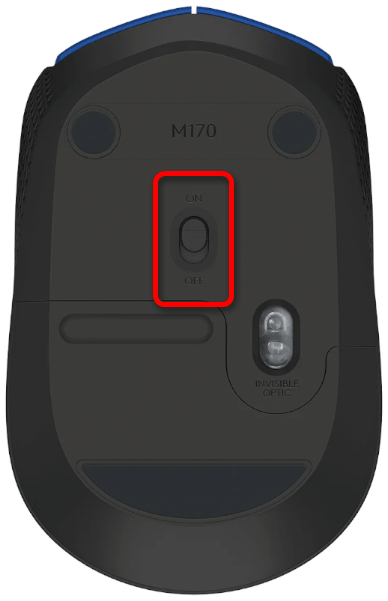
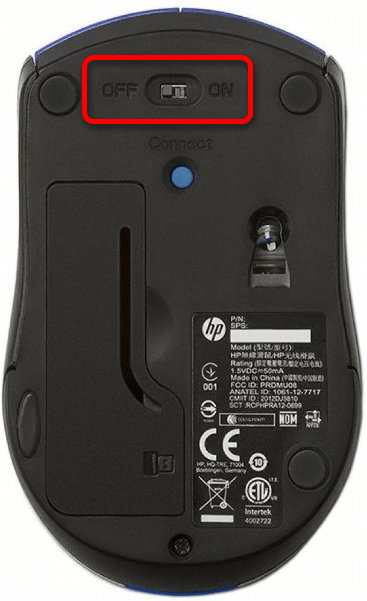
- Переключаем на мышке тумблерок в положение «Включено».
- Жмём «Пуск», «Параметры», выбираем «Устройства».

- В новом окне в меню слева нужно выбрать раздел «Bluetooth». Перетаскиваем ползунок в положение «Включено». Сразу запустится поиск устройств.

- После появится мышка в списке устройств. Выделяем её и нажимаем на кнопку «Подключиться».
- Запустится мастер. Следуем подсказкам.
ВАЖНО! Если при подключении мышки появляется запрос на задание ключа доступа, стоит выбрать вариант «Без ключа доступа». Bluetooth-мыши на Windows 10 не работают с ключом доступа.
О том, как подключить Bluetooth-мышку к ПК с Windows 10 смотрите в видео:
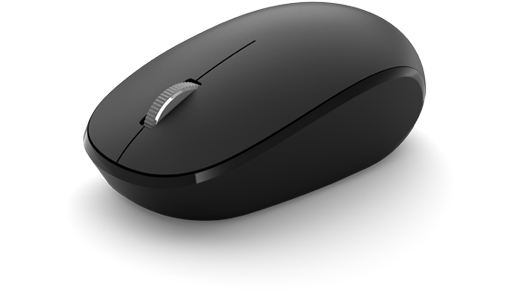
Microsoft Bluetooth Mouse — это идеальная мышь для точной прокрутки и навигации. Компактный дизайн упрощает работу в дороге.
Требования
Для настройки вам понадобится компьютер под управлением Windows 11 с поддержкой Bluetooth 4.0 или более поздней версии. Эта мышь поддерживает функцию быстрой связи в Windows 11.
Какая версия Bluetooth на моем компьютере?
Подключение мыши
Чтобы включить мышь, нажмите кнопку Bluetooth в нижней части мыши. Для отключения нажмите кнопку снова.
Связывание мыши с помощью Bluetooth
Включите мышь, а затем следуйте указаниям, чтобы связать ее с компьютером.
-
Нажмите и удерживайте кнопку связывания в нижней части мыши до тех пор, пока индикатор не начнет мигать (около пяти секунд).
-
При появлении уведомления для мыши на компьютере с Windows 11 нажмите Подключить и дождитесь ее настройки.
Не отображается уведомление? Перейдите в> Параметры > Bluetooth &> Добавить устройство >Bluetooth > Microsoft Bluetooth Mouse> Done.
После связывания мыши индикатор перестанет мигать. Индикатор останется включенным до выключения мыши.
Сведения о батарее
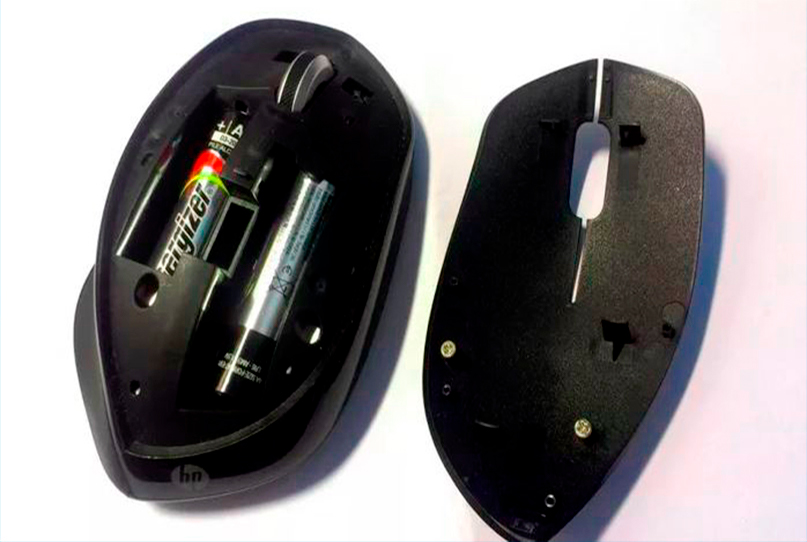
Мышь Microsoft Bluetooth использует 1 АА. Если вам нужно заменить батарею, переверните мышь, нажмите маленький язычок, чтобы открыть крышку отсека для батареек, а затем замените батарею. Чтобы экономить заряд батареи, нажимайте кнопку Bluetooth в нижней части для отключения мыши, если вы не используете ее.
Совет: Чтобы в любой момент проверить уровень заряда батареи, выберитеПоиск , введитеBluetooth и откройте Bluetooth & других устройств. Уровень заряда батареи будет показан рядом с мышью.
Скачивание Центра управления мышью и клавиатурой (Майкрософт)
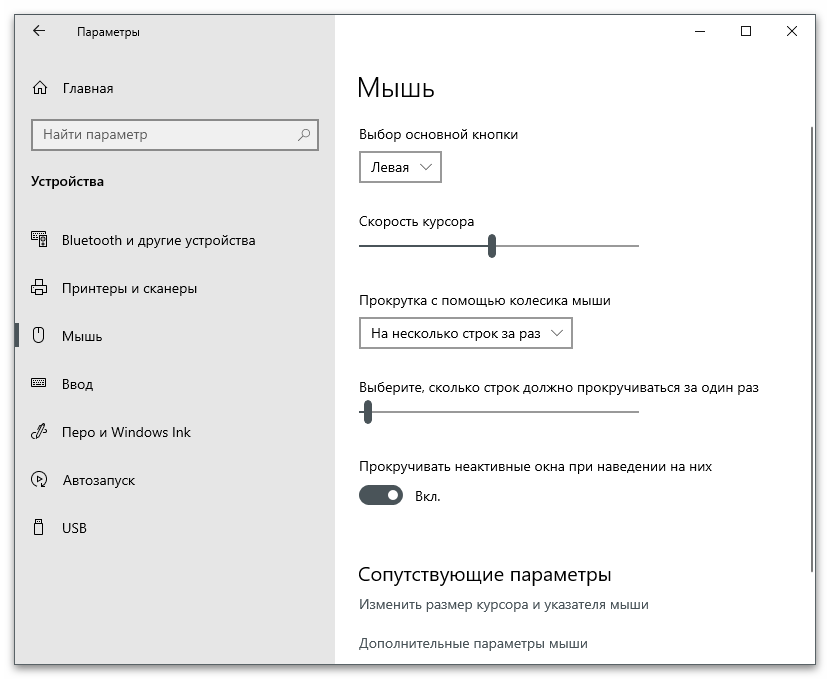
Чтобы изменить основные параметры мыши, нажмите Пуск > Параметры > Bluetooth и устройства > Мышь.
Если вы хотите изменить функции кнопок, параметры прокрутки и другие параметры, скачайте Центр управления мышью и клавиатурой (Майкрософт). Чтобы скачать приложение, см. раздел Скачивание приложения «Центр управления мышью и клавиатурой».
Windows пакеты тем
Заполните внешний вид Windows с помощью эксклюзивных пакетов тем с изображениями, отлично согласованными с мышью Microsoft Bluetooth® Special Edition. Вы можете скачать их при первой настроили мышь или позже, посетив страницу Microsoft Store ниже.
Forest Camo Special Edition
Антаполия Camo Special Edition
Nightfall Camo Special Edition
Microsoft Bluetooth Mouse — это идеальная мышь для точной прокрутки и навигации. Компактный дизайн упрощает работу в дороге.
Требования
Для настройки вам понадобится компьютер под управлением Windows 10 с поддержкой Bluetooth 4.0 или более поздней версии. Эта мышь поддерживает функцию быстрой связи в Windows 10.
Какая версия Bluetooth на моем компьютере?
Подключение мыши
Чтобы включить мышь, нажмите кнопку Bluetooth в нижней части мыши. Для отключения нажмите кнопку снова.
Связывание мыши с помощью Bluetooth
Включите мышь, а затем следуйте указаниям, чтобы связать ее с компьютером.
-
Нажмите и удерживайте кнопку связывания в нижней части мыши до тех пор, пока индикатор не начнет мигать (около пяти секунд).
-
При появлении уведомления для мыши на компьютере с Windows 10 нажмите Подключить и дождитесь ее настройки.
Не отображается уведомление? Выберите Пуск > Параметры > Устройства > Bluetooth и другие устройства > Добавление Bluetooth или другого устройства > Bluetooth > Мышь Microsoft Bluetooth Mouse > Готово.
После связывания мыши индикатор перестанет мигать. Индикатор останется включенным до выключения мыши.
Сведения о батарее
Мышь Microsoft Bluetooth использует 1 АА. Если вам нужно заменить батарею, переверните мышь, нажмите маленький язычок, чтобы открыть крышку отсека для батареек, а затем замените батарею. Чтобы экономить заряд батареи, нажимайте кнопку Bluetooth в нижней части для отключения мыши, если вы не используете ее.
Совет: Чтобы в любой момент проверить уровень заряда батареи, введите в панели поиска Bluetooth иоткройте параметры Bluetooth & других устройств. Уровень заряда батареи будет показан рядом с мышью.
Скачивание Центра управления мышью и клавиатурой (Майкрософт)
Чтобы изменить основные параметры мыши, выберите Пуск > Параметры > Устройства > Мышь .
Если вы хотите изменить функции кнопок, параметры прокрутки и другие параметры, скачайте Центр управления мышью и клавиатурой (Майкрософт). Чтобы скачать приложение, см. раздел Скачивание приложения «Центр управления мышью и клавиатурой».
Windows пакеты тем
Заполните внешний вид Windows с помощью эксклюзивных пакетов тем с изображениями, отлично согласованными с мышью Microsoft Bluetooth® Special Edition. Вы можете скачать их при первой настроили мышь или позже, посетив страницу Microsoft Store ниже.
Forest Camo Special Edition
Антаполия Camo Special Edition
Nightfall Camo Special Edition

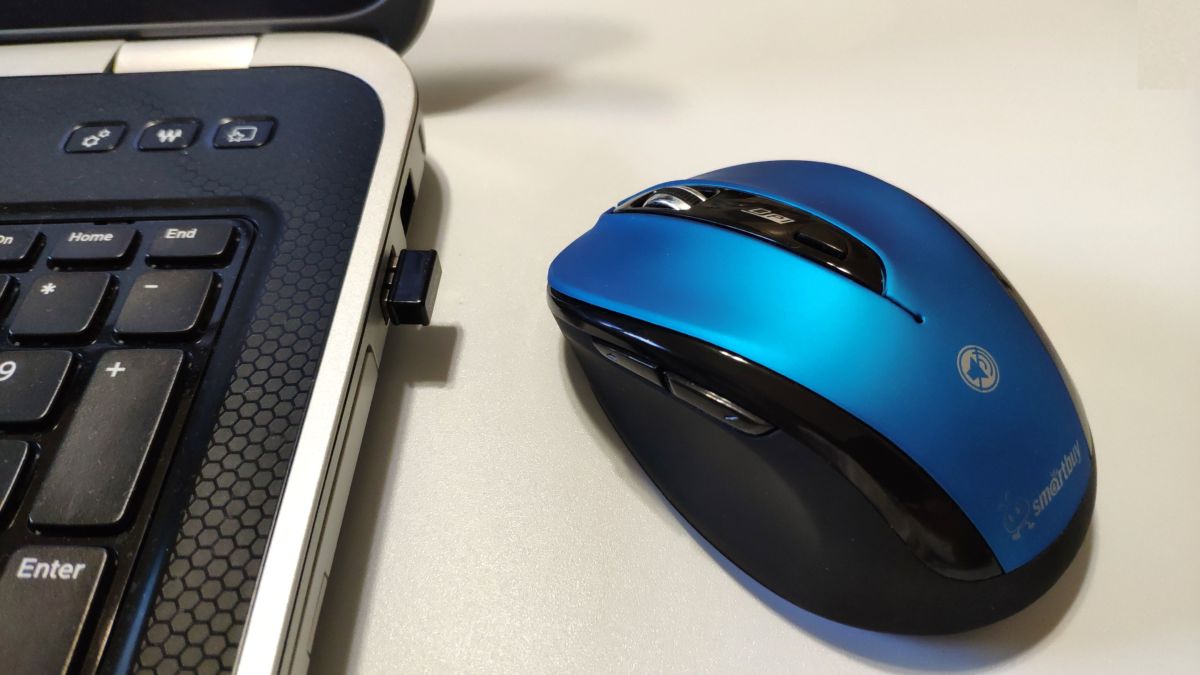
Работа на персональном компьютере подразумевает использование дополнительных, периферийных, устройств. Пользователю необходимо знать, как подключить беспроводную мышь к ноутбуку или стационарному компьютеру, работающему на базе Windows 10. Существуют некоторые особенности подключения беспроводного механизма, с которыми нужно ознакомиться заблаговременно.
Подключаем беспроводную радиомышь через USB-адаптер
В большинстве случаев для соединения необходим дополнительный элемент – адаптер, который поставляется в комплекте с основным объектом (располагается в коробке или в корпусе).
Для работы нужно выполнить несколько простых шагов:
- распаковать комплект элементов;
- вставить адаптер в USB-порт на корпусе персонального компьютера;
- проверить наличие работоспособных батареек;
- на корпусе переключить ползунок в положение «Вкл.».
Если устройство предполагает лазерный тип соединения, появится красноватое свечение. Необходимо пару раз кликнуть любой клавишей мышки по пустому пространству на рабочем столе.
Внимание! Если соединение не установлено, нужно, в первую очередь, проверить работоспособность подключенного порта – вставить другое устройство и флешку, например.

Bluetooth-мышка
Другой вариант соединения – без использования дополнительных элементов, через Bluetooth. Инструкция для пользователей:
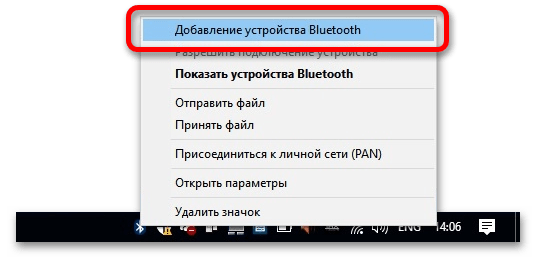
- на панели задач найти значок блютуса, кликнуть по иконке правой клавишей мышки, чтобы вызвать контекстное меню объекта;
![]()
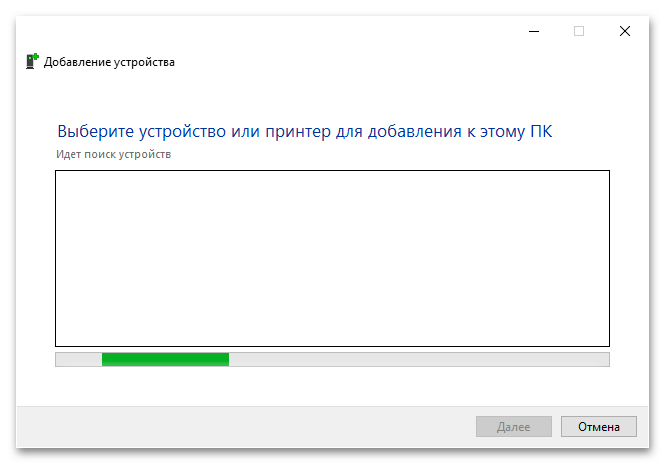
- в представленном списке выбрать строку «Добавление устройства»;
- на мониторе появится дополнительное рабочее окно, где нужно кликнуть по пункту «Добавление Bluetooth или другого устройства»;
- затем выбрать строку нужного подключения.
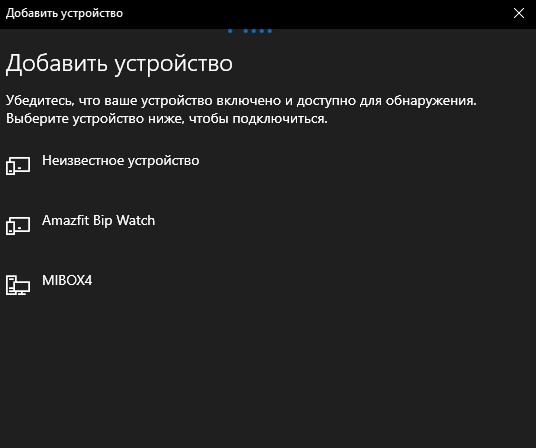
На экране появится список доступных к соединению объектов. Юзеру нужно выбрать мышь, нажать дважды. На ноутбуке пока можно использовать панель сенсорного управления.
После выполнения указанных шагов на экране персонального устройства (стационарного или портативного) появится отдельное уведомление о том, что элемент установлен корректно и полностью готов к работе. Нужно нажать кнопку «Готово» в открытом окне, начать взаимодействие мыши и ПК.
Настройка мыши
После подключения характеристики соединения можно настроить в том порядке, который будет подходить пользователю. Хотя, в большинстве случаев, дополнительной настройки не требуется – после соединения тачпад автоматически отключается, а устройство работает в стандартном порядке. Этапы действий юзера:
- проверить наличие драйверов (на диске в коробке, через сайт производителя ПК или мыши);
- открыть раздел «Диспетчер задач» – если напротив названия элемента стоит желтый треугольник, «дрова» придется переустановить или обновить (кликнуть правой клавишей мышки, выбрать нужный пункт).

Если мышь работает, но пользователя не устраивают некоторые моменты – скорость, чувствительность, иное – можно перенастроить указанные характеристики «под себя». Инструкция:
- по кнопке «Пуск» на мониторе рабочего стола кликнуть правой клавишей тачпада;
- выбрать раздел «Панель управления», затем подраздел «Мышь»;
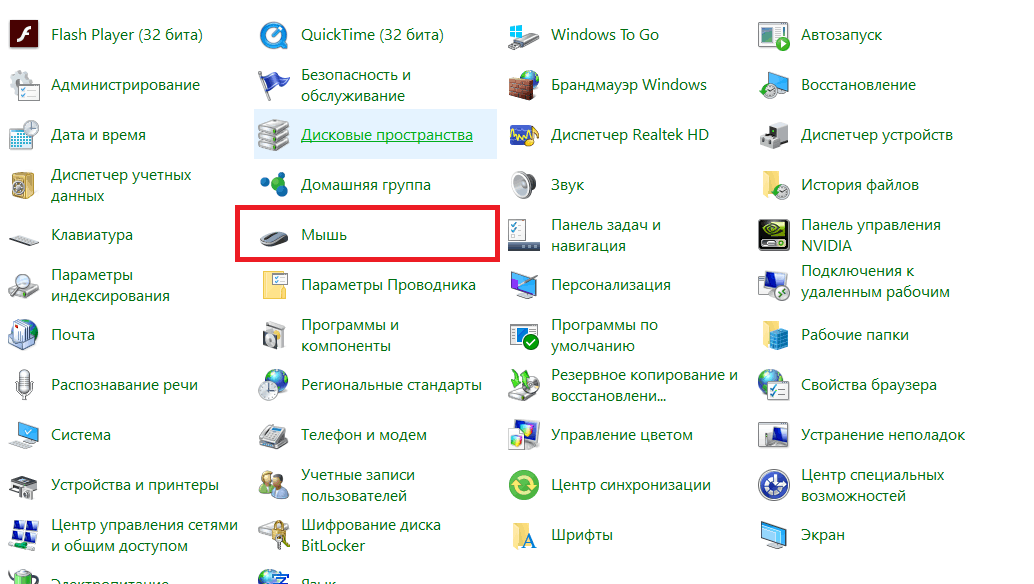
- откроется дополнительное рабочее окно с несколькими вкладками – кнопки, указатели, параметры, колесико.
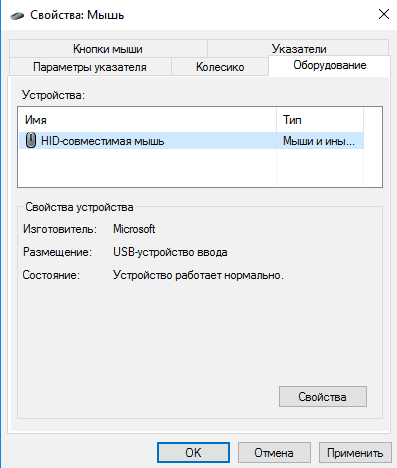
Во вкладке «Оборудование» можно проверить соединение – должна отображаться строка «Устройство работает нормально». В других – можно изменить характеристики движения и чувствительности отображения.
Подключение беспроводных устройств – несложная процедура, инструкции подойдут начинающим пользователям. Стоит обратить внимание на некоторые разделы и настройки в том случае, если успешное соединение не было установлено сразу.
Содержание
- Вариант 1: Bluetooth
- Способ 1: Параметры системы
- Способ 2: Панель управления
- Способ 3: Системный трей
- Вариант 2: Индукционная
- Вариант 3: Радиочастотная
- Вопросы и ответы

Важно! Настройка беспроводной мышки подразумевает под собой два этапа: подключение устройства к ноутбуку и непосредственное определение параметров работы. В этой статье внимание будет уделено первому этапу, так как второй рассматривался в отдельной статье на нашем сайте. Чтобы узнать, как изменить параметры работы манипулятора в операционной системе, перейдите по ссылке ниже.
Подробнее: Как настроить мышку на ноутбуке
Если на данном этапе к ПК не подключена работоспособная мышь, выполнять большинство изложенных ниже рекомендаций может потребоваться исключительно с помощью клавиатуры. О том, как это сделать, рассказывается в отдельной статье на нашем сайте.
Подробнее: Как управлять компьютером с помощью клавиатуры
Вариант 1: Bluetooth
Беспроводные мышки, подключающиеся к компьютеру посредством технологии Bluetooth — одни из наиболее распространенных. Они имеют высокую скорость отклика и способны работать на расстоянии до 10 метров от ноутбука. В комплекте с такими устройствами не поставляются дополнительные комплектующие, необходимые для установки соединения между манипулятором и ноутбуком, поэтому основные настройки выполняются в операционной системе. Всего есть три способа выполнения этой процедуры.
Примечание! Все описываемые далее действия будут производиться на примере Windows 10, но они подходят и для других версий операционных систем от Windows. Отличаться может только графическое оформление элементов интерфейса и месторасположение некоторых кнопок.
Способ 1: Параметры системы
В Windows 10 и 11 подключить Bluetooth-мышку можно через меню системных параметров. Для этого необходимо перейти в соответствующий раздел и запустить процесс поиска беспроводных устройств.
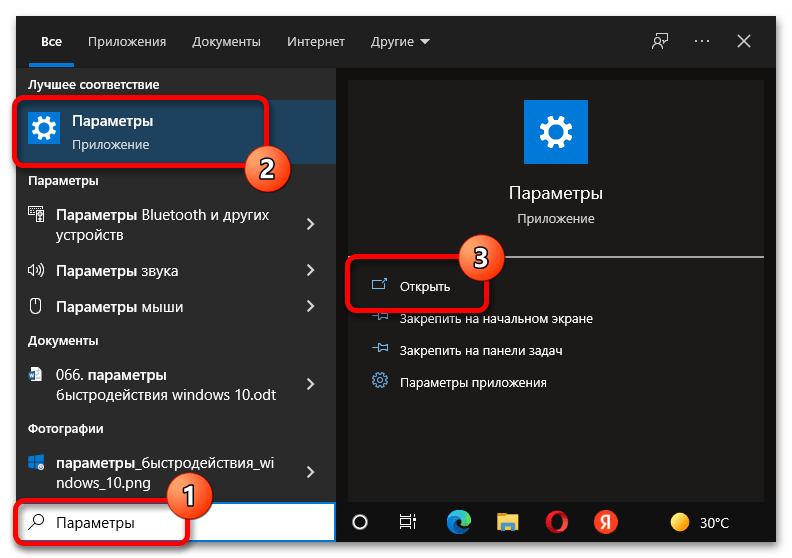
- Раскройте окно параметров любым доступным способом. Например, можно воспользоваться поиском по системе. Для этого введите в соответствующую строку на панели задач запрос «Параметры» и в результатах выдачи кликните «Открыть».
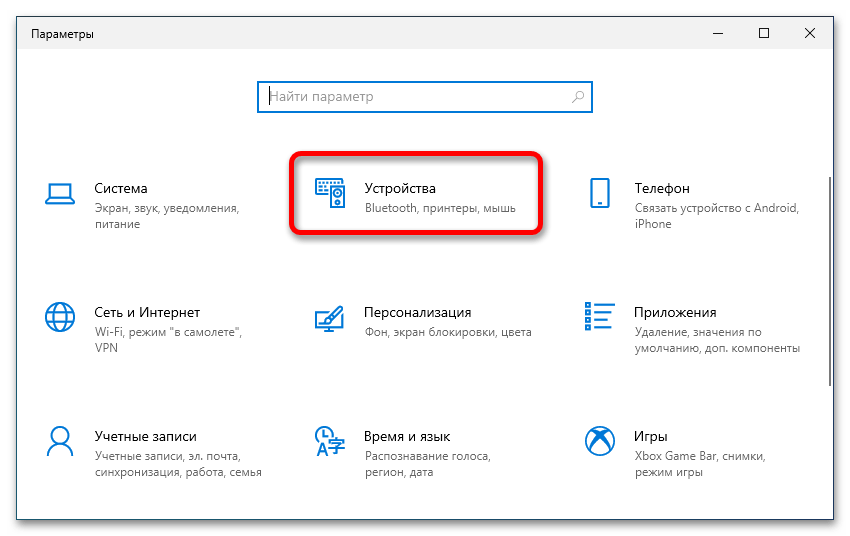
- Проследуйте в раздел «Устройства». Для удобства можно воспользоваться встроенным поиском, размещенным в верхней части открывшегося окна.
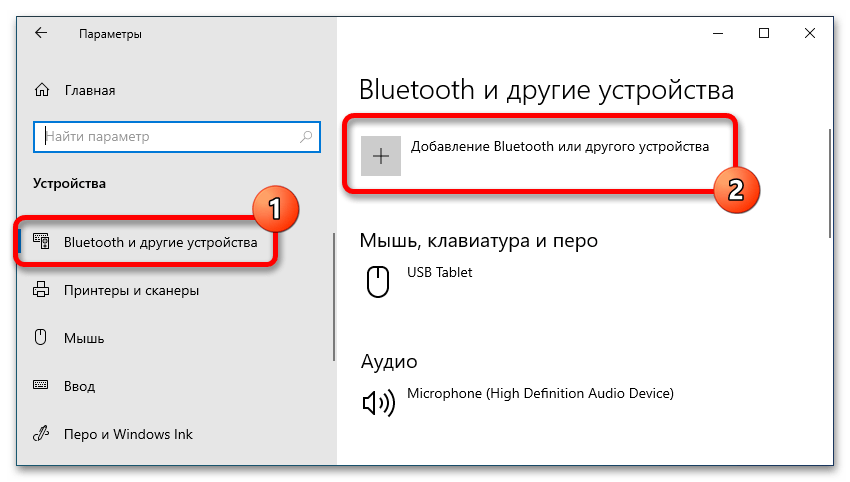
- Находясь на вкладке «Bluetooth и другие устройства», щелкните по кнопке «Добавление Bluetooth или другого устройства».
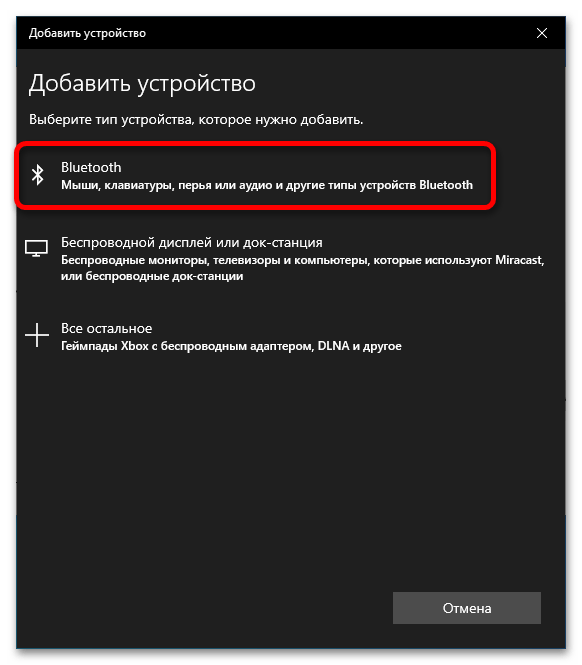
- В появившемся окне выберите тип устройства, которое необходимо подключить. В данном случае необходимо нажать по пункту «Bluetooth».
После этого запустится процесс сканирования окружения на наличие Bluetooth-мыши. Если таковая будет найдена, она отобразится в соответствующем списке, останется только нажать на ее название.

Примечание! Большинство Bluetooth-мышек при бездействии переходит в режим ожидания, чтобы не расходовать заряд аккумулятора. Поэтому в некоторых случаях потребуется перед запуском поиска устройства включить режим обнаружения. Делается это посредством специальной кнопки на корпусе или обычным кликом по одной из кнопок.
Способ 2: Панель управления
До десятой версии в операционных системах Windows отсутствовало ранее рассмотренное меню параметров, поэтому в них для выполнения поставленной задачи потребуется воспользоваться «Панелью управления».
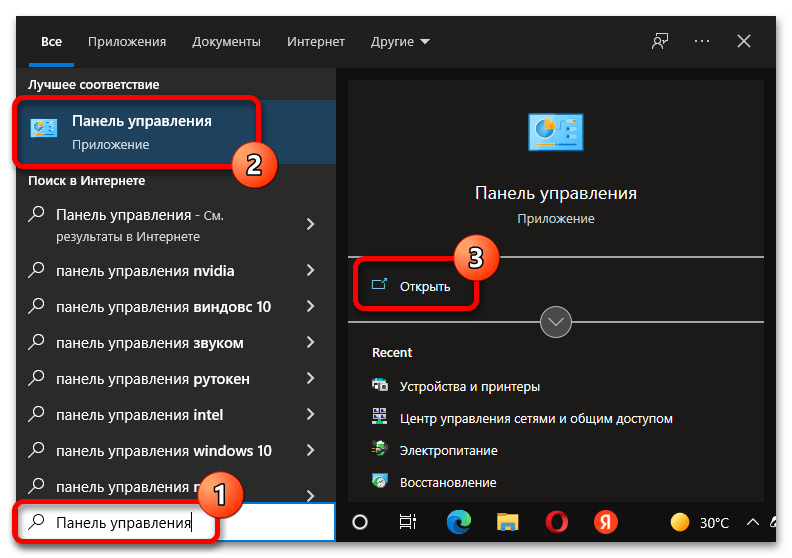
- Откройте «Панель управления» любым доступным способом. Проще всего это сделать, воспользовавшись поиском по системе. Для этого введите поисковой запрос в соответствующую форму на панели задач, а в результатах выдачи кликните по кнопке «Открыть».
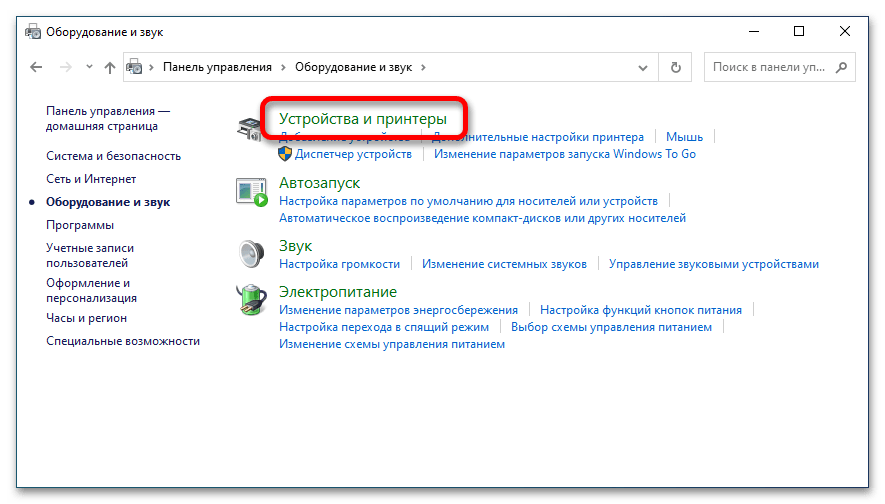
- В правом верхнем углу открывшегося окна измените режим отображения значков меню на «Категория», а затем проследуйте по ссылке «Оборудование и звук».
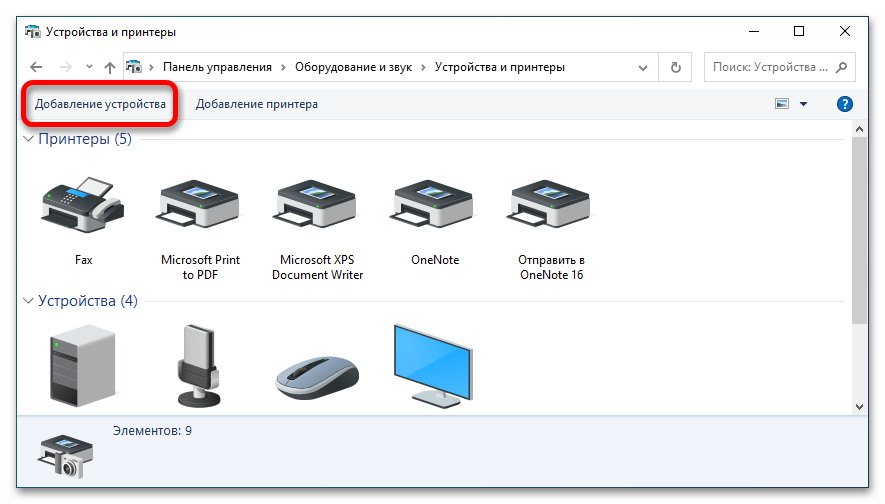
- Далее щелкните по пункту «Устройства и принтеры», чтобы перейти в раздел со списком всего подключенного к компьютеру периферийного оборудования.
- Нажмите по кнопке «Добавление устройства», чтобы открыть интерфейс поиска беспроводных устройств.
- Дождитесь завершения процедуры обнаружения, после чего щелкните по названию активированной в этот момент Bluetooth-мышки.

Примечание! Этот способ подключения беспроводных устройств доступен во всех версиях операционной системы от Microsoft.
Способ 3: Системный трей
Более простой способ подключения Bluetooth-мыши предполагает вызов контекстного меню на панели задач. Стоит также отметить, что этот метод доступен во всех операционных системах семейства Windows.
Щелкните правой кнопкой мыши по индикатору Bluetooth, который находится на панели задач в правой ее части, и в появившемся контекстно меню выберите пункт «Добавление устройств Bluetooth».
Примечание! В некоторых случаях индикатор может быть скрыт в системном трее. Предварительно потребуется открыть его, щелкнув по соответствующей стрелочке.
Вариант 2: Индукционная
Индукционная мышка сейчас встречается крайне редко, так как данная технология перестала быть актуальной в сегменте компьютерных манипуляторов. Правильная настройка подразумевает наличие не только самой мышки, но и специального коврика с выходом USB.
- Подключите индукционный коврик к своему компьютеру посредством интерфейса USB, при необходимости включите устройство, нажав на соответствующую кнопку блока управления. После этого дождитесь завершения процедуры автоматической установки драйверов. Об этом будет свидетельствовать оповещение в области уведомлений операционной системы.
- Поставьте мышку в центр коврика и дождитесь сопряжения двух устройств. Должен загореться специальный индикатор. Стоит отметить, что во время выполнения этой процедуры мышка должна находиться в неподвижном состоянии.
- Осуществите подключение мышки к коврику нажатием по кнопке «Tune», расположенной на ее корпусе. Информацию о точном местонахождении можно отыскать в соответствующей документации, которая поставляется в комплекте с устройством.
Если все действия были выполнены правильно, на устройстве должна загореться зеленая лампочка. После этого мышь можно использовать, но работать она будет только в пределах индукционного коврика.
Вариант 3: Радиочастотная
Радиочастотный тип подключения беспроводной мышки подразумевает наличие специального модуля, который идет в комплекте. Для корректной работы выполнять настройки в операционной системе не потребуется, все манипуляции производятся непосредственно с мышью.
- Вставьте радиочастотный модуль в USB-порт компьютера, при необходимости дождитесь завершения установки драйверов. Этот процесс выполняется в автоматическом режиме, а о его завершении будет свидетельствовать соответствующее уведомление.
- Вставьте в специальный лоток мыши батарейки, если этого не было сделано ранее. В случае наличие аккумулятора убедитесь, что он заряжен.
- Включите мышь для передачи сигнала. Для этого зачастую используется специальный переключатель на корпусе. Если он отсутствует, достаточно будет кликнуть по одной из кнопок.
После этого процедура подключения радиочастотной мыши завершена. Используется она как стандартное устройство этого типа, но при большом расстоянии от модуля может наблюдаться задержка в отклике.
Еще статьи по данной теме:
Помогла ли Вам статья?
![]()
Download Article
Setup instructions for your wireless mouse
![]()
Download Article
- Wireless Receiver
- Windows 11
- Windows 10
- Mac
- Chromebook
- Windows 7
- Q&A
- Tips
- Warnings
|
|
|
|
|
|
|
|
This wikiHow will show you how to connect a wireless mouse.
Want to use a wireless mouse with your laptop or desktop computer? Whether you have a Bluetooth mouse or a radio frequency (RF) mouse with a receiver, connecting it to your computer will be quick and easy. This wikiHow will walk you through hooking up any wireless mouse to your Windows PC, Mac, or Chromebook.
Things You Should Know
- If using a USB receiver, plug it in to your computer.
- On Windows, turn on Bluetooth in the settings menu.
- On Mac, turn on Bluetooth in the System Preferences menu.
-

1
Plug in your mouse’s receiver. The receiver should fit into one of your computer’s USB ports. You can typically find USB ports, which are thin, rectangular slots, on the sides of laptops and on the front of desktops’ CPU boxes.
- Plugging in the receiver before turning on the mouse will allow your computer to install any drivers or software needed to use the mouse.
-
2
Make sure that your mouse has batteries or is charged. To add batteries, you’ll typically flip the mouse over and remove a panel on the bottom, though some mice instead have their batteries in a compartment in the back of the mouse.
- If you haven’t used the mouse in several months, consider replacing the batteries even if they were new when you inserted them.
- Some mice, such as the Apple Magic Mouse 2, require charging instead of new batteries.
Advertisement
-
3
Turn on your mouse. This typically involves shifting or pressing a button on the bottom of the mouse, though you may need to look for the On/Off switch on the side of the mouse.
- If you can’t find the On/Off switch, consult your mouse’s manual.
-
4
Press your mouse’s «Connect» button. This button’s location will vary based on your mouse’s developer, but you’ll usually be able to find this button either between the two mouse buttons or on the mouse’s side.
- Some mice come listed as «plug and play», meaning that you don’t need to manually connect them or download any software.
-
5
Move your mouse around to test the connection. Once you see the cursor begin to move on-screen, your mouse is connected. You’re ready to start using your computer mouse!
- If your mouse doesn’t start moving, try turning it off and then back on. If applicable, you may also want to change the USB port into which the receiver is plugged.
- See our guide on how to extend the wireless range of a wireless mouse for more troubleshooting tips.


Advertisement
-
1
Turn on your mouse. To do so, you’ll need to locate the «On/Off» switch, which is typically found on the underside of the mouse, and slide it to the «On» position.
- If your mouse uses batteries, you should also make sure it has a fresh set. The battery compartment is also usually on the underside of the mouse.
-
2
Open the Start
menu on your computer. You can do so either by clicking the Windows icon in the bottom-left corner of the screen, or by pressing the ⊞ Win key on your computer’s keyboard.
-
3
Open Settings. Search for “settings” in the Windows search box, then select the Settings app.
-
4
Click Bluetooth & devices. It’s in the sidebar.
-
5
Switch on Bluetooth. Click the switch next to “Bluetooth” so that it says “On.”
-
6
Click Add device. This button is at the top of the Bluetooth & devices page, and has a large plus sign.
-
7
Click Bluetooth
. It’s the first option at the top of the «Add a device» menu. This starts scanning for nearby Bluetooth devices.
-
8
Press and hold the ‘Pairing’ button on your mouse. Most Bluetooth mouses have a pairing button that you must press and hold for a second to make the mouse discoverable via Bluetooth. Typically, an LED light will flash when the mouse is in pairing mode.
- Consult the user manual to find out if your mouse has a pairing button and where it is located.
-
9
Look for the mouse’s name. When Windows detects the Bluetooth mouse, it appears in the list of devices in the «Add a device» window.
- If the mouse doesn’t appear, press and hold the pairing button on your mouse again. Then turn your computer’s Bluetooth off and then on again.
-
10
Click the mouse’s name. Doing so will add your mouse to your computer’s Devices list, and you’ll be able to use it without re-pairing it from then on.


Advertisement
-
1
Turn on your mouse. To do so, you’ll need to locate the «On/Off» switch, which is typically found on the underside of the mouse, and slide it to the «On» position.
- If your mouse uses batteries, you should also make sure it has a fresh set. The battery compartment is also usually on the underside of the mouse.
-
2
Open the Start
menu on your computer. You can do so either by clicking the Windows icon in the bottom-left corner of the screen, or by pressing the ⊞ Win key on your computer’s keyboard.
-
3
Click the Settings icon
. It’s the icon that resembles a gear. It’s near the bottom-left corner of the Start window.
-
4
Click Devices. It’s next to an icon that resembles a keyboard and an iPod. It’s the second option in the Windows Settings menu.
-
5
Click Bluetooth & other devices. It’s the first option in the left sidebar on the page.
-
6
Click the switch
beneath the «Bluetooth» heading. Doing so will enable Bluetooth on your Windows 10 computer.
- If the switch is blue, Bluetooth is already on.
-
7
Click + Add Bluetooth or other device. It’s the first button at the top of the «Bluetooth & Other Devices» menu. This displays the «Add a device» window.
-
8
Click Bluetooth
. It’s the first option at the top of the «Add a device» menu. This starts scanning for nearby Bluetooth devices.
EXPERT TIP
«Your computer will begin searching for a broadcast signal from the mouse, which allows you to pair the two devices.»

Spike Baron
Computer Repair Technician
Spike Baron is the Owner of Spike’s Computer Repair based in Los Angeles, California. With over 25 years of working experience in the tech industry, Spike specializes in PC and Mac computer repair, used computer sales, virus removal, data recovery, and hardware and software upgrades. He has his CompTIA A+ certification for computer service technicians and is a Microsoft Certified Solutions Expert.
Spike Baron
Computer Repair Technician -
9
Press and hold the ‘Pairing’ button on your mouse. Most Bluetooth mouses have a pairing button that you must press and hold for a second to make the mouse discoverable via Bluetooth. Typically, a light will flash when the mouse is in pairing mode.
- Consult the user manual to find out if your mouse has a pairing button and where it is located.
-
10
Look for the mouse’s name. When Windows detects the Bluetooth mouse, it appears in the list of devices in the «Add a device» window.
- If the mouse doesn’t appear, press and hold the pairing button on your mouse again. Then turn your computer’s Bluetooth off and then on again.
-
11
Click the mouse’s name. Doing so will add your mouse to your computer’s Devices list, and you’ll be able to use it without re-pairing it from then on.[1]


Advertisement
-
1
Turn on your mouse. To do so, you’ll need to locate the «On/Off» switch, which is typically found on the underside of the mouse, and slide it to the «On» position.
- If your mouse uses batteries, you should also make sure it has a fresh set. The battery compartment is also usually on the underside of the mouse.
-
2
Click the Apple icon
. It’s the apple-shaped icon in the top-left corner of the screen. This displays the Apple menu.
- If you see the Bluetooth icon in the top-right side of the menu bar, click it instead.
-
3
Click System Preferences. This option is toward the top of the drop-down menu.
- In macOS Ventura, this is called “System Settings.”
-
4
Click Bluetooth
. It’s a blue icon with the white Bluetooth symbol on it.
- For macOS Ventura, Bluetooth is located in the sidebar.
-
5
Click Turn Bluetooth On. It’s on the left side of the window. Doing so will enable your Mac’s Bluetooth.
- Alternatively, you can click the Bluetooth icon in the menu bar in the top-right corner. Then click Turn Bluetooth On in the Bluetooth menu.
-
6
Press and hold the ‘Pairing’ button on your mouse. Most Bluetooth mouses have a pairing button that you must press and hold for a second to make the mouse discoverable via Bluetooth. Typically, a light will flash when the mouse is in pairing mode.
- Consult the user manual to find out if your mouse has a pairing button and where it is located.
-
7
Wait for the mouse’s name to appear. Your Mac constantly scans for nearby Bluetooth devices. When one is detected, it appears in the list of devices in the Bluetooth window [2]
- The Magic Mouse 2 must be turned on and then plugged into your Mac via its USB Lightning charger cable to pair.
-
8
Click Connect next to the mouse’s name. When you see the mouse appear in the list of Bluetooth devices, click Connect next to the device’s name to pair your mouse. Once a connection is established, your mouse is ready to use.


Advertisement
-
1
Turn on your mouse. To do so, you’ll need to locate the «On/Off» switch, which is typically found on the underside of the mouse, and slide it to the «On» position.
- If your mouse uses batteries, you should also make sure it has a fresh set. The battery compartment is also usually on the underside of the mouse.
-
2
Click the time on your Chromebook. It’s in the lower-right corner of the screen.
-
3
Click the Bluetooth
icon. It’s in the menu that appears when you click on the time in the lower-right corner of the screen. This will turn on Bluetooth and take you to a list of devices nearby.[3]
-
4
Click the Bluetooth switch. If Bluetooth is not already turned on, click the switch at the top of the menu. This turns Bluetooth on and starts scanning for nearby Bluetooth devices.
-
5
Press and hold the ‘Pairing’ button on your mouse. Most Bluetooth mouses have a pairing button that you must press and hold for a second to make the mouse discoverable via Bluetooth. Typically, a light will flash when the mouse is in pairing mode.
- Consult the user manual to find out if your mouse has a pairing button and where it is located.
-
6
Click the mouse’s name in the Bluetooth menu. This pairs your Chromebook with the mouse. Once a connection is made, your Bluetooth mouse is ready to use. [4]
[5]


Advertisement
-
1
Turn on your mouse. To do so, you’ll need to locate the «On/Off» switch, which is typically found on the underside of the mouse, and slide it to the «On» position.
- If your mouse uses batteries, you should also make sure it has a fresh set. The battery compartment is also usually on the underside of the mouse.
-
2
Open the Start menu. You can do so either by clicking the Windows icon in the bottom-left corner of the screen, or you can press the ⊞ Win key on your computer’s keyboard.
-
3
Click Devices and Printers. This option should be on the right side of the Start window, just below the Control Panel option.
- If you don’t see this option, type devices and printers into the «Search» field at the bottom of the Start window, then click Devices and Printers when it appears.
-
4
Click Add a device. It’s in the top-left side of the Devices and Printers window.
-
5
Press and hold the ‘Pairing’ button on your mouse. Most Bluetooth mouses have a pairing button that you must press and hold for a second to make the mouse discoverable via Bluetooth. Typically, a light will flash when the mouse is in pairing mode.
- Consult the user manual to find out if your mouse has a pairing button and where it is located.
-
6
Click your mouse’s name. It should appear in the window here.
- If you don’t see your mouse’s name, your Windows 7 computer might not support Bluetooth. You can fix this by purchasing a Bluetooth adapter.
-
7
Click Next. This option is in the lower-right corner of the window.
-
8
Wait for your mouse to finish connecting. This process may take a few minutes. Once it completes, you should be able to move the on-screen cursor with your mouse.


Advertisement
Add New Question
-
Question
What could cause my wireless mouse to stop working?

They all stop working eventually. Try unplugging and replugging the receiver if it has one, maybe into a different port. If it’s a Bluetooth mouse, try turning Bluetooth on and off on your computer. Try restarting your computer. Try the mouse with a different computer and see if it works. Try replacing the batteries if possible. If you’ve done all this and it doesn’t work, it’s just time to replace your mouse.
-
Question
Where is the connect button on a laptop for a wireless mouse when there is no USB key?
The mouse may be Bluetooth, in which case you’ll need to determine if your laptop is Bluetooth-enabled. If so, go through the Bluetooth device connection wizard via Control Panel.
-
Question
Do I need to pay money to do this?
Other than the cost of the mouse, you can install a wireless mouse by yourself and at no cost.
See more answers
Ask a Question
200 characters left
Include your email address to get a message when this question is answered.
Submit
Advertisement
-
You may see a blinking light on your mouse when it is in «pairing» mode.
-
Make sure you replace the batteries on your mouse often, or charge it when it’s not in use.
Advertisement
-
Always turn off your mouse and your computer’s Bluetooth when you’re done using them.
Advertisement
About This Article
Article SummaryX
1. Enable Bluetooth on your computer.
2. Turn on the mouse.
3. Put the mouse into pairing mode.
4. Click Pair on the computer.
Did this summary help you?
Thanks to all authors for creating a page that has been read 2,320,422 times.
Is this article up to date?
![]()
Download Article
Setup instructions for your wireless mouse
![]()
Download Article
- Wireless Receiver
- Windows 11
- Windows 10
- Mac
- Chromebook
- Windows 7
- Q&A
- Tips
- Warnings
|
|
|
|
|
|
|
|
This wikiHow will show you how to connect a wireless mouse.
Want to use a wireless mouse with your laptop or desktop computer? Whether you have a Bluetooth mouse or a radio frequency (RF) mouse with a receiver, connecting it to your computer will be quick and easy. This wikiHow will walk you through hooking up any wireless mouse to your Windows PC, Mac, or Chromebook.
Things You Should Know
- If using a USB receiver, plug it in to your computer.
- On Windows, turn on Bluetooth in the settings menu.
- On Mac, turn on Bluetooth in the System Preferences menu.
-
1
Plug in your mouse’s receiver. The receiver should fit into one of your computer’s USB ports. You can typically find USB ports, which are thin, rectangular slots, on the sides of laptops and on the front of desktops’ CPU boxes.
- Plugging in the receiver before turning on the mouse will allow your computer to install any drivers or software needed to use the mouse.
-
2
Make sure that your mouse has batteries or is charged. To add batteries, you’ll typically flip the mouse over and remove a panel on the bottom, though some mice instead have their batteries in a compartment in the back of the mouse.
- If you haven’t used the mouse in several months, consider replacing the batteries even if they were new when you inserted them.
- Some mice, such as the Apple Magic Mouse 2, require charging instead of new batteries.
Advertisement
-
3
Turn on your mouse. This typically involves shifting or pressing a button on the bottom of the mouse, though you may need to look for the On/Off switch on the side of the mouse.
- If you can’t find the On/Off switch, consult your mouse’s manual.
-
4
Press your mouse’s «Connect» button. This button’s location will vary based on your mouse’s developer, but you’ll usually be able to find this button either between the two mouse buttons or on the mouse’s side.
- Some mice come listed as «plug and play», meaning that you don’t need to manually connect them or download any software.
-
5
Move your mouse around to test the connection. Once you see the cursor begin to move on-screen, your mouse is connected. You’re ready to start using your computer mouse!
- If your mouse doesn’t start moving, try turning it off and then back on. If applicable, you may also want to change the USB port into which the receiver is plugged.
- See our guide on how to extend the wireless range of a wireless mouse for more troubleshooting tips.
Advertisement
-
1
Turn on your mouse. To do so, you’ll need to locate the «On/Off» switch, which is typically found on the underside of the mouse, and slide it to the «On» position.
- If your mouse uses batteries, you should also make sure it has a fresh set. The battery compartment is also usually on the underside of the mouse.
-
2
Open the Start
menu on your computer. You can do so either by clicking the Windows icon in the bottom-left corner of the screen, or by pressing the ⊞ Win key on your computer’s keyboard.
-
3
Open Settings. Search for “settings” in the Windows search box, then select the Settings app.
-
4
Click Bluetooth & devices. It’s in the sidebar.
-
5
Switch on Bluetooth. Click the switch next to “Bluetooth” so that it says “On.”
-
6
Click Add device. This button is at the top of the Bluetooth & devices page, and has a large plus sign.
-
7
Click Bluetooth
. It’s the first option at the top of the «Add a device» menu. This starts scanning for nearby Bluetooth devices.
-
8
Press and hold the ‘Pairing’ button on your mouse. Most Bluetooth mouses have a pairing button that you must press and hold for a second to make the mouse discoverable via Bluetooth. Typically, an LED light will flash when the mouse is in pairing mode.
- Consult the user manual to find out if your mouse has a pairing button and where it is located.
-
9
Look for the mouse’s name. When Windows detects the Bluetooth mouse, it appears in the list of devices in the «Add a device» window.
- If the mouse doesn’t appear, press and hold the pairing button on your mouse again. Then turn your computer’s Bluetooth off and then on again.
-
10
Click the mouse’s name. Doing so will add your mouse to your computer’s Devices list, and you’ll be able to use it without re-pairing it from then on.
Advertisement
-
1
Turn on your mouse. To do so, you’ll need to locate the «On/Off» switch, which is typically found on the underside of the mouse, and slide it to the «On» position.
- If your mouse uses batteries, you should also make sure it has a fresh set. The battery compartment is also usually on the underside of the mouse.
-
2
Open the Start
menu on your computer. You can do so either by clicking the Windows icon in the bottom-left corner of the screen, or by pressing the ⊞ Win key on your computer’s keyboard.
-
3
Click the Settings icon
. It’s the icon that resembles a gear. It’s near the bottom-left corner of the Start window.
-
4
Click Devices. It’s next to an icon that resembles a keyboard and an iPod. It’s the second option in the Windows Settings menu.
-
5
Click Bluetooth & other devices. It’s the first option in the left sidebar on the page.
-
6
Click the switch
beneath the «Bluetooth» heading. Doing so will enable Bluetooth on your Windows 10 computer.
- If the switch is blue, Bluetooth is already on.
-
7
Click + Add Bluetooth or other device. It’s the first button at the top of the «Bluetooth & Other Devices» menu. This displays the «Add a device» window.
-
8
Click Bluetooth
. It’s the first option at the top of the «Add a device» menu. This starts scanning for nearby Bluetooth devices.
EXPERT TIP
«Your computer will begin searching for a broadcast signal from the mouse, which allows you to pair the two devices.»
Spike Baron
Computer Repair Technician
Spike Baron is the Owner of Spike’s Computer Repair based in Los Angeles, California. With over 25 years of working experience in the tech industry, Spike specializes in PC and Mac computer repair, used computer sales, virus removal, data recovery, and hardware and software upgrades. He has his CompTIA A+ certification for computer service technicians and is a Microsoft Certified Solutions Expert.
Spike Baron
Computer Repair Technician -
9
Press and hold the ‘Pairing’ button on your mouse. Most Bluetooth mouses have a pairing button that you must press and hold for a second to make the mouse discoverable via Bluetooth. Typically, a light will flash when the mouse is in pairing mode.
- Consult the user manual to find out if your mouse has a pairing button and where it is located.
-
10
Look for the mouse’s name. When Windows detects the Bluetooth mouse, it appears in the list of devices in the «Add a device» window.
- If the mouse doesn’t appear, press and hold the pairing button on your mouse again. Then turn your computer’s Bluetooth off and then on again.
-
11
Click the mouse’s name. Doing so will add your mouse to your computer’s Devices list, and you’ll be able to use it without re-pairing it from then on.[1]
Advertisement
-
1
Turn on your mouse. To do so, you’ll need to locate the «On/Off» switch, which is typically found on the underside of the mouse, and slide it to the «On» position.
- If your mouse uses batteries, you should also make sure it has a fresh set. The battery compartment is also usually on the underside of the mouse.
-
2
Click the Apple icon
. It’s the apple-shaped icon in the top-left corner of the screen. This displays the Apple menu.
- If you see the Bluetooth icon in the top-right side of the menu bar, click it instead.
-
3
Click System Preferences. This option is toward the top of the drop-down menu.
- In macOS Ventura, this is called “System Settings.”
-
4
Click Bluetooth
. It’s a blue icon with the white Bluetooth symbol on it.
- For macOS Ventura, Bluetooth is located in the sidebar.
-
5
Click Turn Bluetooth On. It’s on the left side of the window. Doing so will enable your Mac’s Bluetooth.
- Alternatively, you can click the Bluetooth icon in the menu bar in the top-right corner. Then click Turn Bluetooth On in the Bluetooth menu.
-
6
Press and hold the ‘Pairing’ button on your mouse. Most Bluetooth mouses have a pairing button that you must press and hold for a second to make the mouse discoverable via Bluetooth. Typically, a light will flash when the mouse is in pairing mode.
- Consult the user manual to find out if your mouse has a pairing button and where it is located.
-
7
Wait for the mouse’s name to appear. Your Mac constantly scans for nearby Bluetooth devices. When one is detected, it appears in the list of devices in the Bluetooth window [2]
- The Magic Mouse 2 must be turned on and then plugged into your Mac via its USB Lightning charger cable to pair.
-
8
Click Connect next to the mouse’s name. When you see the mouse appear in the list of Bluetooth devices, click Connect next to the device’s name to pair your mouse. Once a connection is established, your mouse is ready to use.
Advertisement
-
1
Turn on your mouse. To do so, you’ll need to locate the «On/Off» switch, which is typically found on the underside of the mouse, and slide it to the «On» position.
- If your mouse uses batteries, you should also make sure it has a fresh set. The battery compartment is also usually on the underside of the mouse.
-
2
Click the time on your Chromebook. It’s in the lower-right corner of the screen.
-
3
Click the Bluetooth
icon. It’s in the menu that appears when you click on the time in the lower-right corner of the screen. This will turn on Bluetooth and take you to a list of devices nearby.[3]
-
4
Click the Bluetooth switch. If Bluetooth is not already turned on, click the switch at the top of the menu. This turns Bluetooth on and starts scanning for nearby Bluetooth devices.
-
5
Press and hold the ‘Pairing’ button on your mouse. Most Bluetooth mouses have a pairing button that you must press and hold for a second to make the mouse discoverable via Bluetooth. Typically, a light will flash when the mouse is in pairing mode.
- Consult the user manual to find out if your mouse has a pairing button and where it is located.
-
6
Click the mouse’s name in the Bluetooth menu. This pairs your Chromebook with the mouse. Once a connection is made, your Bluetooth mouse is ready to use. [4]
[5]
Advertisement
-
1
Turn on your mouse. To do so, you’ll need to locate the «On/Off» switch, which is typically found on the underside of the mouse, and slide it to the «On» position.
- If your mouse uses batteries, you should also make sure it has a fresh set. The battery compartment is also usually on the underside of the mouse.
-
2
Open the Start menu. You can do so either by clicking the Windows icon in the bottom-left corner of the screen, or you can press the ⊞ Win key on your computer’s keyboard.
-
3
Click Devices and Printers. This option should be on the right side of the Start window, just below the Control Panel option.
- If you don’t see this option, type devices and printers into the «Search» field at the bottom of the Start window, then click Devices and Printers when it appears.
-
4
Click Add a device. It’s in the top-left side of the Devices and Printers window.
-
5
Press and hold the ‘Pairing’ button on your mouse. Most Bluetooth mouses have a pairing button that you must press and hold for a second to make the mouse discoverable via Bluetooth. Typically, a light will flash when the mouse is in pairing mode.
- Consult the user manual to find out if your mouse has a pairing button and where it is located.
-
6
Click your mouse’s name. It should appear in the window here.
- If you don’t see your mouse’s name, your Windows 7 computer might not support Bluetooth. You can fix this by purchasing a Bluetooth adapter.
-
7
Click Next. This option is in the lower-right corner of the window.
-
8
Wait for your mouse to finish connecting. This process may take a few minutes. Once it completes, you should be able to move the on-screen cursor with your mouse.
Advertisement
Add New Question
-
Question
What could cause my wireless mouse to stop working?
They all stop working eventually. Try unplugging and replugging the receiver if it has one, maybe into a different port. If it’s a Bluetooth mouse, try turning Bluetooth on and off on your computer. Try restarting your computer. Try the mouse with a different computer and see if it works. Try replacing the batteries if possible. If you’ve done all this and it doesn’t work, it’s just time to replace your mouse.
-
Question
Where is the connect button on a laptop for a wireless mouse when there is no USB key?
The mouse may be Bluetooth, in which case you’ll need to determine if your laptop is Bluetooth-enabled. If so, go through the Bluetooth device connection wizard via Control Panel.
-
Question
Do I need to pay money to do this?
Other than the cost of the mouse, you can install a wireless mouse by yourself and at no cost.
See more answers
Ask a Question
200 characters left
Include your email address to get a message when this question is answered.
Submit
Advertisement
-
You may see a blinking light on your mouse when it is in «pairing» mode.
-
Make sure you replace the batteries on your mouse often, or charge it when it’s not in use.
Advertisement
-
Always turn off your mouse and your computer’s Bluetooth when you’re done using them.
Advertisement
About This Article
Article SummaryX
1. Enable Bluetooth on your computer.
2. Turn on the mouse.
3. Put the mouse into pairing mode.
4. Click Pair on the computer.
Did this summary help you?
Thanks to all authors for creating a page that has been read 2,320,422 times.
Is this article up to date?
Подключение беспроводной мыши Bluetooth в Windows
Технология беспроводных устройств не везде эффективна
Опубликовано 17.04.2019, 14:47 · Комментарии:15

Беспроводные мыши используют технологию Bluetooth для подключения к вашему компьютеру, освобождая рабочий стол от лишних шнуров. Поскольку беспроводные мыши используют Bluetooth, они подключаются так же, как и любое другое устройство Bluetooth, но с некоторыми другими настройками.
Подключение беспроводной мыши
Для сопряжения с компьютером беспроводная мышь должна опираться на встроенный передатчик, который обменивается данными с приемником внутри компьютера. Большинство современных планшетных компьютеров и ноутбуков имеют встроенные радиомодули Bluetooth. Однако некоторые настольные компьютеры этого не делают. Если ваш компьютер не поддерживает Bluetooth, приобретите адаптер Bluetooth или выберите беспроводную мышь с USB-ключом, который служит в качестве приемника.
Как подключить беспроводную мышь к компьютеру под управлением Windows 10?
- Откройте приложение Настройки (нажмите Win + I в качестве ярлыка) и выберите Устройства.
- В меню левой боковой панели выберите Bluetooth и другие устройства , затем щелкните значок плюса рядом с надписью Добавить Bluetooth или другое устройство на правой панели.
- Во всплывающем окне нажмите Bluetooth .
- Следуйте инструкциям мастера добавления устройств. Вам нужно будет перевести беспроводную мышь в режим сопряжения; процедура установки этого режима зависит от производителя, поэтому ознакомьтесь с кратким руководством по началу работы. Windows обнаружит мышь и добавит соответствующие драйверы.
Как подключить беспроводную мышь к компьютеру под управлением macOS Mojave?
- Переведите беспроводную мышь в режим сопряжения (см. Инструкции в документации устройства).
- Нажмите Apple> Системные настройки> Bluetooth .
- Ваш Mac будет искать любое устройство в режиме сопряжения, когда вы откроете панель Bluetooth. Когда компьютер найдет мышь, он отобразится в окне. Нажмите Пара .
Как подключить беспроводную мышь к компьютеру под управлением Ubuntu Linux (версия 18.04)?
- Откройте панель Bluetooth и убедитесь, что переключатель вверху установлен в положение Вкл .
- Переведите беспроводную мышь в режим сопряжения (см. Инструкции в документации устройства).
- Щелкните мышью в списке устройств и завершите настройку. Вы должны выполнить этот шаг в течение 20 секунд, чтобы избежать тайм-аутов. Когда мышь подключится, ее состояние будет отображаться как Подключено .
- Нажмите подключенную мышь, чтобы открыть панель для индивидуальной настройки устройства.
Обратитесь к нашему руководству по устранению проблем сопряжения Bluetooth, если вам требуется дополнительная поддержка.
Особенности беспроводной мыши
Мышь Bluetooth отличается от проводной мыши в нескольких важных аспектах:
- Вы должны оставаться относительно близко . Несмотря на то, что вы можете отойти от компьютера с помощью мыши Bluetooth на расстояние до 10 метров — намного дольше, чем у проводной мыши с 2-х метровым кабелем — выведение мыши из зоны действия может потребовать повторного сопряжения устройства.
- Беспроводная мышь требует батарейки . Таким образом, вам понадобится нести запасные батареи или кабель для зарядки беспроводных мышей с несменными батареями. Хотя большинство современных мышей Bluetooth работают месяцами или годами от одного комплекта батарей, закон Мерфи предполагает, что ваша мышь разрядиться в самый неподходящий момент. Так что планируйте заранее.
- Разные мыши поддерживают разное количество сопряженных устройств . Некоторые мыши соединяются с одним компьютером одновременно; несколько моделей могут поддерживать два или три устройства. Если вы путешествуете с одной мышью, но двумя компьютерами (например, ноутбуком и планшетом Windows), выберите мышь, которая может поддержизкопрофильную модель, котовать оба без повторного сопряжения при каждом использовании.
- Беспроводные мыши и их ключи иногда теряются . Если вашему компьютеру требуется ключ, ищите нирую вы можете оставить постоянно вставленной в слот USB. Большие ключи могут упасть или повредиться в сумке для ноутбука.
- Разные компьютеры загружают драйверы Bluetooth в разных точках их последовательности запуска . Если вам нужно устранить неполадки с компьютером, который не запускается должным образом, вы можете обнаружить, что ваша мышь Bluetooth не загружается, пока компьютер не работает. Обычно драйверы USB загружаются раньше, чем беспроводные драйверы, так что вам может повезти с поиском неисправного компьютера с помощью проводной мыши.
На чтение 4 мин. Просмотров 984 Опубликовано 03.09.2019
Если вы обновились до Windows 10 или Windows 8.1 и ваша мышь Bluetooth не смогла подключиться после обновления, прочитайте ниже эту статью, чтобы узнать больше о том, как подключить мышь Bluetooth в Windows 10, 8.1. Bluetooth может не подключиться по нескольким причинам в Windows 10 и 8.1, но не беспокойтесь, потому что мы собираемся решить эту проблему, выполнив несколько простых шагов ниже.
Прежде всего, прежде чем приступить к устранению неполадок в Windows 10 и 8.1, нам нужно проверить батареи мыши или любого другого устройства Bluetooth, потому что, если батареи не имеют достаточного заряда, то ваш ПК с Windows 8 или ноутбук не сможет принять передачу мыши, поэтому не сможет подключиться к вашей функции Bluetooth.
Содержание
- Как решить проблемы с подключением с помощью мыши Bluetooth в Windows 10 и Windows 8.1
- 1. Используйте службу поддержки Bluetooth
- 2. Драйверы Bluetooth не найдены
- 3. Bluetooth-мышь не работает в Windows 10, 8.1
Как решить проблемы с подключением с помощью мыши Bluetooth в Windows 10 и Windows 8.1
1. Используйте службу поддержки Bluetooth
- Нажмите и удерживайте кнопки «Windows» и «R».
- Теперь, когда у вас открыто окно «Выполнить», нам нужно ввести в поле поиска «services.msc» (введите слово без кавычек).
- После того, как вы закончили печатать, нажмите «Enter» на клавиатуре.
- Теперь появится окно «Службы», нам нужно посмотреть список, представленный для «Службы поддержки Bluetooth».
- Дважды щелкните (щелкните левой кнопкой мыши) на «Служба поддержки Bluetooth» после того, как найдете его.
- Нажмите (щелкните левой кнопкой мыши) на вкладке «Общие», представленной в верхней части окна, которое вы открыли (Свойства службы поддержки Bluetooth).
- На вкладке «Общие» нажмите на меню рядом с «Тип запуска» и нажмите (левой кнопкой мыши) на «Автоматически»
- Теперь нам нужно нажать (щелкнуть левой кнопкой мыши) на вкладке «Вход в систему» в верхней части окна Bluetooth.
- Нажмите (щелкните левой кнопкой мыши) на «Эта учетная запись», чтобы включить эту функцию.
- Введите там имя своей учетной записи или найдите имя учетной записи.
- После вышеуказанного шага нам нужно удалить поле «Пароль» и поле «Подтверждение пароля».
- Нажмите (щелкните левой кнопкой мыши) на «OK» в нижней части окна Bluetooth.
- Перезагрузите Windows 10, 8.1 ПК или ноутбук.
- После загрузки ПК или ноутбука нам нужно установить последние версии драйверов Bluetooth, доступных на веб-сайте производителя для Windows 10 или Windows 8.1.
2. Драйверы Bluetooth не найдены
Если описанные выше действия не помогли решить проблему с Bluetooth-мышью, мы должны выполнить следующие действия:
Возможно, вы не найдете драйверы Bluetooth для Windows 10 или Windows 8.1.
- Нажмите и удерживайте кнопки «Windows» и «R».
- После того, как вы откроете окно «Выполнить», нам нужно ввести «regedit».
- Нажмите кнопку «Ввод» на клавиатуре.
- Теперь, когда открыто окно «Редактор реестра», нам нужно щелкнуть (левой кнопкой мыши) «HKEY_LOCAL_MACHINE».
- В папке «HKEY_LOCAL_MACHINE» нам нужно нажать (щелкнуть левой кнопкой мыши) «ПРОГРАММНОЕ ОБЕСПЕЧЕНИЕ».
- В папке «ПРОГРАММНОЕ ОБЕСПЕЧЕНИЕ» нам нужно нажать (левой кнопкой мыши) на «Microsoft».
- В папке «Microsoft» нам нужно нажать (левой кнопкой мыши) на «Windows NT».
-
В папке «Windows NT» нам нужно нажать (левой кнопкой мыши) на «CurrentVersion».
Примечание: путь должен выглядеть примерно так: «HKEY_LOCAL_MACHINE/SOFTWARE/Microsoft/Windows NT/CurrentVersion» - В папке «CurrentVersion» нам нужно будет найти справа файл «CurrentVersion» и дважды щелкнуть по нему левой кнопкой мыши.
- После появления окна «Редактировать строку» нам нужно изменить значение с «6.3» до «6.2».
- Нажмите (щелкните левой кнопкой мыши) на «ОК».
- Перезагрузите компьютер с Windows 10, 8.1 и проверьте мышь Bluetooth, чтобы убедиться, что она работает.
3. Bluetooth-мышь не работает в Windows 10, 8.1
Если ваша Bluetooth-мышь просто не работает, вы можете попробовать некоторые решения из этой статьи:
- Изменить настройки питания и сна
- Проверьте, работает ли служба Bluetooth (на всякий случай)
- Перезагрузите мышь Bluetooth
- Изменить частоту мыши
- Откатить ваши драйверы
- Изменить параметры управления питанием
В статье, упомянутой выше, вы узнаете, как сделать id шаг за шагом, и это поможет вам решить эту досадную проблему.
Выше у вас есть 2 способа, как исправить передачу Bluetooth в Windows 10 или Windows 8.1, чтобы распознать вашу мышь. Напишите нам ниже, если у вас есть какие-либо вопросы относительно этой статьи, и мы посмотрим, что мы можем сделать, чтобы помочь вам в дальнейшем.