![]() Администрируя серверы на базе ОС Linux в среде, где в качестве основной клиентской ОС используется Windows, время от времени приходится сталкиваться с необходимостью что-либо скопировать с клиентской Windows на Linux-систему или наоборот, с Linux-системы на Windows. Чаще всего для этого используются возможности протоколов SSH/SCP с помощью таких инструментов, как например, утилита pscp.exe. Но когда приходится сталкиваться с файловыми Linux-серверами, позволяющими использовать возможности протокола NFS, мы можем задаться вопросами типа «может ли клиентская ОС Windows выступать в качестве NFS-клиента?», «есть ли в клиентской ОС Windows какая-то встроенная реализация клиента NFS?». Именно такие вопросы у меня возникли в период времени, который совпал с периодом, когда мы перебирались с Windows 8.1 на первый релиз Windows 10. Информация, которую в тот момент удалось найти по этому вопросу, заключалась в том, что функциональность NFS-клиента имеют только «старшие» редакции клиентских ОС Windows, такие как Windows 7 Ultimate/Enterprise, Windows 8/8.1 Enterprise и Windows 10 Enterprise. Однако в нашем случае использовалась ОС Windows 10 редакции Professional, поэтому пришлось отбросить эти мысли.
Администрируя серверы на базе ОС Linux в среде, где в качестве основной клиентской ОС используется Windows, время от времени приходится сталкиваться с необходимостью что-либо скопировать с клиентской Windows на Linux-систему или наоборот, с Linux-системы на Windows. Чаще всего для этого используются возможности протоколов SSH/SCP с помощью таких инструментов, как например, утилита pscp.exe. Но когда приходится сталкиваться с файловыми Linux-серверами, позволяющими использовать возможности протокола NFS, мы можем задаться вопросами типа «может ли клиентская ОС Windows выступать в качестве NFS-клиента?», «есть ли в клиентской ОС Windows какая-то встроенная реализация клиента NFS?». Именно такие вопросы у меня возникли в период времени, который совпал с периодом, когда мы перебирались с Windows 8.1 на первый релиз Windows 10. Информация, которую в тот момент удалось найти по этому вопросу, заключалась в том, что функциональность NFS-клиента имеют только «старшие» редакции клиентских ОС Windows, такие как Windows 7 Ultimate/Enterprise, Windows 8/8.1 Enterprise и Windows 10 Enterprise. Однако в нашем случае использовалась ОС Windows 10 редакции Professional, поэтому пришлось отбросить эти мысли.
Недавно, читая обсуждения на форумах TechNet, я столкнулся с информацией о том, что с какого-то момента времени в ОС Windows 10 редакции Professional появилась возможность использовать функционал NFS-клиента. По информации из некоторых источников такая возможность появилась в Windows 10 версии 1607 (10.0.14393 / Anniversary Update).
Решив проверить эту информацию на имеющейся у меня под руками Windows 10 1803 (10.0.17134 / April 2018 Update) редакции Professional, я обнаружил, что теперь у нас действительно имеется возможность использования этого функционала.
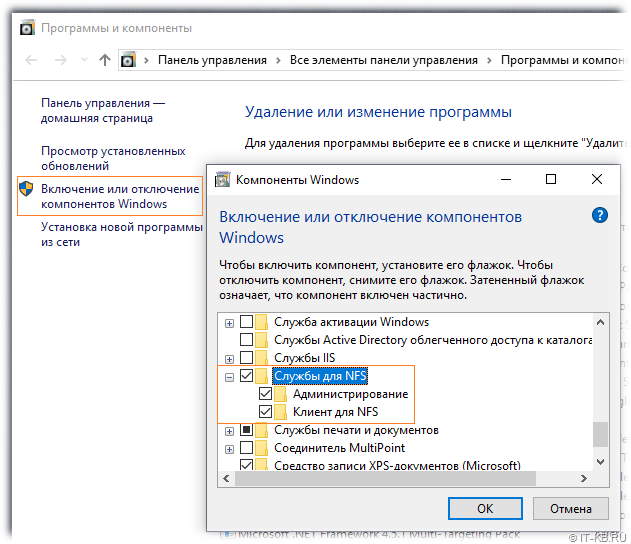
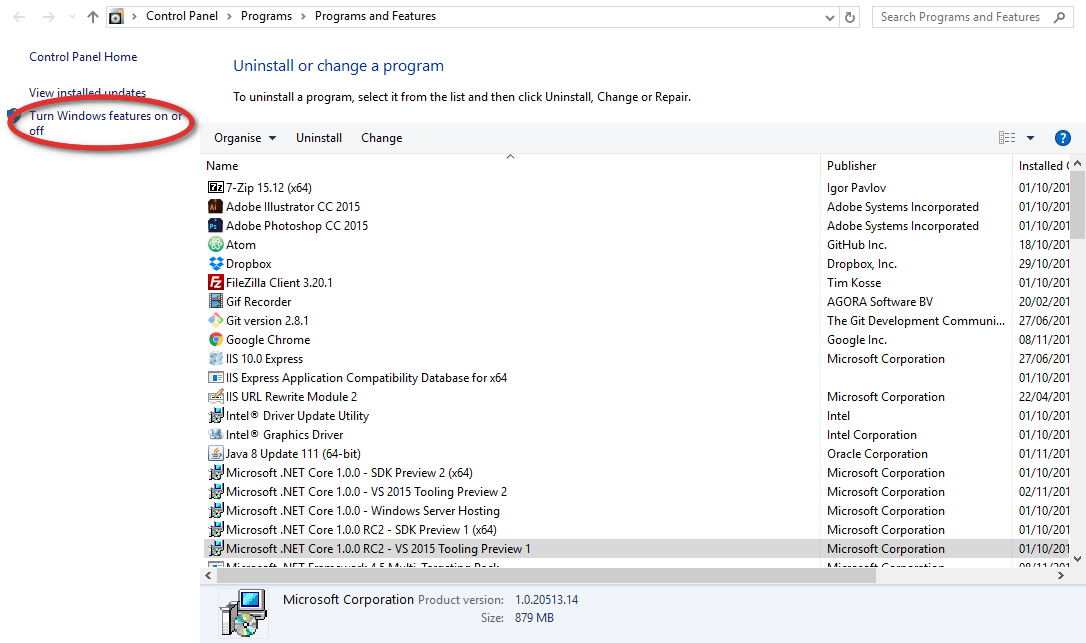
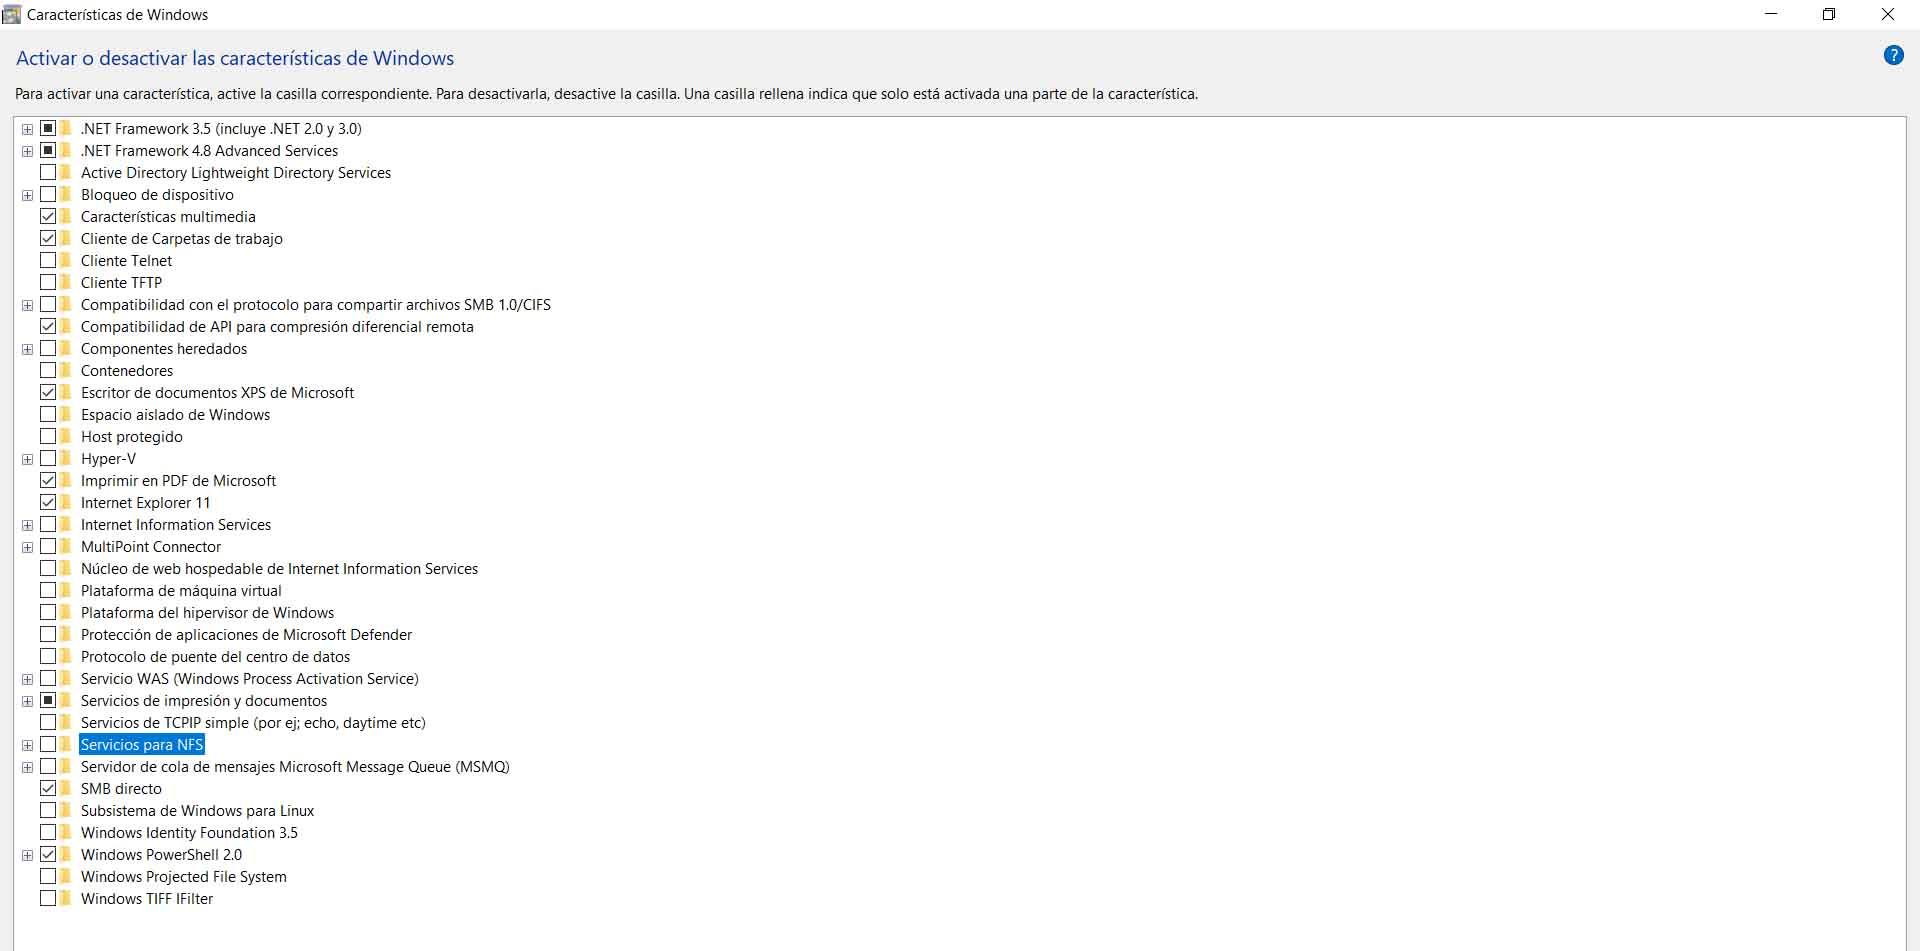
Чтобы включить NFS-клиента, можем воспользоваться оснасткой управления программами и компонентами appwiz.cpl. Здесь в перечне «компонентов Windows» можно найти доступные к включению «Службы для NFS«.
После завершения установки компонент в Панели управления в разделе «Администрирование» появится оснастка «Службы для NFS» (nfsmgmt.msc), в которой мы сможем управлять некоторым параметрами работы NFS-клиента.
Предполагаем, что на стороне NFS сервера уже настроены разрешения для доступа с клиентской системы, например, явно разрешён доступ по IP адресу клиента. Простейший пример установки и настройки NFS-сервера на стороне CentOS Linux можно найти в статье Вики «Установка и настройка сервера и клиента NFS в CentOS Linux 7.2».
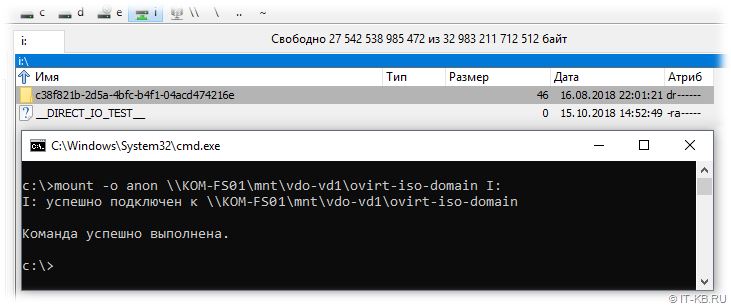
После настройки прав доступа на стороне NFS-сервера переходим на Windows 10 и выполняем подключение сетевого каталога с помощью утилиты «mount«. Простейший пример анонимного подключения к сетевому каталогу выглядит так:
mount -o anon \KOM-FS01mntvdo-vd1ovirt-iso-domain I:
где:
- «-o anon» — подключаться с правами анонимного пользователя;
- «KOM-FS01» — имя NFS-сервера;
- «mntvdo-vd1ovirt-iso-domain» — локальный путь к каталогу на NFS-сервере;
- «I» — буква диска Windows
Другие доступные параметры и ключи утилиты, можно посмотреть командой «mount /?«. Например, при подключении мы явно можем указать имя пользователь и пароль на NFS-сервере.
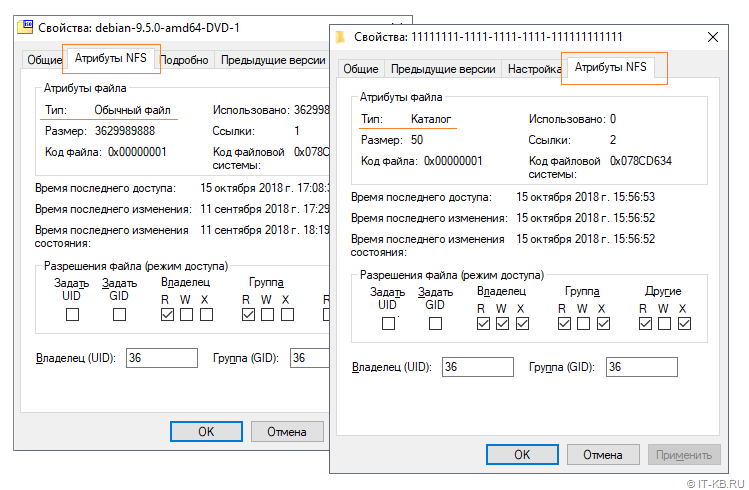
При открытии свойств каталогов и файлов в подключённом NFS-каталоге мы увидим специальную вкладку «Атрибуты NFS» с соответствующими атрибутами, в том числе и информацию о текущих разрешениях на каталог/файл, которыми, в случае достаточных прав, мы можем управлять.
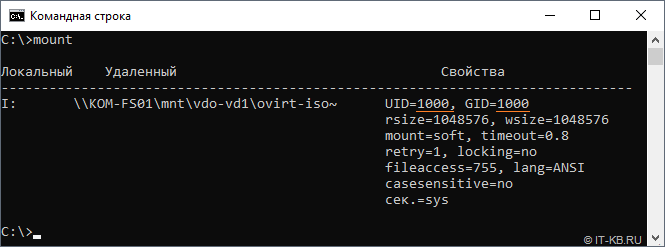
При повторном выполнении команды mount без указания параметров, мы получим сведения о текущий подключениях NFS-клиента и свойствах этих подключений:
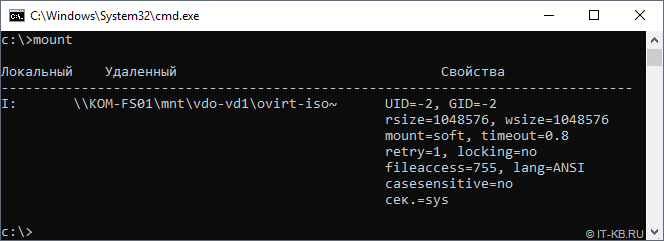
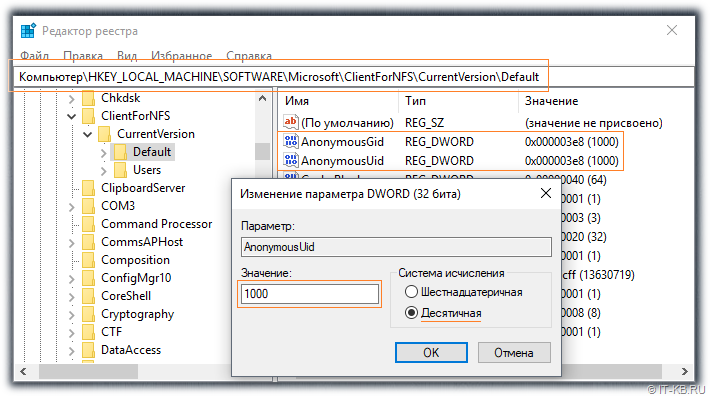
Здесь мы сможем увидеть то, с какими UID и GUID, выполнено подключение. Для анонимных подключений это по умолчанию -2/-2. Если по какой-то причине у нас возникнет необходимость изменить эти идентификаторы для всех анонимных клиентских подключений, то мы можем добавить пару отсутствующих по умолчанию параметров реестра типа DWORD (32-бита):
- AnonymousUid
- AnonymousGid
в ключ реестра:
HKEY_LOCAL_MACHINESOFTWAREMicrosoftClientForNFSCurrentVersionDefault
В значениях созданных параметров можно записать нужные UID и GUID, которые будут использоваться при всех анонимных подключениях. На скриншоте ниже используется пример со значениями 1000:1000 (десятичное).
Если мы хотим, чтобы все анонимные подключения использовали root-овые идентификаторы, то в соответствующих параметрах реестра нужно указать AnonymousUid = 0 и AnonymousGid = 0. Указание root-овых идентификаторов может быть полезно в случае, если, например, нам требуется не только чтение, но запись в подключенном NFS-каталоге, а удалённый NFS-сервер разрешает запись только root-пользователю и/или членам группы root.
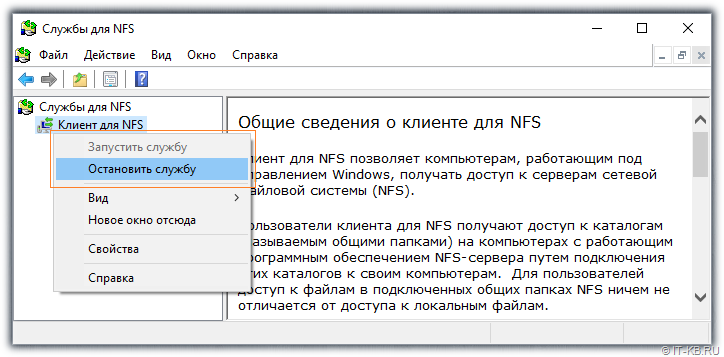
Для вступления изменений в силу потребуется выполнить остановку и повторный запуск службы клиента NFS из ранее упомянутой оснастки «Службы для NFS» (nfsmgmt.msc).
Либо, если перезапуск компьютера не составляет проблемы, то для вступления изменений в силу можно выполнить и перезагрузку клиентского компьютера.
Здесь хочу сделать маленькое отступление относительно перезапуска службы клиента NFS и поделиться своими наблюдениями.
Мои попытки перезапускать системную службу «Клиент для NFS» (NfsClnt) через стандартные механизмы, такие как оснастку управления службами services.msc или утилиту «net«, показали, что это по какой-то причине приводит к невозможности запуска службы после её остановки. Поэтому для перезапуска NFS-клиента лучше использовать именно «родную» оснастку. Хотя, опять же, замечено, что многократные остановки/запуски службы в оснастке «Службы для NFS» также могут привести к неадекватной работе NFS-клиента. В результате чего, например, утилита «mount» может перестать подключать NFS-каталоги, выдавая ошибку сети:
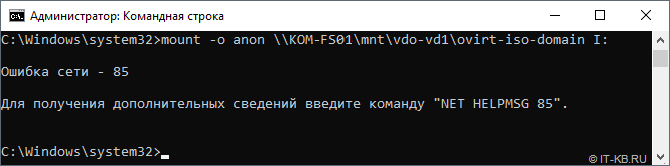
В таких случаях помогает только перезагрузка клиентского компьютера, после которой всё снова начинает работать.
После того, как нужные нам изменения внесены в реестр и служба клиента NFS успешно перезапущена, снова попытаемся подключить NFS-каталог и посмотрим командой «mount» сведения о подключениях.
Как видим, теперь в качестве идентификаторов безопасности выступают именно те, что были ранее нами указаны в реестре.
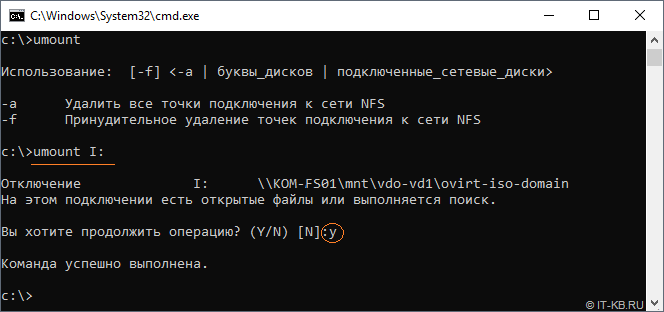
Отключение подключенных по протоколу NFS сетевых ресурсов выполняется также просто, как и подключение, только с помощью другой утилиты – «umount«
В общем это хорошо, что теперь у пользователей ОС Windows 10 редакции Professional есть штатная возможность работать с сетевыми файловыми ресурсами по протоколу NFS. Будем использовать это в работе.
В Unix-подобных операционных системах подключить каталога NFS (Network File System) довольно просто, однако если вам понадобится использовать NFS шару в Windows, придется выполнить ряд дополнительных действий. В этой статье мы покажем, как в Windows 10 подключить NFS каталог, который находинся на UNIX системе. Все описанные инструкции будут работать в Windows 10 Pro (версия 10.0.14393 и выше).
- Установка клиента NFS (службы для NFS)
- Как разрешить запись в NFS каталог анонимному пользователю
- Как подключить NFS каталог в Windows 10
Содержание:
Установка клиента NFS (службы для NFS)
В первую очередь в Windows 10 нужно установить клиент NFS. Для установки необходимо выполнить следующие шаги:
- Откройте раздел «Programs and Features».

- Щелкните по пункту «Turn Windows features on or off».

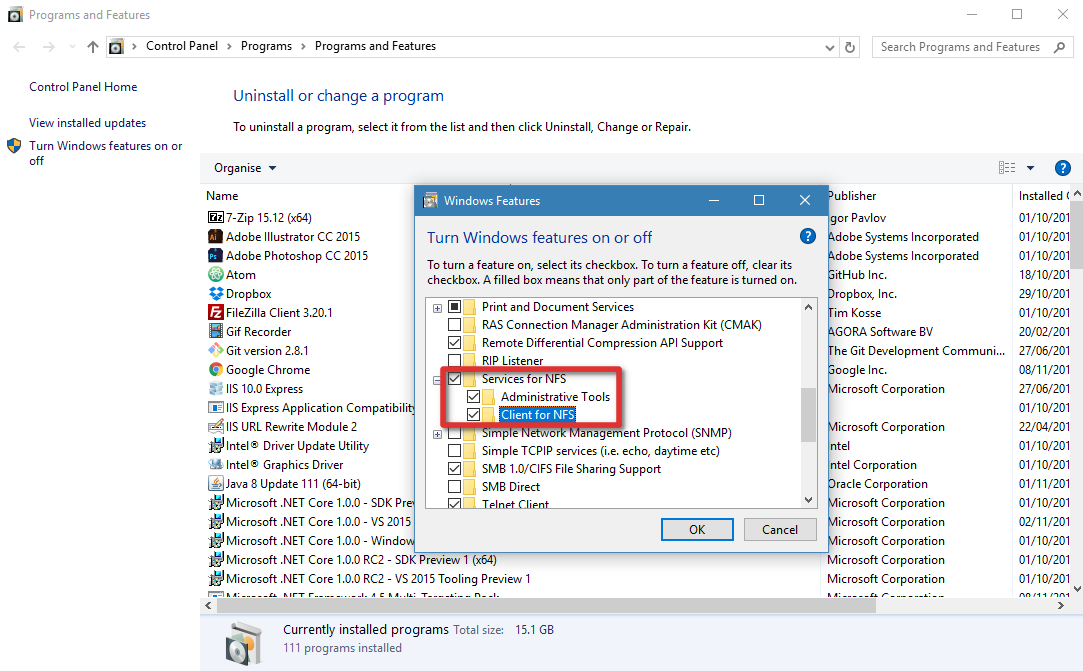
- В появившемся списке в разделе Services for NFS включите NFS клиента (Client for NFS), а затем нажмите «ОК».

- После установки нажмите кнопку «Close» и вернитесь на рабочий стол.

Как разрешить запись в NFS каталог анонимному пользователю
По умолчанию при подключении NFS каталога с UNIX системы, анонимному пользователю (anonymous) предоставляются права только на чтение. Чтобы предоставить анонимным пользователям право записи, необходимо изменить значения UID и GID, которые используются для монтирования NFS каталога в Windows. Пример стандартных настроек представлен на рисунке ниже.
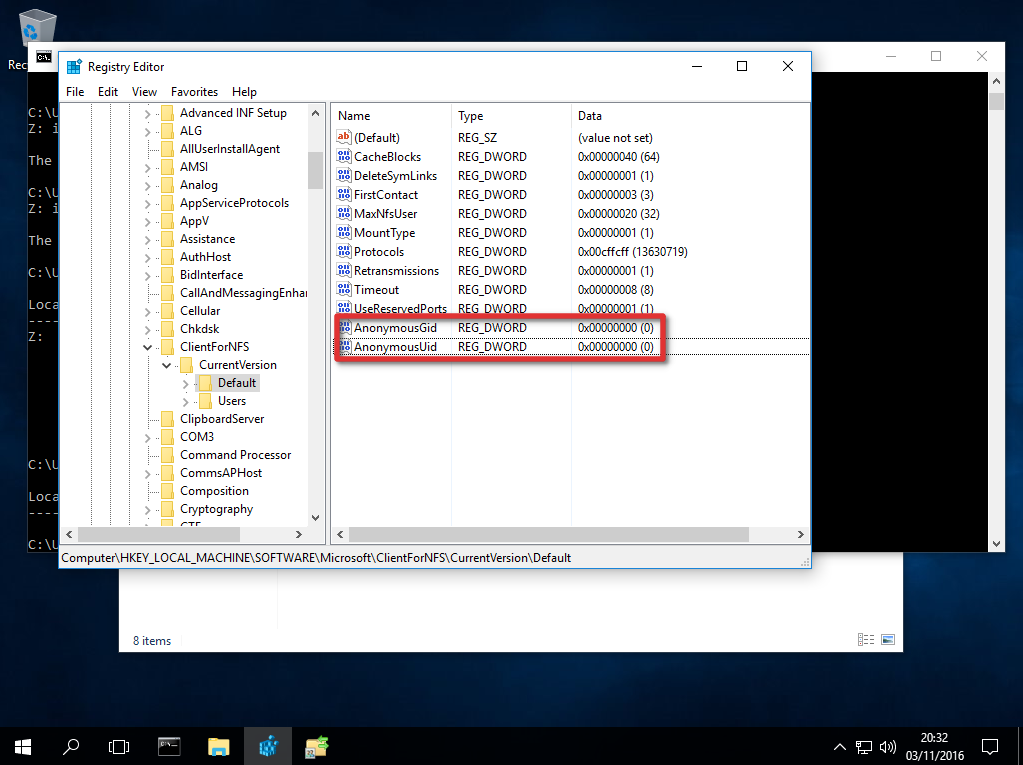
Чтобы изменить значение полей UID и GID, нам потребуется внести изменения в реестр Windows.
- Откройте редактор реестра regedit.
- Перейдите в ветку реестра — HKEY_LOCAL_MACHINESOFTWAREMicrosoftClientForNFSCurrentVersionDefault.
- В каталоге «Default» создайте новый параметр типа DWORD (32бит) с именем AnonymousUid и назначьте UID, назначенный на каталог в UNIX, к которому открыт доступ через NFS.
- В ветке Default создайте ещё один параметр DWORD (32-бит) с именем AnonymousGid и назначьте GID, назначенный данному каталогу в UNIX.

- Для того, чтобы изменения вступили в силу вам необходимо перезапустить клиент NFS или перезагрузить компьютер.
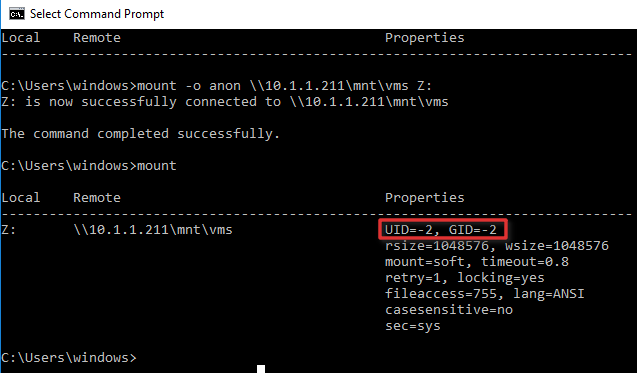
Список подключенных NFS каталогов и параметры монтирования можно вывести с помощью команды Mount без параметров.
Результат работы команды mount теперь должен выглядеть следующим образом:
Local Remote Properties
-------------------------------------------------------------------------------
Z: \10.1.1.211mntvms UID=0, GID=0
rsize=1078756, wsize=1078756
mount=soft, timeout=1.6
retry=1, locking=yes
fileaccess=755, lang=ANSI
casesensitive=no
sec=sys
Обратите внимание на значение полей UID и GID, которое равно 0. UID=0, GID=0 — означает, что общий ресурс монтируется под пользователем root.
Как подключить NFS каталог в Windows 10
Смонтировать NFS каталог в Windows 10 можно с помощью команды mount. Например, смонтируем NFS каталог и назначим ему букву диска Z:. Предположим, что ваше NAS устройство находится в той же сети, что и ваш компьютер с установленной операционной системы Windows, а IP-адрес устройства — 10.1.1.211. С помощью следующей команды можно смонтировать общий ресурс NFS в /mnt/vms.
Mount –o anon \10.1.1.211mntvms Z:
Z: is now successfully connected to \10.1.1.211mntvms.
The command completed successfully
Теперь общий ресурс создан, и мы можем получить доступ к данным. В нашем примере сетевой ресурс (диск) обозначается буквой «Z».
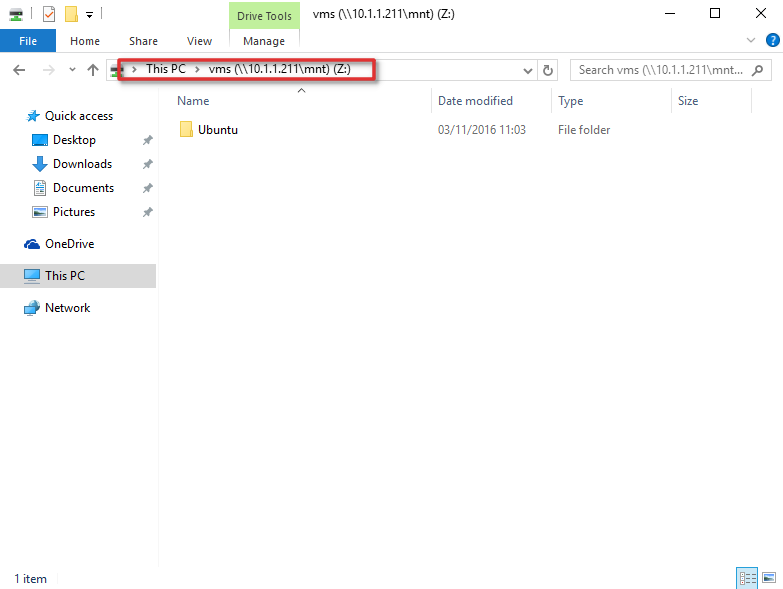
На этом настройка NFS завершена и вы сможете сохранять данные на свое NAS устройство через смонтированный NFS каталог. Обратите внимание, что при в первый раз открытие этого каталога выполняется довольно долго.
Сегодня мы разберемся, как установить и настроить клиент NFS (Network File System) в Windows Server 2012 R2 / Windows 8. Итак, чтобы подключить каталог (шару) с NFS сервера в Windows Server 2012 R2 / Win 8, нужно, как и в предыдущих версиях Windows, установить отдельный компонент — клиент NFS (Client for NFS). Дополнительно, для возможности управления настройками NFS подключения, можно установить компонент служб NFS (Services for Network File System).
Клиент NFS входит в состав ОС Microsoft, начиная с Windows 7. В Windows 2012 / 8 клиент NFS получил небольшие изменения. Теперь NFS клиент поддерживает аутентификацию по протоколу Krb5p — Kerberos версии 5 (в дополнение к Krb5 и Krb5i, поддержка которых появилась еще в Windows 7), поддерживаются большие NFS пакеты – до 1024KB (в Win 7 максимальный размер пакета 32KB)
Клиент NFS можно установить через GUI или с помощью Powershell. Для установки в графическом режиме, откройте консоль Server Manager и выберите компонент (Features) под названием Client for NFS. 
По умолчанию вместе с этим компонентом не устанавливается графическая консоль управления NFS, чтобы исправить это, установим опцию Services for Network File System Management Tools в разделе Remote Server Administration Tools -> Role Administration Tools -> File Services Tools. 
Для установки NFS-клиента в Windows 8 нужно активировать компонент Services for NFS ->Client for NFS, через установку/удаление компонентов (Turn Windows features on or off) в Панели управления (Control Panel -> Programs -> Programs and Features).
Примечание. В отличии от Windows 7, в которой NFS клиент присутствовал в редакциях Enterprise и Ultimate, в Windows 8 клиент Network File System поддерживается только в старшой версии — Windows 8 Enterprise.
Все перечисленные выше компоненты системы можно установить всего одной командой Powershell:
Install-WindowsFeature NFS-Client, RSAT-NFS-Admin

После окончания установки, запустите консоль Services for Network File System Managemen и откройте окно свойств NFS клиента (Client for NFS).
.")
В настройках NFS клиента можно задать:
- Используемый транспортный протокол (Transport protocols) – по умолчанию TCP+UDP
- Тип монтирования NFS шар: hard или soft
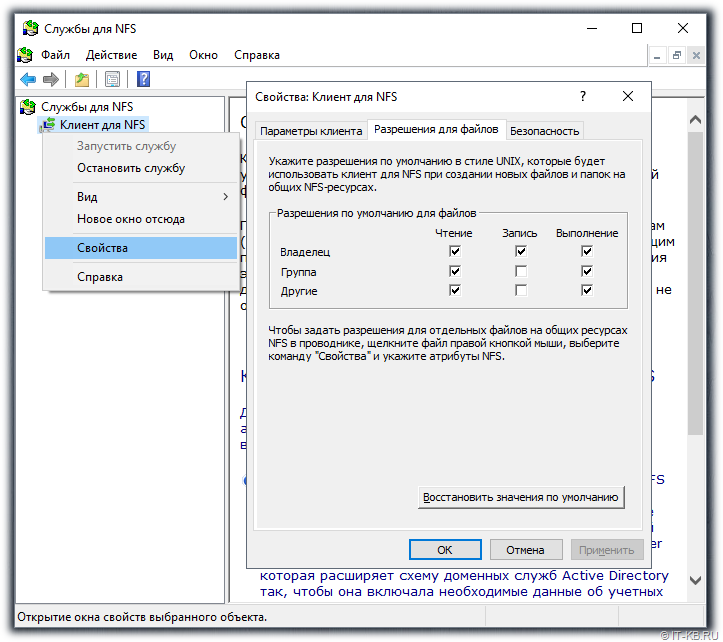
- На вкладке File Permissions указываются дефолтные права для создаваемых папок и файлов на NFS шарах
- На вкладке Security указываются протоколы аутентификации, с помощью которых можно аутентифицироваться на NFS сервере

После настройки установки, администраторы смогут смонтировать NFS каталог с помощью команды mount:
Mount \lx01.abc.labnfs z:

В этом примере мы смонтировали под буквой Z: каталог NFS, расположенный на сервере lx01.abc.lab.
После монтирования, подключенный таким образом каталог на NFS сервере доступен в системе как отдельный диск с буквой Z: .
Смонтировать NFS шару можно и с помощью Powershell:
New-PSdrive -PSProvider FileSystem -Name Z -Root \lx01.abc.labnfs
Примечание. Подключенный таким образом nfs каталог будет доступен только внутри сессии Powershell, в которой была выполнена команда монтирования. Чтобы смонтировать NFS каталог в системе на постоянной основе, в конце Powershell команды нужно добавить ключ –Persist.
Отключить смонтированный каталог можно так:
Remove-PSdrive -Name Y
Содержание
- Что такое протокол NFS?
- Использование протокола NFS
- Централизовать данные
- Иметь возможность удаленного доступа к другому компьютеру
- Экономьте на оборудовании
- Положительные и отрицательные моменты NFS
- Как использовать NFS в Windows
Компания Протокол NFS используется для распределенных файловых систем в локальной сети. В основном он состоит из разных компьютеров, находящихся в этой сети, которые могут подключаться друг к другу и получать доступ к файлам, которые находятся в другой системе. Например, офис с несколькими компьютерами, с одного из которых мы можем получить доступ к другому, как если бы это был жесткий диск или хранилище.
Чтобы это стало возможным, должен быть клиент и сервер . Однако клиентов может быть много. К файлам на сервере может быть подключено множество компьютеров. Все это делается удаленно, без необходимости физически находиться перед компьютером, к которому мы пытаемся получить доступ.
Можно сказать, что сервер — это компьютер, на котором хранятся файлы. Это устройство, которое разрешает доступ другим устройствам, которые могут быть клиентами. На стороне клиента он запрашивает доступ к серверу, как правило, с помощью команд. Это позволит вам взаимодействовать с этим сервером, просматривать контент, загружать файлы…
В команде, которую выполняет клиент, порядок указывается в более чем 30 различных вариантах. Сюда также входят атрибуты используемого программного обеспечения и сервера. Параметры включают, например, размер блока чтения или записи, а также используемый протокол.
Протоколы безопасности будут отвечать за проверка или нет доступа клиента к тем файлам, которые есть на сервере.
Использование протокола NFS
После объяснения, что такое сетевая файловая система или протокол NFS и из чего он состоит, мы поговорим о наиболее распространенных применениях, которые мы можем ему дать. Это протокол, который появился в 1980-х годах и со временем совершенствовался. Однако сегодня, несмотря на то, что он не так широко используется, он продолжает существовать.
Централизовать данные
Одно из основных применений протокола NFS — возможность централизовать все файлы в один сервер . Это позволит отказаться от модулей памяти на других компьютерах и получить возможность удаленного входа для чтения или загрузки любого файла.
Это очень полезно, особенно когда есть много пользователей, которым нужно будет войти, чтобы изменить эти файлы. Например компания. Все компьютеры, которые будут клиентами, могут иметь доступ к единому централизованному серверу и, таким образом, иметь контроль над файлами.
Иметь возможность удаленного доступа к другому компьютеру
Также очевидно, что еще одним положительным моментом является то, что он позволяет удаленный доступ с одного компьютера на другой. Пока они подключены к одной сети, мы можем подключить один компьютер к другому, который действует как сервер.
Мы можем сделать это без необходимости, чтобы он физически был рядом с нами, а мы были впереди. Следовательно, это позволяет нам получить удаленный доступ через протокол NFS. Например, в компании, у которой есть разные помещения с оборудованием.
Экономьте на оборудовании
Поскольку мы можем обмениваться файлами по сети, это также включает, например, дисковые накопители. Это позволяет нам обойтись без дискового накопителя на каждом из компьютеров и иметь его только на одном, который будет действовать как сервер и иметь возможность подключаться с других устройств.
Для того, чтобы экономия затрат на оборудование , эта возможность очень полезна для компаний, у которых много компьютеров. Это позволит избежать использования на всех компьютерах одного и того же оборудования.
Положительные и отрицательные моменты NFS
Этот сетевой протокол имеет разные преимущества и недостатки , как мы увидим. Мы должны исходить из того, что он был у нас несколько десятилетий. Это вызовет определенные ограничения, а также проблемы при его использовании.
Преимущества
- Несколько клиентов могут получить доступ к файлам
- Снижает потребность в дисковом пространстве
- Любой пользователь может изменять и обновлять файлы
- Совместимость со многими компьютерами
Недостатки бонуса без депозита
- Безопасность: только для использования в защищенных сетях и за брандмауэром
- Требуются высокие накладные расходы на чтение файлов
- Заблокировать файлы или дать разрешения непросто
Как использовать NFS в Windows
Итак, как мы можем использовать Протокол NFS Cегодня? Что нам понадобится? Увидев, как он работает, а также его основные отрицательные и положительные моменты, мы можем объяснить, что нам нужно делать, чтобы использовать его в повседневной жизни.
Первое, что нам понадобится, это компьютеры с совместимыми операционными системами. Например, мы можем использовать Ubuntu Сервер или Windowsхотя даже Android имеет совместимость, хотя приложений не так много.
В случае Windows 10 клиент NFS должен быть включен. По умолчанию он отключен, в основном из-за проблем с безопасностью, о которых мы говорили. Такие старые протоколы обычно не активны по умолчанию.
Чтобы включить его, нам нужно зайти в Пуск, войти в Панель управления, перейти в «Программы» и активировать или деактивировать функции Windows.
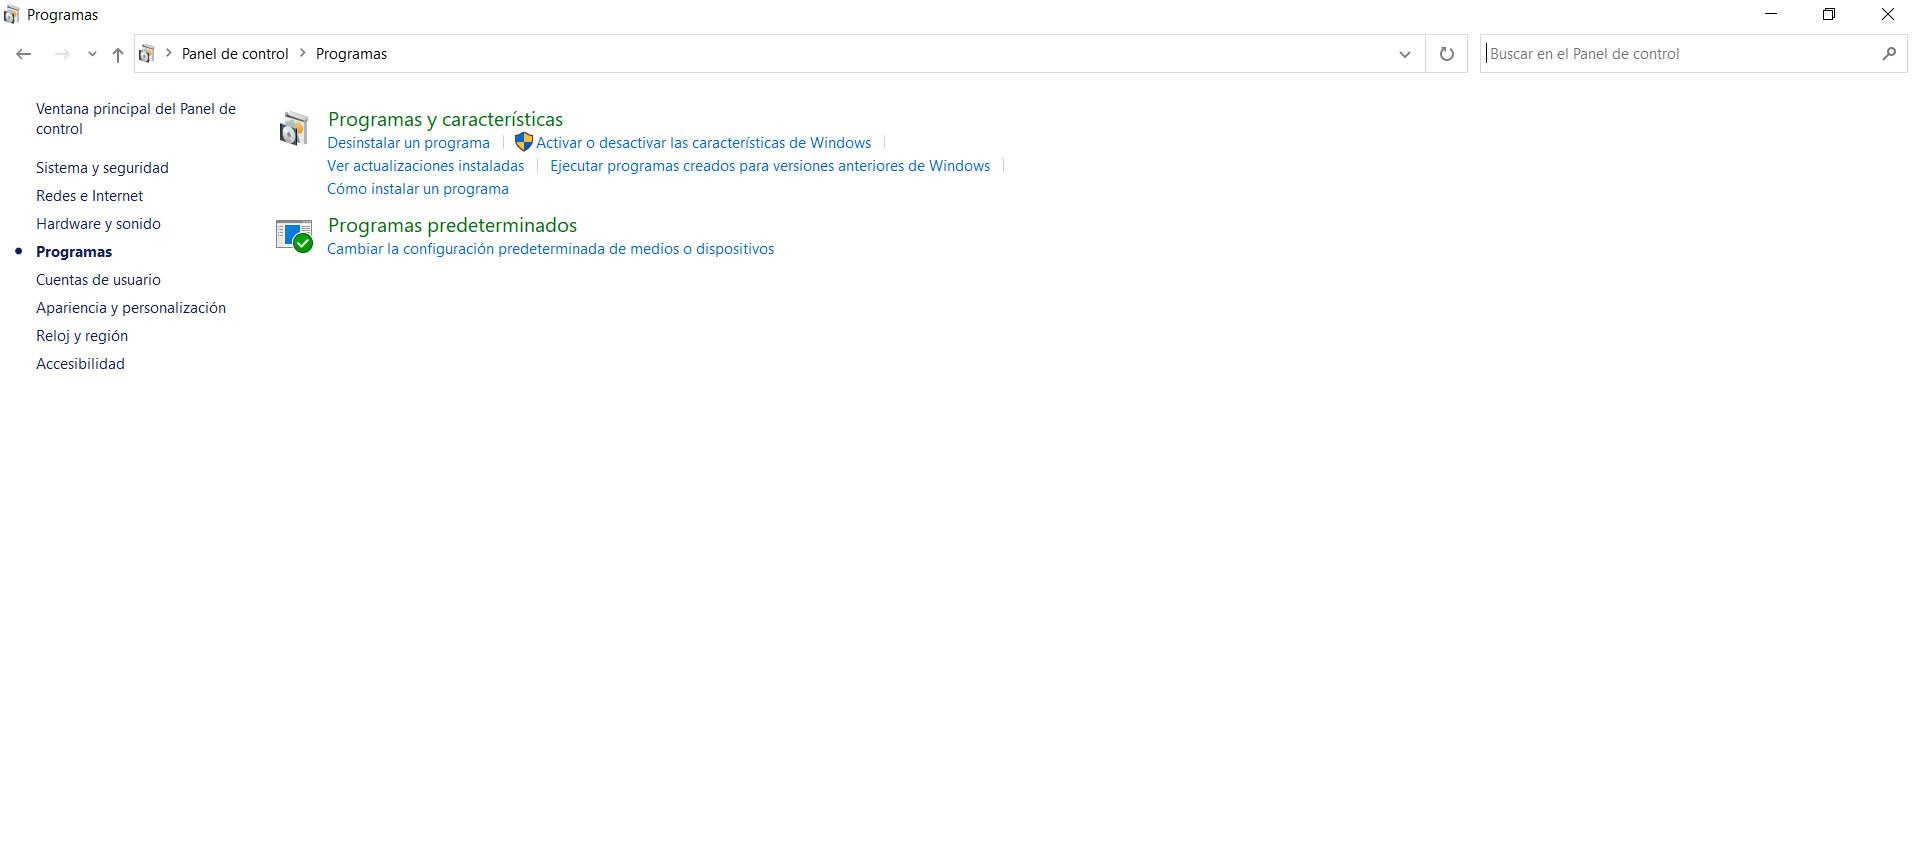
Оказавшись здесь, мы должны нажать «Службы для NFS» и установить флажок. Позже отдаем Accept.
Когда у нас включен клиент NFS в Windows, мы сможем смонтировать модуль. В этом случае нам придется перейти на Командная строка или в командной строке и выполните следующую команду:
mount -o anon 192.168.111.111sistemanombreCarpeta K:
IP будет адресом сервера, а остальное — путем к папке. K — это диск, который создаст Windows. Оттуда у нас будет создана папка, и мы сможем использовать протокол NFS в Windows.
Короче говоря, протокол NFS позволяет получить доступ к файлам на сервере в той же сети. Мы можем входить с разных компьютеров, изменять файлы, читать информацию и т. Д. Мы также объяснили, что мы должны сделать, чтобы включить и использовать его в Windows.
Network File System (NFS) is an open standard for distributing a file system across a network for multi-client access. Designed in 1984, NFS has grown to include many authentication methods at both the share (export) and file system levels, including client IP/hostname, auth_sys (Unix auth), Kerberos and NFSv4.x ACLs.
This blog post explains how to mount an NFS share on a Windows client.
How NSF works with Windows operating systems
While you’re likely to be familiar with accessing network file shares via Server Message Block (SMB) or the Windows implementation of SMB (CIFS), NFS is still prevalent in production environments with Unix servers.
Unfortunately, NFS traditionally did not play well with environments that mix Windows with Unix: To enable Windows client access to NFS exports, each NFS export needed a Samba share equivalent (an SMB implementation for Unix).
However, this changed when Microsoft implemented NFS client and server tools. Microsoft’s NFS documentation lists the following operating system support:
| Operating Systems | NFS Server Versions | NFS Client Versions |
| Windows 7, Windows 8.1 Windows 10 | N/A | NFSv2, NFSv3 |
| Windows Server 2008, Windows Server 2008 R2 | NFSv2, NFSv3 | NFSv2, NFSv3 |
| Windows Server 2012, Windows Server 2012 R2, Windows Server 2016, Windows Server 2019 |
NFSv2, NFSv3, NFSv4.1 | NFSv2, NFSv3 |
How to Configure Windows as an NFS Client
Prerequisite: Enable the necessary Windows features.
Before we mount an NFS share on a Windows client, we need to enable certain features within Windows to perform NFS client operations. The PowerShell command to use depends on your client environment:
For Windows 10:
Enable-WindowsOptionalFeature -FeatureName ServicesForNFS-ClientOnly, ClientForNFS-Infrastructure -Online -NoRestart
For Windows Server:
Install-WindowsFeature NFS-Client
Now we need to mount NFS exports from a Unix server. However, Unix and Windows use different mechanisms for identifying users and groups: In Unix-like operating systems such as Linux, users and groups are identified by user identifiers (UIDs) and group identifiers (GIDs), respectively. In Windows, users and groups are identified using security identifiers (SIDs).
Therefore, in order to authenticate to a Unix server providing NFS exports, we need to map Windows users to Unix UIDs and GIDs. With this UID/GID mapping, the Unix server will be able to determine which user created the request for the NFS export.
Here are three methods you can use to perform the identity mapping and mount the NFS export.
Method 1 (preferred). Perform identity mapping in Active Directory (AD).
If both the Unix NFS server and Windows NFS client are joined to the same Active Directory domain, then we can handle identity mapping in Active Directory. This is the preferred method for security purposes when possible.
NOTE: This method is not available if method 2 (below) is in use, since the presence of a local etcpasswd file will take precedence for identity mapping.
By default, our NFS client won’t look up identity mapping in Active Directory. However, we can change that by running the following command in an elevated PowerShell session on the NFS client:
» Set-NfsMappingStore -EnableADLookup $True -ADDomainName "<your_domain>"
Now we can run the Get-NfsMappingStore command to check the current Windows user’s UID/GID mapping. As you can see, ADLookupEnabled is set to True, and a domain is specified for ADDomain.
» Get-NfsMappingStore
UNMServer               :

UNMLookupEnabled        : False

ADDomain                : <your_domain>

ADLookupEnabled         : True

LdapServer              :

LdapNamingContext       :

LdapLookupEnabled       : False

PasswdFileLookupEnabled : False
Next, we need to configure our identity mapping in Active Directory Users and Computers. To view the uidNumber and gidNumber attributes for each user, make sure you have Advanced Features enabled under the View dropdown:
You’ll then be able to view and edit those fields in a user or group’s Properties menu, on the Attribute Editor tab:
It can be cumbersome to manually map UIDs and GIDs for many Active Directory users. To automate the process, you can use the following PowerShell command to set the appropriate attribute values for each desired user, using a CSV file with UID/GID data:
Set-ADUser -identity <UserPrincipalName> -add @{uidNumber="<user_unix_uid>";

gidNumber="<user_unix_gid>"}
.
NOTE: In the Set-ADUser command, “add” should be changed to “replace” if a user already has a value for either uidNumber or gidNumber.
Using this approach, we can now map an NFS share in Windows to an available drive letter via command prompt, and the UID/GID will be mapped per the current Active Directory user’s uidNumber and gidNumber attribute values.
» mount \<nfs_server_ip_address>pathtonfsexport Z:
The path after the NFS server’s IP is the local path to the NFS export on the NFS server, and the drive letter is any available drive letter on the Windows NFS client.
Of course, the Unix rights given to the user we’ve mapped to ultimately decide what kind of access we have to the export, such as read/write or read-only.
Method 2. Perform identity mapping using the Local etcpasswd file.
Since using Active Directory is the preferred method for identity mapping, we won’t go into detail for the other two options. However, it’s worth briefly stating that Windows can perform local identity mapping using Unix-style passwd and group files, located in %SYSTEMROOT%system32driversetc.
If the passwd file is present and has identity mapping information for the current Windows user, then the mappings specified in the passwd and group files will be used for the client’s NFS mount requests rather than UID/GID mappings in Active Directory or the AnonymousUid/AnonymousGid Windows registry settings outlined below.
When running the Get-NfsMappingStore PowerShell command, you’ll notice PasswdFileLookupEnabled is True whenever this workflow is in effect for the current Windows user.
This approach uses the same mount syntax as the Active Directory identity mapping approach above:
» mount \<nfs_server_ip_address>pathtonfsexport Z:
Method 3. Perform identity mapping using AnonymousUid/AnonymousGid Windows registry settings.
The final method is considered an insecure approach and is not recommended. It potentially allows any local user to mount the target NFS export(s) with read/write access, as opposed to securing write permissions to specific local Windows users via the methods above.
To map the local Windows client to the UID and GID of the Unix user that owns the desired export(s), run the following in an elevated PowerShell:
» New-ItemProperty HKLM:SOFTWAREMicrosoftClientForNFSCurrentVersionDefault -Name AnonymousUID -Value <unix_export_owner_uid> -PropertyType "DWord"
» New-ItemProperty HKLM:SOFTWAREMicrosoftClientForNFSCurrentVersionDefault -Name AnonymousGID -Value <unix_export_owner_gid> -PropertyType "DWord"
After adding these keys to the Windows registry, you need to reboot in order to have them take effect.
Then use the following command to mount the NFS export with read/write access (assuming the client’s IP has permission to mount the export and that the UID/GID mapping is correct for each desired export):
» mount -o anon \<nfs_server_ip_address>pathtonfsexport Z:
FAQ
Does Windows 11 support NFS clients?
Yes.
How can I use NFS in Windows?
- Provide access to the same file share using both the SMB and NFS protocols by using a Windows NFS file server.
- Deploy a non-Windows operating system to provide NFS file shares accessible to non-Windows clients using the NFS protocol.
- To enable applications to be migrated from one operating system to another, store data on file shares accessible using both the SMB and NFS protocols.
What improvements are included in NFS version 4.1?
- The Remote Procedure Call (RPC)/External Data Representation (XDR) transport infrastructure offers better support and provides better scalability
- RPC port multiplexer feature
- Auto-tuned caches and thread pools
- New Kerberos privacy implementation and authentication options
For complete details, visit the Microsoft page that describes all NFS versions.
How do I add the Server for NFS role service?
In Server Manager or Windows Admin Center, use the “Add Roles” and “Features Wizard”.
Which Windows command-line administration tools does Server for NFS contain?
- Mount provides an NFS mount on Windows clients that maps to a local drive
- Nfsadmin manages configuration settings of the Server for NFS and Client for NFS components.
- Nfsshare sets up NFS share settings for folders that are shared via Server for NFS.
- Nfsstat displays or resets statistics on calls received by Server for NFS.
- Showmount lists the file systems that have been exported by Server for NFS.
NFS-mounted drives are unmounted using Umount.

Security Researcher at Netwrix. Joe is an expert in Active Directory, Windows, and a wide variety of enterprise software platforms and technologies, Joe researches new security risks, complex attack techniques, and associated mitigations and detections.

 Недавно задался вопросом: «А возможно ли примонтировать удаленную файловую систему Linux сервера по протоколу NFS к Windows 10?». Оказывается можно, даже более того… для этого есть стандартные средства.
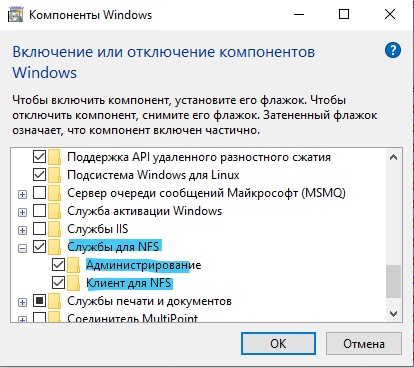
Первым делом пойдем в Панель управления -> Приложения -> (справа выбираем ссылку) Программы и компоненты -> (в открывшемся окне слева) Включение или отключение компонентов Windows -> (в списке находим) Службы для NFS. Выделяем все компоненты и нажимает кнопку ОК.
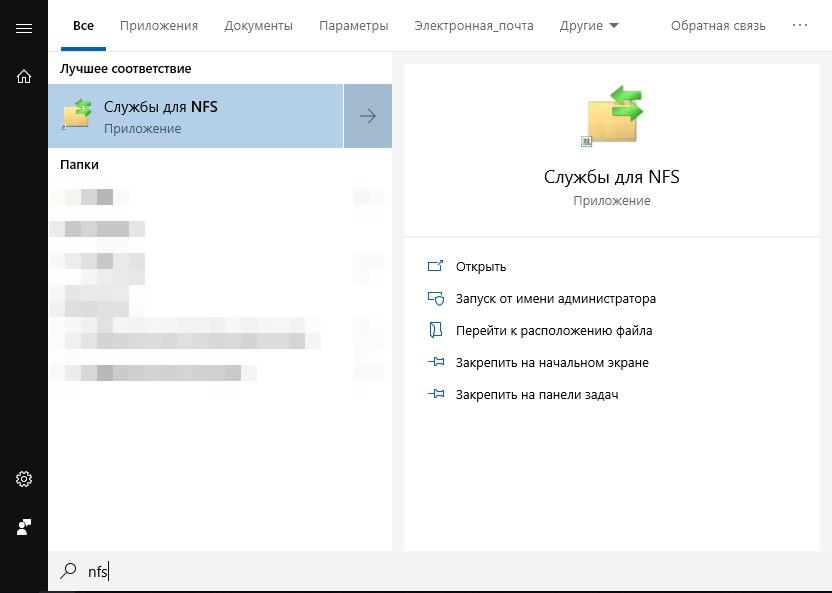
Далее открываем меню «Пуск» и начинаем вводить «NFS». Выбираем пункт «Службы для NFS».
Либо идем в «Администрирование» и там выбираем «Службы для NFS».
В открывшимся окне выбираем «Клиент для NFS» -> Свойства. Выставляем разрешения для файлов которые будут по умолчанию.
По стандарту подключение к NFS в Windows происходит под анонимным пользователем UID и GID которого -2:-2
Нам же нужно подключаться к NFS под пользователем которому даны права со стороны сервера. Предположим пользователь 1000:1000
(по стандарту первый пользователь во многих системах на базе linux).
Идем в «Пуск» и вводим «regedit». Переходим по адресу:
|
HKEY_LOCAL_MACHINESOFTWAREMicrosoftClientForNFSCurrentVersionDefault |
Создаем два DWORD ключа:
- AnonymousUid
- AnonymousGid
C десятичным значением: 1000 (у обоих)

Собственно, с настройкой все. Переходим в файловый медеждер (эксплорер/»этот компьютер») и в строку браузера вводим следующее:
|
mount —o anon 192.168.1.171homealexfolder I: |
«-o anon» — подключаемся как аноним
«\192.168.1.171homealexfolder» — директория на сервере
«I:» — диск для монтирования в windows
Так же, через командную строку доступна информация по примонтированным фс: mount
Отключение примонтированной фс: umount I:
| title | description | ms.topic | author | ms.author | ms.date |
|---|---|---|---|---|---|
|
Network File System overview |
Explains what Network File System is. |
article |
JasonGerend |
jgerend |
12/06/2022 |
Network File System overview
Applies to: Windows Server 2022, Windows Server 2019, Windows Server 2016, Windows Server 2012 R2, Windows Server 2012
This article describes the Network File System role service and features included with the File and Storage Services server role in Windows Server. Network File System (NFS) provides a file sharing solution for enterprises that have heterogeneous environments that include both Windows and non-Windows computers.
Feature description
Using the NFS protocol, you can transfer files between computers running Windows and other non-Windows operating systems, such as Linux or UNIX.
NFS in Windows Server includes Server for NFS and Client for NFS. A computer running Windows Server can use Server for NFS to act as a NFS file server for other non-Windows client computers. Client for NFS allows a Windows-based computer running Windows Server to access files stored on a non-Windows NFS server.
Windows and Windows Server versions
Windows supports multiple versions of the NFS client and server, depending on operating system version and family.
| Operating Systems | NFS Server Versions | NFS Client Versions |
|---|---|---|
| Windows 7, Windows 8.1, Windows 10, Windows 11 | N/A | NFSv2, NFSv3 |
| Windows Server 2008, Windows Server 2008 R2 | NFSv2, NFSv3 | NFSv2, NFSv3 |
| Windows Server 2012, Windows Server 2012 R2, Windows Server 2016, Windows Server 2019, Windows Server 2022 | NFSv2, NFSv3, NFSv4.1 | NFSv2, NFSv3 |
Practical applications
Here are some ways you can use NFS:
- Use a Windows NFS file server to provide multi-protocol access to the same file share over both SMB and NFS protocols from multi-platform clients.
- Deploy a Windows NFS file server in a predominantly non-Windows operating system environment to provide non-Windows client computers access to NFS file shares.
- Migrate applications from one operating system to another by storing the data on file shares accessible through both SMB and NFS protocols.
New and changed functionality
New and changed functionality in Network File System includes support for the NFS version 4.1 and improved deployment and manageability. For information about functionality that is new or changed in Windows Server 2012, review the following table:
| Feature/functionality | New or updated | Description |
|---|---|---|
| NFS version 4.1 | New | Increased security, performance, and interoperability compared to NFS version 3. |
| NFS infrastructure | Updated | Improves deployment and manageability, and increases security. |
| NFS version 3 continuous availability | Updated | Improves continuous availability on NFS version 3 clients. |
| Deployment and manageability improvements | Updated | Enables you to easily deploy and manage NFS with new Windows PowerShell cmdlets and a new WMI provider. |
NFS version 4.1
NFS version 4.1 implements all of the required aspects, in addition to some of the optional aspects, of RFC 5661:
- Pseudo file system, a file system that separates physical and logical namespace and is compatible with NFS version 3 and NFS version 2. An alias is provided for the exported file system, which is part of the pseudo file system.
- Compound RPCs combine relevant operations and reduce chattiness.
- Sessions and session trunking enables just one semantic and allows continuous availability and better performance while utilizing multiple networks between NFS 4.1 clients and the NFS Server.
NFS infrastructure
Improvements to the overall NFS infrastructure in Windows Server 2012 are detailed below:
- The Remote Procedure Call (RPC)/External Data Representation (XDR) transport infrastructure, powered by the WinSock network protocol, is available for both Server for NFS and Client for NFS. This replaces Transport Device Interface (TDI), offers better support, and provides better scalability and Receive Side Scaling (RSS).
- The RPC port multiplexer feature is firewall-friendly (less ports to manage) and simplifies deployment of NFS.
- Auto-tuned caches and thread pools are resource management capabilities of the new RPC/XDR infrastructure that are dynamic, automatically tuning caches and thread pools based on workload. This completely removes the guesswork involved when tuning parameters, providing optimal performance as soon as NFS is deployed.
- New Kerberos privacy implementation and authentication options with the addition of Kerberos privacy (Krb5p) support along with the existing krb5 and krb5i authentication options.
- Identity Mapping Windows PowerShell module cmdlets make it easier to manage identity mapping, configure Active Directory Lightweight Directory Services (AD LDS), and set up UNIX and Linux passwd and flat files.
- Volume mount point lets you access volumes mounted under an NFS share with NFS version 4.1.
- The Port Multiplexing feature supports the RPC port multiplexer (port 2049), which is firewall-friendly and simplifies NFS deployment.
NFS version 3 continuous availability
NFS version 3 clients can have fast and transparent planned failovers with more availability and reduced downtime. The failover process is faster for NFS version 3 clients because:
- The clustering infrastructure now allows one resource per network name instead of one resource per share, which significantly improves resources’ failover time.
- Failover paths within an NFS server are tuned for better performance.
- Wildcard registration in an NFS server is no longer required, and the failovers are more fine-tuned.
- Network Status Monitor (NSM) notifications are sent out after a failover process, and clients no longer need to wait for TCP timeouts to reconnect to the failed over server.
Note that Server for NFS supports transparent failover only when manually initiated, typically during planned maintenance. If an unplanned failover occurs, NFS clients lose their connections. Server for NFS also doesn’t have any integration with the Resume Key filter. This means that if a local app or SMB session attempts to access the same file that an NFS client is accessing immediately after a planned failover, the NFS client might lose its connections (transparent failover wouldn’t succeed).
Deployment and manageability improvements
Deploying and managing NFS has improved in the following ways:
- Over forty new Windows PowerShell cmdlets make it easier to configure and manage NFS file shares. For more information, see NFS Cmdlets in Windows PowerShell.
- Identity mapping is improved with a local flat file mapping store and new Windows PowerShell cmdlets for configuring identity mapping.
- The Server Manager graphical user interface is easier to use.
- The new WMI version 2 provider is available for easier management.
- The RPC port multiplexer (port 2049) is firewall-friendly and simplifies deployment of NFS.
Server Manager information
In Server Manager — or the newer Windows Admin Center — use the Add Roles and Features Wizard to add the Server for NFS role service (under the File and iSCSI Services role). For general information about installing features, see Install or Uninstall Roles, Role Services, or Features. Server for NFS tools includes the Services for Network File System MMC snap-in to manage the Server for NFS and Client for NFS components. Using the snap-in, you can manage the Server for NFS components installed on the computer. Server for NFS also contains several Windows command-line administration tools:
- Mount mounts a remote NFS share (also known as an export) locally and maps it to a local drive letter on the Windows client computer.
- Nfsadmin manages configuration settings of the Server for NFS and Client for NFS components.
- Nfsshare configures NFS share settings for folders that are shared using Server for NFS.
- Nfsstat displays or resets statistics of calls received by Server for NFS.
- Showmount displays mounted file systems exported by Server for NFS.
- Umount removes NFS-mounted drives.
NFS in Windows Server 2012 introduces the NFS module for Windows PowerShell with several new cmdlets specifically for NFS. These cmdlets provide an easy way to automate NFS management tasks. For more information, see NFS cmdlets in Windows PowerShell.
Additional information
The following table provides additional resources for evaluating NFS.
| Content type | References |
|---|---|
| Deployment | Deploy Network File System |
| Operations | NFS cmdlets in Windows PowerShell |
| Related technologies | Storage in Windows Server |