Wiimote может передавать огромные объемы данных на Wii (Nintendo пока что не использует его возможности). К используя внутреннюю беспроводную связь Bluetooth, вы можете подключить Wiimote к компьютеру (любой ОС) и использовать его с широким спектром приложений, уже созданных для Wiimote.
Почему я не могу подключить пульт Wii к компьютеру?
Откройте Системные настройки -> Bluetooth. нажмите красная кнопка синхронизации на задней панели пульта Wii. … Нажмите красную кнопку синхронизации на задней панели пульта Wii и щелкните пару. Если сопряжение не удалось, перезагрузите компьютер и попробуйте выполнить сопряжение еще раз.
Как подключить пульт Wii к компьютеру через Bluetooth?
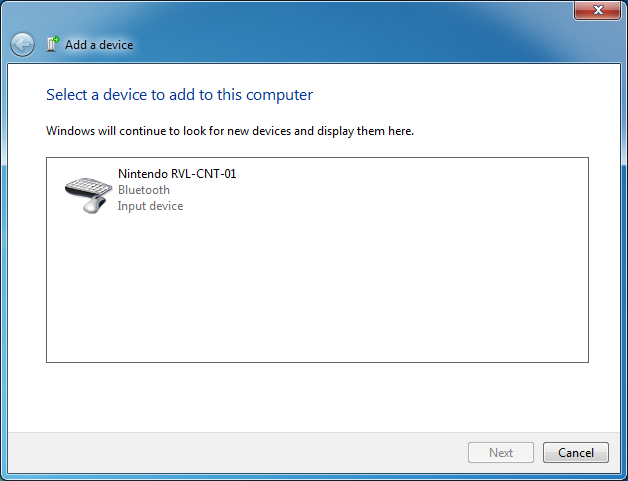
Нажмите на устройства Bluetooth., затем «Добавить устройство». Удерживайте кнопки 1 + 2 на Wiimote, чтобы активировать режим обнаружения (все четыре светодиода должны мигать). Когда он будет обнаружен, он должен появиться на экране добавления устройства как Nintendo RVL-CNT… Выберите Wiimote и нажмите «Далее» на экране добавления устройства.
Как подключить пульт Wii к компьютеру без Bluetooth?
Как подключить Wiimote к ПК без устройства Bluetooth
- Подключите адаптер Nintendo к ПК к USB-порту на вашем компьютере.
- Вставьте установочный компакт-диск с драйверами в дисковод компьютера и дождитесь, пока мастер установки загрузится на ваш экран.
Как я могу играть в игры Wii на моем ПК?
Вы когда-нибудь хотели играть в игры для Wii и GameCube на своем ПК? Как и ваши любимые ретро-системы, есть эмулятор, который справится с этой задачей, и он называется Дельфин. Dolphin — это эмулятор Wii и GameCube с открытым исходным кодом, который поддерживает большинство игр для обеих консолей.
Какой значок у Wii Remote?
ПИН-код двоичный адрес bluetooth wiimote в обратном порядке. После короткого фрагмента кода C для вычисления PIN-кода: Предположим, что у Wiimote есть адрес Bluetooth «00: 1E: 35: 3B: 7E: 6D».
Могу ли я использовать свой телефон в качестве пульта Wii Remote?
Бесплатное приложение называется iFun, разработанный игровой компанией SGN, дает вам возможность использовать ваш iPhone в качестве контроллера для игровой системы Nintendo Wii. Приложение использует внутренний акселерометр iPhone и сенсорный экран для управления действиями вашей игры Wii.
Можете ли вы подключить Wii Remote к телефону?
IME контроллера Wii устанавливает соединение Bluetooth между вашим телефоном и пультом Nintendo Wii Remote, тем самым позволяя вам управлять своими играми с помощью этого бесконечно превосходного метода. … Во-первых, вам нужно включить его в меню настроек «Язык и клавиатура» вашего телефона.
Как перепрограммировать Wii Remote?
Как синхронизировать пульт Wii
- Нажмите кнопку питания на консоли Wii, чтобы включить ее.
- Откройте крышку гнезда для SD-карты на передней панели консоли Wii. …
- Нажмите и отпустите кнопку SYNC на внутренней стороне отсека для SD-карты на консоли. …
- Когда светодиод проигрывателя перестанет мигать, синхронизация завершена.
![]()
Download Article
Learn how to sync or pair a Wii remote to your console or desktop computer
![]()
Download Article
- Syncing With a Wii
- Syncing With a Wii U
- Syncing With a Windows PC
- Video
- Q&A
|
|
|
|
The Nintendo Wii is one of the coolest consoles ever released. Its motion-sensitive controllers turn video games into full-body exercises—that is, once you manage to connect them to your device. As you probably know, connecting a Wii controller—a.k.a. “pairing” or “syncing” it—can be a frustrating process, especially if you’re trying to play Wii games on a PC. But don’t sweat. We’ve prepared a simple guide to connecting Wii controllers, complete with troubleshooting tips for the most common problems you might encounter. Keep reading to learn how to connect your Wii remote to a Wii console, Wii U, or desktop PC.
Things You Should Know
- Turn off your Wii or Wii U console before pairing your Wii remote. Make sure the remote’s batteries are good, or replace them if needed.
- Remove your controller’s battery cover. Press the red SYNC button until the 4 LED lights flash, then press the SYNC button on Wii or Wii U and wait.
- When your controller connects, the LED lights will stop flashing, leaving 1 solid light. To use the controller, place your sensor bar just above or below your TV screen.
- For PC, pair your controller via Bluetooth. Install Dolphin emulator and select your controller. Buy a USB sensor bar or use the one connected to your Wii console.
-

1
Turn on your Wii console by pressing the power button. Let it boot up normally. After the “Warning-Health and Safety” message, you should see the standard Wii menu with no applications running.[1]
- If your Wii was already on (or in standby mode), press and hold the power button for 3 seconds to turn if off. Then power it on again. This ensures that no programs will be running when you pair your remote.
-
2
Open the SD card cover on the front of the Wii. You’ll see a slot for an SD card, plus a red “SYNC” button. Leave the cover open for now.[2]
- The SD card cover is located between the Reset button and the Eject button.
- If you’re using a Wii Mini, the Sync button will be located on the left side of the console near the battery slot.
Advertisement
-
3
Remove the back cover from your Wii Remote. You’ll see the two batteries, plus a small red button labeled “SYNC.” Set the back cover aside.[3]
- Make sure your Wii remote has fresh batteries. It will not connect if the batteries don’t work.
-
4
Press and release the SYNC button on the back of the Wii Remote. The four blue LED lights on front of the Wii Remote will begin blinking.[4]
- If the lights don’t start blinking, firmly press the SYNC button one more time. If the lights still don’t blink, replace the batteries and try again.
- Your remote will not connect unless the lights are blinking.
-
5
Press and release the SYNC button on your Wii console. Do this while lights on the remote are still blinking.[5]
- If you wait too long, the blinking lights on the remotes will turn off before the remote has a chance to connect to your console.
- If this happens, press the remote’s SYNC button again until the lights blink, then quickly press the SYNC button on the console.
-
6
After a few seconds, the lights on the remote will stop blinking. The leftmost light will turn on and stay solid. This means that the remote has connected successfully.[6]
[7]
- You should now be able to control your console using the remote. Try accessing menus and settings on your screen to confirm that the remote is working properly.
-
7
Follow these steps again for every Wii remote. You can connect up to 4 remotes in total. As you pair each remote, the next blue LED light in the row will remain lit after all four lights stop blinking.[8]
- For example, if you pair a second remote, the second LED light will remain lit.
- If you pair a third remote, the third LED light will remain lit, and so on.


Advertisement
-
1
Press the power button on your Wii U console. The main menu should appear on the screen. Don’t select the Wii Menu (aka Wii mode) yet.[9]
- You can’t access Wii Mode until you pair a Wii remote.
- If you try to launch Wii Mode without pairing a Wii Remote, you’ll be asked to pair one.
-
2
Press and hold the Sync button on the front of the Wii U console. The Sync screen will appear. You’ll see a diagram with instructions for pairing different controllers, including the Wii remote.[10]
-
3
Remove the back cover from the Wii Remote. You’ll see the two batteries, plus a small red button labeled “SYNC.” Set the back cover aside.[11]
-
4
Press and release the SYNC button on the back of the Wii Remote. The four blue LED lights on the front of the Wii Remote will begin blinking. Wait for a few moments until the lights stop blinking. One of the lights should turn solid, indicating that the pairing was successful.[12]
- If the lights don’t start blinking, firmly press the SYNC button one more time. If the lights still don’t blink, replace the batteries and try again.
- Your remote will not connect unless the lights are blinking.


Advertisement
-
1
Make sure your PC can connect to Bluetooth devices. Your Wii remote will need a Bluetooth connection to pair with your PC. To check if your PC has Bluetooth, type “Bluetooth” in the search box in your start menu. An option should appear for “Bluetooth & other devices.” Click this option to see to view a list of devices. If your system already has an internal Bluetooth adapter, it will appear on the list as “Bluetooth.”
- If you don’t see anything listed under “Bluetooth,” you’ll need to use a USB Bluetooth adapter. You can buy them online or at any tech store.
- To install the USB Bluetooth adapter, connect to WiFi and plug the adapter into your USB port. Your computer should automatically install it.
-
2
Place a sensor bar above or below your PC’s monitor. You can buy a USB sensor bar and plug it into your PC. You can also use the original Wii or Wii U console’s sensor bar, as long as it is connected to the console (and the console is turned on).
- The Wii or Wii U sensor bar doesn’t need to be connected to your PC to work with your computer. It doesn’t actually send any signals to your Wii controller, but instead works by emitting infrared light that is visible to the controller, but not your eyes.[13]
- As long as the Wii or Wii U sensor bar is plugged into a console (with the console powered on) and placed above or below your PC monitor, you will be able to use it normally.
- You can also use a battery-powered sensor bar, or even make your own.[14]
- The Wii or Wii U sensor bar doesn’t need to be connected to your PC to work with your computer. It doesn’t actually send any signals to your Wii controller, but instead works by emitting infrared light that is visible to the controller, but not your eyes.[13]
-
3
Download and install Dolphin Emulator onto your PC. Download the emulator from the company’s website, then open the file and follow the prompts to install it. This software allows you to play Wii games on your PC using Wii controllers.
- Close Dolphin before pairing your Wii remote with your computer’s Bluetooth adapter.
- If you attempt to pair the remote with Dolphin open, the remote may not appear in the controller selection menu.
-
4
Access your PC’s Bluetooth settings. Go to your Start menu and type “Bluetooth” into the search box. An option will appear labeled “Bluetooth & devices” (for Windows 11 users) or “Bluetooth & other devices” (for Windows 10). Click whichever option you see. In the window that pop ups, select “Add Bluetooth or other device.” Another window will pop up showing “Bluetooth” as the first option. Click “Bluetooth.” A menu will pop up where you can connect your Wii controller.[15]
- Note: If you don’t have a Bluetooth adapter installed on your PC, you’ll receive the error message “Couldn’t Connect.” Purchase and install a USB Bluetooth adapter before continuing.
-
5
Press and hold the «1» and «2» buttons on the Wii Remote. Hold both buttons simultaneously until the four blue LED lights on your controller start blinking.[16]
- On your PC, you should see «Nintendo RVL-CNT-01» under the list of Bluetooth devices.
-
6
Select «Nintendo RVL-CNT-01» from the list of Bluetooth devices. Then click .Next.
-
7
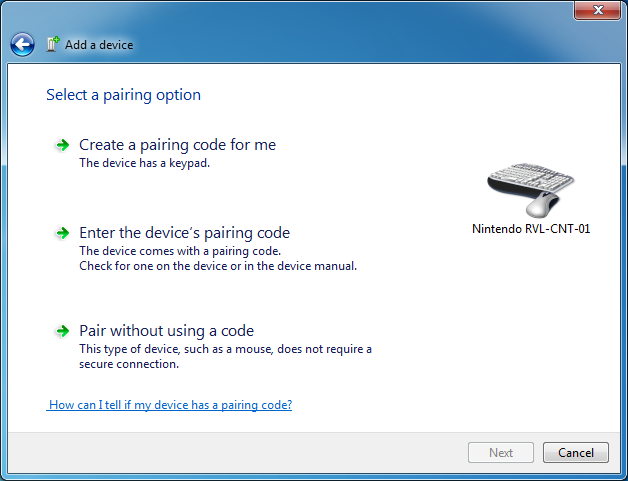
Select «Pair without using a code» and click .Next. Wait a few moments for the Wii Remote to pair with the computer.
-
8
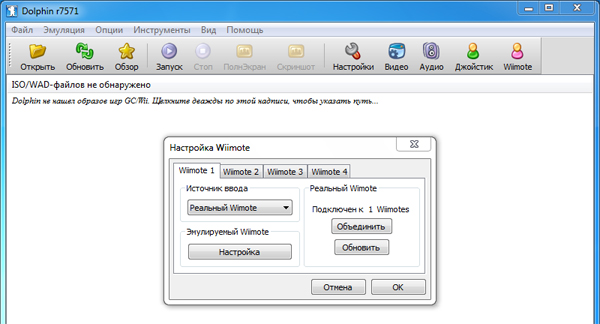
Open the Dolphin emulator once your remote has paired. Then click the “Wiimote” button on the top right.
-
9
Select «Real Wiimote» from the «Input Source» menu. This will let you use the Wii remote when playing games with the emulator.


Advertisement
===Common Problems and Fixes===

Wii Users
-
1
Problem: Your remote won’t sync because programs are running. Your Wii console can’t pair new remotes while games or other programs are running. This includes programs running in the background, such as when you pause a game and go to the menu screen.
- Fix: Make sure you’re on the Wii’s main menu when trying to sync.
- Remove any game discs from the system completely if you’re still unable to sync.
- If these suggestions don’t work, turn off your Wii console completely, then try syncing the remote again. Hold the power button for 3 seconds to turn the console off.
-
2
Problem: Your remote’s LED lights won’t blink when you press SYNC. If nothing happens when you press and release the small red SYNC button, it’s possible that the batteries are dead or degraded.
- Fix: Put new batteries in your remote and try again. Make sure both batteries are in the correct orientation, based on the diagram in the battery tray.
- If you’re using rechargeable batteries, make sure they’re fully charged before trying again.
-
3
Problem: Your remote syncs but you still can’t control the console. If your remote successfully pairs with your Wii console, but nothing happens when you try to use the remote, your Wii’s sensor bar may be in the wrong place. The sensor bar allows your console to “see’ the remote. If it’s in the wrong spot or not connected properly, the remote won’t work.[17]
- Fix: Make sure the wire from your sensor bar is plugged into the small red port on the back of the Wii console.
- Once it’s properly connected, place the sensor bar above or below your TV. Make sure nothing is blocking it. You should be able to clearly see your sensor bar as you use the console.
- If your Wii remote still doesn’t work, turn the console off, then on again. Try pairing your remote.
-
4
Problem: Your console and remote need to be reset. Resetting your devices is a lot like rebooting your computer. It can fix software issues or close programs that are stuck.
-
Fix: Remove the batteries from your Wii remote, then unplug the power cable from the back of your Wii console. Wait one minute, then reconnect the plug to the console and put the batteries back in the remote.[18]
- Turn on your Wii, then try again to connect your remote.
-
Fix: Remove the batteries from your Wii remote, then unplug the power cable from the back of your Wii console. Wait one minute, then reconnect the plug to the console and put the batteries back in the remote.[18]


Advertisement
Wii U Users
-
1
Problem: Your remote won’t sync because programs are running. Your Wii U may not allow you to add controllers while games or other software is open.
- Fix: Make sure you’re on the Wii U’s main menu when trying to sync.
-
2
Problem: Your remote’s LED lights won’t turn on. If this happens, it could mean that the batteries are dead or degraded.
- Fix: Put new batteries in your remote and try again. Make sure both batteries are in the correct orientation, based on the diagram in the battery tray.
- If you’re using rechargeable batteries, make sure they’re fully charged before trying again.
-
3
Problem: Your remote syncs but you still can’t control the console. If your remote successfully pairs with your Wii U console, but nothing happens when you try to use the remote, your Wii U’s sensor bar may be in the wrong place. The sensor bar allows your console to “see’ the remote. If it’s in the wrong spot or not connected properly, the remote won’t work.[19]
- Fix: Make sure the wire from your sensor bar is plugged into the small red port on the back of the Wii U console.
- Once it’s properly connected, place the sensor bar above or below your TV. Make sure nothing is blocking it. You should be able to clearly see your sensor bar as you use the console.
- If your Wii remote still doesn’t work, turn the console off, then on again. Try pairing your remote.


Advertisement
PC Users
-
1
Problem: Your Wii controller isn’t listed in Dolphin’s controller selection menu. This can happen if you try to pair your controller with your PC while Dolphin is open.
- Fix: Close Dolphin before trying to pair your Wii remote with your PC. Once the remote is paired, open Dolphin and try again.

Add New Question
-
Question
My Wii remote won’t show up on the Bluetooth menu. What can I do?

Press the red button and the Wii remote number 2 at the same time.
-
Question
My Wii remote was working, then I changed to a different game and now it won’t work. What do I do?
Milos Tosic
Community Answer
The batteries probably need charging. If that doesn’t help, try to sync the Wii remote again.
-
Question
When I sync only one blue light stays on. Why is this?
The blue light syncs for player one. Two lights appear for player two.
See more answers
Ask a Question
200 characters left
Include your email address to get a message when this question is answered.
Submit
Advertisement
Video
Thanks for submitting a tip for review!
About This Article
Article SummaryX
1. Turn on the console.
2. Flip down the SD card cover on the front.
3. Remove the back cover of the remote.
4. Press and release the Sync button on the back of it.
5. While the LEDs blink, press and release the Sync button.
Did this summary help you?
Thanks to all authors for creating a page that has been read 523,709 times.
Did this article help you?
![]()
Download Article
Learn how to sync or pair a Wii remote to your console or desktop computer
![]()
Download Article
- Syncing With a Wii
- Syncing With a Wii U
- Syncing With a Windows PC
- Video
- Q&A
|
|
|
|
The Nintendo Wii is one of the coolest consoles ever released. Its motion-sensitive controllers turn video games into full-body exercises—that is, once you manage to connect them to your device. As you probably know, connecting a Wii controller—a.k.a. “pairing” or “syncing” it—can be a frustrating process, especially if you’re trying to play Wii games on a PC. But don’t sweat. We’ve prepared a simple guide to connecting Wii controllers, complete with troubleshooting tips for the most common problems you might encounter. Keep reading to learn how to connect your Wii remote to a Wii console, Wii U, or desktop PC.
Things You Should Know
- Turn off your Wii or Wii U console before pairing your Wii remote. Make sure the remote’s batteries are good, or replace them if needed.
- Remove your controller’s battery cover. Press the red SYNC button until the 4 LED lights flash, then press the SYNC button on Wii or Wii U and wait.
- When your controller connects, the LED lights will stop flashing, leaving 1 solid light. To use the controller, place your sensor bar just above or below your TV screen.
- For PC, pair your controller via Bluetooth. Install Dolphin emulator and select your controller. Buy a USB sensor bar or use the one connected to your Wii console.
-
1
Turn on your Wii console by pressing the power button. Let it boot up normally. After the “Warning-Health and Safety” message, you should see the standard Wii menu with no applications running.[1]
- If your Wii was already on (or in standby mode), press and hold the power button for 3 seconds to turn if off. Then power it on again. This ensures that no programs will be running when you pair your remote.
-
2
Open the SD card cover on the front of the Wii. You’ll see a slot for an SD card, plus a red “SYNC” button. Leave the cover open for now.[2]
- The SD card cover is located between the Reset button and the Eject button.
- If you’re using a Wii Mini, the Sync button will be located on the left side of the console near the battery slot.
Advertisement
-
3
Remove the back cover from your Wii Remote. You’ll see the two batteries, plus a small red button labeled “SYNC.” Set the back cover aside.[3]
- Make sure your Wii remote has fresh batteries. It will not connect if the batteries don’t work.
-
4
Press and release the SYNC button on the back of the Wii Remote. The four blue LED lights on front of the Wii Remote will begin blinking.[4]
- If the lights don’t start blinking, firmly press the SYNC button one more time. If the lights still don’t blink, replace the batteries and try again.
- Your remote will not connect unless the lights are blinking.
-
5
Press and release the SYNC button on your Wii console. Do this while lights on the remote are still blinking.[5]
- If you wait too long, the blinking lights on the remotes will turn off before the remote has a chance to connect to your console.
- If this happens, press the remote’s SYNC button again until the lights blink, then quickly press the SYNC button on the console.
-
6
After a few seconds, the lights on the remote will stop blinking. The leftmost light will turn on and stay solid. This means that the remote has connected successfully.[6]
[7]
- You should now be able to control your console using the remote. Try accessing menus and settings on your screen to confirm that the remote is working properly.
-
7
Follow these steps again for every Wii remote. You can connect up to 4 remotes in total. As you pair each remote, the next blue LED light in the row will remain lit after all four lights stop blinking.[8]
- For example, if you pair a second remote, the second LED light will remain lit.
- If you pair a third remote, the third LED light will remain lit, and so on.
Advertisement
-
1
Press the power button on your Wii U console. The main menu should appear on the screen. Don’t select the Wii Menu (aka Wii mode) yet.[9]
- You can’t access Wii Mode until you pair a Wii remote.
- If you try to launch Wii Mode without pairing a Wii Remote, you’ll be asked to pair one.
-
2
Press and hold the Sync button on the front of the Wii U console. The Sync screen will appear. You’ll see a diagram with instructions for pairing different controllers, including the Wii remote.[10]
-
3
Remove the back cover from the Wii Remote. You’ll see the two batteries, plus a small red button labeled “SYNC.” Set the back cover aside.[11]
-
4
Press and release the SYNC button on the back of the Wii Remote. The four blue LED lights on the front of the Wii Remote will begin blinking. Wait for a few moments until the lights stop blinking. One of the lights should turn solid, indicating that the pairing was successful.[12]
- If the lights don’t start blinking, firmly press the SYNC button one more time. If the lights still don’t blink, replace the batteries and try again.
- Your remote will not connect unless the lights are blinking.
Advertisement
-
1
Make sure your PC can connect to Bluetooth devices. Your Wii remote will need a Bluetooth connection to pair with your PC. To check if your PC has Bluetooth, type “Bluetooth” in the search box in your start menu. An option should appear for “Bluetooth & other devices.” Click this option to see to view a list of devices. If your system already has an internal Bluetooth adapter, it will appear on the list as “Bluetooth.”
- If you don’t see anything listed under “Bluetooth,” you’ll need to use a USB Bluetooth adapter. You can buy them online or at any tech store.
- To install the USB Bluetooth adapter, connect to WiFi and plug the adapter into your USB port. Your computer should automatically install it.
-
2
Place a sensor bar above or below your PC’s monitor. You can buy a USB sensor bar and plug it into your PC. You can also use the original Wii or Wii U console’s sensor bar, as long as it is connected to the console (and the console is turned on).
- The Wii or Wii U sensor bar doesn’t need to be connected to your PC to work with your computer. It doesn’t actually send any signals to your Wii controller, but instead works by emitting infrared light that is visible to the controller, but not your eyes.[13]
- As long as the Wii or Wii U sensor bar is plugged into a console (with the console powered on) and placed above or below your PC monitor, you will be able to use it normally.
- You can also use a battery-powered sensor bar, or even make your own.[14]
- The Wii or Wii U sensor bar doesn’t need to be connected to your PC to work with your computer. It doesn’t actually send any signals to your Wii controller, but instead works by emitting infrared light that is visible to the controller, but not your eyes.[13]
-
3
Download and install Dolphin Emulator onto your PC. Download the emulator from the company’s website, then open the file and follow the prompts to install it. This software allows you to play Wii games on your PC using Wii controllers.
- Close Dolphin before pairing your Wii remote with your computer’s Bluetooth adapter.
- If you attempt to pair the remote with Dolphin open, the remote may not appear in the controller selection menu.
-
4
Access your PC’s Bluetooth settings. Go to your Start menu and type “Bluetooth” into the search box. An option will appear labeled “Bluetooth & devices” (for Windows 11 users) or “Bluetooth & other devices” (for Windows 10). Click whichever option you see. In the window that pop ups, select “Add Bluetooth or other device.” Another window will pop up showing “Bluetooth” as the first option. Click “Bluetooth.” A menu will pop up where you can connect your Wii controller.[15]
- Note: If you don’t have a Bluetooth adapter installed on your PC, you’ll receive the error message “Couldn’t Connect.” Purchase and install a USB Bluetooth adapter before continuing.
-
5
Press and hold the «1» and «2» buttons on the Wii Remote. Hold both buttons simultaneously until the four blue LED lights on your controller start blinking.[16]
- On your PC, you should see «Nintendo RVL-CNT-01» under the list of Bluetooth devices.
-
6
Select «Nintendo RVL-CNT-01» from the list of Bluetooth devices. Then click .Next.
-
7
Select «Pair without using a code» and click .Next. Wait a few moments for the Wii Remote to pair with the computer.
-
8
Open the Dolphin emulator once your remote has paired. Then click the “Wiimote” button on the top right.
-
9
Select «Real Wiimote» from the «Input Source» menu. This will let you use the Wii remote when playing games with the emulator.
Advertisement
===Common Problems and Fixes===
Wii Users
-
1
Problem: Your remote won’t sync because programs are running. Your Wii console can’t pair new remotes while games or other programs are running. This includes programs running in the background, such as when you pause a game and go to the menu screen.
- Fix: Make sure you’re on the Wii’s main menu when trying to sync.
- Remove any game discs from the system completely if you’re still unable to sync.
- If these suggestions don’t work, turn off your Wii console completely, then try syncing the remote again. Hold the power button for 3 seconds to turn the console off.
-
2
Problem: Your remote’s LED lights won’t blink when you press SYNC. If nothing happens when you press and release the small red SYNC button, it’s possible that the batteries are dead or degraded.
- Fix: Put new batteries in your remote and try again. Make sure both batteries are in the correct orientation, based on the diagram in the battery tray.
- If you’re using rechargeable batteries, make sure they’re fully charged before trying again.
-
3
Problem: Your remote syncs but you still can’t control the console. If your remote successfully pairs with your Wii console, but nothing happens when you try to use the remote, your Wii’s sensor bar may be in the wrong place. The sensor bar allows your console to “see’ the remote. If it’s in the wrong spot or not connected properly, the remote won’t work.[17]
- Fix: Make sure the wire from your sensor bar is plugged into the small red port on the back of the Wii console.
- Once it’s properly connected, place the sensor bar above or below your TV. Make sure nothing is blocking it. You should be able to clearly see your sensor bar as you use the console.
- If your Wii remote still doesn’t work, turn the console off, then on again. Try pairing your remote.
-
4
Problem: Your console and remote need to be reset. Resetting your devices is a lot like rebooting your computer. It can fix software issues or close programs that are stuck.
-
Fix: Remove the batteries from your Wii remote, then unplug the power cable from the back of your Wii console. Wait one minute, then reconnect the plug to the console and put the batteries back in the remote.[18]
- Turn on your Wii, then try again to connect your remote.
-
Fix: Remove the batteries from your Wii remote, then unplug the power cable from the back of your Wii console. Wait one minute, then reconnect the plug to the console and put the batteries back in the remote.[18]
Advertisement
Wii U Users
-
1
Problem: Your remote won’t sync because programs are running. Your Wii U may not allow you to add controllers while games or other software is open.
- Fix: Make sure you’re on the Wii U’s main menu when trying to sync.
-
2
Problem: Your remote’s LED lights won’t turn on. If this happens, it could mean that the batteries are dead or degraded.
- Fix: Put new batteries in your remote and try again. Make sure both batteries are in the correct orientation, based on the diagram in the battery tray.
- If you’re using rechargeable batteries, make sure they’re fully charged before trying again.
-
3
Problem: Your remote syncs but you still can’t control the console. If your remote successfully pairs with your Wii U console, but nothing happens when you try to use the remote, your Wii U’s sensor bar may be in the wrong place. The sensor bar allows your console to “see’ the remote. If it’s in the wrong spot or not connected properly, the remote won’t work.[19]
- Fix: Make sure the wire from your sensor bar is plugged into the small red port on the back of the Wii U console.
- Once it’s properly connected, place the sensor bar above or below your TV. Make sure nothing is blocking it. You should be able to clearly see your sensor bar as you use the console.
- If your Wii remote still doesn’t work, turn the console off, then on again. Try pairing your remote.
Advertisement
PC Users
-
1
Problem: Your Wii controller isn’t listed in Dolphin’s controller selection menu. This can happen if you try to pair your controller with your PC while Dolphin is open.
- Fix: Close Dolphin before trying to pair your Wii remote with your PC. Once the remote is paired, open Dolphin and try again.
Add New Question
-
Question
My Wii remote won’t show up on the Bluetooth menu. What can I do?
Press the red button and the Wii remote number 2 at the same time.
-
Question
My Wii remote was working, then I changed to a different game and now it won’t work. What do I do?
Milos Tosic
Community Answer
The batteries probably need charging. If that doesn’t help, try to sync the Wii remote again.
-
Question
When I sync only one blue light stays on. Why is this?
The blue light syncs for player one. Two lights appear for player two.
See more answers
Ask a Question
200 characters left
Include your email address to get a message when this question is answered.
Submit
Advertisement
Video
Thanks for submitting a tip for review!
About This Article
Article SummaryX
1. Turn on the console.
2. Flip down the SD card cover on the front.
3. Remove the back cover of the remote.
4. Press and release the Sync button on the back of it.
5. While the LEDs blink, press and release the Sync button.
Did this summary help you?
Thanks to all authors for creating a page that has been read 523,709 times.
Did this article help you?
Напоминаем, что попытки повторить действия автора могут привести к потере гарантии на оборудование и даже к выходу его из строя. Материал приведен исключительно в ознакомительных целях. Если же вы собираетесь воспроизводить действия, описанные ниже, настоятельно советуем внимательно прочитать статью до конца хотя бы один раз. Редакция 3DNews не несет никакой ответственности за любые возможные последствия.
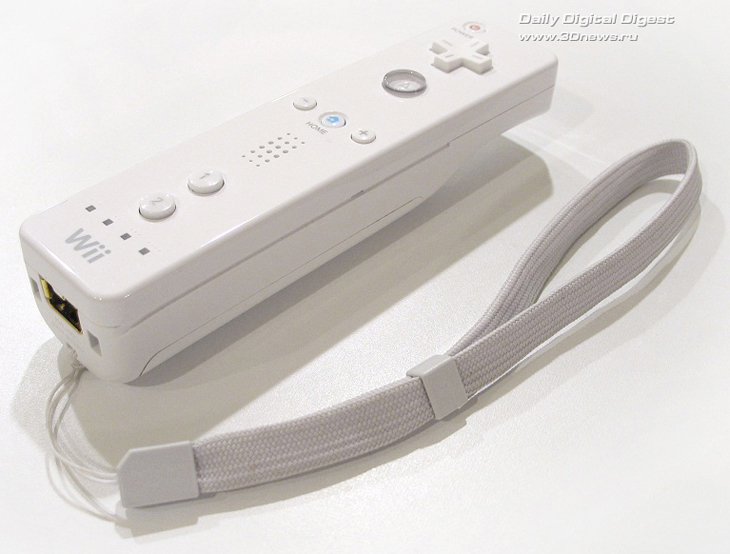
Приставке Nintendo Wii в этом году исполняется пять лет. Маленький, но всё-таки юбилей. Тем не менее она до сих пор успешно продаётся, а многомиллионные продажи за прошедшие годы лишний раз подтверждают, что продукт получился на редкость удачным. Любопытно, что приставка ни тогда, ни тем более сейчас не отличалась какой-то умопомрачительной графикой и физикой в играх, да и на фоне Sony PS3 и MS Xbox 360 её технические характеристики смотрятся довольно блекло. Секрет успеха кроется в новой модели взаимодействия человека с игрой за счёт использования Wii Remote — контроллера, который может определять своё положение в пространстве и тем самым даёт совершенно иные возможности управления игровым миром, нежели традиционные геймпады с кучей кнопок.
Однако рано или поздно любая технологическая новинка приедается и переходит сначала в разряд привычных, а потом уже и морально устаревших вещей. Если вам надоела Wii (хотя как могут надоесть Wii Sports?), то можно дать вторую жизнь если не самой приставке, то хотя бы её замечательному контроллеру, который мы подключим к ПК под управлением Windows 7 и немного поэкспериментируем. Тот, кто уже интересовался этой тематикой, вряд ли найдёт для себя что-то новое в этой статье. К тому же часть проектов уже не поддерживается энтузиастами. Однако тем, кто никогда не задумывался о такой возможности, должно быть интересно.
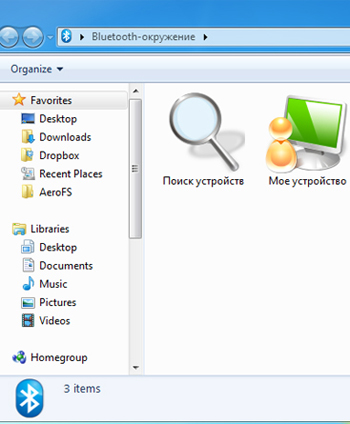
Wii Remote подключается к приставке с помощью Bluetooth, а значит ничто не мешает подсоединить его к обычному компьютеру. Естественно, у вас должен быть Bluetooth-адаптер. Можно воспользоваться стандартными средствами Windows 7 для подключения контроллера. Кликаем правой кнопкой по соответствующей иконке в трее и выбраем пункт «Добавить новое устройство» (то же самое можно сделать и через панель управления в разделе «Устройства и принтеры»). На Wii Remote в это же время надо одновременно зажать кнопки 1 и 2 или нажать небольшую красную кнопочку, которая находится рядом с батарейным отсеком. Все четыре светодиода начнут синхронно мигать. В течение нескольких секунд Windows опознает контроллер как Nintendo RVL-CNT-01.
Кликаем «Далее», выбираем режим соединения без ввода кода.
Снова «Далее» и «Закрыть». Всё, контроллер подключен.

Есть вероятность, что Wii Remote при таком способе подключения будет не совсем корректно работать — например, постоянно отсоединяться, а то и вовсе не подсоединяться. В этом случае придётся воспользоваться платным программным набором IVT BlueSoleil версии 6.4.249.0 или более новой его сборкой. После установки и перезагрузки в области уведомлений появится значок BlueSoleil. Кликаем по нему правой кнопкой, выбираем пункт «Проводник Bluetooth-окружения» и в открывшемся окне запускаем «Поиск устройств» либо нажимаем F5. Снова одновременно зажимаем кнопки 1 и 2 на контроллере, и через несколько секунд он появится среди распознанных устройств. Осталось только дважды кликнуть по иконке джойстика, чтобы окончательно наладить связь с контроллером. Аналогичным образом (зажать 1 и 2, кликнуть дважды по значку) Wii Remote надо будет подключать и в будущем. Посмотреть состояние подключения можно, выбрав соответствующий пункт в меню, которое вызывается правым кликом по иконке устройства.

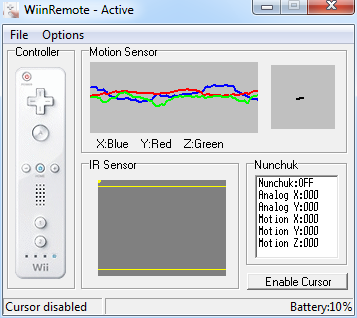
Первым делом для проверки работоспособности надо будет скачать архив с библиотекой WiimotLib, в котором есть приложение WiimoteTesе. Его-то и надо запустить после распаковки. Если контроллер неправильно подключен, то оно выдаст ошибку. В противном случае вы увидите окно, в котором показывается вся текущая активность Wii Remote. Помашите контроллером, понажимайте на нём кнопки — всё это будет отображаться в окне программы. Кстати, для диагностики её можно держать запущенной постоянно. Если все циферки в Wiimote Accel и IR замерли, значит что-то пошло не так.

Простейший вариант использования Wii Remote с ПК — это замена мыши. Для этого надо будет скачать приложение WiinRemote для Windows или DarwiinRemote для Mac OS X. Запуск режима эмуляции мыши осуществляется нажатием на кнопку B с нижней стороны контроллера. Никаких особых настроек делать не придётся.
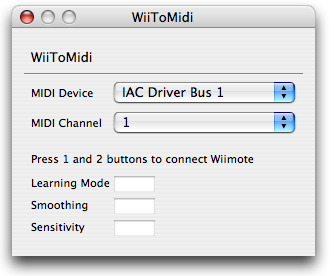
DarwiinRemote на пару с WiiToMidi можно любопытнейшим образом использовать для управления аудио- и видеоэффектами. Фактически Wii Remote превращается в своеобразный MIDI-контроллер. В этом случае управляться с ним даже удобнее, чем использовать в качестве мыши. Аналогичного эффекта можно добиться и в Windows.
Впрочем, самым классическим приложением для взаимодействия различных нестандартных контроллеров с Windows является программа GlovePIE, изначально написанная для работы с перчаткой P5 Glove. На самом деле это довольно развесистая система, которая преобразует любые сигналы с какого-либо контроллера в понятные ОС команды. Это преобразование управляется с помощью скриптов с достаточно простым синтаксисом, так что написать собственный скрипт не очень-то и сложно. Если лень, то можно задать в Google поисковый запрос вроде «имя_программы glovepie script». Энтузиасты написали достаточное количество оных, но какого-то одного места, где их можно легко найти, уже нет. Для начала попробуйте, к примеру, скрипты за авторством Joseph Coulston.
Есть и наработки по эмуляции контроллеров старых приставок для использования совместно с эмуляторами или, например, скрипты для управления медиаплеером. Имеются и наборы для использования Wii Remote в некоторых популярных играх. В общем, ищущий да обрящет. Для использования скрипта достаточно запустить программу и вставить его текст в поле редактора на первой вкладке, а затем нажать на кнопку Run. Wii Remote уже должен быть подключен. Скрипт можно отредактировать и сохранить (File → Save), а в дальнейшем просто открывать его (File → Open). Некоторые готовые скрипты выложены в виде текстового файла с расширением .PIE, открываются они точно так же. Только надо учитывать, что между движением джойстика и реакцией на него есть некоторая задержка, пусть и очень небольшая.

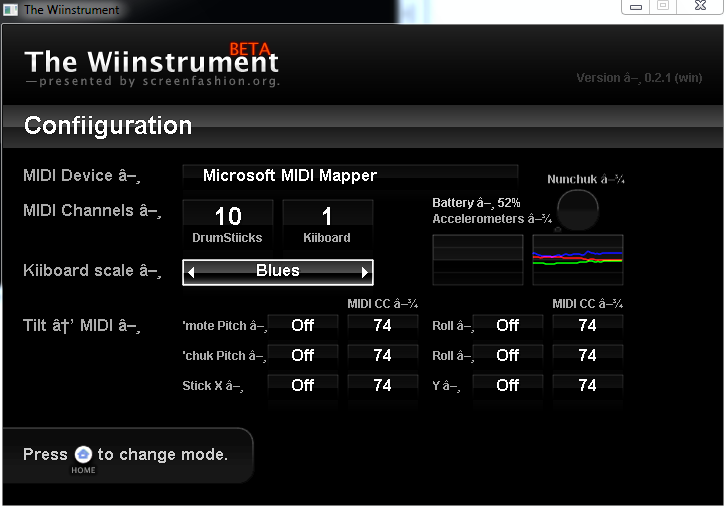
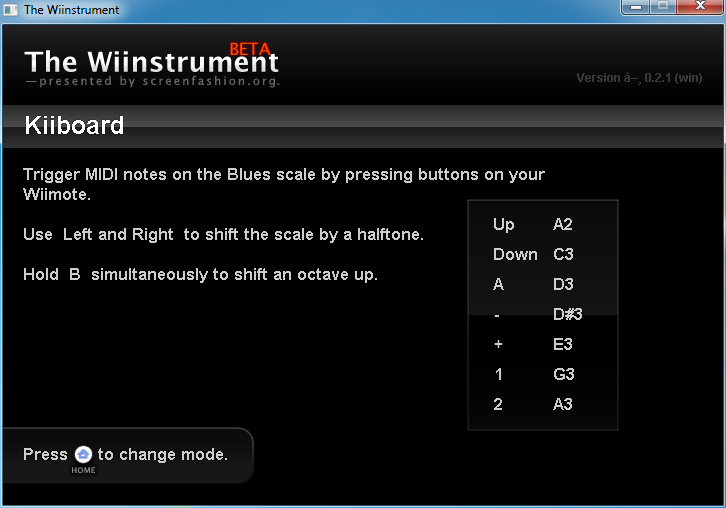
Среди PC-проектов для Wii Remote нельзя не отметить Wiinstrument. Эта кроссплатформенная программа может эмулировать барабанную установку или просто проигрывать семплы. Для полноценной работы нужен ещё Wii Nunchuck. Вариантов работы два: либо по нажатию кнопок проигрывается нужная нота или звук, либо возможно имитировать контроллерами работу рук барабанщика, переключаясь с помощью кнопок между барабанами. В качестве простенького развлечения вполне сгодится, да и освоиться с программой очень легко — минут через 10 уже можно настукивать простенькие ритмы.


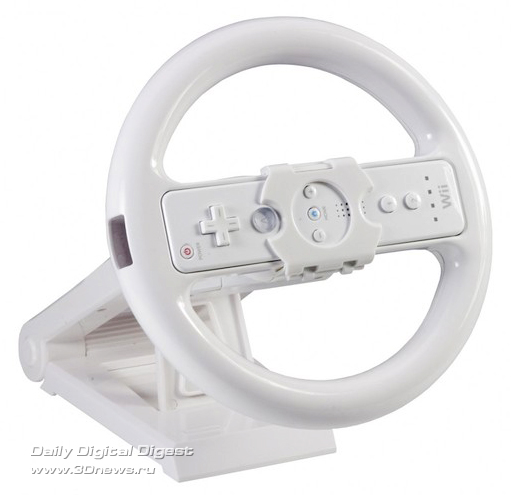
Наши соотечественники тоже отличились на поприще нестандартного использования джойстика Wii. Например, Дмитрий Брюхов предложил более удобный способ использования Wii Remote в качестве руля для гоночных симуляторов и написал небольшую утилиту для упрощения работы. Идея-то, конечно, далеко не нова — для оригинальной приставки уже давно выпускаются специальные пластиковые аксессуары в виде того самого руля стоимостью в пять долларов.
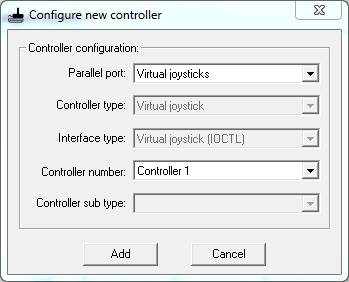
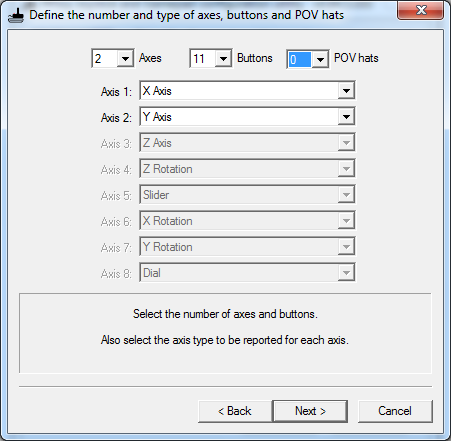
Предлагается использовать универсальный эмулятор джойстиков PPJoy, который можно скачать здесь. После установки драйвера запускаем из главного меню PPJoy Joystick Driver → Configure Joysticks и нажимаем кнопку Add. В появившемся окне в списке Parallel Port выбираем Virtual joysticks и жмём Add. Подождём, пока установится драйвер, а затем выбираем только что созданный джойстик и нажимаем Mapping, а затем Next.


В мастере выставляем все настройки так, как на картинках ниже.


Перед запуском игры нужно включить утилиту WiiController.exe (WiiControllerWiiControllerbinRelease), изменить по желанию уровень чувствительности и нажать Старт. Как только установится соединение с Wii Remote, будет показан уровень заряда батареи и текущие координаты в пространстве. Теперь можно запускать ваш любимый гоночный симулятор, который, конечно, должен поддерживать работу с рулем. В настройках управления надо выбрать контроллер PPJoy Virtual Joystick 1. Для поворотов влево-вправо надо будет повернуть Wii Remote в соответствующую сторону, а остальные функции распределить между кнопками так, как вам угодно. Собственно, всё — можно приступать к игре.

Наконец, последний проект, достойный внимания, — это эмулятор Nintendo Wii и GameBoy под названием Dolphin Emulator. Причём эмуляция реализована вполне прилично, лишь бы компьютер был достаточно мощным. Эмулятор в чём-то даже лучше оригинальной Wii — можно включить сглаживание и фильтрацию картинки, уменьшение пикселизации, выводить изображение в Full HD и с поддержкой стерео за счёт NVIDIA 3D Vision. Самое главное, конечно, возможность одновременного подключения до четырёх Wii Remote (с Motion Plus и Nunchuck). Скорее всего, понадобится ещё и Sensor Bar. Проект постоянно улучшается и развивается — устраняются «баги», наращивается производительность, добавляются новые возможности. В общем, определённо стоит попробовать.
На этом, пожалуй, можно закончить, так как количество проектов, которые используют Wii Remote в качестве контроллера для чего-либо, очень много, и перечислять их все особого смысла нет. Выше собраны наиболее колоритные и простые в реализации примеры. Есть крайне интересные проекты, для которых придётся, как минимум, докупить или сделать самому указку с ИК-диодом, а то и взяться за инструменты. Всем заинтересовавшимся этой темой рекомендуется посетить сайт Wiimote Project, а также поискать на SourceForge или Google Code. Если у вас нет контроллера, то его легко можно купить — в России набор из Wii Remote с Nunchuck обойдётся в 2-3 тысячи рублей, но лучше поискать OEM-аналоги, например, на Dealextreme. Удачных экспериментов!
Если Вы заметили ошибку — выделите ее мышью и нажмите CTRL+ENTER.
You have been redirected to the Русский
version of the website based on your browser language preferences.
If you prefer the English version, click here to go back.
Released only a year after the Wii MotionPlus accessory, the Wii Remote Plus is a Wii Remote with the MotionPlus addon built into the Wii Remote. Unfortunately, shortly after the Wii Remote Pluses came out, a new Wii Remote Plus type appeared. Whereas the standard Wii Remotes and the very first Wii Remote Pluses register as RVL-CNT-01, the new Wii Remotes register as RVL-CNT-01-TR. What exactly changed is unknown, but all -TR Wii Remotes may need additional hardware/software to work with Dolphin. Since all Wii Remotes for sale in stores since 2011 are -TR Wii Remotes, this has become a growing problem. Fortunately, they can work with Dolphin — with some special requirements. This guide tells you how to connect and use a RVL-CNT-01-TR Wii Remote Plus in Dolphin.
Note that the very first Wii Remote Pluses, such as those included in FlingSmash and The Legend of Zelda: Skyward Sword, are not RVL-CNT-01-TR Wii Remotes. For this reason, this guide will not use the blanket «Wii Remote Plus» term, but will use «-TR Wii Remote» to refer to the RVL-CNT-01-TR Wii Remotes specifically. While the addition of the sync button on the battery cover is the common way to tell non-TR Wii Remote Pluses from -TR Wii Remote Pluses, even that is not 100% reliable. The only way to know for sure to is connect it to a computer and see if it is registered as RVL-CNT-01-TR.
Bluetooth Passthrough Mode
In the Bluetooth Passthrough mode, -TR Wii Remotes are not an issue at all. Refer to Bluetooth Passthrough for details.
Linux
Linux (> 3.11) does not require any special treatment. Use the normal connecting methods shown in Configuring Controllers.
Since 5.0-876, the DolphinBar can also be used on Linux.
macOS
macOS does not require any special hardware or software. It only requires a device be paired beforehand.
- Open Bluetooth Settings and click the plus (+) sign to set up a new device.
- While it is scanning, press the red sync button on the back of the controller. All four lights on the front of the controller should be flashing.
- Back in the Bluetooth Settings, hit «Continue» and wait for it to fail.
- Select ‘Passcode Options’ and choose «Do not use a passcode with this device». Click «OK» and then click «Quit».
- Double check in the Bluetooth menu to be certain that the controller is registered.
Once the pairing process is completed, the controller will be usable on Dolphin, as further instruction is available in the Configuring Controllers guide. However the red Sync button must be pressed instead of 1 + 2 every time to connect.
El Capitan
Since the El Capitan update, Bluetooth pairing requires a passcode. To get the Bluetooth passcode you must find the Bluetooth address of the Wii remote.
- Open System Preferences —> Bluetooth.
- Press the red sync button on the back of the Wii remote.
- After pairing fails, right-click on the device and look for the field «address».
- Record the address backwards (e.g. 00-1B-7A-D9-72-0E would be «e0279da7b10»).
- Use a Hexadecimal-to-ASCII table or convertor (such as this one) to get ASCII text.
- Go back to Bluetooth settings, find the Wii remote device and click on options.
- Under «Passcode» paste/write the ASCII text into the field (ignore non-character such as «NULL» or «STX»).
- Press the red sync button on the back of the Wii remote and click pair.
- If pairing fail, restart the computer and try pairing again.
- If pairing continues to fail, see below.
If Pairing Fails
For some people, pairing using the method above does not work. If this is the case open Dolphin, click on «Controller», select «Real WiiMote» from the Wiimote settings, press the red sync button on the back of the Wii remote and hit «refresh» under «Real Wiimote».
Windows
Windows includes the MS Bluetooth Stack and most Bluetooth adapters use it by default. Starting with Dolphin 4.0-8325, if you’re using Windows 8 or newer, all you need to do to connect -TR Wii Remotes is the typical Wii Remote connectivity as described in Configuring Controllers. If you’re running Windows 7 or earlier you’ll have a previous version of MS Bluetooth Stack that lacks some Bluetooth functions which the -TR Wii Remote uses. In that case you have two solutions for this problem, the DolphinBar or the Toshiba Bluetooth Stack. Both have superior Bluetooth functionality and not only allow -TR Wii Remotes to work, but also fix minor Wii Remote bugs that are present in the MS Bluetooth Stack used on Windows 7 and earlier.
DolphinBar
The Mayflash DolphinBar is a combination Bluetooth adapter and Sensor Bar. It doesn’t reveal any of the Bluetooth information to the operating system, instead sending HID packets directly to Dolphin without a Bluetooth Stack, thus allowing -TR support, syncing of Wii Remotes, and other features superior to what the Toshiba Stack can offer. However, since it does this, it is only useful for supported Wii controllers, and cannot be used as a full Bluetooth adapter. Full details are available in the DolphinBar Hardware Review, and links to purchase one are available on our Recommended Accessories page.
Toshiba Stack
The Toshiba Stack provides full Bluetooth on Windows 7, for everything, not just Wii Remotes, and it has full -TR support. However, it requires the additional step of connecting Wii Remotes through the Toshiba Stack instead of just through Dolphin.
The link provided below is the official download page for Toshiba Stack. Use the newest version; it has the highest known compatibility. If the newest version doesn’t work feel free to try older ones. Please be aware that Toshiba Stack will start in trial mode when using on a unsupported dongle subjected with forced driver installation, and will eventually require a supported adapter to continue use of the software.
Download page
Toshiba Stack and the Bluetooth Adapter
The Toshiba Stack only supports a limited number of Bluetooth adapters. For absolute maximum compatibility, buy a Bluetooth adapter that is specifically designed to use the Toshiba Bluetooth Stack; look for «Toshiba Bluetooth Software» somewhere on the package or for «Toshiba» in the comments on the online store. There is a small possibility that the adapter not in the list can be used with Toshiba Stack, through the installation with an edited driver file, as instructed in the later section. But please acknowledge that it is preferably for experienced users only. The instruction will be divided at some point for the users and their specific adapters throughout this guide, starting from the first step in the next section below.
Installing the Toshiba Bluetooth Stack
- If the Bluetooth adapter is USB based, insert it before the installation.
- Run the extractor. Make note of where it extracts to (For future reference, %userprofile%AppDataLocalTemptc00590500a.temp). When the installer does not start, run Setup.exe from the temp folder to start the installer. There are no settings to worry about, so just click through.
- If there is a message pop up that says «Please plug in the Bluetooth device and click OK button», make sure the Bluetooth adapter is properly inserted, and if it still happens, the Bluetooth adapter is not supported. In that case, click on the Cancel button and try to finish the Toshiba Stack setup, then continue to #Forcing the Toshiba Drivers Onto the Adapter.
- Restart the computer when prompted.
- When the installer setup is completed, and for the interests of this guide, try to close any pop ups before continue.
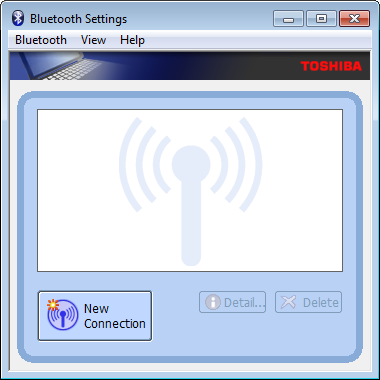
- The Bluetooth Settings window can be accessed through the Start Menu or double clicking the Bluetooth icon in the notification tray. This is where the users will be interacting with the Toshiba Stack on a regular basis, and it is necessary for the next section.

The Bluetooth Settings window
Connecting the Wii Remote Plus
- In the Bluetooth Settings window, press the «New Connection» button.
- In the «Add New Connection Wizard» window, select the «Express Mode», and hit «Next».
- A searching window will appear. Press the Sync button on the bottom of the -TR Wii Remote.
- Now click through the windows. The windows will go away and it will show the Bluetooth settings screen with «Nintendo RVL-CNT-01-TR». Note the green and yellow lines clasping each others: this means the Bluetooth is presently connected. The Wii Remote will continue to flash, it is normal.
Clasped lines indicate a connected Wii Remote
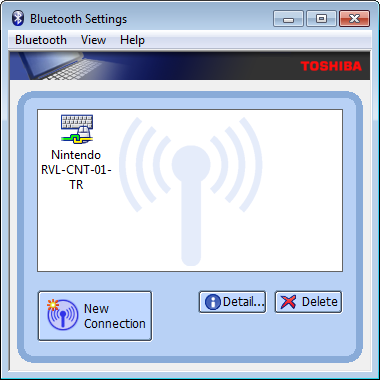
The connection setup with the -TR Wii Remote is completed and will be usable with Dolphin, as further instruction is available in the Configuring Controllers guide.
- For a quick note, because of the Toshiba Stack, it is recommended that Continuous Scanning is enabled. Dolphin will immediately detect the Wii Remote and it will be used upon starting a game.
- Another thing to note, when turning the Wii Remote off, its device ID will remain in the Bluetooth settings window, but the yellow and green clasped lines will be gone. To reconnect the Wii Remote, just double click it. A window will pop up asking to prepare the Wii Remote once again. Click «OK» and then press the red Sync button on the bottom of the Wii Remote. It will be reconnected in a matter of seconds.
Forcing the Toshiba Drivers Onto the Adapter
If Toshiba Stack does not seem to detect the adapter and shows endless «Please plug in the Bluetooth device and click OK button» prompts, it is because the Toshiba Stack will only install its drivers onto the adapter with a matching USBVID number from the list. Naturally, the adapters not in the list are not supported and will be skipped. It is possible to make a workaround by adding the excluded adapter’s USBVID into the list.
Identifying Bluetooth Adapter’s Hardware ID
- Open the Device Manager (or simply run «devmgmt.msc») and find the Bluetooth adapter in the list. It will either show up as a Bluetooth radio or as an unknown device.
- For convenience in finding it in the Device Manager, expand the categories the Bluetooth device might be in, then if the adapter is unplugged, it will disappear from the list. Plug it back in, and it will reappear into the list. In other words, the Device Manager updates live.
- Open its Properties (right-click → Properties), then select «Hardware Ids» in the dropdown menu from the «Details» tab. Note the second (shorter) value. This is the USBVID of the Bluetooth adapter. Copy it into the Notepad.
Editing Driver File
- Go to %programfiles(x86)%ToshibaBluetooth Toshiba StackDriverstosrfusb
- If desired, make a copy of tosrfusb.inf, and consider it as a backup.
- Edit tosrfusb.inf with administrator privileges. Notice that there are three long lists. The first and second lists should look something like this: %TosrfUsb.DeviceDesc###%=TosrfUsb_Device.
- In the bottom of the first list, copy the very last entry and make a duplicate below it. Take the number of the entry (the number immediately after «DeviceDesc») and increase it by one. Then erase the USBVID of this new entry and replace it with the one for the Bluetooth adapter that was collected from last subsection.

An example of device file in its original unedited state
New line is highlighted in blue
- Copy the newly created entry from the first list, and paste into the bottom of the second list.
- On the bottom of the third list, copy the last entry of the third list and make a duplicate below it. Just like before, there is a number following «DeviceDesc» and increase it by one. After this, there is a name in parentheses. Change it to the way you want to recognize it for yourself. Toshiba won’t rely on it in any way.
- Save the file and close it.


Disable Driver Signature Enforcement
By default, 64-bit versions of Windows does not let the users install drivers which are not signed. So, after modifying tosrfusb.inf its signature won’t be valid anymore and Windows will block the installation unless Driver Signature Enforcement is disabled. Follow these steps on Windows 7:
- During boot-up, continuously press F8 to get to «Advanced Boot Options».
- When the boot manager menu appears, use the arrow keys to select «Disable driver signature enforcement».
- Press «Enter» and the computer will restart Windows with the driver signature enforcement disabled.
Installing the Modified Driver Onto the Bluetooth Adapter
The first step may run into the possibility of BSOD (Blue Screen of Death). Save everything and be prepared beforehand.
- Type «Bluetooth Settings» in the Start Menu or Start Screen and hit Enter. A Windows Security window will pop up asking to confirm installation of the unsigned drivers. Install the driver. The process may take some time, and errors may appear during it. Ignore them.
- When the installer setup is completed, and for the interests of this guide, try to close any pop ups before continue.
- Double click the Bluetooth icon that appeared in the notification tray. Click the «New Connection» button.
- If the wizard screen appears, then the Toshiba Stack has successfully installed the Toshiba drivers to the Bluetooth adapter. Continue to #Connecting the Wii Remote Plus.
- If a prompt appears saying «Bluetooth is not ready» …then it failed. Once that point is reached, there is no way known to deal with this.
Pretending to Be a Toshiba Bluetooth Adapter
While there is no option to buy the Toshiba Bluetooth Stack without the bundled hardware, there is a way to make the Bluetooth device recognized as one. Paste the following into Notepad and save it as a .reg file, then run it.
Windows Registry Editor Version 5.00
[HKEY_CURRENT_USERSoftwareToshibaBluetoothStackV1.0Mng]
"TestVersion"="0"
This driver, called HID Wiimote, was developed and elementary implemented as my bachelor thesis in a 6-month period.
What is it?
When you normally connect your Wii Remote to a PC using Bluetooth, you can’t use it properly out of the box. The problem is that Windows don’t know how to handle it properly and does not expose any input buttons or axis. My Bachelor theses was to attempt a solution to that kind of problem. There are many programs which are mapping the Wii Remote buttons to keyboard keys, so for Windows it looks like a key is pressed. This solution is not applicable when it comes to local multiplayer games like FIFA. My driver fixes this issue, since every Wii Remote is recognized as a native game controller, as they should be.
The driver supports the Nunchuck, Classic Controller, Classic Controller Pro Extensions. Furthermore it is Working with the Wii U Pro Controller, Wii Balance Board and some Guitar Hero accessories. The button and input mapping dynamically changes when an Extension is plugged in or out. For update notifications follow me on Twitter.
Download
HID Wiimote (gamepad mode)
The project is under no active development and won’t receive any further updates. Existing binaries may cease to work anytime in the future and install instructions may be out of date.
Latest Changes (v0.4.0.0)
- Final release
- Upgrade to Visual Studio 2022, Windows SDK 11 and Windows WDK 11
- Removed support for Windows 7, 8, 8.1, because Windows WDK 11 only allows for Windows 10 and higher
- Fix Apps and Features uninstall button not working
- Fix zip step if path contains spaces
How do I use it?
Install Instructions for HID Wiimote
The project is under no active development and won’t receive any further updates. Existing binaries may cease to work anytime in the future and install instructions may be out of date.
- Make sure you have the Microsoft Visual C++ Redistributable 2017 installed (64 Bit Download, 32Bit Download)
- Download the HID Wiimote driver package matching your Windows.
- Unpack the files.
- Run “ControlCenter.exe”. That will bring up the HID Wiimote Installer.
- Optionally enable “Test Mode” (requires reboot)
- Install the certificate.
- Install the “Device Driver”.
- Afterwards close the Installer to bring up the Control Center.
- Connect your Wii Remote or Wii U Pro Controller to your PC. Leave the PIN empty. If Windows doesn’t allow an empty PIN see skip PIN request.
- If Windows still uses the default driver, see below to change the driver.
- Select one device in the Control Center and apply settings.
- Start using your Wii Remote like a generic game controller.
Uninstall Instructions
- Open the HID Wiimote Control Center. Bring up the Installer Window via Tools -> Installer. Uninstall the driver package.
- Or open Windows “Programs and Features” settings. On Windows 10 open “Apps and Features” and scroll down to Related settings. It seems the “Apps and Features” entry is currently not working. Search for “HID Wiimote 0.X.Y.Z” and uninstall it.
Known Issues
- When powering off the Wii Remote or moving out of the Bluetooth range, Windows won’t recognize the Wii Remote is gone.
- When shutting down Windows, the Wii Remote Device won’t be ejected and is still present on next start up.
- You have to manually remove the Wii Remote device from Windows Devices each time it has disconnected.
- If the HID Wiimote Control Center shows an error or doesn’t start at all, make sure you have the Microsoft Visual C++ Redistributable 2017 installed (64 Bit Download, 32Bit Download)
- When using other Bluetooth devices, they may stop working, until the Wii Remote is disconnected.
- Other Programs that need to communicate directly with the Wii Remote may not work (e.g. Dolphin Emulator).
- Incompatible with Toshiba Bluetooth Stack or any other Bluetooth Stack with proprietary API.
- Driver Signature Verification may be a hard requirement for certain AntiCheat engines.
Driver Signature Verification
Unfortunately I do not own a Code Signing Certificate. So on 64 Bit Systems you have to disable the Driver Signature Verification. Otherwise Windows won’t load the driver. The Driver Signature Verification can either be deactivated permanently or for a single restart (after an additional restart it is active again).
Permanently deactivate Driver Signature Verification
Start the HID Wiimote Control Center. Open the HID Wiimote Installer via Tools -> Installer. On the installer Window enable Test Mode and reboot your system.
Alternatively you can also manually enable Test Mode. Open a CMD Window with Admin Rights. Then run the following command and restart your System.
Bcdedit.exe -set TESTSIGNING ON
One Time Deactivation
To disable the Driver Signature Verification some steps are necessary. Those are different on Windows 7 and Windows 8.1 and above.
Save all of your work, because you have to reboot you computer!
Windows 7:
- Restart you computer
- After the BIOS, before Windows initialize its booting, press F8 to enter the “Advanced Boot Options” for Windows (like when you try to enter the “safe mode”)
- Choose “Disable Driver Signature Enforcement”
Windos 8.1 & Windows 10:
- Open the Charms Bar
- Chosse “Settings” and then “Change PC settings”
- Switch to “Update and recovery” and open the “Recovery” tab
- Click on “Restart Now” under “Advanced Startup”
- After restart click “Troubleshoot”
- Pick “Advanded options”
- Choose “Startup Settings”
- Click on “Restart”
- Press the number for “Disable driver signature enforcement” (Number 7)
Now Windows starts in a Testing Mode and might display a small watermark in the bottom right corner.
After an additional restart Windows changes back to its normal mode, so you have to disable the Driver Signature Verification each time you want to use the driver.
Skip PIN Request
On Windows 10 Creators Update and above the “Settings – Bluetooth & other devices” panel does not let one skip the PIN input. In order to pair your Wii Remote nonetheless, scroll down to “Related Settings” and open “Devices and Printers”. Its “Add a device” dialog still accepts an empty PIN entry. The “Devices and Printers” Window can also be opened by right clicking the Bluetooth system tray and select “Join a Personal Area Network”.
Switch driver
Because Windows internally ranks all possible drivers for a device mainly by their signing, the default driver might be still used for the Wii Remote. This driver ranking will be performed each time the device is added. So you have to change it every time you connect the Wii Remote. Therefore it is recommended to install the certificate to push its ranking.
- Connect the Wii Remote to the Computer and constantly tap a button, so the Wii Remote won’t turn off.
- Open the Device Manager and locate the “Bluetooth-HID-Device” representing the Wii Remote.
- Right click on it and choose “Update Driver Software…”.
- Pick “Browse my computer for driver software”
- Then “Let me pick from a list on my computer”
- Now choose “Wiimote Device” from the list and click “Next”
- When the LEDs of the Wii Remote switch from flashing to constantly on, the driver is installed properly.
Changelog
Expand
0.3.0.3
- Final release
- Upgrade to Visual Studio 2022, Windows SDK 11 and Windows WDK 11
- Removed support for Windows 7, 8, 8.1, because Windows WDK 11 only allows for Windows 10 and higher
- Fix Apps and Features uninstall button not working
- Fix zip step if path contains spaces
0.3.0.3
- Upgrade to Visual Studio 2017 and current Fall Creators Update SDK and WDK (10.0.16299)
- Add an unhandled exception handler to the Control Center
- Fix #38: Change unit from Radians to Degree
- Fix #40: Change guitar whammy bar and touchbar mapping from RX and RY to Z and RZ
- Fix #41: Home button mapped to wrong output when using Nunchuck
0.3.0.2
- Change checking Extension subtype
- Add Product and Serial string support
- Add minor delay to update process for UX
- Change wording from “Switch” to “Swap”
0.3.0.1
- Fix #24 & Fix #31: Fix Guitar Hero Buttons, Whammy and Touch bar
- Fix not detecting certain GH Accessories
- Change default settings for new unknown devices to have accelerometer and trigger axis enabled
0.3.0.0
- Implement #2: Basic Tool for device specific settings, including an installer replacing TinyInstaller
- Fix phony button presses when connecting extension
0.2.7.4
- Fix Balance Board not beeing detected correctly and reporting any input
0.2.7.3
- Fix #15: Yellow Guitar Hero Button not working
0.2.7.2
- Change Balance Board Axes
0.2.7.1
- Fix Balance Board Axes
0.2.7.0
- Fix RawInput not reading the primary axes correctly
- Add experimental untested Balance Board support
- Add experimental untested Guitar Hero Guitar support
0.2.6.2
- Fix non English languages for the Driver Package Installer.
0.2.6.1
- Installer has been reverted to Multilingual, since there have been issues with non English Windows Systems.
0.2.6
- Fix #11: Improved Extension Controller detection
- Package now includes EULA and Readme file
- Replaced Multilingual Driver Package Installer with only-English one
- Introduced proper versioning, starting with 0.2.6
- Build with WDK 10.0.10586.15, to hopefully fix connectivity issues with Windows 10 Version 1511 (November Update)
08.09.2015
- Windows 10 Desktop Build
13.07.2015
- Fixed LED Battery Level display for Wii U Pro Controller
- Each Classic Controller (Pro) & Wii U Pro Controller Trigger has its own input axis
16.06.2015
- Hotfix for IR-Mouse to enable “-TR” Wii Remotes
01.06.2015
- Input State is reset, when the connection is lost
- New IR-Mouse Version
- Lets you control your Mouse Pointer by pointing at your screen
- IR-Source like Sensor Bar is needed
20.04.2015
- Nunchuck, Classic Controller (Pro) and Wii U Pro Controller are now supported
- Added more Axis, Buttons and a Hat Switch
- Unfortunately no more Vista Builds
- Windows 8.1 Build
12.10.2014
- Added another installer, so Windows will use HID Wiimote as default driver for the Wii Remote
- PDad-Mouse Build (See this Blog)
- There will be Vista builds from now on as well.
01.07.2014
- Added support of the newer Wii Remotes (RVL-CNT-01-TR)
- Added second X/Y axes representing tilt (Currently only tracked by the accelerometer)
26.06.2014
- D-Pad is now represented as X/Y-axis.
- LEDs now represent the battery level.
- Added an Installer.
20.06.2014
- Fixed the binaries (there was some test code left when building, last time, so the old binaries aren’t working)
Download List
- Gamepad
- IR-Mouse
- DPad-Mouse
Source Code
The archived Source code is available on Github:
https://github.com/jloehr/HID-Wiimote
How does it work?
This Part is for those of you, who does not only want to use HID Wiimote, but want to take a peak inside a driver and how i fixed the problem.
Detailed Problem
The communication of the Wii Remote with its host is based on HID. HID is a protocol for input devices without a fixed setup. The protocol is self describing, which means every device is telling the host what kinds of input and outputs it got. E.g. one game controller can have only four buttons, whereas another can have two analog sticks without any buttons, both are using HID and are handled by the same driver.
As said the Wii Remote communication is just based on it, but not strictly followed. So the protocol standard is violated at some points, for example the Wii Remote does not describes itself properly. That’s the reason why Windows knows its a game controller but does not know what kinds of input and output the Wii Remote has.
Solution
So the solution is to put a driver somewhere between the Wii Remote and the HID Class Driver to fix the communication. This driver presents a HID conform game controller to the upper HID Class Driver. Fortunately the HID Class Driver is paired with a minidriver. Those minidrivers handle the transport specific communication with the device. E.g. if the device is connected via USB the HIDUSB driver is loaded to handle the USB specific communication, or if it’s Bluetooth HIDBTH is loaded, to do all the Bluetooth stuff.
The HID Wiimote replaces the minidriver for the Wii Remote and adds the additional functionality to have a fully supported game controller. It consists of three layers.
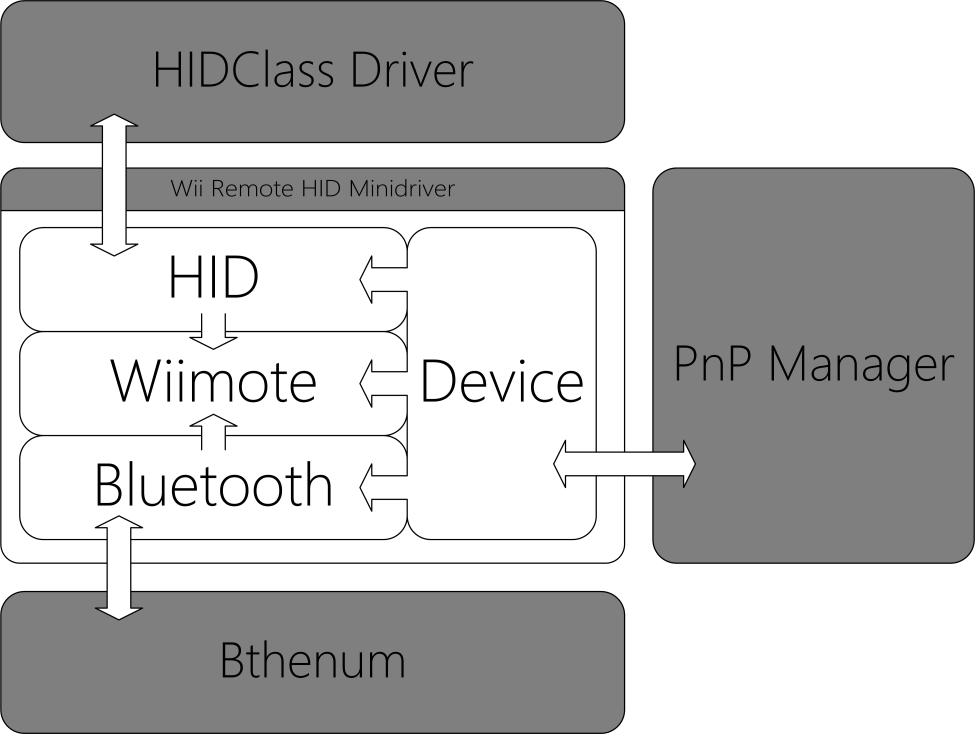
The lower Bluetooth layer handles all the Bluetooth specific stuff, like the direct communication. The middle layer Wiimote saves the Wii Remotes state and handles its specific needs in form of what kind of responses and request and how those have to be handled. The upper Layer HID is handling all request from the HID Class Driver and is translating the current state to a HID conform format.
Further reading
- Bachelor thesis (German)
- Paper (English)
Introduction: How to Use Your Wii Remote on Your PC As a Game Controller and More
Hello! If you would like to know how to connect your Wii Remote to your PC, you have come to the right place. By the end of this guide, you will be able to:
- Use your Wii Remote as a game controller.
- Use your Wii Remote as a mouse
- Create your own custom keybindings for your Wii Remote. (As long as it uses the keyboard and mouse, it can be mapped to the Wii Remote)
But before we get into the details of doing so, here are some materials that you will need before we get started.
You will need:
- A Nintendo Wii Remote. (I am using an older model that does not have the Plus in it, however if you have a newer one it should still work)
- A PC that has a Bluetooth adapter. (If your PC does not have a built-in Bluetooth adapter, you can buy an external one from Amazon.)
- A few free programs for the Wii Remote that will be discussed in detail later.
A few warnings to consider: This guide is written for those who have PCs only. If you have a Mac or other operating system, this guide will is not for you. The instructions and pictures will be specifically for Windows 10, since that is the operating system I am running. Older versions can attempt to follow along, however there is no guarantee that the process I go through will be the same as yours.
Step 1: Downloading the Wii Remote Drivers
If you were to try to connect your Wii Remote now to your PC, you would find that Microsoft will install the wrong drivers for it. Thankfully, a game developer by the name of Julian Löhr created his own drivers to allow PC’s to recognize the Wii Remote. You can find his website here: https://www.julianloehr.de/
Depending on your system, you will need to either download the Windows 64-bit version or 32-bit version.
64-Bit Version:
https://www.julianloehr.de/hid-wiimote/gamepad/0.2…
32-Bit Version:
https://www.julianloehr.de/hid-wiimote/gamepad/0.2…
Note that both downloads will be in a zip file, so create a folder to hold the files.
If you have a 64-bit version of Windows and/or receive an error when trying to connect your Wii Remote, move on to the next step. Otherwise, the next step may be skipped.
Step 2: Disabling Driver Signature Enforcement
NOTE: This step can be skipped if you do not have Windows 64-bit or do not receive the driver signature error.
Because this driver was not made by Microsoft, your PC will not recognize it. In order to bypass this, we will need to disable driver signature enforcement.
1. In the Windows search bar, search «recovery» without the quotes and select «Recovery options».
2. Click «Restart Now» (NOTE: If you click this button, your PC WILL restart at that instant, so be sure to remember the next steps.)
3. After restarting, click the «Troubleshoot» button -> «Advanced Options» -> «Startup Settings».
4. Click «Restart» and when prompted press the key «7» to «Disable driver signature enforcement».
Now, your Windows will seem to start and run normally, the only difference now is that driver signature is disabled, meaning we can now use our drivers that we downloaded, until we restart our computer. We can now move on to the next step.
Things to note:
- A restart will cause your Windows to run normally again, so if you would like driver signatures to be enforced again, a restart will do the trick
- Every time you would like to connect your Wii Remote, you will have to do this whole process again. If you would like to disable driver signature enforcement permanently, you can do so by following the steps below.
For PERMANENT disabling of driver signatures, you do the following:
1. Open the Windows Command Prompt. (Search CMD in the bottom left Windows Search Bar)
2. Type the following:
Bcdedit.exe -set TESTSIGNING ON
3. Press enter and restart your computer.
Step 3: Connecting Your Wii Remote to Your PC
So, with the drivers all downloaded and your PC off of driver signature enforcement (for 64-bit only), now all we need to do is connect your Wii Remote to your PC!
1. Run the «TinyInstaller.exe» to install the actual driver. Note: Admin rights are needed to run this program.
2. Afterwards, check in your programs and features to see if the driver installed correctly. Check to see if the program shows up in the list as shown in the picture above. (Search «program and features» in the Windows search bar) Note: If you ever want to uninstall this driver, you can do so here.
3. Locate your Bluetooth settings (can be found by searching «Bluetooth» in the windows search bar)
4. Turn on your Bluetooth and keep this window open.
5. Turn your Wii Remote over and click the red sync button.
6. Look back onto the Bluetooth window and look for a device called «Nintendo RVL-CNT-01» to pair with. (Note: At first it may appear to be named as «Input device». After a few seconds, its name will change into Nintendo RVL-CNT-01.)
7. If prompted for a passcode, click next without typing any numbers, then cancel. The Wii Remote should connect afterwards.
8. Take a look at your Wii Remote. If the lights look similar to the picture above, then your Wii Remote is successfully paired! If it does not have lights and it says it is paired in the Bluetooth settings, remove the device from the Bluetooth setting and try connecting it again.
Step 4: Getting Your Wii Remote to Work As a Game Controller
Now that our Wii Remote is connected to our PC, lets use another program to map out the Wii Remote inputs as keyboard inputs so that it will work PC games.
1. Download the free version of JoyToKey:
http://download.cnet.com/JoyToKey/3000-2094_4-7522…
2. Download my Wii Remote profile here:
https://www.mediafire.com/?o6mw78i2f509ljz
3. After downloading my profile, place it in the same location as the JoyToKey program.
4. Open JoyToKey. You will see on the left column a profile called Wii Remote Game. If you do not, make sure that the .cfg file you downloaded from me is in the same location as the JoyToKey program, and reopen JoyToKey.
5. The profile I provided is a basic template for providing your own inputs. You can see on the right column I did the basic Up, Down, Left, Right arrows, corresponding to their respective arrows on the keyboard. The other buttons I left blank, for you to decide.
6. Lets say a game requires you to jump with the «Z» key, and we want to jump by pressing «1». Double click the row named Button1.
7. Make sure you are in the «Keyboard» tab, and click on the first «Disabled» rectangle you see. It should highlight yellow, meaning you can now do any input on your keyboard and it will map to whatever button you chose, in this case it was «1». Type Z, and you should see Z show up in the box.
8. Change the other buttons (1,2,+,-,A,B) to those that match your game settings.
9. After minimizing JoyToKey, the inputs should work. You can test this out by seeing if the inputs you put in are typed out in a notepad or web browser. (Note: The up, down, left, right arrows are inputted as if you are holding the Wii Remote horizontally, with the Dpad on the left side and 1,2 buttons on the right.)
Step 5: Using Your Wii Remote As a Mouse and Beyond
So we have our Wii Remote formatted to be used as a game controller. What if we wanted to use it as a mouse?
1. Download my Wii Remote Mouse Profile here:
http://www.mediafire.com/file/ucy4nuz3z4v8wsa/
2. Place it in the JoyToKey folder.
3. Run the JoyToKey program. (Note: If the program is already open and you move the file in the same folder, it will not update until you restart the program.)
4. On the left column, select the «Wii Remote Mouse». (Note: Left clicking the profile name will change between profiles after minimizing JoyToKey).
5. Minimize the JoyToKey program. You should be able to use the Wii Remote as a mouse now! Hold it like you would hold a TV remote, and use the DPad to move the mouse up and down, the A button to left click, B button to right click, and Minus button to Alt+Tab. This profile is very basic. You can add more to it and tweak it to your liking by changing the settings.
6. Open JoyToKey and double click on any of the functions that control the mouse movement.
7. From the top left, the slider determines left and right movement of the mouse. So sliding it to the left will make the mouse move left, and if you slide it far left the mouse will move far to the left when pressing the left Wii Remote button. Similarly, the vertical column determines up and down movement of the mouse. Below you can see mouse clicks, such as left click and right click. Any of these can be mapped to the Wii Remote. The rest of the settings are up to you to explore and experiment!
3 People Made This Project!
Recommendations
На чтение 2 мин Просмотров 42 Опубликовано 20.10.2021
Играйте в игры на ПК с помощью контроллеров Wii!
Если вам нравится пользоваться контроллерами Wii и вы хотите использовать их для игр на ПК или ноутбуке с Windows 10, то это можно легко сделать. Таким образом, вы сможете играть в игры на ПК с комфортом и без проводов, не используя клавиатуру или мышь.
Вы можете подключить к компьютеру два контроллера Wii, если играете с другом.
Для подключения контроллера Wii в Windows 10 вам понадобится Bluetooth. Если Bluetooth не встроен в компьютер, можно использовать адаптер Bluetooth.
Для подключения джой-конов Switch к ПК или ноутбуку с Windows 10:
1. Откройте меню Пуск Windows и введите Панель управления > Откройте Панель управления

2. Нажмите на Устройства и принтеры

3. Нажмите Добавить устройство > Нажмите вместе кнопки 1 и 2 на контроллере Wii (или снимите крышку батарейного отсека на задней панели контроллера и нажмите маленькую красную кнопку синхронизации)

4. На контроллере замигают индикаторы, и на экране появится сообщение Nintendo-RVL-CNT-01 > Нажмите кнопку next (индикаторы должны продолжать мигать, если они перестали мигать, нажмите кнопку синхронизации на контроллере еще раз)

5. У вас появится возможность ввести пароль, но оставьте его пустым и нажмите кнопку next

6. Ваш компьютер начнет установку контроллера, и контроллер должен замигать > Как толькоПосле установки вы должны увидеть Nintendo-RVL-CNT-01 в разделе «Устройства» (теперь вы можете сделать то же самое, чтобы добавить другой контроллер)

Посмотрите видеоурок «Как подключить контроллеры Switch Joy-Con к ПК или ноутбуку Windows 10», если вы застряли:
Посмотрите наши последние сообщения:
- Как удалить Messenger в Windows 10
- Back 4 Blood Улучшение производительности на ПК с Windows 10
- Установка последних драйверов NVIDIA в Windows 11
- Back 4 Blood FIX Connection & Sign In Issues On Windows 10 PC
- Back 4 Blood PC Fix Crashing & Errors Best 7 Methods Windows 10