Для настройки и управления удаленными серверами на базе Linux обычно используется протокол SSH. С помощью SSH на удаленный компьютер можно передавать данные и команды, которые будут выполняться так как бы они выполнялись на локальной машине.
В этой инструкции мы рассмотрим процесс подключения к SSH из Windows 10. Первый способ будет актуален для Windows 10 версии 1809 и выше, а второй можно использовать как на Windows 10, так и на Windows 7.
Подключение по SSH с помощью OpenSSH
Раньше для подключения к Linux серверу по SSH из Windows компьютера требовалась установка программы PuTTy или какого-то другого SSH-клиента. Но, в операционной системе Windows 10 (начиная с версии 1809) доступен клиент OpenSSH, с помощью которого можно подключаться к Linux серверам по SSH. Это позволяет работать с терминалом Linux прямо из командной строки Windows 10, при этом не требуется установка никаких сторонних программ.
Перед тем как использовать данный способ подключения необходимо проверить версию Windows 10. Для этого нажмите комбинацию клавиш Win-R и выполните команду «winver». Если на вашем компьютере установлена Windows 10 с версией 1809 или выше, то все нормально, в противном случае сначала нужно выполнить обновление.

Также нужно открыть меню «Параметры» и зайти в раздел «Приложения – Дополнительные возможности».

Здесь нужно пролистать список установленных дополнительных компонентов и найти в нем «Клиент OpenSSH». Если такой компонент присутствует, значит все нормально и можно переходить к следующему шагу. Если нет, то его нужно сначала установить с помощью меню «Добавить компонент».
Обратите внимание, не нужно путать «Клиент OpenSSH» и «Сервер OpenSSH». Для подключения по SSH вам нужен именно клиент.

Также клиент OpenSSH можно установить с помощью PowerShell. Для этого запустите консоль PowerShell с правами администратора и выполните следующую команду:
Add-WindowsCapability -Online -Name OpenSSH.Client~~~~0.0.1.0
Более подробно об установке и удалении клиента OpenSSH можно почитать в официальной документации Майкрософт.

Если версия Windows 10 подходящая и клиент OpenSSH установлен, то можно начинать подключение по SSH. Для этого запустите обычную командную строку Windows и введите команду «ssh». В ответ вы должны получить информацию о работе с данной командой.

В общем случае синтаксис команды «ssh» выглядит следующем образом:
ssh [email protected]
Где «user» — это имя пользователя на удаленном сервере, а «server» — это имя компьютера или его ip адрес.
Например, если наш сервер доступен по ip адресу «192.168.1.214», а имя пользователя это «aleks», то команда для подключения будет выглядеть так:
ssh [email protected]
После ввода данной команды появится запрос пароля и после этого мы получим доступ к удаленному серверу. Также при первом подключении с помощью ssh будет появляться запрос на добавление сервера в список известных.

По умолчанию для SSH используется порт 22. Для того чтобы это изменить нужно использовать параметр «-p». Например, для подключения по порту 2222 нужно выполнить вот такую команду.
ssh [email protected] -p 2222
Если подключение предполагает использование ключей, то они должны находиться в папке «C:Usersuser.ssh». А при подключении путь к приватному ключу нужно указать с помощью параметра «-i». Например, чтобы использовать ключ «C:Usersstepu.sshid_rsa» нужно выполнить:
ssh [email protected] -i C:Usersstepu.sshid_rsa
Более подробную информацию о команде «ssh» и ее параметрам можно получить на сайте man.openbsd.org/ssh или на opennet.ru (перевод).
Подключение по SSH через PuTTY
В тех случаях, когда версия Windows 10 не поддерживает OpenSSH (или используется Windows 7) к SSH можно подключаться с помощью программы PyTTY. Скачать установщик данной программы можно на официальном сайте www.putty.org.
После установки программы PyTTY ее можно будет запустить с помощью поиска в меню «Пуск»

Сразу после запуска программы PuTTY появляется окно с настройками подключения. Основными параметры здесь находятся на вкладке «Session», здесь нужно ввести:
- Имя компьютера или IP адрес;
- Порт для подключения (по умолчанию, 22);
- Способ подключения (SSH);
После ввода этих данных можно запускать подключение с помощью кнопки «Open».

Если для подключения к SSH используются ключи, то путь к приватному ключу нужно указать в разделе «Connection – SSH – Auth».
Обратите внимание, ключ должен быть сгенерирован программой PuTTYgen, которая устанавливается вместе с PuTTY. Если вы сгенерировали ключи с помощью OpenSSH, то их можно загрузить в PuTTYgen и сохранить в формате подходящем для PuTTy.

Если информация для подключения правильная, то вы увидите консоль с запросом на ввод имени пользователя пароля. Также при первом запуске появится запрос на добавление компьютера в список известных.

После ввода этих данных вы будете подключены к удаленному серверу по SSH.
Посмотрите также:
- Как удалить папку в Linux через терминал (консоль)
- Как открыть файл в терминале Linux
- Как создать файл в Linux через терминал
- Как скопировать файл в Linux через терминал
- Как удалить файл в Linux через терминал
Автор
Александр Степушин
Создатель сайта comp-security.net, автор более 2000 статей о ремонте компьютеров, работе с программами, настройке операционных систем.
Остались вопросы?
Задайте вопрос в комментариях под статьей или на странице
«Задать вопрос»
и вы обязательно получите ответ.
Learning how to use SSH to access your WordPress site is something you may not have considered. For most WordPress users, the most familiar way to connect to your site will be via the WordPress dashboard and admin screens, combined with SFTP and phpMyAdmin to access the database.
But SSH might just prove to be one of the most valuable tools in your WordPress toolbelt.
If you want to speed up your workflow, you’ll find that learning how to use SSH to connect to your WordPress site will make you more efficient.
In this post, we’ll show you how to do it.
What is SSH?
First, let’s start by identifying what SSH is and when you might use it.
SSH means ‘Secure Shell’. The SSH specs define it as:
“A protocol for secure remote login and other secure network services over an insecure network.”
This means you can use it to access your WordPress site remotely, from any computer and regardless of where your site is hosted, as long as you have the login credentials. Using this method is inherently secure.
SSH is designed to provide secure login, so you can be confident no one can access your connection while you are using it. It’s also quick and easy to use once you’ve got the hang of it. And if you want to interact with the WordPress REST API, it’s one way to send commands.
To connect to your server via SSH, you’ll need two things:
- An interface.
- Login credentials.
If you’re running Linux or macOS, you have an interface built into your operating system, so you don’t need to install an SSH client. But if you’re running Windows, you’ll need to install a client. I’ll show you how to do that in this post.
Tools You Need to Connect to Your Site via SSH
To start, you’ll need to use either the terminal or an SSH client. These work in very similar ways.
Connecting via the Terminal on macOS or Linux
The Terminal is an application that comes with Linux or macOS, that allows you to use the command line to send commands, either to your machine or to a remote server.
It isn’t a graphical interface so you won’t be using a mouse. Instead, you type in text commands. For a first-time user, it can be little disconcerting, as you’re probably used to seeing visual representations of your commands. But once you get used to it, you’ll find it quicker.
If you worked with computers in the days before graphical user interfaces, using systems such as Microsoft’s MS-DOS, you might be familiar with this kind of interface. The good news is that the Terminal gives you many more options than MS-DOS did!
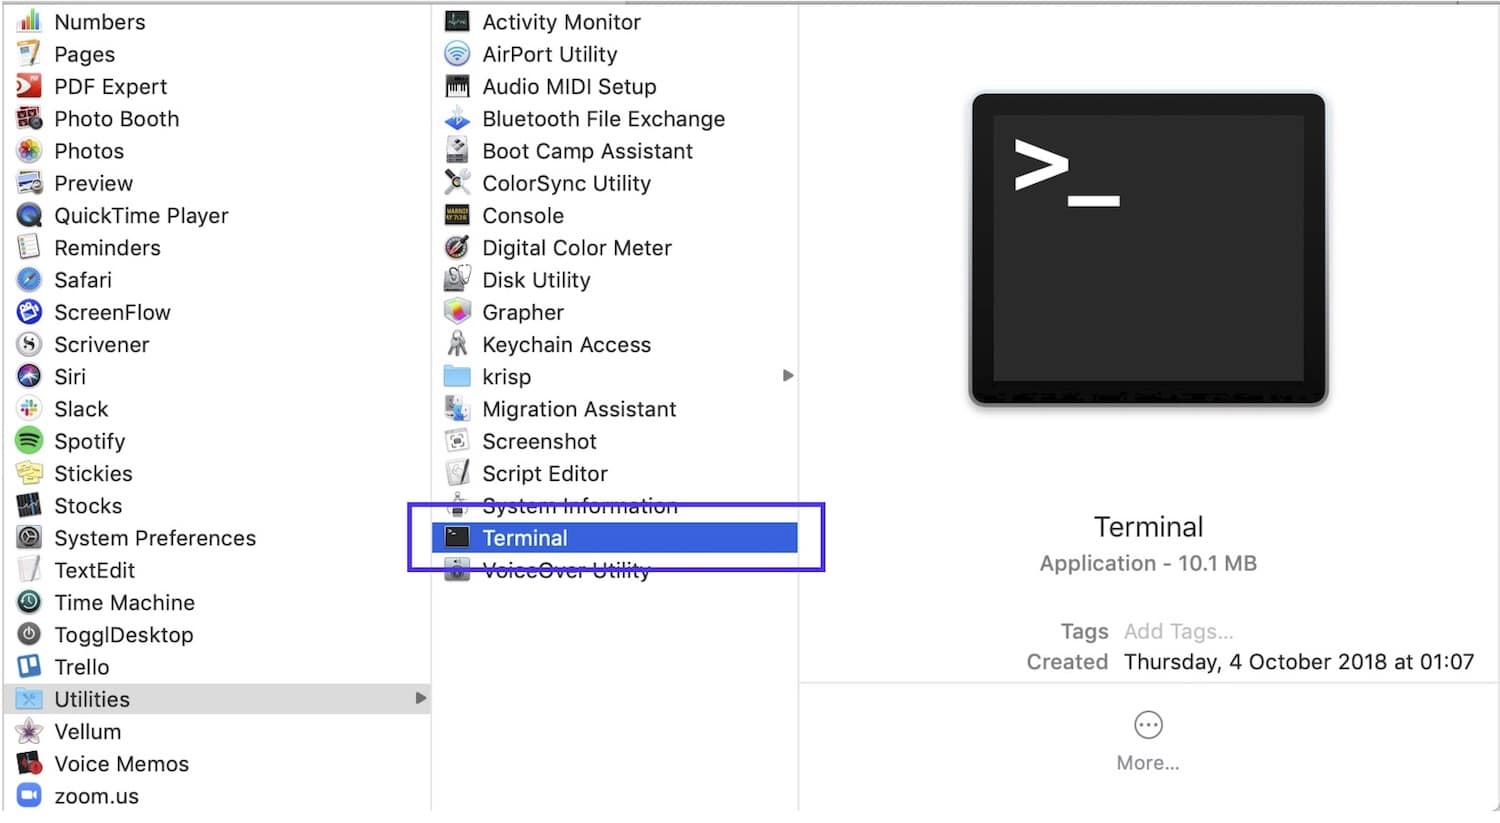
To open the Terminal on Mac, open Spotlight and type Terminal. You can also access it via Applications > Utilities.
To open Terminal on Linux, find it in the Applications menu. If it isn’t immediately obvious, type Terminal into the prompt to find it.
Connecting via an SSH Client on Windows
An SSH client is a program that you’ll need to install if you’re running Windows, in order to connect via SSH.
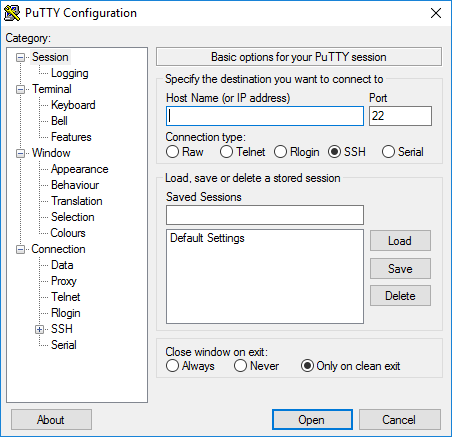
The most popular SSH client is PuTTY. You’ll need to download and install that before you can access your site from Windows.

Installing the Putty SSH Client on Windows
Start by going to the PuTTY download page.

From here, choose the package that corresponds to your version of Windows. If you aren’t sure whether to download the 32-bit or 64-bit version, check out the FAQ page. If in doubt, the 32-bit version is the safer option.
Click on one of the two options under MSI (‘Windows Installer’). The file will download to your machine and run the installer.
Once PuTTY has installed, open it and you can then use it to connect to your site.
How to Connect to Your Server via the Command Line
Once you’ve found or installed the Terminal or an SSH client, the next step is to connect to your remote site.
In either Terminal or an SSH client, you use the command line to connect and send commands to your server. That’s the terminology I’ll use from now on, instead of referring to Terminal or an SSH client.
To do this, you’ll need four pieces of information:
- Server address.
- Username.
- Password.
- Port.
The server address is usually your domain name or IP address. If your site is hosted with Kinsta, use your IP address.
The username and password will be your FTP username and password, not the ones for your WordPress admin.
The port will be provided by your hosting provider. In some cases, a default port is used, but for extra security at Kinsta, we use different ports for different sites.
In MyKinsta, you can find the details by selecting your site and finding the SFTP/SSH section of the Info screen.
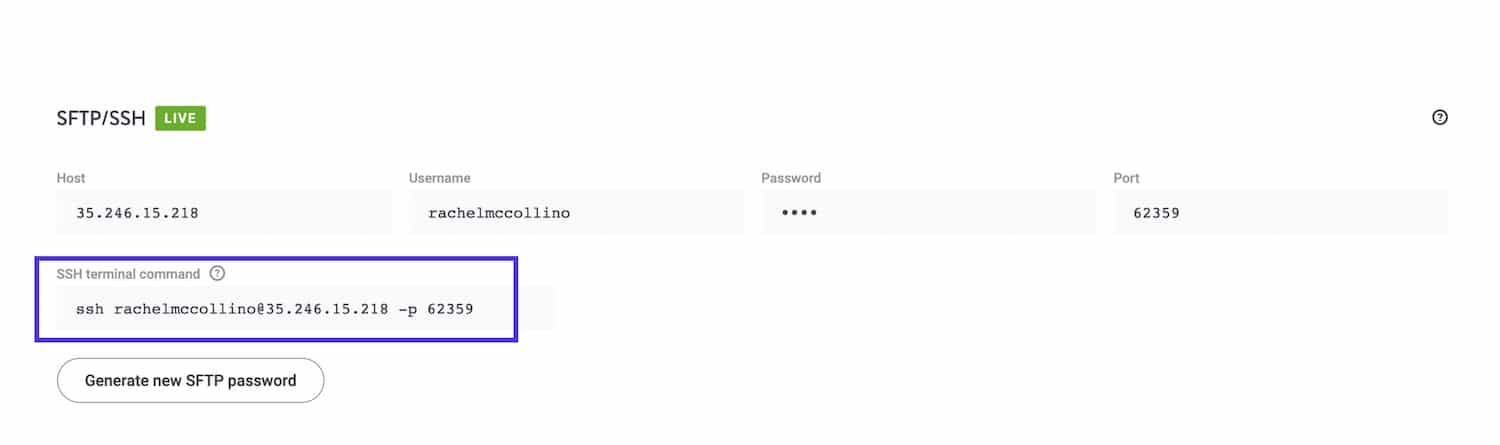
Just copy this and paste it into the command line.
Once you’ve done that, you will be prompted for your password. Copy that from MyKinsta and you’ll be given access to your server.
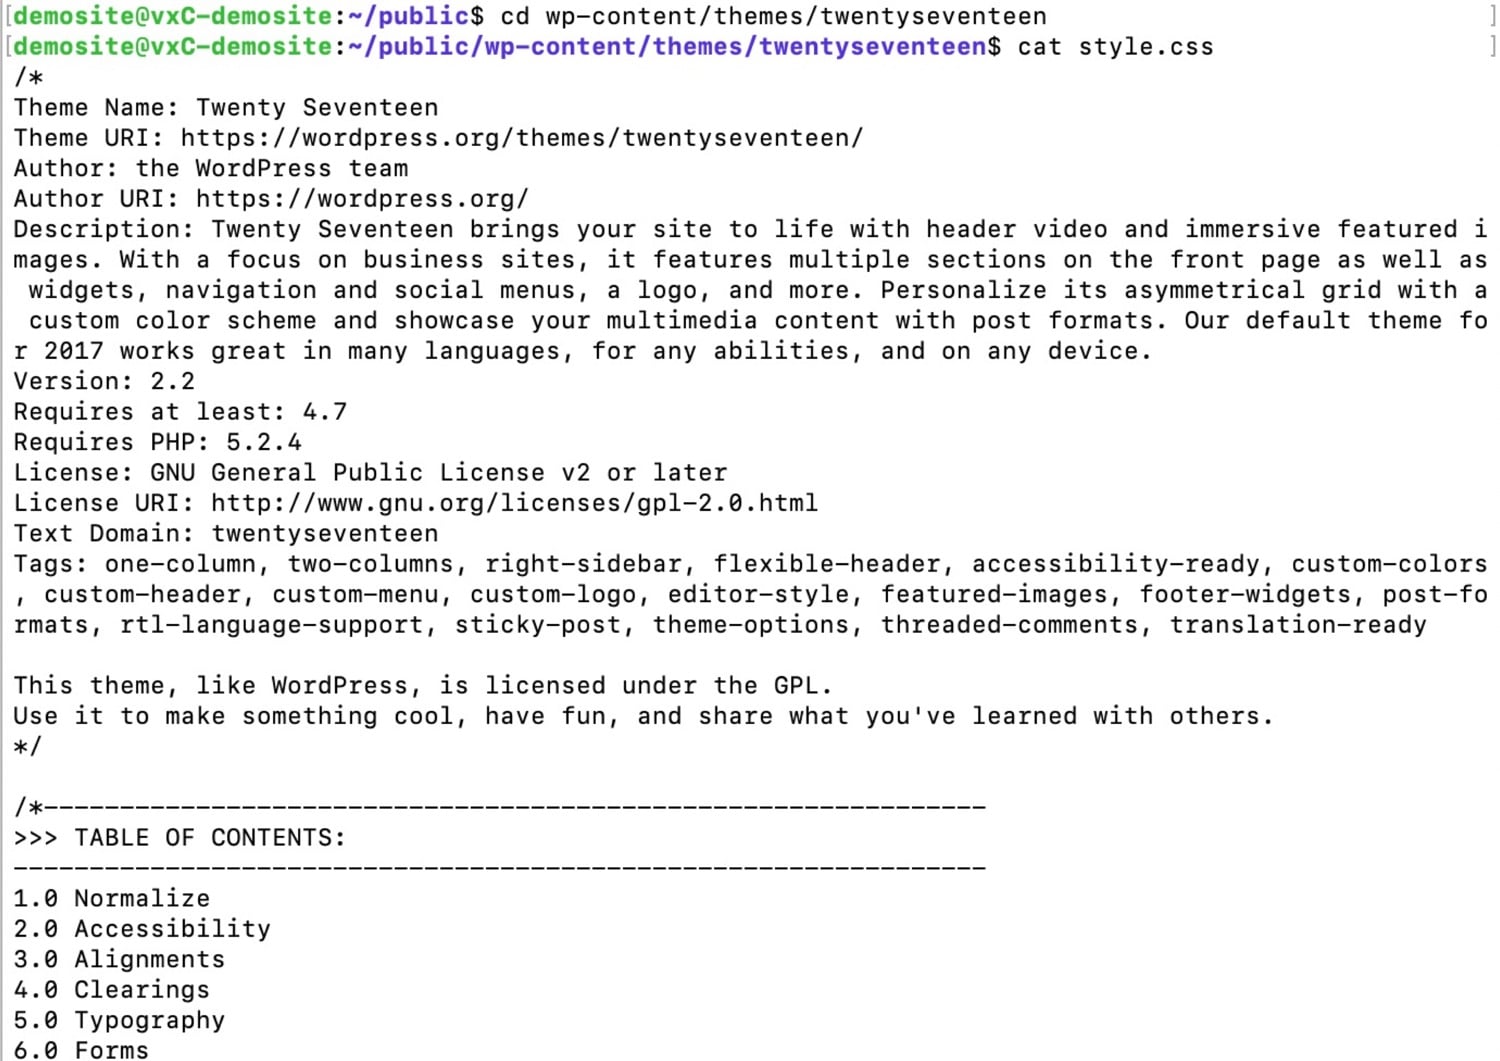
You’ll see a screen that looks something like this:
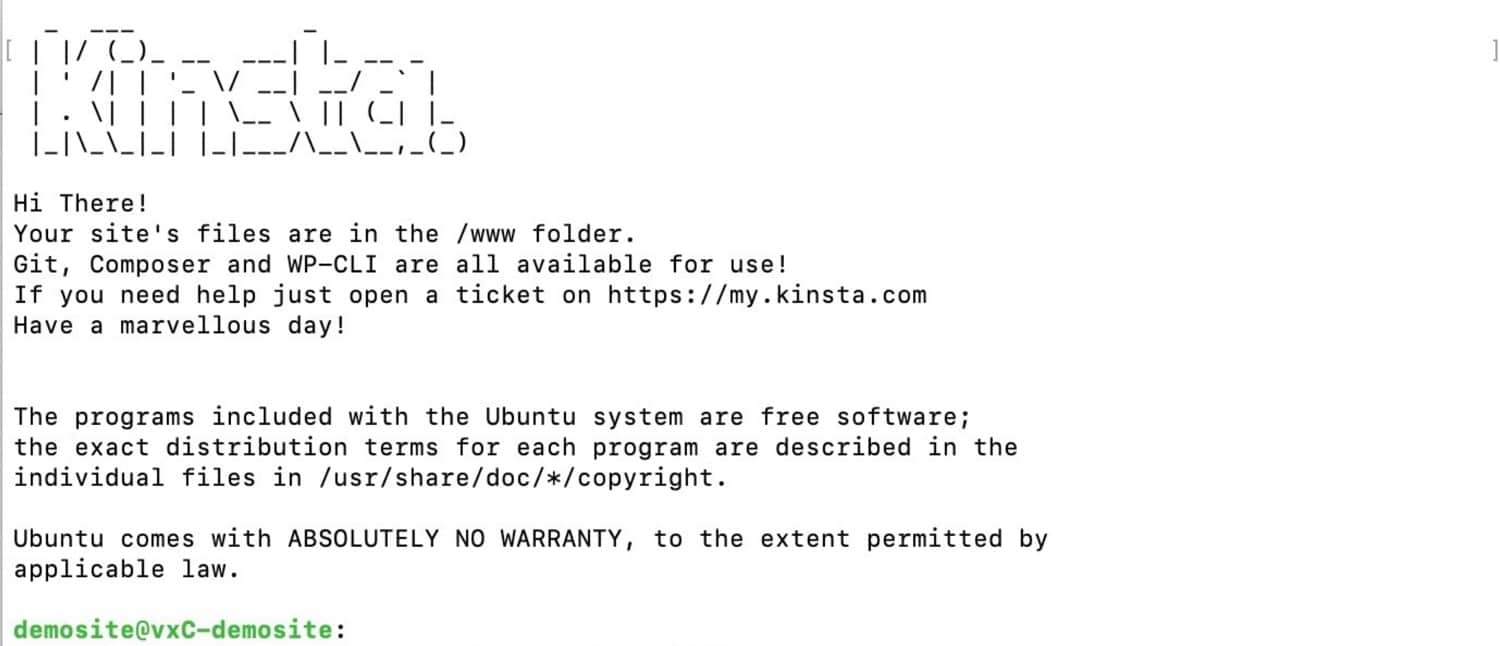
If you’re not with Kinsta hosting, your screen will look a little different, but will still give you access to your server.
How to Use SSH to Interact with Your Site
Now you can start using SSH to interact with your server and your site. There are a number of SSH commands you can use as well as the commands provided by the WordPress Command Line Interface (WP-CLI).
Basic SSH Commands
SSH comes with a range of commands you can use to connect and interact with your server.
Once you’ve looked into your server via the command line, you simply type in SSH commands in the same way you would do if you were using Terminal to interact with your own computer.
Let’s take a look at some of the most useful SSH commands you could start using.
- The ls Command
- The cd Command
- The mkdir Command
- The touch Command
- The cat Command
- The rm Command
- The cp Command
- The mv Command
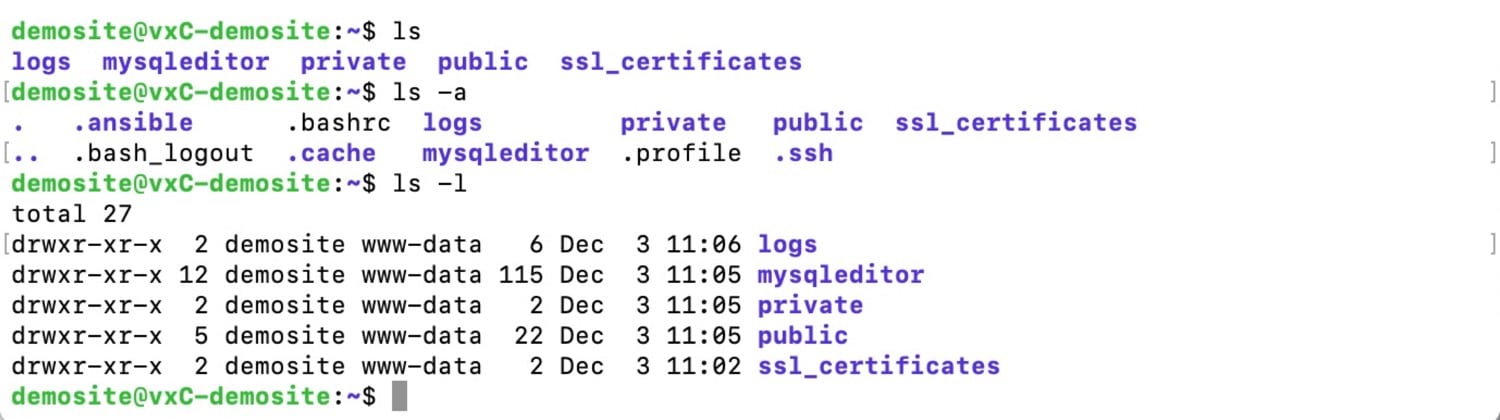
The ls Command
Use the ls command to get a list of the files and directories in your current location. You can add more to the command to get more information:
ls -ldisplays the details of the files, such as size, modified date and time, the owner, and the permissions.ls -ashows hidden files and directories.
The cd Command
Use the cd command to change directories. You’ll be taken to the new directory and the command line will indicate where you are:

You can then use ls again to find out what’s in the new directory.
You can use cd to move down more than one directory or to move up or across directories. To go up, enter two dots after cd like this:
cd ..And to go to a specific directory, type the full directory path such as:
cd public/wp-content/themesThe mkdir Command
Use the mkdir command to create a new directory. So if I’m in the themes directory, I could create a new directory for a new theme:
mkdir mythemeThe touch Command
Once I’ve created my new directory, I could add a new file to it using the touch command:
touch style.cssThe cat Command
To display the contents of a file, use the cat command.
The rm Command
Use the rm command to remove a file or folder. Use with caution, as this can’t be undone:
rm style.cssThe cp Command
The cp command is used to copy files and folders. You need to provide the name of the file or folder and the location where you want to copy it.
cp [options] [source] [destination]You can also add options at the beginning of the command, but don’t need to. So to copy the footer.php file from one theme to another when you’re in the wp-content directory, you would use this:
cp /themes/theme1/footer.php /themes/theme2/Don’t add a name for the destination file. If you do, and there’s already a file with that name at that destination, then the file will be overwritten with the contents of the file you’re copying.
If you don’t include a filename in the detonation and that file already exists, then you will get an error message and the copy won’t take place.
I’ve already mentioned that there are some optional elements you can add at the beginning of this command. These are:
-f: if you don’t have write permission for the destination file, it’ll be deleted and the command will create a new file.-u: copy the source file only if it is newer than the destination file.-n: will not overwrite an existing file.-a: archive the files.-R: for folders only, copy all the files and folders inside that folder.
The mv Command
As an alternative to copying a file, you can move it using the mv command. For this, you just provide the source and destination: there are no options.
mv /themes/theme1/footer.php /themes/theme2/This will remove the footer.php file from theme1 and move it to theme2. If you do this with a folder, it will always move the files and folders within that directory too.
You can find information about more SSH commands in the SSH documentation.
Using WP-CLI to Interact with Your Site
In addition to the standard SSH commands, WordPress also gives you the WP-CLI interface, which provides even more commands. This includes interacting with files and folders, the admin options, and your database.
With Kinsta, WP-CLI comes with your hosting and you can start using it straight away. If your hosting provider doesn’t give your WP-CLI, you can install it by following the steps in this guide to WP-CLI.
Testing and Troubleshooting Your SSH Connection
Sometimes you might find that SSH doesn’t behave in the way you want it to. Either you can’t connect, or the command you’ve used doesn’t work in the way you expect.
If that happens, try some of these troubleshooting tips.
If You Can’t Connect Through SSH
If you can’t connect to your server, take a look at any error messages or prompts that the command line gives you. Sometimes you’ll have to reply to a yes/no prompt or fix a typo in your command.
If that doesn’t work, check that the login credentials you provided are correct. You will be able to get these from the Info page for your site in MyKinsta. Other hosting providers will probably have an SSH section in cPanel or whichever dashboard they’re using.
If you’ve tried again and it still doesn’t work, try resetting your SSH password. Check that your internet connection is working and there isn’t a firewall preventing you from accessing your server. If in doubt, close Terminal or your SSH client down and open it up again.
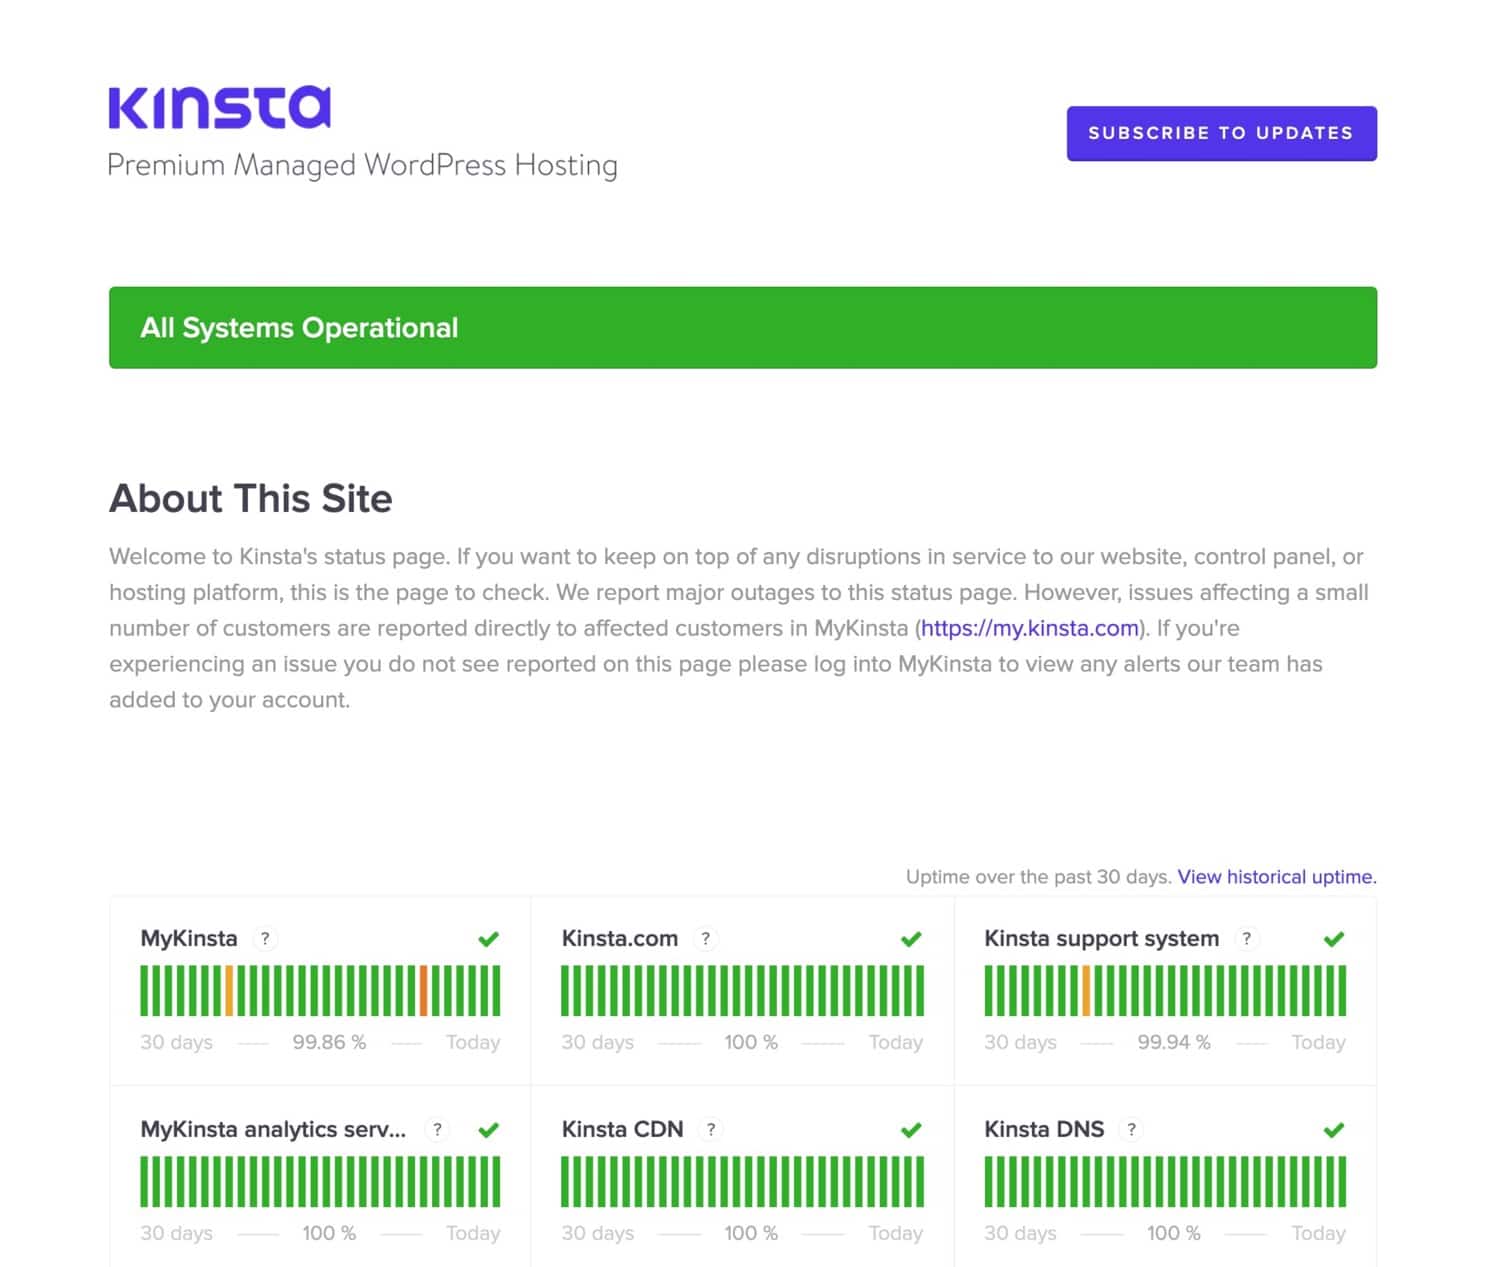
Log in to your hosting account and check that there aren’t any server issues preventing you from gaining access. If you’re with Kinsta, go to our system status page to find out if anything isn’t working.
If you’re on a public network, it may not allow SSH access to your port. Try testing it with other ports that you know are working.
If all else fails, open a support ticket with your hosting provider who will be able to access logs and work out why you haven’t been able to connect.
If Your SSH Commands Don’t Work as They Should
Another common problem is for an SSH command not to work in the way you expect it to. This is normally due to the command being entered incorrectly.
Here’s an example where I typed is instead of ls :

Here, I’m presented with an error warning (command not found) so I try again, with the correct command.
Sometimes you might type the command correctly but get the parameters wrong. If this is the case, check the SSH documentation for SSH commands and the WP-CLI documentation for WP-CLI commands.
If your SSH commands don’t work because the connection isn’t working, you will see an error message telling you this. The command line constantly provides you with information on what’s going on, which is one of its benefits. In fact, it often gives you more and clearer information that a graphical interface.
How to Generate a New SSH Key Pair for Extra Security
Generating an SSH key pair adds an extra layer of security when compared to using your username and password to connect to SSH. You do it from within the Terminal or your SSH client. Here’s how.
Generating a key pair involves three steps:
- Generate the key pair in Terminal or in your SSH client.
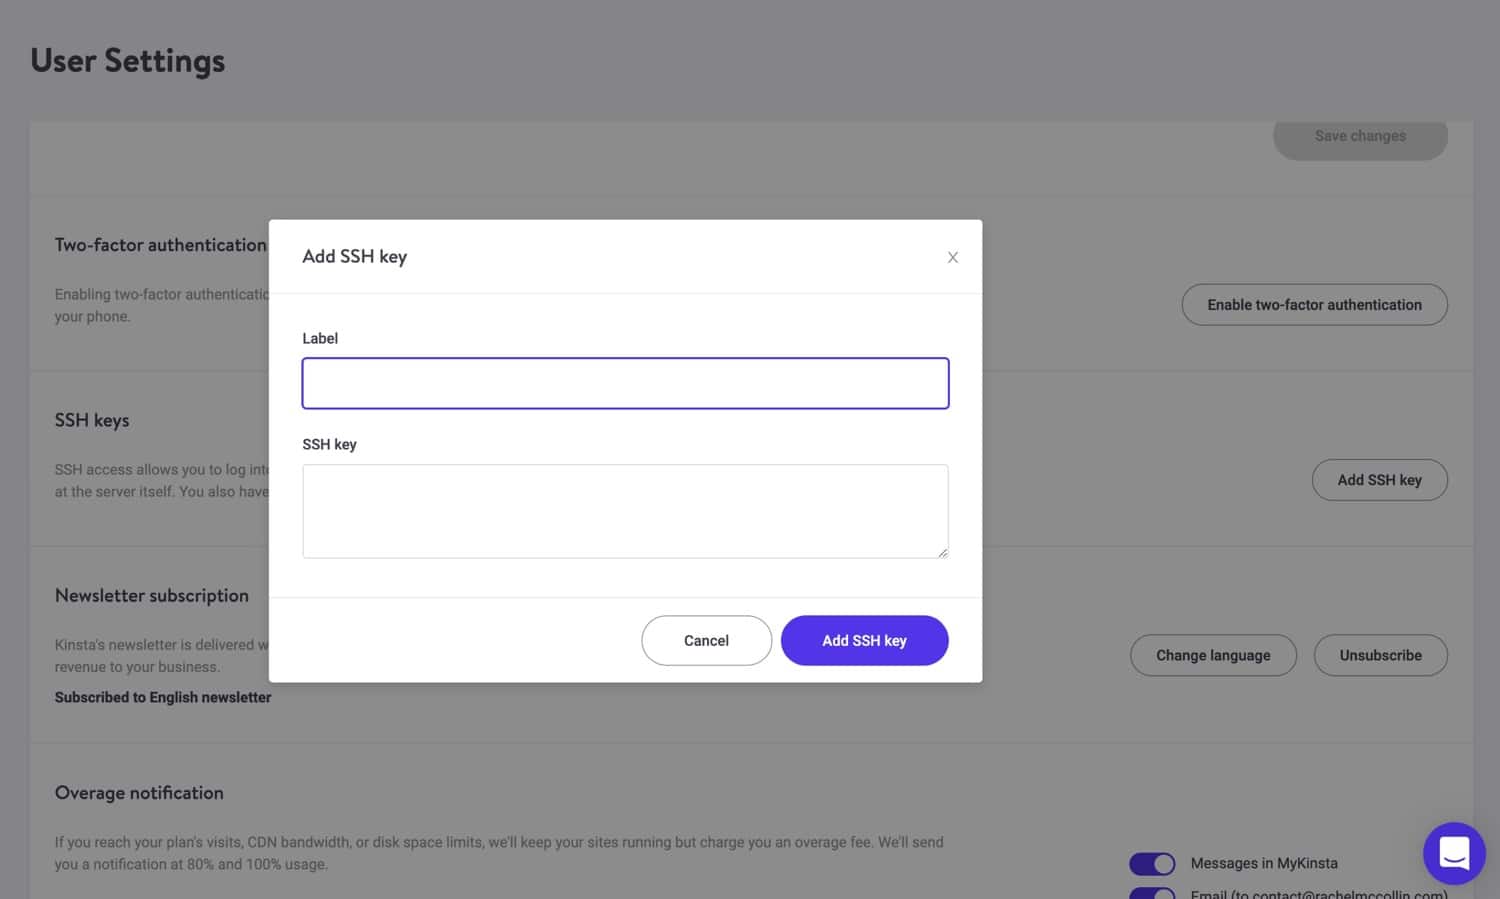
- Add the key pair to your hosting account – in MyKinsta you do this via the User Settings screens.
- Connect to your server in Terminal or your SSH client using the key pair.
You can find full instructions on doing this in our guide to generating SSH key pairs for macOS, Linux, and Windows.
Want to be a more efficient developer? Learn how to connect to your site using SSH! 🔛🔐Click to Tweet
Summary
Using SSH to connect to your server and your WordPress site will make you more efficient than relying on the WordPress admin interface, FTP, and even phpMyAdmin.
Follow the steps above to connect to your server via SSH and you’ll find you can do more on your site without having to switch between applications or browser windows.
Now it’s your turn: what’s your preferred terminal command you use on a daily basis? Let us know in the comments!
Get all your applications, databases and WordPress sites online and under one roof. Our feature-packed, high-performance cloud platform includes:
- Easy setup and management in the MyKinsta dashboard
- 24/7 expert support
- The best Google Cloud Platform hardware and network, powered by Kubernetes for maximum scalability
- An enterprise-level Cloudflare integration for speed and security
- Global audience reach with up to 35 data centers and 275+ PoPs worldwide
Test it yourself with $20 off your first month of Application Hosting or Database Hosting. Explore our plans or talk to sales to find your best fit.
Learning how to use SSH to access your WordPress site is something you may not have considered. For most WordPress users, the most familiar way to connect to your site will be via the WordPress dashboard and admin screens, combined with SFTP and phpMyAdmin to access the database.
But SSH might just prove to be one of the most valuable tools in your WordPress toolbelt.
If you want to speed up your workflow, you’ll find that learning how to use SSH to connect to your WordPress site will make you more efficient.
In this post, we’ll show you how to do it.
What is SSH?
First, let’s start by identifying what SSH is and when you might use it.
SSH means ‘Secure Shell’. The SSH specs define it as:
“A protocol for secure remote login and other secure network services over an insecure network.”
This means you can use it to access your WordPress site remotely, from any computer and regardless of where your site is hosted, as long as you have the login credentials. Using this method is inherently secure.
SSH is designed to provide secure login, so you can be confident no one can access your connection while you are using it. It’s also quick and easy to use once you’ve got the hang of it. And if you want to interact with the WordPress REST API, it’s one way to send commands.
To connect to your server via SSH, you’ll need two things:
- An interface.
- Login credentials.
If you’re running Linux or macOS, you have an interface built into your operating system, so you don’t need to install an SSH client. But if you’re running Windows, you’ll need to install a client. I’ll show you how to do that in this post.
Tools You Need to Connect to Your Site via SSH
To start, you’ll need to use either the terminal or an SSH client. These work in very similar ways.
Connecting via the Terminal on macOS or Linux
The Terminal is an application that comes with Linux or macOS, that allows you to use the command line to send commands, either to your machine or to a remote server.
It isn’t a graphical interface so you won’t be using a mouse. Instead, you type in text commands. For a first-time user, it can be little disconcerting, as you’re probably used to seeing visual representations of your commands. But once you get used to it, you’ll find it quicker.
If you worked with computers in the days before graphical user interfaces, using systems such as Microsoft’s MS-DOS, you might be familiar with this kind of interface. The good news is that the Terminal gives you many more options than MS-DOS did!
To open the Terminal on Mac, open Spotlight and type Terminal. You can also access it via Applications > Utilities.
To open Terminal on Linux, find it in the Applications menu. If it isn’t immediately obvious, type Terminal into the prompt to find it.
Connecting via an SSH Client on Windows
An SSH client is a program that you’ll need to install if you’re running Windows, in order to connect via SSH.
The most popular SSH client is PuTTY. You’ll need to download and install that before you can access your site from Windows.
Installing the Putty SSH Client on Windows
Start by going to the PuTTY download page.
From here, choose the package that corresponds to your version of Windows. If you aren’t sure whether to download the 32-bit or 64-bit version, check out the FAQ page. If in doubt, the 32-bit version is the safer option.
Click on one of the two options under MSI (‘Windows Installer’). The file will download to your machine and run the installer.
Once PuTTY has installed, open it and you can then use it to connect to your site.
How to Connect to Your Server via the Command Line
Once you’ve found or installed the Terminal or an SSH client, the next step is to connect to your remote site.
In either Terminal or an SSH client, you use the command line to connect and send commands to your server. That’s the terminology I’ll use from now on, instead of referring to Terminal or an SSH client.
To do this, you’ll need four pieces of information:
- Server address.
- Username.
- Password.
- Port.
The server address is usually your domain name or IP address. If your site is hosted with Kinsta, use your IP address.
The username and password will be your FTP username and password, not the ones for your WordPress admin.
The port will be provided by your hosting provider. In some cases, a default port is used, but for extra security at Kinsta, we use different ports for different sites.
In MyKinsta, you can find the details by selecting your site and finding the SFTP/SSH section of the Info screen.
Just copy this and paste it into the command line.
Once you’ve done that, you will be prompted for your password. Copy that from MyKinsta and you’ll be given access to your server.
You’ll see a screen that looks something like this:
If you’re not with Kinsta hosting, your screen will look a little different, but will still give you access to your server.
How to Use SSH to Interact with Your Site
Now you can start using SSH to interact with your server and your site. There are a number of SSH commands you can use as well as the commands provided by the WordPress Command Line Interface (WP-CLI).
Basic SSH Commands
SSH comes with a range of commands you can use to connect and interact with your server.
Once you’ve looked into your server via the command line, you simply type in SSH commands in the same way you would do if you were using Terminal to interact with your own computer.
Let’s take a look at some of the most useful SSH commands you could start using.
- The ls Command
- The cd Command
- The mkdir Command
- The touch Command
- The cat Command
- The rm Command
- The cp Command
- The mv Command
The ls Command
Use the ls command to get a list of the files and directories in your current location. You can add more to the command to get more information:
ls -ldisplays the details of the files, such as size, modified date and time, the owner, and the permissions.ls -ashows hidden files and directories.
The cd Command
Use the cd command to change directories. You’ll be taken to the new directory and the command line will indicate where you are:
You can then use ls again to find out what’s in the new directory.
You can use cd to move down more than one directory or to move up or across directories. To go up, enter two dots after cd like this:
cd ..And to go to a specific directory, type the full directory path such as:
cd public/wp-content/themesThe mkdir Command
Use the mkdir command to create a new directory. So if I’m in the themes directory, I could create a new directory for a new theme:
mkdir mythemeThe touch Command
Once I’ve created my new directory, I could add a new file to it using the touch command:
touch style.cssThe cat Command
To display the contents of a file, use the cat command.
The rm Command
Use the rm command to remove a file or folder. Use with caution, as this can’t be undone:
rm style.cssThe cp Command
The cp command is used to copy files and folders. You need to provide the name of the file or folder and the location where you want to copy it.
cp [options] [source] [destination]You can also add options at the beginning of the command, but don’t need to. So to copy the footer.php file from one theme to another when you’re in the wp-content directory, you would use this:
cp /themes/theme1/footer.php /themes/theme2/Don’t add a name for the destination file. If you do, and there’s already a file with that name at that destination, then the file will be overwritten with the contents of the file you’re copying.
If you don’t include a filename in the detonation and that file already exists, then you will get an error message and the copy won’t take place.
I’ve already mentioned that there are some optional elements you can add at the beginning of this command. These are:
-f: if you don’t have write permission for the destination file, it’ll be deleted and the command will create a new file.-u: copy the source file only if it is newer than the destination file.-n: will not overwrite an existing file.-a: archive the files.-R: for folders only, copy all the files and folders inside that folder.
The mv Command
As an alternative to copying a file, you can move it using the mv command. For this, you just provide the source and destination: there are no options.
mv /themes/theme1/footer.php /themes/theme2/This will remove the footer.php file from theme1 and move it to theme2. If you do this with a folder, it will always move the files and folders within that directory too.
You can find information about more SSH commands in the SSH documentation.
Using WP-CLI to Interact with Your Site
In addition to the standard SSH commands, WordPress also gives you the WP-CLI interface, which provides even more commands. This includes interacting with files and folders, the admin options, and your database.
With Kinsta, WP-CLI comes with your hosting and you can start using it straight away. If your hosting provider doesn’t give your WP-CLI, you can install it by following the steps in this guide to WP-CLI.
Testing and Troubleshooting Your SSH Connection
Sometimes you might find that SSH doesn’t behave in the way you want it to. Either you can’t connect, or the command you’ve used doesn’t work in the way you expect.
If that happens, try some of these troubleshooting tips.
If You Can’t Connect Through SSH
If you can’t connect to your server, take a look at any error messages or prompts that the command line gives you. Sometimes you’ll have to reply to a yes/no prompt or fix a typo in your command.
If that doesn’t work, check that the login credentials you provided are correct. You will be able to get these from the Info page for your site in MyKinsta. Other hosting providers will probably have an SSH section in cPanel or whichever dashboard they’re using.
If you’ve tried again and it still doesn’t work, try resetting your SSH password. Check that your internet connection is working and there isn’t a firewall preventing you from accessing your server. If in doubt, close Terminal or your SSH client down and open it up again.
Log in to your hosting account and check that there aren’t any server issues preventing you from gaining access. If you’re with Kinsta, go to our system status page to find out if anything isn’t working.
If you’re on a public network, it may not allow SSH access to your port. Try testing it with other ports that you know are working.
If all else fails, open a support ticket with your hosting provider who will be able to access logs and work out why you haven’t been able to connect.
If Your SSH Commands Don’t Work as They Should
Another common problem is for an SSH command not to work in the way you expect it to. This is normally due to the command being entered incorrectly.
Here’s an example where I typed is instead of ls :
Here, I’m presented with an error warning (command not found) so I try again, with the correct command.
Sometimes you might type the command correctly but get the parameters wrong. If this is the case, check the SSH documentation for SSH commands and the WP-CLI documentation for WP-CLI commands.
If your SSH commands don’t work because the connection isn’t working, you will see an error message telling you this. The command line constantly provides you with information on what’s going on, which is one of its benefits. In fact, it often gives you more and clearer information that a graphical interface.
How to Generate a New SSH Key Pair for Extra Security
Generating an SSH key pair adds an extra layer of security when compared to using your username and password to connect to SSH. You do it from within the Terminal or your SSH client. Here’s how.
Generating a key pair involves three steps:
- Generate the key pair in Terminal or in your SSH client.
- Add the key pair to your hosting account – in MyKinsta you do this via the User Settings screens.
- Connect to your server in Terminal or your SSH client using the key pair.
You can find full instructions on doing this in our guide to generating SSH key pairs for macOS, Linux, and Windows.
Want to be a more efficient developer? Learn how to connect to your site using SSH! 🔛🔐Click to Tweet
Summary
Using SSH to connect to your server and your WordPress site will make you more efficient than relying on the WordPress admin interface, FTP, and even phpMyAdmin.
Follow the steps above to connect to your server via SSH and you’ll find you can do more on your site without having to switch between applications or browser windows.
Now it’s your turn: what’s your preferred terminal command you use on a daily basis? Let us know in the comments!
Get all your applications, databases and WordPress sites online and under one roof. Our feature-packed, high-performance cloud platform includes:
- Easy setup and management in the MyKinsta dashboard
- 24/7 expert support
- The best Google Cloud Platform hardware and network, powered by Kubernetes for maximum scalability
- An enterprise-level Cloudflare integration for speed and security
- Global audience reach with up to 35 data centers and 275+ PoPs worldwide
Test it yourself with $20 off your first month of Application Hosting or Database Hosting. Explore our plans or talk to sales to find your best fit.
SSH-протокол (англ. Secure Shell ) используется для безопасного удалённого управления операционной системой. По SSH можно подключиться к любому серверу с операционной системой семейства Linux.
Если на вашем сервере установлена ОС Windows Server — используйте подключение по RDP.
- Где найти доступы к серверу
- Как подключиться к серверу по SSH с компьютера на ОС Windows
- Как подключиться к серверу по SSH с компьютера на Linux/MacOS
Где найти доступы к серверу
Для подключения по SSH потребуется указать IP-адрес, пароль и логин администратора сервера. Эти данные можно найти на почте, привязанной к аккаунту (после активации VDS приходит письмо с инструкцией) или в Личном кабинете — в разделе «Товары» откройте подраздел «Виртуальные серверы» — выберите сервер в списке, сверху «Инструкция».

В новой вкладке откроется страница с необходимой информацией.

Как подключиться по SSH с компьютера на ОС Windows
Если на вашем компьютере установлена ОС Windows, а на сервере — UNIX-подобная система (например, Ubuntu, Debian, CentOS и др.), то для установки SSH-соединения можно использовать PuTTY. Это бесплатная программа под Windows состоит из одного запускаемого файла и не требует установки.
Чтобы установить соединение при помощи PuTTY, необходимо проделать следующие действия:
0. Скачайте нужную версию PuTTY по ссылке.
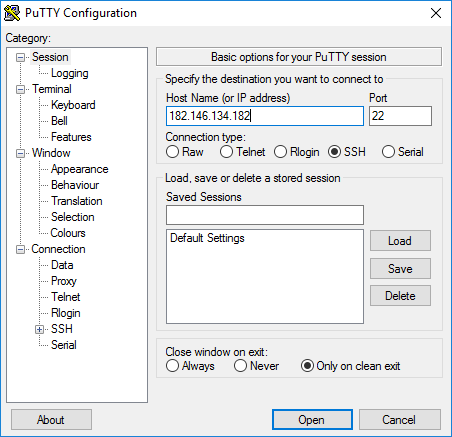
1. Запустите файл putty.exe. Откроется окно программы:
По умолчанию никаких настроек программы менять не нужно. Достаточно убедиться, что указан порт Port 22 и тип соединения Connection type — SSH.
2. В поле Host Name (or IP address) введите IP-адрес сервера. Нажмите кнопку Open.
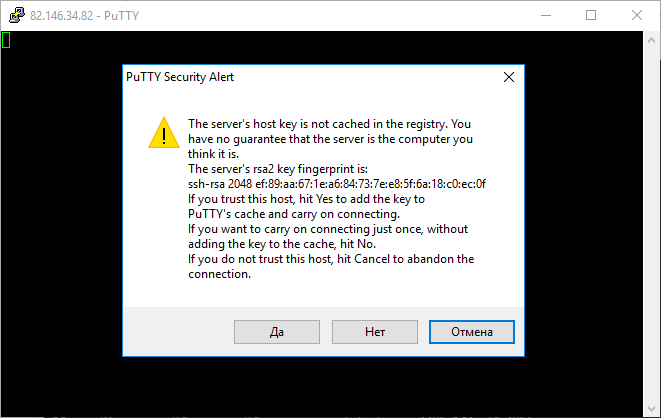
Может появиться предупреждение системы безопасности PuTTY — оно срабатывает при подключении к новому серверу. Нажмите Да — и соединение продолжится.
3. В появившейся командной строке введите имя пользователя, под которым будет выполнен вход на сервер. Для первого подключения к серверу или подключения в режиме администратора используется логин root.
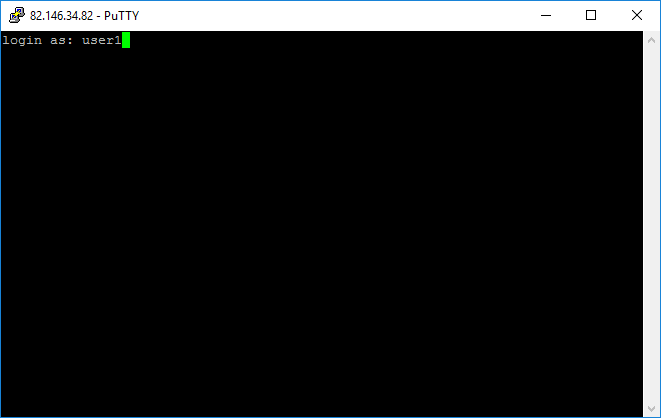
4. В следующей строке введите пароль пользователя. При вводе пароля символы в командной строке не отображаются: можно набрать пароль вслепую или вставить кликом правой кнопки мыши, предварительно скопировав (Ctrl+C) его из инструкции. После ввода нажмите клавишу Enter. Если имя пользователя или пароль указаны неправильно, выведется ошибка «Access denied». В случае успешного подключения откроется командная строка виртуального сервера.
Как подключиться к серверу по SSH с компьютера на Linux/MacOS
Подключиться по SSH к виртуальному серверу можно через терминал — в обоих случаях это приложение предустановлено.
В операционных системах семейства Linux (Ubuntu и др.) его можно открыть сочетанием клавиш Ctrl+Alt+T.
В MacOS приложение Терминал можно найти через Spotlight (иконка поиска в правом верхнем углу экрана).
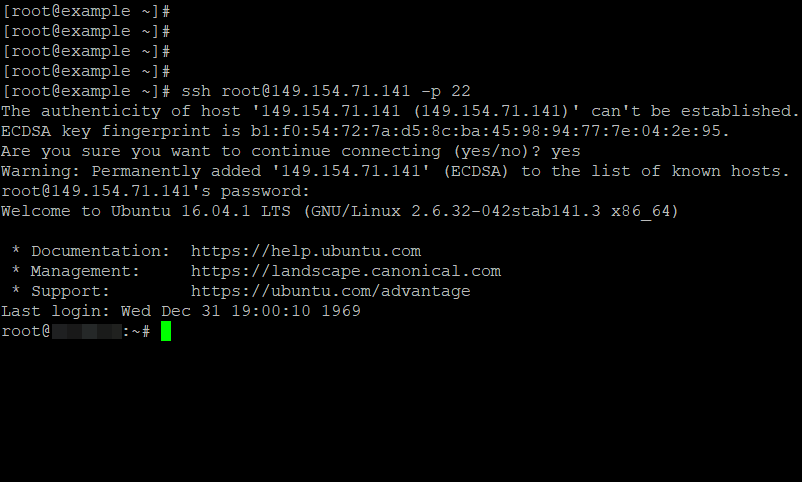
Подключиться к виртуальному серверу по SSH можно одной командой:
ssh username@ip_adress
где вместо username нужно указать логин пользователя, вместо ip-adress — IP-адрес сервера, к которому вы подключаетесь. Если на сервере используется нестандартный порт SSH, команда изменится:
ssh username@ip_adress -p 22
где 22 — порт, по которому будет произведено подключение по SSH.
После ввода команды система запросит подтверждение подключения (необходимо ввести yes и нажать Enter) и пароль пользователя. После ввода нажмите клавишу Enter — откроется SSH-соединение:
Этот материал был полезен?
В этой статье мы расскажем про SSH: что это такое, как подключиться к серверу по SSH, как создать папку и архив, а также как по SSH изменить права на файлы и папки.
SSH – это протокол передачи данных, позволяющий производить безопасное и защищённое управление операционной системой и данными.
Подключение по SSH возможно на всех тарифных планах виртуального хостинга, кроме тарифа «Host-Lite». Если у вас заказан тарифный план «Host-Lite», повысьте тариф, и у вас появится возможность соединения по SSH Как повысить тарифный план хостинга.
Как подключиться к Windows-серверу по SSH
Если у вас заказан Windows хостинг или Windows VPS, то подключение по SSH невозможно. Управление услугой хостинга происходит через панель управления, а к Windows VPS можно подключиться с помощью RDP.
Как подключиться к серверу по SSH
В зависимости от операционной системы, установленной на вашем домашнем компьютере (не путайте с ОС хостинга), для SSH подключения к серверу Linux-хостинга возможны следующие варианты:
- если на вашем компьютере установлена ОС Windows, то подключение происходит через Putty,
- для ОС Linux и macOS на компьютере доступно подключение к SSH через терминал.
Для подключения по SSH в ОС Windows мы рекомендуем использовать SSH-клиент PuTTy.
Скачать клиент можно на официальном сайте (англоязычная версия).
Подключение по SSH Windows:
-
1.
Запустите программу PuTTY.
-
2.
На странице с основными настройками сеанса PuTTY, в поле «Host Name» введите IP-адрес сервера.
Как узнать IP-адрес сервераIP-адрес сервера указан в информационном письме, отправленном на контактный e-mail после заказа хостинга. Также данная информация продублирована в Личном кабинете. Авторизуйтесь на сайте REG.RU и кликните по нужной услуге хостинга. IP-сервера указан на вкладке «Доступы»:
Если вы уже делегировали домен на сервер, вместо IP-адреса можно указать домен. Также в качестве хоста можно использовать технологический домен.
-
3.
При первом подключении к серверу появится окно «Предупреждение безопасности PuTTY». Нажмите Да:
-
4.
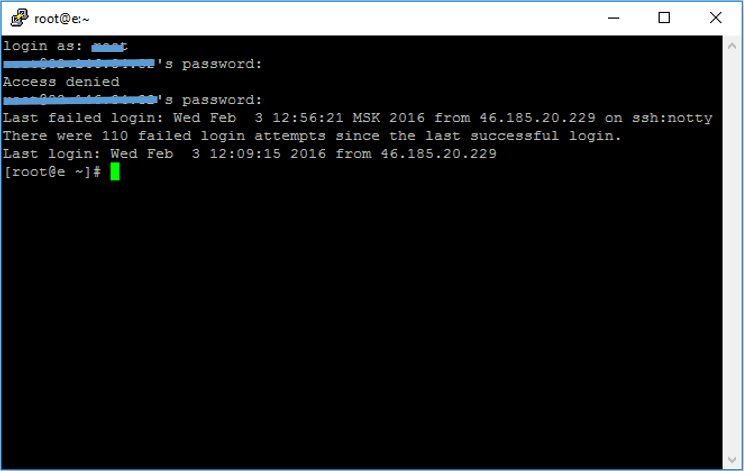
В открывшемся окне PuTTY введите ваш логин услуги хостинга вида «u1234567». Нажмите Enter. Затем введите ваш пароль от услуги хостинга и нажмите Enter. В целях безопасности вводимый пароль не отображается на экране в виде символов. Набирая пароль, вы не увидите на экране ни самого пароля, ни звёздочек.
Чтобы вставить скопированный логин и пароль в окно PuTTy, нажмите Shift + Insert.
Как узнать логин и пароль услуги хостингаЛогин и пароль услуги хостинга указаны в информационном письме, отправленном на контактный e-mail после заказа хостинга. Также данная информация продублирована в Личном кабинете. Авторизуйтесь на сайте REG.RU и кликните по нужной услуге хостинга. Логин и пароль указаны на вкладке «Доступы»:
Важно: если вы несколько раз подряд ввели неправильный пароль и сервер заблокировал соединение по SSH (если PuTTY не подключается по SSH), обратитесь в техническую поддержку или подождите 2 часа. По истечении этого времени блокировка снимается автоматически.
Готово, как только вы подключитесь по SSH, вы окажетесь в домашнем каталоге вашего хостинга. Консольные команды Linux представлены по ссылке. Обратите внимание: многие из этих команд выполнить на виртуальном хостинге не получится (установка и удаление пакетов, монтирование файловых систем и др.), так как у вас нет root-доступа.
Для ОС Linux доступ по SSH осуществляется через терминал, который уже предустановлен в самой системе.
-
1.
Запустите терминал:
- в Unity (Ubuntu): «Главное меню» — в поисковой строке введите слово «Терминал». Либо просто нажмите комбинацию клавиш: Ctrl+Alt+T,
- в Xfce (Xubuntu): «Главное меню» — «Приложения» — «Система» — «Терминал»,
- в KDE (Kubuntu): «Главное меню» — «Приложения» — «Система» — «Терминал».
-
2.
Введите команду:
ssh u1234567@123.123.123.123
Где:
- u1234567 — логин учётной записи хостинга (Как узнать логин и пароль услуги хостинга?,
- 123.123.123.123 — IP-адрес сервера (Как узнать IP-адрес сервера?).
-
3.
Нажмите Enter, введите пароль услуги хостинга.
Готово, вы успешно завершили SSH-подключение через терминал.
-
1.
Запустите терминал. Для этого нажмите Cmd + Пробел, введите в поисковой строке Терминал и нажмите Enter.
-
2.
Введите команду:
ssh логин@123.123.123.123
Где:
- логин ― логин учетной записи хостинга,
- 123.123.123.123 ― IP-адрес сервера.
Нажмите Enter.
-
3.
Если подключение к устройству происходит впервые, то появится предупреждение о том, что ключ сервера не кешируется в реестре. Введите Yes и нажмите Enter:
-
4.
Введите пароль учетной записи.
Обратите внимание, в целях безопасности пароль, который вы вводите, не отображается на экране ни в виде самого пароля, ни в виде звёздочек:
Готово, вы подключились к виртуальному серверу по SSH. Чтобы сбросить подключение, введите команду exit или закройте терминал.
Можно ли создать дополнительного SSH-пользователя
На Hosting Linux подключение по SSH возможно только под основным логином хостинга (вида u1234567). Создать дополнительного пользователя SSH нельзя.
Как отключить доступ по SSH
Чтобы отключить SSH-доступ на хостинге, напишите заявку в службу поддержки. В заявке сообщите ваш логин хостинга (вида u1234567), для которого необходимо отключить доступ по SSH.
Как создать архив по SSH
Создание архива tar.gz
Подключитесь к серверу по SSH и выполните команду:
tar -czvf name.tar.gz path/folder-name/- Данная команда создаст архив папки path/folder-name/. Название архива — name.tar.gz,
- все файлы будут сжаты при помощи gzip,
- в процессе создания архива будет показан процесс архивации. Если данная информация вам не нужна, уберите ключ «v» из команды.
Разархивация происходит при помощи команды:
Создание архива zip
Подключитесь к серверу по SSH и выполните команду:
zip -r имя-архива.zip /путь-к-папке

# пример
zip -r log.zip /var/log
В результате команды из примера будет создан архив папки /var/log со всем её содержимым. Имя созданного архива: log.zip.
Разархивировать можно будет при помощи команды:
Как создать или удалить папку по SSH
Чтобы создать папку, подключитесь к серверу по SSH и используйте команду:
Где new_folder_name — имя создаваемой папки.
После подключения по SSH удалить папку можно с помощью команды:
Где folder_name — имя удаляемой папки. Ключ —r делает рекурсивное удаление, то есть удаляет папку со всеми вложенными в неё папками и файлами.
Как изменить права на файлы и папки по SSH
Чтобы настроить права доступа к отдельному файлу:
- 1.
-
2.
Выполните команду:
chmod 755 /var/www/file_nameГде /var/www/file_name — полный путь до вашего файла (/полный-путь-до-корневой-папки-сайта/сам-файл).
Готово, права на файлы/папки будут изменены.
Чтобы рекурсивно настроить доступ ко всем папкам и файлам на вашем сайте:
- 1.
-
2.
Выполните команды:
find /dir_name -type d -exec chmod 755 {}find /dir_name -type f -exec chmod 644 {}Где dir_name — полный путь до корневой папки сайта (Как узнать корневую папку сайта?).
Первая команда изменит права для всех директорий внутри указанной на 755. Вторая — для файлов внутри указанной директории на 644.
Готово, права на файлы/папки будут изменены.
В качестве альтернативного способа вы можете использовать команду, чтобы сначала задать права всем файлам:
А затем назначить права 755 только на папки:
find /dir_name -type d -exec chmod 755 {} Где dir_name — полный путь до корневой папки сайта (Как узнать корневую папку сайта?).
Как запустить Midnight Commander
Midnight Commander — это файловый менеджер.
Чтобы его запустить:
- 1.
-
2.
Введите в консоли
mcв консоли и нажмите Enter.
Как использовать кириллицу в терминале Linux
Если у вас ОС Linux, то при подключении к серверу по SSH вы можете использовать в терминале не только латиницу, но и кириллицу.
Если вы хотите использовать кириллицу в течение одного сеанса SSH, то после подключения введите в терминале команду:
export LC_ALL="ru_RU.UTF8"Если вы хотите использовать кириллицу постоянно, то нужно внести изменения файл в .bashrc. Для этого после подключения по SSH:
-
1.
Откройте файл .bashrc с помощью текстового редактора vim или nano:
nano .bashrc #с помощью редактора nano vim .bashrc #с помощью редактора vim -
2.
Добавьте в него строку:
export LC_ALL="ru_RU.UTF8"
Готово, теперь при любом подключении к SSH можно будет автоматически использовать кириллицу.
Внимание
Если вы выполнили все шаги инструкции, но не получили желаемого результата, напишите заявку в службу поддержки. Наши специалисты оперативно вам помогут!