Настройка будет состоять из пунктов:
- Настройка Брандмауэра
- Создание пользователей
- Настройка FTP-сайта
- Изоляция пользователей
Установка FTP-сервера
Для начала нужно установить FTP-сервер.
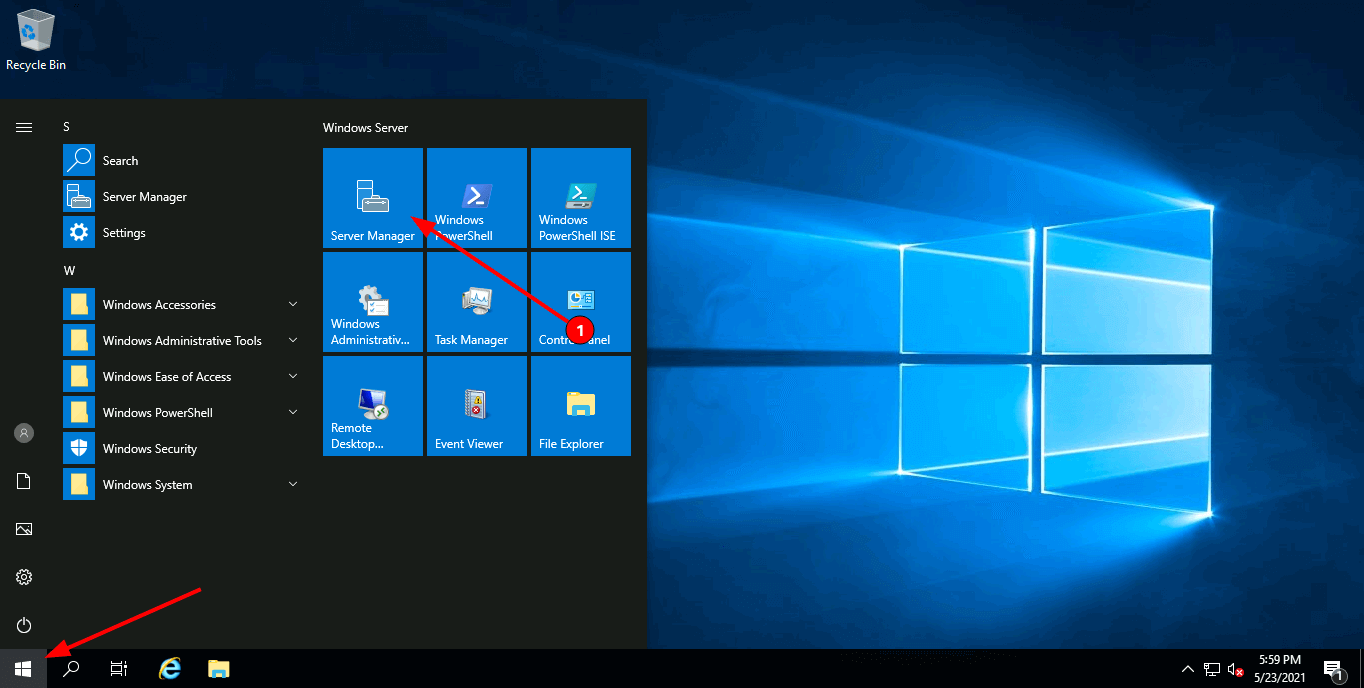
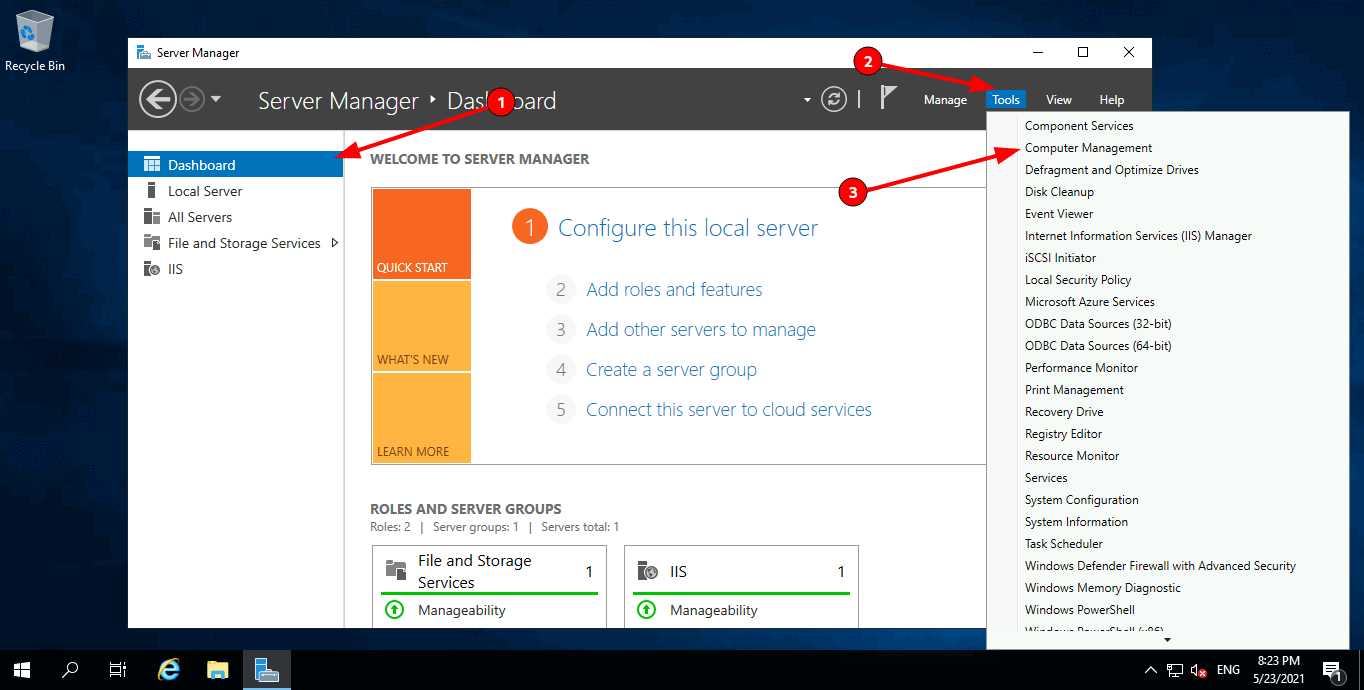
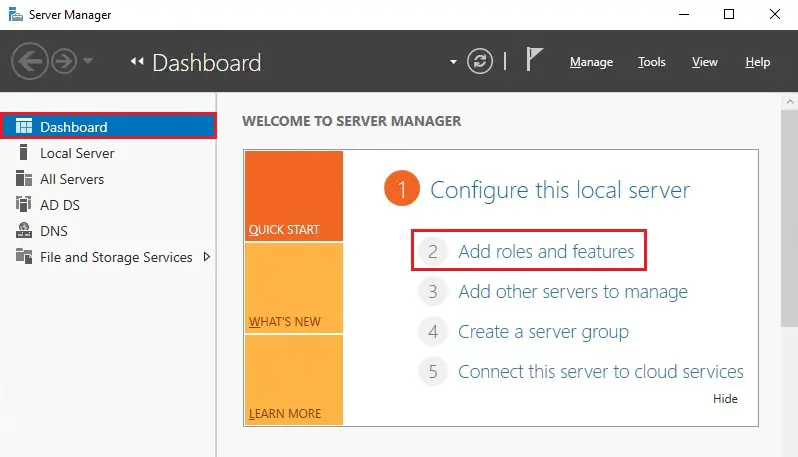
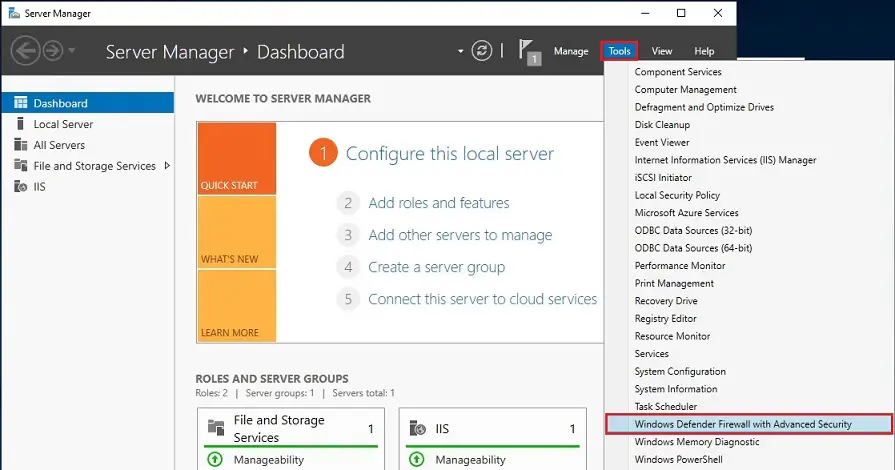
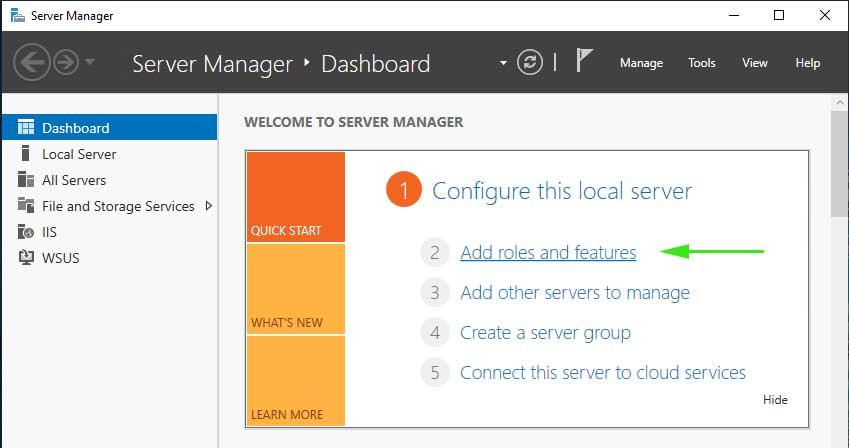
Открываем Пуск в нижнем левом углу, Диспетчер серверов (Server Manager), плитка которого закреплена по умолчанию. Далее все основные действия по настройке будем совершать здесь.
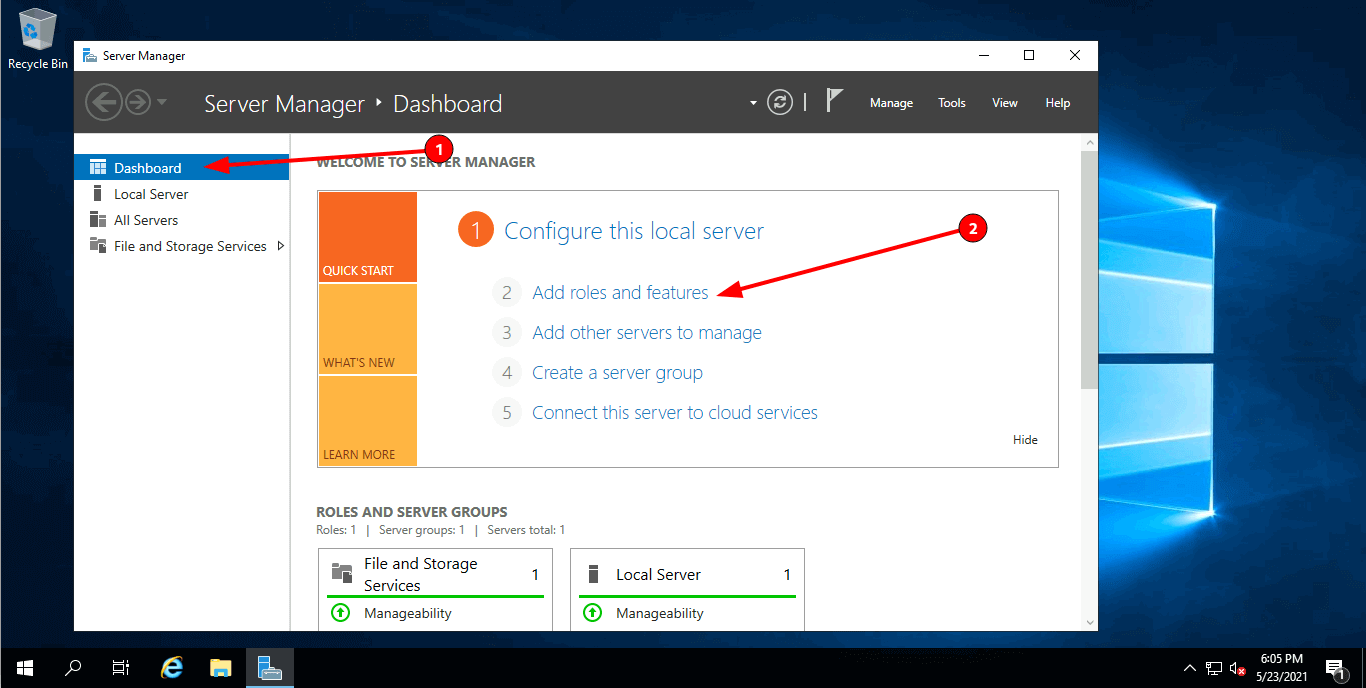
Находим пункт Добавить Роль и Функции (Add roles and features).
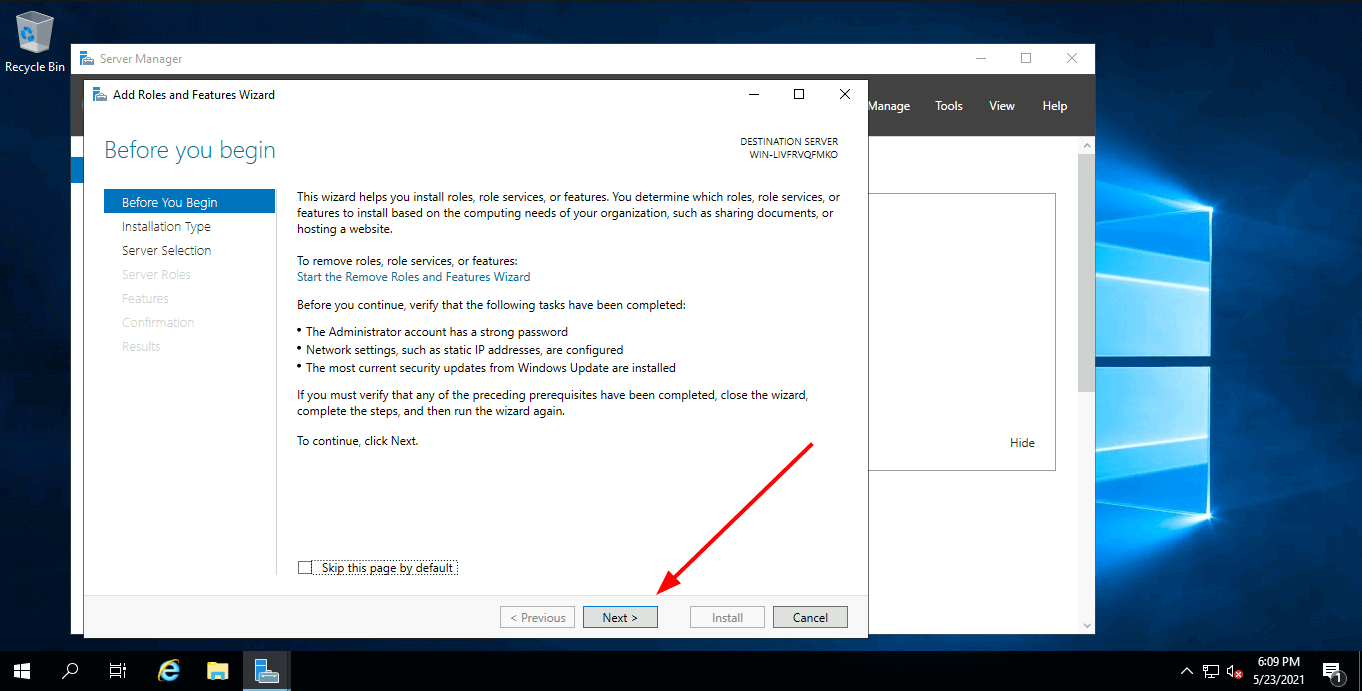
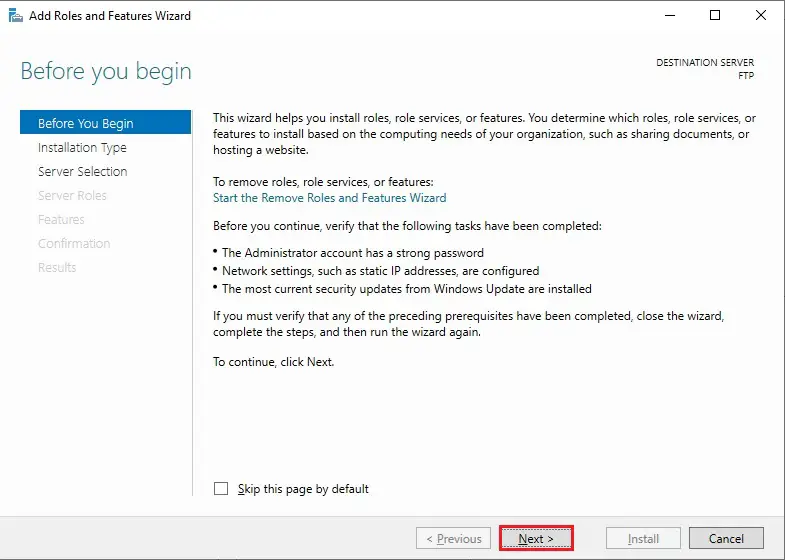
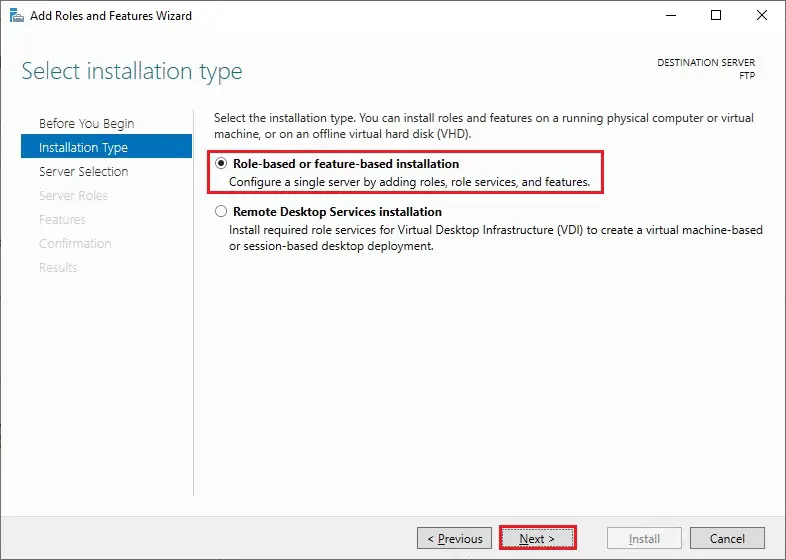
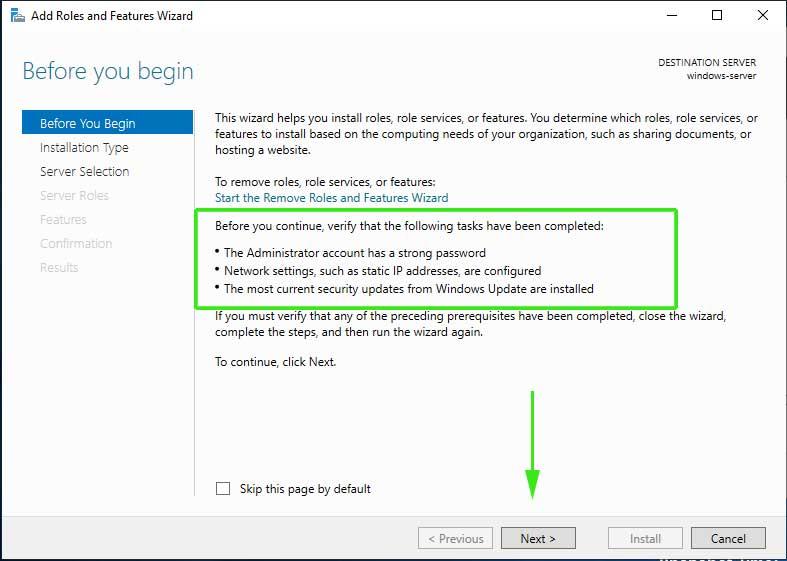
Появится мастер добавления ролей, для продолжения нажимаем Далее (Next).
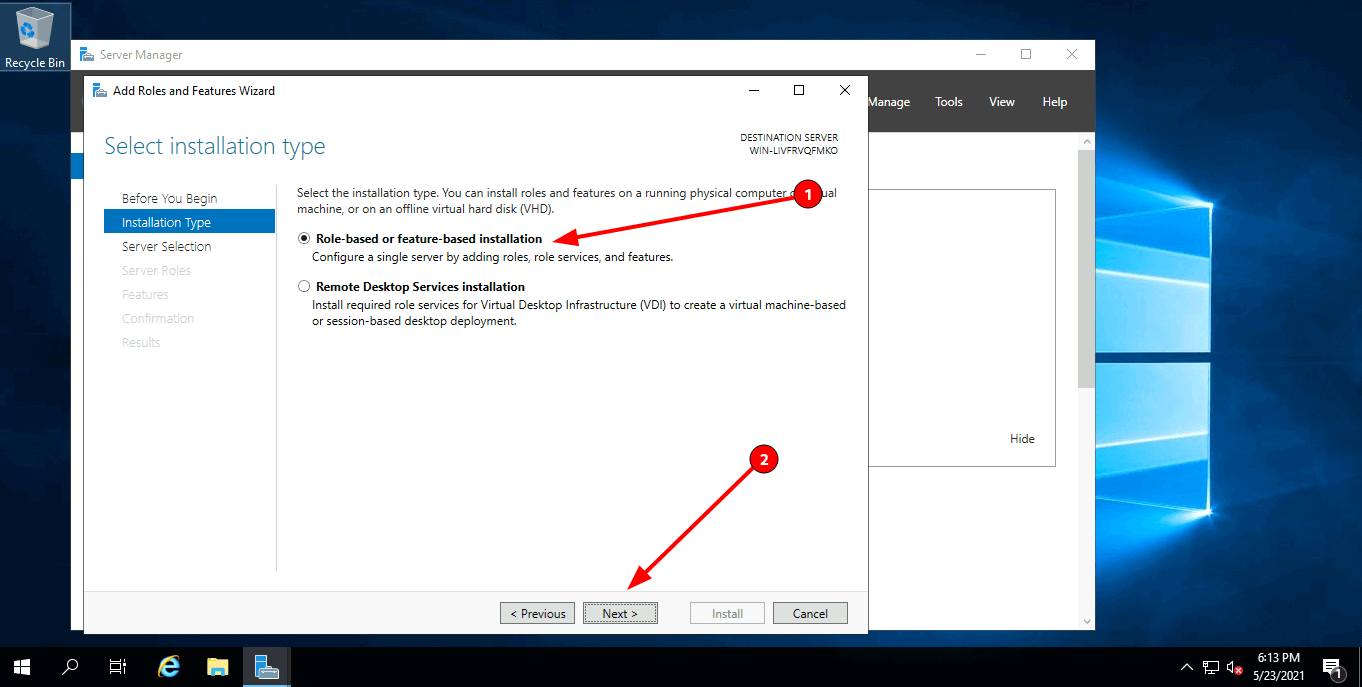
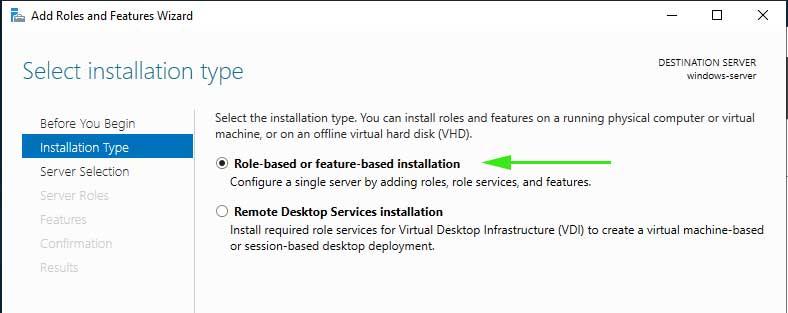
В качестве типа установки выбираем Базовая Роль или Базовая Функция (based-roles or feature-based installation).
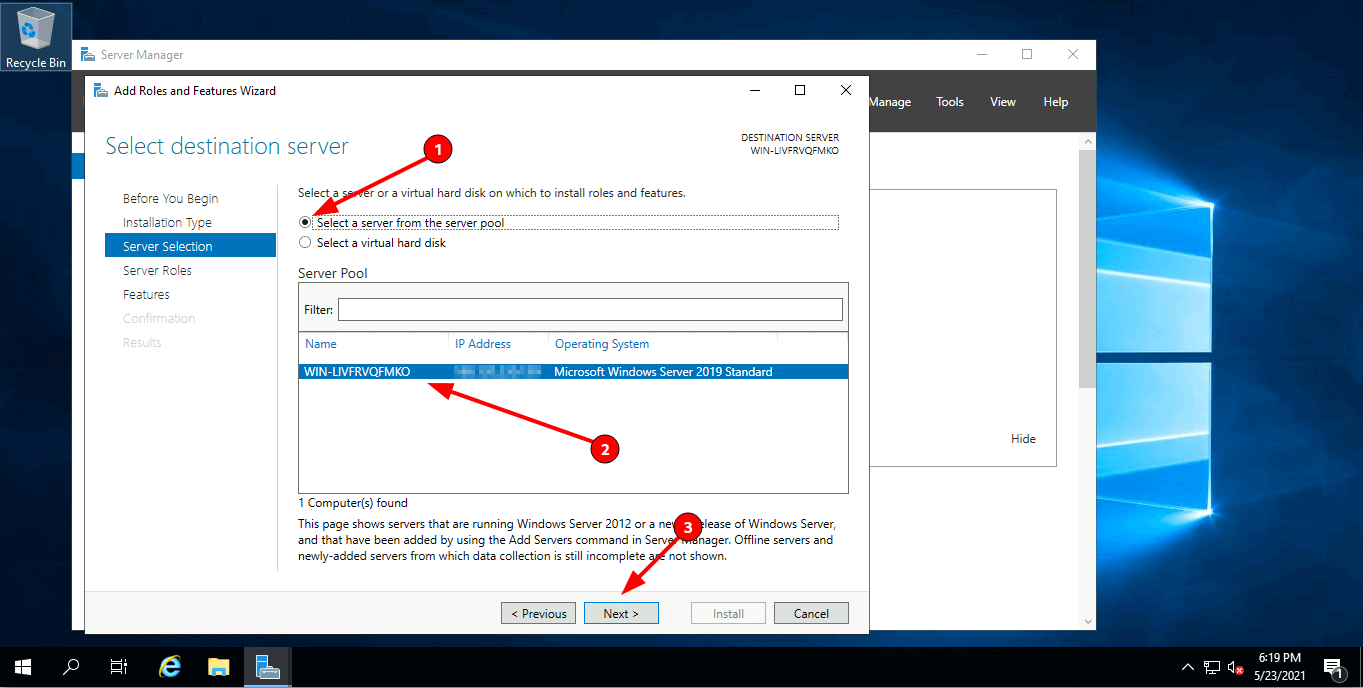
Далее из списка серверов, выбираем нужный сервер, в качестве примера он один, поэтому жмём Далее (Next).
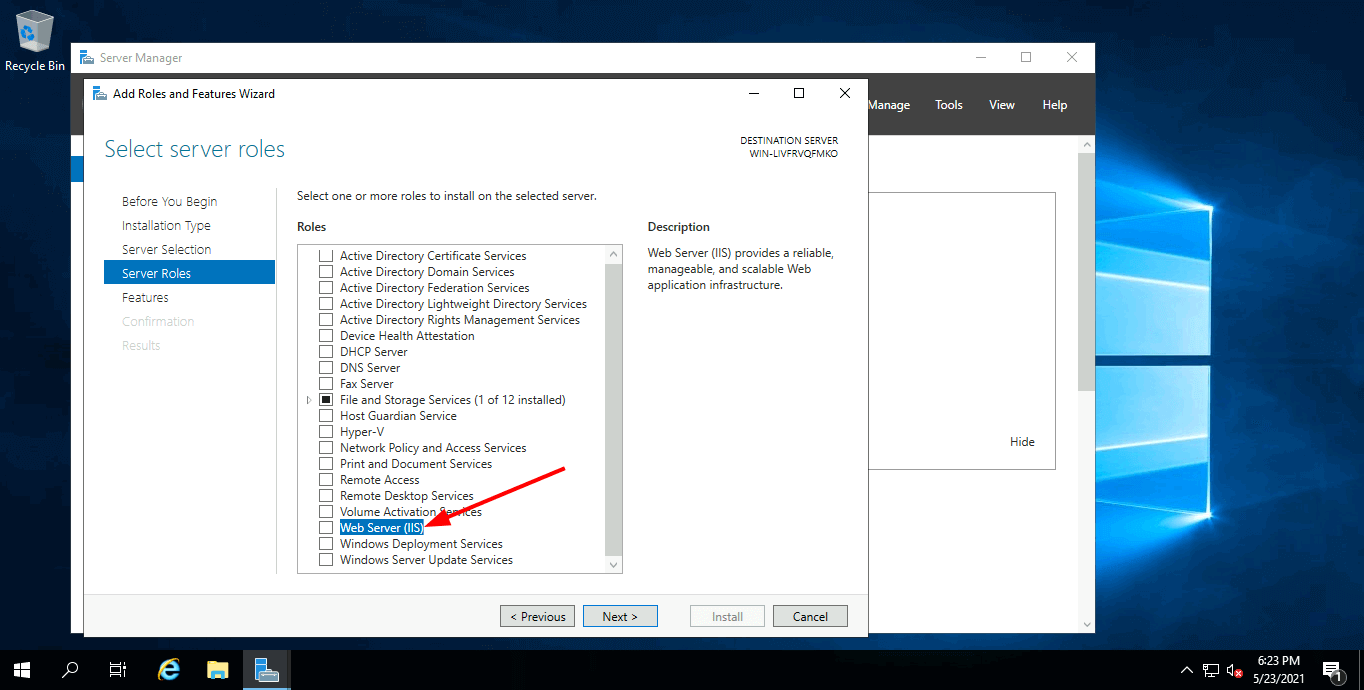
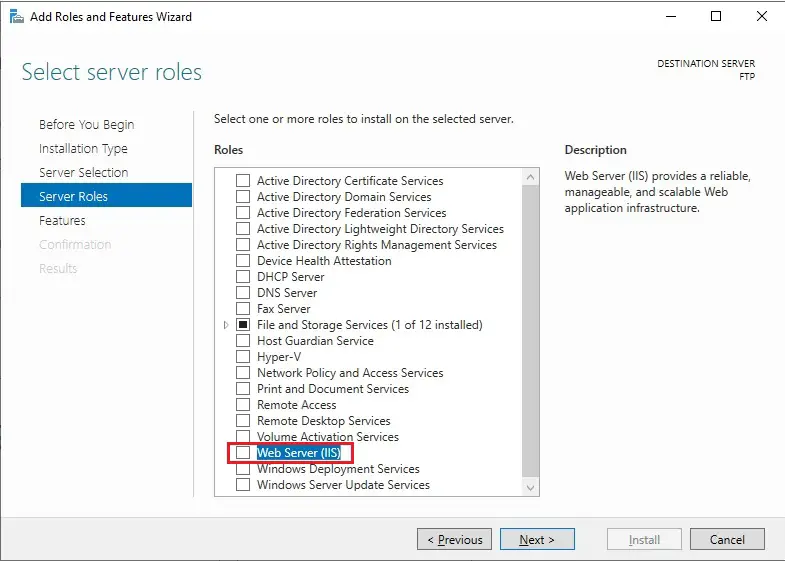
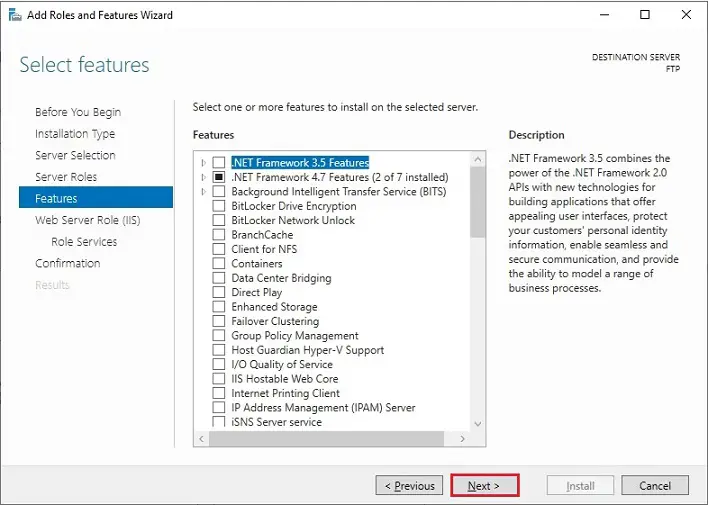
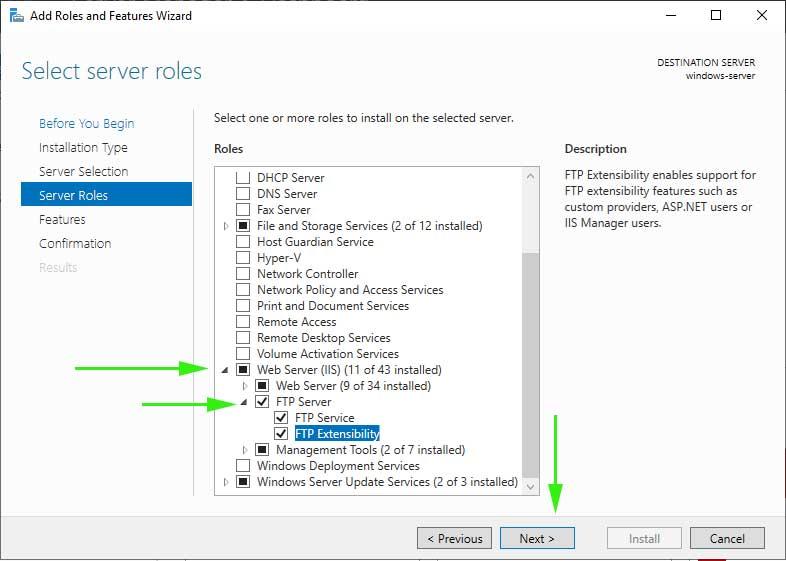
На этапе выбора ролей отмечаем роль Веб-сервер (IIS) (Web Server (IIS)).
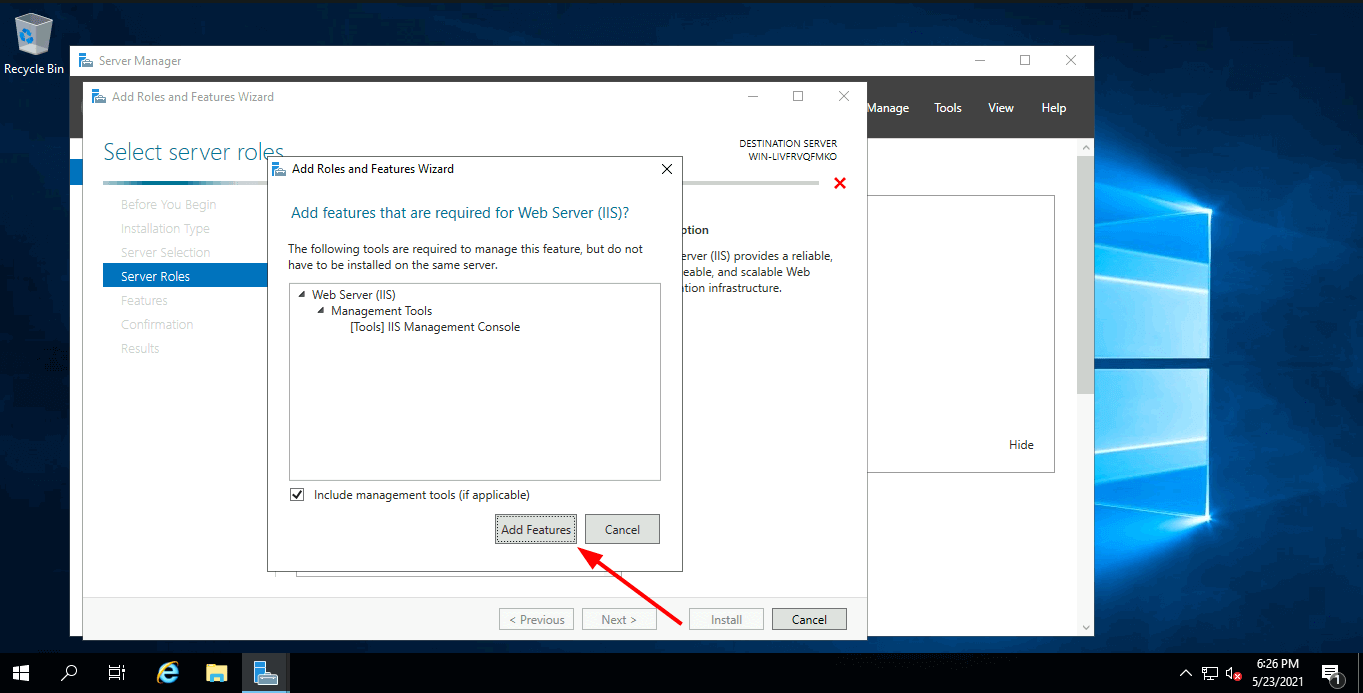
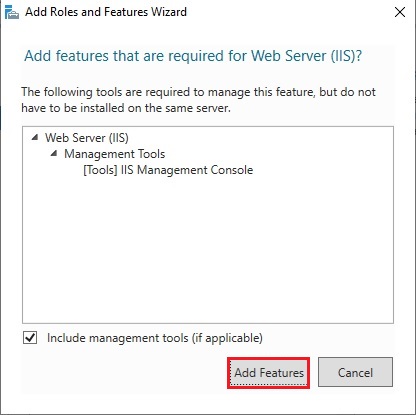
Откроется окно и предложит установить Консоль управления службами IIS (IIS Management Console), жмем Добавить компоненты (Add Featues), они понадобятся, чтобы администрировать FTP-сервер, жмем Далее (Next).
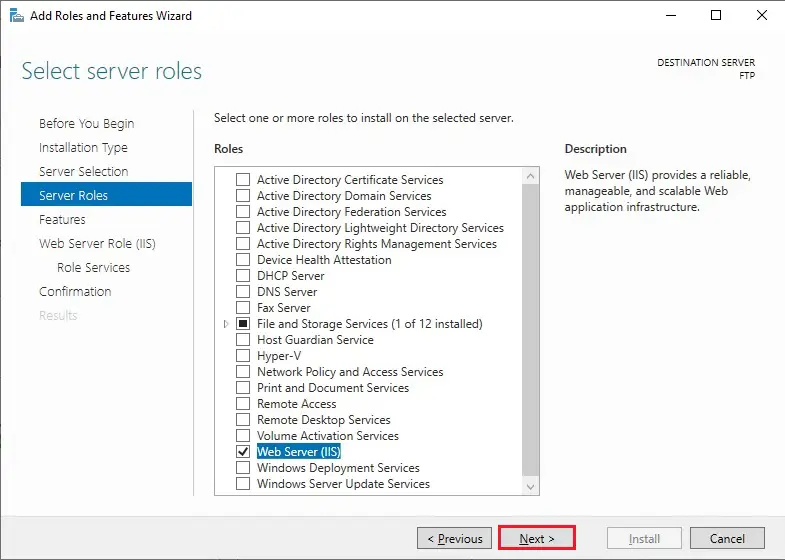
Следующие 2 шага пропускаем, нажимая Далее (Next).
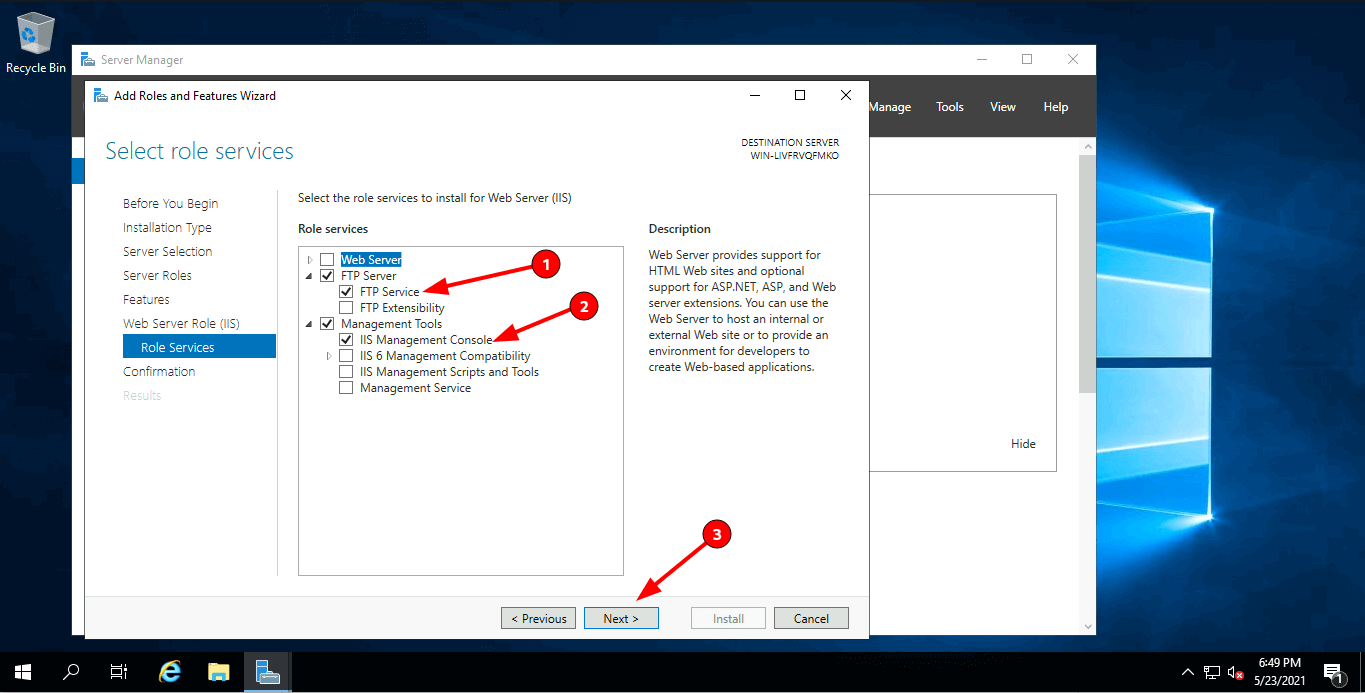
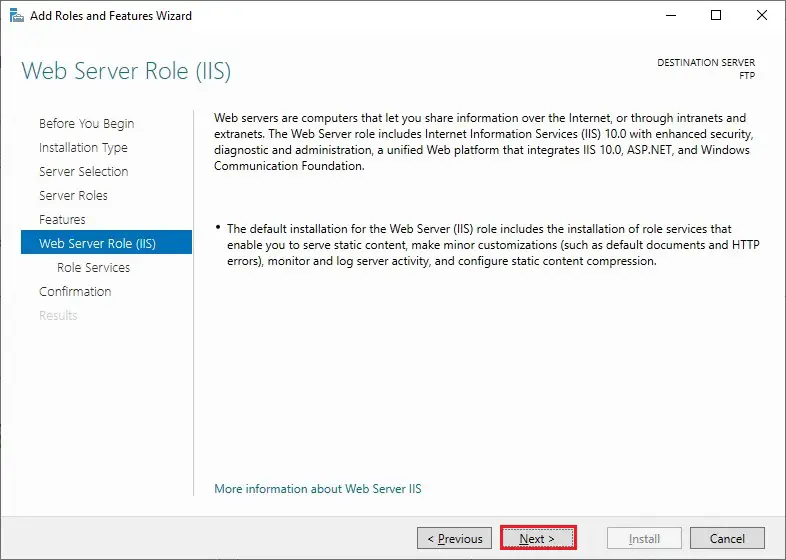
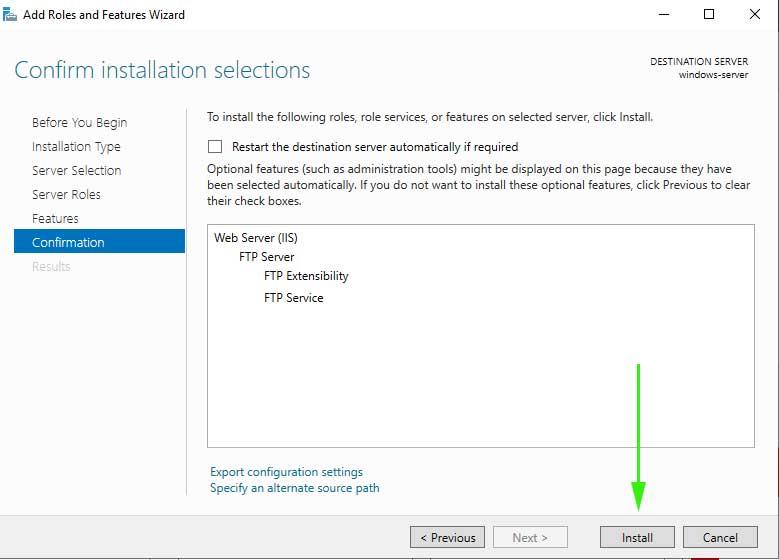
Дойдя до пункта Службы ролей (Role Services), снимаем все галочки и выбираем Служба FTP (FTP Service) и Консоль управления службами IIS (IIS Management Console), жмем Далее (Next).
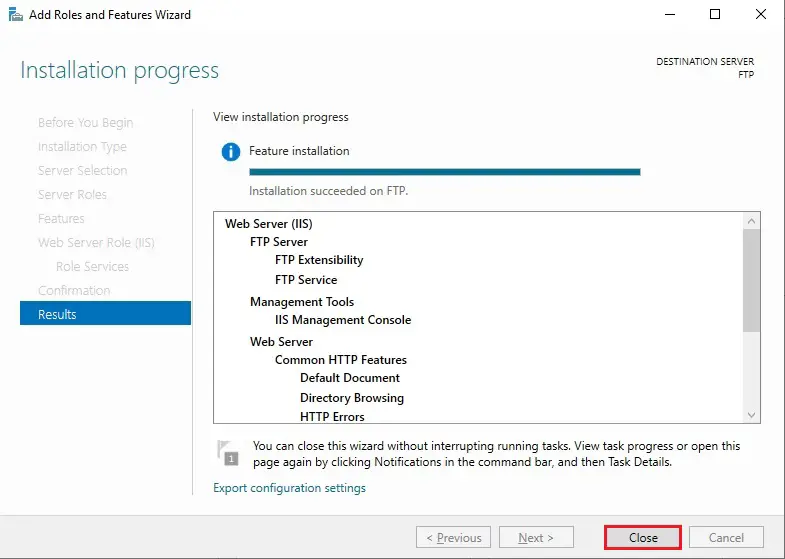
На следующем пункте проверяем все компоненты и жмём Установить (Install).
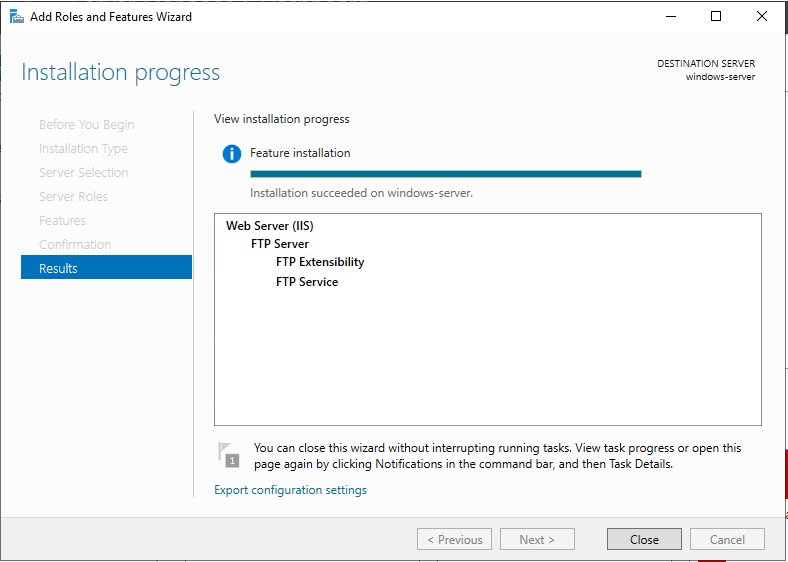
Дожидаемся окончания установки, после чего жмём Закрыть (Close).
Далее ещё нужно настроить пару моментов, не торопитесь перезагружать сервер.
Настройка Брандмауэра
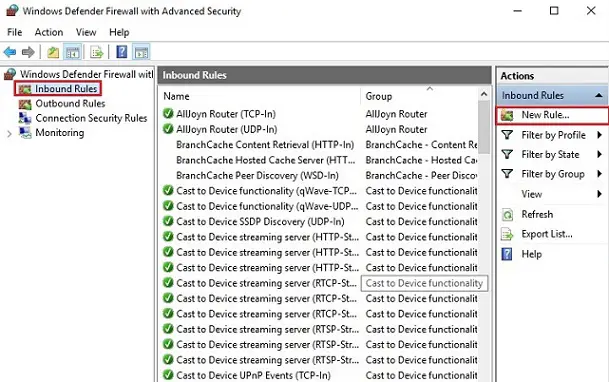
Для подключения к FTP-серверу необходимо настроить Firewall. Для этого откройте Брандмауэр Windows в режиме повышенной безопасности (Windows Firewall with Advanced Security).
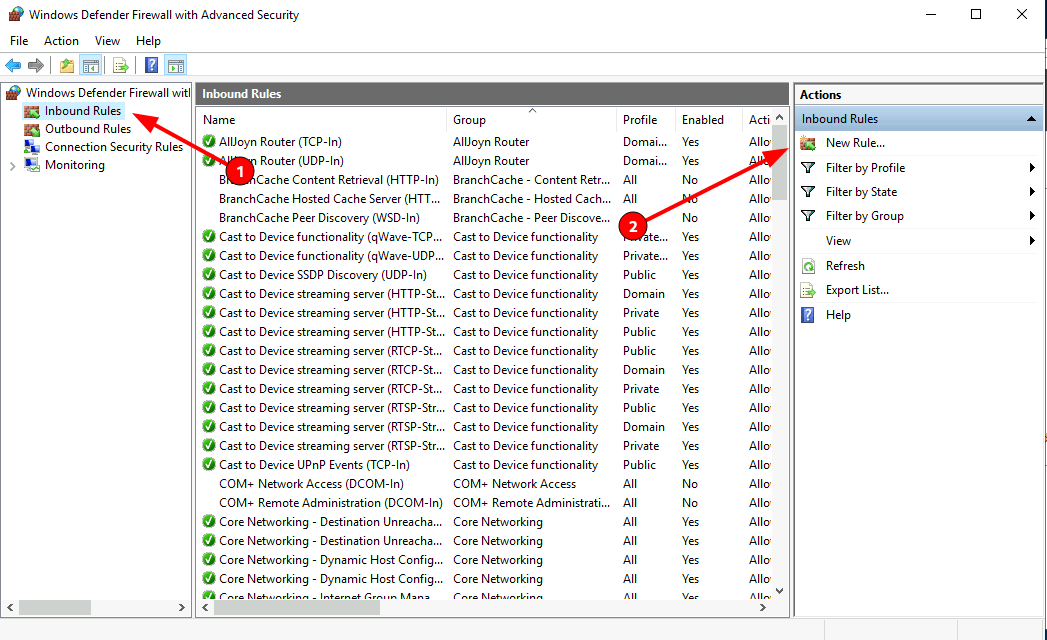
В вертикальном меню слева выберите Правила для входящих подключений (Inbound rules), затем в вертикальном меню справа Создать правило (New Rule).
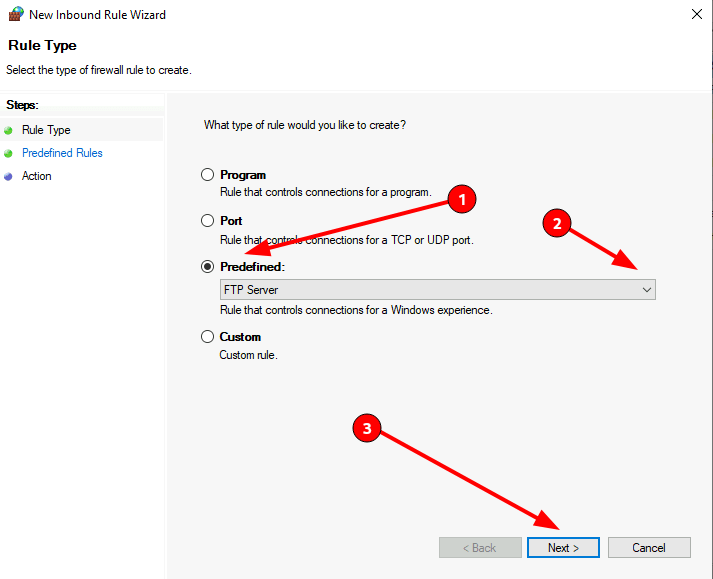
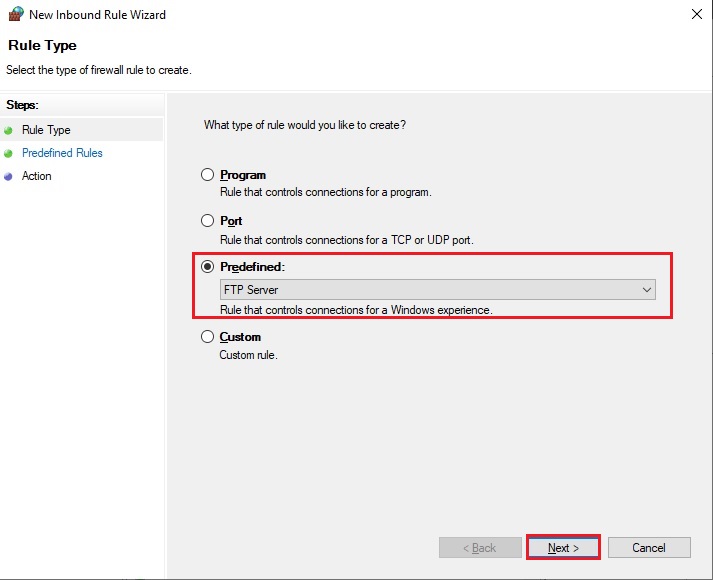
В открывшемся окне отмечаем тип Предопределенные (Predefined) и в выпадающем списке выберите FTP-сервер (FTP Server). Нажмите Далее (Next).
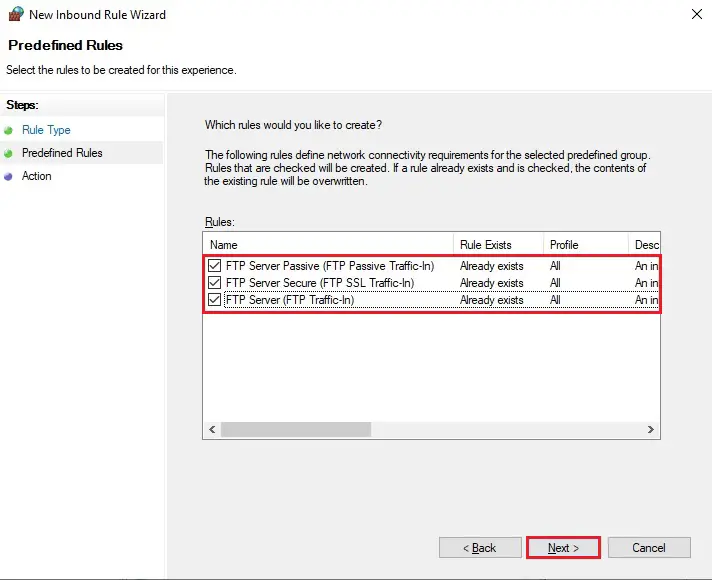
Отмечаем все галочки, Далее (Next), Готово (Finish). Перезагружаем сервер для применения всех настроек.
Создание пользователей
Теперь нужно создать пользователей, которым дадим право подключаться к FTP-серверу.
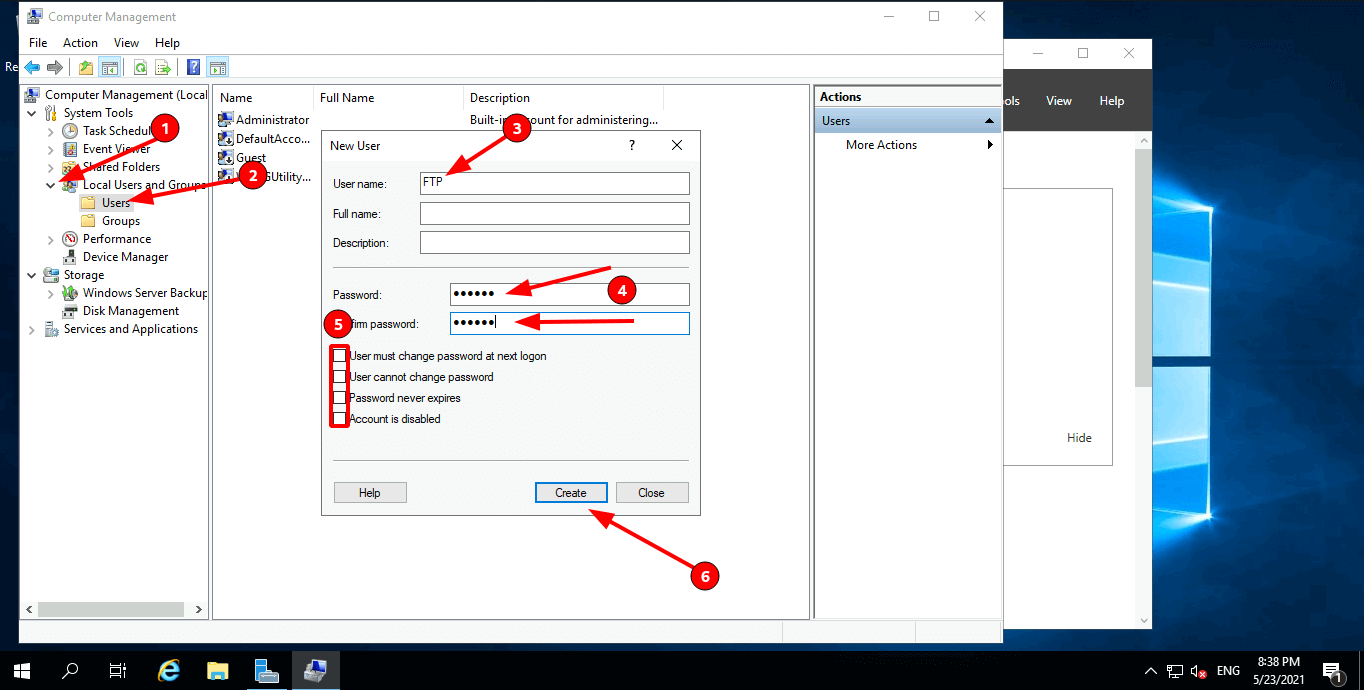
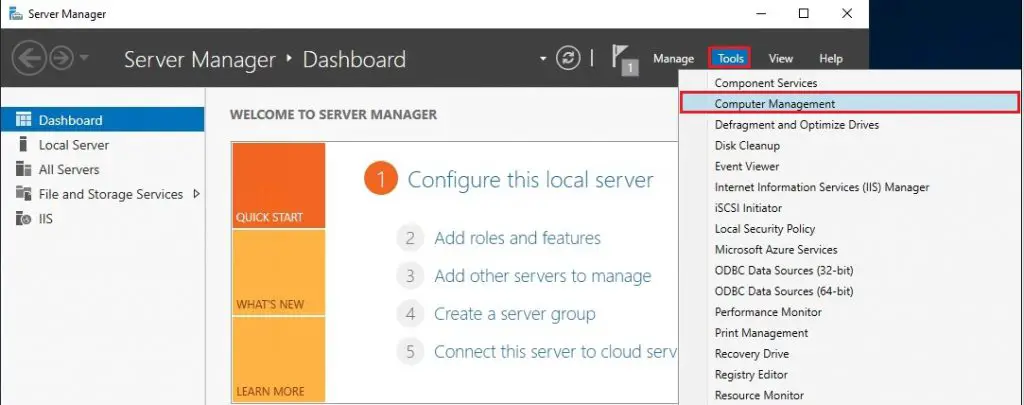
Открываем Управление компьютером (Computer Management).
Открываем пункт Локальные пользователи и группы (Local Users and Groups), щелкаем правой кнопкой мыши по пункту Пользователи (Users) и выбираем Новый пользователь (New User). Заполняем необходимые поля, снимаем все галочки и жмем Создать (Create).
Если появилась следующая ошибка при создании пользователя, значит пароль не соответствует нужным требованиям:
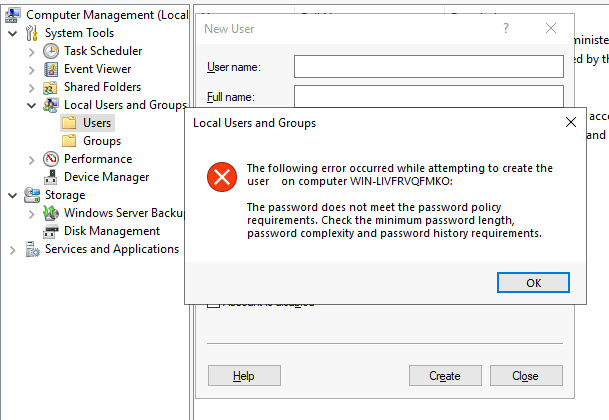
Пароль должен соответствовать как минимум трём условиям из списка перечисленного ниже:
- Наличие прописных букв английского алфавита от A до Z;
- Наличие строчных букв английского алфавита от a до z;
- Наличие десятичных цифр (от 0 до 9);
- Наличие неалфавитных символов (например, !, $, #, %).
Настройка FTP-сайта
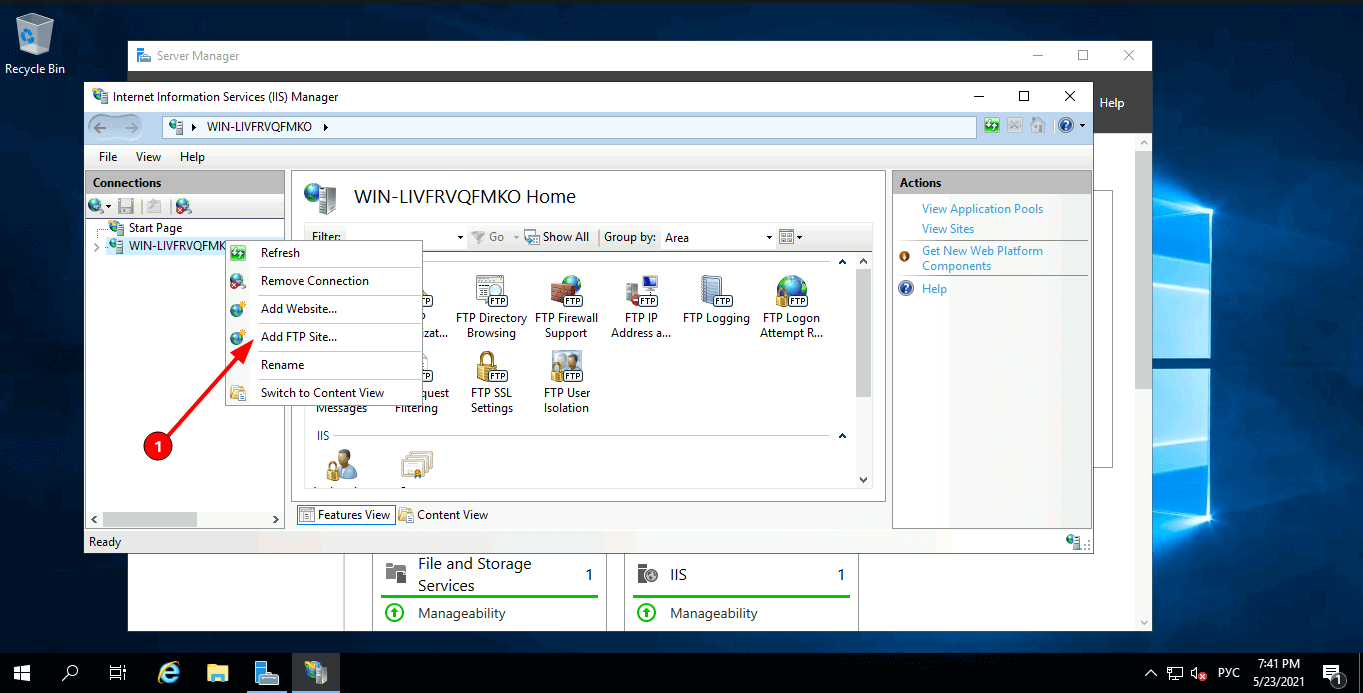
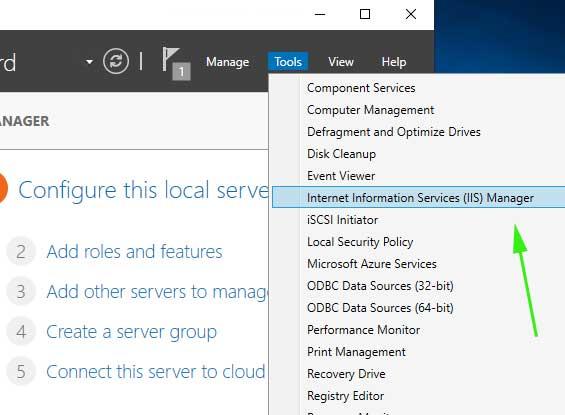
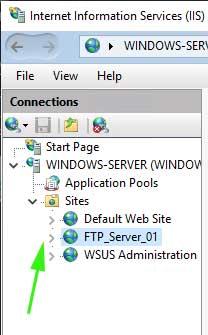
Открываем Диспетчер служб IIS (Internet Information Server (IIS) Manager).

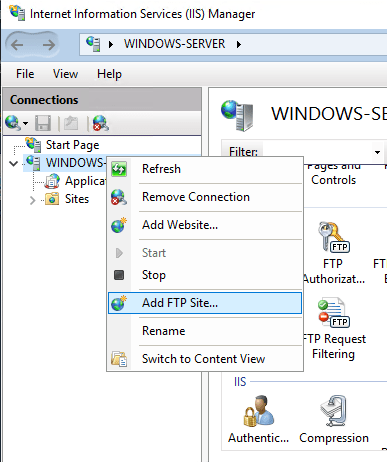
В окне Подключения (Connections), кликаем правой кнопкой мыши по нашему сайту, выбираем Добавить FTP-сайт (Add FTP Site).
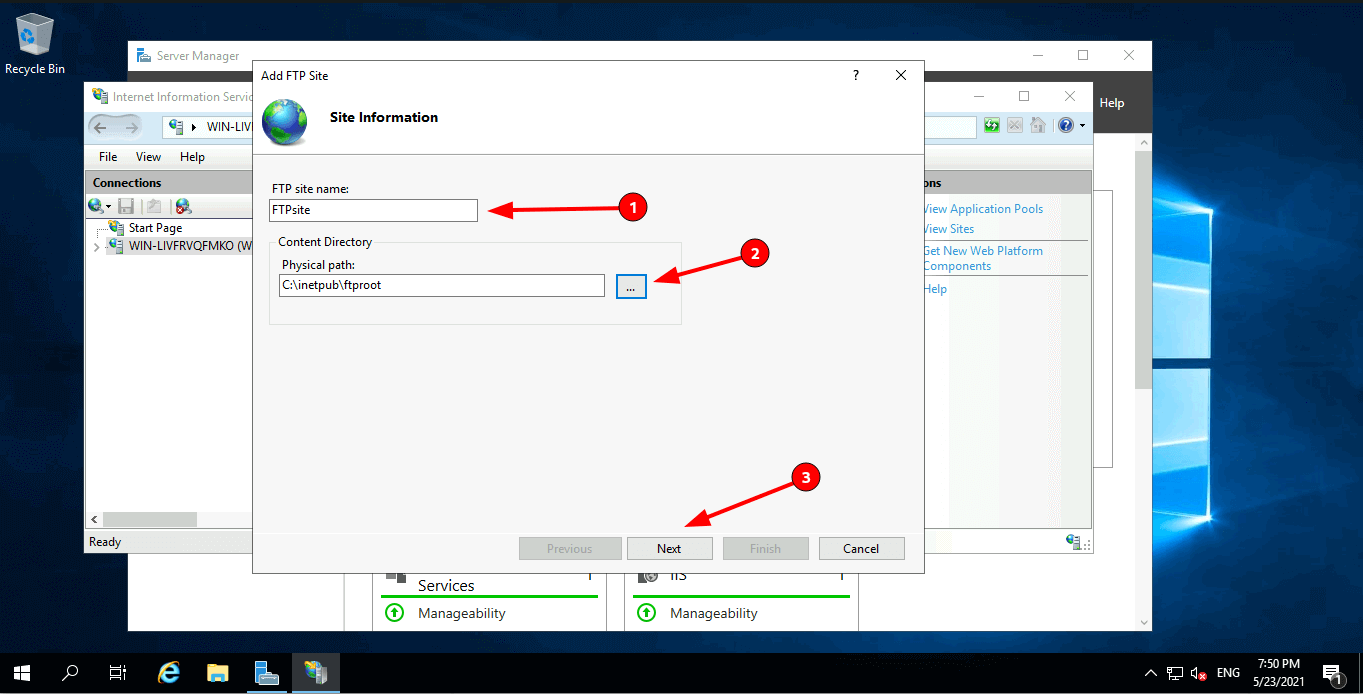
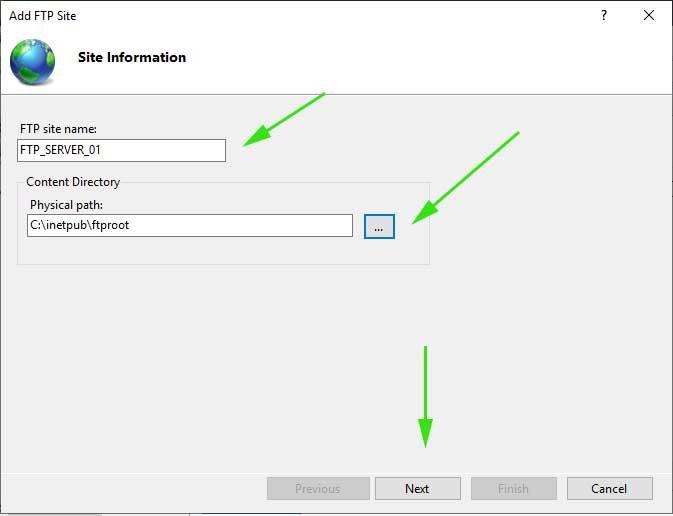
В открывшемся окне Добавить FTP-сайт (Add FTP Site) вводим название нашего FTP-сайта, указываем нужную директорию и жмём Далее (Next).
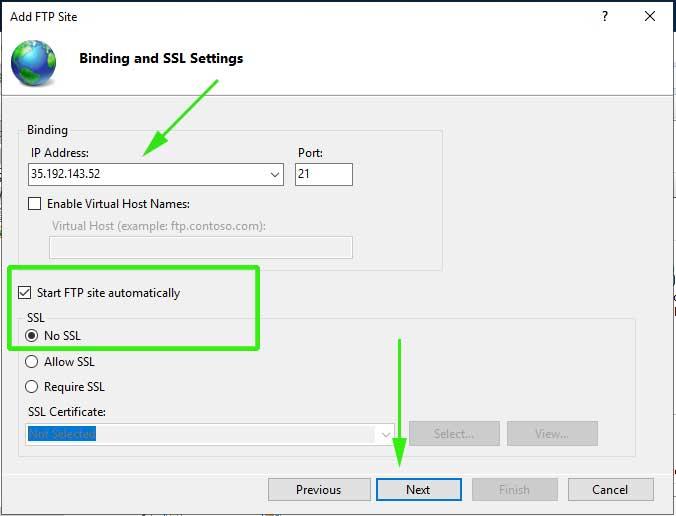
Далее указываем IP-адрес из выпадающего списка, или указываем Все свободные (All Unassigned). Отмечаем галочку ниже. Указываем настройки SSL, если нужно чтобы использовалось шифрование, устанавливаем SSL-сертификат, если нет, то выбираем первый вариант, как показано в примере. Жмём Далее (Next).
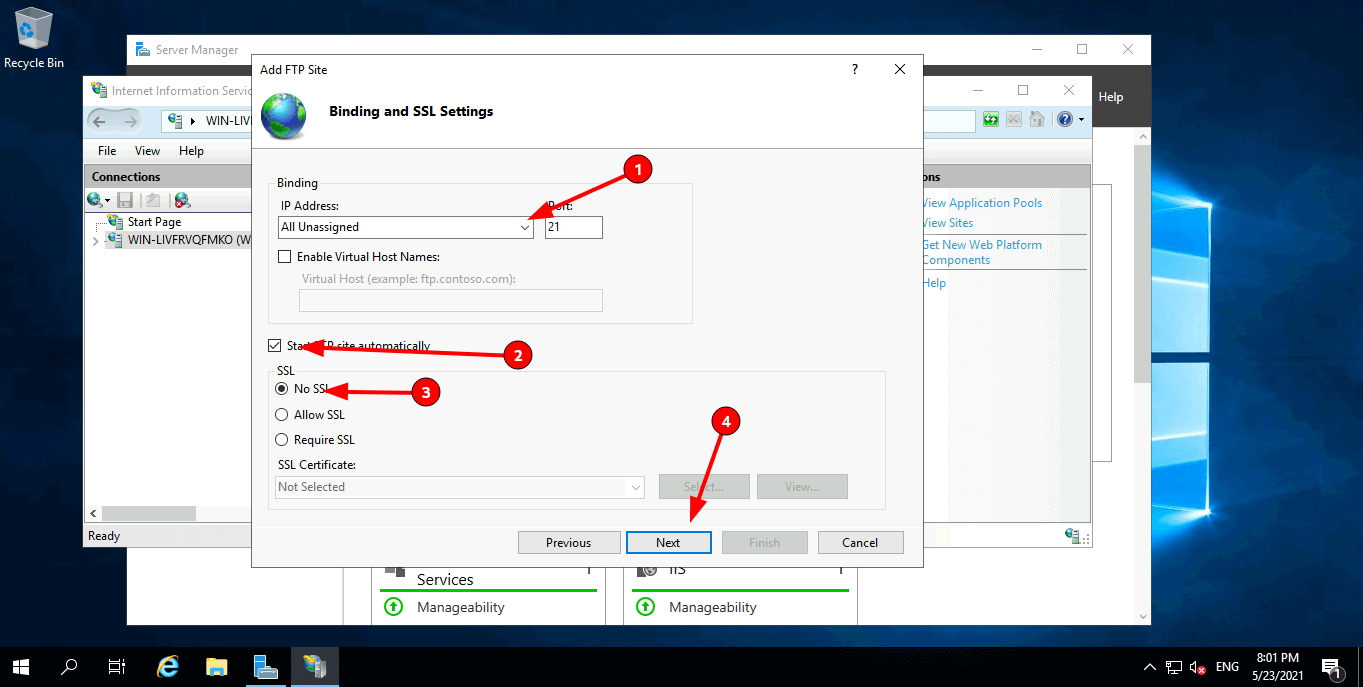
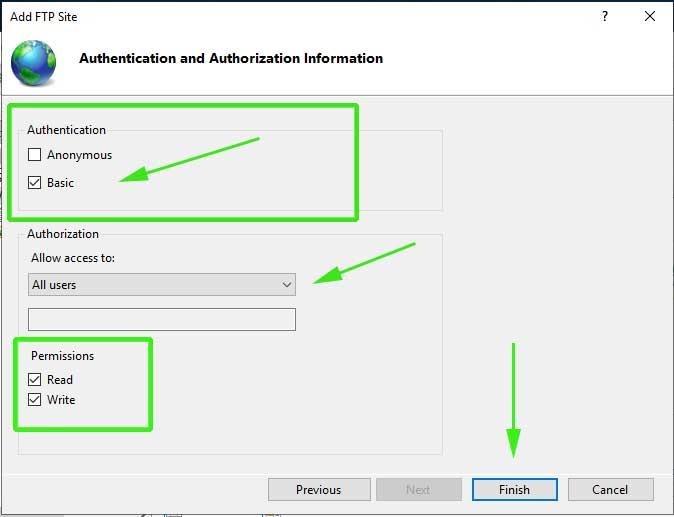
Выбираем проверку подлинности как Обычную (Basic). Из выпадающего списка выбираем Указанные пользователи (Specified users), и вводим имя ранее созданного пользователя. Ставим галочки напротив необходимых разрешений: Чтение (Read) или Запись (Write). Нажимаем Готово (Finish).
Изоляция пользователей
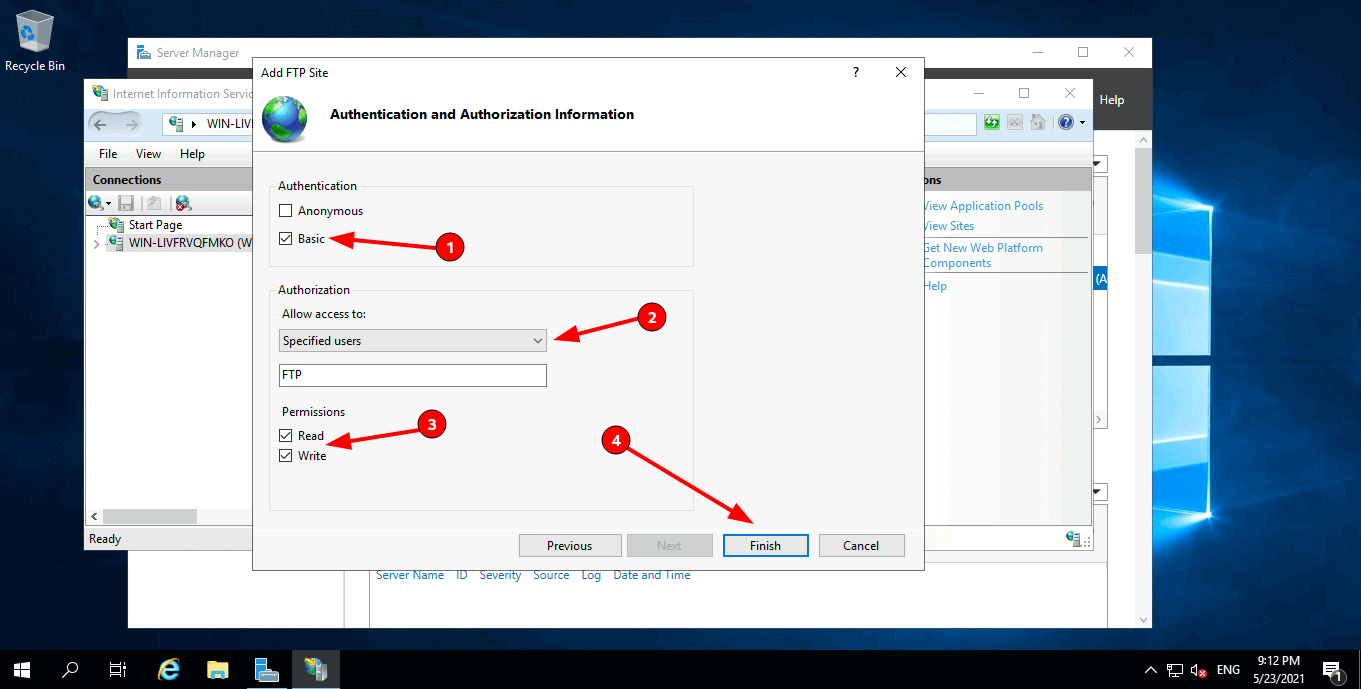
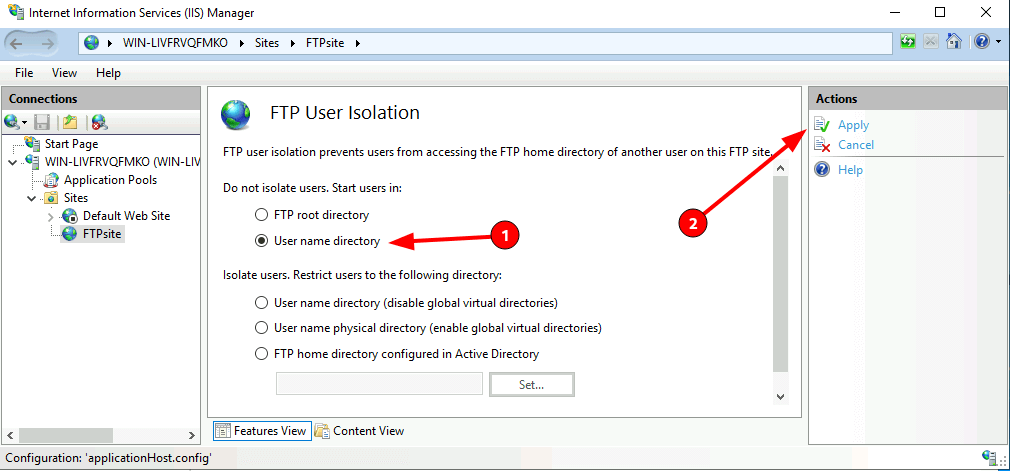
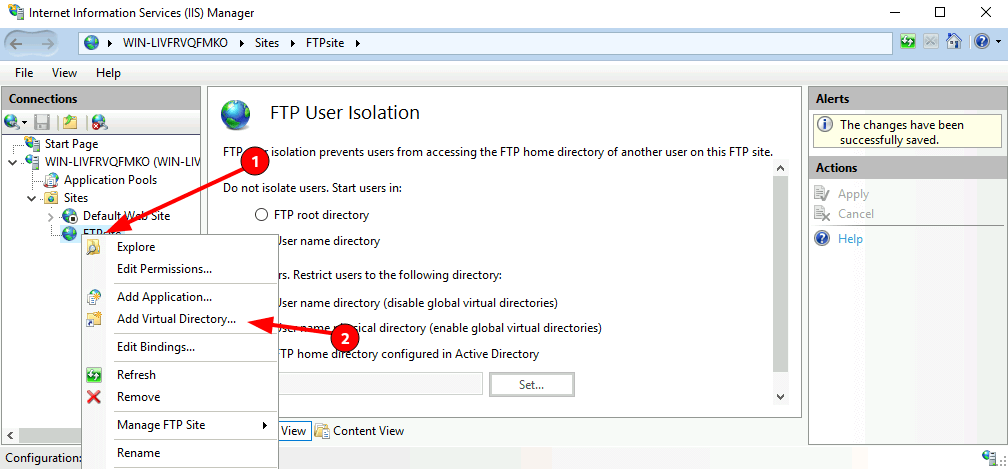
Чтобы после подключения к FTP-серверу пользователь попадал в свою директорию и не имел доступ к чужим файлам других пользователей, необходимо настроить их изоляцию. Для этого откройте настройки вашего ftp сайта и выберите Изоляция пользователей (FTP User Isolation).
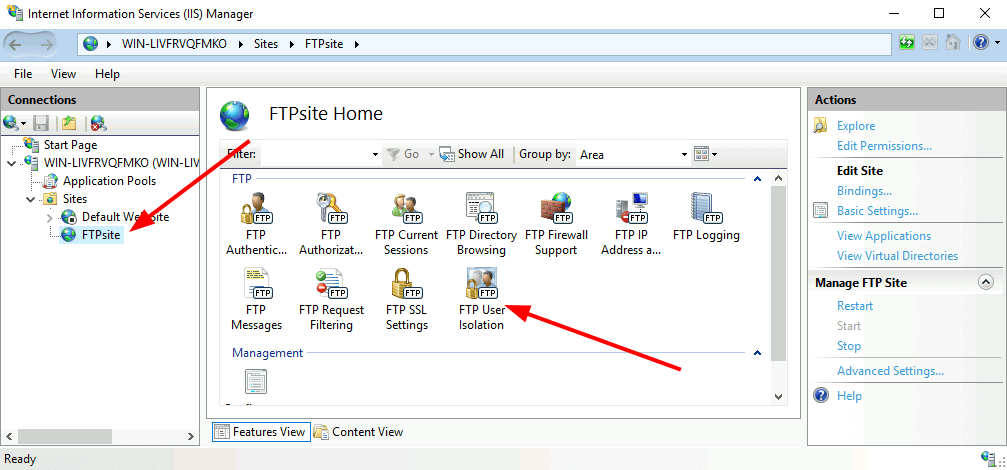
Выберите Каталог имени пользователя (User name directory) и Примените (Apply).
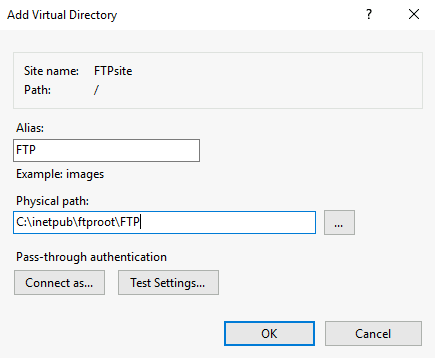
Кликаем правой кнопкой мыши по нашему FTP-сайту, выбираем Добавить виртуальный каталог (Add Virtual Directory).
В первой строке указываем имя FTP-пользователя, ниже полный путь к директории пользователя. Её нужно создать заранее. Для понимания какая директория кому принадлежит, лучше создавать директорию с именем пользователя.
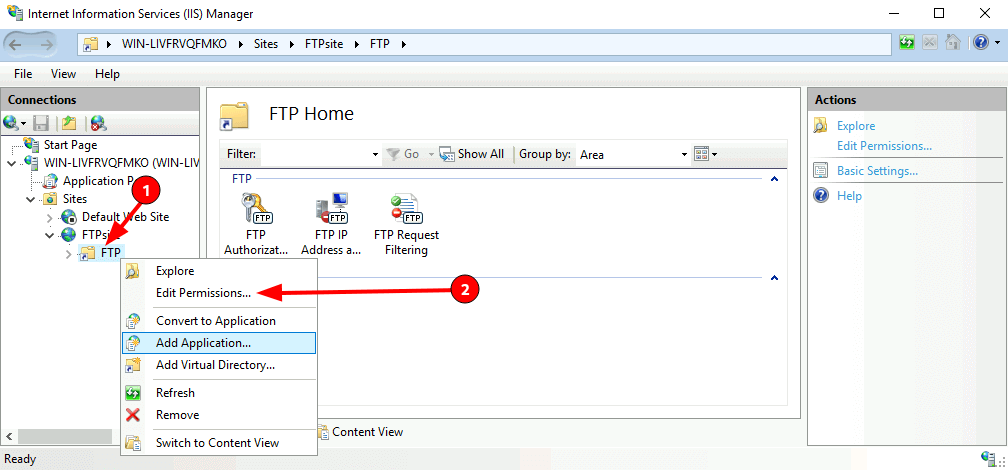
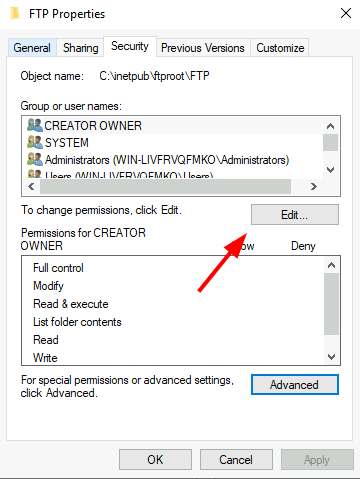
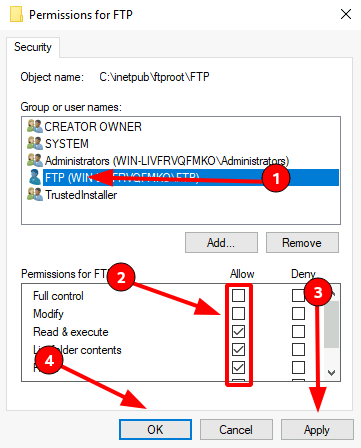
Необходимо настроить права на виртуальный каталог, кликаем правой кнопкой мыши по нему, выбираем Редактировать разрешения (Edit Permission).
Переходим во вкладку Безопасность (Security) и жмём кнопку Дополнительно (Advanced).
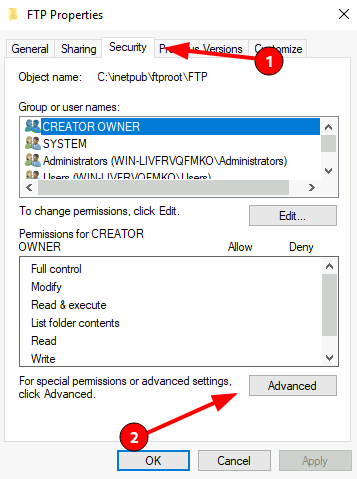
В окне жмём кнопку Отключение наследования (Disable inheritance), в новом окне выбираем первый вариант, затем Применить (Apply) и ОК.
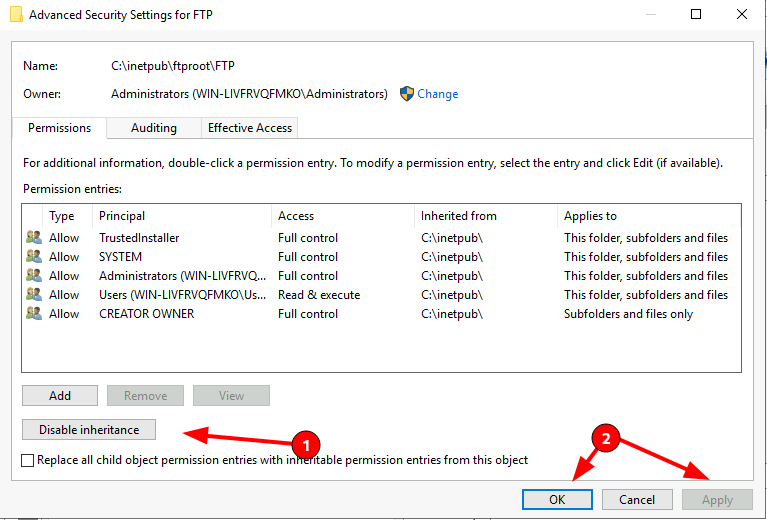
Жмём кнопку Изменить (Edit).
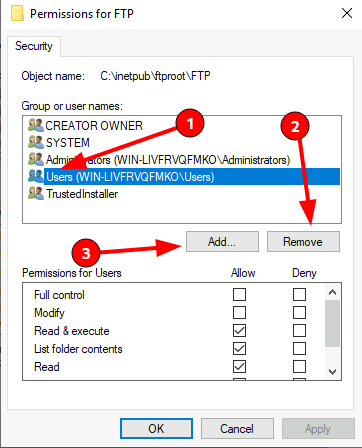
Удаляем группу пользователей Users, и добавляем нового пользователя.
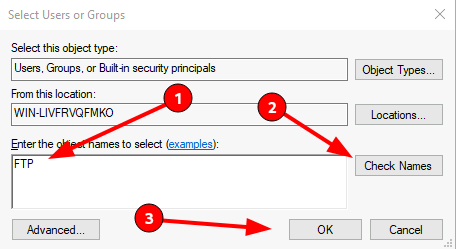
В новом окне, нужно ввести имя FTP-пользователя, для проверки нажмите Проверить имена (Check Names). Если пользователь есть, строка, где вводили имя, дополнится, нажмите ОК.
Даём все права пользователю на его директорию, отметив все галочки в первой колонке, жмём Применить (Apply) — ОК.
На этом все настройки завершены. Чтобы подключиться к серверу, используйте следующие доступы:
- Хост: IP сервера
- Пользователь: FTP-пользователь, которого вы создали
- Пароль: Пароль от FTP-пользователя
Подключиться можно через разное ПО, например FileZilla или, если вы используете Windows — Проводник, введя в адресной строке ftp://IP-сервера, после чего откроется окно для входа.
Краткая инструкция по установке и быстрой настройке FTP-сервера FileZilla Server на ОС Windows Server 2019 Core (без графического окружения).
Данная статья предназначена для решение таких задач, как развёртывание собственного FTP-сервера на базе самостоятельных продуктов, не входящих в стандартные компоненты Windows Server, а также для веб-серверов WAMP и WAPP, как в примере было описано в предыдущей статье.
Для начала необходимо скачать последнюю версию дистрибутива FileZilla Server со страницы: https://filezilla-project.org/download.php?type=server.
Затем открываем порт 21/tcp для подключения
# netsh advfirewall firewall add rule name="FTP" protocol=TCP localport=21 dir=IN action=allow
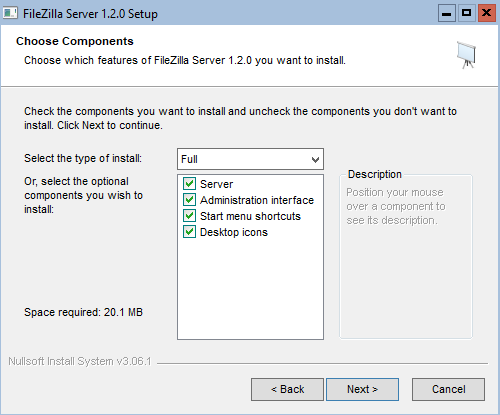
После этого запускаем инсталлятор FileZilla_Server_1.2.0_win64-setup.exe и следуем инструкциям мастера установки. Полный процесс установки описывать смысла нет, поэтому здесь будем обращать внимание только на важные моменты.
В устанавливаемых компонентах следует обязательно отметить пункты Server и Administration Interface, остальные — по желанию.
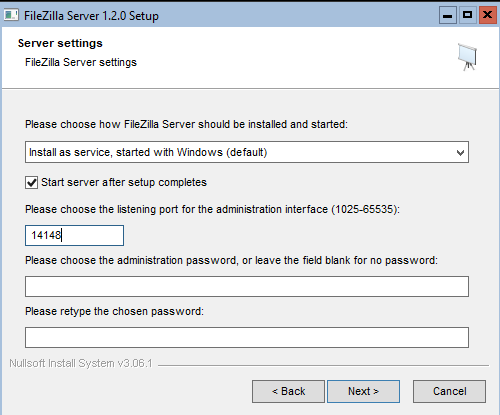
Порт для интерфейса администрирования оставляем по умолчанию
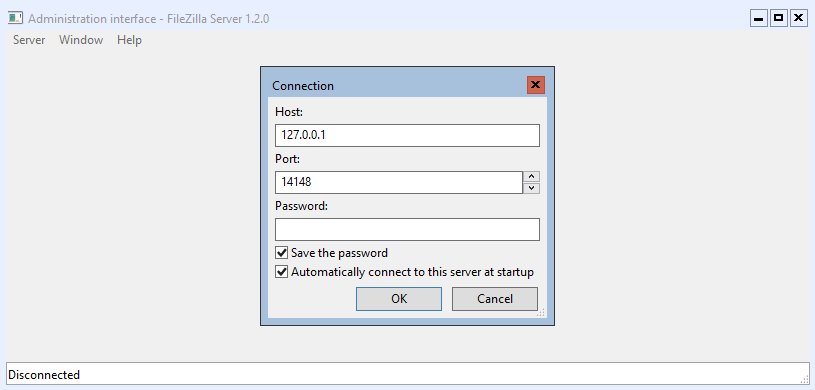
После установки запустится интерфейс администрирования, где будет предложено подключиться к серверу
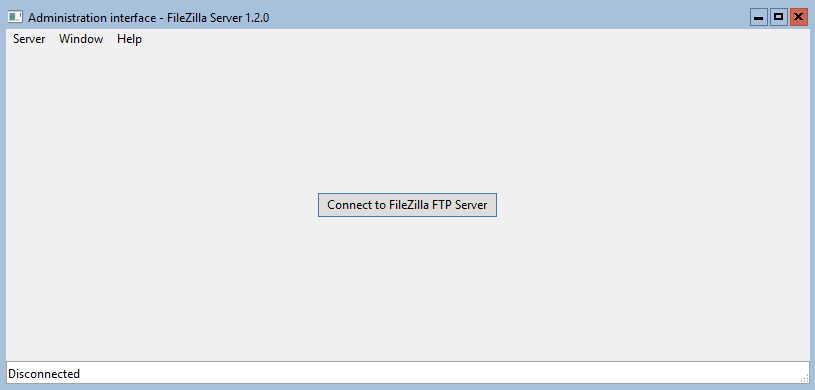
Кликаем Connect to FileZilla FTP Server.
Указываем хост локальной машины и порт (по умолчанию), пароль вводить не нужно
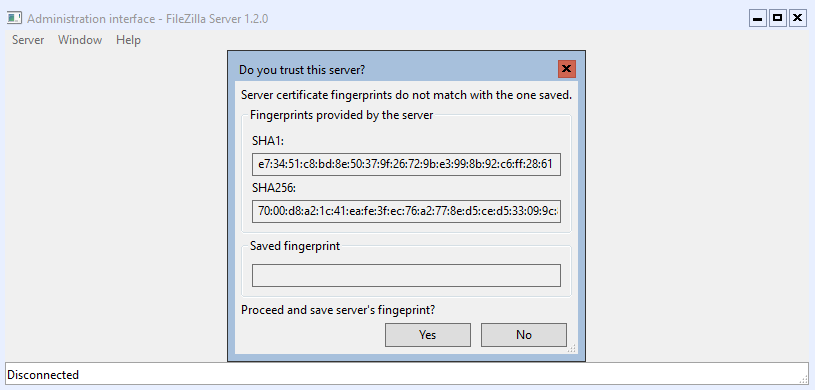
Проходим проверку доверия к серверу
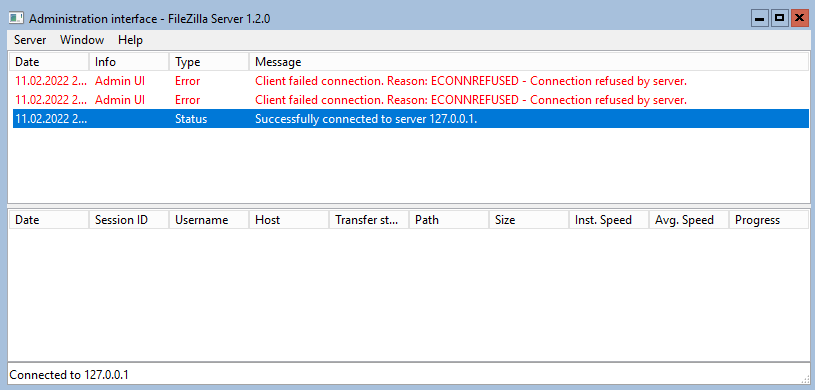
и подключаемся
Далее в настройках идём во вкладку Users. Здесь задаём имя пользователя, пароль и директорию, к которой необходимо предоставить доступ

Теперь на клиентской машине запускаем FileZilla (клиент FTP), заходим в настройки подключения и указываем данные подключения аналогично как на скриншоте ниже:
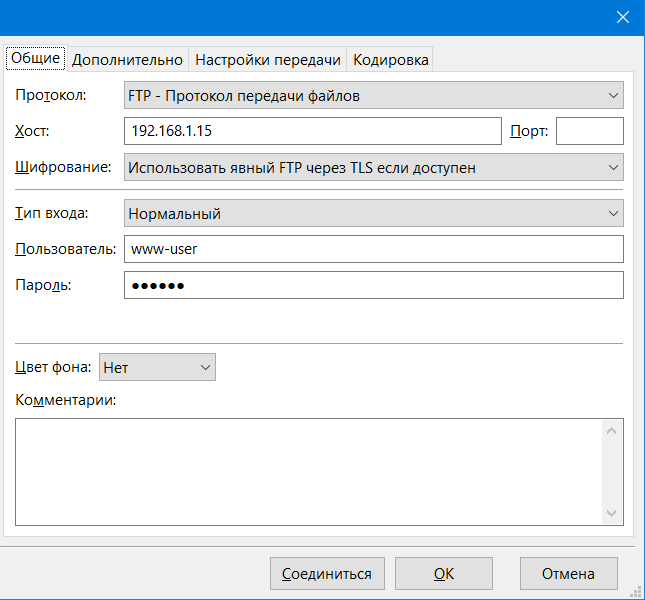
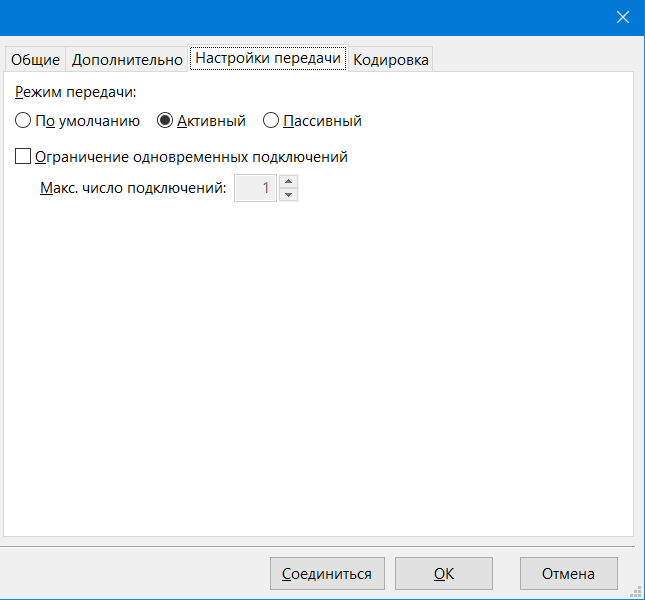
В настройках передачи указываем активный режим
и подключаемся
В интерфейсе администрирования в поле сессии отобразится пользователь и данные его подключения

Настройка будет состоять из пунктов:
- Настройка Брандмауэра
- Создание пользователей
- Настройка FTP-сайта
- Изоляция пользователей
Установка FTP-сервера
Для начала нужно установить FTP-сервер.
Открываем Пуск в нижнем левом углу, Диспетчер серверов (Server Manager), плитка которого закреплена по умолчанию. Далее все основные действия по настройке будем совершать здесь.
Находим пункт Добавить Роль и Функции (Add roles and features).
Появится мастер добавления ролей, для продолжения нажимаем Далее (Next).
В качестве типа установки выбираем Базовая Роль или Базовая Функция (based-roles or feature-based installation).
Далее из списка серверов, выбираем нужный сервер, в качестве примера он один, поэтому жмём Далее (Next).
На этапе выбора ролей отмечаем роль Веб-сервер (IIS) (Web Server (IIS)).
Откроется окно и предложит установить Консоль управления службами IIS (IIS Management Console), жмем Добавить компоненты (Add Featues), они понадобятся, чтобы администрировать FTP-сервер, жмем Далее (Next).
Следующие 2 шага пропускаем, нажимая Далее (Next).
Дойдя до пункта Службы ролей (Role Services), снимаем все галочки и выбираем Служба FTP (FTP Service) и Консоль управления службами IIS (IIS Management Console), жмем Далее (Next).
На следующем пункте проверяем все компоненты и жмём Установить (Install).
Дожидаемся окончания установки, после чего жмём Закрыть (Close).
Далее ещё нужно настроить пару моментов, не торопитесь перезагружать сервер.
Настройка Брандмауэра
Для подключения к FTP-серверу необходимо настроить Firewall. Для этого откройте Брандмауэр Windows в режиме повышенной безопасности (Windows Firewall with Advanced Security).
В вертикальном меню слева выберите Правила для входящих подключений (Inbound rules), затем в вертикальном меню справа Создать правило (New Rule).
В открывшемся окне отмечаем тип Предопределенные (Predefined) и в выпадающем списке выберите FTP-сервер (FTP Server). Нажмите Далее (Next).
Отмечаем все галочки, Далее (Next), Готово (Finish). Перезагружаем сервер для применения всех настроек.
Создание пользователей
Теперь нужно создать пользователей, которым дадим право подключаться к FTP-серверу.
Открываем Управление компьютером (Computer Management).
Открываем пункт Локальные пользователи и группы (Local Users and Groups), щелкаем правой кнопкой мыши по пункту Пользователи (Users) и выбираем Новый пользователь (New User). Заполняем необходимые поля, снимаем все галочки и жмем Создать (Create).
Если появилась следующая ошибка при создании пользователя, значит пароль не соответствует нужным требованиям:
Пароль должен соответствовать как минимум трём условиям из списка перечисленного ниже:
- Наличие прописных букв английского алфавита от A до Z;
- Наличие строчных букв английского алфавита от a до z;
- Наличие десятичных цифр (от 0 до 9);
- Наличие неалфавитных символов (например, !, $, #, %).
Открываем Диспетчер служб IIS (Internet Information Server (IIS) Manager).
В окне Подключения (Connections), кликаем правой кнопкой мыши по нашему сайту, выбираем Добавить FTP-сайт (Add FTP Site).
В открывшемся окне Добавить FTP-сайт (Add FTP Site) вводим название нашего FTP-сайта, указываем нужную директорию и жмём Далее (Next).
Далее указываем IP-адрес из выпадающего списка, или указываем Все свободные (All Unassigned). Отмечаем галочку ниже. Указываем настройки SSL, если нужно чтобы использовалось шифрование, устанавливаем SSL-сертификат, если нет, то выбираем первый вариант, как показано в примере. Жмём Далее (Next).
Выбираем проверку подлинности как Обычную (Basic). Из выпадающего списка выбираем Указанные пользователи (Specified users), и вводим имя ранее созданного пользователя. Ставим галочки напротив необходимых разрешений: Чтение (Read) или Запись (Write). Нажимаем Готово (Finish).
Изоляция пользователей
Чтобы после подключения к FTP-серверу пользователь попадал в свою директорию и не имел доступ к чужим файлам других пользователей, необходимо настроить их изоляцию. Для этого откройте настройки вашего ftp сайта и выберите Изоляция пользователей (FTP User Isolation).
Выберите Каталог имени пользователя (User name directory) и Примените (Apply).
Кликаем правой кнопкой мыши по нашему FTP-сайту, выбираем Добавить виртуальный каталог (Add Virtual Directory).
В первой строке указываем имя FTP-пользователя, ниже полный путь к директории пользователя. Её нужно создать заранее. Для понимания какая директория кому принадлежит, лучше создавать директорию с именем пользователя.
Необходимо настроить права на виртуальный каталог, кликаем правой кнопкой мыши по нему, выбираем Редактировать разрешения (Edit Permission).
Переходим во вкладку Безопасность (Security) и жмём кнопку Дополнительно (Advanced).
В окне жмём кнопку Отключение наследования (Disable inheritance), в новом окне выбираем первый вариант, затем Применить (Apply) и ОК.
Жмём кнопку Изменить (Edit).
Удаляем группу пользователей Users, и добавляем нового пользователя.
В новом окне, нужно ввести имя FTP-пользователя, для проверки нажмите Проверить имена (Check Names). Если пользователь есть, строка, где вводили имя, дополнится, нажмите ОК.
Даём все права пользователю на его директорию, отметив все галочки в первой колонке, жмём Применить (Apply) — ОК.
На этом все настройки завершены. Чтобы подключиться к серверу, используйте следующие доступы:
- Хост: IP сервера
- Пользователь: FTP-пользователь, которого вы создали
- Пароль: Пароль от FTP-пользователя
Подключиться можно через разное ПО, например FileZilla или, если вы используете Windows — Проводник, введя в адресной строке ftp://IP-сервера, после чего откроется окно для входа.
In this guide we will show the steps to setup FTP Server for Windows Server 2019 using IIS. Microsoft started with shaping the field of personal computing with their famous operating system, Windows. Since then, the technology giant has conquered many other areas like software suites, cloud computing, and AI services. It has also acquired many smaller enterprises and has evolved to become one of the most prominent players in the field.
Apart from a large and diverse collection of proprietary products, Microsoft has ventured into the computer networking world with the server operating systems (OS) Windows Server. It is an extension of Microsoft Windows and is intended for ease of use for network administrators and engineers. One of the most significant advantages of having an interface-based server OS is that installing other functionalities becomes easy, like configuring it into an FTP server.
This article gives a quick guide to setting up an FTP server on Windows Server that a user will need to ensure that the process is smooth and successful. It will also give some information about what a server OS like Windows Server is supposed to do and what an FTP server is.

Understanding FTP Server & Windows Server
The server we intend to set up follows the File Transfer Protocol (FTP) and is hence called an FTP server. The protocol follows the client-server model and thus requires a server on the receiving end to satisfy the client’s request to upload or download a file. An FTP server acts as a midpoint, and then it can be configured to restrict transfers of files and from folders that it contains.
An FTP server utilizes two ports for its functions. The client uses one to send over commands and other communications, and the other is used to channel data back and forth. It can run in mainly two modes:
- Active: In this mode, the client connects with the command port to specify the need for file transfer and the port that the server should connect for the transfer. The server then requests to connect to the client’s specified port and satisfies any data requests.
- Passive: In this mode, the first step happens as in the active mode. However, the client then tries to connect to some random port of the FTP server. Data transfer ensues once the connection is secured.
Windows Server is one of the most popular server OS used in the industry. It possesses Microsoft’s powerful PowerShell command-line and the classic Windows GUI for complete user control. It allows the user to set up virtual machines and configure the server to whatever use it serves. It offers built-in installation and configuration support through installation wizards that let the user install services and specify roles as desired.
With each update, Microsoft has tried to instill Windows Server with every new groundbreaking technology that has hit the computer networking industry. Latest updates have introduced containerization, more notable security features, encrypted networks, and better network performances, to name a few. The most recent update was in 2019, and the next update is intended for 2022.
Configuring an FTP Server For The Windows Server 2019
Having a GUI-based server OS like Windows Server significantly simplifies many mundane tasks related to network administration. Traditionally, a command-line interface was the only way to interact with a server or a network, which could get quite complicated. With Windows Server, administrators can use the built-in installation wizards and the robust PowerShell command-line to get tedious tasks done in much less time.
The answer to the question ‘how to setup FTP server’ is a straightforward process thanks to Windows Server’s powerful capabilities. The process will first set up the FTP server using an installation wizard, select appropriate server roles, configure the FTP in passive mode, and finally set up its Firewall support.
Note: The process is specifically described for Windows Server 2019, so it is a vital prerequisite to the following guide.
Configuring The Server To Perform As An FTP Server
Firstly, we will head to the Server Manager software because that is where a user can specify the roles of the server. There, we click on the “Add Roles and Features” option.
You are greeted with a page signifying the functionality of the Server Manager software. After clicking “Next,” we arrive at the installation type. There, select “Role-based or feature-based-installation” and then click “Next”.

Now, we have to select the destination server. The destination server will be the NFS system, where all the files are or will be hosted. You can either choose one from the server pool on your network or select a virtual hard disk to act as the server. Once done, move onto the next step by clicking “Next”.
Now, we select the role our server will occupy. Making our server an FTP server will require it to become an Internet Information Service (IIS) server, Microsoft’s proprietary server technology for web hosting. It is commonly used to host applications made on Microsoft’s own .NET framework. Select the “Web Server (IIS)” checkbox, and after clicking “Next”, read through the features that the wizard will install. Click “Add Features” to move forward.

You have just selected the role and the features of the FTP server-to-be as well. Move ahead by clicking “Next” on the next window and on the “Web Server Role (IIS)” stage too.
We come to the selecting the role services now. Among the options, ensure that the “Security” checkbox and the “Request Filter” under it, the “FTP Server” checkbox and the “FTP Service” under it, and the “Management Tools” checkbox and “IIS Management Console” are checked. Afterward, you can go ahead and click “Install” in the window after confirming all the configurations in the same window.

Configuring The FTP Server Ports & Setting Up Firewall Support
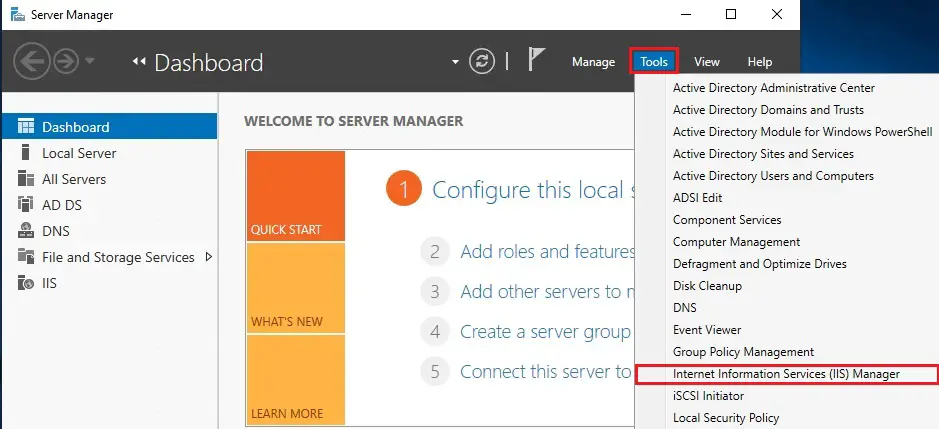
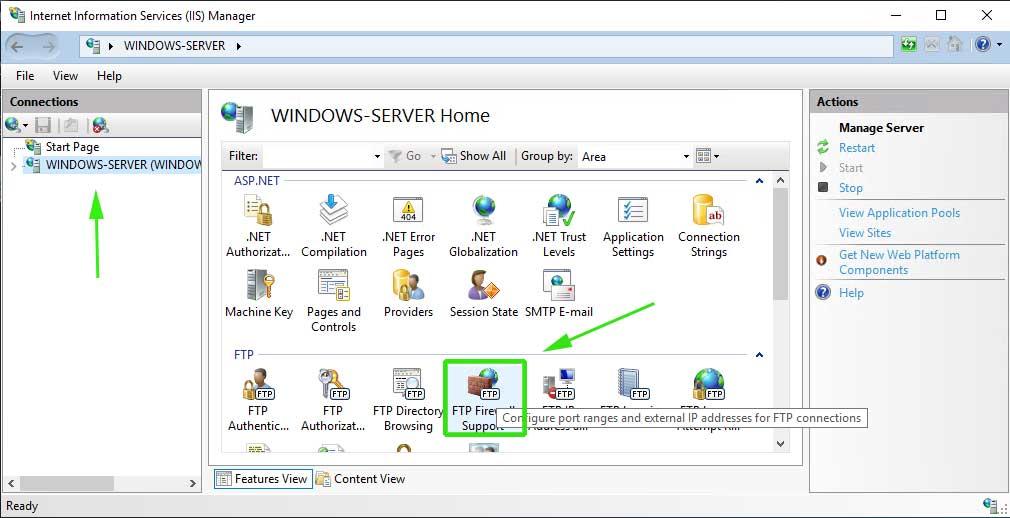
We should also set up the FTP server to work in passive mode. We open Server Manager, select “Tools”, and then select “IIS Manager”. After it opens, click on your server in the left pane to open the middle pane where all the different functionalities are present.

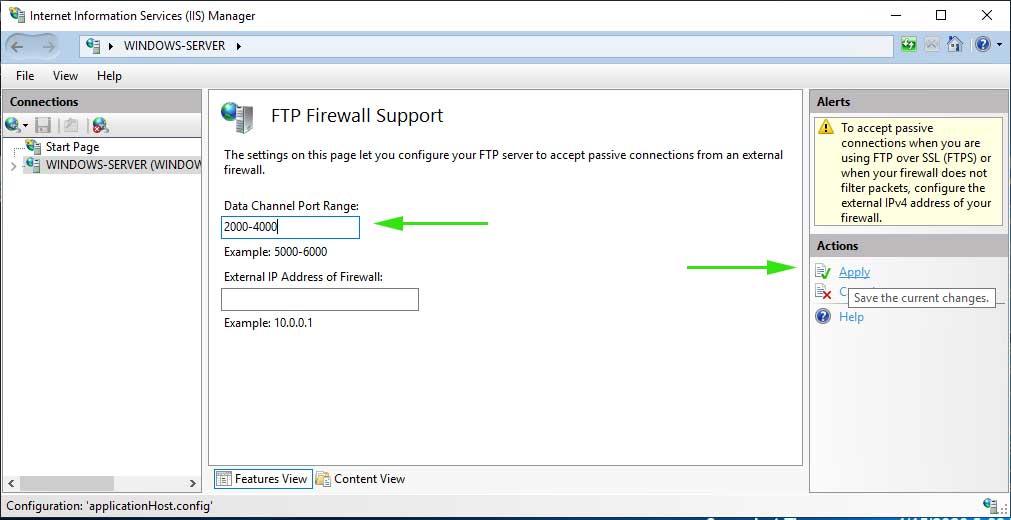
Click on “FTP Firewall Support” and click on “Open Feature” on the rightmost pane. You will have to input the range of port values for the data channel in the first box. You will have to open the ports that you had put in your Firewall configurations. Afterward, click “Apply” in the rightmost pane. After allowing the port range by clicking “OK” on the popup that follows, you will have to restart the server.
Open the Services app, right-click on “Microsoft FTP Server”, and click “Restart”.

You now have a Windows FTP server up and running. After this, you can move on and create an FTP website to provide an easy interface for your server. Additionally, you should thoroughly test your site and server to ensure everything is working as intended.
An FTP Server Up And Running On Windows Server
Network configurations of enterprises are growing more complex with the inclusion of cloud services and strategies like hybrid cloud services. The stakes for administrators and network engineers were already high and are higher with the added complexity. Helpful and robust software like Windows Server makes it easy to monitor a network and ensure its stability. Tasks like installing an FTP Server now take much less effort and time, thanks to Windows Server.
In this article, I will discuss How to set up FTP Server on Windows. I will be able to describe the method of putting in and configuring the FTP server in Windows Server 2019.
How to install FTP Server 2019 (IIS)
1- Open the Server Manager > Left side select Dashboard option and click on Add roles and features under welcome to server manager.
2- Click next.
3- Select Role-based or feature-based installation and click on next because of the installation type.
4- Select the server from the server pool and click on next.

5- In the server roles, check the IIS web server role.
6- Click Add features required for Web Server (IIS).
7- After selecting the Web Server (IIS) role, click next.
8- On the features option page, click next.
9- Click next.
10- In the Role Services window, check the FTP server and FTP Extensibility and click next.

11- Review the confirm installation summary and click install.

12- Server role installation installed successfully. Click close.
Step by step, create FTP users and groups to access an FTP server in 2019
1- Create a replacement user to access the FTP server > open Server Manager > select tools and click on Computer Management.
2- Under computer management > Expand Local Users and Groups > select Users > right-click and select New User.

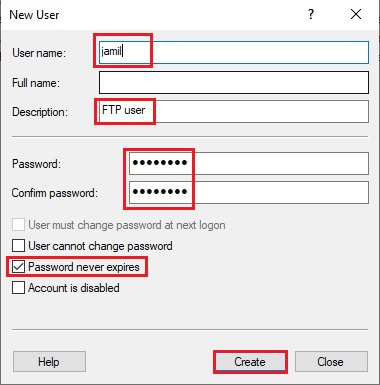
3- Type user name, Description, and Password, select Password never expires, and click create.
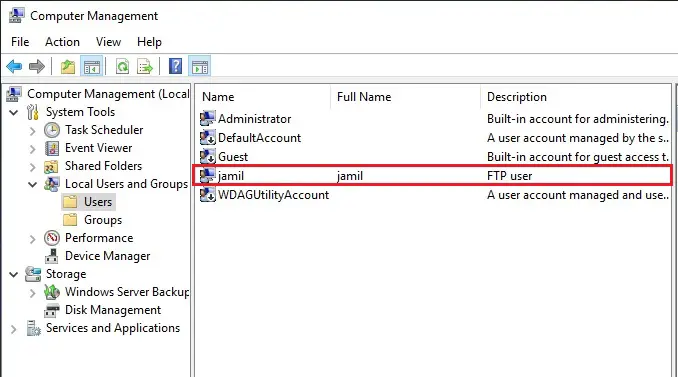
4- Now, a new user has been created.
How to Create a replacement Group for local users and computers.
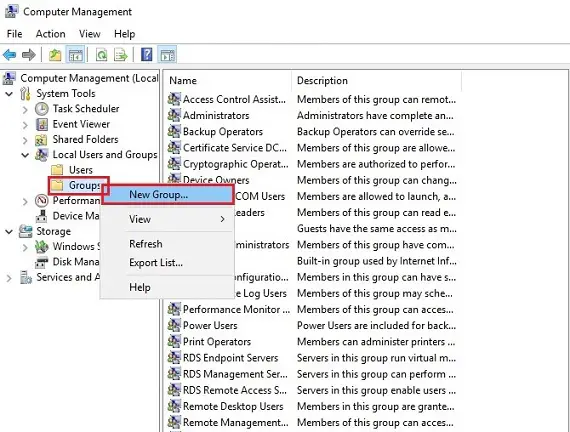
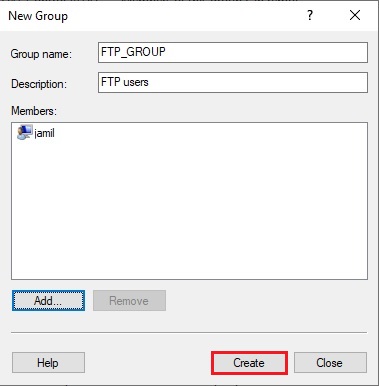
1- After creating a user,> Now right-click on Groups under Users and Groups and click new group.
2- In the Group Name field, type the group’s name> a Description and click the Add button to add a user.
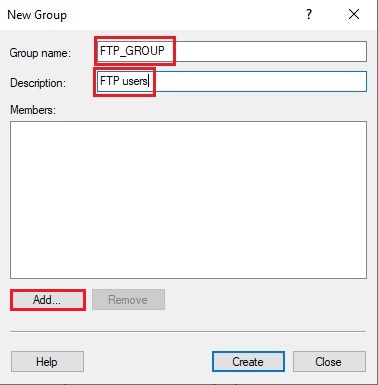
3- Enter a character under the object names to select field > click Check Names If Windows users exist > then click Ok.
4- After the user is added > Select Create button to create a group.
Step by step Creates an FTP site in the IIS Manager server 2019.
1- Open IIS Manager > select Tools and Internet Information Service (IIS) Manager.
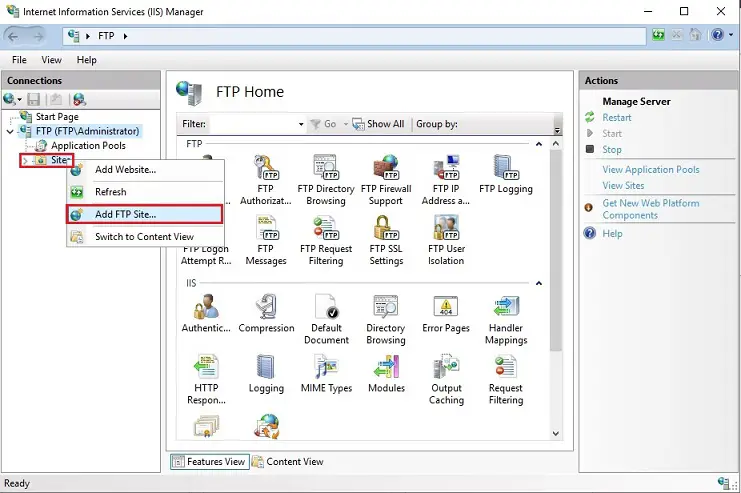
2- Expand your FTP server, right-click Sites, and Add FTP Site.
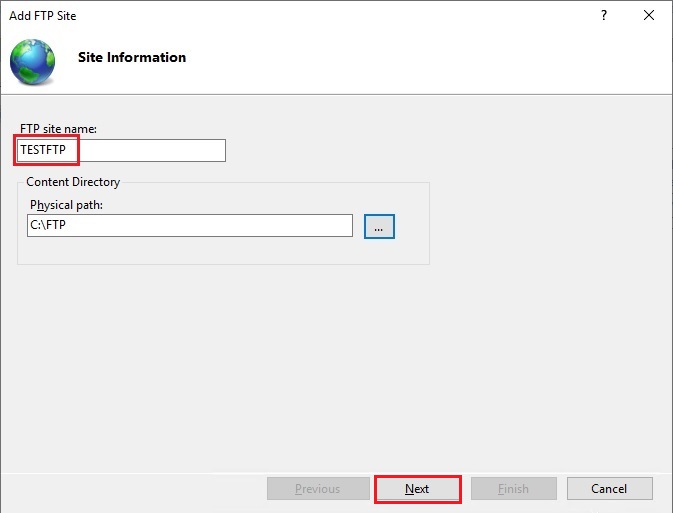
3- Enter the FTP site name and path to the directory and click next.
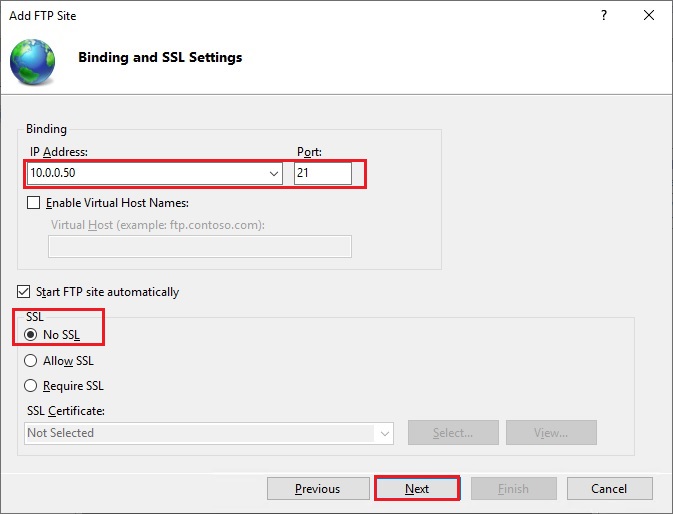
4- type your IP address in the IP Address field, Port, for encryption, select No SSL and click next.
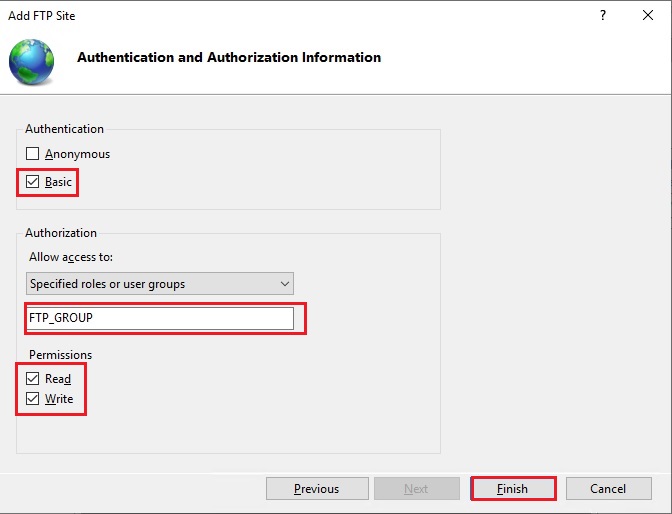
5- Under Authorization, select Basic > Specified roles or groups > type your FTP group name for users > choose read and write permissions and click Finish.
6- Now, my website is showing in the tree structure of the Windows web server.

How to add FTP virtual directory and add permission
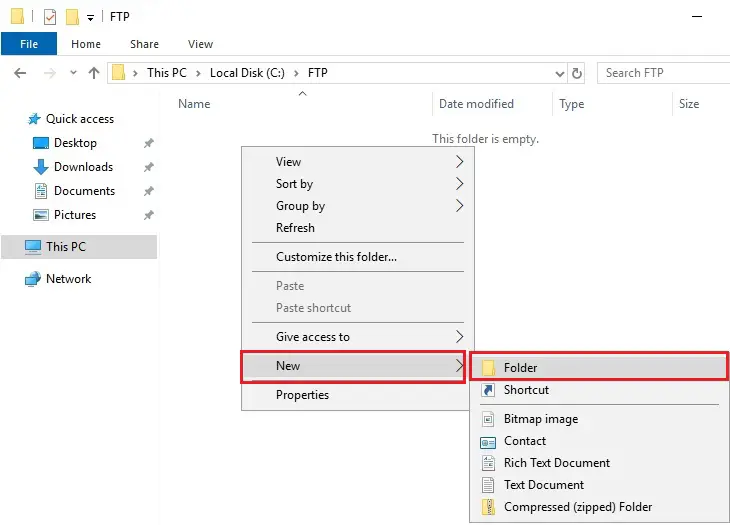
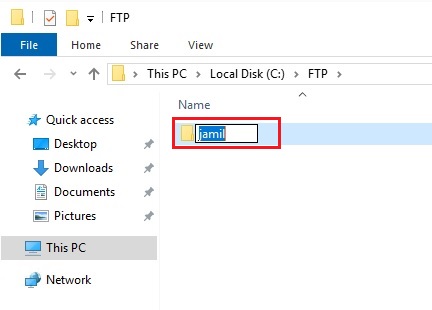
1- Open This PC > open Local Disk (C) > open FTP directory > right-click, select New and click Folder to create a subdirectory.
2- Type a subdirectory name and press enter.
3- Right-click on your FTP site and select Add Virtual Directory.

4- In the Alias field, type a name and select … to add the user directory path,
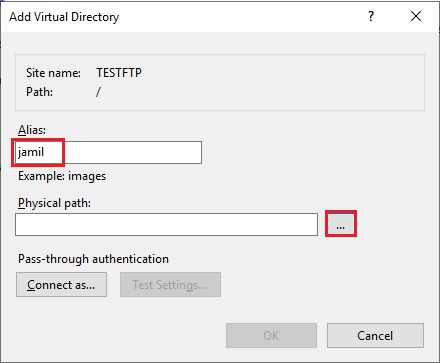
5- Expand Local Drive (C) > FTP directory > select the subdirectory the one you have created and click ok.
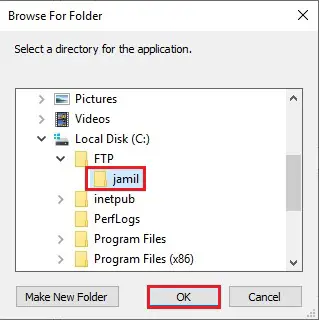
6- After adding a virtual directory path, click ok.
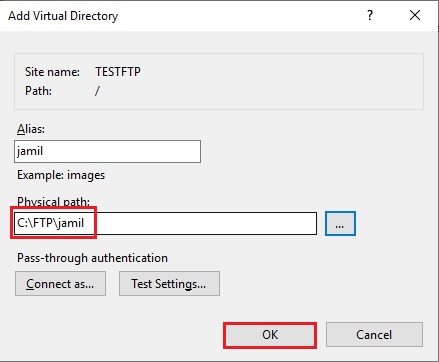
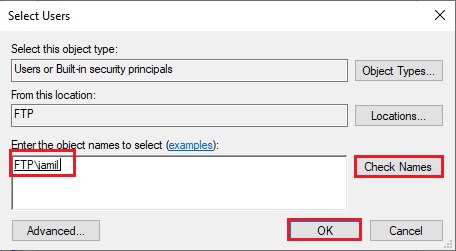
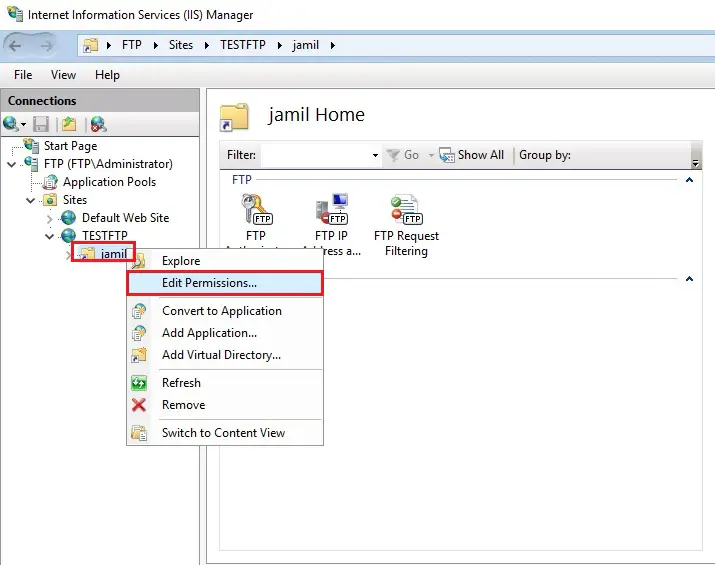
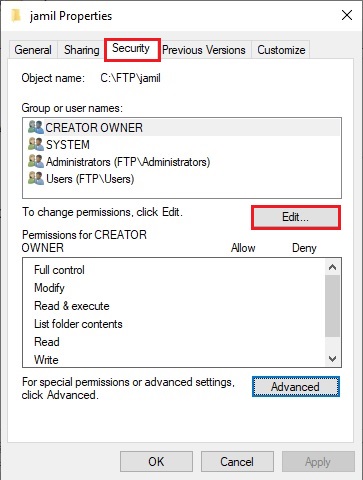
7- To configure permissions in IIS Manager > right-click on a subdirectory (for example, Jamil) and select edit Permission.
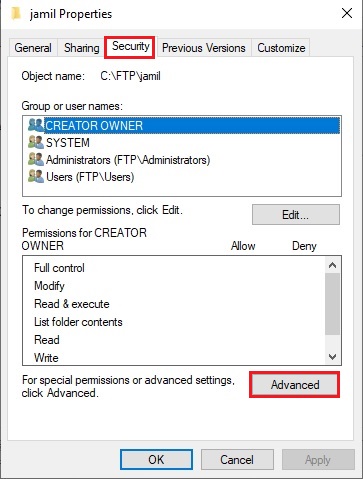
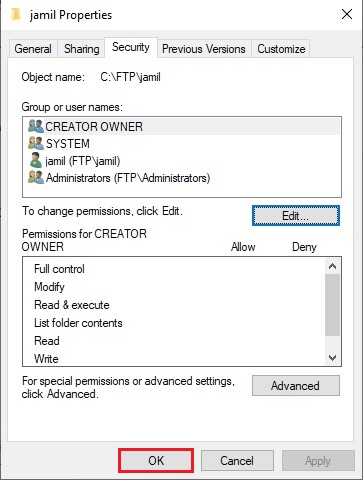
8- Click on the Security tab and click the Advanced button.
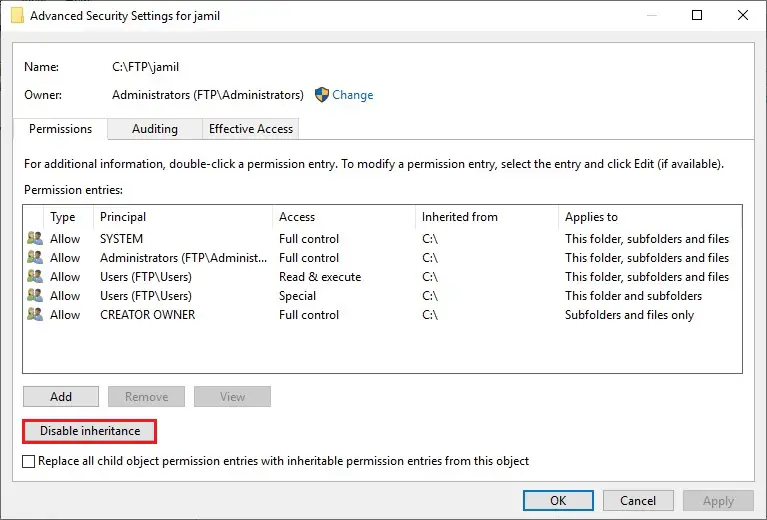
9- Under advanced security settings and click the Disable inheritance button.
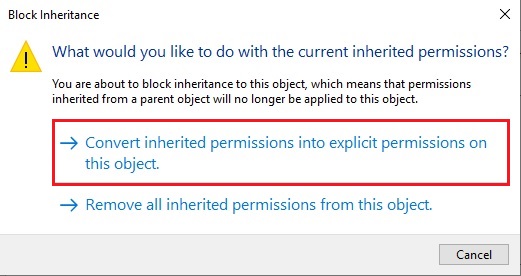
10- Select convert inherited permissions into explicit permission on the object.
11- After enabling inheritance, click ok.
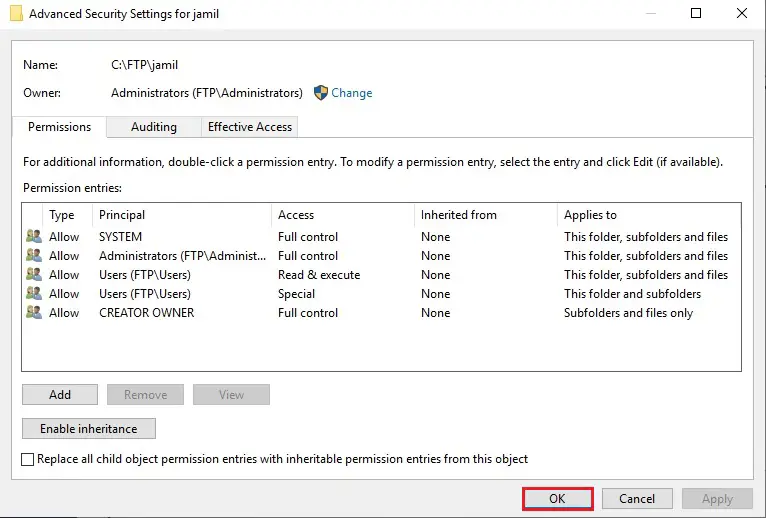
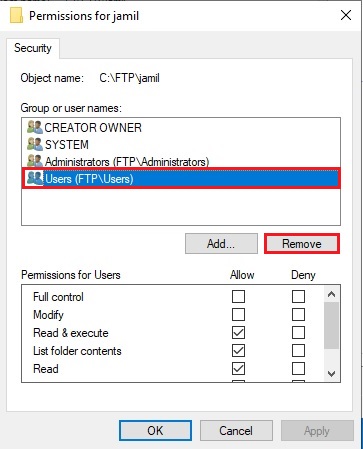
12- Go back to the Security tab and click on the Edit button.
13- Select the Users group in which all users are located and click the Remove button. After removing all users, only the directory owner has access to it.
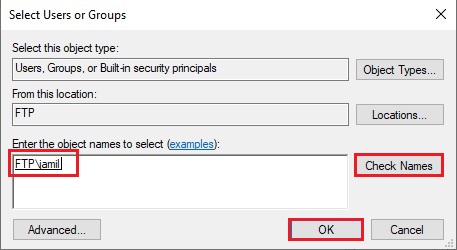
14- We need to add a Windows user with full access to the directory. Click the Add button.

15- Type the username of the virtual directory > click Check Names and click Ok.
16- Next, we need to permit complete control of the guide> Select the created user, check all fields Allow (Permissions), and click ok.
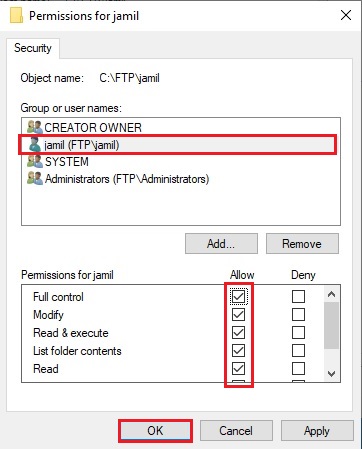
17- Click Ok.
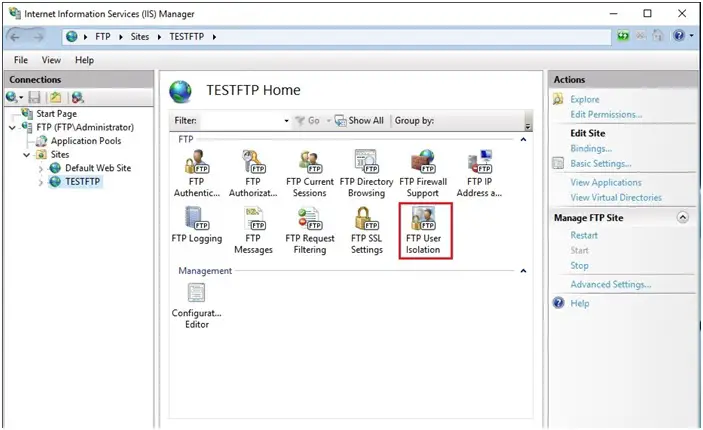
How to set up FTP User Isolation
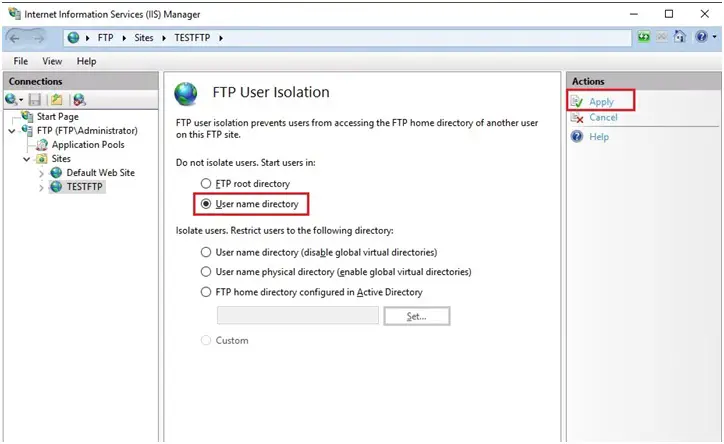
1- Now, we need to set up an isolation FTP For each user to get to their directory and not have access to other files after connecting to the server and selecting FTP User Isolation.
2- Select the user name directory and click Apply under the Action menu.
How to allow FTP port in windows firewall
You need to configure the firewall for an external connection to the FTP server.
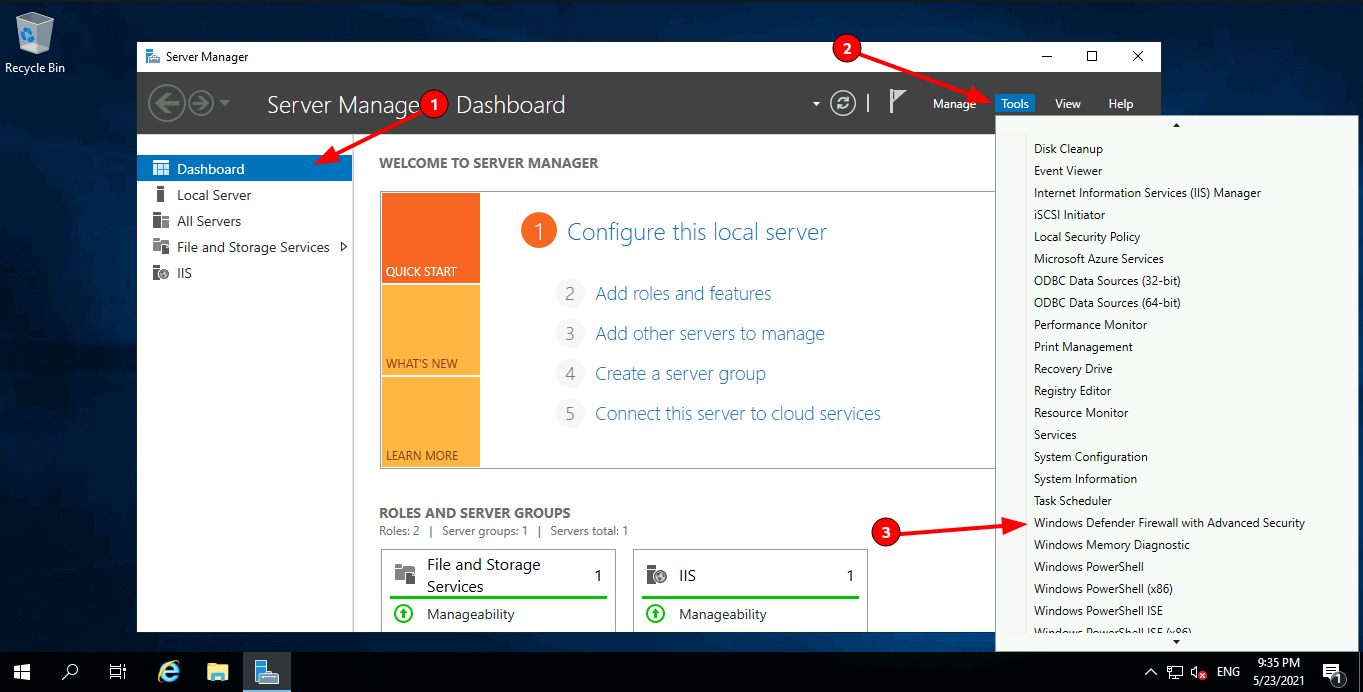
1- Open Server Manager > select Tools and Windows Defender Firewall with Advanced Security.
2- Select Inbound Rules and a particular New Rule under the Action menu.
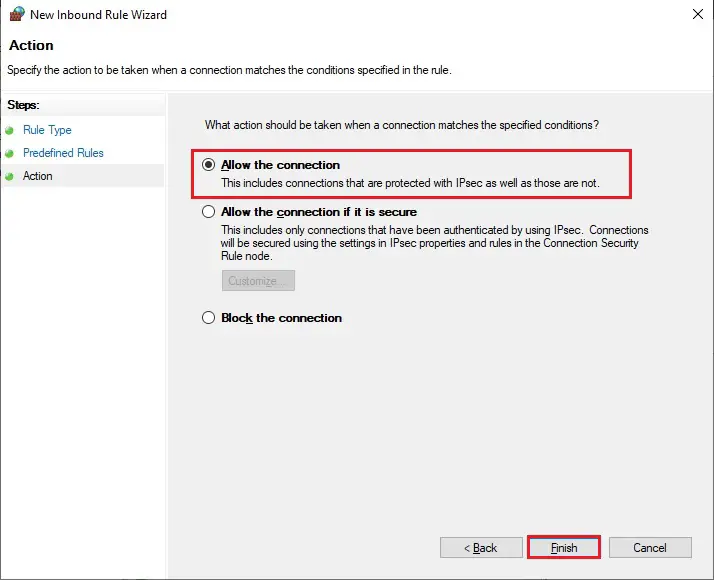
3- Select Predefined, select FTP Server from the drop-down list and click next.
4- Check all the predefined rules and click next.
5- Select Allow the connection, and click Finish. For these rules to take effect and restart the server.
How to Access an FTP Server in Windows Explorer and Internet Explorer
You can set up an FTP server in many ways, for example, through the standard Windows utility, Explorer, or the FileZilla program.
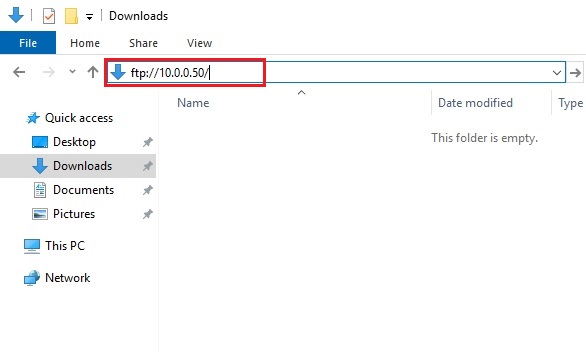
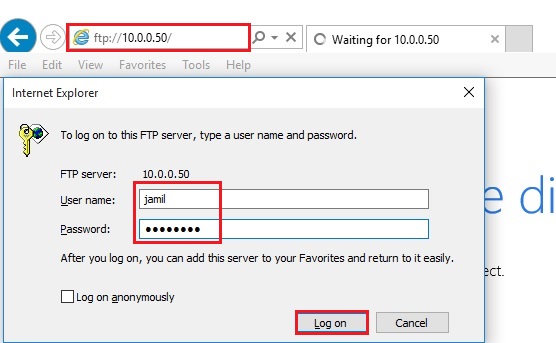
1- I am connecting through Windows Explorer. Type FTP address in the address bar and press enter: For example, (my FTP server address is – ftp://10.0.0.50)
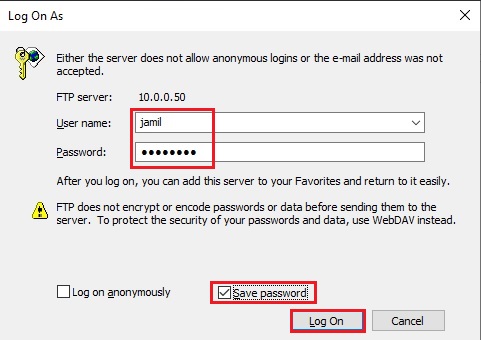
2- Type user name, Password, check the save password box, and click Log On.
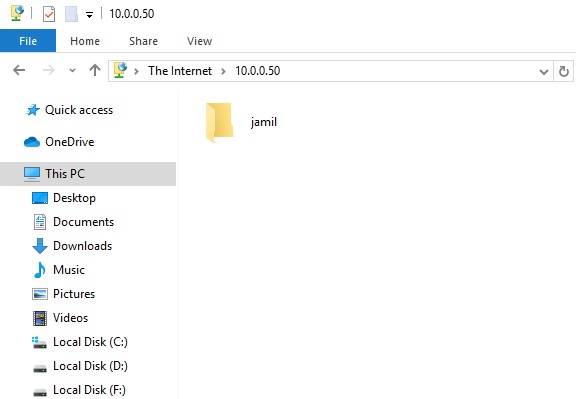
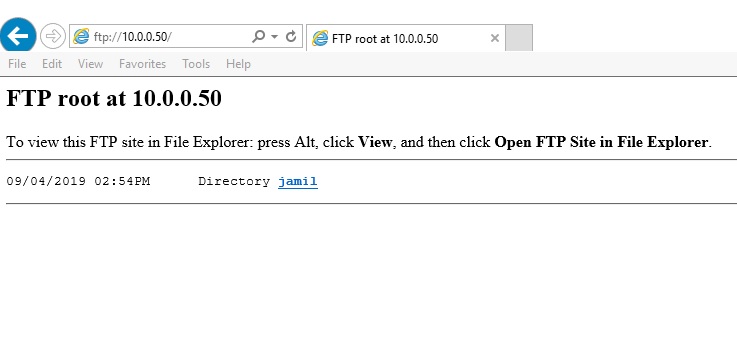
3- You will see the contents of the FTP server folder.
4- Now, I am connecting through Internet Explorer. Type FTP address in the address bar and press enter: For example, (my FTP server address is – ftp://10.0.0.50).
Type a user name, Password and click Log On.
5- You will see the contents of the FTP server folder.
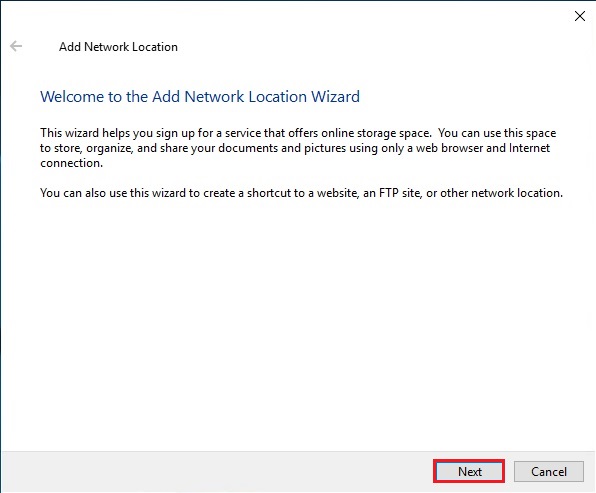
1- Open This PC in Windows Explorer, and select Add a network location to open the Add Network Location Wizard.

2- Click Next.
3- Select Choose a custom network location and click on Next.
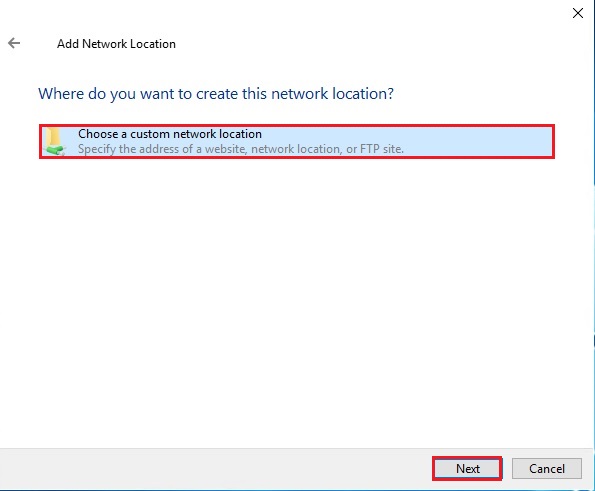
4- Type your FTP address (Ex. ftp://10.0.0.50) and click next.

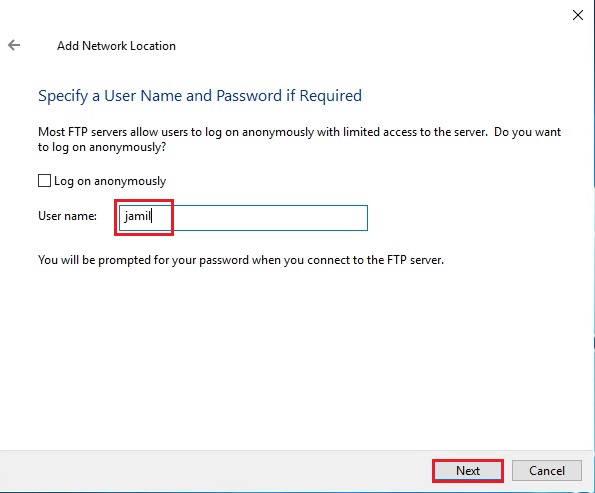
5- Uncheck Log on anonymously, type your user name provided as your FTP login credentials, and then click next.
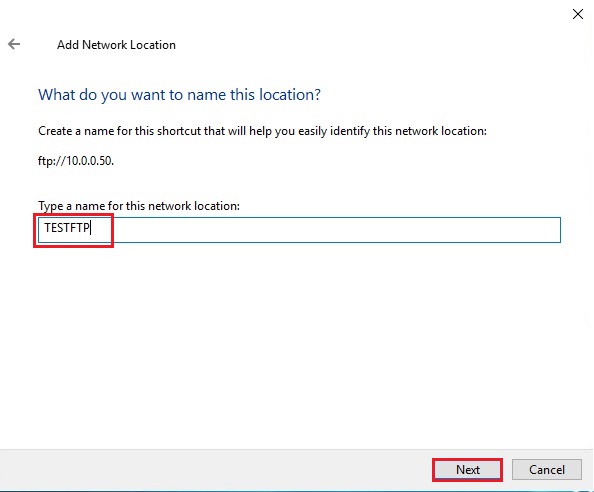
6- Type a name for the Network location and click Finish.
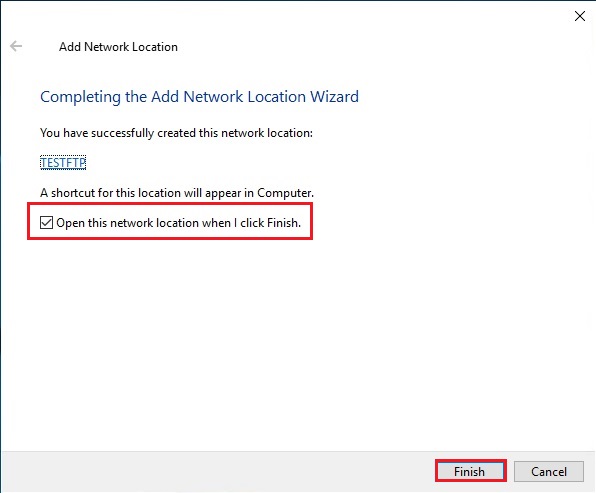
7- Check the box Open this network location when I click Finish.
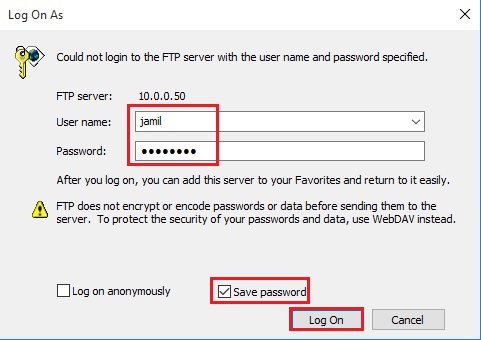
8- Type your Password in the password field, click on Save Password and click Log On to test your connection. This is the second last step in FTP setup.
9- After setting up FTP Server, you can see the FTP folder.

I think I did my best to Provide valuable information to you about How to set up FTP Server on Windows Server. I assure you that if you read this article entirely, You will be able to set up FTP on Windows Server.
For more information, click here
How to Install and Configure the FTP server with PowerShell. We have examined how to install FTP Server in Windows Server 2019 graphically in the previous tutorials, and in this article, we are going to teach you how to do this with PowerShell.
We will show you how to configure the site name, port, and root folders. Then we will explain how to create FTP users, how to authenticate users, and how to configure the SSL policy and NTFS permissions.
Available VPS Servers in Eldernode
How to Install the FTP feature
Before you can begin configuring your FTP server, you first need to install the required Windows features:
1) FTP
2) Web Server (IIS)
3) Management Tools to administer it with PowerShell
# Install the Windows feature for FTP Install-WindowsFeature Web-FTP-Server -IncludeAllSubFeature Install-WindowsFeature Web-Server -IncludeAllSubFeature IncludeManagementToolsAfter the installation completes, import the WebAdministration module.
This will map an Internet Information Services (IIS) drive (IIS:) through which we will configure our FTP site later in this article.
# Import the module Import-Module WebAdministrationHow to Configuring the site name, port, and root folder
You can create a new FTP site using the New-WebFtpSite cmdlet by providing an FTP site name, root folder for your FTP site, and port number.
Note: We are choosing port 21, which is the default FTP port, but you can also specify any custom port for your FTP site.
# Create the FTP site $FTPSiteName = 'Default FTP Site' $FTPRootDir = 'D:FTPRoot' $FTPPort = 21 New-WebFtpSite -Name $FTPSiteName -Port $FTPPort -PhysicalPath $FTPRootDirAfter running the cmdlet, you’ll see the FTP site and bindings in IIS Manager.
How to Create FTP users
After creating a new FTP site, you can create a Windows user or group through which you can control the access to the FTP server.
First, create the Windows local group:
# Create the local Windows group $FTPUserGroupName = "FTP Users" $ADSI = [ADSI]"WinNT://$env:ComputerName" $FTPUserGroup = $ADSI.Create("Group", "$FTPUserGroupName") $FTPUserGroup.SetInfo() $FTPUserGroup.Description = "Members of this group can connect through FTP" $FTPUserGroup.SetInfo()Then we will create a new local FTP user with a username and password:
# Create an FTP user $FTPUserName = "FTPUser" $FTPPassword = '[email protected]' $CreateUserFTPUser = $ADSI.Create("User", "$FTPUserName") $CreateUserFTPUser.SetInfo() $CreateUserFTPUser.SetPassword("$FTPPassword") $CreateUserFTPUser.SetInfo()Add the FTP user to the Windows group:
# Add an FTP user to the group FTP Users $UserAccount = New-Object System.Security.Principal.NTAccount("$FTPUserName") $SID = $UserAccount.Translate([System.Security.Principal.SecurityIdentifier]) $Group = [ADSI]"WinNT://$env:ComputerName/$FTPUserGroupName,Group" $User = [ADSI]"WinNT://$SID" $Group.Add($User.Path)How to Authenticate FTP users to access FTP server data
Now enable basic authentication on the FTP site and authorize the Windows group that contains the FTP user so it can access the FTP site.
# Enable basic authentication on the FTP site $FTPSitePath = "IIS:Sites$FTPSiteName" $BasicAuth = 'ftpServer.security.authentication.basicAuthentication.enabled' Set-ItemProperty -Path $FTPSitePath -Name $BasicAuth -Value $True # Add an authorization read rule for FTP Users. $Param = @{ Filter = "/system.ftpServer/security/authorization" Value = @{ accessType = "Allow" roles = "$FTPUserGroupName" permissions = 1 } PSPath = 'IIS:' Location = $FTPSiteName } Add-WebConfiguration @paramYou can also check these settings under IIS Manager >> FTP Site >> FTP Authorization Rules.
SSL policy and NTFS permissions to the FTP root folder
Change the SSL policy from Require SSL to Allow SSL connections.
$SSLPolicy = @( 'ftpServer.security.ssl.controlChannelPolicy', 'ftpServer.security.ssl.dataChannelPolicy' ) Set-ItemProperty -Path $FTPSitePath -Name $SSLPolicy[0] -Value $false Set-ItemProperty -Path $FTPSitePath -Name $SSLPolicy[1] -Value $falseThe commands below set the NTFS permissions on the FTPRoot folder to allow the FTP user group to access the files:
$UserAccount = New-Object System.Security.Principal.NTAccount("$FTPUserGroupName") $AccessRule = [System.Security.AccessControl.FileSystemAccessRule]::new($UserAccount, 'ReadAndExecute', 'ContainerInherit,ObjectInherit', 'None', 'Allow' ) $ACL = Get-Acl -Path $FTPRootDir $ACL.SetAccessRule($AccessRule) $ACL | Set-Acl -Path $FTPRootDirYou can verify this from the FTP root folder properties under the Security tab.
# Restart the FTP site for all changes to take effect Restart-WebItem "IIS:Sites$FTPSiteName" -VerboseYou can test the FTP server, which should allow you to access files, content, and directories under the FTP root folder.
Also, see:
Tutorial add FTP Site on Windows Server 2019
How to Create FTP in XAMPP
How to install FTP Server on windows server 2019
Dear user, we hope you would enjoy this tutorial, you can ask questions about this training in the comments section, or to solve other problems in the field of Eldernode training, refer to the Ask page section and raise your problem in it as soon as possible. Make time for other users and experts to answer your questions.
How to Install and Configure the FTP server with PowerShell
Goodluck.
FTP (File Transfer Protocol) is a service that allows the transfer of files between a server and a client system over a TCP/IP network. The FTP protocol, usually running on port 21, allows a user to either upload or download files from an FTP server.
In this guide, you will learn how to install and configure an FTP server on Windows 2019.
Installing FTP server using Server Manager
Step 1: Click on ‘Add Roles and Features’
As with any Windows server system from 2012 and onwards, to add any feature using the GUI, you need to begin from the server manager. So, on the ‘Server Manager’ window, click on ‘Add roles and Features’.
Step 2: Click on the ‘Next’ tab
The next pre-flight check window reminds you to first set a strong Administrator account password and set a static IP, so click on the ‘Next’ button below to proceed with the installation process.
Step 3: Select the mode of installation
In the next window, you will be prompted to select the installation type.
Click on the ‘Role-based or feature-based’ option and click ‘Next’
Step 4: Select the Destination Server
In the next window, click on the server that you are installing the FTP on. Usually, this is the server that you currently working on. Enter the NetBIOS name, the IP address and the operating system type.
Select the server and click ‘Next’.

Step 5: Select the roles to be installed
Next, check off the ‘Web Server (IIS)’ option. When expanded, check off the ‘FTP Server’ option, which constitutes the FTP service and FTP extensibility. Then click ‘Next’.
Step 7: Select the roles to be installed
On the next Window, your selections will be confirmed. Click on ‘Install’ to start the installation.
The installation will then begin and after completion, click on the ‘Close’ button.
Installing an FTP server using Windows PowerShell
If you are a fan of running commands and prefer it to using the GUI wizard, Windows PowerShell can equally come in handy.
So, launch Windows PowerShell as an Administrator and execute the command below:
Install-WindowsFeature Web-FTP-Server -IncludeManagementTools
The output below will be displayed:
Success Restart Needed Exit Code Feature Result
——- ————– ——— ————–
True No Success {FTP Server, FTP Service, IIS Management
Configuring your FTP server
At this point, you have successfully installed your FTP server. The next step is to configure your server for the transmission of files.
On the ‘Server Manager’, click on ‘Internet Information Services (IIS) Manager’
On the next Window, click on your server system on the left sidebar. This reveals a pane at the center. Under ‘FTP’, click on ‘FTP firewall Support’.
Next, define a range of ports and click ‘Apply’.
Now go back and right-click on your Windows server and click on ‘Add FTP Site’. Then click ‘Next’.
Provide your preferred site name and specify the path to the FTP directory.
Next, define the bind-address settings. Type your server’s IP or Public IP address. For a start, you can select No SSL, but for future purposes, ensure to use SSL by clicking on ‘Allow SSL’.
Finally, select the authentication type as ‘Basic’ and also select ‘All users’ and assign read and write permissions.
The FTP site is now ready.
On the firewall settings, allow port 21, which by default is used by FTP.

And that’s how you install and configure an FTP server on a Windows 2019 Server!