In this article, I will show you how to configure NTP Server on Windows Server 2016 in just a few steps.
We will use PowerShell to change the NTP Server and we will validate if it worked afterward.
Configure the NTP Server on Windows Server 2016
On your Windows Server, 2016 hit the Windows Button and type: PowerShell and right-click it and select Run as Administrator
Type the following commands
w32tm /config /manualpeerlist:pool.ntp.org /syncfromflags:MANUAL
Stop-Service w32time
Start-Service w32time

Of course, you can take any NTP Server that you want.
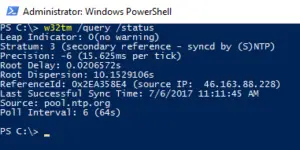
Now verify if the time-server was set correctly on your Server 2016 by typing:
w32tm /query /status
You should get a reply like this:
Now we will go ahead and verify if our clients sync properly.
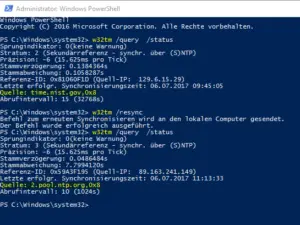
Verifying if the Time Server was correctly set on our Clients
On a client computer open a PowerShell with right-click and Run as Administrator….
Type:
w32tm /query /status
Check the time-server and type:
w32tm /resync
w32tm /query /status
Then you are able to see that the time-server actually changed like in the example below.
And that’s it! Easy, right?
Always make sure that you use the same time-server in your network and that all your clients are syncing with it. If you have time differences inside of your Active Directory Domain you will run into major issues.
В этой статье показано, как настроить службу времени Windows (NTP) в Windows Server 2016, чтобы она действовала как NTP-сервер для клиентских компьютеров домена.

Содержание
- Немного теории
- Проверяем откуда сервер берет время
- Быстрая настройка NTP на Windows Server 2016
- Расширенная настройка NTP на Windows Server 2016
- Проверка работы NTP сервера (Живой ли внешний NTP сервер с которого мы берем время)
- Список команд w32tm
- Также хотел бы поделится комментарием найденным на форуме
Немного теории
Синхронизация времени — важный и во многом достаточно критичный аспект работы Active Directory, особенно сегодня, когда широко используется взаимодействие с внешними системами и работа с сотрудниками, которые могут находиться в различных часовых поясах. Применение систем виртуализации вносит дополнительные особенности, которые также следует учитывать. Поэтому данный вопрос может оказаться не столь простым, как кажется, а синхронизация с внешним источником точного времени становится одной из актуальных задач.
Прежде всего вспомним, как происходит синхронизация времени в Active Directory. В качестве эталона времени выступает контроллер, владеющий ролью эмулятора PDC. Это FSMO-роль и эмулятором PDC может являться только один контроллер в каждом домене. С ним синхронизируют время остальные контроллеры домена. Доменные ПК и рядовые серверы сверяют часы с ближайшим контроллером домена.
Сам эмулятор PDC в качестве источника точного времени может использовать либо аппаратные часы материнской платы, либо внешний источник точного времени, при нахождении в виртуальной среде также может быть использовано время хоста виртуализации.
О последней поговорим более подробно. Раньше все было довольно просто, источником времени в домене обычно служили аппаратные часы эмулятора PDC, ну отстали или убежали на пару минут, в конце концов можно и подвести. Когда добавилось требование взаимодействия с внешними системами критичными к точному времени (например, использующих криптографию), то в качестве источника времени стал выступать внешний сервер. От него получал время эмулятор PDC, с ним синхронизировались контроллеры, а от них точное время расходилось на остальных участников домена.

С приходом виртуализации все изменилось, появился еще один источник времени — время хоста виртуализации. Многие гипервизоры по умолчанию имеют включенной настройку синхронизации времени гостевых систем и при попадании в виртуальную среду контроллера может возникнуть следующая коллизия: контроллер синхронизирует время с хостом, но сам хост, являясь членом домена, в свою очередь синхронизируется с контроллером.
Еще хуже, если в виртуальную среду попадает эмулятор PDC, в силу особенностей таймера виртуальных машин, время внутри может достаточно сильно плавать, поэтому виртуальный эмулятор PDC всегда должен синхронизировать время с внешним источником, а синхронизация времени с хостом должна быть отключена, последнее касается и всех остальных виртуальных членов домена.
Проверяем откуда сервер берет время
Давайте перейдем от теории к практике. Начнем с того, что выясним кто из контроллеров является эмулятором PDC и эталоном времени для домена. Это можно сделать на любом контроллере домена командой:
netdom query fsmoВ выводе будут показаны все хозяева операций, нас интересует только эмулятор PDC.

Затем перейдем на указанный контроллер и узнаем источник времени для него, для этого выполните команду:
w32tm /query /source
Если в выводе вы увидите:
Local CMOS Clock
Free-Running System Clock
то источником времени являются аппаратные часы. А если там будет:
VM IC Time Synchronization Provider
то вы имеете дело с виртуальной машиной, которая синхронизирует время с хостом.
Данную настройку следует исправить, это можно сделать в настройках виртуальной машины, отключив синхронизацию времени с хостом, либо в самой системе, для этого откройте ветвь реестра:
HKEY_LOCAL_MACHINESYSTEMCurrentControlSetServicesW32TimeTimeProvidersVMICTimeProviderи установите для параметра Enabled значение 0.
После данного изменения следует перезапустить Службу времени Windows как показано ниже или перезагрузить компьютер.
net stop w32time
net start w32time
Далее будет показана быстрая настройка NTP клиента на сервере и более расширенная.
Быстрая настройка NTP на Windows Server 2016
На вашем Windows Server 2016 нажмите кнопку Windows и введите: PowerShell, щелкните правой кнопкой мыши и выберите «Запуск от имени администратора».
Введите следующие команды
w32tm /config /manualpeerlist:ntp1.stratum2.ru /syncfromflags:manual /reliable:yes /update

reliable:(YES|NO) — определяет, является ли этот компьютер надежным источником времени


Stop-Service w32time
Start-Service w32time
Конечно, вы можете взять любой NTP-сервер, какой захотите. Я брал отсюда
Теперь проверьте, правильно ли настроен сервер времени на вашем сервере Server 2016, набрав:
w32tm /query /status
Расширенная настройка NTP на Windows Server 2016
Расширенная настройка нашего эмулятора PDC на работу с внешними источниками точного времени. Все изменения также будут вноситься через реестр. Прежде всего изменим тип сервера на NTP, для этого откроем ветку
HKEY_LOCAL_MACHINESYSTEMCurrentControlSetServicesW32TimeParameters
и для параметра Type укажем строковое значение NTP. А для параметра NtpServer зададим адреса серверов точного времени, после каждого из которых, через запятую укажем 0x8, если мы хотим работать как стандартный NTP-клиент или 0x1 если будем использовать собственные параметры, например:
ntp1.stratum2.ru,0x1 ntp2.stratum2.ru,0x1 ntp4.stratum2.ru,0x1
После чего в
HKEY_LOCAL_MACHINESYSTEMCurrentControlSetServicesW32TimeTimeProvidersNtpServer
Параметр Enabled установим в значение 1.

Затем перейдем в
HKEY_LOCAL_MACHINESYSTEMCurrentControlSetServicesW32TimeConfig
и установим для параметра AnnounceFlags значение A.
Значение «AnnounceFlags» может составлять сумму его флагов, например:
10=2+8 — NTP-сервер заявляет о себе как о надежном источнике времени при условии, что сам получает время из надежного источника либо является PDC корневого домена. Флаг 10 задается по умолчанию как для членов домена, так и для отдельно стоящих серверов.
5=1+4 — NTP-сервер всегда заявляет о себе как о надежном источнике времени. Например, чтобы заявить рядовой сервер (не контроллер домена) как надежный источник времени, нужен флаг 5;

Следующие параметры будут работать, только если мы при указании серверов добавили 0x1, иначе будут использоваться настройки, предлагаемые сервером. Чтобы задать период синхронизации откройте ветку
HKEY_LOCAL_MACHINESYSTEMCurrentControlSetServicesW32TimeTimeProvidersNtpClient
и для параметра SpecialPollInterval укажите десятичное значение в секундах.

Вернемся в
HKEY_LOCAL_MACHINESYSTEMCurrentControlSetServicesW32TimeConfig
И зададим максимальное время опережения и отставания часов, после которых синхронизация производиться не будет. Для этого используются параметры MaxPosPhaseCorrection (опережение) и MaxNegPhaseCorrection (отставание) для которых также следует задать десятичное значение в секундах. По умолчанию стоит 48 часов. Это значит, что если время на эмуляторе PDC уйдет от точного источника более чем на 48 часов в любую сторону, то синхронизация производиться не будет.

Если вы хотите, чтобы время синхронизировалось всегда, то установите в оба параметра шестнадцатеричное значение FFFFFFFF.
Выполнив настройки перезапустите Службу времени Windows, это также можно сделать в командной строке:
net stop w32time
net start w32time
После чего еще раз выполним команду чтобы показать источники времени и их состояние
w32tm /query /peers
выполняем еще команду
w32tm /query /source
и убедимся, что источником времени для эмулятора PDC является внешний сервер.

Затем выполним данную команду на рядовых контроллерах домена, в качестве источника времени там должен быть указан эмулятор PDC, и на обычных ПК, где в выводе будет присутствовать любой из контроллеров домена. Обязательно выполните контроль для виртуальных машин, чтобы быть уверенным, что они используют время домена, а не хоста виртуализации.
Проверка работы NTP сервера (Живой ли внешний NTP сервер с которого мы берем время)
В Windows, нужно открыть командную строку и выполнить команду w32tm со специальными параметрами. Где ntp1.stratum2.ru — это NTP сервер
w32tm /stripchart /computer:ntp1.stratum2.ru /dataonly /samples:3Ответ будет содержать локальное время, и разницу со временем на указанном NTP сервере. Например:
w32tm /stripchart /computer:ntp1.stratum2.ru /dataonly /samples:3
Tracking ntp1.stratum2.ru [88.147.254.230:123].
Collecting 3 samples.
The current time is 8/1/2022 3:48:56 PM.
15:48:56, +00.0098812s
15:48:58, -00.0036452s
15:49:00, +00.0005137s
PS C:UsersAdministrator>
На данном выводе видно что погрешность синхронизации составяляет +00.0098812s
Список команд w32tm
Основные команды конфигурации w32tm
- w32tm /register — Регистрация и включение службы со стандартными параметрами.
- w32tm /unregister — Отключение службы и удаление параметров конфигурации.
- w32tm /monitor — Просмотр информации по домену.
- w32tm /resync — Команда принудительной синхронизации с заданным в конфигурации источником.
- w32tm /config /update — Применить и сохранить конфигурацию.
- w32tm /config /syncfromflags:domhier /update – Задаем настройку синхронизации с контроллером домена.
- w32tm /config /syncfromflags:manual /manualpeerlist:time.windows.com – задать конкретные источники синхронизации времени по протоколу NTP.
Просмотр параметров (/query)
- w32tm /query /computer:<target> — Информация о стутусе синхронизации определенной станции (если имя не указано — используется локальный компьютер).
- w32tm /query /Source – Показать источник времени.
- w32tm /query /Configuration — Вывод всех настроек службы времени Windows.
- w32tm /query /Peers – Показать источники времени и их состояние.
- w32tm /query /Status – Статус службы времени.
- w32tm /query /Verbose – Подробный вывод всей информации о работе службы.
Также хотел бы поделится комментарием найденным на форуме
За настройку NTP через политики надо больно бить по рукам.
1. В доменной среде ничего не надо делать, контроллеры берут время с PDC, клиенты с контроллера.
2. Точности времени секунда в секунду не добьетесь.
Больная тема для меня. Предыдущие админы нахреначили синхронизацию чуть ли не в 10 разных политиках, до сих пор натыкаюсь и с матами удаляю.
Есть проблема с синхронизацией времени?
На всех контроллерах:
1. Убиваем службу w32time
2. Грохаем ветку реестра HKLMSystemCurrentControlSetservicesW32Time
3. Регистрируем службу заново
4. Проверяем, что параметр TYPE в HKLMSystemCurrentControlSetservicesW32TimeParameters равен NT5DS

Конфигурация NTP-сервера
Задаем тип синхронизации внутренних часов, на использование внешнего источника.
NoSync — NTP-сервер не синхронизируется с каким либо внешним источником времени. Используются системные часы, встроенные в микросхему CMOS самого сервера.
NTP — NTP-сервер синхронизируется с внешними серверами времени, которые указаны в параметре реестра NtpServer.
NT5DS — NTP-сервер производит синхронизацию согласно доменной иерархии.
AllSync — NTP-сервер использует для синхронизации все доступные источники.

На PDC настраиваем синхронизацию с внешним поставщиком времени
5. И ничего б*ть не трогаем!=) Через какое-то время время стабилизируется.
Для понимания — время не импортируется, оно сверяется и подгоняется под эталон.
Не забываем, что для керберос разница в 5 минут не критична.
Хитрожопых кадровиков и безопасников, желающих снихронить свои убогие СКУДы с виндовыми тачками слать надолго и подальше.
Всё, я кончил =)
===
Полностью согласен. Время домена — не повод для торговли. Оно должно быть правильным, но в разумных пределах, плюс-минус несколько минут не являются критичными для общения. Хотя встречал домен, где для хождения кербероса админы сделали максимальную погрешность часов сутки. Всякое бывает, но «правильный» админ всегда найдет решение… или костыль…
===
ПК не знает и никак не узнает, что PDC сменился. Так что политика обязательно должна быть!
===
А ему не надо знать. Он кричит в сеть «PDC!!!», а те сами знают, кому из них отозваться. У них DNS для этого есть.
Мы рассмотрим как настроить NTP сервер в сети предприятия, где компьютеры пользователей получают точное время от DC с ролью эмулятора PDC (главный контроллер домена – Primary Domain Controller), в свою очередь DC синхронизирует свое время с внешним источником времени. В данном примере мы будем получать время с серверов pool.ntp.org.
Начиная с Windows 2000 все операционные системы Windows включают в себя службу времени W32Time. Эта служба предназначена для синхронизации времени в пределах организации и отвечает за работу как клиентской, так и серверной части, причем один и тот же компьютер может быть одновременно и клиентом и сервером NTP (Network Time Protocol). По умолчанию клиенты в домене синхронизируют время с помощью службы времени Windows (Windows Time), а не с помощью протокола NTP.
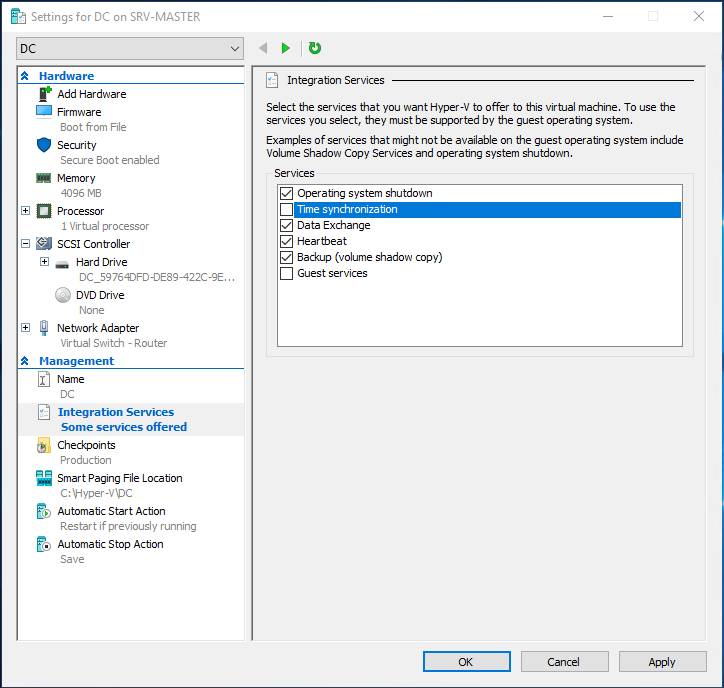
Настройка сервера времени под Hyper-V
Для тех у кого контролер домена виртуализирован и поднят на Hyper-V, прежде необходимо отключить Time Synchronization, иначе виртуальная машина будет синхронизирована с Hyper-V сервером.
# Выключение синхронизации для VMware 5
Свойства машины - Options -> VMware Tools -> Synchronize guest time with host
# Выключение синхронизации для VMware 6
VMware Tools -> Time -> Synchronize guest time with host
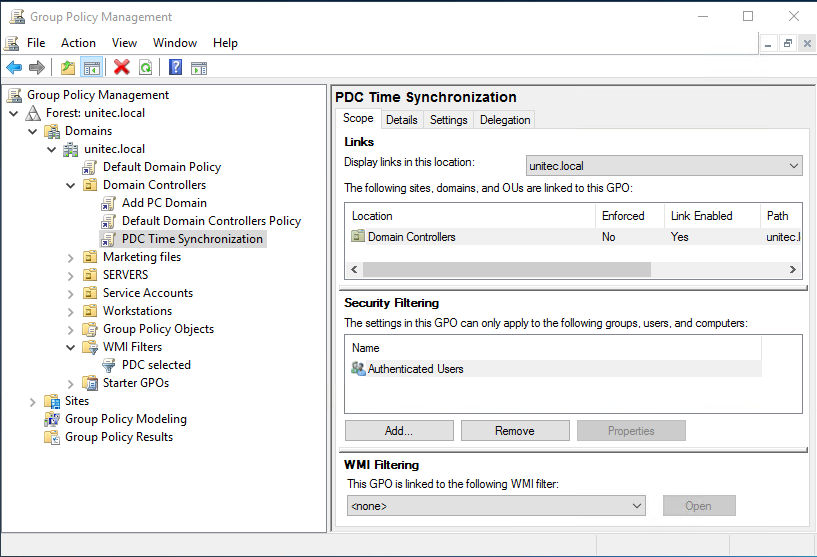
Создание GPO для контроллера домена с ролью эмулятора PDC (главный контроллер домена – Primary Domain Controller)
1 . Создание фильтра WMI
Нам необходимо настроить групповую политику для синхронизации NTP для контролера домена PDC, в связи с тем что роль PDC может перемещаться между контроллерами домена, нам необходимо применить политику к текущему владельцу роли PDC. Для этого мы создадим WMI фильтр, чтобы политика была применена для сервера с ролью PDC.
Для этого в консоли управления Group Policy Management Console (GPMC.msc), в разделе WMI Filters создадим новый WMI фильтр с именем PDC selected и запросом: Select * from Win32_ComputerSystem where DomainRole = 5
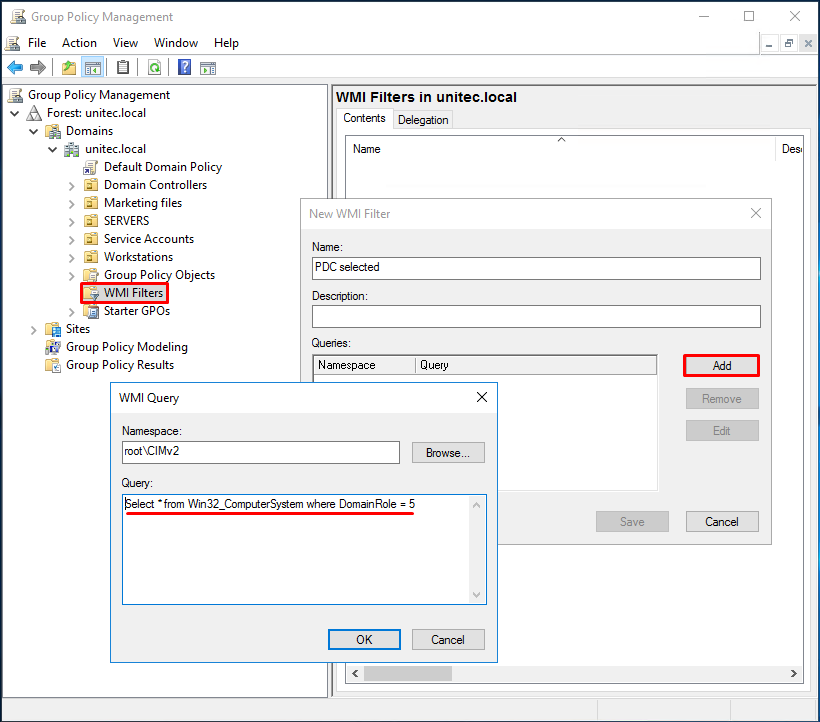
Select * from Win32_ComputerSystem where DomainRole = 5
2 . Создаем и редактируем новую GPO
2.1 Для контейнера Domain Controllers создаем групповую политику, в нашем случае это PDC Time Synchronization.
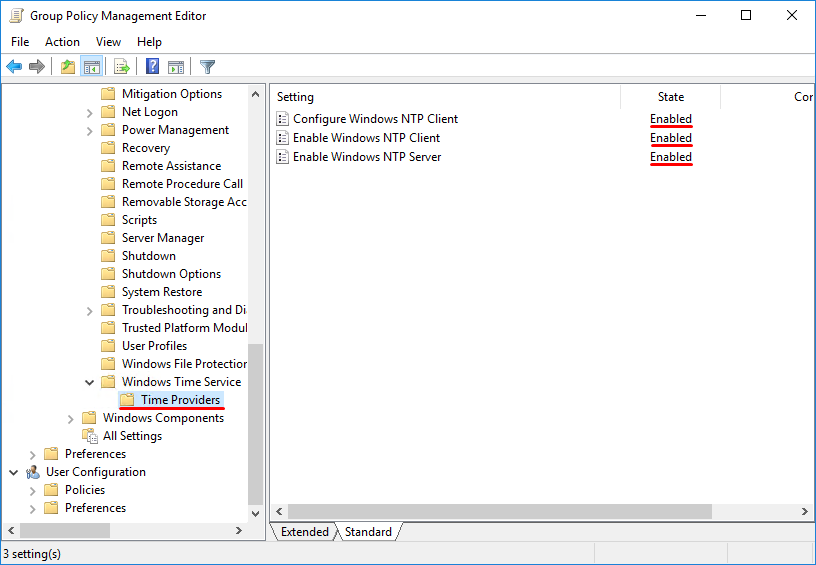
2.2 Редактируем политику PDC Time Synchronization, разворачиваем Computer Configuration -> Policies -> Administrative Templates -> System -> Windows Time Service -> Time Providers и включаем следующие политики:
Configure Windows NTP Client: Enabled
Enable Windows NTP Client: Enabled
Enable Windows NTP Server: Enabled
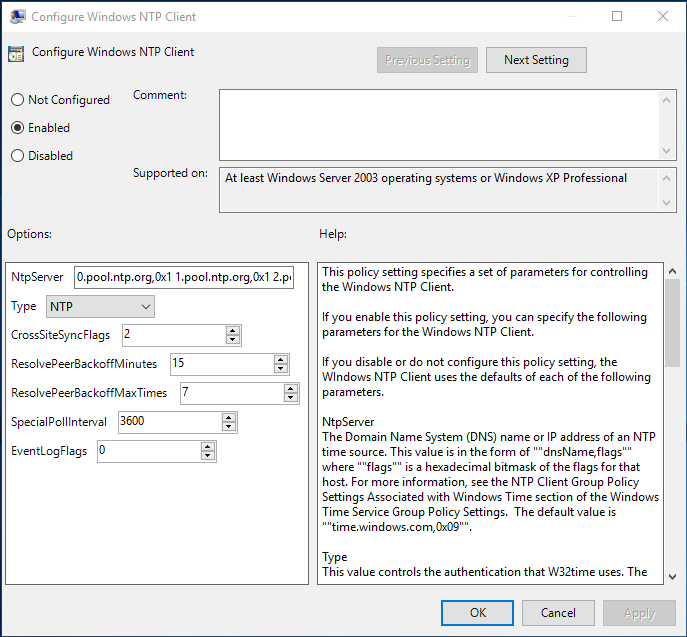
2.3 В настройках политики Enable Windows NTP Server, задаем:
NtpServer: 0.pool.ntp.org,0x1 1.pool.ntp.org,0x1 2.pool.ntp.org,0x1
Type: NTP
CrossSiteSyncFlags: 2
ResolvePeerBackoffMinutes: 15
Resolve Peer BAckoffMaxTimes: 7
SpecilalPoolInterval: 3600
EventLogFlags: 0
Дополнительные опции политики
Enable Windows NTP Server
NoSync — NTP-сервер не синхронизируется с внешним источником времени. Используются встроенные часы в микросхему CMOS самого сервера;
NTP — NTP-сервер синхронизируется серверами указаными в параметре NtpServer;
NT5DS — NTP-сервер производит синхронизацию согласно доменной иерархии;
AllSync — NTP-сервер использует для синхронизации все доступные источники.
Выбрать сервер для синхронизации вы можете по ссылке NTPPoolServers
Параметр NtpServer задает NTP-сервера, с которыми будем синхронизировать время. По умолчанию там задан NTP-сервер Microsoft (time.windows.com,0x1), дополнительные сервера можно добавит через пробел. В конце каждого имени сервера можно добавлять флаг (сервер,0x1) который определяет режим для синхронизации с сервером времени.
Допускаются следующие значения:
0x1 – SpecialInterval, использование специального интервала опроса;
0x2 – режим UseAsFallbackOnly;
0x4 – SymmetricActive, симметричный активный режим;
0x8 – Client, отправка запроса в клиентском режиме.
Проверяем ответ NTP сервера
w32tm /stripchart /computer:192.168.1.100 /dataonly /samples:5This article shows how to configure Windows Time Service (NTP) on Windows Server 2016 so that it acts as an NTP server for domain client computers.
Configure Windows Time Service (NTP)
A prerequisite to having the correct time on the Windows clients, we must have a correct time on the Windows 2016 server. So the first step is to sync server time with pool.ntp.org. Type the following commands on PowerShell:
w32tm /config /manualpeerlist:pool.ntp.org /syncfromflags:MANUAL
Then apply the changes, this is done by restarting the time service. First, we stop the service and then we start it again.
Stop-Service w32time
Start-Service w32time
Now the Windows Server 2016 is an NTP client of pool.ntp.org and its time/clock is synced with the NTP pool servers (The server is at the same time the NTP server for other domain client systems).
Optional: Server is in a Hyper-V VM
If your Windows Server 2016 machine is a VM inside Hyper-V, you have to disable time sync. Go to:
M settings-> Management-> Integration Services
and uncheck:
Time Synchronization.
Otherwise, Windows Server 2016 time/clock will be synced with the Host time/clock.
Configure Windows Clients
Then go to the client machines and run the following command on PowerShell to force them to sync their time/clock with the domain controller on the Windows Server 2016.
w32tm /resync
You can check the time synchronization status using the following command.
w32tm /query /status

Содержание
- Точное время в Windows Server 2016
- Иерархия доменов
- Критические факторы для определения точного времени
- Почему важно время?
- Настройка NTP сервера Windows server 2016 в домене групповыми политиками
- Настройка сервера времени под Hyper-V
- Создание GPO для контроллера домена с ролью эмулятора PDC (главный контроллер домена – Primary Domain Controller)
- 1 . Создание фильтра WMI
- 2 . Создаем и редактируем новую GPO
- Дополнительные опции политики Enable Windows NTP Server
- Set NTP Server Windows 2016 or Windows 2019
- What is NTP?
- How Time is synchronized in a Windows Server domain
- Configuring Windows Time Service with W32tm.exe
- Final Thoughts
Точное время в Windows Server 2016
применимо к: Windows server 2022, Windows server 2019, Windows Server 2016, Windows Server 2012 R2, Windows Server 2012, Windows 10 или более поздней версии, Azure Stack хЦи, versions 21H2 и 20H2
Служба времени Windows — это компонент, использующий модель подключаемых модулей для клиентских и серверных поставщиков синхронизации времени. В Windows есть два встроенных клиентских поставщика и доступны подключаемые модули сторонних поставщиков. Один поставщик использует протокол NTP (RFC 1305) или MS-NTP для синхронизации локального системного времени с эталонным сервером, совместимым с этими протоколами. Другой поставщик предназначен для Hyper-V и синхронизирует виртуальные машины с узлом Hyper-V. Если есть несколько поставщиков, Windows выберет наилучшего поставщика, оценивая стратовый уровень, корневую задержку, корневую дисперсию, а затем смещение времени.
Краткий обзор службы времени Windows см. в этом видео.
В этом разделе мы обсудим темы по мере их влияния на точность времени:
- Улучшения
- Измерения
- Советы и рекомендации
Дополнение, на которое ссылается статья о точном времени в Windows 2016, можно скачать здесь. В этом документе содержатся дополнительные сведения о методологиях тестирования и измерения.
Модель подключаемого модуля поставщика времени Windows описана в документации в TechNet.
Иерархия доменов
Доменная и автономная конфигурации работают по-разному.
Участники домена используют безопасный протокол NTP для проверки подлинности, обеспечивающий безопасность и подлинность ссылки времени. Участники домена синхронизируются с главными часами, определенными иерархией доменов и системой оценки. В домене существует иерархический уровень страт времени, где каждый контроллер домена указывает на родительский контроллер домена с более точной стратой времени. Иерархия разрешается в основной контроллер домена, контроллер домена в корневом лесу или контроллер домена с меткой домена GTIMESERV, которая обозначает лучший сервер времени для домена. См. раздел «Указание надежной локальной службы времени с помощью GTIMESERV» ниже.
По умолчанию автономные компьютеры настроены использовать time.windows.com. Это имя разрешается DNS-сервером, который должен указывать на ресурс, принадлежащий корпорации Майкрософт. Все удаленно размещенные ссылки времени могут создавать сетевые сбои, препятствующие синхронизации. Нагрузка сетевого трафика и асимметричные сетевые пути могут уменьшить точность синхронизации времени. Если вам требуется точность времени до 1 мс, удаленные источники времени будут неэффективны.
При работе в гостевом компьютере вы можете столкнуться с различным поведением домена или автономной среды, так как у гостевых машин Hyper-V будут по крайней мере два поставщика времени Windows на выбор — время узла и NTP.
дополнительные сведения об иерархии доменов и системе оценки см. в записи блога «что такое Windows службы времени?» .
Страта — это концепция, используемая в поставщиках NTP и Hyper-V, и ее значение указывает расположение часов в иерархии. Страта 1 резервируется для часов самого высокого уровня, а Страта 0 — для оборудования, время которого считается точным с минимальной или отсутствующей задержкой, связанной с ним. Страта 2 обращается к серверам страты 1, страта 3 — к страте 2 и т. д. Хотя страты более низкого уровня часто указывают более точное время, случаются несоответствия. Кроме того, служба W32Time принимает только время из страты 15 или ниже. Чтобы просмотреть страту клиента, используйте w32tm /query /status.
Критические факторы для определения точного времени
Во всех случаях для определения точного времени есть три важных фактора:
- Физический источник времени — исходные часы в домене должны быть стабильными и точными. Обычно это означает установку устройства GPS или указание на источник страты 1 с учетом страты 3. Аналогия такова: если у вас есть две лодки в воде и вы пытаетесь измерить высоту одной по сравнению с другой, точность будет правдивой, если исходная лодка очень стабильна и не движется. То же самое касается времени. Если исходные часы нестабильны, то влияние распространится на всю цепь синхронизации времени, усиливаясь на каждом этапе. Источник времени должен быть доступен, так как нарушения соединения могут помешать синхронизации времени. И наконец, источник должен быть безопасным. Если источник ссылки времени обслуживается неправильно или им управляет потенциально вредоносная сторона, домен может подвергаться атакам на основе времени.
- Стабильные клиентские часы — часы, которые гарантируют, что естественное смещение осциллятора не будет критичным. NTP использует несколько выборок, возможно из нескольких серверов NTP, для настройки и согласования часов в ваших локальных компьютерах. Это не шаг изменения времени, а скорее замедление или ускорение местных часов, что позволяет гарантировать точность времени и обеспечить точность среди NTP-запросов. Тем не менее, если осциллятор часов клиентского компьютера нестабилен, то могут возникнуть дополнительные отклонения между настройками и алгоритмы, используемые Windows для настройки часов, не будут работать точно. В некоторых случаях для обеспечения точности времени могут потребоваться обновления встроенного ПО.
- Симметричное NTP-подключение — очень важно, чтобы подключение по протоколу NTP было симметричным. NTP использует вычисления для корректировки времени, которые предполагают, что сетевой путь симметричен. Если путь, по которому пакет NTP передается на сервер, возвращается за другой период времени, это повлияет на точность. Например, путь может измениться из-за изменений в топологии сети или пакетов, направляемых через устройства с разными скоростями интерфейсов.
Для устройств с питанием от аккумулятора, как мобильных, так и переносимых, необходимо учитывать разные стратегии. Мы советуем поддерживать точность времени, обеспечивая корректировку часов единожды в секунду, что соотносится с частотой обновления часов. Эти настройки будут требовать большего потребления энергии аккумулятора, чем ожидалось, и могут отрицательно влиять на режимы энергосбережения, доступные в Windows для таких устройств. В устройствах с питанием от аккумулятора также есть определенные режимы энергопитания, в которых останавливается работа всех приложений, что препятствует способности W32Time корректировать часы и поддерживать точность времени. Кроме того, часы в мобильных устройствах могут быть изначально неточными. Условия окружающей среды влияют на точность часов, и мобильное устройство может попадать из одних условий в другие, что может помешать его способности поддерживать точность времени. Поэтому мы не советуем выбирать для мобильных устройств с питанием от аккумулятора параметры высокой точности.
Почему важно время?
Есть множество различных причин, по которым может потребоваться точное время. Типичным случаем для Windows является Kerberos, где для работы требуется 5-минутная точность между клиентом и сервером. Тем не менее есть множество других областей, в которых важна точность времени, в том числе:
- правительственное управление, к примеру
- 50 мс для FINRA в США;
- 1 мс для Европейской организации по ценным бумагам и рынкам (Директива Евросоюза «O рынках финансовых инструментов») в ЕС;
- алгоритмы шифрования;
- распределенные системы, такие как кластеры, SQL, Exchange и Document DB;
- платформа Блокчейн для биткойн-транзакций;
- распределенные журналы и анализ угроз;
- Репликация Active Directory
- отрасль платежных карт (сейчас требуется точность до 1 с).
Источник
Настройка NTP сервера Windows server 2016 в домене групповыми политиками
Мы рассмотрим как настроить NTP сервер в сети предприятия, где компьютеры пользователей получают точное время от DC с ролью эмулятора PDC (главный контроллер домена – Primary Domain Controller), в свою очередь DC синхронизирует свое время с внешним источником времени. В данном примере мы будем получать время с серверов pool.ntp.org.
Начиная с Windows 2000 все операционные системы Windows включают в себя службу времени W32Time. Эта служба предназначена для синхронизации времени в пределах организации и отвечает за работу как клиентской, так и серверной части, причем один и тот же компьютер может быть одновременно и клиентом и сервером NTP (Network Time Protocol). По умолчанию клиенты в домене синхронизируют время с помощью службы времени Windows (Windows Time), а не с помощью протокола NTP.
Настройка сервера времени под Hyper-V
Для тех у кого контролер домена виртуализирован и поднят на Hyper-V, прежде необходимо отключить Time Synchronization, иначе виртуальная машина будет синхронизирована с Hyper-V сервером.
В настройках виртуальной машины, в разделе Management -> Integration Services отключаем Time Synchronization
Создание GPO для контроллера домена с ролью эмулятора PDC (главный контроллер домена – Primary Domain Controller)
1 . Создание фильтра WMI
Нам необходимо настроить групповую политику для синхронизации NTP для контролера домена PDC, в связи с тем что роль PDC может перемещаться между контроллерами домена, нам необходимо применить политику к текущему владельцу роли PDC. Для этого мы создадим WMI фильтр, чтобы политика была применена для сервера с ролью PDC.
Для этого в консоли управления Group Policy Management Console (GPMC.msc), в разделе WMI Filters создадим новый WMI фильтр с именем PDC selected и запросом: Select * from Win32_ComputerSystem where DomainRole = 5
Добавляем новый WMI фильтр с именем PDC selected и запросом:
Select * from Win32_ComputerSystem where DomainRole = 5
2 . Создаем и редактируем новую GPO
2.1 Для контейнера Domain Controllers создаем групповую политику, в нашем случае это PDC Time Synchronization.
В пункте 2.1 ошибка. на картинке созданный фильтр не привязан к политике
2.2 Редактируем политику PDC Time Synchronization, разворачиваем Computer Configuration -> Policies -> Administrative Templates -> System -> Windows Time Service -> Time Providers и включаем следующие политики:
2.3 В настройках политики Enable Windows NTP Server, задаем:
Дополнительные опции политики
Enable Windows NTP Server
Выбрать сервер для синхронизации вы можете по ссылке NTPPoolServers
Источник
Set NTP Server Windows 2016 or Windows 2019
There is no question about it, having accurate time in your environment set in critical infrastructure systems is a must. Many business-critical applications and infrastructure systems rely on accurate time synchronized between them to ensure the system functions as expected. Time skew can cause all kinds of weirdness when it is misconfigured or out of sync between different servers/systems. This is especially true in a Windows Server Active Directory domain. Having accurate time between a client computer and domain controllers is essential. Let’s take a look at how to set ntp server Windows 2016 or Windows 2019 to see how this can be easily carried out.
What is NTP?
Wen it comes to synchronizing time in most enviornments, Network Time Protocol (NTP) is the protocol that is used to ensure accurate time across your environent. In most environments, NTP servers, special time servers, are configured that provide an external time source for which your internal servers can synchronize with.
There are several widely known NTP IP addresses on the Internet that provide reliable time sources for your network. The NTP.org servers are one such set of time servers that provide an NTP source for configuration.
There are a few NTP values to be aware of:
- NTP Server – This is a specialized server that is able to detremine the precise time from an external timing reference such as GPS and passes these precise time values on to your network
- Offset – This is the difference in time between the external time server and the time on a local client computer. The larger the offset, the more inaccurate the timing source is.
- Delay – This is the value of the round-trip time (latency) of the timing message between the client to the server and back again.
How Time is synchronized in a Windows Server domain
In a Windows domain, Microsoft has default configuration in place that takes care of a good portion of the NTP configuration. Starting with Windows 2000 Server, Windows clients are configured as NTP Clients. When configured as an NTP client, Windows computers only attempt to contact the domain controller for NTP synchronization or a manually specified NTP server.

Microsoft has made the domain controller the default in a Windows domain since it makes sense that clients already have a secure channel established with DCs for other types of communications. Additionally, accurate and synchronized time between domain controllers and clients is especially important for all kinds of things such as logins, group policy synchronization and other tasks/operations.
The order of operations or hierarchy in a Windows domain is as follows:
- Domain members attempt to synchronize time with any domain controller located in the domain
- Domain controllers synchronize with a more authoritative domain controller
- The first domain controller that is installed in the environment is automatically configured to be a reliable time source.
- Other than the first domain controller installed, the PDC emulator (if role has been moved from the first DC installed) generally holds the position of best time source.
An important point to consider and that comes into play when thinking about why we set ntp server in Windows 2016 or Windows 2019 is the authoritative domain controller must have a reliable source to synchronize with as well. This is generally an external time server outside of the domain hierarchy.
Now that we know how the domain hierarchy for time is configured, how is the external time source configured on your domain controller that is configured as the reliable source of time?
Configuring Windows Time Service with W32tm.exe
When it comes to Windows Server environments like Windows Server 2016 or Windows Server 2019, there is a special Windows service that controls the time synchronization of your Windows hosts. This is the Windows Time Service.
Microsoft provides a command line tool to interact with the Windows Time Service called W32tm.exe. This has been included in Windows operating systems since Windows XP/Windows 2003 and later. It can be used to configure Windows Time service parameters as well as diagnose time service problems. This is generally the tool of choice when it comes to configuring, monitoring, and administering Windows Time.
Using the W32tm.exe utility is fairly straightforward. It can be used from a normal command prompt as well as from a PowerShell prompt. There are several command parameters included that allow not only configuring the NTP servers you want to query, but also parameters that allow viewing the low level registry configuration as well as the synchronization status.
You can read the official Microsoft KB on the Windows Time service and the W32tm.exe utility here:
However, there are a few commands I would like to show you for the purposes of configuring your Domain controller that is to be the reliable time source (PDC Emulator) for your domain.
The first command is the command line entry to specify your NTP servers, which in this case I am using the NTP.org servers to set as the source of my NTP synchronization.
 Configuring the time source for your domain with the w32tm utility
If you want to view the status of the NTP synchronization on your server after you have configured the values and restarted the w32time service, you can use the following command:
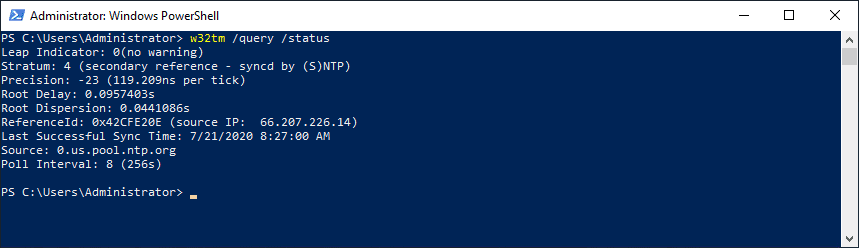 Querying the NTP synchronization status of your Windows Server 2016 or 2019 domain controller
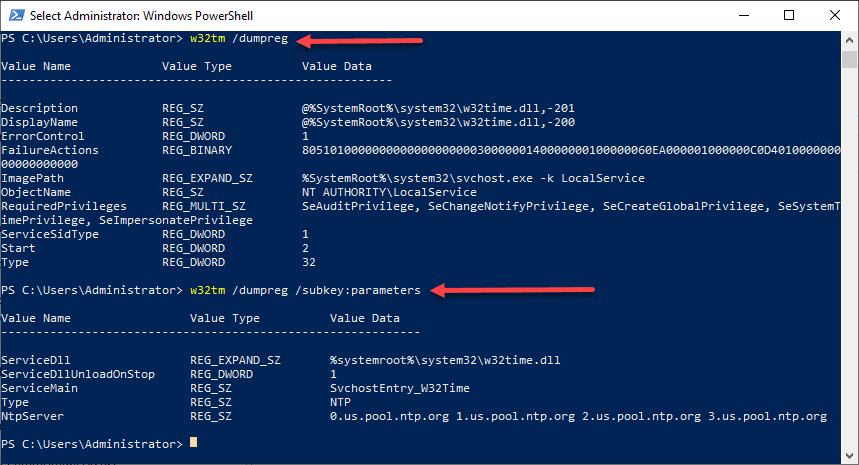
You can also check the values configured in your registry key hkey local machine system currentcontrolset services w32time config using the commands below. You can drill into the configuration parameters using the /dumpreg /subkey command.
 Viewing the NTP registry values that are configured for your Windows Server
Final Thoughts
As shown, you can easily set NTP Server Windows 2016 or Windows 2019 using the w32tm command utility that allows interacting with the time service in Windows Server.
In a Windows domain, you want to configure your authoritative time source domain controller, which by default is the PDC Emulator, to pull time information from an authoritative source like NTP.org or some other reliable NTP time server.
After configuring the time source, the other domain controllers will synchronize with this server and then the Windows clients joined to the domain will synchronize with the domain controllers that have the corrected time from the authoritative server.
Subscribe to the channel: https://www.youtube.com/channel/UCrxcWtpd1IGHG9RbD_9380A?sub_confirmation=1
My blog:
https://www.virtualizationhowto.com
_____________________________________________________
Social Media:
https://twitter.com/vspinmaster
Introduction — 0:00
How I received the Intel Optane drives — 0:45
What about the end of life of Intel Optane storage? — 1:24
Notice of end of life driving price down — 2:05
Introducing information about Intel Optane — 2:23
NAND uses transistors where Intel Optane doesn’t — 2:46
NAND changes data inefficiently compared to Intel Optane — 3:02
No backend processes needed with Intel Optane data changes — 3:40
Looking at the form factors of the Intel Optane drives — 4:07
Looking at the cable I am using to connect the U.2 drive to the motherboard — 4:42
Other ways to connect M.2 to U.2 — 5:04
Looking at the calbe after installation and U.2 Intel Optane drive mounted — 5:41
Introducing VMware HCIBench benchmarking utility — 6:28
Looking at deploying the HCIGBench OVA appliance — 7:15
Configuring the HCIBench benchmarking parameters — 7:29
Looking at the Easy Run — 8:10
Choosing the benchmarking tool to use — 8:45
Looking at the results of the Intel Optane tests! — 9:30
Talking about my Supermicro Xeon-D vSAN hosts — 9:40
Numbers before Intel Optane — 9:57
With Intel Optane numbers — 10:30
95th percentile write latency — 11:16
Concluding thoughts on Intel Optane and the use case for home lab — 12:20
Is Intel Optane worth it?
https://www.virtualizationhowto.com/2022/12/is-intel-optane-worth-it-awesome-vexpert-opportunity/
NVMe server for vSAN virtual machines:
https://www.virtualizationhowto.com/2022/08/nvme-server-for-vsan-virtual-machines/
My Supermicro home lab:
https://www.virtualizationhowto.com/2020/06/supermicro-vmware-home-lab/» data-video-title=»Best Home Server Storage for virtualization — Intel Optane in VMware vSAN»> 
My blog:
https://www.virtualizationhowto.com
_____________________________________________________
Social Media:
https://twitter.com/vspinmaster
Introduction — 0:00
Describing creating virtual machines and tools used — 0:56
Creating Linux virtual machines and running like Docker containers — 1:49
Installing Multipass — 2:23
Downloading Multipass for Windows — 3:02
Describing the virtualization platforms supported with Multipass on Windows — 3:26
Running the Multipass installer — 3:58
Describing the command line options for pulling down VM images and creating new virtual machines — 4:33
Looking at the Multipass command line options — 4:54
Running Multipass list — 5:36
Multipass launch command — 6:15
Launching Hyper-V Manager — 7:09
Connecting to the virtual machine for management and Bash Shell access — 7:44
Running commands inside the Linux virtual machine — 8:10
Talking about tearing down virtual machine environments — 8:23
Stopping and deleting Multipass virtual machine instances — 8:58
Describing how to create custom virtual machine images and configurations — 10:16
Talking about cloud init and cloud config — 10:44
Looking at an example of customizing a virtual machine with Multipass — 10:55
Executing the configuration command — 12:40
Looking at the syntax for using cloud-init — 13:05
Looking at the available appliances in the Multipass catalog and interesting options — 14:01
Concluding thoughts on Multipass and how it can be used — 15:13
Use Terraform to spin up a vSphere Kubernetes automated lab build in 8 minutes:
https://www.virtualizationhowto.com/2021/12/terraform-vsphere-kubernetes-automated-lab-build-in-8-minutes/
Use the Terraform vault provider:
https://www.virtualizationhowto.com/2021/03/using-terraform-vault-provider-with-vmware-vsphere/
Sysprep and VMware Guest Customization with Terraform:
https://www.virtualizationhowto.com/2018/06/sysprep-and-vmware-guest-customization-with-terraform/» data-video-title=»Best Virtual Machine Creation tool to create and run Linux VMs like containers»>
My blog:
https://www.virtualizationhowto.com
Social Media:
https://twitter.com/vspinmaster
Introduction — 0:00
Describing traditional workflow and problem with email — 0:48
Introducing Apprise and Mailrise — 2:03
Overview of the Apprise service and how it works — 2:39
Thinking about the advantages of Apprise — 3:42
What about legacy applications and hardware that only supports SMTP? 4:15
Introducing Mailrise SMTP gateway — 4:42
Legacy devices can SMTP to Mailrise and it translates to modern notification services — 5:30
Simple config for modern notifications in Mailrise — 6:11
Example files for Mailrise notifications — 6:25
Exciting possibilities for home labs — 6:37
Installing Mailrise — 7:30
Copying the mailrise installation command — 7:55
Prerequisite to the install — 8:08
Executing the installation of Mailrise — 8:20
Creating a service file for Mailrise — 8:38
Pasting in service file configuration for Mailrise — 8:54
Creating the Mailrise configuration file — 9:28
Looking at the config file for Mailrise and example config — 9:45
Looking at the configuration for Pushover notifications — 10:22
Discussing the user and application tokens — 10:53
Starting the Mailrise service configuration — 11:37
Talking about testing Mailrise notifications using PowerShell — 11:50
Using send-mailmessage cmdlet to test — 12:20
Talking through the command — 12:35
Added notifications to desktop — 13:38
Running the test of Mailrise notifications to Pushover — 13:56
Wrapping up the testing workflow — 14:20
Apprise Github page:
https://github.com/caronc/apprise
Mailrise Github page:
https://github.com/YoRyan/mailrise
IoT Notification System Push Notifications for Home Lab no SMTP required:
https://www.virtualizationhowto.com/2022/12/iot-notification-system-push-notifications-for-home-lab-no-smtp-required/
My home lab environment:
https://www.virtualizationhowto.com/home-lab/
Supermicro VMware Home Lab:
https://www.virtualizationhowto.com/2020/06/supermicro-vmware-home-lab/» data-video-title=»Best Notification System for Home Servers with Apprise Push Alerts»>
My blog:
https://www.virtualizationhowto.com
Social Media:
https://twitter.com/vspinmaster
Introduction to Docker monitoring — 0:00
Introducing Docker stats command — 0:49
Running the Docker stats command — 1:08
Looking at the Docker stats help and additional parameters — 1:52
Introducing Glances Docker monitoring commandline tool — 3:16
Pulling down the Glances container — 4:08
Looking at the Glances dashboard — 4:45
Looking at Glances container host information for monitoring — 5:02
Information about the running containers — 5:31
Sorting information in Glances — 5:58
Introducing Portainer for Docker monitoring — 6:35
Looking at the Portainer dashboard — 7:15
Containers view in Portainer — 7:49
Portainer Quick Actions and what they do — 8:12
Adding additional Docker hosts in Portainer — 10:12
Introducing Zabbix for monitoring Docker containers — 10:32
Looking at Zabbix dashboards for a Docker host — 11:15
Graphs view in Zabbix — 11:50
Viewing historical data for Docker containers — 12:22
Looking at Zabbix container host monitoring via Linux agent — 12:56
Introducing CheckMK — 13:58
Viewing the CheckMK dashboard — 14:37
Viewing container host performance metrics in CheckMK — 15:01
Viewing the Docker containers information in CheckMK — 16:02
Concluding thoughts and wrapping up monitoring Docker containers — 16:49
Free Docker monitoring solutions that are free and open source:
Install and configure the Portainer remote agent:
Yacht vs. Portainer:
https://www.virtualizationhowto.com/2022/12/yacht-vs-portainer-docker-dashboard-comparison/» data-video-title=»Best Docker Container Monitoring Tools — Free and open source»>
My blog:
https://www.virtualizationhowto.com
_____________________________________________________
Social Media:
https://twitter.com/vspinmaster
Introduction to Windows Subsystem for Linux — 0:00
New Windows Subsystem for Linux WSL2 install process from Microsoft Store — 1:10
Looking at installing it from Microsoft Store 2:09
How can you tell if you have the latest version installed? 2:40
Overwriting installed version with the Store version — 3:14
Supressing the sudo password prompt — 3:54
Adding the command to suppress the sudo prompt — 4:35
Enabling systemd functionality in WSL 2 — 5:10
Editing the file to add systemd to WSL 2 — 5:45
Shutting down WSL after adding systemd — 6:15
Verifying systemd is installed — 6:30
Introducing Ansible — 6:47
Viewing the commands to install Ansible in WSL 2 — 7:10
Entering Kerberos realm — 8:07
Viewing Ansible version command — 8:18
Adding persistent aliases and why you want to do this — 8:32
Creating the file needed for persistent alias in WSL 2 — 8:53
Pasting in the command needed for the alias — 9:20
Testing the alias created — 10:14
Introducing PowerShell and why you can use it — 10:38
Looking at the commands in WSL for installing PowerShell — 11:02
Executing PowerShell in WSL — 12:08
Adding the VMware PowerCLI module — 12:35
Verifying the VMware PowerCLI installation — 13:13
Working with files between WSL and your Windows WSL host — 13:30
Looking at file navigation, browsing, copying, editing between WSL and Windows host — 14:20
Looking at changing to a mounted Windows host directory in WSL — 14:49
Opening a location in WSL 2 in Windows Explorer — 15:27
Installing Kubernetes inside Windows Subsystem for Linux — 16:23
Viewing the command to install Microk8s — 17:05
Issuing microk8s status command — 17:22
Issuing microk8s kubectl commands — 17:38
Installing Minikube in WSL 2 — 18:02
After prerequisites, beginning Minkube installatio — 18:54
Starting the Minkube cluster — 19:36
Viewing Minkube cluster with kubectl — 19:51
Conclueding thoughts on Windows Subsystem for Linux tweaks — 20:00
Windows Subsystem for Linux now GA and how to install it:
Windows Server 2022 WSL 2 support with KB5014021 Windows Update:
https://www.virtualizationhowto.com/2022/05/windows-2022-wsl2-support-with-new-windows-update-kb5014021/» data-video-title=»Windows Subsystem for Linux setup WSL2 Systemd, Ansible, and Kubernetes»>
Источник

There is no question about it, having accurate time in your environment set in critical infrastructure systems is a must. Many business-critical applications and infrastructure systems rely on accurate time synchronized between them to ensure the system functions as expected. Time skew can cause all kinds of weirdness when it is misconfigured or out of sync between different servers/systems. This is especially true in a Windows Server Active Directory domain. Having accurate time between a client computer and domain controllers is essential. Let’s take a look at how to set ntp server Windows 2016 or Windows 2019 to see how this can be easily carried out.
What is NTP?
Wen it comes to synchronizing time in most enviornments, Network Time Protocol (NTP) is the protocol that is used to ensure accurate time across your environent. In most environments, NTP servers, special time servers, are configured that provide an external time source for which your internal servers can synchronize with.
There are several widely known NTP IP addresses on the Internet that provide reliable time sources for your network. The NTP.org servers are one such set of time servers that provide an NTP source for configuration.
There are a few NTP values to be aware of:
- NTP Server – This is a specialized server that is able to detremine the precise time from an external timing reference such as GPS and passes these precise time values on to your network
- Offset – This is the difference in time between the external time server and the time on a local client computer. The larger the offset, the more inaccurate the timing source is.
- Delay – This is the value of the round-trip time (latency) of the timing message between the client to the server and back again.
How Time is synchronized in a Windows Server domain
In a Windows domain, Microsoft has default configuration in place that takes care of a good portion of the NTP configuration. Starting with Windows 2000 Server, Windows clients are configured as NTP Clients. When configured as an NTP client, Windows computers only attempt to contact the domain controller for NTP synchronization or a manually specified NTP server.

Microsoft has made the domain controller the default in a Windows domain since it makes sense that clients already have a secure channel established with DCs for other types of communications. Additionally, accurate and synchronized time between domain controllers and clients is especially important for all kinds of things such as logins, group policy synchronization and other tasks/operations.
The order of operations or hierarchy in a Windows domain is as follows:
- Domain members attempt to synchronize time with any domain controller located in the domain
- Domain controllers synchronize with a more authoritative domain controller
- The first domain controller that is installed in the environment is automatically configured to be a reliable time source.
- Other than the first domain controller installed, the PDC emulator (if role has been moved from the first DC installed) generally holds the position of best time source.
An important point to consider and that comes into play when thinking about why we set ntp server in Windows 2016 or Windows 2019 is the authoritative domain controller must have a reliable source to synchronize with as well. This is generally an external time server outside of the domain hierarchy.
Now that we know how the domain hierarchy for time is configured, how is the external time source configured on your domain controller that is configured as the reliable source of time?
Configuring Windows Time Service with W32tm.exe
When it comes to Windows Server environments like Windows Server 2016 or Windows Server 2019, there is a special Windows service that controls the time synchronization of your Windows hosts. This is the Windows Time Service.
Microsoft provides a command line tool to interact with the Windows Time Service called W32tm.exe. This has been included in Windows operating systems since Windows XP/Windows 2003 and later. It can be used to configure Windows Time service parameters as well as diagnose time service problems. This is generally the tool of choice when it comes to configuring, monitoring, and administering Windows Time.
Using the W32tm.exe utility is fairly straightforward. It can be used from a normal command prompt as well as from a PowerShell prompt. There are several command parameters included that allow not only configuring the NTP servers you want to query, but also parameters that allow viewing the low level registry configuration as well as the synchronization status.
You can read the official Microsoft KB on the Windows Time service and the W32tm.exe utility here:
- https://docs.microsoft.com/en-us/windows-server/networking/windows-time-service/windows-time-service-tools-and-settings
However, there are a few commands I would like to show you for the purposes of configuring your Domain controller that is to be the reliable time source (PDC Emulator) for your domain.
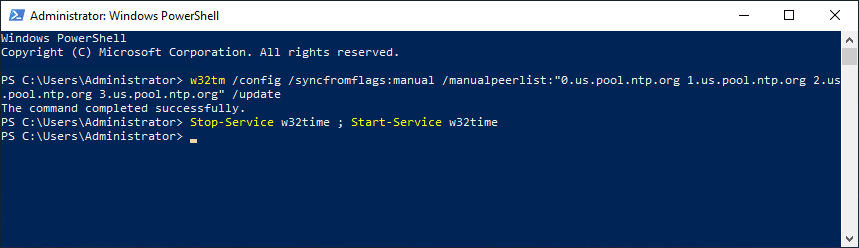
The first command is the command line entry to specify your NTP servers, which in this case I am using the NTP.org servers to set as the source of my NTP synchronization.
w32tm /config /syncfromflags:manual /manualpeerlist:"0.us.pool.ntp.org 1.us.pool.ntp.org 2.us.pool.ntp.org 3.us.pool.ntp.org" /update

Stop-Service w32time
Start-Service w32time
If you want to view the status of the NTP synchronization on your server after you have configured the values and restarted the w32time service, you can use the following command:
w32tm /query /status
You can also check the values configured in your registry key hkey local machine system currentcontrolset services w32time config using the commands below. You can drill into the configuration parameters using the /dumpreg /subkey command.
w32tm /dumpreg

w32tm /dumpreg /subkey:parameters
Final Thoughts
As shown, you can easily set NTP Server Windows 2016 or Windows 2019 using the w32tm command utility that allows interacting with the time service in Windows Server.
In a Windows domain, you want to configure your authoritative time source domain controller, which by default is the PDC Emulator, to pull time information from an authoritative source like NTP.org or some other reliable NTP time server.
After configuring the time source, the other domain controllers will synchronize with this server and then the Windows clients joined to the domain will synchronize with the domain controllers that have the corrected time from the authoritative server.
NtpServer value must be time.google.com,0x9 or time.windows.com,0x9 or any other external NTP
Time Provider
Type value should be
NTP as because PDC will Act as NTP for all other ADC and workstation in Domain

Setting
Number 3
NtpClient>Enable
value must be 1 as it will act as client for external NTP Server

Setting
Number 4
NtpServer>Enable
value must be 1 as it will act as NTP server for Members servers

Run this command to resync the time
net stop w32time && net start w32time
w32tm /resync
w32tm /query /status
Additional Domain Controller NTP Configuration Setting
Below is the Registry Path for Time Setting in Registry
HKEY_LOCAL_MACHINESYSTEMCurrentControlSetServicesW32TimeConfig
Setting
Number 1
Set AnnounceFlags
value 10 Decimal

Setting
Number 2
HKEY_LOCAL_MACHINESYSTEMCurrentControlSetServicesW32TimeParameters
Set Type Value to
NT5DS so this will sync time from PDC

Setting
Number 3
HKEY_LOCAL_MACHINESYSTEMCurrentControlSetServicesW32TimeTimeProvidersNtpClient
Set Enabled value 1
so this will sync time from NTP

Setting
Number 4
HKEY_LOCAL_MACHINESYSTEMCurrentControlSetServicesW32TimeTimeProvidersNtpServer
NtpServer>Enable
value must be 1 as it will act as NTP server for Members systems and server

Configuration Setting on Member Systems and
Workstation
Setting
Number 1
HKEY_LOCAL_MACHINESYSTEMCurrentControlSetServicesW32TimeConfigAnnounceFlags
value must be 10

Setting
Number 2 Default setting
HKEY_LOCAL_MACHINESYSTEMCurrentControlSetServicesW32TimeParametersType
value must be NT5DS so it will take time from any member DC.

Watch Below video on NTP Configuration on Server 2016
Commands to troubleshoot in case of issue
1.
Command to check Time Status and
Source
a.
Command: w32tm /query /source
Output:
time.google.com,0x9
b. Command: w32tm /query /status
Leap
Indicator: 0(no warning)
Stratum:
2 (secondary reference — syncd by (S)NTP)
Precision:
-6 (15.625ms per tick)
Root
Delay: 0.1094525s
Root
Dispersion: 0.0265089s
ReferenceId:
0xD8EF230C (source IP: 216.239.35.12)
Last
Successful Sync Time: 12/2/2018 11:33:35 AM
Source:
time.google.com,0x9
Poll
Interval: 10 (1024s)
2.
Command to resync time with NTP
a. Command: w32tm /resync
Output:
Sending resync command to local computer
The
command completed successfully.
b. Command: C:WINDOWSsystem32>net
stop w32time && net start w32time
Output:
The
Windows Time service is stopping.
The
Windows Time service was stopped successfully.
The
Windows Time service is starting.
The
Windows Time service was started successfully.
c. Command: w32tm /resync /force
Sending
resync command to local computer
The
command completed successfully.
d. Command: w32tm /resync /rediscover
Sending
resync command to local computer
The
command completed successfully.
Copied from https://www.ceos3c.com/2017/07/06/configure-ntp-server-windows-server-2016/
We will use PowerShell to change the NTP Server and we will validate if it worked afterwards.
Configure the NTP Server on Windows Server 2016
On your Windows Server 2016 hit the Windows Button and type: PowerShell and right-click it and select Run as Administrator
Type the following commands
- w32tm /config /manualpeerlist:pool.ntp.org /syncfromflags:MANUAL
- Stop-Service w32time
- Start-Service w32time

Of course, you can take any NTP Server that you want.
Now verify if the time-server was set correctly on your Server 2016 by typing:
- w32tm /query /status
You should get a reply like this:

Now we will go ahead and verify if our clients sync properly.
Verifying if the Time Server was correctly set on our Clients
On a client computer open a PowerShell with right-click and Run as Administrator….
Type:
- w32tm /query /status
Check the time-server and type:
- w32tm /resync
- w32tm /query /status
Then you are able to see that the time-server actually changed like in the example below.

And that’s it! Easy, right?
Always make sure that you use the same time-server in your network and that all your clients are syncing from it. If you have time differences inside of your Active Directory Domain you will run into major issues.