Содержание
- Способ 1: Форматирование стандартными средствами
- Способ 2: Форматирование через консоль в режиме восстановления
- Способ 3: Удаление раздела без форматирования
- Способ 4: Форматирование во время переустановки Windows
- Вопросы и ответы
Способ 1: Форматирование стандартными средствами
В большинстве случаев диск под буквой С в Windows 10 выступает в роли системного, поэтому его форматирование невозможно непосредственно в текущем сеансе ОС. Однако иногда пользователями самостоятельно создается такой раздел или же на нем находятся файлы второй ненужной операционной системы. В такой ситуации с форматированием справится стандартное встроенное средство или дополнительные программы. Детальнее обо всех доступных методах читайте в другом материале на нашем сайте, перейдя по указанной ниже ссылке.
Подробнее: Правильное форматирование жесткого диска
Способ 2: Форматирование через консоль в режиме восстановления
Два следующих метода выполняются в режиме восстановления ОС, который запускается с установочного диска или флешки, куда предварительно был записан образ Windows 10. Поэтому сначала мы предлагаем заняться именно этим делом, внимательно изучив представленные далее инструкции.
Подробнее: Руководство по созданию загрузочной флешки с Windows 10
После успешной загрузки дистрибутива можно переходить к форматированию необходимого раздела жесткого диска, что осуществляется так:
- В первом окне выберите оптимальный язык интерфейса и нажмите на «Далее».
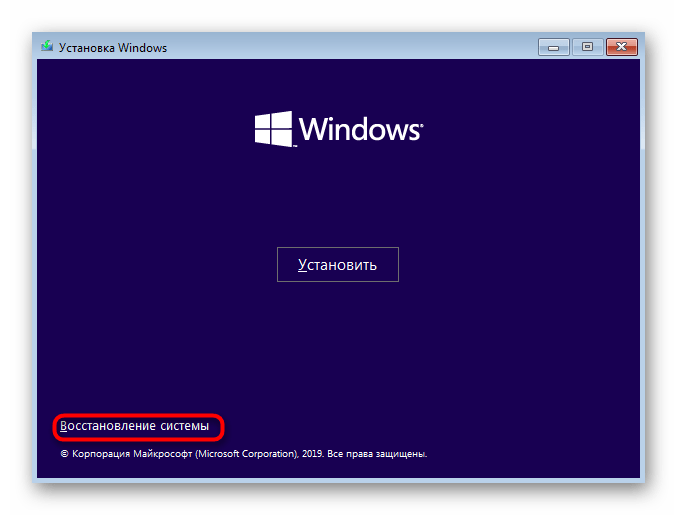
- Здесь вас интересует надпись «Восстановление системы». Кликните по ней, чтобы перейти в соответствующий раздел.
- В появившемся меню перейдите в «Поиск и устранение неисправностей».
- Отсюда запустите «Командная строка». В ней и будут производиться все основные манипуляции, связанные с форматированием раздела.
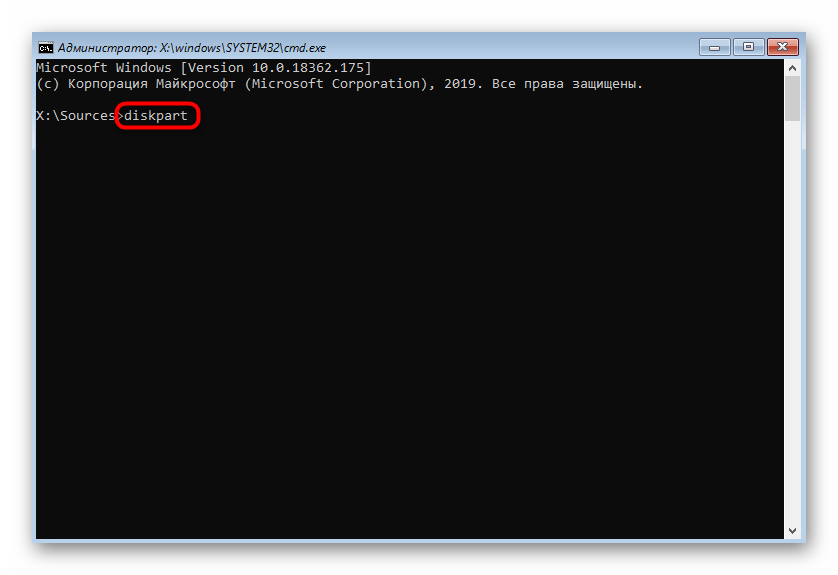
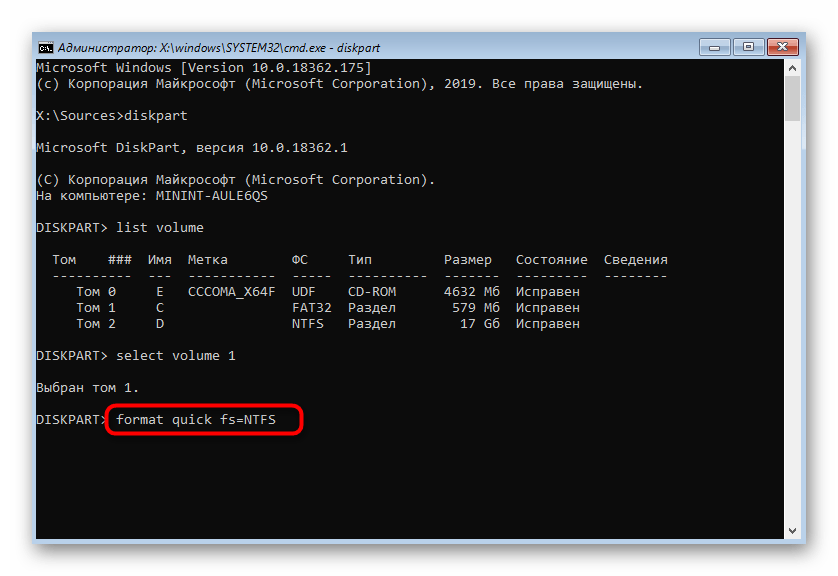
- Запустите утилиту
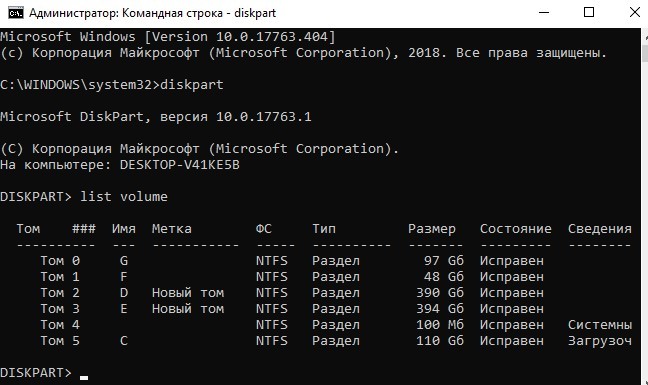
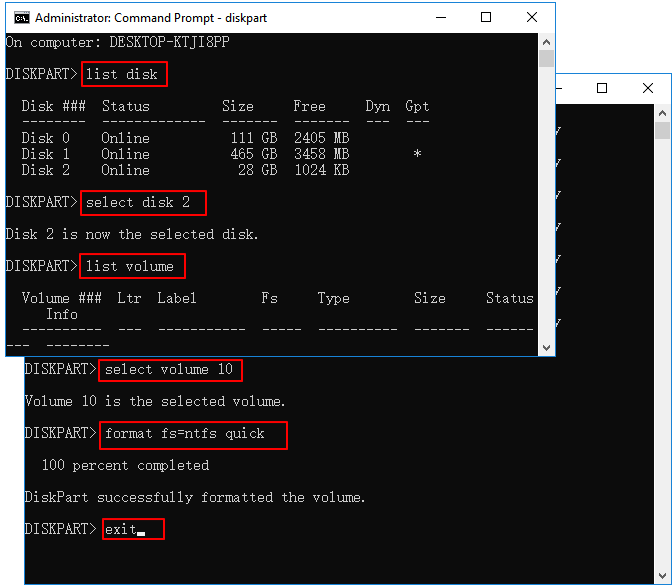
diskpart, чтобы начать работу с дисками. - Выведите список всех существующих разделов через
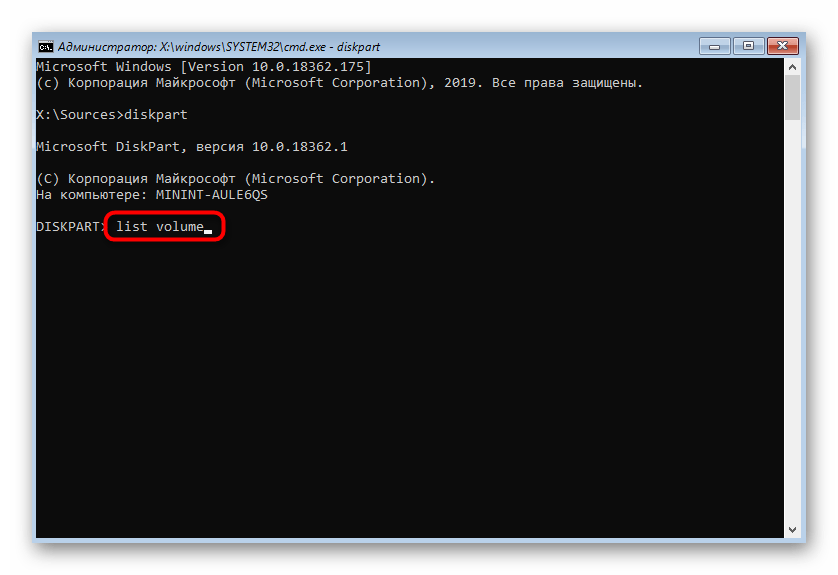
list volume. - Определите цифру тома с буквой C, чтобы в дальнейшем управлять им через соответствующие команды.
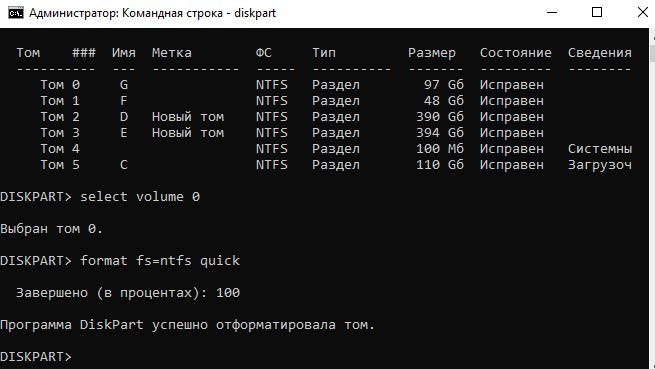
- Выберите этот раздел, введя
select volume N, где N замените на определенную только что цифру. - Осталось только форматировать выбранный диск в необходимый формат файловой системы. Выполняется это через строку
format quick fs=NTFS, где NTFS измените на другую ФС, если это требуется.
После этого можно закрывать «Командную строку» и перезагружать компьютер, чтобы убедиться в корректности форматирования раздела с буквой С. Этот метод хорош тем, что после подобной очистки восстановить уже удаленную информацию будет довольно проблематично.
Способ 3: Удаление раздела без форматирования
Этот метод подойдет тем пользователям, кто желает стереть все данные на разделе жесткого диска, но в том же время иметь возможность восстановить их. Этот вариант так же осуществляется через «Командную строку» в режиме восстановления.
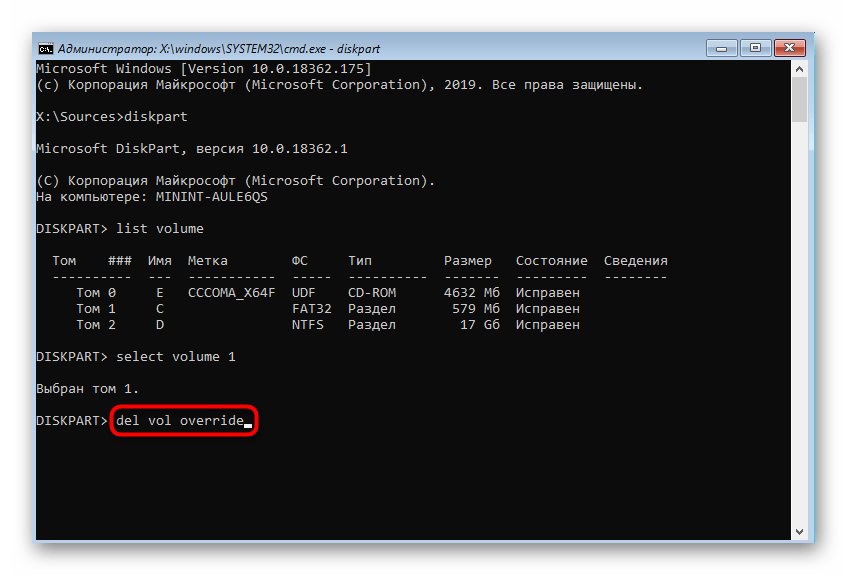
- Выполните первые шаги из приведенного выше способа, чтобы запустить утилиту управления дисками и просмотреть список доступных разделов.
- После этого выберите раздел с требуемым диском через
select volume. - Удалите логический том, используя команду
del vol override.
Теперь можете приступить к работе с операционной системой и в любой момент восстановить любые удаленные файлы. Детальные инструкции по осуществлению поставленной задачи вы найдете в другой статье на нашем сайте, перейдя по указанной ниже ссылке.
Подробнее: Восстановление удаленных файлов на компьютере
Способ 4: Форматирование во время переустановки Windows
Иногда форматирование раздела C в Windows 10 необходимо при переустановке Windows или во время первичной инсталляции. Тогда вариант с использованием средства восстановления не поможет, поскольку лучше всего будет выполнить очистку сразу во время подготовки.
- После запуска с установочной флешки или диска выберите предпочитаемый язык и переходите к следующему шагу.
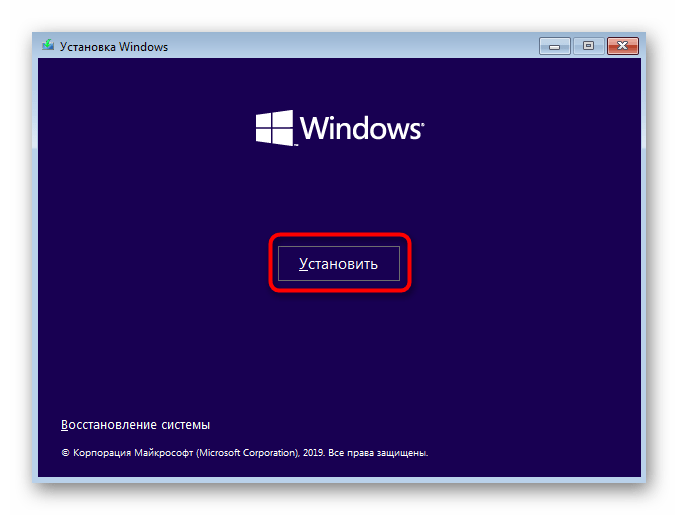
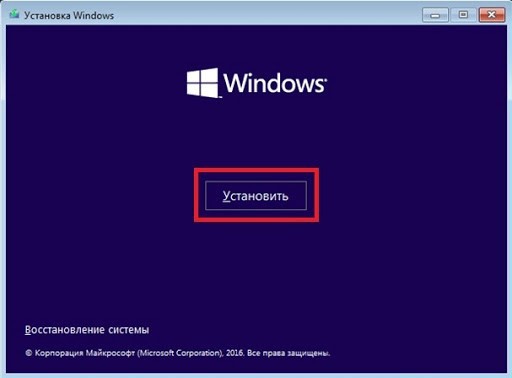
- В появившемся окне нажмите на кнопку «Установить».
- Введите код активации Windows или пропустите этот шаг, чтобы выполнить подтверждение лицензии позже.
- Ознакомьтесь с условиями лицензионного соглашения, отметив галочкой соответствующий пункт, чтобы перейти далее.
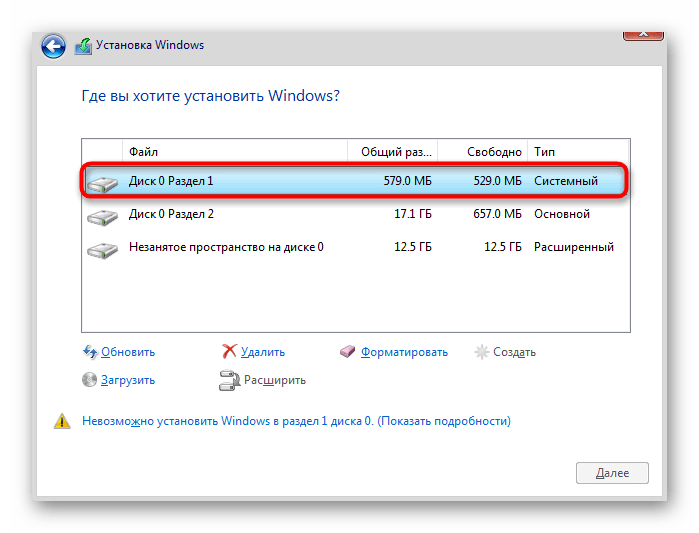
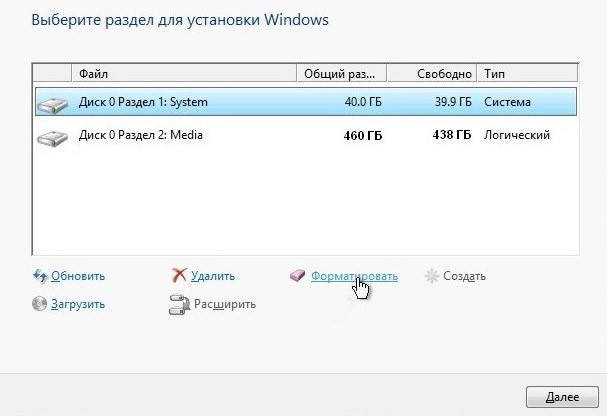
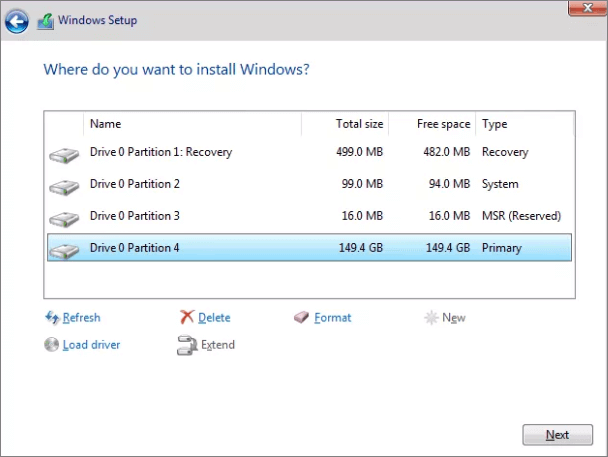
- Среди всех существующих разделов найдите тот, который по размеру в точности совпадает с маркировкой C, и выделите его.
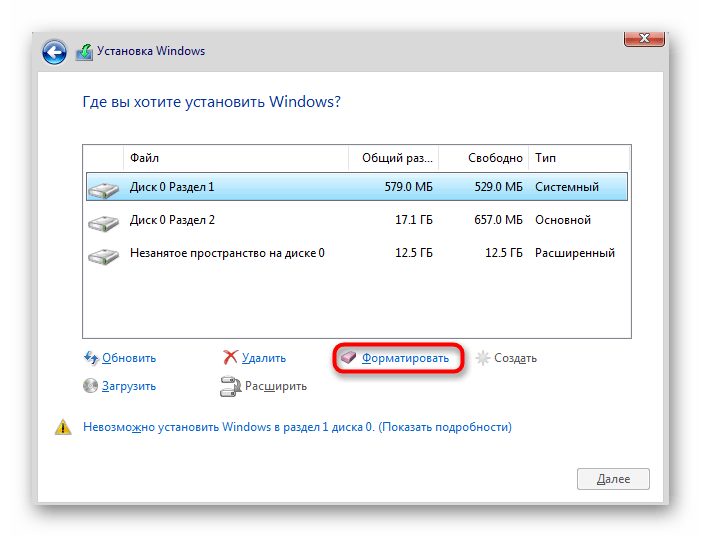
- Щелкните по строке «Форматировать».
- Подтвердите данное действие, нажав на «Да».
- Теперь вы можете удалить раздел, если он больше не нужен, чтобы пространство определилось как «Незанятое».
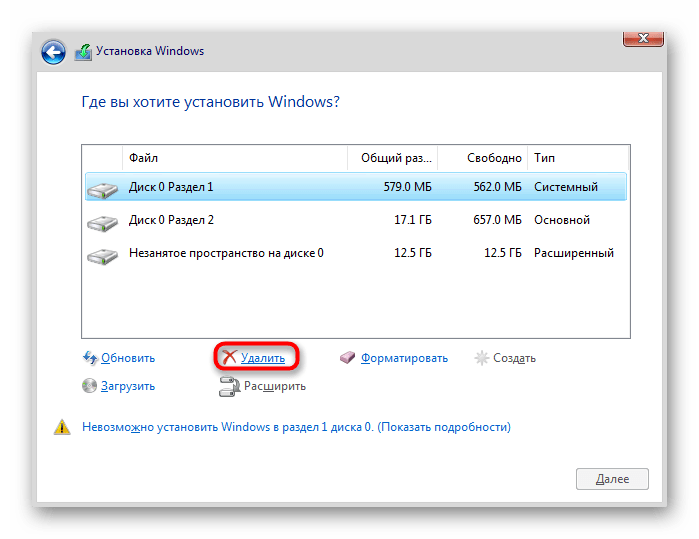
После этого продолжайте стандартную инсталляцию операционной системы, следуя отобразившимся подсказкам. Если на этом этапе возникли какие-то трудности, советуем ознакомиться с приведенным далее материалом, в котором данный процесс разобран максимально детально.
Подробнее: Руководство по установке Windows 10 с USB-флешки или диска
В этой статье мы постарались разобрать все доступные методы форматирования диска C в Windows 10. Как видно, осуществляется поставленная задача не так уж и сложно, а от пользователя требуется только выбрать оптимальный метод и следовать указанным инструкциям, чтобы все прошло успешно и без каких-либо трудностей.
Еще статьи по данной теме:
Помогла ли Вам статья?
Мы уже разбирали тему форматирования жестких дисков и разделов из-под работающей Windows с использованием собственных средств системы — Проводника и командной строки, а также сторонних программ Aomei Partition Assistant Free и HDD LLF Low Level Format Tool. Все они отлично справляются со своими задачами, если только речь не идет о форматировании системного диска, отформатировать который в работающий Windows нельзя в принципе, поскольку система никак не может удалить саму себя. Если вы хотите отформатировать диск или раздел, на котором установлена операционная система, вам нужно будет получить к нему монопольный доступ.
- 1 Загрузка ПК с внешнего носителя
- 2 Форматирование с помощью загрузочной флешки
- 3 Форматирование с помощью WinPE 10-8 Sergei Strelec
- 4 Если нет загрузочного диска
Самый очевидный способ получить такой доступ — это снять жесткий диск, подключить его к рабочему компьютеру и отформатировать любым из способов. Но будем исходить из того, что у нас нет второго компьютера. Как быть в этом случае, можно ли пересоздать файловую систему на диске как-то иначе? Конечно, но для этого вам понадобится как минимум установочный носитель с дистрибутивом операционной системы. Рассмотрим, как полностью отформатировать жесткий диск с системой (Windows 7, 8, 10), загрузив ПК с флешки через БИОС.
Загрузка ПК с внешнего носителя
Чтобы загрузиться с флешки или DVD-диска, вам нужно будет зайти в BIOS или UEFI и изменить приоритет загрузки. В разных версиях BIOS эта процедура может отличаться, например, в AMI BIOS нужно зайти в раздел Boot, выбрать пункт «USB Floppy Drive», а затем вызвать в подразделе «1st Boot» меню и выбрать в нём заранее подключенную к компьютеру флешку. Но гораздо удобнее использовать меню загрузки — Boot Menu, вызываемое нажатием в момент включения компьютера или ноутбука клавиши F12 (могут встречаться и другие варианты). Всё что вам нужно сделать, это выбрать в этом меню свою флешку или другой внешний накопитель, с которого предполагается загрузить компьютер. Естественно, в момент нажатия клавиши вызова Boot Menu он уже должен быть подключен.
Подробный материал о том, как выставить загрузку с флешки в БИОС: https://spravkapc.ru/nastrojka-kompyutera/kak-nastroit-bios-uefi-dlya-zagruzki-s-usb-fleshki.html
Форматирование с помощью загрузочной флешки
Использование мастера-установщика может показаться более удобным решением, но только если речь идет о форматировании отдельного раздела. Даже если вы удалите с накопителя все разделы, то при создании нового раздела с файловой системой мастер-установщик создаст дополнительный служебный раздел. Полностью форматировать диск нужно из командной строки.
- Загрузитесь с установочного диска, а когда на экране появится окно мастера установщика, нажмите Shift + F10, чтобы открыть командную строку;
- Запустите одноименной командой утилиту
diskpartи выведите список физических жестких дисков командойlist disk; - Выберите системный диск с помощью команды
select disk 0и удалите с него командойcleanилиclean allвсе данные и разделы; - Командой
create partition primaryсоздайте раздел на месте полученного нераспределенного пространства и отформатируйте его командойformat fs=ntfs quick. Если нужно затереть все оставшиеся на диске файлы, ключ quick указывать не нужно; - Дождитесь завершения форматирования, выйдите из программы установки и выключите компьютер.
Форматирование с помощью WinPE 10-8 Sergei Strelec
Этот способ форматирования диска с имеющимся на нём системным разделом гораздо проще и удобнее, но нужно, чтобы под рукой у вас был спасательный диск, в данном примере WinPE 10-8 Sergei Strelec. Иметь его при себе желательно любому администратору.
- Загрузите ПК с диска Стрельца и выберите в меню опцию «Boot USB Sergei Strelec Win10» соответствующей разрядности;
- Когда загрузится рабочий стол, нажмите кнопку Пуск и выберите Программы WinPE → Жесткий диск;
- Выберите в списке программ любое знакомое вам приложение для работы с дисками и разделами, например, Acronis Disk Director;
- Последовательно удалите все разделы на выбранном жестком диске;
- После того как тома будут удалены, нажмите по диску правой кнопкой мыши и выберите единственный пункт меню «Создать том»;
- Проследуйте указаниям мастера, на третьем этапе укажите, если нужно, файловую систему (по умолчанию NTFS) и тип тома (лучше основной) и нажмите «Завершить»;
- Примените ожидающие операции и подтвердите запланированные программой действия.
В отличие от Disk Director, входящая в состав спасательного диска программа Aomei Partition Assistant позволят удалять разделы с полным уничтожением данных.
- Запустив дисковый менеджер, нажмите правой кнопкой по визуализированному диску (именно диску, а не разделу) и выберите в меню опцию «Стереть жесткий диск», укажите алгоритм и подтвердите действие;
- Нажмите «Применить» → «Перейти» и «Да» для окончательного подтверждения. В результате все разделы на диске будут удалены, а сектора заполнены нулями;
- Нажмите по образовавшемуся нераспределенному пространству правой кнопкой мыши, выберите в меню «Создание раздела»;
- Выберите, если нужно файловую систему и букву диска, а затем нажмите «OK»;
- Примените действия как показано в было показано в пункте 2.
Если нет загрузочного диска
Наконец, отформатировать диск можно из-под встроенной загрузочной среды WinPE, но этом случае на форматируемом диске у вас всё равно останется один раздел с самой загрузочной средой, поскольку ее нельзя удалить из самой себя. Здесь мы не станет подробно описывать эту процедуру, так как такой способ не решает поставленной задачи и не достигает цели полного форматирования системного диска. Однако вы можете удалить системный и пользовательский разделы либо отформатировать их в Diskpart командой format fs=ntfs.
Форматирование жесткого диска в Windows 10 – это необходимая процедура, которую можно проводить разными способами. Если на этом диске (разделе) не установлена операционная система, операции проводятся в самой ОС. Для форматирования HDD, установленного в качестве системного используются специальные программы, загружаемые с подключенного диска.
ВНИМАНИЕ! Если вы хотите после этого переустановить Windows, то делается это как раз во время установки.
Содержание
- Проводник
- Управление дисками
- Командная строка
- Форматирование диска с установленной Windows 10
- Форматирование нового накопителя
- Задать вопрос автору статьи
Проводник
Форматирование диска в Windows 10 можно сделать через системную утилиту управления и организации файлов – «Проводник». Инструкция, следующая:
- Откройте «Проводник» и перейдите в «Этот компьютер».
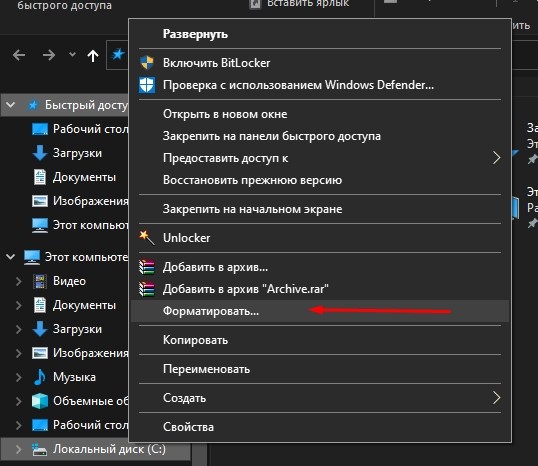
- Нажмите ПКМ по ярлыку нужного накопителя (внешне подключенного по USB или внутреннего по SATA) и выберите «Форматировать..».
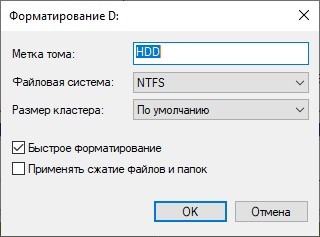
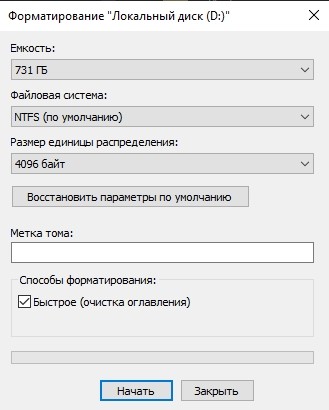
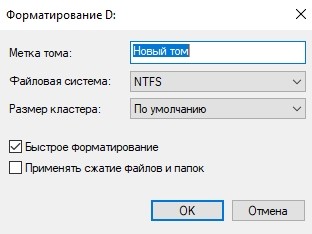
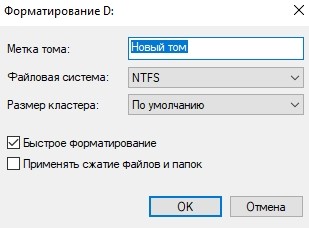
- Далее выберите файловую систему, в которую трансформируется эта область накопителя. Дайте ей имя и отмените «Быстрое», если не желаете очищать только заголовки информации. При подобном форматировании, информация останется на винчестере (ее можно будет восстановить), а при записи новых данных будет идти перезапись данных.
- Кликайте «Начать». При быстрой очистке информации процесс займет не более минуты. Стандартное удаление всех данных затягивается и зависит от ёмкости винчестера.
Управление дисками
Более продвинутый функционал работы со всеми накопителями находится в интегрированном программном обеспечении Виндовс – «Управление дисками». Отформатировать диск Windows 10 можно так:
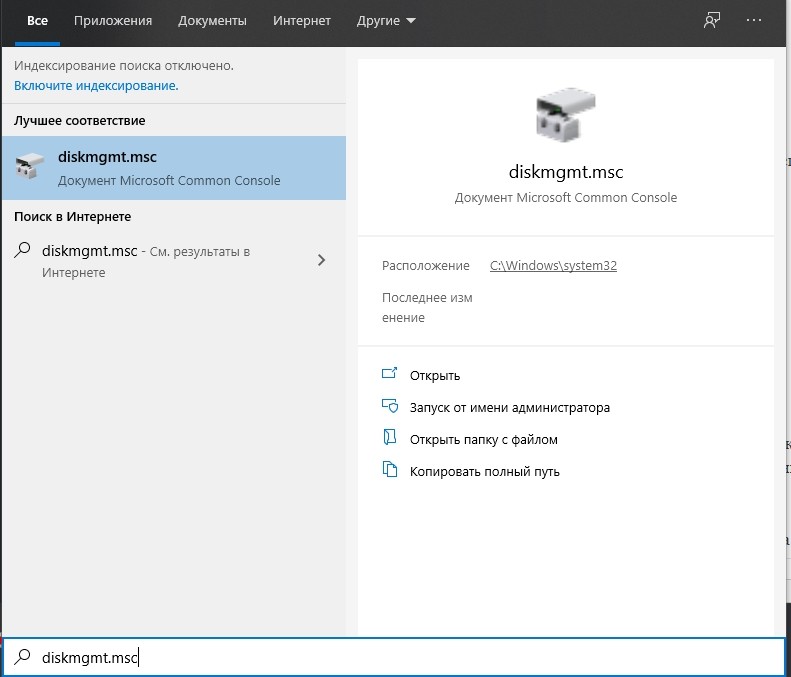
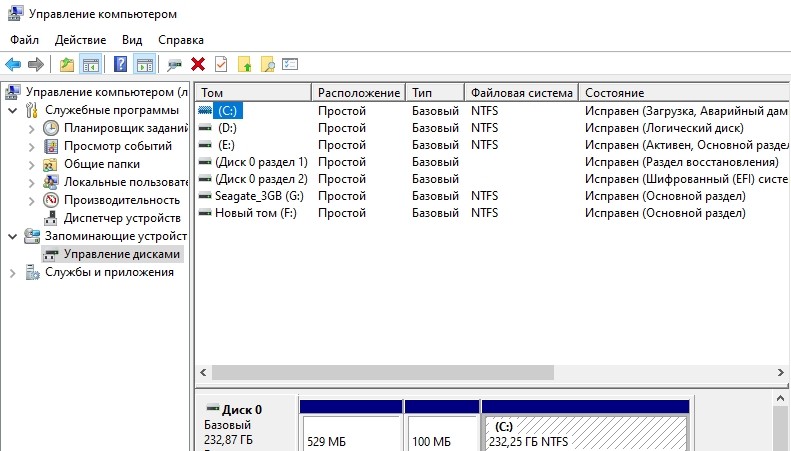
- Нажмите + R и введите «diskmgmt.msc».
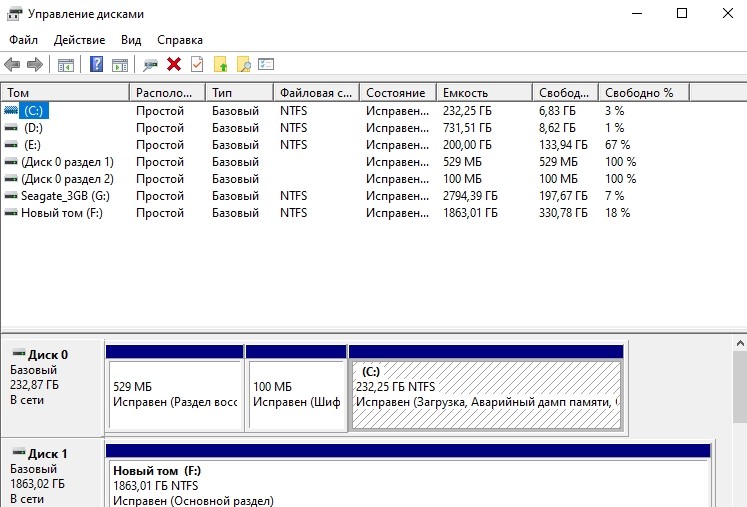
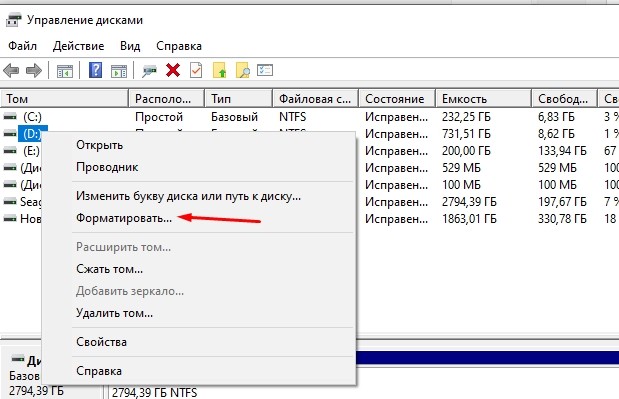
- Зайдя в приложение, кликните нужный вам накопитель, в основном окне, где все они выстроены в качестве таблицы.
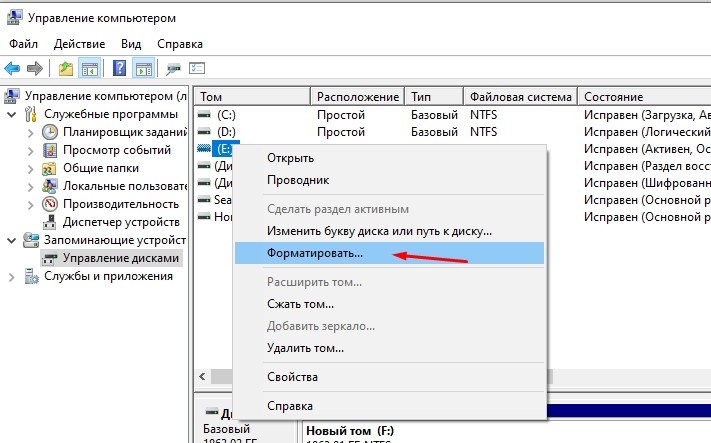
- Тапните ПКМ по нему, затем «Форматировать».
- Подтвердите свой выбор, после назначения необходимых параметров. Файловую систему и размеры кластера оставляйте те, что назначены по умолчанию.
Эта утилита разрешает еще складывать разбитые разделы HDD воедино. Для этого нужно форматировать диск (все разделы), затем задействовать функцию «склейки» накопителя воедино, с помощью опции, размещенной ниже таблицы.
Командная строка
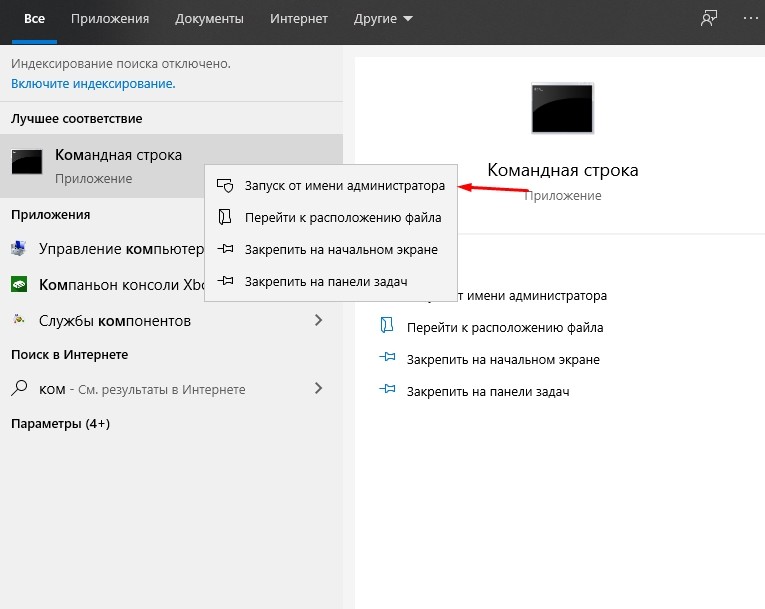
Отформатировать компьютер можно и через командную строку. Для этого в Windows 10 в поисковой строке введите cmd и откройте ее с правами админа. Далее:
- Введите команду: «diskpart» для активации необходимой программы.
- Следующая команда: «list volume» – выводит каталог всех разделов, физических и логических томов, которые присутствуют в системе.
- С помощью команды: «select volume 0» – выберите нужный вам том. Вместо ноль (0) подставьте тот номер тома, который необходимо отформатировать вам.
- Команда стирания данных вводится так:
format fs=ntfs quick
- Готово.
Если нужно полное удаление данных, просто уберите из команды: «quick» – опцию удаления оглавлений. Вместо файловой системы NTFS, можно указать FAT32. По завершению, просто закройте CMD. Перезагружать ПК не нужно.
Когда пришло время переустановки Виндовс с полным удалением данных, отформатировать жесткий диск с Windows 10 можно с помощью инструкции:
- Создайте загрузочную флешку.
- Установите ее в юсб-порт компьютера – через UEFI или BIOS измените настройки «Boot Loader», чтобы загрузится с флешки, а не с хард-драйва с операционной системой.
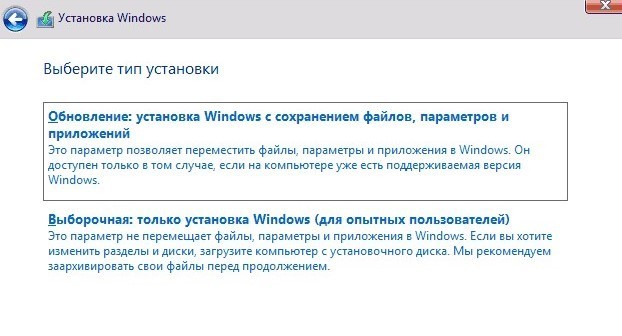
- Нажмите «Установить».
- Далее кликайте «Выборочная».
- После выбора системного раздела, жмите «Форматировать».
- Готово.
После этого, раздел, содержащий операционную систему будет стерт. Ее придется установить заново. Таким же способом можно форматировать не только ПК, но и ноутбук.
Форматирование нового накопителя
Если вы подключили новый накопитель к компьютеру, прежде чем им начать пользоваться, его нужно правильно очистить, назначить файловую систему и сделать так, чтобы тот отображался в «Проводнике». Все это можно организовать в «Управление дисками»:
- Кликните ПКМ по иконке Пуск и из меню выберите «Управление дисками».
- Среди подключенных снизу накопителей найдите тот, который вы недавно подключили к компьютеру.
- Он может быть серым (неразмеченная область) и у него не будет присвоена буква. Чтобы исправить, жмите ПКМ по области и кликайте «Форматировать».
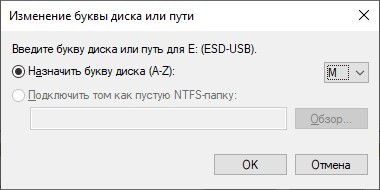
- После, снова в этом же меню кликайте «Назначить букву диска» и жмите «ОК».
- После этого можете проверять Проводник. Пустое пространство с нужной файловой системой будет отображаться в соответствующем разделе в «Этот компьютер».
Пользователи должны знать, как отформатировать жесткий диск со старой ОС после обновления Windows 10. Ведь при хранении огромного объема информации компьютер начинает медленно работать или зависать. Форматирование всегда предполагает удаление имеющихся на диске файлов, перед этим процессом рекомендуется создать архивы. Правда, в ряде случаев форматируют новые disks, чтобы подогнать их под определенную файловую систему, например, под NTFS.
Через проводник
Как отформатировать disk из проводника:
- активировать проводник;
- кликнуть правой кнопкой мыши на накопитель, подлежащий форматированию;
- во всплывающем окне отыскать опцию «Форматировать»;
- в еще одном всплывающем окошке «Форматирование» указать файловую систему (NTFS), размер кластера (стандартный), метку тома (наименование);
- поставить галочку в «Способе…» (быстрое или полное);
- кликнуть на «Начать»;
- когда появится предупреждение об уничтожении всех данных, кликнуть на «ok»;
- дождаться окончания процесса.
С помощью «Управление дисками»
Как выполнить очистку жесткого накопителя через сервис управления:
- кликнуть на «Пуск» правой кнопкой мыши и отыскать «Управление дисками»;
- если эта опция недоступна, то зайти в «Пуск»;
- активировать «Выполнить»;
- в строке «Открыть» написать: «diskmgmt.msc»;
- откроется окно «Управление компьютером»;
- выбрать накопитель и кликнуть на него правой кнопкой мыши;
- во всплывающем окошке отыскать «Форматировать»;
- в еще одном открывшемся окне указать файловую систему, размер кластера, способ (быстрый или полный) и кликнуть на «Начать»;
- подтвердить намерение (кликнуть на «Ok»).
Применение командной строки
Как очистить disk ноутбука из командной консоли:
- открыть командную строку на администраторских правах;
- написать символы: «Diskpart»;
- кликнуть на «Enter»;
- написать символы: «list volume»;
- еще раз кликнуть на «Enter»;
- на экране появится список томов, каждому из которых принадлежит свой диск;
- написать символы: «select volume» и номер тома, подлежащего форматированию;
- снова нажать на «Enter»;
- выбрать способ очистки (быстрый или полный);
- при быстром написать: format fs=<своя файловая система> label=»<своя метка тома>» quick;
- при полном написать: format fs=<своя файловая система> label=»<своя метка тома >»;
- нажать на «Enter» и дождаться завершения процесса.
Во время переустановки Windows
Как отформатировать disk в момент переустановки Виндовс (если требуется перезагрузка с установочного диска):
- настроить bios на загрузку с установочного диска;
- вставить установочный disk в дисковод;
- войти в меню BIOS с помощью клавиш или сочетания кнопок (например, F1, F10);
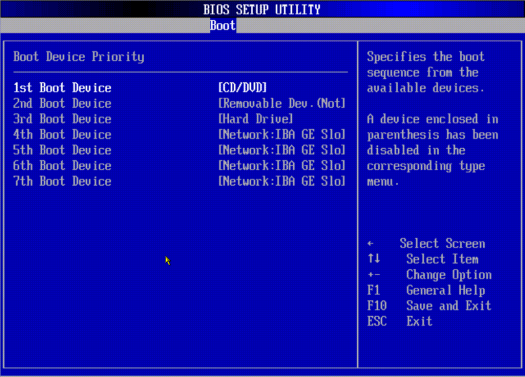
- когда появится экран BIOS, выбрать Boot или Advanced BIOS Features;
- отыскать Boot Device Priority;
- указать, что дисковод является первым устройством загрузки и написать: 1st Boot Device-значение дисковода;
- сохранить изменения одним из доступных способов: Exit-Exit & Save Changes-OK (Save and Exit или F10).
Как убрать старый Виндовс с накопителя (но только не с системного диска С):
- установить новый Виндовс;
- перейти в «Пуск»;
- отыскать в «Панели управления» опцию «Управление компьютером»;
- перейти в «Управление дисками»;
- выбрать накопитель со старым Виндовсом;
- нажать на правую кнопку мыши;
- во всплывающем окне выбрать опцию «Форматировать»;
- задать параметры процесса и кликнуть на «Ok».
С помощью PowerShell
Как полностью очистить накопитель с помощью утилиты:
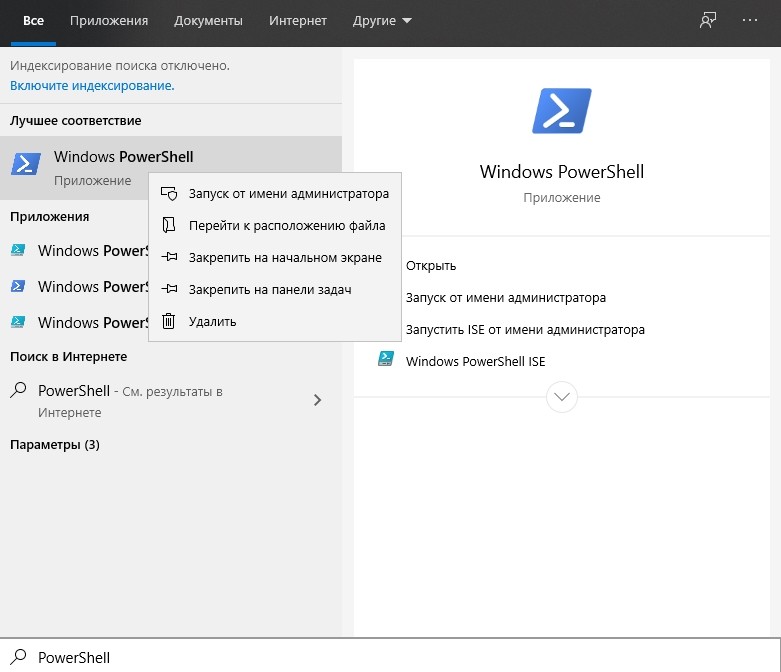
- запустить PowerShell на правах администратора;
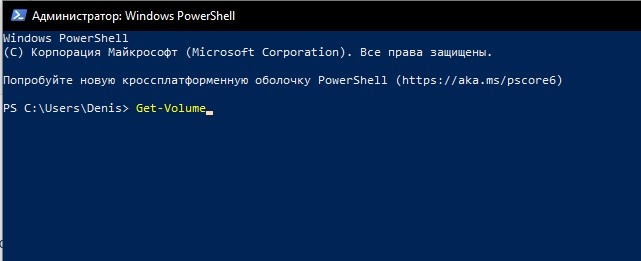
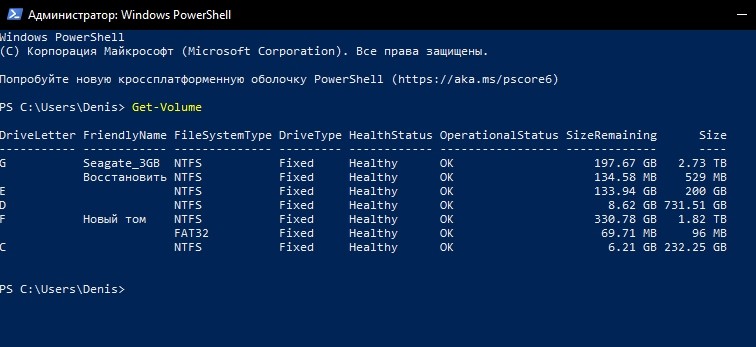
- написать: «Get-Volume»;
- нажать на ввод;
- откроется список томов с метками и буквами, каждому из которых принадлежит свой disk;
- выбрать способ очистки (быстрый или полный);
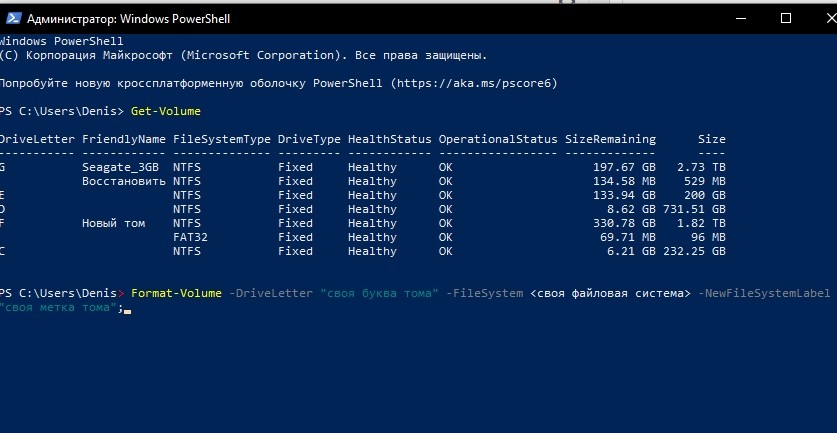
- при быстром написать: Format-Volume -DriveLetter «своя буква тома» -FileSystem <своя файловая система> -NewFileSystemLabel «своя метка тома»;
- при полном ввести символы: Format-Volume -DriveLetter «своя буква тома» -FileSystem <своя файловая система> -NewFileSystemLabel «своя метка тома» –Full;
- кликнуть на «Enter» и дождаться окончания процесса.
Форматирование нового накопителя
Как отформатировать новый жесткий disk на ПК:
- перейти в «Мой компьютер» или «Этот компьютер»;
- кликнуть по новому накопителю и отыскать «Форматировать»;
- во всплывающем окне задать параметры (файловую систему NTFS, стандартный размер кластера, свою метку тома);
- выбрать способ (быстрый или полный);
- кликнуть на «Начать» и «Ok».
Как отформатировать новый винчестер через «Мастер создания разделов»:
- войти в «Управление дисками»;
- отыскать новый накопитель и отформатировать его (способ описан вверху);
- когда disk исправлен, и на нем имеется исправленный том, отыскать опцию «Удалить том»;
- подтвердить удаление (нажать на «Да»);
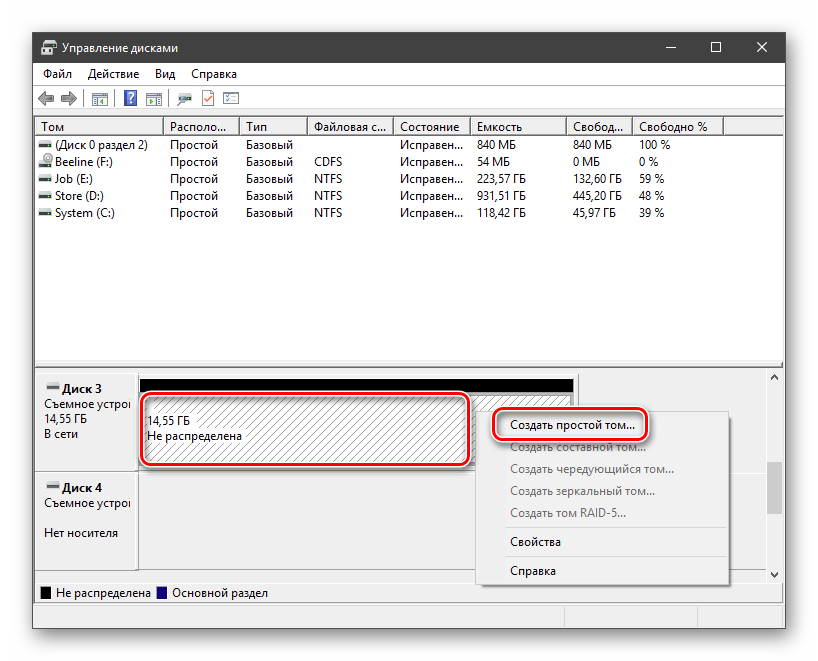
- у нового накопителя появится область «не распределена»;
- кликнуть на нераспределенную область, чтобы появилось всплывающее окно;
- кликнуть на «Создать простой том»;
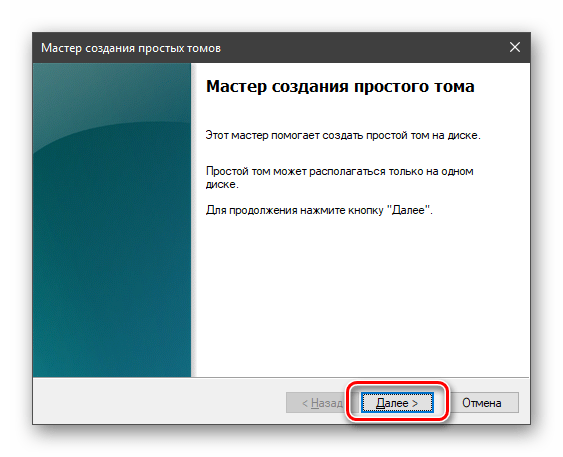
- перейти в «Мастер создания простого тома»;
- нажать на «Далее»;
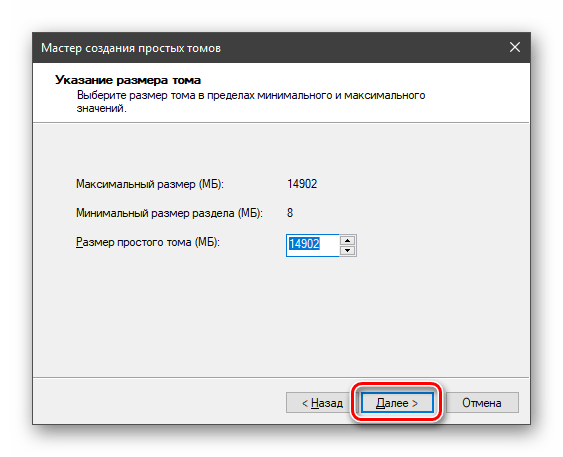
- выставить размер тома;
- назначить новому диску свою букву;
- нажать на «Далее»;
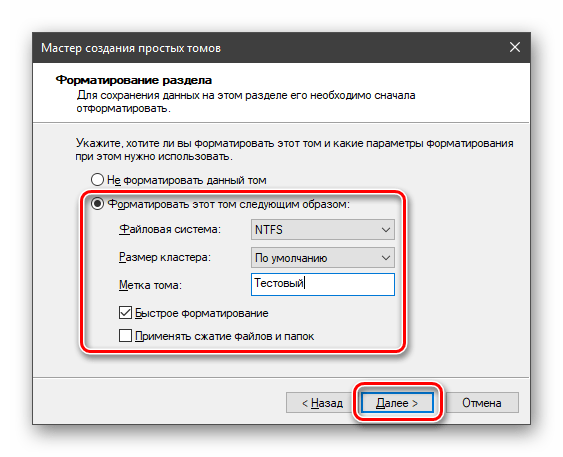
- перейти в «Форматирование раздела»;
- задать файловую систему NTFS, стандартный размер кластера и свою метку тома;
- поставить галочку в «Быстрое…»;
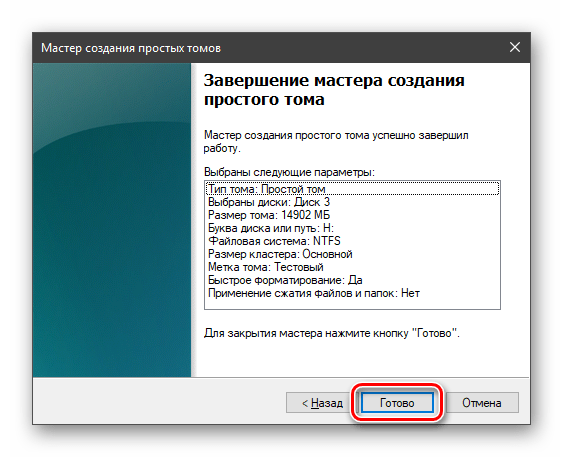
- в «Завершение…» кликнуть на «Готово».
Как отформатировать компьютер не удаляя Windows 10
Способ форматирования без удаления Виндовса (возвращение к заводским настройкам):
- подключить интернет;
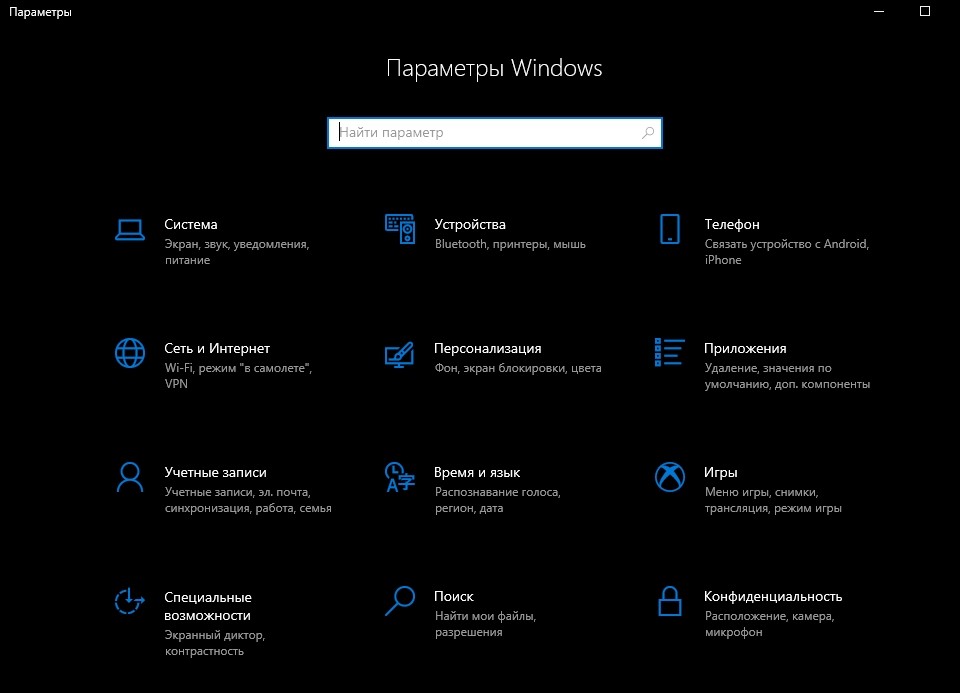
- в разделе «Пуск» отыскать «Параметры» или нажать на «Win+I»;
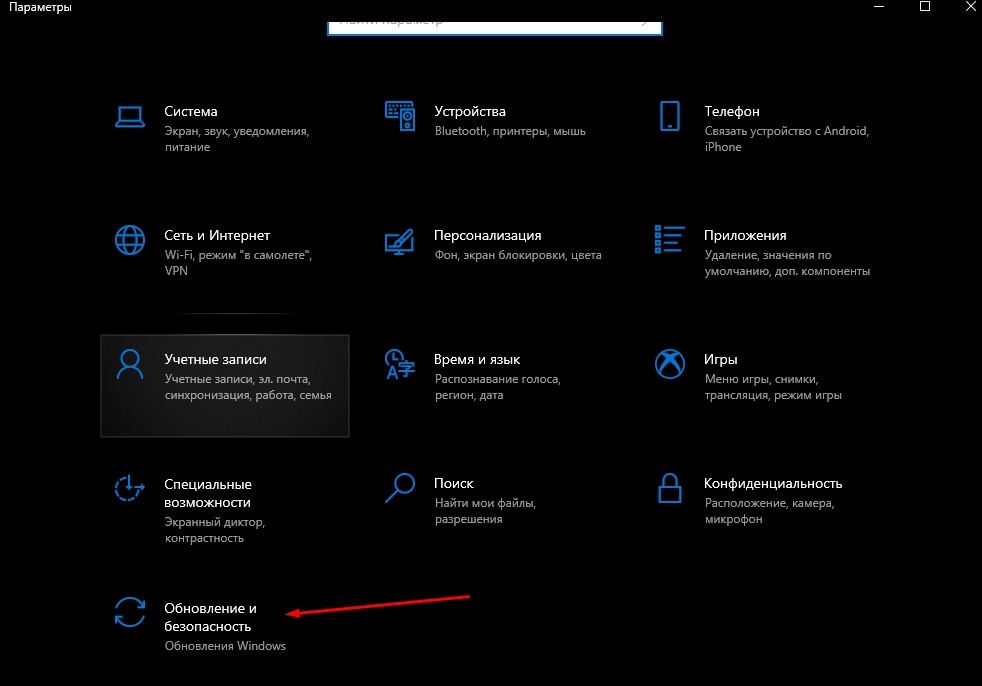
- перейти в «Обновление и безопасность»;
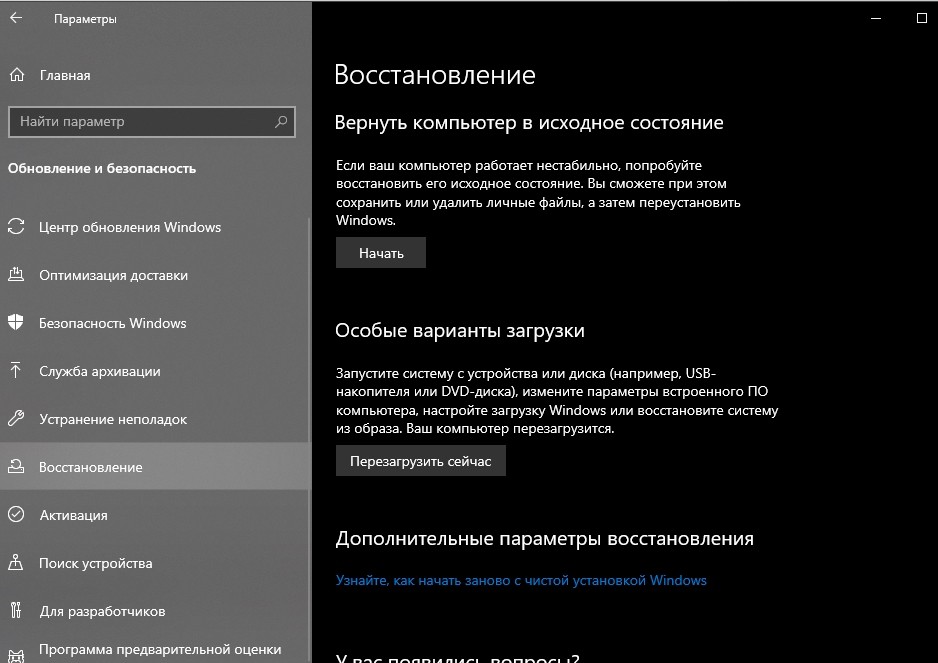
- отыскать в появившемся списке «Восстановление»;
- перейти в «Дополнительные параметры»;
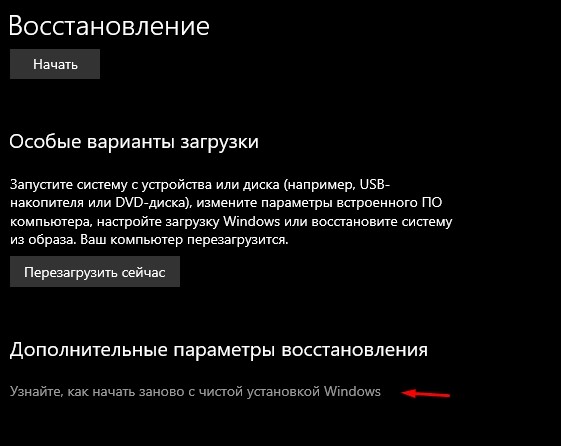
- нажать на «Узнайте, как начать заново с чистой установки Виндовс»;
- открыть «Центр безопасности» (нажать на «Да»);
- в появившейся вкладке «Новый запуск» кликнуть на «Начало работы»;
- появится предупреждение, что «Устройство будет обновлено до последней версии Виндовс»;
- нажать на «Далее» и подождать окончания процесса подготовки;
- еще раз нажать на «Далее»;
- запустить процесс восстановления компьютера, кликнув на «Начало»;
- дождаться завершения обновления.
Возможные проблемы
В процессе форматирования пользователь может столкнуться с различными трудностями. Многие проблемы можно решить, используя встроенные инструменты системы. Правда, в самом начале нужно выяснить причину сбоя или поломки.
Список возможных проблем:
- Не выполняется сброс ОС к заводским настройкам.
Причина: повреждены отвечающие за операцию файлы.
Решение: восстановление поврежденных компонентов.
Способ проверки и восстановления файлов:
- войти в командную строку;
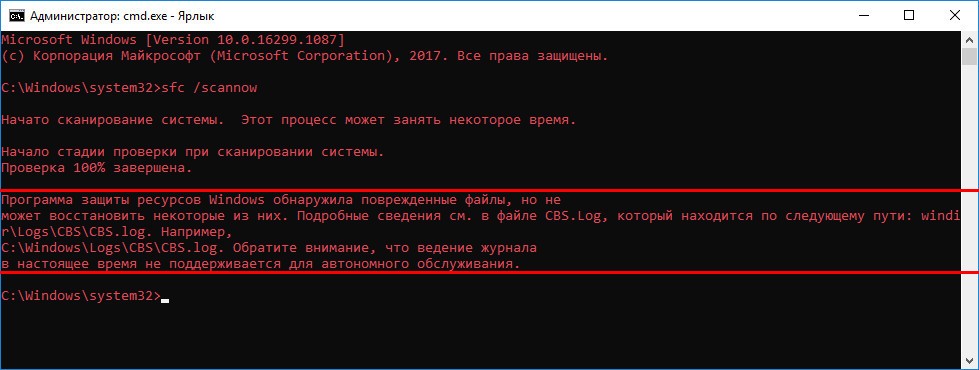
- запустить сканирование (sfc/scannow);
- если ошибка не исправилась, можно использовать утилиту dism.
- Не форматируется жесткий диск D.
Причина: пользователь пытается отформатировать накопитель, с которого запущена работающая ОС (система не может удалить саму себя).
Решение: загрузиться с другой операционной системы, с иного диска и отформатировать накопитель.
- Виндовс не может завершить форматирование.
Причина: антивирус или другое приложение прервало процесс.
Решение: запустить Виндовс в безопасном режиме, еще раз выполнить форматирование.
You delete everything including the operating system when you set your mind to format C drive. You cannot use the quick format on the C drive as on other non-system drives, but we can teach you a special method from the beginning to the end.
Quick Access — How to Format C Drive in Windows 11/10
- Boot using the Windows Setup Disc.
- Once the Windows installs, you will see the screen.
- Click Install Now and wait until it finishes.
- Accept the terms and conditions and select Next.
- Go to the Custom (advanced) option.
- Now, a prompt will ask you the location for the Windows installation.
- Select Format among the options…Read More>>
- Or you can use command lines — In the Command Prompt window, type «format c: /fs:ntfs»…Read More>>
This guide provides you with four ways to format C drive (system partition). You can wipe data, reinstall the system after formatting. Follow these methods if you want to learn how to format C drive in Windows 11/10 successfully.
| Workable Solutions | Step-by-step Troubleshooting |
|---|---|
| Fix 1. Format with Partition Tool (Recommended by Techradar) | Connect or insert the USB/CD/DVD to your computer and launch EaseUS Partition Master…Full steps |
| Fix 2. Format with Windows Setup | Boot with the Windows Setup Disc. Place the CD in the optical hard drive…Full steps |
| Fix 3. Use a System Repair Disc | Insert CD/DVD into DVD-ROM or connected external DVD drive…Full steps |
| Fix 4. Change a USB port | If you have a Windows XP Setup CD, you can format C from the Recovery Console…Full steps |
About Windows 11/10/8.1/8/7 Disk/ C Drive Formatting
According to Wikipedia, «Disk formatting is the process of preparing a data storage device such as hard disk drive, solid-state drive, floppy disk or USB flash drive for initial use.» Formatting a drive will erase all the existing content on the device, therefore, if you have important files on the partition or storage device, back them up before the format. Generally, formatting a disk for use by an operating system and its applications typically involves three different processes.
- Low-level formatting
- Partitioning
- High-level formatting
The high-level formatting creates the file system format within a disk partition or a logical volume. Hence, when it comes to formatting a C drive, it’s related to the high-level formatting.
Can You Format C Drive in Windows 11/10/8.1/8/7
«Can I format the C drive to install Windows 7?»
«Can I format the C drive to reinstall Windows 10?»
The answer is both «Yes» and «No.» Why can’t you format the C drive in Windows 11/10? The C drive is where the Windows operating system locates. To format C means that you erase the operating system and other information on the C drive, or the primary partition using Windows. How can you expect Windows to erase itself?
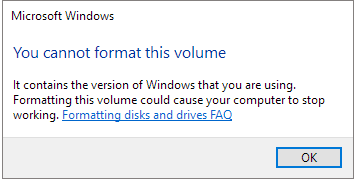
Therefore, you can’t format the C drive within Windows 11/10 or any other versions of Windows. When you attempt to format the C drive, which contains the operating system that is currently running, you will receive a prompt saying, «You can not format this volume. It contains the version of Windows that you’re using. Formatting this volume could cause your computer to stop working», as shown in the image below.
The good news is that there are still ways to format a C drive that contains the operating system. You can get it down quickly if you can boot your computer from another operating system with formatting abilities.
Fix 1. How to Format C Drive in Windows 10/11 with Third-party Tool
Among the four available choices, let’s choose the most straightforward method to start: use the partition tool — EaseUS Partition Master. With this software, you can format the hard drive without using the Windows installation disc or tools.
Reliable Partition Management Tool
- Transfer free disk space from one drive to another directly.
- Resize/move, merge, clone partition, and check file system error.
- Clone disk, convert to MBR/GPT, convert to dynamic/basic.
- Migrate OS, increase partition space, and wipe data, etc.
Procedure 1. Create a Bootable Disk
Download EaseUS Partition Master to create a bootable disk. The WinPE bootable disk allows you to access your hard drive outside the current OS.
Step 1. To create a bootable disk of EaseUS Partition Master, you should prepare a storage media, like a USB drive, flash drive or a CD/DVD disc. Then, correctly connect the drive to your computer.
Step 2. Launch EaseUS Partition Master, and find the «Bootable Media» feature on the left. Click on it.
Step 3. You can choose the USB or CD/DVD when the drive is available. However, if you do not have a storage device at hand, you can also save the ISO file to a local drive, and later burn it to a storage media. Once made the option, click the «Create» button to begin.
- Check the Warning message and click «Yes».
When the process finishes, you have successfully created an EaseUS Partition Master WinPE bootable disk. Now, you can manage your hard disks and partitions through the bootable drive whenever the computer fails to boot normally.
If you have RAID drives, load the RAID driver first by clicking Add Driver from the menu bar, which can help you add the driver of your device under WinPE environment, as some specific device cannot be recognized under WinPE environment without drivers installed, such as RAID or some specific hard disk.
Procedure 2. Boot the Computer from the Bootable Media
Step 1. Restart your computer and press the BIOS key (depending on the computer you use, it could be F2, F8, the Delete key…) to enter BIOS.
Step 2. In BIOS, set to boot the computer from the bootable USB/CD/DVD.
Procedure 3. Format the C Drive Using EaseUS Partition Master
After the startup, your computer will boot into a system with EaseUS Partition Master installed. Now your computer is using another operating system with formatting abilities. You can format the C drive with ease.
hp.com: EaseUS Partition Manager offers a good basic utility for securely erasing your SSD and a variety of paid options.
Step 1. Right-click the hard drive partition and choose the «Format» option.
Step 2. In the new window, set the Partition label, File system, and Cluster size for the partition, then click «OK».
Step 3. You can see a warning window, click «Yes» to continue.
Step 4. Click the «Execute 1 Task(s)» button, then click «Apply» to start formatting the hard drive partition.
If you are using other devices, like USB flash drive or SD card, read on:
Fix 2. Format C Drive Windows 10 with Windows Setup or External Storage Media
It is a convenient way to format C drive with this method. You can format C drive this way — using Windows 11/10, Windows 8, Windows 7, or Windows Vista installation media. Here are the steps to format C drive:
Step 1. Boot with the Windows Setup Disc. Place the CD in the optical hard drive and follow the instructions.
Step 2. Select the language you want to use and select «Next».
Step 3. Click «Install Now» and wait until it finishes. This process isn’t really installing the Windows OS.
Step 4. Accept the terms and conditions and select «Next».
Step 5. Go to the Custom (advanced) option. You will see a list of all the existing drives. Click «Drive options (advanced)».
Step 6. Select «Format». Now, Windows will start the process of formatting your drive.
Video Guide — How to Format C Drive in Windows 10 and Reinstall Windows 10
This video shows how to format local C drive and reinstall Windows 10 system.
- 0:43 Make a backup folder.
- 2:26 Plug a Windows 10 bootable USB.
- 2:37 Change the boot menu.
Fix 3. How to Format C Drive with System Repair Disc in Windows 11/10/8/7
You can also format a C drive by making a System Repair Disc. If you don’t have a copy of Windows 7, 8, 10, or 11, you can create your own disc and use it to boot then format drive C. Steps to format C drive with a System Repair Disc.
Step 1. Create a System Repair Disc.
- 1. Insert CD/DVD into DVD-ROM or connected external DVD drive.
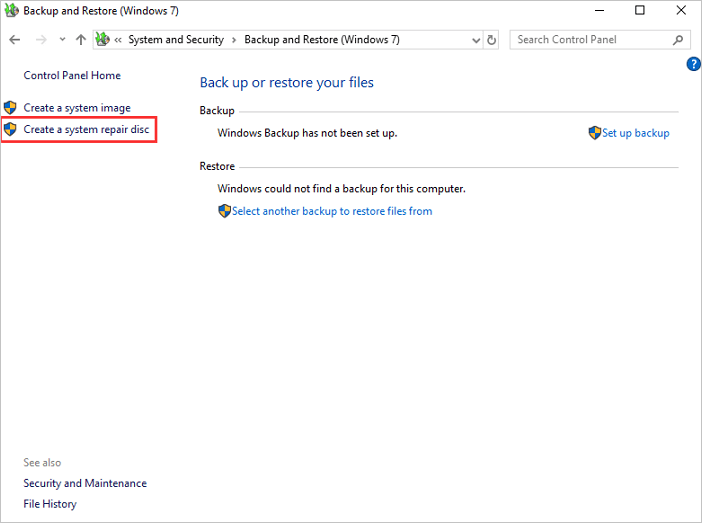
- 2. Click «Control Panel» on the computer screen, then click «Backup and Restore (Windows 7)».
- 3. Click «Create a system repair disc» from the left column to open the repair disc creation window. Follow the on-screen instructions to create a system repair disc.
Step 2. Format C Drive with the System Repair Disc.
- 1. Insert the disc in the optical drive and restart your PC. You will be shown a prompt telling you to press any key to boot from the CD. Wait for the installation to complete. Choose your preferred language and continue.
- 2. You will be redirected to System Recovery. Select the «Use recovery tools…» option and proceed.
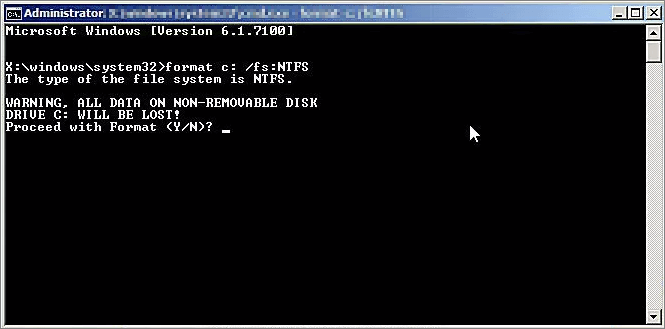
- 3. Go to Command Prompt. Enter the following command: format c: /fs:NTFS
- 4. You will be asked to provide the volume level. Enter the label. Proceed to the format by typing in Y and hit Enter. Once the format is finished, enter the Volume Label.
Fix 4. Format C Drive Windows XP with Recovery Console
Recovery Console does not exist in Windows Vista or later, nor does it exist in Windows ME, Windows 98, or earlier. If you have a Windows XP Setup CD, you can format C from the Recovery Console.
Whether to Format C Drive or Not
But wait a second. Is it really necessary to format the C drive on a computer? According to pre-sales consulting information, users’ primary purpose to erase an old operating system is to leave room for the new OS installation. That’s unnecessary.
When you reinstall Windows on the disk that has an OS, you have to format the disk. That is to say, the format will occur during the operating system installation. Thus, if you intend to format the C drive for Windows installation, it’s needless to format the system drive in advance.
Yet there are always some expectations. What if you have to format the C drive to wipe your hard drive and erase all your system information, settings, files, and programs on that partition? There are four choices for you:
- Partition tool (for Windows 11, 10, 8, 7, or Windows Vista or Windows XP)
- A Windows setup disk or flash drive (for Windows 11, 10, 8, 7, or Windows Vista or Windows XP)
- A system repair disc (for Windows 11/10, Windows 8, or Windows 7)
- Recovery Console for (Windows XP)
The Bottom Line
In conclusion, formatting a C drive is unnecessary if you want to do it for installing Windows because the OS installation requires you to format the disk during the process. If you have to format the C drive on your computer, there are several options for you. The easiest one is to create a bootable media with software like EaseUS Partition Master (Fix 1). A bootable USB/CD/DVD enables you to format the target OS from another OS effortlessly. Hope the guide is helpful to you.
Format C Drive FAQs
how to format local disk c? how to format only c drive in windows 10/11? See short answers.
How do I format my C drive only?
To format your C drive only, you’ll need to create a bootable USB drive or CD/DVD.
Once you have your bootable media, boot from it and select the option to format your C drive. This will erase all the data on your C drive, so be sure to back up any important files before proceeding. Once the format is complete, you’ll need to install an operating system on your C drive. You can do this by booting from your bootable media and selecting the option to install an operating system. Follow the prompts to complete the installation process. Once your new operating system is up and running, you’ll be able to format your C drive as needed without affecting any other drives on your computer.
How do I format C drive quickly?
The answer is actually quite simple, and there are a few different ways to do it. One method is to use the built-in Windows tool called «Disk Cleanup.» This tool will scan your hard drive and remove any unnecessary files, which can help to free up space and improve performance. Another option is to use a third-party disk cleanup program, which can be even more effective at deleting old files and improving performance. Finally, you can format C drive using the Command Prompt. This method is slightly more technical, but it can be useful if you want complete control over the process.
How do I format a C drive partition?
Before you format a C drive partition, it is recommended that you back up any important files that you don’t want to lose. Once you have done this, you can format the partition using the following steps:
1. Open the Disk Management tool by going to Start > Run and typing in ‘diskmgmt.msc’.
2. Right-click on the C drive partition that you want to format and select ‘Format’.
3. Choose the format type (NTFS, FAT32, etc.) and Allocation Unit Size that you want to use.
4. Click ‘OK’ to format the partition.

