The proper way to remove PyCharm depends on the method you used to install it.
If you installed PyCharm using the Toolbox App, do the following:
-
Open the Toolbox App, click the settings icon
 for the necessary instance, and select Uninstall.
 for the necessary instance, and select
Uninstall a standalone instance
If you are running a standalone PyCharm instance, the default IDE directories are preserved when you remove your instance in case you want to keep your settings for later or to use them with another instance, another version, or another IDE. You can remove those directories if you are sure you won’t need them.
-
Open the Apps & Features section in the Windows Settings dialog, select the PyCharm app and click Uninstall.
Depending on your version of Windows, the procedure for uninstalling programs may be different. You can also manually run Uninstall.exe in the installation directory under /bin.
-
Remove the following directories:
- Syntax
-
%APPDATA%JetBrains<product><version>
%LOCALAPPDATA%JetBrains<product><version>
- Example
-
C:UsersJohnSAppDataRoamingJetBrainsPyCharm2022.3
C:UsersJohnSAppDataLocalJetBrainsPyCharm2022.3
-
Delete the PyCharm application in the Applications directory.
-
Remove the following directories:
- Syntax
-
~/Library/Application Support/JetBrains/<product><version>
~/Library/Caches/JetBrains/<product><version>
- Example
-
~/Library/Application Support/JetBrains/PyCharm2022.3
~/Library/Caches/JetBrains/PyCharm2022.3
-
Delete the installation directory.
-
Remove the following directories:
- Syntax
-
~/.config/JetBrains/<product><version>
~/.cache/JetBrains/<product><version>
~/.local/share/JetBrains/<product><version>
- Example
-
~/.config/JetBrains/PyCharm2022.3
~/.cache/JetBrains/PyCharm2022.3
~/.local/share/JetBrains/PyCharm2022.3
Uninstall silently on Windows
If you installed PyCharm silently, you can run the uninstaller with the /S switch as an administrator. The uninstaller is located in the installation directory under bin.
Run cmd (Windows Command Prompt) as administrator, change to the PyCharm installation directory, and run the following:
binuninstall.exe /S
Uninstall the snap package on Linux
If you installed PyCharm as a snap package, use the following command to remove it:
sudo snap remove pycharm-professional
sudo snap remove pycharm-community
Last modified: 03 January 2023
The proper way to remove PyCharm depends on the method you used to install it.
If you installed PyCharm by using the Toolbox App:
-
Open the Toolbox App, click the screw nut icon for the necessary instance, and select Uninstall.


Standalone instance
To remove a standalone PyCharm instance, use the standard procedure for uninstalling applications on your operating system and remove the IDE configuration and system directories.
-
Open the Apps & features section in the system Settings dialog.
-
Select the PyCharm app and click Uninstall.
-
Remove the following directories:
- Syntax
- %HOMEPATH%.<product><version>config
- Example
- C:UsersJohnS.PyCharm2019.2config
- Syntax
- %HOMEPATH%.<product><version>system
- Example
- C:UsersJohnS.PyCharm2019.2system
-
Delete the application in the Applications directory.
-
Remove the following directories:
- Syntax
- ~/Library/Preferences/<product><version>
- Example
- ~/Library/Preferences/PyCharm2019.2
- Syntax
- ~/Library/Caches/<product><version>
- Example
- ~/Library/Caches/PyCharm2019.2
-
Delete the installation directory.
-
Remove the following directories:
- Syntax
- ~/.<product><version>/config
- Example
- ~/.PyCharm2019.2/config
- Syntax
- ~/.<product><version>/system
- Example
- ~/.PyCharm2019.2/system
Uninstall silently
If you installed PyCharm silently, you can run the uninstaller with the /S switch as an administrator. The uninstaller is located in the installation directory under bin.
Run cmd (Windows Command Prompt) as administrator, change to the PyCharm installation directory, and run the following:
binuninstall.exe /S
Snap package
If you installed PyCharm as a snap package, use the following command to remove it:
sudo snap remove <pycharm-professional,·pycharm-community, or·pycharm-educational>
Last modified: 6 November 2019
PyCharm is a Python IDE that provides easiness to developed Python Application.PyCharm provides a lot of useful features like smart code completion, code inspection, on-the-fly error highlighting, quick-fixes, automated code refactoring, and rich navigation capabilities.
PyCharm Features
In this part, we will look powerful features of the PyCharm.
Intelligent Coding Assistance
PyCharm provides intelligent code editor which provides first class support for Python, JavaScript, CoffeeScript, TypeScript, CSS and language aware completion, error detection and on the fly code fix
Built-in Developer Tools
PyCharm provides a huge collection of tools out of the box like integrated debugger, test runner, Python profiler, built-in terminal, integration with major VCS like Git, SVN, Mercurial, remote development capabilities, integrated SSH terminal.
Web Development
In addition to the Python PyCharm provides support for different web frameworks and template, scripting and programming languages like JavaScript, CoffeeScript, TypeScript, HTML/CSS, AngulaJS, Node.js and more.
Scientific Tools
PyCharm integrates with IPython Notebook which is an interactive Python console sports Anaconda and scientific packages including Matplotlib Conda integration.
Customizable and Cross-platform
PyCharm supports different operating system families like Windows, Linux, MacOS where single license key can be used for all of them. PyCharm has a customizable UI and over 50 plugins to make development experience better.
Professional Edition
Professional or Paid edition provides rich features for a fee. This version provides Scientific and Web Python development with HTML, JS and SQL support. Profession edition also provided as Free trial
Community Edition
The community edition is provided without a fee. But there are some limitations like just support for Python. etc. There is no restriction about usage time like a trial.
PyCharm support different platforms like Windows, MacOS, Linux etc. In this tutorial, we will download and install Windows. Following URL can be used to download PyCharm. Below there is two version Professional and Community.
https://www.jetbrains.com/pycharm/download/#section=windows

In this case, we will download the Professional version where the installation is very same as the Community addition.
https://www.jetbrains.com/pycharm/download/download-thanks.html?platform=windows
Install
We will install PyCharm in a Next->Next Windows-style installation. The download file is named as pycharm-professional-2019.1.exe. We will start with the following screen which is Welcome to PyCharm Setup.

Next, we can set the Destination Folder of the PyCharm. By default, PyCharm is installed to the C:Program FilesJetBrainsPyCharm 2019.1.

We will see the following screen which provides Installation Options.
64-bit launcherwill install a 64-bit launcher which can be used for 64 bit operating systems.Add "Open Folder as Project"will add PyCharm Open Folder as Project to the right-click menu which makes it easy to open a PyCharm Project folder easily from File Explorer..pywill associatepyextensions with the PyCharm IDE to open and edit.Add launchers dir to PATHwill set the PATH variable of the Windows to be run launchers from PowerShell or MS-DOS.

As the shortcut will be put to the Start Menu we will specify the name which is JetBrains by default.

The installation process will copy the libraries, data files, executables etc like below.

After completion of the PyCharm installation, we will see the following screen where we can run and start PyCharm with the Run PyCharm like below.
Uninstall or Remove PyCharm
PyCharm and Windows provide the uninstall function we will learn both of them.
Uninstall or Remove with PyCharm Installation File
We will click to the PyCharm installation file which will show the following screen.

We will see following screen where we will just click to the Next

We will see the following screen for Uninstall old versions. This will list currently installed versions. We need to check the versions we want to uninstall or remove. Optionally we can do not delete settings and configuration from old versions by click checkbox below.

When the removal of the PyCharm completed we will see the following screen which says Uninstallation Complete.

Uninstall or Remove From
From Windows Start by typing remove we will list Change or remove program where we will uninstall PyCharm.

From the opening Programs and Features screen, we will select JetBrains PyCharm and click Uninstall from above. We can also see information like version of the PyCharm and installation date.

This will open the following screen where we can set if we want to delete PyCharm caches and local history or settings and installed plugins. Then we can click Uninstall from the following screen.

When the installation is completed we will see the following screen.

Откройте раздел «Приложения и функции» в диалоговом окне «Настройки Windows», выберите приложение PyCharm и нажмите Удалить. В зависимости от вашей версии Windows процедура удаления программ может отличаться. Вы также можете вручную запустить Uninstall.exe в каталоге установки в / bin.
Как мне избавиться от PyCharm, щелкнув правой кнопкой мыши?
Прежде всего, Win + R и введите regedit (редактор реестра), нажмите Enter.
- Чтобы удалить «Открыть папку как PyCharm…» в меню, щелкнув правой кнопкой мыши фон папки:…
- Чтобы удалить «Редактировать с помощью PyCharm…» в меню, щелкнув правой кнопкой мыши значок файла:…
- Чтобы удалить «Открыть папку как PyCharm…»
Как мне восстановить PyCharm по умолчанию?
В главном меню выберите Файл | Управление настройками IDE | Восстановить настройки по умолчанию. В качестве альтернативы, дважды нажмите Shift и введите Restore default настройки . Щелкните Восстановить и перезапустить. Среда IDE будет перезапущена с конфигурацией по умолчанию.
Как установить интерпретатор PyCharm?
Выполните одно из следующих действий:
- Щелкните селектор Python Interpreter и выберите Add Interpreter.
- Нажмите Ctrl + Alt + S, чтобы открыть настройки / настройки проекта и перейдите в Project. | Интерпретатор Python. Затем щелкните значок. значок и выберите Добавить.
Как установить интерпретатор Python?
В качестве альтернативы вы можете установить стандартные интерпретаторы Python из Диалог добавления среды. Выберите команду «Добавить среду» в окне «Среды Python» или на панели инструментов Python, выберите вкладку «Установка Python», укажите, какие интерпретаторы следует установить, и выберите «Установить».
Как убрать опцию печати при щелчке правой кнопкой мыши?
Чтобы удалить контекстное меню печати в Windows 10,
- Загрузите следующий ZIP-архив: Загрузите ZIP-архив.
- Распакуйте его содержимое в любую папку. …
- Разблокируйте файлы.
- Дважды щелкните по контекстному меню «Удалить печать из контекстного меню». …
- Чтобы позже восстановить запись в контекстном меню, используйте предоставленный файл «Добавить печать в контекстное меню».
Как удалить что-то из контекстного меню в Windows 10?
Поделиться
- Нажмите на клавишу Windows на клавиатуре компьютера, введите regedit.exe и нажмите клавишу Enter, чтобы открыть редактор реестра Windows.
- Подтвердите приглашение UAC.
- Перейти к HKEY_Classes_ROOT * shellexContextMenuHandlers
- Щелкните правой кнопкой мыши Modern Sharing и выберите в контекстном меню команду «Удалить».
![]()
Add Answer
|
View In TPC Matrix
Technical Problem Cluster First Answered On
July 29, 2021
Popularity
9/10
Helpfulness
10/10
Contributions From The Grepper Developer Community
Contents
Code Examples
Related Problems
TPC Matrix View Full Screen
how to uninstall pycharm community edition in ubutu
Comment
2
Popularity
9/10 Helpfulness
10/10
Language
shell
Source: Grepper
Tags: pycharm
shell

Contributed on Jul 29 2021
visualscrapper
178 Answers Avg Quality 8/10
Grepper
Features
Reviews
Code Answers
Search Code Snippets
Plans & Pricing
FAQ
Welcome
Browsers Supported
Grepper Teams
Documentation
Adding a Code Snippet
Viewing & Copying Snippets
Social
 Twitter
![]() LinkedIn
LinkedIn
Legal
Privacy Policy
Terms
Contact
support@codegrepper.com
![]()
Add Answer
|
View In TPC Matrix
Technical Problem Cluster First Answered On
July 29, 2021
Popularity
9/10
Helpfulness
10/10
Contributions From The Grepper Developer Community
Contents
Code Examples
Related Problems
TPC Matrix View Full Screen
how to uninstall pycharm community edition in ubutu
Comment
2
Popularity
9/10 Helpfulness
10/10
Language
shell
Source: Grepper
Tags: pycharm
shell
Contributed on Jul 29 2021
visualscrapper
178 Answers Avg Quality 8/10
Grepper
Features
Reviews
Code Answers
Search Code Snippets
Plans & Pricing
FAQ
Welcome
Browsers Supported
Grepper Teams
Documentation
Adding a Code Snippet
Viewing & Copying Snippets
Social
Twitter
![]() LinkedIn
LinkedIn
Legal
Privacy Policy
Terms
Contact
support@codegrepper.com
сделано Revo Uninstaller Pro
Почему и когда вы должны использовать этот журнал?
- — если у вас есть проблемы с удалением Pycharm Professional
- — если вы хотите более качественную и тщательную деинсталляцию Pycharm Professional
- — если вы не знаете, как удалить Pycharm Professional
- — если вы удалили Pycharm Professional, но у вас есть проблемы с установкой более новой версии
- — если вы удалили Pycharm Professional, но от программы остались файлы
-
1
Скачать и установите Revo Uninstaller Pro — 30-дневную полнофункциональную пробную версию
-
2
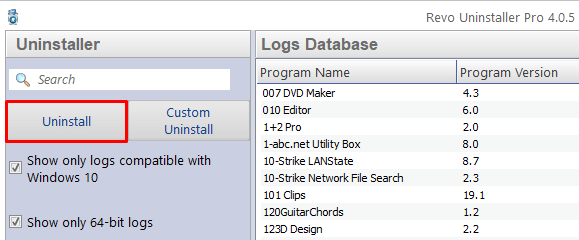
Запустите Revo Uninstaller Pro и откройте модуль «Журналы»

-
3
В поле поиска введит «Pycharm Professional» вы увидите все журналы «Pycharm Professional» в базе данных, совместимой с вашей версией Windows.
-
4
Выберите соответствующий журнал по версии из списка и нажмите кнопку «Удалить» на панели инструментов.
-
5
Вы увидите несколько всплывающих окон, показывающих загрузку и импорт журнала в Revo Uninstaller Pro, а затем главное окно удаления, которое показывает ход удаления Pycharm Professional.

Примечание: Если на вкладке «Все программы» есть Pycharm Professional вы можете начать удаление с этой вкладки. Если Revo Uninstaller Pro обнаружит соответствующий журнал в своей базы данных, он будет автоматически использован для удаления.
Доступные журналы
Pycharm Professional 173.4 on Windows 7 64-bit
Pycharm Professional 173.4 on Windows 7 32-bit
Pycharm Professional 173.4 on Windows 8.1 64-bit
Pycharm Professional 173.4 on Windows 8.1 32-bit
Pycharm Professional 173.4 on Windows 10 64-bit
Pycharm Professional 173.4 on Windows 10 32-bit
PyCharm Professional 202.7 on Windows 7 64-bit
PyCharm Professional 202.7 on Windows 8.1 64-bit
PyCharm Professional 202.7 on Windows 10 64-bit
Связанные программы
Нет связанных продуктов
Мы используем файлы cookie для улучшения работы и качества содержимого нашего сайта.
Продолжая просматривать наш сайт, вы соглашаетесь с нашей Политикой конфиденциальности.
Для получения дополнительной информации ознакомьтесь с нашей Политикой конфиденциальности и Политикой использования файлов cookie
![]()
Загрузить PDF
![]()
Загрузить PDF
Из этой статьи вы узнаете, как удалить приложение Python и связанные с ним файлы и папки. Это можно сделать на компьютере под управлением операционных систем Windows и Mac OS X.
-
1
Откройте меню «Пуск»
. Нажмите на логотип Windows в нижнем левом углу экрана.
-
2
Нажмите «Параметры»
. Это значок в виде шестеренки в нижней левой части меню «Пуск». Откроется окно настроек.
-
3
Щелкните по Приложения. Эта опция находится посередине окна настроек.
-
4
Найдите версию Python, которую вы хотите удалить. Прокрутите вниз и найдите приложение, в имени которого есть слово «Python» (например, «Python 3.6»).
- Возможно, сначала вам придется щелкнуть по вкладке «Приложения и компоненты» в верхнем левом углу окна.
-
5
Нажмите на версию Python. Сделайте это, чтобы отобразить кнопку «Удалить».
-
6
Щелкните по Удалить. Эта кнопка находится под версией Python.
-
7
Нажмите Удалить, когда появится запрос. Запрос появится над версией Python.
-
8
Нажмите Да, когда появится запрос. Так вы подтвердите, что хотите удалить Python.
-
9
Подождите, пока Python будет удален. Откроется всплывающее окно с индикатором прогресса; как только индикатор заполнится, считайте, что Python удален.
- Возможно, во время удаления вам придется щелкнуть по нужным опциям в открывшихся окнах.
-
10
Удалите другие версии Python (если необходимо). Поскольку на компьютере может быть установлено сразу несколько версий Python, поищите их в списке установленных приложений; если вы нашли другую версию Python, повторите описанные выше шаги, чтобы удалить ее.
- Также можно удалить приложение Python Launcher.
-
11
Удалите папку Python 2. Если удалить Python 3, папка Python 3 будет удалена автоматически, чего не скажешь про удаление Python 2. Чтобы удалить папку Python 2, выполните следующие действия:
- откройте окно «Этот компьютер»;
- дважды щелкните по жесткому диску в разделе «Устройства и диски»;
- найдите папку «Python27» (или аналогичную) в списке папок;
- выберите папку Python, а затем щелкните по ней правой кнопкой мыши, чтобы открыть меню;
- в меню выберите «Удалить».
Реклама


-
1
Откройте Finder
. Нажмите на значок в виде синего лица в доке.
- Также можно щелкнуть по пустому пространству рабочего стола.
-
2
Нажмите Переход. Это меню в верхней части экрана. Раскроется меню.
-
3
Щелкните по Перейти в папку. Вы найдете эту опцию в нижней части меню. Откроется всплывающее окно.
-
4
Введите путь к папке с Python. В зависимости от установленной версии Python в текстовом поле «Перейти в папку» введите один из следующих путей: [1]
- Python 3.6 и выше: /Library/Frameworks/Python.framework/Versions
- Python 2.7: /Library/Python/Versions или /Library/Python
-
5
Нажмите Перейти. Эта кнопка находится в нижней части всплывающего окна. Откроется папка, в которой установлен Python.
-
6
Выберите папку с нужной версией. Нажмите на папку с номером нужной версии Python.
- Например, чтобы удалить Python 3.6, щелкните по папке «3.6», чтобы выбрать ее.
-
7
Щелкните по Файл. Это меню находится в верхнем левом углу экрана. Раскроется меню.
-
8
Нажмите Переместить в корзину. Эта опция находится в меню «Файл».
-
9
Введите пароль, когда появится запрос. Введите пароль, который используется для входа в систему.
- Пропустите этот и следующий шаги, если вводить пароль не требуется.
-
10
Щелкните по OK. Эта кнопка находится под подсказкой для пароля. Окно для ввода пароля закроется, а папка Python будет отправлена в корзину.
-
11
Удалите программу Python (если нужно). Не все версии Python создают папку в папке «Программы» (проверьте это, если сомневаетесь). Чтобы найти и удалить приложение Python, выполните следующие действия:
- нажмите «Переход» в верхней части экрана;
- в меню выберите «Программы»;
- найдите приложение, в имени которого есть слово «Python» (например, «Python 3.6»);
- выберите приложение, если нашли его;
- нажмите «Файл» > «Переместить в корзину»;
- введите пароль и нажмите «ОК».
Реклама


Советы
- Удаление Python 3 приведет к его удалению из списка переменных PATH.
Реклама
Предупреждения
- Так как на компьютере может быть установлено сразу несколько версий Python, на удаление всех версий Python понадобится некоторое время.
Реклама
Об этой статье
Эту страницу просматривали 84 888 раз.
Была ли эта статья полезной?
I want to remove my old pycharm completely from my Ubuntu machine so my new installation will not be affected from previous settings. Any help will be appreciated
asked Nov 25, 2015 at 10:01
![]()
You can try the following commands
it will completely delete the pycharm with its preferences from ubuntu.
rm -fv /usr/local/bin/charm
rm -rfv ~/Library/Preferences/PyCharm?0
rm -rfv ~/Library/Caches/PyCharm?0
rm -rfv ~/Library/Application Support/PyCharm?0
rm -rfv ~/Library/Logs/PyCharm?0
answered Nov 25, 2015 at 10:05
![]()
Nauman TariqNauman Tariq
1,2701 gold badge14 silver badges7 bronze badges
0
Incase if pycharm is installed using snap package then you could remove it by running following commands:
sudo snap remove [pycharm-professional|pycharm-community]
rm -rf ~/.PyCharm2017.3
rm -rf ~/.java/.userPrefs/jetbrains/pycharm/
replace .PyCharm2017.3 with your installed version.
answered Feb 19, 2018 at 0:48
![]()
RichieRichie
4,3542 gold badges17 silver badges22 bronze badges
If you installed by ./pycharm.sh
Remove all folder and files below :
/usr/local/bin/charm => should rm with sudo
~/.Pycharm<version>
~/.local/share/icons/jetbrains-pycharm.png
~/.local/share/applications/jetbrains-pycharm.desktop
~/.java/.userPrefs/jetbrains/
And now you can reinstall new version, or having a clean pc without pycharm.
answered Dec 15, 2017 at 5:58
![]()
Edwin LaiEdwin Lai
3591 gold badge3 silver badges7 bronze badges
0
Try this
 sudo snap remove pycharm-professional pycharm-community
sudo apt-get autoclean
sudo apt-get autoremove
answered Dec 21, 2019 at 12:08
![]()
baponkarbaponkar
2304 silver badges14 bronze badges
3
sudo find / -name *PyCharm*
Delete all output directories.
For example:
$ sudo find / -name *PyCharm*
[sudo] password for MY_USERNAME:
/home/MY_USERNAME/.cache/JetBrains/PyCharmCE2020.1
/home/MY_USERNAME/.PyCharmCE2019.1
$ rm -rf /home/MY_USERNAME/.cache/JetBrains/PyCharmCE2020.1 /home/MY_USERNAME/.PyCharmCE2019.1
answered Apr 21, 2020 at 5:50
![]()
Rt.TongRt.Tong
1763 silver badges5 bronze badges
1
As Pycharm doesn’t have any install or uninstall program for ubuntu, the best way to delete it completely is by deleting the directory into which you have unpacked it and the .PyCharmx.x directory.
answered May 23, 2017 at 20:07
![]()
if you have installed using ./pycharm.sh then
press ctrl+H to see the hidden folders in Home
then go to .config
then JetBrains
there you delete the PyCharm folder
Now you can reinstall pycharm or enjoy your pycharm free PC 
answered Apr 26, 2020 at 4:22
![]()
AdarshAdarsh
1166 bronze badges
Open terminal (shortcut: Ctrl+Alt+T) in your ubuntu system and try this command:
sudo snap remove pycharm-community
![]()
Jan Schultke
6,1492 gold badges23 silver badges60 bronze badges
answered Aug 16, 2020 at 17:34
![]()
In Ubuntu you can do
sudo rm -rf ~/.config/JetBrains/PyCharm*sudo rm -rf ~/.java/.userPrefs/jetbrains/
answered Aug 29, 2021 at 21:45
![]()
sahasrara62sahasrara62
9,0603 gold badges28 silver badges42 bronze badges
Maybe, is a little convenience to leave this hidden file for update «major» installation: for example, since PyCharm Community Edition 2.4 to 2.6, I found this in home directory: PyCharmCE2018.2; the installer suggests use (default) or ignore.
answered Dec 22, 2018 at 19:10
![]()
open your terminal as common user
$rm -d -r ~/.PyCharm2019.3
run same command as root user
$sudo su$rm -d -r ~/.PyCharm2019.3
note PyCharm2019.3 replaced with your PyCharm version
![]()
David Buck
3,67235 gold badges33 silver badges35 bronze badges
answered May 22, 2020 at 10:23
![]()
I see some of the answers pointing to ~/Library/* locations which I don’t have by default in Ubuntu (specifically 18.04 Bionic Beaver), and maybe pertinent to MacOS systems.
For Ubuntu, here’s my list of commands (for a standalone installation):
1. Delete the main app (snap|toolbox app|standalone) **see snap uninstallation cmds above)

# Clear caches and remnant files:
2. Remove the following dirs:
${HOME}/.config/JetBrains/<product><version>
${HOME}/.cache/JetBrains/<product><version>
${HOME}/.local/share/JetBrains/<product><version>
${HOME}/.java/.userPrefs/jetbrains/*
Example:
~/.config/JetBrains/PyCharm2021.3
~/.cache/JetBrains/PyCharm2021.3
~/.local/share/JetBrains/PyCharm2021.3
answered Dec 12, 2021 at 19:28
![]()
John DoeJohn Doe
2,0531 gold badge19 silver badges12 bronze badges
Uninstall PyCharm
The proper way to remove PyCharm depends on the method you used to install it.
This guide describes ways to uninstall PyCharm on Windows macOS Linux . Use the platform switcher at the top to select another operating system.
Toolbox App
If you installed PyCharm by using the Toolbox App:
Open the Toolbox App, click the screw nut icon for the necessary instance, and select Uninstall .
Standalone instance
To remove a standalone PyCharm instance, use the standard procedure for uninstalling applications on your operating system and remove the IDE configuration and system directories.
Open the Apps & features section in the system Settings dialog.
Select the PyCharm app and click Uninstall .
Remove the following directories:
Delete the application in the Applications directory.
Remove the following directories:
Delete the installation directory.
Remove the following directories:
Uninstall silently
If you installed PyCharm silently, you can run the uninstaller with the /S switch as an administrator. The uninstaller is located in the installation directory under bin .
Run cmd (Windows Command Prompt) as administrator, change to the PyCharm installation directory, and run the following:
Snap package
If you installed PyCharm as a snap package, use the following command to remove it:
Русские Блоги
Я уже давно написал процедуру установки Pycharm, и я собираюсь присоединиться к соединению через два дня. Я обнаружил, что не опубликовал его! ! ! И нет (ノ ДТ) в проекте, так. Отказ Отказ Отказ Я готов удалить и снова отрезать. В результате я обнаружил, что Pycharm фактически разгрузил. Отказ Отказ Отказ Отказ Это, я не счастлив, потяните его, я нашел несколько маленьких вещей, поэтому я написал установку и удалил на этот раз.
Первый шаг разгрузка программного обеспечения и удаление каталога установки
1. Во-первых, щелкните значок правой кнопкой мыши, если существует сильная удаление, нажмите на мощную удаление (EMMMM, просто удалите, я забыл скриншот ((유 ∀ 유 |||)) Я не хочу удалять и устанавливать Это. O (╥﹏╥) o Вы можете посмотреть на него, я не больше фотографий, когда вы комментируете ниже)
2, создайте файл .py на рабочем столе. Вы найдете его икона, оставшийся Pycham ╮ (─ ▽ -) ╭
Почему это так? Я четко удалил его. Странно, это то, что каталог установки не удалил? Найти путь установки Удалить! Обновите! Посмотри снова! Или значок Pycharm. Это то, что компьютер не ответил? Запустить снова! Посмотри снова! По-прежнему! o (▼ ▼;) o Что происходит?
Дело в том, что это: какое-то большое программное обеспечение занимает большой ресурс системы, чтобы избежать повреждения устойчивости системы после того, как занимает большое количество ресурсов, программист подумал о способе, то есть добавить информацию о реестре. Он скажет систему, как ресурс, который займет ресурс. Таким образом, система имеет определенную подготовку перед запуском этого программного обеспечения, что может сделать макроэкономическое регулирование, чтобы программное обеспечение мог пройти через стабильную работу.
Когда вы удалите программное обеспечение, вы часто просто удаляете каталог установки программного обеспечения, и вы не можете удалить его. Вот почему некоторое программное обеспечение, которое мы обычно сталкиваемся, всегда удалено.
Это также верно, то нам нужно удалить информацию реестра. В качестве общего человека (мы не понимаем конкретную структуру реестра, реестр является жизненным слоем системы, и неясно, что система может вызвать систему, поэтому, пожалуйста, сделайте резервную копию перед удалением информации реестра, Так что вы можете восстановить после вас.)
Реестр делеции второго этапа
Реестр резервного копирования первого шага
Windows + R вход Редактит открывает редактор реестра

Вы найдете каталог, чтобы найти экспорт каталога.

Откройте местоположение файла резервного копирования реестра дважды щелкните экспортируемый вами файл.

Попквал диалоговое окно: нажмите Да

Второй шаг, нахожу расположение реестра программного обеспечения и удаление реестра
Нажмите, чтобы найти

Введите имя программного обеспечения, которое вы хотите удалить во всплывающем окне диалогового окна, щелкните правой кнопкой мыши этот файл, нажмите, чтобы удалить
Третий шаг перезапускается
Перезагрузите компьютер, создайте новый файл PPY, если этот сертификат значка успешен!
Так как вы уже удалили, вы начнете переустановить!
- Установите Pycharm
Шаг 1: Перейти на официальный сайт Pycharm Скачать пакет установки
У Pycharm есть две версии, профессиональные и общественные тарелки, из которых версия сообщества бесплатна

Давайте приедем в общинную версию. Скачать напрямую, дважды щелкните, чтобы открыть и установить

Измените каталог установки, до тех пор, пока он не является диском, вы можете создать новую папку в любом

Проверьте нужные функции, нажмите Далее. Автоматическое обновление Путь этого необходимо выбрать или вы должны добавить переменные среды самостоятельно.


Установка завершена, вам необходимо перезагрузить компьютер, вы можете перезапустить немедленно, или перезапустить позже

Хорошо, теперь я смотрю на наш новый файл .py на рабочем столе, это превращает это

Первый прогон позволит вам сделать что-то, это импортировано настройки, не волнуйтесь первым, продолжайте следующий шаг

Введите интерфейс настройки темы, понравился вам такой стиль, вы можете выбрать крутой стиль Даркула, вы также можете выбрать свежий яркий стиль света.
How to permanently remove PyCharm Community? [duplicate]
I know that this question has posted few times before but I have a different problem than those one and those answers seem not to work on me. I have installed PyCharm Community 4 few weeks ago, and now I bought a student license (which is free of charge). I now want to install PyCharm Professional by deleting the Community version.
Problem is I don’t have a separate directory in which I extracted the PyCharm community. I somehow have managed to install it. When I wrote PyCharm in dash home, I am able to execute the program. But for the professional version, case is different.
When I run the sudo ./pycharm.sh it doesn’t install like it installed Community version. Every time I run pycharm.sh it asks me my license information, which is not permanent. And Professional PyCharm doesn’t appear in dash home.
How can I permanently remove Community version and can install professional like I wanted?
Uninstall PyCharm
The proper way to remove PyCharm depends on the method you used to install it.
Uninstall using the Toolbox App
If you installed PyCharm using the Toolbox App, do the following:
Open the Toolbox App, click the settings icon for the necessary instance, and select Uninstall .
Uninstall a standalone instance
If you are running a standalone PyCharm instance, the are preserved when you remove your instance in case you want to keep your settings for later or to use them with another instance, another version, or another IDE. You can remove those directories if you are sure you won’t need them.
Open the Apps & Features section in the Windows Settings dialog, select the PyCharm app and click Uninstall .
Depending on your version of Windows, the procedure for uninstalling programs may be different. You can also manually run Uninstall.exe in the installation directory under /bin .
Remove the following directories:
Delete the PyCharm application in the Applications directory.
Remove the following directories:
Delete the installation directory.
Remove the following directories:
The default location of the IDE directories has changed starting from PyCharm version 2020.1. If you had a previous version, new installations will import configuration from the old directories. For information about the location of the default directories in previous IDE versions, see the corresponding help version, for example: https://www.jetbrains.com/help/pycharm/2019.3/tuning-the-ide.html#default-dirs.
Uninstall silently on Windows
If you installed PyCharm silently, you can run the uninstaller with the /S switch as an administrator. The uninstaller is located in the installation directory under bin .
Run cmd (Windows Command Prompt) as administrator, change to the PyCharm installation directory, and run the following:
Uninstall the snap package on Linux
If you installed PyCharm as a snap package, use the following command to remove it: