![]()
Download Article
![]()
Download Article
Roblox Studio is a very powerful tool that allows you to create games for the popular online gaming platform Roblox. Unlike other video games that are developed by professional development studios, Roblox games are developed entirely by users. With Roblox Studio, you can build and create, as well as import characters, buildings, objects, vehicles, and more. You can use the Terrain Editor to create an outdoor landscape for your game. You can also use scripting to make the objects in your game interactive. This wikiHow you how to use Roblox Studio.
-

1
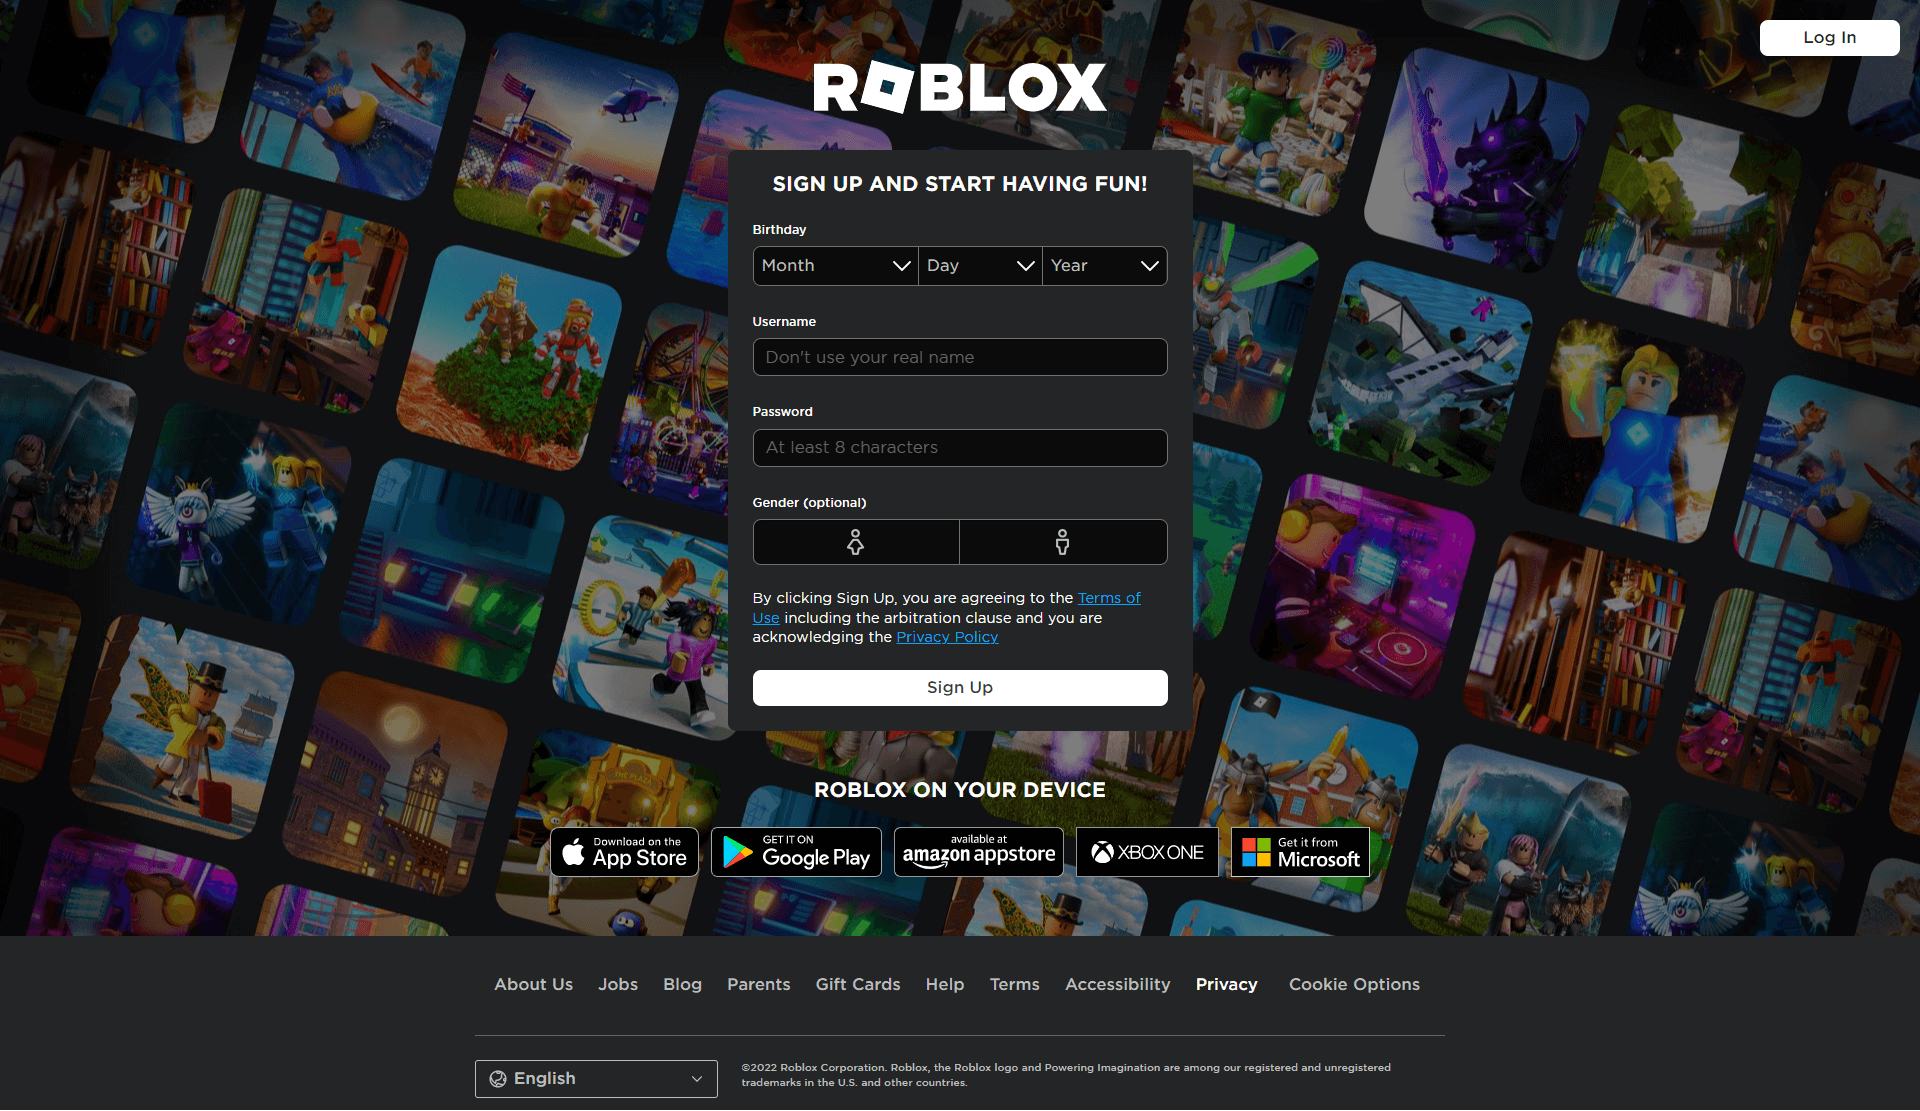
Sign up for a Roblox account. If you haven’t already done so, use the following steps to sign up for a Roblox account:
- Go to https://www.roblox.com/ in a web browser.
- Use the drop-down menus at the top to select the day, month, and year of your birthdate.
- Enter your desired username.
- Enter your desired password.
- Select your gender (optional).
- Click Sign Up.
-
2
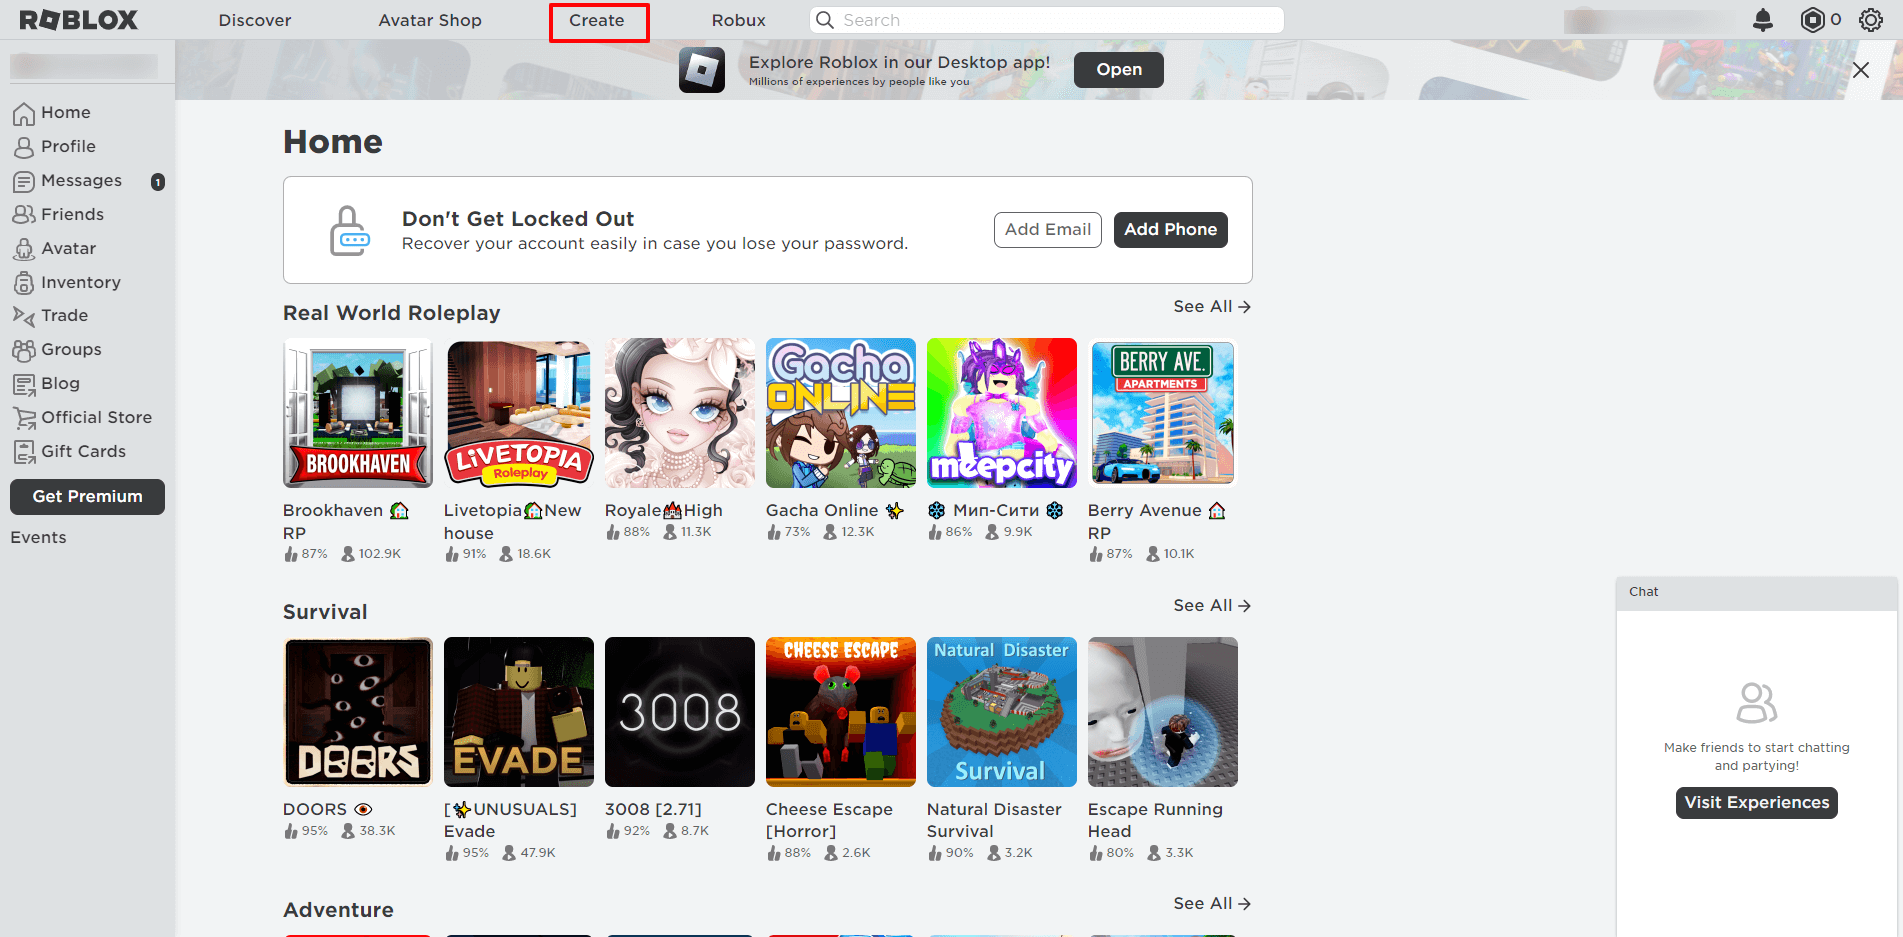
Download Roblox Studio. Use the following steps to download and install Roblox Studio.
- Go to https://www.roblox.com/create in a web browser.
- Click Log In in the upper-right corner.
- Enter your username and password and click Log In.
- Click Start Creating.
- Click Download Studio.
Advertisement
-
3
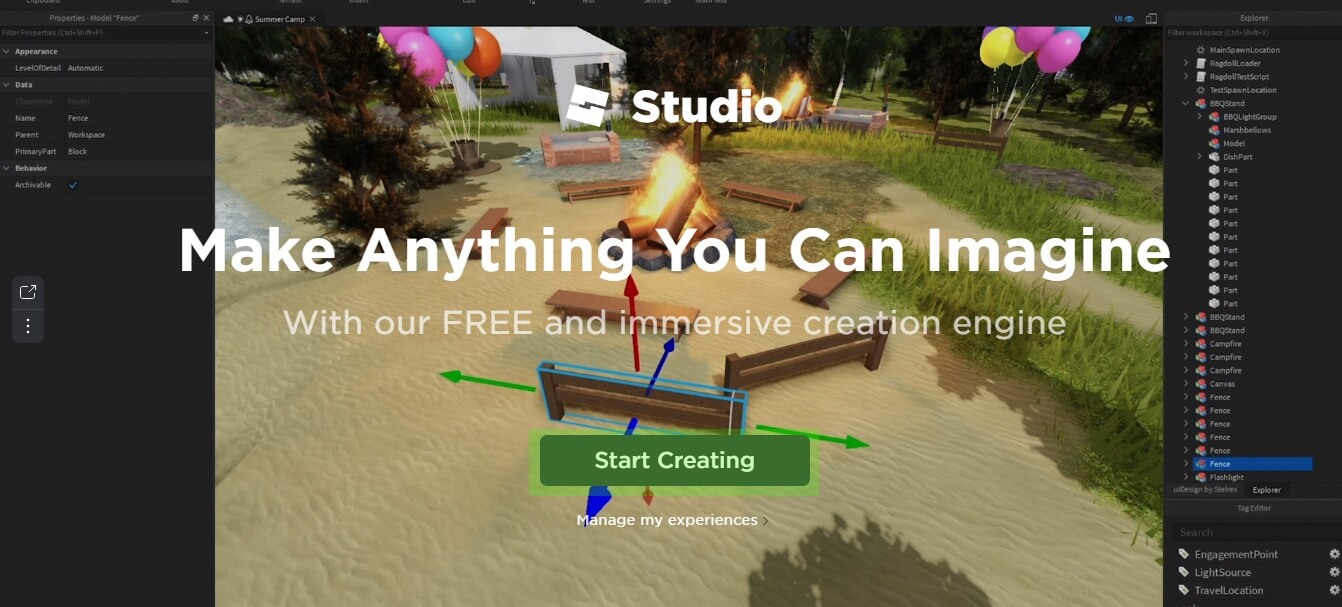
Open Roblox Studio. Roblox Studio has an icon that resembles a blue square. Click the Roblox Studio in the Windows Start menu or the Applications folder on Mac to open Roblox Studio. You can also click Start Creating on the Roblox Create website to open Roblox Studio.
-
4
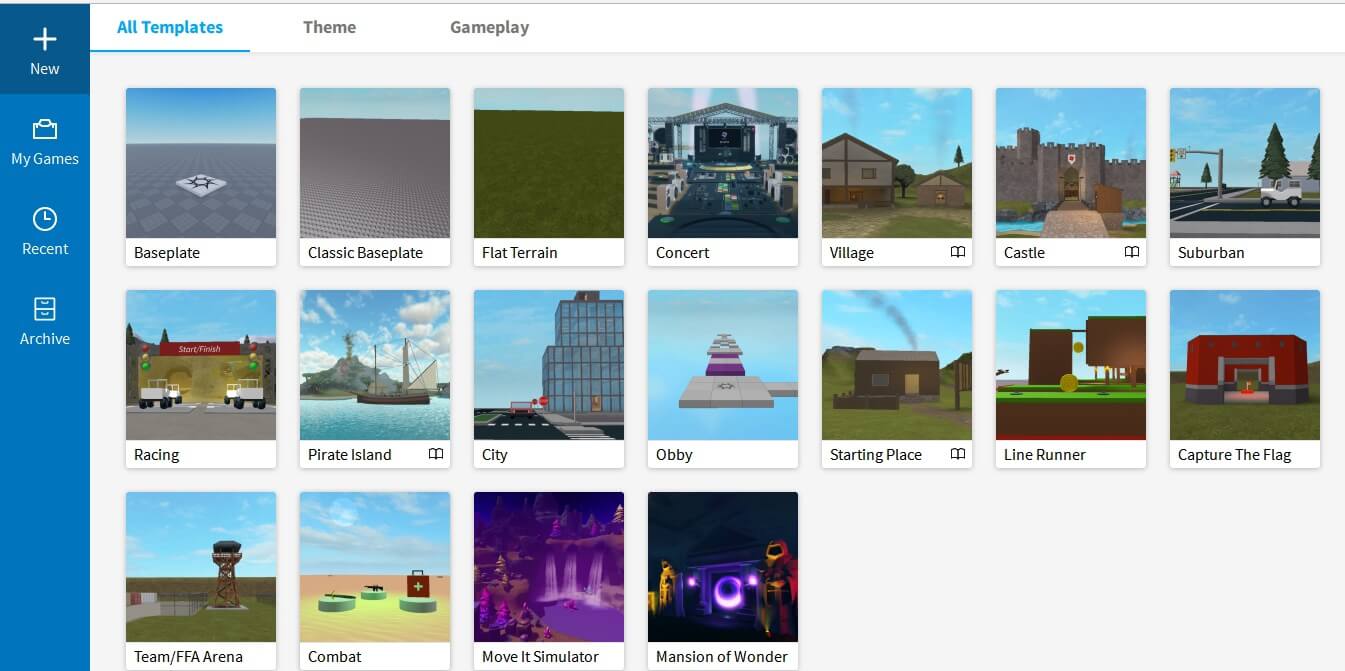
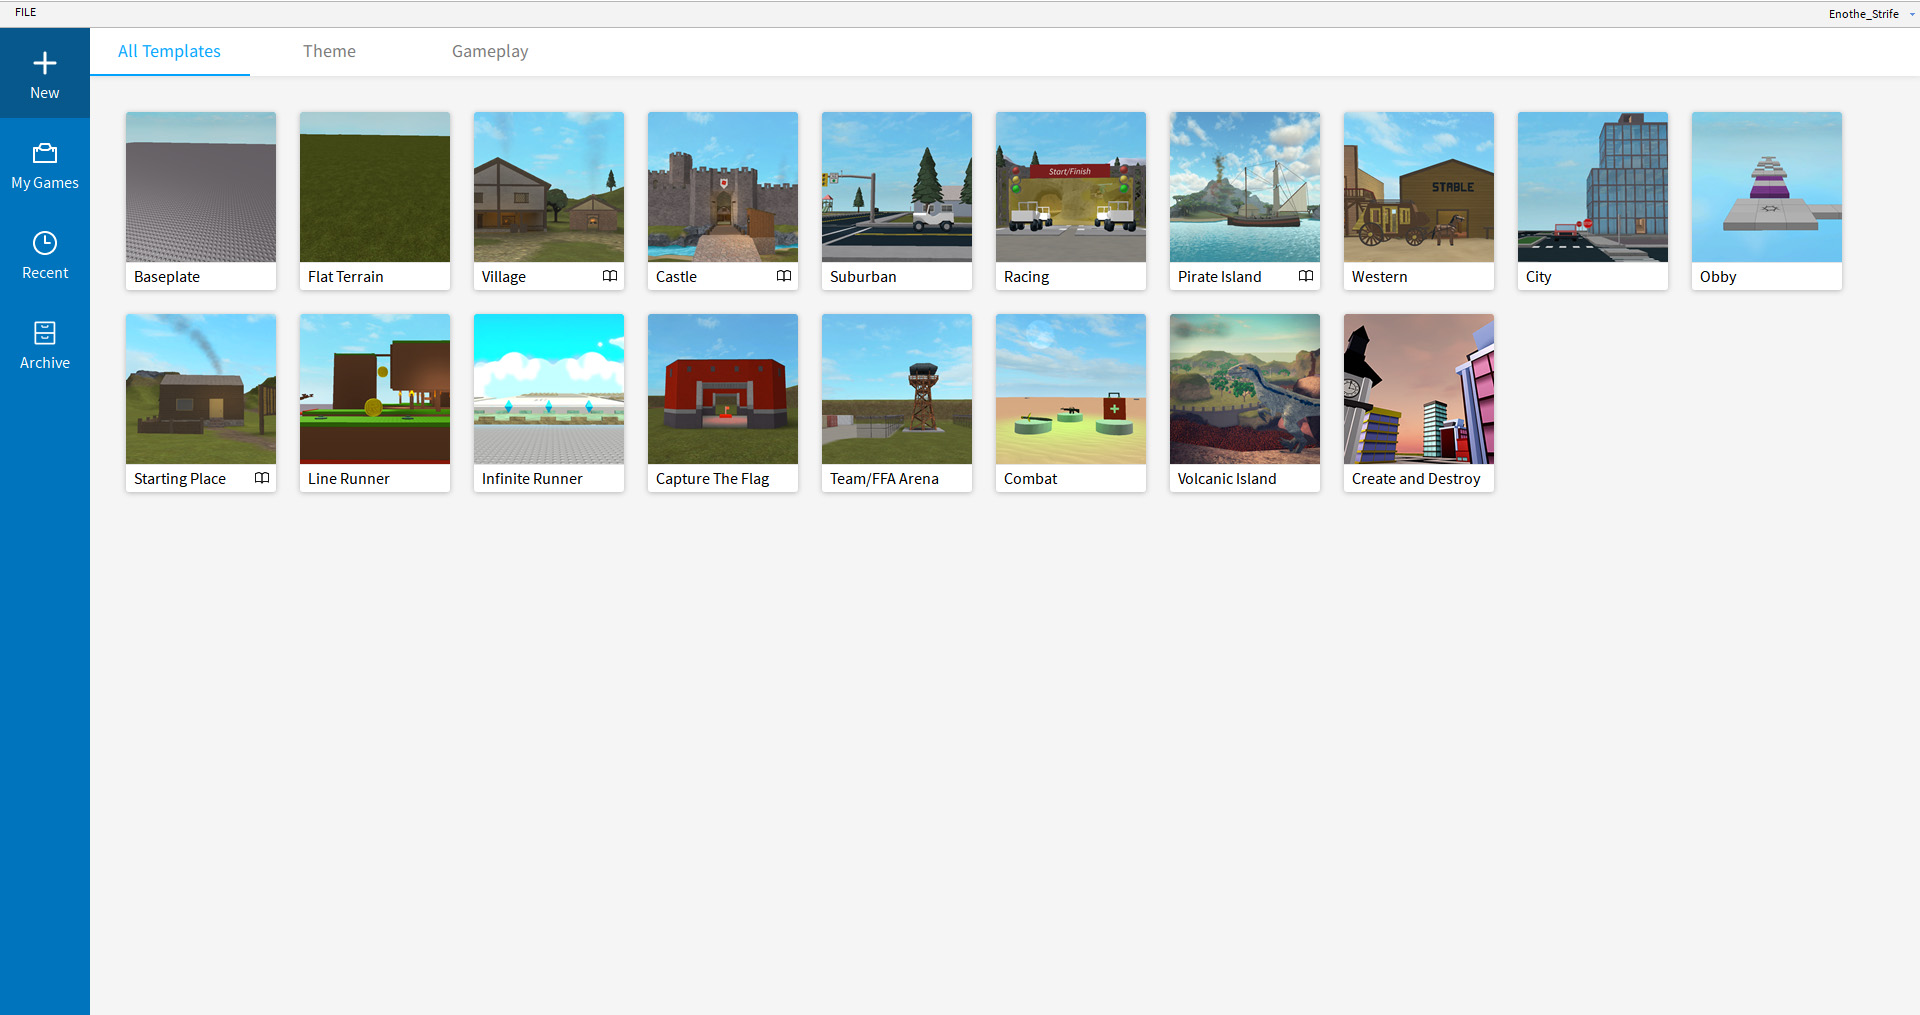
Click + New. It’s the icon with the plus sign in the upper-right corner. This opens a blank Roblox game canvas.
- Alternatively, you can click one of the pre-made game templates on the main page of Roblox Studio. These include a few game stages, which include a suburb, city, medieval village, western town, castle, and pirate island. It also includes a few pre-made games, which include a racing game, obstacle (obby) course, battle arena, capture the flag, endless running games, and more.


Advertisement
-
1
Click the Home tab. It’s the first tab at the top of the screen next to the playback icons. This displays the object selection and manipulations tools in the panel at the top of the screen.
-
2
Click Toolbox. It’s the tab that has an icon that resembles a toolbox in the panel at the top. This opens the Toolbox panel to the right. The Toolbox panel may already be open by default, but if it is not, this is how you open it.
- Make sure the Marketplace tab at the top of the Toolbox panel is selected.
-
3
Type the name of an object you want to add in the search bar and press ↵ Enter. It’s at the top of the Toolbox. Roblox Studio has a vast library of objects made by other users. You can search for anything including foliage, buildings, vehicles, furniture, decorations, or just about anything.
- You can use the drop-down menu in the upper-left corner of the Toolbox to select what type of object you want to search for. This includes models, meshes, images, audio, video, and plug-ins.
-
4
Click an object you want to add. You will see small thumbnail images of each of the objects from your search results in the Toolbar. Click an object’s thumbnail image or click and drag it into your game to add it.
-
5
Use the Select tool to select an object. To select an object in your game, click the Select tool in the toolbar at the top of the page. It has an icon that resembles a mouse cursor. Then click an object in your game to select it. A selected object will have a blue bounding box surrounding it. You can also move an object by clicking and dragging it with the Select tool.
- If you don’t see the Select, Move, Scale, or Rotate tools in the panel at the top, click the «Home» or «Model» tab at the top of the screen.
-
6
Press Delete to delete a selected object. If you want to delete an object for any reason, use the select tool to select it and then press the Delete key to delete it.
-
7
Use the Move tool to move an object. Click the Move tool in the panel at the top. It has an icon that resembles a cross with arrows on each arm. Then click an object you want to move. Click and drag the red, green, and blue arrows on all sides of the object to move it along a particular axis.
- Additionally, you can use the options in the «Clipboard» menu to cut, copy, or duplicate an object.
-
8
Use the Scale tool to make objects larger or smaller. To change the size of an object, click the Scale tool in the panel at the top It has an icon that resembles a small box inside of another box. Then click an object to select it. Click and drag one of the red, green, or ball icons on the side of each object to change the size of an object. Some objects can be resized along a particular vertical or horizontal axis. Other objects can only be scaled evenly.
-
9
Use the Rotate tool to rotate an object. To rotate an object, click the rotate tool in the panel at the top. It has an icon that resembles a circle-arrow at the top. Then click an object to select it. Click and drag the red, green, or blue rings around the object to rotate the object.


Advertisement
-
1
Click the Model tab. It’s the second tab at the top of the page. This displays the modeling tool panel at the top of the page.
-
2
Click Part. It has an icon that resembles a cube. This displays a drop-down menu that allows you to select one of the four shapes you can use to create objects in the game.
-
3
Select a part type. There are four part-types you can select. They are as follows:
- Block: This creates a new rectangular part.
- Sphere: This creates a new object in the shape of a ball.
- Wedge: This creates a new block with an incline.
- Cylinder: This creates a round, pole-shaped object.
-
4
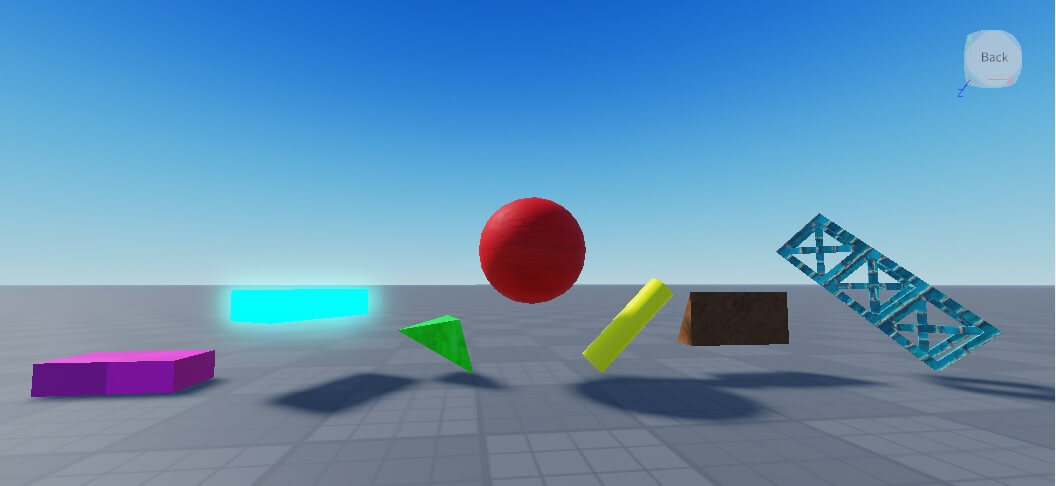
Use the Move, Scale, and Rotate tools to edit a part. You can move and edit parts using the move, enlarge, or rotate tools. The Scale tool manipulates different part types in different ways Some of the following are examples of how you can manipulate a part type with the Scale tool:
- The Scale tool can be used to extend any edge of a block part. This allows you to make a rectangle any dimension you want.
- A sphere can only be scaled uniformly using the Scale tool. You cannot make any side larger than another.
- The Scale tool can be used to change the angle of the incline on a Wedge part. You can also edit the length of the incline.
- The Scale tool can be used to make the circle bigger or smaller as well as make the sides longer or shorter. It cannot be used to make the circle more elliptical.
-
5
Use the Union tool to join parts together. When you have two or more parts touching, you can use the Unite tool to join them together as one shape. The Union Tool has an icon that resembles a cube in the «Shape Modeling» section of the panel at the top. Use the following steps to join two parts together:
- Hold Shift and click the parts you want to unite.
- Click the Union button in the panel at the top.
-
6
Click Separte to break apart united parts. If you want to edit the individual parts of a united part, click the part to select it and then click Separate in the «Shape Modeling» section of the panel at the top to break the part back into individual parts.
-
7
Use the «Negate» tool to cut sections of a part out. The Negate tool can be used to cut out intersecting sections of another part. For example, you can use the Negate tool to hollow out a cylinder using another cylinder to make a wheel. Use the following steps to use the Negate tool to cut out a section of a part:
- Place one so that it intersects with another part.
- Click the intersecting block.
- Click Negate in the «Shape Modeling» section of the panel at the top. The part will turn red.
- Hold Shift and click both parts.
- Click Union in the panel at the top.
-
8
Select the color of a part. To select the color of a part, click the part you want to change the color of. Click Color in the panel at the top. Then click one of the colored-swatches to change the color.
-
9
Select a part’s material. In addition to changing the color of a part, you can also change the material. This allows you to make objects that look like they’re made out of glass, wood, concrete, metal, stone, granite, brick, and more. To change the material of a part, click the part you want to change. Then click Material in the panel at the top. Click the material you want the part to resemble.
-
10
Add an effect to a part. Effects allow you to do things like set a part on fire, make it smoke, emit sparkles, or turn it into a light. To add an effect to a part, click the object you want to add an effect to and then click Effect in the «Gameplay» section of the panel at the top. Click the effect you want to add from the drop-down menu.
-
11
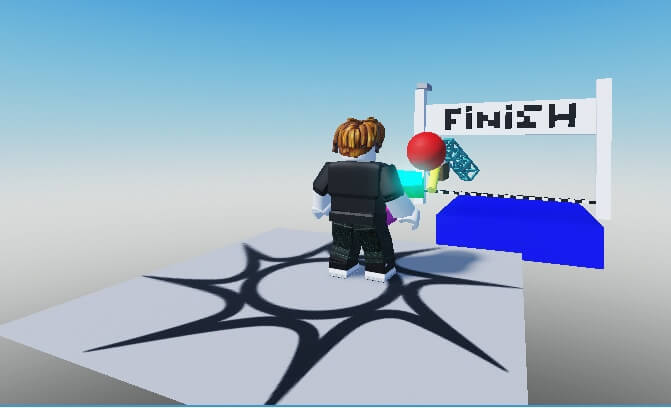
Adding spawn locations and checkpoints. In Roblox, spawn locations indicate where the player starts. Multiple spawn locations act as checkpoints. When a player reaches a spawn location, they will respawn and the last spawn location they touched. To add a spawn location to your game, simply click Spawn Location in the menu at the top.


Advertisement
-
1
Click the Home tab. It’s the first tab at the top of the screen next to the playback icons.
-
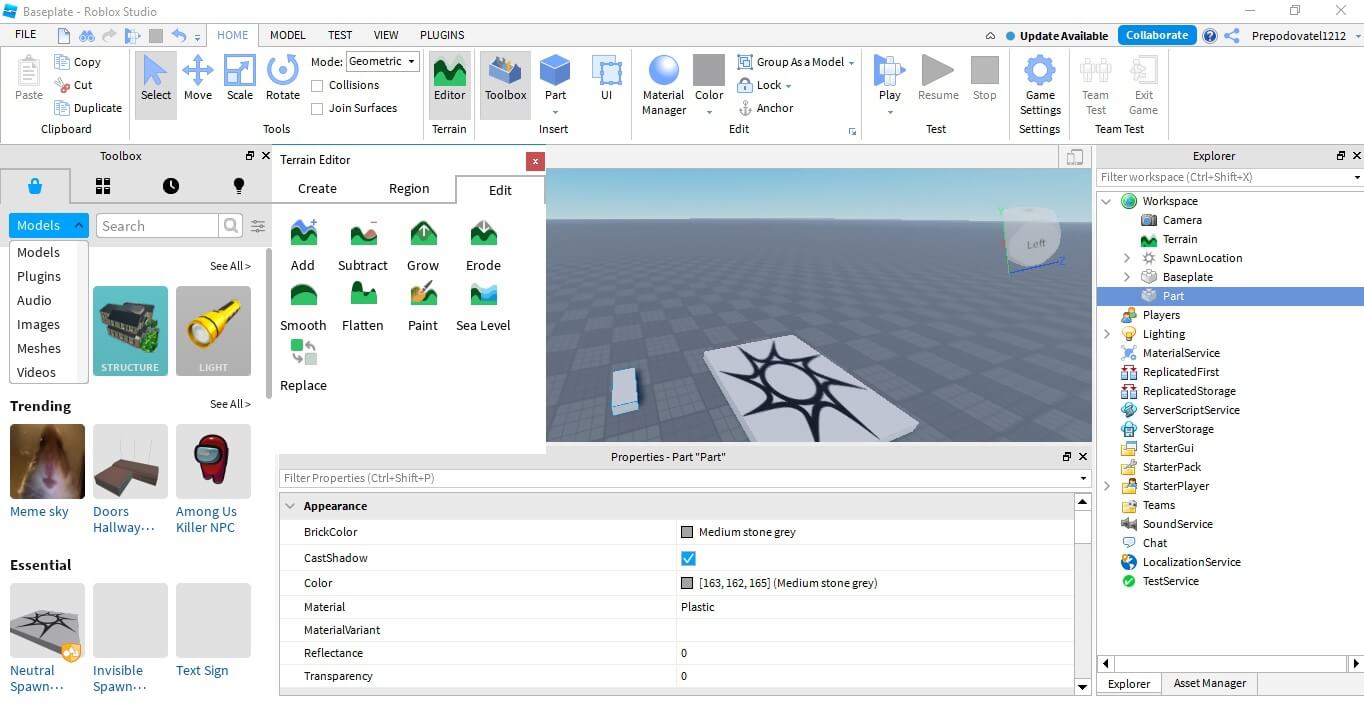
2
Click Editor. It’s in a small section that says «Terrain» in the panel at the top of the Home menu. This opens the Terrain editor. You will see a blue box that indicates the area the terrain will be generated in.
-
3
Adjust the size of the terrain area. To adjust the size of or move the area where the terrain will be generated, simply click and drag the blue balls on all sides of the blue box to move the sides of the terrain area. You can make the terrain area larger or smaller, or move the sides to a new location.
-
4
Select the terrain features you want to generate. The terrain will be generated randomly. To select which features the terrain generator will generate scroll down to the bottom of the Terrain Editor panel to the left. Click the checkboxes next to the features you want to generate. The features include water, plains, dunes, mountains, arctic, canyons, lavascape.
- Use the slider bar below the checkmark boxes to adjust the sizes of the biomes that are generated.
- Click the toggle switch next to Caves to turn cave generation on or off.
-
5
Click Generate. It’s the blue button at the bottom of the Terrain Editor menu. This begins the process of generating the terrain for your level. Allow a few minutes for the terrain to finish generating.
-
6
Click the Edit tab. It’s the third tab at the top of the Terrain editor. This tab contains tools that allow you to edit the terrain.
-
7
Select a tool. There are nine tools to choose from. They are as follows:
- Add: This tool adds new chunks of terrain the exact size and shape of the brush.
- Subtract: This tool deletes chunks of terrain the exact size and shape of the brush.
- Grow: This tool increases the elevation where the brush is clicked.
- Erode: This tool decreases the elevation where the brush is clicked.
- Smooth: This tool smooths the surface where the brush is clicked.
- Flat: This tool flattens the surface of the area you brush over.
- Paint: This tool allows you to change the terrain type. If you select this tool, scroll down to the bottom of the Terrain Editor panel and click the terrain type you want to paint.
- Replace: This tool allows you to replace a specific terrain type with another. To use this tool, select the terrain type you want to change below «Source material» in the Terrain Editor panel. Then select the material you want to change it to below «Target material» at the bottom of the Terrain Editor panel.
-
8
Select the brush shape. This is the shape of the terrain you will create with each click of the brush. You can select a sphere, cube, or cylinder. Click one of the shapes below the tools to select a brush shape.
-
9
Use the slider bar next to «Base size» to adjust the size of the brush. It’s the first slider bar below the brush shapes. You can change the brush size to anything between 1 and 64.
- Some tools also have a slider bar that allows you to adjust the strength of the brush. This allows you to adjust the effectiveness of the brush. You can adjust the strength bar from between .0.1 to 1 with 1 being the strongest.
-
10
Adjust the position of the brush. Click one of the three buttons next to «Pivot position» to adjust the position of the brush. This adjusts where the brush sits on the surface of the terrain. The three options are as follows:
- Bot: This places the bottom of the brush on the top of the terrain surface.
- Cen: This places the center of the brush on top of the terrain surface.
- Top: This places the top of the brush on top of the terrain surface.
-
11
Adjust the brush settings. There are three toggle switches you can use to adjust the brush settings:
- Plane lock: This displays a grid of the plain the brush is locked to and only allows you to move along that plain.
- Snap to grid: This only allows the brush to paint at grid points.
- Ignore water: This instructs the water to ignore water.
-
12
Create Sea Level (optional). Use the following steps to create a sea level that is consistent across a larger area of the terrain.
- Click the Sea Level tool under the «Edit» tab in the Terrain Editor.
- Click and drag the blue bulbs on all sides of the blue box to adjust the size and position of where the sea will be generated.
- Click Generate to create a sea where the blue box is located. Click Evaporate to remove the sea level.


Advertisement
-
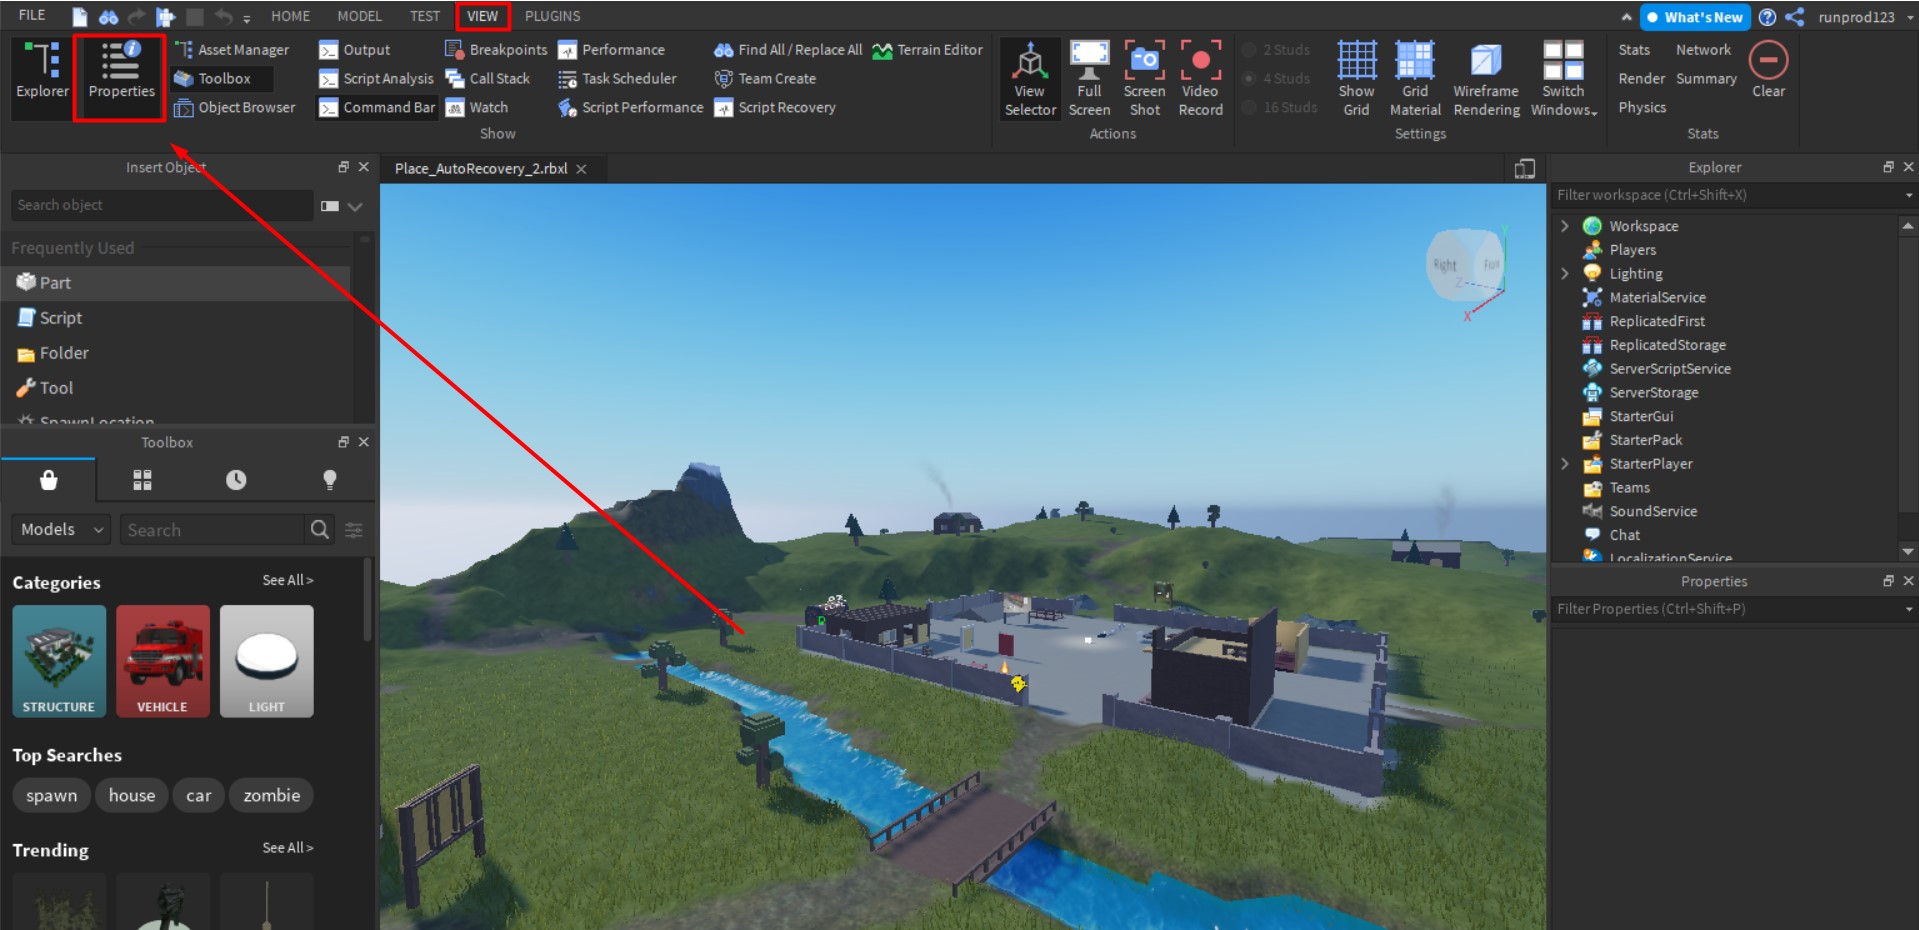
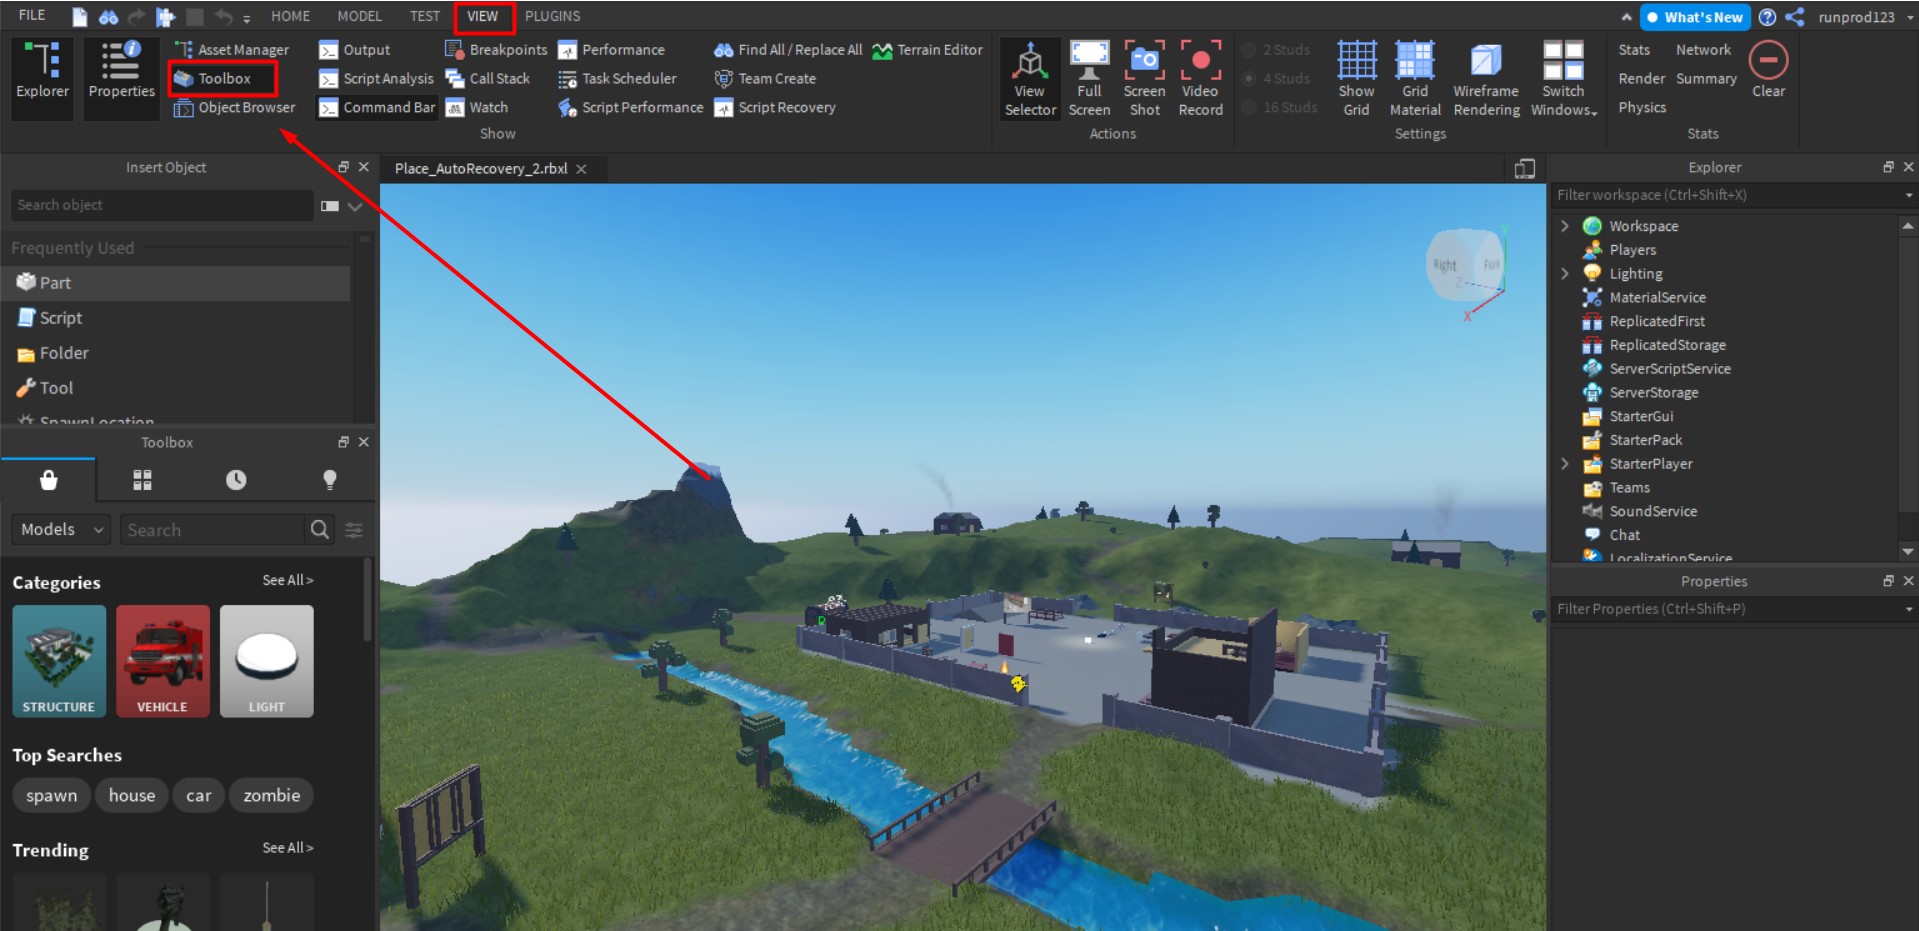
1
Click the View tab. It’s the fourth tab at the top in Roblox Studio. This displays the tools for selecting and adding scripts to objects in your game. Scripts allow you to make objects interactive, animate objects, give or take away health points, kill players, and more.
-
2
Click Explorer. It’s the button on the far left of the panel at the top of the menu. This displays the Explorer panel to the right. It contains a list of all objects in your game.
-
3
Navigate to the object you want to add a script to in the Explorer panel. «Workspace» contains the entire game world. All objects within the game are listed as a child object to the Workspace. Other objects may be listed as child objects to other objects. Click the arrow icon to the left of each object to view each of it’s child objects.
-
4
Click + next to an object you want to add a script to. The icon with a plus sign (+) appears when you hover over an object in the Explorer panel. Clicking this button displays a list of frequently used items you can add to an object.
-
5
Click Script. This opens a blank script in the center of the screen.
-
6
Write a script. In Roblox, scripts are written in a language called Lua. You’ll need to learn Lua and have some basic understanding of coding and computer programming in order to effectively script. Roblox offers tutorials on how to script in Roblox. This is a good place to start if you are a beginner to scripting. You can also find many tutorials on YouTube.


Advertisement
-
1
Click the Home tab. It’s the first button at the top of the page. This displays the panel with the playback controls at the top.
-
2
Click the Play icon to test your game. It’s a good idea to test your game frequently to make sure everything works right. Click the icon with the blue Play triangle in the panel at the top to load your game in the center window and allow you to play your game the way anyone who is playing it no Roblox would be allowed to play it.
-
3
Click the Stop icon to resume editing. If you want to stop testing your game and resume editing, click the icon with the red square in the panel at the top to stop your game.
-
4
Click File. It’s the button in the upper-right corner. When you are ready to save or publish your level, click the File button. Saving your level allows you to save your progress so you can continue work on it later. When you are completely finished with your level, you can publish it to Roblox so others can start playing it.
-
5
Click Save to File As. This allows opens a Save menu that allows you to save your game to your computer as a Roblox file.
- Alternatively, you can click Save to Roblox As to save the game to the Roblox server instead of your computer.
-
6
Enter a name for your game and click Save. Enter the name next to where it says «File name». Then click Save in the lower-left corner to save your game.
-
7
Load a game. If you want to continue a game you have previously saved, use the following steps to load a game:
- Click File in the upper-left corner.
- Click Open from File or Open from Roblox.
- Click a Roblox game or file (.rbxl) and click Open.
-
8
Publish a Roblox game. When you are finished editing a game and you are ready for others to start playing it, use the following steps to publish your game to Roblox:
- Click File.
- Click Publish to Roblox As.
- Click an existing game to replace it or click Create new game.
- Enter a name for your game at the top.
- Enter a brief description of your game.
- Select a creator from the drop-down menu.
- Select a genre using the drop-down menu.
- Click the checkbox next to the consoles your game is compatible with.
- Click Create.


Advertisement
Add New Question
-
Question
Can 2 players be in a single Roblox studio?

Yes, in Team Create.
-
Question
How do you rotate the camera?
Right-click, then move the mouse around in the direction you want.
-
Question
How do I allow people to fly and run with the tools in their inventories?
You could search in models for a fly tool. Just make sure it works correctly!

See more answers
Ask a Question
200 characters left
Include your email address to get a message when this question is answered.
Submit
Advertisement
Video
-
Practice to get good at using Roblox Studio.
-
Don’t forget to save your game frequently.
-
Watch as many tutorials and videos about Roblox Studio as you can to learn as much as you can.
Thanks for submitting a tip for review!
Advertisement
-
Get scripts manually from the catalog. If you get them via Roblox studio and you don’t know who’s made it and what it’s like it may contain a virus that can destroy your game or make it lag.
Advertisement
About This Article
Thanks to all authors for creating a page that has been read 149,317 times.
Reader Success Stories
-

Nathan Leonard
Apr 18, 2022
«This thing is very helpful when I finish editing my game. I am going to make a video how to play my game. Thank you…» more
Did this article help you?
![]()
Download Article
![]()
Download Article
Roblox Studio is a very powerful tool that allows you to create games for the popular online gaming platform Roblox. Unlike other video games that are developed by professional development studios, Roblox games are developed entirely by users. With Roblox Studio, you can build and create, as well as import characters, buildings, objects, vehicles, and more. You can use the Terrain Editor to create an outdoor landscape for your game. You can also use scripting to make the objects in your game interactive. This wikiHow you how to use Roblox Studio.
-
1
Sign up for a Roblox account. If you haven’t already done so, use the following steps to sign up for a Roblox account:
- Go to https://www.roblox.com/ in a web browser.
- Use the drop-down menus at the top to select the day, month, and year of your birthdate.
- Enter your desired username.
- Enter your desired password.
- Select your gender (optional).
- Click Sign Up.
-
2
Download Roblox Studio. Use the following steps to download and install Roblox Studio.
- Go to https://www.roblox.com/create in a web browser.
- Click Log In in the upper-right corner.
- Enter your username and password and click Log In.
- Click Start Creating.
- Click Download Studio.
Advertisement
-
3
Open Roblox Studio. Roblox Studio has an icon that resembles a blue square. Click the Roblox Studio in the Windows Start menu or the Applications folder on Mac to open Roblox Studio. You can also click Start Creating on the Roblox Create website to open Roblox Studio.
-
4
Click + New. It’s the icon with the plus sign in the upper-right corner. This opens a blank Roblox game canvas.
- Alternatively, you can click one of the pre-made game templates on the main page of Roblox Studio. These include a few game stages, which include a suburb, city, medieval village, western town, castle, and pirate island. It also includes a few pre-made games, which include a racing game, obstacle (obby) course, battle arena, capture the flag, endless running games, and more.
Advertisement
-
1
Click the Home tab. It’s the first tab at the top of the screen next to the playback icons. This displays the object selection and manipulations tools in the panel at the top of the screen.
-
2
Click Toolbox. It’s the tab that has an icon that resembles a toolbox in the panel at the top. This opens the Toolbox panel to the right. The Toolbox panel may already be open by default, but if it is not, this is how you open it.
- Make sure the Marketplace tab at the top of the Toolbox panel is selected.
-
3
Type the name of an object you want to add in the search bar and press ↵ Enter. It’s at the top of the Toolbox. Roblox Studio has a vast library of objects made by other users. You can search for anything including foliage, buildings, vehicles, furniture, decorations, or just about anything.
- You can use the drop-down menu in the upper-left corner of the Toolbox to select what type of object you want to search for. This includes models, meshes, images, audio, video, and plug-ins.
-
4
Click an object you want to add. You will see small thumbnail images of each of the objects from your search results in the Toolbar. Click an object’s thumbnail image or click and drag it into your game to add it.
-
5
Use the Select tool to select an object. To select an object in your game, click the Select tool in the toolbar at the top of the page. It has an icon that resembles a mouse cursor. Then click an object in your game to select it. A selected object will have a blue bounding box surrounding it. You can also move an object by clicking and dragging it with the Select tool.
- If you don’t see the Select, Move, Scale, or Rotate tools in the panel at the top, click the «Home» or «Model» tab at the top of the screen.
-
6
Press Delete to delete a selected object. If you want to delete an object for any reason, use the select tool to select it and then press the Delete key to delete it.
-
7
Use the Move tool to move an object. Click the Move tool in the panel at the top. It has an icon that resembles a cross with arrows on each arm. Then click an object you want to move. Click and drag the red, green, and blue arrows on all sides of the object to move it along a particular axis.
- Additionally, you can use the options in the «Clipboard» menu to cut, copy, or duplicate an object.
-
8
Use the Scale tool to make objects larger or smaller. To change the size of an object, click the Scale tool in the panel at the top It has an icon that resembles a small box inside of another box. Then click an object to select it. Click and drag one of the red, green, or ball icons on the side of each object to change the size of an object. Some objects can be resized along a particular vertical or horizontal axis. Other objects can only be scaled evenly.
-
9
Use the Rotate tool to rotate an object. To rotate an object, click the rotate tool in the panel at the top. It has an icon that resembles a circle-arrow at the top. Then click an object to select it. Click and drag the red, green, or blue rings around the object to rotate the object.
Advertisement
-
1
Click the Model tab. It’s the second tab at the top of the page. This displays the modeling tool panel at the top of the page.
-
2
Click Part. It has an icon that resembles a cube. This displays a drop-down menu that allows you to select one of the four shapes you can use to create objects in the game.
-
3
Select a part type. There are four part-types you can select. They are as follows:
- Block: This creates a new rectangular part.
- Sphere: This creates a new object in the shape of a ball.
- Wedge: This creates a new block with an incline.
- Cylinder: This creates a round, pole-shaped object.
-
4
Use the Move, Scale, and Rotate tools to edit a part. You can move and edit parts using the move, enlarge, or rotate tools. The Scale tool manipulates different part types in different ways Some of the following are examples of how you can manipulate a part type with the Scale tool:
- The Scale tool can be used to extend any edge of a block part. This allows you to make a rectangle any dimension you want.
- A sphere can only be scaled uniformly using the Scale tool. You cannot make any side larger than another.
- The Scale tool can be used to change the angle of the incline on a Wedge part. You can also edit the length of the incline.
- The Scale tool can be used to make the circle bigger or smaller as well as make the sides longer or shorter. It cannot be used to make the circle more elliptical.
-
5
Use the Union tool to join parts together. When you have two or more parts touching, you can use the Unite tool to join them together as one shape. The Union Tool has an icon that resembles a cube in the «Shape Modeling» section of the panel at the top. Use the following steps to join two parts together:
- Hold Shift and click the parts you want to unite.
- Click the Union button in the panel at the top.
-
6
Click Separte to break apart united parts. If you want to edit the individual parts of a united part, click the part to select it and then click Separate in the «Shape Modeling» section of the panel at the top to break the part back into individual parts.
-
7
Use the «Negate» tool to cut sections of a part out. The Negate tool can be used to cut out intersecting sections of another part. For example, you can use the Negate tool to hollow out a cylinder using another cylinder to make a wheel. Use the following steps to use the Negate tool to cut out a section of a part:
- Place one so that it intersects with another part.
- Click the intersecting block.
- Click Negate in the «Shape Modeling» section of the panel at the top. The part will turn red.
- Hold Shift and click both parts.
- Click Union in the panel at the top.
-
8
Select the color of a part. To select the color of a part, click the part you want to change the color of. Click Color in the panel at the top. Then click one of the colored-swatches to change the color.
-
9
Select a part’s material. In addition to changing the color of a part, you can also change the material. This allows you to make objects that look like they’re made out of glass, wood, concrete, metal, stone, granite, brick, and more. To change the material of a part, click the part you want to change. Then click Material in the panel at the top. Click the material you want the part to resemble.
-
10
Add an effect to a part. Effects allow you to do things like set a part on fire, make it smoke, emit sparkles, or turn it into a light. To add an effect to a part, click the object you want to add an effect to and then click Effect in the «Gameplay» section of the panel at the top. Click the effect you want to add from the drop-down menu.
-
11
Adding spawn locations and checkpoints. In Roblox, spawn locations indicate where the player starts. Multiple spawn locations act as checkpoints. When a player reaches a spawn location, they will respawn and the last spawn location they touched. To add a spawn location to your game, simply click Spawn Location in the menu at the top.
Advertisement
-
1
Click the Home tab. It’s the first tab at the top of the screen next to the playback icons.
-
2
Click Editor. It’s in a small section that says «Terrain» in the panel at the top of the Home menu. This opens the Terrain editor. You will see a blue box that indicates the area the terrain will be generated in.
-
3
Adjust the size of the terrain area. To adjust the size of or move the area where the terrain will be generated, simply click and drag the blue balls on all sides of the blue box to move the sides of the terrain area. You can make the terrain area larger or smaller, or move the sides to a new location.
-
4
Select the terrain features you want to generate. The terrain will be generated randomly. To select which features the terrain generator will generate scroll down to the bottom of the Terrain Editor panel to the left. Click the checkboxes next to the features you want to generate. The features include water, plains, dunes, mountains, arctic, canyons, lavascape.
- Use the slider bar below the checkmark boxes to adjust the sizes of the biomes that are generated.
- Click the toggle switch next to Caves to turn cave generation on or off.
-
5
Click Generate. It’s the blue button at the bottom of the Terrain Editor menu. This begins the process of generating the terrain for your level. Allow a few minutes for the terrain to finish generating.
-
6
Click the Edit tab. It’s the third tab at the top of the Terrain editor. This tab contains tools that allow you to edit the terrain.
-
7
Select a tool. There are nine tools to choose from. They are as follows:
- Add: This tool adds new chunks of terrain the exact size and shape of the brush.
- Subtract: This tool deletes chunks of terrain the exact size and shape of the brush.
- Grow: This tool increases the elevation where the brush is clicked.
- Erode: This tool decreases the elevation where the brush is clicked.
- Smooth: This tool smooths the surface where the brush is clicked.
- Flat: This tool flattens the surface of the area you brush over.
- Paint: This tool allows you to change the terrain type. If you select this tool, scroll down to the bottom of the Terrain Editor panel and click the terrain type you want to paint.
- Replace: This tool allows you to replace a specific terrain type with another. To use this tool, select the terrain type you want to change below «Source material» in the Terrain Editor panel. Then select the material you want to change it to below «Target material» at the bottom of the Terrain Editor panel.
-
8
Select the brush shape. This is the shape of the terrain you will create with each click of the brush. You can select a sphere, cube, or cylinder. Click one of the shapes below the tools to select a brush shape.
-
9
Use the slider bar next to «Base size» to adjust the size of the brush. It’s the first slider bar below the brush shapes. You can change the brush size to anything between 1 and 64.
- Some tools also have a slider bar that allows you to adjust the strength of the brush. This allows you to adjust the effectiveness of the brush. You can adjust the strength bar from between .0.1 to 1 with 1 being the strongest.
-
10
Adjust the position of the brush. Click one of the three buttons next to «Pivot position» to adjust the position of the brush. This adjusts where the brush sits on the surface of the terrain. The three options are as follows:
- Bot: This places the bottom of the brush on the top of the terrain surface.
- Cen: This places the center of the brush on top of the terrain surface.
- Top: This places the top of the brush on top of the terrain surface.
-
11
Adjust the brush settings. There are three toggle switches you can use to adjust the brush settings:
- Plane lock: This displays a grid of the plain the brush is locked to and only allows you to move along that plain.
- Snap to grid: This only allows the brush to paint at grid points.
- Ignore water: This instructs the water to ignore water.
-
12
Create Sea Level (optional). Use the following steps to create a sea level that is consistent across a larger area of the terrain.
- Click the Sea Level tool under the «Edit» tab in the Terrain Editor.
- Click and drag the blue bulbs on all sides of the blue box to adjust the size and position of where the sea will be generated.
- Click Generate to create a sea where the blue box is located. Click Evaporate to remove the sea level.
Advertisement
-
1
Click the View tab. It’s the fourth tab at the top in Roblox Studio. This displays the tools for selecting and adding scripts to objects in your game. Scripts allow you to make objects interactive, animate objects, give or take away health points, kill players, and more.
-
2
Click Explorer. It’s the button on the far left of the panel at the top of the menu. This displays the Explorer panel to the right. It contains a list of all objects in your game.
-
3
Navigate to the object you want to add a script to in the Explorer panel. «Workspace» contains the entire game world. All objects within the game are listed as a child object to the Workspace. Other objects may be listed as child objects to other objects. Click the arrow icon to the left of each object to view each of it’s child objects.
-
4
Click + next to an object you want to add a script to. The icon with a plus sign (+) appears when you hover over an object in the Explorer panel. Clicking this button displays a list of frequently used items you can add to an object.
-
5
Click Script. This opens a blank script in the center of the screen.
-
6
Write a script. In Roblox, scripts are written in a language called Lua. You’ll need to learn Lua and have some basic understanding of coding and computer programming in order to effectively script. Roblox offers tutorials on how to script in Roblox. This is a good place to start if you are a beginner to scripting. You can also find many tutorials on YouTube.
Advertisement
-
1
Click the Home tab. It’s the first button at the top of the page. This displays the panel with the playback controls at the top.
-
2
Click the Play icon to test your game. It’s a good idea to test your game frequently to make sure everything works right. Click the icon with the blue Play triangle in the panel at the top to load your game in the center window and allow you to play your game the way anyone who is playing it no Roblox would be allowed to play it.
-
3
Click the Stop icon to resume editing. If you want to stop testing your game and resume editing, click the icon with the red square in the panel at the top to stop your game.
-
4
Click File. It’s the button in the upper-right corner. When you are ready to save or publish your level, click the File button. Saving your level allows you to save your progress so you can continue work on it later. When you are completely finished with your level, you can publish it to Roblox so others can start playing it.
-
5
Click Save to File As. This allows opens a Save menu that allows you to save your game to your computer as a Roblox file.
- Alternatively, you can click Save to Roblox As to save the game to the Roblox server instead of your computer.
-
6
Enter a name for your game and click Save. Enter the name next to where it says «File name». Then click Save in the lower-left corner to save your game.
-
7
Load a game. If you want to continue a game you have previously saved, use the following steps to load a game:
- Click File in the upper-left corner.
- Click Open from File or Open from Roblox.
- Click a Roblox game or file (.rbxl) and click Open.
-
8
Publish a Roblox game. When you are finished editing a game and you are ready for others to start playing it, use the following steps to publish your game to Roblox:
- Click File.
- Click Publish to Roblox As.
- Click an existing game to replace it or click Create new game.
- Enter a name for your game at the top.
- Enter a brief description of your game.
- Select a creator from the drop-down menu.
- Select a genre using the drop-down menu.
- Click the checkbox next to the consoles your game is compatible with.
- Click Create.
Advertisement
Add New Question
-
Question
Can 2 players be in a single Roblox studio?
Yes, in Team Create.
-
Question
How do you rotate the camera?
Right-click, then move the mouse around in the direction you want.
-
Question
How do I allow people to fly and run with the tools in their inventories?
You could search in models for a fly tool. Just make sure it works correctly!
See more answers
Ask a Question
200 characters left
Include your email address to get a message when this question is answered.
Submit
Advertisement
Video
-
Practice to get good at using Roblox Studio.
-
Don’t forget to save your game frequently.
-
Watch as many tutorials and videos about Roblox Studio as you can to learn as much as you can.
Thanks for submitting a tip for review!
Advertisement
-
Get scripts manually from the catalog. If you get them via Roblox studio and you don’t know who’s made it and what it’s like it may contain a virus that can destroy your game or make it lag.
Advertisement
About This Article
Thanks to all authors for creating a page that has been read 149,317 times.
Reader Success Stories
-
Nathan Leonard
Apr 18, 2022
«This thing is very helpful when I finish editing my game. I am going to make a video how to play my game. Thank you…» more
Did this article help you?
Нет, это не «просто игрушка»
Roblox — одна из лучших платформ, чтобы стартовать в программировании! Запишите ребёнка на бесплатный урок в Skysmart Pro — расскажем, какие мощные игры и проекты он может создавать
Что такое Roblox
Roblox Studio — специальная программа для создания игр в Roblox. С её помощью можно играть, общаться и разрабатывать собственные проекты с разными механиками, сложностью и сюжетом. А когда новая игра будет готова, её можно опубликовать на миллионную аудиторию, чтобы помочь найти своих игроков. В общем, то, что нужно юному геймеру и будущему игровому разработчику!
Программа имеет широкую функциональность и способна выполнить множество задач под любые цели. Сделать красивый ландшафт или создать собственный транспорт? Построить корабль или основать целый город? Это и многое другое доступно в Roblox Studio!
Получай лайфхаки, статьи, видео и чек-листы по обучению на почту
Как установить Roblox Studio
Прежде чем вы научитесь создавать свои проекты и погрузитесь в мир разработки компьютерных игр, нам нужно разобраться с установкой Roblox Studio. Для начала, если вы всё ещё не зарегистрированы в Roblox, нужно это сделать. Чтобы пройти этот шаг, зайдите на официальный сайт Roblox. Там вы сразу попадёте на форму входа, где нужно заполнить дату своего рождения, пол, придумать логин, пароль и нажать Sign Up.
После этого может появиться небольшая задачка. Она нужна, чтобы система определила, что вы не робот.
Когда вы пройдёте проверку, перед вами откроется главная страница Roblox. В верхней части страницы найдите кнопку Create и нажмите на неё.
Далее появится страница, где можно скачать программу Roblox Studio. Для этого нажимаем на Start Creating.
После этого появится окно с подготовкой для скачивания. Подождите несколько секунд, пока не увидите кнопку Download Studio. Нажмите её и скачайте программу. Когда загрузка завершится, появится программа для установки Roblox Studio. В браузере Google Chrome значок установщика появится в левом нижнем углу экрана.
Кликните на установщик и начните загрузку. Когда она закончится, вам будет нужно авторизоваться в системе: ввести свой логин и пароль. Если всё сделано верно, откроется главная страница Roblox Studio. Теперь мы можем начать создавать свои 3D-игры!
Как начать создавать игры
Чтобы разобраться, как сделать хорошую игру в Roblox, нам нужно для начала ознакомиться с интерфейсом Roblox Studio.
Первое, что мы видим на стартовой странице, — это шаблоны для плейсов. Плейс — игра, созданная игроком и выложенная на Roblox.
Готовые шаблоны разнообразны и делятся не только по тематикам, но и по механике игры. Например, можно использовать шаблон для создания Obby. Это такой тип плейсов, в котором игроку нужно пройти полосу препятствий. Или же создать пиратский корабль и устроить самую настоящую морскую битву!
Также можно выбрать режим игры «захват флага», или же окунуться в атмосферу Средневековья и создать замок. Если же вы хотите создать игру в Roblox с нуля, то нужно выбрать пустой шаблон и начать творить. Но стоить заметить, что для этого вам понадобятся некоторые знания языка программирования Lua.
Немного подробнее про вкладки в главном меню:
-
New — в этой вкладке можно выбрать шаблон для своего будущего плейса.
-
My Games— здесь отображаются все игры, созданные пользователем.
-
Recent— отображает проекты, которые были использованы недавно.
-
Archive— проекты, которые вам пока не нужны, можно отправить в архив.
Интерфейс Roblox Studio
Теперь, когда мы разобрались с главным меню, можем приступать к знакомству с интерфейсом на примере пустого шаблона.
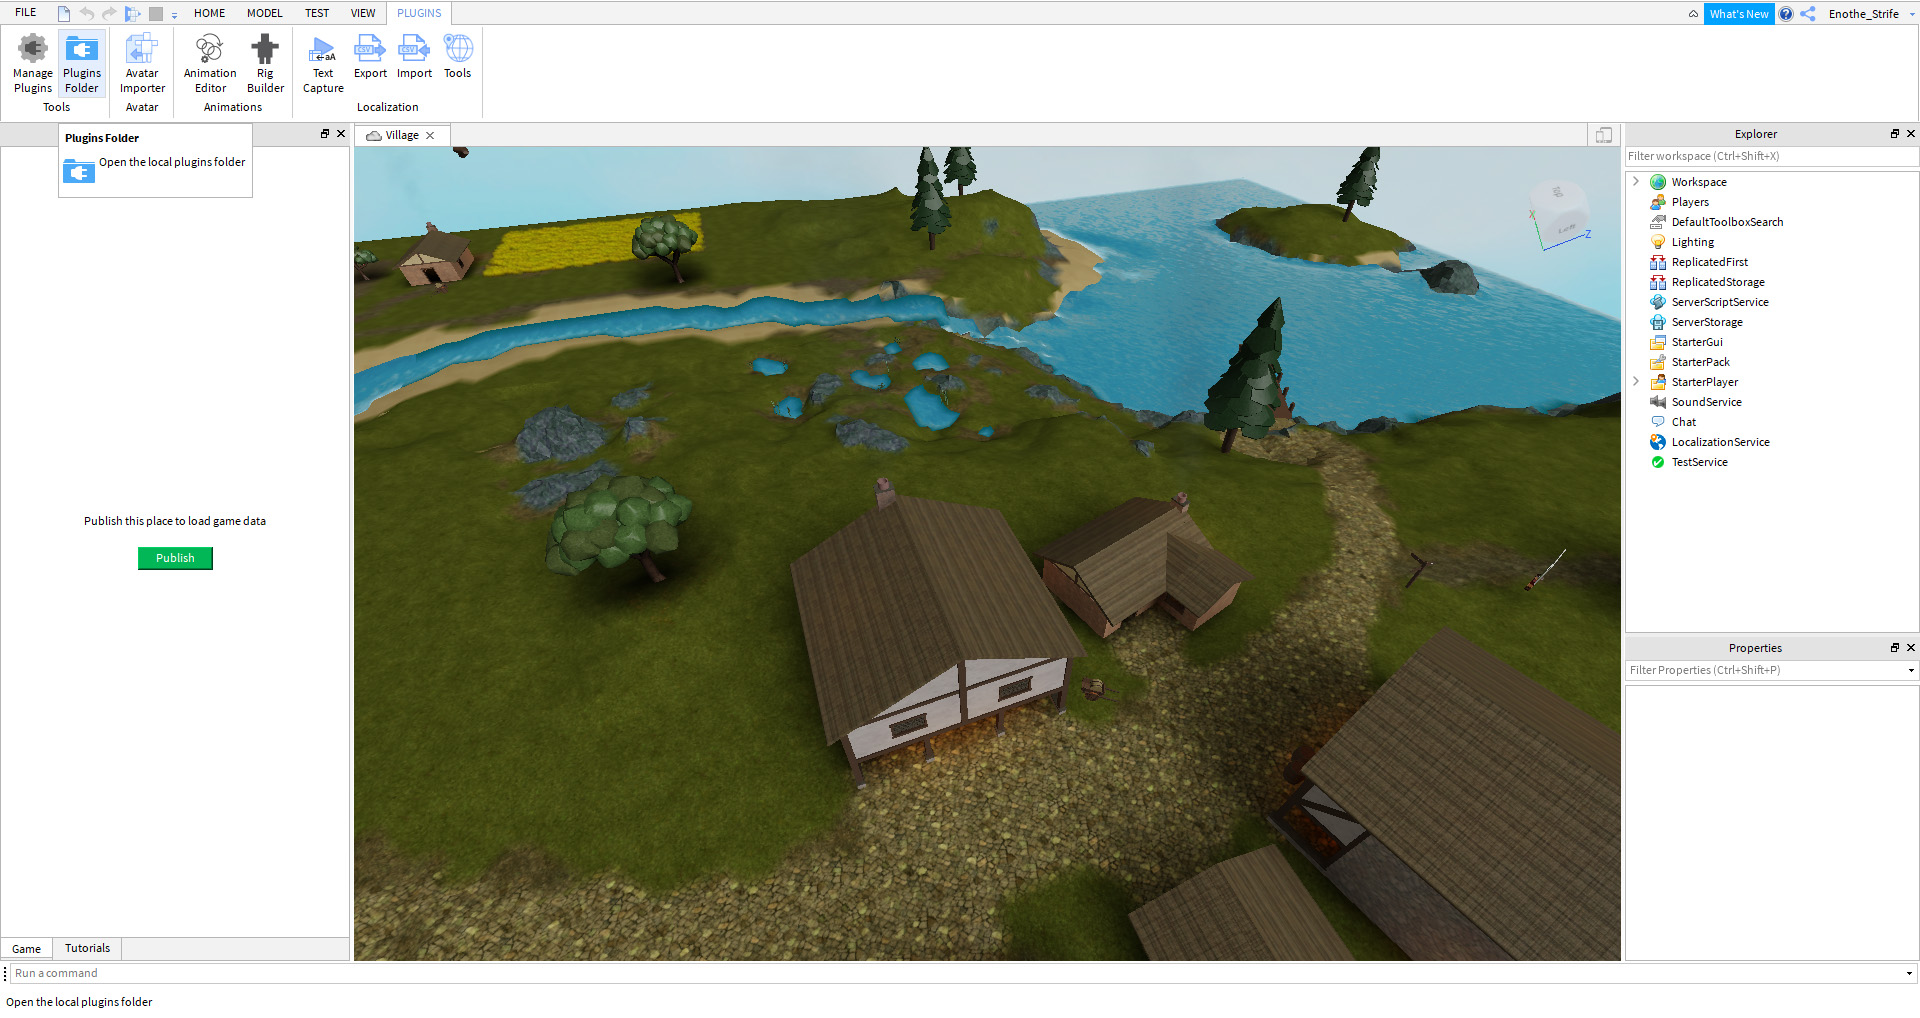
Toolbox — это инструмент, который предоставляет нам быстрый доступ к богатой библиотеке объектов, созданных как разработчиками Roblox, так и другими игроками. Это значит, что любой пользователь, который освоил Roblox Studio, сможет создать свою модель и поделиться с другими игроками! Здесь находятся модели, картинки, плагины и прочие объекты, которые помогают разработчикам делать свои игры лучше.
Explorer отображает все объекты, которые есть в проекте. Это могут быть скрипты, настройки сервера, освещение и другое. Благодаря этому окну намного проще ориентироваться в проекте и находить нужный объект.
Properties отвечает за свойства объекта. Здесь мы можем изменять цвет, материал, тень, прозрачность и многое другое.
Terrain Editor позволяет генерировать и видоизменять ландшафт нашей карты. Можно добавить гору, выкопать яму, или сделать самое настоящее море!
Part в Roblox: создаём игру Obby
Теперь разберёмся, как создать первую игру на компьютер в Roblox. Для этого нам нужно познакомиться с не менее важной частью Roblox Studio — объектами Part и инструментами для работы с ними. Part — важнейший компонент в создании игр, используется для разработки любых моделей. Основные парты — это:
-
block;
-
sphere;
-
wedge;
-
corner Wedge;
-
cylinder.
Чтобы их добавить, необходимо нажать Part на вкладке Home или Model.
Инструменты позволяют работать с партами, изменять их размер, угол наклона и местоположение:
-
Select — выбрать парт.
-
Move — перемещать парт.
-
Scale — измерять и менять размер парта.
-
Rotate — изменять угол наклона парта.
Также, изменяя у парта Color и Material в окне Properties, мы можем сделать, например, красную сферу из дерева или голубоватый неоновый парт!
Теперь, если мы удалим из окошка Explorer платформу Baseplate, а всем партам добавим свойство Anchor, которое позволяет закрепить объекты, то у нас получится наше первое Obby. Вот как просто, оказывается, создать собственную игру в Roblox!
Roblox Studio имеет огромное количество функций, которые позволяют создавать множество своих игр и проектов. Сегодня мы сделали вместе первую игру, но гораздо круче экспериментировать самому. Чтобы полностью погрузиться в мир Roblox, советуем попробовать добавлять парты, изменять их, думать над механикой игры и создавать декорации.
Только создав несколько проектов, вы сможете почувствовать себя самым настоящим разработчиком плейсов! А в этом вам помогут наши преподаватели и курс по созданию игр в Roblox. Там вы научитесь работать с инструментами, создадите 12 разных проектов и сможете опубликовать их на платформе Roblox. Встретимся на первом уроке!
Изображения «Roblox.com» Creative Commons Zero (CC0).
Учимся.
Roblox – мощная платформа, на которой разработчики реализуют самые разные задумки и создают свои игры.
Вся разработка происходит в специальной программе – Roblox Studio. Если вы хотите научиться создавать игры для Роблокс, то мы собрали самые популярные уроки в одном посте.
Режимы Роблокс: во что поиграть в Roblox, лучшие режимы, какой режим выбрать
Скачать Роблокс Студио
- Перейдите на официальный сайт Роблокс Студио (roblox.com/create)
- Нажмите на кнопку Start Creating
- После небольшого ожидания сайт сгенерирует ссылку на скачивание актуальной версии Роблокс Студио
- Нажмите на кнопку Download Studio, сама программа бесплатна
Как сделать свою игру в Роблокс – видеоуроки
При помощи следующей подборки вы сможете научиться:
- Создавать карту в Роблокс
- Изучите основы языка Lua
- Создадите игровые уровни Роблокс
- Научитесь создавать диалоги в Роблокс
- Нарисуете графический интерфейс игры
- Научитесь создавать 3D-игры
- Закрепите изученное и повторите обучение программированию в Роблокс Студио
* * *
Теперь вы знаете, где начать в создании игры для Роблокс при помощи Roblox Studio. Удачи!
Коды на песни в Роблокс: от Моргенштерна до гимна СССР
Моды Роблокс, какие есть – взломанная версия Роблокс
Напоминаем, что у нас есть раздел со скидками, в котором вы сможете найти Промокоды Нетология.
Мы подозреваем, что многие люди слышали о Roblox, популярной видеоигре для компьютеров и мобильных устройств. Но есть еще кое-что под названием Roblox Studio, и мы находим это довольно интересным. Если вы занимаетесь созданием видеоигр, но не очень хорошо разбираетесь в программировании, то это может быть хорошим выбором.
YRoblox Studio — это, по сути, инструмент для публикации, пакет ресурсов и среда разработки, объединенные в один пакет. С помощью этой программы пользователи могут разработать игру и подготовить ее к публикации в короткие сроки, и хотя это хорошо, многие из нас понятия не имеют, как она работает.
С учетом сказанного, давайте немного поговорим о Roblox Studio, потому что она может стать следующей великой вещью для независимых разработчиков в отдаленном будущем.
Roblox Studio объяснила
Подробная информация ниже объяснит, что такое Roblox Studio, а также как ее настроить:
- Что такое Roblox Studio?
- Могут ли разработчики создавать любую игру с помощью Roblox Studio?
- Нужен ли разработчикам опыт программирования?
- Могут ли люди зарабатывать деньги на разработке игр для Roblox?
- Как настроить Roblox Studio на вашем компьютере
Что такое Roblox Studio?
Roblox Studio — это фреймворк, разработанный специально для создания видеоигр. Названия, созданные с помощью этой платформы, могут быть опубликованы только в Roblox, и эти типы игр ограничены как компьютерами, так и мобильными устройствами, где Roblox уже поддерживается.
Игры, созданные с помощью Roblox Studio, не могут быть проданы и всегда должны быть доступны игрокам бесплатно.
Теперь людей привлекает этот фреймворк из-за его простоты использования. Он поставляется с несколькими различными типами шаблонов и бесплатными художественными ресурсами, чтобы помочь разработчикам начать свой путь.
Как настроить Roblox Studio на вашем компьютере
Если вам интересно поиграть с Roblox Studio, давайте объясним, как двигаться в правильном направлении.
- Загрузите инструмент Roblox Studio из Официальный сайт.
- Нажмите на кнопку с надписью «Начать создание».
- Оттуда вы должны выбрать Download Studio.
- После загрузки установите программу на свой компьютер.
- Теперь вы должны зарегистрироваться, используя раздел создания учетной записи.
- Войдите в систему с вашими официальными учетными данными.
Теперь вы должны увидеть несколько шаблонов для начала. Выберите тот, который вы хотите, затем вы можете начать создавать свою первую из многих видеоигр.
Могут ли разработчики создавать любую игру с помощью Roblox Studio?
Дело в том, что разработчики ограничены тем, что они могут сделать с этой платформой. Да, немногие с огромными навыками могут получить от этого больше, но, в конце концов, это структура, построенная на основе известной видеоигры, поэтому она должна следовать правилам, установленным этой игрой.
Вот почему большинство игр Roblox Studio сосредоточены на полосах препятствий и многопользовательской игре, и они, как правило, не слишком отличаются друг от друга. Тем не менее, есть несколько игр с уникальным геймплеем, вот и все.
Нужен ли разработчикам опыт программирования в Roblox Studio?
Чтобы создавать видеоигры с помощью Roblox Studio, не нужно обладать обширными навыками программирования. Используя доступные шаблоны, ваша игра будет довольно простой. Но если вы знаете, как программировать на Lua, то вы можете вывести свою игру на новый уровень, конечно, с ограничениями.
И поскольку Lua несложно освоить, мы подозреваем, что даже новички попробуют свои силы в реальной работе по кодированию, чтобы стать настоящим разработчиком видеоигр.
Могут ли люди зарабатывать деньги на разработке игр для Roblox?
У каждого есть возможность заработать немного денег, создав свои игры в рамках Roblox Studio. Теперь мы ясно дали понять, что игры здесь должны быть доступны бесплатно, но игроки могут покупать косметику и обновления за виртуальную валюту, известную как Robux.
Для тех, кто не знает, игроки могут приобрести Robux, только потратив реальные деньги, поэтому разработчики игр могут немного заработать на стороне. Но как положено, это будет зависеть от популярности игры и от того, насколько она выделяется в людном месте.
Тем не менее, разработчики не должны рассматривать Roblox Studio как средство заработка больших денег, потому что мы очень сомневаемся, что это произойдет со многими. Мы считаем, что лучший вариант здесь — использовать этот фреймворк для улучшения навыков разработки игр, а не для чего-либо еще.
Роблокс Студио автоматически устанавливается вместе с игрой Роблокс и находится в той же папке. Обычно после установке на рабочем столе появляются два ярлыка с Роблокс плеером и Студио. Но если вдруг вы удалили эти ярлыки, я покажу вам 4 способа где можно их найти и как открыть Роблокс Студио на вашем ПК и даже на телефоне.
Содержание:
- Как открыть Роблокс Студио на компьютере
- Как открыть Роблокс Студио на телефоне
- Как открыть Explorer в Роблокс студио
- Как открыть Properties в Роблокс студио
- Как открыть ToolBox в Роблокс студио
- Роблокс Студио НЕ ЗАХОДИТ или выдает ошибку, что делать?
Как открыть Роблокс Студио на компьютере
Способ №1
- Заходите на официальный сайт Roblox.com и переходите во вкладку Create;
- Нажимаете на кнопку Edit на любой карте (одна карта у Вас будет по любому, даже если вы никогда и ничего не создавали);
- Далее появится всплывающее окошко в котором необходимо нажать «Открыть приложение Roblox«


Способ №2
Найти и запустить Роблокс Студио можно если ввести в поиск на вашем ПК слово Roblox (смотри скриншот)
Способ №3
Если нажать кнопку «Пуск» можно попробовать найти приложение Roblox среди других программ.

Способ №4
Роблокс студио можно найти по следующему адресу:
C:UsersИмя_ПользователяAppDataLocalRobloxVersionsversion-ваша_версия
Как открыть Роблокс Студио на Телефоне
- Перейдите на сайт Roblox.com и нажмите Continue in Browser

2. Перейдите во вкладку Create

3. Нажмите на три точки в верхнем правом углу и в открывшемся меню поставьте галочку в пункте «Версия для ПК»
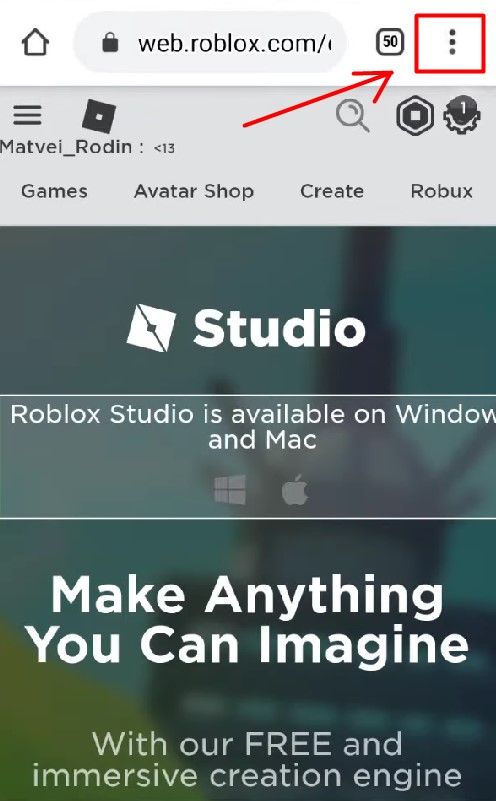
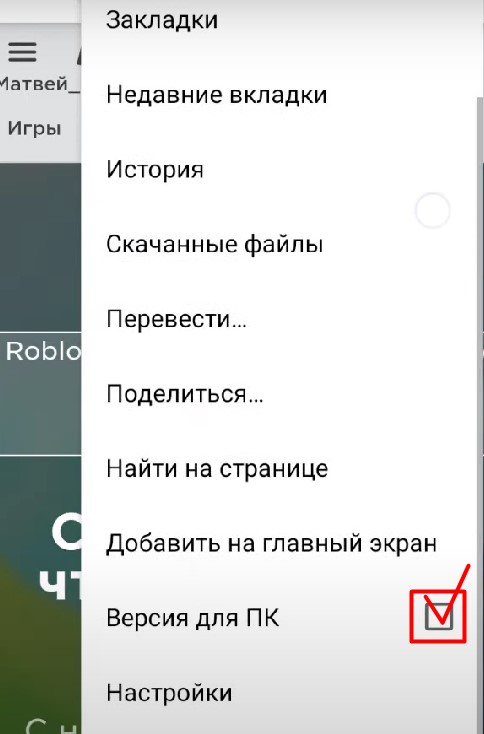
4. Готово, вы вошли в Роблокс Студио с телефона. Для того что бы открыть сам редактор придется все же скачать Роблокс на ПК.
Как открыть Explorer в Роблокс студио
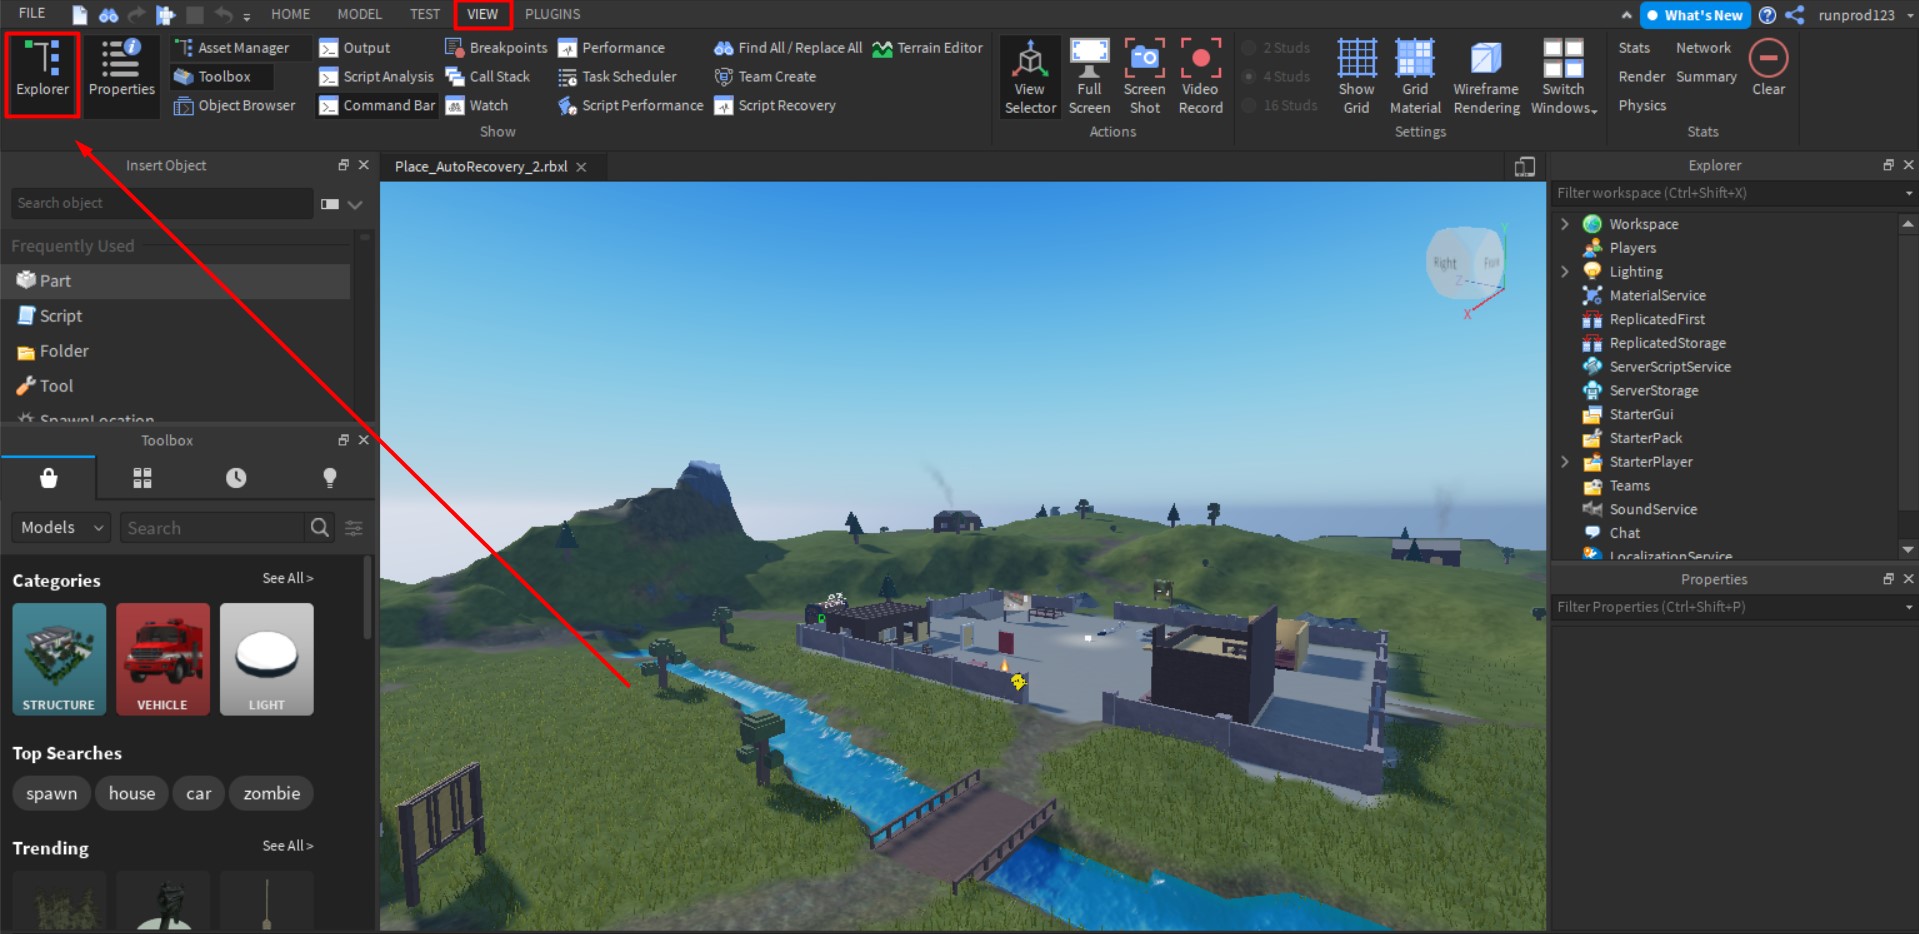
Что бы открыть панель Explorer в Роблокс Студио, нужно перейти во вкладку VIEW и нажать на кнопку Explorer в верхнем левом углу.
Как открыть Properties в Роблокс студио
Что бы открыть панель Properties в Роблокс Студио, нужно перейти во вкладку VIEW и нажать на кнопку Properties в верхнем левом углу.
Как открыть ToolBox в Роблокс студио
Что бы открыть панель ToolBox в Роблокс Студио, нужно перейти во вкладку VIEW и нажать на кнопку ToolBox в верхнем левом углу.

Не знаете, как начать в Roblox Studio? Тогда вы попали в нужное место. Roblox — это больше, чем просто игра по нескольким причинам, одна из которых заключается в том, что он побуждает игроков окунуться в мир игрового дизайна. Помимо множества игровых режимов, которые Roblox предлагает в стандартной комплектации, игроки могут создавать свои собственные сценарии Roblox благодаря Roblox Studio.
Он использует концепции строительства, которые вы найдете в такой игре, как Minecraft, но продвигает их дальше объединяя структуры, стили игрового процесса и даже стили искусства. Но, в отличие от Minecraft, в это нелегко прыгнуть, и загрузка Roblox Studio в первый раз может быть ошеломляющей. Вот несколько советов, которые помогут вам начать путь к тому, чтобы стать одним из лучших дизайнеров.
Советы по Roblox Studio
Улучшение использования Roblox Studio очень похоже на улучшение всего остального — вам нужно практиковаться. Не ожидайте создания совершенно нового игрового режима за пару часов, вам понадобится время, чтобы научиться создавать свои собственные миры и ресурсы. Это может показаться очевидным, но важно не откладывать, потому что вы не можете сразу создать все, что хотите, именно так, как вы себе представляли.
Будьте готовы ошибаться
Обратной стороной практики является много ошибок. Важно учиться на этих ошибках и использовать их для улучшения. Хороший способ сделать это — записать, что произошло. Если вы серьезно настроены поправиться, вам следует вести блокнот — цифровой или другой — и записывать, что происходило каждый раз, когда вы добиваетесь успеха или терпите неудачу. Изучите свои неудачи, а также свои успехи, и вы станете лучше.
Поиграйте с макетом приложения
Как только вы больше познакомитесь с Roblox Studio, стоит реорганизовать интерфейс, чтобы он лучше соответствовал вашим потребностям. Если вы знаете, что используете одни инструменты больше, чем другие, сделайте их приоритетными. При использовании Roblox Studio важно чувствовать себя комфортно, и понятный интерфейс является его неотъемлемой частью.
Включить привязку к сетке
Управлять многими инструментами, которые вы используете, будет проще, если вы включите опцию «Привязка к сетке» в дополнительных настройках. Обычно они находятся в нижней левой части интерфейса Studio. Эта опция означает, что ваша мышь будет прыгать от части к части, а не парить более эзотерически. Это значительно поможет вам при создании ваших первых творений.
Изучите свои горячие клавиши
Многие горячие клавиши, доступные в Roblox Studio, такие же, как и в других программах. Например, Ctrl + N открывает новое место, а Ctrl + O открывает файл, который уже существует. Однако есть несколько специальных горячих клавиш, которые помогут вам создавать свои миры более эффективным способом. Их стоит сохранить в памяти, если вы планируете стать мастером строительства.
- Ctrl + 1: использование инструмента «Выбор».
- Ctrl + 2: использование инструмента «Перемещение».
- Ctrl + 3: использование инструмента «Масштаб».
- Ctrl + 4: использование инструмента «Поворот».
- Ctrl + G: группирует выбранные элементы.
- Alt + L: блокирует или разблокирует объект.
- Ctrl + Shift + G: объединяет детали в одну деталь.
- Ctrl + Shift + N: отрицает деталь, что позволяет делать отверстия.
Есть еще масса, которую нужно изучить, но они наиболее полезны, помимо обычных подозреваемых, таких как Ctrl + S, для сохранения (что всегда является важной частью знаний).
Начни с простого
Лучше всего начать с предоставленных вам шаблонов. Каждый из стандартных шаблонов — отличный способ поэкспериментировать с идеями на ранних стадиях. Даже если вы лучше знакомы с Roblox Studio, они могут стать отличной отправной точкой для более сложных творений и игр. Обязательно изучите их все, и вы обязательно будете расти как творец.
Сначала создайте Обби
Слово «Обби» означает «Полоса препятствий» в Roblox. Это может показаться неудобным сокращением, но это лучший тип игры, с которым можно возиться, когда вы только начинаете. Из-за более простой природы проектирования полосы препятствий по сравнению с чем-то более сложным, например, со стрелком, гораздо легче разобраться в основах.
Попробуйте плагины
Для Roblox Studio доступно множество полезных плагинов. Многие из них служат схожим целям, но есть и другие, которые дополняют друг друга. Одним из самых популярных плагинов среди сообщества является Studio Build Suite. Он добавляет несколько новых инструментов, которые значительно упрощают использование Roblox Studio, что важно, когда вы часами совершенствуете свое мастерство.
Переключение между движением 1 шпильки и 0,2 шпильки
Вы можете изменить способ перемещения объектов в Roblox Studio, изменив шаг перемещения шпильки на вкладке МОДЕЛЬ. Перемещение может варьироваться от 1 гвоздика до 0,2. Это полезно, когда вы хотите внести более мелкие и более подробные настройки. Как правило, вы захотите придерживаться одного режима шпильки, но при работе с конкретными частями каждого объекта часто лучше использовать режим шпильки 0,2.
Планируйте свои сборки
Возиться в Roblox Studio — хороший способ познакомиться с основами, но если вы хотите построить что-то конкретное, неплохо спланировать свою карту, игру или модель, прежде чем начинать сборку. Вы можете использовать сетку, чтобы обозначить, где разместить объекты, или нарисовать грубый набросок вашей модели, прежде чем закрепить ее в многоугольниках. В любом случае ваш проект пойдет гладко, если вы потратите время на подготовительную фазу создания чего-то нового.
Испытайте свои творения
Наконец, убедитесь, что вы действительно тестируете все, что вы создаете, прежде чем делать это общедоступным. Как ваш персонаж выглядит в движении? Имеет ли этот объект желаемый масштаб? Сможете ли вы действительно пройти новый уровень в своем платформере? Любой разработчик игр скажет вам, что тестирование вашего творения жизненно важно для обеспечения плавного и приятного опыта, и если вы не проверите должным образом, вы обнаружите, что ваши с любовью созданные предметы игнорируются всеми.
Roblox (Роблокс) — это платформа, где можно выложить 3D-игру, созданную в специальной программе — Roblox Studio (Роблокс Студио). Здесь даже дети с 8-9 лет могут моделировать 3D-объекты, создавать игровые вселенные, учиться писать скрипты на Lua — простом и легко усваиваемом языке программирования.
Мы собрали серию видеоуроков, которые познакомят детей с разработкой игр в Роблокс Студио и программированием на Lua. Короткие пошаговые уроки рассчитаны на начинающих разработчиков и будут полезны детям и подросткам: сначала мы изучим интерфейс программы и основы языка Lua, а затем создадим игры разных жанров. Попробуйте покопаться в Роблокс и сделать свои первые игры с помощью этого плейлиста.
Для начала давайте установим Roblox и Roblox Studio на компьютер. Подробная инструкция в видео.

Урок 1. Создание первой карты в Роблокс Студио
Процесс обучения начнём с разбора интерфейса программы, а заодно попробуем создать первую игровую карту.

Урок 2. Основы Lua, первые шаги в создании игры
В этом уроке мы разберём, как создать скрипт на языке Lua. А также рассмотрим особенности этого языка, попробуем сделать небольшую программу. Кроме того, мы научимся делать спавн героя и создадим мини-игру в жанре шутера (стрелялки).

Урок 3. Создание уровней, циклы
Мы продолжим изучать язык программирования Lua и писать скрипты, познакомимся с понятием циклов. А также подробно разберём тему добавления уровней в игру, попробуем создать проект наподобие популярного LineRunner.

Урок 4. Создание первого уровня игры Obby
В этом видео мы познакомимся с понятиями условия и функции в программировании. В процессе создадим игру в жанре Obby — проект с полосой препятствий. И добавим в нее несколько уровней.

Урок 5. Создание диалогов в Роблокс
На этом занятии займёмся построением диалогов. Чтобы их осуществить, нам нужно добавить несколько второстепенных персонажей в наш «платформер».

Урок 6. Компоненты GUI в Roblox Studio
Простыми словами, GUI — это вспомогательные компоненты, благодаря которым мы можем делать интерфейс. В этом видеоуроке мы создадим игровое меню с помощью GUI.

Урок 7. Создание 3D-игры Capture the Flag
Давайте научимся создавать команды для наших игр. Для проекта Capture the Flag мы добавим 4 команды, им предстоит пройти полосу препятствий и добраться до вершины первыми. В ходе игры команды будут мешать друг другу.

Урок 8. Продолжаем создавать игру Capture the Flag
Улучшим и доделаем нашу игру.

Урок 9. Повторение материала
Обобщаем изученный материал, подкрепляем знания созданием несложной, но обширной новой игры.

На этом уроки по Roblox Studio и программированию Lua для начинающих завершены, теперь вы умеете делать все самое основное!
Содержание
- Программа для создания карт Роблокс Студио
- Технические характеристики
- Минимальные требования:
- Описание программы
- Вводный урок
- Roblox Studio
- Профиль
- Редактор
- Публикация
- Roblox Studio for Mac
- Roblox Studio
- Roblox Studio Overview
- Studio Interface
- Menu Bar
- Ribbon Bar
- Game Editor Window
- Explorer Window
- Properties Window
- Asset Manager
- Toolbox
- Quick Open
- Moving the Camera
- Saving and Publishing
- Playtesting
- Customizing Studio
- Studio Theme
- Moving Windows
- Quick Access Toolbar
- Studio Shortcuts
- Explorer Window
- Properties Window
- Saving and Publishing
- Games vs. Places
- Publishing to Roblox
- Local Saves
- Customizing Studio
- Dark Theme
- Moving Windows
- Quick Access Toolbar
- Studio Shortcuts
- How this site use cookies
Программа для создания карт Роблокс Студио
Роблокс Студия – это дополнительное программное обеспечение, необходимое для создания собственных карт в игре. Обладает широким функционалом и уже готовыми возможностями.
Чтобы создавать собственные плейсы или редактировать какие-либо объекты, пользователь должен обладать базовыми знаниями в программировании на C++ или увлекаться разработкой 3D-моделями.
Название
Операционная система Разрядность Версия
Скачать
Технические характеристики
Требования для Студио такие же, как у самой игры. Приложение требует поддержки 3D-проработки графики, ровно также, как и сам Роблокс.
Минимальные требования:
Максимальные характеристики включают в себя увеличенное количество оперативной памяти от 1 Гб, что подходит для разработки и создания моделей.
Содержание:
Описание программы
Приложение имеет собственную программную строку и 3D-площадку для создания различных локаций. Пользователь может самостоятельно настроить объекты, соорудить здания и придать им различные свойства. Привязка к определенному объекту выполняется при помощи программного кода или иначе «диалога». Благодаря такой возможности, можно самостоятельно настроить различные предметы и позволить игрокам взаимодействовать вместе с ними.
ПО идет как дополнение к основной игре, поэтому при установке игры – вы сразу же получаете Студию для разработки. На официальном сайте будущий разработчик может ознакомиться с функционалом приложения, а также с мануалами, которые выполнены в видеоформате. Программа обладает панелью быстрого доступа, функциональными клавишами и широкими возможностями для тех, кто планирует самостоятельно создавать игровые площадки.
Пользователь может создать множество карт, но только одна из них будет активна.
Доступ к бесчисленному количеству плейсов есть у тех игроков, которые приобрели для себя статус VIP. Чаще всего, разработкой занимаются целый студии, которые предоставляют Роблоксу права на использование своего продукта. Создание карт приносит относительно серьезный доход, особенно, если настроить на карте систему микротранзакций или платного входа.
Вводный урок
Чтобы начать действительно создавать свои площадки, нужно разобраться с основными параметрами и инструментами. Пользователь может сразу же воспользоваться уже готовыми картами и реализовать их в игру. Представлены такие типы:
Самая первая и представляющая собой обычную площадку для редактирования – Baseplate.
Переходя в нее, игроку будут доступны самые популярные предметы, которые на данный момент используются многими разработчиками. В боковой панели также можно найти дополнительные объекты, при помощи которых можно украсить свою карту.
Начать редактирование и вводный курс, можно с настройки обычного кубика. В Роблоксе все предметы привязаны к определенному месту и состоят из отдельных компонентов. Это квадрат, который достаточно сложно изменить. Чтобы создать максимально плоский объект, например, спрайт (картинка), нужно перейти в настройки панели «Модель» — верхняя часть управления «1 Stat» или же «1/5 Stat», «Offs».
При запуске редактора, по умолчанию стоит «1stat», что обозначает возможность редактировать предмета размером в один кубик. Для создания более тонких деталей, нужно выбрать либо «Offs», либо «1/5 Stat». После этого – настройте объект так, как вам необходимо: растяните или увеличьте в высоту.
Объект можно разукрасить или добавить на него уже готовую картинку. Она расположена в боковой панели инструментов, в разделе «Decals». Выбрав нужное изображение, выделите свой объект и разместите на нем картинку. Изображение будет размещено по всей поверхности с одной стороны, вы также можете разместить картинку и на другой. Вы можете созданный объект «Вырезать», «Копировать» и ставить в абсолютно любых местах.
Достаточно обладать минимальными знаниями английского языка, чтобы полностью разобраться в программе.
Источник
Roblox Studio
С помощью приложения пользователи могут разрабатывать игры, создавать персонажей и локации. Доступны инструменты для редактирования карт и подборка моделей.
Roblox Studio – приложение для Windows, позволяющее создавать многопользовательские игры на основе одноименного движка. Утилита представляет собой визуальный редактор. С его помощью можно разрабатывать карты, уровни и локации. Есть возможность опубликовать свою игру на онлайн платформе Роблокс и пригласить друзей.
Профиль
Для использования программы необходимо создать учетную запись, пройдя регистрацию на официальном сайте разработчика. Потребуется указать имя пользователя, пароль и дату рождения.
Редактор
Приложение позволяет выбрать один из готовых шаблонов или создать новую игровую карту с нуля. Проектирование осуществляется в режиме конструктора. Нужно выбирать модели из каталога и перетаскивать их на рабочую область. Есть возможность менять свойства и размеры объектов.
Программа содержит большой каталог текстур, персонажей и других предметов. Также поддерживается функция создания скриптов для автоматизации разработки. Стоит отметить, что для разработки игр не требуется знание языков программирования. Доступен встроенный отладчик и инструменты для анализа производительности.
Публикация
После завершения редактирования пользователи могут опубликовать проект на онлайн платформе. Есть возможность запустить игру и пригласить друзей.
Источник
Roblox Studio for Mac
Roblox Studio 1.2.1 LATEST
macOS X 10.12 Sierra or later
Roblox Studio for Mac 2022 full offline installer setup for Mac
Roblox Studio for Mac is the building tool of Roblox that helps you to create the places of your dreams. It provides Developers with a more comprehensive and intricate set of tools, which allows for a greater sense of control and creative expression.
Roblox Studio‘s features are accessible to a variety of skill levels ranging from a novice to an experienced programmer. For the aspiring builder, time invested brings great rewards. Many of best Developers use it frequently to get the most out of their creations. Tools range from simple manipulation of objects or terrain, to entering complex scripts and game functions. The app for Mac also allows you to test your games in an isolated environment before uploading them to the website.
Roblox is the best place to Imagine with Friends. With the largest user-generated online gaming platform, and over 15 million games created by users, the app is the #1 gaming site for kids and teens (comScore). Every day, virtual explorers come to app to create adventures, play games, role play, and learn with their friends in a family-friendly, immersive, 3D environment.
Make Anything
The tool lets you create anything and release with one click to smartphones, tablets, desktops, consoles, and virtual reality devices.
Reach Millions of Players
Connect with a massive audience by tapping into an incredibly enthusiastic and international community of over 50 million monthly players.
Features and Highlights
Build Once, Play Anywhere
Maintain a single codebase that works seamlessly across every platform supports. You can immediately ship your projects on phones, desktops, consoles, and VR with a single click.
Reach a Massive, Highly Engaged Global Community
As one of the top digital properties in the U.S. for kids under the age of 18 (comScore), players enjoy more than 600 million hours of engagement on Roblox each month.
Real-Time Social Ecosystem
Roblox isn’t just a game engine. With Roblox’s uniquely inherent social ecosystem, it’s easier than ever for developers to leverage network effects and achieve viral growth.
Fully Managed Cloud Infrastructure
App’s proprietary cloud software and fully managed infrastructure for multiplayer gameplay removes complexity from game updates, scaling, matchmaking, and monetization.
Your Imagination, Your Worlds
Your creations need not be restricted to Roblox’s classic and iconic style. The game engine and API gives you unparalleled freedom to control the look and feel of your experiences.
Build Deeply Immersive 3D Experiences
App’s best-in-class development toolset can be used to model, design, and build incredibly rich and detailed 3D worlds that can be rendered equally well across desktop, mobile, console, and VR.
Dynamic Lighting and Effects
It comes complete with all the design tools to easily create photo-realistic lighting and particle effects, as well as all the APIs needed to engineer your own custom effects.
Custom User Interfaces
It supports the development of immersive 3D environments and beautiful 2D interfaces, making it easy for developers to transition between the two seamlessly during gameplay.
Create Amazing Stories
With the ability to create detailed 3D environments and immersive soundscapes, the program is a robust storytelling environment that can bring characters and worlds to life.
Wiki
The Wiki is the ultimate resource for documentation, tutorials, and samples which will help you learn to make games with Roblox Studio for macOS.
Note: The installer will install you both Roblox Player and Roblox Studio for development.
Источник
Roblox Studio
Roblox Studio 1.6.0.1115 LATEST
Windows XP / Vista / Windows 7 / Windows 8 / Windows 10
Roblox Studio 2022 full offline installer setup for PC 32bit/64bit
Roblox Studio is the building tool of Roblox that helps you to create the places of your dreams. It provides Developers with a more comprehensive and intricate set of tools, which allows for a greater sense of control and creative expression.
Roblox Studio‘s features are accessible to a variety of skill levels ranging from novice to an experienced programmer. For the aspiring builder, time invested brings great rewards. Many of the best Developers use it frequently to get the most out of their creations. Tools range from simple manipulation of objects or terrain to entering complex scripts and game functions. The app for Windows also allows you to test your games in an isolated environment before uploading them to the website.
Roblox is the best place to Imagine with Friends. With the largest user-generated online gaming platform and over 15 million games created by users, the app is the #1 gaming site for kids and teens (comScore). Every day, virtual explorers come to the app to create adventures, play games, role play, and learn with their friends in a family-friendly, immersive, 3D environment.
Make Anything
The tool lets you create anything and release with one click to smartphones, tablets, desktops, consoles, and virtual reality devices.
Reach Millions of Players
Connect with a massive audience by tapping into an incredibly enthusiastic and international community of over 50 million monthly players.
Features and Highlights
Build Once, Play Anywhere
Maintain a single codebase that works seamlessly across every platform supports. You can immediately ship your projects on phones, desktops, consoles, and VR with a single click.
Reach a Massive, Highly Engaged Global Community
As one of the top digital properties in the U.S. for kids under the age of 18 (comScore), players enjoy more than 600 million hours of engagement on Roblox each month.
Real-Time Social Ecosystem
Roblox isn’t just a game engine. With Roblox’s uniquely inherent social ecosystem, it’s easier than ever for developers to leverage network effects and achieve viral growth.
Fully Managed Cloud Infrastructure
App’s proprietary cloud software and fully managed infrastructure for multiplayer gameplay remove complexity from game updates, scaling, matchmaking, and monetization.
Your Imagination, Your Worlds
Your creations need not be restricted to Roblox’s classic and iconic style. The game engine and API gives you unparalleled freedom to control the look and feel of your experiences.
Build Deeply Immersive 3D Experiences
App’s best-in-class development toolset can be used to model, design, and build incredibly rich and detailed 3D worlds that can be rendered equally well across desktop, mobile, console, and VR.
Dynamic Lighting and Effects
It comes complete with all the design tools to easily create photorealistic lighting and particle effects, as well as all the APIs needed to engineer your own custom effects.
Custom User Interfaces
It supports the development of immersive 3D environments and beautiful 2D interfaces, making it easy for developers to transition between the two seamlessly during gameplay.
Create Amazing Stories
With the ability to create detailed 3D environments and immersive soundscapes, the program is a robust storytelling environment that can bring characters and worlds to life.
Wiki
The Wiki is the ultimate resource for documentation, tutorials, and samples which will help you learn to make games with Roblox Studio for PC.
Note: The installer will install you both Roblox Player and Roblox Studio for development.
Источник
Roblox Studio Overview
Studio Interface
The Studio interface is divided into several sections:
At the very top of the Studio window is a menu bar with the following items:


Ribbon Bar
Below the menu bar is the ribbon bar. The tools displayed in the ribbon change when you click on the Home, Model, Test, View, and Plugins tabs.

Game Editor Window
This is where most of your game design happens. Here you can build, playtest, and move the virtual camera around your Roblox world.

Explorer Window
The Explorer window shows a hierarchical list of every object inside a place. It can be toggled from the View tab. See the Explorer reference for more details on this window.

Properties Window
The Properties window, also toggled from the View tab, shows every detail about how an object looks and behaves. For example, a Part has properties such as Position, Color, and Size which define where the part is located and how it appears.

Asset Manager

Toolbox
The Toolbox contains a selection of models, images, meshes, and audio made by Roblox or Roblox community members. It also includes all of the models, images, meshes, audio, and packages you’ve published or those published by groups you belong to. See the Toolbox article for more details.

Quick Open
The Quick Open window can be opened by pressing Ctrl + P ( Command ⌘ + P on Mac) or by adding its action button to the Quick Access Toolbar. This window lets you quickly find any instance or path in the game and it includes some useful options for searching:
Moving the Camera
Inside the game editor window, you can move the camera with these controls:
| Key/Shortcut | Action | Description |
|---|---|---|
| W | Forward | Move the camera forward. |
| S | Back | Move the camera back. |
| A | Left | Move the camera left. |
| D | Right | Move the camera right. |
| Q | Down | Move the camera down. |
| E | Up | Move the camera up. |
| Shift | Change camera speed | In combination with any movement key, changes the camera speed (camera speed can be customized within Studio settings). |
| F | Focus | Focus the camera on a selected part. |
| Right Mouse Button | Turn the camera | Hold and drag to freely move the camera view around. |
| Middle Mouse Button | Pan the camera | Hold and drag to pan (slide) the camera. |
| Mouse Scroll Wheel | Zoom in or out | Zoom the camera in or out. |
Saving and Publishing
The best way to save your work is to publish it to Roblox’s online servers. This lets you edit it from any computer that can run Studio. Publishing also lets others find and play your creations.
Select File → Publish to Roblox to publish your work. This will open a window where you can set the creation’s name, description, creator, genre, and which device types it should run on. If you already published your place in a session of Studio, this will publish the creation to the same slot.
Playtesting
There are three options for articles/game testing|playtesting a game, all accessible from the Home and Test tabs. Click on the small arrow below the button to choose one of the three options.

| Action | Description |
|---|---|
| Play | Starts simulating the game, inserting your avatar at either the SpawnLocation or coordinates of , , . |
| Play Here | Starts simulating the game, inserting your avatar at the current camera position. |
| Run | Starts simulating the game but does not insert your avatar. The simulation begins at the current camera position and you can navigate around the game world using the Studio camera controls. |
Customizing Studio
Studio Theme
Studio features both a light theme and dark theme. To change themes:
Moving Windows
The windows in Studio can be customized to fit your ideal work style.
Quick Access Toolbar
The top-left region in the Studio menu bar is called the Quick Access Toolbar and it contains shortcuts to various buttons and commands in Studio. You can freely add, remove, and rearrange actions in this section.

To quickly customize the Quick Access Toolbar, click the small arrow to the right of the toolbar. This will reveal a drop-down menu that lets you enable and disable items. You can also add and remove buttons, as well as change the order of the buttons, by selecting Customize from the drop-down menu.

Studio Shortcuts
All of the shortcuts in Studio can be customized. There are also many Studio actions without default shortcuts that can be tied to any key combo. See Roblox Studio Shortcuts for a complete list of these actions.
If the camera isn’t responding to keyboard controls, click inside the game editor window to make it active.
Explorer Window
The Explorer window shows a list containing every Instance inside of a place. It can be toggled from the View tab.
The Explorer window uses the concept of parenting to organize all of the instances. If an instance has any children, it will show a small arrow next to its name. Clicking on this arrow toggles a list of all the children of that instance.
Overview
To make an instance the child of another, simply drag-and-drop it within the Explorer window into the instance you want to be the parent.
Properties Window
The Properties window, toggled from the View tab, shows every detail about how an object looks and behaves. For example, a Part has properties such as Position, Material, and Size which define where the part is located and how it appears.
Any changes you can make with a Studio tool can also be made by setting the values inside the Properties window. You will even see some properties that don’t relate to a Studio tool!
Overview
Selecting multiple objects lets you change properties for all of them. For example, if you have multiple parts selected, changing the Material value in the Properties window will set the material for all of them at once.
Saving and Publishing
Roblox games can either be saved online to Roblox servers or offline to your local machine.
Games vs. Places
Roblox games are made up of individual places. A place is like a level or stage in a larger game — it contains the building blocks, terrain, user interfaces, game logic, and everything else that makes up a level.
Publishing to Roblox
The best way to save your work is to publish it to Roblox’s online servers. This lets you edit it from the Roblox website on any computer that can run Studio. Publishing also lets your friends find and play your creations!
Select File → Publish to Roblox As. to publish your work. This will open a window where you can select which “slot” to save to. You can choose a new slot or save over an existing one.
When you publish your work to a new slot ( New Place), you will create both a new place and a new game. The place will become the new “starting place” for the game (the entrance point for every player who loads the game). Once the starting place is set, it cannot be changed, although you’re free to add more places to the game and move players from place to place using the Teleport Service.
If you already published your place in a session of Studio, or if you opened it with the Edit button on the Roblox website, you can simply select File → Publish to Roblox to save the place to the same slot.
Local Saves
Customizing Studio
Dark Theme
Studio has two themes: the light theme (standard) and a dark theme. Many users like the dark theme when they’re working in rooms with less light.

To switch to the dark theme:
Moving Windows
The windows in Studio can be customized to fit your ideal work style.
Quick Access Toolbar
The top-left region in the Studio menu bar is called the Quick Access Toolbar and it contains shortcuts to various buttons and commands in Studio. You can freely add, remove, and rearrange actions in this section.
To quickly customize the Quick Access Toolbar, click the small arrow to the right of the toolbar. This will reveal a drop-down menu that lets you enable and disable items in the bar.
You can also add and remove buttons, as well as change the order of the buttons, by selecting Customize from the drop-down menu.
Studio Shortcuts
All of the shortcuts in Studio can be customized. There are also many Studio actions without default shortcuts that can be tied to any key combo. See Roblox Studio Shortcuts for a complete list of these actions.
How this site use cookies
This Platform uses cookies to offer you a better experience, to personalize content, to provide social media features and to analyse the traffic on our site. For further information, including information on how to prevent or manage the use of cookies on this Platform, please refer to our Privacy and Cookie Policy.
Please press Continue to go to:

© 2022 Roblox Corporation. All Rights Reserved.
Источник