Командная строка в Windows 10 не сравнивается с терминалом в Linux. Чтобы восполнить недостатки, в Windows можно установить такие инструменты, как wget и Cygwin, чтобы получить больше возможностей из командной строки. Вот как вы можете установить и использовать wget в Windows 10.
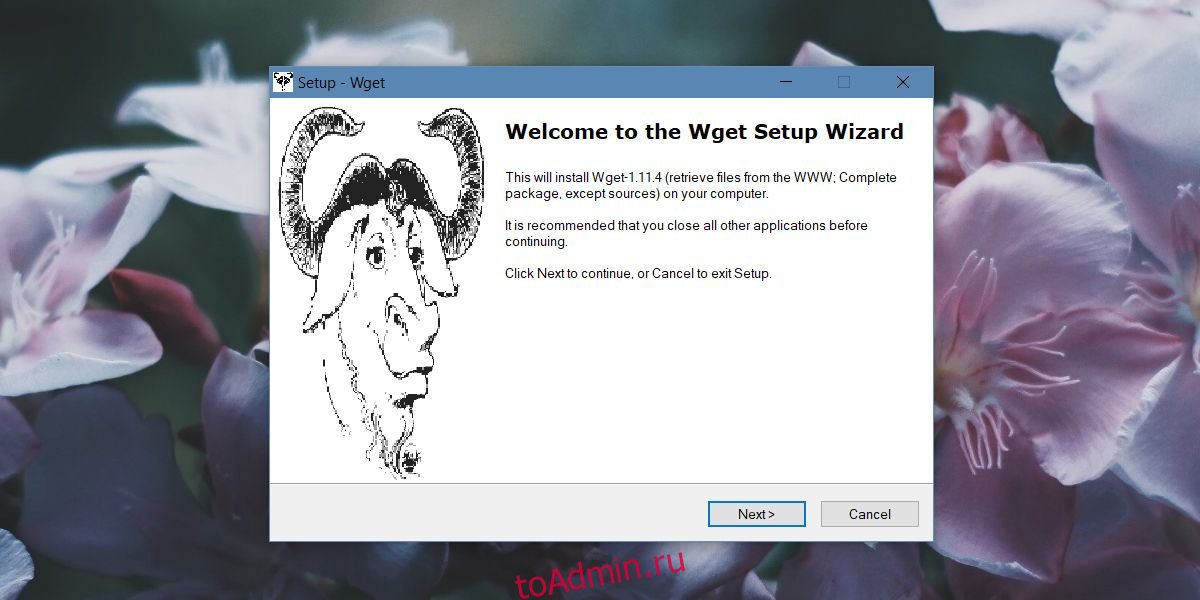
Wget — бесплатный инструмент, но загрузить нужный файл довольно сложно. Трудно сказать, какой именно из них вам следует скачать, и одно из наиболее популярных зеркал для EXE печально известно своими сбоями в Windows 10. Чтобы установить wget, скачать этот файл с Sourceforge.
Распакуйте файл и запустите в нем EXE. Установка довольно проста. Кроме лицензионного соглашения и ничего больше не меняйте.
Использование Wget
Есть два способа использовать Wget в Windows 10. Это инструмент командной строки, поэтому у него нет графического интерфейса. Вы получаете доступ к нему через командную строку. Чтобы использовать его из командной строки, вы можете либо добавить его как переменную среды, либо вручную перейти в каталог, в котором находится приложение Wget, и использовать его оттуда. Второй метод неудобен, если вы собираетесь часто использовать этот инструмент, но мы подробно рассмотрим оба метода, и вы можете выбрать тот, который вам больше всего подходит.
CD в Wget
Это менее удобный способ. Откройте проводник и перейдите в следующее место. Здесь будет файл Wget.exe. Вам действительно нужен только путь к этому файлу. Скопируйте его в буфер обмена.
C:Program Files (x86)GnuWin32bin
Затем откройте командную строку и введите следующую команду, чтобы перейти в указанное выше место.
cd C:Program Files (x86)GnuWin32bin
Оказавшись в этой папке, вы можете ввести wget и использовать любые его функции и переключатели.
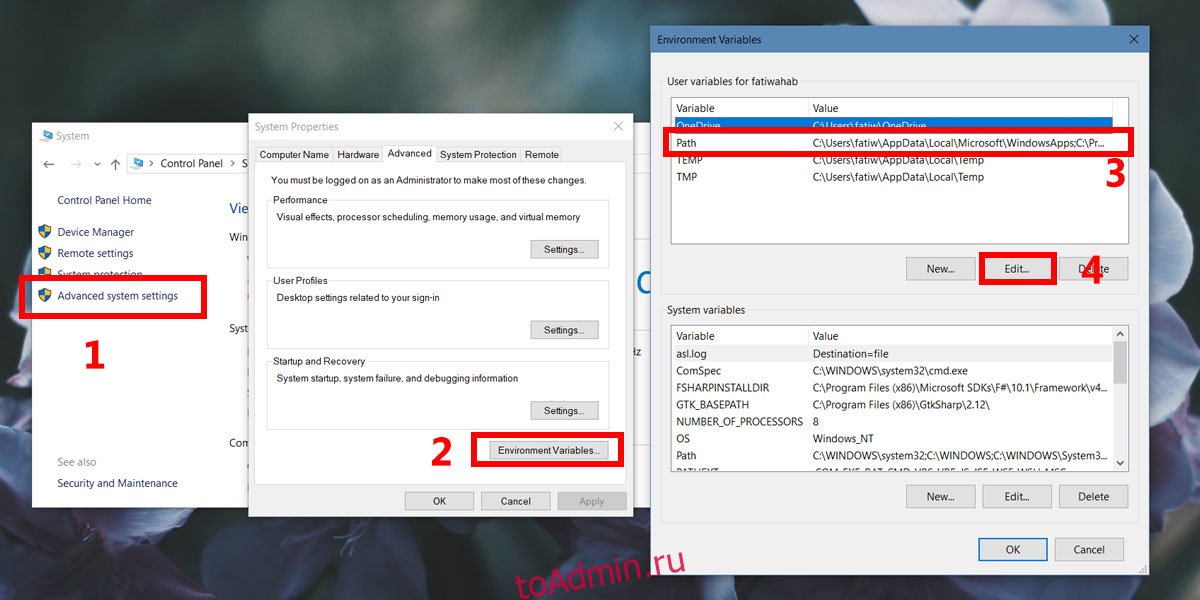
Добавить переменную среды
Перемещение в папку bin, где Wget.exe находится каждый раз, когда вы хотите использовать инструмент, требует много времени. Если вы добавите его как переменную среды, вы можете просто ввести wget из любого каталога и использовать его. Для этого вам потребуются права администратора.
Чтобы добавить wget в качестве переменной среды, откройте проводник и вставьте следующее в адресную строку.
Control PanelSystem and SecuritySystem
В левом столбце щелкните Расширенные настройки системы. В открывшемся окне нажмите Переменные среды. В окне «Переменные среды» выберите «Путь» в разделе вверху и нажмите «Изменить».
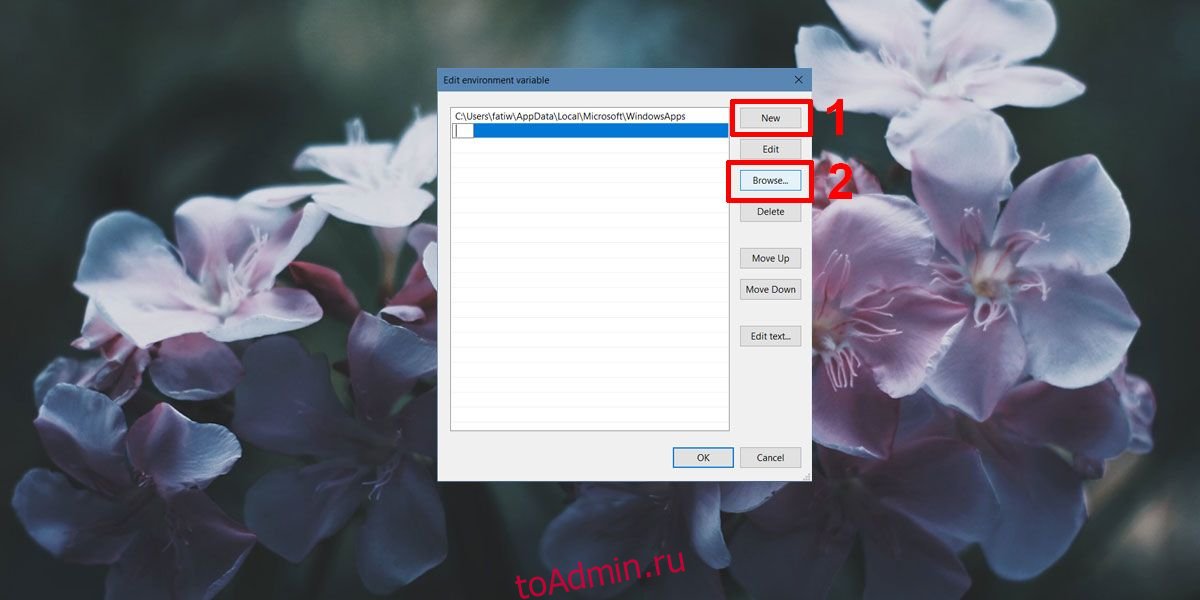
В открывшемся окне нажмите «Создать», затем нажмите кнопку «Обзор». Введите это место;
C:Program Files (x86)GnuWin32bin
Для выхода щелкните ОК в каждом окне.
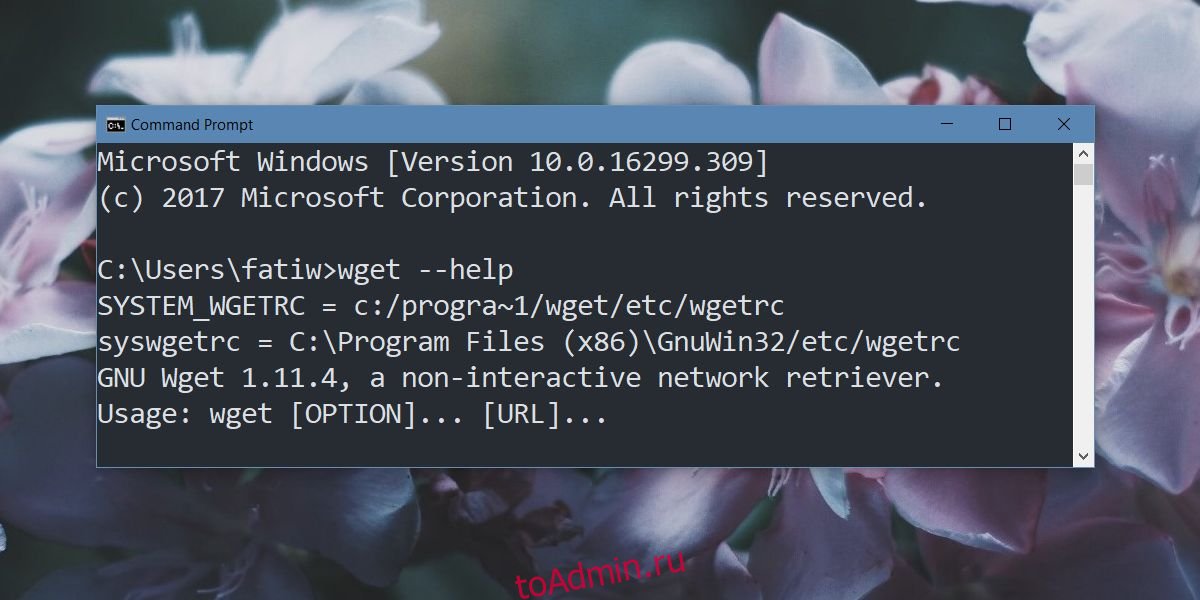
Теперь, когда вы открываете командную строку, вы можете ввести wget независимо от того, в каком каталоге / папке вы находитесь, и вы сможете получить доступ к этому приложению и использовать его команды.
Что вы думаете об этой статье?
Одно время в Рунете немалой популярностью пользовались менеджеры загрузок, позиционируемые их разработчиками как более эффективные инструменты скачивания контента из глобальной сети. Волна популярности, однако, вскоре схлынула, когда пользователи убедились, что эти программы ненамного превосходят встроенные средства браузеров. В почете остались лишь специализированные загрузчики.
Вроде тех, которые выпрямляют ссылки с YouTube или используются для пакетного скачивания с сайтов файлов определенного типа.
Программа, о которой сегодня пойдет речь, также является загрузчиком файлов, но при этом она имеет существенные отличия. Во-первых, у нее нет привычного графического интерфейса, вместо него пользователям предлагается работать в командной строке, во-вторых, она пришла к нам из мира Linux, а значит будет интересна тем, кто начинал свое знакомство с компьютерными технологиями с этой системы или просто хорошо в ней разбирается.
Называется программа Wget. Впрочем, назвать ее полноценной программой в общеупотребительном смысле слова можно лишь с натяжкой, это скорее утилита, к тому же консольная, а значит и понравится она далеко не всем. Изначально она использовалась для загрузки архивов и вообще скачивания файлов по сети, но с таким же успехом ее можно использовать для создания локальных копий сайтов с сохранением локальной структуры последних, групп и отдельных веб-страниц, а также их конвертирования в формат, удобный для просмотра сайтов в автономном режиме.
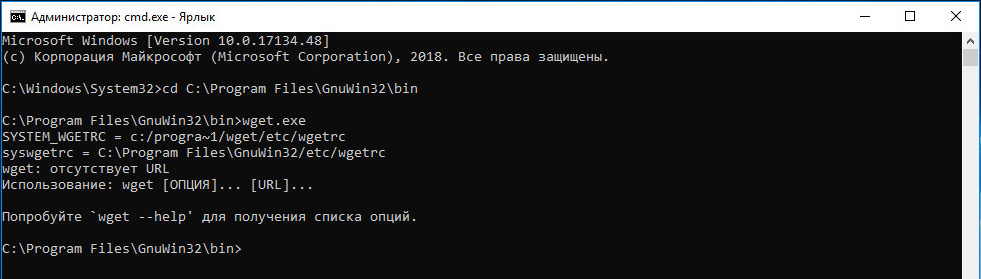
Wget умеет работать с протоколами HTTP, HTTPS и FTP, поддерживает прокси и докачку при обрыве связи, обладая при этом достаточно гибким набором комбинируемых параметров. Несмотря на кажущуюся сложность, пользоваться ею не так уже и трудно. Устанавливается утилита как и всякая другая программа — с помощью мастера, а вот запускать ее придется из командной строки, перейдя в расположение исполняемого файла wget.exe расположенного по адресу C:Program FilesGnuWin32Bin. Вот так:
cd C:Program FilesGnuWin32Bin
wget.exe
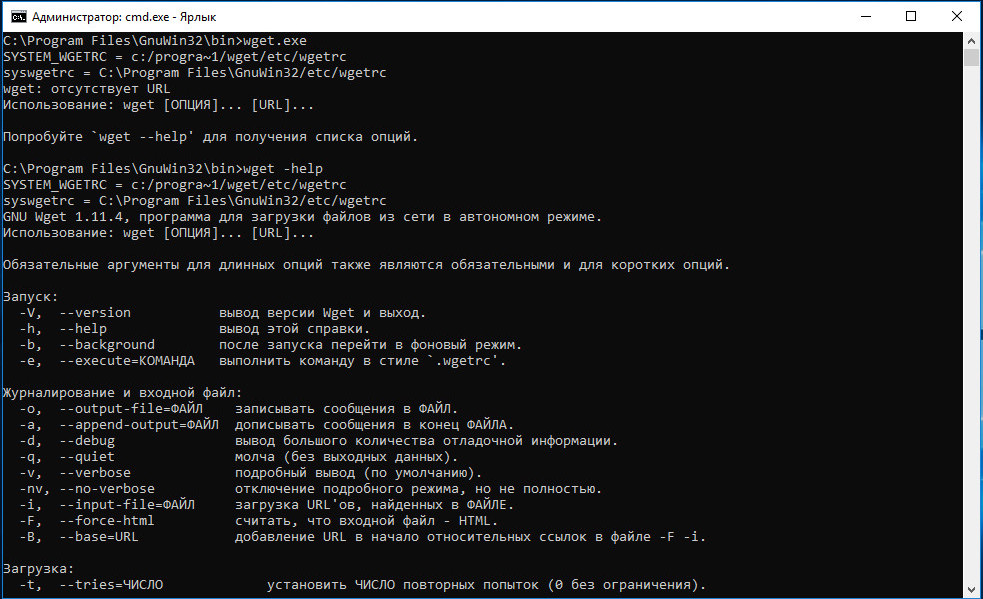
Для удобства вы можете добавить расположение утилиты в переменные среды, это позволит вам запускать утилиту, не переходя в ее каталог. Теперь что касается использования. Wget имеет встроенную справку по ключам на русском языке, вызываемую командой -help.
Синтаксис же утилиты можно представить в виде такой схемы:
wget [web] [key]
wget здесь имя исполняемого файла утилиты, web — ресурс в интернете, с которого производится скачивание, key — дополнительные параметры или ключи, добавляемые по необходимости. А вот и самый простой пример использования. Допустим, мы хотим скачать с сети некое изображение. Зная его URL, выполняем такую команду:
wget http://ab57.ru/images/procexp1.png
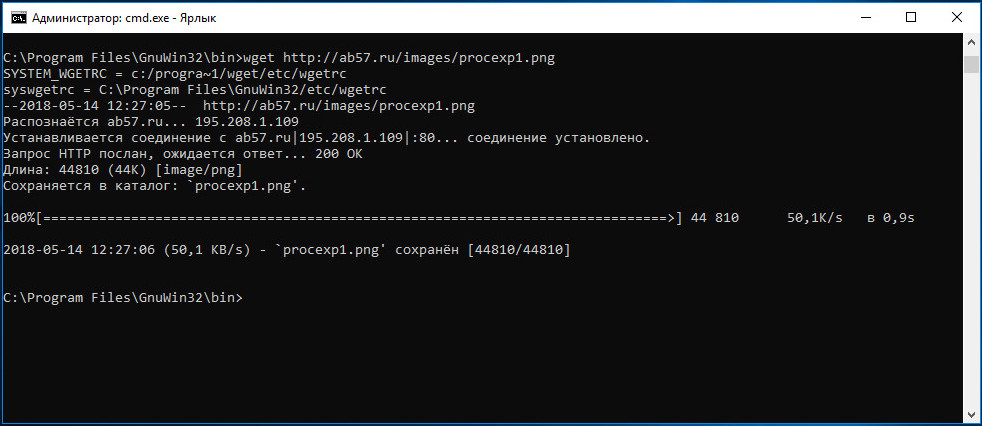
Картинка будет сохранена в каталог с исполняемым файлом утилиты. Также вы можете загрузить файл с сохранением структуры каталогов сайта, добавив ключ -p:
wget -p http://ab57.ru/images/procexp1.png
Если у вас есть текстовый документ со списком файлов с указанием их URL, Wget поможет скачать их в пакетном режиме.
Для этого используется такая команда:
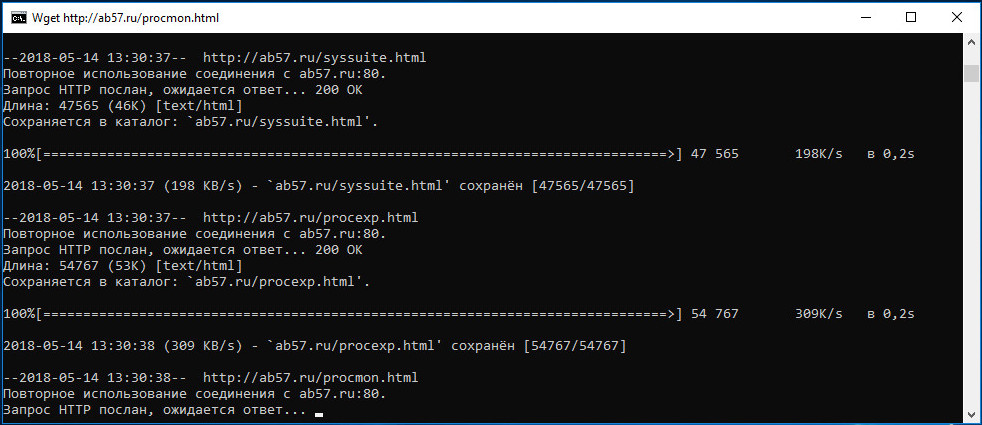
wget -i D:data.tхt
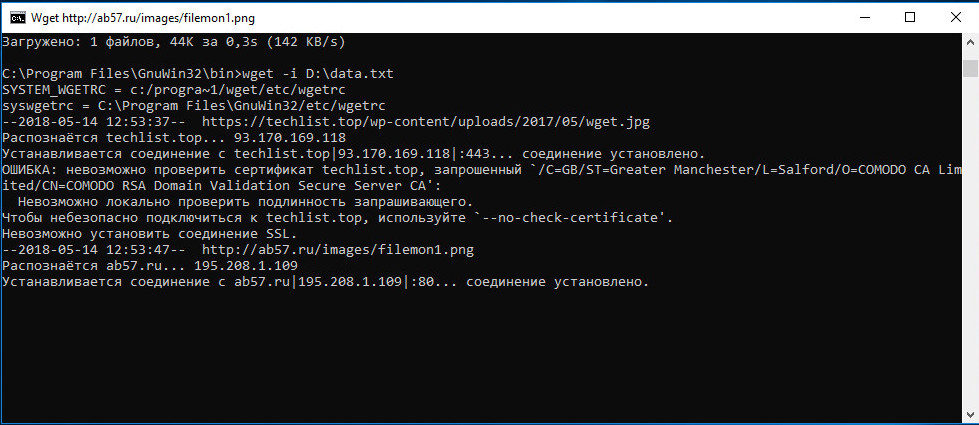
В файле data.tхt было две ссылки на изображения, но утилита скачала только одну картинку. Такое может быть, если сайт использует HTTPS-соединение, в этом случае не удается проверить подлинность сертификата. Чтобы обойти это ограничение, добавляем к команде ключ —no-check-certificate.

Наконец, с помощью утилиты вы можете загрузить на жесткий диск весь сайт. Команда в этом случае будет выглядеть следующим образом:
wget -r -k -p -l 5 ab57.ru
Ключ -r устанавливает рекурсивную загрузку, -k — делает ссылки локальными (просмотр сайта в оффлайн-режиме), -p — загружает все файлы, l — устанавливает глубину рекурсии, в данном примере до пятого уровня вложенности (0 устанавливает бесконечность).
Поддерживает Wget также множество других параметров. Протоколирование операций, авторизация с логином и паролем на удаленном сервере, выбор действия при повторном скачивании файлов, изменение директории загрузки — всё это и многое другое умеет Wget, главное запастись терпением и во всём разобраться.
![]() Загрузка…
Загрузка…
— Advertisement —
Hello, how are you? This time we’re going to talk about Wget. It is a tool created by the GNU Project. Its main purpose is to get content and files from different web servers. Besides, it supports downloads via FTP, SFTP, HTTP, and HTTPS. Its features include recursive download, conversion of links for offline viewing of local HTML, and support for proxies. It is a widely known program in Linux environments, since its appearance in 1996. However, it can also be ported to Windows, where its use is not well known. For that reason, we will see how to install and use Wget in Windows 10.
Installing Wget in Windows 10
Wget is a free tool and relatively simple to install in a Linux environment. Just type the appropriate commands to each distribution, and you’re done. However, when it comes to Windows, the situation changes. There are many installers and options that end up with installation errors. However, we’ve got this version that works properly. Go to this link and download version 1.11.4-1

Next, we proceed to run the installer. Just double click and the wizard will start, press next to continue:

Then accept the license terms, and click Next to continue the installation.

Select the folder where the program will be installed. Click next to continue the installation.

Next, select the components to install. To ensure proper operation, check both boxes and press Next to continue the installation.

Next, you can create direct access to the application and its respective location

You can install additional icons. Click Next to continue

Verify the installation options and press Install to finish the process.

Once the installation is finished, we will see the following screen.

Using Wget in Windows 10
Please note that Wget does not have a graphical interface, so you will have to use it through command in the CMD. To check that the program is actually installed, please go to the installation directory. Depending on the installation options selected, it should be as follows:
C:Program Files (x86)GnuWin32bin
What we need to do is open a command prompt. With this intention, press the Win+R combination and type CMD

Once there, use the CD command to navigate to the file location mentioned above. Then type Wget to use the program.

Add environment variable
We have correctly installed Wget. However, to be able to use it we always have to navigate to the installation folder of the program. This is cumbersome, so if we want to use Wget from any directory, we need to add an environment variable. With this in mind, please follow this path: Control Panel>System and Security>System>Advanced system settings

On the next screen, choose Environment Variables

Next, we are going to create a new environment variable. With that intention, please select Path and press Edit.

On the next screen first select New, then Browse. You must select the address where the program is installed.

Press ok in each of the open windows, and we can run Wget every time we open a Command Prompt. It doesn’t matter which directory we’re in. Let’s test the Wget command, downloading its executable for windows 10. With this intention, we enter this command in the CMD
wget https://sourceforge.net/projects/gnuwin32/files/wget/1.11.4-1/wget-1.11.4-1-setup.exe/download

Using Wget in Windows Subsystem for Linux
We have already seen how to use bash in windows 10. Through WSL we can also use Wget natively. To do this, we’ll open ubuntu and run the following command:
sudo apt-get install wget
Enter your password, and wait while the program is installed. Now we are ready to use wget in Windows 10.

Finally, we have seen how to install Wget in Windows 10. We can do it natively or using the Windows Subsystem for Linux. Both methods are valid for using this powerful download tool. Not only will we have access to files, but also to complete pages so that they can run offline. All right, that’s it for now, if you have any questions, don’t hesitate to ask. We are here to serve! until next time!
What does WGET Do?
Once installed, the WGET command allows you to download files over the TCP/IP protocols: FTP, HTTP and HTTPS.
If you’re a Linux or Mac user, WGET is either already included in the package you’re running or it’s a trivial case of installing from whatever repository you prefer with a single command.
Unfortunately, it’s not quite that simple in Windows (although it’s still very easy!).
To run WGET you need to download, unzip and install manually.
Install WGET in Windows 10
Download the classic 32 bit version 1.14 here or, go to this Windows binaries collection at Eternally Bored here for the later versions and the faster 64 bit builds.
Here is the downloadable zip file for version 1.2 64 bit.
If you want to be able to run WGET from any directory inside the command terminal, you’ll need to learn about path variables in Windows to work out where to copy your new executable. If you follow these steps, you’ll be able to make WGET a command you can run from any directory in Command Prompt.
Run WGET from anywhere
Firstly, we need to determine where to copy WGET.exe.
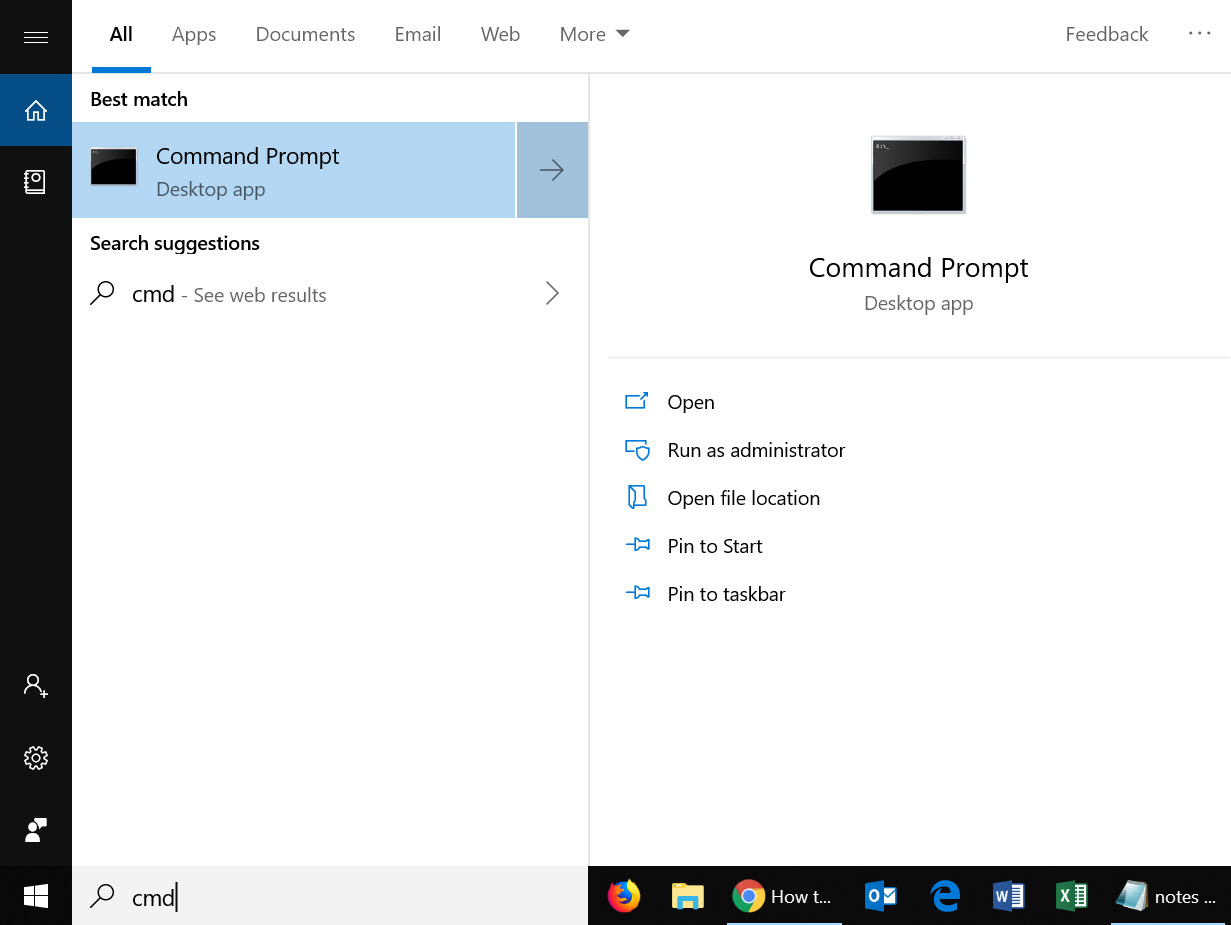
After you’d downloaded wget.exe (or unpacked the associated distribution zip files) open a command terminal by typing “cmd” in the search menu:
We’re going to move wget.exe into a Windows directory that will allow WGET to be run from anywhere.
First, we need to find out which directory that should be. Type:
path
You should see something like this:
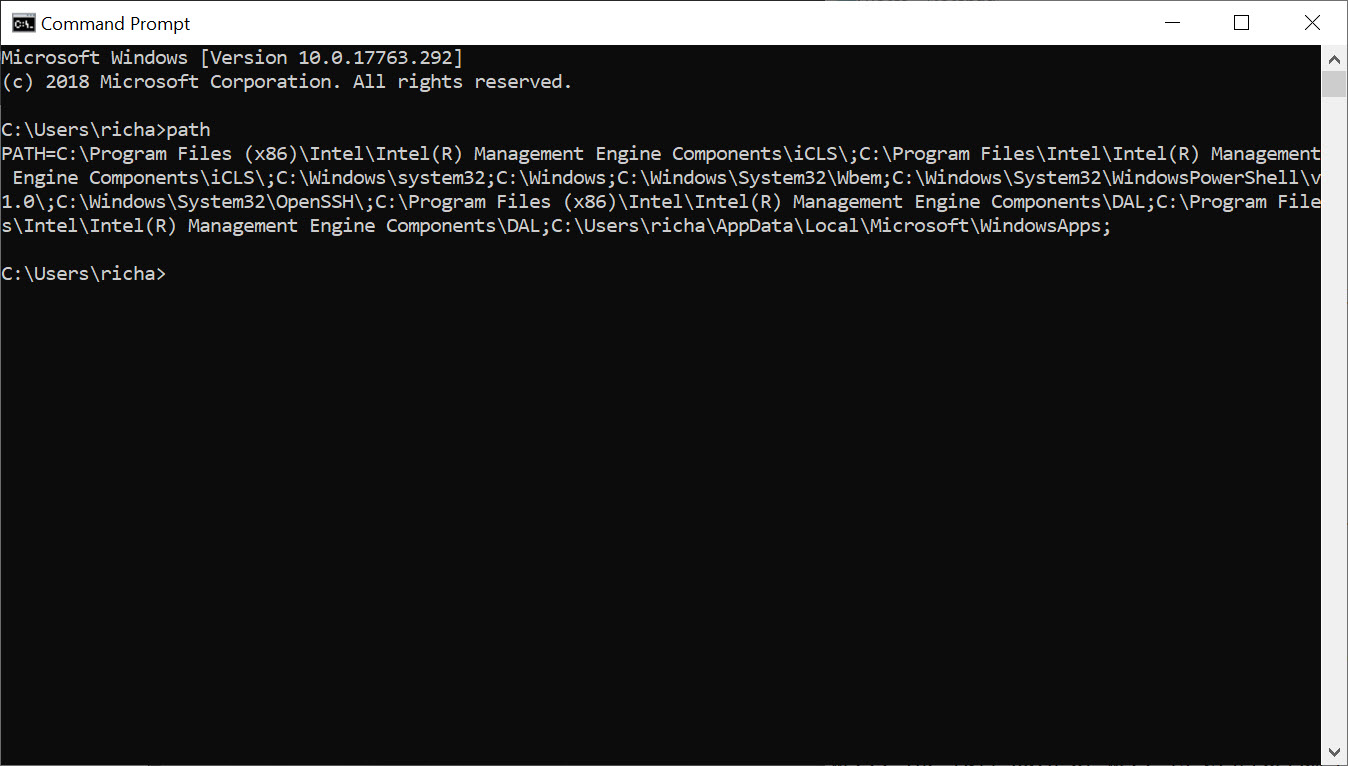
Thanks to the “Path” environment variable, we know that we need to copy wget.exe to the c:WindowsSystem32 folder location.
Go ahead and copy WGET.exe to the System32 directory and restart your Command Prompt.
Restart command terminal and test WGET
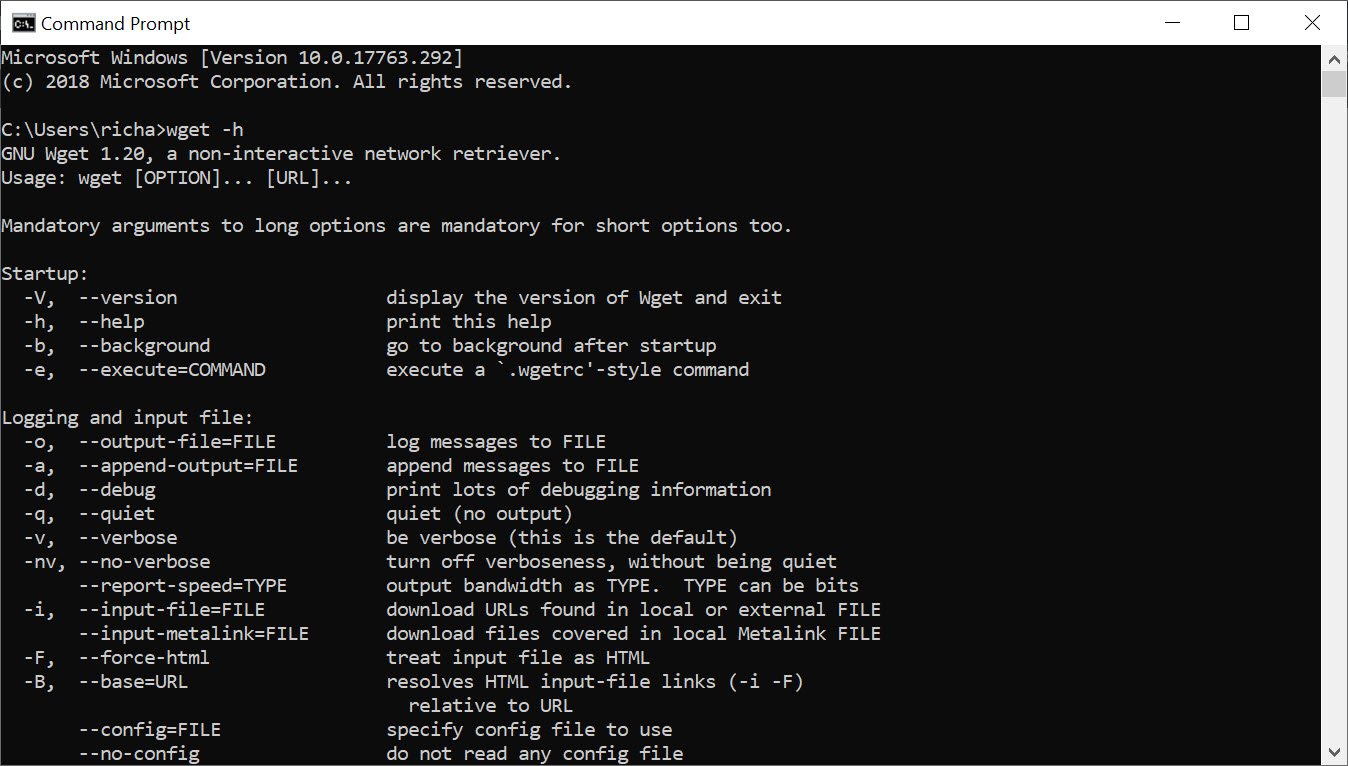
If you want to test WGET is working properly, restart your terminal and type:
wget -h
If you’ve copied the file to the right place, you’ll see a help file appear with all of the available commands.
So, you should see something like this:
Now it’s time to get started.
Get started with WGET
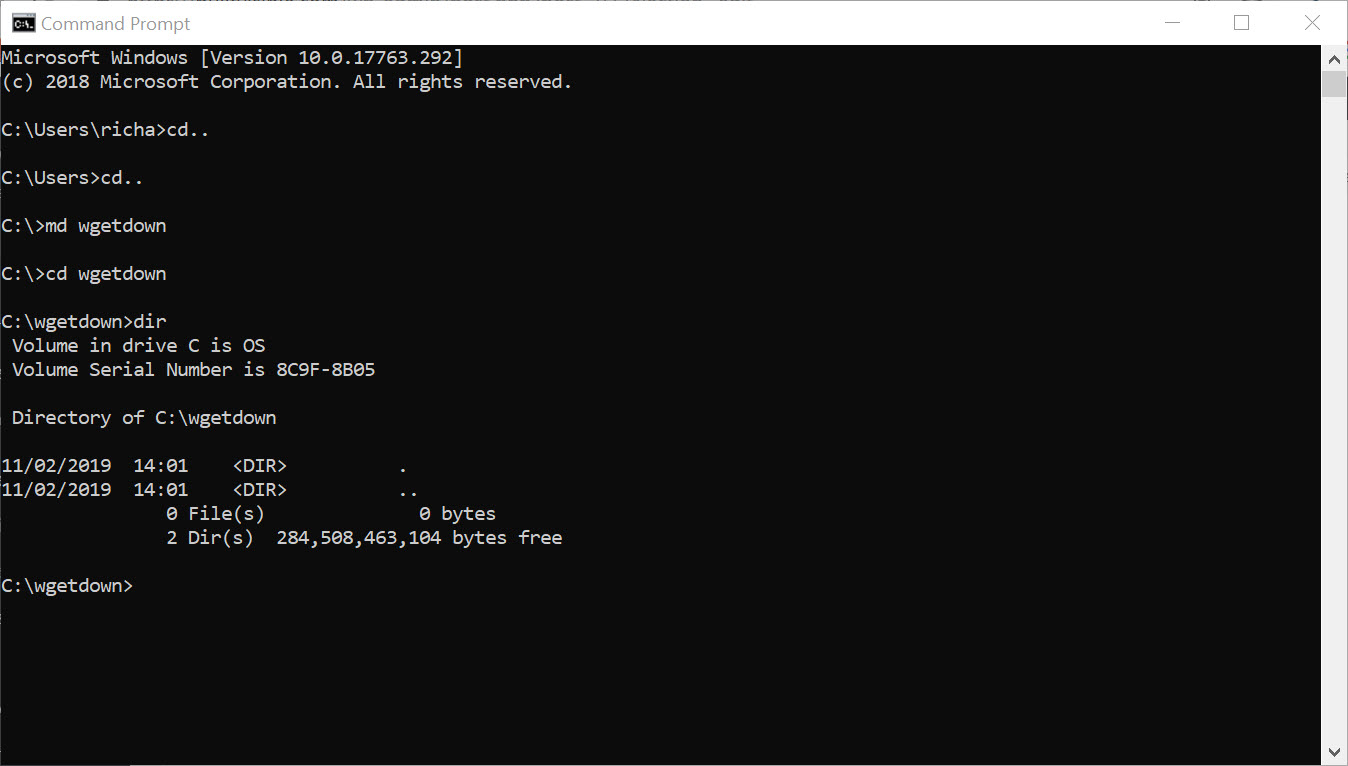
Seeing that we’ll be working in Command Prompt, let’s create a download directory just for WGET downloads.
To create a directory, we’ll use the command md (“make directory”).
Change to the c:/ prompt and type:
md wgetdown
Then, change to your new directory and type “dir” to see the (blank) contents.
Now, you’re ready to do some downloading.
Example commands
Once you’ve got WGET installed and you’ve created a new directory, all you have to do is learn some of the finer points of WGET arguments to make sure you get what you need.
The Gnu.org WGET manual is a particularly useful resource for those inclined to really learn the details.
If you want some quick commands though, read on. I’ve listed a set of instructions to WGET to recursively mirror your site, download all the images, CSS and JavaScript, localise all of the URLs (so the site works on your local machine), and save all the pages as a .html file.
To mirror your site execute this command:
wget -r https://www.yoursite.com
To mirror the site and localise all of the urls:
wget --convert-links -r https://www.yoursite.com
To make a full offline mirror of a site:
wget --mirror --convert-links --adjust-extension --page-requisites --no-parent https://www.yoursite.com
To mirror the site and save the files as .html:
wget --html-extension -r https://www.yoursite.com
To download all jpg images from a site:
wget -A "*.jpg" -r https://www.yoursite.com
For more filetype-specific operations, check out this useful thread on Stack.
Set a different user agent:
Some web servers are set up to deny WGET’s default user agent – for obvious, bandwidth saving reasons. You could try changing your user agent to get round this. For example, by pretending to be Googlebot:
wget --user-agent="Googlebot/2.1 (+https://www.googlebot.com/bot.html)" -r https://www.yoursite.com
Wget “spider” mode:
Wget can fetch pages without saving them which can be a useful feature in case you’re looking for broken links on a website. Remember to enable recursive mode, which allows wget to scan through the document and look for links to traverse.
wget --spider -r https://www.yoursite.com
You can also save this to a log file by adding this option:
wget --spider -r https://www.yoursite.com -o wget.log
Enjoy using this powerful tool, and I hope you’ve enjoyed my tutorial. Comments welcome!
What is wget?
Wget is a free GNU command-line utility tool used to download files from the internet. It retrieves files using HTTP, HTTPS, and FTP protocols.
It serves as a tool to sustain unstable and slow network connections. If a network problem occurs during a download, this helpful software can resume retrieving the files without starting from scratch.
Another important aspect is its capability of recursive downloads, with which it mirrors websites. It transfers parts of a website by following links and directory structure, thus creating local versions of webpages.
The wget command is also highly flexible and can be used in terminals, scripts, and cron jobs. During the download, the user does not have to be active nor logged in. As wget is non-interactive, it can independently run in the background.
Read this article to learn how to use some of the most common wget commands.
How to Check if wget is Installed?
Most likely, the wget package is already on your system as it now comes pre-installed on most Linux distributions.
To check, open the terminal window and type in:
wgetIf you have the wget software, the output tells you that the wget command is missing a URL, as shown in the image below:

wget Command Not Found
If the output displays wget command not found you need to download and install the tool manually. Below you will find the installation instructions for Ubuntu/Debian, CentOS, and Windows.
How to Install wget on Ubuntu/Debian?
To install wget on Ubuntu or Debian releases, use the command:
sudo apt-get install wgetHow to Install wget on CentOS/Fedora?
To install wget on CentOS or Fedora, type the following command:
sudo yum install wgetHow to Install wget on Windows?
To install and configure wget for Windows:
- Download wget for Windows and install the package.
- Add the wget bin path to environment variables (optional). Configuring this removes the need for full paths, and makes it a lot easier to run wget from the command prompt:
- Open the Start menu and search for “environment.”
- Select Edit the system environment variables.
- Select the Advanced tab and click the Environment Variables button.
- Select the Path variable under System Variables.
- Click Edit.
- In the Variable value field add the path to the wget bin directory preceded by a semicolon (;). If installed in the default path, add
C:Program Files (x86)GnuWin32bin.
- Open the command prompt (cmd.exe) and start running
wgetcommands.
Introduction to wget Syntax
The wget syntax has the following pattern:
wget [option][URL]Each [option] has its long and short form which are conveniently interchangeable. This attribute specifies what to do with the URL that follows.
[URL] is the address of the file or directory you wish to download.
Download File from Web
To download a file from the web use:
wget [URL]For example, to install Tomcat 9, first you need to download the package with wget using the command:
wget http://apache.cs.utah.edu/tomcat/tomcat-9/v9.0.20/bin/apache-tomcat-9.0.20.tar.gzDownload File and Save Under Specific Name
To download a file and save it under a specified name run:
wget -O [file_name] [URL]The wget command allows you to rename files prior to downloading them on your computer.
For instance, you may want to install Terraform. To download the package and rename it terraform.zip use the following command:
wget -O terraform.zip https://releases.hashicorp.com/terraform/0.12.2/terraform_0.12.2_linux_amd64.zipDownload File to Specific Directory
By default wget downloads a file in the directory the user is in. To save the file in a different location, add the -P option:
wget -P [wanted_directory] [URL]For example, while installing Git on Ubuntu, you can download the package in the /temp directory with the command:
wget -P /temp https://github.com/git/git/archive/master.zipSet Download Speed
You can set the download speed when downloading a big file, so it does not use the full available bandwidth. The download speed is defined in kilobytes (k) and megabytes (m). Use the command:
wget --limit-rate [wanted_speed] [URL]For example, if you are installing NVIDIA TESLA drivers on Linux and want to limit the download speed to 1 megabyte, would use the command:
wget --limit-rate 1m http://us.download.nvidia.com/tesla/396.37/nvidia-diag-driver-local-repo-ubuntu1710-396.37_1.0-1_amd64.deb Continue Download After Interruption
Instead of having to start from scratch, wget can resume downloading where it stopped before the interruption. This is a useful feature if there is a lost of connection while downloading a file.
wget -c [URL]For instance, you may want to install a Mumble Server on Linux and suddenly lose internet connection while downloading the installation file. To continue downloading, type in the command:
wget -c https://github.com/mumble-voip/mumble/releases/download/1.2.19/murmur-static_x86-1.2.19.tar.bz2Download Multiple Files
wget allows downloading multiple files at the same time using the command:
wget -i [file_name]To do so, follow the steps outlined below:
1. First, create and open a file under the name MultipleDownloads.txt (or a name of your choice), using a text editor. In this case, we used Nano:
nano MultipleDownloads.txt2. Once in the editor, add the URLs of the packages you want to download, one per line.

3. Save and exit the file.
4. Run the following wget command in the terminal window:
wget -i MultipleDownloads.txtThis prompts wget to download from each URL in the text file.
Download Web page (Mirror Web page)
With wget you can download an entire website from the internet, using the -m option. It prompts wget to create a mirror of the specified webpage. The basic command for doing so is:
wget -m [URL]For example:
wget -m <a href="https://phoenixnap.com/" target="_blank" rel="noreferrer noopener">https://phoenixnap.com</a>Download via FTP
To download via FTP, type in the username and password of the FTP server, followed by the ftp address:
wget --ftp-user=[ftp_username] --ftp-password=[ftp_password] ftp://...For instance:
wget --ftp-user=sofiftp --ftp-password=TopSecretPassword ftp://123.456.7890Download in Background
You can download in the background, a practical feature when dealing with a large file:
wget -b [URL]You can check the status of the download with the command:
tail -f wget -logTo download the RPM package manager in the background, type:
wget -b http://some_website/sample_file.rpmIncrease Retry Attempts
You can set how many times wget attempts to download a file after being interrupted by a bad network with:
wget --tries=[number_of_tries] [URL]By default, the number of retry attempts is set to 20.
You can also set the number to infinity with the values 0 or inf, as in the following example:
wget --tries=inf http://download.virtualbox.org/virtualbox/rpm/rhel/virtualbox.repoSkip Certificate Check
By default, wget checks whether the server has a valid SSL/TLS certificate. If it does not identify an authentic certificate, it refuses to download.
The --no-check-certificate option is used to avoid certificate authorities checking for a server certificate. However, utilize it only if you are sure of the website’s credibility or are not worried about security issues it may cause.
wget --no-check-certificate [URL]If http://enteratonerisk.com has an untrusted certificate, but will not harm the system, you can download it with:
wget --no-check-certificate http://enteratonerisk.comChange User Agent
When downloading a webpage, wget essentially emulates a browser. In some cases, the output might say you don’t have permission to access the server, or that the connection is forbidden. This may be due to a website blocking client browsers that have a specific “User-Agent.”
“User-Agent” is a header field that the browser sends to the server it wants to access. Therefore, to download from a server that is refusing to connect, try to modify the user agent.
Find a database of all user agents online, search for the one you need and run the command:
wget --user-agent="User Agent Here" "[URL]"or
wget -U "User Agent Here" "[URL]"For example, to emulate Chrome (version 74), you would change the user agent with the command:
wget --user-agent=" Mozilla/5.0 (Windows NT 10.0; Win64; x64) AppleWebKit/537.36 (KHTML, like Gecko) Chrome/74.0.3729.169 Safari/537.36" "https://phoenixnap.com"Note: Make sure you always download from a trusted source because wget can instruct a download of a script from a malicious source. We outline this and many other dangerous commands in our article 14 Dangerous Linux Terminal Commands.
Conclusion
This article sums up why wget is such a powerful tool for downloading files over the internet. It also serves as a good reference for beginners with its list of 12 essential wget commands and examples.
Linux wget: ваш загрузчик командной строки
Wget — это открыто распостраняемая утилита для загрузки файлов из интернет. 
Он поддерживает HTTP, FTP, HTTPS и другие протоколы, а также средство аутентификации и множество других опций.
Если вы пользователь Linux или Mac, WGET либо уже включен в пакет, который вы используете, либо это простой случай установки из любого репозитория, который вы предпочитаете, с помощью одной команды.
Как установить команду wget в Linux
Используйте команду apt / apt-get, если вы работаете в Ubuntu / Debian / Mint Linux:
$ sudo apt install wget
Пользователь Fedora Linux должен ввести команду dnf
$ sudo dnf install wget
Пользователь RHEL / CentOS / Oracle Linux должен ввести команду yum :
$ sudo yum install wget
Пользователь SUSE / OpenSUSE Linux должен ввести команду zypper:
$ zypper install wget
Пользователь Arch Linux должен ввести команду pacman:
$ sudo pacman -S wget
К сожалению, в Windows все не так просто (хотя не так сложно!).
Для запуска WGET вам необходимо скачать, распаковать и установить утилиту вручную.
Установите WGET в Windows 10
Загрузите классическую 32-разрядную версию 1.14 здесь или перейдите в эту коллекцию двоичных файлов Windows на сайте Eternal Bored здесь, чтобы получить более поздние версии и более быстрые 64-разрядные сборки.
Вот загружаемый zip-файл для 64-разрядной версии 1.2.
Если вы хотите иметь возможность запускать WGET из любого каталога в терминале, вам нужно будет узнать о переменных пути в Windows, чтобы решить, куда копировать новый исполняемый файл. Если вы это сделаете, то сможете сделать WGET командой, которую можно запускать из любого каталога в командной строке, это отдельная тема по настройке Windows.
Запуск WGET из любого места
Во-первых, нам нужно определить, куда копировать WGET.exe.
Мы собираемся переместить wget.exe в каталог Windows, который позволит запускать WGET из любого места.
После того, как вы загрузили wget.exe (или распаковали связанные с ним zip-файлы дистрибутива), откройте командный терминал, набрав «cmd» в меню поиска и запустите командную строку.
Во-первых, нам нужно выяснить, в каком каталоге это должно быть. В командную строку введите:
path
Вы должны увидеть что-то вроде этого:

Благодаря переменной окружения “Path” мы знаем, что нам нужно скопировать wget.exe в папку c:WindowsSystem32.
Скопируйте WGET.exe в каталог System32 и перезапустите командную строку.
Если вы хотите проверить правильность работы WGET, перезапустите терминал и введите:
wget -h
Если вы скопировали файл в нужное место, вы увидите файл справки со всеми доступными командами.
Итак, вы должны увидеть что-то вроде этого:

Начнем работать с WGET
Мы будем работать в командной строке, поэтому давайте создадим каталог загрузок только для загрузок WGET.
Чтобы создать каталог, воспользуемся командой md («создать каталог»).
Перейдите в корневой каталог c: / и введите команду:
md wgetdown
Затем перейдите в новый каталог и введите «dir», и вы увидите (пустое) содержимое.

После того, как вы установили WGET и создали новый каталог, все, что вам нужно сделать, это изучить некоторые тонкости аргументов WGET, чтобы убедиться, что вы получаете то, что вам нужно.
Руководство Gnu.org WGET — особенно полезный ресурс для тех, кто действительно хочет узнать подробности.
Вот несколько советов, как извлечь из этого максимум пользы:
Linux wget примеры команд
Синтаксис:
wget url
wget [options] url
Давайте посмотрим на некоторые распространенные примеры команд Linux wget, синтаксис и использование.
WGET можно использовать для:
Скачать один файл с помощью wget
$ wget https://cyberciti.biz/here/lsst.tar.gz
Загрузить несколько файлов с помощью wget
$ wget https://cyberciti.biz/download/lsst.tar.gz ftp://ftp.freebsd.org/pub/sys.tar.gz ftp://ftp.redhat.com/pub/xyz-1rc-i386.rpm
Можно прочитать URL из файла
Вы можете поместить все URL в текстовый файл и использовать опцию -i, чтобы wget загрузил все файлы. Сначала создайте текстовый файл:
$ xed /temp/download.txt
Добавить список URL:
https://cyberciti.biz/download/lsst.tar.gz
ftp://ftp.freebsd.org/pub/sys.tar.gz
ftp://ftp.redhat.com/pub/xyz-1rc-i386.rpm
Введите команду wget следующим образом:
$ wget -i /temp/download.txt
Можно ограничить скорость загрузки
$ wget -c -o /temp/susedvd.log —limit-rate=50k ftp://ftp.novell.com/pub/suse/dvd1.iso
Используйте wget с сайтами, защищенными паролем
Вы можете указать http имя пользователя / пароль на сервере следующим образом:
$ wget —http-user=vivek —http-password=Secrete http://cyberciti.biz/vivek/csits.tar.gz
Другой способ указать имя пользователя и пароль — в самом URL.
$ wget ‘http://username:password@cyberciti.biz/file.tar.gz
Скачать все mp3 или pdf файлы с удаленного FTP сервера
$ wget ftp://somedom-url/pub/downloads/*.mp3
$ wget ftp://somedom-url/pub/downloads/*.pdf
Скачать сайт целиком
$ wget -r -k -l 7 -p -E -nc https://site.com/
Рассмотрим используемые параметры:
-r — указывает на то, что нужно рекурсивно переходить по ссылкам на сайте, чтобы скачивать страницы.
-k — используется для того, чтобы wget преобразовал все ссылки в скаченных файлах таким образом, чтобы по ним можно было переходить на локальном компьютере (в автономном режиме).
-p — указывает на то, что нужно загрузить все файлы, которые требуются для отображения страниц (изображения, css и т.д.).
-l — определяет максимальную глубину вложенности страниц, которые wget должен скачать (по умолчанию значение равно 5, в примере мы установили 7). В большинстве случаев сайты имеют страницы с большой степенью вложенности и wget может просто «закопаться», скачивая новые страницы. Чтобы этого не произошло можно использовать параметр -l.
-E — добавлять к загруженным файлам расширение .html.
-nc — при использовании данного параметра существующие файлы не будут перезаписаны. Это удобно, когда нужно продолжить загрузку сайта, прерванную в предыдущий раз.
По умолчанию wget загружает файл и сохраняет его с оригинальным именем в URL — в текущем каталоге.
Здесь я перечислил набор инструкций для WGET для рекурсивного зеркалирования вашего сайта, загрузки всех изображений, CSS и JavaScript, локализации всех URL-адресов (чтобы сайт работал на вашем локальном компьютере) и сохранения всех страниц как .html файл.
Чтобы скачать ваш сайт, выполните эту команду:
wget -r https://www.yoursite.com
Чтобы скачать сайт и локализовать все URL:
wget —convert-links -r https://www.yoursite.com
Чтобы создать полноценное оффлайн зеркало сайта:
wget —mirror —convert-links —adjust-extension —page-requisites —no-parent https://www.yoursite.com
Чтобы скачать сайт и сохранить файлы как .html:
wget —html-extension -r https://www.yoursite.com
Чтобы скачать все изображения в формате jpg с сайта:
wget -A «*.jpg» -r https://www.yoursite.com
Дополнительные сведения об операциях, связанных с конкретным типом файлов, можно найти в этой полезной ветке на Stack .
Установите другой пользовательский агент:
Некоторые веб-серверы настроены так, чтобы запрещать пользовательский агент WGET по умолчанию — по очевидным причинам экономии полосы пропускания. Вы можете попробовать изменить свой пользовательский агент, чтобы обойти это. Например, притворившись роботом Google:
wget —user-agent=»Googlebot/2.1 (+https://www.googlebot.com/bot.html)» -r https://www.yoursite.com
Wget режим «паук»:
Wget может получать страницы без их сохранения, что может быть полезной функцией, если вы ищете неработающие ссылки на веб-сайте. Не забудьте включить рекурсивный режим, который позволяет wget сканировать документ и искать ссылки для перехода.
wget —spider -r https://www.yoursite.com
Вы также можете сохранить это в файл журнала, добавив эту опцию:
wget —spider -r https://www.yoursite.com -o wget.log
wget -m -l 10 -e robots=off -p -k -E —reject-regex «wp» —no-check-certificate -U=«Mozilla/5.0 (Windows NT 10.0; Win64; x64) AppleWebKit/537.36 (KHTML, like Gecko) Chrome/68.0.3440.106 Safari/537.36» site-addr.com
Как найти неработающие ссылки на вашем сайте
wget —spider -r -nd -nv -H -l 2 -w 2 -o run1.log https://site.by
Наслаждайтесь использованием этого мощного инструмента, и я надеюсь, что вам понравился мой урок.