Все установленные приложения на компьютере хранятся на запоминающем устройстве — HDD или SSD. В большинстве случаев, при установке ПО, инсталлятор предлагает выбрать, куда сохранить файлы приложения. Можно выбрать разные каталоги и диски для установки.
Если у вас на компьютере установлено много программ, найти папку установки не составит труда, даже если вы не помните куда устанавливали приложение или игру.
Находим расположение установки через ярлык программы
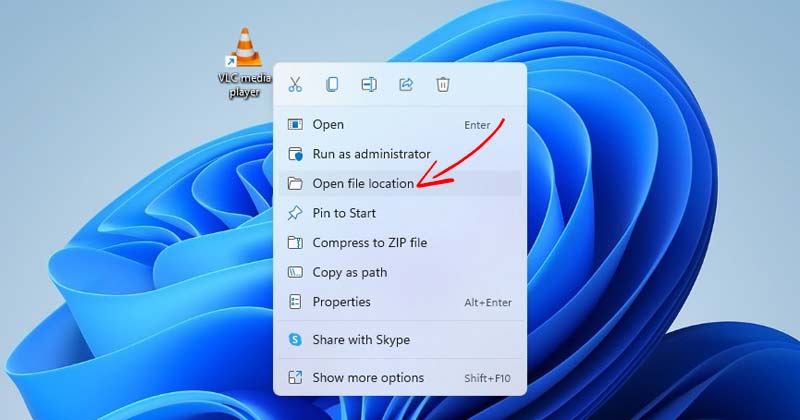
Перейти в папку установки программы можно, просто щелкнув правой кнопкой мыши по ярлыку программы. В появившемся контекстном меню выбираем пункт «Расположение файла».
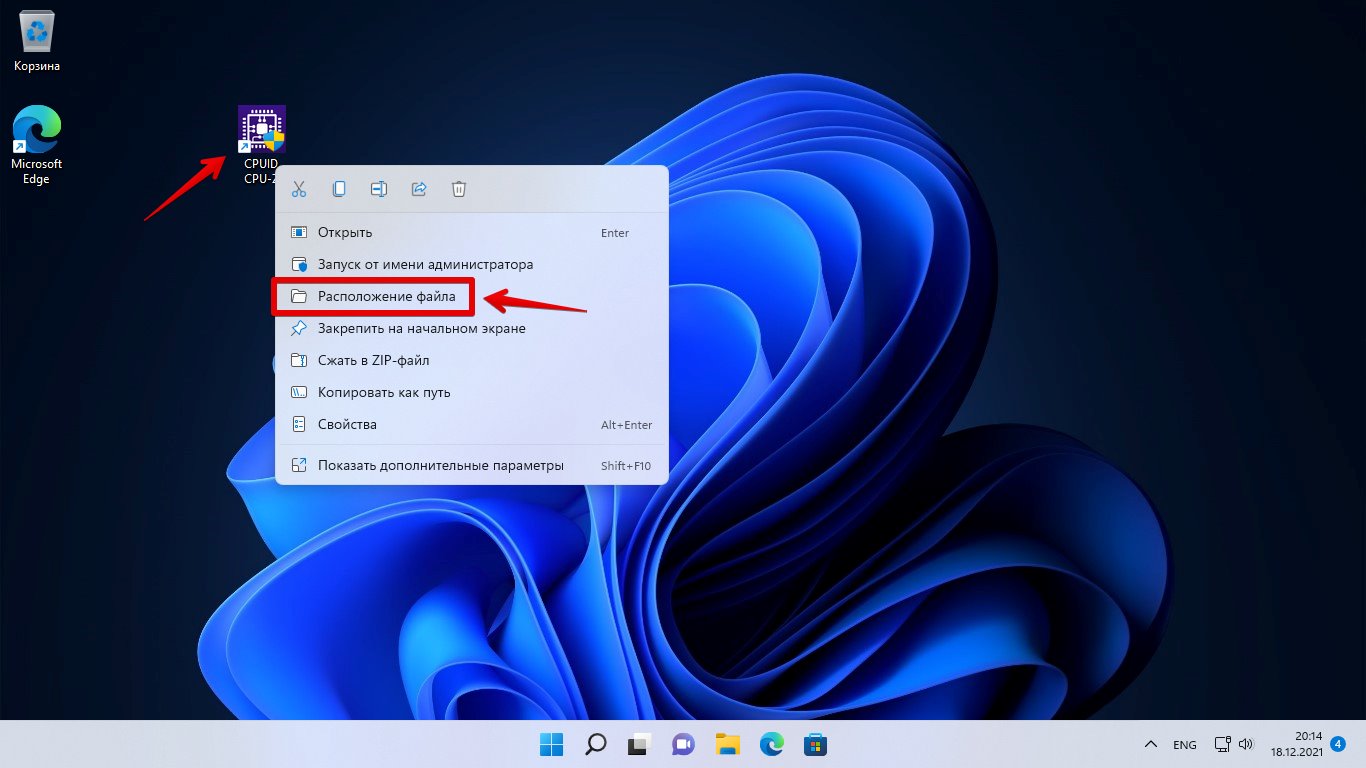
После этого мы попадем в папку установки этой программы.
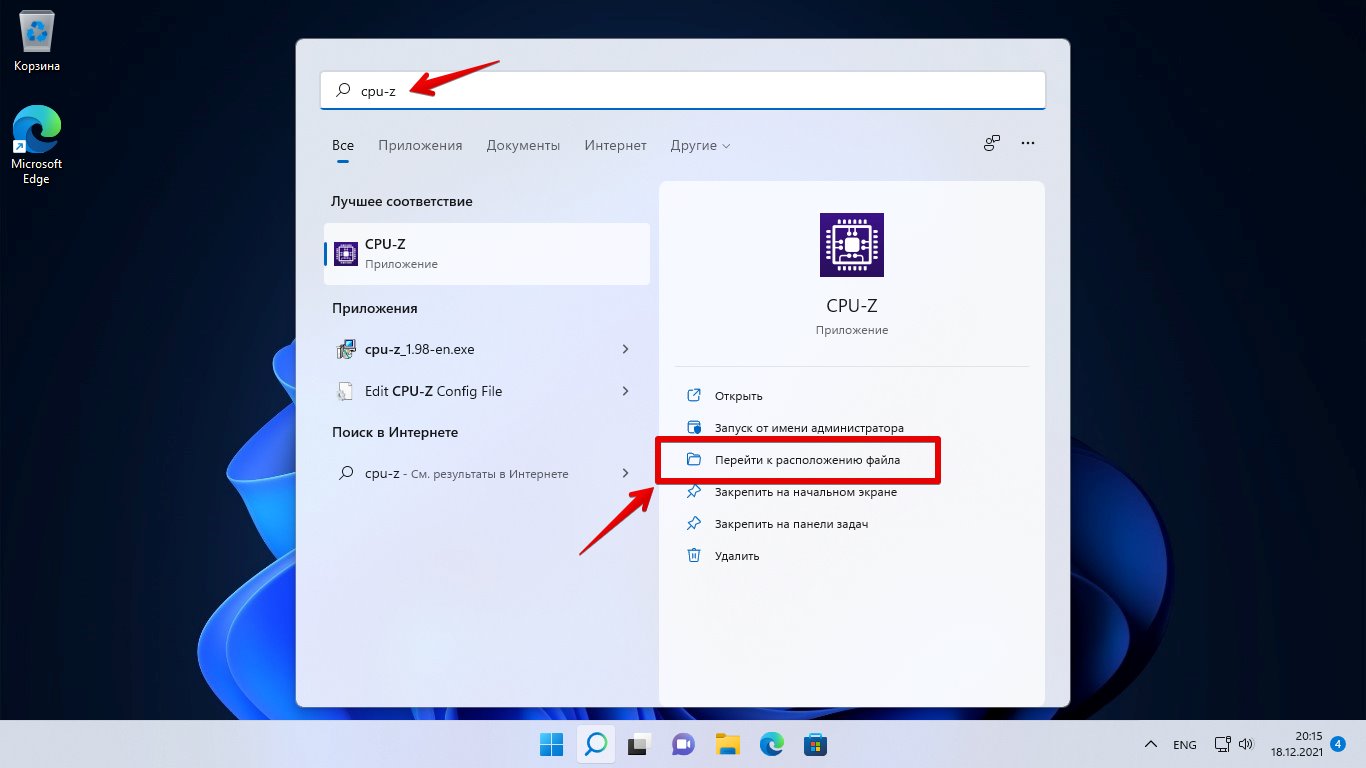
Находим папку установки программы через меню «Пуск»
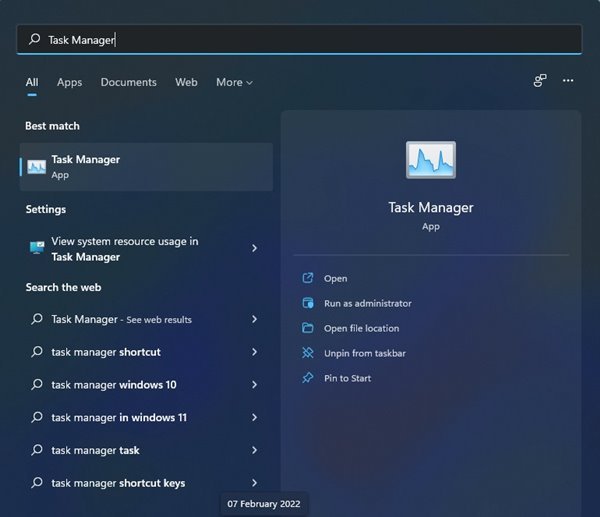
Открываем меню «Пуск» в Windows 11, в поисковой строке вводим название программы. Выделяем в разделе «Лучшее соответствие» приложение, чтобы отобразить справа меню, в котором нажимаем на пункт «Перейти к расположению файла».
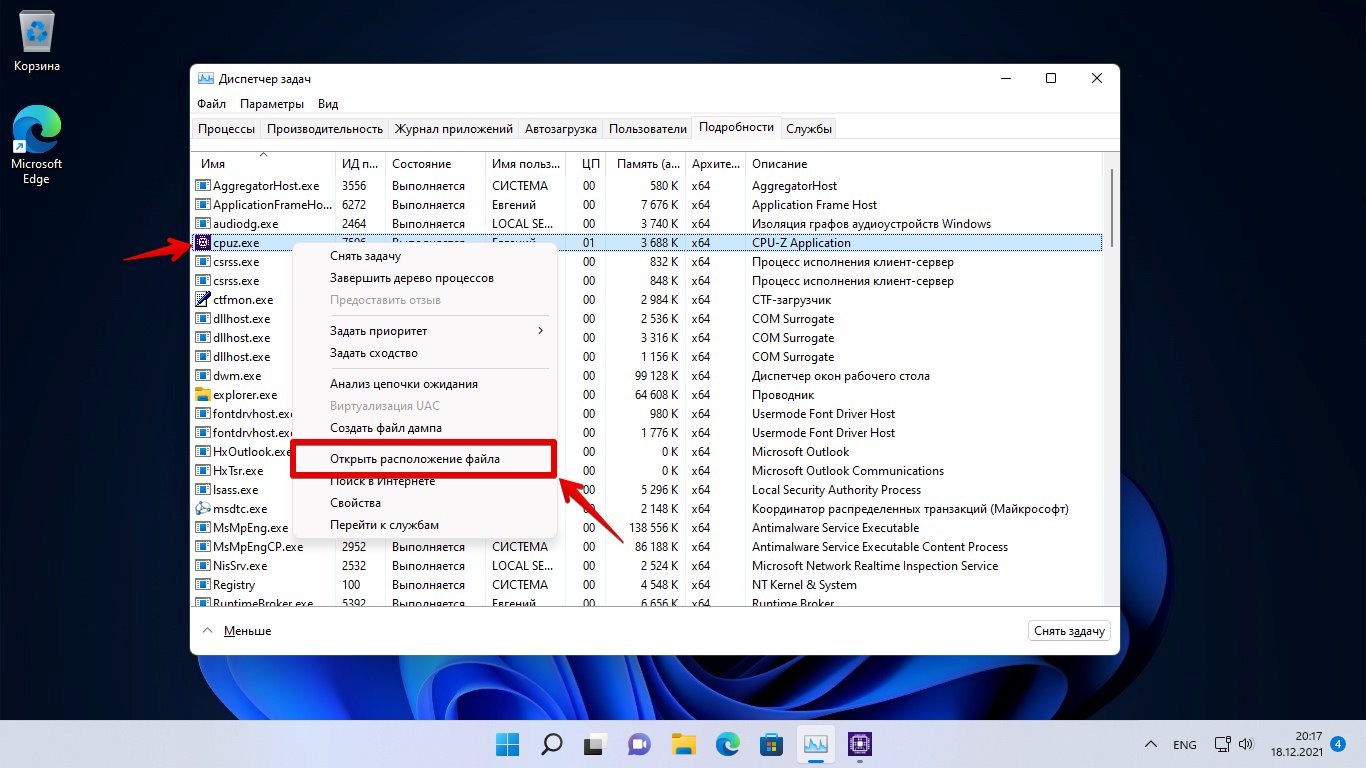
Находим папку установки через диспетчер задач
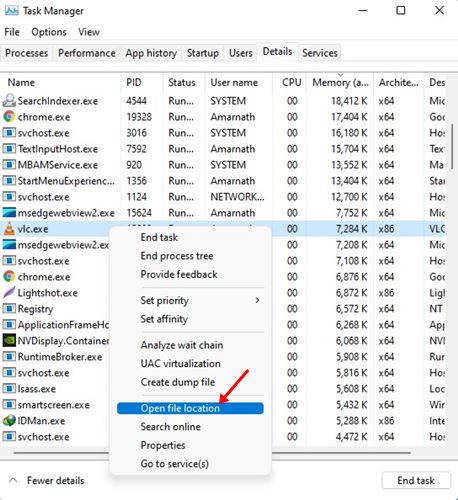
Открываем диспетчер задач, нажав клавиши «Ctrl+Shift+Esc». Затем переходим во вкладку «Подробности», в которой находим приложение (если оно не запущено, запускаем). Щелкаем правой кнопкой мыши по приложению и в появившемся контекстном меню выбираем «Открыть расположение файла».
Находим папку установки программы с помощью проводника
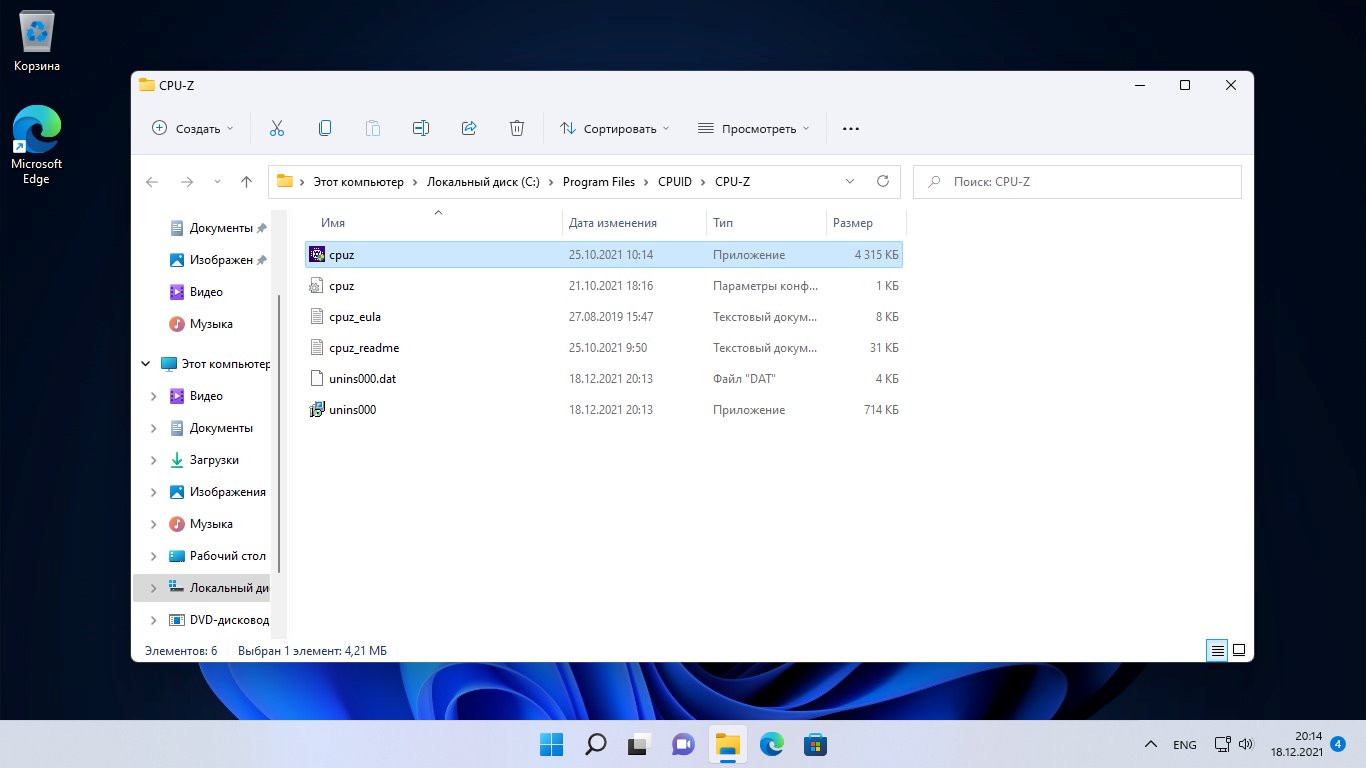
Если при установки программы не вносить никаких изменений в инсталляторе, например, путь установки, то с большей вероятностью установка будет выполнена один из следующих каталогов:
C:Program Files
или
C:Program Files (x86)
Открываем проводник, нажав «Win+E» на клавиатуре. В окне проводника сначала переходим в «Этот компьютер» на левой панели, а затем переходим на «Локальный диск (C:)» на правой панели.
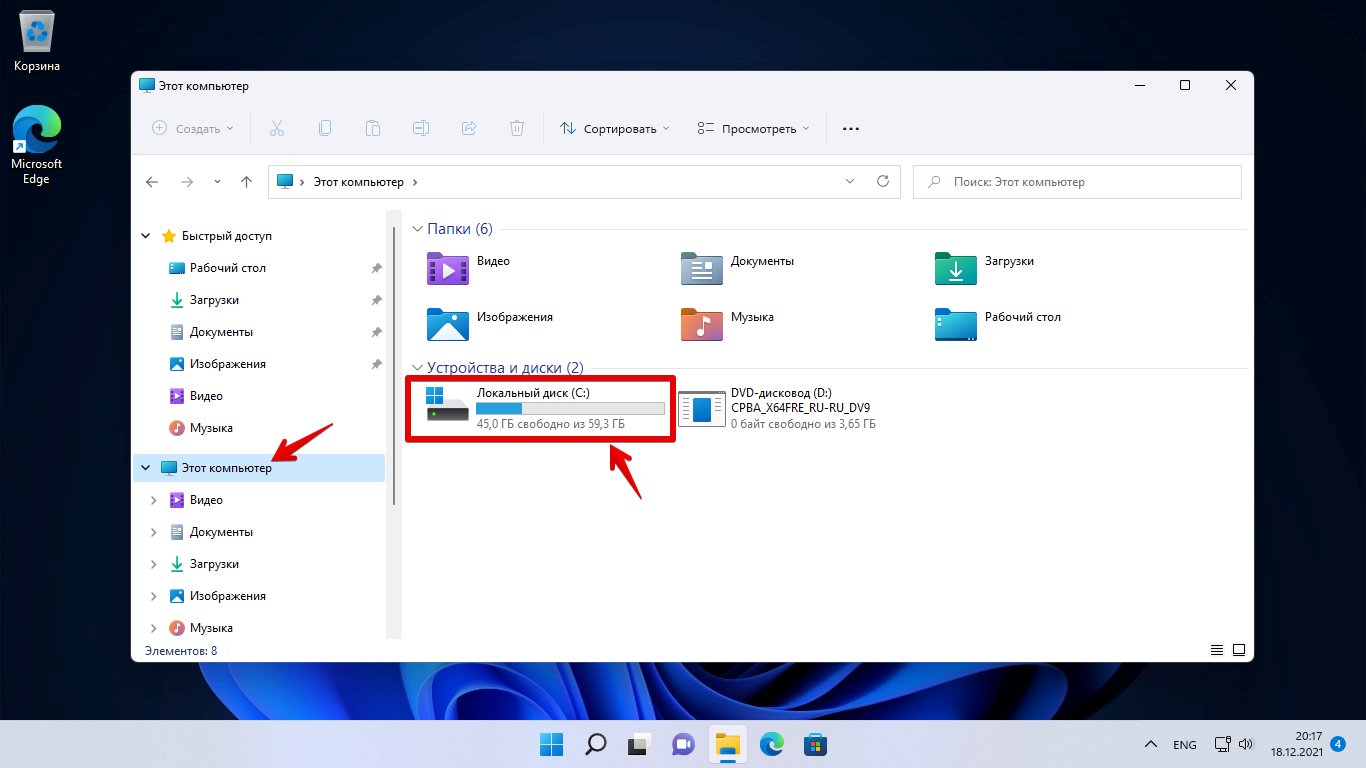
На системном диске будут находится каталоги «C:Program Files» и «C:Program Files (x86)».
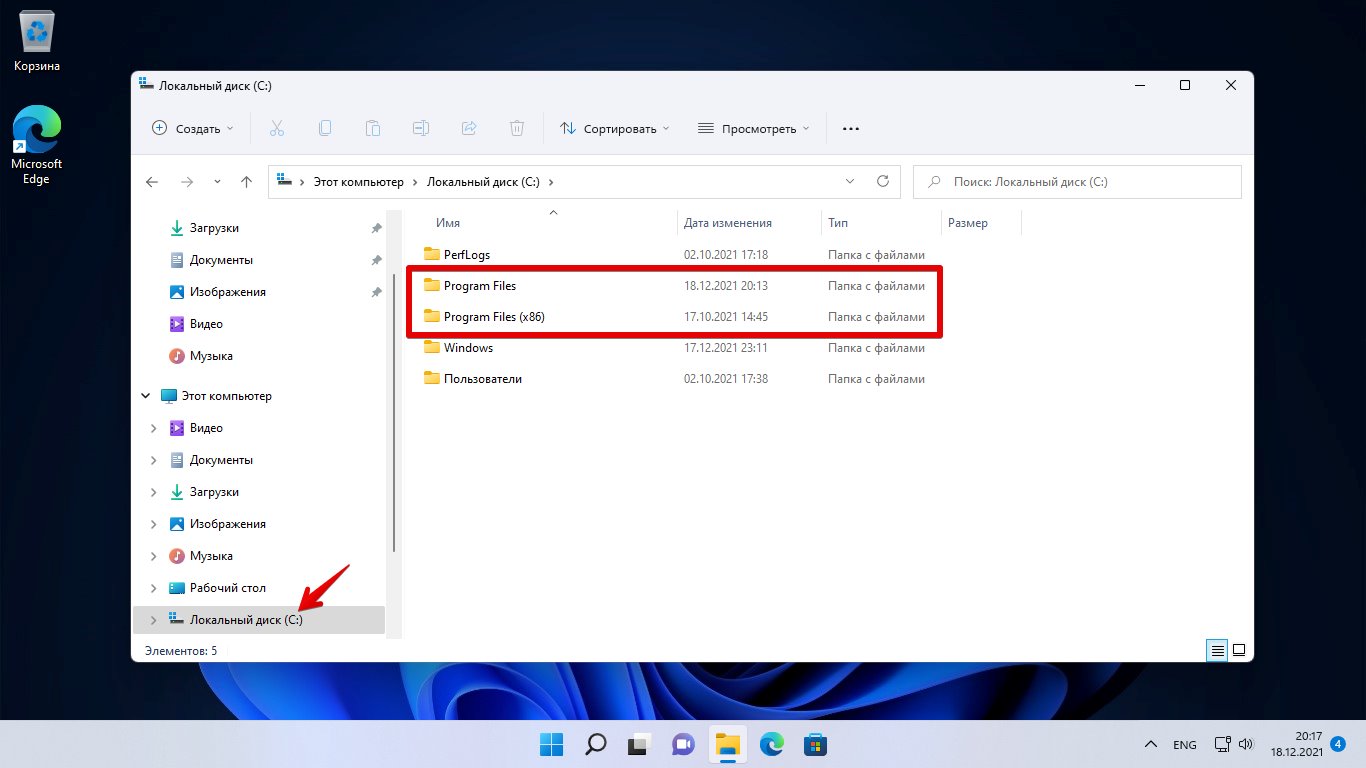
Открыв данные каталоги можно увидеть список установленных программ в системе Windows 11.
Пользователи Windows 11 знают, что файлы программы хранятся на диске C:, который часто используется для установки системы, и все приложения и программы хранятся там по умолчанию.
Однако вы можете изменить место установки в мастере установки приложения. Это позволяет вам выбирать разные папки и диски для хранения программных файлов.
Если вы устанавливаете разные приложения и программы в разные папки или диски, в какой-то момент вы можете забыть фактический путь установки. В таком случае вам нужно использовать несколько методов, чтобы найти приложения или программы.
Также прочтите: Как восстановить приложения и программы в Windows 11
Найти каталог установки любого приложения или игры на ПК с Windows 11 довольно просто. Следовательно, в этой статье будут перечислены некоторые из наилучших способов найти место установки программы на ПК с Windows 11. Давайте проверим.
1) Найти местоположение с помощью значка программы
Значок приложения, который вы видите на экране рабочего стола, может найти папку установки. Вот что вам нужно сделать.
1. Прежде всего, щелкните правой кнопкой мыши программу, папку установки которой вы хотите найти. Затем нажмите Свойства.
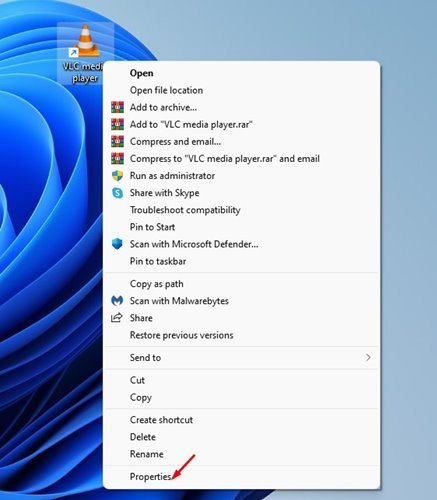
2. Вы найдете путь установки в поле Цель.
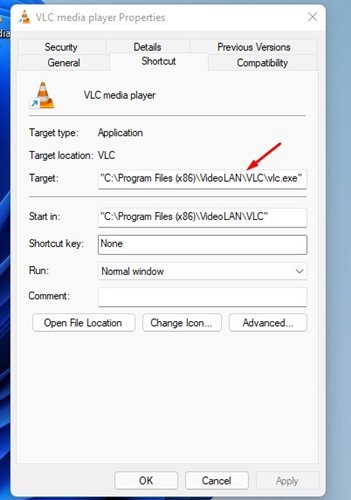
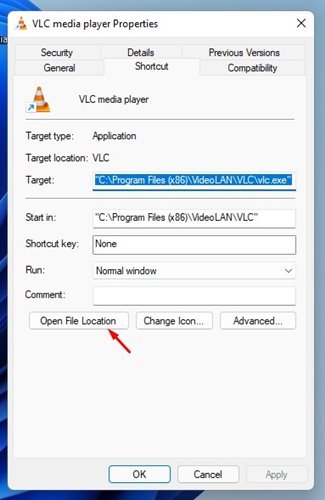
3. Либо нажмите кнопку Открыть расположение файла, чтобы напрямую открыть папку установки.
Вот и все! Вы сделали. Вот как вы можете найти папку установки приложения с помощью значка на рабочем столе.
Мы будем использовать меню «Пуск» Windows 11, чтобы найти местоположение приложения и программы в этом методе. Вот несколько простых шагов, которые необходимо выполнить.
1. Прежде всего, откройте меню «Пуск» Windows 11 и введите название программы, которую вы ищете. Здесь мы использовали медиаплеер VLC для демонстрации процесса.
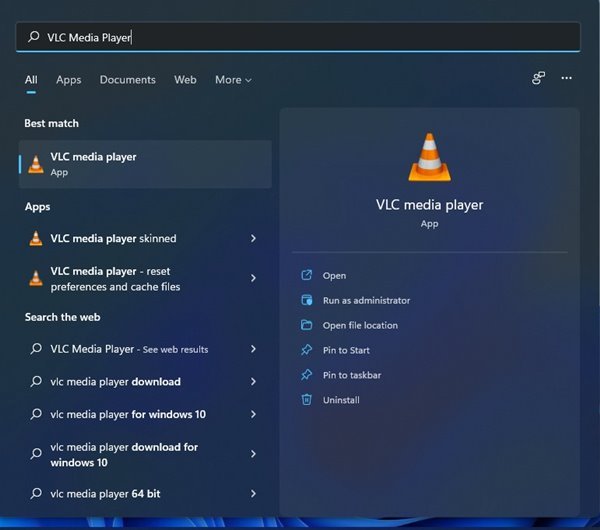
2. Выберите программу и щелкните по ней правой кнопкой мыши. Затем выберите параметр «Открыть местоположение файла».
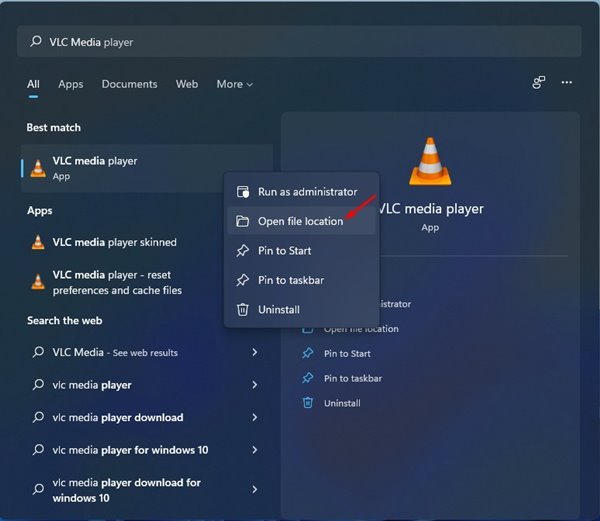
Все! Вы сделали. Это приведет вас к местоположению, в котором программа была сохранена после установки.
3) Найдите приложение и местоположение программы с помощью диспетчера задач
Вы даже можете используйте диспетчер задач в Windows 11, чтобы найти приложение и расположение программы. Вот что вам нужно сделать.
1. Прежде всего, откройте меню «Пуск» Windows 11 и введите «Диспетчер задач». Откройте Диспетчер задач из списка опций.
2. В диспетчере задач перейдите на вкладку Подробности, как показано ниже.
3. Теперь вы найдете все процессы и приложения, запущенные в вашей системе.
4. Найдите свое приложение, щелкните его правой кнопкой мыши и выберите Открыть расположение файла.
Все! Это запустит папку установки вашего приложения.
Эти три метода помогут вам найти каталог установки любого приложения или игры на ПК с Windows 11. Я надеюсь, что эта статья помогла вам! Пожалуйста, поделитесь им и с друзьями. Если у вас есть какие-либо сомнения по этому поводу, сообщите нам об этом в поле для комментариев ниже.
После установки программы на ваш компьютер система сохраняет ее где-то на диске ПК. Обычно система позволяет выбрать место хранения файла. При этом вы можете выбрать любые папки или диски на вашем ПК для хранения программных файлов.

Если у вас есть несколько программ на вашем компьютере, их или их программные файлы легко найти, когда вам это нужно. Однако возникает проблема, когда вам нужно найти приложение или программный файл среди множества программ. В большинстве случаев вы, возможно, даже забыли, где вы сохранили программу в первую очередь. Если вы находитесь в такой ситуации, вы можете использовать любой из методов, обсуждаемых ниже, чтобы найти приложения или программы.
Шаг 1: Запустите предпочитаемый браузер на своем ПК и найдите значок программы, чтобы узнать, как он выглядит и изменился ли значок.

Шаг 2: На рабочем столе вашего ПК просмотрите список программ.

Шаг 3: Щелкните правой кнопкой мыши значок программы или ярлык на рабочем столе и выберите «Свойства».

Шаг 4: В новом диалоговом окне нажмите «Открыть расположение файла».

Как только вы это сделаете, ваш компьютер перенесет вас в место, где сохранен установочный файл программы. Попробуйте следующий метод ниже, если этот метод не работает для вас.
Шаг 1: Щелкните внутри строки поиска рядом с меню «Пуск».

Шаг 2: Введите название программы, которую вы ищете, и вы должны увидеть список результатов поиска.

Шаг 3: Выберите нужную программу и посмотрите на панель справа, чтобы увидеть список различных параметров.
Шаг 4: Нажмите «Открыть расположение файла» в списке меню справа.

После того, как вы это сделаете, ваш компьютер перенесет вас в место, где он сохранил программу после установки.
Шаг 1: Запустите приложение «Диспетчер задач» на своем ПК, одновременно нажав клавиши Ctrl + Shift + Esc на клавиатуре.
Шаг 2: После запуска диспетчера задач щелкните вкладку «Сведения» в верхней части окна. Здесь вы увидите список всех фоновых процессов и приложений, запущенных в данный момент на компьютере.

Шаг 3: Щелкните правой кнопкой мыши любое из приложений, которое вам нужно, чтобы найти папку его установки.

Шаг 4: Выберите «Открыть расположение файла».

Ваш компьютер автоматически запустит папку местоположения в каталоге установки выбранной программы.
Шаг 1: Запустите проводник, одновременно нажав клавиши Windows + E на клавиатуре. Вы также можете щелкнуть значок папки на панели задач.
Шаг 2: Нажмите «Этот компьютер» на левой панели окна проводника.

Шаг 3: Выберите Локальный диск (C:) или OSDisk (C:) из списка вариантов.

Шаг 4: Вы должны увидеть две папки: C:Program Files (x86) и C:Program Files.

Шаг 5: Дважды щелкните любой из этих каталогов, чтобы открыть их, и вы должны найти папку установки для разных программ.

Шаг 6: Прокрутите различные папки, чтобы найти нужную, и дважды щелкните ее, чтобы открыть папку.
Post Views: 70
Download PC Repair Tool to quickly find & fix Windows errors automatically
While installing a program or app, most of us usually ignore the installation path and complete the installation. Later, when it is needed, we just don’t remember the installation path or location of that program. Thankfully, there are multiple ways that can help us find where a program is installed in Windows 11/10. This post covers all such ways.
We have already seen how to find the installation location of Microsoft Store apps, now let us see how to find where software or program is installed in Windows 10, using any of the following methods:
- Using Desktop shortcut of the program
- Using the Start menu
- File Explorer
- The Search box of Windows
- Using Task Manager
- Settings app
- Using a free third-party tool.
By default, Windows 11/10 will install programs in the Program Files folder or the Program Files (x86) folder. These methods will give you the exact location.
How to locate Program EXE file in Windows 11/10
1] Using Desktop shortcut of the program

This is a very basic and easier way to find a program’s location. If you have a desktop shortcut to that program, then this option is handy. The steps are as follows:
- Right-click on the shortcut of the program
- Select Properties option
- In the Properties window, access the Shortcut tab
- In the Target field, you will see the program location or path.
Alternatively, you can simply right-click on the program shortcut and select the Open file location option. This will open the folder where that program is installed.
2] Using the Start menu

This option is useful only when a shortcut of the program is available in the Programs folder under the Start menu folder. Here are the steps:
- Open Start menu
- Now right-click on the program, access More, and select Open file location
- The Program folder will open and program shortcut will be selected
- Right-click on that shortcut
- Select the Open file location option.
The following location will open:
C:Users<username>AppDataRoamingMicrosoftWindowsStart MenuPrograms
Now again right-click on the app’s icon and select Open file location and this time the installation folder of that program will open.
Read: How to find Version Number of Microsoft Store app or Program
3] File Explorer
Mostly, all the installed programs are stored under Program Files (if it is a 64-bit program) or Program Files (x86) folder (if it’s a 32-bit program). So, you can take the help of File Explorer to access those folders and find where your program is installed. The steps are:
- Open File Explorer using Win+E hotkey
- Access the drive where Windows is installed (usually, it is C Drive)
- Access Program Files/Program Files (x86) folder
- There will be a folder with the program name.
4] Search box of Windows 11/10

Whether you have some shortcut or there is no shortcut for a program at all, this option is quite helpful to access the folder where a program is installed. Follow these steps:
- Click on the search box
- Type the exact name of the program
- In the search results, you will see that program
- On the right-hand side, click on the Open file location.
Alternatively, you can also right-click on the program name in the search result and access the Open file location option. Program folder will open in which you will see all the files of that program.
5] Using Task Manager

This is another great way to access the installation path of a program and this option also doesn’t need any shortcut of the program. The steps are as follows:
- Run the program whose location you want to access
- Open Task Manager
- It Task Manager is opened in compact view mode, then use More details option available on the bottom left part to expand it
- Switch to the Details tab
- Right-click on your program name
- Click on Open file location option.
6] Settings app

Here are the steps:
- Press Win+I hotkey to open the Settings app
- Click on the Apps category
- On the right-hand side, scroll down, and you will see the list of installed programs and apps
- Click on a program
- Use Modify (if available) or Uninstall button
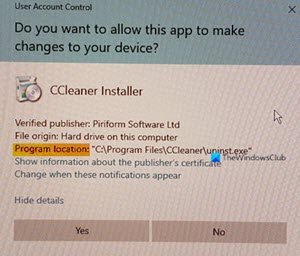
- A User Account Control box will open
- Click on the Show more details option and you will see the program location
- Press the No button in the UAC box to exit it.
Read: How to find the Installation date for apps and programs.
7] Using a free third-party tool
You can also take the help of some free third-party tool that can easily show you the location of a program on its interface. For example, you can use some Task Manager alternative tools that show various details for a program like a file name, program location, processes, etc.
There are some free program uninstaller software also available that can help you find where a program is installed in Windows 11/10. If you want, you can try any of those tools.
Hope all these options will be helpful to you.

Anand Khanse is the Admin of TheWindowsClub.com, a 10-year Microsoft MVP (2006-16) & a Windows Insider MVP (2016-2022). Please read the entire post & the comments first, create a System Restore Point before making any changes to your system & be careful about any 3rd-party offers while installing freeware.
Download PC Repair Tool to quickly find & fix Windows errors automatically
While installing a program or app, most of us usually ignore the installation path and complete the installation. Later, when it is needed, we just don’t remember the installation path or location of that program. Thankfully, there are multiple ways that can help us find where a program is installed in Windows 11/10. This post covers all such ways.
We have already seen how to find the installation location of Microsoft Store apps, now let us see how to find where software or program is installed in Windows 10, using any of the following methods:
- Using Desktop shortcut of the program
- Using the Start menu
- File Explorer
- The Search box of Windows
- Using Task Manager
- Settings app
- Using a free third-party tool.
By default, Windows 11/10 will install programs in the Program Files folder or the Program Files (x86) folder. These methods will give you the exact location.
How to locate Program EXE file in Windows 11/10
1] Using Desktop shortcut of the program
This is a very basic and easier way to find a program’s location. If you have a desktop shortcut to that program, then this option is handy. The steps are as follows:
- Right-click on the shortcut of the program
- Select Properties option
- In the Properties window, access the Shortcut tab
- In the Target field, you will see the program location or path.
Alternatively, you can simply right-click on the program shortcut and select the Open file location option. This will open the folder where that program is installed.
2] Using the Start menu
This option is useful only when a shortcut of the program is available in the Programs folder under the Start menu folder. Here are the steps:
- Open Start menu
- Now right-click on the program, access More, and select Open file location
- The Program folder will open and program shortcut will be selected
- Right-click on that shortcut
- Select the Open file location option.
The following location will open:
C:Users<username>AppDataRoamingMicrosoftWindowsStart MenuPrograms
Now again right-click on the app’s icon and select Open file location and this time the installation folder of that program will open.
Read: How to find Version Number of Microsoft Store app or Program
3] File Explorer
Mostly, all the installed programs are stored under Program Files (if it is a 64-bit program) or Program Files (x86) folder (if it’s a 32-bit program). So, you can take the help of File Explorer to access those folders and find where your program is installed. The steps are:
- Open File Explorer using Win+E hotkey
- Access the drive where Windows is installed (usually, it is C Drive)
- Access Program Files/Program Files (x86) folder
- There will be a folder with the program name.
4] Search box of Windows 11/10
Whether you have some shortcut or there is no shortcut for a program at all, this option is quite helpful to access the folder where a program is installed. Follow these steps:
- Click on the search box
- Type the exact name of the program
- In the search results, you will see that program
- On the right-hand side, click on the Open file location.
Alternatively, you can also right-click on the program name in the search result and access the Open file location option. Program folder will open in which you will see all the files of that program.
5] Using Task Manager
This is another great way to access the installation path of a program and this option also doesn’t need any shortcut of the program. The steps are as follows:
- Run the program whose location you want to access
- Open Task Manager
- It Task Manager is opened in compact view mode, then use More details option available on the bottom left part to expand it
- Switch to the Details tab
- Right-click on your program name
- Click on Open file location option.
6] Settings app
Here are the steps:
- Press Win+I hotkey to open the Settings app
- Click on the Apps category
- On the right-hand side, scroll down, and you will see the list of installed programs and apps
- Click on a program
- Use Modify (if available) or Uninstall button
- A User Account Control box will open
- Click on the Show more details option and you will see the program location
- Press the No button in the UAC box to exit it.
Read: How to find the Installation date for apps and programs.
7] Using a free third-party tool
You can also take the help of some free third-party tool that can easily show you the location of a program on its interface. For example, you can use some Task Manager alternative tools that show various details for a program like a file name, program location, processes, etc.
There are some free program uninstaller software also available that can help you find where a program is installed in Windows 11/10. If you want, you can try any of those tools.
Hope all these options will be helpful to you.
Anand Khanse is the Admin of TheWindowsClub.com, a 10-year Microsoft MVP (2006-16) & a Windows Insider MVP (2016-2022). Please read the entire post & the comments first, create a System Restore Point before making any changes to your system & be careful about any 3rd-party offers while installing freeware.
Хотя вы можете открыть местоположение файла простым щелчком правой кнопкой мыши, введение новых функций в Windows 11 немного усложнило ситуацию.
К счастью, есть несколько способов найти местоположение файла, и для вашего удобства мы создали краткий список.
Как открыть расположение файла в Windows 11?
1. Используйте поиск Windows
- Перейдите в «Пуск» и введите имя приложения/файла в строке поиска Windows.
- Когда имя приложения/файла появится в разделе «Лучшее совпадение», щелкните его правой кнопкой мыши и выберите «Открыть местоположение файла».

- Если вы хотите перейти к местоположению файла для приложения, в правой части результатов поиска вы должны увидеть параметр «Открыть расположение файла».

- Для файла справа от результатов следует Location. Нажмите на путь рядом с ним, и он должен привести вас к местоположению файла.

- Вы также можете выбрать опцию «Открыть местоположение файла» ниже.


Если вам интересно, как открыть местоположение файла приложения Windows 11, использование панели поиска Windows — один из самых быстрых способов.
2. Откройте местоположение файла через проводник.
- Нажмите клавиши Win + E вместе, чтобы открыть проводник.
- Здесь щелкните ярлык «Этот компьютер» слева и найдите имя приложения/файла в поле поиска в правом верхнем углу.
- Когда он отобразит результаты, щелкните правой кнопкой мыши приложение/файл и выберите «Открыть местоположение файла».

- Вы также можете найти приложение/файл в меню быстрого доступа. Просто щелкните правой кнопкой мыши приложение/файл и выберите «Открыть местоположение файла».


Для тех из вас, кто хочет знать, как найти путь к файлу в Windows 11, использование File Explorer может помочь вам именно в этом.
3. Используйте командную строку
- Чтобы открыть диалоговое окно «Выполнить», нажмите клавиши быстрого доступа Win +. R Введите cmd и одновременно нажмите клавиши Ctrl + Shift + Enter , чтобы запустить командную строку с повышенными привилегиями.

- Запустите приведенную ниже команду в окне командной строки (администратора) и нажмите Enter :
dir “*name of your file*” /s
- Теперь вы можете увидеть местоположение файла в результатах.


4. Через диспетчер задач
- Щелкните правой кнопкой мыши кнопку «Пуск» и выберите «Диспетчер задач».

- В окне диспетчера задач на вкладке «Процессы» перейдите в раздел «Фоновые процессы».
- Здесь найдите приложение, щелкните его правой кнопкой мыши и выберите «Открыть местоположение файла».


- Нажмите кнопку «Пуск» и перейдите в раздел «Рекомендуемые».

- Здесь вы увидите ярлыки для ваших файлов.
- Щелкните правой кнопкой мыши нужный файл и выберите «Открыть расположение файла».


Если вы ищете ярлык для открытия местоположения файла, рекомендуемый раздел меню «Пуск» Windows 11 определенно является тем, что вам нужно.
Что делать, если в Windows 11 отсутствует место для открытия файла?
Однако, если в Windows 11 отсутствует опция расположения открытых файлов, это может быть связано с тем, что недавно установленное программное обеспечение мешает этой функции. Вот как решить эту проблему.
- Нажмите клавиши Win + I , чтобы запустить настройки Windows. Здесь нажмите «Приложения» слева, а затем нажмите «Приложения и функции» справа.

- На следующем экране идите вправо и в списке приложений найдите проблемное приложение. Нажмите на три точки рядом с ним и выберите «Удалить».

- Вы также можете отсортировать по дате установки, найти все недавно установленные приложения и удалить их.

- Нажмите «Удалить» еще раз в запросе подтверждения.


После этого вы можете проверить, можете ли вы теперь найти параметр «Открыть файл» в контекстном меню.
Вы все еще задаетесь вопросом, как найти местоположение файла в Windows 11? Вы также можете использовать инструмент поиска Everything, который подтягивает для вас путь к файлу, а затем вы можете щелкнуть его правой кнопкой мыши, чтобы перейти к его расположению.
Если у вас есть какие-либо другие вопросы, связанные с расположением файла или папки, сообщите нам об этом в разделе комментариев ниже.
После установки программы на ваш компьютер система сохраняет ее где-то на диске ПК. Обычно система позволяет выбрать место хранения файла. При этом вы можете выбрать любые папки или диски на вашем ПК для хранения программных файлов.
Если у вас есть несколько программ на вашем компьютере, их или их программные файлы легко найти, когда вам это нужно. Однако возникает проблема, когда вам нужно найти приложение или программный файл среди множества программ. В большинстве случаев вы, возможно, даже забыли, где вы сохранили программу в первую очередь. Если вы находитесь в такой ситуации, вы можете использовать любой из методов, обсуждаемых ниже, чтобы найти приложения или программы.
Как найти расположение приложений и программ с помощью значка программы
Шаг 1: Запустите предпочтительный браузер на своем ПК и найдите значок программы, чтобы узнать, как он выглядит и не изменился ли значок.

Шаг 2: На рабочем столе вашего ПК просмотрите список программ.

Шаг 3: Щелкните правой кнопкой мыши значок или ярлык программы на рабочем столе и выберите «Свойства».

Шаг 4: В новом диалоговом окне нажмите «Открыть расположение файла».

Как только вы это сделаете, ваш компьютер перенесет вас в место, где сохранен установочный файл программы. Попробуйте следующий метод ниже, если этот метод не работает для вас.
Как найти расположение приложений и программ с помощью меню «Пуск»
Шаг 1: Нажмите внутри строки поиска рядом с меню «Пуск».

Шаг 2: Введите название программы, которую вы ищете, и вы должны увидеть список результатов поиска.

Шаг 3: Выберите нужную программу и посмотрите на панель справа, чтобы увидеть список различных опций.
Шаг 4: Щелкните Открыть местоположение файла в списке меню справа.

После того, как вы это сделаете, ваш компьютер перенесет вас в место, где он сохранил программу после установки.
Как найти расположение приложений и программ с помощью диспетчера задач
Шаг 1: Запустите приложение «Диспетчер задач» на своем ПК, одновременно нажав клавиши Ctrl + Shift + Esc на клавиатуре.
Шаг 2: После запуска диспетчера задач щелкните вкладку «Сведения» в верхней части окна. Здесь вы увидите список всех фоновых процессов и приложений, запущенных в данный момент на компьютере.

Шаг 3: Щелкните правой кнопкой мыши любое из приложений, которое вам нужно, чтобы найти папку его установки.

Шаг 4: Выберите Открыть местоположение файла.

Ваш компьютер автоматически запустит папку местоположения в каталоге установки выбранной программы.
Как найти расположение приложений и программ с помощью проводника
Шаг 1: Запустите Проводник, одновременно нажав клавиши Windows + E на клавиатуре. Вы также можете щелкнуть значок папки на панели задач.
Шаг 2: Щелкните Этот компьютер на левой панели окна Проводника.

Шаг 3: Выберите Локальный диск (C:) или OSDisk (C:) из списка вариантов.

Шаг 4: Вы должны увидеть две папки: C:Program Files (x86) и C:Program Files.

Шаг 5: Дважды щелкните любой из этих каталогов, чтобы открыть их, и вы должны найти папку установки для разных программ.

Шаг 6: Прокрутите различные папки, чтобы найти ту, которая вам нужна, и дважды щелкните ее, чтобы открыть папку.
Сохранение изображений Spotlight в Windows 11
Categories
- Transfer Programs from C Drive to D Drive
- Transfer Installed Software to New PC
- Transfer Files from Old PC to New PC
- Transfer Microsoft Office
- Find Office Product Key
- Move User Folder
- Move Google Chrome Bookmarks
- Complex Level: Easy
- Applies to: Switch and change the location of installed apps on Windows 11/10/8.1/8/7/XP and Vista, etc.
This page shows new Windows 11 users how to change where new content is saved in Windows 11, especially for applications like Office, Adobe software, and even some extremely huge games.
| Workable Solutions | Step-by-step Troubleshooting |
|---|---|
| Fix 1. Use App Migration Software | Try every USB port available; Determine you’re using USB 2.0 or 3.0…Full steps |
| Fix 2. Use Apps and Features | Step 1. Press Windows + I keys to open Windows settings, click on «system» and select «Apps and Features»….Full steps |
| Fix 3. Use CMD Command-Line | Step 1. Open your C drive and find out the app you want to move to another drive…Full steps |
| Fix 4. Using Registry Editor | Step 1. Press Windows + R keys to open the run dialog, type regedit, and click «OK»…Full steps |
Why Do You Want to Change the Location of an Installed Program in Windows 11
Though being designed with many new features such as a new user desktop centered Start menu and taskbar on Windows 11, Microsoft still keeps the most classic Windows system design in its newest operating system — Windows 11. All new content will automatically be saved and installed on the Local System C (This PC) Drive is still the same on Windows 11.
As a result, the C drive will soon get full with the following content:
- Downloaded content.
- Installed applications and software.
- Operating system.
- Personal folders, like Documents, Pictures.
- Desktop contents, etc.
How will you resolve this issue when the C drive gets full in Windows 11? You can turn to fix this issue in many ways, such as changing the default download location, moving user folders like Documents, Pictures, and Desktop to another drive, deleting useless large files, etc. Changing the location of installed programs in Windows 11 is also a very efficient way that helps to free up large space in the system C drive.
In this next part, we’ll discuss how and what method you can rely on for changing apps’ location in Windows 11 without any boot issue. Let’s see.
According to experienced and professional Windows administrators, we collect 4 efficient ways to move apps around Windows 11 successfully without losing any app data or boot issues. Let’s see:
- #1. Third-Party App Migration Software
- #2. Apps and Features Tool in Windows 11
- #3. CMD Command Line
- #4. Registry Editor
Among the 4 methods, which method suits you the most? Check the comparison table, and you’ll learn which method suits you the most:
| Comparison | App Migration Software | Apps and Features | CMD | Registry |
|---|---|---|---|---|
| Transfer Content |
|
|
|
|
| Difficulty Level | Easy | Easy | Medium | Complex |
From the comparison table, it’s clear that the third-party app migration software is the most comprehensive solution for Windows 11 users to change the location of installed applications. However, if you are looking for an easy and efficient method, you can’t miss Method 1. Let’s see how to migrate apps and change the install location of your programs in Windows 11 now.
#1. Change Location of Installed Programs in Windows 11 Using App Migration Software
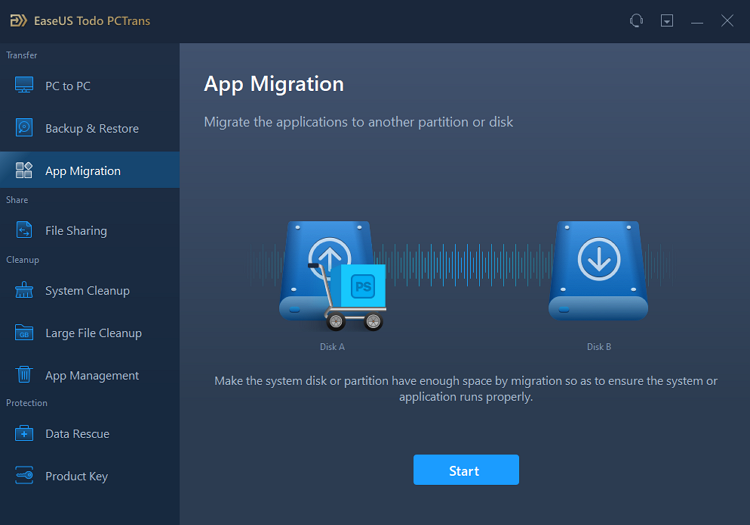
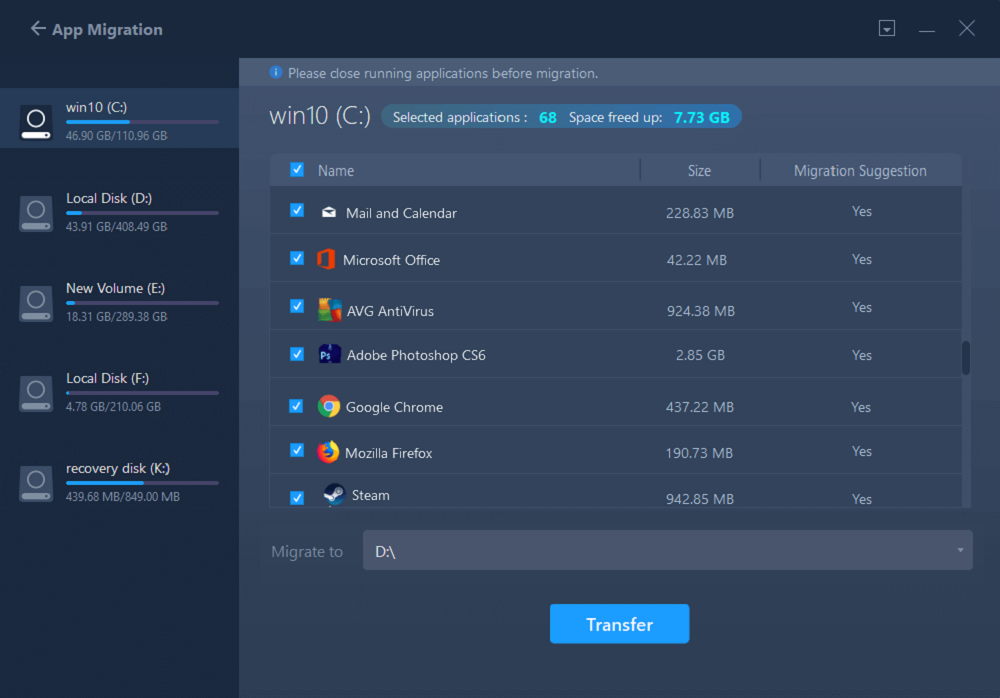
Professional app migration software can directly help you move the C drive installed programs, software, and even games to another local drive on your computer without any boot issue. EaseUS Todo PCTrans, with its App Migration feature, is exactly what you need.
It allows you directly move multiple programs and apps from C drive to D or even a second hard drive at one time on your computer without losing any personal data or boot issue. Here are the detailed steps:
Step 1. Run EaseUS Todo PCTrans on your PC
Go to «App Migration» and click «Start» to continue.
Step 2. Select programs to move from C drive to another drive
1. Tick the C drive and select programs (marked as «Yes») that you want to transfer.
2. Click the triangle icon to select another drive on your computer as the destination, and click «Transfer» to start the process.
Step 3. Finish the transferring
Wait patiently until the transferring process finishes and click «OK» to confirm.
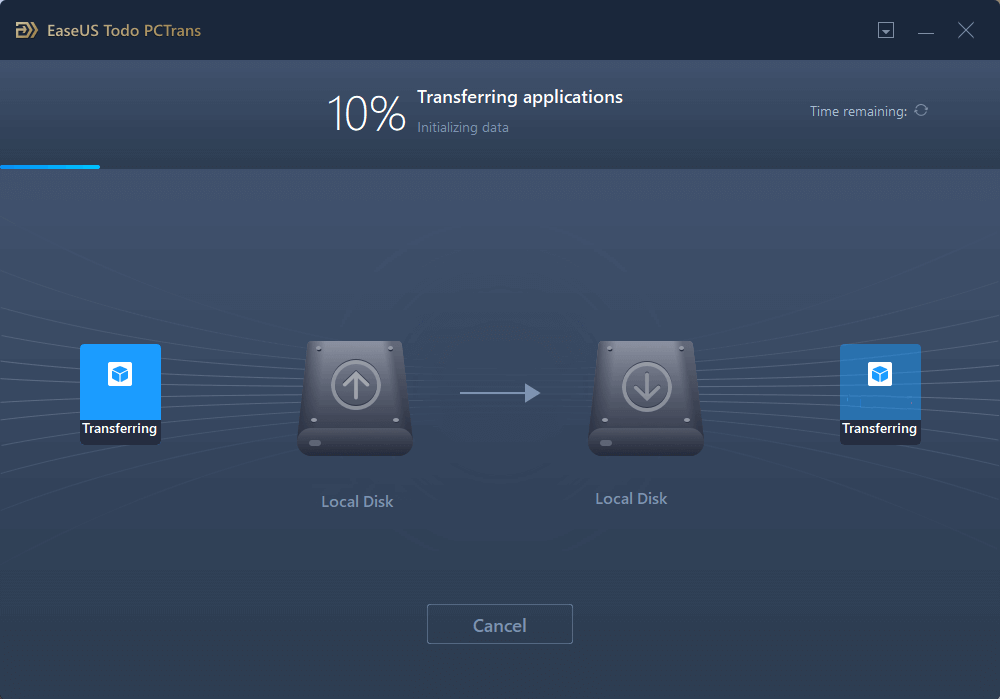
When it has done, you can restart PC if necessary. This will keep all changes on your PC and then you can run and programs from another hard drive without reinstallation.
Aside from this, you can also apply EaseUS Todo PCTrans to:
- Move apps from other drives to C drive
- Move the Desktop folder to another drive
- Transfer apps or programs to another computer
- Backup and rescue data and programs in computer
- More…
#2. Use Apps and Features Tool in Windows 11 to Change Location of Installed Programs
Apps and Features tool is a Windows built-in tool that helps change the location of some installed programs on Windows computers. Windows 11 users can also apply this tool to switch some C drive installed programs from C to other drives.
Here are the steps:
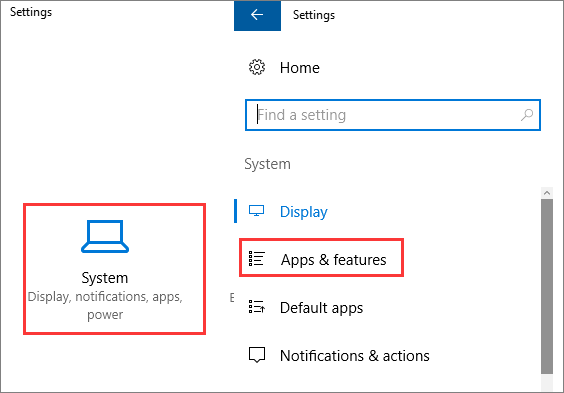
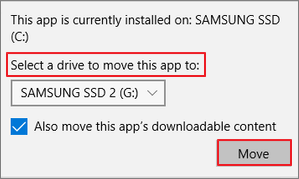
Step 1. Press Windows + I keys to open Windows settings, click on «system» and select «Apps and Features».
Step 2. Wait for the Apps and Feature to open, select the programs or application you’d like to transfer and click «Move».
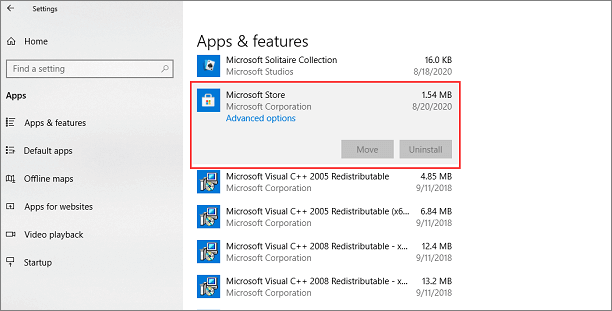
Step 3. Select the drive where you want to move the program to, such as D: drive.
Step 4. Click «Move» to confirm.
If you need to move several programs, you’ll need to repeat the process several times. For a more efficient way, you can totally trust EaseUS Todo PCTrans.
#3. Use CMD Command-Line to Move Apps Around Windows 11
Another efficient but more complex solution to move apps around Windows 11 is to run CMD command lines. To do so, you must be very careful while running the following steps on your PC.
Some experienced Windows administrators recommend that you create a restore point in Windows 11 if you face any issues while moving apps around Windows 11.
Here are steps to move apps around in Windows 11 using CMD:
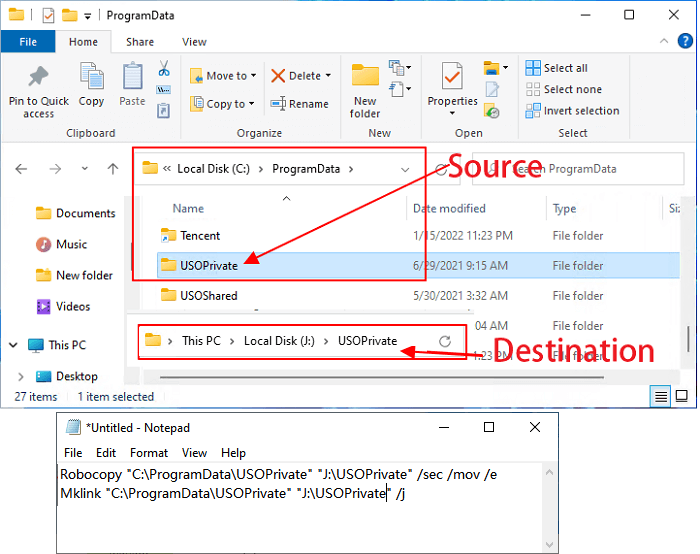
Step 1. Open your C drive and find out the app you want to move to another drive.
Step 2. Create a text document, copy and paste the two command lines in the file:
- Robocopy «Source» «Destination» /sec /mov /e
- Mklink «Source» «Destination» /j
Replace the Source with the path location of the target program in your C drive.
Replace the Destination with the path where you want to move the app to on your PC.
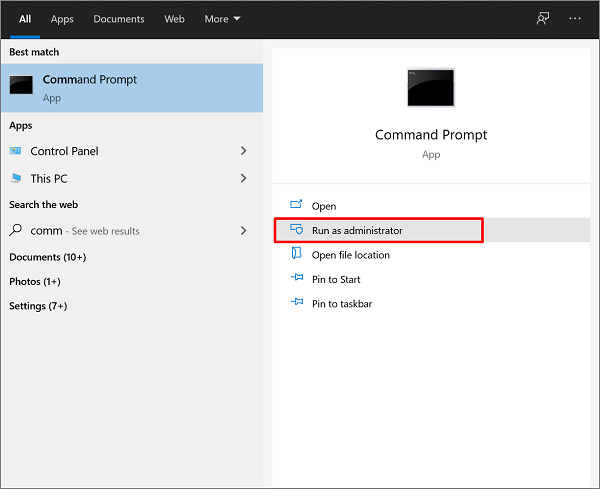
Step 3. Type cmd in the search box, right-click Command Prompt and select «Run as Administrator».
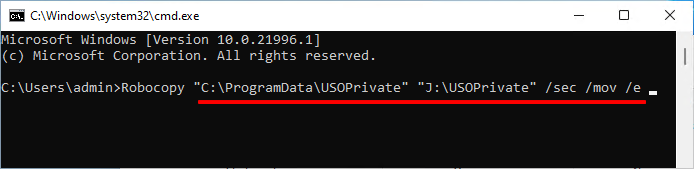
Step 4. Once the command prompt opens, type the first line in your text file and hit Enter:
- Robocopy «Source» «Destination» /sec /mov /e
Step 5. Type the second line in the command prompt and hit Enter:
- Mklink «Source» «Destination» /j
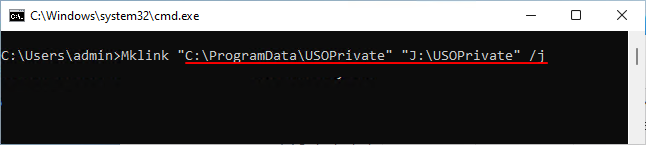
Wait for the process to complete. After this, you can open the target new drive and see if the selected app folder have been successfully moved here.

Note: You need to be very careful while running the command lines, and if any error occurs, it could be Windows that doesn’t allow you to do so. In this case, you should stop the operation and return to Method 1 for help.
#4. Change App Location from C to Other Drive in Windows 11 Using Registry Editor
The last workaround for moving apps from C to another drive in Windows 11 is using Registry Editor. And before you start, you should also confirm where you want to move the apps to.
Here are the steps:
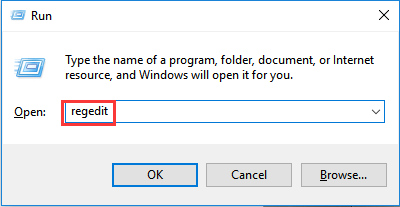
Step 1. Press Windows + R keys to open the run dialog, type regedit, and click «OK».
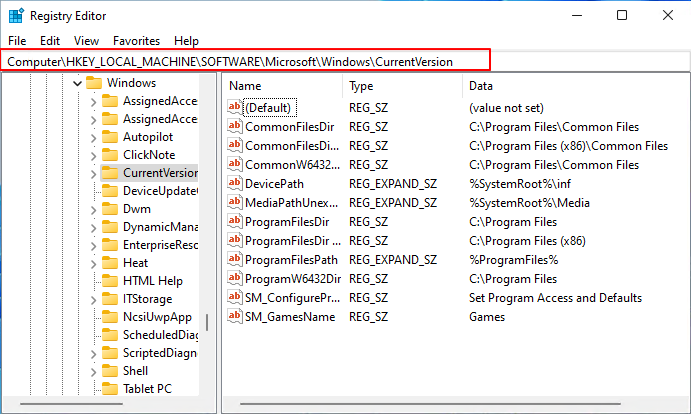
Step 2. Once Registry Editor opens, follow the path here to open the folder in Registry:
HKEY_LOCAL_MACHINESOFTWAREMicrosoftWindowsCurrentVersion
Step 3. Double-click on the ProgramFilesDir (x86) key and change the default value «C:ProgramFiles» to the new drive path.
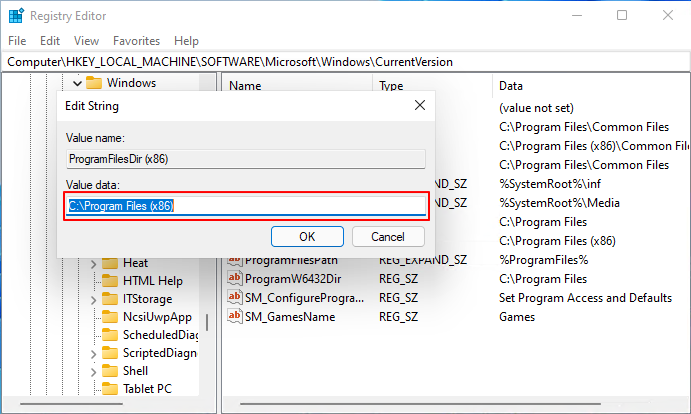
Step 4. Click «OK».
Step 5. Double-click on «ProgramFilesDir» and change the default value from «C:ProgramFiles» to your new drive path.
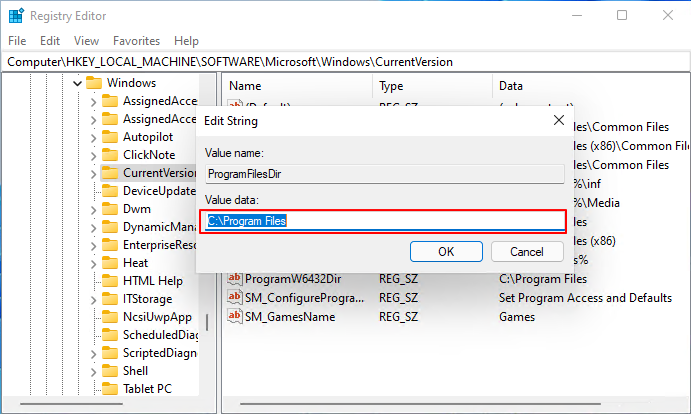
Step 6. Click «OK», close Registry, and restart your computer.
Bonus Tip: How to Change Windows 11 Default Installation Folder
Aside from the above 4 methods to change the location of installed programs in Windows 11, it’s also important that you change the Windows 11 default installation folder to save disk space in the C drive.
Here are the steps that you can follow:
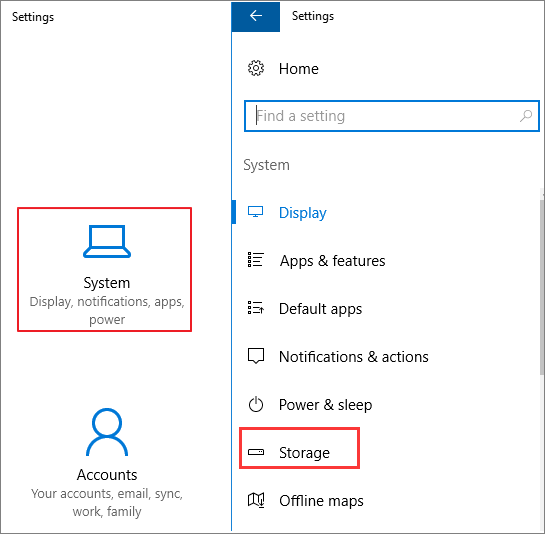
Step 1. Press Windows + I to open Windows Settings, click «System» > «Storage».
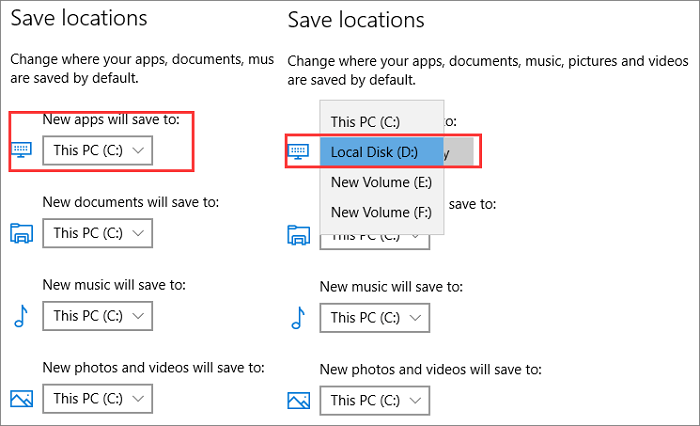
Step 2. At the Save locations section, click «New apps will save to:» column, and select a new drive to change where your apps, documents, music, pictures, and videos are saved by default.
Conclusion
This page covers 4 reliable methods that help move installed programs in Windows 11 from C drive to another drive without any boot issue.
Among the 4 methods, Windows beginners can totally trust EaseUS Todo PCTrans to migrate apps from C to another drive.
Experienced Windows users can also try the other 3 methods if they only want to move some basic apps around Windows 11.
Changing the location of installed programs in Windows 11 is possible and easy. As long as you turn to the correct methods, you can directly execute the operation like an expert on your own.
Categories
- Transfer Programs from C Drive to D Drive
- Transfer Installed Software to New PC
- Transfer Files from Old PC to New PC
- Transfer Microsoft Office
- Find Office Product Key
- Move User Folder
- Move Google Chrome Bookmarks
- Complex Level: Easy
- Applies to: Switch and change the location of installed apps on Windows 11/10/8.1/8/7/XP and Vista, etc.
This page shows new Windows 11 users how to change where new content is saved in Windows 11, especially for applications like Office, Adobe software, and even some extremely huge games.
| Workable Solutions | Step-by-step Troubleshooting |
|---|---|
| Fix 1. Use App Migration Software | Try every USB port available; Determine you’re using USB 2.0 or 3.0…Full steps |
| Fix 2. Use Apps and Features | Step 1. Press Windows + I keys to open Windows settings, click on «system» and select «Apps and Features»….Full steps |
| Fix 3. Use CMD Command-Line | Step 1. Open your C drive and find out the app you want to move to another drive…Full steps |
| Fix 4. Using Registry Editor | Step 1. Press Windows + R keys to open the run dialog, type regedit, and click «OK»…Full steps |
Why Do You Want to Change the Location of an Installed Program in Windows 11
Though being designed with many new features such as a new user desktop centered Start menu and taskbar on Windows 11, Microsoft still keeps the most classic Windows system design in its newest operating system — Windows 11. All new content will automatically be saved and installed on the Local System C (This PC) Drive is still the same on Windows 11.
As a result, the C drive will soon get full with the following content:
- Downloaded content.
- Installed applications and software.
- Operating system.
- Personal folders, like Documents, Pictures.
- Desktop contents, etc.
How will you resolve this issue when the C drive gets full in Windows 11? You can turn to fix this issue in many ways, such as changing the default download location, moving user folders like Documents, Pictures, and Desktop to another drive, deleting useless large files, etc. Changing the location of installed programs in Windows 11 is also a very efficient way that helps to free up large space in the system C drive.
In this next part, we’ll discuss how and what method you can rely on for changing apps’ location in Windows 11 without any boot issue. Let’s see.
According to experienced and professional Windows administrators, we collect 4 efficient ways to move apps around Windows 11 successfully without losing any app data or boot issues. Let’s see:
- #1. Third-Party App Migration Software
- #2. Apps and Features Tool in Windows 11
- #3. CMD Command Line
- #4. Registry Editor
Among the 4 methods, which method suits you the most? Check the comparison table, and you’ll learn which method suits you the most:
| Comparison | App Migration Software | Apps and Features | CMD | Registry |
|---|---|---|---|---|
| Transfer Content |
|
|
|
|
| Difficulty Level | Easy | Easy | Medium | Complex |
From the comparison table, it’s clear that the third-party app migration software is the most comprehensive solution for Windows 11 users to change the location of installed applications. However, if you are looking for an easy and efficient method, you can’t miss Method 1. Let’s see how to migrate apps and change the install location of your programs in Windows 11 now.
#1. Change Location of Installed Programs in Windows 11 Using App Migration Software
Professional app migration software can directly help you move the C drive installed programs, software, and even games to another local drive on your computer without any boot issue. EaseUS Todo PCTrans, with its App Migration feature, is exactly what you need.
It allows you directly move multiple programs and apps from C drive to D or even a second hard drive at one time on your computer without losing any personal data or boot issue. Here are the detailed steps:
Step 1. Run EaseUS Todo PCTrans on your PC
Go to «App Migration» and click «Start» to continue.
Step 2. Select programs to move from C drive to another drive
1. Tick the C drive and select programs (marked as «Yes») that you want to transfer.
2. Click the triangle icon to select another drive on your computer as the destination, and click «Transfer» to start the process.
Step 3. Finish the transferring
Wait patiently until the transferring process finishes and click «OK» to confirm.
When it has done, you can restart PC if necessary. This will keep all changes on your PC and then you can run and programs from another hard drive without reinstallation.
Aside from this, you can also apply EaseUS Todo PCTrans to:
- Move apps from other drives to C drive
- Move the Desktop folder to another drive
- Transfer apps or programs to another computer
- Backup and rescue data and programs in computer
- More…
#2. Use Apps and Features Tool in Windows 11 to Change Location of Installed Programs
Apps and Features tool is a Windows built-in tool that helps change the location of some installed programs on Windows computers. Windows 11 users can also apply this tool to switch some C drive installed programs from C to other drives.
Here are the steps:
Step 1. Press Windows + I keys to open Windows settings, click on «system» and select «Apps and Features».
Step 2. Wait for the Apps and Feature to open, select the programs or application you’d like to transfer and click «Move».
Step 3. Select the drive where you want to move the program to, such as D: drive.
Step 4. Click «Move» to confirm.
If you need to move several programs, you’ll need to repeat the process several times. For a more efficient way, you can totally trust EaseUS Todo PCTrans.
#3. Use CMD Command-Line to Move Apps Around Windows 11
Another efficient but more complex solution to move apps around Windows 11 is to run CMD command lines. To do so, you must be very careful while running the following steps on your PC.
Some experienced Windows administrators recommend that you create a restore point in Windows 11 if you face any issues while moving apps around Windows 11.
Here are steps to move apps around in Windows 11 using CMD:
Step 1. Open your C drive and find out the app you want to move to another drive.
Step 2. Create a text document, copy and paste the two command lines in the file:
- Robocopy «Source» «Destination» /sec /mov /e
- Mklink «Source» «Destination» /j
Replace the Source with the path location of the target program in your C drive.
Replace the Destination with the path where you want to move the app to on your PC.
Step 3. Type cmd in the search box, right-click Command Prompt and select «Run as Administrator».
Step 4. Once the command prompt opens, type the first line in your text file and hit Enter:
- Robocopy «Source» «Destination» /sec /mov /e
Step 5. Type the second line in the command prompt and hit Enter:
- Mklink «Source» «Destination» /j
Wait for the process to complete. After this, you can open the target new drive and see if the selected app folder have been successfully moved here.
Note: You need to be very careful while running the command lines, and if any error occurs, it could be Windows that doesn’t allow you to do so. In this case, you should stop the operation and return to Method 1 for help.
#4. Change App Location from C to Other Drive in Windows 11 Using Registry Editor
The last workaround for moving apps from C to another drive in Windows 11 is using Registry Editor. And before you start, you should also confirm where you want to move the apps to.
Here are the steps:
Step 1. Press Windows + R keys to open the run dialog, type regedit, and click «OK».
Step 2. Once Registry Editor opens, follow the path here to open the folder in Registry:
HKEY_LOCAL_MACHINESOFTWAREMicrosoftWindowsCurrentVersion
Step 3. Double-click on the ProgramFilesDir (x86) key and change the default value «C:ProgramFiles» to the new drive path.
Step 4. Click «OK».
Step 5. Double-click on «ProgramFilesDir» and change the default value from «C:ProgramFiles» to your new drive path.
Step 6. Click «OK», close Registry, and restart your computer.
Bonus Tip: How to Change Windows 11 Default Installation Folder
Aside from the above 4 methods to change the location of installed programs in Windows 11, it’s also important that you change the Windows 11 default installation folder to save disk space in the C drive.
Here are the steps that you can follow:
Step 1. Press Windows + I to open Windows Settings, click «System» > «Storage».
Step 2. At the Save locations section, click «New apps will save to:» column, and select a new drive to change where your apps, documents, music, pictures, and videos are saved by default.
Conclusion
This page covers 4 reliable methods that help move installed programs in Windows 11 from C drive to another drive without any boot issue.
Among the 4 methods, Windows beginners can totally trust EaseUS Todo PCTrans to migrate apps from C to another drive.
Experienced Windows users can also try the other 3 methods if they only want to move some basic apps around Windows 11.
Changing the location of installed programs in Windows 11 is possible and easy. As long as you turn to the correct methods, you can directly execute the operation like an expert on your own.
Ищете давно потерянное приложение или программу? Найти нужный вариант можно несколькими способами.
-
Выберите Начните , выберите Все приложения , а затем прокрутите алфавитный список слева.
Совет: Чтобы уменьшить прокрутку, выберите любую букву в списке, а затем в алфавитных ссылках выберите букву, чтобы перейти к этому разделу. Например, если вы ищете приложение Teams T, выберите Teams T.
-
Выберите кнопку поиска на панели задач и введите имя приложения или программы.
-
Нажмите клавишу Windows клавиатуры и начните вводить текст.
Примечание: Учащиеся, Windows 11 SE не смогут скачивать приложения из Microsoft Store. Приложениями управляет их ИТ-администратор. Дополнительные сведения
Ищете давно потерянное приложение или программу? Найти нужный вариант можно несколькими способами.
-
Выберите Начните , а затем прокрутите алфавитный список слева (если на вашем началом экране установлено полноэкранный режим, выберите Все приложения , а затем прокрутите список).
Совет: Чтобы уменьшить прокрутку, выберите любую букву в списке, а затем в алфавитных ссылках выберите букву, чтобы перейти к этому разделу. Например, если вы ищете приложение Teams T, выберите Teams T.

-
Выберите кнопку поиска на панели задач и введите имя приложения или программы.
-
Нажмите клавишу Windows клавишу на клавиатуре.