С чего начинается администрирование пользователей на сервере терминалов?
Конечно с просмотра «Активных» или «Отключенных» сессий пользователей.
Без этой картины администрирование сервера терминалов невозможно.
Помимо статьи, записал также, и подробное видео, о том как администрировать пользователей на сервере терминалов (Новичкам смотреть обязательно!)
Конечно, данная тема также подымается и на курсе: Администратор 1С!
И так, конечно мы должны во всех подробностях видеть, что у нас происходит на сервере терминалов!
Какие процессы запущены от имени тех или иных пользователей (в т.ч. процессы 1С) их идентификаторы, id сессий пользователей, это и многое другое помогает администратору всегда быть в курсе того что происходит на сервере и соответственно всем этим управлять, и вовремя реагировать на различные ситуации.
На разных версиях Windows server администраторы по-разному решают этот вопрос.
Кто-то смотрит пользователей используя простой «Диспетчер задач» на Windows server 2012 – 2016. Некоторые используют различные команды в CMD, ну а кое-кто использует PowerShell .
Но все администраторы хотят одного:
1. Чтоб быстро посмотреть всех пользователей кто работает на сервере.
2. Чтоб это было как можно информативней.
3. Чтоб бесплатно.
Поэтому поводу решил собрать все лучшие, простые и быстрые способы которые (на мое мнение) стоит использовать.
Уверен, что многим начинающим администраторам эти способы помогут в администрировании сервера терминалов.
И так способ первый и самый простой (На Windows server 2012 R2)
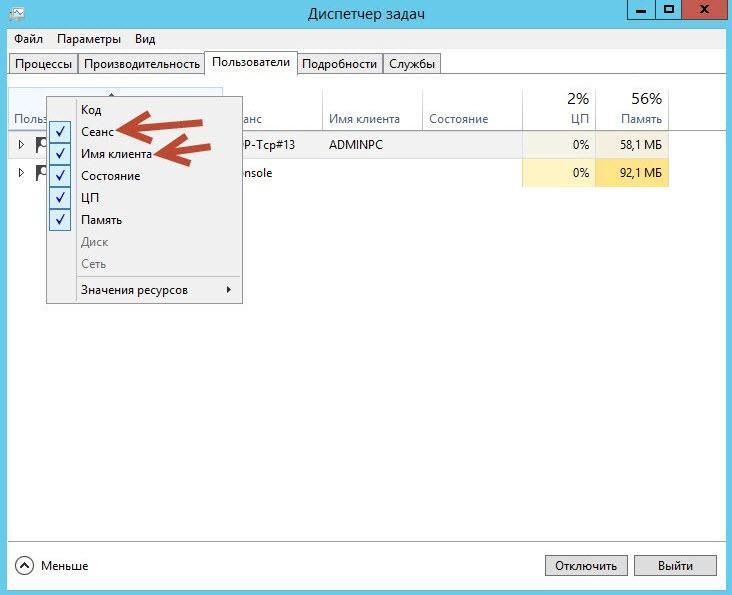
1. Диспетчер задач.
«Диспетчер задач» — вкладка «Пользователи» — позволяет нам видеть пользователей, которые работают на этом сервере.
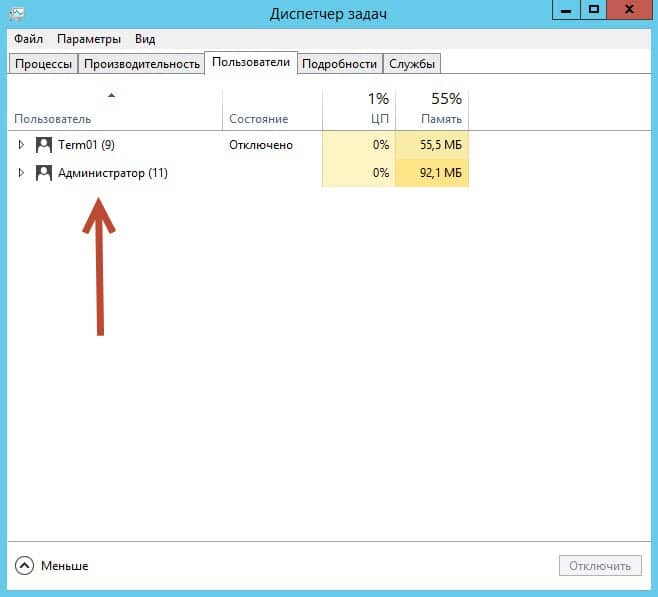
Но по умолчанию стандартный «Диспетчер задач» — вкладка «Пользователи» нам не покажет, что пользователь работает на сервере удаленно, используя RDP, хорошо, что это можно легко исправить.
Правый клик мышкой на панели «Пользователь» и в появившимся контекстном меню
ставим птичку напротив «Сеанс» а также стоит поставить и напротив «Имя клиента».
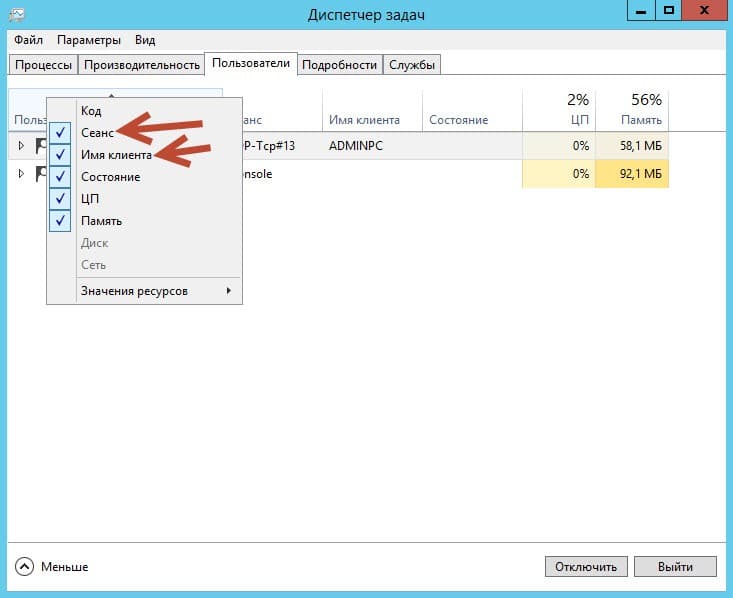
Так мы будем знать, что этот пользователь работает у нас на сервере через RDP.
Минусы данного способа здесь очевидны, чтоб смотреть пользователей мы должны находится на сервере терминалов, где собственно и запускаем «Диспетчер задач», нет возможности сделать какую-то выборку, фильтр и т.д.
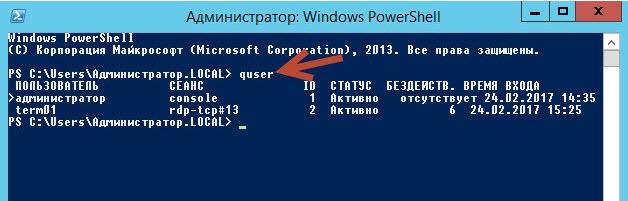
2. quser
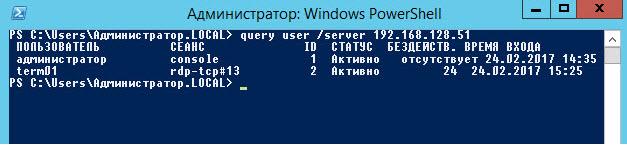
Следующий метод это использование команды quser в CMD или PowerShell.
Quser – это аналог QUERY USER (Такое сокращение позволяет выполнять команду быстрее)
Здесь все просто запускаем CMD или PowerShell и пишем команду quser

Так мы увидим всех пользователей, что работают на этом сервере.
Метод очень простой быстрый и достаточно информативный.
Он покажет Вам — Пользователя, Сеанс, его ID, Статус , Бездействие сеанса, и время входа.
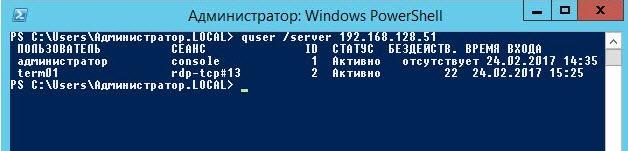
Если мы хотим посмотреть только какого-то конкретного пользователя, тогда можно написать например так:
Пример:
Term01 – это логин пользователя.

Большинство системных администраторов отдают предпочтение именно этому способу.
И не только потому, что быстро, просто и т.д., но и потому что можно смотреть удаленно всех пользователей, сидя за своим ПК, где не будь в локальной сети.
И для этого достаточно ввести команду с параметром SERVER
Пример:
Если Вы хотите больше узнать о технической стороне 1С, тогда регистрируйтесь на первый бесплатный модуль курса: Администратор 1С
Как мне получить список пользователей в Windows Server?
Откройте «Управление компьютером» и перейдите в «Локальные пользователи и группы -> Пользователи». С правой стороны вы видите все учетные записи пользователей, их имена, используемые Windows за кулисами, их полные имена (или отображаемые имена) и описание каждой из них.
Как мне получить список пользователей в Windows Server 2012?
Войдите в Windows Server 2012 R2 и следуйте инструкциям ниже, чтобы просмотреть активных удаленных пользователей:
- Щелкните правой кнопкой мыши панель задач и выберите в меню Диспетчер задач.
- Перейдите на вкладку Пользователи.
- Щелкните правой кнопкой мыши один из существующих столбцов, например «Пользователь» или «Состояние», а затем выберите «Сеанс» в контекстном меню.
16 июн. 2016 г.
Как управлять пользователями в Windows Server?
Настройка разрешений и групп (Windows Server)
- Войдите в Microsoft Windows Server как администратор.
- Создайте группу. Щелкните Пуск> Панель управления> Администрирование> Управление компьютером. …
- Настройте пользователей и группу DataStage для входа в систему.…
- Добавить пользователей в группу. …
- Установите разрешения для следующих папок:
Как мне добавить пользователей в Active Directory?
Использование графического интерфейса
- Перейдите в «Пользователи и компьютеры Active Directory».
- Щелкните «Пользователи» или папку, содержащую учетную запись пользователя.
- Щелкните правой кнопкой мыши учетную запись пользователя и выберите «Свойства».
- Щелкните вкладку «Участник».
29 мар. 2020 г.
Как мне добавить пользователей в Windows Server?
Чтобы добавить пользователей в группу:
- Щелкните значок диспетчера сервера (…
- Выберите меню «Инструменты» в правом верхнем углу, затем выберите «Управление компьютером».
- Разверните Локальные пользователи и группы.
- Разверните Группы.
- Дважды щелкните группу, в которую вы хотите добавить пользователей.
- Выберите Добавить.
Как мне найти пользователей на сервере?
Для просмотра списка учетных записей пользователей
- Откройте панель мониторинга Windows Server Essentials.
- На главной панели навигации щелкните Пользователи.
- На панели инструментов отображается текущий список учетных записей пользователей.
3 окт. 2016 г.
Как мне найти свой сервер RDS?
Чтобы открыть диспетчер лицензирования удаленных рабочих столов, нажмите кнопку Пуск, выберите «Администрирование», выберите «Службы удаленных рабочих столов», а затем щелкните «Диспетчер лицензирования удаленных рабочих столов». Щелкните правой кнопкой мыши сервер лицензий, для которого вы хотите просмотреть идентификатор сервера лицензий, а затем щелкните Свойства. Щелкните вкладку Метод подключения.
Как мне добавить пользователя в Server 2012?
КАК: Добавить новую учетную запись пользователя — Server 2012
- На начальном экране Server 2012 нажмите Windows Key + X. Откроется контекстное меню.
- В контекстном меню выберите «Управление компьютером». …
- В дереве навигации слева от окна «Управление компьютером» выберите «Локальные пользователи и группы». …
- Чтобы добавить дополнительных пользователей, щелкните правой кнопкой мыши на «Пользователи» и выберите «Новый пользователь…».
Как мне найти удаленных пользователей на моем сервере?
удаленно
- Удерживая нажатой клавишу Windows, нажмите «R», чтобы открыть окно «Выполнить».
- Введите «CMD», затем нажмите «Enter», чтобы открыть командную строку.
- В командной строке введите следующее и нажмите «Enter»: запросить пользователя / сервер: имя компьютера. …
- Отображается имя компьютера или домен, за которым следует имя пользователя.
Как мне предоставить себе доступ администратора к Windows Server?
Откройте инструмент «Локальные пользователи и группы» и перейдите на вкладку «Группы». Выберите группу читателей Windows Admin Center. В нижней части панели «Подробности» нажмите «Добавить пользователя» и введите имя пользователя или группы безопасности, которая должна иметь доступ только для чтения к серверу через Windows Admin Center.
Как управлять доступом пользователей?
Советы по эффективному управлению доступом пользователей
- Используйте принцип наименьших привилегий.
- Ограничьте или отмените права доступа суперпользователя.
- Планируйте привилегии заблаговременно.
- Используйте менеджер паролей.
- Просмотрите доступ к привилегированным пользователям.
Как управлять контролем доступа?
Управление контролем доступа — важный компонент эффективного управления потоками людей и ограничения доступа там, где это необходимо. Прошли те времена, когда запирание двери или установка временного барьера были достаточными формами контроля доступа.
Какой тип команды есть у пользователя сети?
Net User — это инструмент командной строки, который позволяет системным администраторам управлять учетными записями пользователей на ПК с Windows. Вы можете использовать команду для отображения информации об учетной записи или внесения изменений в учетные записи пользователей. Его можно использовать, среди прочего, для включения неактивной учетной записи администратора системы Windows.
Чтобы экспортировать данные, запустите Active Directory — пользователи и компьютеры. Перейдите к структуре домена организационной единицы, которую вы хотите экспортировать, и щелкните по ней. В меню выберите значок «Список экспорта» (см. Рис. 1). На этом этапе вам нужно будет выбрать, хотите ли вы.
Как я могу получить список всех пользователей домена?
Список всех пользователей и групп в домене
- ЧИСТЫЕ ПОЛЬЗОВАТЕЛИ / ДОМЕН> USERS.TXT.
- ЧИСТЫЕ СЧЕТА / ДОМЕН> ACCOUNTS.TXT.
- СЕРВЕР КОНФИГУРАЦИИ NET> SERVER.TXT.
- РАБОЧАЯ СТАНЦИЯ КОНФИГУРАЦИИ NET> WKST.TXT.
- ГРУППА / ДОМЕН ЧИСТА> DGRP.TXT.
- ЛОКАЛЬНАЯ ГРУППА ЧИСТА> LGRP.TXT.
- ВИД СЕТИ / ДОМЕН: ИМЯ ДОМЕНА> VIEW.TXT.
- ДОБАВИТЕЛИ ИМЯ КОМПЬЮТЕРА / D USERINFO.TXT.
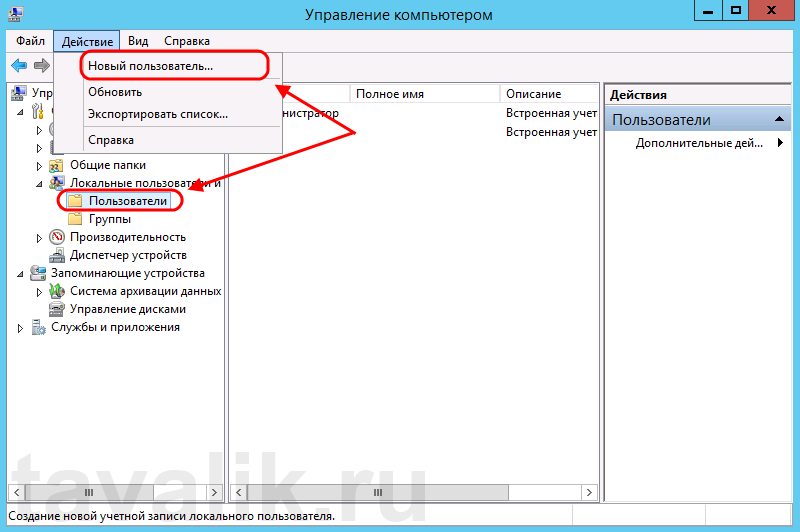
![]() Ниже будет подробно рассказано о том, как добавить нового пользователя на локальный компьютер под управлением Microsoft Windows Server 2012 R2.
Ниже будет подробно рассказано о том, как добавить нового пользователя на локальный компьютер под управлением Microsoft Windows Server 2012 R2.
0. Оглавление
- Добавление пользователя
- Изменение настроек пользователя
1. Добавление пользователя
Запускаем оснастку «Управление компьютером» (Computer Management). Сделать это можно кликнув правой кнопкой мыши по меню «Пуск» (Start) и выбрав в меню «Управление компьютером» (Computer Management).

Или же выполнив команду compmgmt.msc. (Нажать комбинацию клавиш Win + R, в окне «Выполнить» (Run) ввести команду в поле «Открыть» (Open) и нажать «ОК«)

В открывшемся окне раскрываем вкладку «Служебные программы» (System Tools), затем «Локальные пользователи» (Local Users and Groups) и выделив вкладку «Пользователи» (Users) выбираем «Новый пользователь…» (New User…) в меню «Действие» (Action).
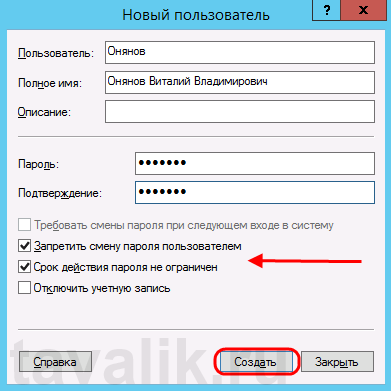
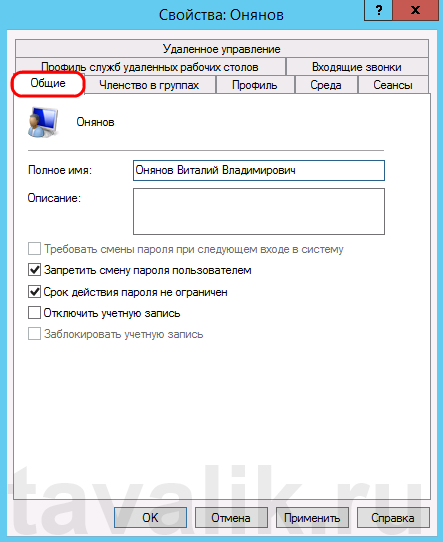
Откроется окно создания нового пользователя (New User). Впишем имя пользователя (имя, которое будет использоваться для входа в систему) в графе «Пользователь» (User name), полное имя (будет показываться на экране приветствия) в поле «Полное имя» (Full name) и описание учетной записи в поле «Описание» (Description). Затем дважды введем пароль для создаваемого пользователя. По умолчанию пароль должен отвечать политики надежности паролей. О том как изменить данную политику читайте в статье Изменение политики паролей в Windows Server 2012 R2.
Рекомендую сразу записать введенный пароль в отведенное для хранение паролей место. Для этих целей удобно использовать специальные менеджеры паролей, например бесплатную программу KeePass.
Далее снимем флаг «Требовать смены пароля при следующем входе в систему» (User must change password at next logon) если требуется оставить введенный только что пароль. В противном случае пользователю придется сменить пароль при первом входе в систему.
Установим флаг «Запретить смену пароля пользователем» (User cannot change password) если хотим лишить пользователя данного права.
Установим флаг «Срок действия пароля не ограничен» (Password never expires) если нет необходимости в периодической смене паролей.
Флаг «Отключить учетную запись» (Account is disabled) отвечает за возможность входа пользователя в систему. Оставляем неизменным.
Нажимаем «Создать» (Create) чтобы создать нового пользователя системы.
2. Изменение настроек пользователя
Добавленного только что пользователя мы найдем в таблице пользователей системы на вкладке «Пользователи» (Users) оснастки «Управление компьютером» (Computer Management). Для того чтобы изменить настройки пользователя, необходимо в таблице кликнуть по нему правой кнопкой мыши и в контекстном меню выбрать пункт «Свойства» (Properties).

Откроется окно свойств выбранного пользователя. Пробежимся по наиболее часто используемым настройкам.
На вкладке «Общие» (General) можно изменить параметры, которые мы задавали при добавлении пользователя.
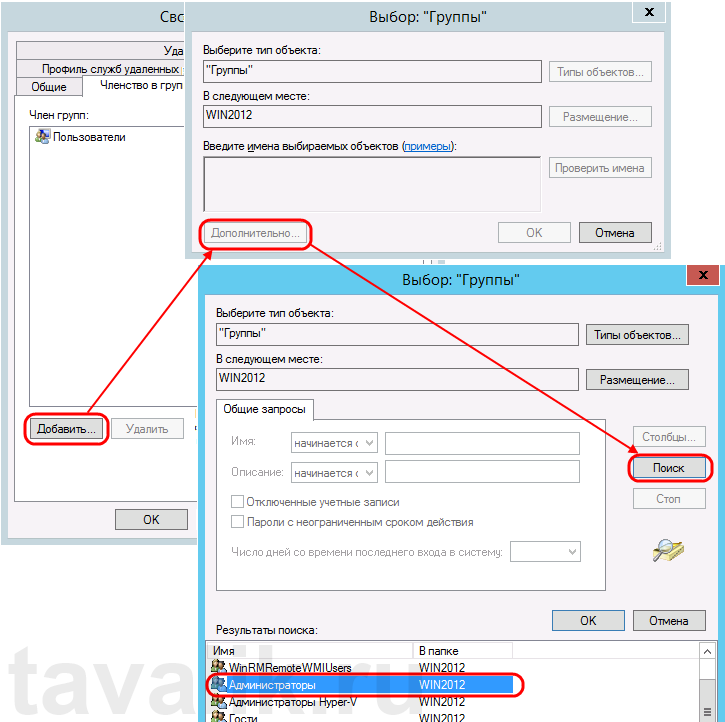
На вкладке «Членство в группах» (Member of) можно увидеть участником каких групп является данный пользователь. Кроме того, здесь можно добавить пользователя в группу или удалить его из выбранной группы.
Например, чтобы сделать пользователя администратором сервера, его необходимо добавить в группу «Администраторы» (Administrators). Для этого нажмем кнопку «Добавить…» (Add…), находящуюся под списком групп, в открывшемся окне выбора группы нажмем «Дополнительно…» (Advanced…) и затем кнопку «Поиск» (Find Now) в окне подбора групп. Выделим необходимую группу в таблице результатов поиска (в нашем случае это группа «Администраторы» (Administrators)) и завершим выбор нажав «ОК» во всех открытых окнах.
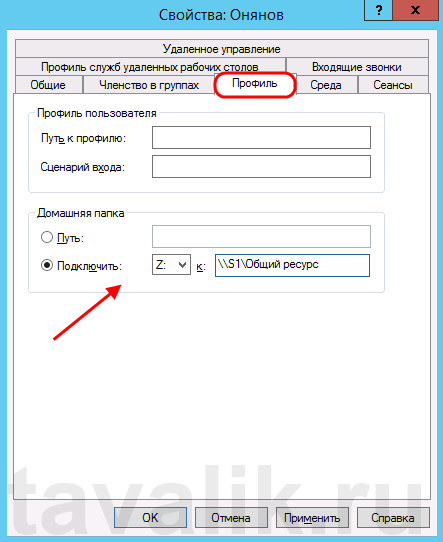
На вкладке «Профиль» (Profile) можно задать путь к профилю пользователя (Profile Path), сценарий входа (Logon script), а также подключить сетевой диск, который будет автоматически подключаться при входе пользователя в систему. Для этого установим переключатель «Домашняя папка» (Home folder) в «Подключить:» (Connect:), выберем букву сетевого диска и укажем путь к ресурсу, где будут располагаться файлы. Это может быть локальный путь к папке или сетевой ресурс.
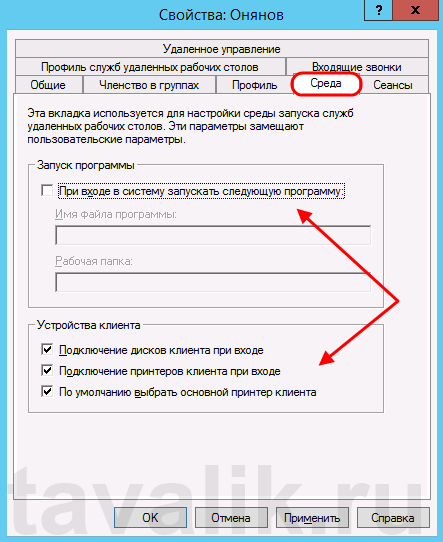
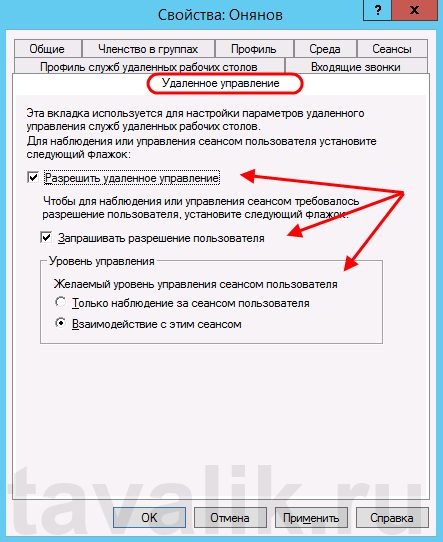
На вкладке «Среда» (Environment) возможно указать программу, которая будет запускаться автоматически при входе пользователя через службу удаленных рабочих столов. В этом режиме работы другие программы и рабочий стол пользователю будут недоступны.
Также здесь можно разрешить/запретить подключение дисков клиента при входе (Connect client drivers at logon), подключение принтеров клиента при входе (Connect client printers at logon) и переопределить основной принтер клиента (Default to main client printer) при работе через удаленных рабочий стол, установив/сняв соответствующие флаги на форме.
На вкладке «Сеансы» (Sessions) можно установить параметры тайм-аута и повторного подключения при работе через службу удаленных рабочих столов.

Вкладка «Удаленное управление» (Remote control) используется для настройки параметров удаленного управления сеансом пользователя при работе через службу удаленных рабочих столов.
С чего начинается администрирование пользователей на сервере терминалов?
Конечно с просмотра «Активных» или «Отключенных» сессий пользователей.
Без этой картины администрирование сервера терминалов невозможно.
И так, конечно мы должны во всех подробностях видеть, что у нас происходит на сервере терминалов!
Какие процессы запущены от имени тех или иных пользователей их идентификаторы, id сессий пользователей, это и многое другое помогает администратору всегда быть в курсе того что происходит на сервере и соответственно всем этим управлять, и вовремя реагировать на различные ситуации.
На разных версиях Windows server администраторы по-разному решают этот вопрос.
Кто-то смотрит пользователей используя простой «Диспетчер задач» на Windows server 2012 – 2022. Некоторые используют различные команды в CMD, ну а кое-кто использует PowerShell .
Но все администраторы хотят одного:
1. Чтоб быстро посмотреть всех пользователей кто работает на сервере.
2. Чтоб это было как можно информативней.
3. Чтоб бесплатно.
Поэтому поводу решил собрать все лучшие, простые и быстрые способы которые (на мое мнение) стоит использовать.
Уверен, что многим начинающим администраторам эти способы помогут в администрировании сервера терминалов.
И так способ первый и самый простой (На Windows server 2012 — 2022)
1. Диспетчер задач.
«Диспетчер задач» — вкладка «Пользователи» — позволяет нам видеть пользователей, которые работают на этом сервере.

Но по умолчанию стандартный «Диспетчер задач» — вкладка «Пользователи» нам не покажет, что пользователь работает на сервере удаленно, используя RDP, хорошо, что это можно легко исправить.
Правый клик мышкой на панели «Пользователь» и в появившимся контекстном меню
ставим птичку напротив «Сеанс» а также стоит поставить и напротив «Имя клиента».
Так мы будем знать, что этот пользователь работает у нас на сервере через RDP.
Минусы данного способа здесь очевидны, чтоб смотреть пользователей мы должны находится на сервере терминалов, где собственно и запускаем «Диспетчер задач», нет возможности сделать какую-то выборку, фильтр и т.д.
2. quser
Следующий метод это использование команды quser в CMD или PowerShell.
Quser – это аналог QUERY USER (Такое сокращение позволяет выполнять команду быстрее)
Здесь все просто запускаем CMD или PowerShell и пишем команду quser
Так мы увидим всех пользователей, что работают на этом сервере.
Метод очень простой быстрый и достаточно информативный.
Он покажет Вам — Пользователя, Сеанс, его ID, Статус , Бездействие сеанса, и время входа.
Если мы хотим посмотреть только какого-то конкретного пользователя, тогда можно написать например так:
Пример:
Term01 – это логин пользователя.

Большинство системных администраторов отдают предпочтение именно этому способу.
И не только потому, что быстро, просто и т.д., но и потому что можно смотреть удаленно всех пользователей, сидя за своим ПК, где не будь в локальной сети.
И для этого достаточно ввести команду с параметром SERVER
Пример:
|
quser /server 192.168.128.50 |
Вместо IP можно указать (хост) имя сервера терминалов.
Формат командной строки:
QUSER [; пользователь ; | ; имя сеанса ; | ; ID сеанса ;] [/SERVER:; сервер ;]
3. query user
Query user делает все что и команда quser.
Использовать ее можно также как в CMD так и в PowerShell.
Также возможно выполнить и удаленно
Пример:
|
query user /server 192.168.128.50 |
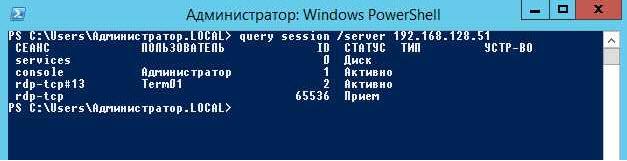
4. query session
Эта команда позволяет получить список всех сеансов (активных и неактивных), которые выполняются на сервере терминалов. Команда query session имеет такой синтаксис:
Использовать ее можно также как в CMD так и в PowerShell.
Также возможно выполнить и удаленно
Пример:
|
query session /server 192.168.128.50 |
У команды есть интересные параметры, такие как, например получение некоторой статистики подключений.
Пример:
|
query session /server 192.168.128.50 /counter |
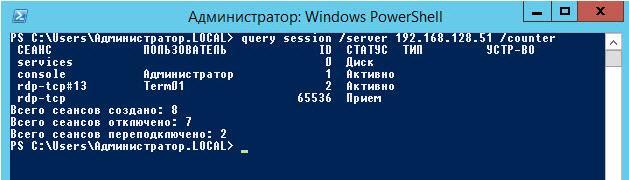
В общем, еще одна неплохая команда для получения пользователей, что работают на сервере.
5. Qwinsta
Qwinsta это аналог query session, по этой причине описывать ее не буду. Работает все аналогично, вот только набрать ее можно быстрее, а соответственно и выполнить.
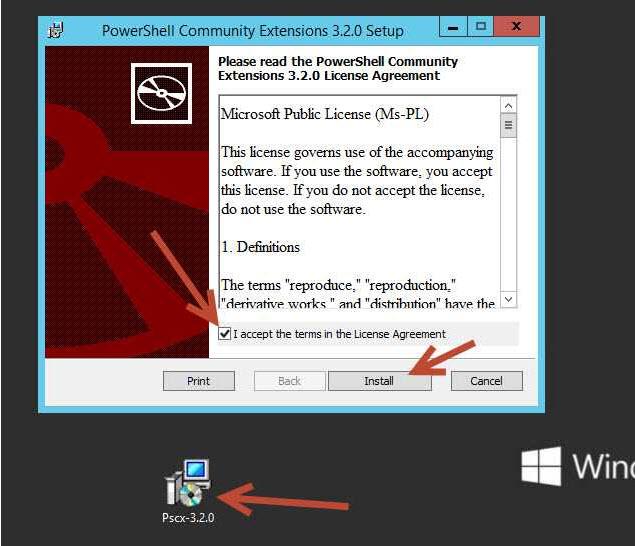
Теперь, когда выше перечисленные способы у Вас по каким-то причинам не сработали, или не подошли, тогда можно обратиться к сторонним компонентам.
6. Get-TerminalSession
| title | description | ms.date | ms.topic | ms.assetid | author | ms.author | manager |
|---|---|---|---|---|---|---|---|
|
Manage User Accounts in Windows Server Essentials |
Learn about the Users page of the Windows Server Essentials Dashboard and how it centralizes information and tasks that help you manage the user accounts. |
10/03/2016 |
article |
0d115697-532b-48c2-a659-9f889e235326 |
nnamuhcs |
wscontent |
mtillman |
Manage User Accounts in Windows Server Essentials
Applies To: Windows Server 2016 Essentials, Windows Server 2012 R2 Essentials, Windows Server 2012 Essentials
The Users page of the Windows Server Essentials Dashboard centralizes information and tasks that help you manage the user accounts on your small business network. For an overview of the Users Dashboard, see Dashboard Overview.
Managing user accounts
The following topics provide information about how to use the Windows Server Essentials Dashboard to manage the user accounts on the server:
-
Add a user account
-
Remove a user account
-
View user accounts
-
Change the display name for the user account
-
Activate a user account
-
Deactivate a user account
-
Understand user accounts
-
Manage user accounts using the Dashboard
Add a user account
When you add a user account, the assigned user can log on to the network, and you can give the user permission to access network resources such as shared folders and the Remote Web Access site. Windows Server Essentials includes the Add a User Account Wizard that helps you:
-
Provide a name and password for the user account.
-
Define the account as either an administrator or as a standard user.
-
Select which shared folders the user account can access.
-
Specify if the user account has remote access to the network.
-
Select email options if applicable.
-
Assign a Microsoft Online Services account (referred to as a Microsoft 365 account in Windows Server Essentials) if applicable.
-
Assign user groups ( Windows Server Essentials only).
[!NOTE]
- Non-ASCII characters are not supported in Microsoft Azure Active Directory (Azure AD). Do not use any non-ASCII characters in your password, if your server is integrated with Azure AD.
- The email options are only available if you install an add-in that provides email service.
To add a user account
-
Open the Windows Server Essentials Dashboard.
-
On the navigation bar, click Users.
-
In the Users Tasks pane, click Add a user account. The Add a User Account Wizard appears.
-
Follow the instructions to complete the wizard.
Remove a user account
When you choose to remove a user account from the server, a wizard deletes the selected account. Because of this, you can no longer use the account to log on to the network or to access any of the network resources. As an option, you can also delete the files for the user account at the same time that you remove the account. If you do not want to permanently remove the user account, you can deactivate the user account instead to suspend access to network resources.
[!IMPORTANT]
If a user account has a Microsoft online account assigned, when you remove the user account, the online account also is removed from Microsoft Online Services, and the user’s data, including email, is subject to data retention policies in Microsoft Online Services. If you want to retain user data for the online account, deactivate the user account instead of removing it. For more information, see Manage Online Accounts for Users.
To remove a user account
-
Open the Windows Server Essentials Dashboard.
-
On the navigation bar, click Users.
-
In the list of user accounts, select the user account that you want to remove.
-
In the <User Account> Tasks pane, click Remove the user account. The Delete a User Account Wizard appears.
-
On the Do you want to keep the files? page of the wizard, you can choose to delete the user’s files, including File History backups and the redirected folder for the user account. To keep the user’s files, leave the check box empty. After making your selection, click Next.
-
Click Delete account.
[!NOTE]
After you remove a user account, the account no longer appears in the list of user accounts. If you chose to delete the files, the server permanently deletes the user’s folder from the Users server folder and from the File History Backups server folder.If you have an integrated email provider, the email account assigned to the user account will also be removed.
View user accounts
The Users section of the Windows Server Essentials Dashboard displays a list of network user accounts. The list also provides additional information about each account.
To view a list of user accounts
-
Open the Windows Server Essentials Dashboard.
-
On the main navigation bar, click Users.
-
The Dashboard displays a current list of user accounts.
To view or change properties for a user account
-
In the list of user accounts, select the account for which you want to view or change properties.
-
In the <User Account> Tasks pane, click View the account properties. The Properties page for the user account appears.
-
Click a tab to display the properties for that account feature.
-
To save any changes that you make to the user account properties, click Apply.
Change the display name for the user account
The display name is the name that appears in the Name column on the Users page of the Dashboard. Changing the display name does not change the logon or sign-in name for a user account.
To change the display name for a user account
-
Open the Windows Server Essentials Dashboard.
-
On the navigation bar, click Users.
-
In the list of user accounts, select the user account that you want to change.
-
In the <User Account> Tasks pane, click View the account properties. The Properties page for the user account appears.
-
On the General tab, type a new First name and Last name for the user account, and then click OK.
The new display name appears in the list of user accounts.
Activate a user account
When you activate a user account, the assigned user can log on to the network and access network resources to which the account has permission, such as shared folders and the Remote Web Access site.
[!NOTE]
You can only activate a user account that is deactivated. You cannot activate a user account after you remove it from the server.
To activate a user account
-
Open the Windows Server Essentials Dashboard.
-
On the navigation bar, click Users.
-
In the list view, select the user account that you want to activate.
-
In the <User Account> Tasks pane, click Activate the user account.
-
In the confirmation window, click Yes to confirm your action.
[!NOTE]
After you activate a user account, the status for the account displays Active. The user account regains the same access rights that were assigned prior to account deactivation.If you have an integrated email provider, the email account assigned to the user account will also be activated.
Deactivate a user account
When you deactivate a user account, account access to the server is temporarily suspended. Because of this, the assigned user cannot use the account to access network resources such as shared folders or the Remote Web Access site until you activate the account.
If the user account has a Microsoft online account assigned, the online account is also deactivated. The user cannot use resources in Microsoft 365 and other online services that you subscribe to, but the user’s data, including email, is retained in Microsoft Online Services.
[!NOTE]
You can only deactivate a user account that is currently active.
To deactivate a user account
-
Open the Windows Server Essentials Dashboard.
-
On the navigation bar, click Users.
-
In the list view, select the user account that you want to deactivate.
-
In the <User Account> Tasks pane, click Deactivate the user account.
-
In the confirmation window, click Yes to confirm your action.
[!NOTE]
After you deactivate a user account, the status for the account displays Inactive.If you have an integrated email provider, the email account assigned to the user account will also be deactivated.
Understand user accounts
A user account provides important information to Windows Server Essentials, which enables individuals to access information that is stored on the server, and makes it possible for individual users to create and manage their files and settings. Users can log on to any computer on the network if they have a Windows Server Essentials user account and they have permissions to access a computer. Users access their user accounts with their user name and password.
There are two main types of user accounts. Each type gives users a different level of control over the computer:
-
Standard accounts are for everyday computing. The standard account helps protect your network by preventing users from making changes that affect other users, such as deleting files or changing network settings.
-
Administrator accounts provide the most control over a computer network. You should assign the administrator account type only when necessary.
Manage user accounts using the Dashboard
Windows Server Essentials makes it possible to perform common administrative tasks by using the Windows Server Essentials Dashboard. By default, the Users page of the Dashboard includes two tabs: Users and Users Groups.
[!NOTE]
- If you integrate your server that is running Windows Server Essentials with Microsoft 365, a new tab called Distribution Groups is also added within the Users page of the Dashboard.
- In Windows Server Essentials, the Users page of the Dashboard includes only a single tab — Users.
The Users tab includes the following:
-
A list of user accounts, which displays:
-
The name of the user.
-
The Logon name for the user account.
-
Whether the user account has Anywhere Access permission. Anywhere Access permission for a user account is either Allowed or Not allowed.
-
Whether the File History for this user account is managed by the server running Windows Server Essentials. The File History status for a user account is either Managed or Not managed.
-
The level of access that is assigned to the user account. You can assign either Standard user access or Administrator access for a user account.
-
The user account status. A user account can be Active, Inactive, or Incomplete.
-
In Windows Server Essentials, if the server is integrated with Microsoft 365 or Windows Intune, the Microsoft online account is displayed.
-
In Windows Server Essentials, if the server is integrated with Microsoft 365, the status of the account (known in Windows Server Essentials as the Microsoft online account) for the user account is displayed.
-
-
A details pane with additional information about a selected user account.
-
A tasks pane that includes:
-
A set of user account administrative tasks such as viewing and removing user accounts, and changing passwords.
-
Tasks that allow you to globally set or change settings for all user accounts in the network.
The following table describes the various user account tasks that are available from the Users tab. Some of the tasks are user account-specific, and they are only visible when you select a user account in the list.
-
[!NOTE]
If you integrate Microsoft 365 with Windows Server Essentials, additional tasks will become available. For more information, see Manage Online Accounts for Users.
User account tasks in the Dashboard
| Task name | Description |
|---|---|
| View the account properties | Enables you to view and change the properties of the selected user account, and to specify folder access permissions for the account. |
| Deactivate the user account | A user account that is deactivated cannot log on to the network or access network resources such as shared folders or printers. |
| Activate the user account | A user account that is activated can log on to the network and can access network resources as defined by the account permissions. |
| Remove the user account | Enables you to remove the selected user account. |
| Change the user account password | Enables you to reset the network password for the selected user account. |
| Add a user account | Starts the Add a User Account Wizard, which enables you to create a single new user account that has either standard user access or administrator access. |
| Assign a Microsoft online account | Adds a Microsoft online account to the local network user account that is selected.
This task is displayed when your server is integrated with Microsoft online services, such as Microsoft 365. |
| Add Microsoft online accounts | Adds Microsoft online accounts and associates them to local network user accounts.
This task is displayed when your server is integrated with Microsoft online services, such as Microsoft 365. |
| Set the password policy | Enables you to change the values of the password polices for your network. |
| Import Microsoft online accounts | Performs a bulk import of accounts from Microsoft online services into the local network.
This task is displayed when your server is integrated with Microsoft online services, such as Microsoft 365. |
| Refresh | Refreshes the Users tab.
This task is applicable to Windows Server Essentials. |
| Change File History settings | Enables you to change File History settings, such as backup frequency, or backup duration.
This task is applicable to Windows Server Essentials. |
| Export all remote connections | Creates a .CSV-format file of all remote connections to the server that have occurred over the past 30 days. |
Managing passwords and access
The following topics provide information about how to use the Windows Server Essentials Dashboard to manage user account passwords and user access to the shared folders on the server:
-
Change or reset the password for a user account
-
What you should know about password policies
-
Change the password policy
-
Level of access to shared folders
-
Retain and manage access to files for removed user accounts
-
Synchronize the DSRM password with the network administrator password
-
Give user accounts remote desktop permission
-
Enable users to access resources on the server
-
Change remote access permissions for a user account
-
Change virtual private network permissions for a user account
-
Change access to internal shared folders for a user account
-
Allow user accounts to establish a remote desktop session to their computer
Change or reset the password for a user account
To change or reset a user account password, follow these steps.
To reset the password for a user account
-
Open the Windows Server Essentials Dashboard.
-
On the navigation bar, click Users.
-
In the list of user accounts, select the user account that you want to reset.
-
In the <User Account> Tasks pane, click Change the user account password. The Change User Account Password Wizard appears.
-
Type a new password for the user account, and then type the password again to confirm it.
-
Click Change password.
-
Provide the new password to the user.
[!IMPORTANT]
- You may not be able to change your password if the password policy for your account has been set to Passwords never expire.
- Non-ASCII characters are not supported in Azure AD. Therefore, if your server is integrated with Azure AD, do not use any non-ASCII characters in your password.
- If a Microsoft online account (known in Windows Server Essentials as a Microsoft 365 account) is assigned to the user, the password is synchronized with the online account password. The user will use the new password to sign in on the server or sign in to Microsoft 365. For more information, see Manage Online Accounts for Users.
- You may not be able to change your password if the password policy for your account has been set to Passwords never expire.
What you should know about password policies
The password policy is a set of rules that define how users create and use passwords. The policy helps to prevent unauthorized access to user data and other information that is stored on the server. The password policy is applied to all user accounts that access the network.
The Windows Server Essentials password policy consists of three primary elements as follows:
-
Password length. The longer a password is, the more secure it is. Blank passwords are not secure.
-
Password complexity. Complex passwords contain a mixture of uppercase and lowercase letters (a-z, A-Z), base numbers (0-9), and non-alphabetic symbols (such as; !,@,#,_,-). Complex passwords are much less susceptible to unauthorized access. Passwords that contain user names, birthdates, or other personal information do not provide adequate security.
-
Password age. Windows Server Essentials requires that users change their password at least once every 180 days. As an option, you can choose to have passwords never expire.
To make it easier to implement a password policy on your computer network, Windows Server Essentials provides a simple tool that allows you to set or change the password policy to any of the following four pre-defined policy profiles:
-
Weak. Users can specify any password that is not blank.
-
Medium. These passwords must contain at least 5 characters. A complex password is not required.
-
Medium Strong. These passwords must contain at least 5 characters, and must include letters, numbers, and symbols.
-
Strong. These passwords must contain at least 7 characters, and must include letters, numbers, and symbols. These passwords are more secure, but may be more difficult for users to remember.
[!NOTE]
Passwords cannot contain the user name or email address.If you integrate with Microsoft 365, the integration enforces the Strong password policy, and updates the policy to include the following requirements:
- Passwords must contain 8 �16 characters.
- Passwords cannot contain a space or the Microsoft 365 email name.
By default, server installation sets the default password policy to the Strong option.
- Passwords must contain 8 �16 characters.
Change the password policy
Use the following procedure to set or change the password policy to any of four pre-defined policy profiles.
To change the password policy
-
Open the Windows Server Essentials Dashboard, and then click Users.
-
In the Users Tasks pane, click Set the password policy.
-
On the Change the Password Policy screen, set the level of password strength by moving the slider.
Microsoft recommends that you set the password strength to Strong.
[!NOTE]
As an option, you can also select Passwords never expire. This setting is less secure, and so it is not recommended. -
Click Change policy.
Level of access to shared folders
As a best practice, you should assign the most restrictive permissions available that still allow users to perform required tasks.
You have three access settings available for the shared folders on the server:
-
Read/Write. Choose this setting if you want to allow the user account permission to create, change, and delete any files in the shared folder.
-
Read only. Choose this setting if you want to allow the user account permission to only read the files in the shared folder. User accounts with read-only access cannot create, change, or delete any files in the shared folder.
-
No access. Choose this setting if you do not want the user account to access any files in the shared folder.
Retain and manage access to files for removed user accounts
The network administrator can remove a user account and choose to keep the user’s files for future use. In this scenario, the removed user account can no longer be used to sign in to the network; however, the files for this user will be saved in a shared folder, which can be shared with another user.
[!IMPORTANT]
Be aware that if you remove a user account that has a Microsoft online account assigned, the online account is also removed, and the user data, including email, is subject to data retention policies in Microsoft Online Services. To retain the user data for the online account, deactivate the user account instead of removing it. For more information, see Manage Online Accounts for Users.
To remove a user account but retain access to the user’s files
-
Open the Windows Server Essentials Dashboard.
-
On the navigation bar, click Users.
-
In the list of user accounts, select the user account that you want to remove.
-
In the <User Account> Tasks pane, click Remove the user account. The Delete a User Account Wizard appears.
-
On the Do you want to keep the files? page, make sure that the Delete the files including File History backups and redirected folder for this user account check box is clear, and then click Next.
A confirmation page appears warning you that are deleting the account but keeping the files.
-
Click Delete account to remove the user account.
After the user account is removed, the administrator can give another user account access to the shared folder.
To give a user account permission to access a shared folder
-
Open the Windows Server Essentials Dashboard.
-
On the navigation bar, click Storage, and then click the Server Folders tab.
-
In the list of folders, select the Users folder.
-
In the Users Tasks pane, click Open the folder. Windows Explorer opens and displays the contents of the Users folder.
-
Right-click the folder for the user account that you want to share, and then click Properties.
-
In <User Account> Properties, click the Sharing tab, and then click Share.
-
In the File Sharing window, type or select the user account name with whom you want to share the folder, and then click Add.
-
Choose the Permission Level that you want the user account to have, and then click Share.
Synchronize the DSRM password with the network administrator password
Directory Services Restore Mode (DSRM) is a special boot mode for repairing or recovering Active Directory. The operating system uses DSRM to log on to the computer if Active Directory fails or needs to be restored. If your network administrator password and the DSRM password are different, DSRM will not load.
During a clean, first-time installation of Windows Server Essentials, the program sets the DSRM password to the network administrator account password that you specify during setup or in the migration answer file. When you change your network administrator password (as recommended typically every 60 days for increased server security), the password change is not forwarded to DSRM. This results in a password mismatch. If this occurs, you can use the following solutions to manually or automatically synchronize your network administrator’s password with the DSRM password.
To manually synchronize the DSRM password to a network administrator account
-
At a command prompt, run
ntdsutil.exeto open the ntdsutil tool. -
To reset the DSRM password, type set dsrm password.
-
To synchronize the DSRM password on a domain controller with the current network administrator’s account, type:
sync from domain account <current_network_administrator_account>, and then press Enter.
Because you will periodically change the password for the network administrator account, to ensure that the DSRM password is always the same as the current password of the network administrator, we recommend that you create a schedule task to automatically synchronize the DSRM password to the network administrator password daily.
To automatically synchronize the DSRM password to a network administrator account
-
From the server, open Administrative Tools, and then double-click Task Scheduler.
-
In the Task Scheduler Actions pane, click Create Task.
-
In the Name text box, type a name for the task such as AutoSync DSRM Password, and then select the Run with highest privileges option.
-
Define when the task should run:
-
In the Create Task dialog box, click the Triggers tab, and then click New.
-
In the New Trigger dialog box, select your recurrence option, specify the recurrence interval, and choose a start time.
[!NOTE]
As a best practice, you should set the task to run daily during non-business hours. -
Click OK to save your changes and return to the Create Task dialog box.
-
-
Define the task actions:
-
Click the Actions tab, and then click New. The New Action dialog box appears.
-
In the Action list, click Start a program, and then browse to C:WINDOWSSYSTEM32ntdsutil.exe.
-
In the Add arguments(optional) text box, type the following (you must include the quotation marks): set dsrm password sync from domain account SBS_network_administrator_account q q where SBS_network_administrator_account is the current network administrator’s account name.
-
-
Click OK twice to save the task and close the Create Task dialog box. The new task appears in the Active Tasks section of Task Schedule.
Give user accounts remote desktop permission
In the default installation of Windows Server Essentials, network users do not have permission to establish a remote connection to computers or other resources on the network.
Before network users can establish a remote connection to network resources, you must first set up Anywhere Access. After you set up Anywhere Access, users can access files, applications, and computers in your office network from a device in any location with an Internet connection.
The Set up Anywhere Access Wizard allows you to enable two methods of remote access:
-
Virtual private network (VPN)
-
Remote Web Access
When you run the wizard, you can also choose to allow Anywhere Access for all current and newly added user accounts.
To set up Anywhere Access, open the Dashboard Home page, click SETUP, and then click Set up Anywhere Access.
For more information about Anywhere Access, see Manage Anywhere Access.
Enable users to access resources on the server
This section applies to a server running Windows Server Essentials or Windows Server Essentials, or to a server running Windows Server 2012 R2 Standard or Windows Server 2012 R2 Datacenter with the Windows Server Essentials Experience role installed.
If you want users to use remote access, and/or have individual user accounts, after you finish connecting a computer to the server, you can create new network user accounts for the users of the networked computer on the server by using the Dashboard. For more information about creating a user account, see Add a user account. After creating the user accounts, you must provide the network user name and password information to the users of the client computer so that they can access resources on the server by using the Launchpad.
For each user account that you create you can set access for the following through the user account properties:
-
Shared folders. By default, network administrators have Read/Write permission to all the shared folders, and standard user accounts have Read-only permissions to the Company folder. If media streaming is enabled, you can assign folder access permissions for individual standard user accounts for the following shared folders: Music, Pictures, Recorded TV, and Videos. You can set permissions for user accounts to access shared folders on the Shared folders tab of the user account properties.
-
Anywhere Access. By default, network administrators can use either VPN or Remote Web Access to access server resources. For standard user accounts, you must set user account permissions on the Anywhere Access tab.
-
Computer access. By default, network administrators can access all the computers in the network. However, for standard user accounts you can set individual user account permissions for accessing computers on the network on the Computer access tab of the user account properties.
To edit user account properties in Windows Server Essentials 2012 R2
-
Open the Windows Server Essentials Dashboard.
-
On the navigation bar, click USERS.
-
In the list of user accounts, select the user account that you want to edit.
-
In the <User Account> Tasks pane, click View the account properties.
-
In the <User Account> Properties, do the following:
-
On the Shared folders tab, set the appropriate folder permissions for each shared folder as needed.
-
On the Anywhere Access tab:
-
To allow a user to connect to the server by using VPN, select the Allow Virtual Private Network (VPN) check box.
-
To allow a user to connect to the server by using Remote Web Access, select the Allow Remote Web Access and access to web services applications check box.
-
-
On the Computer access tab, select the network computers that you would like the user to have access to.
-
To edit user account properties in Windows Server Essentials 2012
-
Open the Windows Server Essentials Dashboard.
-
On the navigation bar, click USERS.
-
In the list of user accounts, select the user account that you want to edit.
-
In the <User Account> Tasks pane, click Properties.
-
In the <User Account> Properties, do the following:
-
On the General tab, select User can view network health alerts if the user account needs to access network health reports.
-
On the Shared folders tab, set the appropriate folder permissions for each shared folder as needed.
-
On the Anywhere Access tab:
-
To allow a user to connect to the server by using VPN, select the Allow Virtual Private Network (VPN) check box.
-
To allow a user to connect to the server by using Remote Web Access, select the Allow Remote Web Access and access to web services applications check box.
-
-
On the Computer access tab, select the network computers that you would like the user to have access to.
-
Change remote access permissions for a user account
A user can access resources located on the server from a remote location by using a virtual private network (VPN), Remote Web Access, or other web services applications. By default, remote access permissions are turned on for network users when you configure Anywhere Access in Windows Server Essentials by using the Dashboard.
To change remote access permissions for a user account
-
Open the Windows Server Essentials Dashboard.
-
On the navigation bar, click Users.
-
In the list of user accounts, select the user account that you want to change.
-
In the <User Account> Tasks pane, click View the account properties. The Properties page for the user account appears.
-
On the Anywhere Access tab, do the following:
-
Select the Allow Virtual Private Network (VPN) check box to allow a user to connect to the server by using VPN.
-
Select the Allow Remote Web Access and access to web services applications check box to allow a user to connect to the server by using Remote Web Access.
-
-
Click Apply, and then click OK.
Change virtual private network permissions for a user account
You can use a virtual private network (VPN) to connect to Windows Server Essentials and access all your resources that are stored on the server. This is especially useful if you have a client computer that is set up with network accounts that can be used to connect to a hosted Windows Server Essentials server through a VPN connection. All the newly created user accounts on the hosted Windows Server Essentials server must use VPN to log on to the client computer for the first time.
To change VPN permissions for network users
-
Open the Windows Server Essentials Dashboard.
-
On the navigation bar, click USERS.
-
In the list of user accounts, select the user account to which you want to grant permissions to access the desktop remotely.
-
In the <User Account> Tasks pane, click Properties.
-
In the <User Account> Properties, click the Anywhere Access tab.
-
On the Anywhere Access tab, to allow a user to connect to the server by using VPN, select the Allow Virtual Private Network (VPN) check box.
-
Click Apply, and then click OK.
Change access to internal shared folders for a user account
You can manage access to any shared folders on the server by using the tasks on the Server Folders tab of the Dashboard. By default, the following server folders are created when you install Windows Server Essentials:
-
Client Computer Backups. Used to store client computer backups created by Windows Server backup. This server folder is not shared.
-
Company. Used to store and access documents related to your organization by network users.
-
File History Backups. By default, Windows Server Essentials stores file backups created by using File History. This server folder is not shared.
-
Folder Redirection. Used to store and access folders that are set up for folder redirection by network users. This server folder is not shared.
-
Music. Used to store and access music files by network users. This folder is created when you turn on media sharing.
-
Pictures. Used to store and access pictures by network users. This folder is created when you turn on media sharing.
-
Recorded TV. Used to store and access recorded TV programs by network users. This folder is created when you turn on media sharing.
-
Videos. Used to store and access videos by network users. This folder is created when you turn on media sharing.
-
Users. Used to store and access files by network users. A user-specific folder is automatically generated in the Users server folder for every network user account that you create.
To change access to a shared folder for a user account
-
Open the Windows Server Essentials Dashboard.
-
Click STORAGE, and then click Server Folders.
-
Navigate to and select the server folder for which you want to modify permissions.
-
In the task pane, click View the folder properties.
-
In <FolderName> Properties, click Sharing, and select the appropriate user access level for the listed user accounts, and then click Apply.
[!NOTE]
You cannot modify the sharing permissions for File History Backups, Folder Redirection, and Users server folders. Hence, the folder properties of these server folders do not include a Sharing tab.
Allow user accounts to establish a remote desktop session to their computer
This section applies to a server running Windows Server Essentials or Windows Server Essentials, or to a server running Windows Server 2012 R2 Standard or Windows Server 2012 R2 Datacenter with the Windows Server Essentials Experience role installed.
The network administrator can grant permissions to network users that allow them to access their network computers from a remote location.
To enable users to access their network computers from a remote location
-
Open the Windows Server Essentials Dashboard.
-
On the navigation bar, click USERS.
-
In the list of user accounts, select the user account that you want to grant permissions for accessing the desktop remotely.
-
In the <User Account> Tasks pane, click Properties.
-
In the <User Account> Properties, click the Computer Access tab.
-
Select the computers that you want this user account to be able to access remotely, and then click OK.
Additional References
-
Manage Online Accounts for Users
-
Get Connected
-
Use Windows Server Essentials
-
Manage Windows Server Essentials
тогда такой вариант (powershell):
$owners = @{}
get-process -ComputerName ИМЯ.КОМПЬЮТЕРА | select processname,Id,@{l="Owner";e={$owners[$_.id.tostring()]}} | sort "owner"
это выведет все процессы на удалённом компьютере. Если пользователь будет залогинен — он будет в списке. Пример:
ProcessName              Id Owner
-----------              -- -----
System                    4
Idle                      0
ipoint                 3556 Admin
igfxEM                 4620 Admin
itype                  3548 Admin
jucheck                3628 Admin
jusched                6660 Admin
SystemSettings         9204 Admin
svchost                3420 Admin
chrome                 4452 Admin
chrome                 2968 Admin
chrome                11996 Admin
dllhost               11008 Admin
firefox                6752 Admin
firefox                5124 Admin
explorer               4056 Admin
firefox                 268 Admin
conhost               11296 Admin
AnVir                 11196 Admin
ctfmon                 4168 Admin
RuntimeBroker          7408 Admin
svchost                3784 LOCAL SERVICE
svchost                4988 LOCAL SERVICE
svchost                6980 LOCAL SERVICE
svchost               11020 LOCAL SERVICE
svchost               10680 LOCAL SERVICE
dasHost                5508 LOCAL SERVICE
svchost               10720 LOCAL SERVICE
svchost                2120 NETWORK SERVICE
svchost                4388 NETWORK SERVICE
svchost                3792 NETWORK SERVICE
или ещё проще cmd:
query user /server:ИМЯ.КОМПЬЮТЕР
и вывод:
 USERNAME              SESSIONNAME        ID  STATE   IDLE TIME  LOGON TIME
 admin                 console             1  Active      none   28.04.2018 09:49
вообщем, в гугле полно примеров 
В этой статье мы рассмотрим несколько примеров использования PowerShell для получения списка пользователей в различных группах Active Directory. Данная статья должна научить вас получать список учетных записей определенной группы AD и экспортировать полученный список пользователей с различными атрибутами в CSV файл, с которым удобно работать в Excel.
Ранее для построения списка пользователей в группах Active Directory приходилось использовать скрипты VBScript, или утилиты командной строки DSQuery или CSVDE, недостаточно гибкие и удобные.
Для взаимодействия с AD Microsoft разработала специальный модуль Active Directory Module для Windows PowerShell. Впервые данный модуль появился в Windows Server 2008 R2 и для его использования нужно сначала его загрузить в вашу сессию PowerShell командой:
Import-Module ActiveDirectory
В Windows Server 2012 / R2 / Windows Server 2016 этот модуль автоматически устанавливается и загружается при установке на сервере роли ADDS (Active Directory Domain Services), т.е. при повышении сервера до контроллера домена.
В настольных пользовательских операционных системах (Windows 10 / 8 / 7) модуль Active Directory для Windows PowerShell входит в состав RSAT, который нужно скачать, устанавливать и активировать модуль для работы с AD отдельно.
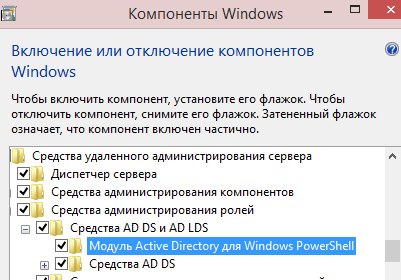
Обратите внимание, что для использования в сессии PowerShell модуля ActiveDirectory не обязательно иметь права администратора домена. Получить информацию о пользователях и группах из AD может любой аутентифицированный пользователь домена.
Для получения информации об учетных записях, которые входят в группу безопасности Active Directory используется командлет Get-ADGroupMember.
Например, чтобы вывести на экран список членов группы Domain Admins, нужно выполнить команду:
Get-ADGroupMember 'Domain Admins'
В том случае, если вы не знаете точного имени группы, можно вывести список всех групп в AD с помощью команды:
Get-ADGroup -filter * | sort name | select Name
Чтобы отобразить только имена пользователей в группе:
Get-ADGroupMember -Identity 'Domain Admin'| ft name
Если в указанной группе содержатся другие группы AD, для вывода членов группы с учетом вложенных групп нужно использовать параметр Recursive .
Get-ADGroupMember -Identity ‘Domain Admin’ -Recursive | ft name
Переключатель –recursive предписывает команде get-adgroupmember получать список пользователей из каждой вложенной группы и выводить только объекты, не являющиеся контейнерами (пользователей или компьютеры). Т.е. данная команда отобразит даже тех пользователей, которые напрямую не входят в группу.
Можно вывести более подробную информацию об учетных записях в данной группе таким образом:
Get-ADGroupMember -Identity ‘Domain Admin’ | foreach { Get-ADUser $_ -Properties * }
Рассмотрим более сложную конструкцию PowerShell, которая позволяет вывести всех членов определённой доменной группы безопасности с информацией о компании, подразделении и должности с последующей сортировкой и разбивкой на блоки с зависимости от конкретного аттрибута (допустим нам нужно сгруппировать пользователей по полю Компания — company ):
Get-ADGroupMember -Recursive ‘Domain Admin’ | ForEach {Get-ADUser -filter {samaccountname -eq $_.SamAccountName} -Properties displayName, company, title, department} | Sort-Object company,displayName | Format-Table displayName,company,department,title -GroupBy company -AutoSize
Для выгрузки полученного списка в текстовый файл в конце предыдущей команды нужно добавить конвейер:
| Out-File -Width 4000 "C:TxTGetUsersADGroupByCompany.txt"
Для выгрузки списка пользователей группы в CSV файл нужно добавить такой конвейер:
| Export-Csv -NoTypeInformation .GetUsersADGroupByCompany.csv -Encoding Unicode
Можно посчитать общее количество пользователей в группе:
(Get-ADGroupMember -Identity 'Domain Admin').Count
Еще один полезный пример. Попробуем найти все группы AD содержащие в имени шаблон *Manager*, и выведем пользователей, которые входят в эти группы. Чтобы выводить только уникальные объекты, воспользуемся аргументом -uniq.
Get-ADGroup -filter 'SamAccountName -like "*Manager*"' | Get-ADGroupMember -recursive|Select-Object -uniq
Если при выполнении команды Get-ADGroupMember появится ошибка:
Get-ADGroupMember : The specified directory service attribute or value does not exist
Значит в состав группы входят пользователи из других лесов. Командлет Get-ADGroupMember не поддерживает работу с пользователями из разных лесов AD.
Для добавления пользователей в группы AD нужно использовать командлет Add-ADGroupMember.