SmugWimp at smugwimp dot com 
16 years ago
If you make changes to your PHP.ini file, consider the following.
(I'm running IIS5 on W2K server. I don't know about 2K3)
PHP will not "take" the changes until the webserver is restarted, and that doesn't mean through the MMC. Usually folks just reboot. But you can also use the following commands, for a much faster "turnaround". At a command line prompt, type:
iisreset /stop
and that will stop the webserver service. Then type:
net start w3svc
and that will start the webserver service again. MUCH faster than a reboot, and you can check your changes faster as a result with the old:
<?php>
phpinfo();
?>
in your page somewhere.
I wish I could remember where I read this tip; it isn't anything I came up with...
lukasz at szostak dot biz 
17 years ago
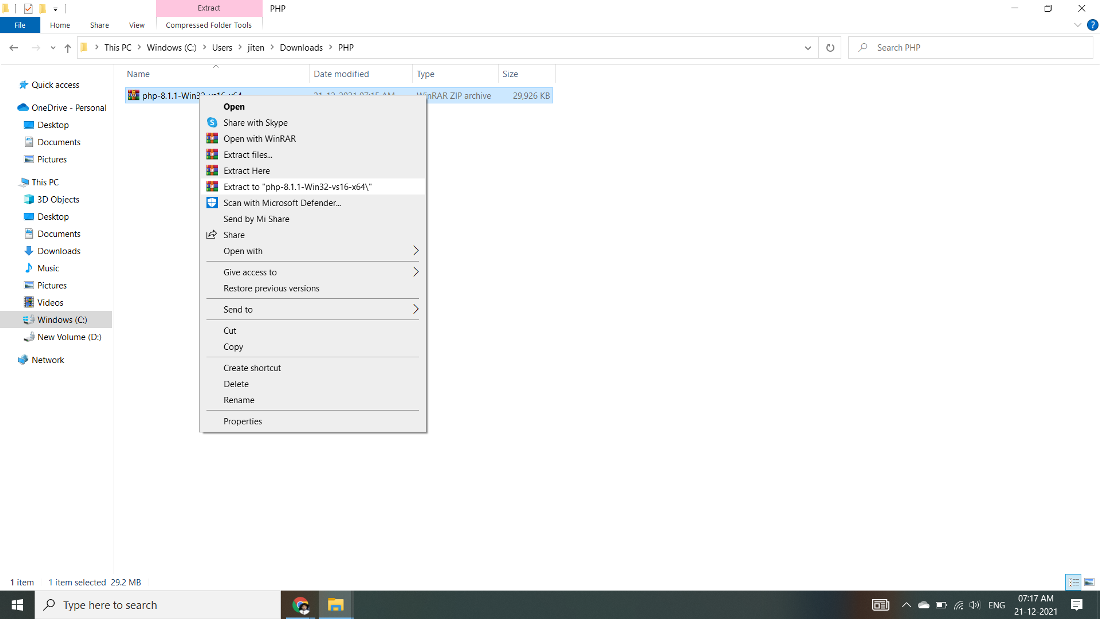
You can have multiple versions of PHP running on the same Apache server. I have seen many different solutions pointing at achieving this, but most of them required installing additional instances of Apache, redirecting ports/hosts, etc., which was not satisfying for me.
Finally, I have come up with the simplest solution I've seen so far, limited to reconfiguring Apache's httpd.conf.
My goal is to have PHP5 as the default scripting language for .php files in my DocumentRoot (which is in my case d:/htdocs), and PHP4 for specified DocumentRoot subdirectories.
Here it is (Apache's httpd.conf contents):
---------------------------
# replace with your PHP4 directory
ScriptAlias /php4/ "c:/usr/php4/"
# replace with your PHP5 directory
ScriptAlias /php5/ "c:/usr/php5/"
AddType application/x-httpd-php .php
Action application/x-httpd-php "/php5/php-cgi.exe"
# populate this for every directory with PHP4 code
<Directory "d:/htdocs/some_subdir">
Action application/x-httpd-php "/php4/php.exe"
# directory where your PHP4 php.ini file is located at
SetEnv PHPRC "c:/usr/php4"
</Directory>
# remember to put this section below the above
<Directory "d:/htdocs">
# directory where your PHP5 php.ini file is located at
SetEnv PHPRC "c:/usr/php5"
</Directory>
---------------------------
This solution is not limited to having only two parallel versions of PHP. You can play with httpd.conf contents to have as many PHP versions configured as you want.
You can also use multiple php.ini configuration files for the same PHP version (but for different DocumentRoot subfolders), which might be useful in some cases.
Remember to put your php.ini files in directories specified in lines "SetEnv PHPRC...", and make sure that there's no php.ini files in other directories (such as c:windows in Windows).
And finally, as you can see, I run PHP in CGI mode. This has its advantages and limitations. If you have to run PHP as Apache module, then... sorry - you have to use other solution (the best advice as always is: Google it!).
Hope this helps someone.
Jack Hardie 
15 years ago
If you are installing PHP on Vista just go to David Wang's blog. http://blogs.msdn.com/david.wang/
archive/2006/06/21/HOWTO-Install-and-Run-PHP-on-IIS7-Part-2.aspx
Magic!
jp at iticonsulting dot nl 
17 years ago
If you get 404 page not found on Windows/IIS5, have a look at C:SYSTEM32INETSRVURLSCAN
There is a .ini file there that prevents some files from being served by IIS, even if they exist, instead IIS will give a 404. The urlscan logfile (same place) should give you some insight into what parameter is preventing a page from loading, if any.
webmaster at nachelfamily dot com 
16 years ago
I made the mistake of setting a 'wildcard application map' for PHP on a Windows 2003 / IIS 6.0 / PHP ISAPI installation.
This resulted in "No input file specified" errors whenever I tried to load the default page in my site's directories. I don't know why this broke things, but it did.
If anyone has the same problem, this may be the cause.
bufoni at hotmail dot com 
13 years ago
Oh Man!
I installed by Microsoft Installer, manually, whatever I always received de same error from IIS7.
HTTP Error 404.3 - Not Found
The page you are requesting cannot be served because of the extension configuration. If the page is a script, add a handler. If the file should be downloaded, add a MIME map.
The IIS7 interface is quite diferent and are not all together like IIS6
The 5.3 version have not any of those files: php5stdll, php5isapi.dll. etc.
The installer puts others files in handlers and I decided to use them as substitutes. Nothing done!
After that, I discovered that installer do not install these files within the sites, but in the root default site configuration of IIS7.
So, I copied the root configuration to my site and them it worked (all others procedures were done e.g. copy php.ini to windows folder)
robert dot johnson at icap dot com 
15 years ago
IIS setup: 403 forbidden error.
We had installed two separate different PHP versions - PHP 5.1.4 followed by 5.2.5.
We configured 5.2.5 php5isapi.dll to be loaded as the .php file type extension.
Despite this, php version 5.1.4 was being loaded. We renamed 5.1.4's folder and then PHP was not loading at all.
There were no visible references to 5.1.4 in the IIS configuration, but in the file webConfig.xml, there was a reference to 5.1.4's isapi under IISFilters.
To fix this problem, we added version 5.2.5's php5isapi.dll to the ISAPI Filter category for the web site, in the IIS control panel.
smileclick at hotmail dot com 
15 years ago
Still Can't Run PHP Code?
After installing php-5.2.5-win32-installer.msi on my Windows XP2. with IIS5.1 it still didn't run PHP files.
I eventually found the fix*:
1. Goto Control Panel>System>Advanced>Environmental Variables
2. Add a New System Variable "PHRC" and set its path as "C:Program FilesPHP"
3. Restart
*source:
http://us2.php.net/manual/en/faq.installation.php
#faq.installation.addtopath
jneill at gamedaytv dot com 
16 years ago
Here's how to run dual PHP instances with PHP 5.2 and any previous PHP on Windows 2003:
1. Right-click My Computer, go to Advanced tab, and click on Environment Variables.
Add the two installations and their EXT directories to the Path variable. For example, add:
c:php;c:phpext;c:TMASphp;c:tmasphpext;
Then, add the newer PHP version's directory as a variable called PHPRC. For example:
Variable:PHPRC
Value: C:PHP
Click OK to close the Environment Variables window, and click OK to close System Properties.
2. In registry, under HKEY_LOCAL_MACHINE>SOFTWARE>PHP, add a REG_SZ key called iniFilePath and give it a value
of the directory where the older PHP is installed. For example:
C:TMASPHP
3. In IIS, go to the Web Service Extensions. Add both versions' ISAPI module separately to the extensions
list, and allow both.
4. In IIS, go to each website utilizing the PHP versions. Set an ISAPI filter if needed. On the Home Directory
tab, click Configuration, and add .php, .php3, .phtml, and any other extensions needed (perhaps .html?) to
be filtered through PHP, and specify the ISAPI module version needed for each website.
You can now run two versions of PHP. This is because the order of where to look for the .ini file changed
between previous PHP versions and PHP 5.2, as documented at http://us2.php.net/ini:
---------------------------------------------------
php.ini is searched in these locations (in order):
* SAPI module specific location (PHPIniDir directive in Apache 2, -c command line option in CGI and CLI, php_ini parameter in NSAPI, PHP_INI_PATH environment variable in THTTPD)
* The PHPRC environment variable. Before PHP 5.2.0 this was checked after the registry key mentioned below.
* HKEY_LOCAL_MACHINESOFTWAREPHPIniFilePath (Windows Registry location)
* Current working directory (for CLI)
* The web server's directory (for SAPI modules), or directory of PHP (otherwise in Windows)
* Windows directory (C:windows or C:winnt) (for Windows), or --with-config-file-path compile time option
----------------------------------------------------
Feroz Zahid 
17 years ago
In order to run php scripts with php.exe CGI instead of php4isapi.dll under IIS, following steps can be followed.
i) Add a web service extension for PHP using IIS manager. Choose a web service extension name like 'PHP' and add your php.exe path in the 'file location' while adding the required file e.g. 'C:phpphp.exe' in the Add extension dialog box. Don't forget to 'Allow' the extension file.
ii) Open php.ini file located at %systemroot%. Set the following variables to the shown values.
cgi.force_redirect = 0
cgi.redirect_status_env = ENV_VAR_NAME
iii) In your websites, add Application Mapping for '.php' and set the executable path to your php.exe file path.
You can test whether PHP is running or not and other PHP settings using the following simple PHP script.
<?php>
phpinfo();
?>
Feroz Zahid
ferozzahid [_at_] usa [_dot_] [_com_]
dpharshman at dslextreme dot com 
13 years ago
PHP 5.2.9.2 Install on XP Pro IIS 5.1 - phpinfo( ) results incorrect
Testing Date: 05.15.09
Background:
For several days now I, as a newbie, have been unsure if I had installed PHP correctly, or not. No matter what I did phpinfo( ) reported "Configuratin File Path" as: “C:WINDOWS”. I was left to wonder what was wrong.
To help resolve the phpinfo() “issue”, I conducted a series of tests using two scripts:
The first is “test-php-ini-loaded.php”; it is stored in c:inetpubwwwroot, and has the following code:
<?php
$inipath = php_ini_loaded_file();
if (
$inipath) {
echo 'Loaded php.ini: ' . $inipath;
} else {
echo 'A php.ini file is not loaded';
}
?>
The second script is simply calls phpinfo( ). It is named test.php, is stored in “c:inetpubwwroot”, and has the following code:
<?php phpinfo( ); ?>
My Dev Environment:
1. Windows XP Pro SP3
2. IIS 5.1 / MMC 3.0
3. PHP 5.2.9.2 – phpMyAdmin not yet installed
4. (plus MySQL 5.1, etc.)
5. Install location is on my local E: drive
The Tests:
Test 1:
a. PHPRC environment variable and IniFilePath Registry left in place and active
b. Verified no other copies of php.ini exist on the system other than in my E:PHP folder
c. Renamed php.ini to hold-php.ini
d. Stopped and started IIS (“net stop iisadmin” and “net start w3svc”)
e. Ran “test-php-ini-loaded.php” to check whether my php.ini is loaded. It is not.
f. Ran "test.php". “Loaded Configuration File” was empty, while “Configuration File (php.ini) Path” showed: C:WINDOWS.
Test 2:
a. Moved php.ini from E:PHP to C:WINDOWS
b. Stopped and started IIS
c. Ran "test-php-ini-loaded.php" to check if my php.ini is loaded. It is not, which surprised me.
d. Ran "test.php". My php.ini is apparently not loaded, or found, by phpinfo( ), even though “Configuration File (php.ini) Path” reports it as being in C:WINDOWS.
e. Note: Per PHP’s “The configuration file” note, PHP's search order includes: “Windows directory (C:windows or C:winnt) (for Windows), ...”; but it apparently doesn’t or php.ini would have been found and displayed at “Loaded Configuration File”.
Test 3:
a. Left the solo copy of my php.ini in C:WINDOWS
b. Disabled PHPRC environment variable by renaming it to “Ex-PHPRC and saving the settings (note: for this test I left the Registry entry for PHP IniFilePath intact)
c. Stopped and started IIS
d. Ran "test-php-ini-loaded.php" to check whether my php.ini is loaded. Predictably it is not found.
e. Ran the "test.php". Again, my php.ini file is reported as not found in C:WINDOWS though “Configuration File (php.ini) Path” reports it as being there.
Test 4:
a. To be thorough and eliminate all possible sources of “mis-direction” I deleted the PHP IniFilePath Registry entry (after backing up the Registry). The PHPRC environment variable was left disabled.
b. Stopped and started IIS
c. Ran "test-php-ini-loaded.php" to check whether my php.ini is loaded. Predictably it is not.
d. Ran "test.php". Again, no change. My php.ini file is not found “Configuration File (php.ini) Path” reports it as being there.
Conclusions:
The first conclusion I came to is that, in the default download version of phpinfo( ), “Configuration File (php.ini) Path” is hard-wired to report C:WINDOWS whether php.ini is there or not. Further, that C:WINDOWS is not a default search location (at least not on XP).
However, given an otherwise “proper” setup, phpinfo() reporting C:WINDOWS as the value for “Configuration File (php.ini) Path” is merely misleading and is not actually harmful or indicative of a failed installation.
Thanks go to Peter Guy of www.peterguy.com who suggested the testing, and to Daniel Brown of www.php.net for some initial guidance.
P.S. This note is not meant to take anything away from PHP. It is a fine tool. The sole purpose of the testing was to confirm that my installation of PHP was correct.
ratkinson at tbs-ltd dot co dot uk 
16 years ago
When installing onto the Windows IIS platform, ensure you add the PHPRC Server Variable to point to your PHP.INI file.
Also, add '.INI' to the FILEEXT Server Variable. Failure to add these could stop the PHP engine being able to find your PHP.INI file, and none of your modifications will be read.
Rob.
Этот раздел содержит инструкции для ручной установки и настройки
PHP на Microsoft Windows.
Выбор и загрузка пакета дистрибутивов PHP
Загрузите дистрибутив PHP в виде zip-архива с
» PHP для Windows: Исполняемые файлы и исходные коды.
Существует несколько различных версий zip-пакетов — выберите версию, которая подходит для
используемого веб сервера:
-
Если PHP используется с IIS, тогда следует использовать PHP 5.3 VC9 Non Thread Safe или
PHP 5.2 VC6 Non Thread Safe; -
Если PHP используется с IIS7 или выше и версия PHP 5.3+, тогда должна использоваться версия
дистрибутива PHP VC9. -
Если PHP используется с Apache 1 или Apache 2 тогда выбирайте PHP 5.3 VC6 или
PHP 5.2 VC6.
Замечание:
Версии VC9 компилируются с помощью Visual Studio 2008 и имеют улучшенную
производительность и стабильность. Версии VC9 требуют наличия в системе
» Microsoft 2008 C++ Runtime (x86) или
» Microsoft 2008 C++ Runtime (x64).
Структура пакетов PHP и их содержимое
Распакуйте содержимое zip архива в директорию по вашему выбору,
например C:PHP. Директория и структура файлов, извлеченных из zip, будет
такой:
Пример #1 Структура пакета PHP 5
c:php
   |
   +--dev
   |  |
   |  |-php5ts.lib                 -- версия php5.lib без поддержки многопоточности
   |
   +--ext                          -- DLL расширения для PHP
   |  |
   |  |-php_bz2.dll
   |  |
   |  |-php_cpdf.dll
   |  |
   |  |-...
   |
   +--extras                       -- пустой
   |
   +--pear                         -- начальная копия PEAR
   |
   |
   |-go-pear.bat                   -- скрипт установки PEAR
   |
   |-...
   |
   |-php-cgi.exe                   -- исполняемый файл CGI
   |
   |-php-win.exe                   -- выполняет скрипты без открытой консоли
   |
   |-php.exe                       -- Исполняемый файл PHP для командной строки (CLI)
   |
   |-...
   |
   |-php.ini-development           -- настройки php.ini по умолчанию
   |
   |-php.ini-production            -- рекомендуемые настройки php.ini
   |
   |-php5apache2_2.dll             -- имеется только в многопоточной версии
   |
   |-php5apache2_2_filter.dll      -- имеется только в многопоточной версии
   |
   |-...
   |
   |-php5ts.dll                    -- ядро PHP DLL ( php5.dll в версии без поддержки многопоточности)
   |
   |-...
Ниже представлен список модулей и исполняемых файлов, включенных в PHP zip
дистрибутив:
-
go-pear.bat — скрипт установки PEAR. Подробнее см. » Установка (PEAR).
-
php-cgi.exe — исполняемый файл CGI, который может быть использован во время запуска PHP
на IIS через CGI или FastCGI. -
php-win.exe — исполняемый файл PHP для выполнения PHP скриптов без использования консоли
(например, приложения PHP, использующие Windows GUI). -
php.exe — исполняемый файл PHP для выполнения PHP скриптов в консоли (CLI).
-
php5apache2_2.dll — модуль Apache 2.2.X.
-
php5apache2_2_filter.dll — фильтр Apache 2.2.X.
Изменение файла php.ini
После того, как содержимое пакета php извлечено, создайте копию php.ini-production с именем php.ini
в той же папке. Если необходимо, также возможно разместить php.ini в любом другом месте по вашему выбору,
но это потребует дополнительной настройки, которая приводится в разделе Настройка PHP.
Файл php.ini содержит правила исполнения PHP и инструкции по работе с
окружением, в котором он запускается. Ниже приводятся некоторые из настроек php.ini,
которые могут улучшить работу PHP в Windows. Некоторые из них опциональны. Есть
много других директив, которые могут быть полезны в вашем окружении — обращайтесь к
списку директив php.ini за более подробной информацией.
Обязательные директивы:
-
extension_dir = <путь к директории расширений> — extension_dir
указывает директорию, где расположены расширения PHP. Путь может быть абсолютным
(например «C:PHPext») или относительным (например «.ext»). Используемые в php.ini расширения
должны быть расположены в extension_dir. -
extension = xxxxx.dll — Для каждого подключаемого расширения необходимо указать директиву «extension=».
Расширения из extension_dir, отмеченные такой директивой, загружаются при старте PHP. -
log_errors = On — в PHP есть механизм ведения лога ошибок, который может использоваться для сохранения ошибок в файле
или для отправки в сервис (например syslog). Механизм также использует значение директивы error_log. Когда PHP исполняется службой IIS,
log_errors должен быть включен с корректным error_log. -
error_log = <пусть к файлу лога ошибок> — error_log нужен для обозначения абсолютного
или относительного пути к файлу, в который протоколируются ошибки PHP. Этот файл должен доступным для записи веб-сервером.
Самые распространенные места размещения этого файла — различные временные TEMP директории, например «C:inetpubtempphp-errors.log». -
cgi.force_redirect = 0 — Эта директива необходима для исполнения под IIS.
Это механизм защиты директории, требуемый многими другими веб серверами. Однако, включение его под IIS
вызовет ошибки ядра PHP в Windows. -
cgi.fix_pathinfo = 1 — Обеспечивает поддержку PATH_INFO согласно спецификации CGI.
IIS FastCGI использует эту настройку. -
fastcgi.impersonate = 1 — FastCGI под IIS поддерживает способность идентифицировать
маркеры безопасности вызывающего клиента. Это позволяет IIS определять контекст безопасности, под которые выполняется запрос. -
fastcgi.logging = 0 — Запись логов FastCGI должна быть выключена в IIS. Если запись включена,
тогда все сообщения любых классов распознаются FastCGI как ошибки, что приведет IIS к генерации исключения HTTP 500.
Опциональные директивы
-
max_execution_time = ## — Эта директива указывает максимальное время выполнения любого скрипта PHP.
По умолчанию равно 30 секундам. Следует увеличить это значение, если приложение PHP должно выполняться дольше. -
memory_limit = ###M — Количество памяти, доступное процессу PHP, в Мб.
По умолчанию 128, что достаточно для большинства PHP приложений. Некоторым сложным приложениям может потребоваться больше памяти. -
display_errors = Off — Директива определяет, какие ошибки следует возвращать веб-серверу для
дальнейшего протоколирования. При значении «On» PHP сообщает обо всех видах ошибок, которые
приводятся в директиве error_reporting.
По соображениям безопасности рекомендуется установить в «Off» на рабочих серверах, чтобы исключить передачу
вывода ошибок конечному пользователю, так как они могут содержат информацию, угрожающую безопасности приложения. -
open_basedir = <пути к директориям, разделенные точкой с запятой>, например
openbasedir=»C:inetpubwwwroot;C:inetpubtemp». Эта директива указывает пути к директориям, в которых PHP
разрешены операции с файловой системой. Любая операция с файлами и директориями вне указанных путей будет приводить к ошибке.
Эта директива особенно полезна для предотвращения доступа к установленному PHP в окружениях разделяемых хостингов для предотвращения
доступа PHP скриптов к любым файлам вне корневой директории веб сайта. -
upload_max_filesize = ###M и post_max_size = ###M —
Максимальный разрешенный размер загруженного файла и присланных данных соответственно. Значения этих директив должны быть
увеличены, если приложения PHP должны обрабатывать большие загружаемые файлы, например изображения или видеофайлы.
После установки PHP в вашей системе, следующим шагом будет выбор веб-сервера и его дальнейшая
настройка для работы с PHP. Выберите конкретный веб-сервер в оглавлении к данному материалу.
Помимо запуска PHP с помощью веб-сервера, PHP может быть запущен из командной строки
как .BAT скрипт. За более подробной информацией обращайтесь к материалу
Консоль PHP на Microsoft Windows.
Вернуться к: Установка в системах Windows
В этой статье вы узнаете как установить php 7.0 и выше на Windows 10, очень просто, надеюсь эта статья будет полезна для вас.
Скачать PHP:
Сначала вам надо скачать PHP 7 для Windows 10 c сайта или для Windows 7, для этого заходим по ссылки, там нажимаем на Zip.

Как можете заметить, я скачиваю тут x64 битную, но не переживаете, там также вы можете скачать x32 битную версию, для этого надо прокрутить чуть ниже и найти, где будет написано x86, если в друг у вас архитектура не x64.
Установка PHP:
После того как скачали сам PHP, пришло время его установить, для архивируем архив который скачали, и создаём папку куда положим все файлы.

Как можете заметить, я поместил все файлы в папку в документах, но это ещё не всё.
Теперь на надо добавить PHP в path, чтобы была возможность запускать PHP скрипты из командной строки, для этого заходим в «Этот компьютер» и там нажимаем правой кнопкой мыши, выбираем «Свойства».

Дальше в открывшемся окне с боку выбираем «Дополнительные параметры системы».

В открывшемся окне нажимаем на кнопку «Переменные среды…».

В открывшемся окне выбираем внизу «Path» и нажимаем кнопку изменить.

Нажимаем «Создать» и вписываем путь, куда вы архивировали ваш PHP, на этом всё и заканчивается, поздравляю вас, вы установили и подключили PHP.
Тест PHP:
Теперь не большой тест, что бы наперника проверить что мы правильно установили PHP, для этого открываем блокнот и делаем не большую PHP программу.
Программа просто выводит «Hello World!» на экран командной строки. Запускаем программу через CMD или командную строку, вот что вышло.

Как можете заметить всё работает нормально, значит и PHP установился нормально.
Вывод:
Вот такая статья получилась где показывалось как установить PHP 7.0 и выше на Windows 10, надеюсь для вас она была полезна, и вы ещё будите читать наши статьи.
Также посмотрите: Как выучить язык PHP с нуля и максимально эффективно.
Подписываетесь на соц-сети:
Оценка:
Загрузка…
Также рекомендую:
This article explains how to install PHP 8.2 and Apache 2.4 on Windows 10 or 11 (64-bit).
Linux and macOS users often have Apache and PHP pre-installed or available via package managers. Windows requires a little more effort. The steps below may work with other editions of Windows, PHP, and Apache, but check the documentation of each dependency for specific instructions.
Contents:
- Why PHP?
- Why Install PHP Locally?
- Alternative Installation Options
- Using an all-in-one package
- Using a Linux virtual machine
- Using Windows Subsystem for Linux 2
- Using Docker
- Installing Apache (optional)
- Installing PHP
- Step 1: Download the PHP files
- Step 2: Extract the files
- Step 3: Configure
php.ini - Step 4: Add
C:phpto thePATHenvironment variable - Step 5: Configure PHP as an Apache module
- Step 6: Test a PHP file
Why PHP?
PHP remains the most widespread and popular server-side programming language on the Web. It’s installed by most web hosts, and has a simple learning curve, close ties with the MySQL database, superb documentation, and a wide collection of libraries to cut your development time. PHP may not be perfect, but you should consider it for your next web application. It’s the language of choice for Facebook, Slack, Wikipedia, MailChimp, Etsy, and WordPress (the content management system which powers almost 45% of the web).
To get your PHP setup blazing fast, check out our free book on improving PHP Performance.
Why Install PHP Locally?
Installing PHP on your development PC allows you to create and test websites and applications without affecting the data or systems on your live server.
Alternative Installation Options
Before you jump in, there may be a simpler installation options…
Using an all-in-one package
All-in-one packages are available for Windows. They contain Apache, PHP, MySQL, and other useful dependencies in a single installation file. These packages include XAMPP, WampServer and Web.Developer.
These packages are easy to use, but they may not match your live server environment. Installing Apache and PHP manually will help you learn more about the system and configuration options.
Using a Linux virtual machine
Microsoft Hyper-V (provided in Windows Professional) and VirtualBox are free hypervisors which emulate a PC so you can install another operating system.
You can install any version of Linux, then follow its Apache and PHP installation instructions. Alternatively, distros such as Ubuntu Server provide them as standard (although they may not be the latest editions).
Using Windows Subsystem for Linux 2
WSL2 is also a virtual machine, but it’s tightly integrated into Windows so activities such as file sharing and localhost resolution are seamless. You can install a variety of Linux distros, so refer to the appropriate Apache and PHP instructions.
Using Docker
Docker creates a wrapper (known as a container) around pre-configured application dependencies such as Apache, PHP, MySQL, MongoDB, and most other web software. Containers look like full Linux Virtual Machines but are considerably more lightweight.
Once you’ve installed Docker Desktop on Windows, it’s easy to download, configure, and run Apache and PHP.
Docker is currently considered the best option for setting up a PHP development environment. Check out SitePoint’s article Setting Up a Modern PHP Development Environment with Docker for a complete guide to setting it up.
Installing Apache (optional)
The following sections describe how to install Apache and PHP directly on Windows.
PHP provides a built-in web server, which you can launch by navigating to a folder and running the PHP executable with an -S parameter to set the localhost port. For example:
cd myproject
php -S localhost:8000
You can then view PHP pages in a browser at http://localhost:8000.
This may be adequate for quick tests, but your live server will use Apache or similar web server software. Emulating that environment as closely as possible permits more advanced customization and should prevent development errors.
To install Apache, download the latest Win64 ZIP file from https://www.apachelounge.com/download/ and extract its Apache24 folder to the root of your C: drive. You’ll also need to install the Visual C++ Redistributable for Visual Studio 2015–2020 (vc_redist_x64); the page has a link at the top.
Open a cmd command prompt (not PowerShell) and start Apache with:
cd C:Apache24bin
httpd
You may need to accept a firewall exception before the server starts to run. Open http://localhost in a browser and an “It works!” message should appear. Note:
C:Apache24confhttpd.confis Apache’s configuration file if you need to change server settings.C:Apache24htdocsis the web server’s root content folder. It contains a singleindex.htmlfile with the “It works!” message.
If Apache fails to start, another application could be hogging port 80. (Skype is the prime candidate, and the Windows app won’t let you disable it!) If this occurs, edit C:Apache24confhttpd.conf and change the line Listen 80 to Listen 8080 or any other free port. Restart Apache and, from that point onward, you can load web files at http://localhost:8080.
Stop the server by pressing Ctrl + C in the cmd terminal. The ReadMe file in the ZIP also provides instructions for installing Apache as a Windows service so it auto-starts on boot.
Installing PHP
Install PHP by following the steps below. Note that there’s more than one way to configure Apache and PHP, but this is possibly the quickest method.
Step 1: Download the PHP files
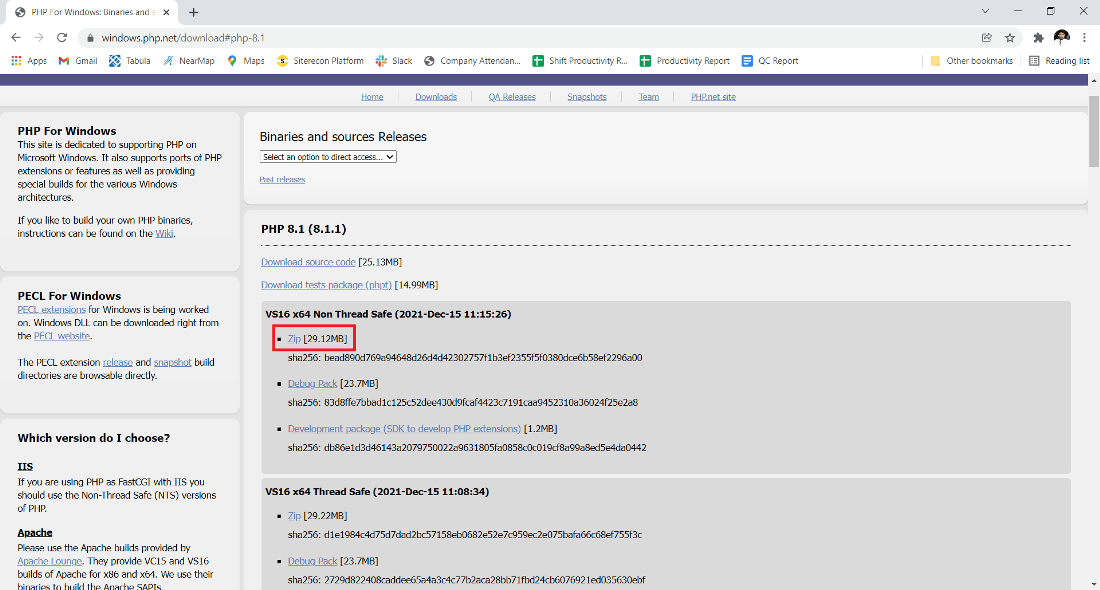
Get the latest PHP x64 Thread Safe ZIP package from https://windows.php.net/download/.
Create a new php folder in the root of your C: drive and extract the content of the ZIP into it.
You can install PHP anywhere on your system, but you’ll need to change the paths referenced below if you use anything other than C:php.
Step 3: Configure php.ini
PHP’s configuration file is php.ini. This doesn’t exist initially, so copy C:phpphp.ini-development to C:phpphp.ini. This default configuration provides a development setup which reports all PHP errors and warnings.
You can edit php.ini in a text editor, and you may need to change lines such as those suggested below (use search to find the setting). In most cases, you’ll need to remove a leading semicolon (;) to uncomment a value.
First, enable any required extensions according to the libraries you want to use. The following extensions should be suitable for most applications including WordPress:
extension=curl
extension=gd
extension=mbstring
extension=pdo_mysql
If you want to send emails using PHP’s mail() function, enter the details of an SMTP server in the [mail function] section (your ISP’s settings should be suitable):
[mail function]
; For Win32 only.
; http://php.net/smtp
SMTP = mail.myisp.com
; http://php.net/smtp-port
smtp_port = 25

; For Win32 only.
; http://php.net/sendmail-from
sendmail_from = my@emailaddress.com
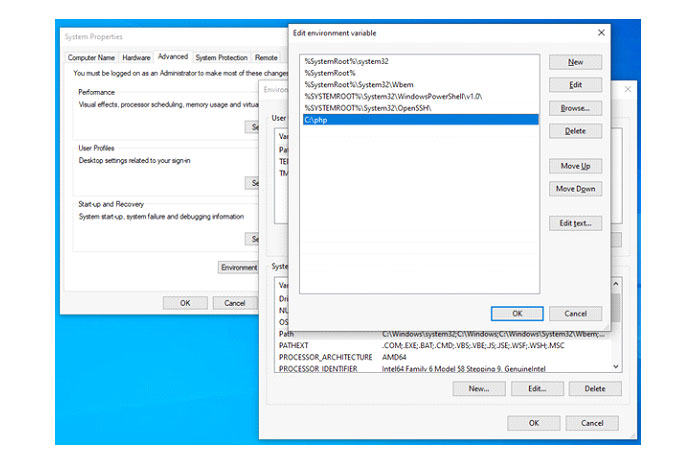
Step 4: Add C:php to the PATH environment variable
To ensure Windows can find the PHP executable, you must add it to the PATH environment variable. Click the Windows Start button and type “environment”, then click Edit the system environment variables. Select the Advanced tab, and click the Environment Variables button.
Scroll down the System variables list and click Path, followed by the Edit button. Click New and add C:php.
Note that older editions of Windows provide a single text box with paths separated by semi-colons (;).
Now OK your way out. You shouldn’t need to reboot, but you may need to close and restart any cmd terminals you have open.
Step 5: Configure PHP as an Apache module
Ensure Apache is not running and open its C:Apache24confhttpd.conf configuration file in a text editor. Add the following lines to the bottom of the file to set PHP as an Apache module (change the file locations if necessary but use forward slashes rather than Windows backslashes):
# PHP8 module
PHPIniDir "C:/php"
LoadModule php_module "C:/php/php8apache2_4.dll"
AddType application/x-httpd-php .php
Optionally, change the DirectoryIndex setting to use index.php as the default in preference to index.html. The initial setting is:
<IfModule dir_module>
    DirectoryIndex index.html
</IfModule>
Change it to:
<IfModule dir_module>
    DirectoryIndex index.php index.html
</IfModule>
Save httpd.conf and test the updates from a cmd command line:
cd C:Apache24bin
httpd -t
Syntax OK will appear … unless you have errors in your configuration.
If all went well, start Apache with httpd.
Step 6: Test a PHP file
Create a new file named index.php in Apache’s web page root folder at C:Apache24htdocs. Add the following PHP code:
<?php
phpinfo();
?>
Open a web browser and enter your server address: http://localhost/. A PHP version page should appear, showing all PHP and Apache configuration settings.
You can now create PHP sites and applications in any subfolder of C:Apache24htdocs. If you need to work more than one project, consider defining Apache Virtual Hosts so you can run separate codebases on different localhost subdomains or ports.
Further information:
- How to Install Apache
- How to Install MySQL
- MySQL: the Pros and Cons of MyISAM Tables
- MySQL: the Pros and Cons of InnoDB Tables
- How to Use MySQL Foreign Keys for Quicker Database Development
- Book: PHP & MySQL: Novice to Ninja, 7th Edition
- Book: Jump Start PHP Environment, as well as many more books in our library.
Best of luck!
Установка PHP 8 на Windows 10
Найти дистрибутив PHP можно по адресу https://windows.php.net/download#php-8.1 Выберите версию Thread Safe.
В папке c:WebServerWAMP создайте новую папку PHP и скопируйте туда содержимое архива php-8.1.5 — VS16 x64 Thread Safe (2022-Apr-12 18:12:52) .
Смотрите Дерево каталогов .
Настройка конфигурационного файла php.ini
С помощью Notepad++ открываем php.ini-development в папке c:WebServerWAMPPHP и сохраняем его как php.ini , и вносим в него следующие изменения .
Для этого находим строку – 768 :
И заменяем ее на :
extension_dir = "C:WebServerWAMPPHPext"Теперь найдите строки: Начинается со строки 920 .
;extension=bz2
;extension=curl
;extension=fileinfo
;extension=gd2
;extension=gettext
;extension=gmp
;extension=intl
;extension=imap
;extension=interbase
;extension=ldap
;extension=mbstring
;extension=exif      ; Must be after mbstring as it depends on it
;extension=mysqli
;extension=oci8_12c  ; Use with Oracle Database 12c Instant Client
;extension=openssl
;extension=pdo_firebird
;extension=pdo_mysql
;extension=pdo_oci
;extension=pdo_odbc
;extension=pdo_pgsql
;extension=pdo_sqlite
;extension=pgsql
;extension=shmop
И заменим их на :
extension=bz2
extension=curl
extension=fileinfo
extension=gd2
extension=gettext
extension=gmp
extension=intl
extension=imap
;extension=interbase
extension=ldap
extension=mbstring
extension=exif      ; Must be after mbstring as it depends on it
extension=mysqli
;extension=oci8_12c  ; Use with Oracle Database 12c Instant Client
extension=openssl
;extension=pdo_firebird
extension=pdo_mysql
;extension=pdo_oci
extension=pdo_odbc
extension=pdo_pgsql
extension=pdo_sqlite
extension=pgsql
extension=shmop
Заменим строки: – начинаются со строки 950.
;extension=soap
;extension=sockets
;extension=sqlite3
;extension=tidy
;extension=xmlrpc
;extension=xsl
На:
extension=soap
extension=sockets
extension=sqlite3
extension=tidy
extension=xmlrpc
extension=xsl
Указываем кодировку по умолчанию . Для этого находим строку – 720 :
;default_charset = "UTF-8"И меняем ее на :
default_charset = "UTF-8"Находим строку – 746:
;include_path = ".;c:phpincludes"И меняем ее на :
include_path = ".;C:WebServerhomeincludes"Предварительно создадим папку includes в C:WebServerhome
Здесь будут хранится подключаемые файлы PHP .
Заменим строку – 970:
На:
date.timezone = "Europe/Moscow"Сохраняем и закрываем файл php.ini .
Теперь необходимо вписать поддержку PHP в файл конфигурации сервера Apache . Открываем файл httpd.conf и в конец файла добавим строки :
PHPIniDir "C:/WebServer/WAMP/PHP"
AddHandler application/x-httpd-php .php
LoadModule php_module "C:/WebServer/WAMP/PHP/php8apache2_4.dll"
Сохраняем и закрываем файл httpd.conf .
Настройка переменной среды
Далее необходимо добавить каталог с установленным интерпретатором PHP в переменную PATH операционной системы Windows 10 . Для этого нажмите кнопку Пуск на Windows 10, начните набирать «Изменение системных переменных среды» и откройте соответствующее окно настроек.

В открывшемся окне выбираем в самом низу пункт переменные среды .
В следующем открывшемся окне :

Выберем пункт path и нажимаем изменить .
В следующем открывшемся окне :

Выбираем пункт создать и в открывшейся строке напишите C:WebServerWAMPPHP и выбираем пункт вверх и подымаем нашу строку к вверху , и нажимаем кнопку Ok , как на рисунке ниже .

Во всех открытых окнах нажимаем Ok , все окна переменной среды path закрываем . После данных изменений следует перезагрузить компьютер .
После перезагрузки компьютера , открываем Notepad++ и набираем следующий код :
<?php
phpinfo();
?>
Сохраняем файл в каталоге c:WEbServerhomewww с названием i.php
В адресной строке Web – браузера набираем : http://localhost/i.php , если вы увидите данные о интерпретаторе PHP , как на рисунке , то значит все настройки сделали правильно и PHP работает .

Установка PHP завершена , если при выполнении примеров появляются ошибки ошибки , то проверяйте все в конфигурационные файлы , перезагружаем сервер и снова пробуем достичь желаемого результата.
И помните после каждого изменения конфигурационных файлов и исправлении ошибок , нужно чистить историю Web – браузера , может так получится вы нашли исправили ошибку , перезагрузили сервер , а Web – браузер выдает вам файлы из истории , и вы видите при загрузке опять ошибку .
PHP is a general-purpose scripting language geared towards web development. PHP is open-source software ( OSS ). PHP is free to use and download. PHP stands for PHP Hypertext Preprocessor. PHP file have extension called .php. PHP supports many databases MySQL, Oracle, etc. PHP is free to download and use. It was created by a Danish Canadian and designed by Rasmus Lerdorf in 1994. The common websites that are used are eCommerce, Social Platforms, Email Hosting, etc.
Installing PHP on Windows:
Follow the below steps to install PHP on Windows:
Step 1: Visit https://www.php.net/ website using any web browser and click on Downloads.
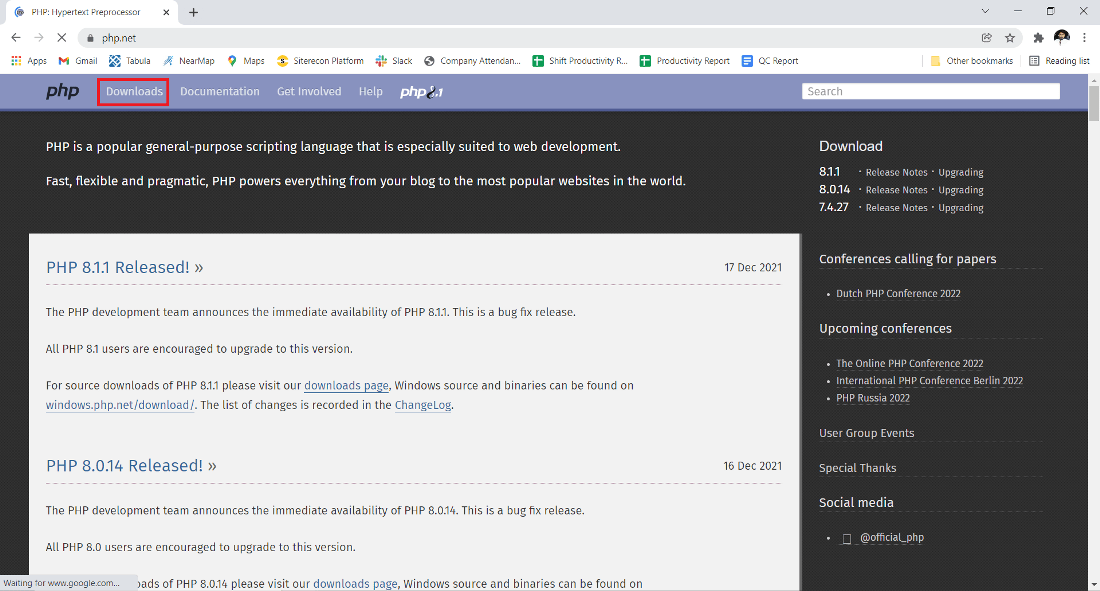
Step 2: Click on the Windows “Downloads” button.
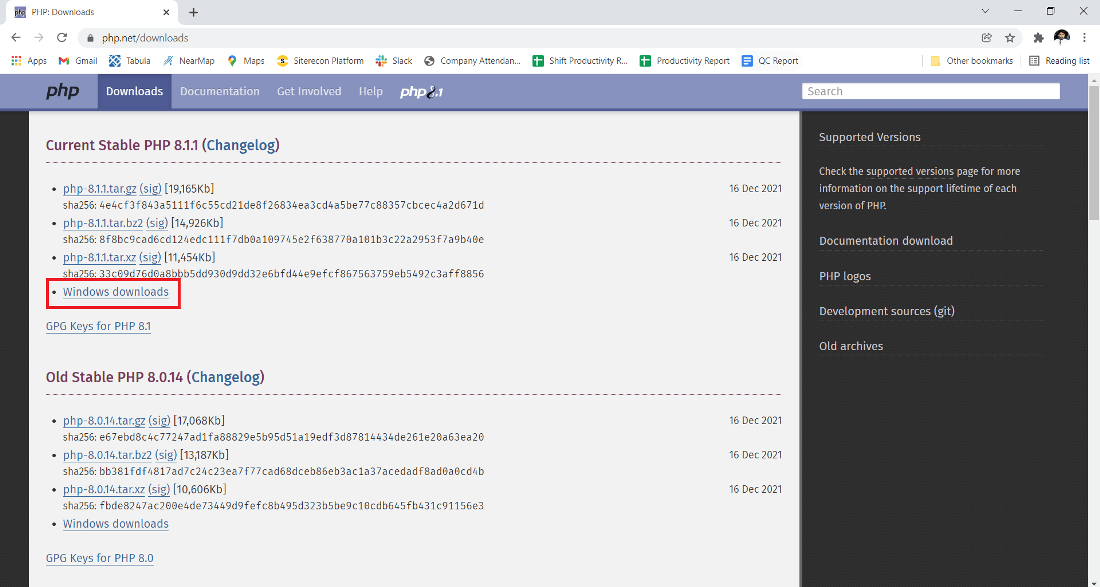
Step 3: The new webpage has different options, choose the Thread safe version, and click on the zip button and Download it.
Step 4: Now check for the executable file in downloads in your system and extract it.
Step 5: After extracting, you get the extracted folder.
Step 6: Now copy the extracted folder.
Step 7: Now paste the copy folder in your windows drive in the Program files folder.
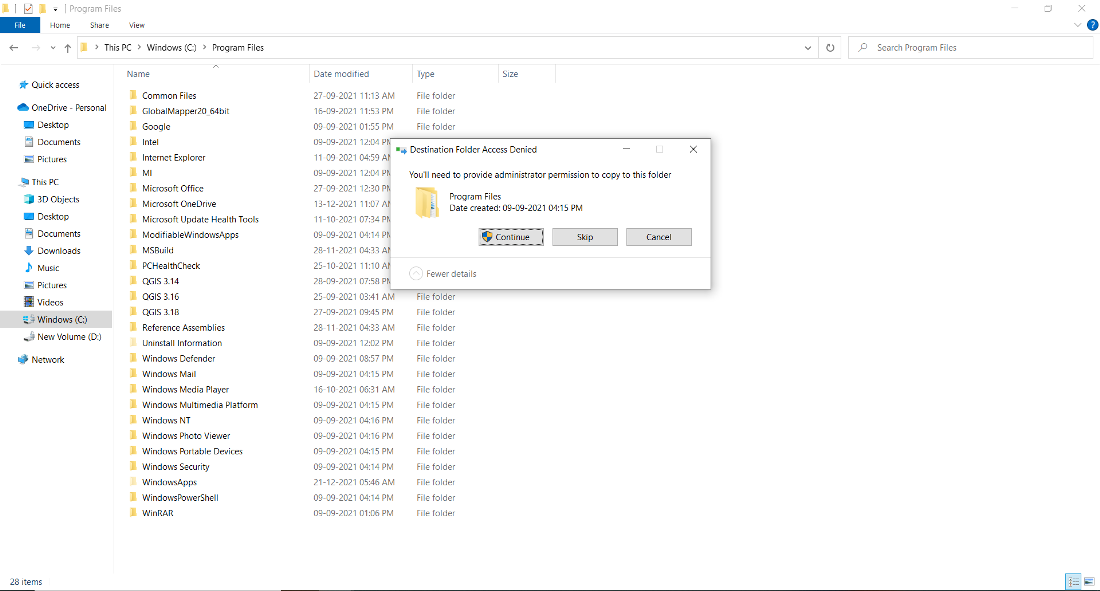
Step 8: Now the Permission Windows appears to paste the folder in program files then click on “Continue”.
Step 9: Now after pasting the folder then copy the address of the folder in program files.
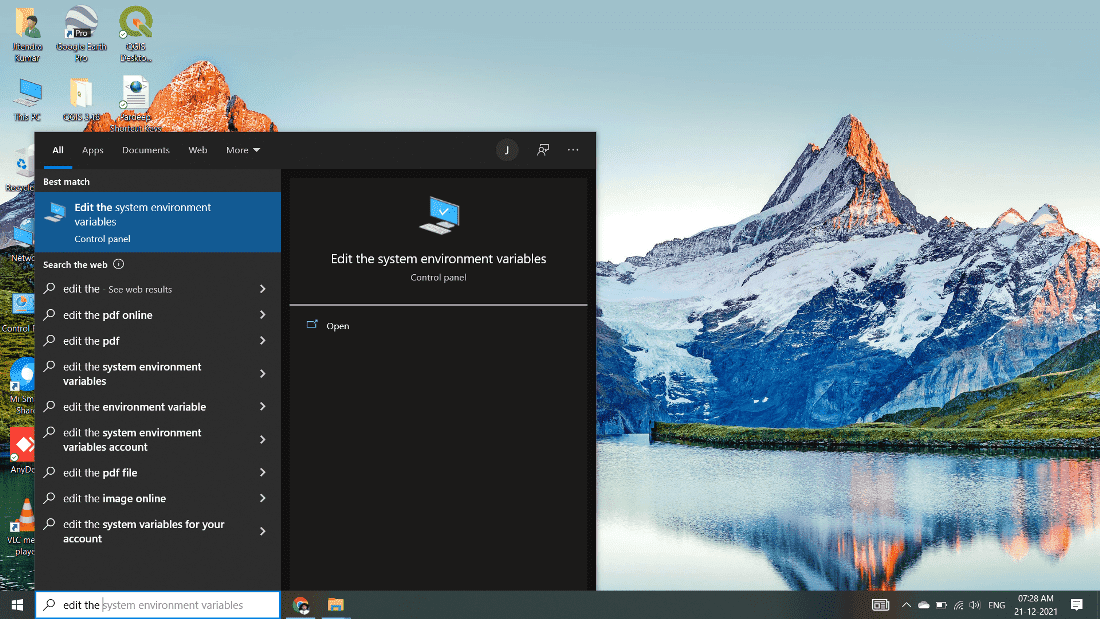
Step 10: Now click on Start Menu and search “Edit the system environment variables” and open it.
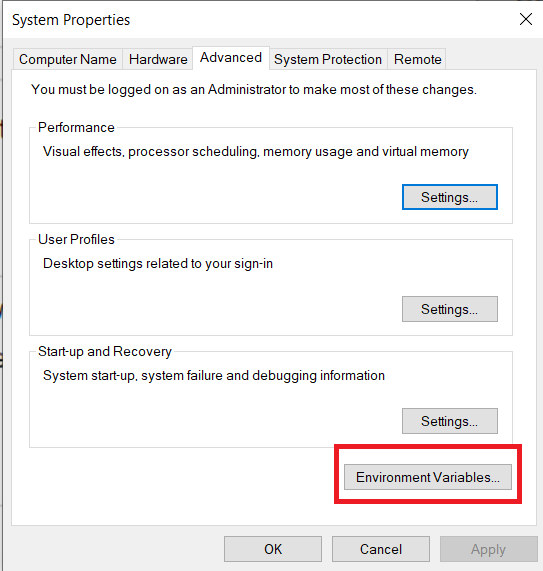
Step 11: After opening System, Variable New window appears, and click on “Environment Variables…”
Step 12: Now go to the “System variables” Path option and double click on Path.
Step 13: Next screen will open and click on the “New” button.
Step 14: After New Paste the address we copy from program files to new and click on Enter button.
Step 15: Now Click on the OK button.
Step 16: Click on the OK button.

Step 17: Click on OK for saving changes.
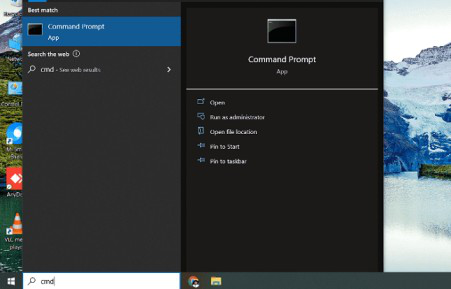
Step 18: Now your PHP is installed on your computer. You may check by going to the “Start” menu typing Command Prompt. Open it.
Step 19: When the Command Prompt opens, type php -v
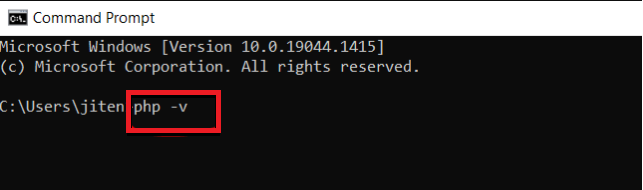
Step 20: Now enter the command prompt to show the version of PHP installed on your computer.
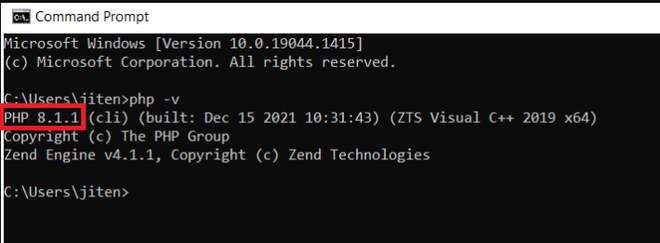
You have successfully installed PHP on your Windows 10 system.
В этой статье объясняется, как установить PHP 8.2 и Apache 2.4 в Windows 10 или 11 (64-разрядная версия).
У пользователей Linux и macOS часто предустановлены Apache и PHP или они доступны через менеджеры пакетов. Windows требует немного больше усилий. Приведенные ниже шаги могут работать с другими выпусками Windows, PHP и Apache, но конкретные инструкции см. в документации по каждой зависимости.
Содержание
- Почему PHP?
- Зачем устанавливать PHP локально?
- Альтернативные варианты установки
- Установка Apache (необязательно)
- Установка PHP
Почему PHP?
PHP остается самым распространенным и популярным серверным языком программирования в Интернете. Он устанавливается большинством веб-хостов и имеет простую кривую обучения, тесные связи с базой данных MySQL, превосходную документацию и обширный набор библиотек, чтобы сократить время разработки. PHP может быть не идеальным, но вы должны рассмотреть его для своего следующего веб-приложения. Это предпочтительный язык для Facebook, Slack, Wikipedia, MailChimp, Etsy и WordPress (система управления контентом, на которой работает почти 45% Интернета ).
Зачем устанавливать PHP локально?
Установка PHP на ваш ПК для разработки позволяет создавать и тестировать веб-сайты и приложения, не затрагивая данные или системы на вашем рабочем сервере.
Альтернативные варианты установки
Прежде чем вы прыгнете, могут быть более простые варианты установки…
Использование универсального пакета
Пакеты «все в одном» доступны для Windows. Они содержат Apache, PHP, MySQL и другие полезные зависимости в одном установочном файле. Эти пакеты включают XAMPP, WampServer и Web.Developer.
Эти пакеты просты в использовании, но они могут не соответствовать среде вашего работающего сервера. Установка Apache и PHP вручную поможет вам узнать больше о системе и параметрах конфигурации.
Использование виртуальной машины Linux
Microsoft Hyper-V (поставляется в Windows Professional) и VirtualBox — это бесплатные гипервизоры, которые эмулируют ПК, поэтому вы можете установить другую операционную систему.
Вы можете установить любую версию Linux, а затем следовать инструкциям по установке Apache и PHP. В качестве альтернативы дистрибутивы, такие как Ubuntu Server, предоставляют их в качестве стандартных (хотя они могут быть не последними выпусками ).
Использование подсистемы Windows для Linux 2
WSL2 также является виртуальной машиной, но она тесно интегрирована в Windows, поэтому такие действия, как совместное использование файлов и localhostразрешение, не вызывают затруднений. Вы можете установить различные дистрибутивы Linux, поэтому обратитесь к соответствующим инструкциям Apache и PHP.
Использование Докера
Docker создает оболочку (известную как контейнер ) вокруг предварительно настроенных зависимостей приложений, таких как Apache, PHP, MySQL, MongoDB и большинства других веб-приложений. Контейнеры выглядят как полноценные виртуальные машины Linux, но значительно легче.
После того как вы установили Docker Desktop в Windows, вы можете легко загрузить, настроить и запустить Apache и PHP.
В настоящее время Docker считается лучшим вариантом для настройки среды разработки PHP.
Установка Apache (необязательно)
В следующих разделах описывается, как установить Apache и PHP непосредственно в Windows.
PHP предоставляет встроенный веб-сервер, который можно запустить, перейдя в папку и запустив исполняемый файл PHP с -Sпараметром для установки localhostпорта. Например:
cd myproject
php -S localhost:8000
Затем вы можете просматривать PHP-страницы в браузере по адресу http://localhost:8000.
Этого может быть достаточно для быстрых тестов, но ваш рабочий сервер будет использовать Apache или аналогичное программное обеспечение веб-сервера. Максимально точное воспроизведение этой среды позволяет выполнять более сложные настройки и должно предотвращать ошибки разработки.
Чтобы установить Apache, загрузите последний ZIP-файл Win64 с https://www.apachelounge.com/download/ и распакуйте его Apache24папку в корень вашего C:диска. Вам также потребуется установить распространяемый пакет Visual C++ для Visual Studio 2015–2020 ( vc_redist_x64); на странице есть ссылка вверху.
Откройте cmdкомандную строку ( не PowerShell) и запустите Apache:
cd C:Apache24bin
httpd
Возможно, вам потребуется принять исключение брандмауэра, прежде чем сервер начнет работать. Откройте http://localhost в браузере и нажмите «Это работает!» должно появиться сообщение. Примечание:
- C:Apache24confhttpd.confэто файл конфигурации Apache, если вам нужно изменить настройки сервера.
- C:Apache24htdocsявляется корневой папкой содержимого веб-сервера. Он содержит один index.htmlфайл с надписью «Это работает!» сообщение.
Если Apache не запускается, возможно, порт 80 занят другим приложением. (Skype — главный кандидат, и приложение Windows не позволит вам его отключить!) Если это произойдет, отредактируйте C:Apache24confhttpd.confи измените строку Listen 80на Listen 8080любой другой свободный порт. Перезапустите Apache, и с этого момента вы сможете загружать веб-файлы по адресу http://localhost:8080.
Остановите сервер, нажав Ctrl+ Cв cmdтерминале. Файл ReadMeв ZIP также содержит инструкции по установке Apache в качестве службы Windows, чтобы он автоматически запускался при загрузке.
Установка PHP
Установите PHP, выполнив следующие действия. Обратите внимание, что существует несколько способов настройки Apache и PHP, но это, возможно, самый быстрый способ.
Шаг 1: Загрузите файлы PHP
Получите последний ZIP-пакет PHP x64 Thread Safe с https://windows.php.net/download/.
Шаг 2: Извлеките файлы
Создайте новую phpпапку в корне вашего C:диска и распакуйте в нее содержимое ZIP.
Вы можете установить PHP в любом месте вашей системы, но вам нужно будет изменить пути, указанные ниже, если вы используете что-то кроме C:php.
Шаг 3: Настройтеphp.ini
Файл конфигурации PHP — это php.ini. Изначально этого не существует, поэтому скопируйте C:phpphp.ini-developmentв C:phpphp.ini. Эта конфигурация по умолчанию обеспечивает настройку разработки, которая сообщает обо всех ошибках и предупреждениях PHP.
Вы можете редактировать php.iniв текстовом редакторе, и вам может потребоваться изменить строки, например, предложенные ниже (используйте поиск, чтобы найти настройку). В большинстве случаев вам потребуется удалить начальную точку с запятой ( ;), чтобы раскомментировать значение.
Сначала включите все необходимые расширения в соответствии с библиотеками, которые вы хотите использовать. Следующие расширения должны подойти для большинства приложений, включая WordPress:
extension=curl
extension=gd
extension=mbstring
extension=pdo_mysql
Если вы хотите отправлять электронные письма с помощью mail()функции PHP, введите данные SMTP-сервера в соответствующем [mail function]разделе (настройки вашего провайдера должны соответствовать):
[mail function]
; For Win32 only.
; http://php.net/smtp
SMTP = mail.myisp.com
; http://php.net/smtp-port
smtp_port = 25

; For Win32 only.
; http://php.net/sendmail-from
sendmail_from = my@emailaddress.com
Шаг 4: Добавьте C:phpв PATHпеременную окружения
Чтобы Windows могла найти исполняемый файл PHP, вы должны добавить его в PATHпеременную среды. Нажмите кнопку » Пуск» в Windows и введите «среда», затем нажмите «Изменить системные переменные среды ». Выберите вкладку » Дополнительно » и нажмите кнопку » Переменные среды «.
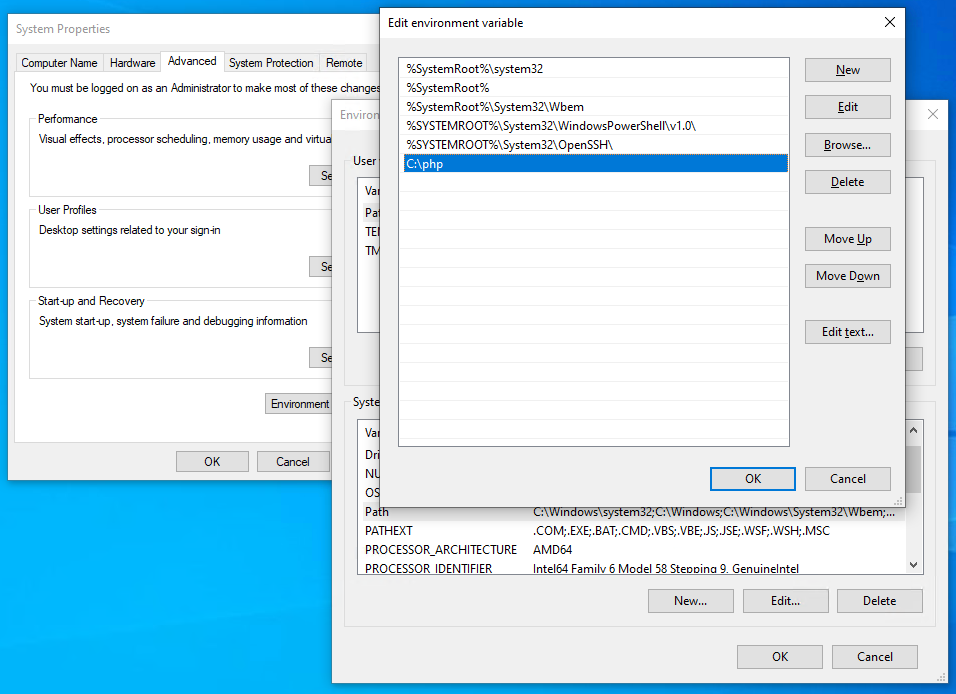
Прокрутите список системных переменных вниз и нажмите » Путь», а затем кнопку » Изменить «. Нажмите » Создать » и добавьте C:php.
Обратите внимание, что в старых выпусках Windows предусмотрено одно текстовое поле с путями, разделенными точкой с запятой ( ;).
Теперь хорошо ваш выход. Вам не нужно перезагружаться, но вам может потребоваться закрыть и перезапустить все cmdоткрытые терминалы.
Шаг 5: Настройте PHP как модуль Apache
Убедитесь, что Apache не запущен, и откройте его C:Apache24confhttpd.confфайл конфигурации в текстовом редакторе. Добавьте следующие строки в конец файла, чтобы установить PHP в качестве модуля Apache (при необходимости измените расположение файлов, но используйте прямую косую черту, а не обратную косую черту Windows):
# PHP8 module
PHPIniDir "C:/php"
LoadModule php_module "C:/php/php8apache2_4.dll"
AddType application/x-httpd-php .php
При необходимости измените DirectoryIndexпараметр для использования index.phpпо умолчанию в качестве предпочтения на index.html. Начальная настройка:
<IfModule dir_module>
    DirectoryIndex index.html
</IfModule>
Измените его на:
<IfModule dir_module>
    DirectoryIndex index.php index.html
</IfModule>
Сохраните httpd.confи протестируйте обновления из cmdкомандной строки:
cd C:Apache24bin
httpd -t
Syntax OKпоявится … если у вас нет ошибок в вашей конфигурации.
Если все прошло хорошо, запустите Apache с расширением httpd.
Шаг 6: Протестируйте файл PHP
Создайте новый файл с именем index.phpв корневой папке веб-страницы Apache по адресу C:Apache24htdocs. Добавьте следующий PHP-код:
<?php
phpinfo();
?>
Откройте веб-браузер и введите адрес вашего сервера: http://localhost/. Должна появиться страница версии PHP со всеми настройками конфигурации PHP и Apache.
Теперь вы можете создавать сайты и приложения PHP в любой подпапке C:Apache24htdocs. Если вам нужно работать с несколькими проектами, рассмотрите возможность определения виртуальных хостов Apache, чтобы вы могли запускать отдельные кодовые базы на разных localhostподдоменах или портах.
This tutorial provides all the steps required to install PHP 8 on Windows 10. The steps should be similar on the other versions of Windows.
In some cases, we need to develop or test our application against a specific version of PHP or to install it separately. In such cases, we can download it from the official site instead of using a bundled package in the form of XAMPP or WAMP. Once installed, we can configure the latest PHP to work with the web servers including Apache and NGINX.
Notes: You may also be interested in our debugging tutorials to debug PHP. These include How To Install NetBeans on Windows, How To Install NetBeans On Ubuntu, How To Debug PHP In NetBeans On Windows, How To Debug PHP Web Apps In NetBeans On Windows, How To Remote Debug PHP Web Apps In NetBeans On Windows, How To Install Eclipse for PHP on Windows, and How To Debug PHP In Eclipse On Windows.
Step 1 — Download PHP 8 for Windows
Go to the official download link and download the required version of PHP 8 for Windows. The distributions are provided as tar and windows binaries. While writing this tutorial, PHP 8.0.3 is the most recent one, hence we will discuss the installation steps specific to PHP 8.0.3. Click the Windows Download Link and it will open the page having Binaries and Sources packaged for Windows.

Fig 1

Fig 2
We can see that PHP is available either as Thread Safe and Non Thread Safe. In simple terms, we can use Thread Safe PHP if we are using mod_php as worker MPM in Apache which spans multiple threads concurrently to process the requests and Non Thread Safe can be used for CGI. The Thread Safe version is required for web servers running in a multithreaded context.
The download page also provided binaries for both 32-bit and 64-bit Operating Systems. We will download the Zip Thread Safe version for 64-bit Operating System having the title as — VC15 x64 Thread Safe. As a regular user, we do not need the Debug Pack which is required for PHP developers.
Step 2 — Extract the Zip
Extract the downloaded zip at a specific location. It will look similar to the one having the PHP executable file as shown in Fig 3.

Fig 3
Step 3 — Verify Installation
Open the command prompt and type php —version to check the available version. It will look similar to Fig 4 in case existing PHP versions are available.

Fig 4
It will show the error ‘php’ is not recognized as an internal or external command, operable program or batch file., in case PHP is not installed on the system.
We need to configure the environment variable to access PHP from the command line. You can follow the below-mentioned steps to do so.
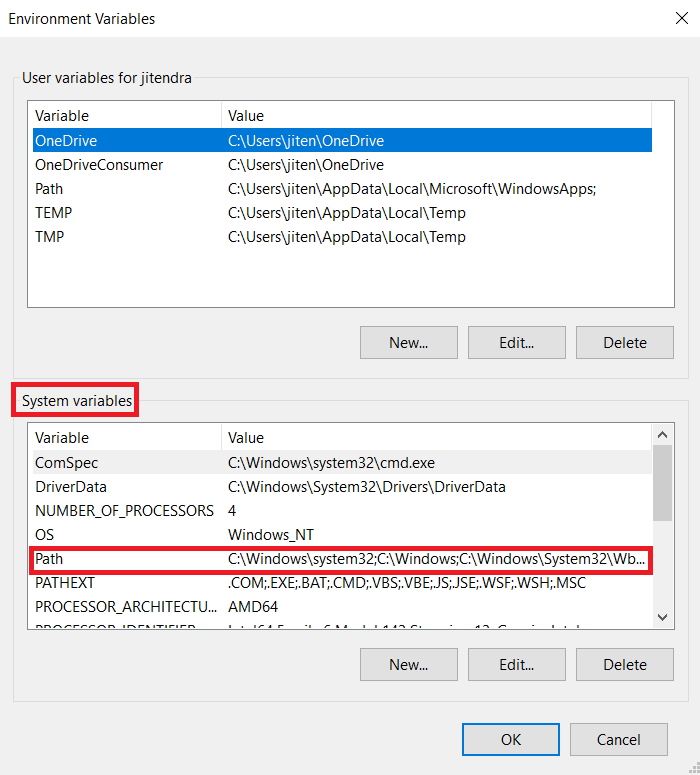
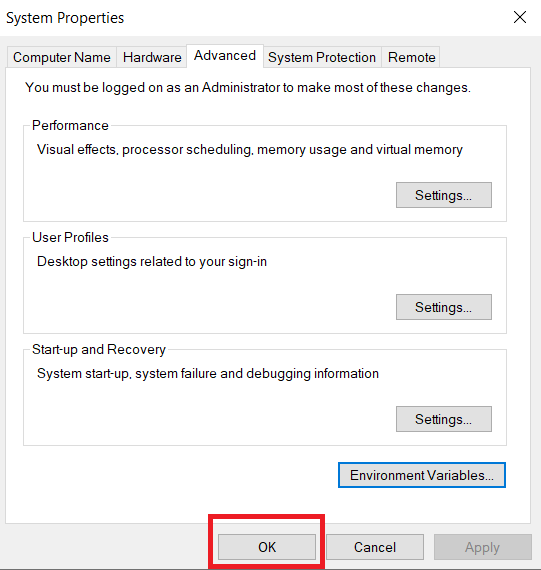
Right Click -> My Computer(This PC) -> Properties -> Scroll Down -> Advanced System Settings
The above steps will open the Windows Settings Panel as shown in Fig 5.

Fig 5
Now click the Environment Variables Button, select Path under either User variables or System Variables based on your preference, and click the Edit Button. We need to add/update the path of the installed PHP to the system Path.
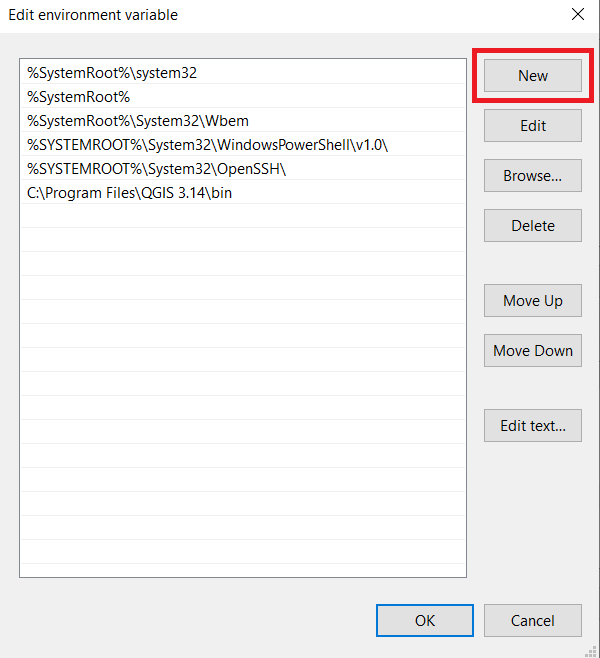
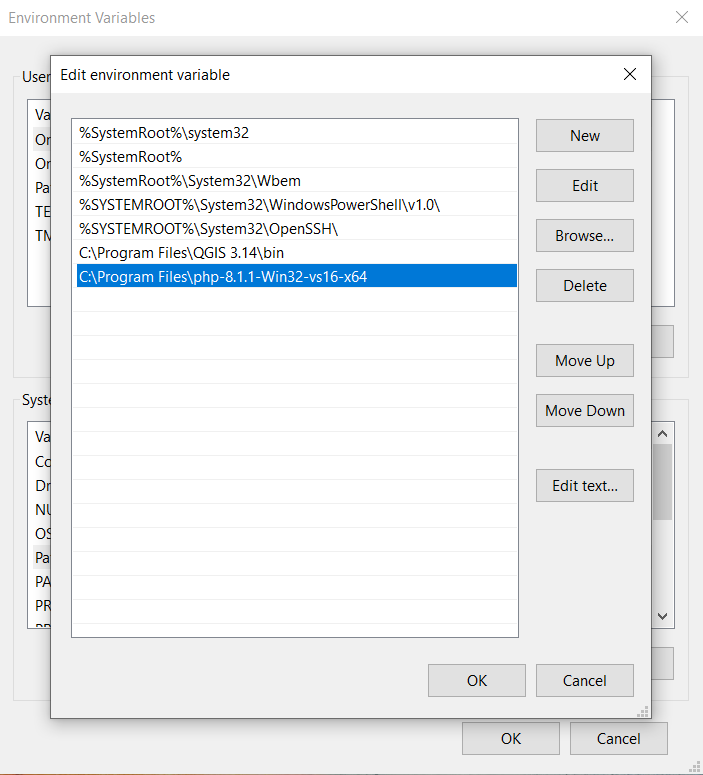
Click the New/Edit Button and add/update the path to the PHP bin which is E:toolsphpphp-7.3.1 in my case. Press the OK Button 3 times to close all the windows. This sets the PHP 8 on system environment variables to access the same from the console.
Now again open the console and test the PHP version as shown in Fig 6.

Fig 6
These are the basic steps required to install PHP 8 on Windows 10.
Step 4 — Getting Started With PHP Development
In this step, we will write a simple program and print Hello World on the console using the PHP executable configured by us in the previous step. Open your favorite editor and write the program as shown below.
<?php
// Print Hello World !!
echo "Hello World !!n";
Now save the file as index.php and execute it using the command as shown below.
E:programsphp>php index.php
Hello World !!
In this way, we can execute the PHP program on the console. Though PHP is meant for web development, we can also use it for console-based development. The latest PHP supports the modern programming concepts i.e. OOPS and it also supports strict typing.
Step 5 — Configure With Apache
You might have installed the Apache Web Server either independently or installed it as part of the bundled packages including WAMP, XAMPP, etc. In this step, we will simply configure the Apache Web Server to use the PHP installed by us in the previous steps.
Copy the file php.ini-development available at the path where we have extracted PHP and save it as php.ini at the same location.
Open the httpd.conf file of your Apache Web Server installation and search for the line having LoadModule php7_module or LoadModule php_module. Now comment on the line and add the path to your PHP as shown below.
#LoadModule php7_module "${INSTALL_DIR}/bin/php/php7.4.9/php7apache2_4.dll"
LoadModule php_module "e:/tools/php/php-8.0.3/php8apache2_4.dll"
PHPIniDir "e:/tools/php/php-8.0.3"
You might not find the php7_module or php_module in case the Apache HTTP Server is installed without using any bundled software. If Apache 2 is installed directly as shown in How To Install Apache 2 On Windows, you just need to add the module to the httpd.conf as highlighted below.
....
....
#LoadModule watchdog_module modules/mod_watchdog.so
#LoadModule xml2enc_module modules/mod_xml2enc.soLoadModule php_module "e:/tools/php/php-8.0.3/php8apache2_4.dll"
AddType application/x-httpd-php .php
PHPIniDir "e:/tools/php/php-8.0.3"<IfModule unixd_module>
#
# If you wish httpd to run as a different user or group, you must run
# httpd as root initially and it will switch.
....
........
....
#
# DirectoryIndex: sets the file that Apache will serve if a directory
# is requested.
#
<IfModule dir_module>
    DirectoryIndex index.php index.html
</IfModule>....
....
Save the file and restart the webserver. Now create a file test.php at your webroot of the Apache server as shown below.
<?php
echo phpinfo();
Save the file, open your browser, and open the link — http://localhost/test.php. It should show the PHP settings as shown in Fig 7.

Fig 7
You can also enable the PHP extensions required for your project. The most important one is the pdo_mysql. I have updated the php.ini file and enabled it as shown below.
....
;extension=openssl
;extension=pdo_firebird
extension=pdo_mysql
;extension=pdo_oci
;extension=pdo_odbc
....
You must also enable to extensions directory by updating the php.ini file as shown below.
; Directory in which the loadable extensions (modules) reside.
; http://php.net/extension-dir
;extension_dir = "./"
; On windows:
;extension_dir = "ext"
extension_dir = "E:toolsphpphp-8.0.3ext"
Below mentioned is the output of phpinfo() before and after enabling the PDO extension.

Fig 8

Fig 9
We have successfully configured the latest PHP installed by us to work with the Apache Web Server.
Step 6 — WampServer & XAMPP
The relevant tutorials to configure or install WampServer and XAMPP include How To Install WampServer on Windows, How To Install XAMPP On Windows, How To Update PHP Version In XAMPP On Windows.
Summary
In this tutorial, we have installed the latest PHP on Windows i.e. PHP 8 on Windows 10, and also configured the system path to use it from the console. We have also executed our first program in PHP to print Hello World on the console. In the last section, we have configured the PHP installation to work with the Apache Web Server and saw how to enable PHP extensions using the PDO extension example.