В современных версиях Windows уже есть встроенный SSH сервер на базе пакета OpenSSH. В этой статье мы покажем, как установить и настроить OpenSSH сервер в Windows 10/11 и Windows Server 2022/2019 и подключиться к нему удаленно по защищенному SSH протоколу (как к Linux).
Содержание:
- Установка сервера OpenSSH в Windows
- Настройка SSH сервера в Windows
- Sshd_config: Конфигурационный файл сервера OpenSSH
- Подключение по SSH к Windows компьютеру
- Логи SSH подключений в Windows
Установка сервера OpenSSH в Windows
Пакет OpenSSH Server включен в современные версии Windows 10 (начиная с 1803), Windows 11 и Windows Server 2022/2019 в виде Feature on Demand (FoD). Для установки сервера OpenSSH достаточно выполнить PowerShell команду:
Get-WindowsCapability -Online | Where-Object Name -like ‘OpenSSH.Server*’ | Add-WindowsCapability –Online
Или при помощи команды DISM:
dism /Online /Add-Capability /CapabilityName:OpenSSH.Server~~~~0.0.1.0
Если ваш компьютер подключен к интернету, пакет OpenSSH.Server будет скачан и установлен в Windows.
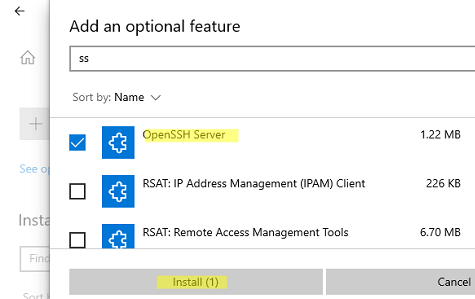
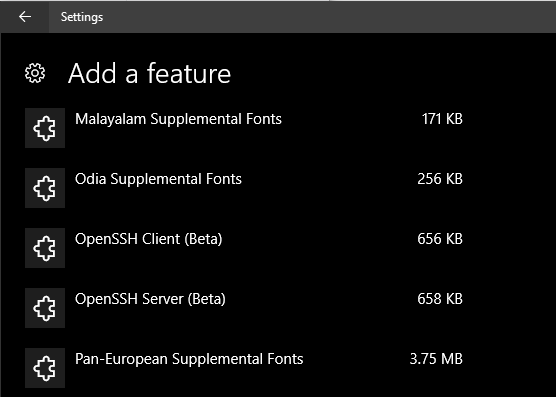
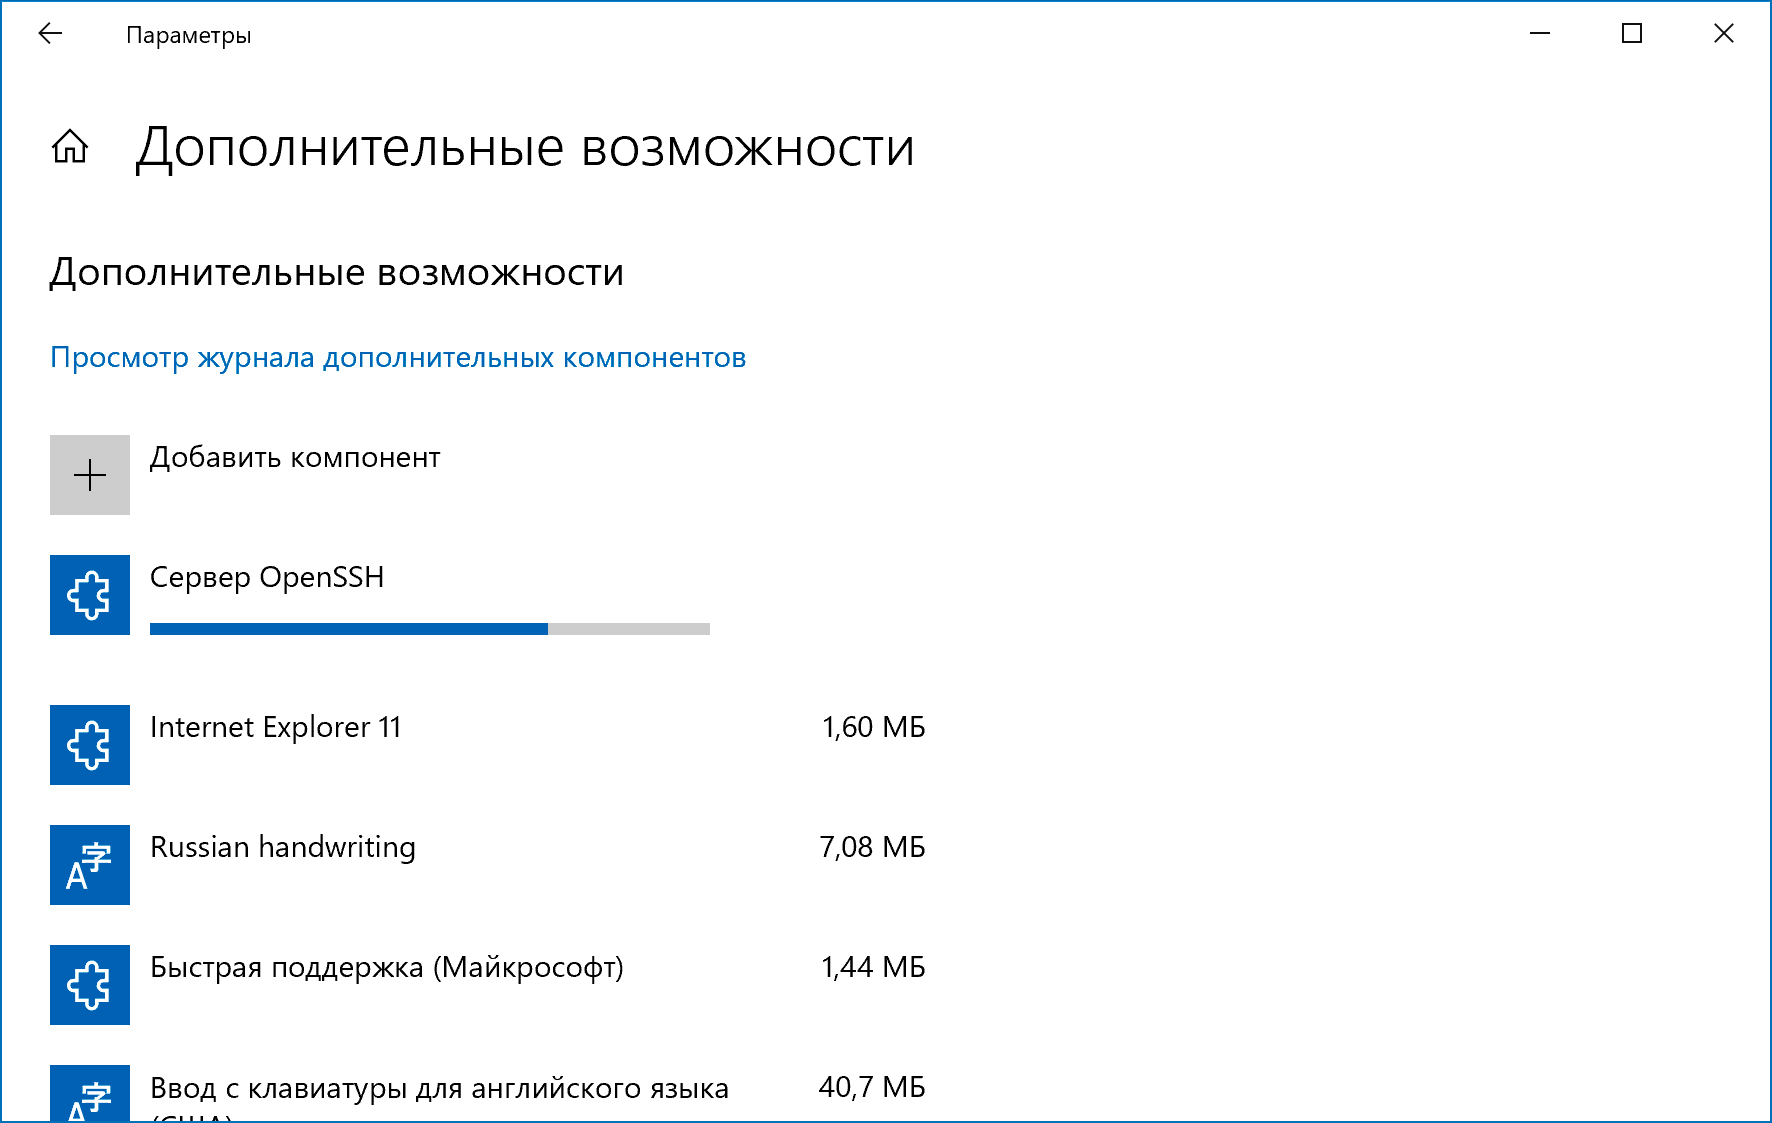
Также вы можете установить сервер OpenSSH в Windows через современную панель Параметры (Settings -> Apps and features -> Optional features -> Add a feature, Приложения -> Управление дополнительными компонентами -> Добавить компонент. Найдите в списке OpenSSH Server и нажмите кнопку Install).
На изолированных от интернета компьютерах вы можете установить компонент с ISO образа Features On Demand (доступен в личном кабинете на сайте Microsoft: MSDN или my.visualstudio.com). Скачайте диск, извлеките его содержимое в папку c:FOD (достаточно распаковать извлечь файл
OpenSSH-Server-Package~31bf3856ad364e35~amd64~~.cab
), выполните установку из локального репозитория:
Add-WindowsCapability -Name OpenSSH.Server~~~~0.0.1.0 -Online -Source c:FOD
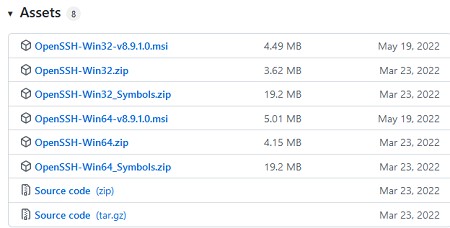
Также доступен MSI установщик OpenSSH для Windows в официальном репозитории Microsoft на GitHub (https://github.com/PowerShell/Win32-OpenSSH/releases/). Например, для Windows 10 x64 нужно скачать и установить пакет OpenSSH-Win64-v8.9.1.0.msi. Следующая PowerShell команда скачает MSI файл и установит клиент и сервер OpenSSH:
Invoke-WebRequest https://github.com/PowerShell/Win32-OpenSSH/releases/download/v8.9.1.0p1-Beta/OpenSSH-Win64-v8.9.1.0.msi -OutFile $HOMEDownloadsOpenSSH-Win64-v8.9.1.0.msi -UseBasicParsing
msiexec /i c:usersrootdownloadsOpenSSH-Win64-v8.9.1.0.msi
Также вы можете вручную установить OpenSSH сервер в предыдущих версиях Windows (Windows 8.1, Windows Server 2016/2012R2). Пример установки Win32-OpenSSH есть в статье “Настройка SFTP сервера (SSH FTP) в Windows”.
Чтобы проверить, что OpenSSH сервер установлен, выполните:
Get-WindowsCapability -Online | ? Name -like 'OpenSSH.Ser*'
State : Installed

Настройка SSH сервера в Windows
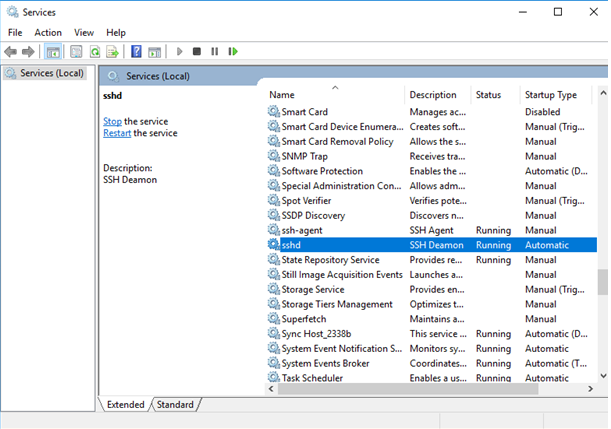
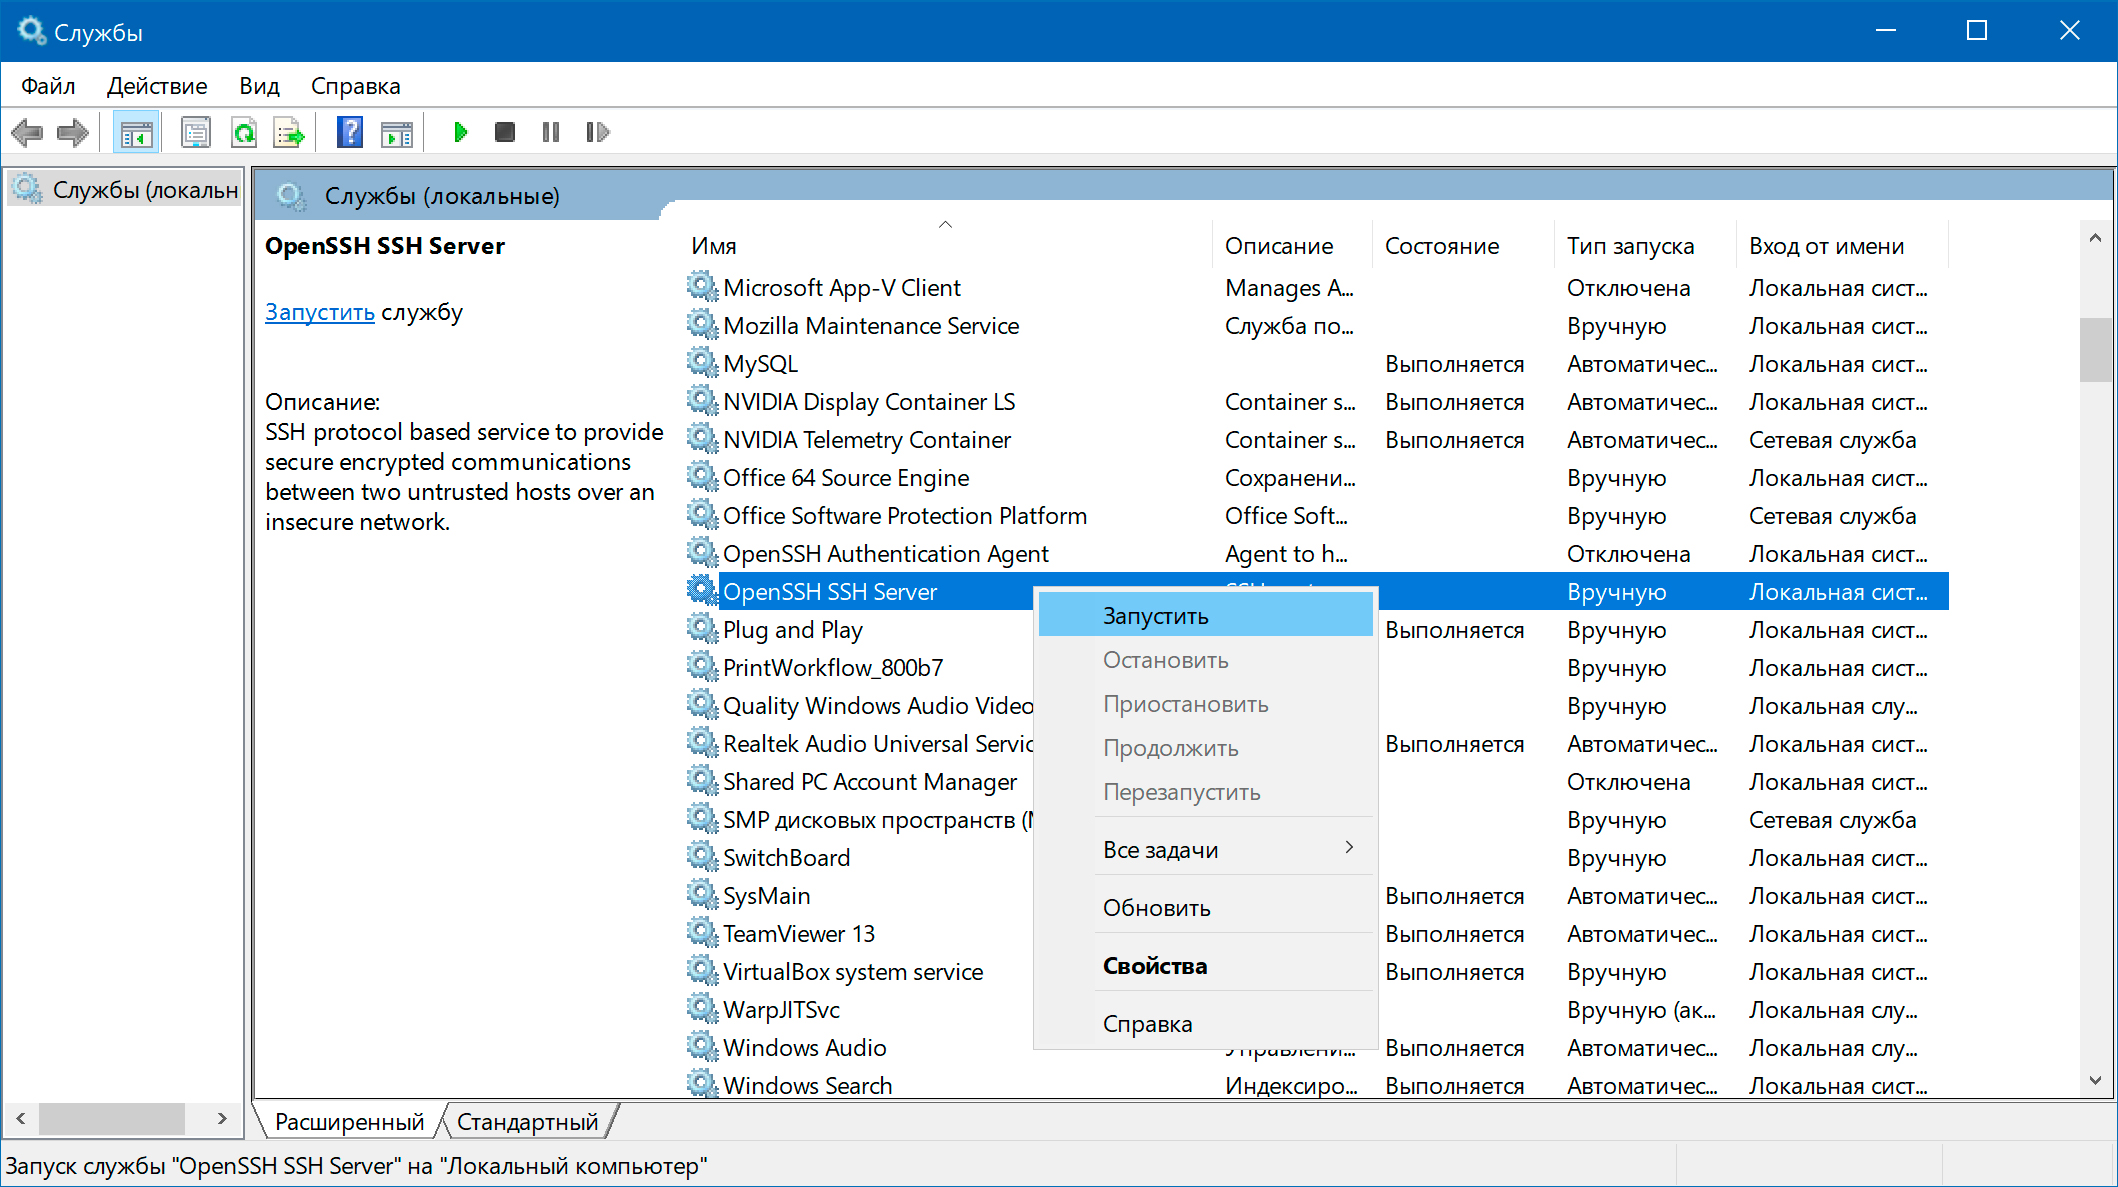
После установки сервера OpenSSH в Windows добавляются две службы:
- ssh-agent (OpenSSH Authentication Agent) – можно использовать для управления закрытыми ключами если вы настроили SSH аутентификацию по ключам;
- sshd (OpenSSH SSH Server) – собственно сам SSH сервер.
Вам нужно изменить тип запуска службы sshd на автоматический и запустить службу с помощью PowerShell:
Set-Service -Name sshd -StartupType 'Automatic'
Start-Service sshd

С помощью nestat убедитесь, что теперь в системе запущен SSH сервер и ждет подключений на порту TCP:22 :
netstat -na| find ":22"

Проверьте, что включено правило брандмауэра (Windows Defender Firewall), разрешающее входящие подключения к Windows по порту TCP/22.
Get-NetFirewallRule -Name *OpenSSH-Server* |select Name, DisplayName, Description, Enabled
Name DisplayName Description Enabled
---- ----------- ----------- -------
OpenSSH-Server-In-TCP OpenSSH SSH Server (sshd) Inbound rule for OpenSSH SSH Server (sshd) True

Если правило отключено (состоянии Enabled=False) или отсутствует, вы можете создать новое входящее правило командой New-NetFirewallRule:
New-NetFirewallRule -Name sshd -DisplayName 'OpenSSH Server (sshd)' -Enabled True -Direction Inbound -Protocol TCP -Action Allow -LocalPort 22
Рассмотрим, где храниться основные компоненты OpenSSH:
- Исполняемые файлы OpenSSH Server находятся в каталоге
C:WindowsSystem32OpenSSH
(sshd.exe, ssh.exe, ssh-keygen.exe, sftp.exe и т.д.) - Конфигурационный файл sshd_config (создается после первого запуска службы):
C:ProgramDatassh - Файлы authorized_keys и ssh ключи можно хранить в профиле пользователей:
%USERPROFILE%.ssh
Sshd_config: Конфигурационный файл сервера OpenSSH
Настройки сервере OpenSSH хранятся в конфигурационном файле %programdata%sshsshd_config. Это обычный текстовый файл с набором директив. Для редактирования можно использовать любой текстовый редактор (я предпочитаю notepad++). Можно открыть с помощью обычного блокнота:
start-process notepad C:Programdatasshsshd_config
Например, чтобы запретить SSH подключение для определенного доменного пользователя (и всех пользователей указанного домена), добавьте в конце файле директивы:
DenyUsers winitpro[email protected]
DenyUsers corp*
Чтобы разрешить подключение только для определенной доменной группы:
AllowGroups winitprosshadmins
Либо можете разрешить доступ для локальной группы:
AllowGroups sshadmins
По умолчанию могут к openssh могут подключаться все пользователи Windows. Директивы обрабатываются в следующем порядке: DenyUsers, AllowUsers, DenyGroups,AllowGroups.
Можно запретить вход под учетными записями с правами администратора, в этом случае для выполнения привилегированных действий в SSH сессии нужно делать runas.
DenyGroups Administrators
Следующие директивы разрешают SSH доступ по ключам (SSH аутентификации в Windows с помощью ключей описана в отдельной статье) и по паролю:
PubkeyAuthentication yes
PasswordAuthentication yes
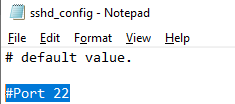
Вы можете изменить стандартный SSH порт TCP/22, на котором принимает подключения OpenSSH в конфигурационном файле sshd_config в директиве Port.
После любых изменений в конфигурационном файле sshd_config нужно перезапускать службу sshd:
restart-service sshd
Подключение по SSH к Windows компьютеру
Теперь вы можете попробовать подключиться к своей Windows 10 через SSH клиент (в этом примере я использую putty).
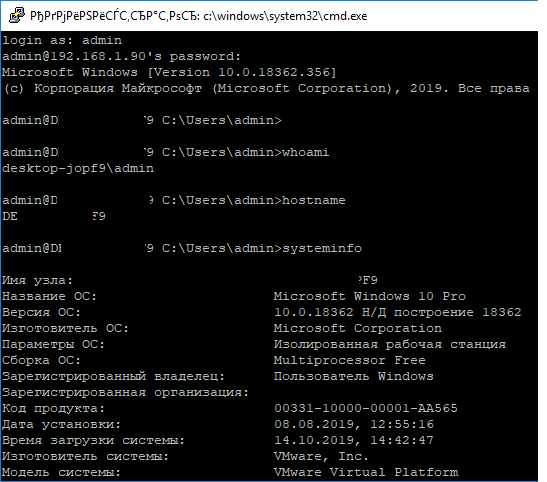
Вы можете использовать встроенный SSH клиентом Windows для подключения к удаленному хосту. Для этого нужно в командной строке выполнить команду:
ssh [email protected]
В этом примере
alexbel
– имя пользователя на удаленном Windows компьютере, и 192.168.31.102 – IP адрес или DNS имя компьютера.
Обратите внимание что можно использовать следующие форматы имен пользователей Windows при подключении через SSH:
-
[email protected]
– локальный пользователь Windows -
[email protected]@server1
–пользователь Active Directory (в виде UPN) или аккаунт Microsoft/ Azure(Microsoft 365) -
winitpro[email protected]
– NetBIOS формат имени
В домене Active Directory можно использовать Kerberos аутентификацию в SSH. Для этого в sshd_config нужно включить параметр:
GSSAPIAuthentication yes
После этого можно прозрачно подключать к SSH сервер с Windows компьютера в домене из сессии доменного подключается. В этом случае пароль пользователя не указывается и выполняется SSO аутентификация через Kerberos:
ssh -K server1
При первом подключении появится стандартный запрос на добавление узла в список известных SSH хостов.
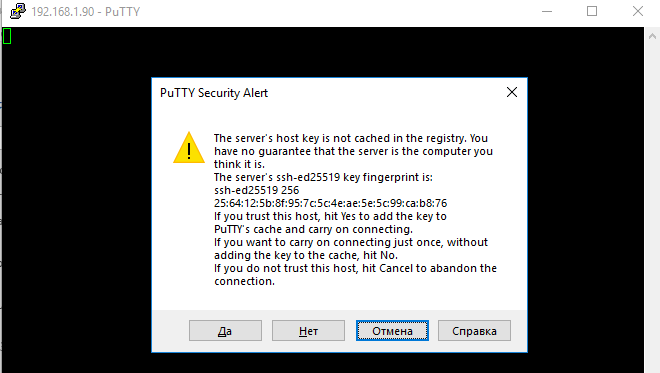
Нажимаем Да, и в открывшееся окне авторизуемся под пользователем Windows.
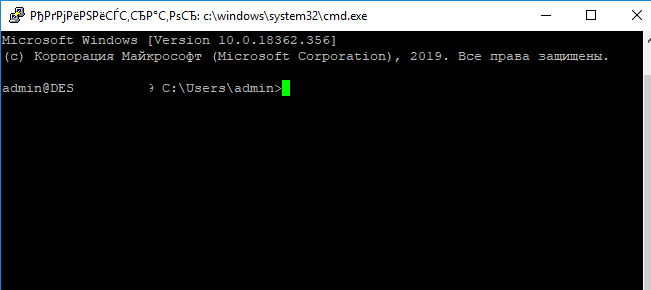
При успешном подключении запускается командная оболочка cmd.exe со строкой-приглашением.
[email protected] C:Usersadmin>
В командной строке вы можете выполнять различные команды, запускать скрипты и программы.
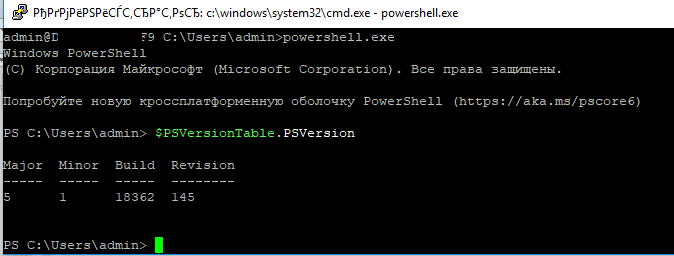
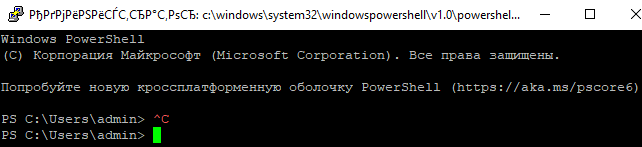
Я предпочитаю работать в командной строке PowerShell. Чтобы запустить интерпретатор PowerShell, выполните:
powershell.exe
Чтобы изменить командную оболочку (Shell) по умолчанию в OpenSSH с cmd.exe на PowerShell, внесите изменение в реестр такой командой:
New-ItemProperty -Path "HKLM:SOFTWAREOpenSSH" -Name DefaultShell -Value "C:WindowsSystem32WindowsPowerShellv1.0powershell.exe" -PropertyType String –Force
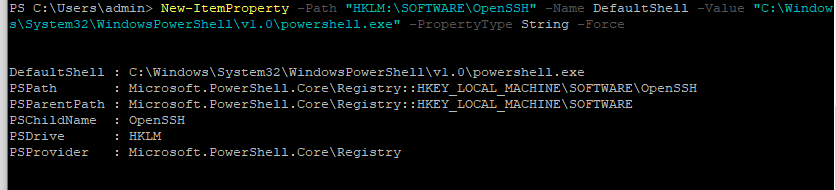
Осталось перезапустить SSH подключение и убедиться, что при подключении используется командный интерпретатор PowerShell (об этом свидетельствует приглашение
PS C:Usersadmin>
).
В SSH сессии запустилась командная строка PowerShell, в которой работают привычные функции: авто дополнение, раскраска модулем PSReadLine, история команд и т.д. Если текущий пользователь входит в группу локальных администраторов, то все команды в его сессии выполняются с повышенными правами даже при включенном UAC.
Логи SSH подключений в Windows
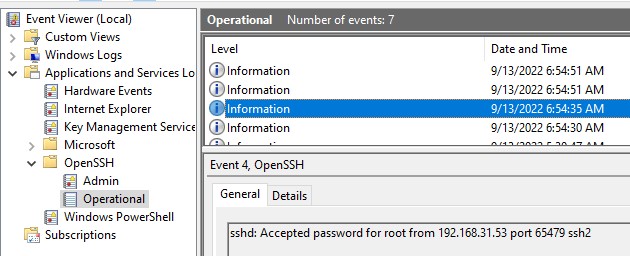
В Windows логи подключений к SSH серверу по-умолчанию пишутся не в текстовые файлы, а в отдельный журнал событий через Event Tracing for Windows (ETW). Откройте консоль Event Viewer (
eventvwr.msc
>) и перейдите в раздел Application and services logs -> OpenSSH -> Operational.
При успешном подключении с помощью к SSH серверу с помощью пароля в журнале появится событие:
EventID: 4
sshd: Accepted password for root from 192.168.31.53 port 65479 ssh2
Если была выполнена аутентификация с помощью SSH ключа, событие будет выглядеть так:
sshd: Accepted publickey for locadm from 192.168.31.53 port 55772 ssh2: ED25519 SHA256:FEHDEC/J72Fb2zC2oJNb45678967kghH43h3bBl31ldPs
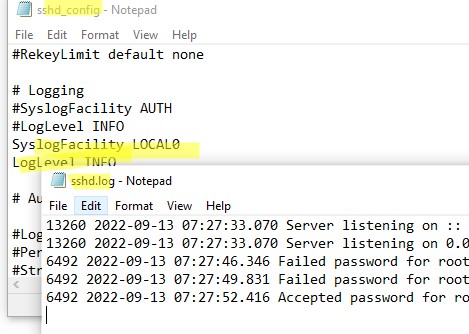
Если вы хотите, чтобы логи писались в локальный текстовый файл, нужно в файле sshd_config включить параметры:
SyslogFacility LOCAL0
LogLevel INFO
Перезапустите службу sshd и провеьте, что теперь логи SSH сервера пишутся в файл C:ProgramDatasshlogssshd.log
Прежде всего, вы можете спросить, зачем нам вообще нужен SSH-сервер на Windows-сервере? В среде Windows SSH может показаться не очень полезным. В конце концов, у нас есть RDP и PowerShell Remoting с WinRM, которые уже обеспечивают мощные возможности удаленного управления. Тем не менее, SSH в Windows определенно имеет свои преимущества. Среди них можно выделить такие вещи, как:
- Простое подключение и управление Windows-серверами из Linux или MacOS с помощью встроенных инструментов.
- Подключение из систем Windows к серверам Linux — это простое решение с интегрированным SSH-клиентом. Есть много администраторов Linux, которые должны управлять серверами на работе с помощью ОС Windows, и всегда должны устанавливать некоторые дополнительные инструменты, такие как PuTTY или WinSCP. Теперь они могут использовать знакомые команды SSH прямо из командной строки Windows.
- Используются те же инструменты удаленного управления для серверов Linux и Windows (SSH, SCP, аутентификация с открытым ключом и т. д.).
- Кроссплатформенный PowerShell Remoting. PowerShell Core использует SSH для включения удаленного сеанса PowerShell в Windows, MacOS и Linux. В отличие от WinRM PowerShell Remoting — Windows PowerShell работает только на Windows.
- Вместе с подсистемой Windows для Linux вы можете получить Linux-подобные сеансы SSH с Bash и обычные инструменты Linux также на сервере Windows, который позволяет администраторам Linux использовать свои знания для управления системами Windows.
- И наоборот: администраторы Windows могут использовать PowerShell для управления сервером Linux, если на нем будет присутствовать соответствующий shell от Microsoft.
- Просто другой вариант для удаленного управления, который дает еще большую гибкость.
Установка OpenSSH в Windows Server 2019
- Используя GUI
Открываем Settings — Apps & features — Manage optional features:

Нажимаем Add a feature, ищем OpenSSH Server — Install:

На предыдущем экране дожидаемся окончания процесса инсталляции. OpenSSH сервер можем считать установленным.
Обращаем внимание, что установка этим методом автоматически создаст правило Windows Firewall, с названием «OpenSSH-Server-In-TCP», открывающее 22 порт для входящих подключений.
Используя PowerShell:
Проверим, присутствует ли на нашей системе встроенный OpenSSH:
Get-WindowsCapability -Online | ? Name -like 'OpenSSH*'
В ответ должны получить:
Name : OpenSSH.Client~~~~0.0.1.0

State : NotPresent #или Install, если клиент уже установлен

Name : OpenSSH.Server~~~~0.0.1.0

State : NotPresent
Устанавливаем клиент, если он не установлен:
Add-WindowsCapability -Online -Name OpenSSH.Client~~~~0.0.1.0
Для установки сервера вводим:
Add-WindowsCapability -Online -Name OpenSSH.Server~~~~0.0.1.0
В обоих случаях вывод должен быть следующим:
Path :

Online : True

RestartNeeded : False
Первичная конфигурация SSH-сервера
По умолчанию при подключении к OpenSSH-серверу используется командная строка Windows. Вы можете использовать практически любую оболочку на вашем компьютере с Windows через SSH-соединение. Даже возможно использовать Bash, когда подсистема Windows для Linux (WSL) также установлена на целевой машине. Также возможно изменение оболочки по умолчанию на SSH-сервере на нечто иное, чем командная оболочка. Для этого ключ реестра «DefaultShell» необходимо изменить.
Сделать это можно как через редактор реестра regedit.exe, открыв в нем следующий путь: HKEY_LOCAL_MACHINESOFTWAREOpenSSH и изменив в нем параметр DefaultShell, указав в нем полный путь до исполняемого файла необходимой командной строки, например:
C:WindowsSystem32WindowsPowerShellv1.0powershell.exe
Тоже самое можно сделать используя PowerShell:
New-ItemProperty -Path "HKLM:SOFTWAREOpenSSH" -Name DefaultShell -Value "C:WindowsSystem32WindowsPowerShellv1.0powershell.exe" -PropertyType String -Force
Проверим настройки Windows Firewall, используя для этого PowerShell:
Get-NetFirewallRule -Name *ssh*
Введя данную команду мы получим параметры правила, разрешающего SSH-подключение к серверу. Если правила не оказалось, введем следующую команду, создав его:
New-NetFirewallRule -Name sshd -DisplayName 'OpenSSH Server (sshd)' -Enabled True -Direction Inbound -Protocol TCP -Action Allow -LocalPort 22
Запуск службы OpenSSH
После установки функции SSH-сервера нам остается только его запустить:
Start-Service sshd
Опционально можно установить для службы sshd автоматический запуск:
Set-Service -Name sshd -StartupType 'Automatic'
Подключение к серверу
Теперь мы готовы к работе и можем подключиться через установленное приложение к нашему хосту. Это можно осуществить либо с Windows 10, компьютера с Linux, с putty.exe на более старой машине с Windows, либо с Bash в настольной операционной системе от Microsoft. Все, что вам нужно, это найти какой-либо SSH-клиент, ввести в него имя пользователя, имя вашего сервера или IP-адрес и подключиться.
Для SSH-клиента в PowerShell синтаксис будет таким:
Ssh username@servername
При первом подключении с неизвестного хоста будет показано следующее сообщение:

Ответив на него yes, хост подключения будет добавлен в список известных хостов сервера. После чего необходимо ввести пароль пользователя (по соображениям безопасности вводимые символы отображаться не будут). После успешного подключения отобразится интерфейс используемой командной строки:

Копирование файлов
Также, как с сервером OpenSSH в любой системе * nix, вы можете использовать SCP для копирования файлов на сервер или с сервера.
Например, администратор Linux может быстро получить файл журнала с сервера Windows с помощью той же команды, что и для сервера Linux.
scp username@servername:C:/inetpub/logs/LogFiles/W3SVC1/u_ex191017.log u_ex191017.log
Когда вы подключаетесь из Bash/*nix к машине с Windows, нужно помнить, что пути Windows также должны указываться с обычными косыми чертами Unix вместо обратных косых черт. Например, C:/Windows вместо C:Windows.
sshd_config
Аналогично операционным системам семейства Linux, OpenSSH Server в Windows имеет в своем составе особый файл, где хранятся все параметры для выполнения более подробных настроек. Например, для ограничения входа.
По умолчанию файл конфигурации находится в «%programdata%sshsshd_config».
Самые различные настройки, применимые к этому файлу можно найти на сайте https://man.openbsd.org/sshd_config.
Кроме того, у Microsoft есть документация для специфичных настроек Windows.
Больше информации
Дополнительную информацию об OpenSSH в Windows можно найти на сайте docs.microsoft.com или в проекте GitHub разветвления OpenSSH от Microsoft.
191028
Санкт-Петербург
Литейный пр., д. 26, Лит. А
+7 (812) 403-06-99
![]()
700
300
ООО «ИТГЛОБАЛКОМ ЛАБС»
191028
Санкт-Петербург
Литейный пр., д. 26, Лит. А
+7 (812) 403-06-99
![]()
700
300
ООО «ИТГЛОБАЛКОМ ЛАБС»
С добавлением клиента и сервера OpenSSH в Windows 10 Fall Creators Update вам больше не придется полагаться на сторонние программы, чтобы открыть SSH-сервер и подключиться к машине Windows.
В то время как это все еще бета-функция, он представляет собой долгожданное обновление, выполняющее обещание, сделанное еще в 2015 году.
Клиент OpenSSH позволяет использовать SSH на удаленных серверах непосредственно из командной строки Windows.
Сервер позволяет удаленным клиентам подключаться к вашей системе Windows 10, где они смогут получить командную строку для вашей системы удаленно. Если вы знакомы с OpenSSH от Linux, то вы будете дома дома с версией Windows 10.
OpenSSH для Windows определенно находится в бета-форме и должен использоваться только в безопасной тестовой среде, такой как ваша домашняя сеть.
Это не должно использоваться в производстве или открываться в Интернете.
При этом, по прошествии времени, эта реализация OpenSSH должна стать более безопасной и полезной.
Чтобы следовать этому руководству, вам понадобится компьютер с Windows 10, который был полностью обновлен.
Перед началом работы убедитесь, что вы проверяете и устанавливаете любые обновления, которые могут быть у Windows или эти шаги могут не работать должным образом.
Чтобы проверить наличие обновлений, вы можете перейти к кнопке «Пуск», а затем перейти в «Настройки» -> «Обновление и безопасность» -> «Центр обновления Windows», затем нажмите «Проверить наличие обновлений».
Содержание
- Шаг 1 Включите режим разработчика
- Шаг 2 Установите сервер OpenSSH
- Метод 1 Использование PowerShell
- Метод 2 Использование DISM
- Шаг 3 Создание ключей хоста
- Шаг 4 Установите модуль поддержки OpenSSH Utils
- Шаг 5 Откройте порт в брандмауэре
Шаг 1 Включите режим разработчика
Для начала нам нужно убедиться, что система Windows установлена в «Режим разработчика», иначе загрузить эти бета-функции будет невозможно. П
ерейдите к строке поиска в нижней левой части экран
а. Найдите «настройки разработчиков» и он должен появиться в списке «Лучшее совпадение» в результатах.
Выберите его, чтобы открыть настройки.
Теперь вы должны увидеть меню «Использовать функции разработчика».
По умолчанию будет выбран параметр «Приложения Windows Store», поэтому нажмите «Режим разработчика», чтобы включить его.
Для установки файла размером 6 МБ потребуется несколько минут.

Шаг 2 Установите сервер OpenSSH
Когда режим разработчика включен, мы готовы установить OpenSSH, и есть несколько способов сделать это, в зависимости от ваших предпочтений.
Мы рассмотрим такие как PowerShell, так и DISM.
Метод 1 Использование PowerShell
Весь процесс установки может быть выполнен в PowerShell, что более удобно, если вы устанавливаете OpenSSH на нескольких компьютерах.
Это можно было бы легко превратить в USB-Rubber Ducky-скрипт, чтобы сделать процесс настройки сервера SSH более быстрым.
Некоторые хакеры могут даже начать использовать это как способ создания SSH-бэкдора в системах Windows.
Сначала запустите PowerShell в качестве администратора, нажав Windows + X на клавиатуре и нажав «Windows PowerShell (Admin)». Затем убедитесь, что функции OpenSSH доступны для установки, выполнив следующую команду.
Get-WindowsCapability -Online | ? Name -like ‘OpenSSH*’
Оболочка должна вернуть «NotPresent», что означает, что сервер еще не загружен.
Как вы можете видеть, у меня установлен клиент OpenSSH, а сервер доступен для установки.

Предполагая, что OpenSSH доступен, вы можете установить сервер с помощью следующей команды.
Если он недоступен, убедитесь, что ваша система обновлена и включен режим разработчика, поскольку это две наиболее распространенные проблемы, которые могут вызвать это.
Add-WindowsCapability -Online -Name OpenSSH.Server~~~~0.0.1.0
Обратите внимание, что в приглашении может быть сказано, что перезагрузка не требуется, но мой опыт в том, что перезапуск действительно необходим.
Когда процесс будет завершен, вы увидите что-то вроде экрана ниже.

Метод 2 Использование DISM
Если вы предпочитаете использовать командную строку поверх PowerShell, служба обслуживания изображений и управления развертыванием (DISM) – это инструмент командной строки, который мы также можем использовать для установки сервера OpenSSH.
Чтобы начать установку OpenSSH с помощью DISM, откройте командную строку в качестве администратора. Это можно сделать, выполнив поиск «CMD» в строке поиска в нижнем левом углу экрана. Щелкните правой кнопкой мыши «Командная строка» и выберите «Запуск от имени администратора».
Убедитесь, что функции OpenSSH доступны с помощью следующей команды.
dism /Online /Get-Capabilities | findstr OpenSSH
Если вы получаете следующее сообщение, то вы готовы установить сервер.

Установите сервер с помощью этой команды:
dism /Online /Add-Capability /CapabilityName:OpenSSH.Server~~~~0.0.1.0

Шаг 3 Создание ключей хоста
Теперь, когда у нас установлен сервер, нам нужно сгенерировать ключи хоста, чтобы сервер SSH смог аутентифицировать клиентов во время использования.
Для этого мы откроем PowerShell в качестве администратора, нажав Windows + X и нажав «Windows PowerShell (Admin)».
Запустите ssh-agent со следующей командой.
Start-Service ssh-agent

После запуска ssh-agent мы можем перейти в папку OpenSSH и начать генерировать ключ.
Используйте cd для изменения папок, как показано в первой команде ниже, а затем создайте ключ со второй
cd C:WindowsSystem32OpenSSH
.ssh-keygen -A

Теперь мы можем добавить ключ к нашему SSH-серверу со следующей командой.
.ssh-add sshhosted25519_key
Это ключ, который будет использоваться с этого момента для наших SSH-соединений.
Шаг 4 Установите модуль поддержки OpenSSH Utils
Теперь вы можете попытаться использовать SSH-сервер, но если вы это сделаете, вы столкнетесь со множеством ошибок.
Это связано с тем, что сервер все еще находится в стадии бета-тестирования и очень тонкий.

Чтобы решить эти проблемы, Microsoft создала вспомогательный модуль OpenSSHUtils, который соответствующим образом добавит ваши ключи хоста и установит права доступа к списку контроля доступа (ACL).
Чтобы установить OpenSSHUtils, мы выполним приведенную ниже команду.
Install-Module -Force OpenSSHUtils
Он также может попросить установить диспетчер пакетов NuGet.
Если у вас его еще нет, введите y для его установки.

Как только это будет сделано, мы готовы запустить вспомогательный модуль, который должен очистить те ошибки, которые мы видели ранее.
Для его установки выполните следующую команду.
Repair-SshdHostKeyPermission -FilePath C:WindowsSystem32OpenSSHsshhosted25519_key
Как вы можете видеть ниже, вы должны сказать «yes» несколько раз.

Шаг 5 Откройте порт в брандмауэре
Теперь все должно быть готово пойти на стороне сервера SSH.
Нам просто нужно открыть порт в брандмауэре, чтобы мы могли установить SSH-соединение с клиентом за пределами текущей системы Windows.
Ваши требования могут различаться в зависимости от вашей среды, но в целом для большинства пользователей Windows должно работать следующее правило брандмауэра.
Введите следующую команду, чтобы открыть локальный порт 22 с именем SSH.
New-NetFirewallRule -Protocol TCP -LocalPort 22 -Direction Inbound -Action Allow -DisplayName SSH
| title | description | ms.date | ms.topic | ms.author | author | ms.custom |
|---|---|---|---|---|---|---|
|
Get started with OpenSSH for Windows |
Learn how to install and connect to remote machines using the OpenSSH Client and Server for Windows. |
01/11/2023 |
quickstart |
roharwoo |
robinharwood |
contperf-fy21q4 |
Get started with OpenSSH for Windows
Applies to: Windows Server 2022, Windows Server 2019, Windows 10 (build 1809 and later)
OpenSSH is a connectivity tool for remote sign-in that uses the SSH protocol. It encrypts all traffic between client and server to eliminate eavesdropping, connection hijacking, and other attacks.
An OpenSSH-compatible client can be used to connect to Windows Server and Windows client devices.
[!IMPORTANT]
If you downloaded the OpenSSH beta from the GitHub repo at PowerShell/Win32-OpenSSH, follow the instructions listed there, not the ones in this article. Some information in the Win32-OpenSSH repository relates to prerelease product that may be substantially modified before it’s released. Microsoft makes no warranties, express or implied, with respect to the information provided there.
Prerequisites
Before you start, your computer must meet the following requirements:
- A device running at least Windows Server 2019 or Windows 10 (build 1809).
- PowerShell 5.1 or later.
- An account that is a member of the built-in Administrators group.
Prerequisites check
To validate your environment, open an elevated PowerShell session and do the following:
-
Type winver.exe and press enter to see the version details for your Windows device.
-
Run
$PSVersionTable.PSVersion. Verify your major version is at least 5, and your minor version at least 1. Learn more about installing PowerShell on Windows. -
Run the command below. The output will show
Truewhen you’re a member of the built-in Administrators group.(New-Object Security.Principal.WindowsPrincipal([Security.Principal.WindowsIdentity]::GetCurrent())).IsInRole([Security.Principal.WindowsBuiltInRole]::Administrator)
Install OpenSSH for Windows
GUI
Both OpenSSH components can be installed using Windows Settings on Windows Server 2019 and Windows 10 devices.
To install the OpenSSH components:
-
Open Settings, select Apps, then select Optional Features.
-
Scan the list to see if the OpenSSH is already installed. If not, at the top of the page, select Add a feature, then:
- Find OpenSSH Client, then select Install
- Find OpenSSH Server, then select Install
-
Once setup completes, return to Apps and Optional Features and confirm OpenSSH is listed.
-
Open the Services desktop app. (Select Start, type services.msc in the search box, and then select the Service app or press ENTER.)
-
In the details pane, double-click OpenSSH SSH Server.
-
On the General tab, from the Startup type drop-down menu, select Automatic.
-
To start the service, select Start.
[!NOTE]
Installing OpenSSH Server will create and enable a firewall rule namedOpenSSH-Server-In-TCP. This allows inbound SSH traffic on port 22. If this rule is not enabled and this port is not open, connections will be refused or reset.
PowerShell
To install OpenSSH using PowerShell, run PowerShell as an Administrator.
To make sure that OpenSSH is available, run the following cmdlet:
Get-WindowsCapability -Online | Where-Object Name -like 'OpenSSH*'
The command should return the following output if neither are already installed:
Name  : OpenSSH.Client~~~~0.0.1.0
State : NotPresent

Name  : OpenSSH.Server~~~~0.0.1.0
State : NotPresent
Then, install the server or client components as needed:
# Install the OpenSSH Client
Add-WindowsCapability -Online -Name OpenSSH.Client~~~~0.0.1.0

# Install the OpenSSH Server
Add-WindowsCapability -Online -Name OpenSSH.Server~~~~0.0.1.0
Both commands should return the following output:
Path          :
Online        : True
RestartNeeded : False
To start and configure OpenSSH Server for initial use, open an elevated PowerShell prompt (right click, Run as an administrator), then run the following commands to start the sshd service:
# Start the sshd service
Start-Service sshd

# OPTIONAL but recommended:
Set-Service -Name sshd -StartupType 'Automatic'

# Confirm the Firewall rule is configured. It should be created automatically by setup. Run the following to verify
if (!(Get-NetFirewallRule -Name "OpenSSH-Server-In-TCP" -ErrorAction SilentlyContinue | Select-Object Name, Enabled)) {
    Write-Output "Firewall Rule 'OpenSSH-Server-In-TCP' does not exist, creating it..."
    New-NetFirewallRule -Name 'OpenSSH-Server-In-TCP' -DisplayName 'OpenSSH Server (sshd)' -Enabled True -Direction Inbound -Protocol TCP -Action Allow -LocalPort 22
} else {
    Write-Output "Firewall rule 'OpenSSH-Server-In-TCP' has been created and exists."
}
Connect to OpenSSH Server
Once installed, you can connect to OpenSSH Server from a Windows or Windows Server device with the OpenSSH client installed. From a PowerShell prompt, run the following command.
ssh domainusername@servername
Once connected, you get a message similar to the following output.
The authenticity of host 'servername (10.00.00.001)' can't be established.
ECDSA key fingerprint is SHA256:(<a large string>).
Are you sure you want to continue connecting (yes/no)?
Entering yes adds that server to the list of known SSH hosts on your Windows client.
At this point, you’ll be prompted for your password. As a security precaution, your password won’t be displayed as you type.
Once connected, you’ll see the Windows command shell prompt:
domainusername@SERVERNAME C:Usersusername>
Uninstall OpenSSH for Windows
GUI
To uninstall OpenSSH using Windows Settings:
- Open Settings, then go to Apps > Apps & Features.
- Go to Optional Features.
- In the list, select OpenSSH Client or OpenSSH Server.
- Select Uninstall.
PowerShell
To uninstall the OpenSSH components using PowerShell, use the following commands:
# Uninstall the OpenSSH Client
Remove-WindowsCapability -Online -Name OpenSSH.Client~~~~0.0.1.0

# Uninstall the OpenSSH Server
Remove-WindowsCapability -Online -Name OpenSSH.Server~~~~0.0.1.0
You may need to restart Windows afterwards if the service was in use at the time it was uninstalled.
Next steps
Now that you’ve installed OpenSSH Server for Windows, here are some articles that might help you as you use it:
- Learn more about using key pairs for authentication in OpenSSH key management
- Learn more about the OpenSSH Server configuration for Windows
Documentation » Using WinSCP » Guides » Other »
Recently, Microsoft has released a port of OpenSSH for Windows. You can use the package to set up an SFTP/SSH server on Windows.
- Installing SFTP/SSH Server
- On Windows 11 and Windows 10
- On earlier versions of Windows
- Configuring SSH server
- Setting up SSH public key authentication
- Connecting to the server
- Finding Host Key
- Connecting
- Further reading
Advertisement
Installing SFTP/SSH Server
On Windows 11 and Windows 10
- On Windows 11:
- Go to Settings > Apps > Optional features and click on View features.
- Locate “OpenSSH server” feature, select it, click Next, and then click Install.
- On Windows 10 (version 1803 and newer):
- Go to Settings > Apps > Apps & features > Optional features and click on Add a feature.
- Locate “OpenSSH server” feature, expand it, and select Install.
Binaries are installed to %WINDIR%System32OpenSSH. Configuration file (sshd_config) and host keys are installed to %ProgramData%ssh (only after the server is started for the first time).
You may still want to use the following manual installation if you want to install a newer version of OpenSSH than the one built into Windows.
On earlier versions of Windows
- Download the latest OpenSSH for Windows binaries (package
OpenSSH-Win64.ziporOpenSSH-Win32.zip) - As the Administrator, extract the package to
C:Program FilesOpenSSH - As the Administrator, install sshd and ssh-agent services:
powershell.exe -ExecutionPolicy Bypass -File install-sshd.ps1
Configuring SSH server
- Allow incoming connections to SSH server in Windows Firewall:
- When installed as an optional feature, the firewall rule “OpenSSH SSH Server (sshd)” should have been created automatically. If not, proceed to create and enable the rule as follows.
- Either run the following PowerShell command as the Administrator:
New-NetFirewallRule -Name sshd -DisplayName 'OpenSSH SSH Server' -Enabled True -Direction Inbound -Protocol TCP -Action Allow -LocalPort 22 -Program "C:WindowsSystem32OpenSSHsshd.exe"
Replace
C:WindowsSystem32OpenSSHsshd.exewith the actual path to thesshd.exe(C:Program FilesOpenSSHssh.exe, had you followed the manual installation instructions above). - or go to Windows Security > Firewall & network protection1 > Advanced Settings > Inbound Rules and add a new rule for port 22.
- Start the service and/or configure automatic start:
- Go to Control Panel > System and Security > Administrative Tools and open Services. Locate OpenSSH SSH Server service.
- If you want the server to start automatically when your machine is started: Go to Action > Properties (or just double-click the service). In the Properties dialog, change Startup type to Automatic and confirm.
- Start the OpenSSH SSH Server service by clicking the Start the service link or Action > Start in the menu.
Advertisement
These instructions are partially based on the official deployment instructions.
Setting up SSH public key authentication
Follow a generic guide for Setting up SSH public key authentication in *nix OpenSSH server, with the following difference:
- Create the
.sshfolder (for theauthorized_keysfile) in your Windows account profile folder (typically inC:Usersusername.ssh).2 - For permissions to the
.sshfolder and theauthorized_keysfile, what matters are Windows ACL permissions, not simple *nix permissions. Set the ACL so that the respective Windows account is the owner of the folder and the file and is the only account that has a write access to them. The account that runs OpenSSH SSH Server service (typicallySYSTEMorsshd) needs to have read access to the file. - Though, with the default Win32-OpenSSH configuration there is an exception set in
sshd_configfor accounts inAdministratorsgroup. For these, the server uses a different location for the authorized keys file:%ALLUSERSPROFILE%sshadministrators_authorized_keys(i.e. typicallyC:ProgramDatasshadministrators_authorized_keys).
Connecting to the server
Finding Host Key
Before the first connection, find out the fingerprint of the server’s host key by using ssh-keygen.exe for each file.
In Windows command-prompt, use:
for %f in (%ProgramData%sshssh_host_*_key) do @%WINDIR%System32OpenSSHssh-keygen.exe -l -f "%f"
Replace %WINDIR%System32 with %ProgramFiles%, if appropriate.
In PowerShell, use:
Get-ChildItem $env:ProgramDatasshssh_host_*_key | ForEach-Object { . $env:WINDIRSystem32OpenSSHssh-keygen.exe -l -f $_ }
Replace $env:WINDIRSystem32 with $env:ProgramFiles, if appropriate.
You will get an output like this:
C:WindowsSystem32OpenSSH>for %f in (%ProgramData%sshssh_host_*_key) do @%WINDIR%System32OpenSSHssh-keygen.exe -l -f "%f"
1024 SHA256:K1kYcE7GHAqHLNPBaGVLOYBQif04VLOQN9kDbiLW/eE martin@example (DSA)
256 SHA256:7pFXY/Ad3itb6+fLlNwU3zc6X6o/ZmV3/mfyRnE46xg martin@example (ECDSA)
256 SHA256:KFi18tCRGsQmxMPioKvg0flaFI9aI/ebXfIDIOgIVGU martin@example (ED25519)
2048 SHA256:z6YYzqGiAb1FN55jOf/f4fqR1IJvpXlKxaZXRtP2mX8 martin@example (RSA)
Connecting
Start WinSCP. Login dialog will appear. On the dialog:
- Make sure New site node is selected.
- On New site node, make sure the SFTP protocol is selected.
- Enter your machine/server IP address (or a hostname) into the Host name box.
- Enter your Windows account name to the User name box. It might have to be entered in the format
user@domainif running on a domain. - For a public key authentication:
- Press the Advanced button to open Advanced site settings dialog and go to SSH > Authentication page.
- In Private key file box select your private key file.
- Submit Advanced site settings dialog with the OK button.
- For a password authentication:
- Enter your Windows account password to the Password box.
- If your Windows account does not have a password, you cannot authenticate with the password authentication (i.e. with an empty password), you need to use the public key authentication.
- Save your site settings using the Save button.
- Login using Login button.
- Verify the host key by comparing fingerprints with those collected before (see above).
Advertisement
If you cannot authenticate to the server and use Windows 10 Developer mode, make sure that your OpenSSH server does not conflict with an internal SSH server used by the Developer mode. You may need to turn off the SSH Server Broker and SSH Server Proxy Windows services. Or run your OpenSSH server on a different port than 22.
Further reading
- Guide to Installing Secure FTP Server on Windows using IIS;
- Guide to uploading files to SFTP server;
- Guide to automating operations (including upload).
Last modified: 2022-10-24 by martin
SSH • Компьютерные истории • Конфигурирование • Windows • OpenSSH • Истории

Несколько лет назад я прочитал о том, что Microsoft собирается реализовывать настоящий SSH сервер в своей флагманской операционной системе, то бишь, в Windows 10. Если уж быть совсем точным, было это в 2015 году, сообщение было размещено в блоге команды, занимающейся развитием PowerShell. С тех пор сообщение «переезжало», но я, все-таки, оставлю актуальную (на данный момент) ссылку — для истории, так сказать.
Я тогда активно интересовался вопросами удаленного управления компьютерами, и мне было интересно, как с этим делом обстоят дела у Windows. Понятно, конечно, что можно использовать удаленный рабочий стол, его аналоги от Google или TeamViewer, или поставить сторонний софт, тот же OpenSSH. Но я, если честно, значительно чаще и с большим удовольствием отдаю предпочтение решениям, интегрированным в используемый продукт, будь то средство программирования, используемые библиотеки языка программирования или программы, предназначенные для решения каких-то проблем и вопросов.
Конечно, надо признать, что эти дополнительные встроенные возможности практически всегда проигрывают по набору каких-то характеристик сторонним специализированным разработкам, что, собственно, не удивительно: если вы разрабатываете узкоспециализированную программу, то вы заведомо лучше должны реализовывать различные требования, да и сам набор требований можете существенно расширить, обогатив тем самым конечный продукт; реализуя же какую-то встроенную функциональность, лежащую несколько в стороне от основного продукта, вы, чаще всего, идете на множество упрощений и допущений — ведь определяющим для вас в этом случае является ваш главный продукт, а дополнительные встроенные возможности — лишь приятный бонус для пользователей.
Но если у вас, как у потребителя, не самые требовательные запросы, и вам надо всего лишь удовлетворить свои весьма поверхностные «хотелки», то стоит ли устанавливать и настраивать супер-мега-комбайны? Вряд ли — пословица «из пушки по воробьям» актуальна значительно чаще, чем мы думаем. К тому же, в данном конкретном случае, все выглядело так, словно речь не идет о какой-то второстепенной вспомогательной функции — Microsoft анонсировала использование , в качестве основы, того самого OpenSSH, да еще и оформила все в виде open source проекта.
Так вот, изучая возможности удаленного управления Windows, я, как говорится, взял на карандаш, что планируется к реализации встроенный SSH сервер. Понятно, что когда речь идет о Microsoft, то ни в чем нельзя быть уверенным до конца. К счастью, сейчас уже можно утверждать, что не в этот раз. Несколько раз за прошедшие три года я вспоминал про эти обещания и проверял, так сказать, состояние дел, каждый раз убеждаясь в том, что процесс, в принципе, движется. Правда, когда я углублялся в тему, например, пытался прояснить для себя, что надо сделать, чтобы заставить все это хозяйство работать, то довольно быстро приходило осознание того, что продукт все еще довольно сырой и вряд ли текущая реализация позволит воспользоваться даже заявленным функционалом на все 100 процентов.
Но время шло, странностей и явных обходных маневров в различных описаниях процесса установки, настройки и использования становилось все меньше и меньше, и вот настал, наконец, момент, когда я решил, что можно попробовать со всем этим делом разобраться и попытаться таки запустить встроенный SSH сервер. Конечно, обострение интереса случилось не просто так, появилась причина, которая заставила меня несколько форсировать события.
Дело в том, что у меня постепенно заканчивается место на моем сетевом устройстве MyBookLiveDuo (на MyBookLive место закончилось уже давно). Пока есть еще около 500 гигабайт, но практика показывает, что к дедлайну лучше подготовиться заранее. Поэтому я достал из загашника USB диск на два терабайта и подключил его к своему серверу. После чего осталось понять, как теперь с этим диском взаимодействовать: до сих пор все мои хранилища были под управлением Linux, а этот оказался подключен к компьютеру с Windows 10 на борту. А я, если честно, уже привык и вполне освоился со всеми этими стандартными сценариям работы с Linux — SSH, монтирование удаленных каталогов и так далее и тому подобное. Отказываться от накопленных знаний не хотелось, и тут, очень кстати, вспомнились обещания Microsoft.
После непродолжительных поисков, в интернете нашлось более-менее внятное описание процесса установки и настройки, оно было относительно недавним и рассказывало про бета версию SSH сервера[1]. Не откладывая в долгий ящик, я принялся реализовывать описанный сценарий, мысленно приготовившись проходить очередной квест [2]. Каково же было мое искреннее удивление, когда выяснилось, что все значительно проще. Именно, что значительно. Но, обо всем по-порядку.
Итак, как уже писал выше, я стал по шагам проходить инструкцию. Несмотря на то, что уже некоторое время вожусь с Linux, я до сих пор так и не стал ярым приверженцем командной строки, и, когда есть такая возможность, проявляю слабость, пользуясь инструментами с GUI. Вот и в этот раз я отдал предпочтение первой части инструкции, хотя честно прочитал и ту часть, которая описывала установку SSH сервера с использованием командной строки PowerShell. Но GUI, значит GUI… Вот как все происходило:
Шаг 1. Открываем Настройки Windows. Сделать это можно через меню Пуск или Центр Уведомлений
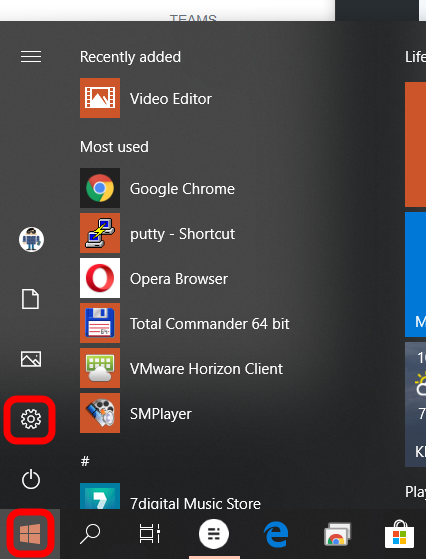
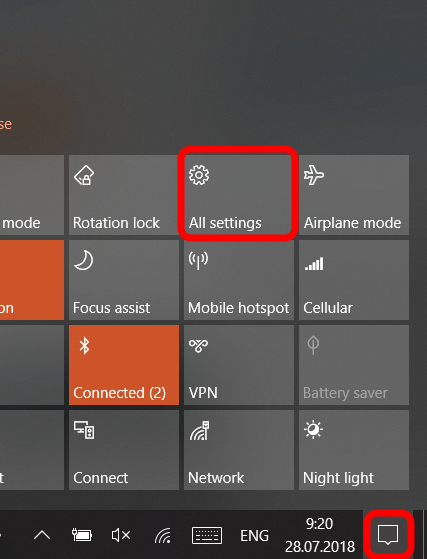
или же, еще проще — использовав комбинацию клавиш «`Win + I«`.
Шаг 2. В появившемся окне надо выбрать Приложения
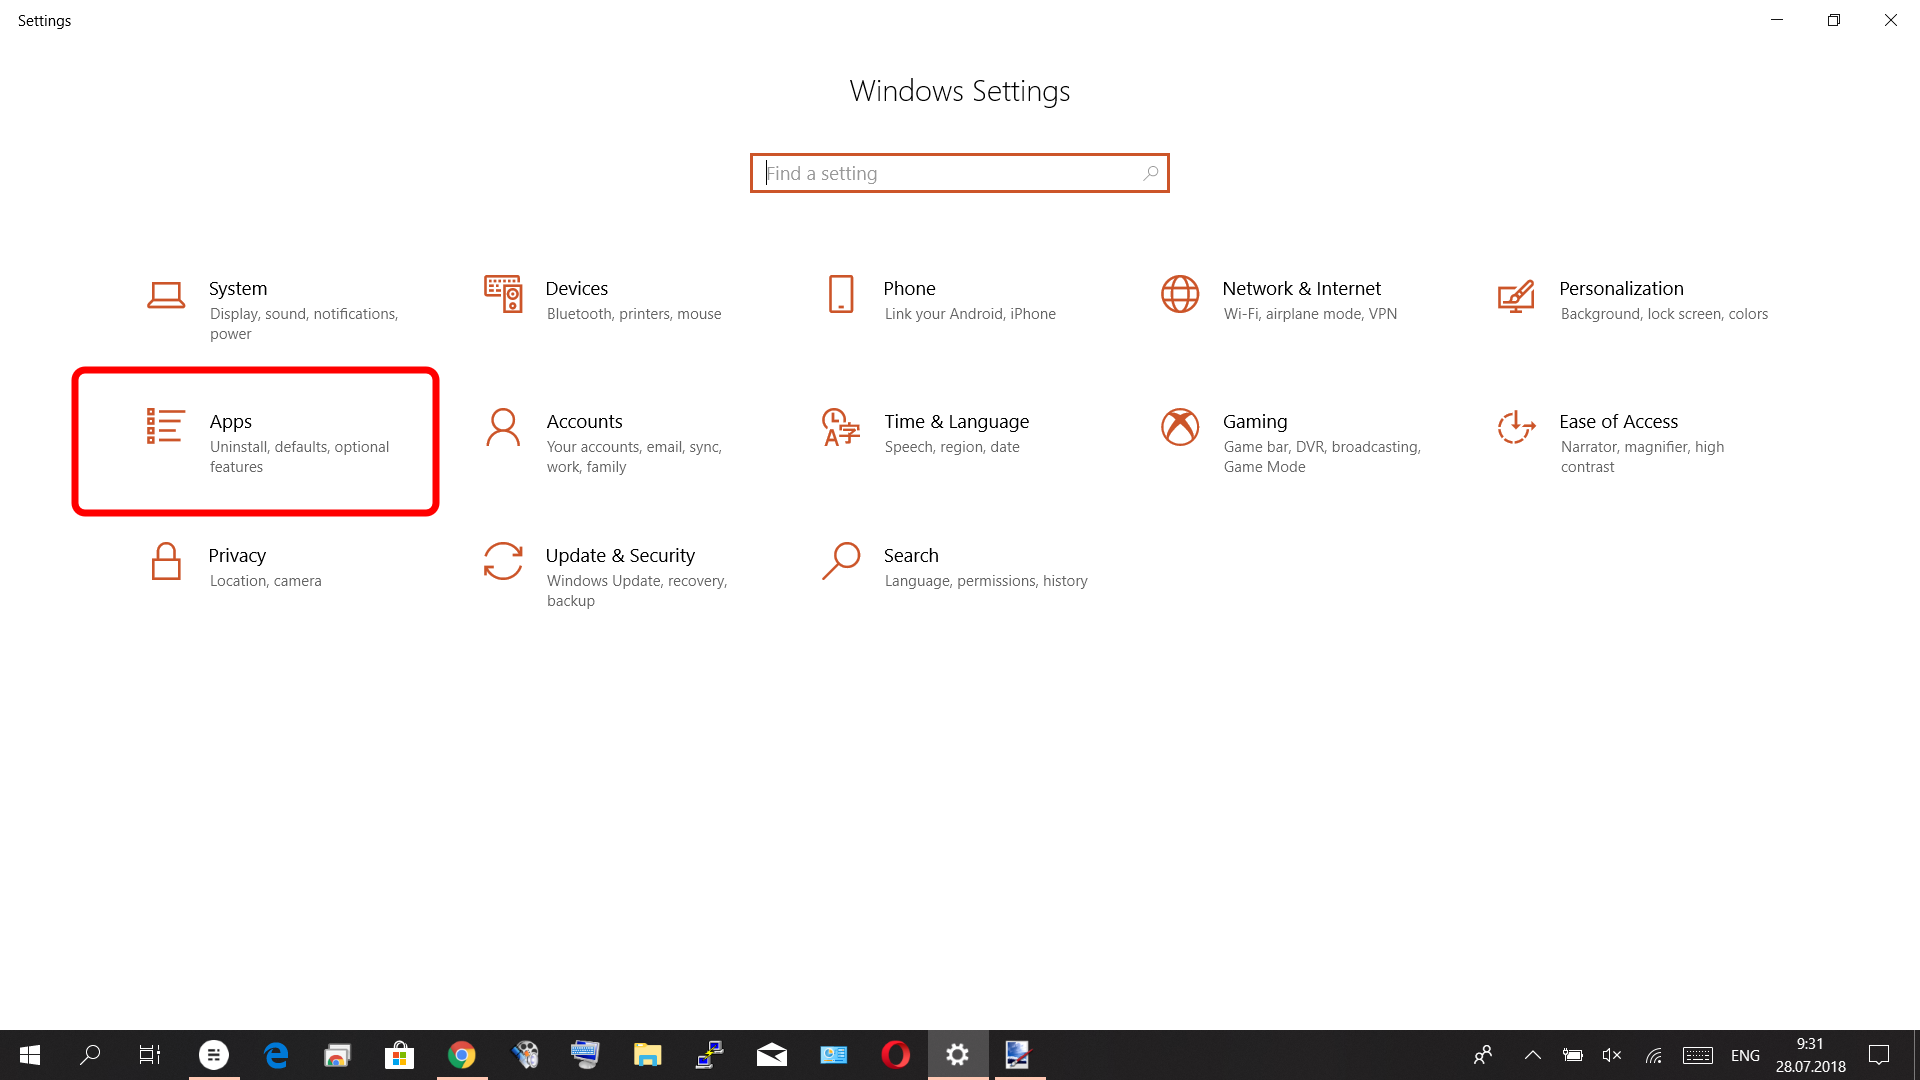
Шаг 3. В списке Приложения и возможности надо выбрать пункт Управление дополнительными компонентами.

Шаг 4. Теперь надо нажать кнопку Добавить компонент. Это откроет список дополнительных компонентов, которые могут быть установлены.
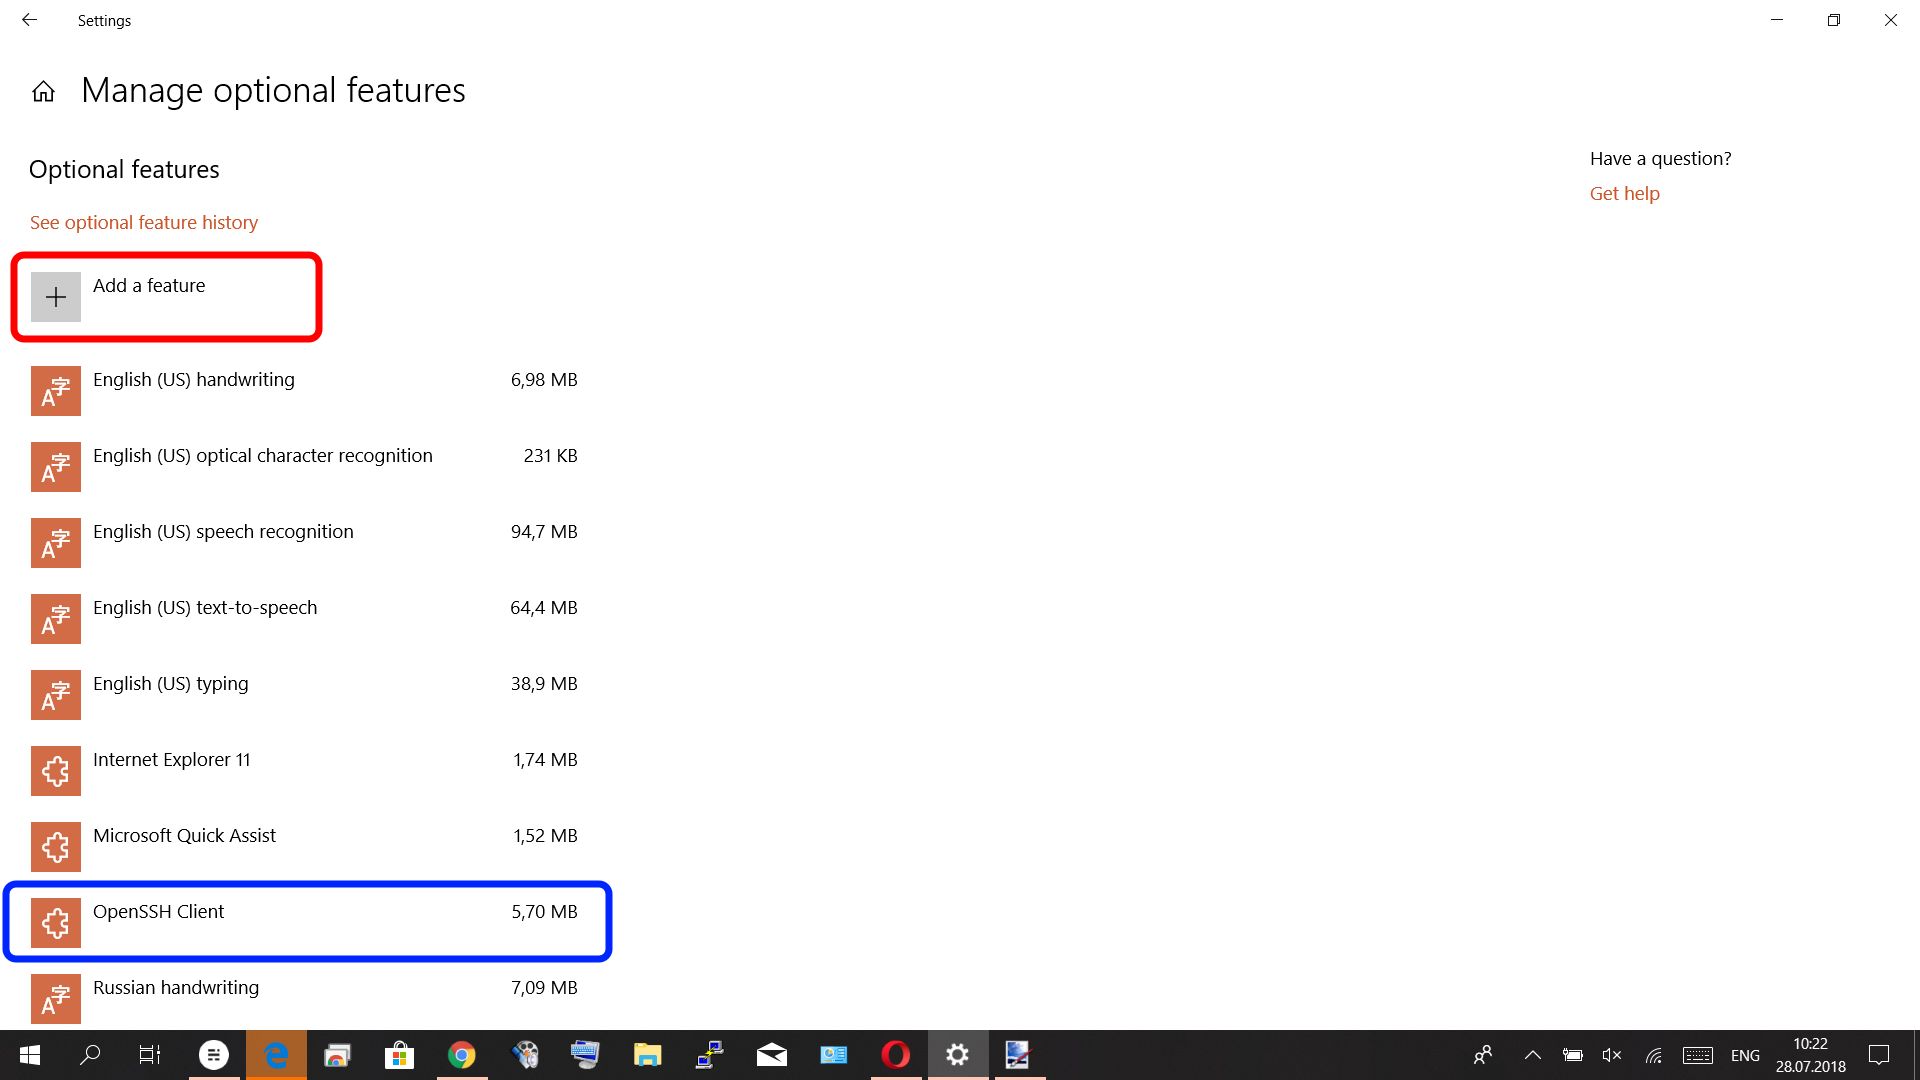
Обратите внимание на то, что в списке уже установленных дополнительных компонентов присутстует… SSH Client. Это меня немного насторожило, так как в используемом мною источнике рассказывалось не только об установке сервера, но и об установке клиента. А тут получалось, что клиента устанавливать не надо. Ладно, это, конечно, отличие, но оно косвенное и пока не критичное.
Шаг 5. Устанавливаем SSH Server. В списке дополнительных компонентов довольно много пакетов шрифтов, но, если прокрутить вниз, то можно увидеть OpenSSH Server.
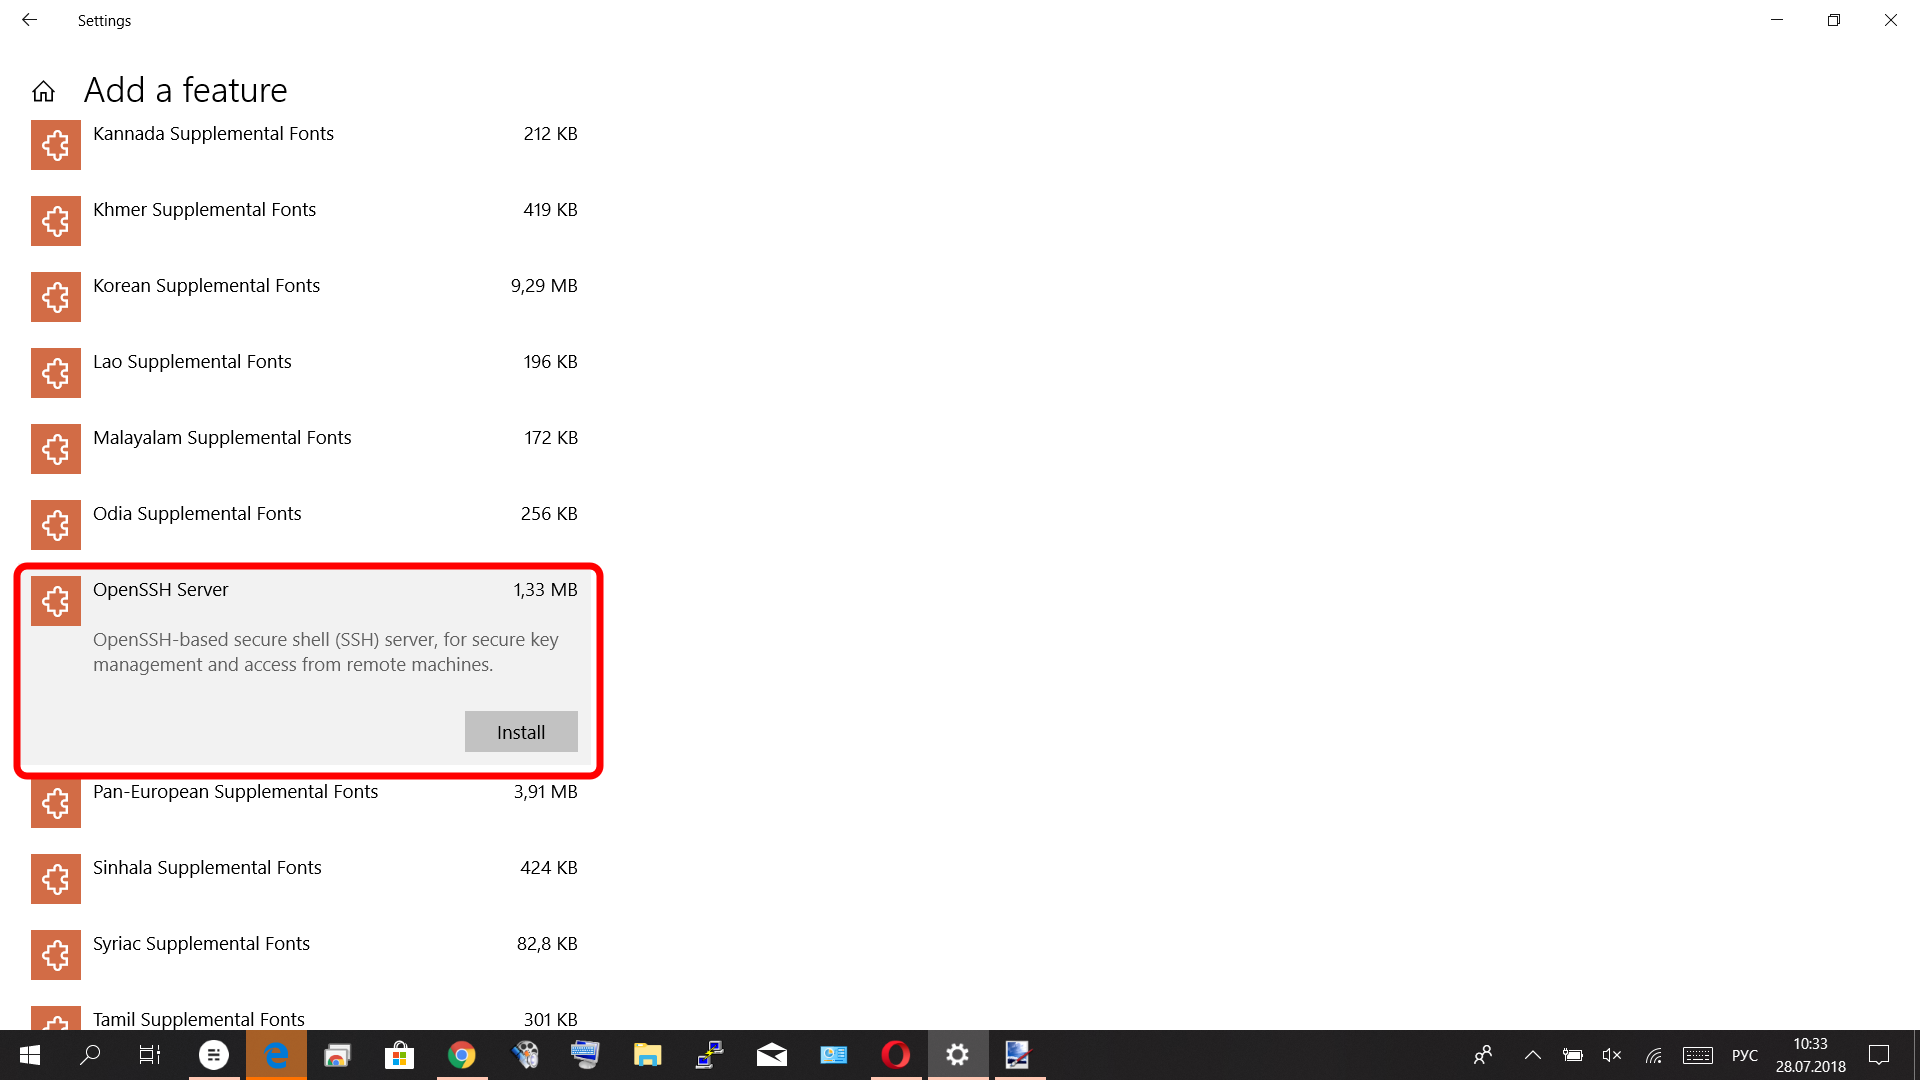
И вот тут-то я окончательно понял, что инструкция устарела. Для наглядности приведу картинку из инструкции:
Eсли отбросить разницу в цвете фона, то бросается в глаза два факта:
- Есть возможность, как я уже говорил, установки и
SSH ClientиSSH Server - Оба этих компонента помечены, как
beta(!) версии, в моем же случае, у сервера (да и у уже установленного клиента) такой пометки нет
На этом месте меня начали одолевать сомнения — смогу ли я дойти до завершения процесса установки, пользуясь устаревшей инструкцией. Немного поразмыслив, я решил понадеяться на то, что раз программное обеспечение лишилось пометки beta, то хуже уж точно не стало, и… нажал кнопку Install.
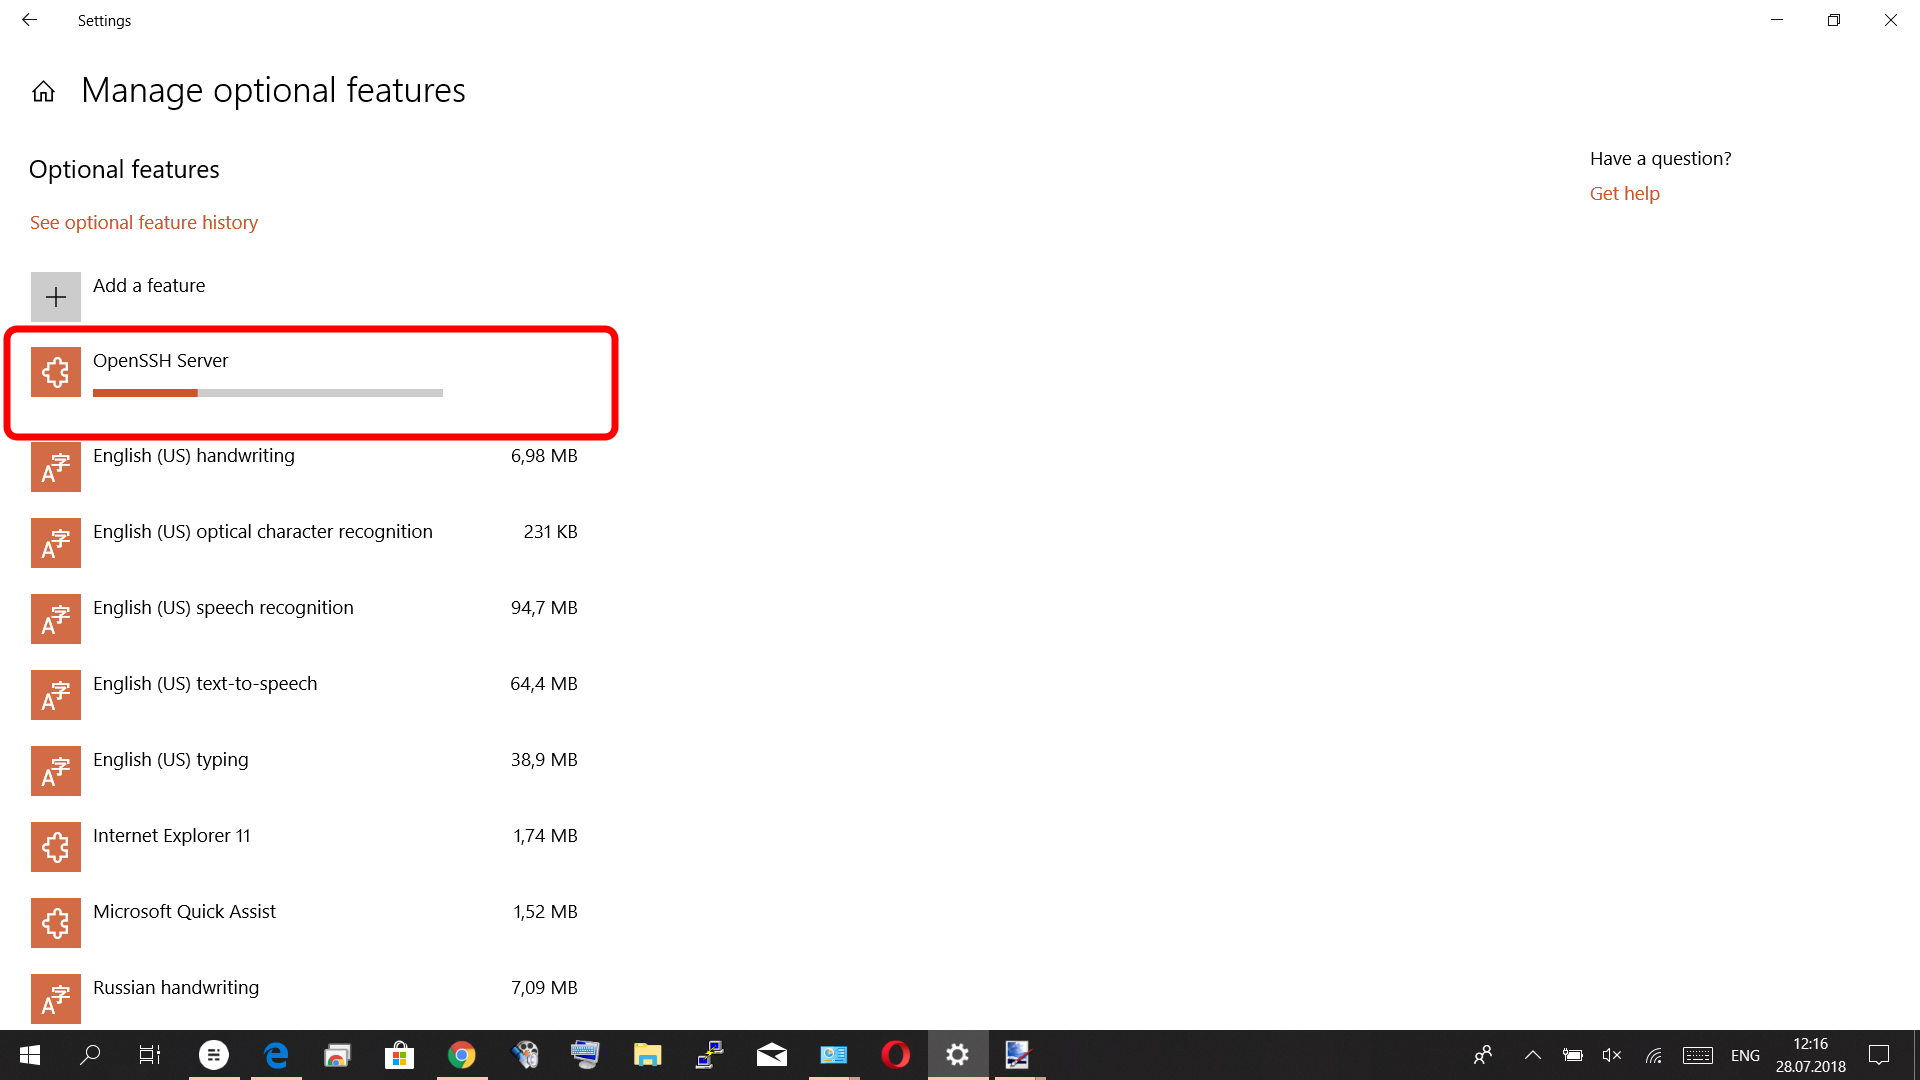
Как оказалось, этого было достаточно для завершения установки. То есть, через некоторое время установка завершилась и … все! Вот он, уже установленный SSH сервер, в списке дополнительных компонентов, рядом с клиентом:

Я перешел в список сервисов — там тоже красовался только что установленный SSH сервер:

До этого я встречал в интернете информацию о том, что существуют определенные проблемы с запуском сервиса, что надо вручную генерировать ключи, делать еще какие-то телодвижения. Учитывая все эти истории и особо не надеясь на успех, я, тем не менее, попробовал запустить сервис. Каково же было мое удивление и, честно говоря, радость, когда сервис просто молча запустился. Видимо, все шероховатости были устранены в процессе бета-тестирования и релиз вышел без явных видимых проблем.
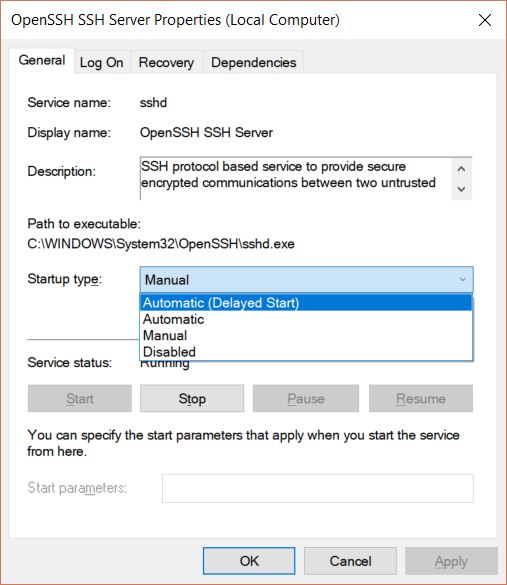
Так что, осталось лишь определиться, как мы хотим, чтобы сервис запускался. Так как установку я производил на сервере, то и запуск мне требовался не ручной, а автоматический. На всякий случай, я выбрал режим запуска Automatic (Delayed Start), то есть, запуск автоматический, но с задержкой, чтобы перед ним могли стартовать другие сервисы, наличие которых, возможно, потребуется для работы сервиса SSH Server (хотя, вкладка Dependencies пуста).
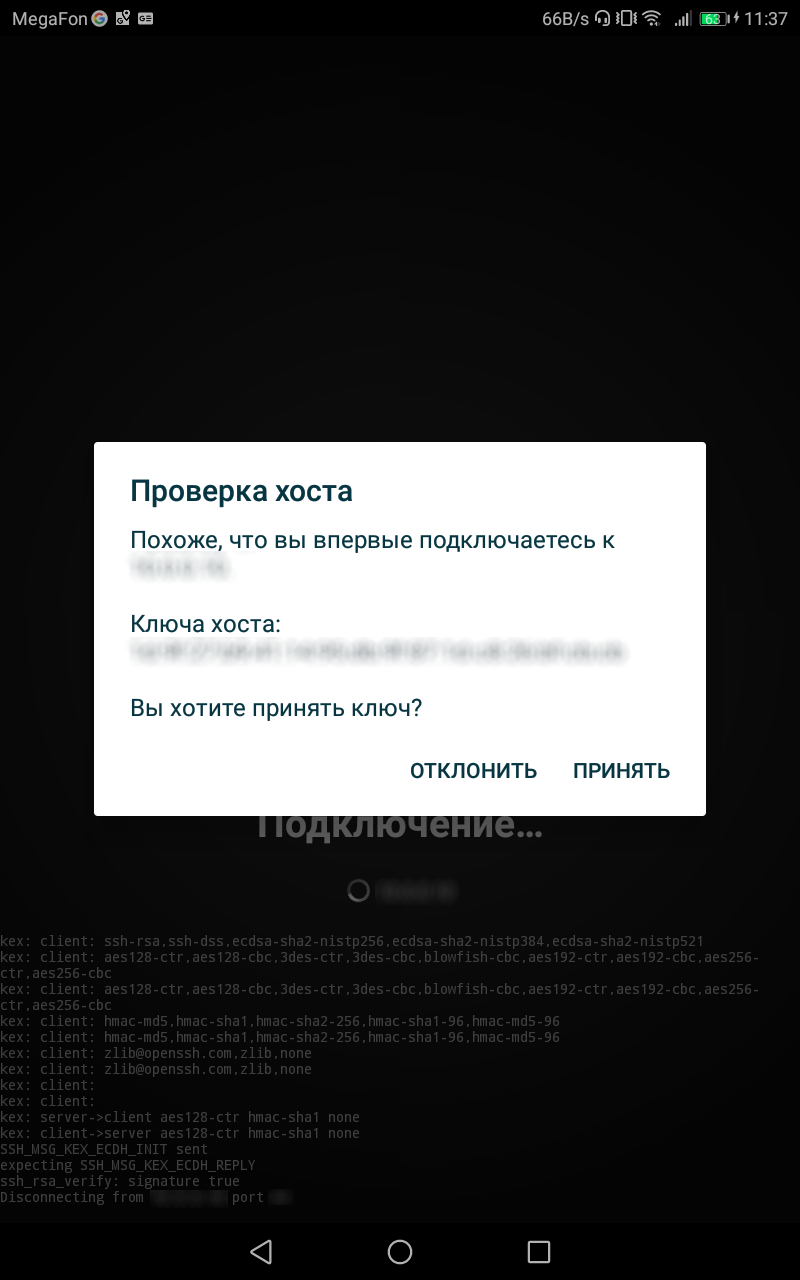
Я сделал попытку установить соединение по SSH с планшета — все было, как обычно: запрос на подтверждение принятия ключа сервера, согласие, ввод пароля — и вот я уже в командной строке. И да, это — командная строка Windows, хотя бы потому, что команда dir нормально распозналась и отработала.

Вот, пожалуй, и все, что следует знать про установку встроенного SSHсервера Windows. Конечно, есть еще масса вопросов, связанных с тем, как к нему подсоединяться, что и как можно делать в командной строке. Но это все темы для отдельного разговора (или, даже, разговоров 😉), так что, подождем…
-
Вот что меня действительно удивляет, так это то, что документации для актуальной версии мне так найти и не удалось ↩︎
-
отсылка к играм-головоломкам не случайна, довольно часто при такого рода действиях приходится решать много дополнительных задач и преодолевать неожиданные сложности ↩︎
Subscribe to Записки на полях
Get the latest posts delivered right to your inbox
Great! Check your inbox and click the link to confirm your subscription.
Please enter a valid email address!
В этой статье мы рассмотрим, как установить SSH сервер (OpenSSH) на Windows Server и использовать его для удаленного управления сервером с помощью PowerShell по протоколу SSH.
Для удаленного управления компьютерами и серверами через PowerShell можно воспользоваться возможностями протокола WinRM, однако для более гладкого стыка с Linux системами удобнее использовать единый протокол удаленного управления — SSH. Одним из проектов команды Microsoft, занимающейся разработкой функционала PowerShell, является портирование популярного открытого сервера OpenSSH на Windows системы. Проект называется Win32-OpenSSH
- Установка пакета OpenSSH
- SSH авторизация в Windows по паролю
- SSH с аутентфикацией по ключу
- Подключение с клиента через модуль Posh-SSH
Содержание:
Установка пакета OpenSSH
Сервер Win32-OpenSSH для Windows можно установить, скачав дистрибутив с GitHub (https://github.com/PowerShell/Win32-OpenSSH), либо (гораздо проще), установив его через менеджер пакетов Chocolatey.
Если Chocolatey еще не установлен, установить его можно следующими командами PowerShell:
Set-ExecutionPolicy Unrestricted
iwr https://chocolatey.org/install.ps1 -UseBasicParsing | iex
Установка OpenSSH сервера после этого выполняется командой:
choco install openssh -params '"/SSHServerFeature /KeyBasedAuthenticationFeature"' –y
Данная команда выполнит установку как SSH сервера, так и клиента. Если нужно установить только клиент, нужно убрать аргумент param.
Сценарий установки автоматически создаст правило файервола, разрешающее подключение на 22 порт, и запустит службы sshd и ssh-agent.
Примечание. Если правило по каким-то причинам не создалось, вы можете создать его командой:
New-NetFirewallRule -Protocol TCP -LocalPort 22 -Direction Inbound -Action Allow -DisplayName SSH
Для перезагрузки переменных окружения, выполните команду:
refreshenv
SSH авторизация в Windows по паролю
Для удаленного подключения к данному SSH серверу под локальным пользователем user1, воспользуйтесь такой командой:
ssh user1@192.168.1.100
После запуска команды, для авторизации нужно указать пароль пользователя user1. Если SSH-сервер включен в домен, можно авторизоваться и под пользователем Active Directory. Имя пользователя в этом случае указывается в формате domaindomain_user_name или domain_user_name@domain.
ssh –l domain_user_name@domain remotehost
SSH с аутентфикацией по ключу
Для беспарольного входа можно использовать авторизацию на сервере SSH по ключу. Сначала нужно сгенерировать ключ на клиенте (в процессе нужно указать ключевую фразу)
Ssh-keygen.exe
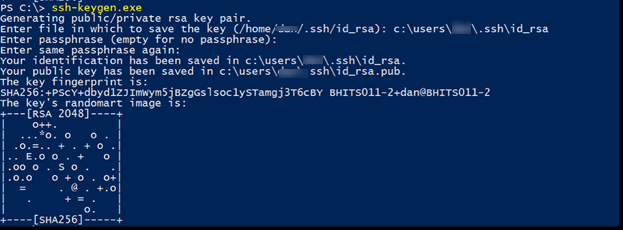
В результате в каталоге пользователя c:usersusername.ssh появится два файла id_rsa и id_rsa.pub.
Теперь нужно запустить службу ssh-agent
Start-Service ssh-agent
И добавить в настройки агента путь к нашему закрытому ключу:
ssh-add.exe C:usersusername.sshid_rsa
Затем нужно разрешить аутентфикацию по этому ключу на стороне сервера. Для этого, скопируйте файл открытого ключа(id_rsa.pub) на SSH сервер в файл C:usersusername.sshauthorized_keys. Либо, при наличии администартивного доступа сразу на обоих системах, скопировать файл можно так:
cat c:usersusername.sshid_rsa.pub | Add-Content '\192.168.1.100c$usersusername.sshauthorized_keys'
Теперь службе сервера SSH нужно дать право на чтение данных их каталога.ssh.
icacls C:usersusername.ssh /grant "NT Servicesshd:R" /T
Теперь можно подключится SSH-клиентом к серверу, указав параметр –i и путь к закрытому ключу:
Ssh –I c:usersusername.sshid_rsa –l user@domain 192.168.1.100![]()
По умолчанию открывается командная строка cmd, но можно запустить и PowerShell:

Подключение с клиента через модуль Posh-SSH
Для удаленного подключения к SSH серверу, модуль Posh-SSH используется следующим образом:
Подключаемся к серверу с сохранением сессии и указанием ключа:
New-SSHSession myclient -KeyFile "c:dataMyKeyPair.pem"
Выполним команду ifconfig в сессии с ID 0.
Invoke-SSHCommandStream "ifconfig" -SessionId 0
Для завершения сеанса, выполните:
Invoke-SSHCommand -SessionId 0 -Command "logout"
Удалим сессию:
Remove-SSHSession 0
The Secure Shell (SSH) protocol and the OpenSSH project have been around for decades on Linux. But OpenSSH on Windows hasn’t been embraced in the Windows world until recently. As such, a Windows Server doesn’t typically come pre-built and ready to go and requires some setup.
Not a reader? Watch this related video tutorial!
Not seeing the video? Make sure your ad blocker is disabled.
In this tutorial, you’re going to learn how to SSH into your Windows Server just as easily as Linux. You’ll learn how to get OpenSSH installed (or updated) on Windows, add appropriate firewall rules, and configure public key, password, and certificate-based authentication.
Prerequisites
To effectively follow the examples and demos in this article, you’ll need to meet these requirements below.
- A Windows Server machine – This article will use Windows Server 2019 Datacenter. The server this tutorial will use will have a user account called june and will connect to the server at the IP address of 40.117.77.227 with a hostname of ataWindows.
- A local computer with PowerShell 7.1 installed. PowerShell 7.1 is available in Windows, Linux, and macOS. The examples in this article use PowerShell 7.1 in Windows 10.
Downloading OpenSSH
Unlike Linux servers, Windows servers do not have an out-of-the-box SSH server running. But Microsoft has released an open-source port of OpenSSH for Windows. With this release, you can now set up an SSH server on a Windows machine.
To get started, you’ll first need to download OpenSSH. To do so, follow the steps below:
- Connect to the desktop on a Windows Server using Remote Desktop (RDP) or your preferred desktop manager client.
2. On your Windows Server desktop, open an elevated Windows PowerShell console.
3. Next, copy the code below, paste it in the PowerShell window, and press Enter. This script will download the latest OpenSSH release, which as of this writing, is v8.1.0.0p1-Beta to the current working directory.
If you like to save the PowerShell code to download OpenSSH, you can also open a code editor like Windows PowerShell ISE or Visual Studio Code and save it in there.
## Set network connection protocol to TLS 1.2
## Define the OpenSSH latest release url
$url = 'https://github.com/PowerShell/Win32-OpenSSH/releases/latest/'
## Create a web request to retrieve the latest release download link
$request = [System.Net.WebRequest]::Create($url)
$request.AllowAutoRedirect=$false
$response=$request.GetResponse()
$source = $([String]$response.GetResponseHeader("Location")).Replace('tag','download') + '/OpenSSH-Win64.zip'
## Download the latest OpenSSH for Windows package to the current working directory
$webClient = [System.Net.WebClient]::new()
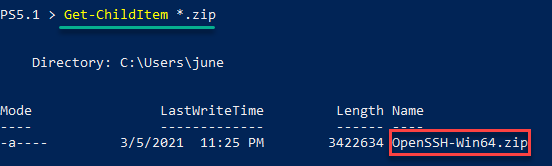
$webClient.DownloadFile($source, (Get-Location).Path + 'OpenSSH-Win64.zip')4. The OpenSSH-Win64.zip file should now be in your current working directory. Verify this by running the command below.
As you can see below, the OpenSSH-Win64.zip file exists in the directory.
Installing OpenSSH
After you’ve downloaded OpenSSH-Win64.zip, the next step is to install OpenSSH on the server. There’s no installation wizard in case you’re expecting it.
- While still in the same PowerShell session, copy the code below and run it in PowerShell. This code extracts the OpenSSH-Win64.zip file contents to C:Program FilesOpenSSH.
# Extract the ZIP to a temporary location
Expand-Archive -Path .OpenSSH-Win64.zip -DestinationPath ($env:temp) -Force
# Move the extracted ZIP contents from the temporary location to C:Program FilesOpenSSH
Move-Item "$($env:temp)OpenSSH-Win64" -Destination "C:Program FilesOpenSSH" -Force
# Unblock the files in C:Program FilesOpenSSH
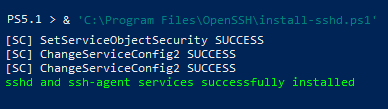
Get-ChildItem -Path "C:Program FilesOpenSSH" | Unblock-File2. After extracting the ZIP file, run the command below in PowerShell to execute the script C:Program FilesOpenSSHinstall-sshd.ps1. This script installs the OpenSSH SSH Server service (sshd) and OpenSSH Authentication Agent service (sshd-agent).
& 'C:Program FilesOpenSSHinstall-sshd.ps1'You can see the expected result below.
To ensure that the SSH server starts automatically, run the command below in PowerShell.
## changes the sshd service's startup type from manual to automatic.
 Set-Service sshd -StartupType Automatic
## starts the sshd service.
 Start-Service sshd
Adding a Windows Firewall Rule to Allow SSH Traffic
This procedure is applicable only if your Windows Server is using the Windows Firewall. For servers using third-party firewalls, refer to your firewall documentation on how to allow port 22.
Installing OpenSSH does not automatically create a firewall exception rule to allow SSH traffic. Therefore, your next task is to create the firewall rule manually.
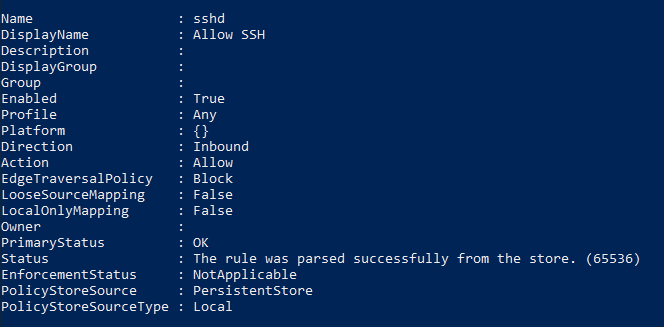
One of the easiest ways to create a new Windows Firewall rule is with PowerShell and the New-NetFirewallRule cmdlet. The command below creates a firewall rule called Allow SSH that allows all inbound TCP traffic destined to port 22.
Copy the command below and run it in PowerShell.
New-NetFirewallRule -Name sshd -DisplayName 'Allow SSH' -Enabled True -Direction Inbound -Protocol TCP -Action Allow -LocalPort 22The below screenshot shows the expected output in PowerShell after creating the firewall rule.
Connecting with SSH using Password Authentication
At this point, you’ve installed OpenSSH on Windows and performed the initial server configuration. The next step is to test whether connecting via SSH actually works.
To test your newly configured SSH server, let’s now run the ssh command on your local computer.
The same steps in this section also apply when connecting to a Linux SSH server.
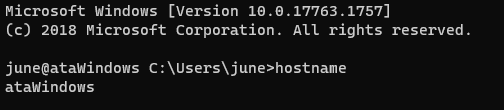
1. From your local computer this time, open PowerShell.
2. Next, run the command below to start the SSH login process. Make sure to change the username and the remote host of your Windows Server.
3. Since you’re connecting for the first time to the server, you will see a prompt saying that the authenticity of the host can’t be established. The message means that your computer does not recognize the remote host yet. Type yes and press Enter to continue.
4. When prompted for the password, type in your account password and press enter.

5. After logging in, as you can see in the screenshot below, you’ll arrive at the remote host’s command prompt. Suppose you want to confirm that you’ve entered the session on the remote host. To do so, type hostname, and press Enter. The command should return the remote computer name.
Changing the Default Shell for OpenSSH to PowerShell
When you first logged in to your Windows SSH server, you’ll notice that the default shell or command interpreter is CMD. Having CMD as the default SSH shell is fine, but if you prefer to use PowerShell as the default shell instead, follow these steps.
To change the default OpenSSH shell from CMD to PowerShell:
First, open an elevated PowerShell window on your Windows Server, if you don’t have one open already.
Next, create a new registry string value called DefaultShell in the registry key HKLM:SOFTWAREOpenSSH. Set the DefaultShell string data to the Windows PowerShell path C:WindowsSystem32WindowsPowerShellv1.0powershell.exe.
New-ItemProperty -Path "HKLM:SOFTWAREOpenSSH" -Name DefaultShell -Value "C:WindowsSystem32WindowsPowerShellv1.0powershell.exe" -PropertyType String -ForceThe screenshot below shows the expected result of the command.

Configuring Public Key Authentication
In the previous sections, you connected with a username and password. this works but a more secure way to authenticate with an SSH server is by using a key pair.
In a nutshell, a key pair consists of two keys called the public key and private key, which constitute a set of security credentials to prove your identity.
The public key is stored on the server, while the private key stays on the local computer. You must treat a private key like your password. If the private key is compromised, anyone can use it to gain access to your SSH server.
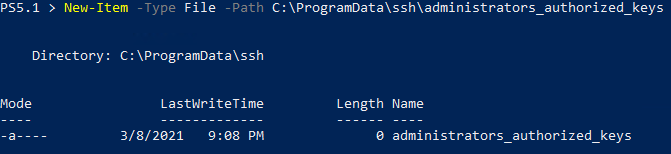
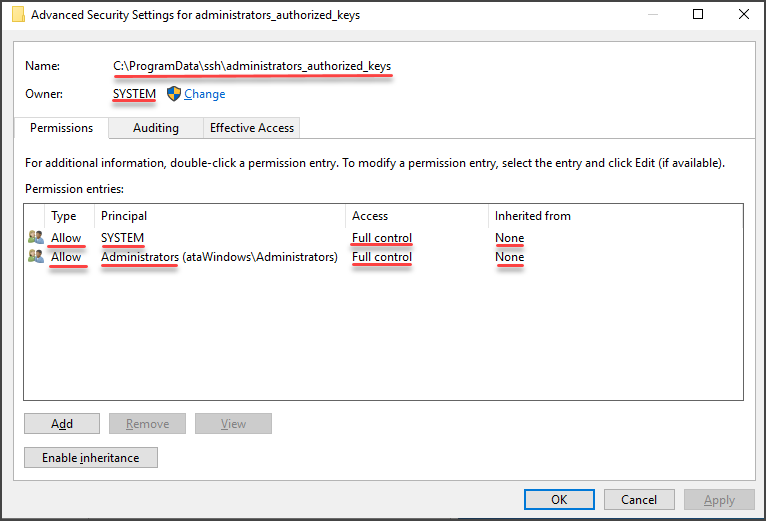
Public keys have to be on the server. But where? For OpenSSH on Windows, the SSH server reads the public keys from the C:ProgramDatasshadministrators_authorized_keys file. But this file does not exist by default. You must create one first.
Follow these steps below to create the administrators_authorized_keys file and set its proper access control list (ACL).
On the Windows Server:
1. Open an elevated Windows PowerShell console if not already.
2. Copy the command below and run it in PowerShell. This command creates the administrators_authorized_keys file using the New-Item cmdlet.
New-Item -Type File -Path C:ProgramDatasshadministrators_authorized_keysYou should see a result similar to the screenshot below.
3. Next, get the ACL currently assigned to the ssh_host_dsa_key file and copy that ACL to the administrators_authorized_keys file. To do so, run the command below.
get-acl C:ProgramDatasshssh_host_dsa_key | set-acl C:ProgramDatasshadministrators_authorized_keysThe OpenSSH service requires that only the Administrators group and the SYSTEM account have access to the administrators_authorized_keys file. And copying the ACL of ssh_host_dsa_key to administrators_authorized_keys makes sense because the ACL is already set.
4. Now open up Windows Explorer.
5. Navigate to the C:ProgramDatassh folder.
6. Right-click on the administrators_authorized_keys file and click Properties.
7. On the properties page, click on the Security Tab and click Advanced.
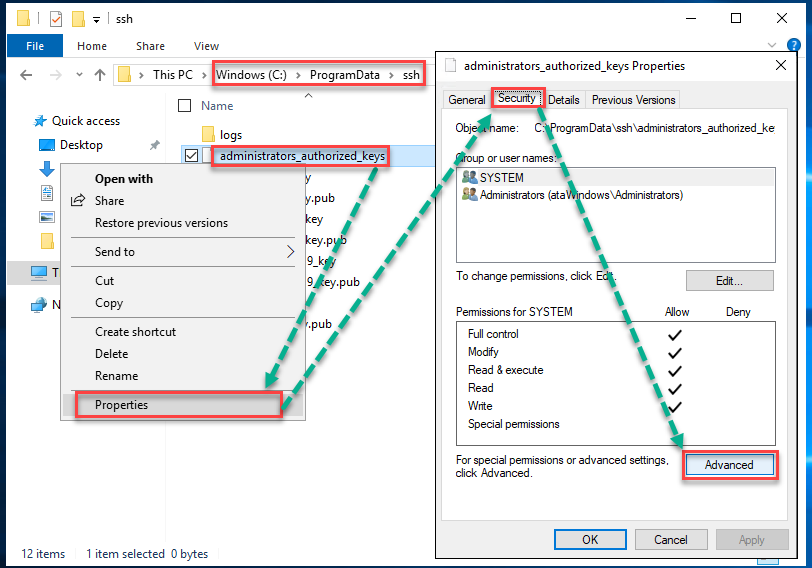
8. Then, confirm if the permissions are as shown like in the image below.
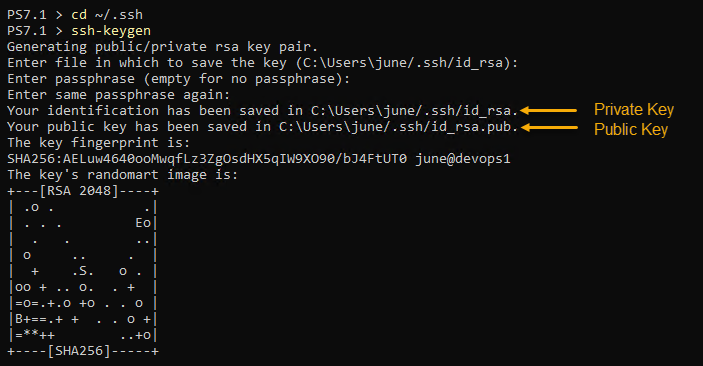
Generating a New SSH Key Pair
To generate a new SSH key pair, use the ssh-keygen command, which is part of the OpenSSH client tools built-in to Windows 10 (and above) and most Linux operating systems.
The example shown in this section works on both Windows and Linux computers.
On your local computer, in a PowerShell console:
1. Navigate to your home folder’s .ssh directory by running the command below.
2. Next, type in the command ssh-keygen and press Enter. When asked to enter a file location to save the key you’re generating, keep the default location and press Enter. Doing so allows your SSH client to find your SSH keys when authenticating automatically.
In Windows, the default key file is C:Users<username>.sshid_rsa.
3. At the next prompt, leave the passphrase blank. At this point, you do not have to use a passphrase for testing.
Adding a passphrase to your private key significantly increases its security. A passphrase acts as a second-factor authentication (2FA) to your private key.
You’ll notice that the command created two files; id_rsa (private key) and id_rsa.pub (public key).
Deploying the Public Key to the Windows SSH Server
Now that you’ve generated your private-public key pair, your next step is to copy the public key to the C:ProgramDatasshadministrators_authorized_keys file on the SSH server.
On your local computer, in a PowerShell console:
1. Copy the code below and run it in PowerShell. Make sure to change the username and IP address first. You can refer to the comment above each command to know what each command does.
# Read the public key
 $public_key = Get-Content ~/.ssh/id_rsa.pub
# Append the public key to the administrators_authorized_keys on the server using ssh.
 ssh [email protected] "'$($public_key)' | Out-File C:ProgramDatasshadministrators_authorized_keys -Encoding UTF8 -Append"
2. Enter your password when prompted, and ssh will proceed to copy the public key. You will see a similar result, as shown below.

Connecting with SSH using Public Key Authentication
Now that you’ve copied your public key to your SSH server, you no longer need to use a password to authenticate. As you can see below, ssh did not prompt for a password.

Configuring Certificate Authentication
Like public key authentication, certificate authentication is passwordless or passphrase-protected. To enable certificate login, follow the same procedure of generating a key pair sans deploying the public key to the SSH server.
You do not need to map the public key to the authorized_keys or administrators_authorized_keys files on the SSH server. Instead, the public key is signed using a certificate authority (CA) key.
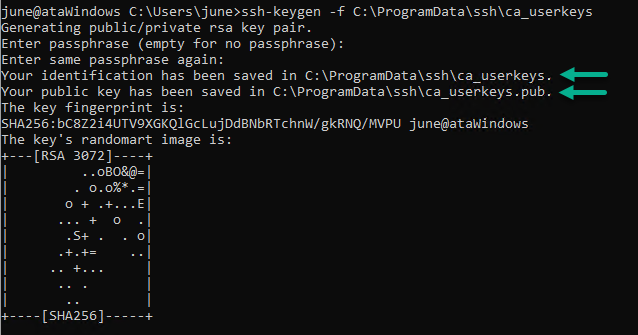
Creating the Certificate Authority (CA) Key
Generating the CA keys for signing is similar to generating a user key pair that you did earlier in this article. Only this time, you’ll need to specify a filename for the new CA keys. To do so, on your Windows Server in a PowerShell console:
Execute the ssh-keygen command as shown below. This command creates the CA key in C:ProgramDatasshca_userkeys, but feel free to use a different file name. Using a different filename will not affect the CA key functionality.
When asked for a passphrase, leave the passphrase empty and press Enter.
ssh-keygen -f C:ProgramDatasshca_userkeysYou can see below that the command created two files. ca_userkeys, which is the private key, and ca_userkeys.pub, which is the public key.
Now that you’ve generated the CA keys, tell the SSH server to trust the CA and where to find the CA key. To do this, add a new line TrustedUserCAKeys path/to/ca_userkeys.pub to the C:ProgramDatasshsshd_config file on the server.
Run the commands below to append the configuration item in the file sshd_config.
# If the SSH server is Windows
 echo TrustedUserCAKeys C:ProgramDatasshca_userkeys.pub>> C:ProgramDatasshsshd_config
Signing the User’s Public Key
At this point, you’ve generated the CA keys and configured the SSH server to trust the CA public key file. What’s left now is to sign your user public key.
On your local computer, in a PowerShell console:
1. Copy the id_rsa.pub file to your home drive on the SSH server using the SCP command. Make sure to change the username and IP address to the correct values.
2. Log in to your Windows Server using ssh. Once logged in, run ssh-keygen to sign the user’s public key. You’ll notice that the command below used several parameters. Let’s break them down.
-s C:ProgramDatasshca_userkeys– specify the CA key’s location for signing the public key. In this example, the CA key is the one you generated.-I id_username– specify the ID you want to assign to the signed user public key. Change theid_usernamevalue to any name you want.-V +4w– this parameter specifies the validity period for the signed key. In this example,+4wmeans that the signed user key will be valid for four weeks. You can change this value to your preferred validity period.-n username– this is the username of whom will own the signed public key.<path to id_rsa.pub>– this is the user public key’s location to sign (Windows).
ssh-keygen -s C:ProgramDatasshca_userkeys -I id_username -V +4w -n username ~/id_rsa.pubAfter you run the command in your SSH session, you should get a similar output, as shown below. As you can see, the command generated a new file called id_rsa-cert.pub, which is the signed user certificate.

3. Now, navigate back to your local computer PowerShell session and copy the id_rsa-cert.pub file from the server to your local computer. Change the username and IP address to the correct values first before running the command.
After the copy completes, you’ll find the signed user certificate in your home folder, as shown below.

Connecting with SSH using Certificate Authentication
You’ve configured certificate authentication, and now you have your user certificate. You should now test if you can connect the SSH server with certificate authentication.
The command to connect to SSH with a certificate is the same as using a password or public key. But, if you enabled public key authentication previously, disable it first. Otherwise, ssh will keep using your key pair instead of your certificate.
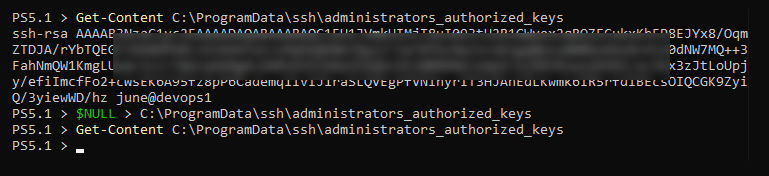
To disable your key-pair, remove your public key from the administrators_authorized_keys file. To do so, follow these steps.
Note that the succeeding commands will empty the whole administrators_authorized_keys file, effectively removing all mapped public keys. If you don’t want to clear all mapped public keys, use a text editor to remove selected public keys from each file manually.
While SSHed into the Windows Server:
1. Run the below code in PowerShell to empty the administrators_authorized_keys file.
# Clear the administrators_authorized_keys file
 $NULL > C:ProgramDatasshadministrators_authorized_keys
# Confirm that the administrators_authorized_keys is empty
 Get-Content C:ProgramDatasshadministrators_authorized_keys
2. At this point, the authorized_keys and administrators_authorized_keys files are empty, as you can see in the screenshot below.
3. Type exit and press Enter to disconnect from your SSH session. You’ll be back to your PowerShell session.
4. After removing the public keys, your next ssh login attempt will use certificate authentication. The login experience will be the same as public key authentication.

Conclusion
You’ve now set up an OpenSSH Windows Server from scratch all the way to exploring and setting up various authentication means. You can now connect to your Windows Servers exactly how you would with Linux!
Клиент OpenSSH и сервер OpenSSH являются отдельными устанавливаемыми компонентами в Windows Server 2019 и Windows 10 1809. Чтобы установить сервер, открываем последовательно Параметры → Приложения → Приложения и возможности → Дополнительные возможности → Добавить компонент. Находим в списке компонент «Cервер OpenSSH» и нажимаем кнопку «Установить».
Установка сервера OpenSSH создаст и включит правило брандмауэра, которое разрешает входящий трафик SSH через порт 22.
Запускаем службу, при необходимости в Свойствах устанавливаем Автозапуск:
Проверяем подключение по ssh с другого компьютера:
$ ssh Evgeniy@192.168.110.2
The authenticity of host '192.168.110.2 (192.168.110.2)' can't be established.
ECDSA key fingerprint is SHA256:SUosMa1VPeeaxU0Uyo5nG0EKkVEifMWYshHqRGIiz7I.
Are you sure you want to continue connecting (yes/no)? yes
Warning: Permanently added '192.168.110.2' (ECDSA) to the list of known hosts.
Evgeniy@192.168.110.2's password: пароль
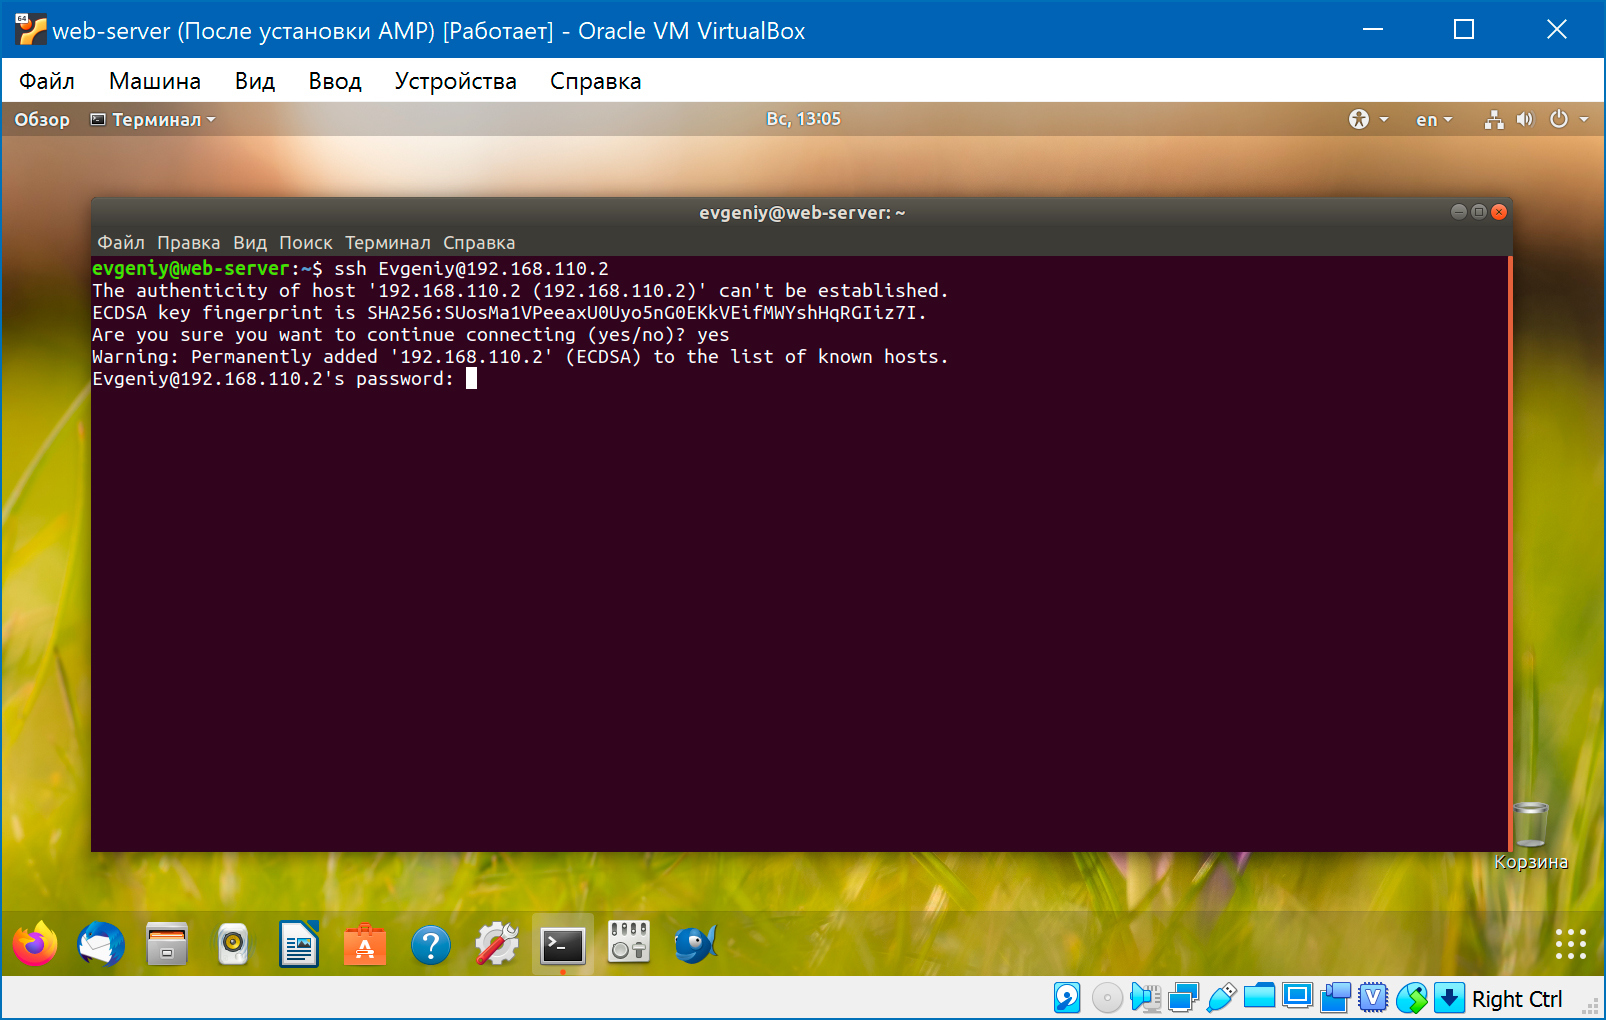
По умолчанию для сервера OpenSSH в ОС Windows используется командная оболочка Windows.
Настройка сервера OpenSSH
Компоненты OpenSSH хранятся в следующих каталогах:
- Исполняемые файлы OpenSSH:
C:WindowsSystem32OpenSSH - Конфигурационный файл
sshd_config:C:ProgramDatassh - Журнал OpenSSH:
C:ProgramDatasshlogssshd.log - Файл
authorized_keysи ключи:~.ssh - При установке в системе создается новый пользователь
sshd
Следующие директивы в sshd_config разрешают доступ по ключам и по паролю:
# разрешает доступ по ключам
PubkeyAuthentication yes
# разрешает доступ по паролю
PasswordAuthentication yes
# доступ с пустым паролем запрещен
PermitEmptyPasswords no
Можно изменить порт, на котором принимает подключения OpenSSH сервер:
Port 2222
После любых изменений в конфигурационном файле нужно перезапустить службу. Если был изменен порт — нужно еще изменить правило брандмауэра.
Установка с использованием PowerShell
Запускаем PowerShell от имени администратора. Проверяем, что OpenSSH сервер и клиент доступны для установки:
> Get-WindowsCapability -Online | ? Name -like 'OpenSSH*'

Name  : OpenSSH.Client~~~~0.0.1.0
State : Installed

Name  : OpenSSH.Server~~~~0.0.1.0
State : NotPresent
Клиент уже был установлен ранее, а сервер — еще нет. Запускаем установку сервера:
> Add-WindowsCapability -Online -Name OpenSSH.Server~~~~0.0.1.0
Если клиент еще не установлен, установить его можно так:
> Add-WindowsCapability -Online -Name OpenSSH.Client~~~~0.0.1.0
Запустить, остановить или перезапустить службу:
> Start-Service sshd
> Stop-Service sshd
> Restart-Service sshd
Изменить тип запуска службы на Автоматический:
> Set-Service -Name sshd -StartupType 'Automatic'
Для удаления OpenSSH сервера и клиента:
> Remove-WindowsCapability -Online -Name OpenSSH.Server~~~~0.0.1.0
> Remove-WindowsCapability -Online -Name OpenSSH.Client~~~~0.0.1.0
Поиск:
CLI • SSH • Windows • Команда • Конфигурация • Настройка • Сервер
Каталог оборудования
Lorem ipsum dolor sit amet, consectetur adipiscing elit, sed do eiusmod tempor incididunt ut labore et dolore magna aliqua.
Производители
Lorem ipsum dolor sit amet, consectetur adipiscing elit, sed do eiusmod tempor incididunt ut labore et dolore magna aliqua.
Функциональные группы
Lorem ipsum dolor sit amet, consectetur adipiscing elit, sed do eiusmod tempor incididunt ut labore et dolore magna aliqua.