This post demonstrates how to install Windows Server 2012R2 evaluation version onto Oracle VirtualBox.
- First go to Windows Server 2012R2 evaluation downloading website “https://www.microsoft.com/en-in/evalcenter/evaluate-windows-server-2012-r2“
Choose ISO file type
Download ISO image of Windows Server 2012R2 evaluation

2. Start Oracle Virtual Manager, Select NEW.
Name: Windows Server 2012R2
Type: Microsoft Windows
Version: Windows 2012(64-bit)

3. Give 5120M memory size depending on availability.

4. Create an virtual hard disk.

5. Choose “VDI( VirtualBox Disk Image)“.

6. Choose “Dynamically allocated“.

7. Give size 30GB.

8. Also you can choose where the VDI image file located.

9. Click “create” to create “Windows Server 2012R2” virtual machine.

10. Now attach the ISO image to the virtual CD/DVD drive by :
a)Ensure the Windows Server 2012R2 VM is selected and click Settings.
b)Select Storage. Click on Empty under IDE Controller.
c)In the Attributes section, click on “+”sign for adding optimal disk.
d)Select “Choose a disk file”.
e)Browse to the location where you saved the Windows DVD ISO file and select it.
f)Click Open.
g)It should look similar to the following graphic.


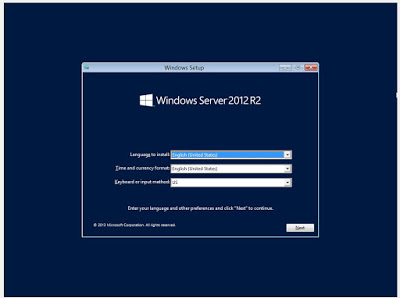
11) Now we can install Windows 2012R2 .
a)Select the Windows Server 2012R2 VM in VirtualBox and click Start.
When the Install screen appears, click Next.

b)Click Install Now.

c)Select 2012 evalution Datacenter (Server with a GUI) and click Next. The Server Core installation includes a command prompt but not a graphical user interface (GUI).
d)Review the license terms, select the checkbox to accept the license terms, and click Next.

e) Select Custom: Install Windows only (advanced).

f) The 30 GB drive you created with the VM will be selected as Drive 0 Unallocated Space. Click Next.

g)The installation will begin .

h)When prompted, enter a password for the Administrator account in the Password and Retype password text boxes. Click Finish.

To log on Windows Server 2012R2, press the host key plus the Delete key to simulate the CTRL + ALT + DELETE key combination. The host key is the right-CTRL key by default.
Windows Server 8 is the next generation Server by Microsoft that is bound to act as the game changer in the server market. It comes with many cloud based enhancements, as well as the new Metro UI introduced by Microsoft for its Windows operating systems, including Windows 8 and Windows Server 2012. In a previous post I showed you How to install Windows 8 on Virtualbox. In this post I will show you the procedure for installing Windows Server 8 on Virtualbox. For those of you who might be unaware of the Virtualbox, it is a VMware like application that enables running operating systems virtually. This helps IT professionals to simulate physical environment features, practice on new software applications and operating systems, as well as to save hardware costs in an enterprise environment.
Step 1: First of all Download Windows Server 8.
Step 2: Download the latest VirtualBox , for Windows, Linux, Mac OS X or Sun Solaris to install Windows Server 8.
Step 3: Now, install Virtualbox and follow the simple instruction given below to install Windows Server 8 on VirtualBox.
Step 4: Once VirtualBox is installed on your computer, open it and select New,to create a new virtual machine and click Next on the new window that pops-up.

Step 5: Select Windows 2008 as the operating system and enter a name for the virtual machine, e.g. “Windows Server 8″. It is quite likely that you may face installation crashes if you select “Windows 2008 64-bit” option. For this reason, select Windows Server 2008 instead.

Step 6: Now allocate RAM for your virtual machine. The minimum RAM requirement for Windows Server 8 is 512 MB, but the virtual machine may not work with the minimum RAM requirement, therefore, allocate at least 1 GB RAM.

Step 7: Leave the default “Create New Hard Disk” option enabled and click Next to continue.

Step 8: Leave the Virtual hard Disk to VDI (VirtualBox Disk image) and click Next to proceed further.

Step 9: Now, choose the “Fixed Size” option to create a virtual hard disk.

Step 10: Allocate desired disk space for your virtual machine, however, make sure that the minimum hardware requirement for 32 GB is met for your Windows Server 8 virtual machine. You can also change the default location of the virtual hard disk from the folder icon, (next to your virtual machine name) and select a different partition to save the virtual disk image file.

Step 11: Click Create to create the virtual disk image.

Step 12: After your virtual hard disk is created, click Settings to configure VM (Virtual Machine) Settings.

Step 13: Now, go to System menu and enable IO APIC from Motherboard sub-tab.

Step 14 (optional): From the Processor tab, allocate at least 2 processors (provided your hardware can support them) for better Virtual Machine performance and to avoid VM installation issues. I am using a Core i3 Laptop so allocating 2 processor still leaves me with 2 additional ones for my physical machine, as Corei3 has 2 physical and 2 virtual cores due to Hyper Threading.

Step 15: Head over to the Storage menu, click Empty, followed by the CD icon to select the Windows Server 8 ISO image. Click OK to continue.

Step 16: Select your Virtual Machine name and click Start from left side of the main interface to begin installation.

The rest of the installation process is not much different form a normal Windows operating system installation. However, you can check out the rest of the process in this post: How To Install Windows Server 8.

You can also check out this video walkthrough for understanding the complete process of creating a Windows Server 8 virtual machine on VirtualBox. This video is also available on our WML Cloud YouTube Channel. How To Install Windows Server 2012 On VirtualBox
Microsoft SharePoint Server 2016 Beta 2 version was released in Nov 2015.
I decided to create the VM to explore SharePoint 2016 new features, especially SharePoint 2016 Hybrid Cloud based infrastructure, improved user experience and compliance and reporting.
In this blog, I will talk about how I created the VirtualBox VM environment and how to install the Windows Server 2012 R2 on VirtualBox VM.
I decided to go for Oracle VM VirtualBox Manager simply because it’s lightweight and supports all different image formats (VHD/VHDX, VDI, VMDK, etc.). Find more details about Oracle VM VirtualBox Manager image format support, click here.
To setup this virtual environment, you need to have at least 16GB of RAM and Core i7 processor on your host machine. I am using «New Dell XPS 15» with Quad Core 6th Gen Core i7 Processor, 16 GB RAM, 512 GB SSD Drive and touch screen display.
Once VirtualBox Manager (or HyperV, Virtual PC or WMware Workstation) is downloaded and installed. You need to download Windows Server 2012 R2, SQL Server 2014 SP1 and SharePoint Server 2016 Beta 2 ISO files.
You can download 180 Days trial version of Windows Server 2012 and SQL Server 2014 from TechNet Evaluation Center. Find the download links below.
- Download Windows Server 2012 R2 180 days trial version here.
- Download SQL Server 2014 SP1 180 days trial version here.
- To download SharePoint 2016 Beta 2 trial version, click here.
Follow the below steps to create a new VirtualBox Server VM, boot the VM from Windows Server 2012 ISO file and install the Windows server.
- Open VirtualBox and click on ‘New’ from top ribbon. Give your VM a name and select Version as Windows Server 2012 and click Next.

- From the next screen, allocate at least 10240MB (10GB) of memory to your VM.

- From the next screen, select ‘Create a virtual hard disk now’ and select ‘Çreate’.

- Once your VM is created, it will be available in left Pan. Right click on VM and select ‘Start’. Once started, it will show a ‘No bootable disk error’ message.
- You need to mount Windows Server 2012 ISO image file to your VM. For that click on Devices > Optical Drives and Choose Disk Image. Once ISO file is mounted, restart the VM.

- Once VM is restarted, Windows Server 2012 installation will begin. Complete the Windows Server 2012 installation and get ready to configure the environment for SharePoint 2016 installation.


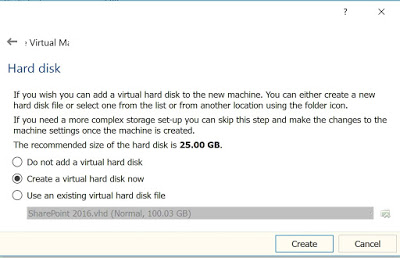

In my next post, I will write on configuring Windows Server 2012 R2 for SharePoint installation and then installing SharePoint 2016 on the server.
This member has not yet provided a Biography. Assume it’s interesting and varied, and probably something to do with programming.
Microsoft SharePoint Server 2016 Beta 2 version was released in Nov 2015.
I decided to create the VM to explore SharePoint 2016 new features, especially SharePoint 2016 Hybrid Cloud based infrastructure, improved user experience and compliance and reporting.
In this blog, I will talk about how I created the VirtualBox VM environment and how to install the Windows Server 2012 R2 on VirtualBox VM.
I decided to go for Oracle VM VirtualBox Manager simply because it’s lightweight and supports all different image formats (VHD/VHDX, VDI, VMDK, etc.). Find more details about Oracle VM VirtualBox Manager image format support, click here.
To setup this virtual environment, you need to have at least 16GB of RAM and Core i7 processor on your host machine. I am using «New Dell XPS 15» with Quad Core 6th Gen Core i7 Processor, 16 GB RAM, 512 GB SSD Drive and touch screen display.
Once VirtualBox Manager (or HyperV, Virtual PC or WMware Workstation) is downloaded and installed. You need to download Windows Server 2012 R2, SQL Server 2014 SP1 and SharePoint Server 2016 Beta 2 ISO files.
You can download 180 Days trial version of Windows Server 2012 and SQL Server 2014 from TechNet Evaluation Center. Find the download links below.
- Download Windows Server 2012 R2 180 days trial version here.
- Download SQL Server 2014 SP1 180 days trial version here.
- To download SharePoint 2016 Beta 2 trial version, click here.
Follow the below steps to create a new VirtualBox Server VM, boot the VM from Windows Server 2012 ISO file and install the Windows server.
- Open VirtualBox and click on ‘New’ from top ribbon. Give your VM a name and select Version as Windows Server 2012 and click Next.
- From the next screen, allocate at least 10240MB (10GB) of memory to your VM.
- From the next screen, select ‘Create a virtual hard disk now’ and select ‘Çreate’.
- Once your VM is created, it will be available in left Pan. Right click on VM and select ‘Start’. Once started, it will show a ‘No bootable disk error’ message.
- You need to mount Windows Server 2012 ISO image file to your VM. For that click on Devices > Optical Drives and Choose Disk Image. Once ISO file is mounted, restart the VM.
- Once VM is restarted, Windows Server 2012 installation will begin. Complete the Windows Server 2012 installation and get ready to configure the environment for SharePoint 2016 installation.
In my next post, I will write on configuring Windows Server 2012 R2 for SharePoint installation and then installing SharePoint 2016 on the server.
This member has not yet provided a Biography. Assume it’s interesting and varied, and probably something to do with programming.
Здравствуйте, дорогие читатели. Сегодня мы займемся установкой операционной системы Windows Server 2012 R2 на эмуляторе виртуальных машин VMware Workstation 9 или 10 версии. Для начала необходимо скачать архив самой ОС. Архив должен быть в формате ISO (.iso). После скачивания операционной системы запускаем VMware.
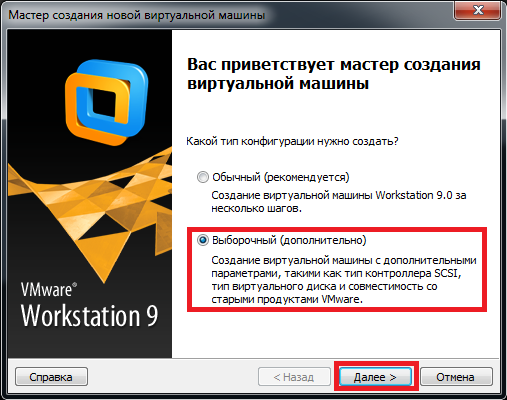
После запуска заходим в меню Файл — Новая виртуальная машина (или в программе нажимаем комбинацию клавиш CTRL+N).
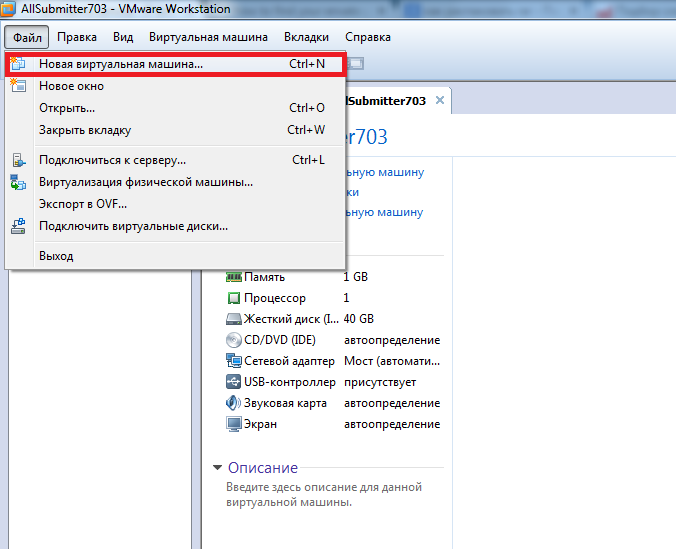
Программа спросит какой тип конфигурации необходимо создать, необходимо выбрать Выборочный (дополнительно) и нажать кнопку далее.
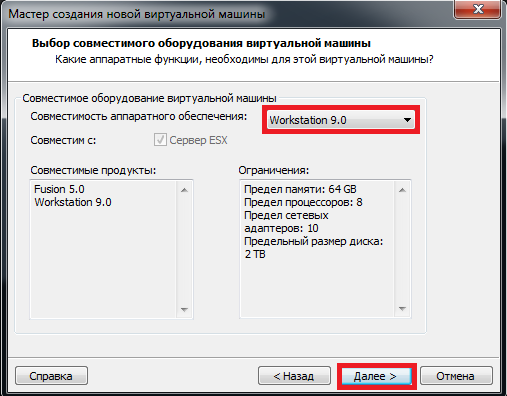
В совместимости аппаратного обеспечения выбираем Workstation 9 и нажимаем Далее.
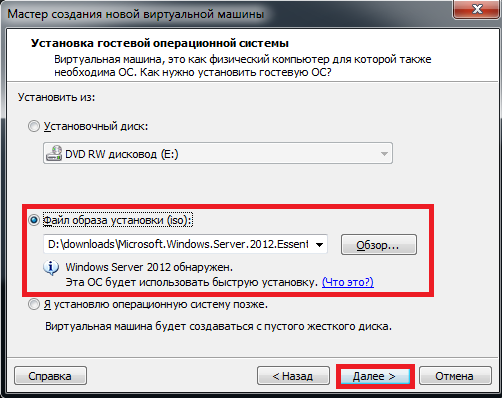
Указываем место расположения нашего файла-образа (скачанный образ Windows Server 2012) если образ находится на DVD диске выбираем 1-й пункт (установить с диска), если образ находится на жестком диске выбираем 2-й пункт и нажимаем кнопку Далее
Программа просит ввести лицензионный ключ к Windows и учетные данные (пользователь/пароль) для последующего входа в систему.
Если лицензионного ключа нет (как в моем случае), его можно не вводить (а с помощью windows loadrer и других подобных программ активировать нашу операционную систему позднее).
Заполняем имя пользователя и дважды вводим пароль и опять же нажимаем далее.
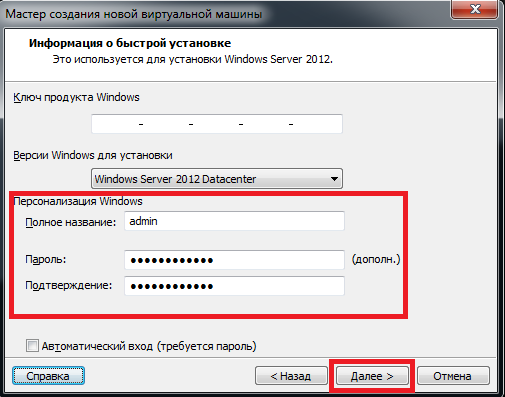
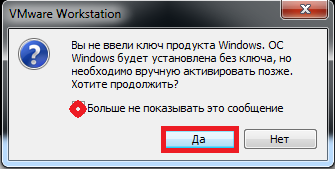
Программа предупредит нас, что мы не ввели ключ продукта и что его можно ввести в последствии, мы соглашаемся и нажимаем Да
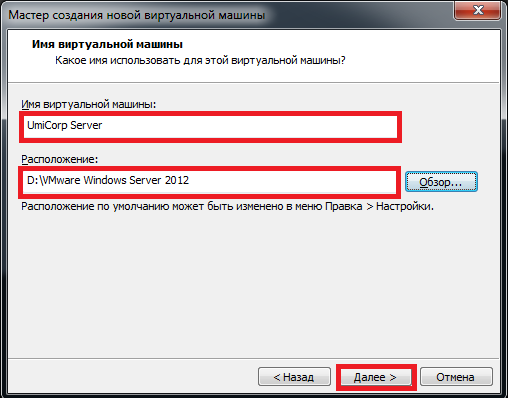
Присваиваем имя для нашей виртуальной машины и указываем путь установки и подтверждаем наши действия.
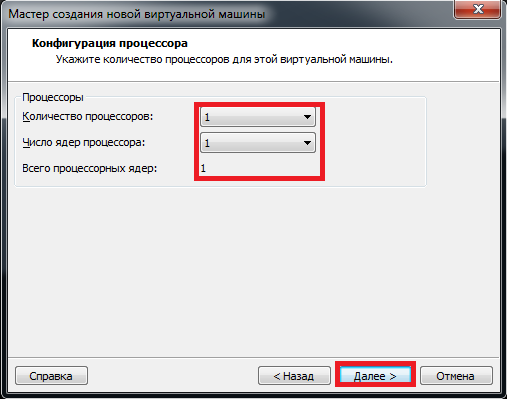
Указываем количество выделяемых для ОС процессоров и ядер (позже это количество можно изменять в большую или меньшую сторону), на своем ПК я выбрал 1 процессор и 1 ядро (у меня Intel Core i7 3630QM).
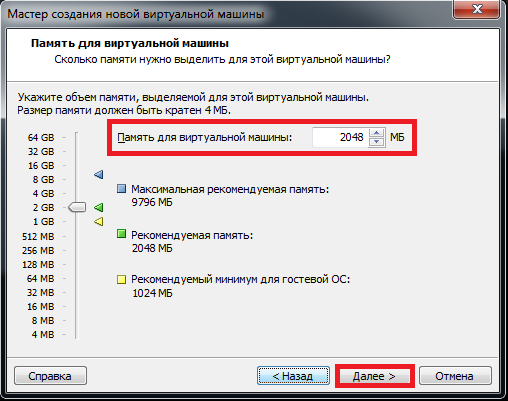
Выделяем оперативную память для Windows Server 2012. По рекомендуемым требованиям необходимо 2 Гб оперативной памяти (минимум 512 Мб), для жесткого диска рекомендуется 80 Гб и более.
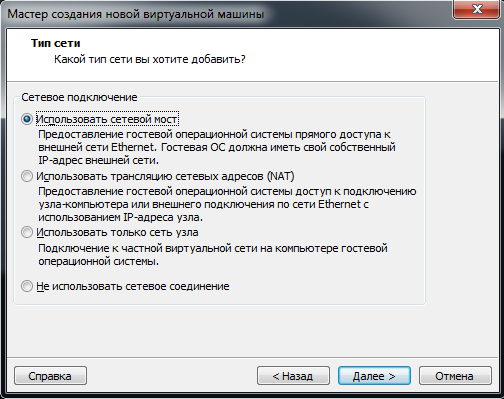
Далее программа спросит: Какой тип сети вы хотите выбрать? Я обычно выбираю 1-й пункт (сетевой мост), т.к. данный тип позволяет виртуальной машине находиться в единой сети с реальными компьютерами. Выбираем необходимый нам пункт и подтверждаем выбор.
В типе контроллера ввода-вывода выбираем рекомендуемый программой пункт (LSI logic SAS) и нажимаем Далее.
После программа спросит какой диск мы хотим использовать. Я выбрал пункт Создать новый виртуальный диск и нажал Далее.
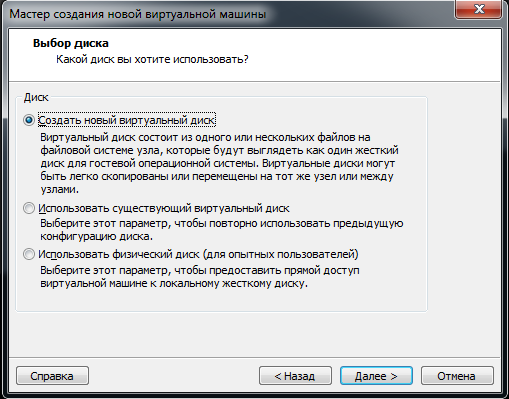
Затем выбираем тип виртуального диска, который по умолчания предлагает нам VMware (SCSI).
В максимальном размере диска я указал рекомендуемый Microsoft объем равный 80 Гб, также для производительности я выбрал пункт выбелить все дисковое пространство сейчас.
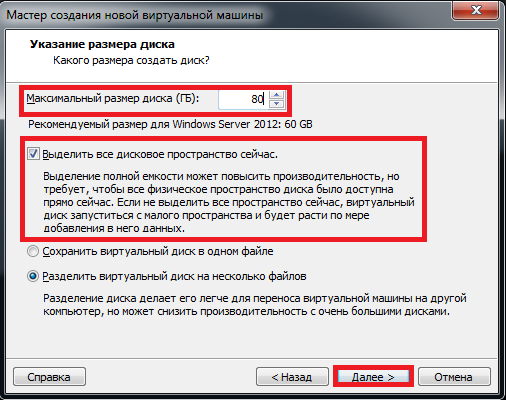
Программа спросит где хранить файлы диска, я указал директорию установки схожей с директорией основных файлов нашей операционной системы.
В конце программа выведет список всех наших настроек, проверяем их, оставляем «галочку» на пункте запустить виртуальную машину после создания (если желаем сразу приступить к установке) и жмем кнопку готово.
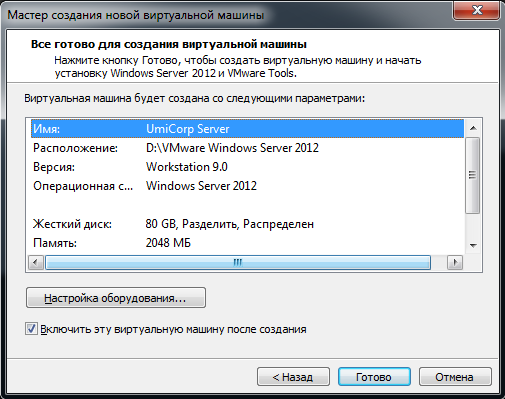
Программа создает диск и приступает к установке.
Многие сталкиваются с проблемой, на экране выскакивает ошибка:
 (This virtual machine is configured for 64-bit guest operating systems. However, 64-bit operation is not possible.) Как справиться с данной проблемой я писал в своей статье.
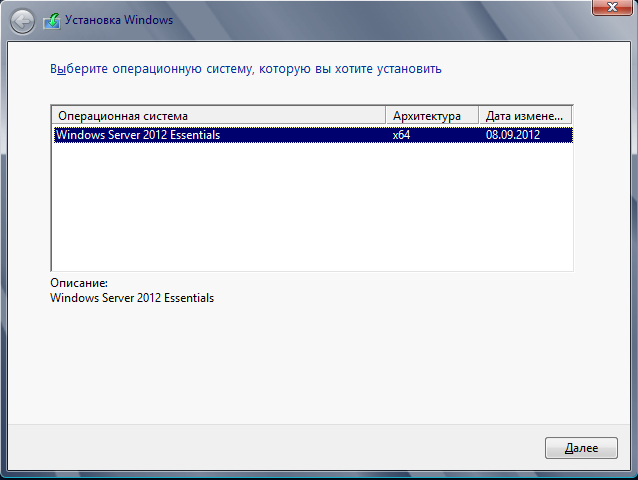
Первым шагом установки является выбор устанавливаемой операционной системы:
После подтверждения начинается процесс установки Windows Server 2012.
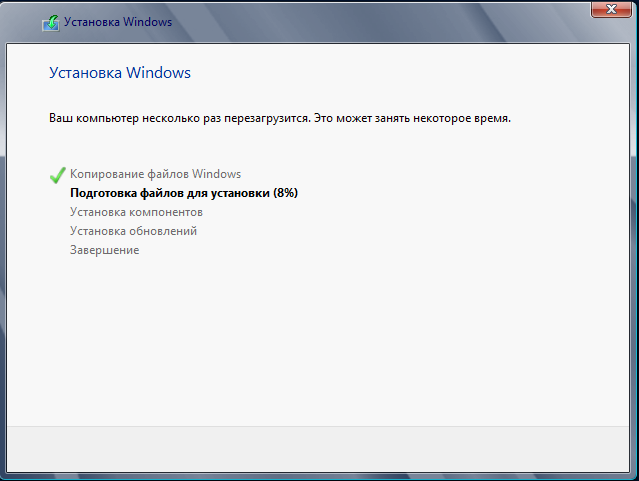
Процесс установки занимает от 15 до 50 минут (у меня система установилась за 25 минут). В процессе установки VMware перезагружает систему несколько раз. И вот спустя 25 минут ОС установлена и просит нажить CTRL+ALT+DEL, для этого во вкладке Виртуальная машина выбираем пункт Отправить команду CTRL+ALT+DEL.

Затем вводим ранее заданные учетные данные логин+пароль и нажимаем ENTER.
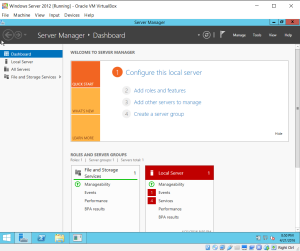
После входа в систему сервер готов к работе.

После установки Windows Server 2012 можно продолжить настройку ОС. Если сервер будет использоваться в организации первой ролью можно установить роль домен контроллера.
Про установку AD DS на Windows Server 2012 я писал в одной из своих статей.
На этом все, надеюсь статья Вам понравилась, если у кого-то возникнут вопросы или ошибки в процессе установки пишите, попробую Вам помочь.
OS, windows
August 6, 2018August 22, 2018
1 Minute
This blog will show how to download Windows Server 2012R2 180days evaluation and create a VM using Virtualbox VHD.
Reference:
Download Windows Server 2022/2019/2016/2012 R2 VHD for VirtualBox & VMware
- First download the VHD file from Microsoft website. Make sure to select the VHD option:
https://www.microsoft.com/en-us/evalcenter/evaluate-windows-server-2012-r2
NOTE: Once you use this VHD file to create a VM then this file cannot be used again to create another VM. So create a copy of this file so you wont have to download again to create another VM.
2. You must have latest version of VirtualBox. VirtualBox supports Windows 8.1 (2012 R2) from 4.2.16 version only.
3. Create a new virtual machine. Select Windows 2012(64bit) as OS.
Instead of creating new hard disk, select existing virtual hard drive option. Browse and select the downloaded VHD file .
9600.16415.amd64fre.winblue_refresh.130928-2229_server_serverdatacentereval_en-us.vhd
4. Start the VM and choose an Administrator password. Use the Input->insert CTRL-ALT-DEL when asked during login.
You can now use various windows tools like Active Directory, Server Manager in your VM. Enjoy!
Published
August 6, 2018August 22, 2018
В статье подробно описан процесс установки и настройки роли Hyper-V, создание виртуальной машины, а также настройка сетевого взаимодействия и запуск виртуальной машины на Windows Server 2012 R2.
Для установки роли Hyper-V на Windows Server 2012 R2 потребуется компьютер, под управлением Windows Server 2012 R2 (О том как установить Windows Server 2012 R2 можно прочитать в данной статье: «Установка и активация Windows Server 2012 R2 c USB флешки» ).
I. Установка роли Hyper-V на Windows Server 2012 R2
1. Откройте окно диспетчера сервера и выберите пункт Добавить роли и компоненты (Рис.1).

Рис.1
.
2. В появившемся окне нажмите Далее (Рис.2).

Рис.2
.
3. Выберите пункт Установка ролей и компонентов, затем нажмите Далее (Рис.3).

Рис.3
.
4. Выберите сервер на который будет производиться установка роли, затем нажмите Далее (Рис.4).

Рис.4
.
5. Поставьте галочку напротив Hyper-V (Рис.5).

Рис.5
.
6. Мастер установки ролей предупредит, что для установки роли Hyper-V нужно установить несколько компонентов. Нажмите Добавить компоненты (Рис.6).

Рис.6
.
7. Убедитесь, что после установки необходимых компонентов напротив Hyper-V стоит галочка, затем нажмите Далее (Рис.7).

Рис.7
.
8. На этапе добавления компонентов оставьте все значения по умолчанию и нажмите Далее (Рис.8).

Рис.8
.
9. Ознакомьтесь с дополнительной информацией касательно Hyper-V, затем нажмите Далее (Рис.9).

Рис.9
.
10. Мастер добавления ролей и компонентов предложит настроить сеть и выбрать сетевые адаптеры, ничего не выбирайте (настройку можно будет произвести позднее) и нажмите Далее (Рис.10).

Рис.10
.
11. Настройку миграции тоже можно произвести позднее, нажмите Далее (Рис.11).

Рис.11
.
12. Оставьте настройки по умолчанию и нажмите Далее (Рис.12).

Рис.12
.
13. Нажмите Установить (Рис.13).

Рис.13
.
14. Начнётся процесс установки (Рис.14).

Рис.14
.
15. После окончания установки нажмите Закрыть, затем перезагрузите сервер (Рис.15).

Рис.15
.
16. После перезагрузки откройте Диспетчер серверов, в левой колонке Вы увидите пункт Hyper-V (Рис.16). На этом установка роли Hyper-V в Windows Server 2012 R2 закончена.

Рис.16
.
II. Создание виртуальной машины в Hyper-V
1. Откройте Диспетчер серверов, затем Средства и выберите Диспетчер Hyper-V (Рис.17).

Рис.17
.
2. В открывшемся окне нажмите Создать (Рис.18).

Рис.18
.
3. В открывшемся меню выберите Виртуальная машина… (Рис.19).

Рис.19
.
4. В открывшемся окне Мастера создания виртуальной машины нажмите Далее (Рис.20).

Рис.20
.
5. В поле Имя введите имя для новой виртуальной машины (прим. в данном руководстве это DemoVM), затем нажмите Далее (Рис.21).

Рис.21
.
6. Выберите поколение виртуальной машины, затем нажмите Далее (Рис.22).
ВАЖНО! Поколение созданной виртуальной машины невозможно изменить! Если Вы выбираете Поколение 2, то в качестве гостевых операционных систем следует использовать: Windows Server 2012, Windows Server 2012 R2, Windows 8 64-bit, Windows 8.1 64-bit, Windows 10 64-bit, Linux. Для всех остальных операционных систем выбирайте Поколение 1.

Рис.22
.
7. Поставьте галочку напротив Использовать для этой виртуальной машины динамическую память, затем нажмите Далее (Рис.23).

Рис.23
.
8. В окне настроек сети — нажмите Далее (Рис.24).

Рис.24
.
9. Выберите пункт Создать виртуальный жесткий диск, затем установите размер диска, после чего нажмите Далее (Рис.25).

Рис.25
.
10. Выберите пункт Установить операционную систему позднее, затем нажмите Далее (Рис.26).

Рис.26
.
11. Для создания виртуальной машины и закрытия мастера нажмите Готово (Рис.27). На этом создание виртуальной машины завершено.

Рис.27
.
III. Настройка сетевого взаимодействия
1. Откройте Диспетчер Hyper-V и выберите Диспетчер виртуальных коммутаторов (Рис.28).

Рис.28
.
2. Выберите необходимый тип виртуального коммутатора (прим. описание для каждого типа указаны в диспетчере виртуальных коммутаторов ниже. В данном руководстве будет использоваться Внешний тип виртуального коммутатора), затем нажмите ОК (Рис.29).

Рис.29
.
3. В поле Имя введите имя для виртуального коммутатора (прим. в данном руководстве это Demo Virtual switch). Выберите пункт Внешняя сеть и укажите Сетевое подключение, затем поставьте галочку напротив Разрешить управляющей операционной системе предоставлять общий доступ к этому сетевому адаптеру, нажмите Применить и ОК (Рис.30).

Рис.30
.
4. В появившемся окне предупреждения нажмите Да (Рис.31).

Рис.31
.
5. Откройте Диспетчер Hyper-V, выберите виртуальную машину (прим. в данном руководстве это DemoVM), откройте меню (пр. кнопкой мыши) и выберите Параметры… (Рис.32).

Рис.32
.
6. В окне Параметров выберите Сетевой адаптер, затем укажите виртуальный коммутатор (прим. в данном руководстве это Demo Virtual switch) (Рис.33).

Рис.33
.
7. После того как Вы выбрали виртуальный коммутатор, нажмите Применить, затем ОК (Рис.34). На этом настройка сети завершена.

Рис.34
.
IV. Запуск виртуальной машины в Hyper-V
1. Откройте Диспетчер Hyper-V и выберите Параметры… (Рис.35).

Рис.35
.
2. Выберите DVD-дисковод, затем пункт Файл образа и нажмите Обзор… (Рис.36).

Рис.36
.
3. Выберите ISO-образ операционной системы (прим. в данном руководстве, в качестве примера, используется Windows Server 2012 R2) и нажмите Открыть (Рис.37).

Рис.37
.
4. Нажмите Применить, затем ОК (Рис.38).

Рис.38
.
5. В Диспетчере Hyper-V выберите виртуальную машину, вызовите меню (пр. кнопкой мыши) и нажмите Пуск (Рис.39).

Рис.39
.
6. Сделайте двойной клик на названии виртуальной машины, после чего откроется окно запущенной виртуальной машины (Рис.40).

Рис.40
.
Установка и настройки роли Hyper-V, создание виртуальной машины, а также настройка сетевого взаимодействия и запуск виртуальной машины на Windows Server 2012 R2 произведены! Надеемся, что данное руководство было для Вас полезно!
.