Содержание
- 1 Xcode — комплект для разработки приложений
- 2 Требования, необходимые для установки Xcode в ОС Windows 7/8/10
- 3 ✔ Шаги по установке Xcode на ПК или ноутбуке с Windows 10, 8 / 8.1 и 7
- 4 Альтернатива для Xcode
- 4.1 Подводя итоги: Xcode для Windows 2023
Это довольно сложно, если вы хотите создать приложение для iOS, но у вас нет устройств Mac!
Xcode для Windows — ваш выбор. Его хорошо используют программисты, которые хотят разрабатывать приложения для iOS с использованием Windows.
Xcode — это IDE (интегрированная среда разработки), разработанная Apple, которая состоит из различных программных инструментов, которые используются для создания приложений для macOS, iOS, watchOS и tvOS.
 Этот SDK (Software Development Kit) не работает ни в одной другой операционной системе, кроме Mac OS X и iOS.
Если вы хотите установить Xcode на свой ПК с Windows (7, 8.1 и 10), то вы попали точно на нужную страницу.
Xcode — комплект для разработки приложений
Бесплатный Xcode для Windows 10 — это приложение для тестирования и набор инструментов для управления активами, или, другими словами, это построитель интерфейса, который не поддерживается в Windows по некоторым причинам и из-за проблем с совместимостью.
Есть способ его установки с помощью Oracle Virtual Box.
Следовательно, можно создавать и разрабатывать базовые приложения на ПК с Windows, установив этот Xcode SDK в вашу ОС Windows.
Взгляните: Как использовать iMessage на ПК, Windows или MAC
Требования, необходимые для установки Xcode в ОС Windows 7/8/10
Ниже приведены некоторые системные требования, которым вы должны следовать для установки Xcode для Windows 7, 8 или 8.1 и 10.
После обсуждения требований мы обязательно рассмотрим подробный процесс установки.
- Для начала вам понадобится рабочая виртуальная машина Mac OS X на VMware или Virtual Box.
- Тогда вам нужно скачать Пакет Xcode с сайта Apple. Но помните, что вам нужен Apple ID, чтобы загрузить Xcode из магазина Apple.
- Двухъядерный процессор Intel
- Минимум 2 ГБ ОЗУ (рекомендуется: 4 ГБ +)
- Аппаратная виртуализация
Убедитесь, что у вас есть работающая виртуальная машина Mac OS X, когда вы устанавливаете Xcode для Windows бесплатно. Если вы профессиональный разработчик приложений, необходимо приобрести оборудование Apple с OS X и идентификатором разработчика приложения.
Чтобы узнать больше, посмотрите это сейчас:
Прочтите это: Лучший медиаконвертер Tuneskit DRM для Windows
✔ Шаги по установке Xcode на ПК или ноутбуке с Windows 10, 8 / 8.1 и 7
Это следующие шаги, которые необходимо выполнить для установки xcode в виртуальном окне Windows, выполните их внимательно:
- Прежде всего вам необходимо загрузить и установить VMware или VirtualBox на свой ПК с Windows. Если вы не знаете, откуда скачать, нажмите на VirtualBox. Отсюда его можно скачать бесплатно, так как это открытый исходный код.
- Затем вам нужно загрузить и установить ОС X Маверикс ISO как виртуальная машина.
- Теперь вам нужно открыть виртуальный ящик и нажать «Создать», чтобы создать виртуальную машину в виртуальном ящике Oracle.
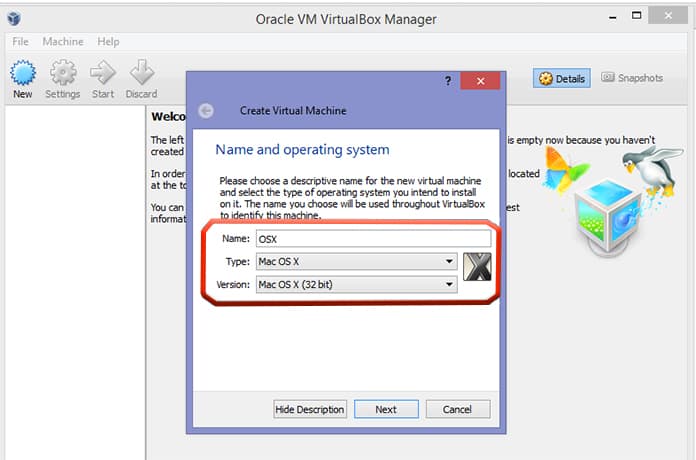
- Как только вы нажмете кнопку «Создать», откроется новое окно, в котором будет запрашиваться новое имя операционной системы. Здесь введите Имя как OSX, Тип ОС как Mac OS X, а также введите Версию как Mac OS X (32-разрядную), а затем нажмите Enter.
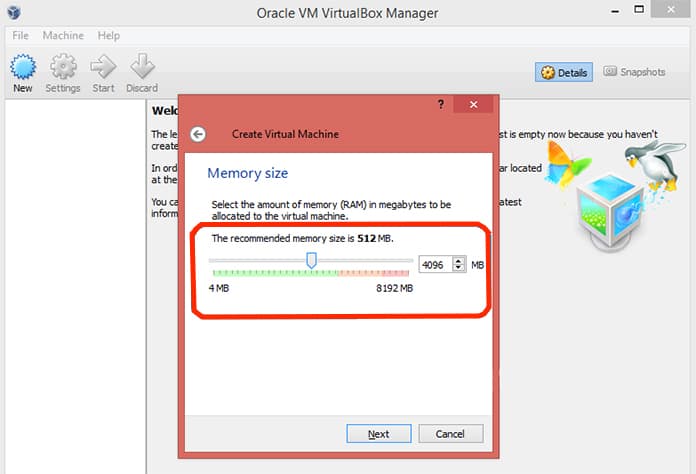
- Теперь необходимо выбрать размер ОЗУ для скачивания бесплатного xcode для windows. на виртуальную машину. Максимальный объем памяти, необходимый для работы Android на ПК с Windows, составляет 1024 МБ (1 ГБ). Выберите нужный размер и нажмите Enter.
- Пришло время создать файл виртуального жесткого диска.
- После этого для выбора файла оборудования всегда используйте VDI (VirtualBox Disk Image) в терминах ISO-образа. Когда вы закончите, нажмите «Далее».
- Выберите физический жесткий диск в качестве динамического. На физическом жестком диске вашего устройства укажите местоположение файла, а также размер Android. Затем нажмите «Создать».
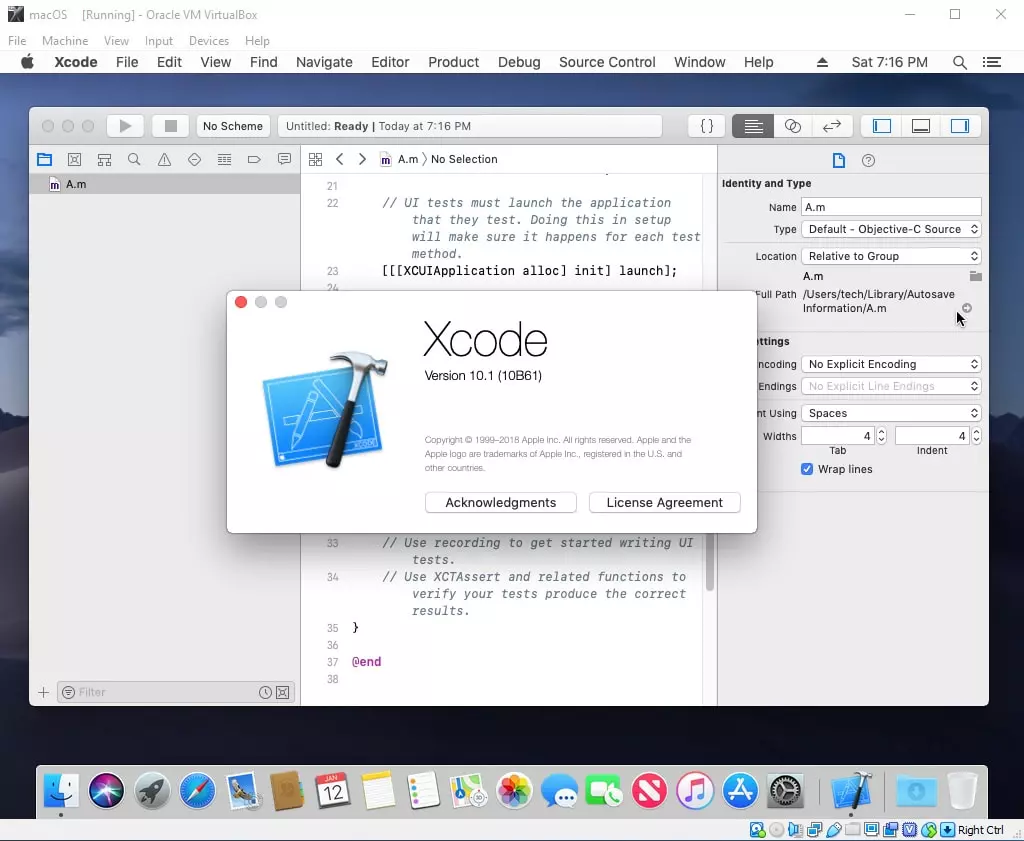
- Если вы выполнили все указанные шаги правильно, это означает, что вы успешно создали виртуальную машину в своем виртуальном ящике. Теперь то, что осталось, — это файл iso, который был загружен ранее. Для этого перейдите в Настройки >> Хранилище >> Загрузить iso. Файл >> Нажмите ОК >> Начать.
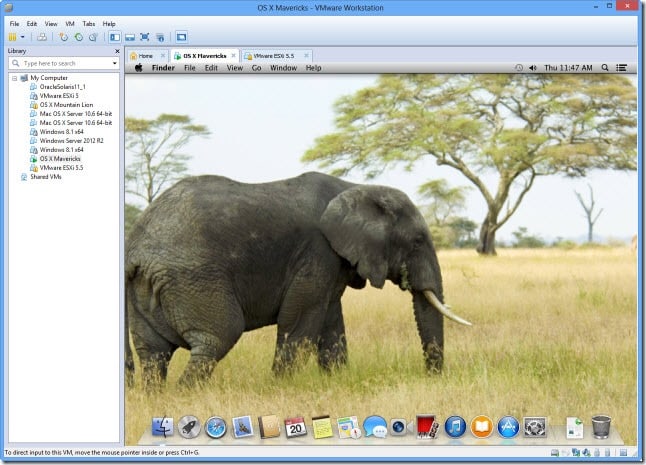
- Чтобы установить xcode для загрузки Windows 8.1, следующее, что вам нужно сделать, это выполнить экранные шаги загрузки OSX в качестве мастера, а затем OSX будет легко установлен в Oracle Virtual.
- Теперь откройте официальный магазин приложений Apple, открыв браузер сафари, войдя в магазин приложений Apple ID и пароль.
- Чтобы получить полный пакет, введите xcode в поле поиска после регистрации. Когда вы нажмете кнопку ввода в поле поиска, он покажет вам различные связанные приложения, и из этих приложений выберите xcode и нажмите «Бесплатно» и «Загрузить». Затем нажмите ОК, чтобы загрузить файл.
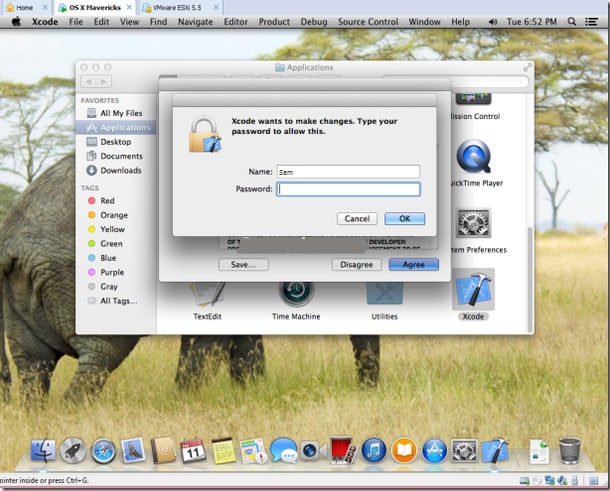
- Теперь, когда вы закончите установку, откройте его из приложений на компьютере и укажите свои корневые учетные данные для установки Xcode для компонентов ПК с Windows, вместе с настройками системы. Введите свое имя и пароль и нажмите ОК.
- Что дальше? Это все. Вы установили последнюю версию Xcode на ПК с Windows 10, 8 / 8.1 и 7 с помощью программного обеспечения для виртуализации рабочего стола VMware workstation.
Должен прочитать: Почему Easeus — лучшее программное обеспечение для восстановления данных для Windows
Теперь пришло время разобраться с наиболее часто задаваемыми вопросами о xcode для Windows Free, держите ручку и бумагу наготове и сразу же записывайте эти обсуждаемые ниже вопросы!
Альтернатива для Xcode
Если вы хотите изучать и разрабатывать приложения на базе iOS, но у вас нет системы Mac, у вас есть альтернатива — Swift.
Swift — это язык программирования, который используется для разработки приложений iOS, macOS, tvOS и watchOS.
Вы также можете использовать цель c вместо Swift, так как цель c использовалась раньше Swift, но теперь все настоятельно рекомендуют ее.
Swift — это язык программирования с открытым исходным кодом, и если вы хотите изучить его, мы рекомендуем приложение Swift Playgrounds для iPad.
В 1: Как мы можем открыть среду программирования Xcode в Windows?
Ответ: Все, что вам нужно установить, — это macOS / OSX в виртуальной среде, такой как VMWare или VirtualBox, чтобы использовать Xcode в любой среде Windows.
В 2: Возникли ли какие-либо сложности после установки Xcode на переносной компьютер Windows?
Ответ: Если говорить об осложнениях, то их всего одно, что может вас беспокоить или раздражать, — это скорость.
Очевидно, что если вы загружаете и устанавливаете xcode в окнах, которые на самом деле предназначены только для пользователей Mac, он не будет работать так же хорошо, как на Mac.
В 3: Что такое Xcode для Windows?
Ответ: Xcode — это в основном SDK (Software Development Kit) или, другими словами, это полный набор инструментов разработчика, который используется для разработки приложений для Mac, iPhone, iPad, Apple Watch и Apple TV.
В 4: Каковы возможности использования инструментов командной строки для Xcode?
Ответ: Это небольшой автономный пакет, который использует разработку из командной строки в OS X. OS X SDK и инструменты командной строки, такие как Clang, являются двумя его компонентами, которые устанавливаются в / usr / bin.
В 5: Какой язык программирования используется в Xcode для Windows?
Ответ: Xcode использует множество языков программирования, таких как C, C ++, Objective-C, Objective-C ++, Java, AppleScript, Python, Ruby, Rez и Swift. GNU Pascal, Free Pascal, Ada, C #, Perl и D — сторонние системы, добавляющие поддержку языков программирования.
В 6: Можем ли мы использовать Xcode в Linux?
Ответ: Нет, мы не можем использовать Xcode в Linux.
Должен прочитать: Лучший конвертер PDF и редактор PDF для Windows
Подводя итоги: Xcode для Windows 2023
Итак, это была подробная информация о том, как загрузить и установить Xcode в Windows. Мы надеемся, что этой информации было достаточно, чтобы вы поняли, что нужно делать, чтобы Xcode работал на вашем ПК.
Так чего же вы ждете, начните разрабатывать свои приложения для ios уже сегодня!
Xcode is an IDE that is used to develop apps for different operating systems. As we know, we have a lot of different software tools and systems that can be used to develop apps for operating systems like Windows and Linux. On the very another hand, when it comes to developing Mac apps, it is not an easy job. We can easily install any software tool on an operating system like Windows to develop apps on it. But, Mac requires SDK that is Xcode. This is a platform that can be used to develop apps on Mac or iOS. In this post, we will show you how to install Xcode on Windows 10, 8, 7 or Vista PC.
The problem with Xcode is it is challenging and complicated to install. However, here we will tell you an easy way to install this tool on your machine. You will need some stuff in order to install Xcode on Windows 10,8, or 7 PC.
- Mac OS X Virtual machine
- Intel processor with dual core integrity
- Hardware virtualization
- Xcode application install package
- Memory of the system with at least 2GB
Steps to Install Xcode on Windows Computers
Here you will get to know how you can install the package to your virtual machine in order to get the installation of Xcode completed. You can download the latest Xcode application package from the official site of Apple. All you need is going to the Xcode website, putting your Apple ID and downloading the package. Now if you are ready for the installation process, have a look at this process.
Step 1: You will need to download VirtualBox on your Windows OS running machine. You can easily download this tool from the official website of VirtualBox.
Step 2: After downloading VirtualBox on your system, get OSX Mavericks ISO as a virtual machine.
Step 3: Now open the install VirtualBox on your system. On the top left corner, you will see the New option. Click on it.
Step 4: Here you can create a virtual machine on your system. You will have to enter the Name as OSX, Type as Mac OS X and Version as Mac OS X (32 bit).
Create Virtual Machine to Install Xcode on Windows 10
Step 5: After putting the necessary information in it, click on next to proceed to the next step.
Step 6: Now you will see Memory Size option. This option allows your system to provide enough Ram to the virtual machine.
Step 7: Select the size as a minimum of 1GB and click Next.
Select the amount of RAM to create virtual machine
Step 8: Now you will see the type of virtual hard drive. Choose the first option named as VDI (VirtualBox Disk Image) and click Next.
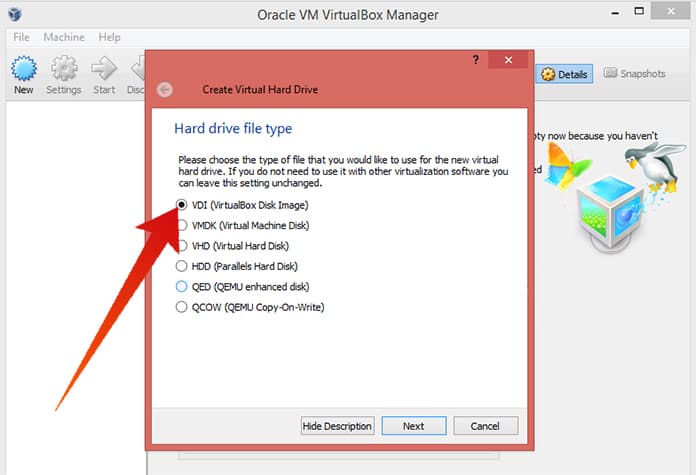
Select VDI to install Mac OS on Windows PC
Step 9: Now select the hard drive space you want to allocate to the virtual machine and click Create.
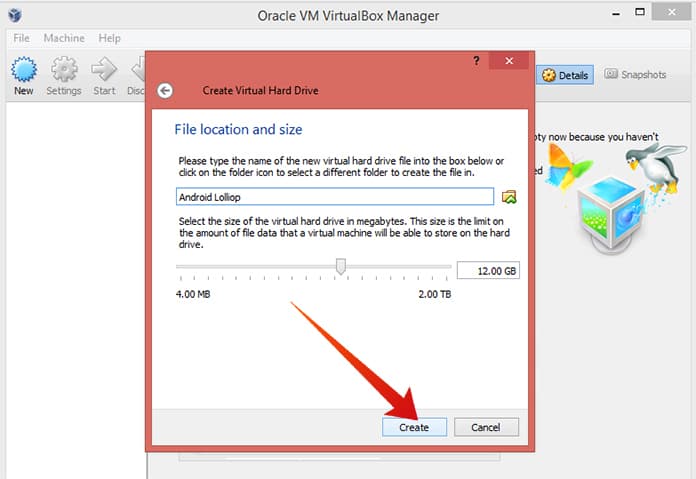
Select HD size to install Xcode on Windows
Step 10: The virtual machine has successfully been created on your VirtualBox.
Step 11: In the head left corner, you will see the Settings icon. Click on it. Now click on Storage then Load iOS File and click OK.
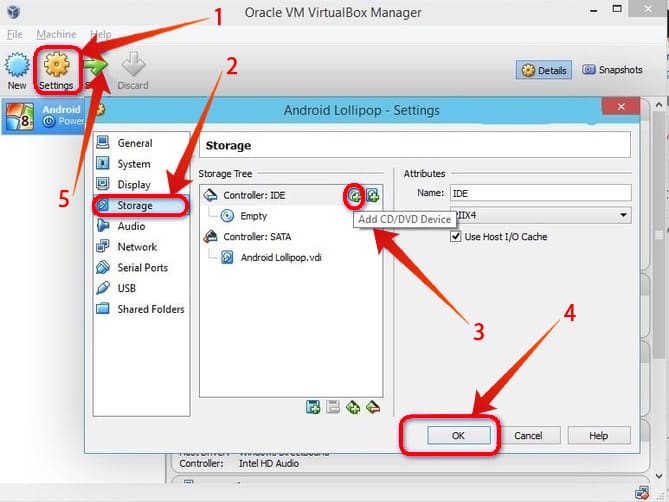
Add storage and Start the MAC OS X Machine
Step 12: After that, you just follow the on-screen steps of OSX boot.
Download and Install Xcode on Windows 10,8 or 7 PC
Step 13: Now open the Safari browser in your VirtualBox and log in with your Apple ID.
Download Xcode for PC running Windows 10/8/7
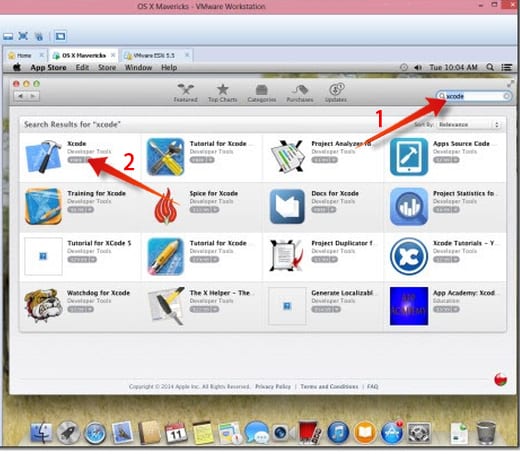
Step 14: Type Xcode in the search bar and select the Xcode from the search results.
Install Xcode on Windows Computer
Step 15: Provide your name and password there and click OK.
Download and install xcode on PC
Step 16: You are all done! You have successfully installed Xcode on your machine.
Use Xcode on Windows 7, 8 or 10 PC
You have successfully installed Xcode, app development software on your Windows PC or Laptop. The performance and speed of Xcode won’t be extremely high because you are running this software on Windows, but it can be used for educational purpose. Hope that these steps will help you to install Xcode on Windows 10, 8 and 7 PC.
![]()
How to develop iOS apps on Windows

When you have an intention to write iOS apps on a Windows 10 or 11 machine, you should remember that the only platform that is compatible with the iOS SDK is macOS. This means the main developer tool for macOS, Xcode, can be used only with this operating system.
Below you’ll find a brief tutorial on what you need for iOS development on Windows 10 or Windows 11 and how to make Xcode work on Windows. To achieve your goal, you will need a Windows computer, a copy of macOS, an Apple ID, a dedicated software tool for redirecting iOS devices to a virtual environment (e.g. USB Network Gate), and a stable connection to the Internet.
Three different options can be used for iOS app development on Windows. You can run Xcode on a virtual machine, rent a macOS cloud instance, or use dedicated third-party tools. We’ll take a look at each method later in this article.

Download USB Network Gate for FREE
14-day free trial
What is Xcode and why do you need it?

As is mentioned before, the major software tool that can help you build an iOS app is Xcode, an integrated development environment (IDE) for macOS. It allows creating applications not only for iPhone and iPad but also for Mac, Apple TV, and Apple Watch. Among other things, Xcode offers an interface builder, a code editor, an asset management toolkit, and simulators of iOS devices. It gives you the ability to test the application that you are developing with no need to leave Xcode.
Xcode provides graphical tools for analyzing application performance, including those for diagnosing CPU usage and utilization of drives (HDD, SDD) and more.
If you are looking for different solutions, you can explore the best alternatives to Xcode.
Virtualize macOS
Given that Xcode works only on macOS, a solution to get Xcode on Windows would be to install macOS on a Windows PC by means of a virtualization app such as VMware or VirtualBox.
Using a virtualization platform provides users with the full functionality of Xcode on your Windows machine. You can use the best iOS development tool on your PC under VMWare or Virtual Box. Virtualization lets you install macOS in a partition on your Windows computer strictly for developing iOS applications.
VirtualBox
VirtualBox is a free and open source virtualization solution from Oracle. This very popular virtualization tool is supported by Windows 10 and 11. All you need is a copy of the Mac operating system available on your computer and you can download Virtual Box to start developing iPhone and iPad apps.

VMWare
VMWare offers more functionality than VirtualBox which may appeal to some developers. This powerful tool is a commercial product that requires users to obtain a license.

How to run Xcode on Windows 10 or Windows 11 using virtualization machine
So, let’s imagine that you decided to use VirtualBox. What you should do next is make sure that the Windows computer on which you are going to install it is:
- A relatively powerful PC capable of operating smoothly with a virtual machine installed;
- Its hardware is equivalent to that of MacBook, Mac Pro, or iMac;
- It has a Dual-Core Intel processor and no less than 2GB of RAM.
Step 1: When you are ready, install VirtualBox on your PC.
After the installation procedure is complete, start the app and select to install Mac OS X Server (x64). Allocate at least 2GB of RAM (4GB+ is recommended) and 30GB+ of hard disk space to your VM.
Step 2: VirtualBox will make all required OS configurations automatically. You should only go to the Settings menu and change the following:
- Leave unchecked the “Enable EFI” box in the System tab;
- Choose two CPUs in the Processor tab;
- Increase the video memory above 128MB in the Display tab.
Step 3: Then, install macOS and boot your VM.
It’s important to remember: when configuring macOS, you should enter a valid Apple ID. This Apple account will be needed for Xcode download later.
At the final stage of macOS configurations, select the desired resolution and settings in the System Preferences. Once done, installing XCode is simple:
- In the Dock, find the App Store application icon and click it. Once the app has started, type Xcode in the search field located at the top-right corner.
- Now, click the Install button below the Xcode icon.
Note: There might be a need to provide your Apple ID (if you didn’t enter it when configuring the macOS virtual machine) or re-enter it (if you did so).
- Once Xcode is downloaded and installed, you can run it on your guest OS just like it was Xcode for Windows!
Download USB Network Gate for FREE
14-day free trial
Rent a Mac cloud instance
Another method that can be used to develop iOS applications from a Windows machine is to rent a virtual cloud instance running macOS. You can avoid the expense of an Apple computer, but this technique does require a stable and fast Internet connection to access the virtual machine effectively. Virtual machines running the Mac operating system are available from multiple sources including MacStadium, MacInCloud, and XcodeClub. You can rent a Mac by the hour for some quick work or save some money by seeking a more long term arrangement with your provider.
MacInCloud
At MacInCloud, customers can rent a variety of different Mac machines in the cloud that can be used to develop iOS applications. All of the rented devices have Xcode and other SDKs installed to make it easy for a developer to get started quickly. Costs vary according to the features you choose and subscriptions can be canceled at any time. This allows you to test drive MacInCloud without making a major investment. It’s a great way to get the functionality of a Mac without the expense of purchasing an Apple computer.

MacStadium
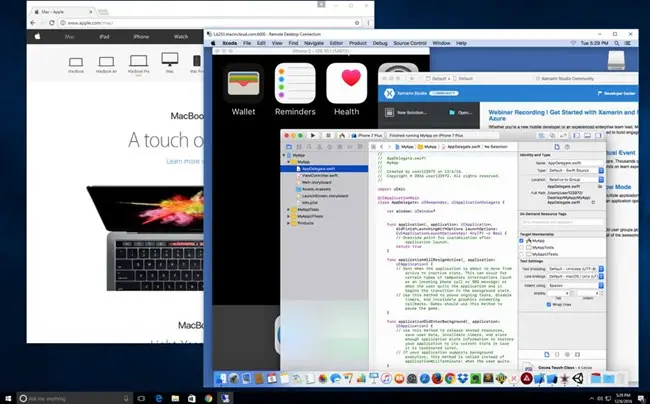
MacStadium may be the easiest way to develop iOS apps on a Windows machine. This method provides access to Apple devices through a Windows Remote Desktop connection. You can develop and test apps on remote devices without any complicated setup or configuration.
How to access a rented Mac
Step 1: Sign in to the remote machine using a VNC client or the native Windows RDP option.
Step 2: Enter the IP address of the rented Mac in the connectivity tool.
Step 3: Log in to the virtual machine with your user credentials.
Step 4: You will now be at the Mac login screen where you will again be prompted to enter your password to gain access to the desktop.
Top 5 alternatives to Xcode for iOS app development
You can also develop iOS apps on your Windows machine using third-party alternatives to Xcode. Developers willing to use tools besides Xcode have many choices when developing for the Apple mobile operating system. Based on the survey, 38 percent of software developers used React Native.

Here are some excellent third-party iOS development tools
1. Hackintosh
Building your own “Hackintosh” — a PC that is customized to run macOS. If you are a tech-savvy Mac supporter, you can create a separate physical computer running macOS. You can find all the necessary information on how to run Mac OS X on an unsupported computer at Hackintosh.com.
2. React Native
Our next pick is React Native. This third-party solution can be a great Xcode alternative for Windows. With React Native, you can create native apps for iOS using a JavaScript library for building user interfaces. The versatile React framework forms the foundation of this development tool in which users employ Javascript to create apps for the iOS or Android platforms. The open source solution is free and has many online tutorials to get you going in the right direction.
3. Xamarin
Xamarin is an open-source mobile app platform that gives you a way to develop cross-platform apps that can be deployed natively to iOS using C#. Xamarin is a versatile framework that has been available for years. Microsoft developers have used this .NET compatible tool for cross-platform development on Windows systems. Users targeting multiple OS platforms should consider the flexibility of Xamarin over the Apple-centric Xcode.
4. Appcelerator Titanium
Another great solution for building native mobile apps is Appcelerator Titanium. This open-source framework lets you create applications from a single JavaScript code base. Those creations are built as completely native cross-platform mobile apps.
5. PhoneGap
PhoneGap allows developing applications for iOS using HTML, CSS, and JavaScript web technologies.
Download USB Network Gate for FREE
14-day free trial
Dedicated software for linking VM and cloud platforms with an iPhone/iPad

After showing you how you can use a virtual machine or cloud instance to replicate a Mac, we’ll tell you about another challenge you may face. The issue that is common for many virtualization apps is the inability to connect to USB devices attached to the host computer. Although some VMs offer USB passthrough functionality, the problem still persists when it comes to particular USB device types.
If your VirtualBox app does not recognize an iPhone that you want to use for app testing, you can resort to the help of a dedicated software tool called USB Network Gate.
USB Network Gate is a simple yet powerful software application designed to forward USB devices to a virtual environment. It allows redirecting any iOS device to VirtualBox, VMware, Hyper-V, XenDesktop, and many other virtualization programs.
With this solution, you will be able to connect your iPhone or iPad to a macOS virtual machine and make the device visible to Xcode and all other apps running on your Mac.
A big advantage of this software is that it works not only with virtual machines but also with cloud infrastructures. If you decide to rent a Mac in the Cloud, you will have no problem redirecting iOS devices from your Windows PC to the cloud desktop.
Download USB Network Gate for FREE
14-day free trial
How to connect iPhone to a virtual machine with the software:
In order to share an iOS device (e.g. an iPhone) with a guest operating system you use on your Windows PC, do as follows:
- Connect the iPhone to your host PC physically.
- Download USB Network Gate and install it.
- In the software interface, share the iPhone by clicking the Share button next to the iPhone’s name in the Local USB devices tab.
- Install the app on the guest OS.
- Connect the iPhone by clicking the Connect button in the Remote devices tab.
That’s it! Now you can work with the iPhone like it was physically attached to your Mac.
As you see, USB Network Gate is a cross-platform solution. Additionally to Windows and Mac, it supports Linux and Android platforms. That means you can share USB devices among these OSes no matter which of them is used as a host and which one is a guest.
Nowadays, every operating system got their own app development programs. Like we have used Windows apps on Linux and vice versa. But when we talk about Mac OS, it’s not easy to use Mac apps on Windows or Linux like the rest. Mac uses an SDK called Xcode to develop apps in itself. Seeing it, a few Windows users started craving for it, ignorant of the fact that Xcode cannot be used on Windows.
But is it really so?
Xcode is available only for Mac and iOS platforms and not for any other OS. The reason for this unavailability is a number of compatibility issues.
So is there any fix for this?
Yes!
We firmly believe that everything is possible when it comes to technology. So we’ve brought you a detailed method to install Xcode on Windows. But before that, you need to learn what actually Xcode is and what it includes.
What is Xcode?
Xcode is an IDE (Integrated Development Environment) that contains a set of software development tools, designed by Apple. These tools are available specifically for developing software on Mac OS X, iOS, and Apple TV. And this IDE is programmed in such a way that you cannot install it on any other OSs.
As a developer, I had always felt easy to develop apps for Linux and Windows OS as compared to Mac OS. The reason being is you can develop Linux and Windows apps on any platform while developing apps on Mac requires a toolset called XCode. If you are interested to install Xcode for Windows PC (7, 8.1 and 10), then here is a detailed way on how to install Xcode on Windows 7 and 8/8.1 and Windows 10 PC.
So we’ll be giving you a detailed guide to install Xcode on your Windows 7, Windows 8 and Windows 10 systems.
The procedure to run Xcode on other systems and developing apps for Apple is separated into two parts. First is installing Mac OS on a virtual workstation on Windows or Linux. And the second is, installing Xcode on a virtual Mac OS.
- A working Mac OS X virtual machine on VMware or VirtualBox
- Downloaded Xcode package from Apple site. You need to have an Apple ID in order to download Xcode from Apple store.
- Dual-Core Intel processor in the computer
- Minimum 2GB of RAM (Recommended: 4 GB+)
- Availability of the hardware virtualization on the computer
10 Most Popular Free File Sharing Sites (Secure Upload Websites)
Steps to install Xcode on Windows 10, 8/8.1 and 7 PC or Laptop
Here, we will use Virtual Box to install Xcode on Windows. So if you don’t have a copy of an installed Virtual Box, then you can download it as it is the free and open source.
Follow the below steps so as to install Xcode on Windows 10, 8 or 8.1 and Windows 7 desktop or Laptop for iOS SDK.
Step 1: Download and install VMware or VirtualBox on your Windows computer from the here. Search for “VirtualBox 5.2.4 platform packages” and click on “Windows Hosts”.
Step 2: Now, download and install OSX Mavericks ISO as a virtual machine from here.
Step 3: Create the virtual machine on your Oracle virtual box. For that, you need to open Virtual Box and click New.
Step 4: Now, you will get a new window asking for the name of the new operating system. Enter Name as OSX, Type of the OS as Mac OS X and also enter the Version as Mac OS X (32 bit). Click Next.

Create New Virtual Machine
Step 5: Select the memory size for the virtual machine as 1024 MB (1 GB) and then click Next.
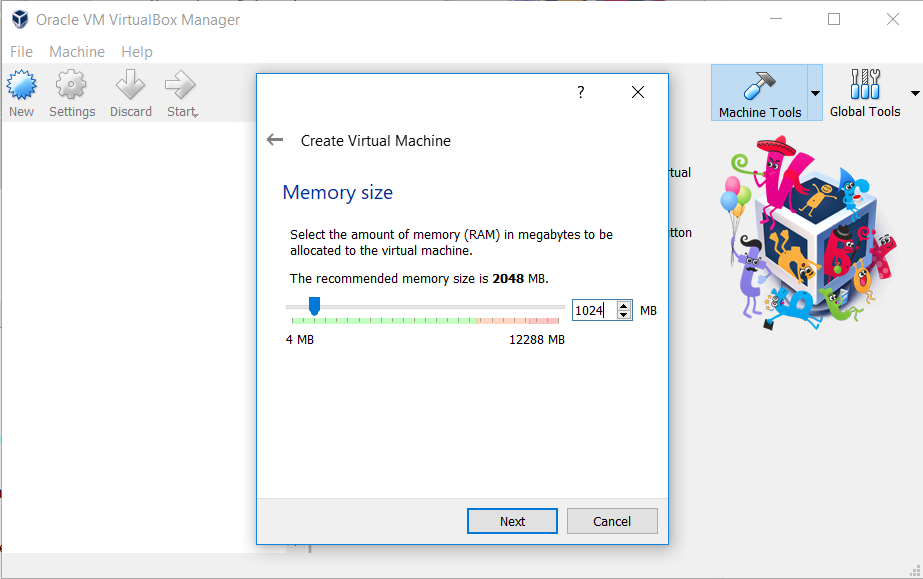
Select memory size for virtual machine
Step 6: Now, Select and create the type of virtual hard drive file.
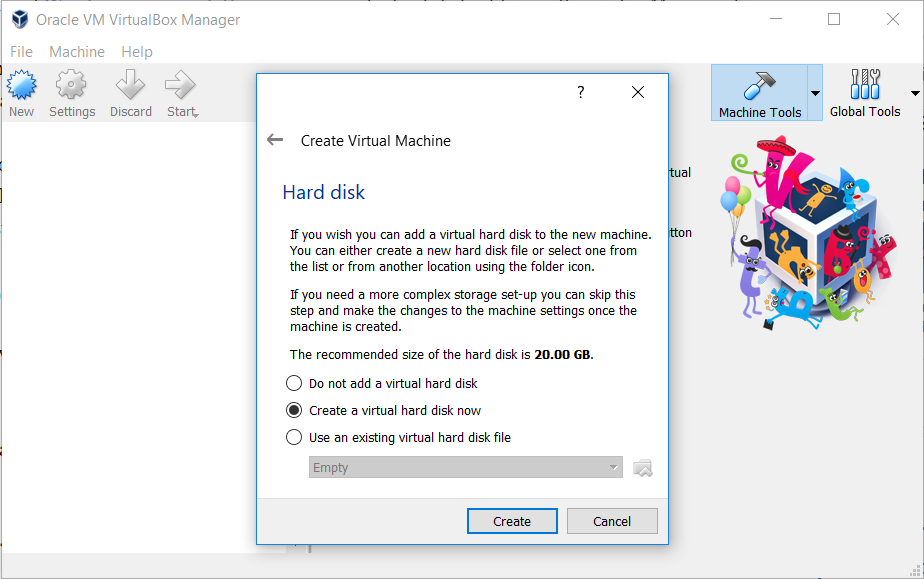
Create Virtual machine – Hard Disk
Step 7: Select the type of Hardware file as VDI (VirtualBox Disk Image). It is always recommended to go for VDI in terms of ISO image. Click Next.
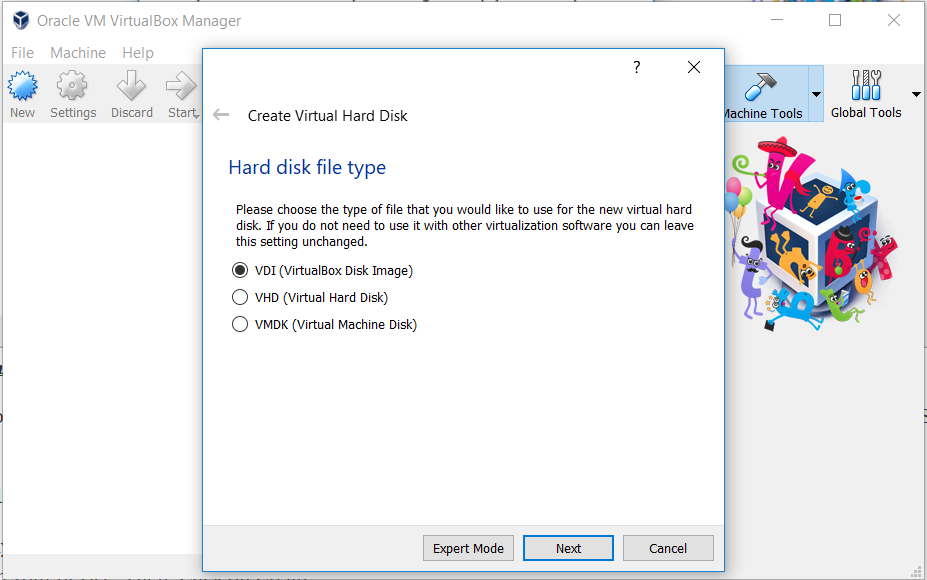
Create Virtual Machine-Hard Disk File Type
Step 8: Select the physical hard drive as Dynamically allocated. Now, you need to allocate the file location and size from the physical hard drive on your device. Then, Click on Create.
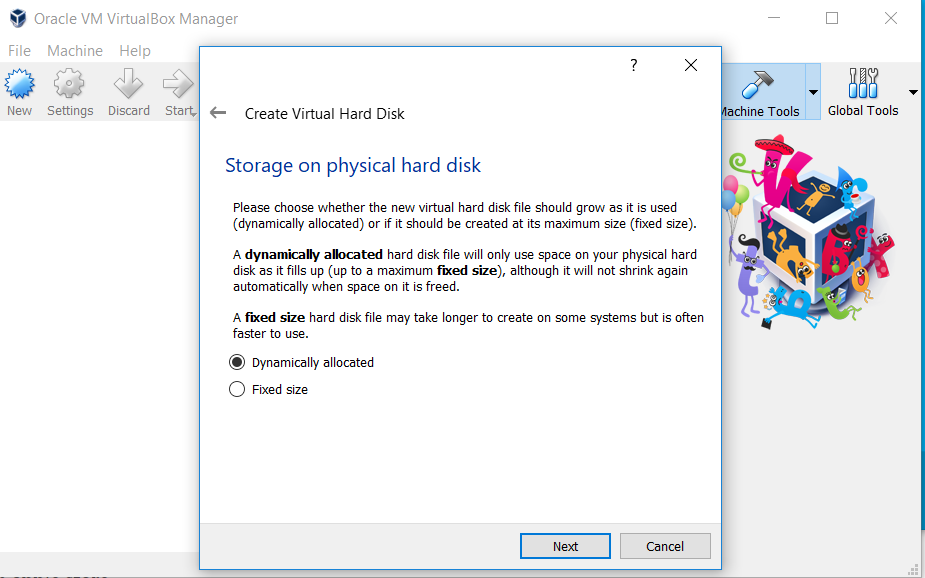
Create Virtual Machine- Storage
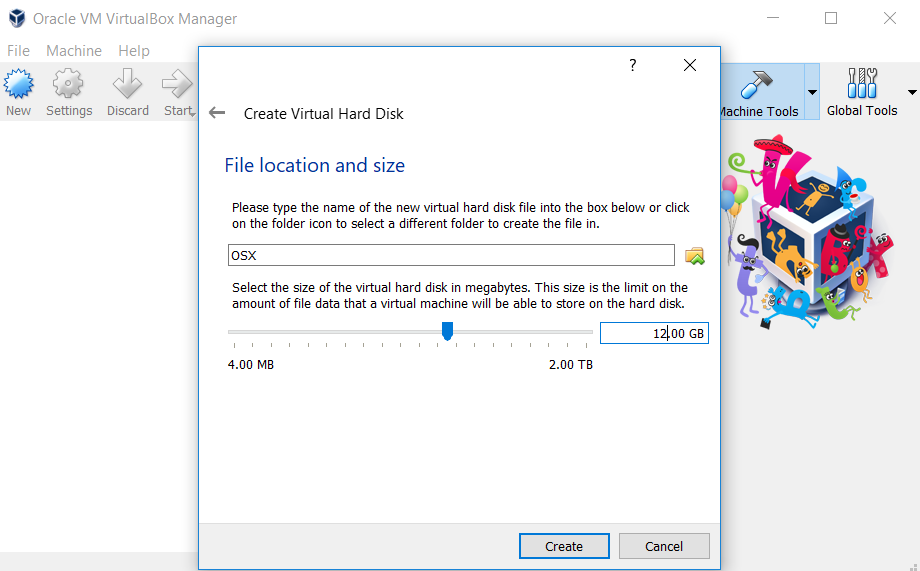
Create Virtual Machine – File Size & Location
Step 9: Now, you have successfully created a virtual machine on your virtual box. Currently, it will be in “Powered Off” state.
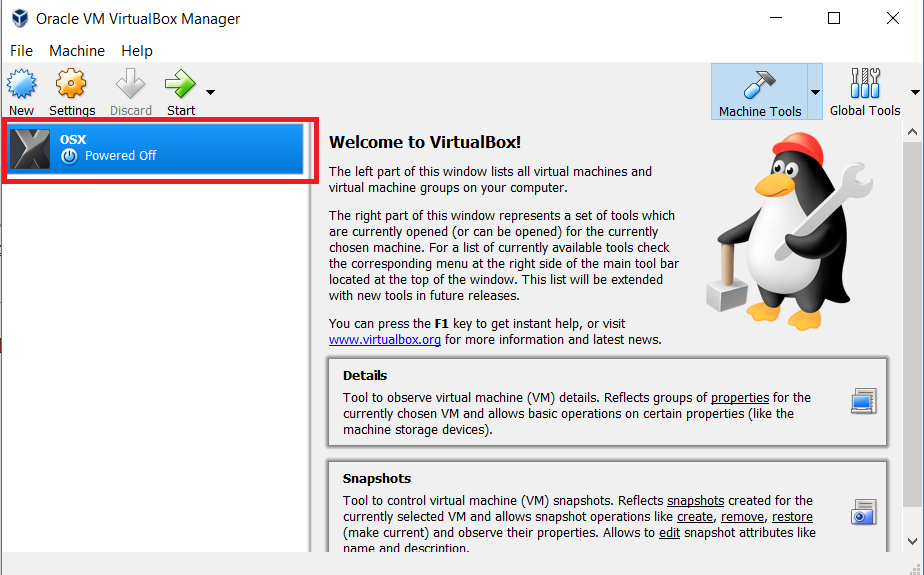
Virtual Machine – OSX
Step 10: Now you need to mount the OSX Mavericks ISO that we have downloaded before. For that, Go to Settings -> Storage -> Load iso File -> Click Ok -> Start.
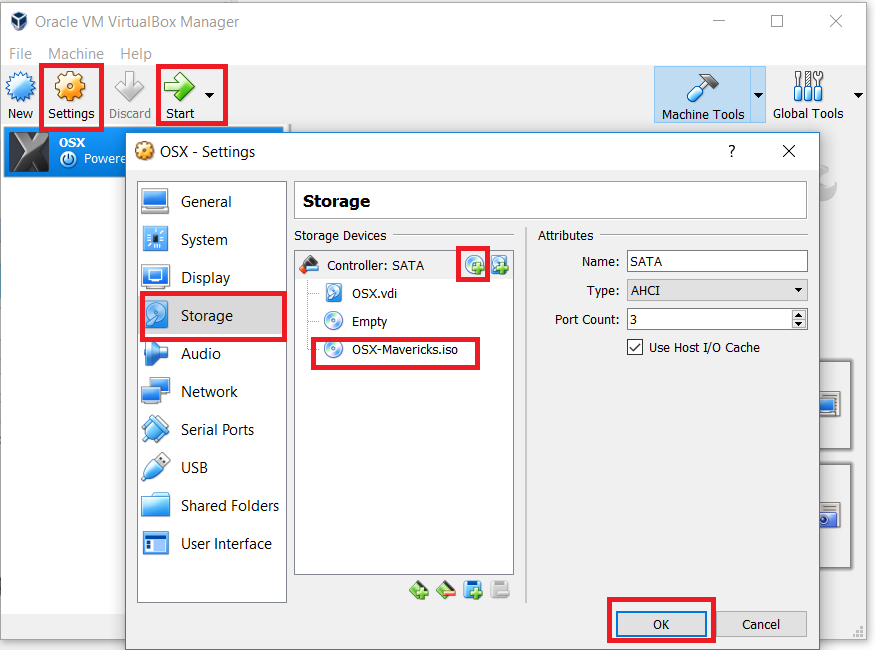
Create VM on Oracle
Step 11: Next, follow the on-screen steps of OSX boot and then OSX will be installed in Oracle Virtual.
Step 12: Go to safari browser in your Virtualbox.
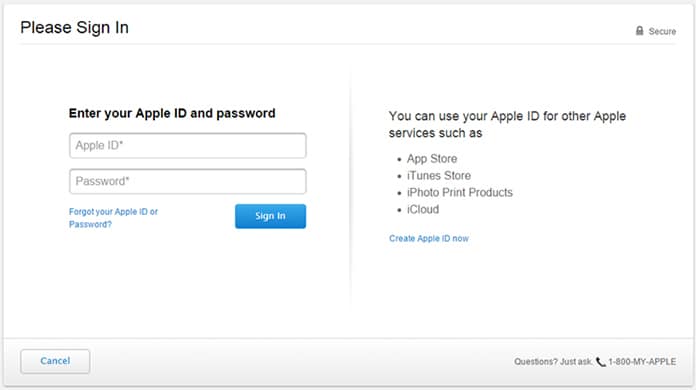
Step 13: Open official Apple App store and sign in using your Apple ID in the App store. You need to enter the Apple ID and password as shown in the image below:
Step 14: After signing, type Xcode in the search box. You can select any of the apps. Click on Free and Download. Then, click OK to download the kit. After completing the installation process, open it from the applications.
Step 15: In order to install Xcode components, you need to be the root user. So now, you need to provide your root credential. Enter your name and password and press OK.
7 Best Antivirus Apps – An iPad User Must Have
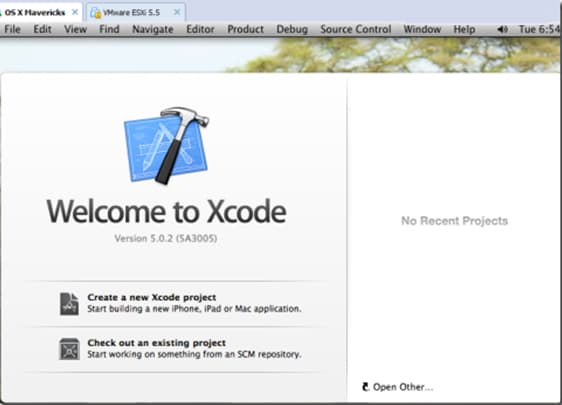
That’s it, we have now successfully installed the latest Xcode version on your Windows 10, 8/8.1 and 7 PC using desktop virtualization software VMware workstation. Start creating new projects and better apps using this interface.
So in this way, you can easily download and install Xcode for windows Personal computer or laptop. The performance and speed of Xcode won’t be extremely high.
Hope this tutorial helps you in the best way to install Xcode on Windows 10, 8/8.1 and 7 OS running PC or Laptop.
Xcode is coding software or to precisely say is an app development software for Apple devices created by Apple Inc. The devices like iPhone, iPad & MacOS can use the software or applications developed using the Xcode. The Xcode IDE (Integrated Development Environment) can easily analyze the project made by the user and even identify the mistakes or issues that can arise because of an incorrect logic or syntax. But still, you can’t use the application because you do not have a system having MacOS and you want to download Xcode for Windows now.
So, today in this article I will help you install Xcode in Windows PC if available and if not available then will let you know what are the best alternatives instead of Xcode.

Contents
- 1 Is Xcode available for Windows?
- 2 How to Install and Run Xcode on Windows?
- 2.1 1. Virtual Box.
- 2.2 2. VMWare Player
- 2.3 3. Boot Windows to Mac OS
- 3 Windows Alternatives for Xcode
- 3.1 1. These applications/platforms might help
- 3.2 2. Other Alternatives
- 4 Conclusion
Is Xcode available for Windows?
Since it is developed by Apple, meaning that it is not officially available for Windows platform to develop applications and users can use it for Mac OS only. But, though there are some ways using which we can use Xcode in Windows.
Below, in the next point, I will discuss a few methods using which you can install the Xcode for Windows OS. Just follow the steps that I provide and you can install Xcode easily and start developing applications for various Apple devices.
How to Install and Run Xcode on Windows?
Apple has not launched any software or application using which one can use Xcode on Windows and create applications for iPhone, iPad or MacOS. Meaning you would need MacOS to run the Xcode software and create your own apps. So, you should install MacOS in your system first and then you can install Xcode for your Windows.
1. Virtual Box.
A Virtual Box is a software developed that allows users to use multiple operating systems in one single operating system of a PC. You can use any operating systems like Windows, Linux, Mac, whichever you want to use and the best part of using this app is you don’t need to remove your old operating system.
- You can download the Virtual Box software from here.
- Install the software and run it.
- Open the OS that you want to open using the Add button in Virtual Box. But you need to download the Virtual Box image file of that O.S. in your system beforehand.
- After the O.S. is added you can use the Xcode software to create the apps of Apple devices howsoever you wish.
Apart from Virtual Box, there is another similar software for using multiple operating systems i.e. VMWare Player. If you have already installed VMWare then you can use it for the installing Xcode for Windows.
2. VMWare Player
VMware player is also the same as Virtual Box and can be used to install any operating systems on a single PC and run multiple OS at the same time. The steps for the installing VMware would be the same as those of Virtual Box but for your reference, I will guide you using these simple steps:
- Download the VMware using the link.
- Install & run the software now.
- You must have download OS image file (MacOS image file for VMware) already in your PC.
- Add the OS using the add button and after installation is done, you can start using it.
You can now create applications for various Apple devices like iPhone, iPad or Mac or if you are a beginner then you can start learning & creating applications slowly.
3. Boot Windows to Mac OS
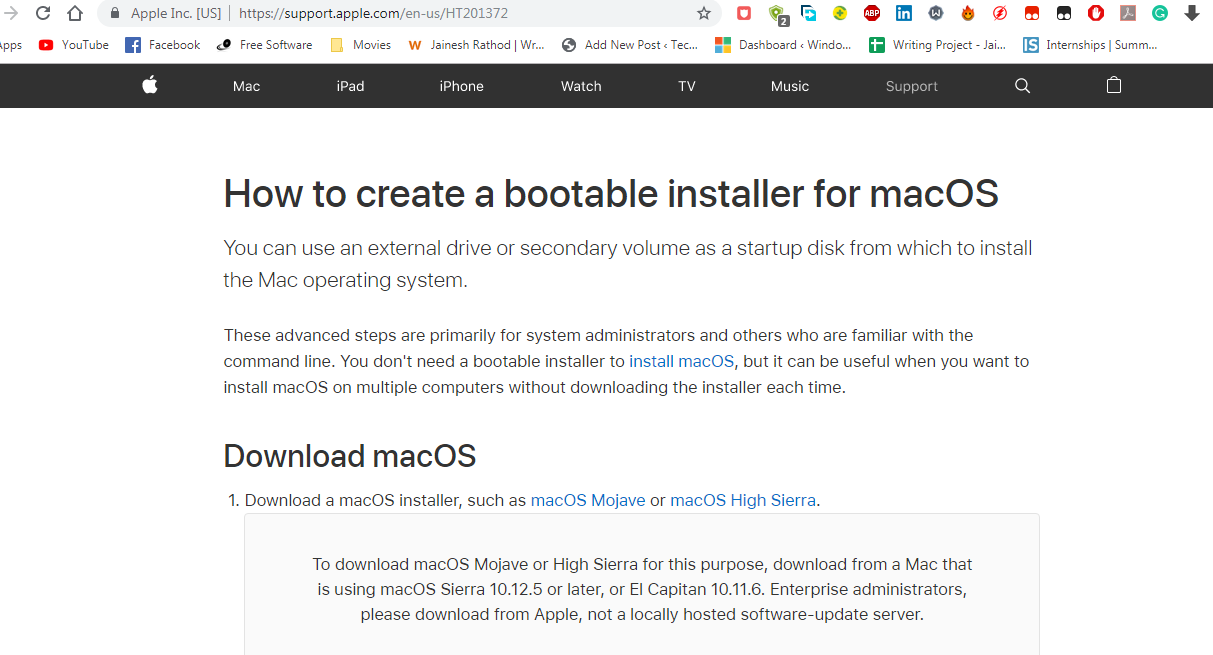
In this method, you can download and create a bootable drive(like pen drive) to install the MacOS on your Windows PC. You can use the devices as an external bootable drive to use it for MacOS(but it should have a large space of more than 16GB) or you can boot it into your device keeping or removing your Windows OS during the process and install MacOS.
The whole process can be followed using this link.
After the MacOS is installed using any of the above mentioned 3 methods, you can now download and install Xcode software to your MacOS.
The link to download Xcode for Windows is here.

Using these methods you can download Xcode for Windows 32 bit or 64 bit and use it for developing the apps. But an important note – Apple has not legalized the use of MacOS in Windows by anyway yet and using the Xcode in Windows is illegal.
Windows Alternatives for Xcode
Now since we know that Xcode is not officially available for Windows and so, we can use some alternatives instead of Xcode to develop applications for Apple devices.
1. These applications/platforms might help
- React Native – Uses JavaScript to build native mobile apps for Android & iOS.
- Xamarin – It uses C# language to build mobile apps that you can deploy natively to Android, iOS, and Windows operating systems.
- Appcelerator – It can also be used to build native mobile apps using JavaScript.
- PhoneGap – It builds a hybrid cross-platform mobile app using HTML, CSS, and JavaScript languages.
- Flutter – Flutter is a mobile application development framework created by Google to develop applications for Android and iOS.
These are the best alternatives available in the market which can develop apps for both Apple & Android and some can develop for Windows too. But using them to develop applications for Apple devices won’t be of worth because as a result, you will be needing the Xcode software to check the application & also you would need an Apple developer I’d to add the application to the Apple Store.
2. Other Alternatives
- Rent the MacOS over a cloud – The cheapest way to use MacOS for those who can’t afford to buy the MacOS system then you can use MacOS by renting it through the cloud. You can just google rent MacOS using cloud and there will be a bunch of results helping you out. Review the site properly before renting the MacOS and then only pay. Using this method, you can use MacOS and complete your needs for a short term period.
- Buy a Mac – The best option and the last option left is to buy a system from Apple and use it for developing applications for Apple devices. The easiest and legal way for those who can afford the system.
Also Read: Best Android Emulators for Win 10
Conclusion
The Xcode isn’t available for Windows since Apple hasn’t launched anything on this topic yet. Also, if you really need to install MacOS and use Xcode for Windows then the alternatives are there for your help. For more help, we are there for you and you can comment below and let us know if in case you have any doubts or queries. Also, you can comment below if you find any new method or alternative that can help people use Xcode on Windows OS.
-
Partition Wizard
-
Partition Manager
- How to Use Xcode on Windows [3 Ways]
How to Use Xcode on Windows [3 Ways] [Partition Manager]
By Linda | Follow |
Last Updated September 24, 2021
Xcode is an integrated development environment provided by Apple to developers for developing applications for macOS, iOS, iPadOS, WatchOS and tvOS. It only runs on macOS! What if you don’t have a Mac PC? This post from MiniTool Partition Wizard tells you how to use Xcode on Windows.
1. Rent a Mac
Someone connects a bunch of Mac’s to the internet and then you can sign in on one of those Macs via a Remote Desktop Connection (RDP). Through this way, you can rent a Mac «in the Cloud».
Because you’re essentially connected to a Mac that’s elsewhere, you can run Xcode on your Windows PC.
Cloud-based Macs usually come in 3 flavours:
- A dedicated Mac: The Mac you get access to is a physical Mac.
- A virtual Mac: The Mac you get access to is a virtual Mac. The Mac won’t run on Apple hardware, but it will run macOS.
- A Mac Build Server: It is a specialized kind of Mac that can be used to compile iOS apps.
Renting a Mac has two disadvantages:
- High price: Mac rent service usually charges $10-30 per month. Some dedicated Mac rent service may charge more.
- You can’t easily connect your iPhone to Xcode via USB. If you want to run and debug your app on your own iPhone, you should use iPhone Simulator, Flexihub, NoMachine, USB Network Gate, or other tools.
6 Methods to Fix the Windows 10 Remote Desktop Not Working Error
2. Build MacOS Virtual Machine
If you don’t want to spend money, you can try this method. The disadvantage of this method is that the MacOS virtual machine installation process is very complicated. You can use VirtualBox or VMware to install a MacOS VM. But to make sure the MacOS VM can run smoothly, your PC should meet the following requirements:
- CPU:4th Intel i5 or higher
- RAM:at least 8GB
- Storage:more than 100 GB free space
If you plan to create a MacOS VM using VMware, please refer to the following post:
3. Build a Hackintosh
Apple doesn’t allow users to install MacOS on PCs that are not produced by Apple or authorized by Apple. If you do so, the OS is called Hackintosh.
Although installing Hackintosh will infringe copyright, many people do that still. If you don’t want to use the above methods to run Xcode, you can try Hackintosh. You can even dual boot Windows and macOS.
However, building a Hackintosh can be a complicated job. Not all hardware is compatible with macOS. Moreover, Apple has of course created safe-guards against booting macOS on unsupported hardware.
But if you want to try this, please go to hackintosh.com for more information and step-by-step installation guide.
How to Fix: macOS Could Not Be Installed on Your Computer
Conclusion
How to use Xcode on Windows? To some extent, this problem is similar to how to run MacOS on Windows, because Xcode can only run on MacOS. I have offered 3 solutions. If you have other ideas, please share with us in the following comment zone.
About The Author

Position: Columnist
Author Linda has been working as an editor at MiniTool for 1 year. As a fresh man in IT field, she is curious about computer knowledge and learns it crazily. Maybe due to this point, her articles are simple and easy to understand. Even people who do not understand computer can gain something.
By the way, her special focuses are data recovery, partition management, disk clone, and OS migration.
-
Partition Wizard
-
Partition Manager
- How to Use Xcode on Windows [3 Ways]
How to Use Xcode on Windows [3 Ways] [Partition Manager]
By Linda | Follow |
Last Updated September 24, 2021
Xcode is an integrated development environment provided by Apple to developers for developing applications for macOS, iOS, iPadOS, WatchOS and tvOS. It only runs on macOS! What if you don’t have a Mac PC? This post from MiniTool Partition Wizard tells you how to use Xcode on Windows.
1. Rent a Mac
Someone connects a bunch of Mac’s to the internet and then you can sign in on one of those Macs via a Remote Desktop Connection (RDP). Through this way, you can rent a Mac «in the Cloud».
Because you’re essentially connected to a Mac that’s elsewhere, you can run Xcode on your Windows PC.
Cloud-based Macs usually come in 3 flavours:
- A dedicated Mac: The Mac you get access to is a physical Mac.
- A virtual Mac: The Mac you get access to is a virtual Mac. The Mac won’t run on Apple hardware, but it will run macOS.
- A Mac Build Server: It is a specialized kind of Mac that can be used to compile iOS apps.
Renting a Mac has two disadvantages:
- High price: Mac rent service usually charges $10-30 per month. Some dedicated Mac rent service may charge more.
- You can’t easily connect your iPhone to Xcode via USB. If you want to run and debug your app on your own iPhone, you should use iPhone Simulator, Flexihub, NoMachine, USB Network Gate, or other tools.
6 Methods to Fix the Windows 10 Remote Desktop Not Working Error
2. Build MacOS Virtual Machine
If you don’t want to spend money, you can try this method. The disadvantage of this method is that the MacOS virtual machine installation process is very complicated. You can use VirtualBox or VMware to install a MacOS VM. But to make sure the MacOS VM can run smoothly, your PC should meet the following requirements:
- CPU:4th Intel i5 or higher
- RAM:at least 8GB
- Storage:more than 100 GB free space
If you plan to create a MacOS VM using VMware, please refer to the following post:
3. Build a Hackintosh
Apple doesn’t allow users to install MacOS on PCs that are not produced by Apple or authorized by Apple. If you do so, the OS is called Hackintosh.
Although installing Hackintosh will infringe copyright, many people do that still. If you don’t want to use the above methods to run Xcode, you can try Hackintosh. You can even dual boot Windows and macOS.
However, building a Hackintosh can be a complicated job. Not all hardware is compatible with macOS. Moreover, Apple has of course created safe-guards against booting macOS on unsupported hardware.
But if you want to try this, please go to hackintosh.com for more information and step-by-step installation guide.
How to Fix: macOS Could Not Be Installed on Your Computer
Conclusion
How to use Xcode on Windows? To some extent, this problem is similar to how to run MacOS on Windows, because Xcode can only run on MacOS. I have offered 3 solutions. If you have other ideas, please share with us in the following comment zone.
About The Author
Position: Columnist
Author Linda has been working as an editor at MiniTool for 1 year. As a fresh man in IT field, she is curious about computer knowledge and learns it crazily. Maybe due to this point, her articles are simple and easy to understand. Even people who do not understand computer can gain something.
By the way, her special focuses are data recovery, partition management, disk clone, and OS migration.
How to Install Xcode on Windows 10 | Download Xcode
In this article you will learn how to install Xcode on Windows 10. But remember, it will work on all versions of windows including Windows 8.1, 8 and 7. Further, you are already familiar that originally Xcode is designed for macOS operating system. Moreover, you can easily install it on your macOS Mojave directly if you have MacBook or iMac. Don’t worry, If you don’t have Mac machine. I will give you complete instruction for both windows and mac OS. Further, you can download and install Xcode on your machine. But, for doing anything. You must have some information about Xcode. Then we will proceed further.
What is Xcode for Windows

Install Xcode on Windows 10
Xcode is a development tool, developed by Apple for developing software for Mac operating system, such as, iOS devices, watchOS and as well as tvOS. Xcode is very popular since the first release. However, with the latest version of Xcode every tool is easier and more efficient while working on any project. It is specific software where all the product by Apple is developed. Therefore, at the moment there is no particular Xcode version for Windows. Because, Apple has the software which only run on the Apple devices. Moreover, you know that Windows is an operating system which is developed by Microsoft. Therefore, Apple do not allow it on Windows platform. But, don’t worry. There is always a way to go back and forth and use one software to another platform. Like Xcode is developed for Apple. However, we are going to use it on Windows.
What is Difference between Windows and macOS?
Both Windows and macOS are popular operating system. There are hundreds of thousand of people who are using Windows and macOS everyday. However, the main question is that what is difference between both operating system. To understand the difference between both operating system. You must know that these are two different companies. Windows is designed by Microsoft and macOS by Apple. Since, these two companies are in competition. likewise, iPhone and Samsung. Therefore, these companies always try to make the best software out in market then one another. In this competition, both the companies are making more amazing software like Xcode. Which only runs on Apple device.
However, these are some specific software which is developed only for these operating system. But, all other software, Adobe software, including Photoshop, Illustrator, Premiere etc runs on both platform. Therefore, if you don’t want some specific builtin software then my suggestion is that you have to buy one machine (computer) and integrate that with another. But remember, most of the Apple devices are more expensive then Windows operating systems. Therefore, the clever way is to buy Windows computer or laptop and integrate the iOS software on it.
What You Need to Install Xcode on Windows 10?
Now you have clear sense that you cannot install Xcode on Windows without third party software. Therefore, we are going to use third party software and install Xcode on Windows quickly. The software which we need are Virtual Box and VMware. These both software are virtual machine software. With the help of these software, you can easily install Xcode on Windows.
What is Virtual Box and VMware Virtual Machine?
Virtual Machine is a software which give you a platform. Where you can install either macOS on Windows or Windows on macOS. Therefore, virtual machine act like it is different machine. Where you can install any operating system. Like linux, Android operating system, macOS and Windows. Further, There are two popular software for virtual machine. First, which is Virtual Box. Second is the VMware Work Station.
Install Xcode on Windows 10?
For installing Xcode on Windows 10. You need to have Virtual Box or VMware installed you Windows PC. Therefore, you have to read How to Install macOS Mojave on VMware or How to Install macOS Mojave on VirtualBox Windows. These both articles will help you to install Mac operating sytem on Windows using VMware and Virtual Box. However, You can also get macOS Mojave VMware & VirtualBox Image Download.
Install Xcode on AppStore
Once you have successfully installed Mac operating system on your machine. Now you have to proceed to install Xcode on Windows 10. For doing so you have to start mac operating system with the help you virtual machine. Once the operating system will start. At the bottom you will see the icon of App Store. You have to click on it. Further, you will find the search bar on the top left cover. Further, you have to write Xcode. Next you will see different application. You have to find out Xcode. Once you find it you have to click on Get. Then the Xcode will automatically start installation. Remember, that Xcode has a large file Size. Therefore, if you have slow internet. It will take hours to install. Therefore, you have to be patient and wait for a while to install Xcode you virtual machine.
Further, when installation will complete you have to run the software and find it everything is working fine.
Conclusion:
If hop you have done everything great and the Xcode is running successfully on your Windows PC operating system. However, if you face any problem regarding any steps. You have ask me anytime while writing your question on comment box below. However, we will also be happy if you can write you feedback or suggestion as well. Thank you.
About The Author

Jamshaid Raza
Jamshaid Raza is an enthusiastic Content Writer. He writes about Online earning, programing, and development. Further, he teaches online on Youtube and Udemy related to earning, programming, and development. Therefore, you can rich at YouTube: Professional Tutorial
Apple’s Xcode is a fantastic IDE (integrated development environment) to help you in making entire application development project –making your app from scratch via coding, to other processes like testing, and finally publish it on the App Store.
Xcode is a reliable app development application for Mac OS, which makes a favourable environment for people to develop apps for iOS, Mac OS, Apple Tv OS and Apple Watch OS. Xcode was released in 2003 by Apple as a free, open-source program, and now they are working on a new version with minor improvements. On the Apple official Developer website, you can download the prior versions also.

Are you planning to develop iOS apps via Xcode but you don’t have a system that supports Mac OS? Unfortunately, Xcode is only available for Mac OS. Apple hasn’t released any versions of Xcode on Windows.
But don’t worry, we got you covered, even though you can’t install it Windows 10 or 8.1/7, but we’ll show you some method via which you can use with your Windows PC (or affordable ways) so that you can make apps for Mac OS or iOS.
The steps which are provided by us is mostly for education and testing purpose. If you want to do hard-core programming without any issues in your app, you need to run Xcode on Apple hardware or Apple device which will be the most reliable and will resolve all the errors and problem.
Below are some of the solutions, so that you can get comfortable with the Mac and iOS environment.
Solutions at a glance to have Xcode on Windows:
- Rent a MacBook or any Apple Hardware
- Build a “Hackintosh”
- Get MacMini
- Use MacOS virtually by using VMware or Virtualbox
- Buy a used Macbook
- Third-Party Solutions
Rent a Mac:
Cloud computing technology has transformed the industry; you can now use the supercomputers at only the fraction of the price of it. And the best part you can use them on an hourly basis. The best thing about cloud technology is that you can choose your desired platform of OS and you’ll get the best speed and memory as per your choice.
People nowadays rent those computers via the cloud to run their favourite games, those games need much more power as compared to Xcode still they run seamlessly on the system.
When you rent a Mac virtually, first, you will sign in on your choice of Mac OS system with a remote desktop connection or RDP which are pre-installed in your window’s PC. It’s just that simple; then you can access to Mac OS from any Windows PC. Some popular services such as Virtualmacosx or Mac-stadium or Mac-in-Cloud will provide you with access to the desired Mac by paying some fee that can be paid on a monthly basis.
There are few major players when it comes to renting Mac online or on the cloud. Check out these websites.
a) MacStadium
b) MacinCloud
Build a “Hackintosh”:
One obvious choice is to install macOS itself on your Windows PC. Hackintosh is a windows PC on which Mac OS is installed. You can make a Hackintosh by two methods:
- Make MacOS the primary OS of your system, switch PC on, and macOS will load.
- You can also make a dual-boot, then it will be a system that contains Windows and macOS both so when you turn your PC on, It will prompt you to select the operating system that you want to use.
Setting up a Hackintosh is a technical task, but as many people use it, so you can find many websites and forums online that will assist you in building a Windows PC with macOS. The Online community of Hackintosh is technical, so you’ll have to look carefully before doing any changes to your system.
Get Mac Mini:
There’s a cheap alternative of buying a MacBook for using MacOS that is purchasing a mac mini. Mac mini is a small portable CPU which contains numerous of USB and HDMI ports, some versions of Mac mini are more powerful than a Macbook. It can be beneficial when you want to install Xcode on your system.
You can set up Mac mini directly to a screen via HDMI or you can use remote connection and connect it on your Windows PC via remote desktop client to use Xcode on your PC. If you get up via remote desktop client, then you can use the mac mini wherever you want to run Xcode be it your office or home.
Use MacOS virtually by using VMware or Virtualbox:
We mentioned several guides to install macOS on a Windows computer by using VMware or VirtualBox. We can use one of these virtual machines to use Xcode on Windows.
As these VMs do not perform like using on Apple hardware, we can’t use this setup for real game/app development using Xcode. It is always better to get the Apple hardware if you are a serious and professional app developer.
Follow the steps to have Xcode for iOS SDK development from Windows computer for testing and learning purpose.
Step 1: Install the latest macOS on a virtual machine. Read more about our guide of Big Sur on VMware.
Step 2: Sign in to app store with your Apple ID. You must have it or create a new account for this purpose.
Step 3: Search for Xcode in App store and install it.
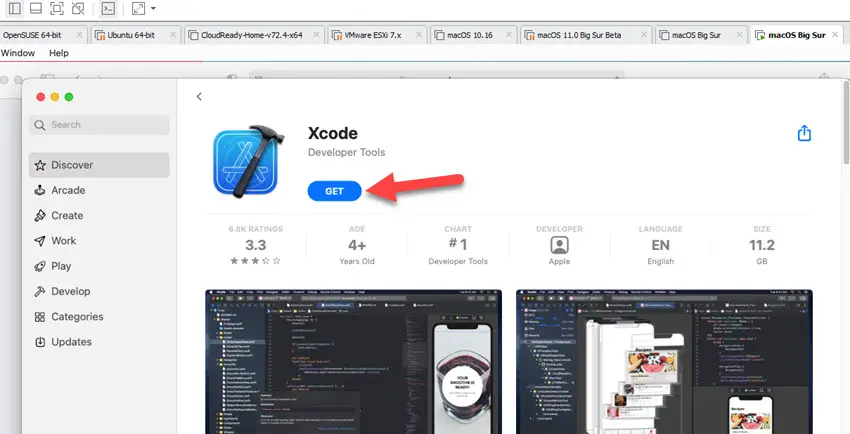
Step 4: Installation is straight forward. You may need to provide the root access if required. Once it is installed successfully, open the app and create your first project in Xcode which is actually working on your Windows computer.
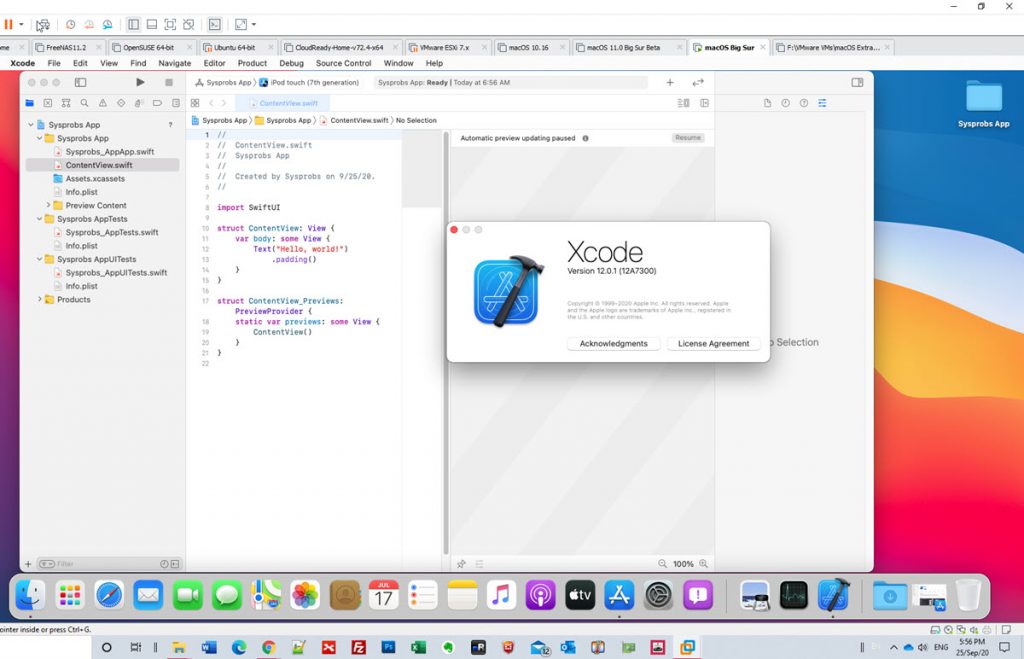
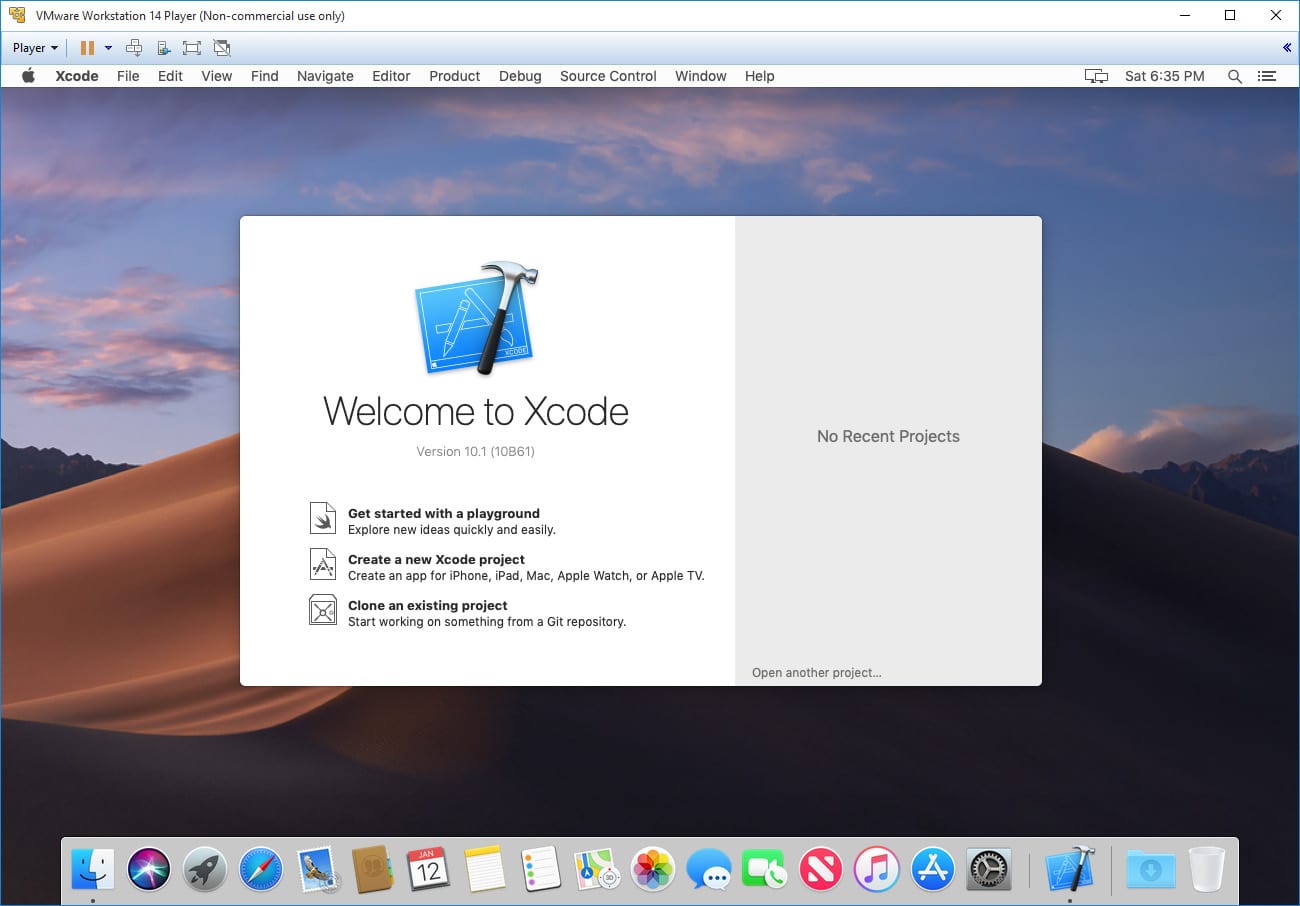
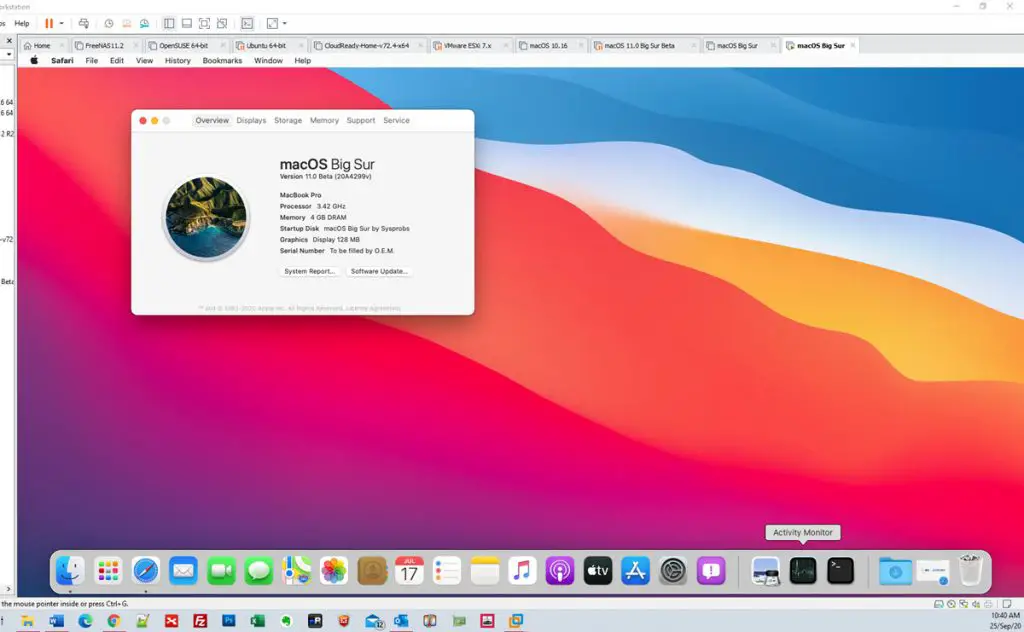
That was my Xcode 12.x version with Big Sur macOS on my Windows 10 desktop computer by using VMware workstation.
Buy a used MacBook:
If you want to develop iOS apps via Xcode without any issue then I’d suggest you buy a used MacBook, sometimes you can find great deals on a used MacBook on websites like eBay.
You should consider buying a used MacBook when a new generation gets released because at that time people sell off their old MacBook at very less price and the price of the previous generation goes down; moreover you can get almost the latest Hardware because no significant changes happen in just one year or two.
Also, consider buying at least a 2-Year old MacBook because then you’ll have one year of apple care left in an ideal situation so you can have hassle-free and cheap part replacements if you come up with any hardware issue. You can also check for physical damage and negotiate the price with the owner for a good deal.
Third-Party Solutions:
You can use various tools which are available with which you can develop cross-platform app instead of using Xcode. Those development tools help you to write a single code that can be used and tested on all devices; they will fulfil your primary purpose of developing iOS apps.
You must be thinking that this is the best solution but remember that iOS only allows apps which are made on Xcode. Hence, what this kind of tools will do is they take your app and translate your code in such a manner that it can be used in all devices, so with this approach, there can be minor errors while publishing it or developing it.
Since Apple releases new features frequently, so these third party tools don’t need to always keep up to date to fulfil your requirements, in that case, many issues can come up, so you’ll have to wait until the third party app catches up with the new update.
Frequently Asked Questions (FAQs):
Is it possible to run Xcode on Windows?
Apple hasn’t officially released Xcode for Windows so you cannot install Xcode on your Windows PC, but you certainly can run Xcode via VirtualBox or VMware. Another method you can use is to rent a Mac on cloud storage. We have given some more solutions; you can consider the above options to start developing iOS applications.
Can I build iOS applications on Windows?
You can use cross-app developing platforms that can help you develop an application for both iOS and Android. But you can’t use Apple’s Xcode IDE developing iOS apps on Window’s system as apple doesn’t allow compilation on other platforms like Linux or Windows.
How do I download Xcode on my computer?
You cannot download Xcode directly on your Windows computer because it isn’t compatible with windows, you’ll have to use a virtual mac machine via remote desktop client and run Xcode on that, or you can even rent a mac on the cloud and start developing iOS apps via Xcode.
Can I run Swift on Windows?
Unlike Xcode, Swift is available for Windows. Apple has released swift; it is a general-purpose, compiled programming language which is used for developing apps for iOS, OS X, watchOS, tvOS. “Swift for Windows” is a free, open-source and GUI IDE that provides an environment to develop apps in the Swift programming language to compile and run on a Windows PC.
Is Xcode free to download?
Xcode is an IDE which is released by Apple to develop apps for iOS, OS X, watchOS and tvOS. It can be downloaded with the help of the Mac app store as a free app. You will have to log in with your Apple ID and password in the mac app store, then you need to search for the Xcode, click on download, and it’ll download and install on your Mac. You don’t have to be a member of Apple developer program to download this application.
Final Verdict:
There is no official way to use Xcode on Windows PC because Apple hasn’t released a version which is compatible with Windows. So according to your requirement and feasibility, you can choose any of the above solutions and start developing apps for iOS.
The best option in this scenario according to my experience is to go with a mac mini or a used mac because then you don’t have to worry about minor bugs and the investment also won’t be that much.