Содержание
- Шаг 1: Скачивание и распаковка файлов
- Шаг 2: Изменение конфигурационного файла
- Шаг 3: Первый запуск локального веб-сервера
- Вопросы и ответы

В этой статье мы разберем только основные принципы установки и первого запуска веб-сервера Apache на компьютере под управлением Windows. Учитывайте, что все остальные действия, такие как: установка PHP, подключение MySQL, добавление других необходимых компонентов для локального сервера, придется выполнять вручную, из-за чего могут изменяться настройки Apache. Если во время редактирования глобальных параметров возникнут проблемы, не стесняйтесь обращаться к официальной документации и искать в поисковике решение ошибок по их кодам.
Шаг 1: Скачивание и распаковка файлов
Apache для Windows распространяется в виде ZIP-архива, в котором находятся все нужные файлы. Установка через Терминал, как это осуществляется в дистрибутивах Linux, в этом случае недоступна, поэтому для получения файлов выполните следующие действия:
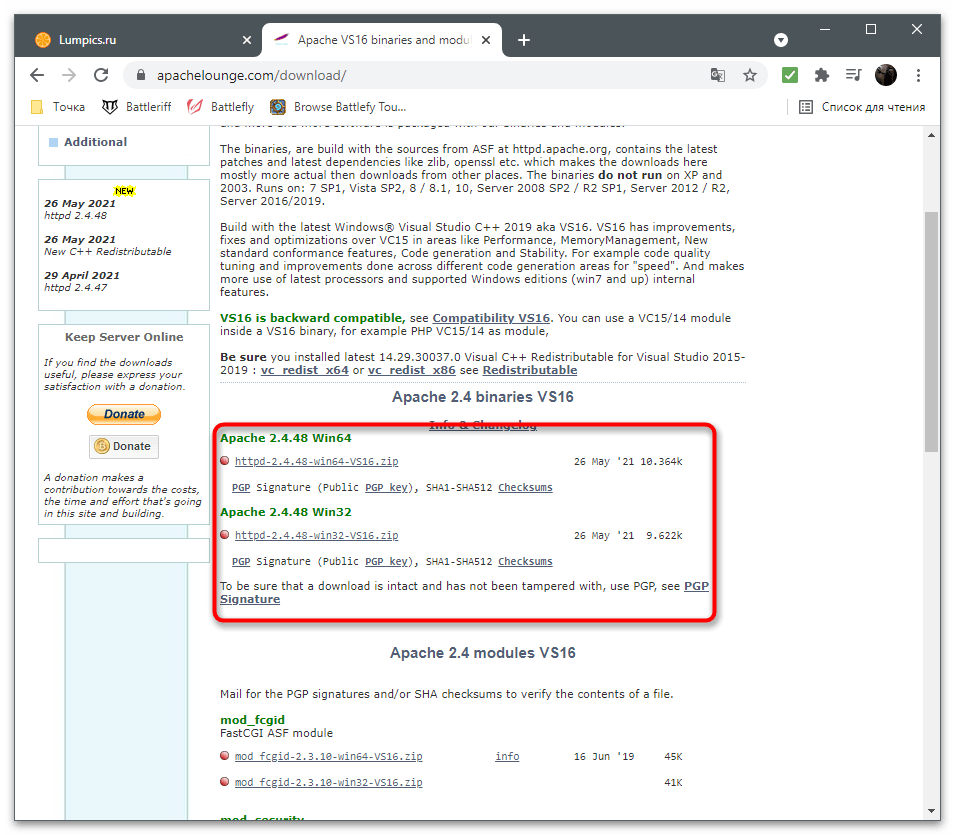
Скачать Apache с официального сайта
- Кликните по кнопке выше, чтобы перейти на официальный сайт веб-сервера, где нажмите по ссылке с названием последней доступной версии Apache.
- Вы окажетесь на странице описания версии, после чего выберите «Files for Microsoft Windows».
- В разделе «Downloading Apache for Windows» нажмите на ссылку «Apache Lounge».
- Выберите версию для разрядности своей операционной системы и начните загрузку.
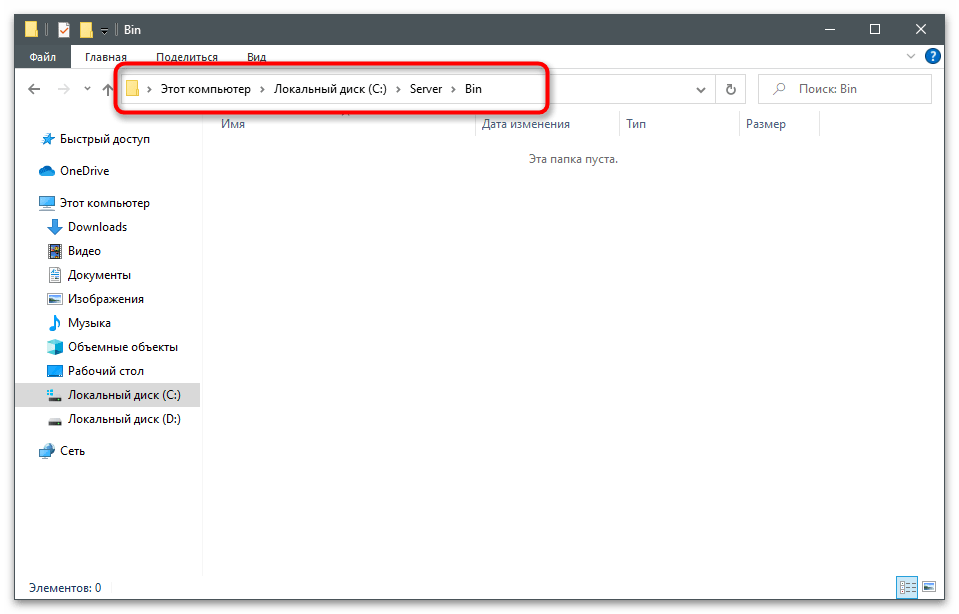
- Пока файлы скачиваются, создайте папку, куда будут помещены все элементы, связанные с веб-сервером. Мы выбрали для этого системный раздел жесткого диска, создали папку «Server», а в ней — «Bin». Это стандартные названия каталогов, поэтому при редактировании конфигурационного файла будем учитывать именно данное расположение.
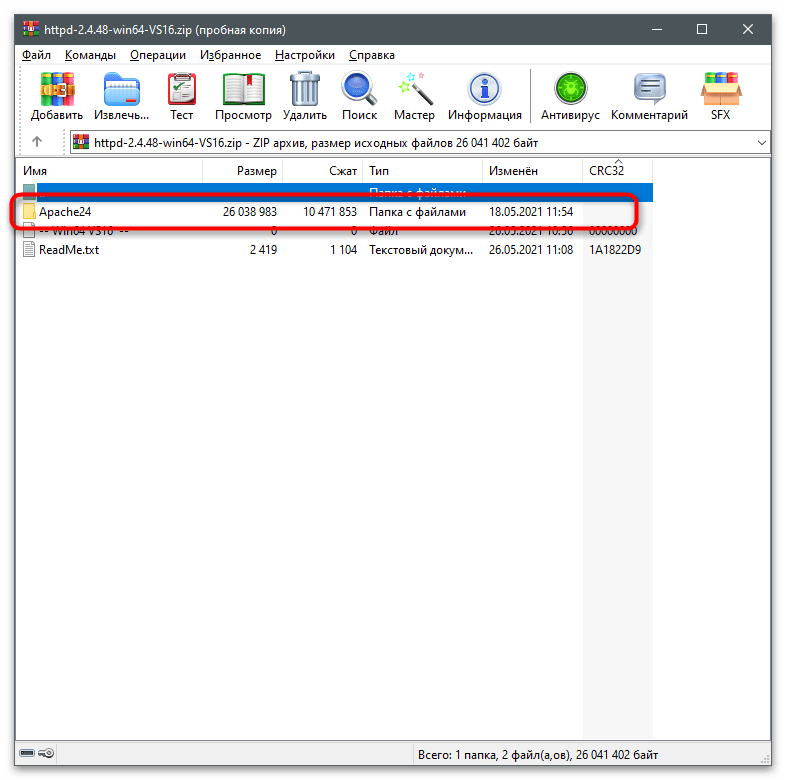
- Перетащите папку «Apache24» из скачанного архива в созданный ранее каталог «Bin».


Шаг 2: Изменение конфигурационного файла
Конфигурация локального веб-сервера, установленная по умолчанию, не подходит для его нормального запуска, чтобы проверить работу и подключить остальные компоненты. Связано это с изменением пути расположения файлов и другими параметрами, влияющими на старт программы. Измените их, выполнив представленные далее шаги.
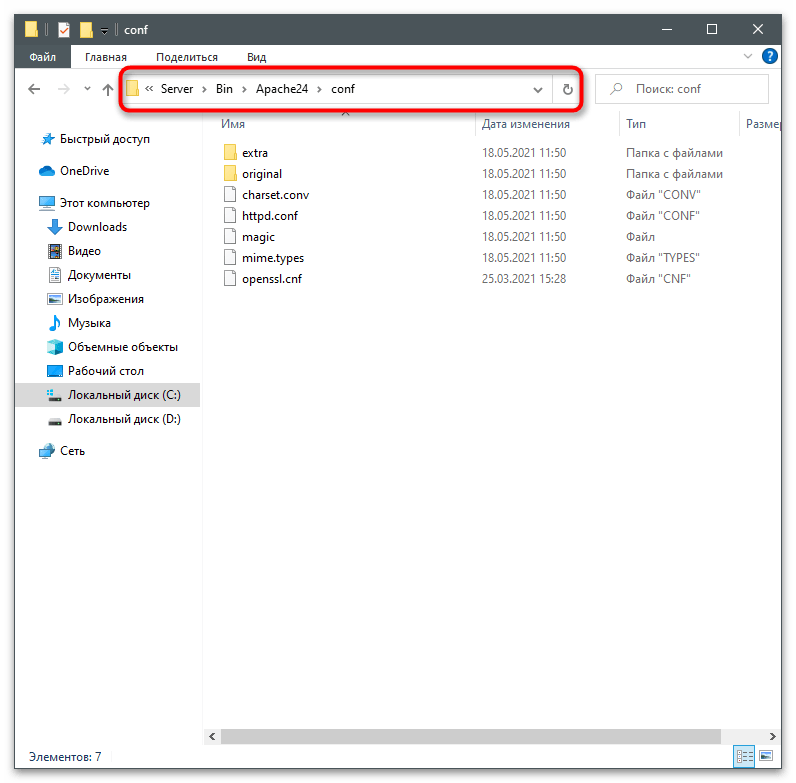
- Перейдите по пути
C:ServerbinApache24conf. - Дважды кликните по файлу «httpd.conf» для его открытия.
- Если у вас есть продвинутый текстовый редактор, выберите его для просмотра файла конфигурации. В противном случае используйте стандартный «Блокнот».
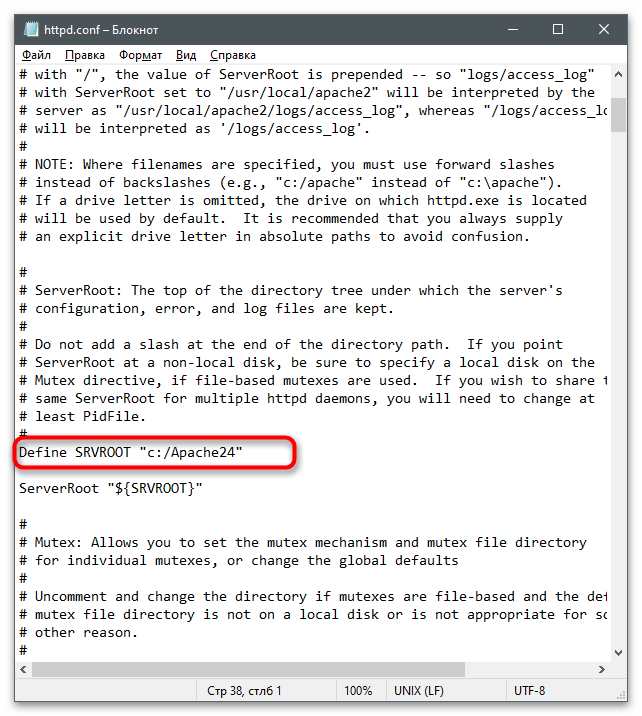
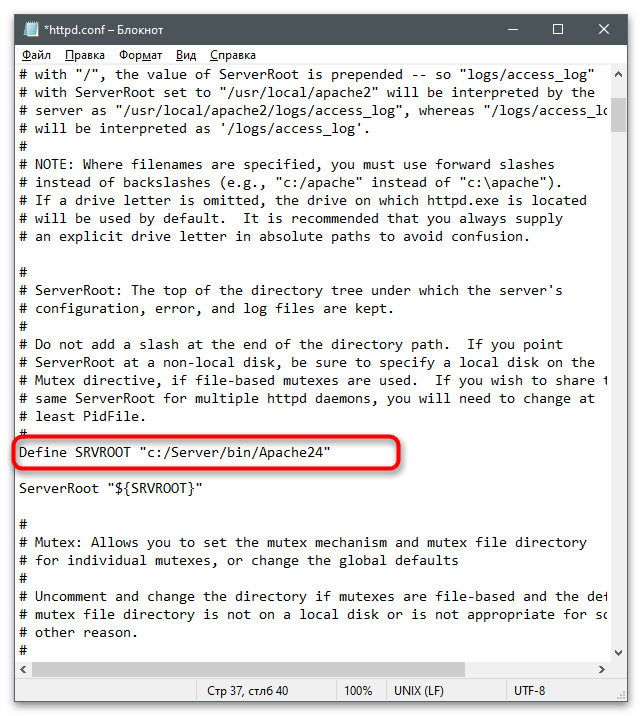
- В документе найдите строку
Define SRVROOT "c:/Apache24". - Замените ее на
Define SRVROOT "c:/Server/bin/Apache24", чтобы указать новый путь к файлам. Учитывайте, что в строке мы указали созданный ранее путь. Если у вас он отличается, поменяйте выражение в кавычках. - Далее найдите строку
#ServerName www.example.com:80, которая по умолчанию заключена в комментарий и неактивна. - Измените ее на
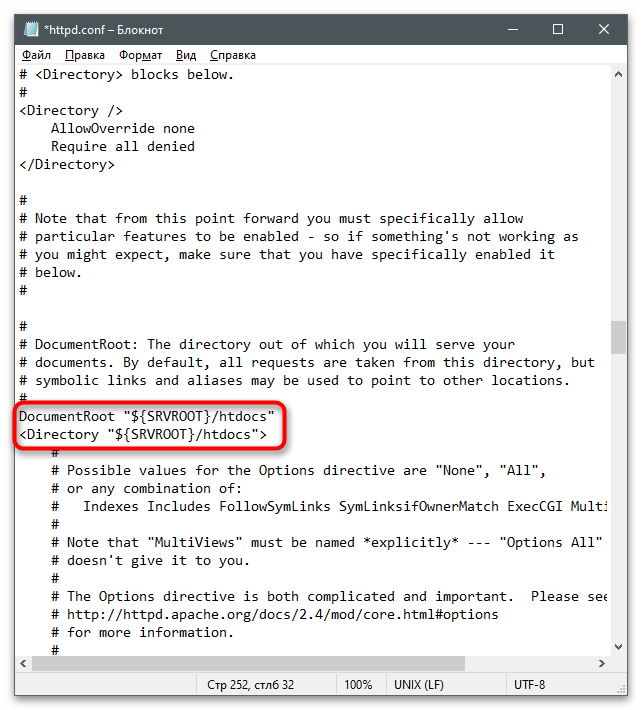
ServerName localhost, указав тем самым локальный адрес, который в дальнейшем и будет использоваться для проверки веб-сервера. - Отыщите строки
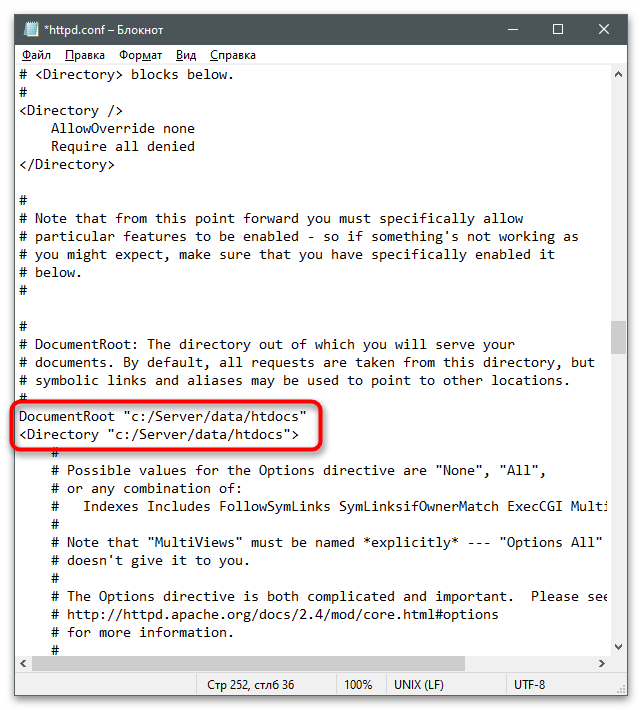
DocumentRoot "${SRVROOT}/htdocs"и<Directory "${SRVROOT}/htdocs">, которые отвечают за расположение связанных с сервером файлов. - Замените их на
DocumentRoot "c:/Server/data/htdocs"и<Directory "c:/Server/data/htdocs">. - Сейчас параметр
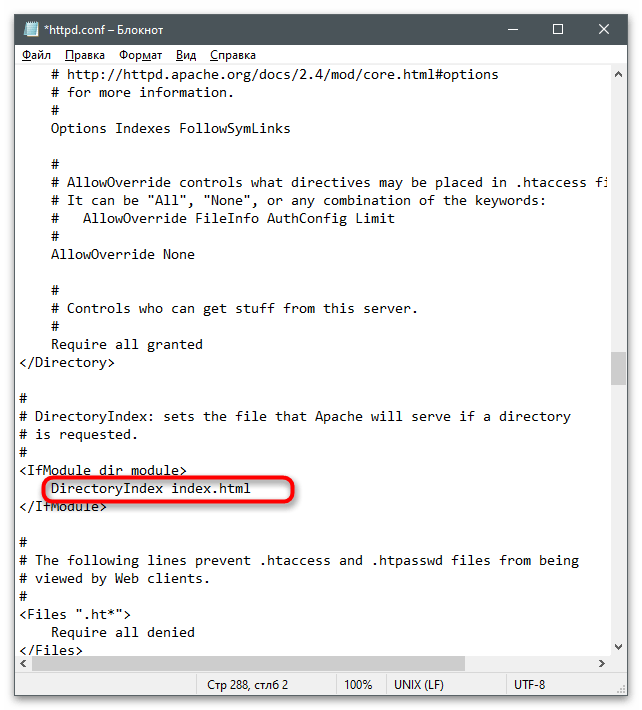
DirectoryIndexимеет только значениеindex.html, поэтому его тоже нужно найти и отредактировать. - Добавьте еще несколько доступных форматов файлов, чтобы в итоге строка обрела вид
DirectoryIndex index.php index.html index.htm. - Для строки
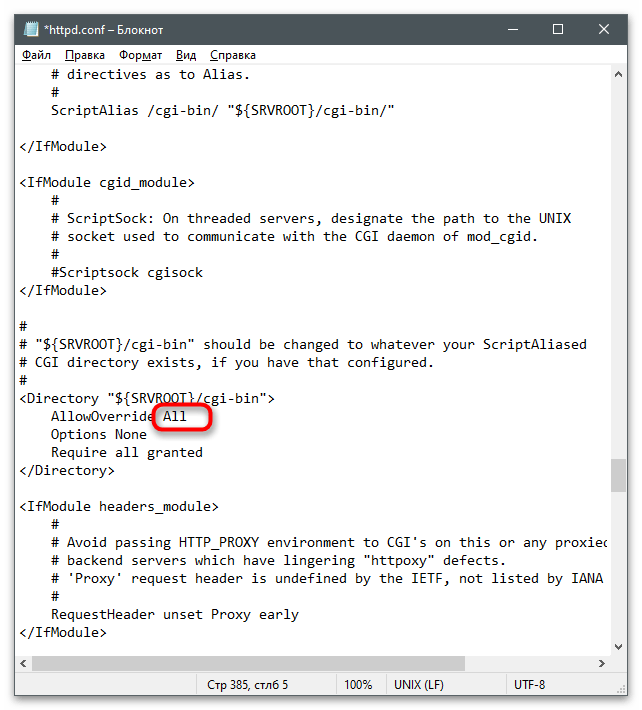
AllowOverride Noneпоменяйте состояние наAll, удалив предыдущее выражение. - Осталось только найти
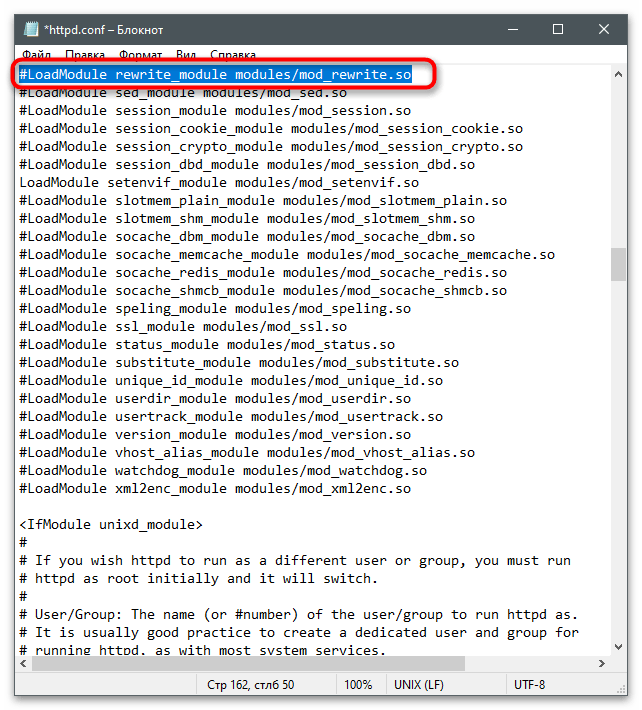
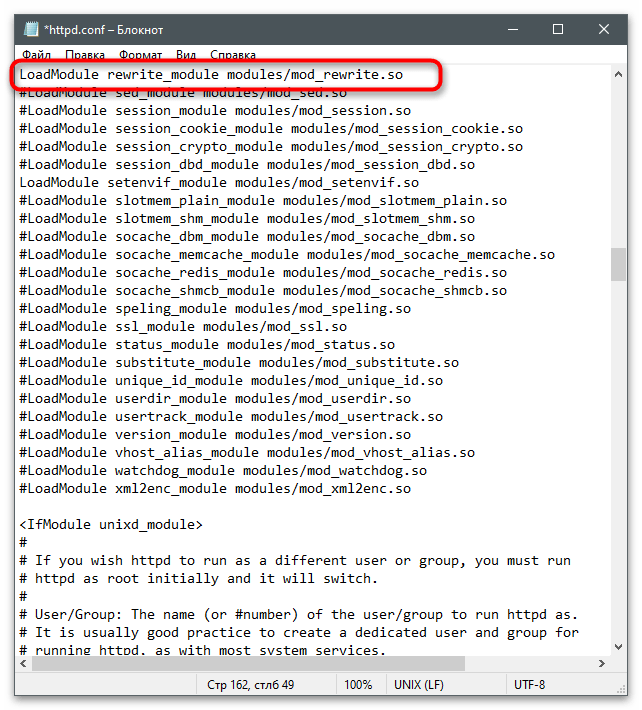
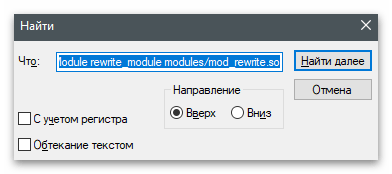
#LoadModule rewrite_module modules/mod_rewrite.soи убрать значок #, активировав тем самым строку. - В итоге она должна отображаться так, как это показано на следующем скриншоте.
- Если с поиском конкретных строк у вас возникают проблемы, используйте сочетание клавиш Ctrl + F, чтобы вызвать инструмент «Найти» и вписать там необходимое выражение.
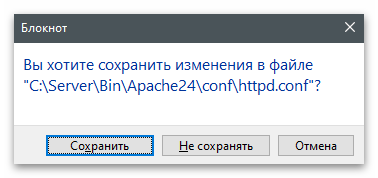
- Перед выходом не забудьте сохранить изменения в конфигурационном файле.


Шаг 3: Первый запуск локального веб-сервера
Приступим к первому запуску локального веб-сервера Apache для проверки его работоспособности. Надо это для того, чтобы при дальнейшей настройке у вас не возникло серьезных неполадок, на решение которых потратится много времени.
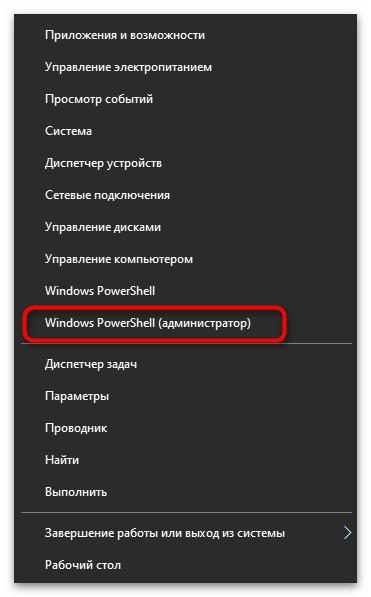
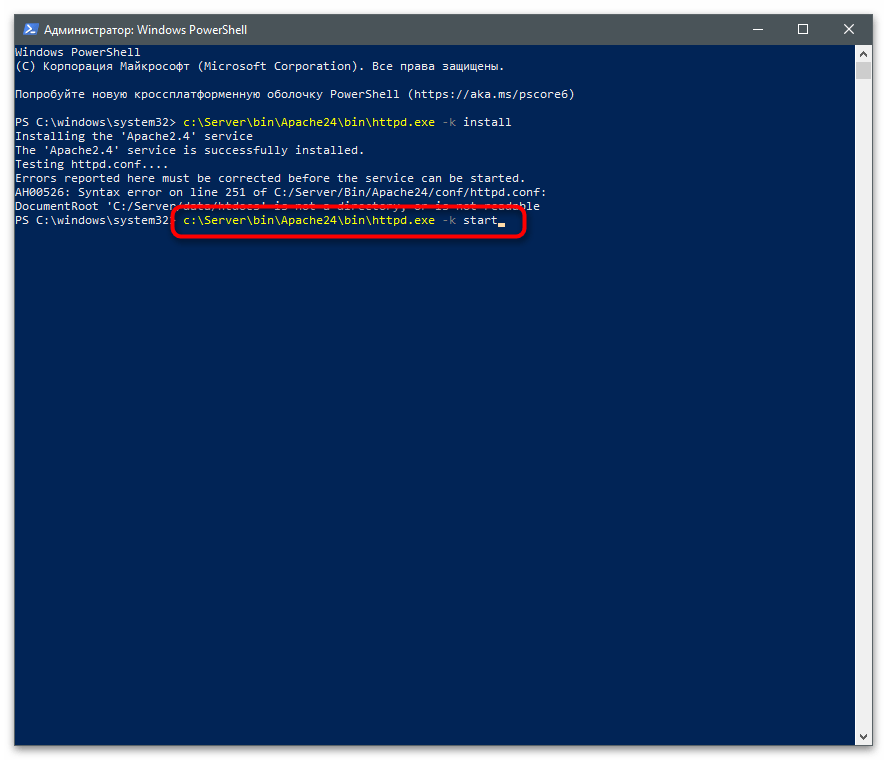
- Щелкните правой кнопкой мыши по меню «Пуск» и из появившегося меню выберите пункт «Windows PowerShell (администратор)».
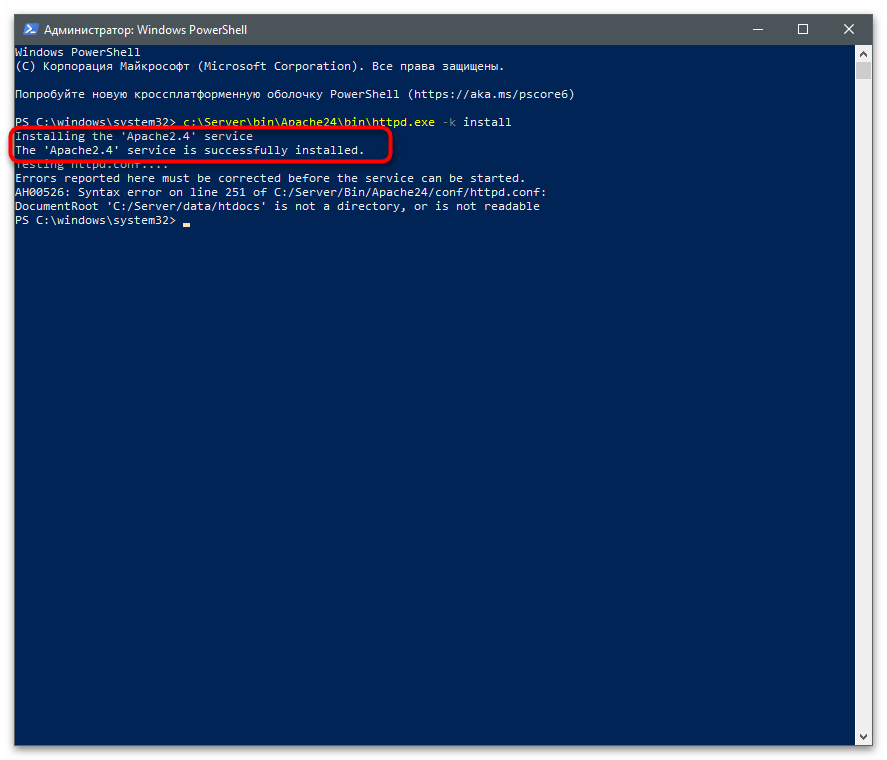
- Введите команду
c:ServerbinApache24binhttpd.exe -k installи нажмите Enter для ее активации. Она установит компоненты Apache и подготовит их к работе. - После получения информации об успешной установке сервисов переходите к следующему шагу.
- Запуск веб-сервера осуществляется через команду c
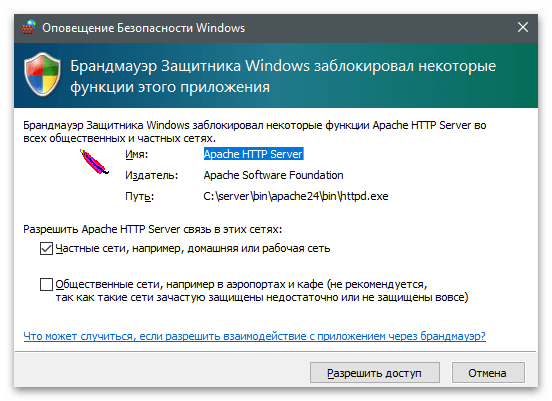
:ServerbinApache24binhttpd.exe -k start. - Появится оповещение Безопасности Windows, которое следует подтвердить, нажав «Разрешить доступ».
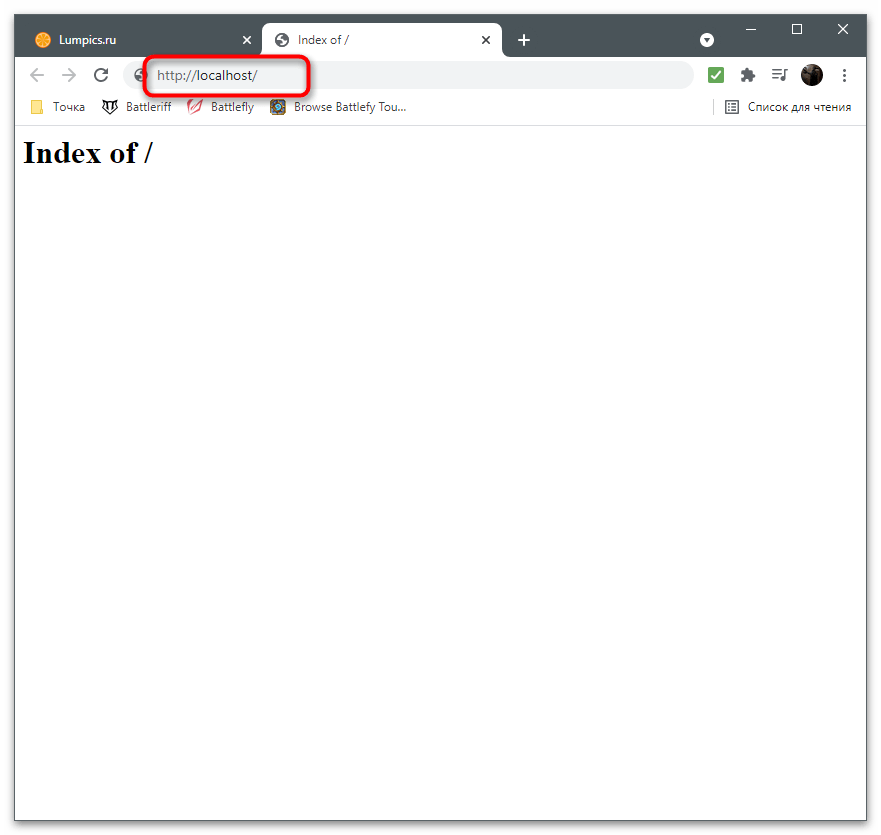
- Откройте любой браузер и перейдите по адресу
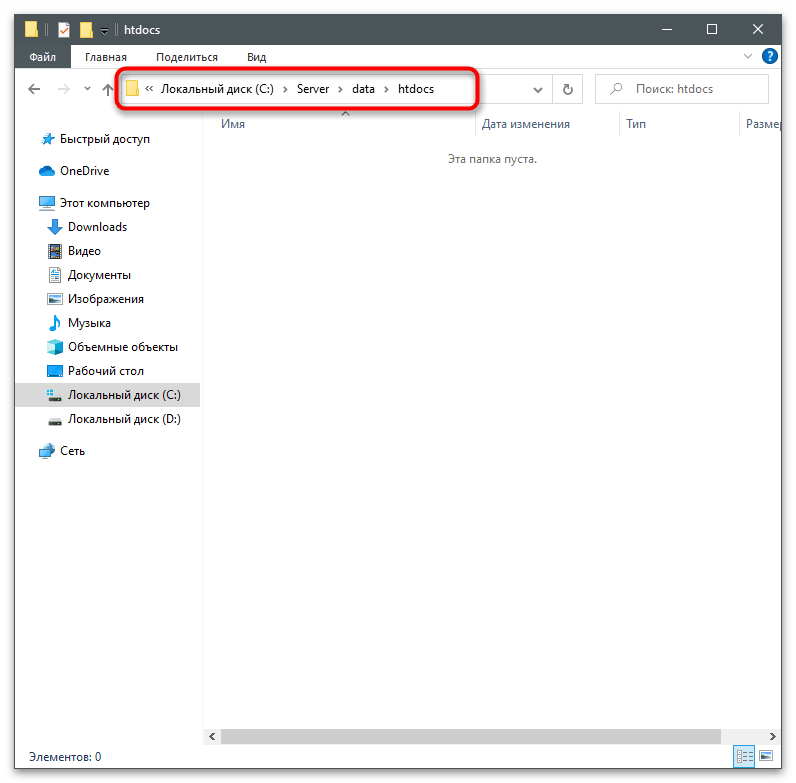
http://localhost/. Если на странице появилась надпись «Index of /», значит, все действия выполнены правильно. - При получении ошибки в консоли, свидетельствующей об отсутствии необходимых папок, перейдите в каталог «Server», создайте там директорию «data» с подпапкой «htdocs».

Еще статьи по данной теме:
Помогла ли Вам статья?
The whole business of a web server is to serve websites on the internet, and these are services that the developers of Apache think a server should offer. The Apache software is open-source infrastructure compatible with any operating system, like Windows. But how do you install Apache on Windows? Well, you’re in for a treat!
In this tutorial, you’ll learn how to install Apache on Windows and set up an Apache server to launch a web application.
Ready? Read on and start setting up your Apache server!
Prerequisites
This tutorial houses step-by-step instructions, but as long as you have a Windows 10 PC, you’re good to go – This tutorial uses a Windows 10 20H2 computer.
Downloading Apache on Windows
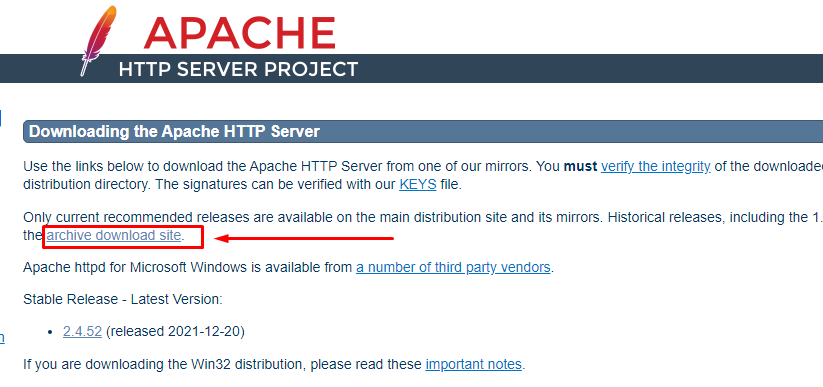
You’ll be launching a web application on your Apache server later in this tutorial. But as a first step, you’ll install Apache on your machine. You can download the Apache HTTP Server from Apache’s official download site.
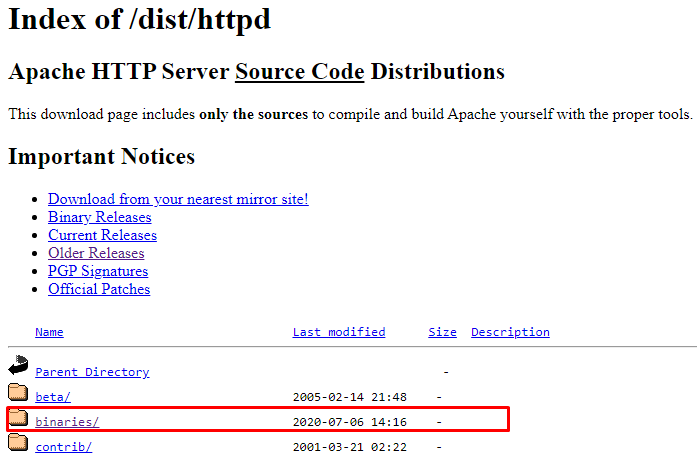
1. Open your web browser, navigate to the Apache HTTP Server download page, and click on the archive download site link below. Doing so redirects your browser to the Apache HTTP Server Source Code Distributions page (step two).
2. Next, find and click on the binaries/ link to see the contents of the binaries package.
3. Scroll down to the end and click on the win32/ link to see the list of Apache packages you can choose to install on your machine.
4. Finally, look for Apache’s package installer for Windows and click on it to download the Apache package installer. You’ll download Apache 2.0 series for this tutorial, as shown below.

Configuring the Apache Installer to Install Apache on Windows
After downloading the Apache package, you’ll need to configure the installer and set where Apache gets resources to deploy by default.
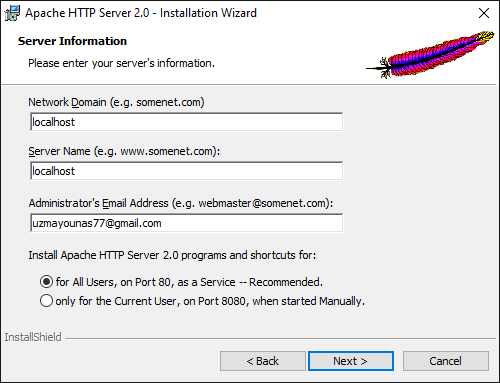
1. Run the Apache installer and click Next to accept the license agreement until you reach the Server Information page (step two).
2. Next, configure the server information with the following:
- Type localhost for the Network Domain as well Server Name.
- Enter your email address in the Administrator’s Email Address field.
- Leave the default setting for All Users, and click on Next.
You can also specify changes in these settings from the configuration files later.
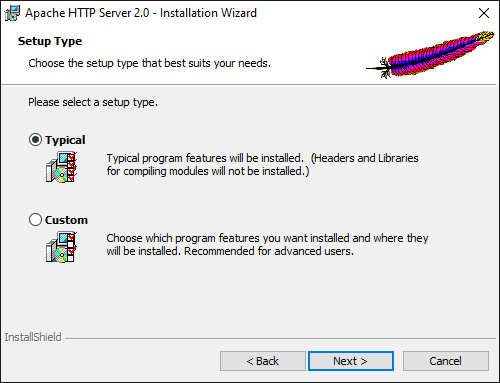
3. Choose Typical in the Setup Type page since you’re only working learning about the basics of Apache on Windows, and click Next.
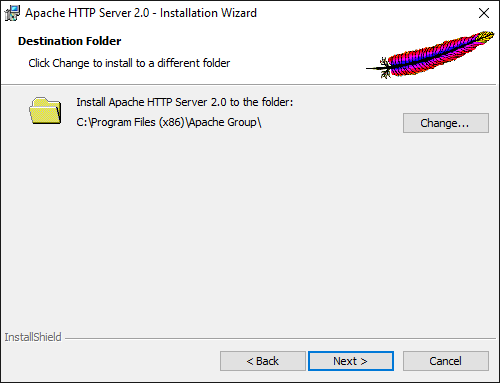
4. Now, leave the default installation path, as shown below, and click on Next.
You can change the installation path you prefer by clicking on the Change button and selecting your desired path.
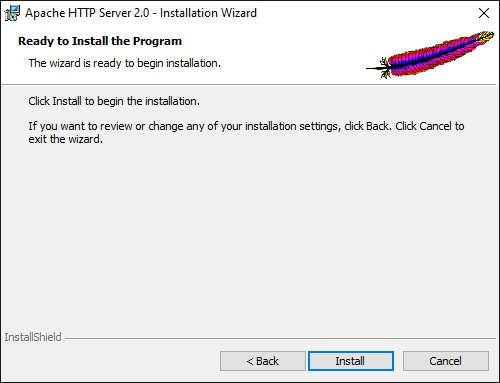
5. Click on Install to start installing Apache HTTP Server on your machine.
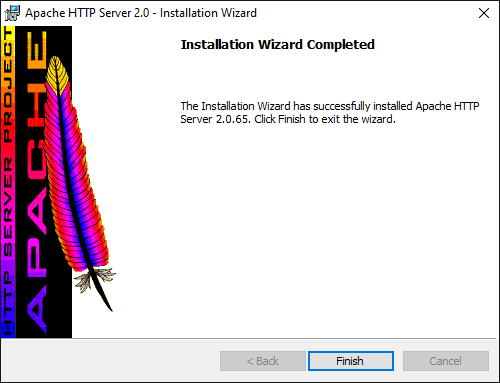
6. Click on Finish once the installation completes. Closing the installation wizard starts the Apache server automatically.
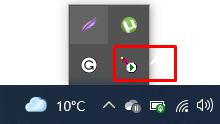
7. Look for the Apache icon in your system tray to verify the Apache server is running.
8. Finally, open your preferred browser and navigate to localhost, as shown below, to test your Apache Server installation.
You will see the following page if the installation is successful.
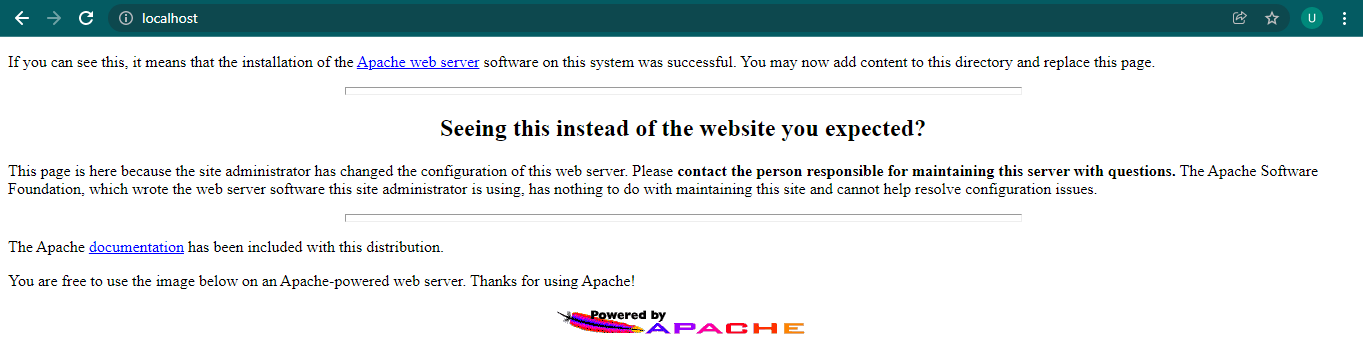
You can also navigate to the loopback address (http://127.0.0.1/) to access the Apache Server.
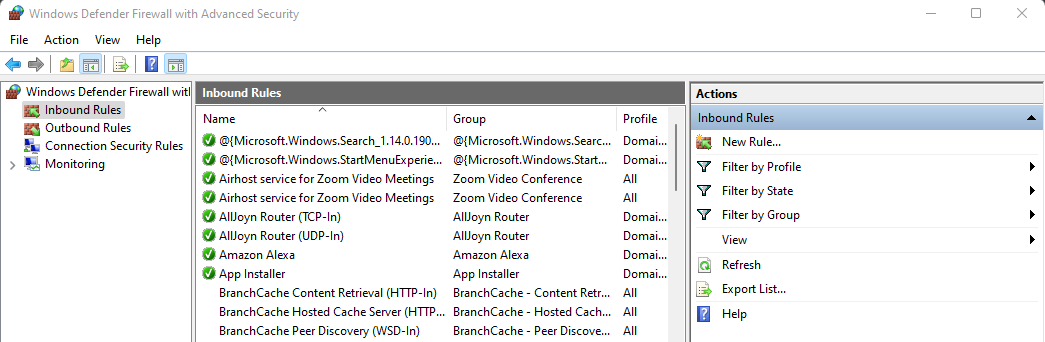
Allowing External Connections to the Apache Web Server
Although a localhost connection may work for testing, an external system may need to access the web page. Therefore you must open a connection via the Windows Firewall.
1. First, launch the Windows Defender Firewall with Advanced Security console.
2. Navigate to Inbound Rules and click New Rule.
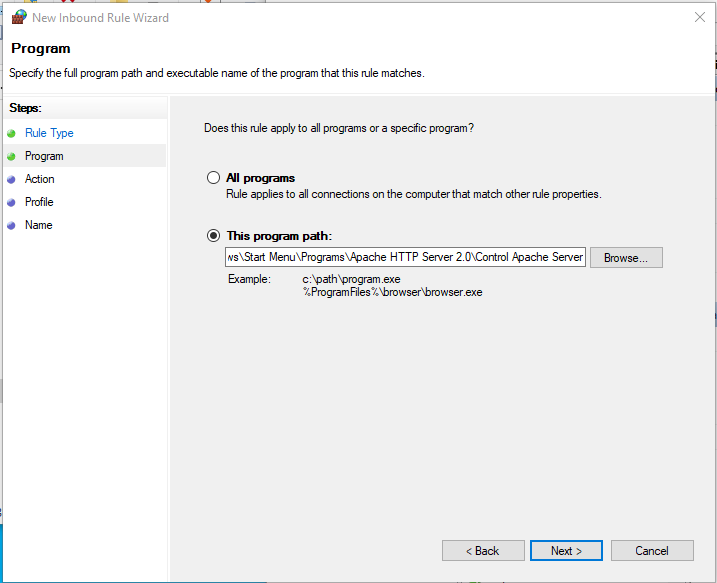
3. Under Rule Type, select Program.
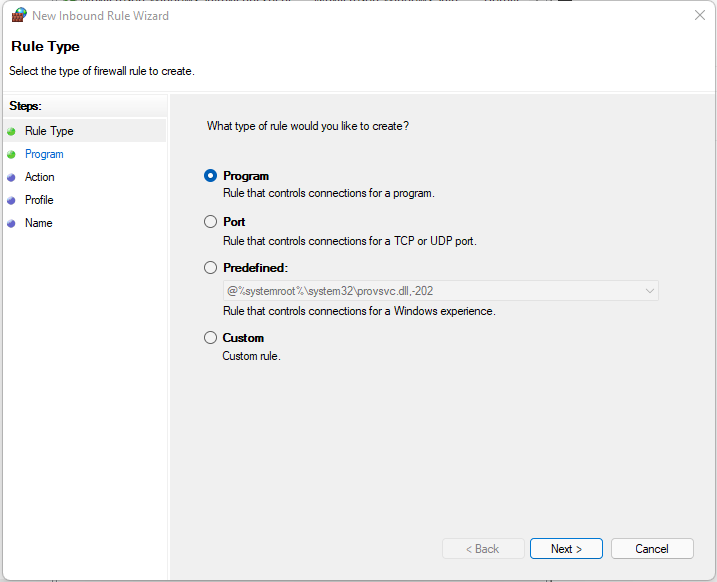
4. Browse, or enter, the path to the Apache server executable.
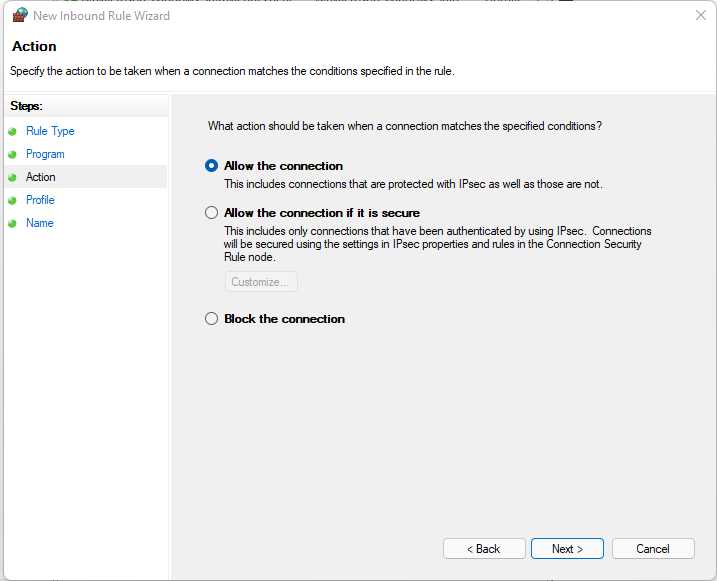
5. For the action, choose to Allow the connection.
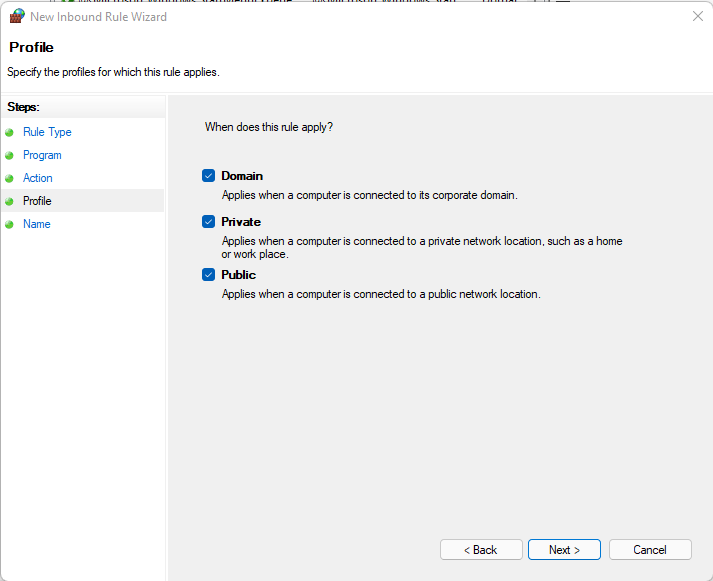
6. Under applied profiles, allow the default of all profiles.
7. Finally, give the rule a name and click on Finish.
Launching a Web Application
You’re now ready to launch your web application as Apache is running correctly. But where exactly do you store your web application for deployment?
The Apache server root directory (C:Program FilesApache GroupApache2) contains at least three important subdirectories:
- conf – Contains a file that tells Apache how to respond to different kinds of requests.
- htdocs – Contains the documents, images, or data that you want to serve to your clients.
- logs – Contains the log files that record what happened. You can consult …/logs/error_log whenever anything fails to work as expected.
Apache returns all the files placed in the C:Program FilesApache GroupApache2htdocs directory when localhost is launched.
To see how the Apache server works, you’ll create an HTML file as your web application to launch.
1. First, delete all the default files in the C:Program FilesApache GroupApache2htdocs directory.
2. Open your preferred text editor to create an index.html file in the htdocs directory, and populate the file with the code below.
The code below prints a message on a page when launched in a web browser.
<html>
<style>
<title>
My Web Page
</title>
</style>
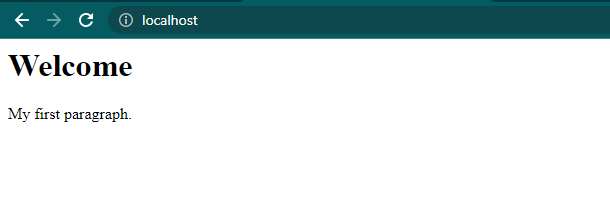
<body>
<h1>Welcome</h1>
<p>My first paragraph.</p>
</body>
</html>
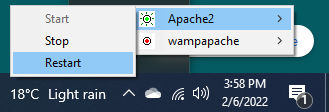
3. Click on the Apache icon at the system tray to restart the Apache server, as shown below.
4. Lastly, navigate to your IP address or localhost on your web browser.
If all goes well, you’ll get the same message as below.
You can place an entire project into the htdocs folder and access it from the browser typing localhost/project_name/.
Updating Server Name and Administrator Email
By default, the Apache files are read-only. But typically, you’ll want to have more control over your Apache server configuration. How? You need to grant Apache files with Write permissions for any modification.
1. For this demo, grant permissions to the conf directory located in the C:Program Files (x86)Apache GroupApache2 directory.
2. Once you’ve enabled the permissions, open the http.conf file located at C:Program Files (x86)Apache GroupApache2conf.
3. Lookup for the following line, replace localhost with your preferred name and save the changes.
ServerName gives the hostname of the server to use when creating redirection URLs
4. Finally, look for the following line, and replace [email protected] with your preferred email address.
ServerAdmin gives Apache an email address for automatic pages generation when some errors occur.
Changing the Root Directory
As you already know, Apache returns files from the htdocs folder. But you can also use another folder or drive to make backups and launch on Apache. Or if you just want to test your project without messing up anything in the original project directory.
1. Create a dummy folder with your preferred name. But for this demo, the folder is named MyApacheFolder in the E drive.
2. Create a new HTML file named index.html in the MyApacheFolder folder, and populate the file with the code below.
The code below prints the Launching Page From Other Directory message when you launch it on your web browser.
<html>
<style>
  <title>My Web Page </title>
</style>

<body>
  <h2>Launching Page From Other Directory</h2>
</body>

</html>
Now open the http.conf file and change some values as follow:
- Look for the DocumentRoot shown below, and change the value to your dummy folder’s path (E:MyApacheFolder).

- Now, change the Directory value below with your dummy folder’s path (E:MyApacheFolder).

- Save the changes you made to the http.conf file. These changes enable the Apache Server to access files from this folder instead of the default directory (htdocs).
4. Lastly, navigate to localhost on your web browser, and you’ll see the following message.
The Apache server will now launch all the sites from the new location (MyApacheFolder).

Conclusion:
Throughout this tutorial, you have learned how to download a Windows Apache server and allow running a website without any overhead. Apache server can be an appropriate solution for practically any HTTP protocol situation.
Now you are ready to host a single-page website or an enormous site serving millions of visitors. You can also use Apache as a test-server on personal desktops, writing and trying code in a local environment before publishing it to a broader audience.
Установка Apache2.4 на Windows
Нужные программы
В этой статье вы узнаете как установить сервер Apache 2.4 на Windows 10 но также эта инструкция подойдёт и для Windows 7.
Для настройки локального Web-сервера нужно установить некоторое программное обеспечение,чтобы тестировать работу PHP , в любом случае придется устанавливать на компьютер локальный Web–сервер , делается это все легко , только нужна внимательность , как создать WAMP собственной сборки написано много материалов , но я попробую все выразить максимально ясно и понятно , больше всего путаницы и ошибок происходит в указании пути каталогов и настройках конфигурационных файлов.
Все программы которые нам нужны , для установки локального сервера , являются бесплатными и занимают мало места на диске.
Первый делом установите , файл Visual C ++ Redistributable для Visual Studio , это программа нужна для работы Web–сервера , в установке очень простая , так что мы на ней останавливаться не будем . Без Visual C ++ Redistributable для Visual Studio , Web – сервер работать не будет .
Нужные программы для WAMP
| Нужные программы | Ссылка на скачивание |
|---|---|
| Visual C ++ Redistributable | Загрузите последнюю версию 64-разрядной версии , 32-разрядной версии |
| Apache2.4 | https://www.apachelounge.com/download/ |
| PHP 8.1.6 | Thread Safe (TS) http://windows.php.net/qa/ |
| MySQL | ZIP-архив последнею версию: http://dev.mysql.com/downloads/mysql/ |
| phpMyAdmin | https://www.phpmyadmin.net/ |
Создаем нужные каталоги

На диске С: создаем главную папку нашего сервера , назовем ее WebServer , в ней создадим две папки , папку WAMP – в которой будут расположены все программы Web–сервера , и папку home – в которой разместим страницы нашего сайта .
В папке WAMP создадим три папки для сервера и одну папку для почты , Первые три это Apache24 , PHP , mysql-8.0 и четвертая для почты Sendmail .
Далее нужно создать папку home , в которой создадим две папки , папка DB где будет находится база данных и пака www в которой будет находиться наш сайт .
Также можно создать папку uncludes где в дальнейшем мы будем хранить файлы конфигурации PHP .
Установка и настройка Apache 2.4
После скачивания Apache (архив httpd-2.4.41-win64-VS16.zip) распакуйте архив и скопируйте файлы архива в папку Apache24 находящуюся в каталоге C:WebServerWAMPApache24
После распаковки или копирования перейдите в папку c:WebServerWAMPApache24conf и откройте файл httpd.conf в любом текстовом редакторе. Лучше конечно использовать Notepad++ в нем есть нумерация строк.
>Скачать Notepad++можно по адресу https://notepad-plus-plus.org/downloads/
Сначала внесем изменения в главный конфигурационный файл сервера Apache – httpd.conf , откроем его в Notepad++ C:/WebServer/WAMP/Apache24/conf/httpd.conf и отыщем следующую директиву – строка 37:
Define SRVROOT "c:/Apache24"Заменим ее на :
Define SRVROOT "c:/WebServer/WAMP/Apache24"Меняем – Строку 162 :
#LoadModule rewrite_module modules/mod_rewrite.soЗаменим ее на :
LoadModule rewrite_module modules/mod_rewrite.soМеняем — Строка 227:
#ServerName www.example.com:80Заменим ее на :
Меняем – Строка 251:
DocumentRoot "${SRVROOT}/htdocs"Заменим ее на :
DocumentRoot "c:/WebServer/home/www/"Меняем – Строка 252:
<Directory "${SRVROOT}/htdocs">Заменим ее на :
<Directory "c:/WebServer/home/www/">Находим строку 268:
# AllowOverride controls what directives may be placed in .htaccess files.
    # It can be "All", "None", or any combination of the keywords:
    #   AllowOverride FileInfo AuthConfig Limit
Находим – Строка 272:
Заменим ее на :
Меняем – Строка 284:
<IfModule dir_module>
   DirectoryIndex index.html
</IfModule>
Заменим ее на :
<IfModule dir_module>
 DirectoryIndex index.php index.html index.htm index.shtml index.html.var
</IfModule>
Это основные настройки , при которых Web– сервер Apache уже готов к работе , но мы продолжим настройку сервера .
Чтобы иметь возможность использовать файл конфигурации .htaccess , необходимо включить его поддержку .
Находим раздел – Строка 252:
<Directory "${SRVROOT}/htdocs"> – строка 252
…
</Directory>
Внутри раздела отыскиваем строки — Строка 265:
Options Indexes FollowSymLinksAllowOverride None – строка 272И заменим их на :
Options -Indexes +Includes +FollowSymLinksНаходим строки под номером 234:
<Directory/>
    AllowOverride none
    Require all denied
</Directory>
И меняем их на :
<Directory/>
    AllowOverride All
    Options -Indexes +Includes +FollowSymLinks
    Require all granted
</Directory>
Внутри раздела – Строка 384:
<Directory "${SRVROOT}/cgi-bin">
AllowOverride None
Меняем на:
Заменим строку – под номером 433:
#AddHandler cgi-script .cgiНа:
AddHandler cgi-script .cgi .plУбираем комментарии в строках – 444 , 445 , 499 , 502 , 520 .
AddType text/html .shtml
AddOutputFilter INCLUDES .shtml
Include conf/extra/httpd-autoindex.conf
Include conf/extra/httpd-default.conf
Include conf/extra/httpd-languages.conf
Проделав это все , сохраним файл httpd.conf
Настройка русского языка
Теперь можно настроить сервер на работу с русским языком . Откроем файл httpd-languages/conf ( расположен в папке c:WebServerWAMPApache24confextra ) и заменим строку под номером 19 .
На:
Далее находим строку номер – 78:
LanguagePriority en ca cs da de el eo es et fr he hr it ja ko ltz nl nn no pl pt pt-BR ru sv tr zh-CN zh-TWИ ставим русский язык на первое место :
LanguagePriority ru en ca cs da de el eo es et fr he hr it ja ko ltz nl nn no pl pt pt-BR sv tr zh-CN zh-TWВ конец файла добавляем строку
Сохраняем файл httpd-languages.conf и закрываем его .
Нужно открыть командную строку от имени администратора .
Как открыть командную строку , можно посмотреть в этом разделе .
В открывшемся меню выберите пункт Запустить от имени администратора
После запуска командной строки от имени администратора , скопируйте туда ниже приведенные команды :
c:WebServerWAMPApache24binhttpd.exe -k installЕсли поступит запрос от файервола в отношение Apache, то нажмите Разрешить.
Теперь вводим в командную строку:
c:WebServerWAMPApache24binhttpd.exe -k startИ нажмите Enter.

Теперь в браузере набираем http://localhost/ и видим следующее:

Это означает:
Каталог c:WebServerhomewww пуст
Все ваши файлы нужно располагать в папке c:WebServerhomewww
Как это сделать можно посмотреть Здесь .
На данном этапе Web – сервер готов к использованию , если по какой то причине сервер выдает ошибку то нужно проверить все настройки конфигурации файла httpd.conf .
По собственному опыту скажу , для начала чтобы вносить какие то изменения в файле httpd.conf , делаем его копию , после этого можно всегда начать с чистого файла.
Запустить можно также через файла httpd.exe , то есть перейти к исполняемому файлу который находится в папке c:WebServerWAMPApache24bin и запустить исполняемый файл httpd.exe , так же для удобства создать ярлык файла ApacheMonitor.exe и разместить его на рабочем столе , это удобно для перезапуска и остановки Web– сервера Apache .
Установка и удаление Apache как службы Windows
c:WebServerWAMPApache24binhttpd.exe -k install – Устанавливает службу
c:WebServerWAMPApache24binhttpd.exe -k uninstall Удаляет Apache
В следующем разделе будут рассмотрена создание виртуальных хостов .
Download PC Repair Tool to quickly find & fix Windows errors automatically
A web server is a fundamental element of the internet. Apache works by establishing a connection between a remote server and the browsers of website visitors as they communicate with each other. Although its use has declined over time, this webserver still maintains great penetration in the server market. With that in perspective, we will walk you through how to go about installing Apache on Windows 11/10.
Before you begin, you’ll need to download these two items:
- Microsoft Visual Studio C++.
- The latest version of the Apache Lounge.
Once you have downloaded these items, you can now proceed as follows.
First, double-click the Microsoft Visual Studio C++ executable file to install it. After the install completes, you’ll be prompted to restart your computer. Go ahead and restart.
On boot, you can now continue to install Apache.
Here’s how:
Create a folder named Apache24.
This folder must be located in the root of the directory where Windows is installed. For eg, C:Apache24.
Then unzip the content of the Apache Lounge you downloaded into the Apache24 folder.

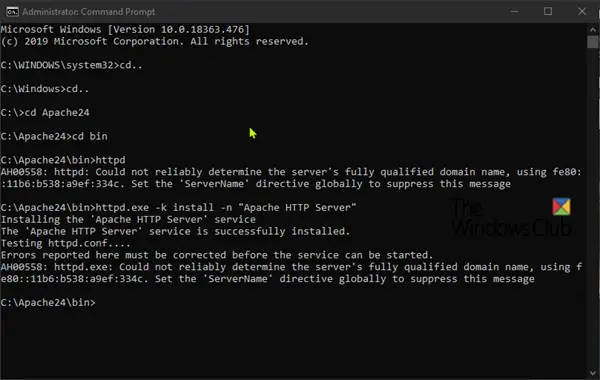
Once the extraction into the directory completes – launch a command prompt in elevated mode and copy all together and paste the following commands and hit Enter to get to the bin folder:
cd..
cd..
cd Apache24
cd bin

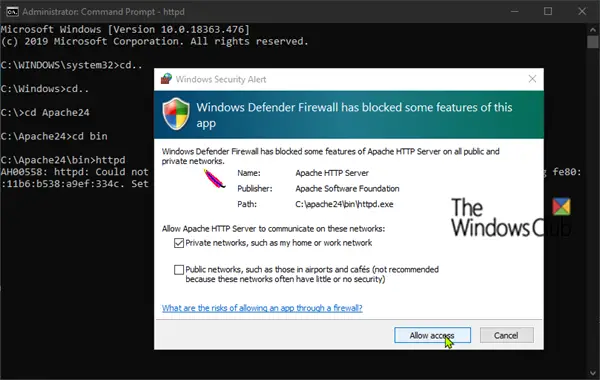
Now, type httpd and hit Enter to install and run the server. You will be prompted to allow access via the Windows Firewall to be able to connect to the network.
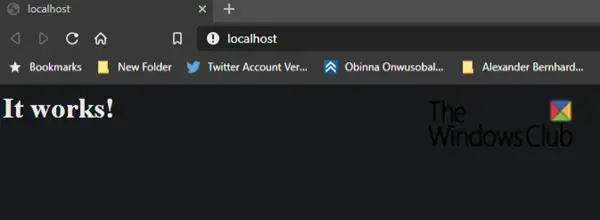
At this point, you can now test the server. To do so, fire up any installed web browser on your PC, then type localhost or the IP address of the PC into the address bar and hit Enter. You’ll see the message: It works!
You can terminate the service by pressing the CTRL + C key combination.
Now that you have the Apache webserver installed, configured, and tested – you will need to configure it as a system service. To do so, copy and paste the command below and hit Enter:
httpd.exe -k install -n "Apache HTTP Server"
You can now verify if Apache has been successfully added as a system service. To do so, press Windows key + R. In the Run dialog box, type services.msc and hit Enter.
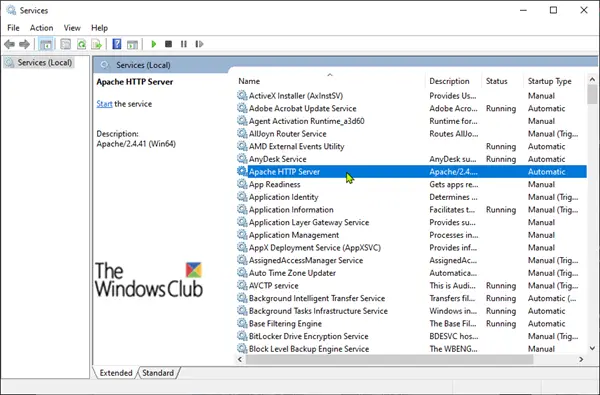
In the Services window, locate Apache HTTP Server and verify the Startup Type is set to Automatic. This ensures that every time you boot Windows 10, the server will start automatically.
That’s it, folks!

Obinna Onwusobalu has studied Information & Communication Technology and is a keen follower of the Windows ecosystem. He has been a Windows Insider MVP (2020). He runs a computer software clinic.
Download PC Repair Tool to quickly find & fix Windows errors automatically
A web server is a fundamental element of the internet. Apache works by establishing a connection between a remote server and the browsers of website visitors as they communicate with each other. Although its use has declined over time, this webserver still maintains great penetration in the server market. With that in perspective, we will walk you through how to go about installing Apache on Windows 11/10.
Before you begin, you’ll need to download these two items:
- Microsoft Visual Studio C++.
- The latest version of the Apache Lounge.
Once you have downloaded these items, you can now proceed as follows.
First, double-click the Microsoft Visual Studio C++ executable file to install it. After the install completes, you’ll be prompted to restart your computer. Go ahead and restart.
On boot, you can now continue to install Apache.
Here’s how:
Create a folder named Apache24.
This folder must be located in the root of the directory where Windows is installed. For eg, C:Apache24.
Then unzip the content of the Apache Lounge you downloaded into the Apache24 folder.
Once the extraction into the directory completes – launch a command prompt in elevated mode and copy all together and paste the following commands and hit Enter to get to the bin folder:
cd..
cd..
cd Apache24
cd bin
Now, type httpd and hit Enter to install and run the server. You will be prompted to allow access via the Windows Firewall to be able to connect to the network.
At this point, you can now test the server. To do so, fire up any installed web browser on your PC, then type localhost or the IP address of the PC into the address bar and hit Enter. You’ll see the message: It works!
You can terminate the service by pressing the CTRL + C key combination.
Now that you have the Apache webserver installed, configured, and tested – you will need to configure it as a system service. To do so, copy and paste the command below and hit Enter:
httpd.exe -k install -n "Apache HTTP Server"
You can now verify if Apache has been successfully added as a system service. To do so, press Windows key + R. In the Run dialog box, type services.msc and hit Enter.
In the Services window, locate Apache HTTP Server and verify the Startup Type is set to Automatic. This ensures that every time you boot Windows 10, the server will start automatically.
That’s it, folks!
Obinna Onwusobalu has studied Information & Communication Technology and is a keen follower of the Windows ecosystem. He has been a Windows Insider MVP (2020). He runs a computer software clinic.