SmugWimp at smugwimp dot com 
16 years ago
If you make changes to your PHP.ini file, consider the following.
(I'm running IIS5 on W2K server. I don't know about 2K3)
PHP will not "take" the changes until the webserver is restarted, and that doesn't mean through the MMC. Usually folks just reboot. But you can also use the following commands, for a much faster "turnaround". At a command line prompt, type:
iisreset /stop
and that will stop the webserver service. Then type:
net start w3svc
and that will start the webserver service again. MUCH faster than a reboot, and you can check your changes faster as a result with the old:
<?php>
phpinfo();
?>
in your page somewhere.
I wish I could remember where I read this tip; it isn't anything I came up with...
lukasz at szostak dot biz 
17 years ago
You can have multiple versions of PHP running on the same Apache server. I have seen many different solutions pointing at achieving this, but most of them required installing additional instances of Apache, redirecting ports/hosts, etc., which was not satisfying for me.
Finally, I have come up with the simplest solution I've seen so far, limited to reconfiguring Apache's httpd.conf.
My goal is to have PHP5 as the default scripting language for .php files in my DocumentRoot (which is in my case d:/htdocs), and PHP4 for specified DocumentRoot subdirectories.
Here it is (Apache's httpd.conf contents):
---------------------------
# replace with your PHP4 directory
ScriptAlias /php4/ "c:/usr/php4/"
# replace with your PHP5 directory
ScriptAlias /php5/ "c:/usr/php5/"
AddType application/x-httpd-php .php
Action application/x-httpd-php "/php5/php-cgi.exe"
# populate this for every directory with PHP4 code
<Directory "d:/htdocs/some_subdir">
Action application/x-httpd-php "/php4/php.exe"
# directory where your PHP4 php.ini file is located at
SetEnv PHPRC "c:/usr/php4"
</Directory>
# remember to put this section below the above
<Directory "d:/htdocs">
# directory where your PHP5 php.ini file is located at
SetEnv PHPRC "c:/usr/php5"
</Directory>
---------------------------
This solution is not limited to having only two parallel versions of PHP. You can play with httpd.conf contents to have as many PHP versions configured as you want.
You can also use multiple php.ini configuration files for the same PHP version (but for different DocumentRoot subfolders), which might be useful in some cases.
Remember to put your php.ini files in directories specified in lines "SetEnv PHPRC...", and make sure that there's no php.ini files in other directories (such as c:windows in Windows).
And finally, as you can see, I run PHP in CGI mode. This has its advantages and limitations. If you have to run PHP as Apache module, then... sorry - you have to use other solution (the best advice as always is: Google it!).
Hope this helps someone.
Jack Hardie 
15 years ago
If you are installing PHP on Vista just go to David Wang's blog. http://blogs.msdn.com/david.wang/
archive/2006/06/21/HOWTO-Install-and-Run-PHP-on-IIS7-Part-2.aspx
Magic!
jp at iticonsulting dot nl 
17 years ago
If you get 404 page not found on Windows/IIS5, have a look at C:SYSTEM32INETSRVURLSCAN
There is a .ini file there that prevents some files from being served by IIS, even if they exist, instead IIS will give a 404. The urlscan logfile (same place) should give you some insight into what parameter is preventing a page from loading, if any.
webmaster at nachelfamily dot com 
16 years ago
I made the mistake of setting a 'wildcard application map' for PHP on a Windows 2003 / IIS 6.0 / PHP ISAPI installation.
This resulted in "No input file specified" errors whenever I tried to load the default page in my site's directories. I don't know why this broke things, but it did.
If anyone has the same problem, this may be the cause.
bufoni at hotmail dot com 
13 years ago
Oh Man!
I installed by Microsoft Installer, manually, whatever I always received de same error from IIS7.
HTTP Error 404.3 - Not Found
The page you are requesting cannot be served because of the extension configuration. If the page is a script, add a handler. If the file should be downloaded, add a MIME map.
The IIS7 interface is quite diferent and are not all together like IIS6
The 5.3 version have not any of those files: php5stdll, php5isapi.dll. etc.
The installer puts others files in handlers and I decided to use them as substitutes. Nothing done!
After that, I discovered that installer do not install these files within the sites, but in the root default site configuration of IIS7.
So, I copied the root configuration to my site and them it worked (all others procedures were done e.g. copy php.ini to windows folder)
robert dot johnson at icap dot com 
15 years ago
IIS setup: 403 forbidden error.
We had installed two separate different PHP versions - PHP 5.1.4 followed by 5.2.5.
We configured 5.2.5 php5isapi.dll to be loaded as the .php file type extension.
Despite this, php version 5.1.4 was being loaded. We renamed 5.1.4's folder and then PHP was not loading at all.
There were no visible references to 5.1.4 in the IIS configuration, but in the file webConfig.xml, there was a reference to 5.1.4's isapi under IISFilters.
To fix this problem, we added version 5.2.5's php5isapi.dll to the ISAPI Filter category for the web site, in the IIS control panel.
smileclick at hotmail dot com 
15 years ago
Still Can't Run PHP Code?
After installing php-5.2.5-win32-installer.msi on my Windows XP2. with IIS5.1 it still didn't run PHP files.
I eventually found the fix*:
1. Goto Control Panel>System>Advanced>Environmental Variables
2. Add a New System Variable "PHRC" and set its path as "C:Program FilesPHP"
3. Restart
*source:
http://us2.php.net/manual/en/faq.installation.php
#faq.installation.addtopath
jneill at gamedaytv dot com 
16 years ago
Here's how to run dual PHP instances with PHP 5.2 and any previous PHP on Windows 2003:
1. Right-click My Computer, go to Advanced tab, and click on Environment Variables.
Add the two installations and their EXT directories to the Path variable. For example, add:
c:php;c:phpext;c:TMASphp;c:tmasphpext;
Then, add the newer PHP version's directory as a variable called PHPRC. For example:
Variable:PHPRC
Value: C:PHP
Click OK to close the Environment Variables window, and click OK to close System Properties.
2. In registry, under HKEY_LOCAL_MACHINE>SOFTWARE>PHP, add a REG_SZ key called iniFilePath and give it a value
of the directory where the older PHP is installed. For example:
C:TMASPHP
3. In IIS, go to the Web Service Extensions. Add both versions' ISAPI module separately to the extensions
list, and allow both.
4. In IIS, go to each website utilizing the PHP versions. Set an ISAPI filter if needed. On the Home Directory
tab, click Configuration, and add .php, .php3, .phtml, and any other extensions needed (perhaps .html?) to
be filtered through PHP, and specify the ISAPI module version needed for each website.
You can now run two versions of PHP. This is because the order of where to look for the .ini file changed
between previous PHP versions and PHP 5.2, as documented at http://us2.php.net/ini:
---------------------------------------------------
php.ini is searched in these locations (in order):
* SAPI module specific location (PHPIniDir directive in Apache 2, -c command line option in CGI and CLI, php_ini parameter in NSAPI, PHP_INI_PATH environment variable in THTTPD)
* The PHPRC environment variable. Before PHP 5.2.0 this was checked after the registry key mentioned below.
* HKEY_LOCAL_MACHINESOFTWAREPHPIniFilePath (Windows Registry location)
* Current working directory (for CLI)
* The web server's directory (for SAPI modules), or directory of PHP (otherwise in Windows)
* Windows directory (C:windows or C:winnt) (for Windows), or --with-config-file-path compile time option
----------------------------------------------------
Feroz Zahid 
17 years ago
In order to run php scripts with php.exe CGI instead of php4isapi.dll under IIS, following steps can be followed.
i) Add a web service extension for PHP using IIS manager. Choose a web service extension name like 'PHP' and add your php.exe path in the 'file location' while adding the required file e.g. 'C:phpphp.exe' in the Add extension dialog box. Don't forget to 'Allow' the extension file.
ii) Open php.ini file located at %systemroot%. Set the following variables to the shown values.
cgi.force_redirect = 0
cgi.redirect_status_env = ENV_VAR_NAME
iii) In your websites, add Application Mapping for '.php' and set the executable path to your php.exe file path.
You can test whether PHP is running or not and other PHP settings using the following simple PHP script.
<?php>
phpinfo();
?>
Feroz Zahid
ferozzahid [_at_] usa [_dot_] [_com_]
dpharshman at dslextreme dot com 
13 years ago
PHP 5.2.9.2 Install on XP Pro IIS 5.1 - phpinfo( ) results incorrect
Testing Date: 05.15.09
Background:
For several days now I, as a newbie, have been unsure if I had installed PHP correctly, or not. No matter what I did phpinfo( ) reported "Configuratin File Path" as: “C:WINDOWS”. I was left to wonder what was wrong.
To help resolve the phpinfo() “issue”, I conducted a series of tests using two scripts:
The first is “test-php-ini-loaded.php”; it is stored in c:inetpubwwwroot, and has the following code:
<?php
$inipath = php_ini_loaded_file();
if (
$inipath) {
echo 'Loaded php.ini: ' . $inipath;
} else {
echo 'A php.ini file is not loaded';
}
?>
The second script is simply calls phpinfo( ). It is named test.php, is stored in “c:inetpubwwroot”, and has the following code:
<?php phpinfo( ); ?>
My Dev Environment:
1. Windows XP Pro SP3
2. IIS 5.1 / MMC 3.0
3. PHP 5.2.9.2 – phpMyAdmin not yet installed
4. (plus MySQL 5.1, etc.)
5. Install location is on my local E: drive
The Tests:
Test 1:
a. PHPRC environment variable and IniFilePath Registry left in place and active
b. Verified no other copies of php.ini exist on the system other than in my E:PHP folder
c. Renamed php.ini to hold-php.ini
d. Stopped and started IIS (“net stop iisadmin” and “net start w3svc”)
e. Ran “test-php-ini-loaded.php” to check whether my php.ini is loaded. It is not.
f. Ran "test.php". “Loaded Configuration File” was empty, while “Configuration File (php.ini) Path” showed: C:WINDOWS.
Test 2:
a. Moved php.ini from E:PHP to C:WINDOWS
b. Stopped and started IIS
c. Ran "test-php-ini-loaded.php" to check if my php.ini is loaded. It is not, which surprised me.
d. Ran "test.php". My php.ini is apparently not loaded, or found, by phpinfo( ), even though “Configuration File (php.ini) Path” reports it as being in C:WINDOWS.
e. Note: Per PHP’s “The configuration file” note, PHP's search order includes: “Windows directory (C:windows or C:winnt) (for Windows), ...”; but it apparently doesn’t or php.ini would have been found and displayed at “Loaded Configuration File”.
Test 3:
a. Left the solo copy of my php.ini in C:WINDOWS
b. Disabled PHPRC environment variable by renaming it to “Ex-PHPRC and saving the settings (note: for this test I left the Registry entry for PHP IniFilePath intact)
c. Stopped and started IIS
d. Ran "test-php-ini-loaded.php" to check whether my php.ini is loaded. Predictably it is not found.
e. Ran the "test.php". Again, my php.ini file is reported as not found in C:WINDOWS though “Configuration File (php.ini) Path” reports it as being there.
Test 4:
a. To be thorough and eliminate all possible sources of “mis-direction” I deleted the PHP IniFilePath Registry entry (after backing up the Registry). The PHPRC environment variable was left disabled.
b. Stopped and started IIS
c. Ran "test-php-ini-loaded.php" to check whether my php.ini is loaded. Predictably it is not.
d. Ran "test.php". Again, no change. My php.ini file is not found “Configuration File (php.ini) Path” reports it as being there.
Conclusions:
The first conclusion I came to is that, in the default download version of phpinfo( ), “Configuration File (php.ini) Path” is hard-wired to report C:WINDOWS whether php.ini is there or not. Further, that C:WINDOWS is not a default search location (at least not on XP).
However, given an otherwise “proper” setup, phpinfo() reporting C:WINDOWS as the value for “Configuration File (php.ini) Path” is merely misleading and is not actually harmful or indicative of a failed installation.
Thanks go to Peter Guy of www.peterguy.com who suggested the testing, and to Daniel Brown of www.php.net for some initial guidance.
P.S. This note is not meant to take anything away from PHP. It is a fine tool. The sole purpose of the testing was to confirm that my installation of PHP was correct.
ratkinson at tbs-ltd dot co dot uk 
16 years ago
When installing onto the Windows IIS platform, ensure you add the PHPRC Server Variable to point to your PHP.INI file.
Also, add '.INI' to the FILEEXT Server Variable. Failure to add these could stop the PHP engine being able to find your PHP.INI file, and none of your modifications will be read.
Rob.
Выберите веб-сервер
IIS
IIS является встроенным в Windows.
На сервере Windows используйте Server Manager для добавления роли IIS. Убедитесь, что функция роли CGI включена.
На рабочем столе Windows используйте панель «Установка и удаление программ» для добавления IIS.
В документации Microsoft есть » подробные инструкции.
Для настольных веб-приложений и веб-разработки можно также использовать IIS/Express или рабочий стол PHP.
Пример #1 Командная строка для настройки IIS и PHP
@echo off

REM download .ZIP file of PHP build from http://windows.php.net/downloads/

REM path to directory you decompressed PHP .ZIP file into (no trailing )
set phppath=c:php


REM Clear current PHP handlers
%windir%system32inetsrvappcmd clear config /section:system.webServer/fastCGI
REM The following command will generate an error message if PHP is not installed. This can be ignored.
%windir%system32inetsrvappcmd set config /section:system.webServer/handlers /-[name='PHP_via_FastCGI']

REM Set up the PHP handler
%windir%system32inetsrvappcmd set config /section:system.webServer/fastCGI /+[fullPath='%phppath%php-cgi.exe']
%windir%system32inetsrvappcmd set config /section:system.webServer/handlers /+[name='PHP_via_FastCGI',path='*.php',verb='*',modules='FastCgiModule',scriptProcessor='%phppath%php-cgi.exe',resourceType='Unspecified']
%windir%system32inetsrvappcmd set config /section:system.webServer/handlers /accessPolicy:Read,Script

REM Configure FastCGI Variables
%windir%system32inetsrvappcmd set config -section:system.webServer/fastCgi /[fullPath='%phppath%php-cgi.exe'].instanceMaxRequests:10000
%windir%system32inetsrvappcmd.exe set config -section:system.webServer/fastCgi /+"[fullPath='%phppath%php-cgi.exe'].environmentVariables.[name='PHP_FCGI_MAX_REQUESTS',value='10000']"
%windir%system32inetsrvappcmd.exe set config -section:system.webServer/fastCgi /+"[fullPath='%phppath%php-cgi.exe'].environmentVariables.[name='PHPRC',value='%phppath%php.ini']"
Apache
Существует несколько версий Apache2 для Windows.
Мы поддерживаем ApacheLounge, но другие варианты включают XAMPP, WampServer и BitNami, которые предоставляют средства автоматической установки.
Вы можете использовать mod_php или mod_fastcgi для загрузки PHP на Apache.
Если вы используете mod_php, необходимо использовать TS-build Apache, Visual C той же версии и тот же процессор (x86 или x64).
Выберите сборку
Скачайте PHP-релизы с » http://windows.php.net/download/.
Все сборки оптимизированы (PGO), а выпуски QA и GA тщательно протестированы.
Есть 4 типа сборок PHP:
-
Thread-Safe(TS) — для одного процесса веб-служб, как Apache с mod_php
-
Non-Thread-Safe(NTS) — для служб IIS и других FastCGI веб-серверов (Apache с mod_fastcgi) рекомендуется и для сценариев командной строки
-
для x86 — для 32-разрядной версии
-
для x64 — для 64-разрядной версии
klaussantana at gmail dot com 
2 years ago
If you're installing PHP 8.0.1 as Apache http server module, in httpd.conf you must use "php_module" in "LoadModule" directive instead of versioned names like in previous versions (aka, php5_module, php7_module, ...). Make the directive as follow:
LoadModule php_module "/path/to/php8apache2_4.dll"
I cracked my head over this...
md dot shahin dot hawladar at gmail dot com 
1 year ago
when using apache we will add this php8apache2_4.dll module in httpd.config file
example: LoadModule php_module C:/php/php8apache2_4.dll
I extracted php in "C" drive
Этот раздел содержит инструкции для ручной установки и настройки
PHP на Microsoft Windows.
Выбор и загрузка пакета дистрибутивов PHP
Загрузите дистрибутив PHP в виде zip-архива с
» PHP для Windows: Исполняемые файлы и исходные коды.
Существует несколько различных версий zip-пакетов — выберите версию, которая подходит для
используемого веб сервера:
-
Если PHP используется с IIS, тогда следует использовать PHP 5.3 VC9 Non Thread Safe или
PHP 5.2 VC6 Non Thread Safe; -
Если PHP используется с IIS7 или выше и версия PHP 5.3+, тогда должна использоваться версия
дистрибутива PHP VC9. -
Если PHP используется с Apache 1 или Apache 2 тогда выбирайте PHP 5.3 VC6 или
PHP 5.2 VC6.
Замечание:
Версии VC9 компилируются с помощью Visual Studio 2008 и имеют улучшенную
производительность и стабильность. Версии VC9 требуют наличия в системе
» Microsoft 2008 C++ Runtime (x86) или
» Microsoft 2008 C++ Runtime (x64).
Структура пакетов PHP и их содержимое
Распакуйте содержимое zip архива в директорию по вашему выбору,
например C:PHP. Директория и структура файлов, извлеченных из zip, будет
такой:
Пример #1 Структура пакета PHP 5
c:php
   |
   +--dev
   |  |
   |  |-php5ts.lib                 -- версия php5.lib без поддержки многопоточности
   |
   +--ext                          -- DLL расширения для PHP
   |  |
   |  |-php_bz2.dll
   |  |
   |  |-php_cpdf.dll
   |  |
   |  |-...
   |
   +--extras                       -- пустой
   |
   +--pear                         -- начальная копия PEAR
   |
   |
   |-go-pear.bat                   -- скрипт установки PEAR
   |
   |-...
   |
   |-php-cgi.exe                   -- исполняемый файл CGI
   |
   |-php-win.exe                   -- выполняет скрипты без открытой консоли
   |
   |-php.exe                       -- Исполняемый файл PHP для командной строки (CLI)
   |
   |-...
   |
   |-php.ini-development           -- настройки php.ini по умолчанию
   |
   |-php.ini-production            -- рекомендуемые настройки php.ini
   |
   |-php5apache2_2.dll             -- имеется только в многопоточной версии
   |
   |-php5apache2_2_filter.dll      -- имеется только в многопоточной версии
   |
   |-...
   |
   |-php5ts.dll                    -- ядро PHP DLL ( php5.dll в версии без поддержки многопоточности)
   |
   |-...
Ниже представлен список модулей и исполняемых файлов, включенных в PHP zip
дистрибутив:
-
go-pear.bat — скрипт установки PEAR. Подробнее см. » Установка (PEAR).
-
php-cgi.exe — исполняемый файл CGI, который может быть использован во время запуска PHP
на IIS через CGI или FastCGI. -
php-win.exe — исполняемый файл PHP для выполнения PHP скриптов без использования консоли
(например, приложения PHP, использующие Windows GUI). -
php.exe — исполняемый файл PHP для выполнения PHP скриптов в консоли (CLI).
-
php5apache2_2.dll — модуль Apache 2.2.X.
-
php5apache2_2_filter.dll — фильтр Apache 2.2.X.
Изменение файла php.ini
После того, как содержимое пакета php извлечено, создайте копию php.ini-production с именем php.ini
в той же папке. Если необходимо, также возможно разместить php.ini в любом другом месте по вашему выбору,
но это потребует дополнительной настройки, которая приводится в разделе Настройка PHP.
Файл php.ini содержит правила исполнения PHP и инструкции по работе с
окружением, в котором он запускается. Ниже приводятся некоторые из настроек php.ini,
которые могут улучшить работу PHP в Windows. Некоторые из них опциональны. Есть
много других директив, которые могут быть полезны в вашем окружении — обращайтесь к
списку директив php.ini за более подробной информацией.
Обязательные директивы:
-
extension_dir = <путь к директории расширений> — extension_dir
указывает директорию, где расположены расширения PHP. Путь может быть абсолютным
(например «C:PHPext») или относительным (например «.ext»). Используемые в php.ini расширения
должны быть расположены в extension_dir. -
extension = xxxxx.dll — Для каждого подключаемого расширения необходимо указать директиву «extension=».
Расширения из extension_dir, отмеченные такой директивой, загружаются при старте PHP. -
log_errors = On — в PHP есть механизм ведения лога ошибок, который может использоваться для сохранения ошибок в файле
или для отправки в сервис (например syslog). Механизм также использует значение директивы error_log. Когда PHP исполняется службой IIS,
log_errors должен быть включен с корректным error_log. -
error_log = <пусть к файлу лога ошибок> — error_log нужен для обозначения абсолютного
или относительного пути к файлу, в который протоколируются ошибки PHP. Этот файл должен доступным для записи веб-сервером.
Самые распространенные места размещения этого файла — различные временные TEMP директории, например «C:inetpubtempphp-errors.log». -
cgi.force_redirect = 0 — Эта директива необходима для исполнения под IIS.
Это механизм защиты директории, требуемый многими другими веб серверами. Однако, включение его под IIS
вызовет ошибки ядра PHP в Windows. -
cgi.fix_pathinfo = 1 — Обеспечивает поддержку PATH_INFO согласно спецификации CGI.
IIS FastCGI использует эту настройку. -
fastcgi.impersonate = 1 — FastCGI под IIS поддерживает способность идентифицировать
маркеры безопасности вызывающего клиента. Это позволяет IIS определять контекст безопасности, под которые выполняется запрос. -
fastcgi.logging = 0 — Запись логов FastCGI должна быть выключена в IIS. Если запись включена,
тогда все сообщения любых классов распознаются FastCGI как ошибки, что приведет IIS к генерации исключения HTTP 500.
Опциональные директивы
-
max_execution_time = ## — Эта директива указывает максимальное время выполнения любого скрипта PHP.
По умолчанию равно 30 секундам. Следует увеличить это значение, если приложение PHP должно выполняться дольше. -
memory_limit = ###M — Количество памяти, доступное процессу PHP, в Мб.
По умолчанию 128, что достаточно для большинства PHP приложений. Некоторым сложным приложениям может потребоваться больше памяти. -
display_errors = Off — Директива определяет, какие ошибки следует возвращать веб-серверу для
дальнейшего протоколирования. При значении «On» PHP сообщает обо всех видах ошибок, которые
приводятся в директиве error_reporting.
По соображениям безопасности рекомендуется установить в «Off» на рабочих серверах, чтобы исключить передачу
вывода ошибок конечному пользователю, так как они могут содержат информацию, угрожающую безопасности приложения. -
open_basedir = <пути к директориям, разделенные точкой с запятой>, например
openbasedir=»C:inetpubwwwroot;C:inetpubtemp». Эта директива указывает пути к директориям, в которых PHP
разрешены операции с файловой системой. Любая операция с файлами и директориями вне указанных путей будет приводить к ошибке.
Эта директива особенно полезна для предотвращения доступа к установленному PHP в окружениях разделяемых хостингов для предотвращения
доступа PHP скриптов к любым файлам вне корневой директории веб сайта. -
upload_max_filesize = ###M и post_max_size = ###M —
Максимальный разрешенный размер загруженного файла и присланных данных соответственно. Значения этих директив должны быть
увеличены, если приложения PHP должны обрабатывать большие загружаемые файлы, например изображения или видеофайлы.
После установки PHP в вашей системе, следующим шагом будет выбор веб-сервера и его дальнейшая
настройка для работы с PHP. Выберите конкретный веб-сервер в оглавлении к данному материалу.
Помимо запуска PHP с помощью веб-сервера, PHP может быть запущен из командной строки
как .BAT скрипт. За более подробной информацией обращайтесь к материалу
Консоль PHP на Microsoft Windows.
Вернуться к: Установка в системах Windows
Этот урок переехал в репозиторий с черновиками: https://github.com/codedokode/pasta/blob/master/soft/php-install.md
Ниже — старая, неподдерживаемая версия.
Ты можешь установить интерпретатор PHP себе на компьютер. Это позволит тебе запускать у себя программы. В отличие от сервисов типа ideone, ты можешь запускать программы без ограничения по размеру и времени работы, можешь читать/сохранять данные в файл, можешь работать с сетью и интернетом.
В инструкции упоминается командная строка. Если ты с ней не работал, можешь почитать мой краткий курс молодого бойца на эту тему: https://gist.github.com/codedokode/10539568
Обрати внимание, на Windows XP можно поставить максимум PHP5.4 (и Apache 2.2). Для более новых версий надо обновиться.
Обрати внимание, инструкция немного устарела. Теперь страница скачивания бинарников под Windows находится тут: http://windows.php.net/download/ x86 — версия для 32-битной ОС, x64 — 64-битная версия (она не очень проверенная, если не заработает — придется ставить 32-битную). Из Thread Safe и Non Thread Safe выбирай Thread Safe (c поддержкой многопоточности).

Вот, таким образом ты можешь установить PHP и запускать скрипты из командной строки. Учти, что во многих IDE (PhpStorm, Netbeans PHP) эта возможность уже встроена и в них программу можно просто запускать нажатием одной клавиши.
Также, тебе может захотеться запускать программы на PHP не только из командной строки, но и через браузер. Для этого нужен веб-сервер — программа, которая взаимодействует с браузером и отвечает на его запросы (веб-сервер принимает запрос на загрузку страницы от браузера и запускает нужный PHP скрипт, а результат работы отдает обратно в браузер). Обычно для этого ставят Апач, но для начала тебе вполне хватит встроенного в PHP сервера. Чтобы запустить его, перейди в папку со своими PHP файлами:
d:
cd phpfilesmyfiles
(Естественно, надо подставить в эти команды имя диска и папки где у тебя на самом деле хранятся файлы). После этого запускай PHP в режиме сервера (то есть он запустится и будет ждать запросов от браузера):
"c:phpphp.exe" -S localhost:9091
-S обозначает «запуститься в режиме сервера». Надо написать именно заглавную S, c маленькой буквой не заработает. localhost обозначает принимать соединения только со своего компьютера, и не принимать соединения с других устройств (если хочешь чтобы твой сервер был доступен во всей локальной сети, пиши вместо localhost адрес 0.0.0.0 — после этого к тебе можно будет зайти по ip и что-нибудь набить).
9091 — это номер порта, на котором сервер будет ждать соединения от браузера. Если произойдет ошибка и будет написано что этот порт уже занят, введи другое число (от 1 до 65534), например 9092.
После того, как сервер запущен, ты можешь запускать программы в той папке через браузер. Для этого набери в нем http://localhost:9091/test.php — должен будет запуститься скрипт test.php и его результат работы отобразится в браузере (а в консоли ты увидишь строчку с его названием, и сообщения об ошибках если таковые будут).
Если ты расшарил сервер на всю сеть, указав адрес 0.0.0.0 при запуске, то можешь зайти на него с другого устройства, указав IP компьютера: http://10.2.3.4:9091/test.php. Если у тебя есть роутер то с 0.0.0.0 зайти можно только из твоей домашней сети, если нет роутера или ты прокинешь порт наружу — из всей сети провайдера, если у тебя подключен «белый IP», то вообще со всего мира.
Ты можешь запустить несколько серверов в нескольких консолях, если вдруг понадобится, но не забудь указать каждому свой уникальный номер порта.
Для завершения работы сервера нажми в консоли Ctrl + C (если ты читал мой гайд по командной строке то и так знаешь, что эта комбинация клавиш завершает выполняющуюся программу).
This article explains how to install PHP 8.2 and Apache 2.4 on Windows 10 or 11 (64-bit).
Linux and macOS users often have Apache and PHP pre-installed or available via package managers. Windows requires a little more effort. The steps below may work with other editions of Windows, PHP, and Apache, but check the documentation of each dependency for specific instructions.
Contents:
- Why PHP?
- Why Install PHP Locally?
- Alternative Installation Options
- Using an all-in-one package
- Using a Linux virtual machine
- Using Windows Subsystem for Linux 2
- Using Docker
- Installing Apache (optional)
- Installing PHP
- Step 1: Download the PHP files
- Step 2: Extract the files
- Step 3: Configure
php.ini - Step 4: Add
C:phpto thePATHenvironment variable - Step 5: Configure PHP as an Apache module
- Step 6: Test a PHP file
Why PHP?
PHP remains the most widespread and popular server-side programming language on the Web. It’s installed by most web hosts, and has a simple learning curve, close ties with the MySQL database, superb documentation, and a wide collection of libraries to cut your development time. PHP may not be perfect, but you should consider it for your next web application. It’s the language of choice for Facebook, Slack, Wikipedia, MailChimp, Etsy, and WordPress (the content management system which powers almost 45% of the web).
To get your PHP setup blazing fast, check out our free book on improving PHP Performance.
Why Install PHP Locally?
Installing PHP on your development PC allows you to create and test websites and applications without affecting the data or systems on your live server.
Alternative Installation Options
Before you jump in, there may be a simpler installation options…
Using an all-in-one package
All-in-one packages are available for Windows. They contain Apache, PHP, MySQL, and other useful dependencies in a single installation file. These packages include XAMPP, WampServer and Web.Developer.
These packages are easy to use, but they may not match your live server environment. Installing Apache and PHP manually will help you learn more about the system and configuration options.
Using a Linux virtual machine
Microsoft Hyper-V (provided in Windows Professional) and VirtualBox are free hypervisors which emulate a PC so you can install another operating system.
You can install any version of Linux, then follow its Apache and PHP installation instructions. Alternatively, distros such as Ubuntu Server provide them as standard (although they may not be the latest editions).
Using Windows Subsystem for Linux 2
WSL2 is also a virtual machine, but it’s tightly integrated into Windows so activities such as file sharing and localhost resolution are seamless. You can install a variety of Linux distros, so refer to the appropriate Apache and PHP instructions.
Using Docker
Docker creates a wrapper (known as a container) around pre-configured application dependencies such as Apache, PHP, MySQL, MongoDB, and most other web software. Containers look like full Linux Virtual Machines but are considerably more lightweight.
Once you’ve installed Docker Desktop on Windows, it’s easy to download, configure, and run Apache and PHP.
Docker is currently considered the best option for setting up a PHP development environment. Check out SitePoint’s article Setting Up a Modern PHP Development Environment with Docker for a complete guide to setting it up.
Installing Apache (optional)
The following sections describe how to install Apache and PHP directly on Windows.
PHP provides a built-in web server, which you can launch by navigating to a folder and running the PHP executable with an -S parameter to set the localhost port. For example:
cd myproject
php -S localhost:8000
You can then view PHP pages in a browser at http://localhost:8000.
This may be adequate for quick tests, but your live server will use Apache or similar web server software. Emulating that environment as closely as possible permits more advanced customization and should prevent development errors.
To install Apache, download the latest Win64 ZIP file from https://www.apachelounge.com/download/ and extract its Apache24 folder to the root of your C: drive. You’ll also need to install the Visual C++ Redistributable for Visual Studio 2015–2020 (vc_redist_x64); the page has a link at the top.
Open a cmd command prompt (not PowerShell) and start Apache with:
cd C:Apache24bin
httpd
You may need to accept a firewall exception before the server starts to run. Open http://localhost in a browser and an “It works!” message should appear. Note:
C:Apache24confhttpd.confis Apache’s configuration file if you need to change server settings.C:Apache24htdocsis the web server’s root content folder. It contains a singleindex.htmlfile with the “It works!” message.
If Apache fails to start, another application could be hogging port 80. (Skype is the prime candidate, and the Windows app won’t let you disable it!) If this occurs, edit C:Apache24confhttpd.conf and change the line Listen 80 to Listen 8080 or any other free port. Restart Apache and, from that point onward, you can load web files at http://localhost:8080.
Stop the server by pressing Ctrl + C in the cmd terminal. The ReadMe file in the ZIP also provides instructions for installing Apache as a Windows service so it auto-starts on boot.
Installing PHP
Install PHP by following the steps below. Note that there’s more than one way to configure Apache and PHP, but this is possibly the quickest method.
Step 1: Download the PHP files
Get the latest PHP x64 Thread Safe ZIP package from https://windows.php.net/download/.
Create a new php folder in the root of your C: drive and extract the content of the ZIP into it.
You can install PHP anywhere on your system, but you’ll need to change the paths referenced below if you use anything other than C:php.
Step 3: Configure php.ini
PHP’s configuration file is php.ini. This doesn’t exist initially, so copy C:phpphp.ini-development to C:phpphp.ini. This default configuration provides a development setup which reports all PHP errors and warnings.
You can edit php.ini in a text editor, and you may need to change lines such as those suggested below (use search to find the setting). In most cases, you’ll need to remove a leading semicolon (;) to uncomment a value.
First, enable any required extensions according to the libraries you want to use. The following extensions should be suitable for most applications including WordPress:
extension=curl
extension=gd
extension=mbstring
extension=pdo_mysql
If you want to send emails using PHP’s mail() function, enter the details of an SMTP server in the [mail function] section (your ISP’s settings should be suitable):
[mail function]
; For Win32 only.
; http://php.net/smtp
SMTP = mail.myisp.com
; http://php.net/smtp-port
smtp_port = 25

; For Win32 only.
; http://php.net/sendmail-from
sendmail_from = my@emailaddress.com
Step 4: Add C:php to the PATH environment variable
To ensure Windows can find the PHP executable, you must add it to the PATH environment variable. Click the Windows Start button and type “environment”, then click Edit the system environment variables. Select the Advanced tab, and click the Environment Variables button.
Scroll down the System variables list and click Path, followed by the Edit button. Click New and add C:php.
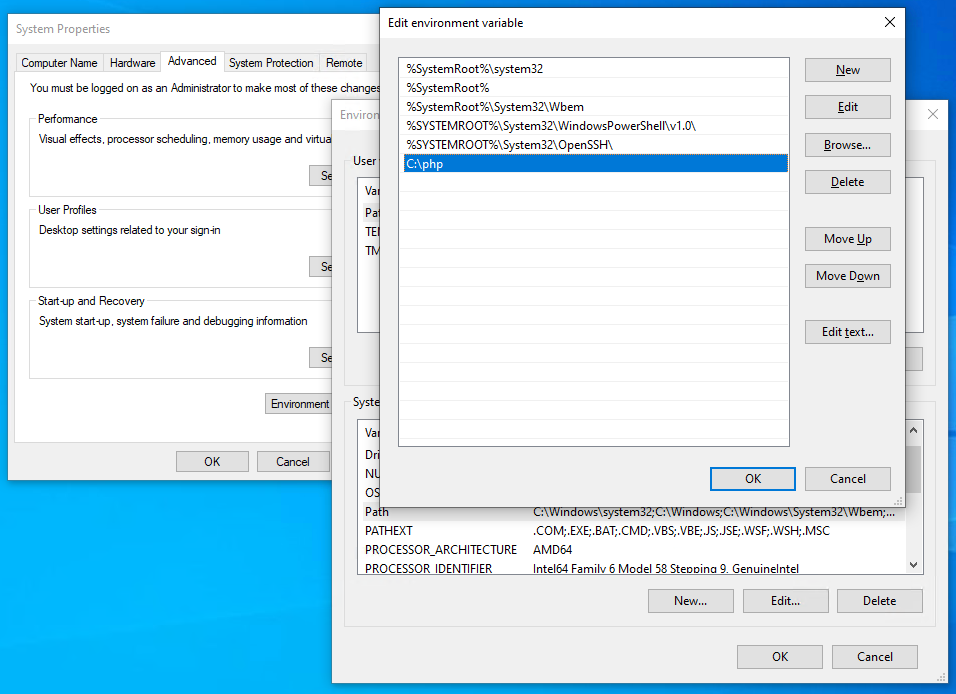
Note that older editions of Windows provide a single text box with paths separated by semi-colons (;).
Now OK your way out. You shouldn’t need to reboot, but you may need to close and restart any cmd terminals you have open.
Step 5: Configure PHP as an Apache module
Ensure Apache is not running and open its C:Apache24confhttpd.conf configuration file in a text editor. Add the following lines to the bottom of the file to set PHP as an Apache module (change the file locations if necessary but use forward slashes rather than Windows backslashes):
# PHP8 module
PHPIniDir "C:/php"
LoadModule php_module "C:/php/php8apache2_4.dll"
AddType application/x-httpd-php .php
Optionally, change the DirectoryIndex setting to use index.php as the default in preference to index.html. The initial setting is:
<IfModule dir_module>
    DirectoryIndex index.html
</IfModule>
Change it to:
<IfModule dir_module>
    DirectoryIndex index.php index.html
</IfModule>
Save httpd.conf and test the updates from a cmd command line:
cd C:Apache24bin
httpd -t
Syntax OK will appear … unless you have errors in your configuration.
If all went well, start Apache with httpd.
Step 6: Test a PHP file
Create a new file named index.php in Apache’s web page root folder at C:Apache24htdocs. Add the following PHP code:
<?php
phpinfo();
?>
Open a web browser and enter your server address: http://localhost/. A PHP version page should appear, showing all PHP and Apache configuration settings.
You can now create PHP sites and applications in any subfolder of C:Apache24htdocs. If you need to work more than one project, consider defining Apache Virtual Hosts so you can run separate codebases on different localhost subdomains or ports.
Further information:
- How to Install Apache
- How to Install MySQL
- MySQL: the Pros and Cons of MyISAM Tables
- MySQL: the Pros and Cons of InnoDB Tables
- How to Use MySQL Foreign Keys for Quicker Database Development
- Book: PHP & MySQL: Novice to Ninja, 7th Edition
- Book: Jump Start PHP Environment, as well as many more books in our library.
Best of luck!
In this article, we’re going to discuss how to install PHP on Windows. There are three different ways to install and run PHP on Windows, and we’ll look at each one.
PHP is a server-side scripting language which is mostly used to build web applications—these may range from a very simple blog website to a full-fledged eCommerce store. In fact, PHP is one of the most popular server-side scripting languages for web development.
In the next section, we’ll go through the prerequisites for installing PHP on your Windows computer.
Prerequisites
Before we install PHP, let’s make sure of the following things.
The first thing to check is the Windows version. If you’re using a Windows version older than Windows 2008/Vista, you won’t be able to install PHP versions that are greater than 5.5. As per the official documentation, as of the PHP 7.2.0 version, Windows 2008 and Windows Vista are not supported.
Thus, it’s important to be sure that your Windows version aligns with the PHP version you want to install.
In the next section, we’ll discuss different ways to install PHP. If you want to install PHP manually, you should be comfortable editing a few system files since that is part of the manual installation process. On the other hand, if you just use the all-in-one package, it will be pretty straightforward, and all the configuration will happen automatically.
Today, we’re going to install the latest stable version of PHP, which is 7.4. In fact, PHP has several different versions, and if you want to install a different version of PHP and are facing any difficulties, drop me a line in the comments section and I’ll be happy to help.
With that out of the way, let’s get started installing PHP!
Possible Ways to Install PHP on Windows
In this section, I’ll briefly discuss the different ways you can install PHP on Windows.
Manual Installation
In the manual installation process, apart from downloading the PHP package, you need to go through a couple of steps to properly configure it. As I said earlier, if you prefer manual installation, you should be comfortable enough to edit a few configuration files in the text editor.
All-in-One Packages
There are a couple of popular Windows PHP distributions that come as all-in-one packages. Apart from PHP, these also install and configure the Apache web server and a MySQL database server. These packages are really useful for developers who want to set up and run the full web development stack quickly and easily.
XAMPP and WampServer are two of the most popular Windows distributions among the PHP community.
Using a .msi Installer
I would say this was one of the easiest and most preferred ways to install PHP among newbies. But it’s deprecated and not recommended anymore. To install PHP with an installer, you just need to download the .msi installer and run it to install PHP just like any other software you install on Windows.
However, as of PHP 5.4.0, you won’t find the .msi installer files on the PHP downloads page. So this is only going to be useful if you want to install an older PHP version. As it’s deprecated, we won’t discuss this installation method in detail.
How to Install PHP on Windows Manually
In this section, we’ll go through the steps that are required in order to install PHP in your Windows installation manually.
Download and Extract the PHP Package Files
The first thing you have to do is to download the PHP package file of your choice from the official PHP downloads page.
You’ll find .zip files available for both x86 and x64 systems, so make sure to download the correct one as per your Windows OS architecture. Also, you’ll have to choose either to download the non-thread-safe or thread-safe version of PHP. If you’re planning to run PHP as an Apache module, the thread-safe version is recommended. However, if you want to run PHP as a CGI module, you can choose either of them!
Next, you need to extract the .zip file in the directory where you want to install PHP. A common install location is C:php. Create the php directory and extract the .zip file contents inside the C:php directory.
Configure the php.ini Configuration File
In this section, we’ll discuss the necessary changes you need to make in the php.ini configuration file.
The PHP package that you’ve just downloaded already contains two different versions of the configuration file: php.ini-development and php.ini-production. The php.ini-development file is designed and configured for your local development. This has a lot of features enabled which make it easier to test and debug your code, but it makes your software run slower and is not secure for a live site. On the other hand, the php.ini-production file is designed for optimum performance and security. We’re going to use the php.ini-production file.
As PHP detects the php.ini file as its configuration file, you’ll have to copy the file which you choose for your local development, and rename it to the php.ini file. As we’re going to use the production version, copy the php.ini-production file to the C:phpphp.ini file.
Next, open the php.ini file in your favorite text editor and find the following line.
It’s the path of the PHP extensions directory, and let’s change it as shown in the following snippet.
1 |
extension_dir = "C:/php/ext" |
It’s important to note that we’ve also removed the semicolon in front of the line to make sure it’s not commented. Of course, you need to adjust the above path to match your installation directory.
And with that, we’ve finished the php.ini configuration file changes.
Configure the PATH Environment Variable
In this final section, we’ll see how to add the PHP installation path to the PATH environment variable. The process of updating the PATH variable in Windows changes from version to version. I’ll show you how to change it in Windows 10, but feel free to ask me if you’re using a different version.
In the Windows search bar, just type the environment keyword and choose Edit the system environment variables in the search results. Go to the Advanced > Environment Variables section. Edit the PATH environment variable and add ;C:php to the end. This will make it so you can run PHP just by typing php from the command prompt, no matter what folder you’re in.
Finally, reboot the system, and you’re done. You’ve successfully installed PHP in your Windows installation!
Installing With an All-in-One Package
As I mentioned earlier, XAMPP and WampServer are popular all-in-one packages that allow you to install PHP along with the other essential web development components like a web server and database server.
Irrespective of the tool you choose, the process of installing these tools is pretty straightforward. You just need to download the corresponding installer and run it to install it in your Windows installation. We won’t go into the details of this, but if you have any queries regarding this, feel free to post them.
In the next section, we’ll see how to enable specific PHP extensions in your PHP installation.
How to Install PHP Extensions
In this section, we’ll see how to enable PHP extensions.
Every time you want to enable a specific extension in PHP, you just need to find the associated entry in the php.ini configuration file and uncomment it.
For example, let’s say you want to enable the mysqli extension. Then you need to search for the extension=mysqli entry in the php.ini file and uncomment it, as shown in the following snippet.
1 |
… |
2 |
… |
3 |
;extension=mbstring |
4 |
;extension=exif ; Must be after mbstring as it depends on it |
5 |
extension=mysqli |
6 |
;extension=oci8_12c ; Use with Oracle Database 12c Instant Client |
7 |
… |
8 |
… |
In the same way, you can enable other extensions as well.
Learn PHP With a Free Online Course
If you want to learn PHP, check out our free online course on PHP fundamentals!

In this course, you’ll learn the fundamentals of PHP programming. You’ll start with the basics, learning how PHP works and writing simple PHP loops and functions. Then you’ll build up to coding classes for simple object-oriented programming (OOP).
Along the way, you’ll learn all the most important skills for writing apps for the web: you’ll get a chance to practice responding to GET and POST requests, parsing JSON, authenticating users, and using a MySQL database.
Did you find this post useful?

Software Engineer, FSPL, India
I’m a software engineer by profession, and I’ve done my engineering in computer science. It’s been around 14 years I’ve been working in the field of website development and open-source technologies.
Primarily, I work on PHP and MySQL-based projects and frameworks. Among them, I’ve worked on web frameworks like CodeIgnitor, Symfony, and Laravel. Apart from that, I’ve also had the chance to work on different CMS systems like Joomla, Drupal, and WordPress, and e-commerce systems like Magento, OpenCart, WooCommerce, and Drupal Commerce.
I also like to attend community tech conferences, and as a part of that, I attended the 2016 Joomla World Conference held in Bangalore (India) and 2018 DrupalCon which was held in Mumbai (India). Apart from this, I like to travel, explore new places, and listen to music!
![]()
Download Article
![]()
Download Article
This article explains how to install PHP on Windows 7. This includes how to install the whole PHP, Apache and MySQL on Windows 7. You’ll also learn how to configure the environment to ensure that the server is running correctly.
-
1
-
2
Unzip these three files.
Advertisement
-
3
Install three software one by one. First MySQL, then Apache, and PHP last. MySQL is a database software which contains data. Apache is a server and PHP is the language that you will learn and use.
-
4
Install MySQL. Remember the username and password you entered because you can’t enter your database system without the username and password. Follow the instructions step-by-step. Install MySQL first because MySQL don’t need to configure the environment. You just follow the instructions and you can install it correctly.
-
5
Install Apache. Open the file and follow the instructions. Do not change anything because if you do, you have to change a lot of things in the future. That will cause you problems if you are a beginner at all this.
-
6
Open your web browser and type ‘localhost’ as the address. If it shows ‘It works!’, that means you have successfully installed the Apache. Then you can go on to the next step.
-
7
Unzip the PHP file and copy it to the C disk. Rename the folder as ‘php’. It’s easy to remember when so named.
-
8
Find the file named ‘httpd.conf’ at ‘C:Program FilesApache Software FoundationApache2.2conf’. Edit it with Notepad++. Add two important sentences at the end of file: ‘LoadModule php5_module C:/php/php5apache2_2.dll’ ‘AddType application/x-httpd-php .php’. Do not forget to save the file. Close the notepad and restart the Apache.
-
9
Open the htdocs folder at ‘C:Program FilesApache Software FoundationApache2.2’. Create a new file called ‘test.php’. Open it with Notepad and enter the following contents: Don’t forget to save.
-
10
Open your web browser and enter ‘localhost/test.php’ as the address. If the browser shows your PHP version and other things, that means you have successfully installed the whole PHP. Now you can start to use and learn PHP on your own computer.


Advertisement
Ask a Question
200 characters left
Include your email address to get a message when this question is answered.
Submit
Advertisement
-
These steps are for server side computers. It’s quite difficult but it is more stable. If you want to save time, you can download a software called ‘XAMPP’. It contains those three software. When you finish install it, you can use it immediately. But you can’t use it as a server because it is easy to crash.
Thanks for submitting a tip for review!
Advertisement
-
Remember the password for your MySQL database!
-
Do not miss any step during the installation!
Advertisement
About This Article
Thanks to all authors for creating a page that has been read 79,210 times.
Is this article up to date?
![]()
Download Article
![]()
Download Article
This article explains how to install PHP on Windows 7. This includes how to install the whole PHP, Apache and MySQL on Windows 7. You’ll also learn how to configure the environment to ensure that the server is running correctly.
-
1
-
2
Unzip these three files.
Advertisement
-
3
Install three software one by one. First MySQL, then Apache, and PHP last. MySQL is a database software which contains data. Apache is a server and PHP is the language that you will learn and use.
-
4
Install MySQL. Remember the username and password you entered because you can’t enter your database system without the username and password. Follow the instructions step-by-step. Install MySQL first because MySQL don’t need to configure the environment. You just follow the instructions and you can install it correctly.
-
5
Install Apache. Open the file and follow the instructions. Do not change anything because if you do, you have to change a lot of things in the future. That will cause you problems if you are a beginner at all this.
-
6
Open your web browser and type ‘localhost’ as the address. If it shows ‘It works!’, that means you have successfully installed the Apache. Then you can go on to the next step.
-
7
Unzip the PHP file and copy it to the C disk. Rename the folder as ‘php’. It’s easy to remember when so named.
-
8
Find the file named ‘httpd.conf’ at ‘C:Program FilesApache Software FoundationApache2.2conf’. Edit it with Notepad++. Add two important sentences at the end of file: ‘LoadModule php5_module C:/php/php5apache2_2.dll’ ‘AddType application/x-httpd-php .php’. Do not forget to save the file. Close the notepad and restart the Apache.
-
9
Open the htdocs folder at ‘C:Program FilesApache Software FoundationApache2.2’. Create a new file called ‘test.php’. Open it with Notepad and enter the following contents: Don’t forget to save.
-
10
Open your web browser and enter ‘localhost/test.php’ as the address. If the browser shows your PHP version and other things, that means you have successfully installed the whole PHP. Now you can start to use and learn PHP on your own computer.
Advertisement
Ask a Question
200 characters left
Include your email address to get a message when this question is answered.
Submit
Advertisement
-
These steps are for server side computers. It’s quite difficult but it is more stable. If you want to save time, you can download a software called ‘XAMPP’. It contains those three software. When you finish install it, you can use it immediately. But you can’t use it as a server because it is easy to crash.
Thanks for submitting a tip for review!
Advertisement
-
Remember the password for your MySQL database!
-
Do not miss any step during the installation!
Advertisement
About This Article
Thanks to all authors for creating a page that has been read 79,210 times.