Вторая версия премиального набора Big Sur. От первой отличается более детальной проработкой и несколько переработанными элементами интерфейса. В архиве на данный момент находится исключительно визуальный стиль и две версии обоев: темная и светлая. Позднее, автор опубликует полный релиз с дополнительными ресурсами.
Как и всегда, изначально тема доступна для ограниченного круга лиц и находится в стадии Beta. Полный релиз намечен на октябрь этого года.
UPD 24.11.2020: Обновлены стили для Curtains.
UPD 23.11.2020: Правки для панели задач, а также релиз темы для Stardock Curtains Style.
UPD 22.11.2020: Состоялся общедоступный релиз темы. Обновлен архив, добавлено множество ресурсов.
Поддержка версий Windows 10: 22H2, 21H2, 21H1, 2009, 2004, 1909, 1903
- Скачайте и распакуйте архив big_sur.zip с помощью 7zip.
- Если Вы устанавливаете темы первый раз: пропатчите систему с помощью UltraUXThemePatcher.
- Переместите файлы *.theme, а также папку с содержанием ресурсов *.msstyles по адресу: C:WindowsResourcesThemes.
- Нажмите в пустой области на рабочем столе и выберите пункт «Персонализация» в контекстном меню.
- Перейдите в раздел «Темы» и примените добавленную тему.
- Установка завершена!
Обратите внимание! Для установки кнопки пуск, панели быстрого доступа и других ресурсов Вам потребуются специальные программы. Ссылки на них указаны в блоке «Дополнения». Чтобы узнать версию системы, нажмите сочетание клавиш «Win+R» (где «win» — это кнопка с логотипом windows на клавиатуре), а затем в окне «Выполнить» введите команду «winver» и нажмите Enter (или кнопку «ОК»).
Пользователи Windows во все времена любили кастомизировать операционную систему под себя и всячески менять внешний вид стандартных элементов интерфейса. Особой популярностью пользуются темы оформления (так называемые паки), которые одним махом превращают “винду” в Linux, macOS или какую-нибудь мобильную операционную систему.
Я и сам лет 15 назад всячески “украшал” рабочий стол своего Windows-PC, перенося на него диковинную док-панель из мира OS X.
В тему: все новшества Windows 11 в одной статье
Сегодня кастомизация вышла на новый уровень. Вместо самостоятельной сборки из нескольких слабо совместимых между собой утилит и ручной замены системных файлов появились комплексные решения, которые делают все в автоматическом режиме.
Одним из таких решений мы и воспользуемся сегодня, чтобы превратить Windows 11 (или Windows 10 при желании) в операционную систему Apple.
Как настроить внешний вид Windows в стиле macOS
Для простоты и удобства воспользуемся комплексным решением от китайских разработчиков. Они выпустили утилиту MyDockFinder, которая маскирует большинство элементов рабочего стола Windows и добавляет недостающие модули из macOS вроде док-панели или меню Launchpad.
Не стоит переживать насчет содержимого утилиты. Её исходный код доступен на GitHub, а коммерческая версия приложения даже продается в Steam за 277 руб.
Для проверки работоспособности и ознакомления рекомендуем воспользоваться сборкой с GitHub, а в дальнейшем при желании отблагодарить создателей всегда сможете купить MyDockFinder в Steam.

1. Скачайте приложение MyDockFinder с GitHub.
2. Распакуйте загруженный архив и перенесите его на системный диск. Желательно, чтобы в названии пути не встречалась кириллица.
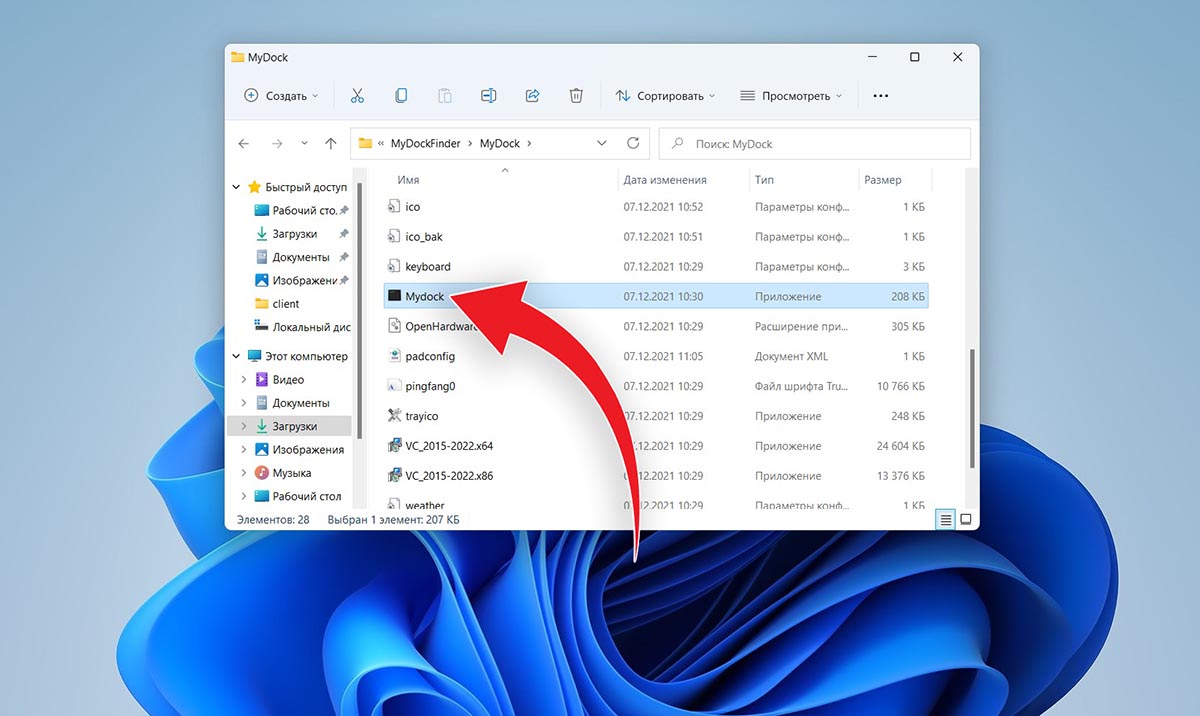
3. Запустите приложение Mydock. Еще в данной папке расположен установщик Microsoft Visual C++. Запустите его, если еще не устанавливали данный пакет библиотек. Они необходимы для полноценной работы MyDockFinder.
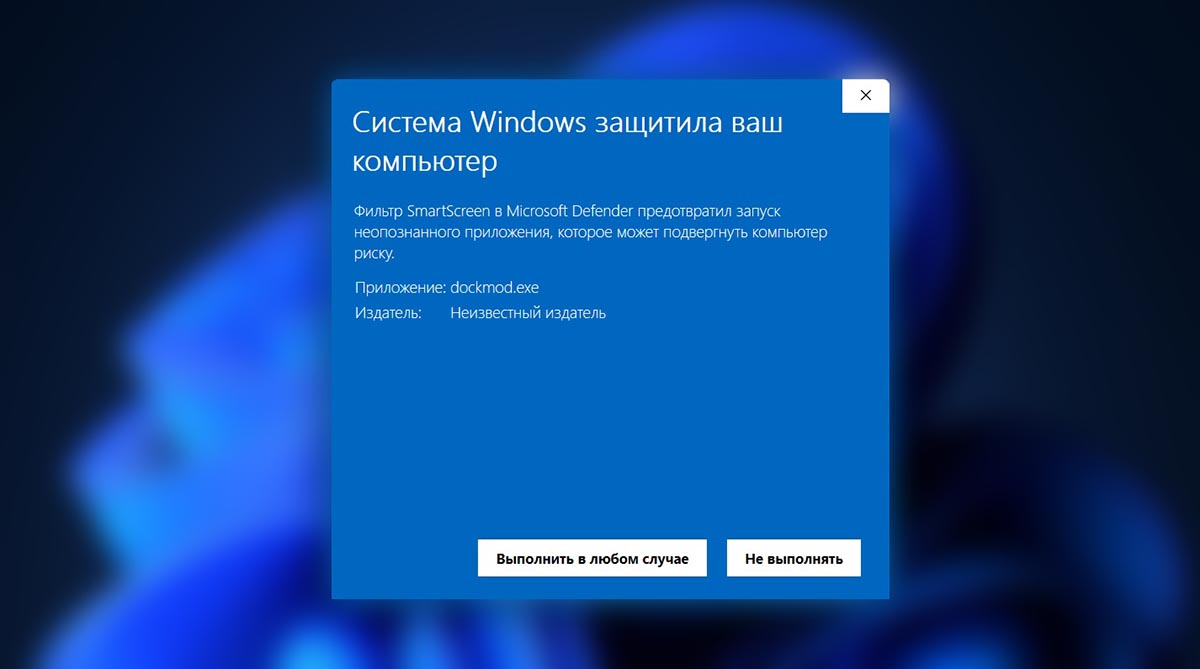
4. Выдайте необходимые разрешения при первом запуске приложения.
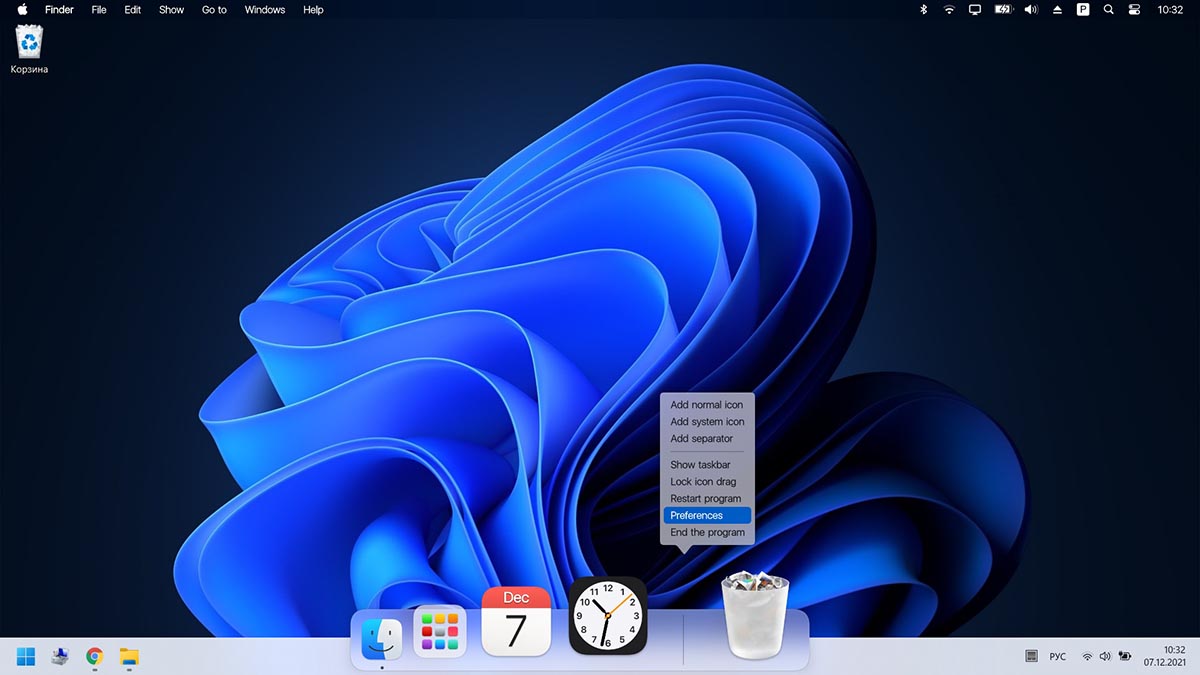
5. Сразу же увидите узнаваемые элементы операционной системы macOS: док-панель и строку меню. В верхнюю панель переехали все иконки и индикаторы из трея Windows.
Для перехода к параметрам приложения нужно вызвать контекстное меню в месте разделительной панели Дока и выбрать пункт Preferences.
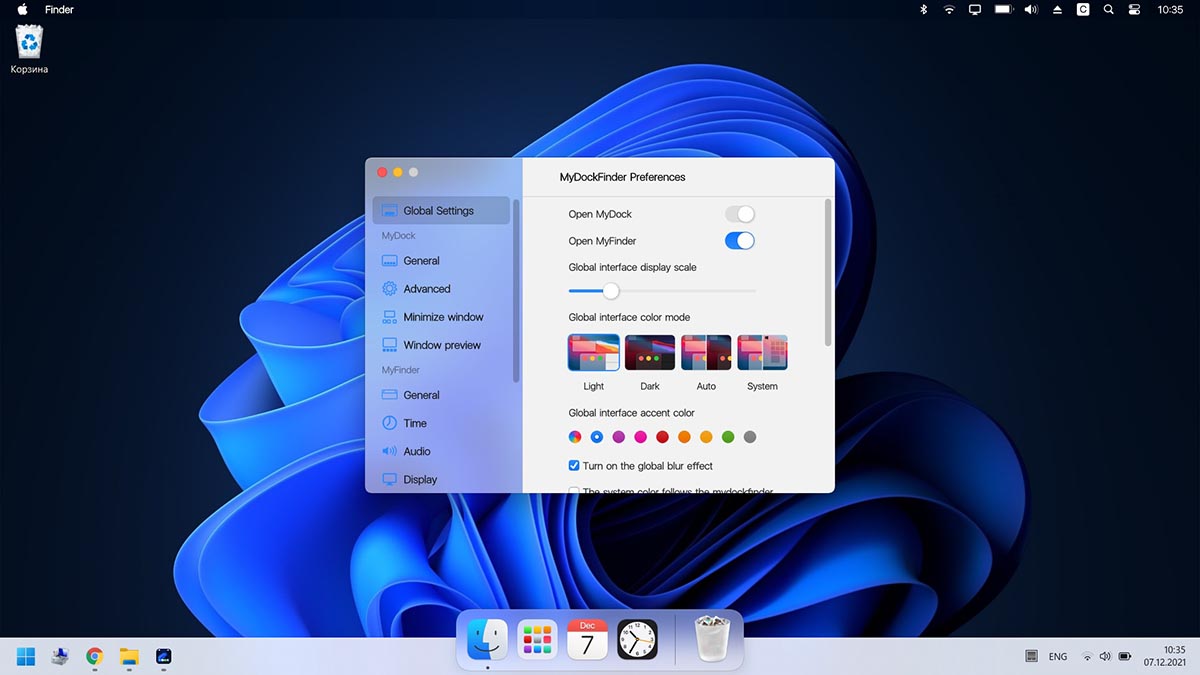
6. Настроек у приложения MyDockFinder даже больше, чем у аналогичных элементов в macOS.
В разделе параметров Global settings указывается размер элементов интерфейса, тема оформления, цветовой акцент и возможность автоматического запуска утилиты при старте системы.

7. В меню General можно изменить размер Док-панели, включить или отключить увеличение иконок при наведении и задать ряд других дополнительных настроек.
Как и в оригинальной macOS панель с иконками может располагаться у нижнего края экрана или у одной из боковых граней.
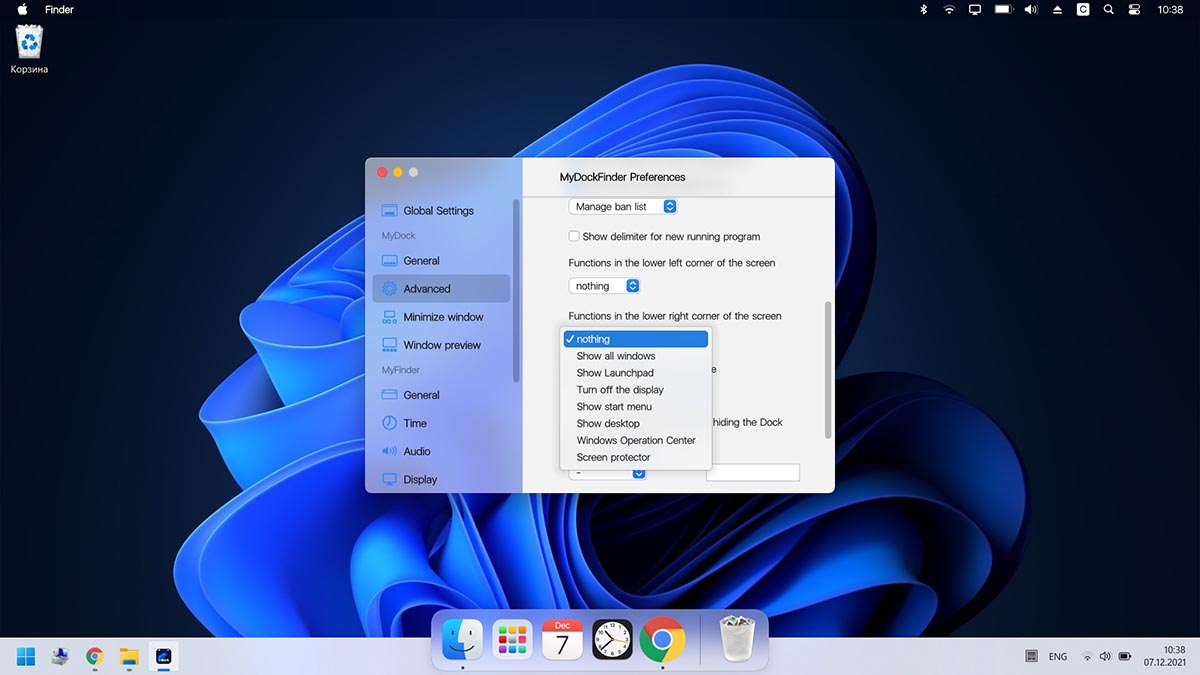
8. В блоке настроек Advanced есть аналог фишки Активные углы, который позволяет задать действия при наведении курсора в выбранную область рабочего стола.
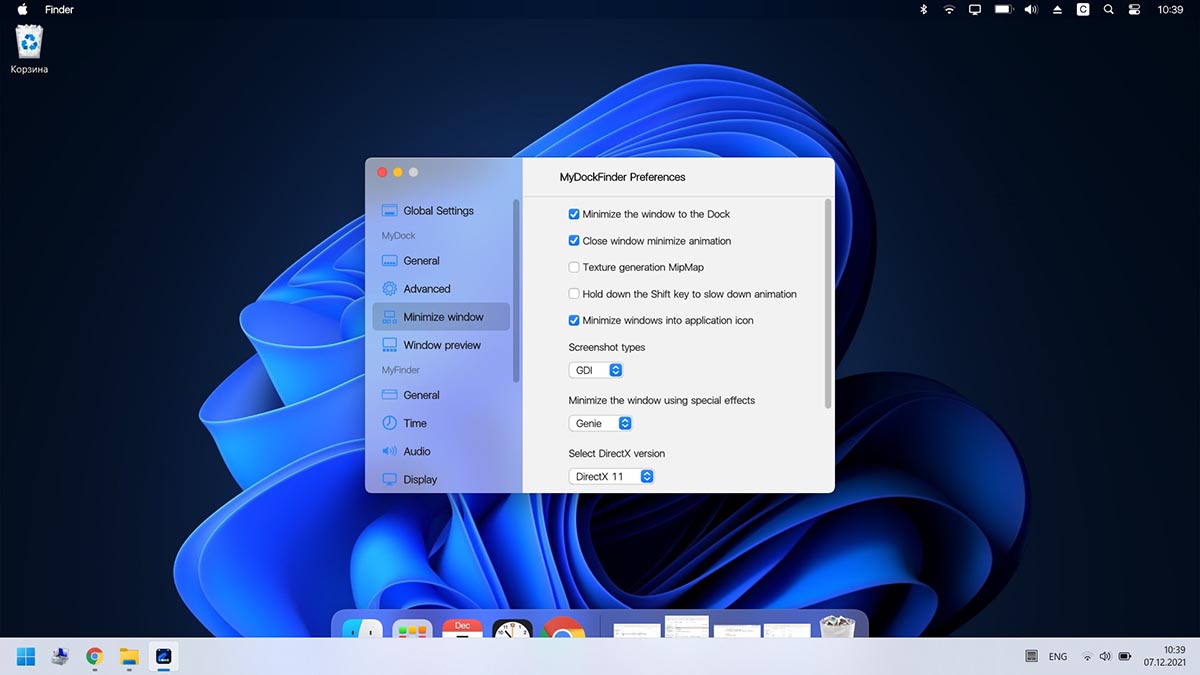
9. В разделах Minimize window и Window Preview настраивается поведение окон и приложений в док-панели. Можно настроить привычную для Windows группировку окон или скрывать их в иконку приложения, как в macOS.
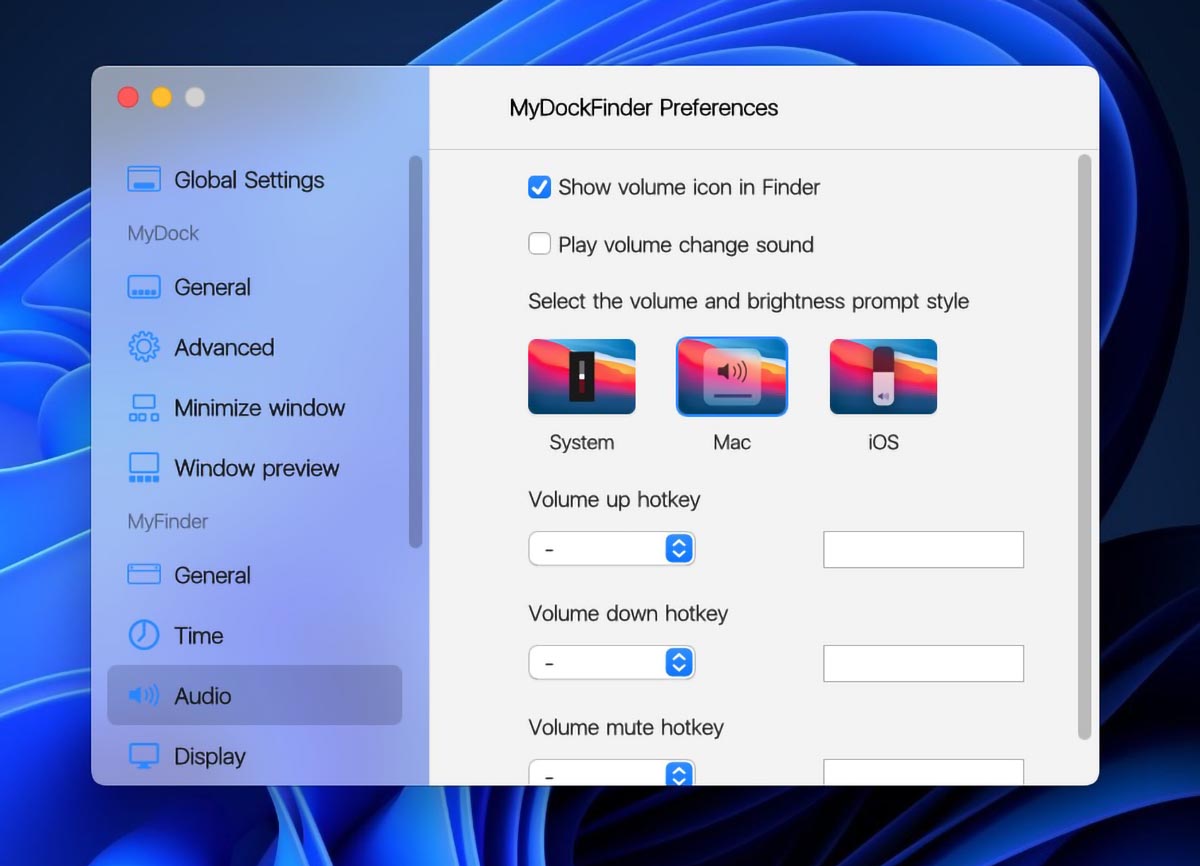
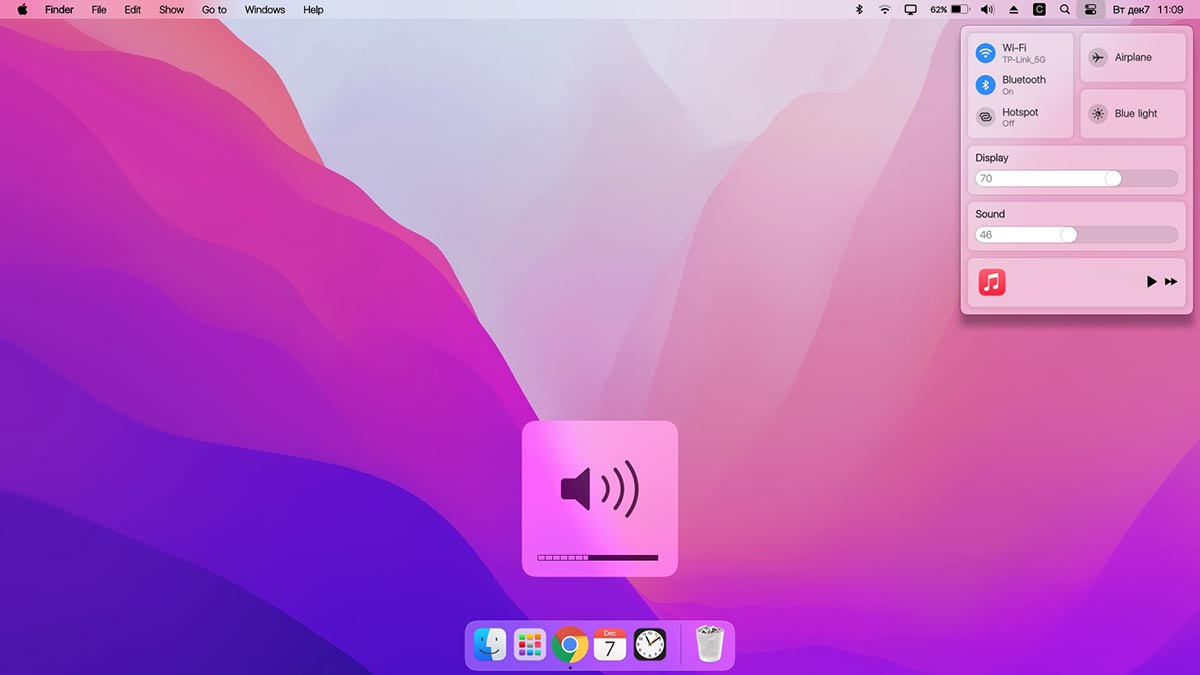
10. Особого внимания заслуживает блок параметров Audio. Здесь можно изменить стандартную графику для регулировки уровня громкости компьютера. Можно оставить классический Windows-индикатор, стандартное меню из macOS или минималистичный боковой слайдер из iOS.
Здесь же можно назначить клавиши управления громкостью при отсутствии мультимедийных кнопок на клавиатуре.
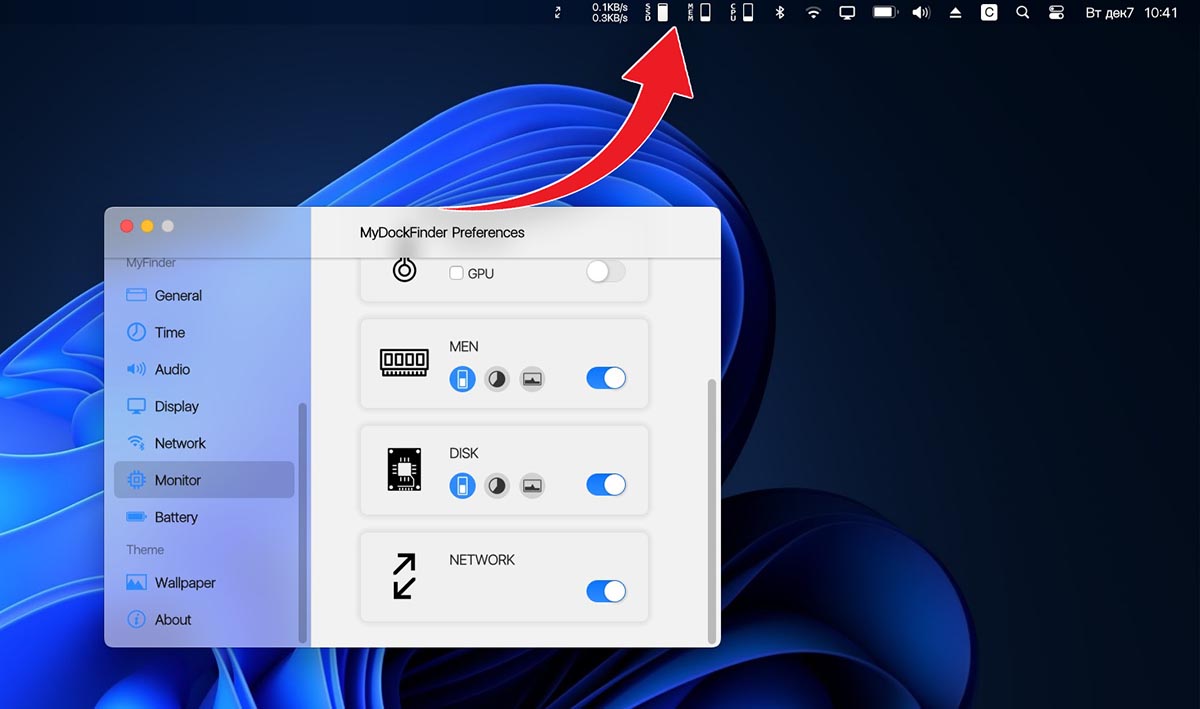
11. Раздел настроек Monitor позволяет добавить в строку меню системные индикаторы. Прямого аналога данной фишке в macOS нет, но разработчики явно вдохновлялись утилитой iStat Menus.
Можно вывести индикатор загруженности процессора, оперативной памяти, видеоадаптера и свободное место на накопителе.

12. После настройки всех элементов останется найти и установить подходящие обои. Не забудьте перезагрузить компьютер для вступления в силу новых параметров.
В качестве финального штриха можете отключить отображение системных иконок на рабочем столе ОС. Чаще всего там остается мусорная корзина. Отключаются иконки по пути Системные настройки – Персонализация – Темы – Параметры значков рабочего стола.
После перезагрузки рабочий стол вашего Windows-компьютера будет на 99% походить на новую macOS Monterey.
Как работать в Windows после установки MyDockFinder
Как видите, приложение для изменения внешнего вида операционной системы является комплексным и переносит не только док-панель, но и ряд других элементов macOS.
Во-первых, вы получаете удобную строку меню, в которой содержатся все настройки утилиты и некоторые параметры запускаемых приложений. К сожалению, перенести все пункты меню разных программ в верхний бар невозможно.
Во-вторых, строка меню в стиле macOS является более функциональным аналогом трея из Windows. Здесь предусмотрены всплывающие меню для разных системных индикаторов вроде Wi-Fi, Bluetooth, индикатора громкости и т.п.
Особого внимания заслуживает Пункт управления, который с первого взгляда не отличить от оригинального “яблочного”. Все элементы здесь функционируют и управляют параметрами системы.
В-третьих, MyDockFinder заменяет некоторые системные меню и диалоговые окна, которые начинают выглядеть более эстетично и не выбиваются из общей стилистики.
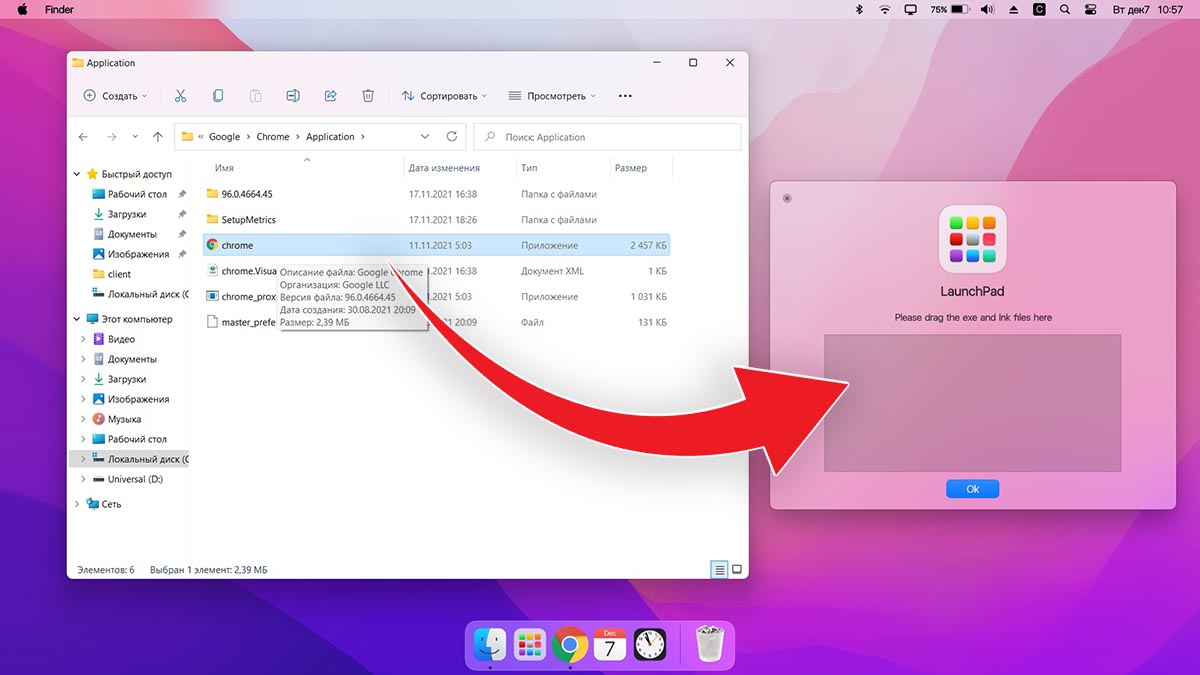
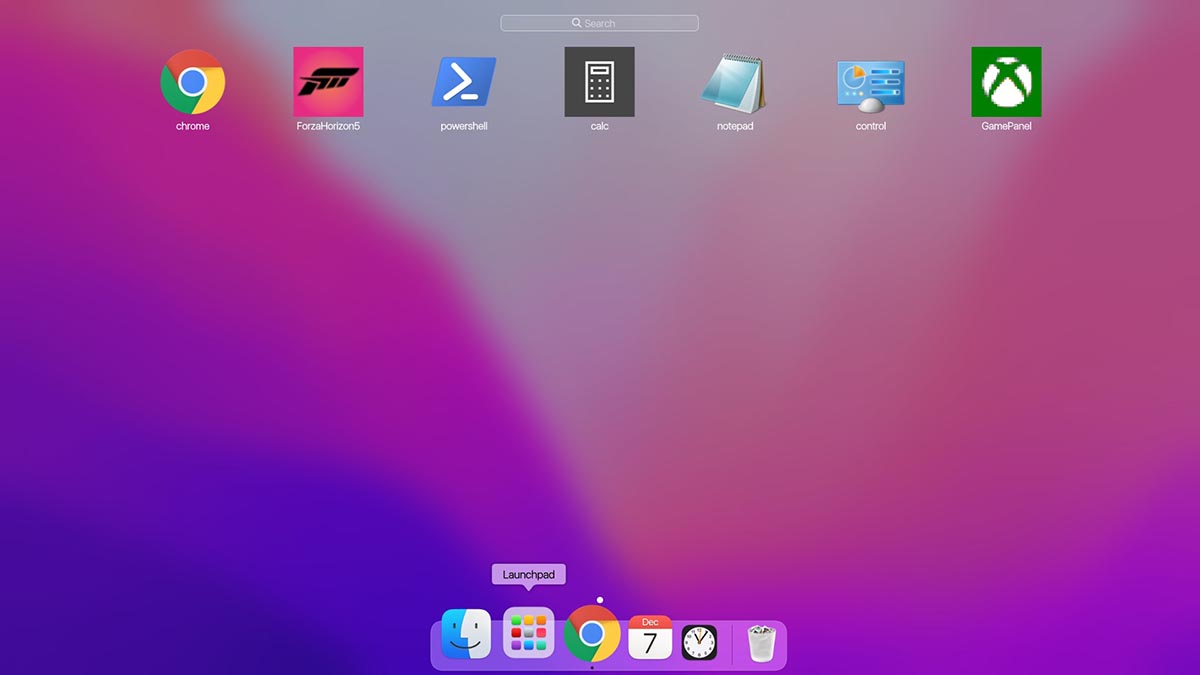
В-четвертых, появляется некий аналог Launchpad. Сюда придется вручную перенести ярлыки нужных вам приложений. Можете поискать программы в папке Program Files либо выполнить общий поиск файлов *.exe на системном диске и перетянуть в меню нужные.
После настройки меню выглядит с точно как родной “ланчпэд” из macOS. Вы сможете в любой момент отредактировать набор приложений в нем.
В-пятых, основные элементы операционной системы Windows будут доступны из нового интерфейса. Так при запуске Finder будет открываться привычный файловый менеджер от Microsoft, вместо поиска Spotlight в строке меню будет запускаться глобальный поиск по Windows, а нажатие на одноименную кнопку откроет стандартное меню Пуск.
Не забывайте и о скрытых пунктах меню за индикатором , там есть стандартное меню выключения и перезагрузки компьютера, доступ к системным параметрам и Microsoft Store.
Лично мне понравилось приложение MyDockFinder. Это качественная комплексная утилита для изменения операционной системы Windows “все в одном”. Единое приложение меняет большое количество элементов и делает систему максимально схожей с macOS.
Вам не придется устанавливать с десяток приложений, менять системные файлы и возиться с подстройкой элементов. Все параметры задаются в одном понятном меню настроек, а фишки не конфликтуют друг с другом. Удаляется MyDockFinder быстро и беспроблемно. Нужно просто отключить утилиту из контекстного меню и удалить содержащую все файлы папку.
Если вы большую часть времени работаете с macOS, но периодически заглядываете в Windows – можете смело устанавливать MyDockFinder, чтобы быстрее адаптироваться в данной операционной системе.

 (41 голосов, общий рейтинг: 4.44 из 5)
🤓 Хочешь больше? Подпишись на наш Telegram.
![]()
iPhones.ru
Если очень хочется macOS, но не можется.
- macOS,
- macOS Monterey,
- windows,
- Windows 11,
- приложения,
- Технологии,
- Это интересно
![]()
Артём Суровцев
@artyomsurovtsev
Люблю технологии и все, что с ними связано. Верю, что величайшие открытия человечества еще впереди!

If you are a Mac-style lover, then this theme should definitely add to your collection. The visual style is well developed, almost to the smallest detail, but at the same time, usability remains at the level of the standard theme. There are several theme options to choose from, dark, light, and their modifications with different explorer panels. The archive also contains system icons, wallpapers, start buttons, and skins for some programs.
Make your customization awesome by installing this theme’s appropriate Windows 7TSP icons.
What is included in this?
- Themes (Dark,Light)
- Icon (7tsp,Ipack)
- Stardock Curtains themes
- Wallpaper
- SIB Start Orb
- Cursors
- Dock
- Big Sur dock Icons
Instalation steps:
- I recommend creating a restore point before starting the customization.
- This third party theme will only work if you install Theme Patcher, so definitely install Theme Patcher.
- If you’re new to this, check out this page to learn how to install a Windows custom theme or visit this Youtube Channel.
- Theme support : Windows 10 version 1903 to latest
Download
1. Install ThemeTool.exe
Releases · namazso/SecureUxTheme
🎨 A secure boot compatible in-memory UxTheme patcher — namazso/SecureUxTheme
 GitHubnamazso

- Run the ThemeTool.exe by Administrator
- Select «Hook LogonUI» only
- Then click on «Install»
- Reboot the computer to apply the changes.

2. Download Big Sur theme
Big Sur Windows 10 Suite — Enable Windows 10 Theme Customization
Do you want new style in your desktop? Here is the new theme for Windows 10 users. This is realy awsome theme, enjoy it and have fun! Operating System Support: Windows 10 : 1903 – 2004 , (Not tested on older and new builds) Author : niivu Note : First it is recommended you make […]
![]() Enable Windows 10 Theme Customization
Enable Windows 10 Theme Customization

- Unzip the downloaded zip
- Go to path «ThemesThin Taskbar»
- Copy all theme/files inside the folder
- Paste theme files to «C:WindowsResourcesThemes»
- Open the ThemeTool.exe in the step (1) by Administration again

- Select any «Big Sur» theme you like
- Click «Patch and apply»
3. Change Desktop Background to Mac OS Big Sur 4k Wallpaper
macos big sur wallpaper 4k — Penelusuran Google
Penelusuran Google

4. Change Windows Icons to Big Sur Theme
- Download Macpac Icon Theme
https://www.deviantart.com/niivu/art/macpac-Icon-Theme-801554621
- Unzip the file and remove the file tail «.remove» then the file’s name changed to «.7z»
- Download 7TSP GUI 2019 Edition
https://www.deviantart.com/devillnside/art/7TSP-GUI-2019-Edition-804769422
- Change the file name «.ee» to «.exe» to execute the file.
- Open the file «7tsp GUI v0.6(2019).exe»
- Select «Add a Custom Pack»
- Choice the file «.7z» of Macpac Icon Theme
- Click «Start Patching»

- Reboot the computer to apply the changes.

5. Install Widgets
- Install the Rainmeter
- Download Theme for Rainmeter
https://www.deviantart.com/fediafedia/art/Big-Sur-BETA-3-for-Rainmeter-846882462
- Unzip and click on «BigSur.rmskin» to install the theme.
- Top bar Widget: droptop four by Cariboudjan on DeviantArt


6. Install Dock
- Download Rocket Dock
Punk Labs
We make games, apps, things and stuff.
![]() Punk Labs
Punk Labs

- Install Rocket Dock Skin
https://www.deviantart.com/maiguris/art/macOS-BigSur-For-RocketDock-847338077
- Unzip the Rocket Skin zip file then copy all folder to the Rocket Dock skins «C:Program Files (x86)RocketDockSkins»
- Open Dock Setting (by right click) then change Position to «Bottom» and Style to «Big Sur»

- Now you can go to task bar setting and hide it

- Remove the default icon/app in the Dock.
- Copy icons in «macOS BigSur ICONS by Maiguris» (folder inside the skins zip above) to «C:Program Files (x86)RocketDockIcons».
- Add Items to the Dock by Icon and Setting Open Program by Path.

7. Change the Mouse Cursor
https://www.deviantart.com/diamond8fighter/art/macOS-cursors-for-Windows-849162315
- Right click on «.Install.inf» and click «Install»
- Go the the mouse setting (additional mouse options) and change the theme

All software in this post you can easily download here
https://drive.google.com/file/d/1EunXnyq8CGDu9_H7UCczATdi6jHQTUt6/view?usp=sharing
Skip to content
Apple has recently released the new version of their flagship operating system macOS. The new version of macOS is being called Big Sur. If you are not an Apple user and are using a Windows PC, then you can also get some fun by making your Windows 10 PC look like macOS Big Sur.
If you want to make your Windows 10 PC look like the latest version of Apple macOS Big Sur then you can follow these steps:
- Download and install RocketDock from https://punklabs.com/.
- Download macOS Big Sur pack for RocketDock from https://www.deviantart.com/maiguris/art/macOS-BigSur-For-RocketDock-847338077.
- From the downloaded ZIP file, extract all the folders beginning with Big Sur into C:Program Files (x86)RocketDockSkins. Similarly, extract the icons folder from the ZIP to any folder on your hard drive.

- Right-click on RocketDock and choose Dock Settings. In the settings, select Style section and then choose any of the Big Sur themes – Big Sur Light, Big Sur Night, Big Sur RoundedNight, Big Sur RoundedLight.

- Right-click on RocketDock, choose Icon settings, click on the + icon and add the icon folder from step 3. Select the newly added folder and click OK.
- Right-click on Windows Taskbar and select Taskbar settings. Select the option, Automatically hide the taskbar in desktop mode. This will hide the taskbar on your Windows desktop.

- In the RocketDock settings, select Position section and choose Bottom as screen position.

- Download Windows 10 themes from https://www.deviantart.com/niivu/art/Big-Sur-Windows-10-Suite-849525656. Extract the contents of Themes folder from the ZIP into C:WindowsResourcesThemes.
- Download UltraUxThemePatcher from https://mhoefs.eu/software_uxtheme.php. Use this to patch your theme files in Windows 10.
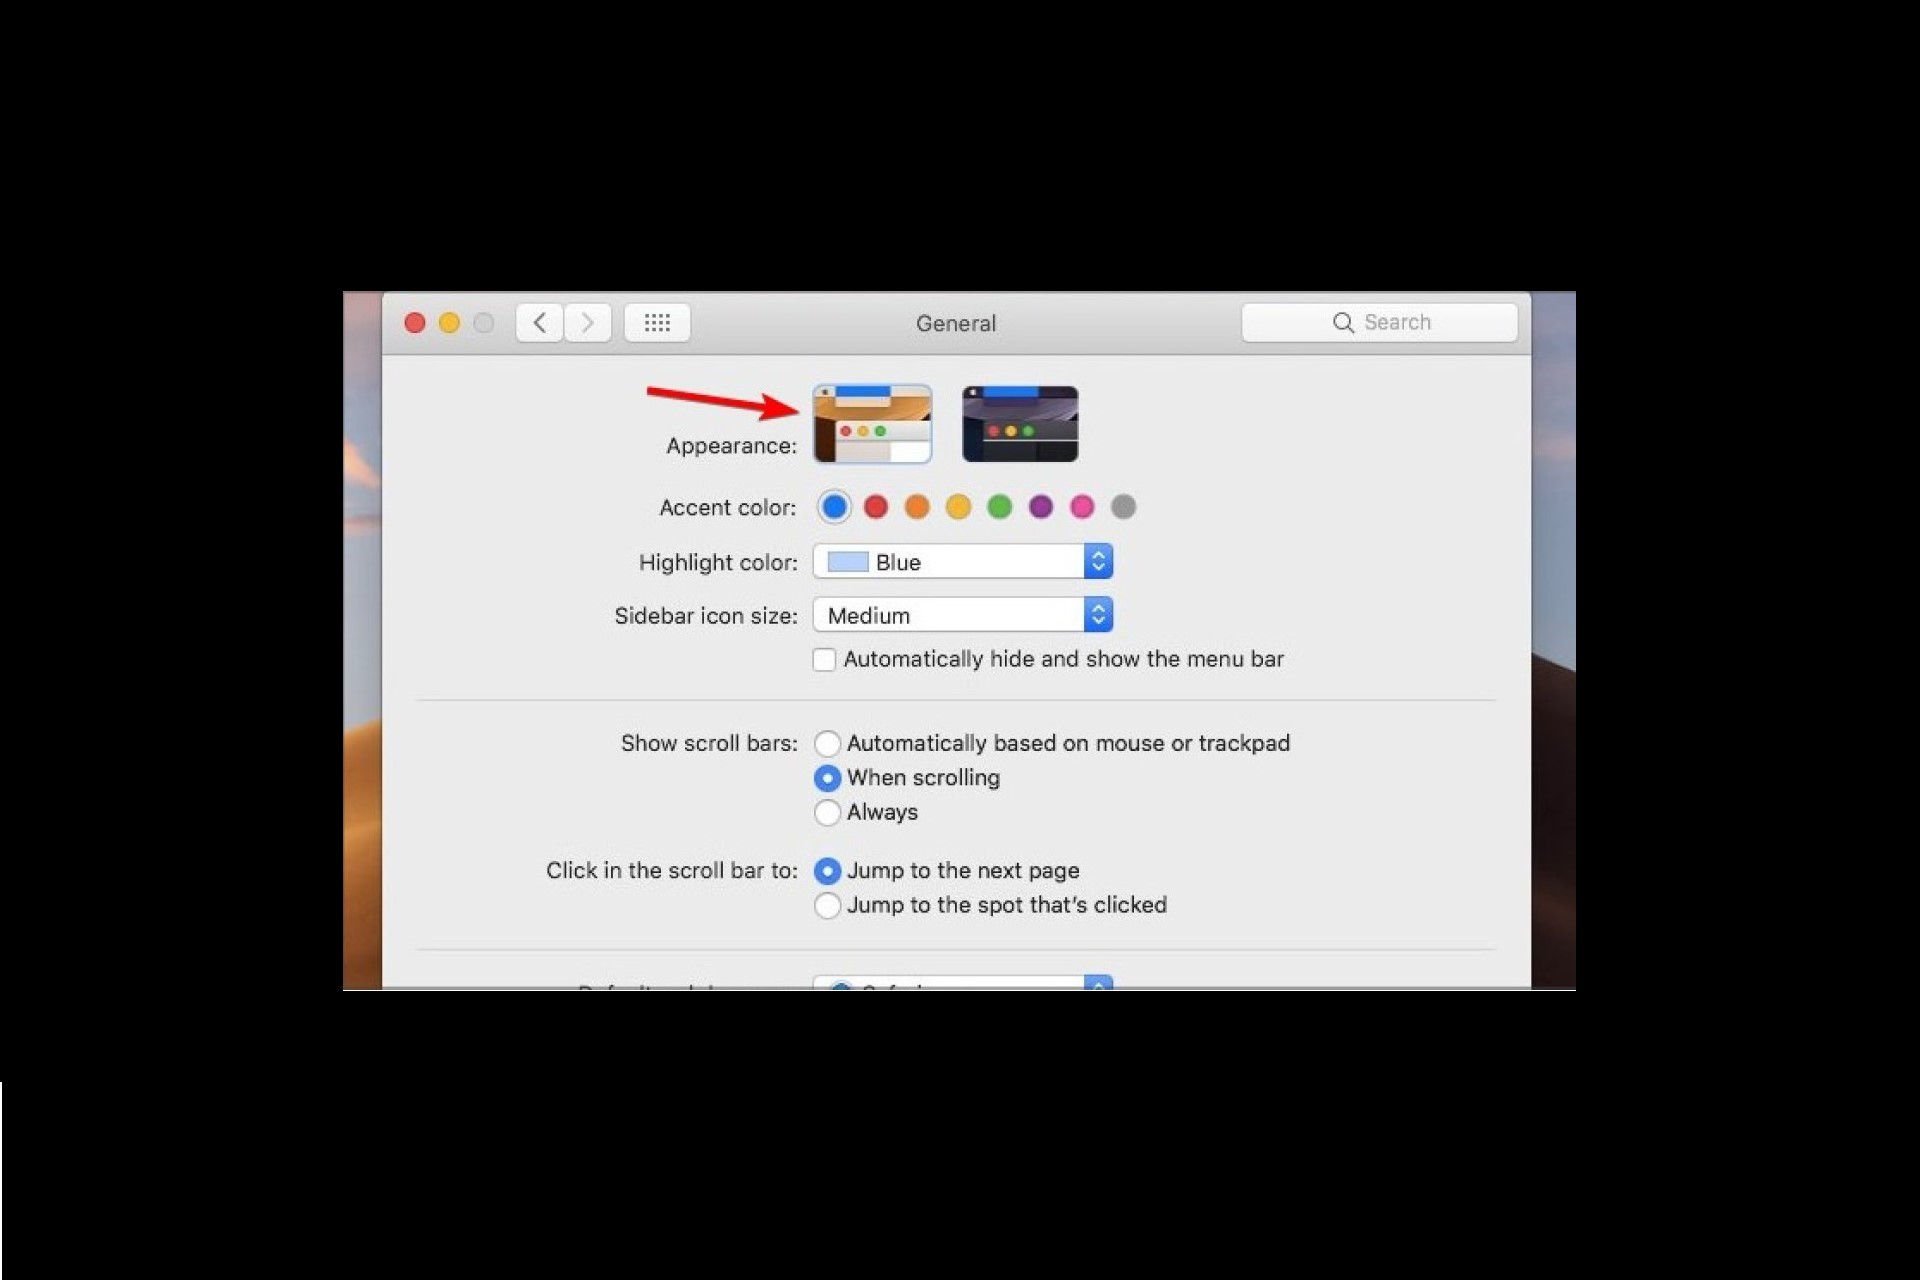
- Restart your Windows PC and choose macOS Big Sur themes by right-clicking on Windows desktop and choosing Personalization.


This is it, now you have macOS Big Sur theme installed on your Windows 10 PC complete with a dock. Now your Windows PC must be looking like macOS Big Sur. For extra effect, you can even change the wallpaper to macOS wallpapers which are available all over the internet.
We use cookies on our website to give you the most relevant experience by remembering your preferences and repeat visits. By clicking “Accept”, you consent to the use of ALL the cookies.

Welcome to the macOS Big Sur Hackintosh Tutorial. In this article, we will show you how to create a macOS Big Sur installer using Windows 10 PC. If you own a Mac, you can follow my other tutorial to create a macOS Big Sur installer from a Mac/Hackintosh. Please note that this is not a complete Big Sur Hackintosh step by step guide. After you create the installer, there still one critical step, creating and configuring the EFI. The EFI configuration will be in another post.
This tutorial is based on OpenCore version 0.6.3. If there is a new version, the steps might be a little bit different but overall its the same.
Prerequisites
- Windows 10 PC with 15 GB of free hard disk space
- OpenCore RELEASE
- Python
- USB Drive 16 GB or more
Step 1. Download the macOS Big Sur Files
At this point, make sure you have installed Python software on your Windows 10. You can download and install Python from the following link.
https://www.python.org/downloads/
After Python is installed, now download the latest OpenCore Master file from the following link
https://github.com/acidanthera/OpenCorePkg/archive/master.zip
Extract the file and then open the command prompt and cd to the macrecovery folder inside the Utilities folder. For example
cd "D:SoftwareBigSur_HackintoshOpenCorePkg-masterUtilitiesmacrecovery"
And then run this command. The following command is for macOS Big Sur download. For another macOS version, please visit this dortania page.
python macrecovery.py -b Mac-E43C1C25D4880AD6 -m 00000000000000000 download

Wait until the download process completes.

Step 2. Format the USB drive
Once the download completed, now we need to format the USB drive. To do this, open the Disk Management. Right-click the Windows Start Menu and click Disk Management.

If your USB disk has multiple partitions as mine above, right-click on each volume and click Delete. Make sure there is no important data in it. Backup first if necessary. And then once all volumes are deleted.
- Right-click and choose New Simple Volume. In this example, I use all the space of my USB drive. And then Format it with FAT32 and call it “EFI”.


Now open the USB drive and create a new folder called com.apple.recovery.boot. And then copy the following files from the OpenCore folder OpenCore-0.6.3-RELEASEUtilitiesmacrecovery.
- BaseSystem.chunklist
- BaseSystem.dmg

Now copy the EFI folder from the OpenCore folder to the USB drive. In my case, it would be OpenCore-0.6.3-RELEASEX64EFI

At this point, we have successfully created the macOS USB installer from Windows 10. But, we still need to configure the EFI in order to boot our PC and install macOS Big Sur.
If you have an AMD FX PC, you may try to use my EFI which can be downloaded from the link below. Replace the EFI folder with mine below. Visit this page and scroll down to the EFI download section.
Download EFI folder for AMD FX for macOS Big Sur
Последнее изменение: 6 августа 2019 г.
Чтобы исправить различные проблемы с ПК, мы рекомендуем DriverFix: это программное обеспечение будет поддерживать ваши драйверы в рабочем состоянии, тем самым защищая вас от распространенных компьютерных ошибок и сбоев оборудования. Проверьте все свои драйверы сейчас за 3 простых шага:
- Загрузите DriverFix (проверенный файл для загрузки).
- Нажмите «Начать сканирование», чтобы найти все проблемные драйверы.
- Нажмите «Обновить драйверы», чтобы получить новые версии и избежать сбоев в работе системы.
- DriverFix в этом месяце скачали 501 404 читателя.
Последние сборки Windows 10 и версии Windows 10 для широкой публики, несомненно, содержат множество улучшений пользовательского интерфейса. Но если этого недостаточно, вы можете попробовать еще больше настроить свою систему.
Вы когда-нибудь хотели превратить свой ПК в Mac? Что ж, с пакетом трансформации Йосемити вы сможете это сделать.
Скачать пакет трансформации Йосемити
Как сделать Windows 10 похожей на Mac OS? Это частый вопрос среди пользователей Windows 10, которые недавно перешли с ОС Apple на ОС Microsoft.
Конечно, есть также много пользователей Windows 10, которые просто предпочитают более аккуратный и чистый пользовательский интерфейс MacOS по эстетическим соображениям.
Пакет преобразования Yosemite – это просто тема ОС для Windows 10, но он также выполнит несколько изменений ваших системных файлов. Он установит набор различных программ, которые автоматически сделают Windows 10 похожей на Mac OS.
Несмотря на то, что процесс установки позволяет вам немного настроить его, вы, вероятно, захотите придерживаться параметров по умолчанию, предлагаемых программой.
После завершения установки ваша система перезагрузится, и вы получите новый красивый скин Mac для Windows.
Почти каждый элемент графического интерфейса вашей системы будет изменен: обои, значки, меню, звуки и т.д.
Обычная панель задач Windows 10 станет панелью задач Mac OS для Windows 10 и будет перемещена наверх, а док-станция Mac для Windows 10 (RocketDock) будет внизу.
Также будет добавлено множество других интересных функций, таких как виртуальные рабочие столы, меню приложений в стиле Launchpad и меню виджетов.
Конечно, это не точная копия Yosemite (и вы не должны ожидать, что это будет), но если вы хотите попробовать совершенно новый внешний вид вашей традиционной Windows, вам обязательно стоит попробовать эту программу запуска Mac OS для Windows 10.
Мы не можем гарантировать, что он будет работать без сбоев, потому что Windows 10 по-прежнему является нестабильной операционной системой, но она определенно откроет новое измерение для вашей операционной системы Windows.
Похоже, что в наши дни пользователи Mac и Windows любят экспериментировать с операционной системой конкурента, поскольку Parallels выпустила виртуальную машину для Mac OS, которая поддерживает установку Windows 10.
Кроме того, если вы хотите попробовать некоторые другие сторонние темы в своей Windows 10, вам следует прочитать нашу подробную статью об этом.
Вы можете бесплатно загрузить Yosemite Transformation Pack с веб-сайта Windowsxlive.
Существует также второй метод, который вы можете использовать для установки темы Windows Mac OS на свой компьютер. Вы можете загрузить Mac OS Transformation Pack.
После того, как вы установили его на свой компьютер, вы можете начать добавлять Mac-подобный интерфейс на свой ПК с Windows. Пакет содержит новейшие функции OS X.
Чтобы узнать больше о том, как превратить ПК в Mac и получить Mac OS x для Windows 10, перейдите по ссылке ниже.
Если у вас есть другие вопросы или предложения, не стесняйтесь оставлять их в разделе комментариев ниже, и мы обязательно их рассмотрим.
ДАЛЬНЕЙШЕЕ ЧТЕНИЕ:
- Как сделать Windows 10 похожей на Mac [СУПЕР ПРОСТО]
Примечание редактора: этот пост был первоначально опубликован в мае 2015 года и с тех пор был переработан и обновлен для обеспечения свежести, точности и полноты.
Источник записи: windowsreport.com
Combine Windows and Mac to get the best of both worlds in one pack.
by Ivan Jenic
Passionate about all elements related to Windows and combined with his innate curiosity, Ivan has delved deep into understanding this operating system, with a specialization in drivers and… read more
Updated on September 29, 2022
Reviewed by
Vlad Turiceanu

Passionate about technology, Windows, and everything that has a power button, he spent most of his time developing new skills and learning more about the tech world. Coming… read more
- If you love the Mac look but also appreciate Windows’ functionality, you might have a hard time making a decision.
- The good news is that you won’t have to pick between one or the other.
- Why settle for one when you can have both? Here’s how to make Windows look like Mac and reap all the benefits!
If you like the Mac interface or if you used it before but you would still like to keep your Windows 10 operating system, you now have the possibility to make Windows look like Mac.
It turns out it’s actually super easy to get the best of both worlds and all it takes is mastering the right apps to help you pull this off. Don’t worry, we’re here to guide you throughout the entire process.
In this manner, you’ll make your PC look like a Mac with just a couple of clicks and a Mac theme for Windows 10.
The desktop will look exactly like a Mac but your operating system will still function under Windows 10. Also, you can have access to all the Windows 10 features as you did before.
With no changes in the functionality department, you’ll just make Windows feel like Mac.
How can I make Windows look like Mac?
Making your Windows desktop look like Mac OS can be done very easily and in just a couple of minutes of your time.
You will only have to carefully follow the tutorials posted below and you will be ready to use your new apple theme for Windows 10.
1. Make Windows look like Mac using a skin pack
Users who wish to make their Windows OS look like mac can do this using a skin pack. A skin pack helps you change your UI to look exactly like on a mac OS.
You can manually customize which mac features you want to import and use on your Windows.
1. First you need to create a system restore point. It is highly recommended to do this before you download the skin packs, just in case something goes wrong during the installation or if you cannot uninstall them.
2. Press and hold the Windows button and the X button to open the Power Menu.

3. Select System from the options.
Some PC issues are hard to tackle, especially when it comes to corrupted repositories or missing Windows files. If you are having troubles fixing an error, your system may be partially broken.
We recommend installing Restoro, a tool that will scan your machine and identify what the fault is.
Click here to download and start repairing.
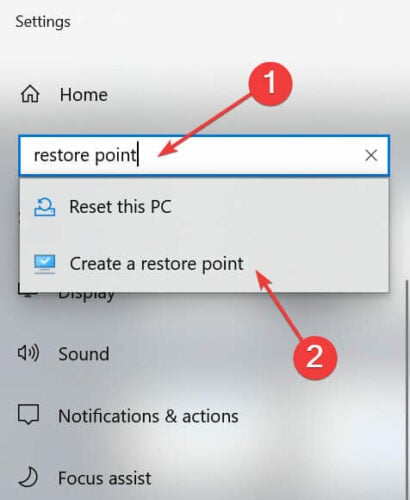
4. On the left side-panel, in the Find a setting search box, type restore point and click on Create a restore point.
5. Now you should have a window with System properties in front of you. Left click on the Create button you are presented there and give a name to the restore session that you will create.
6. Proceed with the system restore.
7. Download a Mac theme for Windows 10. You need to choose the theme which is compatible with your OS and has the same system type (32bit or 54bit).
8. Right click on the installer for the Windows 10 Mac OS skin.
9. During the installation, you will be asked what features you want to have from the mac interface. You can choose the features as you see fit.
10. After the skin pack finishes the installation, restart your Windows 10 PC.
Note: If you have any issues after the restart of the Windows 10 PC, you can boot into Safe mode and disable any of the features that are causing the issues.
2. Make Windows look like Mac using the Mac OS Transformation Pack
You can also download and install the Mac OS transformation pack. With the help of this tool, you can make Windows feel like Mac.
The pack includes a great number of changes, but it’s easy to install and use. It brings Mac themes, wallpapers, as well as new OS X features to your Windows computer.
- Norton Won’t Uninstall: 5 Ways to Remove it by Force
- Fix: Password Protected Sharing not Turning Off on Windows
- How to Uninstall uTorrent: 5 Ways to Completely Remove it
There are other interesting MAC-related things that you can do on a Windows PC. We will show you the most popular and used MAC features on Windows PCs. Here they are:
- 6 best PC emulation software for Macs
- How to create a Mac OS bootable USB Media on Windows 10
- How to install Windows 10 on a Mac
- How to read Mac-formatted drives on Windows
Now that you have your Windows 10 Mac OS skin up and running on your PC, you can start testing it and see if it fits your needs.
Don’t hesitate to write us below if you are unable to install the Mac theme for Windows on your PC, and we’ll be sure to help you succeed.
![]()
Newsletter
Combine Windows and Mac to get the best of both worlds in one pack.
by Ivan Jenic
Passionate about all elements related to Windows and combined with his innate curiosity, Ivan has delved deep into understanding this operating system, with a specialization in drivers and… read more
Updated on September 29, 2022
Reviewed by
Vlad Turiceanu
Passionate about technology, Windows, and everything that has a power button, he spent most of his time developing new skills and learning more about the tech world. Coming… read more
- If you love the Mac look but also appreciate Windows’ functionality, you might have a hard time making a decision.
- The good news is that you won’t have to pick between one or the other.
- Why settle for one when you can have both? Here’s how to make Windows look like Mac and reap all the benefits!
If you like the Mac interface or if you used it before but you would still like to keep your Windows 10 operating system, you now have the possibility to make Windows look like Mac.
It turns out it’s actually super easy to get the best of both worlds and all it takes is mastering the right apps to help you pull this off. Don’t worry, we’re here to guide you throughout the entire process.
In this manner, you’ll make your PC look like a Mac with just a couple of clicks and a Mac theme for Windows 10.
The desktop will look exactly like a Mac but your operating system will still function under Windows 10. Also, you can have access to all the Windows 10 features as you did before.
With no changes in the functionality department, you’ll just make Windows feel like Mac.
How can I make Windows look like Mac?
Making your Windows desktop look like Mac OS can be done very easily and in just a couple of minutes of your time.
You will only have to carefully follow the tutorials posted below and you will be ready to use your new apple theme for Windows 10.
1. Make Windows look like Mac using a skin pack
Users who wish to make their Windows OS look like mac can do this using a skin pack. A skin pack helps you change your UI to look exactly like on a mac OS.
You can manually customize which mac features you want to import and use on your Windows.
1. First you need to create a system restore point. It is highly recommended to do this before you download the skin packs, just in case something goes wrong during the installation or if you cannot uninstall them.
2. Press and hold the Windows button and the X button to open the Power Menu.
3. Select System from the options.
Some PC issues are hard to tackle, especially when it comes to corrupted repositories or missing Windows files. If you are having troubles fixing an error, your system may be partially broken.
We recommend installing Restoro, a tool that will scan your machine and identify what the fault is.
Click here to download and start repairing.
4. On the left side-panel, in the Find a setting search box, type restore point and click on Create a restore point.
5. Now you should have a window with System properties in front of you. Left click on the Create button you are presented there and give a name to the restore session that you will create.
6. Proceed with the system restore.
7. Download a Mac theme for Windows 10. You need to choose the theme which is compatible with your OS and has the same system type (32bit or 54bit).
8. Right click on the installer for the Windows 10 Mac OS skin.
9. During the installation, you will be asked what features you want to have from the mac interface. You can choose the features as you see fit.
10. After the skin pack finishes the installation, restart your Windows 10 PC.
Note: If you have any issues after the restart of the Windows 10 PC, you can boot into Safe mode and disable any of the features that are causing the issues.
2. Make Windows look like Mac using the Mac OS Transformation Pack
You can also download and install the Mac OS transformation pack. With the help of this tool, you can make Windows feel like Mac.
The pack includes a great number of changes, but it’s easy to install and use. It brings Mac themes, wallpapers, as well as new OS X features to your Windows computer.
- Norton Won’t Uninstall: 5 Ways to Remove it by Force
- Fix: Password Protected Sharing not Turning Off on Windows
- How to Uninstall uTorrent: 5 Ways to Completely Remove it
- Windows Photo Gallery Not Working: 3 Fixes That You Can Use
- Here Are The Best Ways to Block Ads on a Smart TV
There are other interesting MAC-related things that you can do on a Windows PC. We will show you the most popular and used MAC features on Windows PCs. Here they are:
- 6 best PC emulation software for Macs
- How to create a Mac OS bootable USB Media on Windows 10
- How to install Windows 10 on a Mac
- How to read Mac-formatted drives on Windows
Now that you have your Windows 10 Mac OS skin up and running on your PC, you can start testing it and see if it fits your needs.
Don’t hesitate to write us below if you are unable to install the Mac theme for Windows on your PC, and we’ll be sure to help you succeed.
![]()