Возникновение проблем и сбоев не является чем-то новым, так как это стало обычным явлением для некоторых пользователей после установки Windows 11.
Большое количество клиентов сообщили о серьезной проблеме с подключением между контроллером Xbox и ПК.
Появляется уведомление об ошибке, в котором говорится, что USB-устройство не обнаружено, и в этом случае нам нужно будет установить самое последнее доступное обновление драйвера.
Если ваш геймпад Xbox не работает должным образом по какой-либо другой причине, перечисленные ниже методы могут решить вашу проблему. Не забудьте тщательно опробовать их шаг за шагом.
Какие контроллеры Xbox работают с ПК?
Контроллер Xbox One можно использовать для игр на компьютере, если вы предпочитаете геймпад мыши и клавиатуре при игре на компьютере.
Кроме того, поскольку контроллер Xbox One изначально поддерживается Windows 11 (а также Windows 10), процесс установки чрезвычайно прост.
С другой стороны, метод подключения контроллера Xbox One к компьютеру может немного отличаться в зависимости от типа вашего геймпада и выбранного вами метода подключения.

Если вы не возражаете против проводного подключения, использование USB-кабеля для подключения любого контроллера Xbox One к ПК — это, безусловно, самый простой способ начать работу. Таким же образом можно использовать геймпады Microsoft Xbox One S и Elite.
Все контроллеры Xbox One оснащены портом Micro USB. По этой причине вы можете подключить их напрямую к ПК с помощью адаптера Micro USB — USB Type-A (продается отдельно). А поскольку Windows может автоматически распознавать подключенные контроллеры Xbox One, в этом нет ничего лишнего.
Что делать, если контроллер не распознается в Windows 11?
1. Отключите и снова подключите контроллер
Вы можете перезапустить консоль Xbox, выполнить полный цикл питания или физически отсоединить ее от компьютера, чтобы полностью перезагрузить ее и решить многие распространенные проблемы.
Попробуйте отключить и снова подключить контроллер к ПК несколько раз. Эта простая стратегия всегда должна быть первым методом, который вы пробуете, поскольку она постоянно дает положительные результаты.
2. Обновите драйвер USB
- Теперь разверните папку контроллеров универсальной последовательной шины , щелкните правой кнопкой мыши каждую опцию USB и нажмите « Обновить драйвер » .

Дождитесь завершения процессов, затем перезагрузите компьютер, чтобы изменения вступили в силу. Теперь вы можете повторить попытку с помощью контроллера Xbox.
Если вам нужно автоматически обновить драйвер USB и сэкономить больше времени, с DriverFix этот процесс будет выполнен за считанные минуты, и вы сможете пользоваться последней версией любого драйвера.
3. Переустановите драйвер контроллера Xbox.
- Щелкните правой кнопкой мыши значок « Пуск », затем выберите « Диспетчер устройств» .

- Теперь разверните раздел контроллера Xbox One , щелкните его правой кнопкой мыши и нажмите « Удалить устройство » .

После завершения операции перезагрузите компьютер. Во время перезагрузки компьютера Windows автоматически переустановит драйвер.
4. Отключите антивирус
- Нажмите стрелку расширения на панели задач и щелкните правой кнопкой мыши значок антивируса, затем выберите « Управление щитами Avast », а затем « Отключить на 10 минут » .
![]()
- Если у вас установлены другие антивирусные программы, вы можете временно отключить приложение, выполнив те же действия, что и выше, или аналогичные шаги.
![]()
Если проблема больше не возникает, вероятно, причиной проблемы было ваше антивирусное приложение. Вам следует подумать о выборе другого совместимого антивирусного решения для Windows 11 для защиты вашего компьютера.
5. Обновите Windows
- Нажмите Windows клавишу + I , чтобы открыть приложение « Настройки », затем нажмите « Центр обновления Windows » на левой панели.

- Если у вас есть какие-либо новые обновления для загрузки, нажмите кнопку « Установить сейчас » и дождитесь завершения процесса, в противном случае нажмите кнопку « Проверить наличие обновлений » .

Запуск более ранней версии Windows может быть причиной ошибки, которую можно легко устранить, обновив операционную систему. Скорее всего, ошибка будет исправлена в следующих релизах.
6. Замените USB-кабель
Если вы видите уведомление о том, что USB-устройство не распознано при попытке использовать контроллер Xbox, возможно, проблема связана с вашим кабелем.
По словам пользователей, существуют различные типы USB-кабелей, некоторые из которых предназначены исключительно для зарядки, а другие предназначены для зарядки и передачи данных.
Чтобы определить, работает ли ваш контроллер Xbox неправильно или не распознается, попробуйте заменить USB-кабель и посмотреть, решит ли это проблему.
Ошибка драйвера контроллера Xbox Windows 11
Хотя мы обсудили наиболее актуальные и эффективные исправления в предыдущем разделе, скорее всего, проблема связана с ошибкой драйвера контроллера Xbox в Windows 11.

И для таких проблем два лучших метода устранения неполадок — либо обновить драйвер, если вы используете более старую версию, либо установить драйвер вручную. Эти два метода обязательно устранят любые проблемы.
Если эти два не работают, вы всегда можете попробовать отключить, а затем снова подключить контроллер. Часто Windows 11 не может автоматически установить драйвер контроллера Xbox, что приводит к ошибке. Но простое повторное подключение, скорее всего, исправит это.
Итак, теперь, столкнулись ли вы с ошибкой драйвера контроллера Xbox в Windows 11 или она не распознана, вы знаете, как избавиться от них обоих и наслаждаться играми на Xbox.
Что делает Xbox Game Pass?
За единую ежемесячную плату Xbox Games Pass предоставляет вам доступ к более чем 300 играм, которые вы можете загрузить и играть на своей консоли Xbox One или Xbox Series X/S.

Все пользователи Windows 11 имеют простой доступ к Xbox Game Pass, которая на сегодняшний день является самой значимой новой игровой платформой Microsoft.
Он начинается с 10 долларов в месяц и дает вам доступ к постоянно меняющейся коллекции отличных игр для ПК. Game Pass доступен и на консолях за ежемесячную абонентскую плату в размере 15 долларов.
Наряду со всеми крупными играми Microsoft, от Gears 5 до Halo Infinite, библиотека также включает в себя множество увлекательных сторонних игр, таких как Dragon Ball FighterZ и The Forgotten City. Игры доступны на сервисе только в течение ограниченного времени, поэтому пользуйтесь ими, пока можете.
Если вы приобретете Xbox Game Pass Ultimate, вы также получите Xbox Live Gold, Xbox Game Pass для ПК, EA Play и доступ к Xbox Cloud Gaming (ранее известному как Project xCloud) по той же цене, что и базовый Xbox Game Pass.
Сообщите нам в комментариях ниже, какое решение сработало для вас лучше всего, а также в какую игру из комплекта Xbox Game Pass вы играете больше всего. Спасибо за чтение!
Learn how to properly connect your PS4 controller to your Windows 11 PC
by Cesar Cadenas
Cesar has been writing for and about technology going on for 6 years when he first started writing tech articles for his university paper. Since then, his passion… read more
Published on November 24, 2022
Reviewed by
Alex Serban

After moving away from the corporate work-style, Alex has found rewards in a lifestyle of constant analysis, team coordination and pestering his colleagues. Holding an MCSA Windows Server… read more
- If you decide to hop over to PC gaming, you don’t have to throw away your old PS4 controllers as you can use them on Windows 11.
- However, there may be times when your controller won’t be recognized by Windows 11.
- This guide will show you steps that you can take to fix your PS4 controller not being recognized by your PC.
There are many different ways that you can play video games on your Windows 11 computer. The classic mouse and keyboard, Xbox controller, or PlayStation 4 controller; all work in Microsoft’s latest OS.
But there have been reports that the PS4 controller may not get recognized on your Windows 11 PC. This may due to outdated Bluetooth drivers that don’t work or DS4 Windows not working properly.
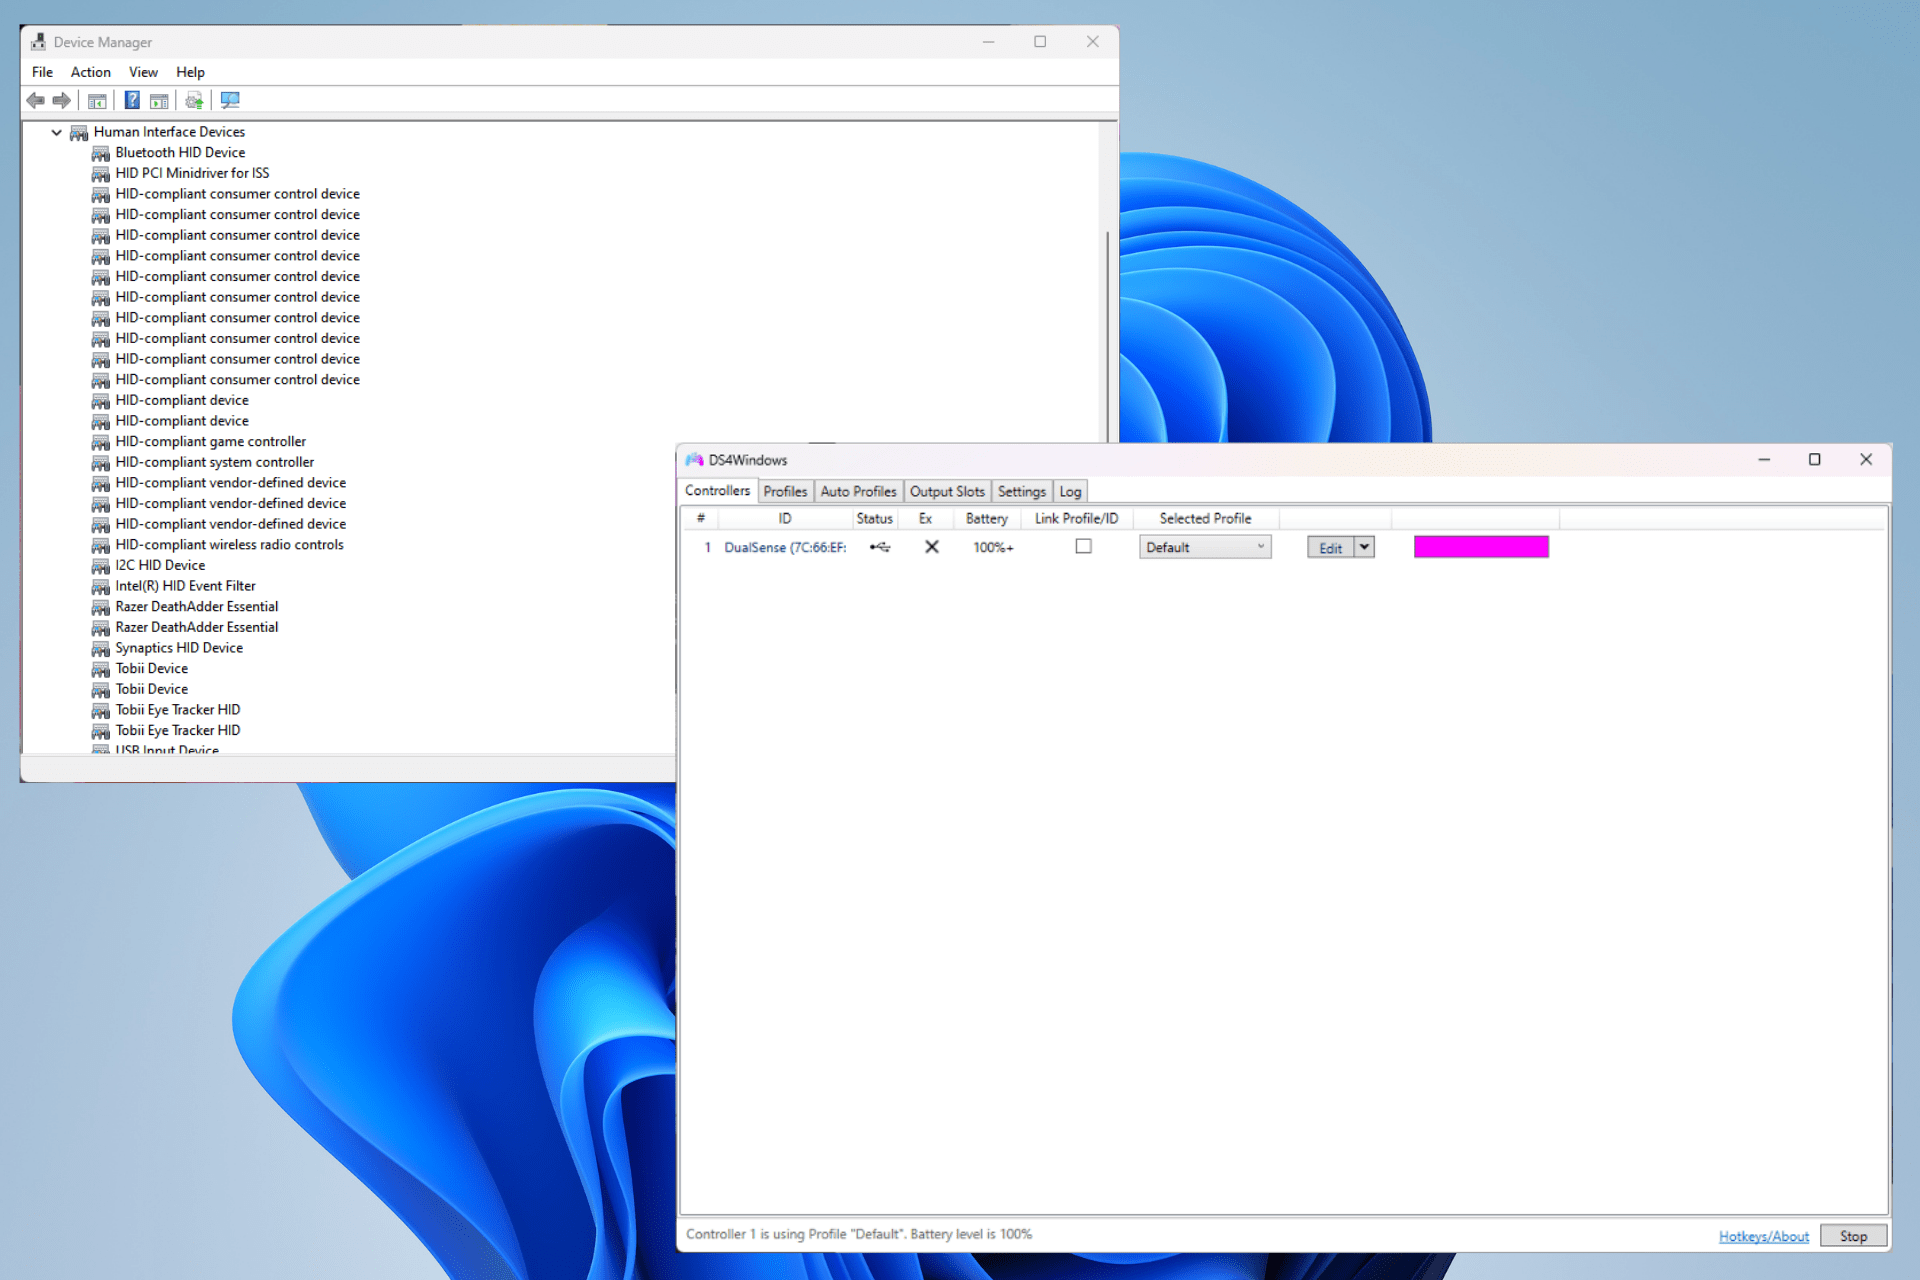
Does Windows 11 support DS4?
Yes, Windows 11 supports DS4. So if you want to connect your PS4 controller to PC, you’ll need to install it alongside PS4 controller drivers for Windows 11.
Your PS4 can connect to the PC via Bluetooth, but a lot of games don’t support that controller and prefer Xbox devices. That is why you download and install DS4 Windows, a third-party app that masks your PS4 controller as an Xbox one.
That way, you can use the PS4 controller however you please. But things are hardly ever that simple and some connectivity problems will arise. In those instances, you’ll have to run DS4 Windows as an administrator.

This guide will show you what you can do if your PlayStation 4 controller is not being recognized by your Windows 11 computer. Instructions are straightforward to follow.
How do I get my PS4 controller to work on my PC?
- Does Windows 11 support DS4?
- How do I get my PS4 controller to work on my PC?
- 1. Update Bluetooth drivers
- 2. Install DS4 Windows
- 3. Update DS4Windows
- 4. Run as administrator
- 5. Re-enable Controller
- What else should I know about Windows 11 and gaming controllers?
1. Update Bluetooth drivers
Your PS4 controller should suddenly work again after updating the Bluetooth drivers. You can either complete this task manually using Device Manager or automatically by utilizing a driver updater program that makes your work easier.
Here’s the steps of how to correctly update Bluetooth manually:
1.Click on the magnifying glass icon to bring up the search bar.
2. Search for the Device Manager.
3. Click on the entry that appears.
4. In the Device Manager, search for the Bluetooth entry if your computer can connect via Bluetooth.
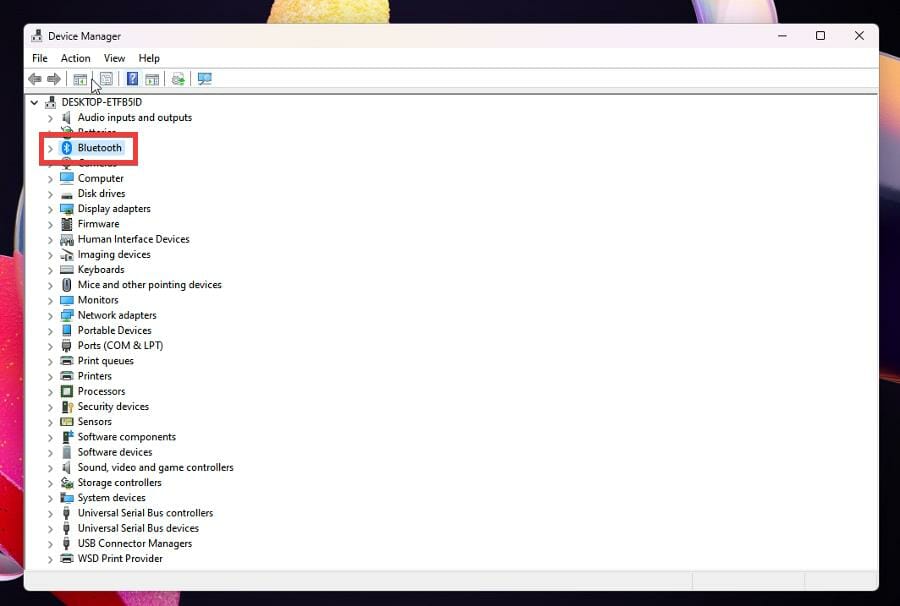
5. Click it to bring down the drop-down menu.
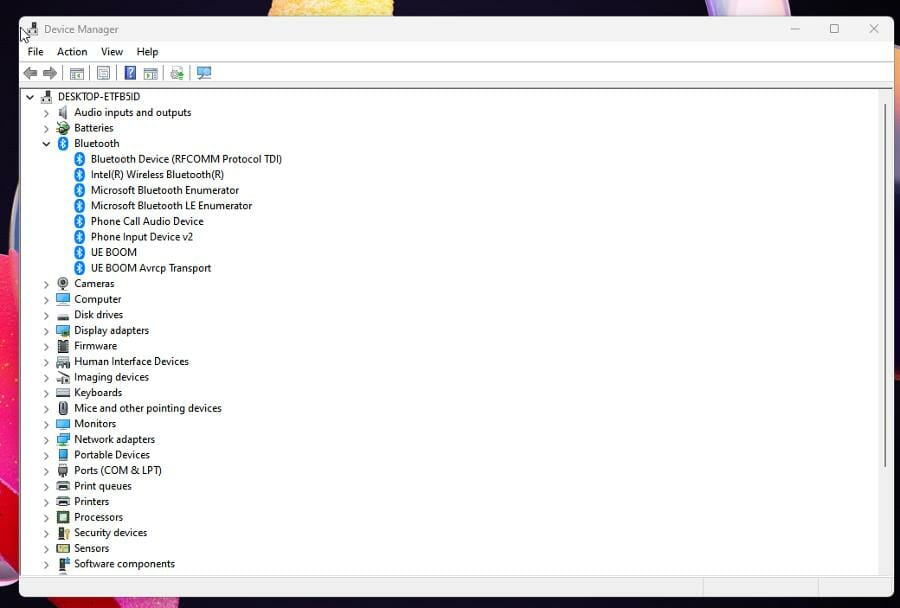
6. Right-click the entry that appears and a small window will appear.
7. Select Update driver in that small window.
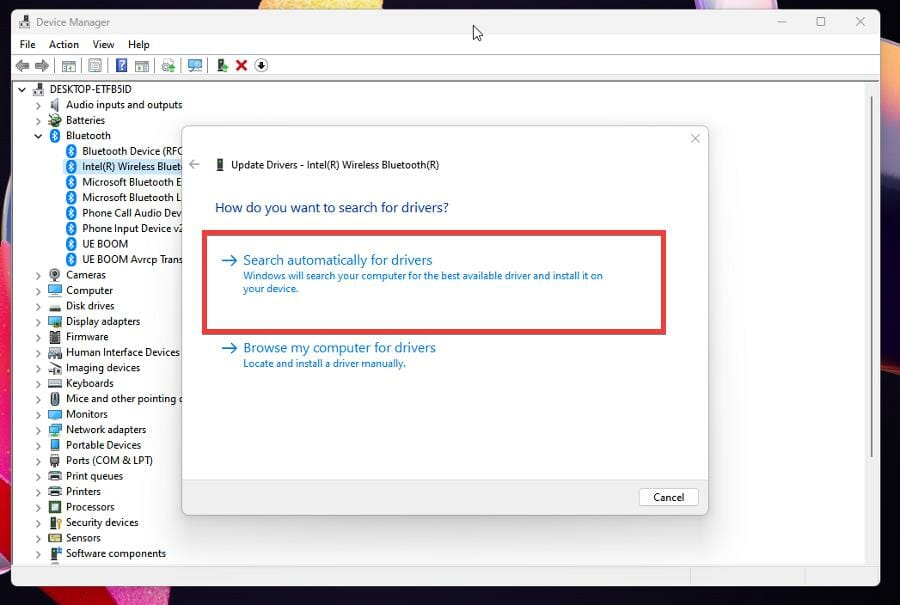
8. A window will appear.
Some PC issues are hard to tackle, especially when it comes to corrupted repositories or missing Windows files. If you are having troubles fixing an error, your system may be partially broken.
We recommend installing Restoro, a tool that will scan your machine and identify what the fault is.
Click here to download and start repairing.
9. Select Search automatically for drivers.
10. Your Windows 11 computer will automatically download and install the drivers.
11. If you have multiple entries, it’s recommended that you update the drivers for all of them.
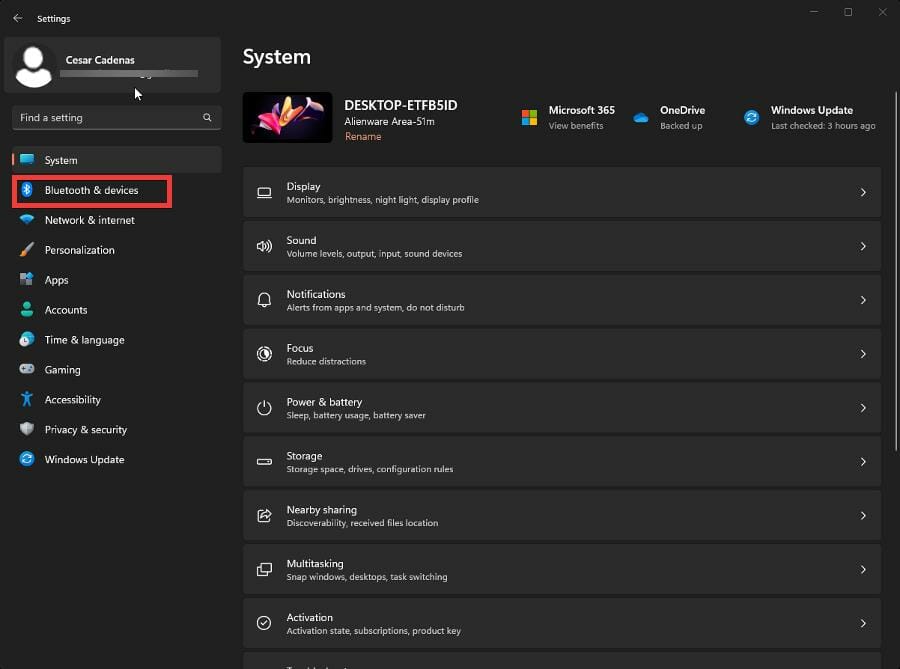
12. Then open the Settings menu.
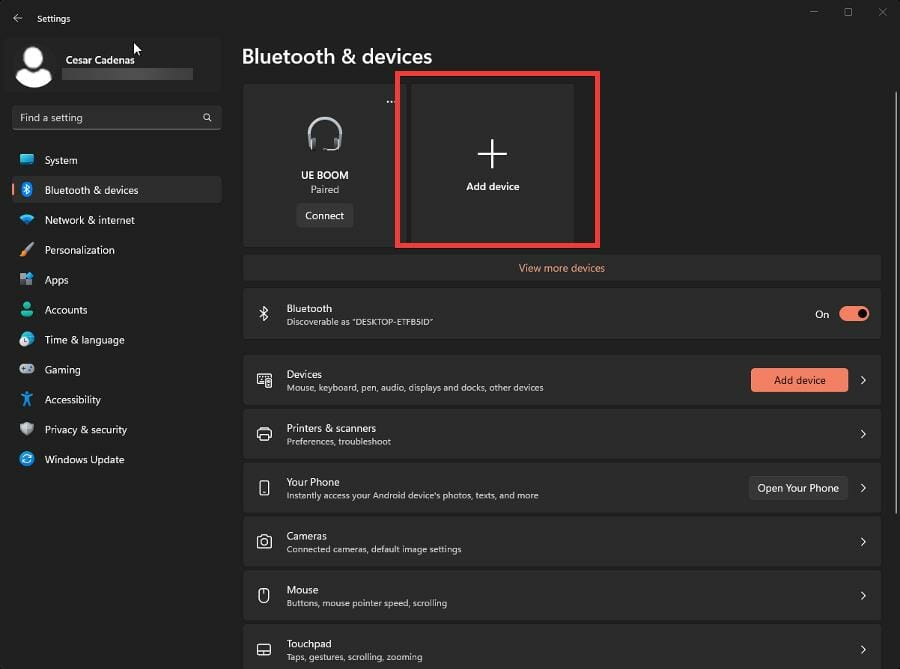
13. Select Bluetooth & devices on the left-hand side.
14. Ensure that Bluetooth is enabled by clicking the switch On.
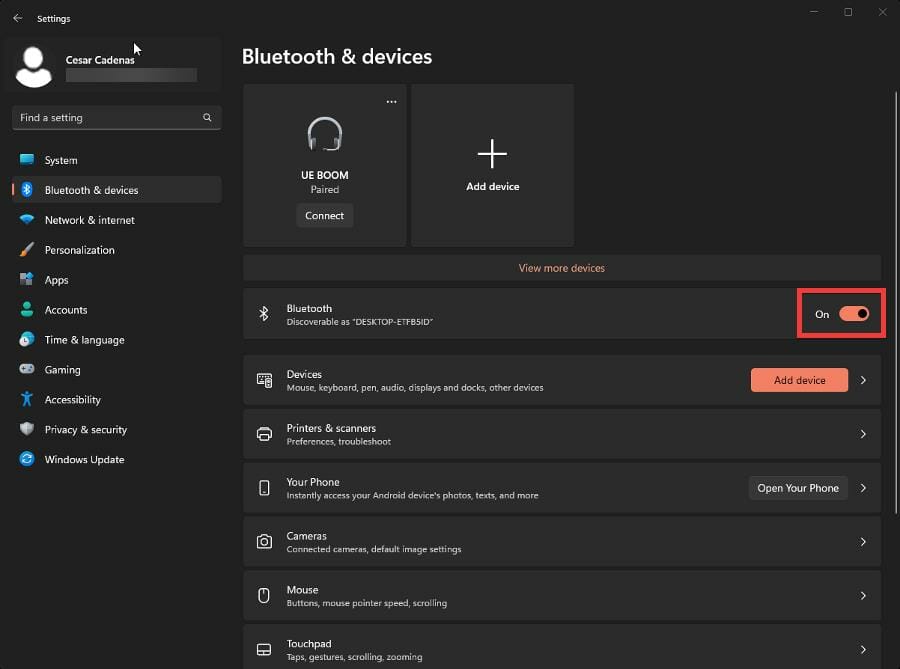
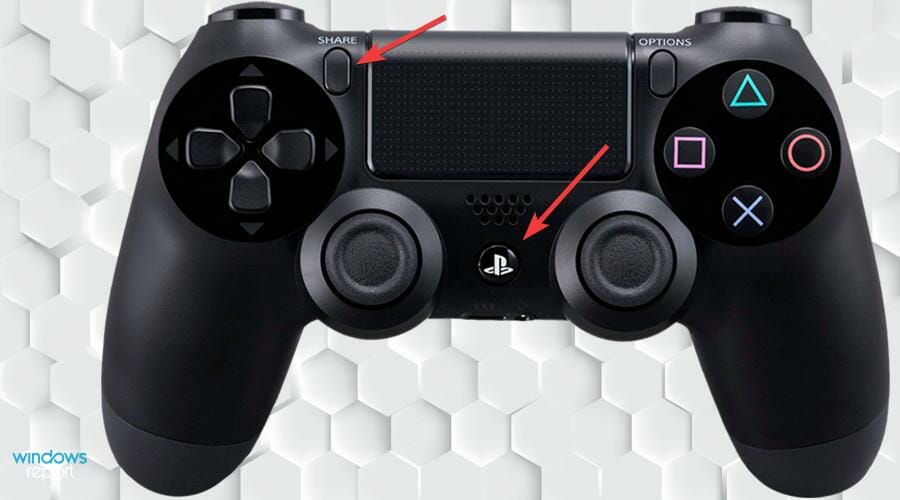
15. Hold the Share and PS button on your PS4 controller until it starts blinking rapidly. This blinking means that it’s searching for a connection point.
16. Then select Add device.
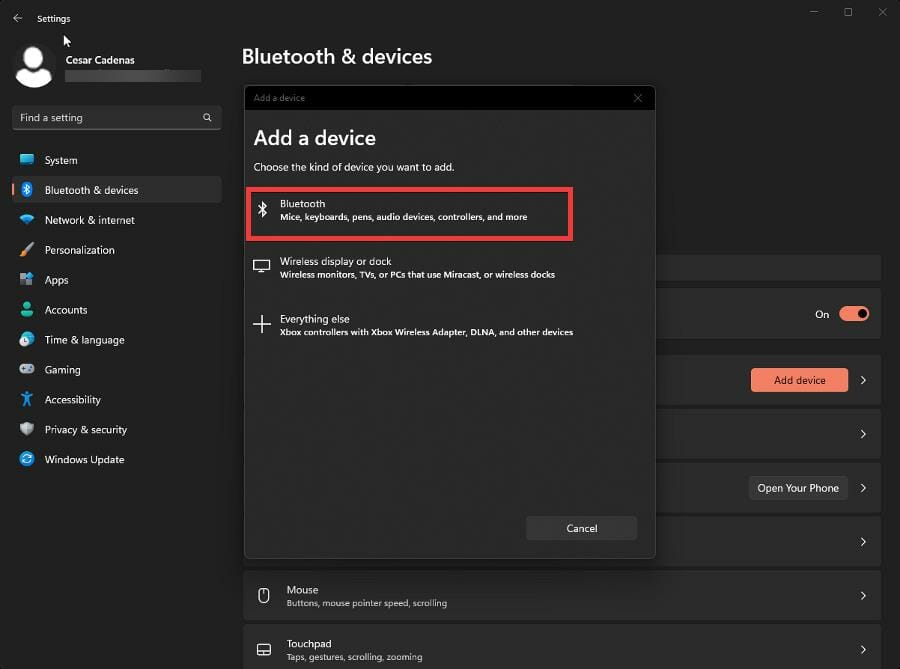
17. Select Bluetooth.
18. Select Wireless Controller.
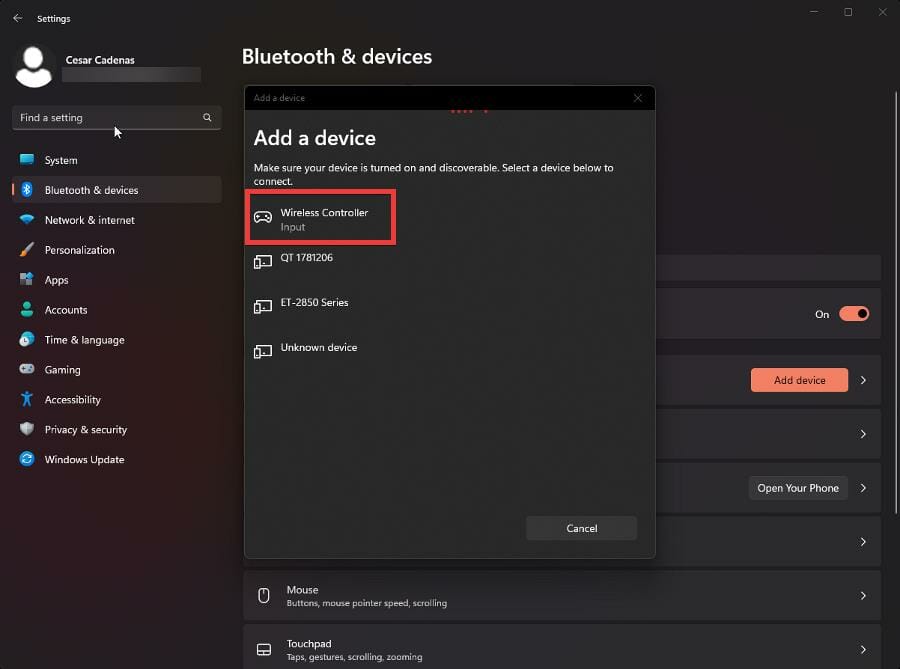
19. Your PS4 controller is now connected to your Windows 11 computer and there should be no issue.
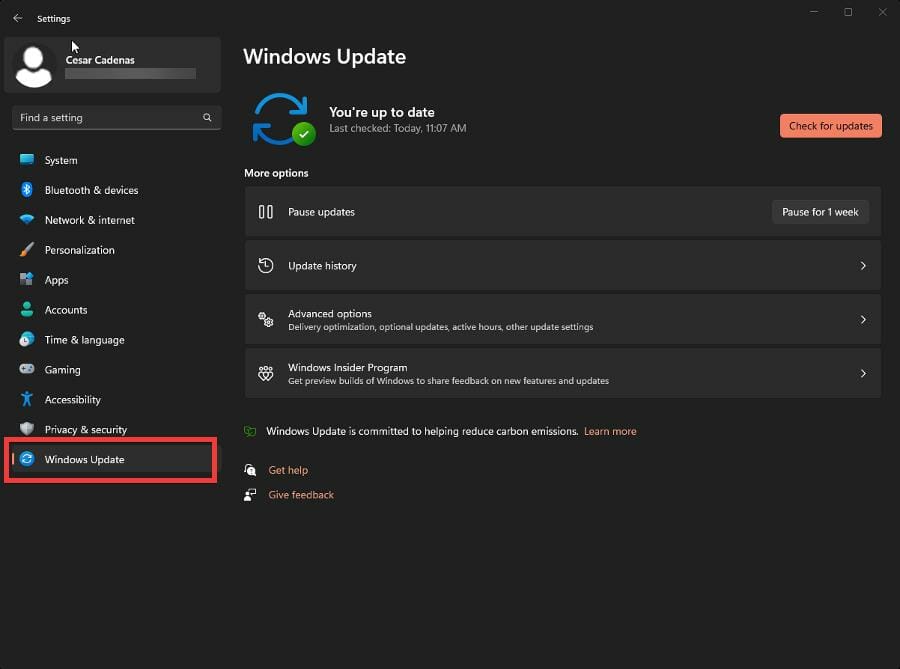
20. Conversely, you can go to the Windows Update tab in the Settings menu and click on Check for updates to see if there are new drivers.
If you’re looking for a more time-efficient way to update your drivers, you can do so automatically with DriverFix. It’s an app that scans your PC for missing or out-of-date drivers and fixes them for you.

DriverFix
Let this tool automatically find and update your Bluetooth driver along with other outdated drivers.
2. Install DS4 Windows
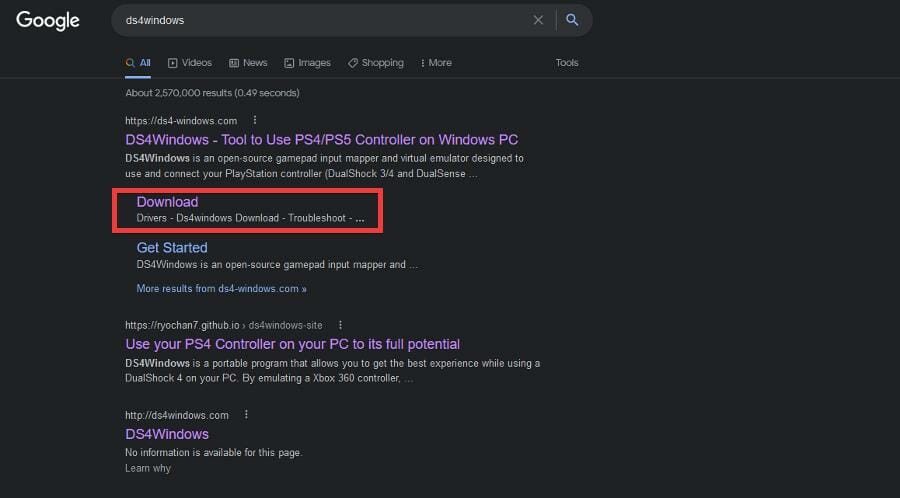
- In a web browser, search for DS4 Windows.
- Click on Download.

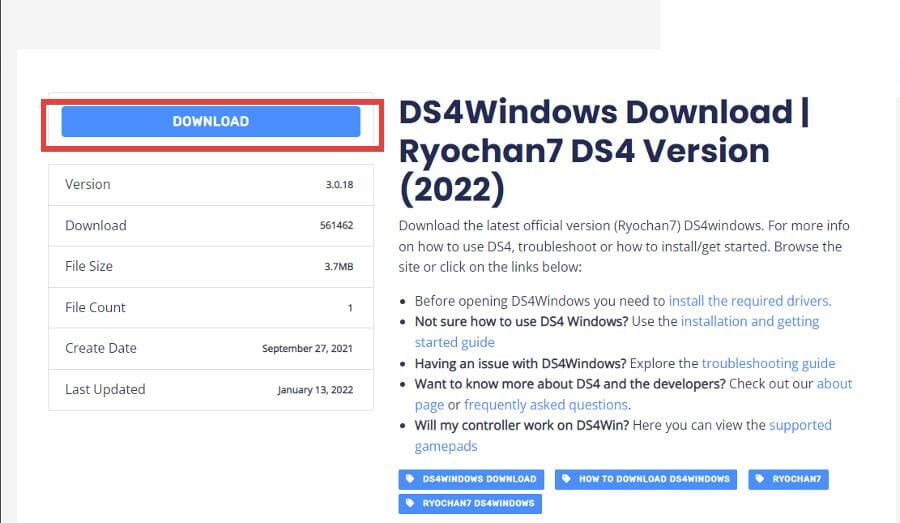
- In this new window, click the Download button.

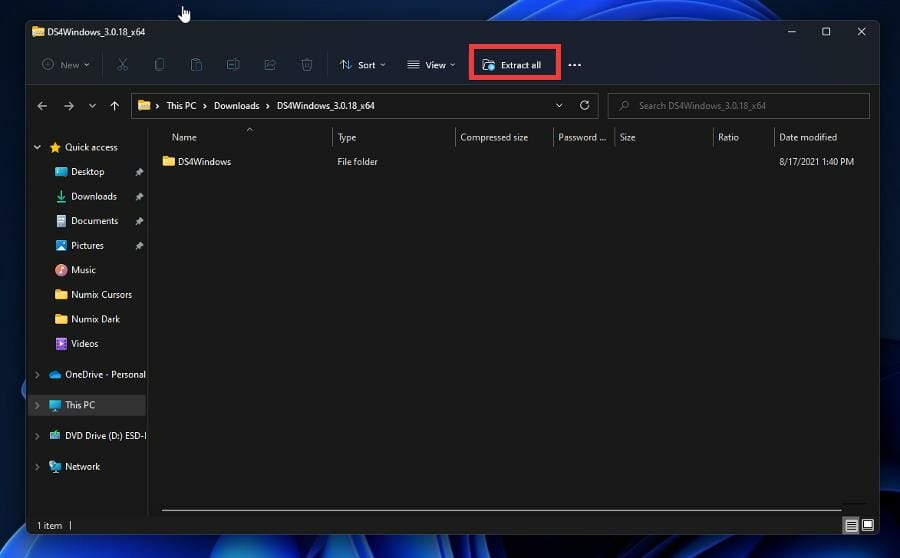
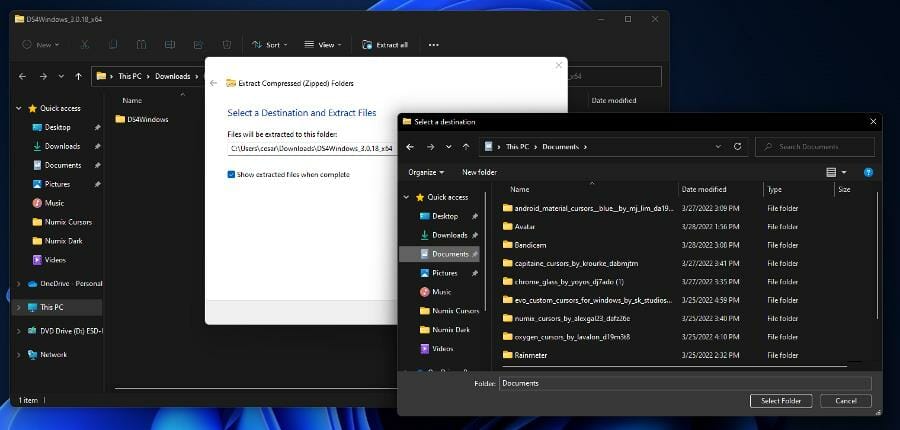
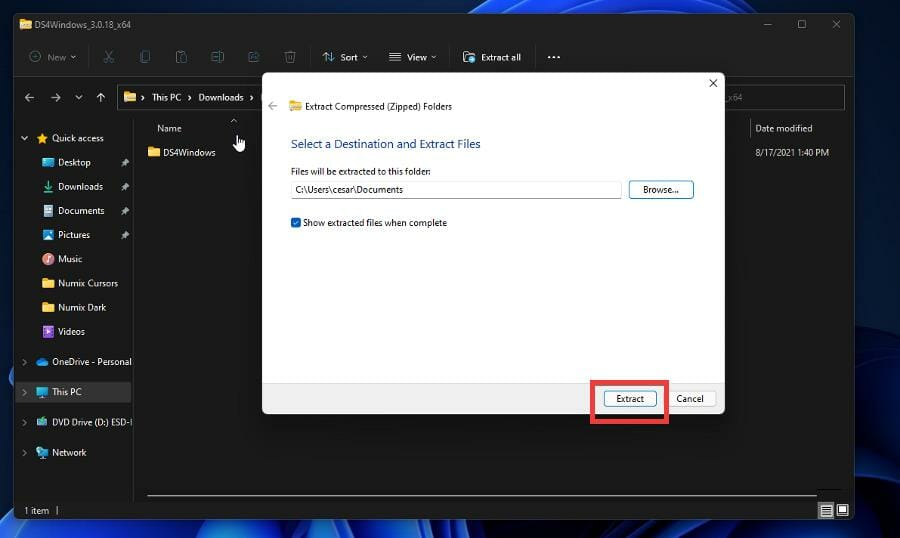
- Open the file that was downloaded and click Extract all at the top of the File Explorer. You will need to extract the app.

- Select a location where to extract the file to.

- Click the Extract button.

- Open the folder that you extracted and double-click the Application file to install the app.

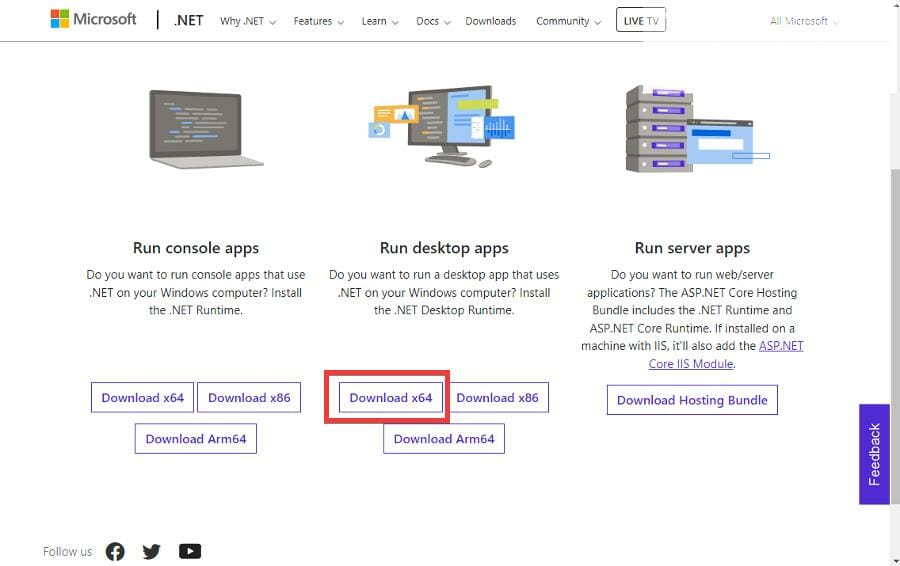
- Be aware that you may have to download .NET 5.0 Runtime. A small window will appear giving you the option.
- Download the file according to your PC’s bit version. In this example, the guide will select Download x64.

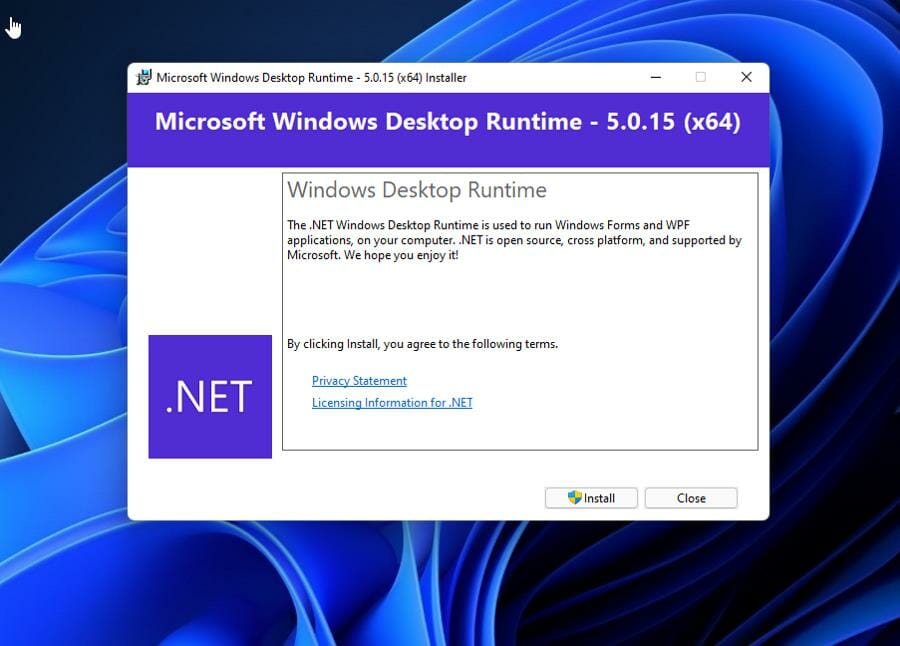
- Open the downloaded file and click Install to begin the installation process.

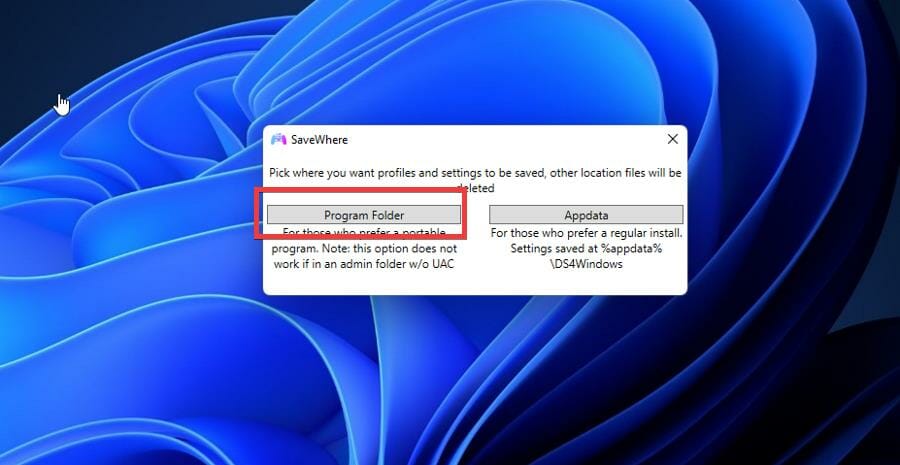
- After opening the DS4 Windows app, select where you want to save the files.


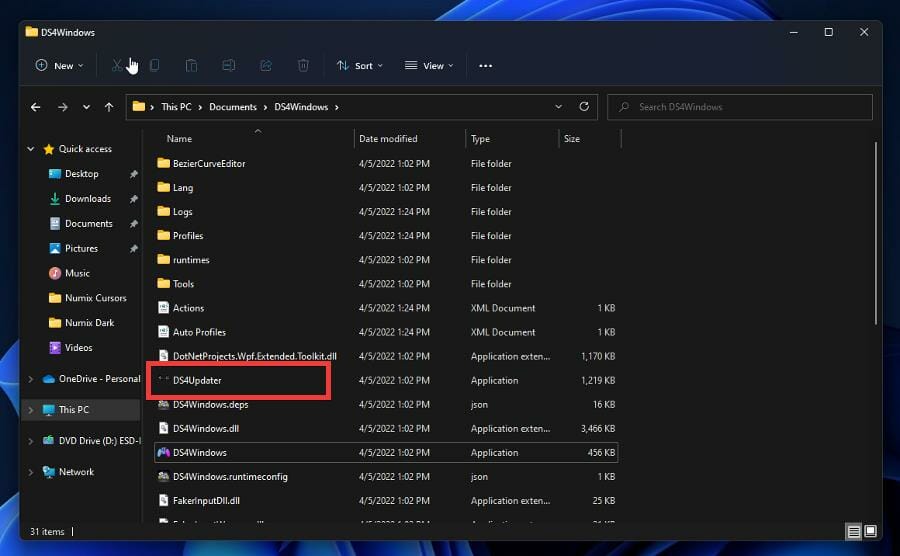
3. Update DS4Windows
- Issues with DS4 Windows may arise from compatibility problems.
- Go back to the directory where DS4 Windows sits.
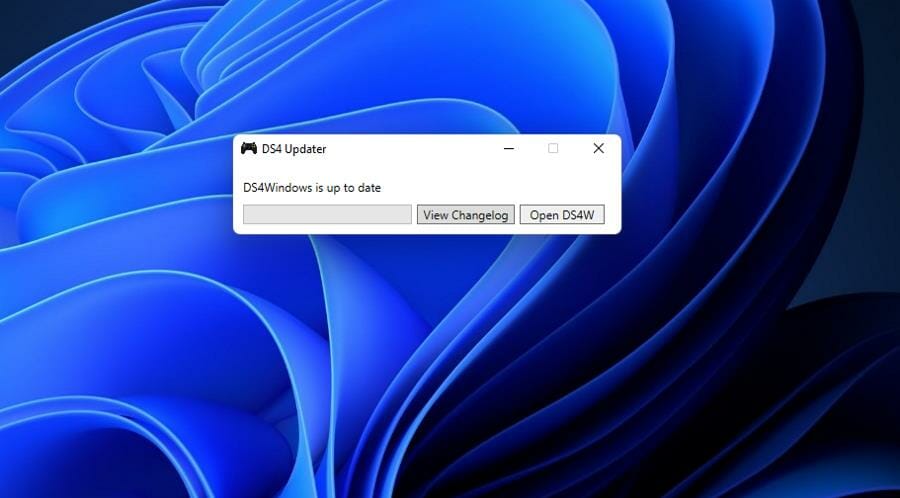
- Double click DS4Updater.

- DS4 Windows will begin to automatically download and install any updates.
- After it’s done, a window will appear stating that it’s up to date.
- A fatal error occurred while creating a TLS credential: 10013
- Windows 11 No Sleep Mode Option: 6 Ways to Fix It
- Error Code 2755: How to Fix This Windows Installer Issue
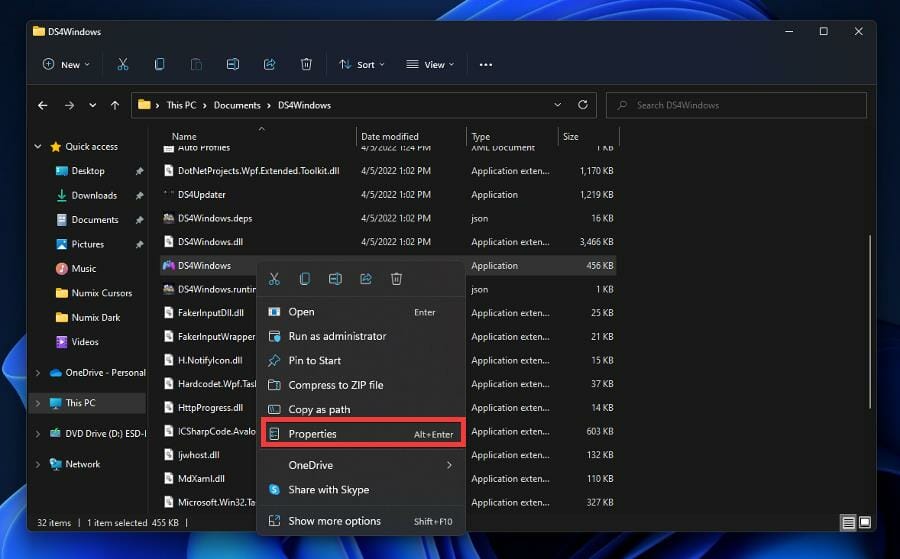
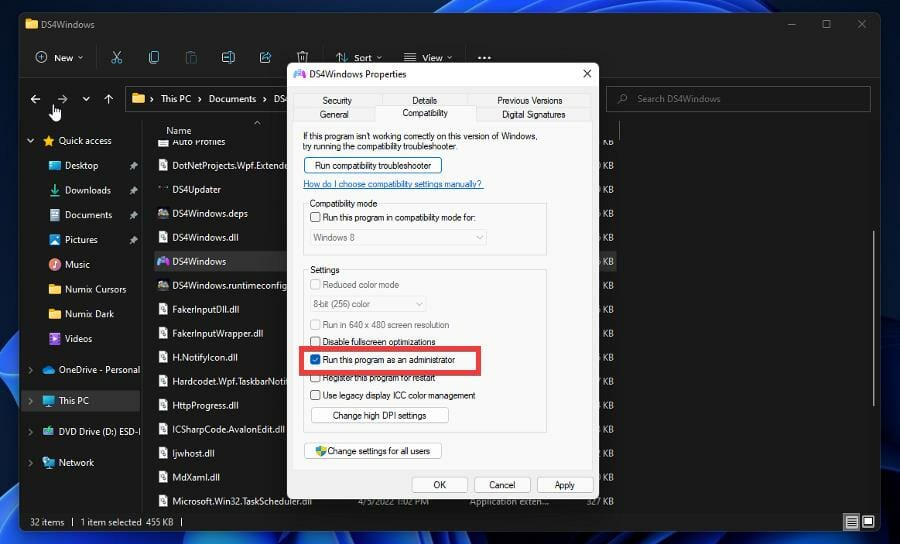
4. Run as administrator
- You can also try running DS4 Windows as an administrator.
- Return to the DS4 Windows directory and right-click the app to bring up the context menu.
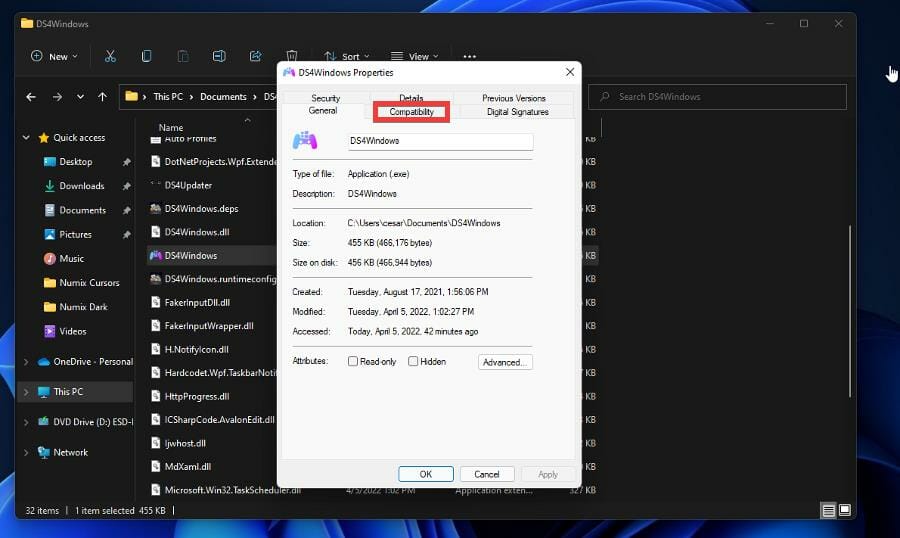
- Select Properties.

- Click the Compatibility tab.
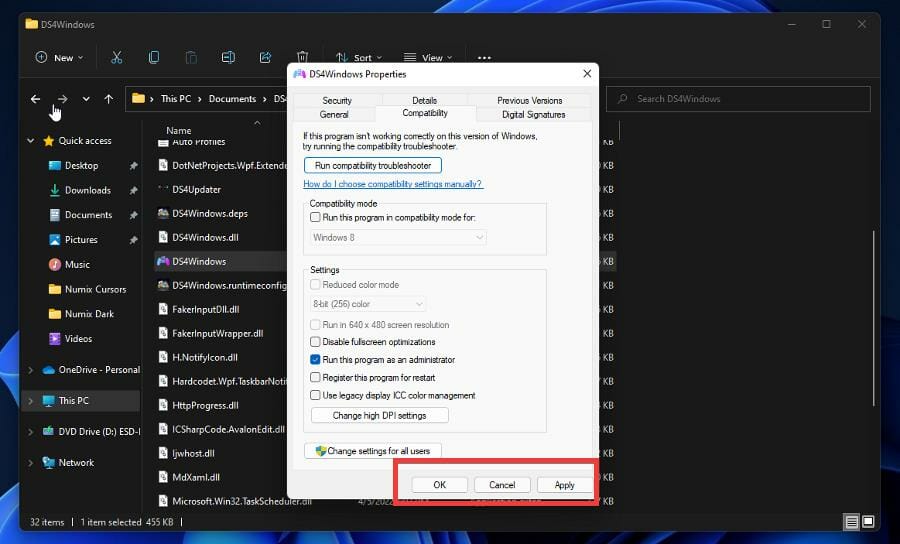
- Click the checkbox next to Run this program as an administrator.

- Click on the Apply button and then OK to save the changes.
- Now DS4 Windows should run just fine.
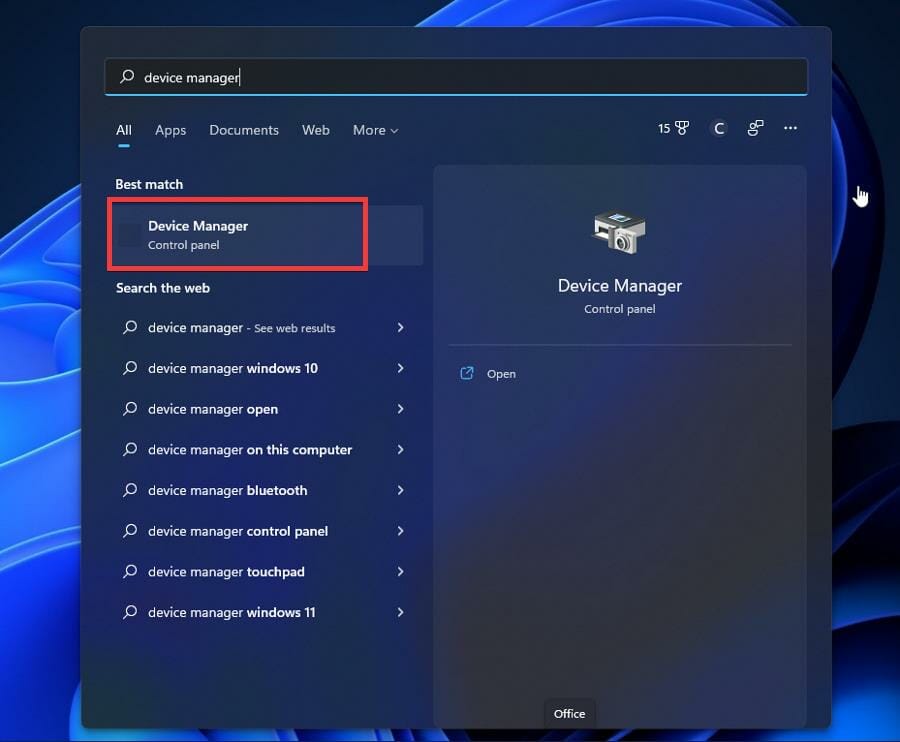
5. Re-enable Controller
- Click on the magnifying glass icon to bring up the search bar.
- Search for the Device Manager.

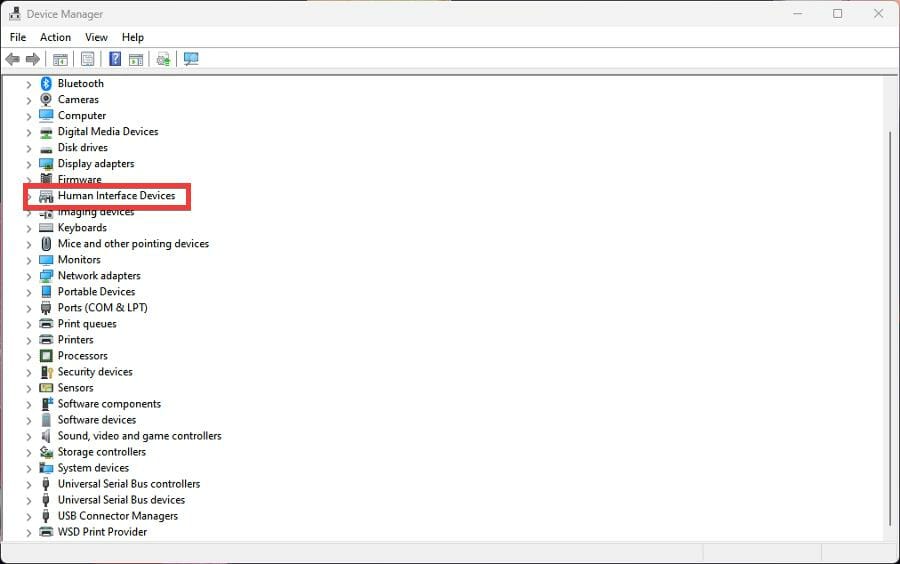
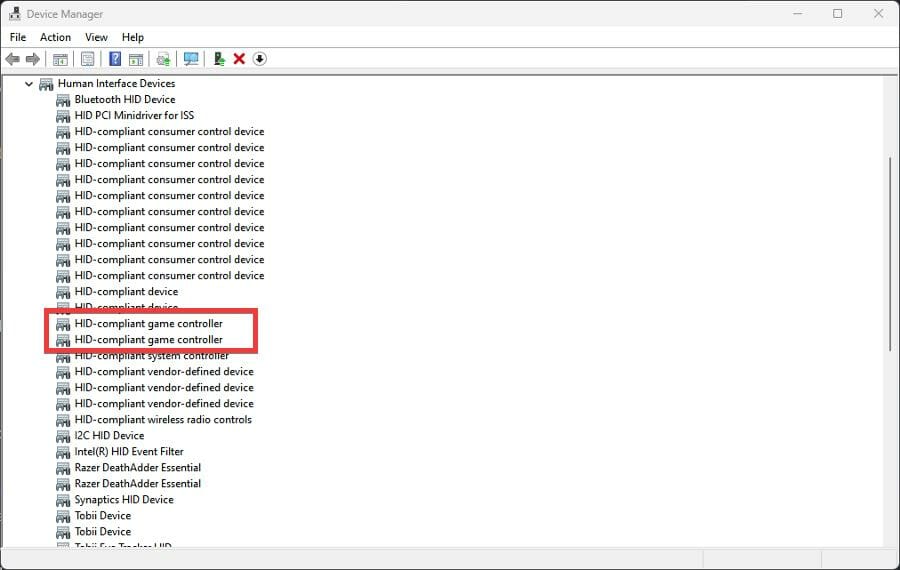
- Locate and click on Human Interface Devices in the Device Manager.

- Locate the HID-compliant game controller and right-click the entry.

- Select Enable device in the small context menu. If it’s already enabled, click Disable device instead.
- Restart your computer.
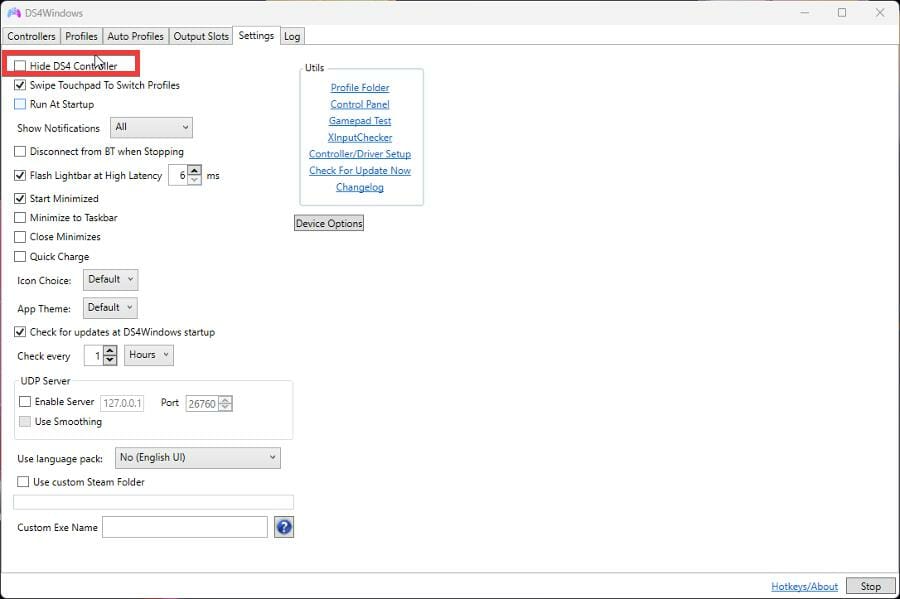
- After your computer restarts, open DS4 Windows.
- Go to the Settings tab.
- Click on Hide DS4 Controller.

- Reconnect your PS4 controller to DS4 Windows.
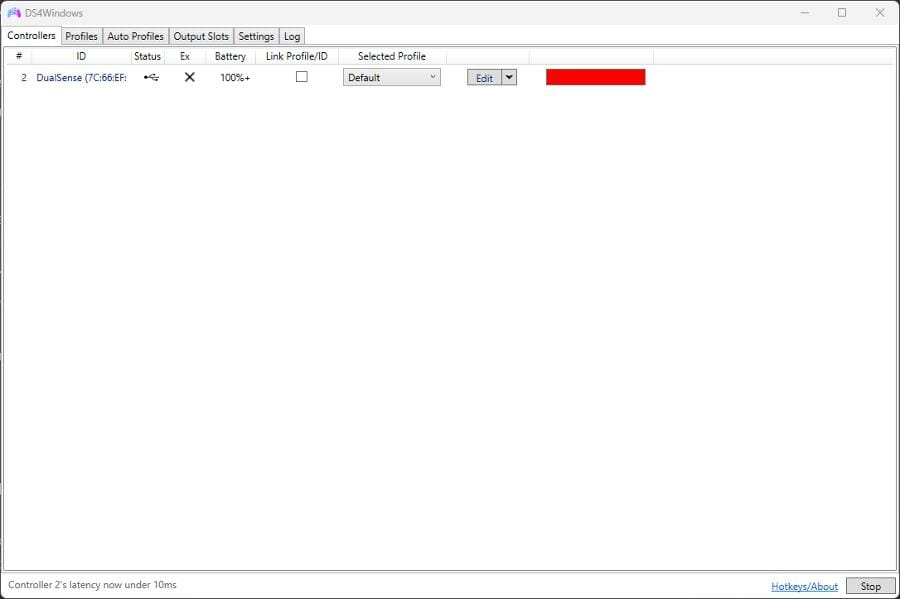
- Click on the Controllers tab to see if your controller is there. If not, uncheck Hide DS4 Controller in the Settings and check it again.
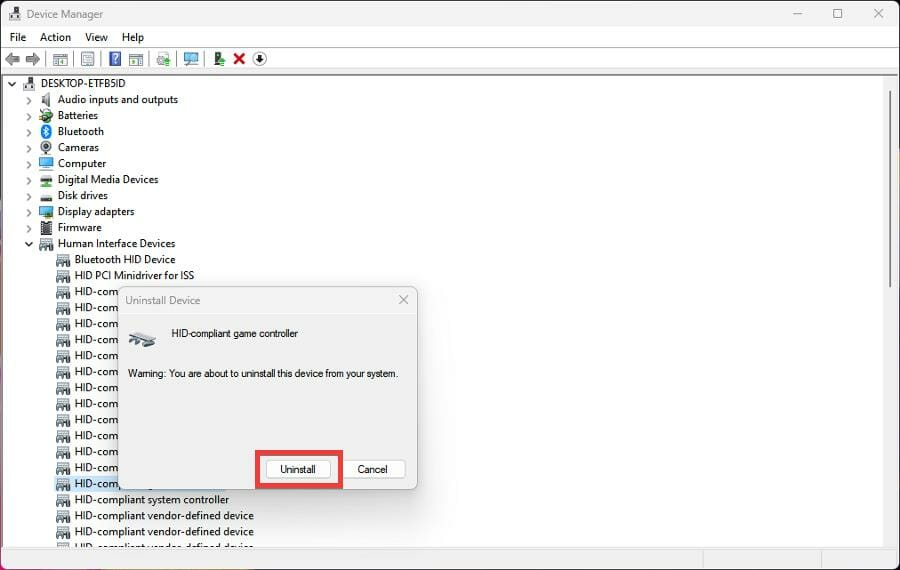
- What you can also do is uninstall the controller drivers as well.
- Right-click the drivers to bring up the context menu.
- But this time, select Uninstall device.
- A window may appear warning you of what you’re about to do. Select Uninstall.
- Restart your computer and connect your PS4 controller when it turns on again.
- Your Windows 11 computer will automatically check for missing controller drivers and install them.
What else should I know about Windows 11 and gaming controllers?
Gamers in the past have also had issues with their PS5 controllers not functioning properly as Windows 11 won’t connect to their device. Fixing PS5 controller connectivity is similar to the PS4 and shares similar steps.
DS4 Windows itself has had its issues as well. Majority of the time all you have to do is update the app by downloading the latest version. In other cases, you have to check the controller status on the Device Manager.

For Xbox controller owners, you may be interested in learning about what to do if your gamepad suddenly switches to player 2 on a PC. Solutions involve running the troubleshooter and deleting a specific driver.
Feel free to leave a comment below if you have any questions on other Windows 11 apps. Also, leave comments about guides that you’d like to see or information on other Windows 11 features or list guides.
![]()
Newsletter
Learn how to properly connect your PS4 controller to your Windows 11 PC
by Cesar Cadenas
Cesar has been writing for and about technology going on for 6 years when he first started writing tech articles for his university paper. Since then, his passion… read more
Published on November 24, 2022
Reviewed by
Alex Serban
After moving away from the corporate work-style, Alex has found rewards in a lifestyle of constant analysis, team coordination and pestering his colleagues. Holding an MCSA Windows Server… read more
- If you decide to hop over to PC gaming, you don’t have to throw away your old PS4 controllers as you can use them on Windows 11.
- However, there may be times when your controller won’t be recognized by Windows 11.
- This guide will show you steps that you can take to fix your PS4 controller not being recognized by your PC.
There are many different ways that you can play video games on your Windows 11 computer. The classic mouse and keyboard, Xbox controller, or PlayStation 4 controller; all work in Microsoft’s latest OS.
But there have been reports that the PS4 controller may not get recognized on your Windows 11 PC. This may due to outdated Bluetooth drivers that don’t work or DS4 Windows not working properly.
Does Windows 11 support DS4?
Yes, Windows 11 supports DS4. So if you want to connect your PS4 controller to PC, you’ll need to install it alongside PS4 controller drivers for Windows 11.
Your PS4 can connect to the PC via Bluetooth, but a lot of games don’t support that controller and prefer Xbox devices. That is why you download and install DS4 Windows, a third-party app that masks your PS4 controller as an Xbox one.
That way, you can use the PS4 controller however you please. But things are hardly ever that simple and some connectivity problems will arise. In those instances, you’ll have to run DS4 Windows as an administrator.
This guide will show you what you can do if your PlayStation 4 controller is not being recognized by your Windows 11 computer. Instructions are straightforward to follow.
How do I get my PS4 controller to work on my PC?
- Does Windows 11 support DS4?
- How do I get my PS4 controller to work on my PC?
- 1. Update Bluetooth drivers
- 2. Install DS4 Windows
- 3. Update DS4Windows
- 4. Run as administrator
- 5. Re-enable Controller
- What else should I know about Windows 11 and gaming controllers?
1. Update Bluetooth drivers
Your PS4 controller should suddenly work again after updating the Bluetooth drivers. You can either complete this task manually using Device Manager or automatically by utilizing a driver updater program that makes your work easier.
Here’s the steps of how to correctly update Bluetooth manually:
1.Click on the magnifying glass icon to bring up the search bar.
2. Search for the Device Manager.
3. Click on the entry that appears.
4. In the Device Manager, search for the Bluetooth entry if your computer can connect via Bluetooth.
5. Click it to bring down the drop-down menu.
6. Right-click the entry that appears and a small window will appear.
7. Select Update driver in that small window.
8. A window will appear.
Some PC issues are hard to tackle, especially when it comes to corrupted repositories or missing Windows files. If you are having troubles fixing an error, your system may be partially broken.
We recommend installing Restoro, a tool that will scan your machine and identify what the fault is.
Click here to download and start repairing.
9. Select Search automatically for drivers.
10. Your Windows 11 computer will automatically download and install the drivers.
11. If you have multiple entries, it’s recommended that you update the drivers for all of them.
12. Then open the Settings menu.
13. Select Bluetooth & devices on the left-hand side.
14. Ensure that Bluetooth is enabled by clicking the switch On.
15. Hold the Share and PS button on your PS4 controller until it starts blinking rapidly. This blinking means that it’s searching for a connection point.
16. Then select Add device.
17. Select Bluetooth.
18. Select Wireless Controller.
19. Your PS4 controller is now connected to your Windows 11 computer and there should be no issue.
20. Conversely, you can go to the Windows Update tab in the Settings menu and click on Check for updates to see if there are new drivers.
If you’re looking for a more time-efficient way to update your drivers, you can do so automatically with DriverFix. It’s an app that scans your PC for missing or out-of-date drivers and fixes them for you.
DriverFix
Let this tool automatically find and update your Bluetooth driver along with other outdated drivers.
2. Install DS4 Windows
- In a web browser, search for DS4 Windows.
- Click on Download.
- In this new window, click the Download button.
- Open the file that was downloaded and click Extract all at the top of the File Explorer. You will need to extract the app.
- Select a location where to extract the file to.
- Click the Extract button.
- Open the folder that you extracted and double-click the Application file to install the app.
- Be aware that you may have to download .NET 5.0 Runtime. A small window will appear giving you the option.
- Download the file according to your PC’s bit version. In this example, the guide will select Download x64.
- Open the downloaded file and click Install to begin the installation process.
- After opening the DS4 Windows app, select where you want to save the files.
3. Update DS4Windows
- Issues with DS4 Windows may arise from compatibility problems.
- Go back to the directory where DS4 Windows sits.
- Double click DS4Updater.
- DS4 Windows will begin to automatically download and install any updates.
- After it’s done, a window will appear stating that it’s up to date.
- A fatal error occurred while creating a TLS credential: 10013
- Windows 11 No Sleep Mode Option: 6 Ways to Fix It
- Error Code 2755: How to Fix This Windows Installer Issue
4. Run as administrator
- You can also try running DS4 Windows as an administrator.
- Return to the DS4 Windows directory and right-click the app to bring up the context menu.
- Select Properties.
- Click the Compatibility tab.
- Click the checkbox next to Run this program as an administrator.
- Click on the Apply button and then OK to save the changes.
- Now DS4 Windows should run just fine.
5. Re-enable Controller
- Click on the magnifying glass icon to bring up the search bar.
- Search for the Device Manager.
- Locate and click on Human Interface Devices in the Device Manager.
- Locate the HID-compliant game controller and right-click the entry.
- Select Enable device in the small context menu. If it’s already enabled, click Disable device instead.
- Restart your computer.
- After your computer restarts, open DS4 Windows.
- Go to the Settings tab.
- Click on Hide DS4 Controller.
- Reconnect your PS4 controller to DS4 Windows.
- Click on the Controllers tab to see if your controller is there. If not, uncheck Hide DS4 Controller in the Settings and check it again.
- What you can also do is uninstall the controller drivers as well.
- Right-click the drivers to bring up the context menu.
- But this time, select Uninstall device.
- A window may appear warning you of what you’re about to do. Select Uninstall.
- Restart your computer and connect your PS4 controller when it turns on again.
- Your Windows 11 computer will automatically check for missing controller drivers and install them.
What else should I know about Windows 11 and gaming controllers?
Gamers in the past have also had issues with their PS5 controllers not functioning properly as Windows 11 won’t connect to their device. Fixing PS5 controller connectivity is similar to the PS4 and shares similar steps.
DS4 Windows itself has had its issues as well. Majority of the time all you have to do is update the app by downloading the latest version. In other cases, you have to check the controller status on the Device Manager.
For Xbox controller owners, you may be interested in learning about what to do if your gamepad suddenly switches to player 2 on a PC. Solutions involve running the troubleshooter and deleting a specific driver.
Feel free to leave a comment below if you have any questions on other Windows 11 apps. Also, leave comments about guides that you’d like to see or information on other Windows 11 features or list guides.
![]()
Newsletter

Игровой контроллер – незаменимый аксессуар геймера. С ним обеспечивается комфортный процесс игры. Поэтому настройка геймпада на ПК с операционной системой Windows 10 имеет важное значение. Как правило, калибровка, предполагающая изменение функций некоторых кнопок, выполняется в отдельно взятой игре. Однако есть и другие, более удобные способы настройки.
Как проверить геймпад без игры?
В настройках игры есть пункт «Управление». Во-первых, здесь можно переключиться с классической клавиатуры на контроллер. Во-вторых, задать то или иное действие для определенной кнопки геймпада. Но сначала нужно проверить работоспособность.
И в случае, если игра не установлена, сделать это могут не все пользователя, так как мало кто знает об универсальной инструкции для осуществления проверки:
- Подключите геймпад к ПК.
- Через поиск Windows найдите и откройте «Панель управления».

- Перейдите в раздел «Все элементы управления», а затем – «Устройства и принтеры».
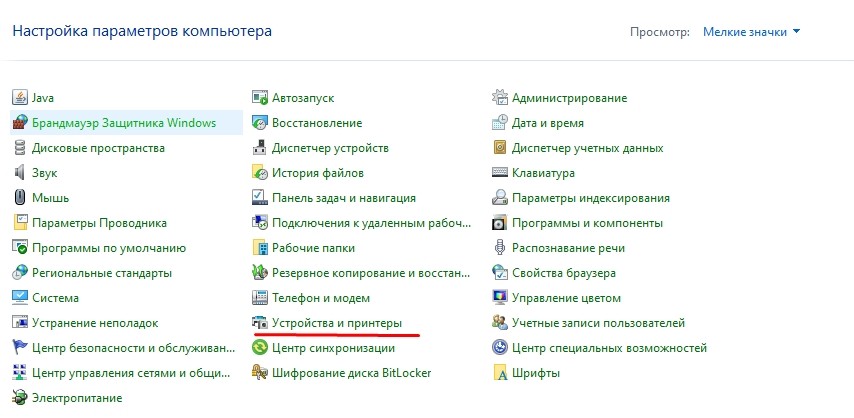
- Выберите подключенный контроллер.
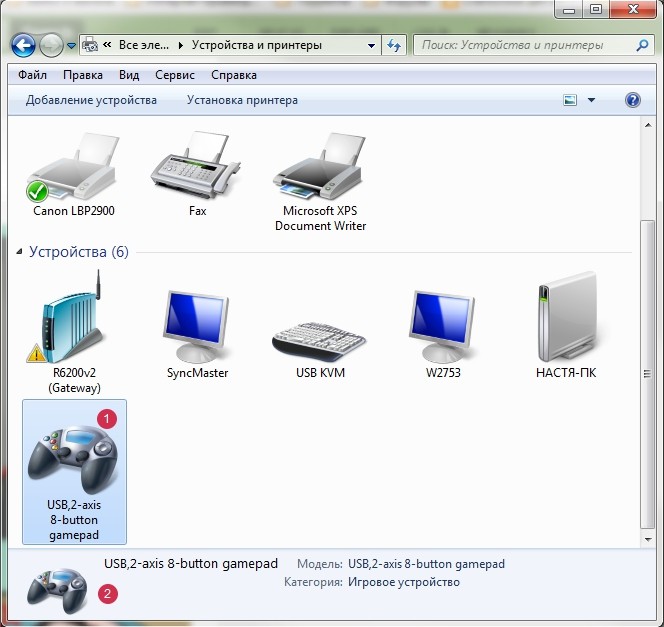
- Перейдите в «Свойства» оборудования.
- Во вкладке «Проверка» выполните все необходимые действия.
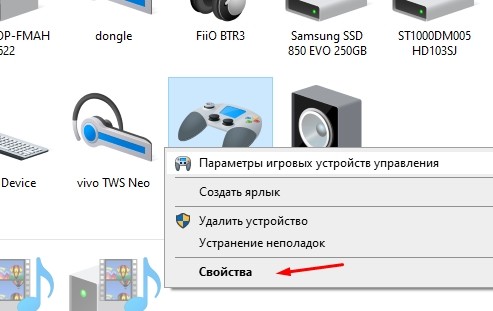
Совет. Если компьютер не видит геймпад, попробуйте принудительно установить драйверы. Их можно скачать на официальном сайте производителя.
Теперь, когда вам удалось убедиться в работоспособности геймпада, можно переходить к его настройке. Не беспокойтесь, если игра еще не установлена на компьютер. Есть масса других способов выполнения калибровки.
Инструкция по настройке и калибровке джойстика
К сожалению, встроенные средства Windows 10 не позволяют выполнить точную настройку и калибровку. Поэтому нам придется обратиться к помощи специализированного ПО. Ниже рассмотрим лучшие программы, способные справиться с поставленной задачей.
X360CE
Приложение поддерживает манипуляторы разных производителей и доступно для бесплатного скачивания. После загрузки и установки программы вы можете запустить X360CE, где перед вами сразу же откроется окно настроек.
Обратите внимание, что все манипуляции необходимо выполнять после подключения джойстика. Он отображается во вкладке «Controller 1». Но, если геймпадов несколько, есть смысл рассмотреть вкладки «Controller 2» и «Controller 3».
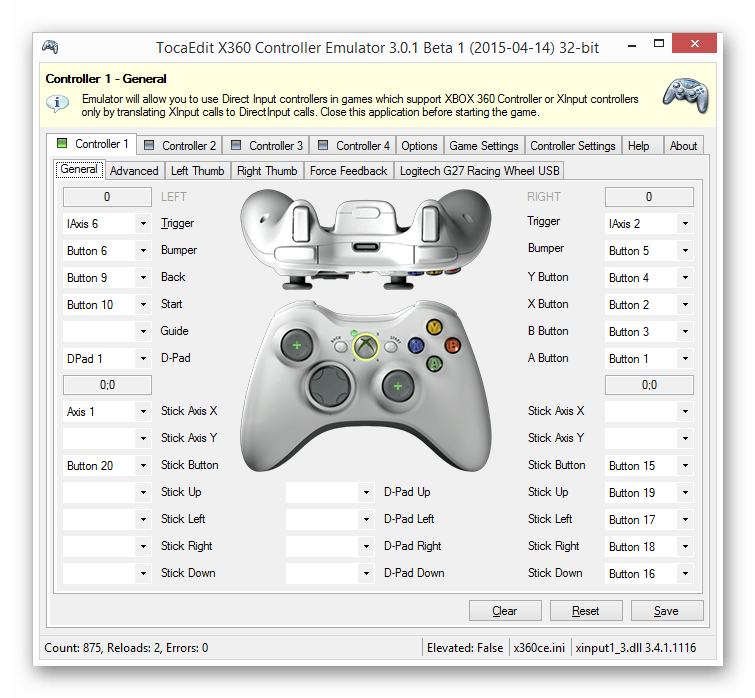
В разделе с контроллером предлагается задать функции для кнопок. Это будет очень полезно, если настройка не работает в играх. Еще одной отличительной особенностью X360CE является то, что программа заставляет воспринимать подключенный джойстик в качестве Xbox-контроллера, благодаря чему решаются проблемы, связанные с обнаружением устройства.
DS4Windows
Это приложение будет полезно тем, кто использует для гейминга различные эмуляторы, которые не поддерживают геймпады от PlayStation. Программа DS4Windows решает проблему распознавания и позволяет настроить управление на свой вкус. Также в DS4Windows можно откалибровать геймпад, сделав движения стиками более резкими или, напротив, менее выраженными.

MotioninJoy
Данная программа обладает устаревшим интерфейсом, но это не помешает настроить геймпад вне зависимости от производителя. Для начала нужно подключить Defender к компьютеру, а затем открыть приложение. Внутри MotioninJoy скрываются тесты контроллера, включая проверку вибрации. Кроме того, программа позволяет обновить драйверы оборудования без обращения к постороннему ПО. Так что MotioninJoy является универсальным средством проверки и обслуживания джойстиков.
Xpadder
Также вы можете настроить геймпад, обратившись к помощи Xpadder. Мало того, что он обладает продвинутым средством проверки контроллера, так еще приложение умеет подменять сигналы клавиатуры и мыши. Это будет полезно в тех случаях, когда вы решите запустить игру, не поддерживающую джойстики.
Что касается процедуры настройки управления, то Xpadder обеспечивает высокий уровень удобства благодаря автоматическому распознаванию производителя контроллера и сопутствующей визуализации. Вы будете сразу понимать, какие действия назначаются на ту или иную кнопку.

JoyToKey
Заключительное приложение в нашем списке ничем не уступает рассмотренным ранее программам. Его особенностью является то, что у пользователя появляется возможность настроить геймпад таким образом, чтобы он работал не только в играх, но и в приложениях.
Есть расширенная настройка профилей, позволяющая задать управление для разных пользователей. А еще эта функция будет полезна, когда требуется подготовить параметры в зависимости от запущенной программы или игры.

Перед началом процедуры не забудьте подключить джойстик к ноутбуку или компьютеру, а затем устройство отобразится на главном экране JoyToKey. Дальнейшие действия зависят от предпочтений пользователя, которые программное обеспечение попробует автоматически предугадать. Останется лишь внести коррективы и сохранить настройки.
После перехода с Windows 10 до 11 версии, я по привычке решил подключить свой Dualshock 4 к компьютеру через Bluetooth, нажав комбинацию кнопок Share + Playstation я успешно подключил его к пк. Следующим шагом я всегда запускал программу DS4Windows для установки связи между контроллером и играми, но по какой-то причине программа не могла обнаружить мой геймпад (как я понял дальше, он и не хотел его обнаруживать).
Найти решение этой проблемы я решил на русском и зарубежном ютубе, но смотря сквозь слёзы на счастливые комментарии людей, которым помогли эти видеоролики (я конечно же был исключением), я попытался решить эту проблему своими силами.
Просидев часами за переустановкой программы и драйверов, одновременно листая гайды, я понял что такое безумие, повторяя одно и то же действие раз за разом я случайно наткнулся на одну статью где написано, что Microsoft (которые также являются боссами в Xbox) решили что владельцам контроллером от Sony следует пересесть на контроллеры от Xbox, так как поддерживать устройства конкурента на своей операционной системе у них нет желания.
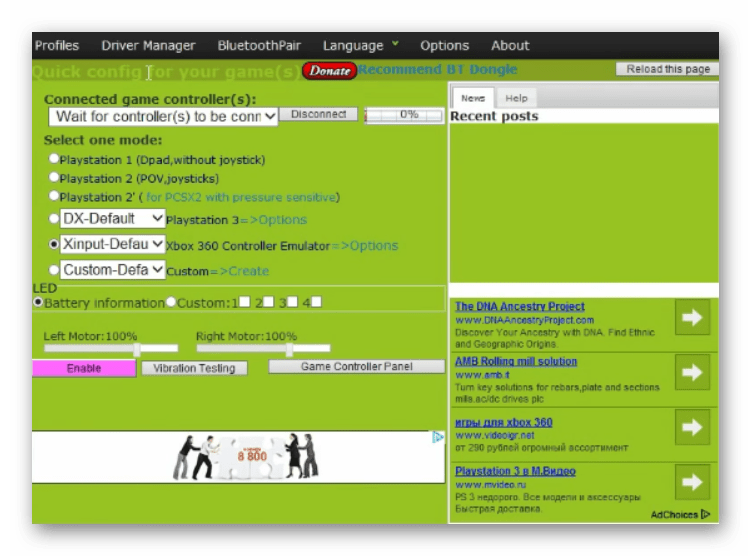
Собрав остатки своих нервных клеток я обратил внимание на другую программу реализации связи между контроллером и играми. Этой программой была InputMapper. Всегда ей пользовался ей, когда капризничал DS4Windows и был доволен. Запустил я эту программу и Аллилуйя, он обнаружил мой контроллер, правда функционировало у него только тачпад, как мышка.
Я был в небывалой ярости и потратив ещё получаса, капаясь в настройках программы и обнаружил, что в параметрах профилей контроллера можно менять его раскладку (Dualshock 4 и Xbox 360), как на зло у меня стоял None. Сменив профиль подключённого геймпада на Xbox 360, джойстик начал функционировать полностью, удостоверившись в Steam BigPicture.
Но недолго фраер танцевал, зайдя в Battlefield 2042 с подключённым геймпадом, я обнаружил внушительный Инпут-лаг у моего контроллера. Персонаж реагировал на движение стика через пол секунды. Комфортно играть было невозможно. Хотя на следующий день, по каким-то непонятным причинам зайдя снова в BF задержка стала меньше раза в два, но всё ровно доставляла большой дискомфорт.
Сейчас ломаю голову над этой проблемой. Прошу помочь найти мне решение этой проблемы или найти иной путь подключения контроллера к пк и без применения InputMapper. Благодарю заранее!
- Подробности
-
Создано: 16 августа 2021
С каждым обновлением операционной системы Windows 10, разработчики все больше интегрируют фишки с игровой приставки Xbox. И соответственно система имеет полную интеграцию с фирменным контроллером от Microsoft. Как подключить геймпад от Microsoft Xbox One S Wireless Controller а также Xbox Series X Controller / Series S к компьютеру (ПК) на Windows 11 и Windows 10?

Стоит сразу сказать, что делается это очень просто и об этом мы расскажем в этой статье. Для этого джойстика не нужны драйвера. Геймпад Xbox можно подключить с помощью кабеля USB или беспроводного подключения Bluetooth.
Подключение геймпада Xbox к ПК с помощью кабеля USB
Этот способ самый простой и надежный. Для него не нужно иметь всегда заряженные батарейки. Но для такого подключения Xbox геймпада, нужно иметь USB кабель, так как в комплекте он не поставляется (исключением являются специальные комплектации). Для этого:
- подключите кабель к ПК и к вашему геймпаду
примечание: для моделей от Xbox One нужен кабель с microUSB, а для новых контролеров от Series S/X нужен провод с USB Type-C
- при необходимости нажмите круглую кнопку с логотипом Xbox, чтобы вывести геймпад из спящего режима
- об успешном подключении будет соответствующее системное уведомление
- для проверки подключения, перейдите в «параметры» системы и выберите раздел «Устройства«


Это все действия которые нужны для соединения Xbox геймпада к вашему ПК. Но если вы не любите проводов и оны вам мешают и если есть техническая возможность, подключите с помощью второго варианта, описанного ниже.
Подключение Xbox джойстика к компьютеру через Bluetooth
Этот способ идеально подойдет, если в вашем компьютере есть Bluetooth адаптер. Такое соединение предложит вам более комфортное управление в игре. Но стоит помнить, что беспроводной геймпад Xbox нуждается в питании аккумуляторов или батареек.
- для включения геймпада — нажмите на круглую кнопку с изображением лого Xbox (данная кнопка начнет мигать)
- на задней панели, где размещены курки, нажмите и удерживайте кнопку на протяжении 2-3 сек (логотип Xbox начнет мигать в два раза быстрее)
- перейдите в «Параметры» Windows и откройте «Устройства«
- убедитесь что Bluetooth на компьютере включен и нажмите на кнопку с надписью «Добавление Bluetooth и другого устройства»
- выберите пункт «Все остальное» со значком в виде плюсика и подождите пока ваш геймпад отобразиться в списке
- Нажмите на название «XboxOne» или «Xbox Wireless Controller» и кнопку «Готово»


Вот такие шаги нужно сделать, чтобы успешно подключить Xbox геймпад к компьютер через беспроводное подключение Bluetooth. Надеемся что вам получилось сделать эти шаги и вы теперь вы сможете насладиться игровым процессом.
Также, хотим напомнить о разделе нашего портала, на котором помещены актуальные инструкции для Windows наподобие этой.
Download PC Repair Tool to quickly find & fix Windows errors automatically
You’re a gamer who prefers to use a gamepad instead of the keyboard and mouse. While that’s odd for a Windows PC gamer, we all like what we like. Now, a day comes when your gamepad is no longer working, and you’re wondering what is going on. If your USB gamepad or joystick is not being recognized in Windows 11/10, we’ve got a few fixes that should solve the problem once and for all. You may need to update the Driver, Adjust power management settings and get rid of some plug-n-play devices.
It’s an issue where the gamepad is not being recognized by Windows 10. You’ve run the Hardware Troubleshooter, restarted the computer, yet the issue still persists. So what’s the next move, then? Well, we’re going to talk about a number of ways to get this problem under control.
1] Update the driver

Many times, a problem with Windows 10 compatible hardware all boils down to the driver. A simple update and the problem is fixed. You’ll need to download the latest driver from the manufacturer’s website.
In case you are using a gamepad that supports Windows 10 update the driver to its latest version.
If you are using an older gamepad that doesn’t fully support Windows 10, you may need to run the driver in Windows 7 or Windows 8 compatibility mode. To do this, download the gamepad driver, preferably the latest one, and right-click on the setup file, and then select Properties from the menu.
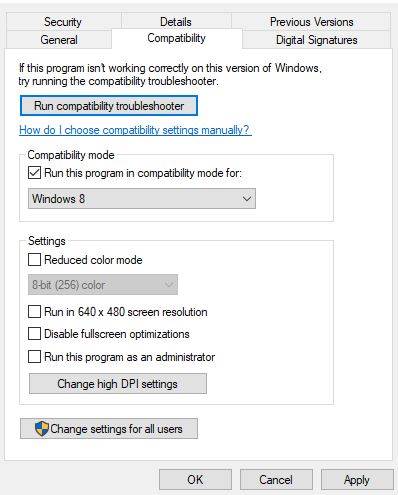
In the new window that pops up, search for the compatibility tab, then click on “Run this program in compatibility mode.” From the drop-down menu, select either Windows 7 or Windows 8, and after that, complete the installation and restart the computer.
2] Adjust power management settings
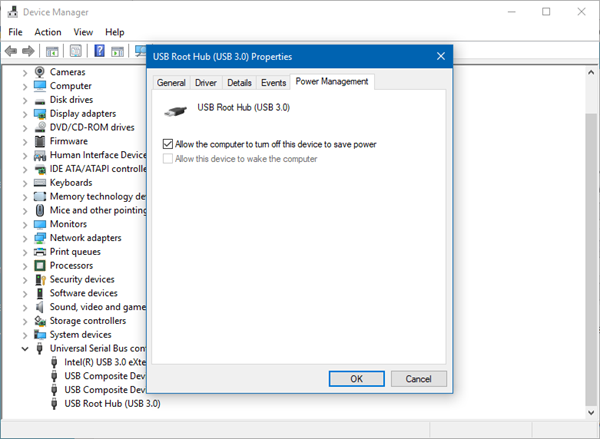
Your gamepad not being recognized can be fixed with a simple adjustment of the power management settings in Windows 10.
Press down on the Windows Key + X to open the WinX menu, then select Device Manager from the list. From here, expand the option that says Universal Serial Bus controllers, then right-click on USB Root Hub and choose Properties.
The next move is to select Power Management, then clear all the check boxes under “Allow the computer to turn off this device to save power.”
Restart the Windows computer and try using your gamepad again.
Read: Windows not detecting PS5 Controller
3] Get rid of some plug-n-play devices
There’s a chance the number of devices plugged into your computer is causing the problem, so what you need to do, then, is to remove them or just the ones you’re not using.
Let’s face it, if a computer has enough ports, we’ll plug a host of things into the computer and never remove them even when they’re not in use.
For the most part, these tips should do the job. However, should they fail to work, then the best means of moving forward may very well be to get a new gamepad.
Related read: USB Device Not Recognized.

Vamien McKalin possesses the awesome power of walking on water like a boss. He’s also a person who enjoys writing about technology, comics, video games, and anything related to the geek world.
Download PC Repair Tool to quickly find & fix Windows errors automatically
You’re a gamer who prefers to use a gamepad instead of the keyboard and mouse. While that’s odd for a Windows PC gamer, we all like what we like. Now, a day comes when your gamepad is no longer working, and you’re wondering what is going on. If your USB gamepad or joystick is not being recognized in Windows 11/10, we’ve got a few fixes that should solve the problem once and for all. You may need to update the Driver, Adjust power management settings and get rid of some plug-n-play devices.
It’s an issue where the gamepad is not being recognized by Windows 10. You’ve run the Hardware Troubleshooter, restarted the computer, yet the issue still persists. So what’s the next move, then? Well, we’re going to talk about a number of ways to get this problem under control.
1] Update the driver
Many times, a problem with Windows 10 compatible hardware all boils down to the driver. A simple update and the problem is fixed. You’ll need to download the latest driver from the manufacturer’s website.
In case you are using a gamepad that supports Windows 10 update the driver to its latest version.
If you are using an older gamepad that doesn’t fully support Windows 10, you may need to run the driver in Windows 7 or Windows 8 compatibility mode. To do this, download the gamepad driver, preferably the latest one, and right-click on the setup file, and then select Properties from the menu.
In the new window that pops up, search for the compatibility tab, then click on “Run this program in compatibility mode.” From the drop-down menu, select either Windows 7 or Windows 8, and after that, complete the installation and restart the computer.
2] Adjust power management settings
Your gamepad not being recognized can be fixed with a simple adjustment of the power management settings in Windows 10.
Press down on the Windows Key + X to open the WinX menu, then select Device Manager from the list. From here, expand the option that says Universal Serial Bus controllers, then right-click on USB Root Hub and choose Properties.
The next move is to select Power Management, then clear all the check boxes under “Allow the computer to turn off this device to save power.”
Restart the Windows computer and try using your gamepad again.
Read: Windows not detecting PS5 Controller
3] Get rid of some plug-n-play devices
There’s a chance the number of devices plugged into your computer is causing the problem, so what you need to do, then, is to remove them or just the ones you’re not using.
Let’s face it, if a computer has enough ports, we’ll plug a host of things into the computer and never remove them even when they’re not in use.
For the most part, these tips should do the job. However, should they fail to work, then the best means of moving forward may very well be to get a new gamepad.
Related read: USB Device Not Recognized.
Vamien McKalin possesses the awesome power of walking on water like a boss. He’s also a person who enjoys writing about technology, comics, video games, and anything related to the geek world.