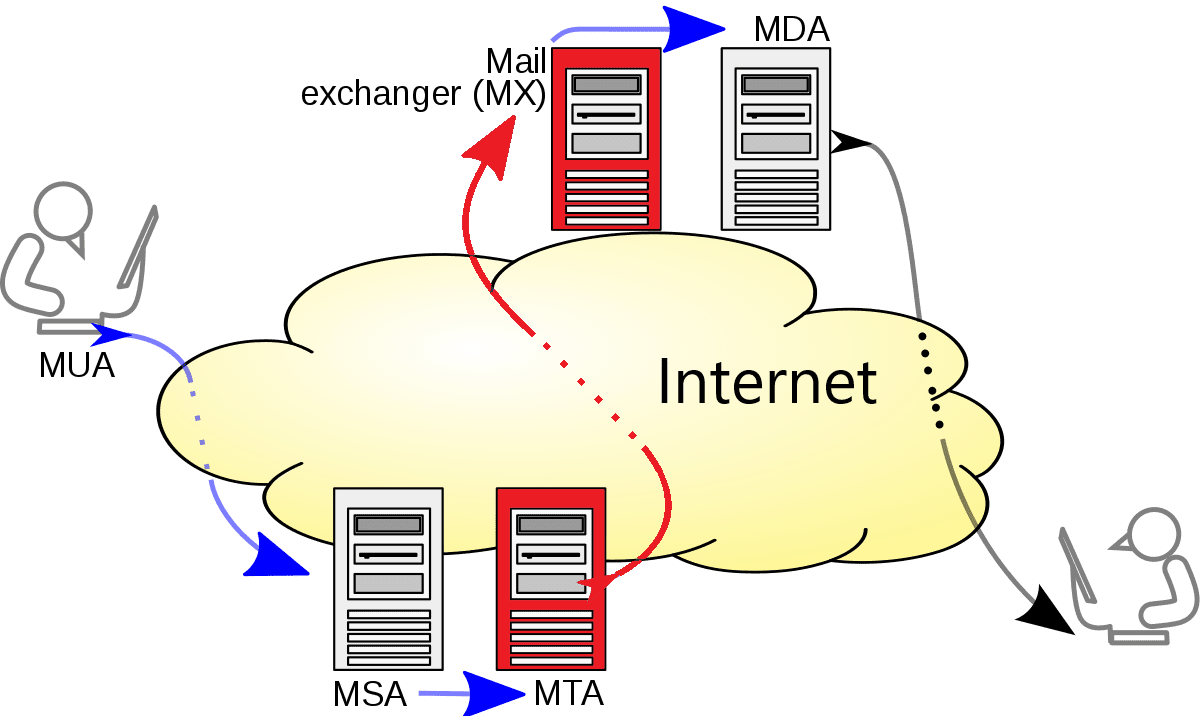
 Очень часто перед администратором встает необходимость проверить работу почтового сервера по протоколу SMTP, как своего, так и чужого. Обычно это связано с проблемами отправки или получения почты и следует не только убедиться в доступности сервера, но и понять, что происходит с письмом дальше. Несмотря на то, что существуют различные сервисы для диагностики почтовых систем, лучше всего проверить работу сервера подключившись к нему через Telnet и отправив письмо при помощи SMTP-команд, получив необходимую информацию, что называется «из первых рук».
Научиться настраивать MikroTik с нуля или систематизировать уже имеющиеся знания можно на углубленном курсе по администрированию MikroTik. Автор курса, сертифицированный тренер MikroTik Дмитрий Скоромнов, лично проверяет лабораторные работы и контролирует прогресс каждого своего студента. В три раза больше информации, чем в вендорской программе MTCNA, более 20 часов практики и доступ навсегда.
Несмотря на кажущуюся сложность этого метода, он достаточно прост и необходимость ручного ввода SMTP-команд не должна вас пугать. Зато вы сможете получить всю необходимую для диагностики информацию прямо здесь и сейчас, не оглядываясь на возможности и ограничения сторонних сервисов.
Поставим себе некую задачу. Допустим мы хотим проверить доставку почты c некого ящика example@interface31.ru на ящик test@host31.ru, а также проверить работу сервера в некоторых иных ситуациях.
Прежде всего сразу следует выяснить какой узел в указанном домене отвечает за прием почты, это следует сделать даже если вы знаете точный адрес этого сервера, так как позволит выявить возможные ошибки при настройке DNS. Для этого мы будем использовать утилиту nslookup, в Windows она входит в штатный комплект поставки, а в Linux вам возможно потребуется установить пакет dnsutils.
Для получения записей MX-хостов узла (т.е. серверов, принимающих почту) выполним:
nslookup -type=mx host31.ruВ качестве ответа вы должны получить имя одного или нескольких серверов.
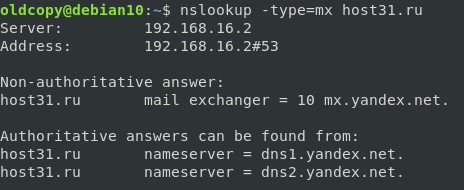 В нашем случае почта обслуживается серверами Яндекса, а именно mx.yandex.net, с которым мы и будем работать. Для дальнейших действий нам потребуется telnet-клиент, в Linux он есть из коробки, в Windows его следует установить в дополнительных компонентах или использовать любой сторонний клиент, поддерживающий этот протокол, например, PuTTY. В нашем примере будет использоваться telnet-клиент в Debian 10.
Прежде всего запустим самого клиента:
telnetв ответ мы увидим строку приглашения, куда введем строку соединения с сервером, обычно используется порт 25, но могут также быть 465 или 587:
OPEN mx.yandex.net 25В ответ мы должны получить сообщение с кодом 220, которое содержит имя узла, работающего с нами.

Обратите внимание, что оно отличается от адреса, к которому мы подключались. Это связано с тем, что почту могут обслуживать несколько серверов и при обращении к домену mx.yandex.net каждый раз будет выдаваться разный адрес, для распределения нагрузки между серверами. В этом несложно убедиться, выполнив еще раз команду nslookup, без аргументов она сообщит нам А-записи, которые соответствуют адресам серверов.
nslookup mx.yandex.net Поэтому, если вы испытываете проблемы доставки с одной из таких почтовых систем, то следует проверить все доступные сервера, подключившись к ним уже не по имени, а по IP-адресу, так как проблемы могут быть только с одним из них.
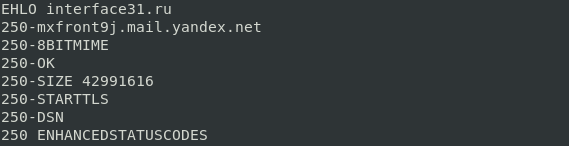
После того как мы подключились к серверу нужно отправить приветствие, которое будет содержать полное доменное имя клиента (либо адрес, если клиент не имеет доменного имени):
EHLO interface31.ruНа приветствие сервер отвечает кодом 250 OK и сообщает поддерживаемые SMTP-расширения, это означает что сервер готов к получению почты.
 Для начала почтовой сессии введите команду:
MAIL FROM:<example@interface31.ru>Она означает, что мы хотим передать сообщение от отправителя example@interface31.ru, на что сервер должен ответить нам кодом 250 2.1.0 ok.
Теперь укажем получателя:
RCPT TO:<test@host31.ru> Также мы можем попросить сервер отправить нам отчет о доставке или невозможности это сделать, для этого добавим в команду необязательные параметры:
RCPT TO:<test@host31.ru> NOTIFY=success,failureЕсли все хорошо, то сервер должен ответить нам с кодом 250 2.1.5 recipient ok, после чего мы можем перейти к передаче письма.
 Для этого введем команду:
DATAВ ответ мы получим сообщение с кодом 354, которое разрешит нам ввод письма, которое следует закончить точкой с новой строки.
В первую очередь следует указать тему:
Subject: TESTЗатем вводим пустую строку, по правилам тему письма следует отделять от тела пустой строкой, и далее пишем текст сообщения. Количество символов и строк не ограничено, главное — не превысить допустимый размер письма. Закончив, ставим точку в новой строке и нажимаем Enter.
 TEST TEST TEST
.
После чего сервер выполнит попытку отправки нашего письма и сообщит нам результат.
 В нашем случае письмо принято к доставке, о чем говорит код 250 2.0.0 Ok, также сервер сообщает нам присвоенный письму идентификатор. Его можно использовать при дальнейшем поиске сообщения в недрах самой почтовой системы. Обратите внимание, что этот код не говорит о том, что письмо успешно доставлено получателю, в дальнейшем оно может попасть под фильтры и оказаться в спаме, но это уже находится за рамками работы протокола SMTP, свою работу в данном случае он выполнил.
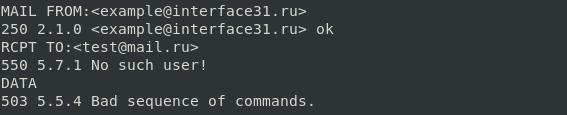
С какими ошибками доставки мы можем столкнуться? Одна из самых распространенных — неверный получатель. Попробуем указать в качестве получателя несуществующий ящик test@mail.ru, здесь мы также указали необслуживаемый данным сервером домен, что позволят дополнительно проверить сервер на открытый релей. В подавляющем большинстве случаев нормально работающий сервер не должен пересылать не предназначенную ему почту из публичных сетей.
В данном случае все закончилось быстро, сервер сообщил нам с кодом 550 5.7.1 No such user! , что такого пользователя не существует, а когда мы попытались упорствовать, сообщил с кодом 503 5.5.4 Bad sequence of commands о неверной последовательности команд.
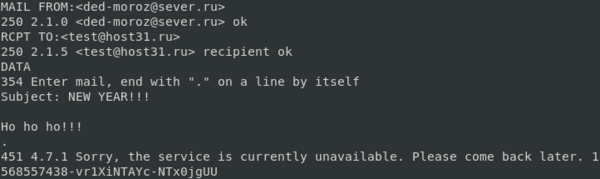
 Еще одна часто встречающаяся ситуация — это технология серых списков. Ее суть заключается в том, что если отправитель первый раз присылает почту и в его отношении есть некоторые сомнения, то данные о нем вносятся в серый список, а ему выдается сообщение о временной недоступности сервера. Смысл такого поведения заключается в том, что нормальный сервер повторит отправку, в то время как спамерские скрипты этого обычно не делают. Кроме того, согласно требованиям протокола SMTP, повторную отправку следует производить не ранее, чем через полчаса.
Для проверки мы отправили сообщение с подделанным отправителем и сразу же получили ошибку 451 4.7.1 Sorry, the service is currently unavailable. Please come back later.
 Чтобы убедиться, что вы действительно имеете дело с серыми списками, а не временными неполадками на сервере, повторите отправку спустя полчаса, она должна увенчаться успехом.
Для окончания сессии с сервером введите команду
QUIT Как видим, работа с почтовым сервером по протоколу SMTP через Telnet не сложна, но в тоже время предоставляет широкие возможности по диагностике сервера и позволяет быстро найти и выявить причины возможных проблем с доставкой почты.
Научиться настраивать MikroTik с нуля или систематизировать уже имеющиеся знания можно на углубленном курсе по администрированию MikroTik. Автор курса, сертифицированный тренер MikroTik Дмитрий Скоромнов, лично проверяет лабораторные работы и контролирует прогресс каждого своего студента. В три раза больше информации, чем в вендорской программе MTCNA, более 20 часов практики и доступ навсегда.
Вы можете установить SMTP сервер с помощью встроенных средств во всех версиях Windows Server. Такой SMTP сервер внутри организации может работать в качестве почтового релея, который должен принимать и пересылать через себя SMTP сообщения от различных устройств (к примеру, сендеров, сканеров, устройств СКД и пр.) и приложений (веб приложения, SQL Reporting Services, SharePoint), которым необходимо иметь возможность отправлять почту через SMTP сервер. Такой релей может пересылать сообщения на полноценные Exchange сервер или на публичные почтовые сервисы в Интернет типа Gmail, Mail.ru, Office 365 и т.д (ведь не всегда целесообразно разворачивать полноценную внутреннюю почтовую инфраструктуру на базе Microsoft Exchange Server или других почтовых служб).
В этой статье мы покажем, как установить, настроить и протестировать работу SMTP сервера на Windows Server 2012 R2, 2016 и 2019, который будет функционировать в качестве mail релея. Такой SMTP сервер не хранит почтовые сообщения и на нем отсутствуют почтовые ящики, он сможет только отправлять или пересылать почту.
Содержание:
- Установка службы SMTP на Windows Server 2016/2012 R2
- Настройка SMTP сервера на Windows Server
- Автозапуск службы SMTPSVC
- Проверка работы SMTP сервера на Windows Server
Установка службы SMTP на Windows Server 2016/2012 R2
SMTP сервер – это один из компонентов Windows Server, который можно установить через Server Manager. Для этого откройте консоль Server Manager Dashboard (servermanager.exe), перейдите в режим Add roles and features и на этапе выбора функций отметьте чекбокс у пункта SMTP Server. Для управления службой SMTP нужно установить консоли управления, которые входят в комплект роли Web Server IIS (вам будет предложено установить IIS Management Tools).
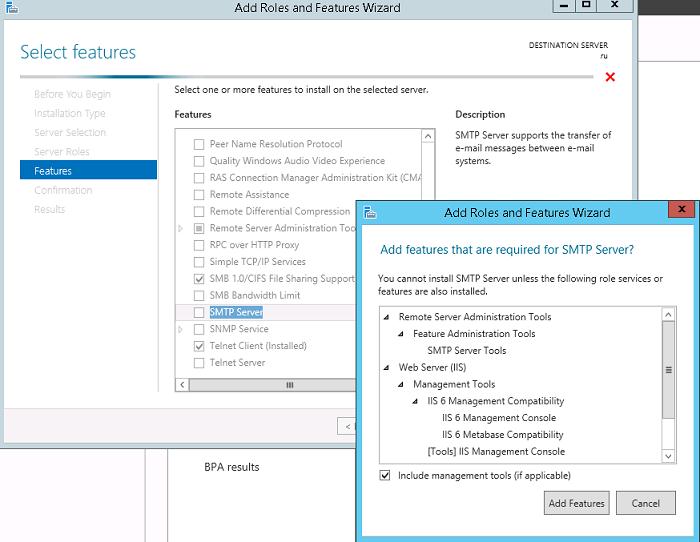
Оставьте все предлагаемые опции роли Web Server (IIS) и запустите установку.

Также вы можете установить компонент SMTP сервера с помощью одной команды PowerShell:
Install-WindowsFeature smtp-server
После окончания установки компонентов может потребоваться перезагрузка системы.
Настройка SMTP сервера на Windows Server
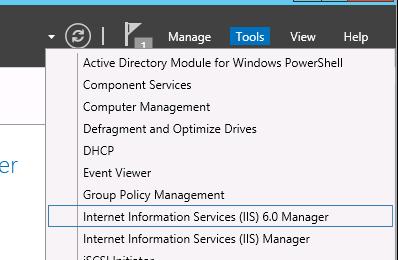
Управляется SMTP сервер консоль управления Internet Information Services (IIS) Manager 6. Открыть эту консоль можно через Server Manager: Tools-> Internet Information Services (IIS) 6.0 Manager или командой inetmgr6.exe.
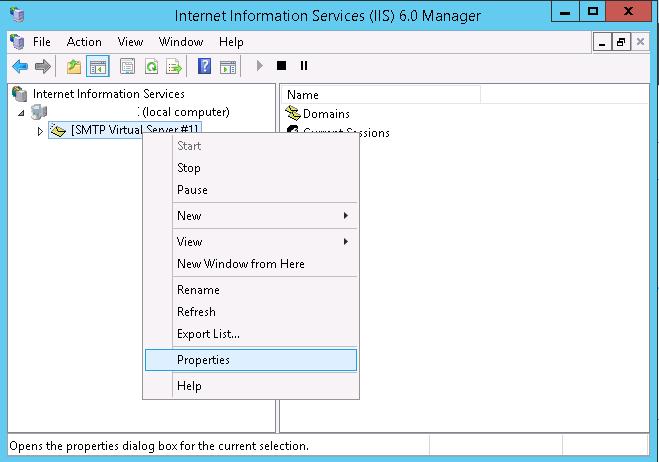
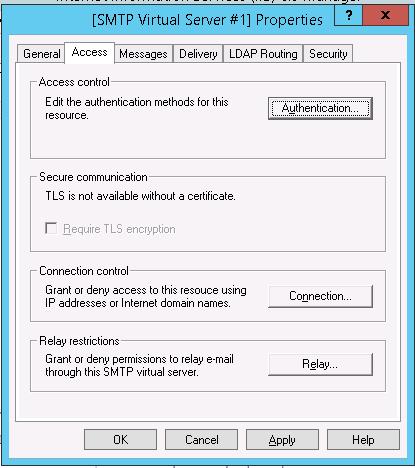
 В консоли IIS 6 Manager разверните ветку с именем сервера, щёлкните ПКМ по SMTP Virtual Server и откройте его свойства.
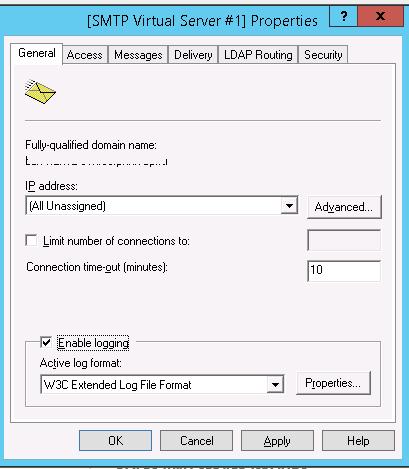
 На вкладке General, если необходимо, выберите IP адрес, на котором должен отвечать SMTP сервер (если у сервера несколько IP адресов), и включите ведение логов Enable logging (чтобы сохранялась информация обо всех полученных письмах).
 Затем перейдите на вкладку Access.
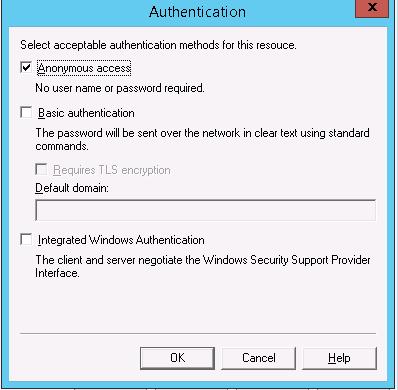
 Здесь нажмите на кнопку Authentication и убедитесь, что разрешен анонимный доступ (Anonymous access).
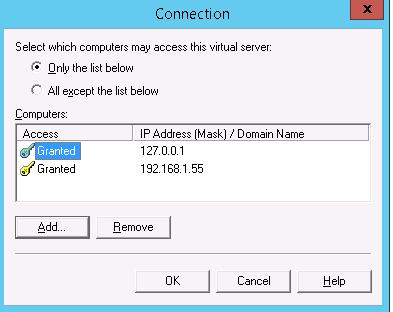
Вернитесь на вкладку Access и нажмите кнопку Connection. Здесь вы можете указать IP адреса устройств, которым разрешено отправлять почту через наш SMTP релей. Нужно выбрать опцию Only the list below и указать список IP адресов, не забыв самого себя (127.0.0.1).
Аналогичным образом настройте список разрешенных IP в настройках Relay (нажмите соответствующую кнопку). В этой секции указано каким IP адресам (или подсетям) можно пересылать почту через ваш SMTP сервер.
Примечание. Как правило, обязательно стоит включать эту опцию, как минимум ограничив список обслуживаемых устройств диапазоном IP адресов. В противном случае ваш SMTP сервер может использоваться спамерами и другими злоумышленниками как открытый релей для массовых почтовых рассылок.
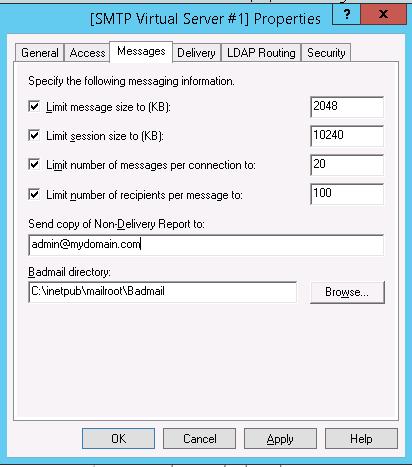
Перейдите на вкладку Messages. Здесь указывается email, на который будут отправляться копии всех NDR отчетов (Send copy of Non-Delivery Report to:). Также здесь можно указать ограничения на максимальный размер писем (Limit message size KB) и количество получателей (Limit number of recepients per message).
 Перейдите на вкладку Delivery:
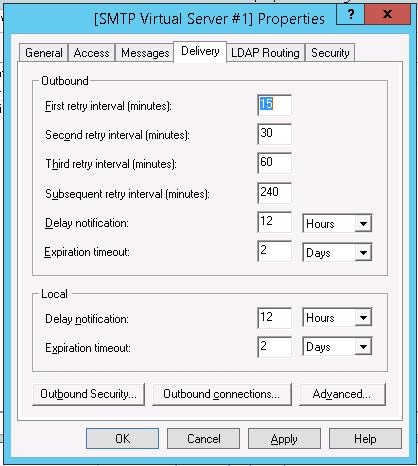
Затем нажмите на кнопку Outbound Security. Здесь указывается, как нужно авторизоваться на почтовом сервере, на который ваш SMTP-сервере будет пересылать (relay) всю почту. К примеру, если вся почта будет отправляться на почтовый сервер Gmail и уже с него пересылаться адресатам, вам нужно выбрать тип аутентификации Basic authentication, указав в качестве пользователя и пароля данные для доступа к почтовому ящику на сервисе Gmail (в настройках аккаунта Google нужно разрешить отправку через smtp сервера gmail).

Затем нажмите на кнопку Advanced.
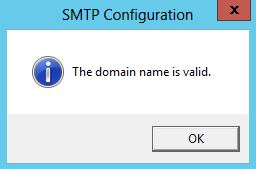
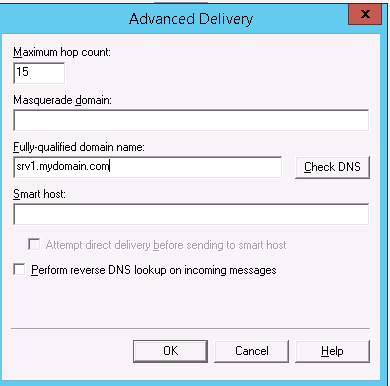 Здесь указывается FQDN имя вашего SMTP сервера. Нажмите кнопку Check DNS, чтобы проверить корректность записи в DNS.
Если сервер должен пересылать почту внешнему smtp серверу, нужно указать его имя в поле Smart host (к примеру smtp.gmail.com или smtp.office365.com).
Некоторые внешние почтовые сервера принимает почту только при использовании защищенного SMTP соединения с помощью TLS Encryption (используется порт TCP 587). Это настраивается в разделе Delivery-> Outbound Security и Outbound Connections. Ознакомитесь с документацией вашего почтового провайдера.
Сохраните настройки SMTP сервера и перезапустите ваш виртуальный SMTP сервер для применения изменений.
Примечание.
- Настройки DNS критичны с точки зрения работоспособности почтовой системы. Если ваш SMTP сервер не может корректно разрешить DNS имена доменов, на которые он пытается отправить письма, доставка не удастся.
- Если ваш сервер сам будет отправлять почту в другие домены, важно, чтобы для вашего адреса была сформирована правильная PTR запись для разрешения обратных DNS запросов. PTR запись для белого IP адреса должна указывать на FQDN имя. В противном случае большинство внешних smtp серверов не будут принимать от вас почту, считая ваш сервер спамерским.
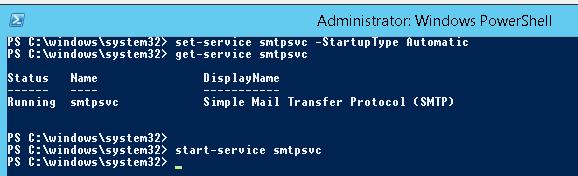
Автозапуск службы SMTPSVC
Осталось настроить автозапуск службы SMTP сервера. Быстрее всего это сделать из командной строки PowerShell:
set-service smtpsvc -StartupType Automatic
Запустим службу:
start-service smtpsvc
Проверим, что запущена служба SMTPSVC :
get-service smtpsvc
Status Name DisplayName
—— —- ————
Running smtpsvc Simple Mail Transfer Protocol (SMTP)
Проверка работы SMTP сервера на Windows Server
Ну и последнее, что осталось сделать, проверить работу созданного SMTP сервера. Проще всего это сделать, создав на рабочем столе текстовый файл smtp-test-email.txt и скопировав в него следующий текст, заменив имя отправителя и получателя на ваши.
From: [email protected]
To: [email protected]
Subject: Email test
This is the test email
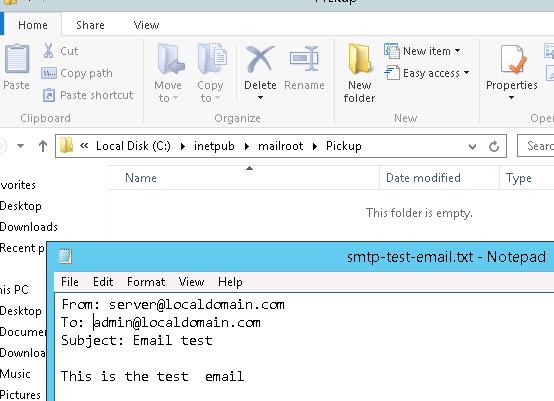
Скопируйте файл smtp-test-email.txt в каталог C:inetpubmailrootPickup. SMTP сервер следит за появлением файлов в этой каталоге и при обнаружении файла прочтет его содержимое и попытается отправить письмо с данной темой и текстом адресату, указанному в разделе To:.
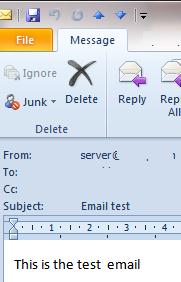
Проверьте ящик получателя, в него должно прийти такое письмо.
Совет. Протестировать работу SMTP сервера можно и из командой строки telnet, скрипта vbs или PowerShell:
Send-MailMessage -SMTPServer localhost -To [email protected] -From [email protected] -Subject "Email test" -Body "This is the test email sent via PowerShell"
Если вы хотите, чтобы вы включили Basic Authentication (Обычная проверка подлинности) для авторизации всех ваших SMTP клиентов (вместо анонимной аутентификации), вы можете отправить письмо с smtp-аутентификацией через telnet следующим образом.
Также убедитесь, что на вашем SMTP сервере не блокируется порт TCP 25 при удаленном подключении (локальным файерволом, антивирусом или межсетевым экраном). Проще всего это сделать с компьютера Windows, IP адрес которого добавлен в разрешенные. Проверку доступности порта можно выполнить с помощью командлета Test-NetConnection:
Test-NetConnection smtpsrv1.name.local –port 25
Если 25 порт блокируется, проверьте настройки Windows Firewall, антивируса и аппаратных межсетевых экранов.
Итак, вы настроили собственный почтовый SMTP релей на Windows Server 2016/2012 R2 и протестировали отправку писем через него.

This blog post was originally published on 02/07/2020 and was updated on 03/01/2022

In the world of email, there are many facets to testing, but one of the most basic tests you can do is to simply telnet into a given SMTP server. This SMTP check is useful in determining if the most basic of problems do or do not exist.
- Is the server up?
- Is there a firewall blocking communication?
- Does the mail server allow for relaying of a particular domain/email address?
- What SMTP commands does the mail server support?
- Does the server respond with the correct hostname?
- Does the connection work outside any third-party software or APIs?
All these questions and more can be answered with a simple telnet test.
Before we get started, be sure to open up our companion piece to this post: To Where are Bounce Messages Sent? in a new tab so you can read it after you’re done with this blog.
As a note, the commands used in the following examples (as well as additional commands) are covered in section 4.1 of RFC 2821.
How Do I Send an Email Using Telnet?
Sending email through telnet can help you identify deliverability problems within your current configuration.

Before you send an email using telnet, confirm telnet is both installed and enabled on your computer. Most computers come pre-installed with a telnet client. For those Windows versions that do not, one can be installed by opening the “Programs and Features” section of the control panel and selecting “Turn Windows features on or off”. With this window open, select “telnet client” and then click OK.
Once a telnet client has been verified to be installed on the server, open the terminal window where you’ll enter your prompt commands. On Windows, use the Windows + R, key in “cmd”, and press enter. For Mac users, you’ll find the terminal icon by opening Finder and searching for “Utilities” on the Applications page, or by entering “terminal” in the Launchpad search function.
Next, we need to find a mail server to log into. For this, we will need the DNS MX record for a given domain. This can be found with the following command (for these examples port25.com will be used, but any domain can be substituted):
Windows:
nslookup -type=mx port25.com
Non-authoritative answer:
port25.com MX preference = 100, mail exchanger = mail.port25.com
Linux:
nslookup -type=mx port25.com
Non-authoritative answer:
port25.com mail exchanger = 100 mail.port25.com.
SMTP uses one of three ports — 25, 465, or 587, which Microsoft Outlook commonly uses. If your SMTP relay uses a different port than 25 as shown in the example, you’ll use the port specified by the mail exchange server’s response to the nslookup. You can also verify the port your SMTP relies on by asking your administrator or logging into the mail exchange server and reviewing the protocols.
Next we need the DNS PTR for the IP we are going to use. First we need to know what IP address the internet sees us as having. To find that we can use a website like:
http://whatismyipaddress.com/
With the IP address run the following command, where A.B.C.D is the IP address.
Windows:
nslookup -type=ptr A.B.C.D
Non-authoritative answer:
D.C.B.A.in-addr.arpa name = server.example.com
Linux:
nslookup -type=ptr A.B.C.D
Non-authoritative answer:
D.C.B.A.in-addr.arpa name = server.example.com
server.example.com is just an example, and your results will be different.
So now that we have the MX record for port25.com and the PTR for the IP we are going to use, it is time to log in to the SMTP server. To do so, use the following command:
telnet mail.port25.com 25
Something similar to the following should now be displayed:
Trying 69.63.149.30...
Connected to mail.port25.com (69.63.149.30).
Escape character is '^]'.
220 mail.port25.com (PowerMTA(TM) v4.0) ESMTP service ready
If you receive an error message like “cannot connect” at this point, either the port number is correct or the mail server is facing issues.
The first command we need to issue to the mail server for our SMTP email tester is the EHLO or HELO. This is a basic greeting that starts the communication between the telnet client and the SMTP server. Also passed is the DNS PTR for the IP address from which we are connecting as determined previously.
EHLO server.example.com
Something similar to the following should be returned:
250-mail.port25.com says hello
250-STARTTLS
250-ENHANCEDSTATUSCODES
250-PIPELINING
250-CHUNKING
250-8BITMIME
250-XACK
250-XMRG
250-SIZE 54525952
250-VERP
250 DSN
This shows the SMTP commands that the SMTP server accepts. Not all SMTP servers support the same sets of commands. For example, yahoo only shows the following:
250-8BITMIME
250-SIZE 41943040
250 PIPELINING
And aol shows only one with:
250 DSN
The next command we need to issue is the MAIL FROM command. This determines the address to which bounces are sent. This is not the same as the from header, which is the email address shown in an email client.
MAIL FROM: <support@port25.com>
250 2.1.0 MAIL ok

Ensure you use the domain name corresponding to your mail server’s domain. For example, if your email’s domain is anycompany.com, you’ll want to use you@anycompany.com instead of an outside email like you@free-mail-provider.com. Variations in domain names can cause an error message to appear.
Now that the MAIL FROM command has been sent we can send the RCPT TO command. This command tells the SMTP mail server to who the message should be sent. This can be the same or different than the to header, which is the email address shown in the email client.
RCPT TO: <support@port25.com>
250 2.1.5 <support@port25.com> ok
Double-check your recipient’s address before sending the RCPT TO command — an error message displaying here can indicate a misspelled or blocked email recipient.
The last command to run before starting the body of the message is the DATA command. This command lets the SMTP mail server know that everything else about to be sent is the body of the message (which also contains the headers).
DATA
354 send message
It is important to note that if a mail server supports PIPELINING, as mail.port25.com does, the SMTP mail server may wait until the DATA command is issued before responding to any other commands after the EHLO/HELO. In this case, enter the MAIL FROM, RCPT TO, and DATA commands before waiting for a response.
Now that the DATA command has been sent we can start sending the message contents. This starts with the various headers. At minimum a message should contain a to, from, subject, and date header. The headers entered here will be shown to the user in their email client.
From: "John Smith" <jsmith@port25.com>
To: "Jane Doe" <jdoe@port25.com>
Subject: test message sent from manual telnet session
Date: Wed, 11 May 2011 16:19:57 -0400
With the headers set, we now add one blank line with a carriage return/line feed (just press enter twice) and then we start the actual body of the message.
Hello World,
This is a test message sent from a manual telnet session.

Yours truly,
SMTP administrator
With the message complete, we need to tell the SMTP server that we are done with the message and want the SMTP mail server to accept it. This is done with a period on a line by itself. If during the writing of a message a period on a line by itself is needed, you must put 2 periods, the first escaping the second.
.

250 2.6.0 message received
If you get an error message instead of the “received” notification, log the relevant details and contact your email provider for more assistance.
Lastly, the QUIT command is sent to close the connection:
QUIT
221 2.0.0 mail.port25.com says goodbye
With that the mail server has now accepted the message for delivery, your telnet send email test is complete, and it should be sitting in the inbox of the RCPT TO address!!!
Here are all the commands without interruption:
telnet mail.port25.com 25
Trying 69.63.149.30...
Connected to mail.port25.com (69.63.149.30).
Escape character is '^]'.
220 mail.port25.com (PowerMTA(TM) v4.0) ESMTP service ready
EHLO server.example.com
250-mail.port25.com says hello
250-STARTTLS
250-ENHANCEDSTATUSCODES
250-PIPELINING
250-CHUNKING
250-8BITMIME
250-XACK
250-XMRG
250-SIZE 54525952
250-VERP
250 DSN
MAIL FROM: <support@port25.com>
250 2.1.0 MAIL ok
RCPT TO: <support@port25.com>
250 2.1.5 <support@port25.com> ok
DATA
354 send message
From: "John Smith" <jsmith@port25.com>
To: "Jane Doe" <jdoe@port25.com>
Subject: test message sent from manual telnet session
Date: Wed, 11 May 2011 16:19:57 -0400

Hello World,
This is a test message sent from a manual telnet session.
Yours truly,
SMTP administrator
.
250 2.6.0 message received
QUIT
221 2.0.0 mail.port25.com says goodbye
Sending an email using telnet lets you test connection capabilities quickly and at less cost than robust diagnostic equipment or software.
How Do I Test SMTP Using Telnet Authentication?
Now that you know how to check an SMTP connection with telnet, we’ll discuss authentication procedures. SMTP authentication helps prevent large amounts of spam from reaching reader inboxes, though not all mail exchange servers require it.

The primary difference in modern authentication protocols is the presence of a base64 encoding. Base64 converts binary data into the ASCII-text format required by mail servers for successful data transmission. It’s a way of representing your login credentials — some combination of text — in numeric format the computer can understand.
You can generate your base64 using software or free online tools. Once you communicate the information to the mail server, it compares this data with its records to determine authentication.
To test SMTP authentication via telnet, complete the following steps:
- Open the terminal and connect with the mail server using the telnet server name and access command — mail.port25.com in the example above.
- Greet the server with EHLO or HELO, enter AUTH LOGIN, and wait for the computer’s response.
- Enter the base64-encoded user name and allow the server to answer.
- Enter the password encoded in base64, and you should receive a response such as “authentication succeeded.”
- Proceed with MAIL FROM, RCPT TO, DATA, and QUIT to send your authenticated email.
~ Scott

Отправка электронных писем является важной частью вашего бизнеса.
Это означает, что вы полагаетесь на свой SMTP-сервер; это то, о чем большинство людей обычно не задумываются.
Предприятия делают упор на создание большого количества копий электронной почты и информационных бюллетеней. Тем не менее, не все на самом деле заботятся о проверке ваших электронных писем на предмет того, имеют ли они правильный HTML, не содержат ошибок и доставляются ли они в нужное место.
В результате это может привести к ошибкам, попаданию писем в папки со спамом, странному форматированию и даже неправильному отображению в некоторых почтовых клиентах. Компании таким образом потеряли своих клиентов или, по крайней мере, разочаровали своих пользователей.
Итак, каково решение?
Чтобы определить потенциальные риски и устранить проблемы, связанные с входящей и исходящей электронной почтой, вам нужно подумать о причинах этих проблем.
И в этом вам могут помочь инструменты тестирования SMTP!
Вот так.
Итак, давайте узнаем больше об инструменте тестирования SMTP и о том, зачем он вам нужен.
Что такое SMTP?
Простой протокол передачи почты (SMTP) — это набор правил, используемых при отправке электронных писем.
Обычно этот протокол связан с IMAP или POP3. Однако SMTP используется для доставки сообщений, а POP3 и IMAP — для их получения.
Пожалуйста, не путайте его со службами ретрансляции SMTP, которые являются сторонними службами или приложениями, используемыми при передаче электронной почты между несколькими серверами, доменами и службами хостинга.
А SMTP-серверы — это системы, которые используются только для доставки электронной почты. Точно так же аутентификация SMTP относится к процессу идентификации, который клиенты интернет-провайдера (такие как Outlook Express) проходят с почтовым сервером, который они используют для отправки электронных писем.
Что такое инструменты тестирования SMTP?
Инструмент тестирования SMTP может выявить проблемы с SMTP-сервером и устранить их, чтобы обеспечить безопасность вашей электронной почты.
Для этого инструмент отправляет SMTP-серверу сообщение, а затем отображает и записывает испытания и результаты в журнал. Это сообщение проходит через интернет-провайдеров, и когда сообщение аутентифицируется почтовым сервером SMTP с соответствующим паролем и именем пользователя, соединение устанавливается.
Но если инструменту не удастся установить это соединение, он покажет вам результаты, помогая вам решить проблемы, которые не удалось решить в первую очередь.
Это помогает во многих отношениях, и некоторые из них приведены ниже.
Легко обнаруживаемые и устраняемые проблемы
Инструменты помогут вам проверить, что не так с вашим SMTP-сервером, предлагая простые для понимания данные журнала. Он проверяет правильность ваших учетных данных и наличие внешней угрозы.
Без этого инструмента вы можете не знать фактическую причину, по которой ваши электронные письма не достигают нужного адресата. Таким образом, это также экономит ваши усилия, время и затраты, связанные с отправкой каждого письма.
Поддержка интеграции
Современные службы SMTP поставляются с множеством вариантов интеграции, поэтому вы можете использовать уже используемые инструменты. Он варьируется от одного инструмента тестирования SMTP к другому, но распространенными интеграциями являются поддержка IPv6, поддержка SOCKS, поддержка ICAP и т. д.
Снижает показатель отказов
Убедившись, что ваша система безопасности электронной почты безопасна, ваши показатели отказов электронной почты будут снижены. Это означает, что доставляемость электронной почты будет выше, чтобы повысить коэффициент конверсии.
Далее давайте узнаем о некоторых из лучших инструментов SMTP, которые вы можете использовать для тестирования и диагностики проблем и обеспечения безопасности.
SocketLabs
SocketLabs предлагает бесплатный инструмент для тестирования, диагностики и мониторинга SMTP, который можно бесплатно использовать и загрузить. Это поможет вам протестировать и устранить неполадки SMTP-соединений.
Инструмент поддерживает как безопасные (SSL), так и открытые подключения к серверу SMTP. Он содержит встроенную библиотеку команд, таких как DATA, EHLO, RCPT TO и другие. Этот инструмент SMTP легко загружается и требует Windows и .NET Framework 2.0 или более поздней версии.
МксТулбокс
Протестируйте и диагностируйте безопасность вашего сервера с помощью МксТулбокс. Все, что вам нужно сделать, это ввести адрес вашего почтового сервера и нажать кнопку рядом с полем.
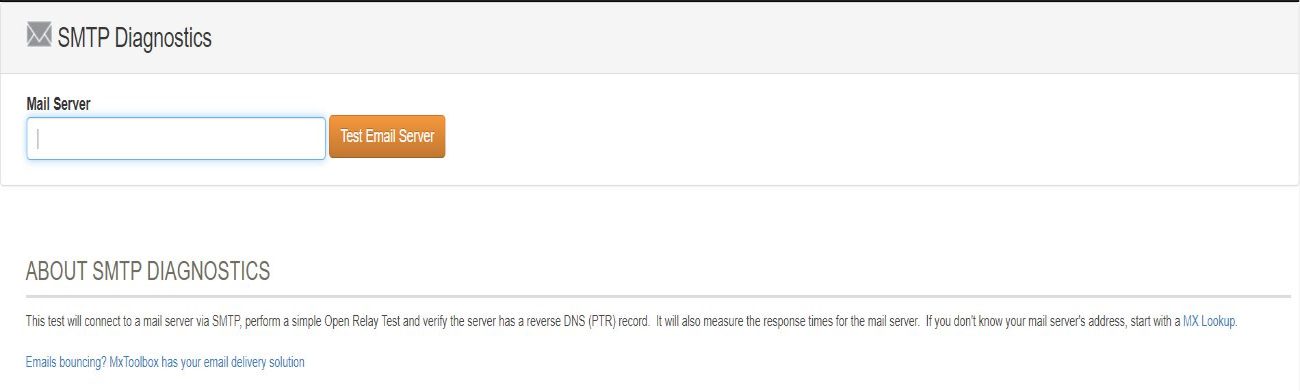
Этот тест подключает ваш почтовый сервер через SMTP и выполняет тест Open Relay. Таким образом, инструмент поможет вам проверить, содержит ли сервер обратную запись DNS или PTR.
Кроме того, вы также можете рассчитать время отклика, связанное с вашим почтовым сервером. Если вы не знаете адрес своего почтового сервера, вы можете рассмотреть возможность поиска MX.
червивый
Запустите тест SMTP с червивый введя IP-адрес вашего SMTP-сервера или полный адрес домена. Введите свой адрес электронной почты, чтобы инструмент мог проверить ваш адрес на вашем SMTP-сервере или с помощью RCPT TO.
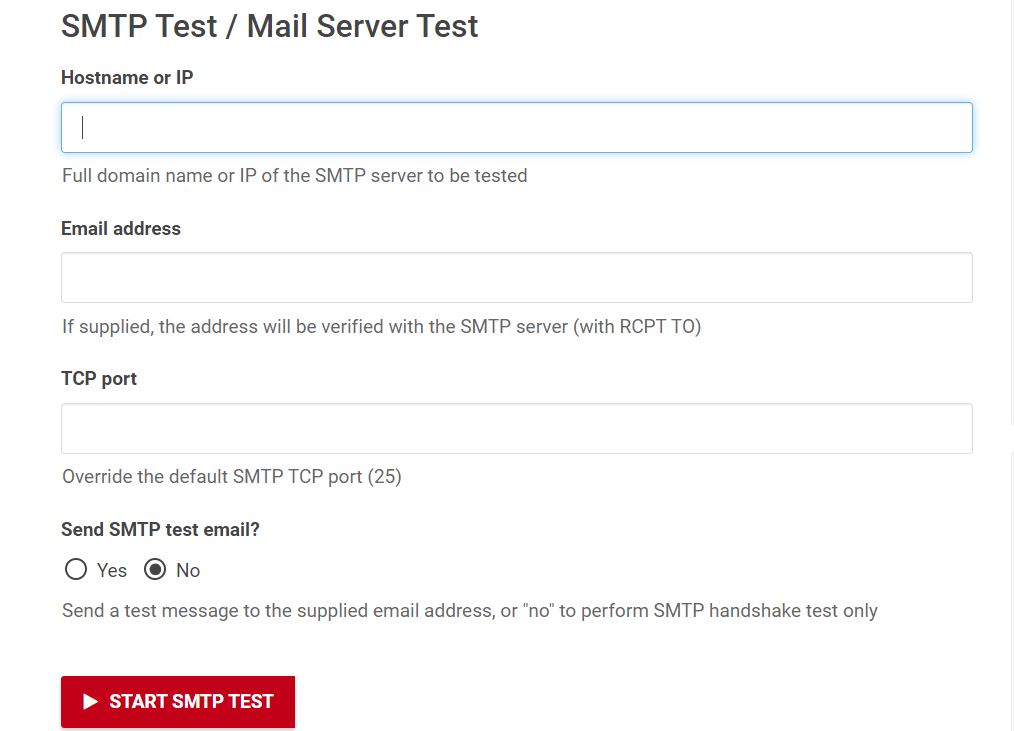
Существует также возможность переопределить TCP-порт по умолчанию вашего SMTP-сервера. Вы также можете выбрать отправку тестового SMTP-сообщения по указанному адресу электронной почты. Кроме того, вы можете выбрать «Нет», если хотите выполнить проверку рукопожатия SMTP.
ПроверитьTLS
С использованием ПроверитьTLS, вы можете проверить безопасность своей электронной почты и то, как работает ваша электронная почта. Их EmailSentry Outlook поможет вам убедиться, что все ваши отправленные электронные письма являются конфиденциальными, законными и безопасными.
Инструмент одобрен HIPAA, CCPA, PCI, GDPR и другими правилами безопасности электронной почты. Обнаружив какие-либо проблемы с вашими электронными письмами после теста, CheckTLS также поможет вам их исправить.
SSL-инструменты
Проверьте шифрование вашего почтового сервера с помощью простого инструмента: SSL-инструменты. Это довольно простой инструмент для ввода доменной части адреса электронной почты и проверки его безопасности.
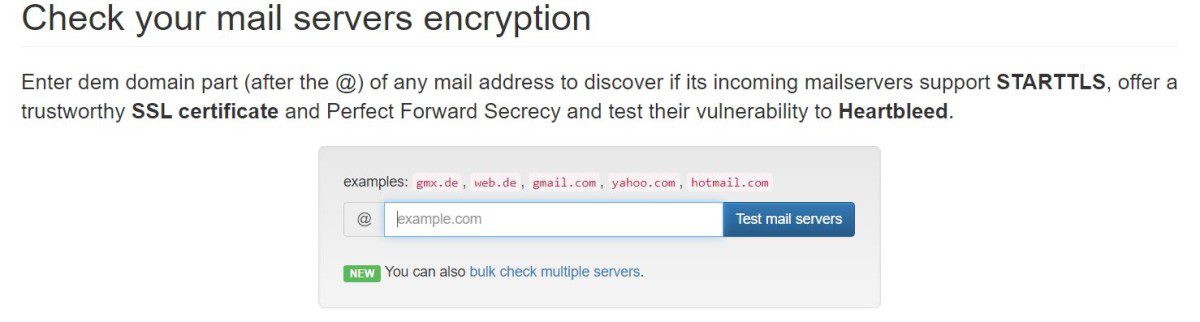
Это поможет вам узнать, поддерживает ли его сервер входящей почты STARTTLS и имеет ли он подлинный сертификат SSL или нет. Вы также можете узнать о его Perfect Forward Secrecy в дополнение к тестированию их уязвимости к Heartbleed.
ИммуниВеб
ИммуниВеб предлагает эффективный инструмент для проверки безопасности SSL. Это бесплатный инструмент, который уже выполнил 73 миллиона тестов безопасности.
Различные типы тестов безопасности SSL, которые предлагает инструмент, предназначены для:
- Почтовые серверы
- Веб-серверы
- SSL-сертификаты
- Тест на PCI DSS, NIST и HIPAA
Просто введите адрес своего почтового сервера или веб-сайта и начните тестирование.
СпамПомощь
Тест открытой ретрансляции SMTP СпамПомощь может обнаруживать и сообщать обо всех открытых ретрансляторах в список бойкотов распределенных серверов (DSBL).
Чтобы продолжить тест, вам нужно ввести свой IP-адрес или имя хоста.
DNS-запросы
DNS-запросы предоставляет полезный инструмент, который поможет вам проверить работоспособность вашего SMTP-сервера, чтобы убедиться, что все работает правильно.
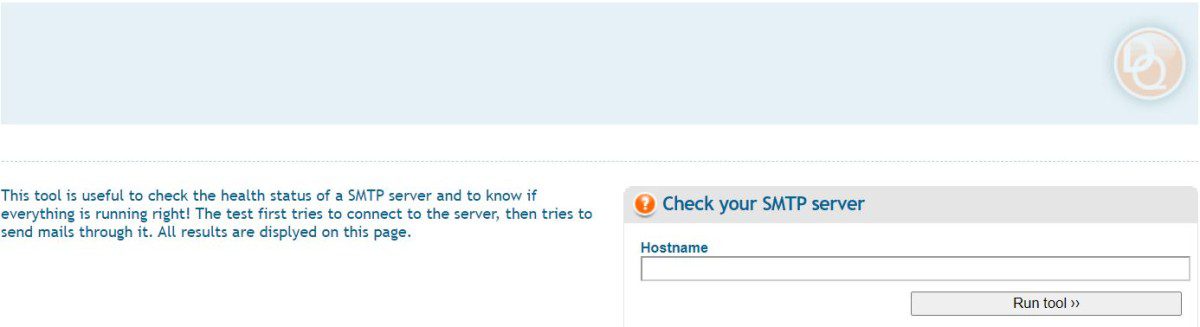
Сначала тест пытается подключиться к вашему почтовому серверу, а затем через него отправляет почту. Затем он отображает результат прямо на этой веб-странице. Если инструмент успешно справляется с обеими задачами, будьте уверены, все в порядке.
Введите имя хоста, чтобы начать тест.
Крошечная утилита на основе Python, SMTP-тестер — отличный инструмент, который может протестировать ваш почтовый сервер SMTP на наличие трех распространенных уязвимостей — спуфинга, перечисления пользователей и ретрансляции.
Вперед, установите Python и SMTPTester, чтобы проверить, не уязвим ли ваш SMTP-сервер.
У вас есть три варианта использования инструмента:
- Внутренний — только для проверки спуфинга почты
- Внешний — только для проверки почтового ретранслятора.
- Vrfy — только для проверки перечисления пользователей. Если вы не укажете какой-либо конкретный тип теста, инструмент выполнит как внешние, так и внутренние тесты, а затем добавит результаты.

Как следует из названия, этот простой в использовании инструмент — Анализатор заголовков сообщений помогает вам анализировать ваши заголовки сообщений для обеспечения безопасности. Просто вставьте заголовок сообщения, которое вы хотите проанализировать, и сразу получите результаты. Так просто, как, что!
Анализатор Майкрософт
Анализатор удаленного подключения Майкрософт предоставляет множество тестов, включая тесты для входящей и исходящей электронной почты SMTP.
Тест входящей электронной почты SMTP показывает различные действия, предпринимаемые почтовым сервером для отправки на ваш домен входящей электронной почты SMTP. Точно так же тест исходящей электронной почты SMTP определяет ваши исходящие IP-адреса для некоторых требований. Он включает в себя обратный DNS, проверки RBL и идентификатор отправителя.
NetScanTools
NetScanTools Pro SMTP Server Tests Tool — это инструмент 2-в-1.
№1. Генератор электронной почты SMTP
Он предназначен для тестирования процесса отправки электронных писем через почтовый сервер SMTP. Это дает вам доступ ко всем параметрам заголовка, например, к подтверждению срочных флагов.
Он поддерживает базовую аутентификацию SMTP или через STARTTLS с паролем и именем пользователя для сервера, которому они нужны. Инструмент позволяет отправлять вложения по почте, регистрировать сеансы электронной почты в файлах журналов и просматривать эти файлы для проверки связи между почтовым SMTP-сервером и NetScanTools Pro.
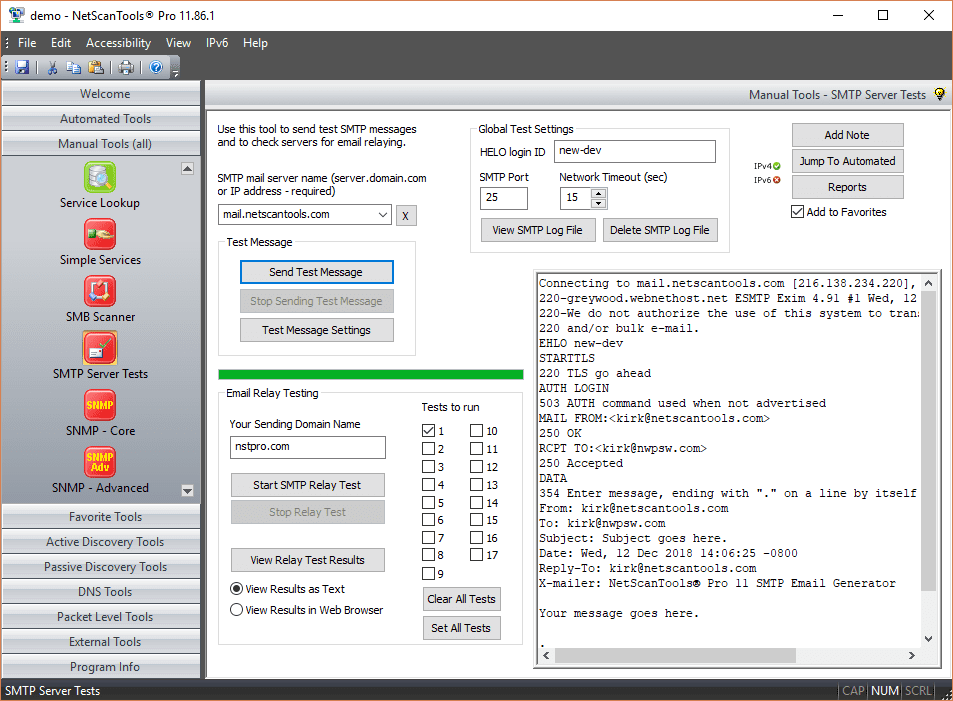
№ 2. Тестер ретрансляции электронной почты SMTP
Он выполняет более 15 типичных тестов ретрансляции, взаимодействуя с SMTP-сервером. Вы можете контролировать, какие тесты вы хотите запустить, и просматривать отчет о тестировании в виде HTML или текста в своем браузере. В этом отчете также показана связь между целевым SMTP-сервером и NetScanTools Pro.
SMTPPing
SMTPPing — это простой и портативный инструмент, который можно использовать для измерения задержки SMTP-сервера, пропускной способности задержки и вариаций.
Вывод
Отправка электронных писем вашим читателям, потенциальным клиентам и клиентам — это только первый шаг. Было бы лучше, если бы вы всегда прилагали усилия, чтобы выяснить, успешно ли дошли ваши электронные письма до соответствующих адресатов или нет.
Инструменты тестирования и диагностики SMTP помогают поддерживать работоспособность SMTP-сервера, проверяя его и устраняя потенциальные риски. Таким образом, не рискуйте тем, что ваше следующее письмо попадет в папку со спамом получателя. Вместо этого используйте вышеупомянутые инструменты SMTP для обеспечения безопасности электронной почты и увеличения доставляемости.
By Thomas Underwood 🕥 Updated on August 5, 2021 at 10:30 am
Automation Workshop strongly relies on its email sending capacities. It features Send Email Action that can send automated email messages according to user specified scenarios. It also uses email to report successful Task completions and failures.
Automation Workshop monitors files and folders on local & network or remote servers like Amazon S3 and SFTP, and executes Actions when files or folders are created, modified or deleted according to defined conditions · Getting started · Automation videos
Let’s debug… the SMTP
This article will show how to troubleshoot SMTP connectivity by using ping and telnet commands as well as Send Email Action built-in in Automation Workshop.
Overview
Since Automation Workshop uses specified SMTP server for sending email, it is essential to ensure SMTP connectivity. If SMTP server is not reachable, Automation Workshop will not be able to deliver email messages, which in turn can lead to various problem situations.
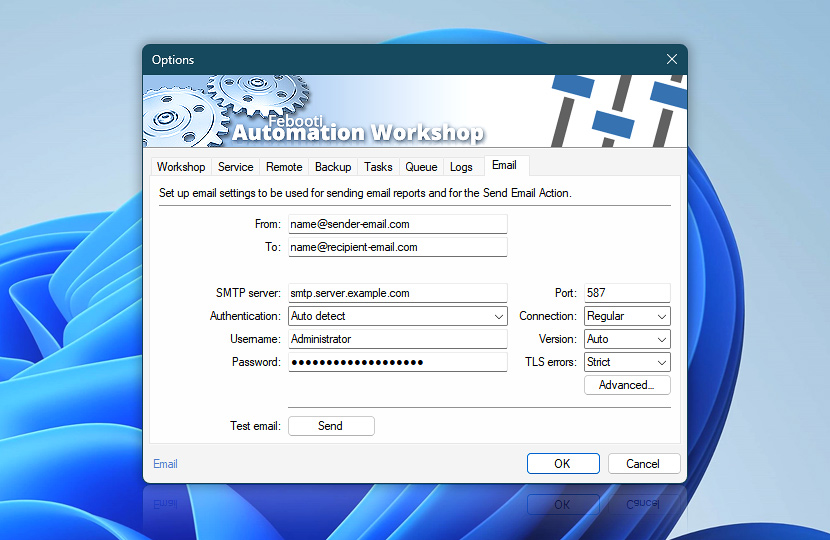
Automation Workshop email options
Verify SMTP settings
First of all, ensure that the email settings are configured correctly. Open Options from Tools menu in Automation Workshop Manager and go to the Email tab. SMTP server name or IP address as well as connection type and port number must be specified correctly. If unsure, contact system administrator or consult SMTP server help to get the necessary parameters.
If SMTP server is provided by Internet Service Provider (ISP), try contacting its support service to inquire for necessary SMTP server parameters.
Ping SMTP server…
Step 1: Ping SMTP server to verify server connectivity. As the first SMTP connectivity test, let us try using ping command. We need to open Windows command prompt:
- How to open Windows command prompt in Windows? Open the Start Menu and type
cmdin Search input. Click on cmd.exe in the list. - How to open Windows command prompt in older Windows versions? Click on the Run option in Start Menu. Type
cmdin the Run window and click OK.
When in Command prompt, type ping mail.example.com where mail.example.com is the name or IP address of SMTP server you intend to use. Normally, if SMTP server is reachable, it should reply.
If SMTP server is not reachable, the ping request will timeout. However, some SMTP servers are configured to explicitly block ping requests. Thus, even if the ping packet timeouts, you should still try to telnet the SMTP server unless absolutely sure that ping command should not be blocked.
ping mail.example.com
Pinging mail.example.com [192.168.0.33] with 32 bytes of data:
Reply from 192.168.0.33: bytes=32 time=56ms TTL=54
Reply from 192.168.0.33: bytes=32 time=56ms TTL=54
Reply from 192.168.0.33: bytes=32 time=56ms TTL=54
Reply from 192.168.0.33: bytes=32 time=57ms TTL=54
Ping statistics for 192.168.0.33:
Packets: Sent = 4, Received = 4, Lost = 0 (0% loss),
Approximate round trip times in milli-seconds:
Minimum = 56ms, Maximum = 57ms, Average = 56ms
Most probably though, if ping command timeouts, the server address is not reachable. If SMTP server does not work, although its IP address is reachable by ping command, the SMTP server software might not be running on the specified machine · Ping server regularly
ping mail.example.com
Pinging mail.example.com [192.168.0.33] with 32 bytes of data:
Reply from 192.168.0.33: Destination host unreachable.
Reply from 192.168.0.33: Destination host unreachable.
Request timed out.
Request timed out.
Ping statistics for 192.168.0.33:
Packets: Sent = 4, Received = 0, Lost = 4 (100% loss)
Open telnet
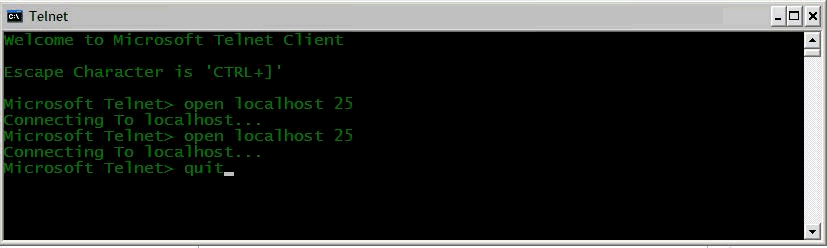
Step 2: Telnet SMTP server. Telnet is TCP/IP based protocol that can be used to connect remote computer system through terminal emulation program. We will use it to verify SMTP server connectivity. Start the telnet program:
- How to start telnet program in Windows? Open the Start Menu and type
telnetin Search input. Click on telnet.exe if it is present in the list. If telnet.exe is not in the list, probably it is not be installed. - How to start telnet program in older Windows versions? Click on the Run option in Start Menu. Type
telnetin the Run window and click OK.
No telnet?
To install telnet, click Start button, select Control Panel, Programs, and click on Turn Windows Features on or off. In the available program list, scroll down and select Telnet Client. Click OK to start the installation. Alternatively, run the following command string from command prompt or Run window:
start /w pkgmgr /iu:"TelnetClient"
Telnet SMTP server…
When telnet terminal is open, we can now continue with SMTP connectivity testing. To connect to the SMTP server, type: o smtp.example.com 25 in telnet command prompt (where smtp.example.com should be replaced by actual SMTP server and 25 by the actual SMTP server port).
Welcome to Microsoft Telnet Client
Escape Character is 'CTRL+]'
Microsoft Telnet>
o smtp.example.com 25
Alternatively, you can enter telnet command followed by SMTP server name or IP address directly into Run window or Search program and files input (both accessible from Start Menu).
telnet smtp.example.com 25
If connection is successful, SMTP server should return code 220 with server address, connection type, greeting, mail server software version and other information. Sometimes, though, the server is configured to return only reply code (without other text).
Let us try sending SMTP server some command… enter the helo testing command.
220 smtp.example.org ESMTP Server is glad to see you!
helo testing
Normally, SMTP server should return code 250 followed by additional information. If codes 220 and 250 were returned when, respectively, connecting SMTP server and sending helo command, SMTP server is most likely working properly.
220 smtp.example.org ESMTP Server is glad to see you!
helo testing
250 smtp.example.org
If using telnet to establish SMTP connection has failed, try checking local firewall and antivirus software settings to see if telnet has necessary rights to connect to the SMTP server. Also ensure that SMTP is accepting connections from the IP address of this particular machine.
If telnet connection is working properly, yet Automation Workshop cannot connect to SMTP server, try checking antivirus and firewall settings either on local machine or remote hardware to see if Automation Workshop has necessary rights to connect to the SMTP server.
Test SMTP with Send Email…
Step 3: Testing SMTP connectivity with Send Email Action. Even if ping and telnet commands return fully successful results when testing SMTP server connectivity, some other problems might persist. We will use Send Email Action of Automation Workshop to retrieve the most detailed data on the connection between Automation Workshop and SMTP server.
First, let us create a Task that will test SMTP connection whenever it is executed. Open Automation Workshop and click New Task… in File menu. This will open the Task Wizard. After reading the Welcome screen, click Next. Click Next once more to skip the Trigger screen (unless you would like to set up periodic SMTP testing by adding Task Scheduler trigger).
In Actions tab, push the Add button (this will open Add Action window) and select Send Email from Email category, and click OK—this will open Send Email Action settings.
Now, let us configure Send Email Action for SMTP testing. Fill in From, To, Subject and Email text fields. Then, open Server tab and choose either default SMTP server (set in of Automation Workshop options) or custom SMTP server. In the latter case we will have to set SMTP server address, port, connection security protocol and authentication type and credentials.
Advanced debug
After configuring SMTP server settings, go to Advanced tab. We have to enable client and SMTP server communication logging in order to save data session into text file. Enable the checkbox and choose the file in which you would like to save SMTP server communication with Automation Workshop.
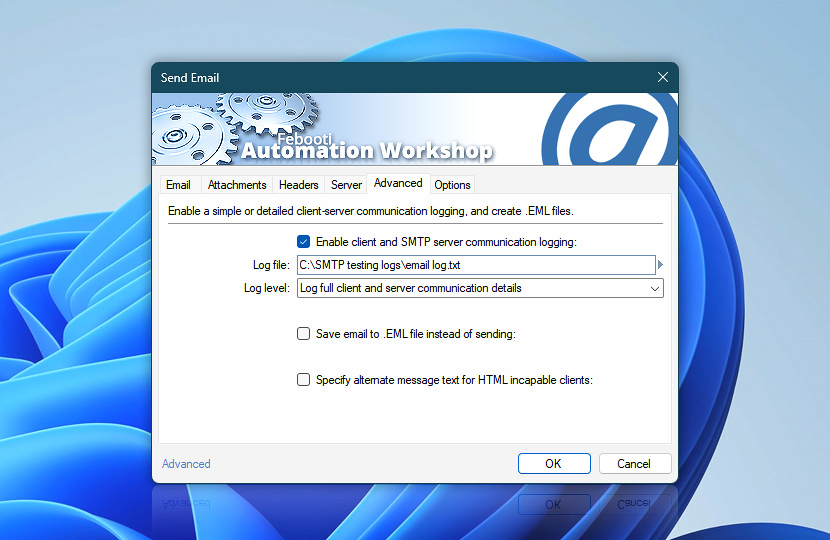
Enable full client and server communication details
Since every new log overwrites the previous one, we can add date and time variable to file name specification in order to preserve all log files, each with recognizable name.
Click Variable Wizard button and choose Sortable file (dashed) from Presets in Date & Time category. This option returns current date and time in easy to read format that can be used in file names (i.e., without characters not allowed in file names like slashes or colons).
![Enable client and SMTP server communication logging—log file ‐ [date].txt](https://i.febooti.com/i/automation-workshop/tutorials/debug-smtp-server-log-file-date.jpg)
Enable full client and server communication details + date
In either case choose Log full client and server communication details as Log level setting to save as much data as possible for troubleshooting purposes.
Finally, check Headers and Options tabs for additional options you would like to set and click OK to save the Send Email settings and return to Task Wizard. Click Next to configure email reports in Reports tab. Then in Task tab give Task a name and, optionally, description and finish creation of Task.
The Task is now saved in the Task folder where we created it. If the Task Scheduler trigger was not added when the Task was created, it can only be executed manually. Select the Task and choose Run Task option from File menu. Alternatively, Run Task can be accessed from context menu, Task toolbar and keyboard shortcut Ctrl+F5.
Summary
Every time you run the Task, it will perform the Send Email Action which will send an email from specified email address to specified recipient and, additionally, save communication session with SMTP server into the text file with unique name containing the date and time the Send Email Action was performed.
Now you can either analyze the logs to see if some errors occur or send these text files to support to illustrate the issue at hand. See an example of successful email session:
Server: 220 smtp.example.org ESMTP Server is glad to see you!

Client: HELO user

Server: 250 smtp.example.org

Client: MAIL FROM:<sender@example.com>

Server: 250 2.1.0 Ok

Client: RCPT TO:<recipient@example.com>

Server: 250 2.1.5 Ok

Client: DATA

Server: 354 End data with <CR><LF>.<CR><LF>

Client: From: sender@example.com

To: recipient@example.com

Subject: Testing SMTP connectivity!

X-Mailer: Febooti Automation Workshop

Content-Type: text/plain;

              charset=UTF-8

Date: Tue, 17 Mar 2020 17:13:54 +0200

X-Priority: 3 (normal)
SMTP connectivity test
(with logging session details to text file).
---
Email sent with trial version
of Automation Workshop 6.5.0
Visit febooti.com to get full version
Client:
.
Server: 250 2.00 Ok: queued as 7C00F9D715
Client: QUIT
Server: 221 2.00 Bye
SMTP reply codes
The list of most common SMTP reply codes:
| SMTP reply code | Description |
|---|---|
| 214 | Help message. |
| 220 | Service ready. |
| 221 | Service closing transmission channel. |
| 250 | Requested mail action okay; completed. |
| 354 | Start mail input; End data with <CR><LF>.<CR><LF> |
| 421 | Service not available; closing transmission channel. |
| 450 | Requested mail action not taken; mailbox unavailable. |
| 500 | Syntax error; command unrecognized. |
| 501 | Syntax error in parameters or arguments. |
| 502 | Command not implemented. |
| 503 | Bad sequence of commands. |
| 504 | Command parameter not implemented. |
| 521 | Domain does not accept mail. |
| 530 | Access denied. |
| 535 | SMTP authentication unsuccessful. |
| 550 | Unable to relay. |
| 552 | Requested mail action aborted; exceeded storage allocation. |
| 553 | Requested action not taken; mailbox name not allowed. |
| 554 | Relay access denied. |
Relaying denied?
Most common error is relaying denied (with code 550 or 554) which usually means that user authentication (username and password) is necessary in order to send an email through the particular SMTP server. Some examples of relaying denied error texts (depends on SMTP server software and version):
Server Response: 550 Relaying is prohibited.Server Response: 550 5.7.1 Unable to relay.Server Response: 550 Relaying denied.Server Response: 554 Relay access denied.
If all tests are successful, the email should be delivered to recipient’s address. If the test email is not delivered, there might be some problems with recipient’s mailbox (e.g., mailbox does not exist, is full or some other problem). Check the mailbox specified in the From address to see if it contains email delivery problem notification from mail system. If accessible, you can also consult SMTP server log files.
More relaying debugging…
- AW Event 50461 · Command RCPT failed
- AW Event 50463 · An unexpected response after end-of-mail indicator
- AW Event 2501 · Could not send notification email
- Command Line Email relaying access denied
- Gmail Workspace SMTP error reference
- Microsoft Office 365 authentication issues

Congratulations!
We have tested SMTP server connectivity by using ping and telnet commands as well as the Send Email Action that is built-in in Automation Workshop.
While the former two allowed us to verify whether the machine at the specified address is online and whether it is correctly running SMTP server software on the specified port, respectively, the use of Send Email Action has provided us with full communication data between Automation Workshop and SMTP server.
The communication session log is saved into uniquely named text file each time the SMTP testing Task is executed.
Popular SMTP settings
- Outlook
- Office 365
- Gmail
- Yahoo
- iCloud
- Windows Mail and Mozilla Thunderbird apps.
Discover
Automation Workshop includes many more awesome Triggers and numerous Actions to aid you to automate any repetitive computer or business task by providing state-of-the-art GUI tools.
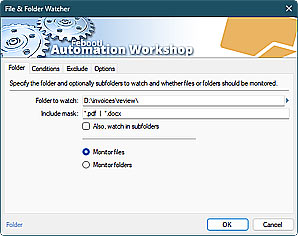
File & Folder Watcher
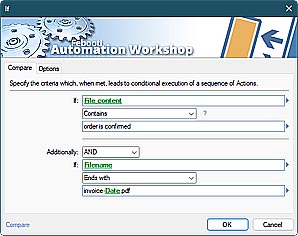
Compare
Debug more?
Command Line Email is powerful but easy-to-use email sending utility, which supports all basic and advanced email client sending capabilities · Quick start
- Debug email client-server connection
- Use DEBUG and advanced DEBUGX commands
Automate now!
Assistance is here…
If you have any questions, please do not hesitate to contact our support team.
Sending emails is an important part of your business.
It implies that you rely on your SMTP server; it’s something that most people do not usually care to think about.
Businesses emphasize creating lots of email copies and newsletters. Still, not everyone is actually concerned about testing your emails whether they have correct HTML, are free of mistakes, and deliver at the right place.
As a result, it can lead to errors, emails ending up in spam folders, weird formatting, and even failing to display properly in certain email clients. Businesses have lost their customers this way, or at least made their users disappointed.
So, what’s the solution?
To identify potential risks and fix the issues associated with your inbound and outbound emails, you need to think about the roots of these troubles.
And for that, SMTP testing tools can help you!
That’s right.
So, let’s find out more about an SMTP testing tool and why you need it.
What is an SMTP?

Simple Mail Transfer Protocol (SMTP) is a set of rules used while sending emails.
Usually, this protocol is associated with IMAP or POP3. However, SMTP is utilized to deliver messages, while POP3 and IMAP are utilized to receive them.
Please don’t confuse it with SMTP relay services, which are 3rd-party services or applications used while transferring emails between multiple servers, domains, and hosting services.
And SMTP servers are systems that are utilized to carry out just email delivery. Similarly, SMTP authentication refers to the identification process that ISP clients (such as Outlook Express) undergo with the mail server they use to send the emails.
What are the SMTP test tools?
An SMTP test tool can identify SMTP server issues and troubleshoot them to keep your email secure and safe.
For this, the tool sends the SMTP server a message, and then it displays and records the trials and results in a log. This message goes via the ISPs, and when the message gets authenticated with the associated password and username by the SMTP mail server, the connection is established.
But if the tool fails to make that connection, it will show you the results while helping you to solve the problems that failed in the first place.
It helps in many ways, and some of them are below.
Easy-to-detect and fix issues
The tools help you check what is wrong with your SMTP server by offering an easy to understand log details. It checks whether or not your login credentials are correct or there is any external threat.
Without this tool, you may not know the actual reason why your emails are not reaching the right destination. So, it also saves your efforts, time, and cost associated with sending every mail.
Integration support
Modern SMTP services come with lots of integration options, so you can leverage the tools you already use. It varies from one SMTP test tool to another, but common integrations are IPv6 support, SOCKS support, ICAP support, etc.
Reduces bounce rates
By ensuring that your email security system is safe, your email bounce rates would be reduced. It implies that email deliverability will be higher to bring your better conversion rates.
Next, let’s find out some of the best SMTP tools you can use to test and diagnose issues and maintain security.
SocketLabs
SocketLabs offers a free tool for SMTP testing, diagnostics, and monitoring that is free to use and download. It helps you to test and troubleshoot SMTP connections.

The tool supports both secure (SSL) and open SMTP server connections. It contains an in-built library of commands like DATA, EHLO, RCPT TO, and more. This SMTP tool is lightweight to download and requires Windows & .NET 2.0 framework or higher.
MxToolbox
Test and diagnose your server security with MxToolbox. All you need to do is enter your mail server address and hit the button next to the field.

This test connects your mail server through SMTP and performs an Open Relay Test. This way, the tool helps you verify if the server includes a reverse DNS or PTR record.
Apart from that, you can also calculate the response times associated with your mail server. In case you are not aware of your mail server’s address, you can consider taking up an MX Lookup.
Wormly
Start an SMTP test from Wormly by entering your SMTP server IP or your full domain address. Enter your email address so the tool can verify your address with your SMTP server or with RCPT TO.

There is also an option to override your default TCP port of your SMTP server. You can also opt to send an SMTP test email over the given email address. Alternatively, you can choose “No” if you want to perform an SMTP handshake testing.
CheckTLS
Using CheckTLS, you can check your email security and how your emails are working. Their EmailSentry Outlook helps you ensure all your sent emails are private, legal, and safe.

The tool is approved by HIPAA, CCPA, PCI, GDPR, and other compliance regulations for email security. On detecting any issues with your emails after the test, CheckTLS also helps you to fix them.
SSL-Tools
Check the encryption of your email server from the simple tool by SSL-Tools. It is a pretty straightforward tool to enter the domain part of an email address and test its security.

It will help you discover whether its incoming mail server supports STARTTLS and has an authentic SSL certificate or not. You can also find out about its Perfect Forward Secrecy in addition to testing their vulnerabilities to Heartbleed.
ImmuniWeb
ImmuniWeb offers an efficient tool to test SSL security. It is a free tool that has performed 73M security tests already.

The various types of SSL security tests that the tool offers are for:
- Email servers
- Web servers
- SSL certificates
- Test for PCI DSS, NIST, and HIPAA
Just enter your mail server address or website and start testing.
SpamHelp
The SMTP Open Relay Test by SpamHelp can detect and report all the open relays to the Distributed Server Boycott List (DSBL).
To carry on the test, you need to enter your IP address or Hostname.
DNSQueries
DNSQueries provides a useful tool to help you check your SMTP server’s health to make sure everything is working correctly.

At first, the test tries connecting to your mail server and then sends mail via this. Next, it displays the result directly on this web page. If the tool is successful in doing both things, rest assured things are good.
Enter your hostname to get the test started.
SMTPTester
A python-based tiny utility, SMTPTester is a great tool that can test your SMTP mail server for three common vulnerabilities – spoofing, user enumeration, and relays.
Go ahead, install Python and SMTPTester to check if your SMTP server is vulnerable.
You have three options to consider for using the tool:
- Internal – to test mail spoofing only
- External – to test mail relay only
- Vrfy – to test user enumeration only. If you don’t specify any specific test type, the tool performs both external and internal tests and then appends the results.

As the name suggests, this easy-to-use and simple tool – Message Header Analyzer helps you analyze your message headers for security. Just paste a message header that you wish to analyze and get the results directly. As simple as that!
Microsoft Analyzer
Microsoft Remote Connectivity Analyzer provides lots of tests, including tests for Inbound and outbound SMTP emails.
The Inbound SMTP Email test shows you the various steps taken by an email server to send your domain an inbound SMTP email. Similarly, an Outbound SMTP Email test finds out your outbound IPs for some requirements. It includes Reverse DNS, RBL checks, and Sender ID.
NetScanTools
NetScanTools Pro SMTP Server Tests Tool is a 2-in-1 tool.
#1. SMTP Email Generator
It is designed to test the process of sending emails via an SMTP mail server. It gives you access to all the header parameters, such as to confirm for urgent flags.
It supports basic SMTP authentication or through STARTTLS with a password and username for the server that needs them. The tool lets you send attachments via mail, log email sessions into log files, and view those files to check the communication between the SMTP mail server and NetScanTools Pro.

#2. SMTP Email Relay Tester
It performs 15+ typical relay tests by interacting with an SMTP server. You can control which tests you want to run and view the test report as either HTML or text in your browser. This report also shows the communication between the targeted SMTP server and NetScanTools Pro.
SMTPPing
SMTPPing is a simple and portable tool you can use to measure SMTP server delay, delay throughput, and variation.
Conclusion
Sending emails to your readers, prospects, and clients are only the first step. It would be best if you always made an effort to find whether your emails reached their respective destinations successfully or not.
SMTP test and diagnostic tools help you maintain your SMTP server’s health by testing it and fixing potential risks. Thus, don’t take any chances of your next email ending up in the receiver’s spam box. Instead, use the above-mentioned SMTP tools to safeguard email security and increase deliverability.
Question
How to use telnet to test the status of an SMTP mail server that is configured for use with IBM Cognos BI Server on Windows
Answer
By utilising the Microsoft Telnet command-line utility, one can easily verify the status of an SMTP server (whether it is ‘on’ or ‘off’) very quickly by doing the following:
Step 1: Click on «start» from menu and choose «run», type «cmd» (without quotes) into text field and click «OK». A command-line prompt will present.
Step2: Issue the command «telnet» (without quotes) and press the ENTER key to get the telnet utility started. Type «set LocalEcho» (without quotes) to turn on the Local echo feature:

Step3: Issue the command «open localhost 25» (without quotes) but be sure to change ‘localhost’ and ’25’ in this context to the actual SMTP servername and port that you are using. Press the ENTER key to see the following screen:

Step 4: Enter «helo me» to receive a greeting message from the SMTP server. Type «mail from:tester@fakedomain.com» as a fake email address. Then enter «rcpt to:someone@locahost.com» (changing that syntax to the actual email address on the SMTP server). You will need to press ENTER after each of thes commands to get to the following screen shot:

Step 5: Type «Data» (without quotes and note the capitalized «D»), and press Enter. Next, type «Subject:» followed by the subject line in this test email. Press the Enter key twice and enter the content of the email body, for instance «Testing message», then press the ENTER key twice to enter a period «.» Then press Enter one last time to ensure that the test email is queued for delivery, as shown in the following screen.

Step 6: Type «quit» to close the connection with the SMTP server. Press any key to continue.

Step 7: Type «quit» to terminate Microsoft telnet utility from the command line:
If all these steps complete successfully as seen in the screenshots above, then the SMTP server is up and running. If any errors are encountered, there is likely something wrong with the configuration of the SMTP server.
[{«Product»:{«code»:»SSEP7J»,»label»:»Cognos Business Intelligence»},»Business Unit»:{«code»:»BU059″,»label»:»IBM Software w/o TPS»},»Component»:»Install and Config»,»Platform»:[{«code»:»PF033″,»label»:»Windows»}],»Version»:»10.1;10.1.1;10.2;10.2.1;10.2.2″,»Edition»:»»,»Line of Business»:{«code»:»LOB10″,»label»:»Data and AI»}}]