![How to Check Node Version? [Check Node JS Version]](https://monovm.com/wp-content/uploads/2022/11/how-to-check-node-version568-847xAuto.webp)
List of content you will read in this article:
- 1. What is Node.js?
- 2. How to Check Node Version? [Check Node.js Vesion]
- 3. Benefits of Node.js
- 4. Drawbacks of Node.js
- 5. Conclusion
- 6. FAQ
Node.js is a widely adopted platform built on JavaScript runtime, allowing you to efficiently create scalable and web-based interactive applications. Node.js works on an event-driven and non-blocking I/O architecture, making it lightweight and perfect for creating data-intensive, real-time applications running on distributed systems. This article will give you a complete brief and step-by-step guide through which you can find how to check Node version [get Node version], i.e. that can be installed on different platforms. Let’s get started!
What is Node.js?
Node.js was developed as a server-side platform by Ryan Dahl in 2009. It’s only been 12 years and has gained popularity within no time. This software is designed to help create web-based servers and networking tools with JavaScript and various modules. It is capable of handling numerous core functionalities. It offers multiple modules that help in reducing the complications while writing the server applications using its APIs. Node.js is compatible with macOS, Windows, and Linux systems.
It has been significantly less time since this software has managed to attract large enterprises. Some major companies that rely on Node.js are Groupon, Netflix, IBM, Voxer, SAP, etc.
How to Check Node Version? [Check Node.js Vesion]
Node.js is a cross-platform software that can be installed on various platforms. Over time, it has multiple versions with advanced tools and technology. You can install and check Nodejs version on Linux, macOS, and Windows operating systems.
Here you will learn how to check node version installed in your operating system, along with the installation guide for Linux, Windows, and macOS.
How to check node.js version on Linux with the installation guide?
We are considering Ubuntu as a Linux distro here. You can easily find Node.js within Ubuntu’s repository and use commands for installation. Follow the below-mentioned steps to check the node version on Linux VPS too:
Step 1: Press ctrl+alt+t to open the terminal on your system and run this node command to install Node.js.
sudo apt install nodejs
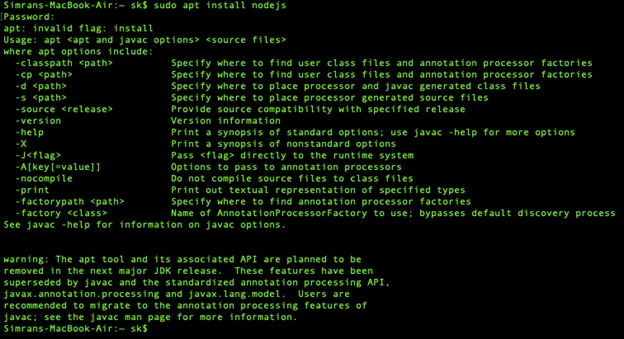
Step 2: After installing the Node.js, check node version that you have installed with the help of the following node version command.
node -v or node –version
![]()
Step 3: It is strictly recommended that you install the Node package manager with Node.js. Npm offers you the open-source library of the Node.js packages. For installing NPM, use these commands.
sudo apt install npmnpm -v or npm –version
How to check Node version on windows with the installation guide?
To install Node.js on your Windows system, you need administrative rights on your user account and command line. Follow the below-mentioned steps if you want to install and check Node.js’ version of Node.js in Windows.
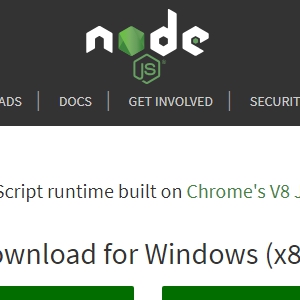
Step 1: Navigate to the official download site of Node.js and select the Windows installer button. It will start the download for the latest version by default. The NPM installer comes with an NPM package manager.

Step 2: After the completion of the download process, launch the installer. Open the directory where you store your download files.
Step 3: You will be asked if you want to run the software to confirm and click Run.
Step 4: You will be entered in the Node.js setup wizard and click on Next.
Step 5: You will be asked to accept the license, click Next after agreeing on the terms and conditions, and start installing the software.
Step 6: You will be asked for the software’s location, and you can leave the default location or fill in the required path and click Next.
Step 7: Next, select the components you want and do not wish to include accordingly and click Next.
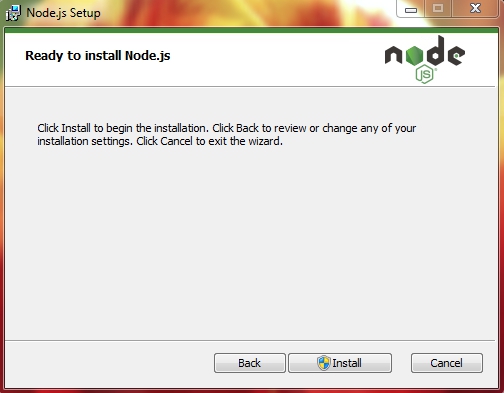
Step 8: At last, you can click on the Install option to run the installer and click on Finish.
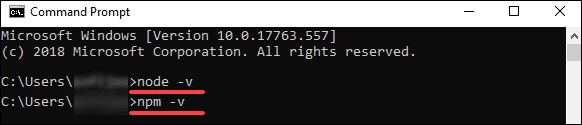
Run the following command on the command prompt, and you can verify the installed version of Node.js.
node –v
How to check node.js version on Mac and the installation guide?
You can go through the following steps for installing Node.js on macOS.
Step 1: Go to the official download page for Node.js and select macOS.
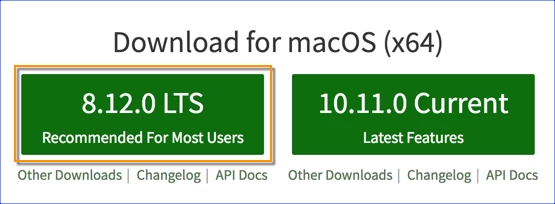
Step 2: Start running the download Node.js .pkg installer.
Step 3: Once the download process is complete, you can start running the installer, accepting all the details, and clicking installs to finish the procedure.
Step 4: Once the installation process is completed, you can find Node version, i.e., installed in your system.
Run the following nodejs get version command to check the version of Node.js.
$ node -v

Benefits of Node.js
Below are various benefits offered by Node.js:
1. Robust Technology Stack
After JavaScript, Node.js has become a robust stand-alone name in the programming field. It has experienced more than 368,985,988 downloads and over 750 contributors and is still growing. If you are using Node.js for backend development, you will automatically get all the advantages of full-stack development.
- It offers better efficiency for improving the developer’s productivity.
- You can share and reuse the code.
- It helps in enhancing the speed and performance of your project development.
- It allows you to collaborate with your team efficiently for better productivity.
- It provides you with a wide range of free tools.
- It makes your team more flexible and requires less time in development.
- It helps the developers to start server-side programming with minimum effort.
2. Perfect for Microservices
Node.js is a lightweight tool, making it suitable for microservices architecture. It allows you to break application logic into smaller modules rather than building a single and large monolithic core. It ensures better flexibility and scalability for the development process. It also helps you add more microservices to the existing ones rather than add more features using the basic application functionality.
3. Rich Ecosystem
Node.js comes with npm, which provides a marketplace for open-source JavaScript tools and helps advance this technology. Node.js has a wide range of libraries and still adding over time, providing a rich ecosystem. Today, about 97 percent of advanced web-based applications use npm modules, proving its unstoppable contribution to extensive development.
Due to its rich ecosystem, there is considerable potential for the growth of Node.js as technology helps create new solutions without investing in the development process.
4. Strong Corporate Support
After Joyent supported the development of Node.js, it created the Node.js foundation in 2015. It helps in adopting and accelerating Node.js development. Many major companies, like IBM, PayPal, SAP, etc., have become the organization’s founding members. With time, many companies are adopting Node.js. Also, there are very few open-source projects that have strong corporate support.
Drawbacks of Node.js
1. Performance Bottlenecks
When using Node.js, you may face some drawbacks, like the inability to process CPU-bound tasks efficiently. To understand the root cause of the problem, you need to have a bit of context about the situation.
Everyone knows that we use Node.js as a runtime environment that helps execute the JavaScript on the server side. JavaScript is a front-end programming language that allows you to quickly use a single thread for processing the task. It will not require threading for working as all the tasks in JavaScript are lightweight and consume little CPU, which may lead to bottlenecks if multiple tasks are handled.
If we consider Node.js, the main problem occurs when it receives a CPU-bound task. Once it gets a heavy task, it will set all the CPU available for processing it first and later answer the other queued request. It will result in slow processing and delay in the event loop process, making Node.js unsuitable for handling heavy computation.
2. Immature Tools
However, Node.js consists of stable and mature modules, but numerous tools are available in the npm registry that is of poor quality and stored without being tested. It does not have a structured registry for offering tools based on their rating and quality. It makes it a challenging situation for finding the best solution for your purposes without understanding the need for it.
Node.js ecosystem is open-source, and Joyent is supervising the quality. Still, there might be a possibility that the remaining tools lack quality standards set by the global organization.
Conclusion
Node.js has been widely popular due to its various benefits for creating web-based and interactive websites. However, it has multiple versions, and you can choose any, but most prefer to use the latest node js version to experience better tools and functionality. We have explained a guide to You can learn how to install Node JS and the steps you must follow to check the node js version. You can install Node.js on any platform quickly and seamlessly, following straightforward steps.
People are also reading:
- What is Node.js?
- How to Install Node.js and NPM?
- How to Update Node.js?
- How to update NPM package to the latest version?
- How to Check NPM Version?
28.04.2019
1 комментарий
7 829
Привет! В этой статье расскажу, как установить Node.js. Причем не важно, какая у вас система — Windows или macOS.
Node.js — это технология, программная платформа, позволяющая писать серверный код на языке JаvaScript. Она представляет из себя компилятор, построенный на движке V8, зашитый в Google Chrome.
V8 — это высокопроизводительный движок JavaScript и WebAssembly от Google с открытым исходным кодом, написанный на C ++.
Он используется в Chrome и Node.js и других; реализует ECMAScript и WebAssembly, работает в системах от Windows 7 и более новых, macOS 10.12+ и Linux, использующих процессоры x64, IA-32, ARM или MIPS.
V8 может работать автономно или может быть встроен в любое приложение C ++.
Установка Node.js
1. Заходим на сайт https://nodejs.org
Ваша система определяется автоматически. Выбираем Current (текущую версию). Это обычный exe файл, который устанавливается как и любая другая программа.
2. Следуйте всем настройкам по умолчанию, нажимая Next для продолжения:
Принимаем условия использования, ставим галочку:

Папка назначения, куда будет установлен Node.js. По умолчанию, это Program Files на диске C:

Настройки по умолчанию. Модули, которые установятся, здесь важно наличие npm modules:
Предлагают установить дополнительные инструменты — здесь галочку не ставим:
Install — нажимаем для запуска инсталляции или Back, чтобы вернуться и изменить настройки:
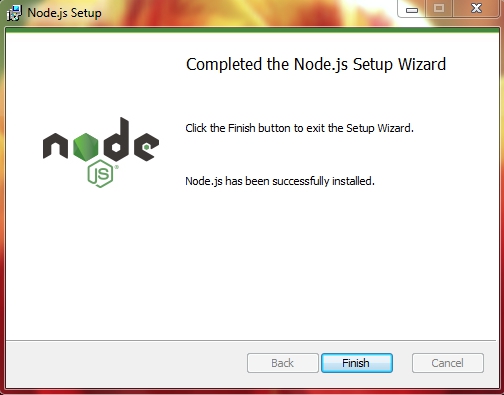
После успешной установки нажимаем Finish:
Проверяем работу Node.js
1. На вашем виртуальном сервере, у меня это OpenServer/domains:
- Создаем папку node
- В папке node создаем файл index.js с содержимым:
var text = 'Hello, world!';
console.log(text);
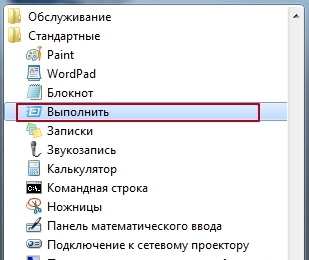
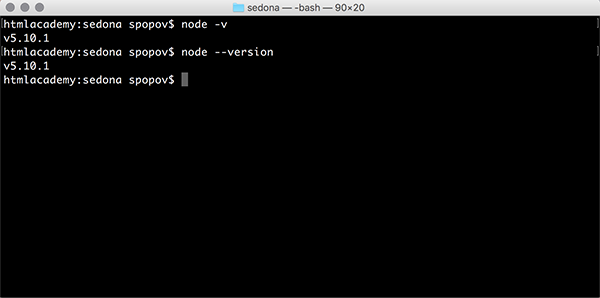
2. Запускаем командную строку. Если не знаете, как её запустить, то перейдите Пуск -> Стандартные программы -> Выполнить
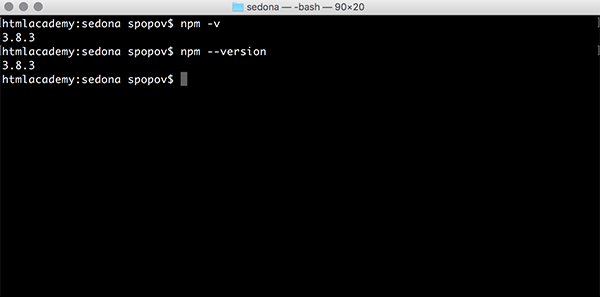
2.1. Напишите в этой строке: npm -v
-v — version — версия
Если видим версию (на скрине у меня 6.7.0), значит всё ОК!
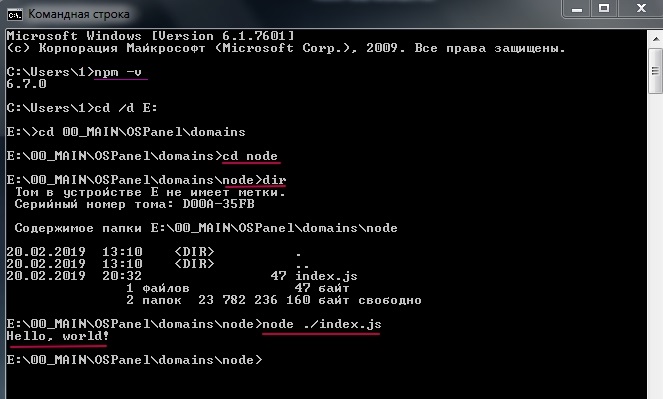
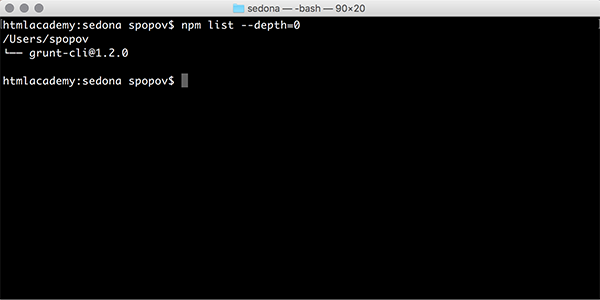
2.2. Здесь же, в консоли, переходим к папке node: cd node и командой dir проверяем содержимое папки. Наблюдаем наличие нашего index.js
2.3. Делаем компиляцию командой: node index
node index это сокращенная команда — аналог записи node ./index.js (выше на скрине). Т.е. можно не указывать путь к файлу, Node.js по умолчанию сам ищет в корне индексный файл index.js.
2.4. И вот он, долгожданный результат: Hello, World!
Всё работает! Поздравляю! 🙂 Или нет? Пишите.
Эту статью написала специально к серии уроков по Gulp, поскольку там ссылаюсь на необходимость установленного Node.js. Теперь будет понятно, как это сделать.
Документация по Nodejs https://nodejs.org/api/
Голосов: 6, Средняя оценка: 5
Перед тем как рассматривать полезные команды при работе с Node.js, её необходимо установить.
node -h — показывает список всех доступных команд Node.js.
node -v, node --version — показывает установленную версию Node.js.
npm -h — показывает список всех доступных команд пакетного менеджера (npm).
npm -v, npm --version — показывает установленную версию npm.
Команда npm update npm -g позволяет обновить версию npm.
npm list --depth=0 показывает список установленных пакетов.
Команда npm outdated --depth=0 покажет список установленных пакетов, которые требуют обновления.
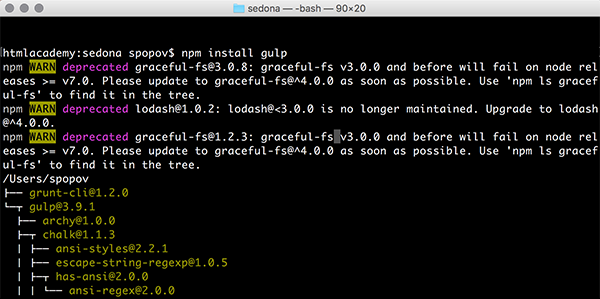
npm install package — позволяет установить любой пакет по его имени. Если при этом к команде добавить префикс -g пакет будет установлен глобально на весь компьютер.
Команда npm i package является укороченной альтернативой предыдущей команды.
Если вы хотите установить конкретную версию пакета, воспользуйтесь префиксом @ с номером версии. Например, npm install package@1.0.1.
npm uninstall package — удаляет установленный пакет по имени.
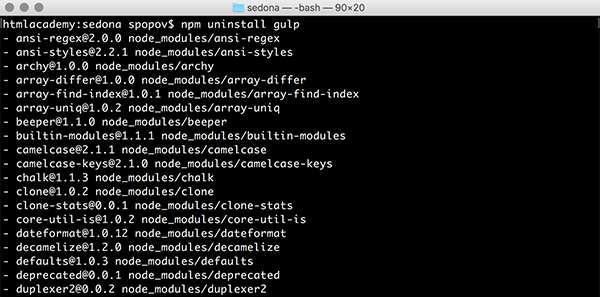
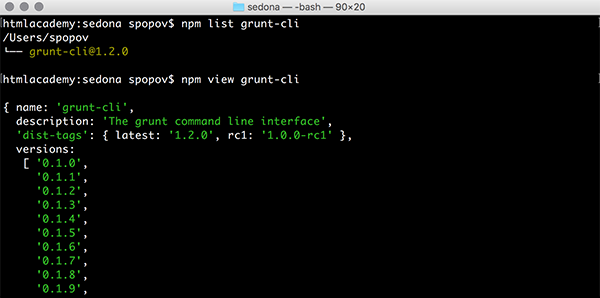
Команда npm list package — покажет версию установленного пакета, а команда npm view package version — последнюю версию пакета, которая существует.
Для работы с пакетным менеджером также пригодится файл package.json, который должен лежать в директории, с которой происходит работа в консоли.
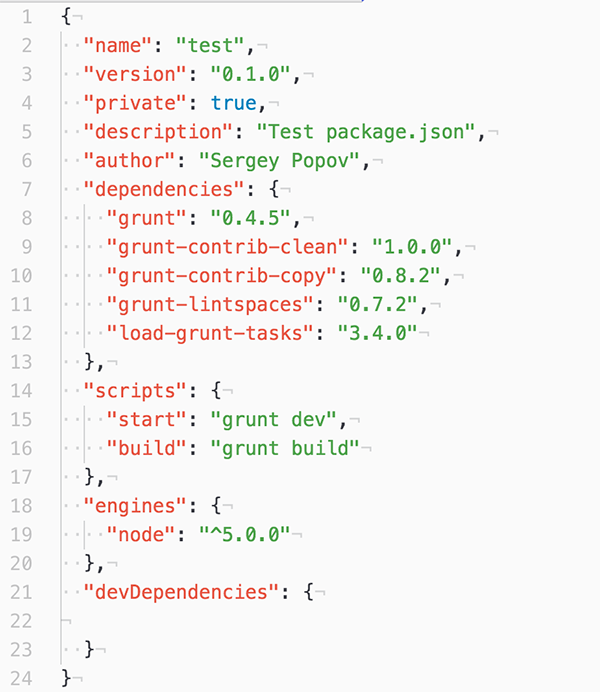
Он содержит различные мета-данные, например, имя проекта, версия, описания и автор. Также он содержит список зависимостей, которые будут установлены, если вызвать из этой папки команду npm install.
Кроме этого он ещё имеет скрипты, которые вызывают другие команды консоли. Например, для этого файла вызов команды npm start вызовет запуск Grunt таска с именем dev. А команда npm run build вызовет скрипт build, который запустит Grunt таск с именем build.
Во время работы часто возникает необходимость установить некоторые пакеты. Если установить пакет с префиксом --save, то он автоматически запишется в package.json в раздел dependencies. Такая же команда с префиксом --save-dev запишет пакет в раздел devDependencies.
Напоследок хотелось бы рассказать про Node Version Manager. Эта утилита, которая позволяет быстро менять версии Node.js.
Чтобы её установить, достаточно запустить скрипт
curl -o- https://raw.githubusercontent.com/creationix/nvm/v0.31.0/install.sh | bashТеперь можно установить последнюю версию Node.js, например,5.0 с помощью команды nvm install 5.0. Чтобы начать использовать её, введите команду nvm use 5.0. Таким образом, можно быстро переключаться между версиями, например, для тестирования.
I had the similar issue with my codebase. I wanted to know the current NodeJs version I am going to use to run my server at runtime. For that, I wrote a code which can be run before starting the Server using npm run start script.
Found below code helpful from this question.
'use strict';
const semver = require('semver');
const engines = require('./package').engines;
const nodeVersion = engines.node;

// Compare installed NodeJs version with required NodeJs version.
if (!semver.satisfies(process.version, nodeVersion)) {
  console.log(`NodeJS Version Check: Required node version ${nodeVersion} NOT SATISFIED with current version ${process.version}.`);
  process.exit(1);
} else {
  console.log(`NodeJS Version Check: Required node version ${nodeVersion} SATISFIED with current version ${process.version}.`);
}
My package.json looks like this:
{
  "name": "echo-server",
  "version": "1.0.0",
  "engines": {
    "node": "8.5.0",
    "npm": "5.3.0"
  },
  "description": "",
  "main": "index.js",
  "scripts": {
    "check-version" : "node checkVersion.js",
    "start-server" : "node app.js"
    "start" : "npm run check-version && npm run start-server",
    "test": "npm run check-version && echo "Error: no test specified" && exit 1"
  },
  "author": "",
  "license": "ISC",
  "dependencies": {
    "bluebird": "^3.5.1",
    "express": "^4.16.3",
    "good-guy-http": "^1.10.3",
    "semver": "^5.5.0"
  }
}
Do run npm install command before you run npm run start command to run your project.
- Назад
- Обзор: Express Nodejs
- Далее
Теперь, когда вы знаете, что такое Express, мы покажем вам, как настроить и протестировать среду разработки Express для Windows, Linux (Ubuntu) и Mac OS X — какую бы операционную систему вы не использовали, эта статья должна дать вам все, что необходимо для возможности начать разрабатывать приложения Express.
| Требования: | Знание как открыть терминал / командную строку, как устанавливать программные пакеты в операционной системе вашего компьютера. |
|---|---|
| Задача: | Создать среду разработки для Express на вашем компьютере. |
Обзор среды разработки Express
Node и Express упрощают настройку вашего компьютера, чтобы вы могли начать разработку веб-приложений. В этом разделе объясняется, какие инструменты нужны, приводятся некоторые из самых простых способов установки Node (и Express) на Ubuntu, macOS, and Windows, и показывается как вы можете протестировать свою установку.
Что такое среда разработки Express?
Среда разработки Express включает в себя установку Nodejs, менеджера пакетов NPM и (необязательно) Express Application Generator на локальном компьютере.
Узел и менеджер пакетов NPM устанавливаются вместе из подготовленных двоичных пакетов, установщиков, менеджеров пакетов операционной системы или из исходного кода (как показано в следующих разделах). Затем Express устанавливается NPM как зависимость от ваших отдельных веб-приложений Express (наряду с другими библиотеками, такими как механизмы шаблонов, драйверы баз данных, промежуточное программное обеспечение для аутентификации, промежуточное программное обеспечение для обслуживания статических файлов и т. Д.)
NPM также можно использовать для (глобальной) установки Express Application Generator, удобного инструмента для создания каркасных веб-приложений Express, которые следуют шаблону MVC. Генератор приложений является необязательным, поскольку вам не нужно использовать этот инструмент для создания приложений, использующих Express, или для приложений для создан Express, имеющих одинаковую архитектурную разметку или зависимости. Мы будем использовать его, потому что это значительно облегчает начало работы и продвигает модульную структуру приложения.
Примечание: Примечание: в отличие от некоторых других веб-сред, среда разработки не включает отдельный веб-сервер разработки. В Node / Express веб-приложение создаёт и запускает собственный веб-сервер!
Существуют и другие периферийные инструменты, которые являются частью типичной среды разработки, в том числе текстовые редакторы или IDE для редактирования кода и инструменты управления исходным кодом, такие как Git, для безопасного управления различными версиями вашего кода. Мы предполагаем, что вы уже установили подобные инструменты (в частности, текстовый редактор).
Какие операционные системы поддерживаются?
Узел может быть запущен в Windows, macOS, во многих «разновидностях» Linux, Docker и т. Д. (Полный список на странице загрузок nodejs). Практически любой персональный компьютер должен иметь необходимую производительность для запуска Node во время разработки. Express работает в среде Node и, следовательно, может работать на любой платформе, на которой работает Node.
В этой статье мы предоставляем инструкции по установке для Windows, macOS и Ubuntu Linux.
Какую версию Node / Express следует использовать?
Существует множество выпусков Node — более новые выпуски содержат исправления ошибок, поддержку более свежих версий стандартов ECMAScript (JavaScript) и улучшения API-интерфейсов Node.
Как правило, вы должны использовать самый последний выпуск LTS (с долгосрочной поддержкой), поскольку он будет более стабильным, чем «текущий» выпуск, при этом все ещё имея относительно недавние функции (и все ещё активно поддерживается). Вы должны использовать Текущий выпуск, если вам нужна функция, которой нет в версии LTS.
Для Express вы всегда должны использовать последнюю версию.
Как насчёт баз данных и других зависимостей?
Другие зависимости, такие как драйверы баз данных, механизмы шаблонов, механизмы аутентификации и т. д., Являются частью приложения и импортируются в среду приложения с помощью диспетчера пакетов NPM. Мы обсудим их в следующих статьях для конкретных приложений.
Установка Node
Чтобы использовать Express, сначала необходимо установить Nodejs и Node Package Manager (NPM) в вашей операционной системе. В следующих разделах описывается самый простой способ установки версии Nodejs с долгосрочной поддержкой (LTS) в Ubuntu Linux 16.04, macOS и Windows 10.
Примечание: Совет: В следующих разделах показан самый простой способ установки Node и NPM на наши целевые платформы ОС. Если вы используете другую ОС или просто хотите увидеть некоторые другие подходы для текущих платформ, см. Установка Node.js через менеджер пакетов (nodejs.org).
Windows и macOS
Установка Node и NPM в Windows и macOS проста, потому что вы можете просто использовать предоставленный инсталлятор:
- Загрузите необходимый установщик:
- Перейдите по ссылке https://nodejs.org/en/
- Нажмите кнопку, чтобы загрузить сборку LTS, которая «Рекомендуется для большинства пользователей».
- Установите Node, дважды щёлкнув по загруженному файлу и следуя инструкциям по установке.
Ubuntu 16.04
Самый простой способ установить последнюю версию LTS Node 6.x — это использовать package manager чтобы получить его из репозитория бинарных дистрибутивов Ubuntu. Это можно сделать очень просто, выполнив следующие две команды на вашем терминале:
curl -sL https://deb.nodesource.com/setup_8.x | sudo -E bash -
sudo apt-get install -y nodejs
Предупреждение: Внимание: Не устанавливайте напрямую из обычных репозиториев Ubuntu, поскольку они содержат очень старые версии узла.
Проверка вашей установки Nodejs и NPM
Самый простой способ проверить, установлен ли этот узел, — это запустить команду «версия» в своём терминале / командной строке и проверить, что возвращается строка версии:
Менеджер пакетов Nodejs NPM также должен быть установлен и может быть протестирован таким же образом:
В качестве немного более захватывающего теста давайте создадим очень простой сервер «чистого узла», который просто печатает «Hello World» в браузере, когда вы посещаете правильный URL в вашем браузере:
- Скопируйте следующий текст в файл с именем hellonode.js. Здесь используются чистые функции Node (ничего из Express) и некоторый синтаксис ES6:
//Загрузка модуля HTTP
const http = require("http");
const hostname = '127.0.0.1';
const port = 3000;

//Создание HTTP-сервера
const server = http.createServer((req, res) => {

  //Установка HTTP-заголовков ответа с HTTP-статусом и Content type
  res.statusCode = 200;
  res.setHeader('Content-Type', 'text/plain');
  res.end('Hello Worldn');
});

//Слушание запросов на порту 3000, и в качестве каллбака функция, которая пишет в лог
server.listen(port, hostname, () => {
  console.log('Server running at http://${hostname}:${port}/');
});
Код импортирует модуль «http» и использует его для создания сервера (createServer ()), который обрабатывает HTTP-запросы на порту 3000. Затем сценарий выводит на консоль сообщение о том, какой URL-адрес браузера можно использовать для тестирования сервера. Функция createServer () принимает в качестве аргумента колбэк-функцию, которая будет вызываться при получении HTTP-запроса — она просто возвращает ответ с кодом состояния HTTP 200 («ОК») и простым текстом «Hello World».
Примечание: Замечание: не беспокойтесь, если вы ещё не совсем понимаете, что делает этот код! Мы объясним наш код более подробно, как только мы начнём использовать Express!
- Запустите сервер, перейдя в тот же каталог, что и ваш файл hellonode.js в командной строке, и вызвав узел вместе с именем скрипта, например так:
>node hellonode.js Server running at http://127.0.0.1:3000/ - Перейдите к URL-адресу
http://127.0.0.1:3000. Если все работает, браузер должен просто отобразить строку «Hello World».
Использование NPM
Помимо самого Node, NPM является наиболее важным инструментом для работы с приложениями Node. NPM используется для получения любых пакетов (библиотек JavaScript), которые необходимы приложению для разработки, тестирования и / или производства, а также может использоваться для запуска тестов и инструментов, используемых в процессе разработки.
Примечание: Замечание: С точки зрения Node, Express — это просто ещё один пакет, который вам нужно установить с помощью NPM, а затем установить его в своём собственном коде.
Вы можете вручную использовать NPM для получения каждого необходимого пакета отдельно. Обычно мы вместо этого управляем зависимостями, используя простой текстовый файл с именем package.json. В этом файле перечислены все зависимости для конкретного «пакета» JavaScript, включая имя пакета, версию, описание, исходный файл для выполнения, производственные зависимости, зависимости разработки, версии Node, с которыми он может работать, и т. Д. Файл package.json должен содержать все, что нужно NPM для загрузки и запуска вашего приложения (если вы пишете библиотеку многократного использования, вы можете использовать это определение для загрузки пакета в репозиторий npm и сделать его доступным для других пользователей).
Добавление зависимостей
Следующие шаги показывают, как вы можете использовать NPM для загрузки пакета, сохранить его в зависимостях проекта, а затем потребовать его в приложении Node.
Примечание: Замечание: Здесь мы показываем инструкции для получения и установки пакета Express. Позже мы покажем, как этот пакет и другие уже указаны для нас с помощью Express Application Generator. Этот раздел предоставлен, потому что полезно понять, как работает NPM и что создаётся генератором приложений.
- Сначала создайте каталог для вашего нового приложения и перейдите в него:
- Используйте команду npm init для создания файла package.json для вашего приложения. Эта команда запрашивает у вас несколько вещей, включая имя и версию вашего приложения, а также имя исходного файла точки входа (по умолчанию это index.js). Сейчас просто примите значения по умолчанию:
Если вы отобразите файл package.json (cat package.json), вы увидите принятые по умолчанию значения, заканчивающиеся лицензией.{ "name": "myapp", "version": "1.0.0", "description": "", "main": "index.js", "scripts": { "test": "echo "Error: no test specified" && exit 1" }, "author": "", "license": "ISC" } - Теперь установите Express в каталог myapp и сохраните его в списке зависимостей вашего файла package.json
-
npm install express --saveРаздел зависимостей вашего package.json теперь появится в конце файла package.json и будет содержать Express.
{ "name": "myapp", "version": "1.0.0", "description": "", "main": "index.js", "scripts": { "test": "echo "Error: no test specified" && exit 1" }, "author": "", "license": "ISC", "dependencies": { "express": "^4.16.3" } } -
Для использования библиотеки вы вызываете функцию require (), как показано ниже в вашем файле index.js.
const express = require('express')
const app = express();

app.get('/', (req, res) => {
  res.send('Hello World!')
});

app.listen(8000, () => {
  console.log('Example app listening on port 8000!')
});
Этот код показывает минимальное веб-приложение Express «HelloWorld». Это импортирует модуль «экспресс» и использует его для создания сервера (приложения), который обрабатывает HTTP-запросы на порту 8000 и выводит на консоль сообщение, объясняющее, какой URL-адрес браузера можно использовать для тестирования сервера. Функция app.get () отвечает только на запросы HTTP GET с указанным URL-путём (‘/’), в этом случае вызывая функцию для отправки нашего Hello World! сообщение.
Создайте файл с именем index.js в корне каталога приложения «myapp» и передайте ему содержимое, показанное выше. - Вы можете запустить сервер, вызвав узел с помощью скрипта в командной строке:
>node index.js Example app listening on port 8000 - Перейдите к URL (
http://127.0.0.1:8000/) . Если все работает, браузер должен просто отобразить строку «Hello World!».
Зависимости разработки
Если зависимость используется только во время разработки, вы должны вместо этого сохранить её как «зависимость разработки» (чтобы пользователям вашего пакета не приходилось устанавливать её в производстве). Например, чтобы использовать популярный инструмент JavaScript Linting eslint, вы должны вызвать NPM, как показано ниже:
npm install eslint --save-dev
Следующая запись будет добавлена в package.json вашего приложения:
  "devDependencies": {
    "eslint": "^4.12.1"
  }
Примечание: Примечание: «Линтеры» — это инструменты, которые выполняют статический анализ программного обеспечения, чтобы распознавать и сообщать о приверженности / несоблюдении некоторого набора лучших практик кодирования.
Запуск задач
В дополнение к определению и извлечению зависимостей вы также можете определить именованные скрипты в ваших файлах package.json и вызвать NPM, чтобы выполнить их с помощью команды run-script. Этот подход обычно используется для автоматизации выполнения тестов и частей набора инструментов разработки или сборки (например, запуска инструментов для минимизации JavaScript, сжатия изображений, LINT / анализа вашего кода и т. Д.).
Примечание: Замечание: Для запуска тестов и других внешних инструментов могут также использоваться такие исполнители, как Gulp и Grunt.
Например, чтобы определить скрипт для запуска зависимости разработки eslint, которую мы указали в предыдущем разделе, мы могли бы добавить следующий блок скрипта в наш файл package.json (при условии, что наш источник приложения находится в папке / src / js):
"scripts": {
  ...
  "lint": "eslint src/js"
  ...
}
Чтобы пояснить немного подробнее, eslint src / js — это команда, которую мы могли бы ввести в нашем терминале / командной строке, чтобы запустить eslint для файлов JavaScript, содержащихся в каталоге src / js внутри каталога нашего приложения. Включение вышеупомянутого в файл package.json нашего приложения обеспечивает ярлык для этой команды — lint.
Затем мы сможем запустить eslint с помощью NPM, вызвав:
npm run-script lint
# OR (using the alias)
npm run lint
Этот пример может выглядеть не короче, чем исходная команда, но вы можете включить в свои сценарии npm гораздо более крупные команды, включая цепочки из нескольких команд. Вы можете определить один скрипт npm, который запускает все ваши тесты одновременно.
Установка Express Application Generator
Инструмент Express Application Generator создаёт «скелет» приложения Express. Установите генератор, используя NPM, как показано (флаг -g устанавливает инструмент глобально, чтобы вы могли вызывать его из любого места):
npm install express-generator -g
Чтобы создать приложение Express с именем «helloworld» с настройками по умолчанию, перейдите туда, где вы хотите его создать, и запустите приложение, как показано ниже:
Примечание: Замечание: Вы также можете указать библиотеку шаблонов для использования и ряд других настроек. Используйте команду help, чтобы увидеть все параметры:
NPM создаст новое приложение Express в подпапке вашего текущего местоположения, отображая процесс сборки на консоли. По завершении инструмент отобразит команды, которые необходимо ввести, чтобы установить зависимости Node и запустить приложение.
Примечание: Новое приложение будет иметь файл package.json в своём корневом каталоге. Вы можете открыть это, чтобы увидеть, какие зависимости установлены, включая Express и библиотеку шаблонов Jade:
{
  "name": "helloworld",
  "version": "0.0.0",
  "private": true,
  "scripts": {
    "start": "node ./bin/www"
  },
  "dependencies": {
    "body-parser": "~1.18.2",
    "cookie-parser": "~1.4.3",
    "debug": "~2.6.9",
    "express": "~4.15.5",
    "jade": "~1.11.0",
    "morgan": "~1.9.0",
    "serve-favicon": "~2.4.5"
  }
}
Установите все зависимости для приложения helloworld, используя NPM, как показано ниже:
cd helloworld
npm install
Затем запустите приложение (команды немного отличаются для Windows и Linux / macOS), как показано ниже:
# Run the helloworld on Windows with Command Prompt
SET DEBUG=helloworld:* & npm start

# Run the helloworld on Windows with PowerShell
SET DEBUG=helloworld:* | npm start

# Run helloworld on Linux/macOS
DEBUG=helloworld:* npm start
Команда DEBUG создаёт полезное ведение журнала, что приводит к выводу, подобному показанному ниже.
>SET DEBUG=helloworld:* & npm start

> helloworld@0.0.0 start D:Githubexpresstestshelloworld
> node ./bin/www

  helloworld:server Listening on port 3000 +0ms
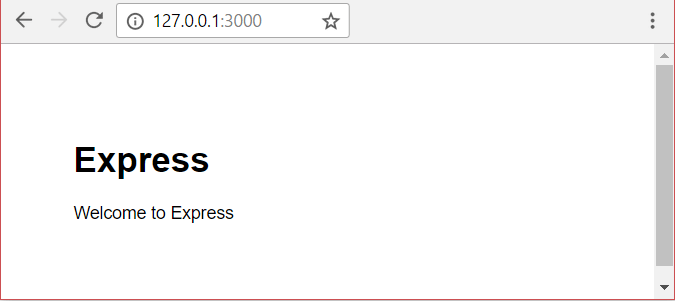
Откройте браузер и перейдите по адресу http://127.0.0.1:3000/, чтобы увидеть страницу приветствия Express по умолчанию.
Мы поговорим больше о сгенерированном приложении, когда перейдём к статье о создании каркасного приложения.
Резюме
Теперь на вашем компьютере установлена и запущена среда разработки Node, которую можно использовать для создания веб-приложений Express. Вы также увидели, как NPM можно использовать для импорта Express в приложение, а также как вы можете создавать приложения с помощью инструмента Express Application Generator и затем запускать их.
В следующей статье мы начнём работу с учебным пособием по созданию полноценного веб-приложения с использованием этой среды и связанных инструментов.
Смотрите также
В этом модуле
Node.js came as a blessing for JavaScript developers worldwide struggling with swapping among multiple languages and frameworks to amplify their code into a sustainable development environment.
With Node.js, you can finally build web applications with two-way connections where both the server-side and client-side can thoroughly communicate in real-time and exchange data. Indeed, Node.js has been revolutionary for developers who wanted to push real-time web applications over WebSocket.
If you’re aiming forward to enhancing your web development skills to the next level and becoming a full-stack JavaScript developer, Node.js indeed prepares the path towards that enthusiastic buzzword!
In this article, we’ll demonstrate a step-by-step guideline for installing Node.js on your computer and commencing with your web development journey.
What Is Node.js?
![]()
The first thing you should know is that Node.js is not a programming language!
You may already be aware of this fact, but it bears repeating for new developers in the field who may mistake Node.js for a unique programming language. It’s not!
Node.js is an open-source runtime environment for the JavaScript language that reshapes JavaScript’s characteristics and upgrades its functionality. As a result, you can use JavaScript for frontend and backend development, enabling full-stack development solely using JavaScript.
Initially, Node.js was designed to serve real-time performance, pushed-back architectures. But since then, Node.js has grown into a vital element for server-side programming for event-driven, non-blocking servers. Most conventional websites and API services today depend on Node.js.
Before Node.js, if you wanted to store any data on the database or connect your program to the database, you needed support from a server-side language. That’s because JavaScript couldn’t regulate the backend process. Consequently, you had to learn server-side languages like PHP, Python, Ruby, or C# — or seek a backend developer’s help.
The Node.js environment empowers JavaScript to directly employ the database and function properly as a backend language. As a result, you can ultimately build and run a program using only JavaScript with Node.js.
Node.js uses the V8 JavaScript runtime engine as its root power, and it employs a non-blocking I/O architecture that’s event-driven. All these together construct Node.js and help drive products towards robust performance.
Who Uses Node.js?
According to W3Techs, to date, 1.4% of all websites use Node.js — that’s more than 22 million websites. These numbers give you a general idea of the amount of Node.js users. On top of that, Node.js has been downloaded more than 1.3 billion times! As you can see, the stats speak strongly to Node.js’ market scale.
From your friends in IT to the industry tycoons, all are enjoying leveraging Node.js. That’s because Node.js amplifies the performance of developers and increases the speed of the development process. One of the most intelligent trends nowadays is using JavaScript everywhere, which has brought Node.js into the arena.
Top companies that use Node.js include:
- NASA
- Netflix
- PayPal
- Trello
- eBay
- Walmart
- Mozilla
- Medium
If you study these companies, you may notice that they run their businesses on different services or products. But they all have a critical factor in common: they rely on Node.js. Indeed, using Node.js can solve most of your development issues, never mind what industry you’re in.
Advantages of Using Node.js
Choosing the right programming platform for your tech stack is as important as the labor you want to invest in. Multiple factors should be considered when you look for the advantages of using a particular platform. Things like the learning curve, development speed, community, and scale can alter the overall balance of benefits.
Here are the main advantages of using Node.js:
- Simple syntax
- Easy learning curve
- Ability to scale quickly
- Open source and flexible
- Cross-platform development
- Single-language full-stack development
- Real-time communication
- Vast and active community
Node.js Prerequisites
Before installing Node.js, you need to ensure that you’ve gathered all the necessary bits of knowledge and downloaded all required installation files and elements.
Firstly, it would help if you had a basic understanding of JavaScript and its syntax — this will make picking up Node.js easier for you.
Secondly, a basic understanding of an object-oriented programming (OOP) language will help you work on server-side coding.
Lastly, rather than rushing into deep learning, take it one step at a time. Always remember that you’re not a day late or a dollar short as long as you’re progressing.
System Requirements
Node.js doesn’t require a fancy hardware setup to run; most computers of this era should handle Node.js efficiently. Even the most miniature computers like BeagleBone or Arduino YÚN can run Node.js.
Nevertheless, much still depends on what other memory hog software you’ve got running on the same system. But in most cases, you shouldn’t be worried unless your computer is from the Mesozoic Era!
LTS Version vs Current Version
Node.js offers two different versions for you to download: the LTS version and the Current version.
The first one is Long-Term Support (LTS), which indicates the version that has been in the market for a while and comes with all mandatory support. Consequently, you can access a bunch of information and community for additional help with this version.
This LTS version is recommended to most users because of its sustainability and 18-month-long support cycle. As it’s a stable version, using it to produce backends can help you achieve a robust outcome.
The Current version indicates the latest released version of Node with the most recently added and updated features. But this version has less support behind it (around eight months) and possible bug exposure. Therefore, experts suggest using this version only for frontend development.
Considering all these factors, if you’re a regular user who loves to live hassle-free, go for the LTS version. On the other hand, if you’re an advanced user who loves the adventure of experiencing new technology, you can choose to install the Current version.
How to Install Node.js and npm
Every operating system has a distinct method of installing Node.js. The core setup file differs for each OS to OS. However, the Node.js creators have taken care to provide you with the files needed for each system.
In the next portion of the article, we’ll discuss installing Node.js on Windows, macOS, and Linux operating systems.
How to Install Node.js on Windows
Follow this step-by-step guide to install Node.js on Windows.
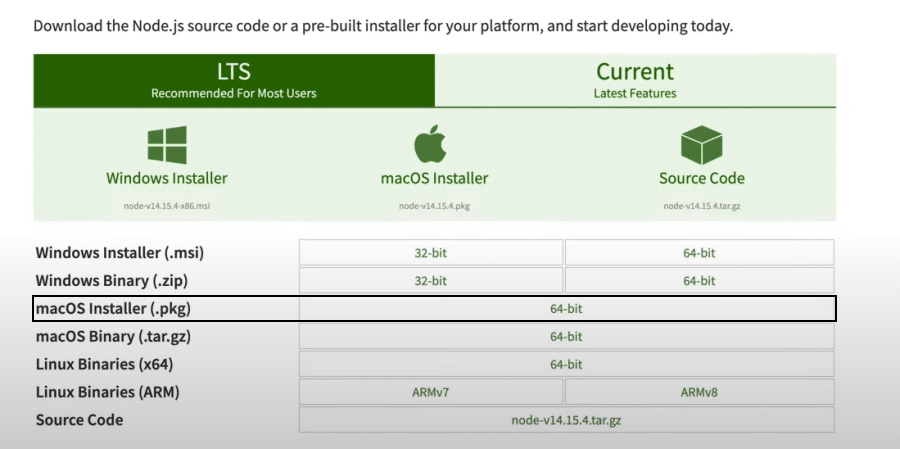
1. Download Windows Installer
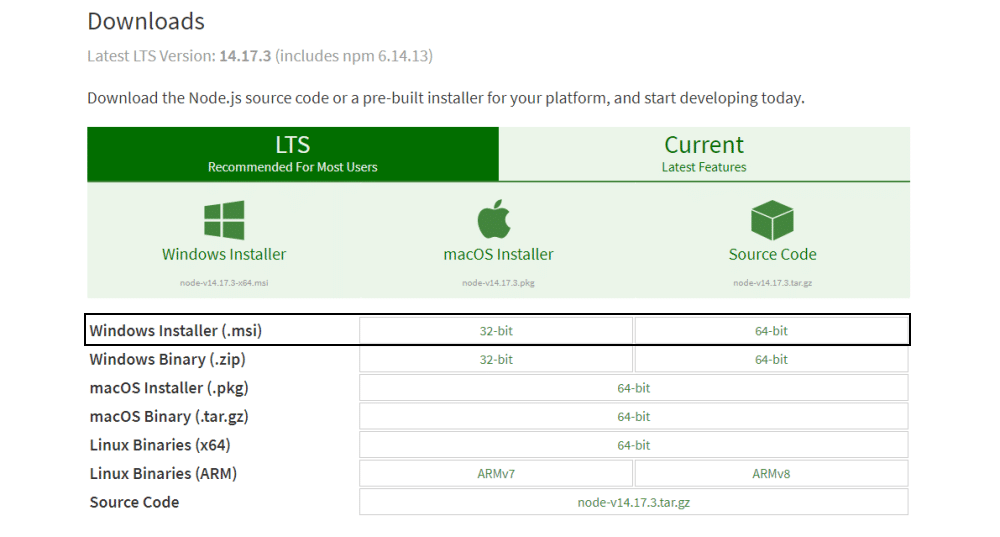
First, you need to download the Windows Installer (.msi) file from the official Node.js website. This MSI installer database carries a collection of installer files essential to install, update, or modify the existing Node.js version.
Notably, the installer also carries the Node.js package manager (npm) within it. It means you don’t need to install the npm separately.
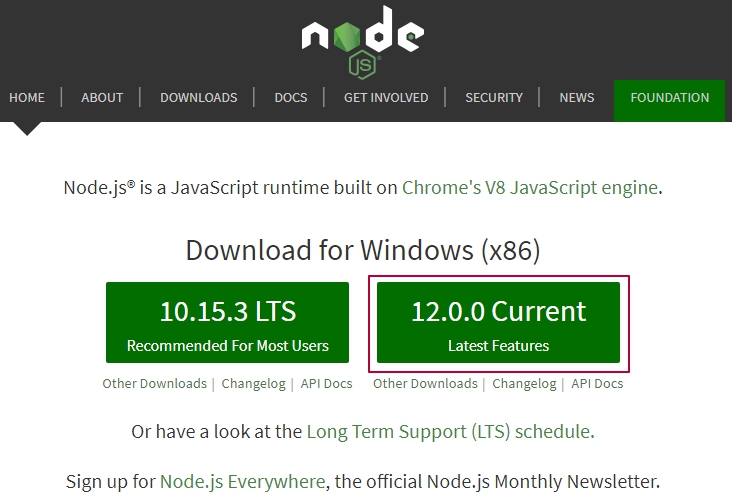
When downloading, select the correct version as per your operating system. For example, if you’re using a 64-bit operating system, download the 64-bit version, and if you’re using the 32-bit version, download the 32-bit version:
2. Begin the Installation Process
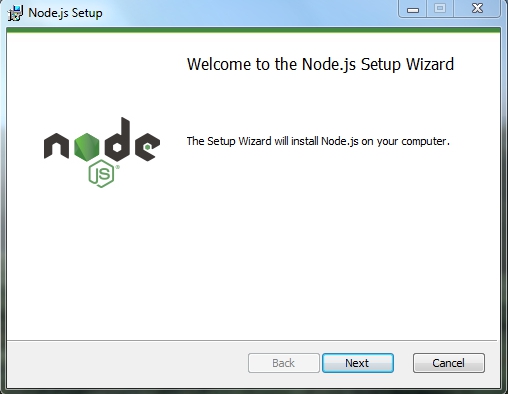
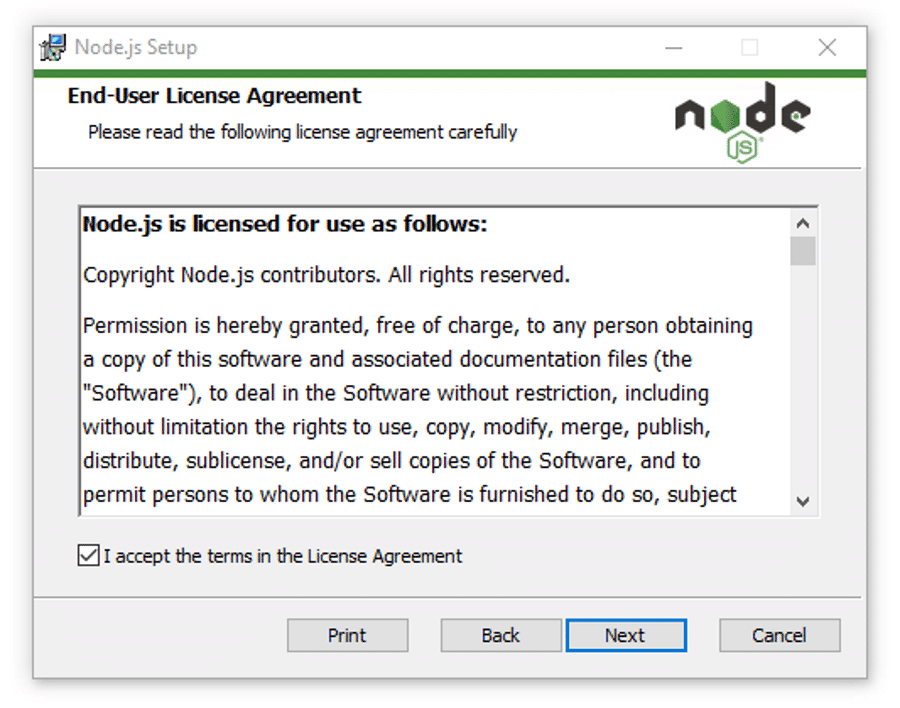
Once you open and run the .msi file, the installation process begins. But you have to set a few parameters before running the installation process.
Double-click on the installer file and run it. The installer will ask you to accept the Node.js license agreement. To move forward, check the “I accept” box and click Next:
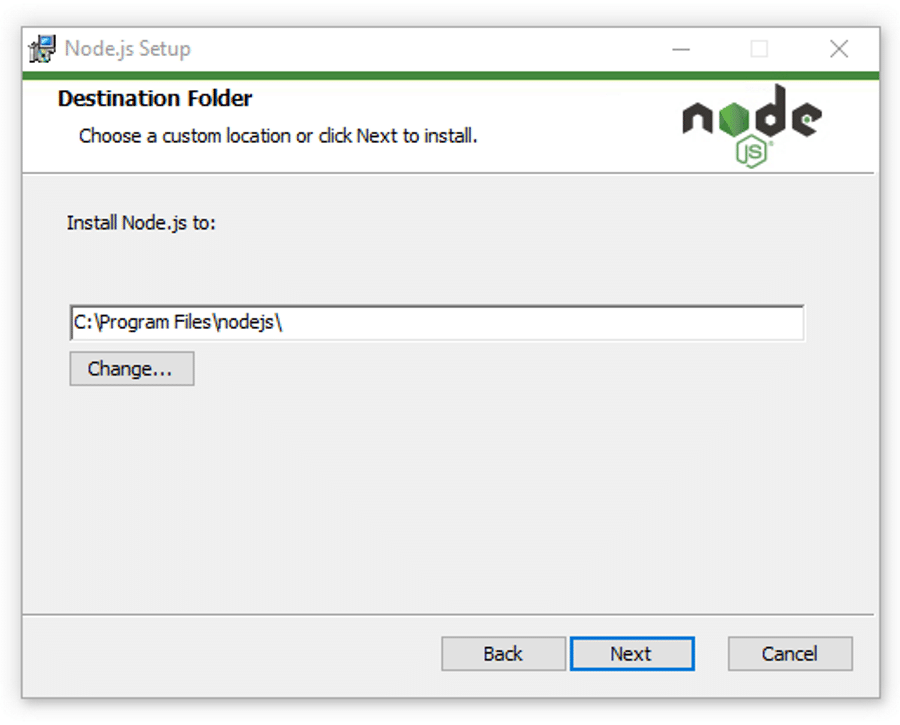
Then, select the destination where you want to install Node.js. If you don’t want to change the directory, go with the Windows default location and click the Next button again.
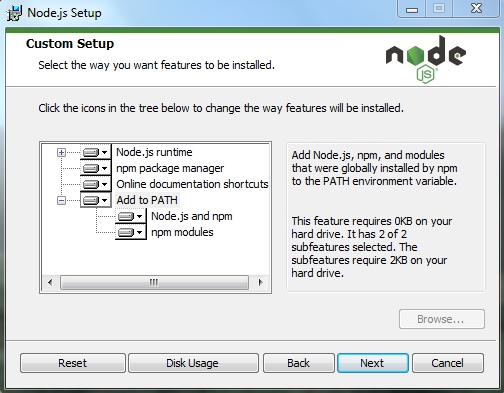
The next screen will show you custom setup options. If you want a standard installation with the Node.js default features, click the Next button. Otherwise, you can select your specific elements from the icons in the tree before clicking Next:
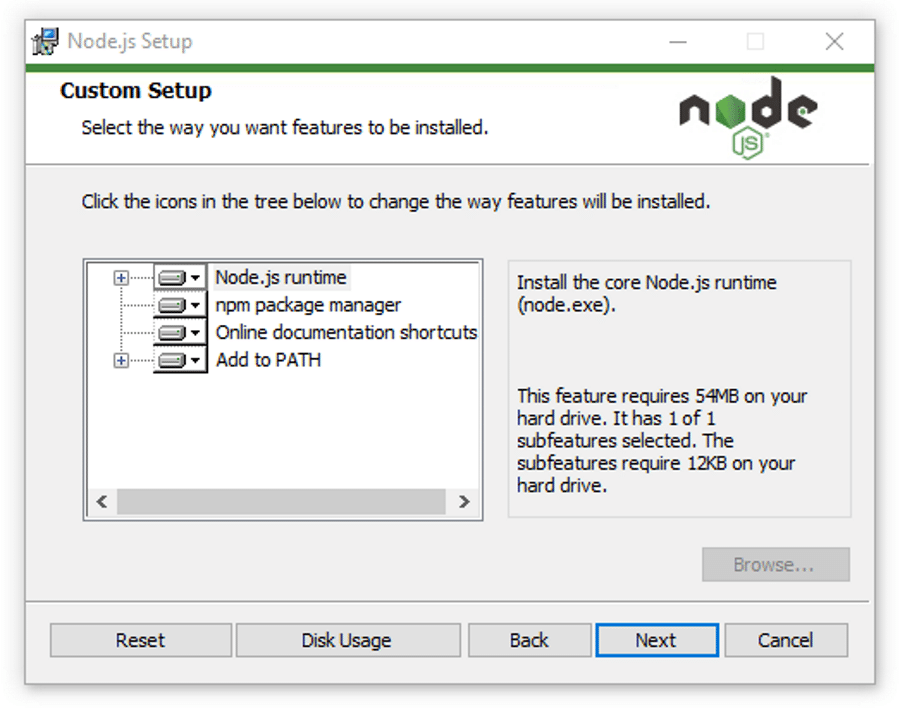
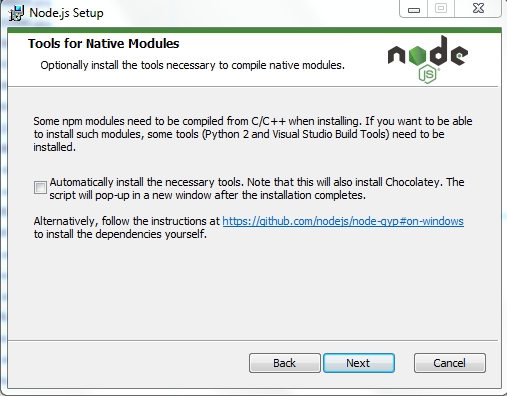
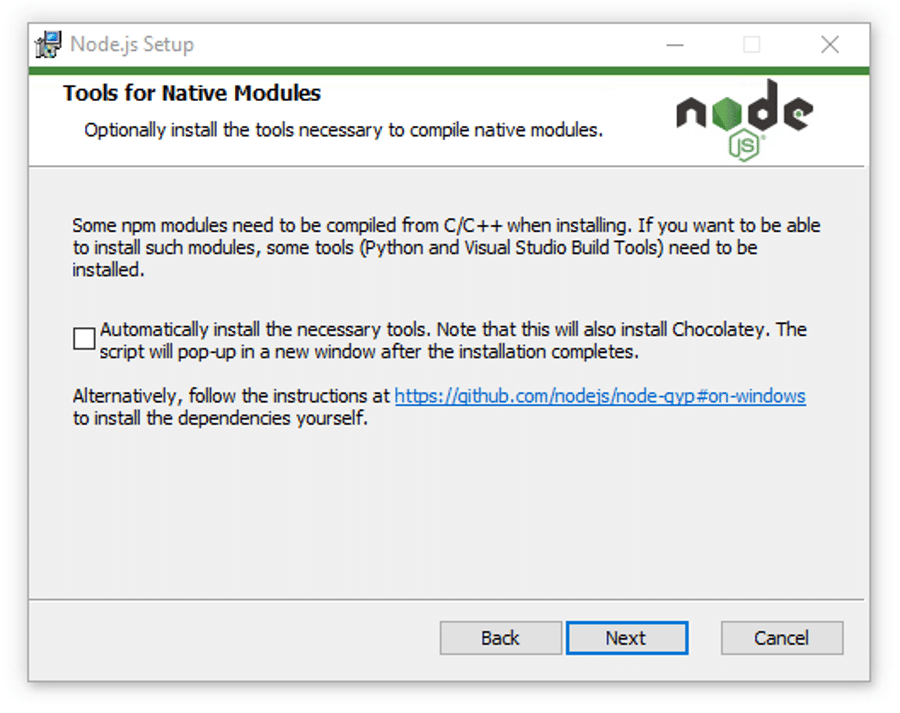
Node.js offers you options to install tools for native modules. If you’re interested in these, click the checkbox to mark your preferences, or click Next to move forward with the default:
3. Run Node.js Installation on Windows
Lastly — and this is the easiest part of all — click the Install button to begin the installation process:
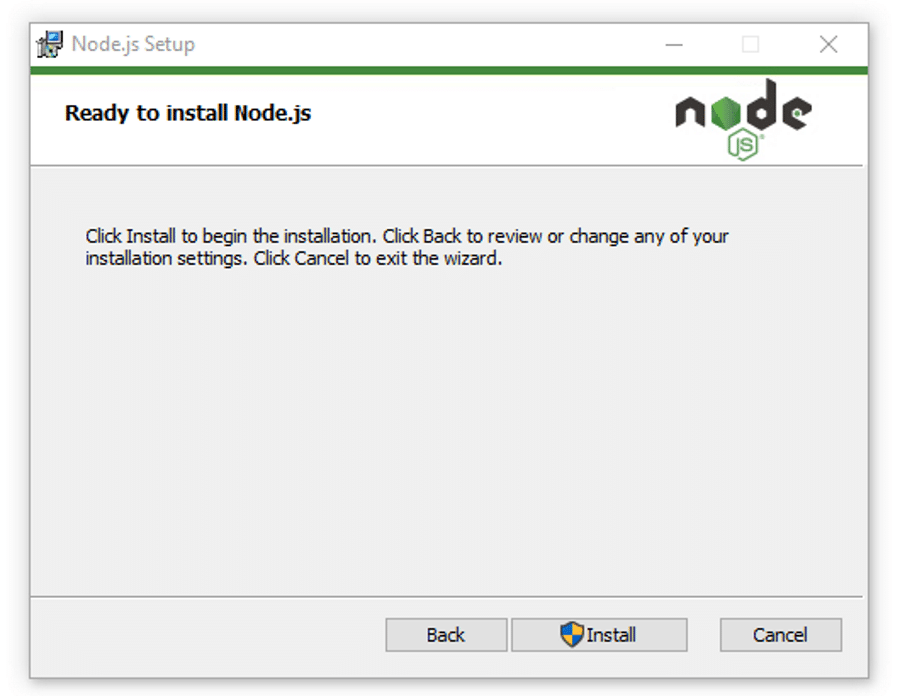
The system will complete the installation within a few seconds or minutes and show you a success message. Click on the Finish button to close the Node.js installer.

4. Verify Node.js Installation
So the installation process is completed. Now, you have to check whether Node.js is successfully installed or not.
To verify the installation and confirm whether the correct version was installed, open your PC’s command prompt and enter the following command:
Node --versionAnd to check the npm version, run this command:
npm --version
If the Node.js version and npm are correctly installed, you’ll see the version name in the CMD prompt.
How To Install Node.js on macOS
Follow these step-by-step guidelines to install Node.js on macOS.
1. Download macOS Installer
Installing Node.js on macOS follows almost the same procedure as Windows. All you have to do is to download the installation file for Mac. Then, as soon as you start it up, the installer will walk you through the rest.
Firstly, download the macOS installer (.pkg) file from the Node.js website. There’s only a 64-bit version, so you don’t have to worry about which to download.
2. Begin Node.js Installation on macOS
Check your Download folder for the installer file and click on it to start the installation process.
The Node.js installer carries the Node.js core file, and, consequently, the installation process installs both Node.js and npm from the installer file. Therefore, you don’t need to install npm separately.
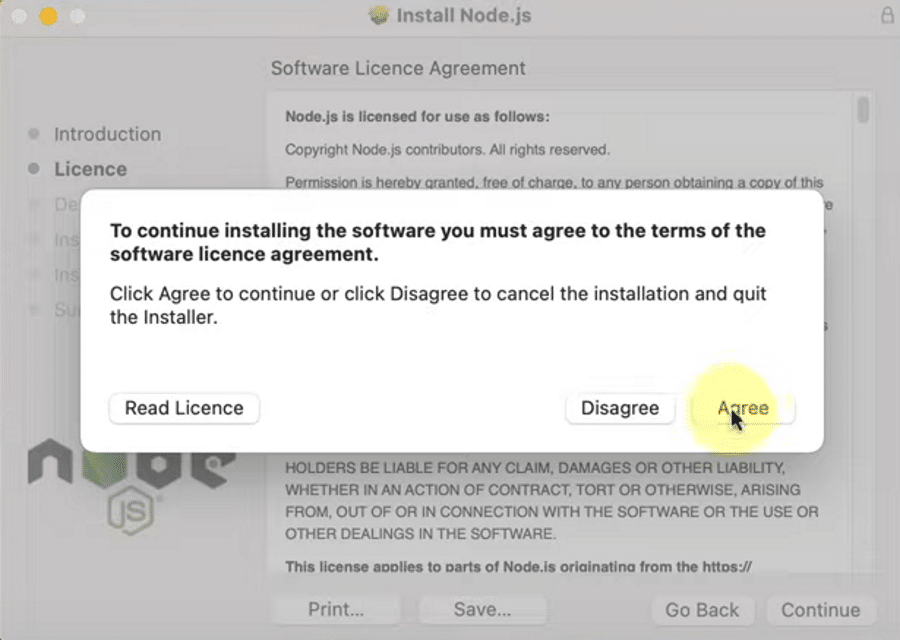
Then, click Continue to move forward with the installation.

You must agree to the terms of usage to install Node.js. Read through it before clicking the Agree button to continue if you’d like to explore the license agreement.
At this screen, you need to select the installation location. Usually, the OS determines a default installation location. If you have other requirements, you can change the location. Otherwise, keep the default location.
3. Run Node.js Installation on macOS
Until now, you’ve set all the preferences that are needed to install Node.js on macOS fully. Now click on the Install button to finish things up.
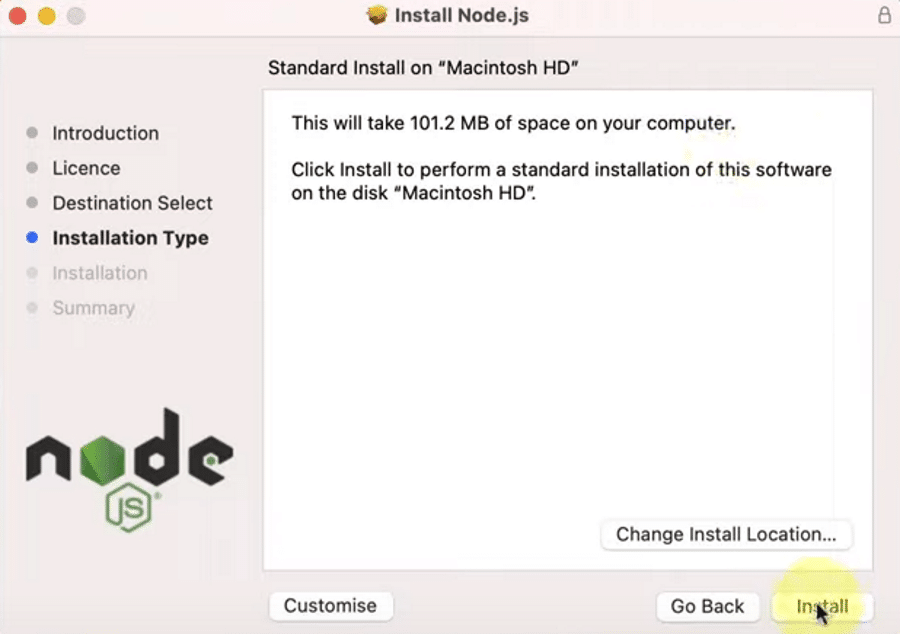
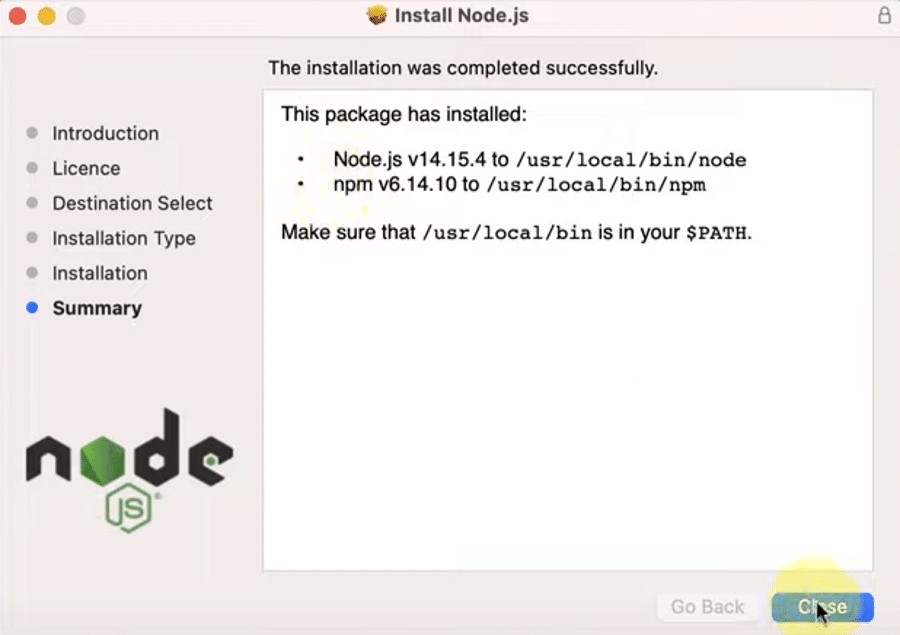
After a successful installation process, the system will show you a confirmation message. As npm is integrated within the Node.js installer, the notification should indicate proof of npm installation too.
Finally, click on the Close button to close the dialogue box.
4. Verify Node.js Installation on macOS
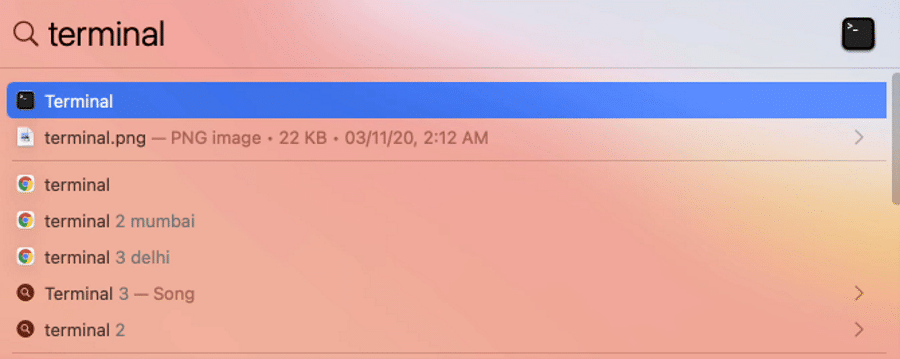
You’ve now successfully installed Node.js on your macOS. However, you should check to confirm that the installation process was successful and whether the Node.js and npm versions are working properly on your macOS.
To check the Node.js version, you need to open your macOS terminal, click the Command + Space keys, or search the terminal from the search bar.
To check the Node.js version, type:
Node --versionAnd to check the npm version, run this command:
npm --version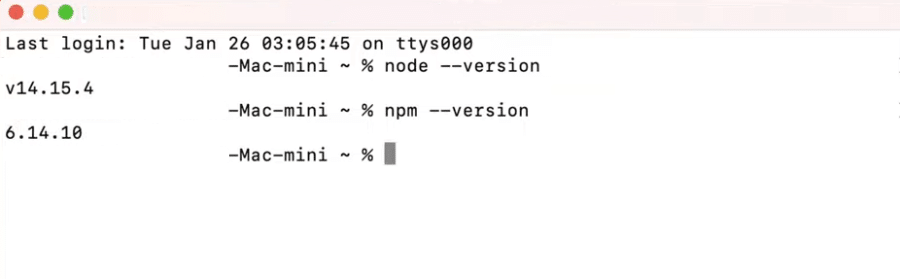
If the Node.js and npm versions are visible, both of them are correctly installed and working fine. If not, you may need to recheck to find the error or try the installation process again.
How To Install Node.js on Linux
The Linux operating system works a bit differently than the other traditional operating systems. That’s because Linux is open-source, offering you more freedom, customization, and advanced functionalities.
If you’re casual with commands, you should feel comfortable with Linux. Here, we are about to discuss the easiest method of installing Node.js on the Linux operating system.
1. Choose the Node.js Version for Your Linux Distribution
The Linux operating system has hundreds of different distributions because of the diversity it provides. And users love to customize and harness different versions’ specific functionalities using distinct distributions.
Firstly, find the installation instruction for your specific distribution from Node.js’s Binary Distributions page. For this guide, we’ll be using Ubuntu for illustration purposes.
2. Install the Curl Command-Line Tool
Before going for Node.js installation, ensure that you have the curl command-line utility installed on your system. If not, then paste this command on your terminal to install curl:
sudo apt install curlIt may ask for your system password to verify the permission of the installation. Once you input the password, the system should begin the curl installation.

3. Start Node.js Installation
You need to copy and paste the Node.js installation command into your terminal (in our case, we can grab it from the Ubuntu distribution page) so that the system can begin the Node.js installation.
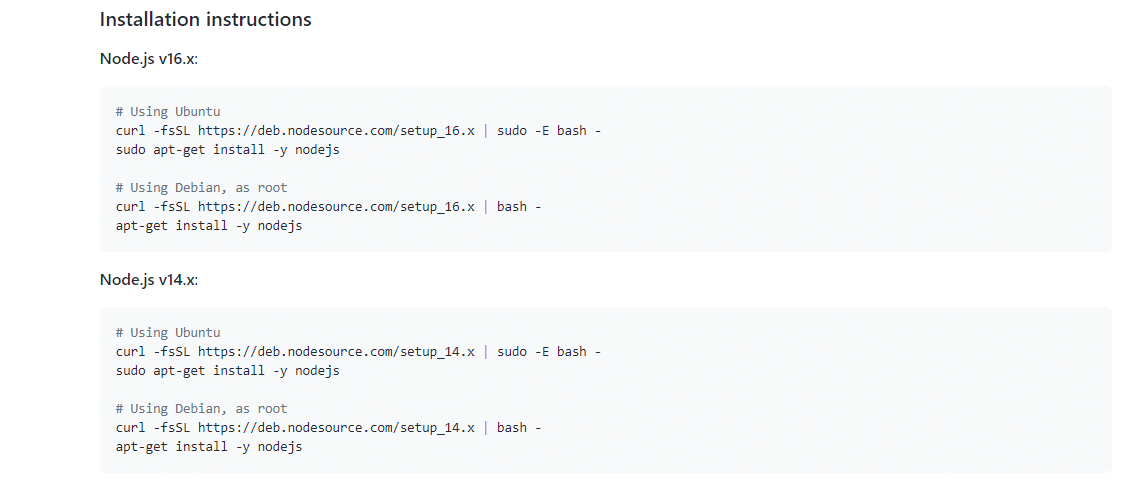
For instance, here, we’ll be installing Node.js v14.x. These are the installation commands for Ubuntu:
curl -fsSL https://deb.nodesource.com/setup_14.x | sudo -E bash -sudo apt-get install -y nodejsAs you already have the curl command line installed on your terminal, you’ll need to copy and paste the first command (the curl command) on your terminal and run it.

The curl command begins the Node.js installation process, updates your system, and downloads all Node.js libraries required to install Node.js on your Linux OS.
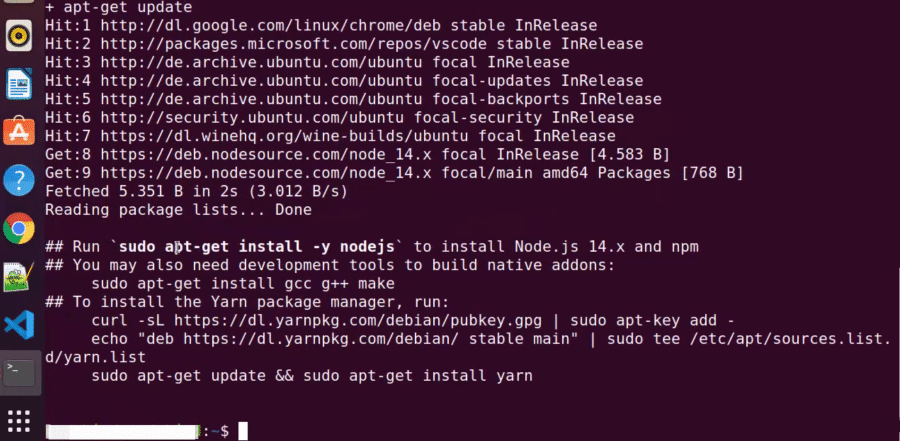
Now, all the libraries and resources of Node.js have been downloaded to your PC. With one final command, we can finish installing Node.js and npm on your computer.
Copy and paste the second line of command from the installation instructions above into your Linux terminal:
sudo apt-get install -y nodejs
If you’ve done everything correctly, Node.js will install correctly on your Linux distribution. Now input the Clear command to clear the terminal.
4. Verify Node.js Installation on Linux Ubuntu distribution
As you’ve installed Node.js, you can verify to check whether the installation is successful or not. To confirm the installation, you need to run two simple Linux commands on your Linux terminal.
To check the Node.js version, type:
Node --versionAnd to check the npm version, type:
npm --version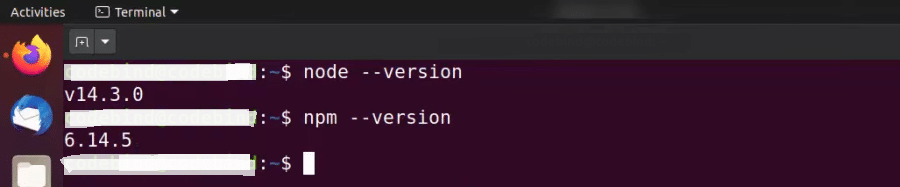
If the Node.js version and npm are installed correctly, you’ll see the Node.js and npm version names visible on the Linux terminal. It indicates that you have successfully installed Node.js and npm on your Linux distribution.
Check and Update npm Version
As we’ve mentioned, npm is the Node.js package manager. It manages the dependencies for packages. Without npm, you would have to unpack all your Node.js packages manually every time you want to upload a framework. But npm relieves you of this responsibility and takes care of it automatically.
Regularly updating npm also updates your local packages and improves the code used in your projects. However, as npm automatically installs with the Node.js version you choose, it often misses the latest npm release. In such cases, you can check your npm version and update it manually in a simple process.
The processes to check and update your npm version are very similar between Windows, macOS, and Linux — you’ll be running the same command on each.
Update npm in Windows
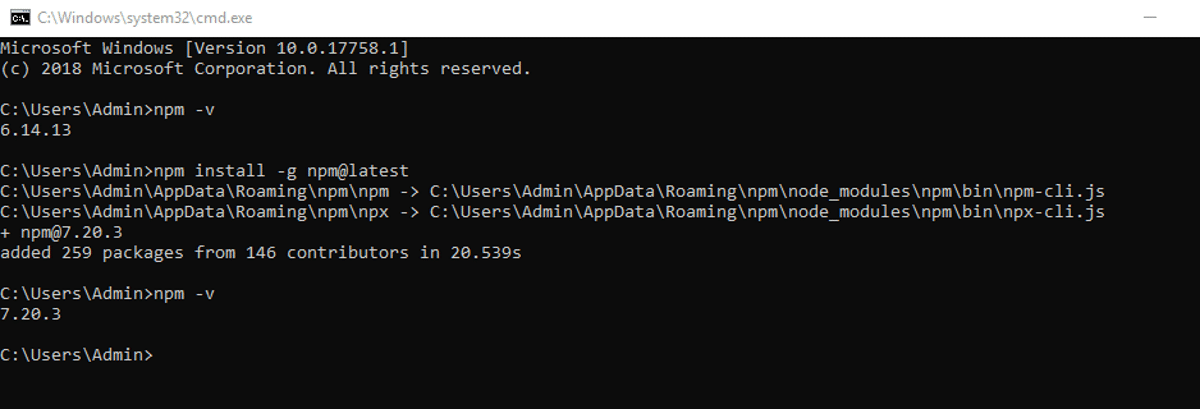
To check the npm version, run the following command:
npm -v…or:
npm --versionAnd to update the npm version, run this command:
npm install -g [email protected]After running this command on your CMD prompt on Windows, the system will update your npm version and install the additional packages in a few seconds. In the end, you can recheck the version to confirm the update of the npm version.
Update npm on macOS
To check the npm version on macOS, open your terminal and run the following command:
npm -v…or:
npm --version
To update the npm version, run this command in your macOS terminal:
npm install -g [email protected]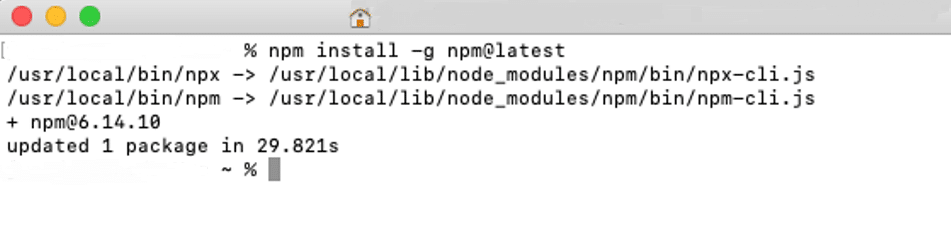
Update npm in Linux
To update your npm version on Linux, type these commands into your terminal:
sudo npm install -g n…and then:
sudo n latest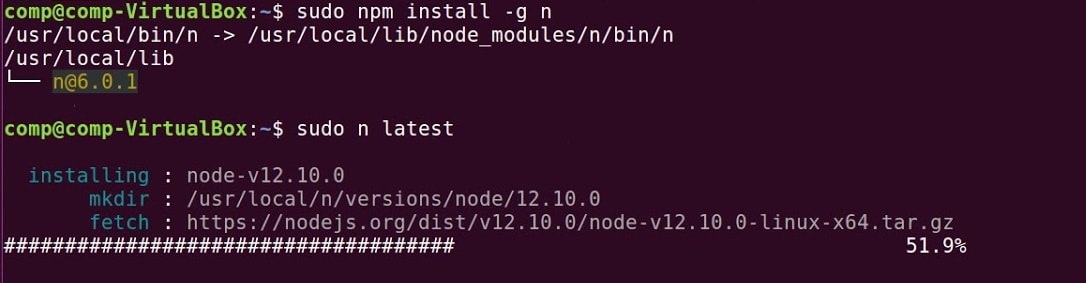
With Node.js, you can take your web dev skills to the next level 📈… so what are you waiting for? Get started with this guide 👇Click to Tweet
Summary
Node.js has become a popular programming environment quickly because of its usefulness in both frontend and backend. Thousands of active users have created a vast community that helps keep new developers and their questions from slipping through the cracks.
In essence, it’s easy to start with Node.js because of its simplicity, and its capabilities for creating advanced applications are extraordinary. It can also help turn you into a full-stack developer in a short time. These features make Node.js an inevitable choice for next-generation programming.
Have we missed any helpful tips about installing Node.js on Windows, macOS, or Linux? Let us know in the comments section!
Get all your applications, databases and WordPress sites online and under one roof. Our feature-packed, high-performance cloud platform includes:
- Easy setup and management in the MyKinsta dashboard
- 24/7 expert support
- The best Google Cloud Platform hardware and network, powered by Kubernetes for maximum scalability
- An enterprise-level Cloudflare integration for speed and security
- Global audience reach with up to 35 data centers and 275+ PoPs worldwide
Test it yourself with $20 off your first month of Application Hosting or Database Hosting. Explore our plans or talk to sales to find your best fit.
Node.js came as a blessing for JavaScript developers worldwide struggling with swapping among multiple languages and frameworks to amplify their code into a sustainable development environment.
With Node.js, you can finally build web applications with two-way connections where both the server-side and client-side can thoroughly communicate in real-time and exchange data. Indeed, Node.js has been revolutionary for developers who wanted to push real-time web applications over WebSocket.
If you’re aiming forward to enhancing your web development skills to the next level and becoming a full-stack JavaScript developer, Node.js indeed prepares the path towards that enthusiastic buzzword!
In this article, we’ll demonstrate a step-by-step guideline for installing Node.js on your computer and commencing with your web development journey.
What Is Node.js?
![]()
The first thing you should know is that Node.js is not a programming language!
You may already be aware of this fact, but it bears repeating for new developers in the field who may mistake Node.js for a unique programming language. It’s not!
Node.js is an open-source runtime environment for the JavaScript language that reshapes JavaScript’s characteristics and upgrades its functionality. As a result, you can use JavaScript for frontend and backend development, enabling full-stack development solely using JavaScript.
Initially, Node.js was designed to serve real-time performance, pushed-back architectures. But since then, Node.js has grown into a vital element for server-side programming for event-driven, non-blocking servers. Most conventional websites and API services today depend on Node.js.
Before Node.js, if you wanted to store any data on the database or connect your program to the database, you needed support from a server-side language. That’s because JavaScript couldn’t regulate the backend process. Consequently, you had to learn server-side languages like PHP, Python, Ruby, or C# — or seek a backend developer’s help.
The Node.js environment empowers JavaScript to directly employ the database and function properly as a backend language. As a result, you can ultimately build and run a program using only JavaScript with Node.js.
Node.js uses the V8 JavaScript runtime engine as its root power, and it employs a non-blocking I/O architecture that’s event-driven. All these together construct Node.js and help drive products towards robust performance.
Who Uses Node.js?
According to W3Techs, to date, 1.4% of all websites use Node.js — that’s more than 22 million websites. These numbers give you a general idea of the amount of Node.js users. On top of that, Node.js has been downloaded more than 1.3 billion times! As you can see, the stats speak strongly to Node.js’ market scale.
From your friends in IT to the industry tycoons, all are enjoying leveraging Node.js. That’s because Node.js amplifies the performance of developers and increases the speed of the development process. One of the most intelligent trends nowadays is using JavaScript everywhere, which has brought Node.js into the arena.
Top companies that use Node.js include:
- NASA
- Netflix
- PayPal
- Trello
- eBay
- Walmart
- Mozilla
- Medium
If you study these companies, you may notice that they run their businesses on different services or products. But they all have a critical factor in common: they rely on Node.js. Indeed, using Node.js can solve most of your development issues, never mind what industry you’re in.
Advantages of Using Node.js
Choosing the right programming platform for your tech stack is as important as the labor you want to invest in. Multiple factors should be considered when you look for the advantages of using a particular platform. Things like the learning curve, development speed, community, and scale can alter the overall balance of benefits.
Here are the main advantages of using Node.js:
- Simple syntax
- Easy learning curve
- Ability to scale quickly
- Open source and flexible
- Cross-platform development
- Single-language full-stack development
- Real-time communication
- Vast and active community
Node.js Prerequisites
Before installing Node.js, you need to ensure that you’ve gathered all the necessary bits of knowledge and downloaded all required installation files and elements.
Firstly, it would help if you had a basic understanding of JavaScript and its syntax — this will make picking up Node.js easier for you.
Secondly, a basic understanding of an object-oriented programming (OOP) language will help you work on server-side coding.
Lastly, rather than rushing into deep learning, take it one step at a time. Always remember that you’re not a day late or a dollar short as long as you’re progressing.
System Requirements
Node.js doesn’t require a fancy hardware setup to run; most computers of this era should handle Node.js efficiently. Even the most miniature computers like BeagleBone or Arduino YÚN can run Node.js.
Nevertheless, much still depends on what other memory hog software you’ve got running on the same system. But in most cases, you shouldn’t be worried unless your computer is from the Mesozoic Era!
LTS Version vs Current Version
Node.js offers two different versions for you to download: the LTS version and the Current version.
The first one is Long-Term Support (LTS), which indicates the version that has been in the market for a while and comes with all mandatory support. Consequently, you can access a bunch of information and community for additional help with this version.
This LTS version is recommended to most users because of its sustainability and 18-month-long support cycle. As it’s a stable version, using it to produce backends can help you achieve a robust outcome.
The Current version indicates the latest released version of Node with the most recently added and updated features. But this version has less support behind it (around eight months) and possible bug exposure. Therefore, experts suggest using this version only for frontend development.
Considering all these factors, if you’re a regular user who loves to live hassle-free, go for the LTS version. On the other hand, if you’re an advanced user who loves the adventure of experiencing new technology, you can choose to install the Current version.
How to Install Node.js and npm
Every operating system has a distinct method of installing Node.js. The core setup file differs for each OS to OS. However, the Node.js creators have taken care to provide you with the files needed for each system.
In the next portion of the article, we’ll discuss installing Node.js on Windows, macOS, and Linux operating systems.
How to Install Node.js on Windows
Follow this step-by-step guide to install Node.js on Windows.
1. Download Windows Installer
First, you need to download the Windows Installer (.msi) file from the official Node.js website. This MSI installer database carries a collection of installer files essential to install, update, or modify the existing Node.js version.
Notably, the installer also carries the Node.js package manager (npm) within it. It means you don’t need to install the npm separately.
When downloading, select the correct version as per your operating system. For example, if you’re using a 64-bit operating system, download the 64-bit version, and if you’re using the 32-bit version, download the 32-bit version:
2. Begin the Installation Process
Once you open and run the .msi file, the installation process begins. But you have to set a few parameters before running the installation process.
Double-click on the installer file and run it. The installer will ask you to accept the Node.js license agreement. To move forward, check the “I accept” box and click Next:
Then, select the destination where you want to install Node.js. If you don’t want to change the directory, go with the Windows default location and click the Next button again.
The next screen will show you custom setup options. If you want a standard installation with the Node.js default features, click the Next button. Otherwise, you can select your specific elements from the icons in the tree before clicking Next:
Node.js offers you options to install tools for native modules. If you’re interested in these, click the checkbox to mark your preferences, or click Next to move forward with the default:
3. Run Node.js Installation on Windows
Lastly — and this is the easiest part of all — click the Install button to begin the installation process:
The system will complete the installation within a few seconds or minutes and show you a success message. Click on the Finish button to close the Node.js installer.
4. Verify Node.js Installation
So the installation process is completed. Now, you have to check whether Node.js is successfully installed or not.
To verify the installation and confirm whether the correct version was installed, open your PC’s command prompt and enter the following command:
Node --versionAnd to check the npm version, run this command:
npm --version
If the Node.js version and npm are correctly installed, you’ll see the version name in the CMD prompt.
How To Install Node.js on macOS
Follow these step-by-step guidelines to install Node.js on macOS.
1. Download macOS Installer
Installing Node.js on macOS follows almost the same procedure as Windows. All you have to do is to download the installation file for Mac. Then, as soon as you start it up, the installer will walk you through the rest.
Firstly, download the macOS installer (.pkg) file from the Node.js website. There’s only a 64-bit version, so you don’t have to worry about which to download.
2. Begin Node.js Installation on macOS
Check your Download folder for the installer file and click on it to start the installation process.
The Node.js installer carries the Node.js core file, and, consequently, the installation process installs both Node.js and npm from the installer file. Therefore, you don’t need to install npm separately.
Then, click Continue to move forward with the installation.
You must agree to the terms of usage to install Node.js. Read through it before clicking the Agree button to continue if you’d like to explore the license agreement.
At this screen, you need to select the installation location. Usually, the OS determines a default installation location. If you have other requirements, you can change the location. Otherwise, keep the default location.
3. Run Node.js Installation on macOS
Until now, you’ve set all the preferences that are needed to install Node.js on macOS fully. Now click on the Install button to finish things up.
After a successful installation process, the system will show you a confirmation message. As npm is integrated within the Node.js installer, the notification should indicate proof of npm installation too.
Finally, click on the Close button to close the dialogue box.
4. Verify Node.js Installation on macOS
You’ve now successfully installed Node.js on your macOS. However, you should check to confirm that the installation process was successful and whether the Node.js and npm versions are working properly on your macOS.
To check the Node.js version, you need to open your macOS terminal, click the Command + Space keys, or search the terminal from the search bar.
To check the Node.js version, type:
Node --versionAnd to check the npm version, run this command:
npm --version
If the Node.js and npm versions are visible, both of them are correctly installed and working fine. If not, you may need to recheck to find the error or try the installation process again.
How To Install Node.js on Linux
The Linux operating system works a bit differently than the other traditional operating systems. That’s because Linux is open-source, offering you more freedom, customization, and advanced functionalities.
If you’re casual with commands, you should feel comfortable with Linux. Here, we are about to discuss the easiest method of installing Node.js on the Linux operating system.
1. Choose the Node.js Version for Your Linux Distribution
The Linux operating system has hundreds of different distributions because of the diversity it provides. And users love to customize and harness different versions’ specific functionalities using distinct distributions.
Firstly, find the installation instruction for your specific distribution from Node.js’s Binary Distributions page. For this guide, we’ll be using Ubuntu for illustration purposes.
2. Install the Curl Command-Line Tool
Before going for Node.js installation, ensure that you have the curl command-line utility installed on your system. If not, then paste this command on your terminal to install curl:
sudo apt install curlIt may ask for your system password to verify the permission of the installation. Once you input the password, the system should begin the curl installation.
3. Start Node.js Installation
You need to copy and paste the Node.js installation command into your terminal (in our case, we can grab it from the Ubuntu distribution page) so that the system can begin the Node.js installation.
For instance, here, we’ll be installing Node.js v14.x. These are the installation commands for Ubuntu:
curl -fsSL https://deb.nodesource.com/setup_14.x | sudo -E bash -sudo apt-get install -y nodejsAs you already have the curl command line installed on your terminal, you’ll need to copy and paste the first command (the curl command) on your terminal and run it.
The curl command begins the Node.js installation process, updates your system, and downloads all Node.js libraries required to install Node.js on your Linux OS.
Now, all the libraries and resources of Node.js have been downloaded to your PC. With one final command, we can finish installing Node.js and npm on your computer.
Copy and paste the second line of command from the installation instructions above into your Linux terminal:
sudo apt-get install -y nodejs
If you’ve done everything correctly, Node.js will install correctly on your Linux distribution. Now input the Clear command to clear the terminal.
4. Verify Node.js Installation on Linux Ubuntu distribution
As you’ve installed Node.js, you can verify to check whether the installation is successful or not. To confirm the installation, you need to run two simple Linux commands on your Linux terminal.
To check the Node.js version, type:
Node --versionAnd to check the npm version, type:
npm --version
If the Node.js version and npm are installed correctly, you’ll see the Node.js and npm version names visible on the Linux terminal. It indicates that you have successfully installed Node.js and npm on your Linux distribution.
Check and Update npm Version
As we’ve mentioned, npm is the Node.js package manager. It manages the dependencies for packages. Without npm, you would have to unpack all your Node.js packages manually every time you want to upload a framework. But npm relieves you of this responsibility and takes care of it automatically.
Regularly updating npm also updates your local packages and improves the code used in your projects. However, as npm automatically installs with the Node.js version you choose, it often misses the latest npm release. In such cases, you can check your npm version and update it manually in a simple process.
The processes to check and update your npm version are very similar between Windows, macOS, and Linux — you’ll be running the same command on each.
Update npm in Windows
To check the npm version, run the following command:
npm -v…or:
npm --versionAnd to update the npm version, run this command:
npm install -g [email protected]After running this command on your CMD prompt on Windows, the system will update your npm version and install the additional packages in a few seconds. In the end, you can recheck the version to confirm the update of the npm version.
Update npm on macOS
To check the npm version on macOS, open your terminal and run the following command:
npm -v…or:
npm --version
To update the npm version, run this command in your macOS terminal:
npm install -g [email protected]
Update npm in Linux
To update your npm version on Linux, type these commands into your terminal:
sudo npm install -g n…and then:
sudo n latest
With Node.js, you can take your web dev skills to the next level 📈… so what are you waiting for? Get started with this guide 👇Click to Tweet
Summary
Node.js has become a popular programming environment quickly because of its usefulness in both frontend and backend. Thousands of active users have created a vast community that helps keep new developers and their questions from slipping through the cracks.
In essence, it’s easy to start with Node.js because of its simplicity, and its capabilities for creating advanced applications are extraordinary. It can also help turn you into a full-stack developer in a short time. These features make Node.js an inevitable choice for next-generation programming.
Have we missed any helpful tips about installing Node.js on Windows, macOS, or Linux? Let us know in the comments section!
Get all your applications, databases and WordPress sites online and under one roof. Our feature-packed, high-performance cloud platform includes:
- Easy setup and management in the MyKinsta dashboard
- 24/7 expert support
- The best Google Cloud Platform hardware and network, powered by Kubernetes for maximum scalability
- An enterprise-level Cloudflare integration for speed and security
- Global audience reach with up to 35 data centers and 275+ PoPs worldwide
Test it yourself with $20 off your first month of Application Hosting or Database Hosting. Explore our plans or talk to sales to find your best fit.