Other respondents have already described which commands can be used to check the CUDA version. Here, I’ll describe how to turn the output of those commands into an environment variable of the form «10.2», «11.0», etc.
To recap, you can use
nvcc --version
to find out the CUDA version.
I think this should be your first port of call.
If you have multiple versions of CUDA installed, this command should print out the version for the copy which is highest on your PATH.
The output looks like this:
nvcc: NVIDIA (R) Cuda compiler driver
Copyright (c) 2005-2020 NVIDIA Corporation
Built on Thu_Jun_11_22:26:38_PDT_2020
Cuda compilation tools, release 11.0, V11.0.194
Build cuda_11.0_bu.TC445_37.28540450_0
We can pass this output through sed to pick out just the MAJOR.MINOR release version number.
CUDA_VERSION=$(nvcc --version | sed -n 's/^.*release ([0-9]+.[0-9]+).*$/1/p')
If nvcc isn’t on your path, you should be able to run it by specifying the full path to the default location of nvcc instead.
/usr/local/cuda/bin/nvcc --version
The output of which is the same as above, and it can be parsed in the same way.
Alternatively, you can find the CUDA version from the version.txt file.
cat /usr/local/cuda/version.txt
The output of which
CUDA Version 10.1.243
can be parsed using sed to pick out just the MAJOR.MINOR release version number.
CUDA_VERSION=$(cat /usr/local/cuda/version.txt | sed 's/.* ([0-9]+.[0-9]+).*/1/')
Note that sometimes the version.txt file refers to a different CUDA installation than the nvcc --version. In this scenario, the nvcc version should be the version you’re actually using.
We can combine these three methods together in order to robustly get the CUDA version as follows:
if nvcc --version 2&> /dev/null; then
    # Determine CUDA version using default nvcc binary
    CUDA_VERSION=$(nvcc --version | sed -n 's/^.*release ([0-9]+.[0-9]+).*$/1/p');

elif /usr/local/cuda/bin/nvcc --version 2&> /dev/null; then
    # Determine CUDA version using /usr/local/cuda/bin/nvcc binary
    CUDA_VERSION=$(/usr/local/cuda/bin/nvcc --version | sed -n 's/^.*release ([0-9]+.[0-9]+).*$/1/p');

elif [ -f "/usr/local/cuda/version.txt" ]; then
    # Determine CUDA version using /usr/local/cuda/version.txt file
    CUDA_VERSION=$(cat /usr/local/cuda/version.txt | sed 's/.* ([0-9]+.[0-9]+).*/1/')

else
    CUDA_VERSION=""

fi
This environment variable is useful for downstream installations, such as when pip installing a copy of pytorch that was compiled for the correct CUDA version.
python -m pip install
    "torch==1.9.0+cu${CUDA_VERSION/./}"
    "torchvision==0.10.0+cu${CUDA_VERSION/./}"
    -f https://download.pytorch.org/whl/torch_stable.html
Similarly, you could install the CPU version of pytorch when CUDA is not installed.
if [ "$CUDA_VERSION" = "" ]; then
    MOD="+cpu";
    echo "Warning: Installing CPU-only version of pytorch"
else
    MOD="+cu${CUDA_VERSION/./}";
    echo "Installing pytorch with $MOD"
fi

python -m pip install
    "torch==1.9.0${MOD}"
    "torchvision==0.10.0${MOD}"
    -f https://download.pytorch.org/whl/torch_stable.html
But be careful with this because you can accidentally install a CPU-only version when you meant to have GPU support.
For example, if you run the install script on a server’s login node which doesn’t have GPUs and your jobs will be deployed onto nodes which do have GPUs. In this case, the login node will typically not have CUDA installed.
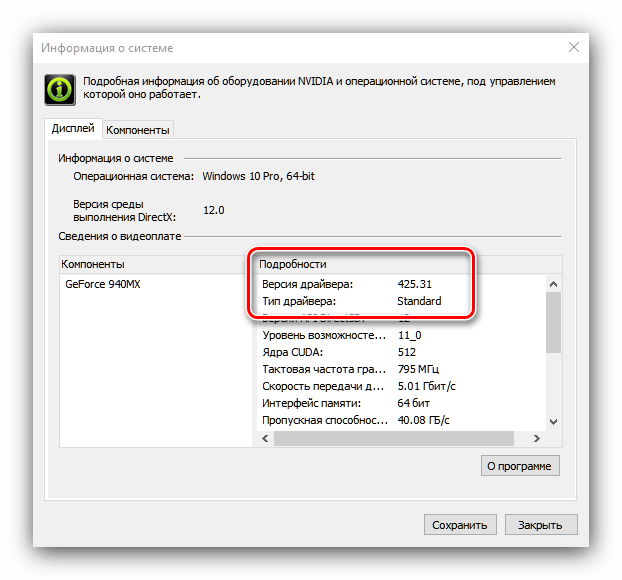
В нем перейдите на вкладку справки и выберите Информация о системе. В нем есть следующий раздел компонентов. В том, что под NVCUDA. DLL показывает NVIDIA CUDA 10.2.
3 способа проверить версию CUDA
- Пожалуй, самый простой способ проверить файл. Запустите cat /usr/local/cuda/version.txt. …
- Другой способ — использовать команду пакета cuda-toolkit nvcc. Простой запуск nvcc –version. …
- Другой способ — с помощью установленной вами команды nvidia-smi драйвера NVIDIA. Просто запустите nvidia-smi.
10 сред. 2020 г.
Какая версия CUDA у меня Windows?
Проверить наличие графического процессора с поддержкой CUDA можно в разделе «Адаптеры дисплея» в диспетчере устройств Windows. Здесь вы найдете название производителя и модель вашей видеокарты. Если у вас есть карта NVIDIA, указанная на http://developer.nvidia.com/cuda-gpus, этот графический процессор поддерживает CUDA.
Как узнать, установлена ли Cuda?
Проверить установку CUDA
- Проверьте версию драйвера, просмотрев: / proc / driver / nvidia / version:…
- Проверьте версию CUDA Toolkit. …
- Проверьте выполнение заданий CUDA GPU, скомпилировав образцы и выполнив программы deviceQuery или bandwidthTest.
Как обновить драйверы Cuda для Windows 10?
- Шаг 1. Проверьте программное обеспечение, которое вам нужно установить. …
- Шаг 2. Загрузите Visual Studio Express. …
- Шаг 3. Загрузите CUDA Toolkit для Windows 10.…
- Шаг 4. Загрузите исправления CUDA для Windows 10. …
- Шаг 5: Загрузите и установите cuDNN. …
- Шаг 6. Установите Python (если у вас его еще нет)…
- Шаг 7: Установите Tensorflow с поддержкой графического процессора.
Какую версию Cuda мне следует установить?
Для этих графических процессоров CUDA 6.5 должна работать. Начиная с CUDA 9. x, старые графические процессоры CUDA с вычислительными возможностями 2. x также не поддерживаются.
Как проверить версию драйвера Nvidia?
О: Щелкните правой кнопкой мыши на рабочем столе и выберите Панель управления NVIDIA. В меню панели управления NVIDIA выберите «Справка»> «Информация о системе». Версия драйвера указана в верхней части окна «Подробности». Для более опытных пользователей вы также можете получить номер версии драйвера из Диспетчера устройств Windows.
Cuda только для Nvidia?
В отличие от OpenCL, графические процессоры с поддержкой CUDA доступны только от Nvidia.
Поддерживает ли мой графический процессор CUDA?
CUDA-совместимая графика
Чтобы проверить, есть ли на вашем компьютере графический процессор NVIDA и включен ли он CUDA: Щелкните правой кнопкой мыши на рабочем столе Windows. Если во всплывающем диалоговом окне вы видите «Панель управления NVIDIA» или «Дисплей NVIDIA», значит, в компьютере установлен графический процессор NVIDIA. Нажмите «Панель управления NVIDIA» или «Дисплей NVIDIA» во всплывающем диалоговом окне.
Где устанавливается Cuda?
По умолчанию CUDA SDK Toolkit устанавливается в / usr / local / cuda /. Драйвер компилятора nvcc устанавливается в / usr / local / cuda / bin, а 64-разрядные библиотеки времени выполнения CUDA устанавливаются в / usr / local / cuda / lib64.
Как узнать версию Cudnn?
Посмотреть версию cuda, cudnn, ubuntu
Проверьте версию cudnn cat / usr / local / cuda / include / cudnn. h | grep CUDNN_MAJOR -A 2 3. Проверьте версию unbuntu cat / etc / issue 4.
Как запустить образец Cuda?
Перейдите в каталог nbody образцов CUDA. Откройте файл решения nbody Visual Studio для установленной вами версии Visual Studio. Откройте меню «Сборка» в Visual Studio и нажмите «Создать решение». Перейдите в каталог сборки образцов CUDA и запустите образец nbody.
Что такое Cuda и Cudnn?
Библиотека NVIDIA CUDA® Deep Neural Network (cuDNN) — это библиотека примитивов для глубоких нейронных сетей с ускорением на GPU. … Это позволяет им сосредоточиться на обучении нейронных сетей и разработке программных приложений, а не тратить время на низкоуровневую настройку производительности графического процессора.
Что такое Cuda 11?
Резюме. CUDA 11 предоставляет базовую среду разработки для создания приложений для архитектуры NVIDIA Ampere GPU и мощных серверных платформ на базе NVIDIA A100 для AI, анализа данных и рабочих нагрузок HPC, как для локальных (DGX A100), так и для облачных (HGX A100) развертывания.
Как запустить графический процессор Tensorflow?
Шаги:
- Удалите старый тензорный поток.
- Установите tenorflow-gpu pip install tensorflow-gpu.
- Установите видеокарту Nvidia и драйверы (вероятно, у вас уже есть)
- Загрузите и установите CUDA.
- Загрузите и установите cuDNN.
- Проверяем простой программой.
23 мар. 2019 г.
Как установить драйверы CUDA?
- Подключитесь к виртуальной машине, на которую вы хотите установить драйвер.
- Установите последний пакет ядра. При необходимости эта команда также перезагружает систему. …
- Если система перезагрузилась на предыдущем шаге, повторно подключитесь к экземпляру.
- Обновите Zypper. sudo zypper refresh.
- Установите CUDA, в который входит драйвер NVIDIA. sudo zypper установить cuda.
| layout | title | date | categories | comments |
|---|---|---|---|---|
|
post |
Установка CUDA 9 в Windows 10 для TensorFlow и Keras |
2018-02-06 11:00:00 +0500 |
deep_learning |
true |
Недавно вышла версия TensorFlow 1.5 с поддержкой CUDA 9, поэтому можно переводить TensorFlow и Keras на новую версию CUDA. В этой статье я расскажу, как установить CUDA 9 и CuDNN 7 в Windows 10. По установке для Linux будет отдельная статья.
Что нужно устанавливать
Чтобы TensorFlow и Keras могли использовать GPU под Windows, необходимо установить три компонента:
- Microsoft Visual Studio. Любая GPU-программа содержит код как для GPU, так и для CPU. Данные для проведения расчетов нужно загрузить из файлов и передать их в память GPU, где они будут обработаны. Результаты обработки передаются обратно на CPU для сохранения и визуализации. NVIDIA СUDA включает компилятор только для GPU. Код для CPU генерируется с помощью внешнего компилятора, для Windows это Microsoft Visual Studio.
- NVIDIA CUDA — библиотека, которая позволяет использовать GPU для проведения вычислений общего назначения (general purpose computing), а не только обрабатывать графику.
- Библиотека cuDNN. Это библиотека для CUDA, которая содержит эффективные реализации операций с нейронными сетями. В отличие от Theano, TensorFlow не может работать без cuDNN.
Проверка GPU
CUDA работает только с GPU компании NVIDIA, вот список поддерживаемых GPU. Если у вас GPU от AMD или Intel, то CUDA работать не будет и TensorFlow, к сожалению, не сможет использовать такие GPU.
Для TensorFlow нужна видеокарта с CUDA Compute Capability 3.0. Узнать Compute Capability для своей карты можно на сайте. Если у вас старый GPU с Compute Capability меньше 3.0, то вместо TensorFlow можно использовать Theano, у которой меньше требования к GPU. Однако ускорение на таких GPU будет не очень большим, по сравнению с центральным процессором.
Установка Microsoft Visual Studio
Под Windows NVIDIA CUDA использует Microsoft Visual Studio для генерации кода для CPU. Список поддерживаемых версий Visual Studio для CUDA 9 приведен на сайте NVIDIA. На момент написания этой статьи поддерживаются версии:
- Visual Studio 2017
- Visual Studio 2015
- Visual Studio Community 2015
- Visual Studio 2013
- Visual Studio 2012
Из бесплатных версий есть только Visual Studio Community 2015, я устанавливал именно ее. Скачать Visual Studio Community 2015 можно с сайта my.visualstudio.com, нужна предварительная регистрация.
Если у вас есть Visual Studio 2017, то можно использовать ее. Однако обратите внимание, что пока не поддерживается обновленная версия Visual Studio 2017 с компилятором Visual C++ 15.5. Официально CUDA 9 работает только с Visual C++ 15.0.
Рекомендую устанавливать Visual Studio на английском языке. С русскоязычной Visual Studio есть проблемы у Theano. В TensorFlow я пока с подобными проблемами не сталкивался, но, возможно, мне просто повезло.
При установке Visual Studio выберите средства для разработки C++, остальное устанавливайте по желанию.
После установки добавьте путь к компилятору Visual С++ (cl.exe) в переменную PATH.
Установка NVIDIA CUDA
На время написания этой статьи текущей версией CUDA является 9.1. Однако TensorFlow 1.5 поддерживает только CUDA 9.0. Если установите 9.1, то получите ошибку. Странное поведение, но что поделать.
Скачать CUDA 9.0 можно на странице CUDA Toolkit Archive. Выбираем нужную версию Windows и тип загружаемого файла — exe(local). Этот файл содержит CUDA и драйвер для GPU с поддержкой CUDA. Просто скачайте файл и запустите его. Все конфигурационные параметры при установке можно оставить по умолчанию.
Установка cuDNN
cuDNN — это дополнение к NVIDIA CUDA, которое содержит эффективную реализацию операций с нейронным сетями для GPU. DNN в названии библиотеки расшифровывается как Deep Neural Networks. Некоторые библиотеки, например, Theano, могут работать с CUDA без cuDNN. Но TensorFlow так работать не может, для нее cuDNN нужна обязательно.
cuDNN можно скачать бесплатно с сайта NVIDIA. Нужна предварительная регистрация в качестве разработчика NVIDIA, что также делается бесплатно и быстро на этом же сайте.
После регистрации будет предложено скачать несколько версий cuDNN для разных версий CUDA. Выбирайте cuDNN 7 для CUDA 9.0. С другими версиями cuDNN и CUDA не будет работать TensorFlow 1.5.
cuDNN представляет собой архив, в котором всего три файла:
bincudnn64_7.dllincludecudnn.hlibx64cudnn.lib
Эти файлы нужно распаковать в каталог, где установлена CUDA 9.0. Как правило, это C:Program FilesNVIDIA GPU Computing ToolkitCUDAv9.0.
Перезагрузка
После установки Microsoft Visual Studio, NVIDIA CUDA и cuDNN, компьютер необходимо перезагрузить.
Проверка установки CUDA
Проверить, правильно ли установилась CUDA и видит ли она ваш GPU, можно с помощью утилиты nvidia-smi.exe. Эта утилита показывает доступные GPU для CUDA. Утилита работает в командной строке и при установке по умолчанию находится в каталоге c:Program FilesNVIDIA CorporationNVSMI. На моем ноутбуке с GPU NVIDIA GeForce GTX 1050 Ti nvidia-smi.exe выдает следующую информацию:
Tue Feb 06 13:03:37 2018
+-----------------------------------------------------------------------------+
| NVIDIA-SMI 385.54                 Driver Version: 385.54                    |
|-------------------------------+----------------------+----------------------+
| GPU  Name            TCC/WDDM | Bus-Id        Disp.A | Volatile Uncorr. ECC |
| Fan  Temp  Perf  Pwr:Usage/Cap|         Memory-Usage | GPU-Util  Compute M. |
|===============================+======================+======================|
|   0  GeForce GTX 105... WDDM  | 00000000:01:00.0 Off |                  N/A |
| N/A   35C    P8    N/A /  N/A |     80MiB /  4096MiB |      0%      Default |
+-------------------------------+----------------------+----------------------+

+-----------------------------------------------------------------------------+
| Processes:                                                       GPU Memory |
|  GPU       PID   Type   Process name                             Usage      |
|=============================================================================|
|    0      1224    C+G   ... Files (x86)DropboxClientDropbox.exe N/A      |
|    0      6080    C+G   Insufficient Permissions                   N/A      |
|    0      8440    C+G   ...351.0_x64__8wekyb3d8bbweCalculator.exe N/A      |
|    0     12664    C+G   C:Program Files (x86)SCMSCM.exe         N/A      |
|    0     14648    C+G   ...4.0_x64__8wekyb3d8bbweWinStore.App.exe N/A      |
|    0     15440    C+G   ..._8wekyb3d8bbweMessagingApplication.exe N/A      |
|    0     15880    C+G   ...osoft.LockApp_cw5n1h2txyewyLockApp.exe N/A      |
+-----------------------------------------------------------------------------+
В выводе nvidia-smi.exe видно, что в компьютере есть один GPU с номером 0, модель GeForce GTX 105… (название видеокарты поместилось не полностью), объем памяти 4 Гб, текущая загрузка 0%. В нижней части показаны процессы, которые используют GPU.
Видеокарта есть в выводе nvidia-smi.exe, это означает, что CUDA установлена успешно.
Итоги
Кратко, основные особенности установки:
- Обязательно нужно Microsoft Visual Studio, у меня работает бесплатная англоязычная версия Visual Studio Community 2015. Не забудьте прописать путь с компилятору Visual C++ (cl.exe) в переменную PATH, иначе CUDA его не найдет.
- Для TensorFlow 1.5 нужно устанавливать CUDA 9.0, а не CUDA 9.1! TensorFlow ищет файлы именно из CUDA 9.0, поэтому CUDA 9.1 не работает.
- Устанавливать cuDNN обязательно, т.к. без нее TensorFlow не работает. Внимательно смотрим за версиями: нужна cuDNN 7 для CUDA 9.0.
Полезные ссылки
- Проверка поддержки CUDA и Compute Capability.
- Загрузка Visual Studio Community 2015 c my.visualstudio.com.
- Загрузка CUDA 9.0 c CUDA Toolkit Archive
- Загрузка cuDNN.
Содержание
- Русские Блоги
- Как проверить версию Windows CUDA
- Как получить версию cuda?
- 11 ответов:
- Как получить версию cuda?
- 32 ответа
- Включение ядер NVIDIA CUDA в программах
- Этап 1: Установка ПО
- Этап 2: Включение CUDA
- 1. IntroductionпѓЃ
- 1.1. System RequirementsпѓЃ
- 1.2. About This DocumentпѓЃ
- 2. Installing CUDA Development ToolsпѓЃ
- 2.1. Verify You Have a CUDA-Capable GPUпѓЃ
- 2.2. Download the NVIDIA CUDA ToolkitпѓЃ
- 2.3. Install the CUDA SoftwareпѓЃ
- 2.3.1. Uninstalling the CUDA SoftwareпѓЃ
- 2.4. Using Conda to Install the CUDA SoftwareпѓЃ
- 2.4.1. Conda OverviewпѓЃ
- 2.4.2. InstallationпѓЃ
- 2.4.3. UninstallationпѓЃ
- 2.4.4. Installing Previous CUDA ReleasesпѓЃ
- 2.5. Use a Suitable Driver ModelпѓЃ
- 2.6. Verify the InstallationпѓЃ
- 2.6.1. Running the Compiled ExamplesпѓЃ
- 3. Pip WheelsпѓЃ
- 4. Compiling CUDA ProgramsпѓЃ
- 4.1. Compiling Sample ProjectsпѓЃ
- 4.2. Sample ProjectsпѓЃ
- 4.3. Build Customizations for New ProjectsпѓЃ
- 4.4. Build Customizations for Existing ProjectsпѓЃ
- 5. Additional ConsiderationsпѓЃ
- 6. NoticesпѓЃ
- 6.1. NoticeпѓЃ
- 6.2. OpenCLпѓЃ
- 6.3. TrademarksпѓЃ
Русские Блоги
Как проверить версию Windows CUDA
Недавно я начал изучать некоторые проблемы компьютерного зрения, связанные с обработкой изображений (следуйте за учителем, чтобы расширить свой кругозор)
Первый — установить anaconda Окружающая среда (это просто)
Затем учитель попросил использовать pytorch в качестве нашего инструмента обучения, поэтому перейдите на официальный сайт, чтобы проверить соответствующую версию pytorch:

Нам нужно только самостоятельно выбрать соответствующую систему, загрузить используемые инструменты, версию python и номер версии CUDA, а затем мы сможем получить соответствующие команды для загрузки и установки.
Я столкнулся с проблемой в это время, Что такое CUDA?
CUDA (Compute Unified Device Architecture), производитель видеокартNVIDIAВычислительная платформа запущена. CUDA ™ — универсальныйПараллельные вычисленияАрхитектура, позволяющаяGPUУмеет решать сложные вычислительные задачи. Он содержит CUDAАрхитектура набора команд(ISA) И механизм параллельных вычислений внутри графического процессора. (Приведенное выше объяснение взято из записи Baidu)
Понять, что такое CUDA, Так какой у меня номер версии CUDA? (Два метода перечислены ниже, мне только что удалось использовать первый метод, просто посмотрите на первый напрямую)
(1) Нажмите win + Q, войдите в панель управления, затем просмотрите маленький значок, щелкните панель управления NVIDIA:

Щелкните Справка на панели управления NVIDIA, а затем щелкните Информация о системе в нижнем левом углу:

Щелкните компонент: Здесь отображается ваша информация CUDA! ! !

(2) Второй способ:
Откройте CMD, введите nvcc —version

(Я знаю, что не добавил путь к пути, но, Я искал диск C и нашел его! ! ! У меня нет этого файла ∑ (っ ° Д °;) っ Бля, его больше нет! ! ! ! Я не понимаю действия гнева. . . . . Если кто-нибудь знает, где сейчас находится папка, оставьте сообщение и дайте мне знать, спасибо! ! ! ! )

(Путь поиска в Интернете: C: Program Files NVIDIA GPU Computing Toolkit CUDA)
Если статья неправильная, дайте мне совет! ! ! Спасибо (* ^ ▽ ^ *)
Источник
Как получить версию cuda?
есть ли быстрая команда или скрипт для проверки версии установленного CUDA?
Я нашел руководство 4.0 в каталоге установки, но не уверен, является ли фактическая установленная версия таковой или нет.
11 ответов:
как Джаред упоминает в комментарии, из командной строки:
дает версию компилятора CUDA (которая соответствует версии инструментария).
из кода приложения вы можете запросить версию API среды выполнения с помощью
или версия API драйвера с
как указывает Даниэль, deviceQuery-это пример приложения SDK, который запрашивает выше, а также возможности устройства.
как другие отмечают, вы также можете проверить содержание version.txt использование (например, на Mac или Linux)
однако, если установлена другая версия инструментария CUDA, отличная от той, которая связана с /usr/local/cuda , это может сообщить о неточной версии, если другая версия находится ранее в вашем PATH чем выше, так что используйте с осторожностью.
$ cat /usr/local/cuda/version.txt или $ cat /usr/local/cuda-8.0/version.txt
иногда папка называется «Cuda-version».
если ничего из вышеперечисленного не работает, попробуйте перейти $ /usr/local/ И найдите правильное имя вашей папки Cuda.
результат должен быть похож на: CUDA Version 8.0.61
Если вы установили CUDA SDK, вы можете запустить «deviceQuery», чтобы увидеть версию CUDA
вы можете найти CUDA-Z полезным, вот цитата с их сайта:
» эта программа родилась как пародия на другие Z-утилиты, такие как CPU-Z и GPU-Z. CUDA-Z показывает некоторую базовую информацию о графических процессорах с поддержкой CUDA и GPGPUs. Он работает с картами nVIDIA Geforce, Quadro и Tesla, чипсетами ION.»
на вкладке поддержка есть URL для исходного кода: http://sourceforge.net/p/cuda-z/code/ и загрузка на самом деле не установщик, а сам исполняемый файл (без установки, так что это «быстро»).
эта утилита предоставляет множество информации, и если вам нужно знать, как она была получена, есть источник посмотреть. Есть и другие утилиты, подобные этой, которые вы можете искать.
после установки CUDA можно проверить версии по: nvcc-V
Я установил как 5.0, так и 5.5, поэтому он дает
инструменты компиляции Cuda, выпуск 5.5, V5. 5,0
эта команда работает как для Windows, так и для Ubuntu.
кроме упомянутых выше, ваш путь установки CUDA (если он не был изменен во время установки) обычно содержит номер версии
делать which nvcc должны дать путь, и это даст вам версию
PS: Это быстрый и грязный способ, приведенные выше ответы более элегантны и приведут к правильной версии со значительными усилиями
сначала вы должны найти, где установлен Cuda.
Если это установка по умолчанию, такие как здесь расположение должно быть:
в этой папке должен быть файл
открыть этот файл в любом текстовом редакторе или выполнять:
можно узнать cuda версия, введя следующее в терминале:
кроме того, можно вручную проверьте версию, сначала выяснив каталог установки с помощью:
а то cd в этот каталог и проверьте версию CUDA.
Я получаю /usr / local — нет такого файла или каталога. Хотя nvcc -V дает
для версии cuDNN:
используйте следующее, чтобы найти путь для cuDNN:
затем используйте это, чтобы получить версию из файла заголовка,
используйте следующее, чтобы найти путь для cuDNN:
затем используйте это, чтобы сбросить версию из файла заголовка,
Источник
Как получить версию cuda?
Есть ли какая-нибудь быстрая команда или скрипт, чтобы проверить версию установленной CUDA?
Я нашел руководство 4.0 в каталоге установки, но я не уверен, является ли оно действующей установленной версией или нет.
32 ответа
Как упоминает Джаред в комментарии, из командной строки:
дает версию компилятора CUDA (которая соответствует версии инструментария).
Из кода приложения вы можете запросить версию API времени выполнения с помощью
или версия API драйвера с
Как указывает Даниэль, deviceQuery — это пример приложения SDK, которое запрашивает вышеупомянутое, а также возможности устройства.
Как отмечают другие, вы также можете проверить содержимое version.txt используя (например, на Mac или Linux)
Однако, если установлена другая версия инструментария CUDA, отличная от той, что приведена по ссылке /usr/local/cuda , это может сообщить о неточной версии, если другая версия ранее в вашем PATH чем выше, поэтому используйте с осторожностью.
На Ubuntu Cuda V8:
Если ваш пробег
Вы должны найти версию CUDA в верхнем правом углу вывода команды. По крайней мере, я обнаружил, что вывод для CUDA версии 10.0, например, 
Для версии CUDA:
Для версии cuDNN:
Используйте следующую команду, чтобы найти путь для cuDNN:
Затем используйте это, чтобы получить версию из файла заголовка,
Используйте следующую команду, чтобы найти путь для cuDNN:
Затем используйте это для выгрузки версии из файла заголовка,
Используйте следующую команду, чтобы проверить установку CUDA с помощью Conda:
И следующая команда для проверки версии CUDNN, установленной conda:
Если вы хотите установить / обновить CUDA и CUDNN через CONDA, используйте следующие команды:
В качестве альтернативы вы можете использовать следующие команды для проверки установки CUDA:
Если вы используете tensorflow-gpu через пакет Anaconda (вы можете проверить это, просто открыв Python в консоли и проверьте, показывает ли Python по умолчанию Anaconda, Inc. при запуске, или вы можете запустить какой python и проверить местоположение), затем вручную установка CUDA и CUDNN, скорее всего, не сработает. Вместо этого вам придется обновляться через conda.
Если вы хотите установить CUDA, CUDNN или tensorflow-gpu вручную, вы можете ознакомиться с инструкциями здесь https://www.tensorflow.org/install/gpu
$ cat /usr/local/cuda/version.txt или же $ cat /usr/local/cuda-8.0/version.txt
Иногда папка называется «Cuda-версия».
Если ничего из вышеперечисленного не работает, попробуйте $ /usr/local/ И найдите правильное имя вашей папки Cuda.
Вывод должен быть похож на: CUDA Version 8.0.61
Другие респонденты уже описали, какие команды можно использовать для проверки версии CUDA. Здесь я опишу, как преобразовать вывод этих команд в переменную среды вида «10.2», «11.0» и т. Д.
Напомним, вы можете использовать
чтобы узнать версию CUDA. Я думаю, это должен быть ваш первый порт захода. Если у вас установлено несколько версий CUDA, эта команда должна распечатать версию для копии, которая является самой высокой в вашем PATH.
Результат выглядит так:
Мы можем передать этот вывод через sed, чтобы выбрать только номер версии выпуска MAJOR.MINOR.
Если nvcc отсутствует на вашем пути, вы сможете запустить его, указав вместо этого полный путь к местоположению nvcc по умолчанию.
Вывод такой же, как указано выше, и его можно проанализировать таким же образом.
Кроме того, вы можете найти версию CUDA в файле version.txt.
На выходе из которых
можно проанализировать с помощью sed, чтобы выбрать только номер версии выпуска MAJOR.MINOR.
Обратите внимание, что иногда файл version.txt относится к инсталляции CUDA, отличной от nvcc —version . В этом случае версия nvcc должна быть той версией, которую вы действительно используете.
Мы можем объединить эти три метода вместе, чтобы надежно получить версию CUDA следующим образом:
Эта переменная среды полезна для последующих установок, например, когда pip устанавливает копию pytorch, которая была скомпилирована для правильной версии CUDA.
Точно так же вы можете установить версию pytorch для процессора, когда CUDA не установлен.
Но будьте осторожны с этим, потому что вы можете случайно установить версию только для ЦП, когда хотели иметь поддержку графического процессора. Например, если вы запускаете сценарий установки на узле входа в систему сервера, который не имеет графических процессоров, хотя ваши задания будут развернуты на узлах, которые имеют графические процессоры. В этом случае на узле входа обычно не будет установлен CUDA.
Источник
Включение ядер NVIDIA CUDA в программах

Этап 1: Установка ПО
Перед тем как активировать вычислительные мощности ядер CUDA, необходимо установить специальное программное обеспечение от компании-производителя.
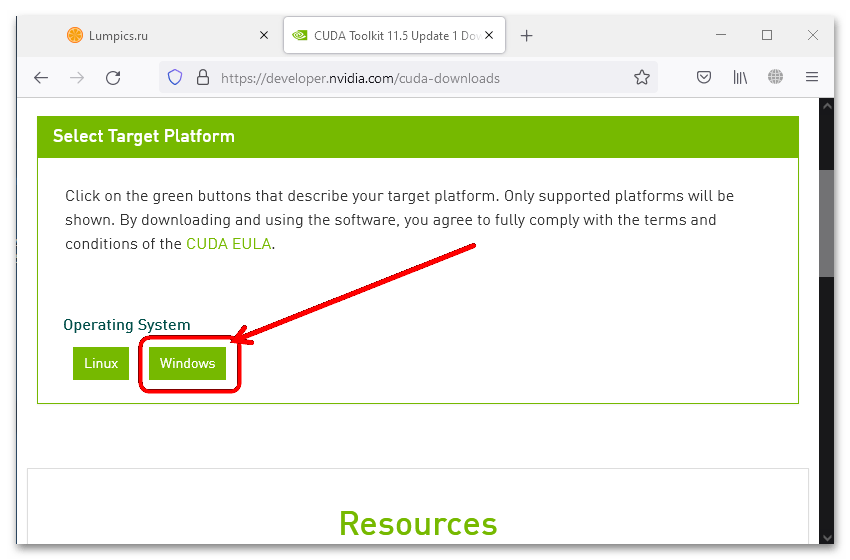
- Перейдя по предложенной выше ссылке, выберите операционную систему – «Windows» (наш пример) или «Linux».
На этом инсталляция средств работы с CUDA закончена.
Этап 2: Включение CUDA
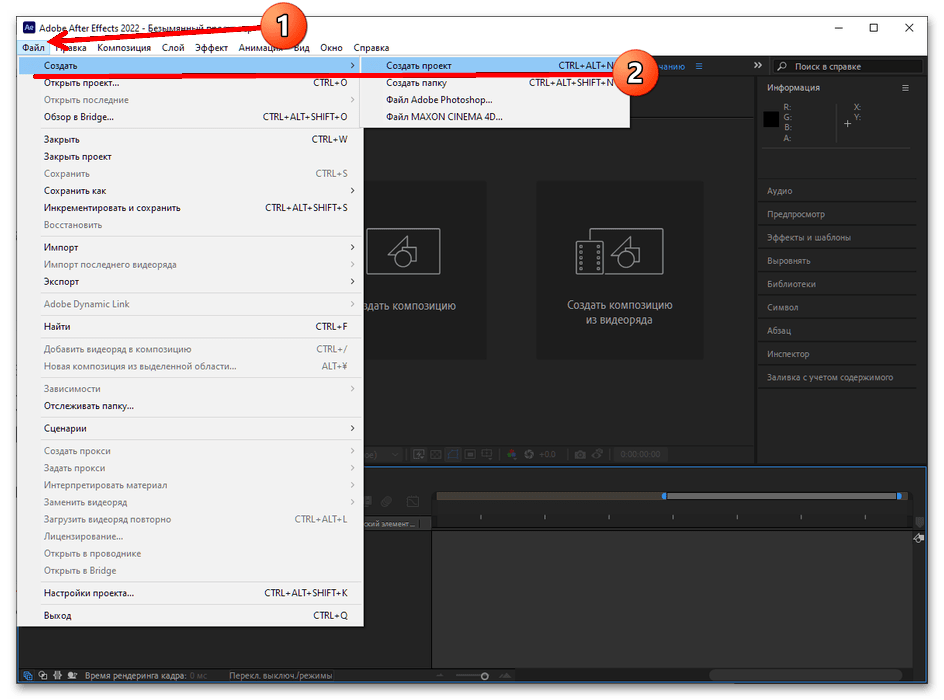
Включить рассматриваемую технологию разом для всех программ не получится – необходимо её выбирать либо перед началом работы, либо в процессе, либо перед непосредственно вычислением. Использование данного средства покажем на примере программы Adobe After Effects последней версии.
- Запустите Афтер Эффектс и выберите пункты «Файл» – «Создать» – «Создать проект».

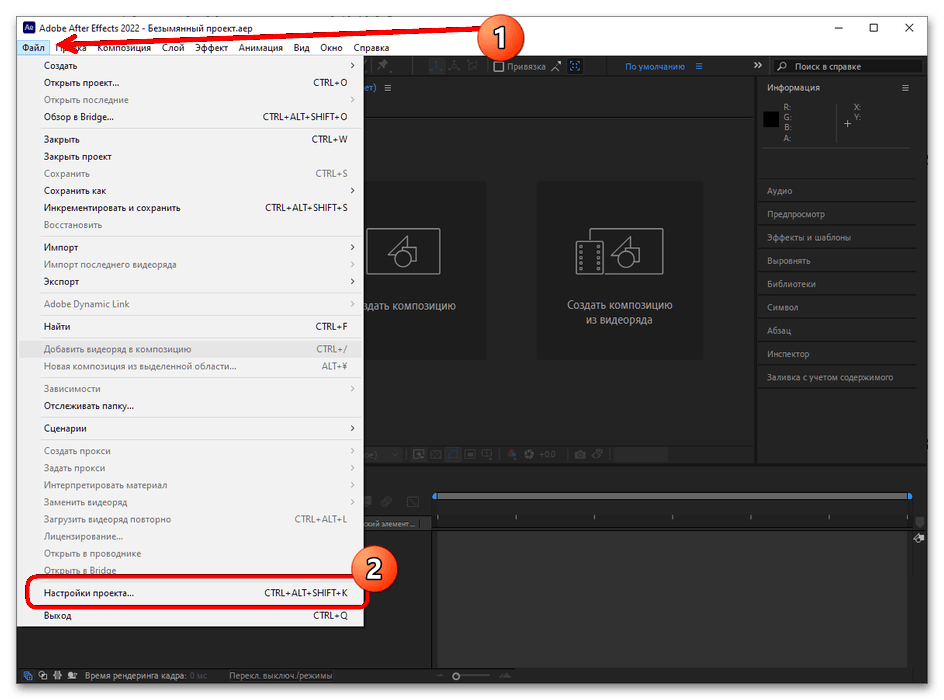
- После создания проекта снова воспользуйтесь элементом «Файл», только на этот раз укажите «Настройки проекта».
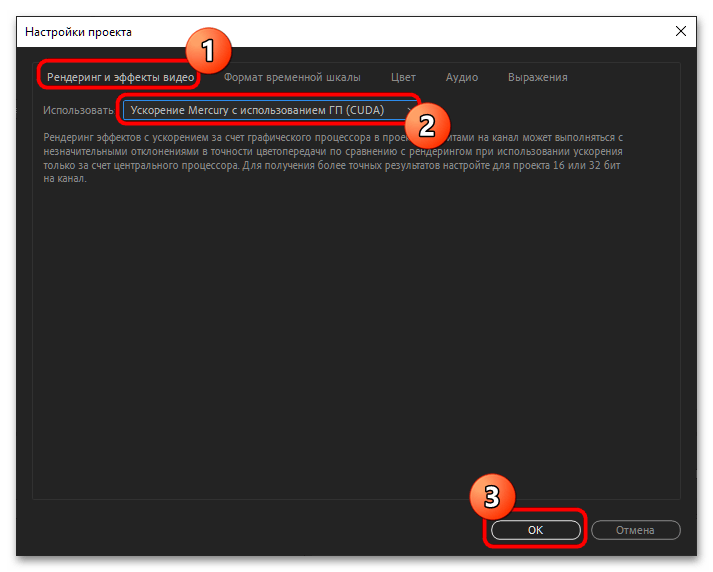
- На вкладке «Рендеринг и эффекты видео» в меню «Использовать» должен быть пункт «Ускорение Mercury с использованием ГП (CUDA)» – выберите его и нажмите «ОК».

В других приложениях данная технология активируется подобным образом.
Источник
1. IntroductionпѓЃ
CUDA В® is a parallel computing platform and programming model invented by NVIDIA. It enables dramatic increases in computing performance by harnessing the power of the graphics processing unit (GPU).
CUDA was developed with several design goals in mind:
Provide a small set of extensions to standard programming languages, like C, that enable a straightforward implementation of parallel algorithms. With CUDA C/C++, programmers can focus on the task of parallelization of the algorithms rather than spending time on their implementation.
Support heterogeneous computation where applications use both the CPU and GPU. Serial portions of applications are run on the CPU, and parallel portions are offloaded to the GPU. As such, CUDA can be incrementally applied to existing applications. The CPU and GPU are treated as separate devices that have their own memory spaces. This configuration also allows simultaneous computation on the CPU and GPU without contention for memory resources.
CUDA-capable GPUs have hundreds of cores that can collectively run thousands of computing threads. These cores have shared resources including a register file and a shared memory. The on-chip shared memory allows parallel tasks running on these cores to share data without sending it over the system memory bus.
This guide will show you how to install and check the correct operation of the CUDA development tools.
1.1. System RequirementsпѓЃ
To use CUDA on your system, you will need the following installed:
A CUDA-capable GPU
A supported version of Microsoft Windows
A supported version of Microsoft Visual Studio
The next two tables list the currently supported Windows operating systems and compilers.
Cross (x86_32 on x86_64)
Windows Server 2022
Windows Server 2019
Windows Server 2016
32-bit compilation native and cross-compilation is removed from CUDA 12.0 and later Toolkit. Use the CUDA Toolkit from earlier releases for 32-bit compilation. CUDA Driver will continue to support running existing 32-bit applications on existing GPUs except Hopper. Hopper does not support 32-bit applications. Ada will be the last architecture with driver support for 32-bit applications.
MSVC Version 193x
Visual Studio 2022 17.0
MSVC Version 192x
Visual Studio 2019 16.x
MSVC Version 191x
Visual Studio 2017 15.x (RTW and all updates)
* Support for Visual Studio 2015 is deprecated in release 11.1.
Support for running x86 32-bit applications on x86_64 Windows is limited to use with:
CUDA Runtime (cudart)
CUDA Math Library (math.h)
1.2. About This DocumentпѓЃ
This document is intended for readers familiar with Microsoft Windows operating systems and the Microsoft Visual Studio environment. You do not need previous experience with CUDA or experience with parallel computation.
Basic instructions can be found in the Quick Start Guide. Read on for more detailed instructions.
The setup of CUDA development tools on a system running the appropriate version of Windows consists of a few simple steps:
Verify the system has a CUDA-capable GPU.
Download the NVIDIA CUDA Toolkit.
Install the NVIDIA CUDA Toolkit.
Test that the installed software runs correctly and communicates with the hardware.
2.1. Verify You Have a CUDA-Capable GPUпѓЃ
You can verify that you have a CUDA-capable GPU through the Display Adapters section in the Windows Device Manager. Here you will find the vendor name and model of your graphics card(s). If you have an NVIDIA card that is listed in https://developer.nvidia.com/cuda-gpus, that GPU is CUDA-capable. The Release Notes for the CUDA Toolkit also contain a list of supported products.
The Windows Device Manager can be opened via the following steps:
Open a run window from the Start Menu
The NVIDIA CUDA Toolkit is available at https://developer.nvidia.com/cuda-downloads. Choose the platform you are using and one of the following installer formats:
Network Installer: A minimal installer which later downloads packages required for installation. Only the packages selected during the selection phase of the installer are downloaded. This installer is useful for users who want to minimize download time.
Full Installer: An installer which contains all the components of the CUDA Toolkit and does not require any further download. This installer is useful for systems which lack network access and for enterprise deployment.
The CUDA Toolkit installs the CUDA driver and tools needed to create, build and run a CUDA application as well as libraries, header files, and other resources.
Download Verification
The download can be verified by comparing the MD5 checksum posted at https://developer.download.nvidia.com/compute/cuda/12.0.0/docs/sidebar/md5sum.txt with that of the downloaded file. If either of the checksums differ, the downloaded file is corrupt and needs to be downloaded again.
2.3. Install the CUDA SoftwareпѓЃ
Before installing the toolkit, you should read the Release Notes, as they provide details on installation and software functionality.
The driver and toolkit must be installed for CUDA to function. If you have not installed a stand-alone driver, install the driver from the NVIDIA CUDA Toolkit.
The installation may fail if Windows Update starts after the installation has begun. Wait until Windows Update is complete and then try the installation again.
Graphical Installation
Install the CUDA Software by executing the CUDA installer and following the on-screen prompts.
Silent Installation
The installer can be executed in silent mode by executing the package with the -s flag. Additional parameters can be passed which will install specific subpackages instead of all packages. See the table below for a list of all the subpackage names.
Table 1. Windows Operating System Support in CUDA 12.0 пѓЃ Table 3. Possible Subpackage Names пѓЃ
Toolkit Subpackages (defaults to C:Program FilesNVIDIA GPU Computing ToolkitCUDAv12.0)
CUDA Profiler API.
CUDA Runtime libraries.
Extracts information from cubin files.
The CUDA Profiling Tools Interface for creating profiling and tracing tools that target CUDA applications.
The CUDA cu++ filt demangler tool.
Prebuilt demo applications using CUDA.
CUDA HTML and PDF documentation files including the CUDA C++ Programming Guide, CUDA C++ Best Practices Guide, CUDA library documentation, etc.
Extracts information from standalone cubin files.
NVML development libraries and headers.
Tool for collecting and viewing CUDA application profiling data from the command-line.
Prunes host object files and libraries to only contain device code for the specified targets.
NVRTC runtime libraries.
NVTX on Windows.
Compute Sanitizer API.
cuBLAS runtime libraries.
cuFFT runtime libraries.
cuRAND runtime libraries.
cuSOLVER runtime libraries.
cuSPARSE runtime libraries.
NPP runtime libraries.
Installs the Nsight Visual Studio Edition plugin in all VS.
Installs CUDA project wizard and builds customization files in VS.
Installs the CUDA_Occupancy_Calculator.xls tool.
The NVIDIA Display Driver. Required to run CUDA applications.
For example, to install only the compiler and driver components:
Use the -n option if you do not want to reboot automatically after install or uninstall, even if reboot is required.
Extracting and Inspecting the Files Manually
Sometimes it may be desirable to extract or inspect the installable files directly, such as in enterprise deployment, or to browse the files before installation. The full installation package can be extracted using a decompression tool which supports the LZMA compression method, such as 7-zip or WinZip.
Once extracted, the CUDA Toolkit files will be in the CUDAToolkit folder, and similarily for CUDA Visual Studio Integration. Within each directory is a .dll and .nvi file that can be ignored as they are not part of the installable files.
Accessing the files in this manner does not set up any environment settings, such as variables or Visual Studio integration. This is intended for enterprise-level deployment.
2.3.1. Uninstalling the CUDA SoftwareпѓЃ
All subpackages can be uninstalled through the Windows Control Panel by using the Programs and Features widget.
2.4. Using Conda to Install the CUDA SoftwareпѓЃ
This section describes the installation and configuration of CUDA when using the Conda installer. The Conda packages are available at https://anaconda.org/nvidia.
2.4.1. Conda OverviewпѓЃ
The Conda installation installs the CUDA Toolkit. The installation steps are listed below.
2.4.2. InstallationпѓЃ
To perform a basic install of all CUDA Toolkit components using Conda, run the following command:
2.4.3. UninstallationпѓЃ
To uninstall the CUDA Toolkit using Conda, run the following command:
2.4.4. Installing Previous CUDA ReleasesпѓЃ
All Conda packages released under a specific CUDA version are labeled with that release version. To install a previous version, include that label in the install command such as:
Some CUDA releases do not move to new versions of all installable components. When this is the case these components will be moved to the new label, and you may need to modify the install command to include both labels such as:
This example will install all packages released as part of CUDA 11.3.0.
2.5. Use a Suitable Driver ModelпѓЃ
On Windows 10 and later, the operating system provides two driver models under which the NVIDIA Driver may operate:
The WDDM driver model is used for display devices.
The Tesla Compute Cluster (TCC) mode of the NVIDIA Driver is available for non-display devices such as NVIDIA Tesla GPUs and the GeForce GTX Titan GPUs; it uses the Windows WDM driver model.
TCC is enabled by default on most recent NVIDIA Tesla GPUs. To check which driver mode is in use and/or to switch driver modes, use the nvidia-smi tool that is included with the NVIDIA Driver installation (see nvidia-smi -h for details).
Keep in mind that when TCC mode is enabled for a particular GPU, that GPU cannot be used as a display device.
NVIDIA GeForce GPUs (excluding GeForce GTX Titan GPUs) do not support TCC mode.
2.6. Verify the InstallationпѓЃ
Before continuing, it is important to verify that the CUDA toolkit can find and communicate correctly with the CUDA-capable hardware. To do this, you need to compile and run some of the included sample programs.
2.6.1. Running the Compiled ExamplesпѓЃ
The version of the CUDA Toolkit can be checked by running nvcc -V in a Command Prompt window. You can display a Command Prompt window by going to:
Start > All Programs > Accessories > Command Prompt
CUDA Samples are located in https://github.com/nvidia/cuda-samples. To use the samples, clone the project, build the samples, and run them using the instructions on the Github page.
To verify a correct configuration of the hardware and software, it is highly recommended that you build and run the deviceQuery sample program. The sample can be built using the provided VS solution files in the deviceQuery folder.
This assumes that you used the default installation directory structure. If CUDA is installed and configured correctly, the output should look similar to Figure 1.
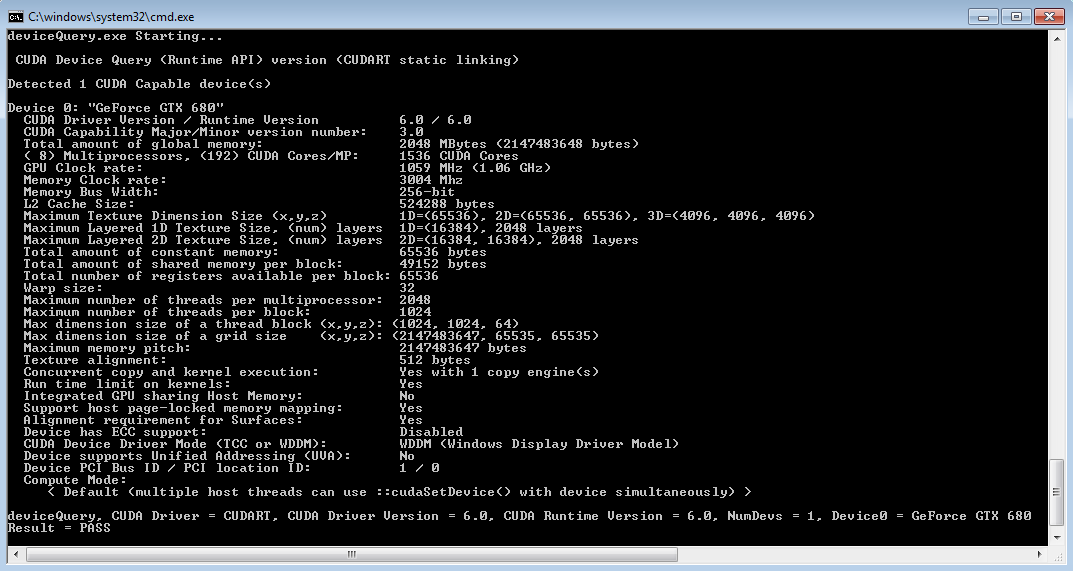
Figure 1. Valid Results from deviceQuery CUDA Sample пѓЃ
The exact appearance and the output lines might be different on your system. The important outcomes are that a device was found, that the device(s) match what is installed in your system, and that the test passed.
If a CUDA-capable device and the CUDA Driver are installed but deviceQuery reports that no CUDA-capable devices are present, ensure the deivce and driver are properly installed.
Running the bandwidthTest program, located in the same directory as deviceQuery above, ensures that the system and the CUDA-capable device are able to communicate correctly. The output should resemble Figure 2.
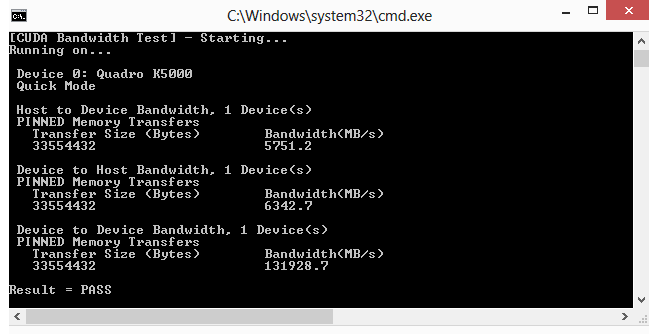
Figure 2. Valid Results from bandwidthTest CUDA Sample пѓЃ
The device name (second line) and the bandwidth numbers vary from system to system. The important items are the second line, which confirms a CUDA device was found, and the second-to-last line, which confirms that all necessary tests passed.
If the tests do not pass, make sure you do have a CUDA-capable NVIDIA GPU on your system and make sure it is properly installed.
To see a graphical representation of what CUDA can do, run the particles sample at
3. Pip WheelsпѓЃ
NVIDIA provides Python Wheels for installing CUDA through pip, primarily for using CUDA with Python. These packages are intended for runtime use and do not currently include developer tools (these can be installed separately).
Please note that with this installation method, CUDA installation environment is managed via pip and additional care must be taken to set up your host environment to use CUDA outside the pip environment.
Prerequisites
To install Wheels, you must first install the nvidia-pyindex package, which is required in order to set up your pip installation to fetch additional Python modules from the NVIDIA NGC PyPI repo. If your pip and setuptools Python modules are not up-to-date, then use the following command to upgrade these Python modules. If these Python modules are out-of-date then the commands which follow later in this section may fail.
You should now be able to install the nvidia-pyindex module.
If your project is using a requirements.txt file, then you can add the following line to your requirements.txt file as an alternative to installing the nvidia-pyindex package:
Procedure
Install the CUDA runtime package:
Optionally, install additional packages as listed below using the following command:
Metapackages
The following metapackages will install the latest version of the named component on Windows for the indicated CUDA version. “cu12” should be read as “cuda12”.
These metapackages install the following packages:
4. Compiling CUDA ProgramsпѓЃ
The project files in the CUDA Samples have been designed to provide simple, one-click builds of the programs that include all source code. To build the Windows projects (for release or debug mode), use the provided *.sln solution files for Microsoft Visual Studio 2015 (deprecated in CUDA 11.1), 2017, 2019, or 2022. You can use either the solution files located in each of the examples directories in
4.1. Compiling Sample ProjectsпѓЃ
The bandwidthTest project is a good sample project to build and run. It is located in https://github.com/NVIDIA/cuda-samples/tree/master/Samples/1_Utilities/bandwidthTest.
If you elected to use the default installation location, the output is placed in CUDA Samplesv12.0binwin64Release . Build the program using the appropriate solution file and run the executable. If all works correctly, the output should be similar to Figure 2.
4.2. Sample ProjectsпѓЃ
The sample projects come in two configurations: debug and release (where release contains no debugging information) and different Visual Studio projects.
A few of the example projects require some additional setup.
These sample projects also make use of the $CUDA_PATH environment variable to locate where the CUDA Toolkit and the associated .props files are.
The environment variable is set automatically using the Build Customization CUDA 12.0.props file, and is installed automatically as part of the CUDA Toolkit installation process.
CUDA 12.0 .props file Install Directory
Visual Studio 2015 (deprecated)
C:Program Files (x86)MSBuildMicrosoft.Cppv4.0V140BuildCustomizations
Visual Studio 2017
Visual Studio 2019
C:Program Files (x86)Microsoft Visual Studio2019ProfessionalMSBuildMicrosoftVCv160BuildCustomizations
Visual Studio 2022
C:Program FilesMicrosoft Visual Studio2022ProfessionalMSBuildMicrosoftVCv170BuildCustomizations
You can reference this CUDA 12.0.props file when building your own CUDA applications.
4.3. Build Customizations for New ProjectsпѓЃ
When creating a new CUDA application, the Visual Studio project file must be configured to include CUDA build customizations. To accomplish this, click File-> New | Project… NVIDIA-> CUDA->, then select a template for your CUDA Toolkit version. For example, selecting the “CUDA 12.0 Runtime” template will configure your project for use with the CUDA 12.0 Toolkit. The new project is technically a C++ project (.vcxproj) that is preconfigured to use NVIDIA’s Build Customizations. All standard capabilities of Visual Studio C++ projects will be available.
To specify a custom CUDA Toolkit location, under CUDA C/C++, select Common, and set the CUDA Toolkit Custom Dir field as desired. Note that the selected toolkit must match the version of the Build Customizations.
A supported version of MSVC must be installed to use this feature.
4.4. Build Customizations for Existing ProjectsпѓЃ
When adding CUDA acceleration to existing applications, the relevant Visual Studio project files must be updated to include CUDA build customizations. This can be done using one of the following two methods:
Open the Visual Studio project, right click on the project name, and select Build Dependencies > Build Customizations…, then select the CUDA Toolkit version you would like to target.
Alternatively, you can configure your project always to build with the most recently installed version of the CUDA Toolkit. First add a CUDA build customization to your project as above. Then, right click on the project name and select Properties. Under CUDA C/C++, select Common, and set the CUDA Toolkit Custom Dir field to $(CUDA_PATH) . Note that the $(CUDA_PATH) environment variable is set by the installer.
While Option 2 will allow your project to automatically use any new CUDA Toolkit version you may install in the future, selecting the toolkit version explicitly as in Option 1 is often better in practice, because if there are new CUDA configuration options added to the build customization rules accompanying the newer toolkit, you would not see those new options using Option 2.
If you use the $(CUDA_PATH) environment variable to target a version of the CUDA Toolkit for building, and you perform an installation or uninstallation of any version of the CUDA Toolkit, you should validate that the $(CUDA_PATH) environment variable points to the correct installation directory of the CUDA Toolkit for your purposes. You can access the value of the $(CUDA_PATH) environment variable via the following steps:
Open a run window from the Start Menu.
Select the Advanced tab at the top of the window.
Click Environment Variables at the bottom of the window.
Files which contain CUDA code must be marked as a CUDA C/C++ file. This can done when adding the file by right clicking the project you wish to add the file to, selecting Add New Item, selecting NVIDIA CUDA 12.0CodeCUDA C/C++ File, and then selecting the file you wish to add.
For advanced users, if you wish to try building your project against a newer CUDA Toolkit without making changes to any of your project files, go to the Visual Studio command prompt, change the current directory to the location of your project, and execute a command such as the following:
5. Additional ConsiderationsпѓЃ
Now that you have CUDA-capable hardware and the NVIDIA CUDA Toolkit installed, you can examine and enjoy the numerous included programs. To begin using CUDA to accelerate the performance of your own applications, consult the CUDAВ C Programming Guide, located in the CUDA Toolkit documentation directory.
A number of helpful development tools are included in the CUDA Toolkit or are available for download from the NVIDIA Developer Zone to assist you as you develop your CUDA programs, such as NVIDIA В® Nsightв„ў Visual Studio Edition, and NVIDIA Visual Profiler.
For technical support on programming questions, consult and participate in the developer forums at https://developer.nvidia.com/cuda/.
6. NoticesпѓЃ
6.1. NoticeпѓЃ
This document is provided for information purposes only and shall not be regarded as a warranty of a certain functionality, condition, or quality of a product. NVIDIA Corporation (“NVIDIA”) makes no representations or warranties, expressed or implied, as to the accuracy or completeness of the information contained in this document and assumes no responsibility for any errors contained herein. NVIDIA shall have no liability for the consequences or use of such information or for any infringement of patents or other rights of third parties that may result from its use. This document is not a commitment to develop, release, or deliver any Material (defined below), code, or functionality.
NVIDIA reserves the right to make corrections, modifications, enhancements, improvements, and any other changes to this document, at any time without notice.
Customer should obtain the latest relevant information before placing orders and should verify that such information is current and complete.
NVIDIA products are sold subject to the NVIDIA standard terms and conditions of sale supplied at the time of order acknowledgement, unless otherwise agreed in an individual sales agreement signed by authorized representatives of NVIDIA and customer (“Terms of Sale”). NVIDIA hereby expressly objects to applying any customer general terms and conditions with regards to the purchase of the NVIDIA product referenced in this document. No contractual obligations are formed either directly or indirectly by this document.
NVIDIA products are not designed, authorized, or warranted to be suitable for use in medical, military, aircraft, space, or life support equipment, nor in applications where failure or malfunction of the NVIDIA product can reasonably be expected to result in personal injury, death, or property or environmental damage. NVIDIA accepts no liability for inclusion and/or use of NVIDIA products in such equipment or applications and therefore such inclusion and/or use is at customer’s own risk.
NVIDIA makes no representation or warranty that products based on this document will be suitable for any specified use. Testing of all parameters of each product is not necessarily performed by NVIDIA. It is customer’s sole responsibility to evaluate and determine the applicability of any information contained in this document, ensure the product is suitable and fit for the application planned by customer, and perform the necessary testing for the application in order to avoid a default of the application or the product. Weaknesses in customer’s product designs may affect the quality and reliability of the NVIDIA product and may result in additional or different conditions and/or requirements beyond those contained in this document. NVIDIA accepts no liability related to any default, damage, costs, or problem which may be based on or attributable to: (i) the use of the NVIDIA product in any manner that is contrary to this document or (ii) customer product designs.
No license, either expressed or implied, is granted under any NVIDIA patent right, copyright, or other NVIDIA intellectual property right under this document. Information published by NVIDIA regarding third-party products or services does not constitute a license from NVIDIA to use such products or services or a warranty or endorsement thereof. Use of such information may require a license from a third party under the patents or other intellectual property rights of the third party, or a license from NVIDIA under the patents or other intellectual property rights of NVIDIA.
Reproduction of information in this document is permissible only if approved in advance by NVIDIA in writing, reproduced without alteration and in full compliance with all applicable export laws and regulations, and accompanied by all associated conditions, limitations, and notices.
THIS DOCUMENT AND ALL NVIDIA DESIGN SPECIFICATIONS, REFERENCE BOARDS, FILES, DRAWINGS, DIAGNOSTICS, LISTS, AND OTHER DOCUMENTS (TOGETHER AND SEPARATELY, “MATERIALS”) ARE BEING PROVIDED “AS IS.” NVIDIA MAKES NO WARRANTIES, EXPRESSED, IMPLIED, STATUTORY, OR OTHERWISE WITH RESPECT TO THE MATERIALS, AND EXPRESSLY DISCLAIMS ALL IMPLIED WARRANTIES OF NONINFRINGEMENT, MERCHANTABILITY, AND FITNESS FOR A PARTICULAR PURPOSE. TO THE EXTENT NOT PROHIBITED BY LAW, IN NO EVENT WILL NVIDIA BE LIABLE FOR ANY DAMAGES, INCLUDING WITHOUT LIMITATION ANY DIRECT, INDIRECT, SPECIAL, INCIDENTAL, PUNITIVE, OR CONSEQUENTIAL DAMAGES, HOWEVER CAUSED AND REGARDLESS OF THE THEORY OF LIABILITY, ARISING OUT OF ANY USE OF THIS DOCUMENT, EVEN IF NVIDIA HAS BEEN ADVISED OF THE POSSIBILITY OF SUCH DAMAGES. Notwithstanding any damages that customer might incur for any reason whatsoever, NVIDIA’s aggregate and cumulative liability towards customer for the products described herein shall be limited in accordance with the Terms of Sale for the product.
6.2. OpenCLпѓЃ
OpenCL is a trademark of Apple Inc. used under license to the Khronos Group Inc.
6.3. TrademarksпѓЃ
NVIDIA and the NVIDIA logo are trademarks or registered trademarks of NVIDIA Corporation in the U.S. and other countries. Other company and product names may be trademarks of the respective companies with which they are associated.
© Copyright 2009-2022, NVIDIA Corporation & Affiliates. All rights reserved. Last updated on Dec 08, 2022.
Источник
Adblock
detector
Table 4. CUDA Visual Studio .props locations пѓЃ
Содержание
- Как узнать версию cuda на видеокарте
- Узнаём версию драйверов
- Способ 1: GPU-Z
- Способ 2: Панель управления NVIDIA
- Способ 3: Системные средства
- Заключение
- Как получить версию cuda?
- 11 ответов:
Как узнать версию cuda на видеокарте
Своевременное обновление драйвера видеокарты — залог её оптимальной и качественной работы. Для того, чтобы узнать какая версия драйвера установлена на вашем компьютере (ноутбуке) и требуется ли его обновление, необходимо проделать несколько простых манипуляций. Предлагаем два варианта: первый подойдет только для пользователей видеокарт от NVIDIA, второй подойдет также и для тех, кто использует AMD (ATI) Radeon.
1. Кликаем правой кнопкой мыши в пустое место рабочего стола. В открывшемся окне выбираем пункт «Панель управления NVIDIA», как показано на рисунке.

В открывшейся панели управления в левом нижнем углу находим ссылку «Информация о системе», нажимаем её.

В новом окне мы видим всю информацию о нашей графической системе, и в самой первой строке находится версия установленного драйвера.

2. Для любителей поэкспериментировать предлагаем еще один простой способ. Он также подойдет для пользователей видеокарт от AMD (ATI) Radeon.
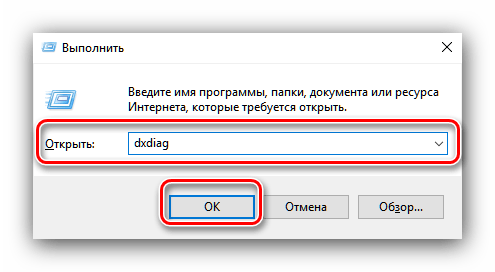
Комбинацией клавиш Win+R открываем меню «Выполнить». Вводим команду «dxdiag» и нажимаем «OK».

Перед нами откроется большое окно под названием «Средство диагностики DirectX». Здесь выбираем меню «Экран» и в правой колонке видим полную информацию о нашем драйвере.

Надеемся, мы помогли вам найти ответ на вопрос «как узнать версию драйвера видеокарты». Напомним, что вы всегда можете скачать последнюю версию драйверов для мобильных видеокарт на нашем сайте.

Для оптимальной производительности видеокарт от NVIDIA необходимо регулярно обновлять программное обеспечение. Перед выполнением данной процедуры желательно узнать версию драйверов, уже установленных на компьютере. Операция довольно простая.
Узнаём версию драйверов
Получить данные о версии установленного ПО для видеоадаптера от НВИДИА можно с помощью сторонних средств, приложения от производителя или задействованием системного инструментария.
Способ 1: GPU-Z
Разработчики утилиты CPU-Z выпускают также средство GPU-Z, которое показывает параметры установленной в компьютере графической карты, в том числе и сведения об установленных драйверах.
- Утилита поставляется в портативном виде – достаточно воспользоваться исполняемым файлом.

После запуска найдите в главном окне строку «Driver Version» – все нужные сведения о ПО видеоадаптера находятся там.
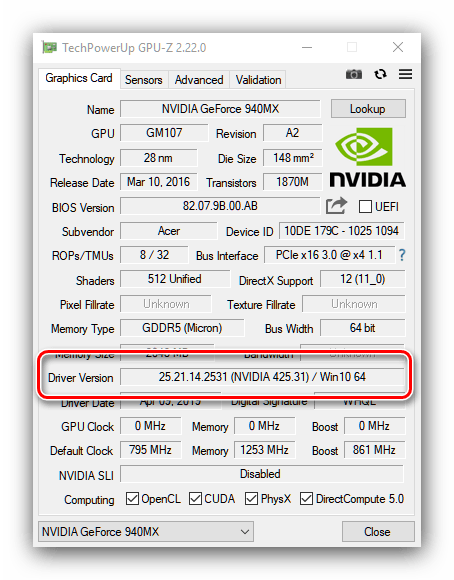
Первые 10 цифр представляют собой непосредственно версию драйверов, а цифры в скобках после надписи «NVIDIA» – релизный номер пакета.
Дату релиза драйвера можно узнать в поле «Driver Date».

Как видим, с помощью ГПУ-З получить требуемую информацию очень просто. Единственным недостатком этого решения, хотя и не самым критичным, является отсутствие русского языка.
Способ 2: Панель управления NVIDIA
В комплекте с драйверами для «зелёной» видеокарты обычно идёт панель управления драйверами – программное средство настройки тех или иных параметров GPU, с помощью которого также можно узнать версию установленного ПО.
- На «Рабочем столе» найдите пустое место, наведите на него курсор и кликните правой кнопкой мыши. Появится контекстное меню, в котором выберите пункт «Панель управления NVIDIA».
После запуска средства воспользуйтесь меню «Справка», в котором выберите пункт «Информация о системе».
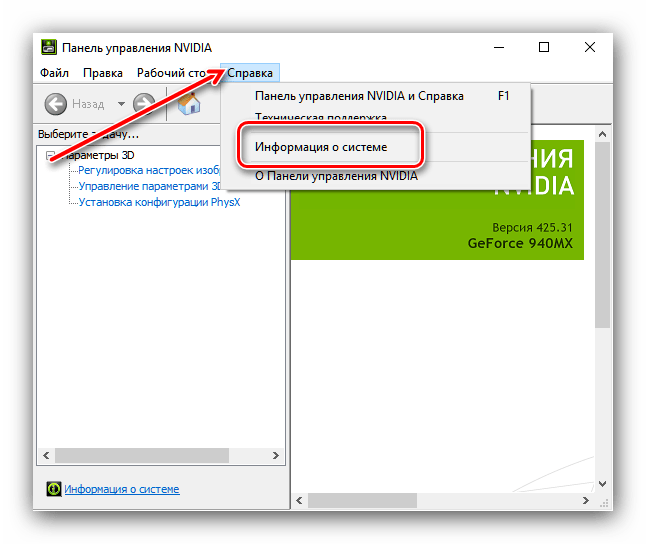
В окошке со сведениями найдите строки «Версия драйвера» и «Тип драйвера». В первой можно узнать точный номер версии, а во второй — вариант комплектации пакета ПО.
Способ 3: Системные средства
Требуемую информацию также можно получить из некоторых системных оснасток – средства диагностики DirectX, окна сведений о системе или «Диспетчера устройств».
Средство диагностики DirectX
Графическое API ДиректИкс зависит от аппаратных и программных характеристик видеокарты, поэтому всегда отображает версию установленных драйверов.
- Откройте инструмент «Выполнить» (клавиши Win+R), затем впишите в него команду dxdiag и нажмите «ОК».
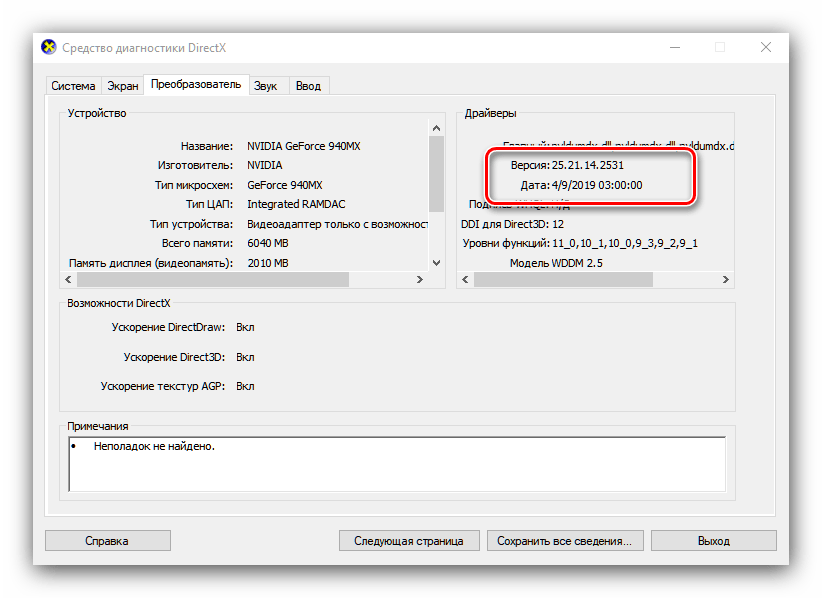
После запуска средства перейдите на вкладку «Экран» (компьютеры с CPU без встроенного видеоядра) или «Преобразователь» (ПК с вмонтированными в процессор GPU или ноутбуки с гибридными системами).
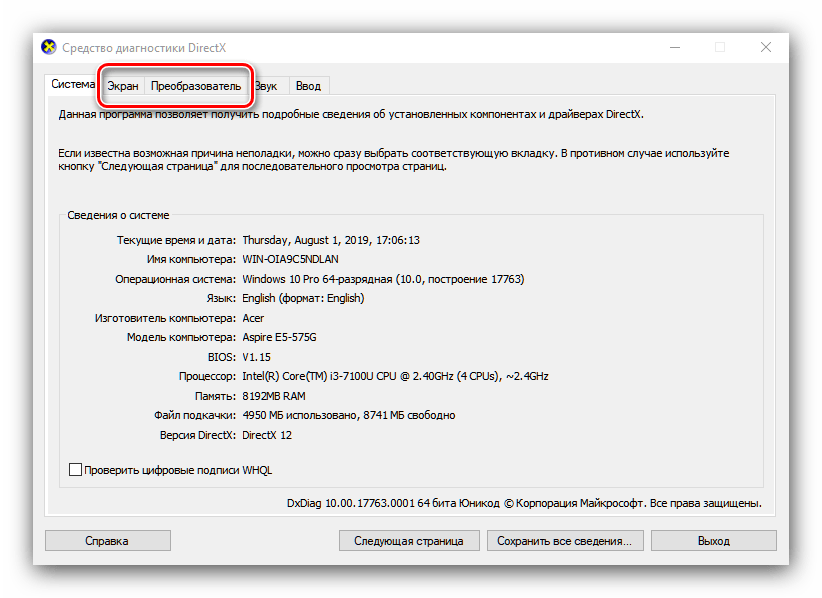
Найдите блок «Драйверы». Информация о номере пакета и дате его выпуска содержится в строках «Версия» и «Дата» соответственно.
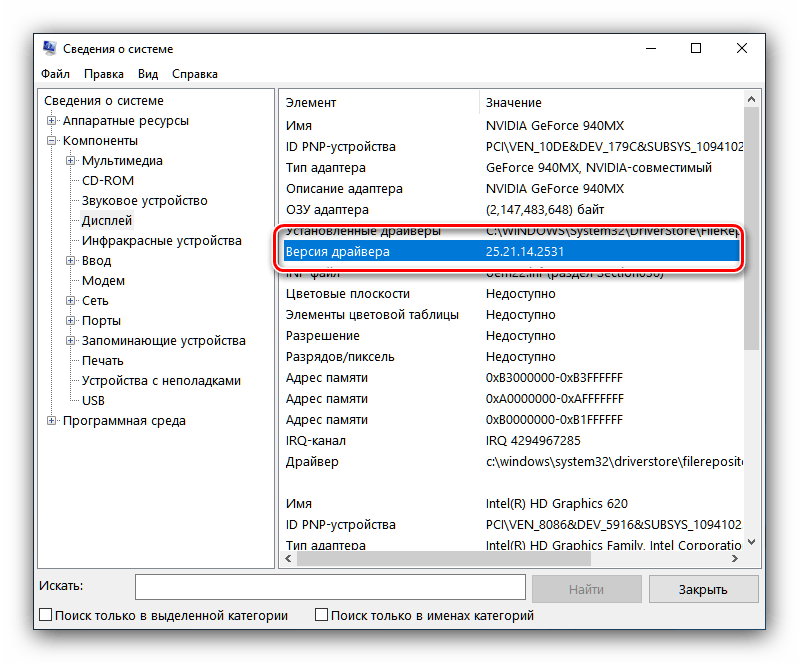
Сведения о системе
Во все актуальные версии Виндовс встроено средство отображения данных о системе, которое умеет также отображать версии присутствующих в системе драйверов, в том числе и для видеокарт. Им мы и воспользуемся.
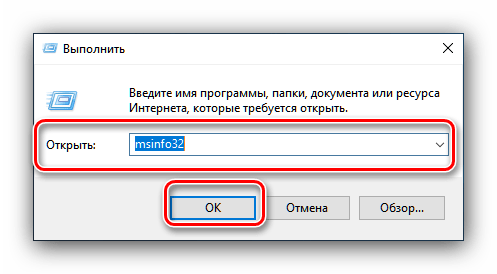
- Повторите первый шаг предыдущей инструкции, только сейчас прописывайте команду msinfo32 .
Откройте ветку «Компоненты» и выберите пункт «Дисплей».
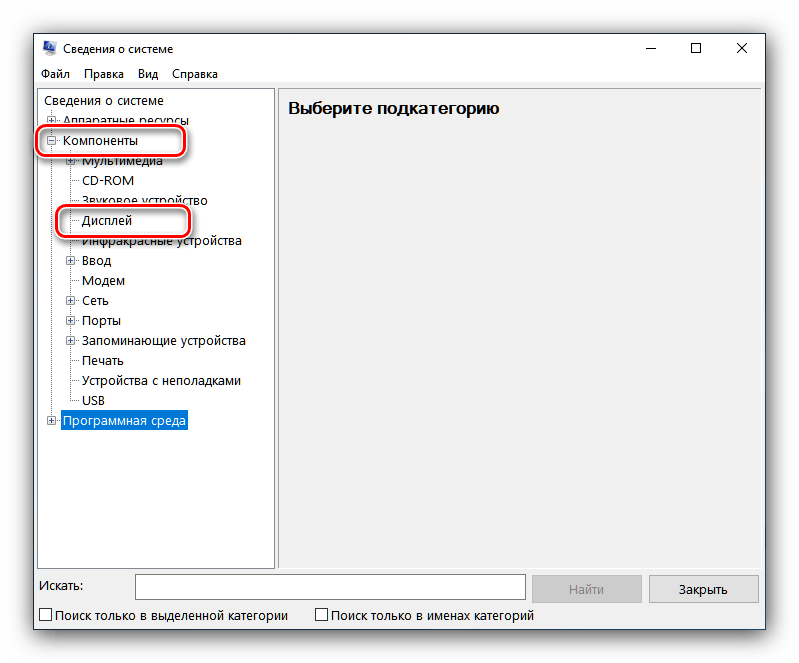
Найдите строку «Версия драйвера» – отображаемый в ней номер и есть версия установленных драйверов.
«Диспетчер устройств»
Также требуемую информацию можно получить в «Диспетчере устройств».
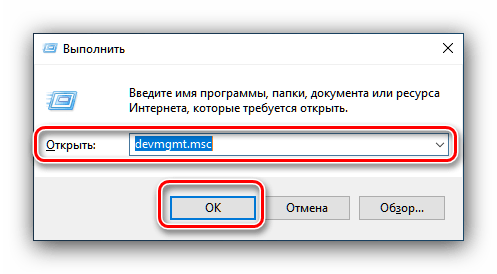
- Снова воспользуемся окном «Выполнить» — вводите код devmgmt.msc .
Найдите в списке оборудования раздел «Видеоадаптеры» и открывайте его. Далее выделите пункт, соответствующий вашей видеокарте NVIDIA, кликните по нему правой кнопкой мыши, и выберите вариант «Свойства».
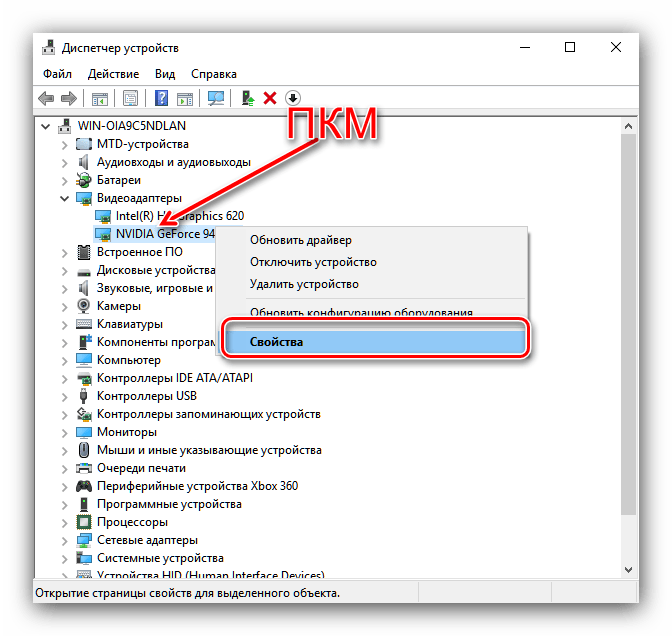
В «Свойствах» перейдите на вкладку «Драйвер». Позиция «Версия драйвера» укажет номер версии ПО, а «Дата разработки» – дату его релиза.

Все системные инструменты не отображают номер релиза драйверов, что можно назвать недостатком этого способа.
Заключение
Таким образом мы рассмотрели несколько вариантов получения сведений о версии драйверов для видеокарт NVIDIA. Как видим, более полную информацию можно получить либо сторонними средствами, либо через панель управления видеокартой.
Отблагодарите автора, поделитесь статьей в социальных сетях.
B: Могу ли я найти драйвер для более раннего продукта и где?
O: Да. Вы можете воспользоваться Опцией номер 2 для автоматического поиска драйвера для вашего продукта или выбрать “Предыдущие модели” в Типе продукта в Опции номер 1.
B: Где я могу найти более ранние или бета версии драйверов?
O: На главной странице закачки драйверов, выберите Бета версии и драйверы из архива в меню Дополнительное ПО и драйверы.
B: Как узнать, с какой версией драйвера я работаю?
O: Нажмите правую клавишу мыши на рабочем столе и выберите Панель управления NVIDIA. В меню Панели управления NVIDIA выберите Помощь > Информация о системе. Версия драйвера указана в верхней части окна Детали. Более продвинутые пользователи могут узнать версию драйвера из Мастера управления оборудованием Windows. Нажмите правую кнопку мыши на графическом устройстве во вкладке адаптеры дисплея и выберите Свойства. Выберите вкладку Драйвер и узнайте версию драйвера. Последние 5 цифр являются номером версии драйвера NVIDIA.
B: После того, как я нажал Согласен и Скачать, я должен выбрать Запустить или Сохранить?
O: Ваш выбор зависит от ваших предпочтений. Если вы хотите сохранить драйвер и использовать его позже или на другом ПК, то стоит выбрать Сохранить. Если вы хотите скачать и тут же начать использовать драйвер, то необходимо выбрать Запустить.
B: Нужно ли сперва удалить более ранний драйвер?
O: Нет. Ранее перед установкой следовало удалить предыдущий драйвер. Сегодня мы рекомендуем установку нового драйвера поверх более раннего. Это позволит вам управлять любыми текущими настройками и профилями Панели управления NVIDIA.
B: Я бы хотел вернуться к предыдущей версии драйвера. Как это сделать?
O: Если вы установили новый драйвер поверх старого, просто сделайте откат к более ранней версии драйвера. Инструкции вы найдете тут: Опция 2: Откат к предыдущему драйверу.
Как получить версию cuda?
есть ли быстрая команда или скрипт для проверки версии установленного CUDA?
Я нашел руководство 4.0 в каталоге установки, но не уверен, является ли фактическая установленная версия таковой или нет.
11 ответов:
как Джаред упоминает в комментарии, из командной строки:
дает версию компилятора CUDA (которая соответствует версии инструментария).
из кода приложения вы можете запросить версию API среды выполнения с помощью
или версия API драйвера с
как указывает Даниэль, deviceQuery-это пример приложения SDK, который запрашивает выше, а также возможности устройства.
как другие отмечают, вы также можете проверить содержание version.txt использование (например, на Mac или Linux)
однако, если установлена другая версия инструментария CUDA, отличная от той, которая связана с /usr/local/cuda , это может сообщить о неточной версии, если другая версия находится ранее в вашем PATH чем выше, так что используйте с осторожностью.
$ cat /usr/local/cuda/version.txt или $ cat /usr/local/cuda-8.0/version.txt
иногда папка называется «Cuda-version».
если ничего из вышеперечисленного не работает, попробуйте перейти $ /usr/local/ И найдите правильное имя вашей папки Cuda.
результат должен быть похож на: CUDA Version 8.0.61
Если вы установили CUDA SDK, вы можете запустить «deviceQuery», чтобы увидеть версию CUDA
вы можете найти CUDA-Z полезным, вот цитата с их сайта:
» эта программа родилась как пародия на другие Z-утилиты, такие как CPU-Z и GPU-Z. CUDA-Z показывает некоторую базовую информацию о графических процессорах с поддержкой CUDA и GPGPUs. Он работает с картами nVIDIA Geforce, Quadro и Tesla, чипсетами ION.»
на вкладке поддержка есть URL для исходного кода: http://sourceforge.net/p/cuda-z/code/ и загрузка на самом деле не установщик, а сам исполняемый файл (без установки, так что это «быстро»).
эта утилита предоставляет множество информации, и если вам нужно знать, как она была получена, есть источник посмотреть. Есть и другие утилиты, подобные этой, которые вы можете искать.
после установки CUDA можно проверить версии по: nvcc-V
Я установил как 5.0, так и 5.5, поэтому он дает
инструменты компиляции Cuda, выпуск 5.5, V5. 5,0
эта команда работает как для Windows, так и для Ubuntu.
кроме упомянутых выше, ваш путь установки CUDA (если он не был изменен во время установки) обычно содержит номер версии
делать which nvcc должны дать путь, и это даст вам версию
PS: Это быстрый и грязный способ, приведенные выше ответы более элегантны и приведут к правильной версии со значительными усилиями
сначала вы должны найти, где установлен Cuda.
Если это установка по умолчанию, такие как здесь расположение должно быть:
в этой папке должен быть файл
открыть этот файл в любом текстовом редакторе или выполнять:
можно узнать cuda версия, введя следующее в терминале:
кроме того, можно вручную проверьте версию, сначала выяснив каталог установки с помощью:
а то cd в этот каталог и проверьте версию CUDA.
Я получаю /usr / local — нет такого файла или каталога. Хотя nvcc -V дает
для версии cuDNN:
используйте следующее, чтобы найти путь для cuDNN:
затем используйте это, чтобы получить версию из файла заголовка,
используйте следующее, чтобы найти путь для cuDNN:
затем используйте это, чтобы сбросить версию из файла заголовка,
Completing the CAPTCHA proves you are a human and gives you temporary access to the web property.
What can I do to prevent this in the future?
If you are on a personal connection, like at home, you can run an anti-virus scan on your device to make sure it is not infected with malware.
If you are at an office or shared network, you can ask the network administrator to run a scan across the network looking for misconfigured or infected devices.
Another way to prevent getting this page in the future is to use Privacy Pass. You may need to download version 2.0 now from the Chrome Web Store.
Cloudflare Ray ID: 715e5ad8ef5a91cf • Your IP : 217.138.221.216 • Performance & security by Cloudflare
Русские Блоги
Как проверить версию CUDA, поддерживаемую Nvidia в Win10
Открыть настройки 
Введите панель управления в поиск и откройте панель управления

Щелкните параметр «Оборудование и звук», а затем выберите панель Nvidia. 
Нажмите Help на панели Nvidia и выберите System Information.

Выберите компонент, найдите «NVCUDA.DLL», вы увидите поддерживаемую версию CUDA.

Интеллектуальная рекомендация

Адаптивный дизайн сайта (6) -медиа запросы
Медиа-запросы Инструменты отладки После настройки стиля на ПК нам нужно адаптироваться к мобильному. Прежде всего, тип оборудования, которое мы выбираем, является не определенным видом оборудования, а.
Серия шаблонов дизайна 14-Singleton Pattern
Шаблон проектирования синглтон часто используется при разработке.Цель состоит в том, чтобы создать только один экземпляр класса в течение всего жизненного цикла программы, и до тех пор, пока программа.

Веб-проект развертывания Linux
Веб-проект развертывания Linux См. Статью по установке java, tomcat и mysql в проекте linux:Linux установить java, Tomcat, mysql 1. Используйте команду, чтобы выключить брандмауэр. 2. Упакуйте проект .

K8S-Server реализует простой выпуск в середине серого
K8S-Server реализует простой выпуск в середине серого Непосредственно на файл yaml Служба будет соответствовать значению сдерживания в POD через значение внутри селектора. Напишите разные файлы index.

Настройка среды установки ZenTao под mac
Как установить Zen Tao под Mac (два решения, два рекомендуемых решения) ВзглянемОфициальный сайт Дзен Таоописание Первый вариант Официальный сайт сообщает нам, что у нас есть среда Apache и php, а так.
Как получить версию cuda?
есть ли быстрая команда или скрипт для проверки версии установленного CUDA?
Я нашел руководство 4.0 в каталоге установки, но не уверен, является ли фактическая установленная версия такой или нет.
11 ответов
как упоминает Джаред в комментарии, из командной строки:
дает версию компилятора CUDA (которая соответствует версии toolkit).
из кода приложения вы можете запросить версию API среды выполнения с помощью
или версия API драйвера с
как указывает Даниэль, deviceQuery является образцом SDK приложение, которое запрашивает выше, наряду с возможностями устройства.
как отмечают другие, вы также можете проверить содержание version.txt использование (например, на Mac или Linux)
однако, если установлена другая версия инструментария CUDA, отличная от той, которая символически связана с /usr/local/cuda , это может сообщить о неточной версии, если другая версия ранее в вашем PATH чем выше, поэтому используйте с осторожностью.
На Ubuntu Cuda V8:
$ cat /usr/local/cuda/version.txt или $ cat /usr/local/cuda-8.0/version.txt
иногда папка называется «Cuda-version».
если ничего из вышеперечисленного не работает, попробуйте $ /usr/local/ И найдите правильное имя вашей папки Cuda.
результат должен быть похож на: CUDA Version 8.0.61
Если вы установили CUDA SDK, вы можете запустить «deviceQuery», чтобы увидеть версию CUDA
вы можете найти CUDA-Z полезным, вот цитата с их сайта:
» эта программа родилась как пародия на другие Z-утилиты, такие как CPU-Z и GPU-Z. CUDA-Z показывает некоторую базовую информацию о графических процессорах с поддержкой CUDA и GPGPUs. Он работает с картами nVIDIA Geforce, Quadro и Tesla, ионными чипсетами.»
на вкладке поддержка есть URL для исходного кода: http://sourceforge.net/p/cuda-z/code/ и загрузка на самом деле не является установщиком, а исполняемым файлом (без установки, поэтому это «быстро»).
эта утилита предоставляет множество информации, и если вам нужно знать, как она была получена, есть источник посмотреть. Есть другие утилиты, похожие на это, которые вы можете искать.
после установки CUDA можно проверить версии по: nvcc-V
Я установил как 5.0, так и 5.5, поэтому он дает
инструменты компиляции Cuda, выпуск 5.5, V5.5,0
эта команда работает как для Windows, так и для Ubuntu.
помимо упомянутых выше, ваш путь установки CUDA (если он не был изменен во время установки) обычно содержит номер версии
делать which nvcc должны дать путь, и это даст вам версию
PS: Это быстрый и грязный способ, вышеуказанные ответы более элегантны и приведут к правильной версии со значительными усилиями
сначала вы должны найти, где установлена Cuda.
Если это установка по умолчанию, такие как здесь расположение должно быть:
в этой папке должен быть файл
откройте этот файл с помощью любого текстового редактора или запустите:
можно узнать cuda версия, набрав в терминале следующее:
кроме того, можно вручную проверьте версию, сначала выяснив каталог установки с помощью:
а то cd в этот каталог и проверьте версию CUDA.
Я получаю /usr / local — нет такого файла или каталога. Хотя nvcc -V дает
Here you will learn how to check NVIDIA CUDA version in 3 ways: nvcc from CUDA toolkit, nvidia-smi from NVIDIA driver, and simply checking a file. Using one of these methods, you will be able to see the CUDA version regardless the software you are using, such as PyTorch, TensorFlow, conda (Miniconda/Anaconda) or inside docker.
Prerequisite
You should have NVIDIA driver installed on your system, as well as Nvidia CUDA toolkit, aka, CUDA, before we start. If you haven’t, you can install it by running sudo apt install nvidia-cuda-toolkit.
What is CUDA?
CUDA is a general parallel computing architecture and programming model developed by NVIDIA for its graphics cards (GPUs). Using CUDA, PyTorch or TensorFlow developers will dramatically increase the performance of PyTorch or TensorFlow training models, utilizing GPU resources effectively.
In GPU-accelerated technology, the sequential portion of the task runs on the CPU for optimized single-threaded performance, while the computed-intensive segment, like PyTorch technology, runs parallel via CUDA at thousands of GPU cores. When using CUDA, developers can write a few basic keywords in common languages such as C, C++ , Python, and implement parallelism.
Method 1 — Use nvcc to check CUDA version
If you have installed the cuda-toolkit software either from the official Ubuntu repositories via sudo apt install nvidia-cuda-toolkit, or by downloading and installing it manually from the official NVIDIA website, you will have nvcc in your path (try echo $PATH) and its location will be /usr/bin/nvcc (by running which nvcc).

To check CUDA version with nvcc, run
nvcc --versionYou can see similar output in the screenshot below. The last line shows you version of CUDA. The version here is 10.1. Yours may vary, and can be either 10.0, 10.1, 10.2 or even older versions such as 9.0, 9.1 and 9.2. After the screenshot you will find the full text output too.

vh@varhowto-com:~$ nvcc --version
nvcc: NVIDIA (R) Cuda compiler driver
Copyright (c) 2005-2019 NVIDIA Corporation
Built on Sun_Jul_28_19:07:16_PDT_2019
Cuda compilation tools, release 10.1, V10.1.243
What is nvcc?
nvcc is the NVIDIA CUDA Compiler, thus the name. It is the key wrapper for the CUDA compiler suite. For other usage of nvcc, you can use it to compile and link both host and GPU code.
Check out nvcc‘s manpage for more information.
Method 2 — Check CUDA version by nvidia-smi from NVIDIA Linux driver
The second way to check CUDA version is to run nvidia-smi, which comes from downloading the NVIDIA driver, specifically the NVIDIA-utils package. You can install either Nvidia driver from the official repositories of Ubuntu, or from the NVIDIA website.

$ which nvidia-smi
/usr/bin/nvidia-smi
$ dpkg -S /usr/bin/nvidia-smi
nvidia-utils-440: /usr/bin/nvidia-smi
To check CUDA version with nvidia-smi, directly run
nvidia-smiYou can see similar output in the screenshot below. The version is at the top right of the output. Here’s my version is CUDA 10.2. You may have 10.0, 10.1 or even the older version 9.0 or 9.1 or 9.2 installed.
Importantly, except for CUDA version. There are more details in the nvidia-smi output, driver version (440.100), GPU name, GPU fan percentage, power consumption/capability, memory usage, can also be found here. You can also find the processes which use the GPU at the moment. This is helpful if you want to see if your model or system is using GPU such as PyTorch or TensorFlow.

Here is the full text output:
vh@varhowto-com:~$ nvidia-smi
Tue Jul 07 10:07:26 2020
+-----------------------------------------------------------------------------+
| NVIDIA-SMI 440.100 Driver Version: 440.100 CUDA Version: 10.2 |
|-------------------------------+----------------------+----------------------+
| GPU Name Persistence-M| Bus-Id Disp.A | Volatile Uncorr. ECC |
| Fan Temp Perf Pwr:Usage/Cap| Memory-Usage | GPU-Util Compute M. |
|===============================+======================+======================|
| 0 GeForce GTX 1070 Off | 00000000:01:00.0 On | N/A |
| 31% 48C P0 35W / 151W | 2807MiB / 8116MiB | 1% Default |
+-------------------------------+----------------------+----------------------+
+-----------------------------------------------------------------------------+
| Processes: GPU Memory |
| GPU PID Type Process name Usage |
|=============================================================================|
| 0 1582 G /usr/lib/xorg/Xorg 262MiB |
| 0 2481 G /usr/lib/xorg/Xorg 1646MiB |
| 0 2686 G /usr/bin/gnome-shell 563MiB |
| 0 3244 G …AAAAAAAAAAAACAAAAAAAAAA= --shared-files 319MiB |
+-----------------------------------------------------------------------------+
What is nvidia-smi?
nvidia-smi (NVSMI) is NVIDIA System Management Interface program. It is also known as NVSMI. nvidia-smi provides monitoring and maintenance capabilities for all of tje Fermi’s Tesla, Quadro, GRID and GeForce NVIDIA GPUs and higher architecture families. For most functions, GeForce Titan Series products are supported with only little detail given for the rest of the Geforce range.
NVSMI is also a cross-platform application that supports both common NVIDIA driver-supported Linux distros and 64-bit versions of Windows starting with Windows Server 2008 R2. Metrics may be used directly by users via stdout, or stored via CSV and XML formats for scripting purposes.
For more information, check out the man page of nvidia-smi.
Method 3 — cat /usr/local/cuda/version.txt
cat /usr/local/cuda/version.txtNote that if you install Nvidia driver and CUDA from Ubuntu 20.04’s own official repository this approach may not work.

Time Needed : 5 minutes
There are basically three ways to check CUDA version. One must work if not the other.
- Perhaps the easiest way to check a file
Run
cat /usr/local/cuda/version.txtNote: this may not work on Ubuntu 20.04
- Another method is through the
cuda-toolkitpackage commandnvcc.Simple run
nvcc --version. The cuda version is in the last line of the output. - The other way is from the NVIDIA driver’s
nvidia-smicommand you have installed.Simply run
nvidia-smi. The version is in the header of the table printed.


Here you will learn how to check NVIDIA CUDA version in 3 ways: nvcc from CUDA toolkit, nvidia-smi from NVIDIA driver, and simply checking a file. Using one of these methods, you will be able to see the CUDA version regardless the software you are using, such as PyTorch, TensorFlow, conda (Miniconda/Anaconda) or inside docker.
Prerequisite
You should have NVIDIA driver installed on your system, as well as Nvidia CUDA toolkit, aka, CUDA, before we start. If you haven’t, you can install it by running sudo apt install nvidia-cuda-toolkit.
What is CUDA?
CUDA is a general parallel computing architecture and programming model developed by NVIDIA for its graphics cards (GPUs). Using CUDA, PyTorch or TensorFlow developers will dramatically increase the performance of PyTorch or TensorFlow training models, utilizing GPU resources effectively.
In GPU-accelerated technology, the sequential portion of the task runs on the CPU for optimized single-threaded performance, while the computed-intensive segment, like PyTorch technology, runs parallel via CUDA at thousands of GPU cores. When using CUDA, developers can write a few basic keywords in common languages such as C, C++ , Python, and implement parallelism.
Method 1 — Use nvcc to check CUDA version
If you have installed the cuda-toolkit software either from the official Ubuntu repositories via sudo apt install nvidia-cuda-toolkit, or by downloading and installing it manually from the official NVIDIA website, you will have nvcc in your path (try echo $PATH) and its location will be /usr/bin/nvcc (by running which nvcc).
To check CUDA version with nvcc, run
nvcc --versionYou can see similar output in the screenshot below. The last line shows you version of CUDA. The version here is 10.1. Yours may vary, and can be either 10.0, 10.1, 10.2 or even older versions such as 9.0, 9.1 and 9.2. After the screenshot you will find the full text output too.
vh@varhowto-com:~$ nvcc --version
nvcc: NVIDIA (R) Cuda compiler driver
Copyright (c) 2005-2019 NVIDIA Corporation
Built on Sun_Jul_28_19:07:16_PDT_2019
Cuda compilation tools, release 10.1, V10.1.243
What is nvcc?
nvcc is the NVIDIA CUDA Compiler, thus the name. It is the key wrapper for the CUDA compiler suite. For other usage of nvcc, you can use it to compile and link both host and GPU code.
Check out nvcc‘s manpage for more information.
Method 2 — Check CUDA version by nvidia-smi from NVIDIA Linux driver
The second way to check CUDA version is to run nvidia-smi, which comes from downloading the NVIDIA driver, specifically the NVIDIA-utils package. You can install either Nvidia driver from the official repositories of Ubuntu, or from the NVIDIA website.
$ which nvidia-smi
/usr/bin/nvidia-smi
$ dpkg -S /usr/bin/nvidia-smi
nvidia-utils-440: /usr/bin/nvidia-smi
To check CUDA version with nvidia-smi, directly run
nvidia-smiYou can see similar output in the screenshot below. The version is at the top right of the output. Here’s my version is CUDA 10.2. You may have 10.0, 10.1 or even the older version 9.0 or 9.1 or 9.2 installed.
Importantly, except for CUDA version. There are more details in the nvidia-smi output, driver version (440.100), GPU name, GPU fan percentage, power consumption/capability, memory usage, can also be found here. You can also find the processes which use the GPU at the moment. This is helpful if you want to see if your model or system is using GPU such as PyTorch or TensorFlow.
Here is the full text output:
vh@varhowto-com:~$ nvidia-smi
Tue Jul 07 10:07:26 2020
+-----------------------------------------------------------------------------+
| NVIDIA-SMI 440.100 Driver Version: 440.100 CUDA Version: 10.2 |
|-------------------------------+----------------------+----------------------+
| GPU Name Persistence-M| Bus-Id Disp.A | Volatile Uncorr. ECC |
| Fan Temp Perf Pwr:Usage/Cap| Memory-Usage | GPU-Util Compute M. |
|===============================+======================+======================|
| 0 GeForce GTX 1070 Off | 00000000:01:00.0 On | N/A |
| 31% 48C P0 35W / 151W | 2807MiB / 8116MiB | 1% Default |
+-------------------------------+----------------------+----------------------+
+-----------------------------------------------------------------------------+
| Processes: GPU Memory |
| GPU PID Type Process name Usage |
|=============================================================================|
| 0 1582 G /usr/lib/xorg/Xorg 262MiB |
| 0 2481 G /usr/lib/xorg/Xorg 1646MiB |
| 0 2686 G /usr/bin/gnome-shell 563MiB |
| 0 3244 G …AAAAAAAAAAAACAAAAAAAAAA= --shared-files 319MiB |
+-----------------------------------------------------------------------------+
What is nvidia-smi?
nvidia-smi (NVSMI) is NVIDIA System Management Interface program. It is also known as NVSMI. nvidia-smi provides monitoring and maintenance capabilities for all of tje Fermi’s Tesla, Quadro, GRID and GeForce NVIDIA GPUs and higher architecture families. For most functions, GeForce Titan Series products are supported with only little detail given for the rest of the Geforce range.
NVSMI is also a cross-platform application that supports both common NVIDIA driver-supported Linux distros and 64-bit versions of Windows starting with Windows Server 2008 R2. Metrics may be used directly by users via stdout, or stored via CSV and XML formats for scripting purposes.
For more information, check out the man page of nvidia-smi.
Method 3 — cat /usr/local/cuda/version.txt
cat /usr/local/cuda/version.txtNote that if you install Nvidia driver and CUDA from Ubuntu 20.04’s own official repository this approach may not work.
Time Needed : 5 minutes
There are basically three ways to check CUDA version. One must work if not the other.
- Perhaps the easiest way to check a file
Run
cat /usr/local/cuda/version.txtNote: this may not work on Ubuntu 20.04
- Another method is through the
cuda-toolkitpackage commandnvcc.Simple run
nvcc --version. The cuda version is in the last line of the output. - The other way is from the NVIDIA driver’s
nvidia-smicommand you have installed.Simply run
nvidia-smi. The version is in the header of the table printed.
Содержание
- How to Check CUDA Version Easily
- Prerequisite
- What is CUDA?
- Method 1 — Use nvcc to check CUDA version
- What is nvcc?
- Method 2 — Check CUDA version by nvidia-smi from NVIDIA Linux driver
- What is nvidia-smi?
- Method 3 — cat /usr/local/cuda/version.txt
- 3 ways to check CUDA version
- Как получить версию cuda?
- 11 ответов
- Check cuda version windows
- 1. Introduction
- 1.1. System Requirements
- 1.2. x86 32-bit Support
- 1.3. About This Document
- 2. Installing CUDA Development Tools
- 2.1. Verify You Have a CUDA-Capable GPU
- 2.2. Download the NVIDIA CUDA Toolkit
- Download Verification
- 2.3. Install the CUDA Software
- Graphical Installation
- Silent Installation
- Extracting and Inspecting the Files Manually
- 2.3.1. Uninstalling the CUDA Software
- 2.4. Using Conda to Install the CUDA Software
- 2.4.1. Conda Overview
- 2.4.2. Installation
- 2.4.3. Uninstallation
- 2.5. Use a Suitable Driver Model
- 2.6. Verify the Installation
- 2.6.1. Running the Compiled Examples
- 3. Pip Wheels
- 4. Compiling CUDA Programs
- 4.1. Compiling Sample Projects
- 4.2. Sample Projects
- 4.3. Build Customizations for New Projects
- 4.4. Build Customizations for Existing Projects
- 5. Additional Considerations
- Notices
- Notice
How to Check CUDA Version Easily

Here you will learn how to check NVIDIA CUDA version in 3 ways: nvcc from CUDA toolkit, nvidia-smi from NVIDIA driver, and simply checking a file. Using one of these methods, you will be able to see the CUDA version regardless the software you are using, such as PyTorch, TensorFlow, conda (Miniconda/Anaconda) or inside docker.
» class=»wp_ulike_btn wp_ulike_put_image wp_post_btn_2895″>
Prerequisite
What is CUDA?
CUDA is a general parallel computing architecture and programming model developed by NVIDIA for its graphics cards (GPUs). Using CUDA, PyTorch or TensorFlow developers will dramatically increase the performance of PyTorch or TensorFlow training models, utilizing GPU resources effectively.
Method 1 — Use nvcc to check CUDA version

To check CUDA version with nvcc, run
You can see similar output in the screenshot below. The last line shows you version of CUDA. The version here is 10.1. Yours may vary, and can be either 10.0, 10.1, 10.2 or even older versions such as 9.0, 9.1 and 9.2. After the screenshot you will find the full text output too.

What is nvcc?
Check out nvcc ‘s manpage for more information.
Method 2 — Check CUDA version by nvidia-smi from NVIDIA Linux driver
The second way to check CUDA version is to run nvidia-smi, which comes from downloading the NVIDIA driver, specifically the NVIDIA-utils package. You can install either Nvidia driver from the official repositories of Ubuntu, or from the NVIDIA website.

You can see similar output in the screenshot below. The version is at the top right of the output. Here’s my version is CUDA 10.2. You may have 10.0, 10.1 or even the older version 9.0 or 9.1 or 9.2 installed.
Importantly, except for CUDA version. There are more details in the nvidia-smi output, driver version (440.100), GPU name, GPU fan percentage, power consumption/capability, memory usage, can also be found here. You can also find the processes which use the GPU at the moment. This is helpful if you want to see if your model or system is using GPU such as PyTorch or TensorFlow.

Here is the full text output:
What is nvidia-smi?
nvidia-smi (NVSMI) is NVIDIA System Management Interface program. It is also known as NVSMI. nvidia-smi provides monitoring and maintenance capabilities for all of tje Fermi’s Tesla, Quadro, GRID and GeForce NVIDIA GPUs and higher architecture families. For most functions, GeForce Titan Series products are supported with only little detail given for the rest of the Geforce range.
NVSMI is also a cross-platform application that supports both common NVIDIA driver-supported Linux distros and 64-bit versions of Windows starting with Windows Server 2008 R2. Metrics may be used directly by users via stdout, or stored via CSV and XML formats for scripting purposes.
Method 3 — cat /usr/local/cuda/version.txt
Note that if you install Nvidia driver and CUDA from Ubuntu 20.04’s own official repository this approach may not work.

3 ways to check CUDA version
Time Needed : 5 minutes
There are basically three ways to check CUDA version. One must work if not the other.
Run cat /usr/local/cuda/version.txt
Note: this may not work on Ubuntu 20.04
Источник
Как получить версию cuda?
есть ли быстрая команда или скрипт для проверки версии установленного CUDA?
Я нашел руководство 4.0 в каталоге установки, но не уверен, является ли фактическая установленная версия такой или нет.
11 ответов
как упоминает Джаред в комментарии, из командной строки:
дает версию компилятора CUDA (которая соответствует версии toolkit).
из кода приложения вы можете запросить версию API среды выполнения с помощью
или версия API драйвера с
как указывает Даниэль, deviceQuery является образцом SDK приложение, которое запрашивает выше, наряду с возможностями устройства.
как отмечают другие, вы также можете проверить содержание version.txt использование (например, на Mac или Linux)
иногда папка называется «Cuda-version».
результат должен быть похож на: CUDA Version 8.0.61
Если вы установили CUDA SDK, вы можете запустить «deviceQuery», чтобы увидеть версию CUDA
вы можете найти CUDA-Z полезным, вот цитата с их сайта:
» эта программа родилась как пародия на другие Z-утилиты, такие как CPU-Z и GPU-Z. CUDA-Z показывает некоторую базовую информацию о графических процессорах с поддержкой CUDA и GPGPUs. Он работает с картами nVIDIA Geforce, Quadro и Tesla, ионными чипсетами.»
на вкладке поддержка есть URL для исходного кода: http://sourceforge.net/p/cuda-z/code/ и загрузка на самом деле не является установщиком, а исполняемым файлом (без установки, поэтому это «быстро»).
эта утилита предоставляет множество информации, и если вам нужно знать, как она была получена, есть источник посмотреть. Есть другие утилиты, похожие на это, которые вы можете искать.
после установки CUDA можно проверить версии по: nvcc-V
Я установил как 5.0, так и 5.5, поэтому он дает
инструменты компиляции Cuda, выпуск 5.5, V5.5,0
эта команда работает как для Windows, так и для Ubuntu.
помимо упомянутых выше, ваш путь установки CUDA (если он не был изменен во время установки) обычно содержит номер версии
делать which nvcc должны дать путь, и это даст вам версию
PS: Это быстрый и грязный способ, вышеуказанные ответы более элегантны и приведут к правильной версии со значительными усилиями
сначала вы должны найти, где установлена Cuda.
Если это установка по умолчанию, такие как здесь расположение должно быть:
в этой папке должен быть файл
откройте этот файл с помощью любого текстового редактора или запустите:
можно узнать cuda версия, набрав в терминале следующее:
кроме того, можно вручную проверьте версию, сначала выяснив каталог установки с помощью:
а то cd в этот каталог и проверьте версию CUDA.
для версии CUDA:
для версии cuDNN:
используйте следующее, чтобы найти путь для cuDNN:
затем используйте это, чтобы получить версию из файла заголовка,
используйте следующее, чтобы найти путь для cuDNN:
затем используйте это, чтобы сбросить версию из файла заголовка,
Источник
Check cuda version windows
The installation instructions for the CUDA Toolkit on MS-Windows systems.
1. Introduction
CUDA В® is a parallel computing platform and programming model invented by NVIDIA. It enables dramatic increases in computing performance by harnessing the power of the graphics processing unit (GPU).
This guide will show you how to install and check the correct operation of the CUDA development tools.
1.1. System Requirements
The next two tables list the currently supported Windows operating systems and compilers.
Table 1. Windows Operating System Support in CUDA 11.4
| Operating System | Native x86_64 | Cross (x86_32 on x86_64) |
|---|---|---|
| Windows 10 | YES | NO |
| Windows Server 2022 | YES | NO |
| Windows Server 2019 | YES | NO |
| Windows Server 2016 | YES | NO |
Table 2. Windows Compiler Support in CUDA 11.4
| Compiler* | IDE | Native x86_64 | Cross (x86_32 on x86_64) |
|---|---|---|---|
| MSVC Version 192x | Visual Studio 2019 16.x | YES | YES |
| MSVC Version 191x | Visual Studio 2017 15.x (RTW and all updates) | YES | YES |
* Support for Visual Studio 2015 is deprecated in release 11.1.
x86_32 support is limited. See the x86 32-bit Support section for details.
For more information on MSVC versions, Visual Studio product versions, visit https://dev.to/yumetodo/list-of-mscver-and-mscfullver-8nd.
1.2. x86 32-bit Support
Native development using the CUDA Toolkit on x86_32 is unsupported. Deployment and execution of CUDA applications on x86_32 is still supported, but is limited to use with GeForce GPUs. To create 32-bit CUDA applications, use the cross-development capabilities of the CUDA Toolkit on x86_64.
1.3. About This Document
This document is intended for readers familiar with Microsoft Windows operating systems and the Microsoft Visual Studio environment. You do not need previous experience with CUDA or experience with parallel computation.
Basic instructions can be found in the Quick Start Guide. Read on for more detailed instructions.
2.1. Verify You Have a CUDA-Capable GPU
You can verify that you have a CUDA-capable GPU through the Display Adapters section in the Windows Device Manager. Here you will find the vendor name and model of your graphics card(s). If you have an NVIDIA card that is listed in http://developer.nvidia.com/cuda-gpus, that GPU is CUDA-capable. The Release Notes for the CUDA Toolkit also contain a list of supported products.
2.2. Download the NVIDIA CUDA Toolkit
The CUDA Toolkit installs the CUDA driver and tools needed to create, build and run a CUDA application as well as libraries, header files, CUDA samples source code, and other resources.
Download Verification
The download can be verified by comparing the MD5 checksum posted at https://developer.download.nvidia.com/compute/cuda/11.4.2/docs/sidebar/md5sum.txt with that of the downloaded file. If either of the checksums differ, the downloaded file is corrupt and needs to be downloaded again.
To calculate the MD5 checksum of the downloaded file, follow the instructions at http://support.microsoft.com/kb/889768.
2.3. Install the CUDA Software
Graphical Installation
Install the CUDA Software by executing the CUDA installer and following the on-screen prompts.
Silent Installation
Table 3. Possible Subpackage Names
| Subpackage Name | Subpackage Description |
|---|---|
| Toolkit Subpackages (defaults to C:Program FilesNVIDIA GPU Computing ToolkitCUDAv 11.4 ) | |
| cudart_ 11.4 | CUDA Runtime libraries. |
| cuobjdump_ 11.4 | Extracts information from cubin files. |
| cupti_ 11.4 | The CUDA Profiling Tools Interface for creating profiling and tracing tools that target CUDA applications. |
| cuxxfilt_ 11.4 | The CUDA cu++ filt demangler tool. |
| demo_suite_ 11.4 | Prebuilt demo applications using CUDA. |
| documentation_ 11.4 | CUDA HTML and PDF documentation files including the CUDA C++ Programming Guide, CUDA C++ Best Practices Guide, CUDA library documentation, etc. |
| memcheck_ 11.4 | Functional correctness checking suite. |
| nvcc_ 11.4 | CUDA compiler. |
| nvdisasm_ 11.4 | Extracts information from standalone cubin files. |
| nvml_dev_ 11.4 | NVML development libraries and headers. |
| nvprof_ 11.4 | Tool for collecting and viewing CUDA application profiling data from the command-line. |
| nvprune_ 11.4 | Prunes host object files and libraries to only contain device code for the specified targets. |
| nvrtc_ 11.4 |
NVRTC runtime libraries. nvtx_ 11.4 NVTX on Windows. visual_profiler_ 11.4 Visual Profiler. sanitizer_ 11.4 Compute Sanitizer API. thrust_ 11.4 CUDA Thrust. cublas_ 11.4
cuBLAS runtime libraries. cufft_ 11.4
cuFFT runtime libraries. curand_ 11.4
cuRAND runtime libraries. cusolver_ 11.4
cuSOLVER runtime libraries. cusparse_ 11.4
cuSPARSE runtime libraries. npp_ 11.4
NPP runtime libraries. nvjpeg_ 11.4
nvJPEG libraries. nsight_compute_ 11.4 Nsight Compute. nsight_nvtx_ 11.4 Older v1.0 version of NVTX. nsight_systems_ 11.4 Nsight Systems. nsight_vse_ 11.4 Installs the Nsight Visual Studio Edition plugin in all VS. visual_studio_integration_ 11.4 Installs CUDA project wizard and builds customization files in VS. occupancy_calculator_ 11.4 Installs the CUDA_Occupancy_Calculator.xls tool. Samples Subpackages (defaults to C:ProgramDataNVIDIA CorporationCUDA Samplesv 11.4 ) samples_ 11.4
Source code for many example CUDA applications using supported versions of Visual Studio.
Note: C:ProgramData is a hidden folder. It can be made visible within the Windows Explorer options at (Tools | Options).
Driver Subpackages Display.Driver The NVIDIA Display Driver. Required to run CUDA applications.
Extracting and Inspecting the Files Manually
Sometimes it may be desirable to extract or inspect the installable files directly, such as in enterprise deployment, or to browse the files before installation. The full installation package can be extracted using a decompression tool which supports the LZMA compression method, such as 7-zip or WinZip.
2.3.1. Uninstalling the CUDA Software
All subpackages can be uninstalled through the Windows Control Panel by using the Programs and Features widget.
2.4. Using Conda to Install the CUDA Software
This section describes the installation and configuration of CUDA when using the Conda installer. The Conda packages are available at https://anaconda.org/nvidia.
2.4.1. Conda Overview
2.4.2. Installation
To perform a basic install of all CUDA Toolkit components using Conda, run the following command:
2.4.3. Uninstallation
To uninstall the CUDA Toolkit using Conda, run the following command:
2.5. Use a Suitable Driver Model
On Windows 7 and later, the operating system provides two under which the NVIDIA Driver may operate:
The TCC driver mode provides a number of advantages for CUDA applications on GPUs that support this mode. For example:
2.6. Verify the Installation
Before continuing, it is important to verify that the CUDA toolkit can find and communicate correctly with the CUDA-capable hardware. To do this, you need to compile and run some of the included sample programs.
2.6.1. Running the Compiled Examples
Start > All Programs > Accessories > Command Prompt
This assumes that you used the default installation directory structure. If CUDA is installed and configured correctly, the output should look similar to Figure 1.

The exact appearance and the output lines might be different on your system. The important outcomes are that a device was found, that the device(s) match what is installed in your system, and that the test passed.
If a CUDA-capable device and the CUDA Driver are installed but deviceQuery reports that no CUDA-capable devices are present, ensure the deivce and driver are properly installed.
Running the bandwidthTest program, located in the same directory as deviceQuery above, ensures that the system and the CUDA-capable device are able to communicate correctly. The output should resemble Figure 2.

The device name (second line) and the bandwidth numbers vary from system to system. The important items are the second line, which confirms a CUDA device was found, and the second-to-last line, which confirms that all necessary tests passed.
If the tests do not pass, make sure you do have a CUDA-capable NVIDIA GPU on your system and make sure it is properly installed.
3. Pip Wheels
NVIDIA provides Python Wheels for installing CUDA through pip, primarily for using CUDA with Python. These packages are intended for runtime use and do not currently include developer tools (these can be installed separately).
Please note that with this installation method, CUDA installation environment is managed via pip and additional care must be taken to set up your host environment to use CUDA outside the pip environment.
4. Compiling CUDA Programs
4.1. Compiling Sample Projects
The bandwidthTest project is a good sample project to build and run. It is located in the NVIDIA CorporationCUDA Samplesv 11.4 1_UtilitiesbandwidthTest directory.
4.2. Sample Projects
The sample projects come in two configurations: debug and release (where release contains no debugging information) and different Visual Studio projects.
A few of the example projects require some additional setup.
4.3. Build Customizations for New Projects
When creating a new CUDA application, the Visual Studio project file must be configured to include CUDA build customizations. To accomplish this, click File-> New | Project. NVIDIA-> CUDA->, then select a template for your CUDA Toolkit version. For example, selecting the «CUDA 11.4 Runtime» template will configure your project for use with the CUDA 11.4 Toolkit. The new project is technically a C++ project (.vcxproj) that is preconfigured to use NVIDIA’s Build Customizations. All standard capabilities of Visual Studio C++ projects will be available.
To specify a custom CUDA Toolkit location, under CUDA C/C++, select Common, and set the CUDA Toolkit Custom Dir field as desired. Note that the selected toolkit must match the version of the Build Customizations.
4.4. Build Customizations for Existing Projects
While Option 2 will allow your project to automatically use any new CUDA Toolkit version you may install in the future, selecting the toolkit version explicitly as in Option 1 is often better in practice, because if there are new CUDA configuration options added to the build customization rules accompanying the newer toolkit, you would not see those new options using Option 2.
5. Additional Considerations
A number of helpful development tools are included in the CUDA Toolkit or are available for download from the NVIDIA Developer Zone to assist you as you develop your CUDA programs, such as NVIDIA В® Nsightв„ў Visual Studio Edition, NVIDIA Visual Profiler, and cuda-memcheck.
For technical support on programming questions, consult and participate in the developer forums at http://developer.nvidia.com/cuda/.
Notices
Notice
This document is provided for information purposes only and shall not be regarded as a warranty of a certain functionality, condition, or quality of a product. NVIDIA Corporation (“NVIDIA”) makes no representations or warranties, expressed or implied, as to the accuracy or completeness of the information contained in this document and assumes no responsibility for any errors contained herein. NVIDIA shall have no liability for the consequences or use of such information or for any infringement of patents or other rights of third parties that may result from its use. This document is not a commitment to develop, release, or deliver any Material (defined below), code, or functionality.
NVIDIA reserves the right to make corrections, modifications, enhancements, improvements, and any other changes to this document, at any time without notice.
Customer should obtain the latest relevant information before placing orders and should verify that such information is current and complete.
NVIDIA products are sold subject to the NVIDIA standard terms and conditions of sale supplied at the time of order acknowledgement, unless otherwise agreed in an individual sales agreement signed by authorized representatives of NVIDIA and customer (“Terms of Sale”). NVIDIA hereby expressly objects to applying any customer general terms and conditions with regards to the purchase of the NVIDIA product referenced in this document. No contractual obligations are formed either directly or indirectly by this document.
NVIDIA products are not designed, authorized, or warranted to be suitable for use in medical, military, aircraft, space, or life support equipment, nor in applications where failure or malfunction of the NVIDIA product can reasonably be expected to result in personal injury, death, or property or environmental damage. NVIDIA accepts no liability for inclusion and/or use of NVIDIA products in such equipment or applications and therefore such inclusion and/or use is at customer’s own risk.
NVIDIA makes no representation or warranty that products based on this document will be suitable for any specified use. Testing of all parameters of each product is not necessarily performed by NVIDIA. It is customer’s sole responsibility to evaluate and determine the applicability of any information contained in this document, ensure the product is suitable and fit for the application planned by customer, and perform the necessary testing for the application in order to avoid a default of the application or the product. Weaknesses in customer’s product designs may affect the quality and reliability of the NVIDIA product and may result in additional or different conditions and/or requirements beyond those contained in this document. NVIDIA accepts no liability related to any default, damage, costs, or problem which may be based on or attributable to: (i) the use of the NVIDIA product in any manner that is contrary to this document or (ii) customer product designs.
No license, either expressed or implied, is granted under any NVIDIA patent right, copyright, or other NVIDIA intellectual property right under this document. Information published by NVIDIA regarding third-party products or services does not constitute a license from NVIDIA to use such products or services or a warranty or endorsement thereof. Use of such information may require a license from a third party under the patents or other intellectual property rights of the third party, or a license from NVIDIA under the patents or other intellectual property rights of NVIDIA.
Reproduction of information in this document is permissible only if approved in advance by NVIDIA in writing, reproduced without alteration and in full compliance with all applicable export laws and regulations, and accompanied by all associated conditions, limitations, and notices.
THIS DOCUMENT AND ALL NVIDIA DESIGN SPECIFICATIONS, REFERENCE BOARDS, FILES, DRAWINGS, DIAGNOSTICS, LISTS, AND OTHER DOCUMENTS (TOGETHER AND SEPARATELY, “MATERIALS”) ARE BEING PROVIDED “AS IS.” NVIDIA MAKES NO WARRANTIES, EXPRESSED, IMPLIED, STATUTORY, OR OTHERWISE WITH RESPECT TO THE MATERIALS, AND EXPRESSLY DISCLAIMS ALL IMPLIED WARRANTIES OF NONINFRINGEMENT, MERCHANTABILITY, AND FITNESS FOR A PARTICULAR PURPOSE. TO THE EXTENT NOT PROHIBITED BY LAW, IN NO EVENT WILL NVIDIA BE LIABLE FOR ANY DAMAGES, INCLUDING WITHOUT LIMITATION ANY DIRECT, INDIRECT, SPECIAL, INCIDENTAL, PUNITIVE, OR CONSEQUENTIAL DAMAGES, HOWEVER CAUSED AND REGARDLESS OF THE THEORY OF LIABILITY, ARISING OUT OF ANY USE OF THIS DOCUMENT, EVEN IF NVIDIA HAS BEEN ADVISED OF THE POSSIBILITY OF SUCH DAMAGES. Notwithstanding any damages that customer might incur for any reason whatsoever, NVIDIA’s aggregate and cumulative liability towards customer for the products described herein shall be limited in accordance with the Terms of Sale for the product.
Источник