Содержание
- Описание
- Замечания о переводе
- Сводка опций
- Определение цели сканирования
- Обнаружение хостов
- Основы сканирования портов
- Различные приемы сканирования портов
- Определение портов и порядка сканирования
- Обнаружение служб и их версий
- Определение ОС
- Скриптовый движок Nmap(NSE — Nmap Scripting Engine)
- Опции управления временем и производительностью
- Обход Брандмауэров/IDS
- Вывод результатов
- Различные опции
- Взаимодействие во время выполнения
- Примеры
- Ошибки
- Автор
- Юридические уведомления
- Unofficial Translation Disclaimer / Отречение неофициального перевода
- Авторское право и лицензия Nmap
- Creative Commons License для этого справочного руководства Nmap
- Доступность исходного кода и общественные вклады
- Отсутствие гарантии
- Несоответствующее использование
- Стороннее программное обеспечение
- Классификация по контролю экспорта Соединенных Штатов
Название
nmap — Утилита для исследования сети и сканер портов
Синтаксис
nmap [
<Тип сканирования>
…] [
<Опции>
] {
<цель сканирования>
}
Описание
![[Примечание]](https://nmap.org/man/ru/images/note.png) |
Примечание |
|---|---|
|
Этот документ описывает версию Nmap 4.22SOC8. Последняя документация |
Nmap («Network Mapper») — это утилита с открытым исходным кодом для исследования сети и
проверки безопасности. Она была разработана для быстрого сканирования больших сетей, хотя прекрасно справляется
и с единичными целями. Nmap использует «сырые» IP пакеты оригинальным способом, чтобы определить какие хосты
доступны в сети, какие службы (название приложения и версию) они предлагают, какие операционные системы (и версии
ОС) они используют, какие типы пакетных фильтров/брандмауэров используются и еще множество других характеристик.
В то время, как Nmap обычно используется для проверки безопасности, многие системные администраторы находят ее
полезной для обычных задач, таких как контролирование структуры сети, управление расписаниями запуска
служб и учет времени работы хоста или службы.
Выходные данные Nmap это список просканированных целей с дополнительной информацией по каждой из них в зависимости
от заданных опций. Ключевой информацией является «таблица важных портов».
Эта таблица содержит номер порта, протокол, имя службы и состояние. Состояние может иметь значение
open (открыт), filtered (фильтруется),
closed (закрыт) или unfiltered (не
фильтруется).
Открыт
означает, что приложение на целевой машине готово для установки соединения/принятия пакетов на этот порт.
Фильтруется
означает, что брандмауэр, сетевой фильтр, или какая-то другая помеха в сети блокирует порт, и Nmap не может установить
открыт этот порт или закрыт.
Закрытые
порты не связаны ни с каким приложением, но могут быть открыты в любой момент. Порты расцениваются как
не фильтрованные, когда они отвечают на запросы Nmap, но Nmap не может определить открыты они или закрыты. Nmap выдает комбинации
открыт|фильтруется
и закрыт|фильтруется, когда не может определить, какое из этих двух
состояний описывает порт. Эта таблица также может предоставлять детали о версии программного обеспечения, если это
было запрошено. Когда осуществляется сканирование по IP протоколу (-sO), Nmap предоставляет
информацию о поддерживаемых протоколах, а не об открытых портах.
В дополнение к таблице важных портов Nmap может предоставлять дальнейшую информацию о целях: преобразованные
DNS имена, предположение об используемой операционной системе, типы устройств и MAC адреса.
Типичное сканирование с использованием Nmap показано в Пример 1. Единственные аргументы, использованные в этом примере — это -A, для определения версии ОС,
сканирования с использованием скриптов и трассировки; -T4 для более быстрого выполнения; затем
два целевых хоста.
Пример 1. Типичный пример сканирования с помощью Nmap
# nmap -A -T4 scanme.nmap.org playground

Starting Nmap ( https://nmap.org )
Interesting ports on scanme.nmap.org (64.13.134.52):
(The 1663 ports scanned but not shown below are in state: filtered)
PORT    STATE  SERVICE VERSION
22/tcp  open   ssh     OpenSSH 3.9p1 (protocol 1.99)
53/tcp  open   domain
70/tcp  closed gopher
80/tcp  open   http    Apache httpd 2.0.52 ((Fedora))
113/tcp closed auth
Device type: general purpose
Running: Linux 2.4.X|2.5.X|2.6.X
OS details: Linux 2.4.7 - 2.6.11, Linux 2.6.0 - 2.6.11

Interesting ports on playground.nmap.org (192.168.0.40):
(The 1659 ports scanned but not shown below are in state: closed)
PORT     STATE SERVICE       VERSION
135/tcp  open  msrpc         Microsoft Windows RPC
139/tcp  open  netbios-ssn
389/tcp  open  ldap?
445/tcp  open  microsoft-ds  Microsoft Windows XP microsoft-ds
1002/tcp open  windows-icfw?
1025/tcp open  msrpc         Microsoft Windows RPC
1720/tcp open  H.323/Q.931   CompTek AquaGateKeeper
5800/tcp open  vnc-http      RealVNC 4.0 (Resolution 400x250; VNC port: 5900)
5900/tcp open  vnc           VNC (protocol 3.8)
MAC Address: 00:A0:CC:63:85:4B (Lite-on Communications)
Device type: general purpose
Running: Microsoft Windows NT/2K/XP
OS details: Microsoft Windows XP Pro RC1+ through final release
Service Info: OSs: Windows, Windows XP

Nmap finished: 2 IP addresses (2 hosts up) scanned in 88.392 seconds
Самую новую версию Nmap можно скачать с https://nmap.org. Самая новая версия страницы справки Nmap
(man page) расположена по адресу https://nmap.org/book/man.html.
Время прочтения
5 мин
Просмотры 364K

Вы когда-нибудь интересовались откуда атакующий знает какие порты открыты в системе? Или как узнать, какие приложения запущены на сервере, не спрашивая об этом администратора? Вы можете сделать все это и даже больше вместе с небольшим инструментом под названием Nmap.
Что такое Nmap? Название Nmap это сокращение от “network mapper”, сам nmap это набор инструментов для сканирования сети. Он может быть использован для проверки безопасности, просто для определения сервисов запущенных на узле, для идентификации ОС и приложений, определения типа фаерволла используемого на сканируемом узле.
Nmap это знаменитый инструмент. Как только вы узнаете больше о Nmap, вы поймете, что он делает в эпизодах таких фильмов как Матрица Перезагрузка, Ультиматум Борна, Хоттабыч, и других.
В этом руководстве будут описаны основы использования Nmap и приведены некоторые примеры, которые вы сможете использовать.
Где взять Nmap?
Если Вы используете Linux, то можете найти пакеты Nmap в репозиториях для большинства дистрибутивов. Последний релиз Nmap вышел в начале 2010, поэтому самой свежей версии может не быть в текущих стабильных ветках. Найти исходники и некоторые бинарные сборки можно на странице загрузки.Там есть и windows версия.
Основы использования Nmap.
Синтаксис Nmap следующий:
nmap Опции_сканирования Цель_сканирования.
Допустим Вы хотите сканировать узел и узнать какая операционная система на нем работает. Чтобы сделать это выполните следующее:
nmap -O target.host.com
Заметим что Nmap требует привилегий суперпользователя для запуска подобного типа сканирования. Процесс сканирования может занять около минуты, так что будьте терпеливы. Когда процесс закончится вы увидите что то похожее на это:
Starting Nmap 5.21 ( nmap.org ) at 2010-02-27 23:52 EST

Nmap scan report for 10.0.0.1

Host is up (0.0015s latency).

Not shown: 997 closed ports

PORT STATE SERVICE

53/tcp open domain

5009/tcp open airport-admin

10000/tcp open snet-sensor-mgmt

MAC Address: 00:11:24:6B:43:E2 (Apple Computer)

Device type: WAP|printer

Running: Apple embedded, Canon embedded, Kyocera embedded, Xerox embedded

OS details: VxWorks: Apple AirPort Extreme v5.7 or AirPort Express v6.3; Canon imageRUNNER printer (5055, C3045, C3380, or C5185); Kyocera FS-4020DN printer; or Xerox Phaser 8860MFP printer

Network Distance: 1 hop
Как вы видите Nmap предоставляет множество информации. Здесь он отображает предположение об операционной системе, которая была запущена на узле. В данном случае выполнялось сканирование маршрутизатора Apple Airport Extrime. В качестве дополнительного бонуса Nmap сообщил, что устройство на расстоянии одного прыжка, а также MAC адрес устройства и производителя сетевой карты, открытые порты и сколько времени выполнялось сканирование.
Ниже приведены результаты другого сканирования, домашнего компьютера с запущенной Ubuntu 9.10:
Starting Nmap 5.21 ( nmap.org ) at 2010-02-28 00:00 EST

Nmap scan report for 10.0.0.6

Host is up (0.0039s latency).

Not shown: 999 closed ports

PORT STATE SERVICE

22/tcp open ssh

MAC Address: 00:17:08:2A:D6:F0 (Hewlett Packard)

Device type: general purpose

Running: Linux 2.6.X

OS details: Linux 2.6.19 - 2.6.31

Network Distance: 1 hop
OS detection performed. Please report any incorrect results at nmap.org/submit .
Nmap done: 1 IP address (1 host up) scanned in 3.40 seconds
Здесь мы видим, что система имеет сетевую карту HP, запущено Linux между версиями 2.6.19 и 2.6.31. Кстати, Вы не сможете явно идентифицировать дистрибутив, только версию Linux ядра.
Сканирование чужих узлов.
В примерах выше для сканирования были выбраны локальный маршрутизатор и одна из рабочих станций, потому что мы имели право на их сканирование. Однако, будет плохой идеей запуск множественного сканирования чужого узла, если вы их не контролируете или не имеете прав для сканирования. Для экспериментов Nmap имеет общедоступный тестовый сервер scanme.nmap.org который Вы можете использовать.
Многие администраторы не любят несанкционированного сканирования их серверов, так что лучшим вариантом будет ограничение сканирования узлов своей локальной сети или тех для которых у вас есть права на сканирование. Также в некоторых случаях вы можете нарушить договор с вашим провайдером, при использовании некоторых особо агрессивных методов сканирования Nmap, поэтому будьте осторожны.
Сканирование нескольких узлов.
Вы можете сканировать больше чем один узел за раз, используя nmap. Если вы производите сканирование по IP-адресу вы можете определить диапазон 10.0.0.1-6 или 10.0.0.0/24.Используя диапазон 10.0.0.1-6 будут сканироваться узлы от 10.0.0.1 до 10.0.0.6. Используя определение /24 будет сканироваться весь диапазон узлов от 10.0.0.0 до 10.0.0.255. Для примера, если нужно просканировать узлы от 10.0.0.1 до 10.0.0.42 и узнать какая ОС вероятно запущена используйте:
nmap –O 10.0.0.1-42
Если у вас есть некоторый список доменных имен вместо IP адресов, вы можете разделить их в командной строке, вот так:
nmap -O host1.target.com host2.target.com
Проверка открытых портов
Если вы запустите nmap вообще без опций и укажите какой то узел, то он будет сканировать порты и покажет все найденные открытые порты и сервисы запущенные на них. Например запустите:
nmap target.hostname.com
после чего он должен выдать что то похожее на это:
Interesting ports on target.hostname.com (10.0.0.88):

Not shown: 1711 closed ports

PORT STATE SERVICE

22/tcp open ssh

80/tcp open http

3306/tcp open mysql
Nmap done: 1 IP address (1 host up) scanned in 0.228 seconds
Nmap выдаст больше информации если использовать опцию -v (verbose).
Сканирование запущенных сервисов
Если вы хотите узнать какой сервис возможно запущен попробуйте опцию –sV. Эта опция произведет более агрессивное сканирование и попытается выяснить какая версия сервисов запущена на данном узле, а также может помочь более точно определить какая ОС запущена. Для пример запустим nmap –sV на тестовый сервер и получим следующий ответ:
Starting Nmap 5.21 ( nmap.org ) at 2010-02-28 00:15 EST

Nmap scan report for test.host.net (XX.XXX.XXX.XX)

Host is up (0.090s latency).

Not shown: 965 closed ports, 33 filtered ports

PORT STATE SERVICE VERSION

22/tcp open ssh OpenSSH 4.7p1 Debian 8ubuntu1.2 (protocol 2.0)

80/tcp open http Apache httpd 2.2.8 ((Ubuntu) PHP/5.2.4-2ubuntu5.10 with Suhosin-Patch)

Service Info: OS: Linux
Service detection performed. Please report any incorrect results at nmap.org/submit .
Nmap done: 1 IP address (1 host up) scanned in 11.43 seconds
Как вы видите, Nmap может проанализировать пакеты и определить версию запущенного приложений на SSH и HTTP портах. Здесь вы можете увидеть что опрашиваемая система это Ubuntu с Apache 2.2.8 и OpenSSH 4.7p1. Эта информация может быть полезна по ряду причин. Nmap сканирование может идентифицировать систему под управлением устаревших сервисов которые могут быть уязвимы для известных эксплойтов.
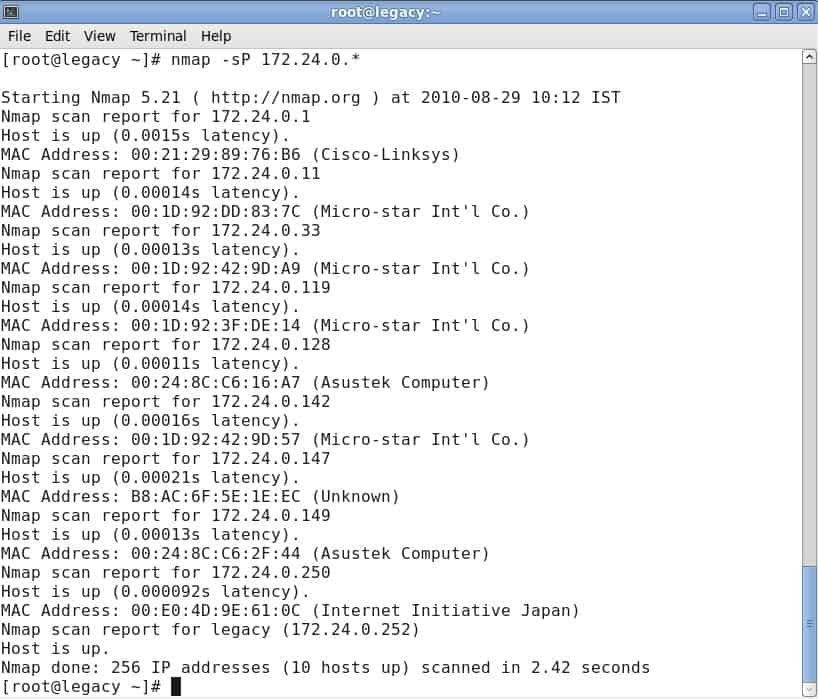
Кто в моей сети?
Не знаете сколько онлайн узлов находятся в вашей сети? Попробуйте использовать nmap –sP который запустит ping сканирование указанной сети. Для примера, nmap –sP 10.0.0.0/24 сканирует 256 узлов от 10.0.0.0 до 10.0.0.255 проверит доступны ли они и доложит об этом. Так же вы можете использовать диапазон, например:
nmap –sP 10.0.0.1-15
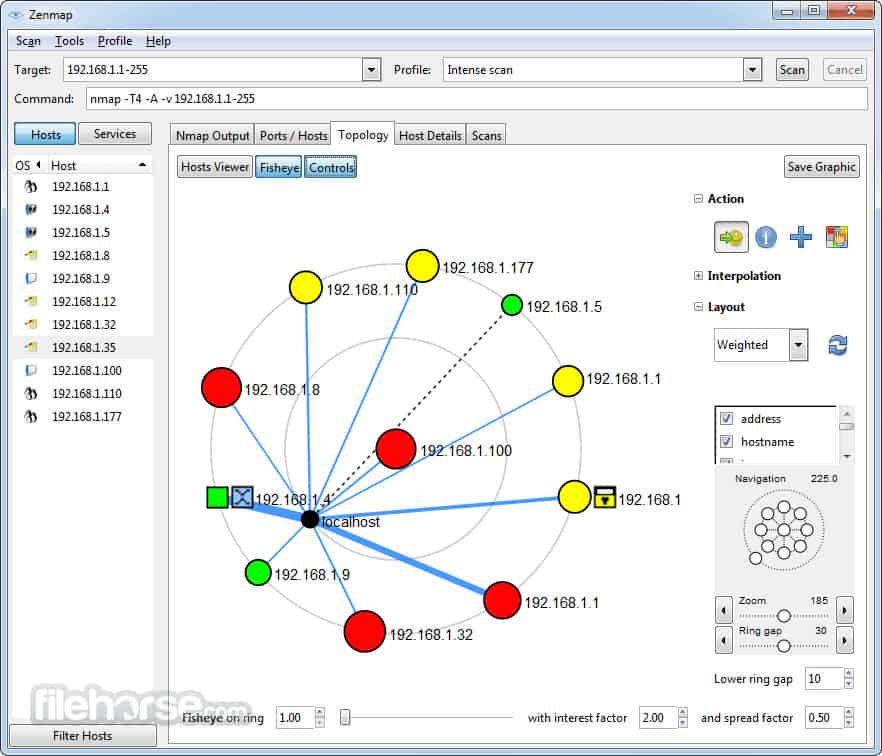
Zenmap
Наконец, если все эти радости командной строки не для вас, nmap имеет GUI который вы можете использовать для построения и выполнения команд. Называется Zenmap. Он позволит выбрать цель, запустить сканирование, отобразить результаты, а также сохранить их и сравнить с другими.
GUI Zenmap это хороший способ познакомиться с Nmap, но лучше знать как использовать Nmap в командной строке, если вы собираетесь работать с ним часто.
В будущем руководстве мы более глубоко познакомимся с Nmap и конкретными задачами которые вы сможете решить.
Данный пост это вольный перевод статьи Beginner’s Guide to Nmap. Спасибо за внимание.
![]()
Загрузить PDF
![]()
Загрузить PDF
Вы беспокоитесь о безопасности вашей или какой-нибудь другой сети? Защита вашего маршрутизатора от нежелательных подключений является залогом безопасности вашей сети. Одним из простых методов является Nmap или Network Mapper. Это программа сканирования, которая проверяет какие порты открыты и какие закрыты, а так же другие детали. Специалисты по безопасности используют эту программу для тестирования безопасности сети. Чтобы научиться использовать эту программу смотрите Шаг 1.
-

1
Скачайте установщик Nmap. Вы можете найти установщик на сайте разработчиков и скачать бесплатно. Рекомендуется скачивание именно с сайта разработчиков, чтобы избежать риск скачивания вирусов или подмененных файлов. Скачивая Nmap вы одновременно получить Zenmap, графический интерфейс для Nmap, что делает программу простой в использовании для новичков при выполнении сканирования без знания команд.
- Программа Zenmap доступна для операционных систем Windows, Linux, и Mac OS X. Вы можете найти установщики на официальном сайте Nmap.
-
2
Установите Nmap. Запустите установщик сразу после окончания загрузки. Выберите компоненты для установки. Чтобы полностью воспользоваться всеми возможностями Nmap выберите все компоненты. Nmap не будет устанавливать рекламные или шпионские приложения.
-
3
Запустите программу “Nmap – Zenmap” GUI. Если во время установки вы оставили все пункты не тронутыми, то иконка программы должна появиться на вашем рабочем столе. Если нет, посмотрите в меню старт и запустите Zenmap.
-
4
Введите цель вашего сканирования. Программа Zenmap превращает сканирование сети в очень простой процесс. В первую очередь выберете цель сканирования. Вы можете ввести домен (example.com), IP-адрес (127.0.0.1), сеть (192.168.1.0/24), или комбинацию перечисленных.
- В зависимости от загрузки и цели вашего сканирования, использование Nmap может оказаться нарушением пользовательских правил вашего интернет провайдера. Всегда проверяйте местные пользовательские правила во время использования Nmap в случаях сканирования этой программой вне вашей собственной сети.
-
5
Выберете ваш профиль. Профили представляют из себя группу модификаций, которые изменяют структуру сканирования. Профили позволяют быстро выбрать разные типы сканов без необходимости набора модификаций в командной строке. Выберете лучший профиль для ваших нужд:[1]
- Intense scan — обширное сканирование. Включает распознавание операционной системы, версии, скриптов, трассировку, и имеет агрессивное время сканирования.
- Ping scan — это сканирование, определяет онлайн статус цели вашего сканирования, и не сканирует порты.
- Quick scan — сканирует быстрее чем обычный скан с агрессивным временем сканирования и выборку портов.
- Regular scan — это стандартны Nmap скан без каких-либо модификаций. Результат включает пинг и открытые порты.
-
6
Нажмите Scan чтобы начать сканирование. Активные результаты скана будут отображаться во вкладке Nmap Output. Время сканирования будет зависеть от выбранного профиля, физического расстояния до цели, и сетевой конфигурации.
-
7
Посмотрите ваши результаты. После окончания скана, вы увидите сообщение “Nmap is done” в низу вкладки Nmap Output. Теперь вы можете проверить ваши результаты, в зависимости от типа выбранного скана. Все результаты собраны во вкладке Output, но, выбирая другие вкладки, вы можете более детально изучить получившийся результат.[2]
-
Ports/Hosts — эта вкладка покажет сканирования портов, включая службы, работающие на этих портах.
-
Topology — показывает трассировку для выполненного сканирования. Вы можете посмотреть через сколько «прыжков» ваши данные доходят до нужной цели.
-
Host Details — показывает полную информацию о цели, количество портов, IP-адреса, имена хостов, операционные системы, и другое.
-
Scans — эта вкладка записывает историю ваших предыдущих сканов. Таким образом вы можете быстро перезапустить скан, проделанный в прошлом, с определенным сетом параметров.
Реклама
-
Ports/Hosts — эта вкладка покажет сканирования портов, включая службы, работающие на этих портах.


-
1
Установите Nmap. Nmap является не большой и бесплатной программой. Вы можете скачать программу на сайте разработчика. Следуйте инструкциям исходя из вашей операционной системы:
-
Linux — скачайте и установите Nmap из вашего хранилища. Nmap доступен практически во всех версиях Linux. Введите данную команду исходя из ваших путей:
- Red Hat, Fedora, SUSE
rpm -vhU http://nmap.org/dist/nmap-6.40-1.i386.rpm(32-bit) ORrpm -vhU http://nmap.org/dist/nmap-6.40-1.x86_64.rpm(64-bit) - Debian, Ubuntu
sudo apt-get install nmap
- Red Hat, Fedora, SUSE
-
Windows — скачайте и установите Nmap. Вы можете найти его на сайте разработчиков и скачать бесплатно. Рекомендуется скачивание именно с сайта разработчиков, чтобы избежать риск скачивания вирусов или подмененных файлов. Используя установщик вы можете с легкостью установить командную строку Nmap.
- Если вы не хотите устанавливать графический интерфейс Zenmap, не выбирайте этот пункт во время установки программы.
-
Mac OS X – скачайте дисковый образ Nmap. Рекомендуется скачивание именно с сайта разработчиков, чтобы избежать риск скачивания вирусов или подмененных файлов. Используйте установщик, чтобы установить программу. Nmap работает на OS X 10.6 и выше.
-
Linux — скачайте и установите Nmap из вашего хранилища. Nmap доступен практически во всех версиях Linux. Введите данную команду исходя из ваших путей:
-
2
Откройте вашу командную строку. Команды Nmap работают из командной строки и показывают результаты сразу под командой. Вы можете использовать параметры, чтобы изменить структуру сканирования. Вы можете запустить сканирования из любого места прописанного в вашей командной строке.
-
Linux — откройте терминал используя графический интерфейс.
-
Windows — вы можете нажать комбинацию кнопок Windows+R и написать “cmd”. Пользователи Windows 8 могут нажать Windows+X и выбрать Командную строку из меню.
-
Mac OS X — откройте терминал, находящийся в Приложениях и Утилитах.
-
Linux — откройте терминал используя графический интерфейс.
-
3
Проведите скан нужных вам портов. Чтобы начать простое сканирование, напишите
nmap <target>. Таким образом начнется пинг выбранной цели и сканирование портов. Этот скан очень просто распознать. Результаты будут видны на вашем экране. Возможно вам придется прокрутить наверх, чтобы увидеть результаты полностью.- В зависимости от загрузки и цели вашего скана, использование Nmap может оказаться нарушением правил вашего интернет провайдера. Всегда проверяйте местные пользовательские правила во время использования Nmap в случаях сканирования этой программой вне вашей собственной сети.
-
4
Проведите модифицированное сканирование. Вы можете использовать командные переменные, чтобы изменить параметры сканирования, в результате получая более или менее обширное сканирование. Вы можете добавить несколько переменных оставляя пробел между каждым. Переменные ставятся до цели:
nmap <variable> <variable> <target>[3]
- -sS — это скрытое сканирование SYN. Это сканирование сложнее обнаружить, чем обычное, но может занять дольше времени для завершения. Большинство новых файерволов могут обнаружить сканирование –sS.
- -sn — это сканирование пинга. Это сканирование не использует обнаружение портов, и только проверяет онлайн статус цели.
- -O — это сканирование определяет вид операционной системы цели.
- -A — эта переменная включает обнаружение более обширной информации: операционная система, версия, скрипты, и трассировка.
- -F — включает быстрое сканирование, и уменьшает количество сканируемых портов.
- -v — эта переменная показывает большее количество результатов вашего сканирования, делая их читабельными.
-
5
Выведите результаты вашего сканирования в XML файл. Вы можете настроить вывод результатов вашего сканирования в XML файл и, в последствии, легко открыть их в любом веб-браузере. Чтобы это сделать используйте переменную -oX с названием файла для вывода данных. Полностью команда выглядит таким образом
nmap –oX ScanResults.xml <target>.- Ваш XML файл будет сохранен в текущей директории работы вашей командной строки.
Реклама


Советы
- Интересно как проходит сканирование? Нажмите пробел, или любую кнопку, во время работы скана, чтобы посмотреть прогресс Nmap.
- Цель не отвечает? Попробуйте добавить переменную “-P0” к вашему сканированию. В результате сканирование Nmap начнет свою работу, даже если программа «думает», что цель не существует. Это бывает полезно, когда компьютер защищён файерволом.
- Если ваше сканирование занимает большое время (больше 20 минут), попробуйте добавить переменную “-F”, таким образом Nmap сканирование затронет только недавно использовавшиеся порты.
Реклама
Предупреждения
- Убедитесь, что у вас есть разрешение на сканирование цели. Сканирование государственных сайтов принесет вам не мало проблем. Если вы хотите проверить сканирование, вы можете использоваться scanme.nmap.org. Это тестовый компьютер установленный создателем программы.
- Если вы часто используете сканирование Nmap, будьте готовы ответить на вопросы от вашего интернет провайдера. Некоторые провайдеры специально проверяют трафик на сканирование Nmap. Программа является известной и часто используемой хакерами.
Реклама
Об этой статье
Эту страницу просматривали 26 157 раз.
Была ли эта статья полезной?

Contents
- 1 Что такое Nmap?
- 2 Анализ сети и анализ пакетов с помощью Nmap
- 2.1 Примеры использования Nmap
- 3 Как установить Nmap
- 3.1 Установить Nmap в Windows
- 3.2 Установите Nmap в Linux
- 3.3 Установите Nmap на Mac
- 4 Как запустить сканирование Ping
- 5 Методы сканирования портов
- 5.1 TCP SYN Scan
- 5.2 TCP Connect Scan
- 5.3 UDP Scan
- 5.4 Сканирование порта SCTP INIT
- 5.5 TCP NULL Scan
- 6 Сканирование хоста
- 7 Определить имена хостов
- 8 Сканирование ОС
- 9 Обнаружение версии
- 10 Увеличение многословия
- 11 Скриптовый движок Nmap
- 12 Инструменты Nmap GUI
- 12.1 Zenmap
- 12.2 Paessler PRTG Сетевой монитор
- 12.3 WhatsUp Gold
- 13 Альтернативы Nmap
- 14 Nmap: необходимый инструмент сетевого администрирования
Nmap (или «сетевой картограф») — один из самых популярных бесплатных инструментов для обнаружения сетей на рынке. За последнее десятилетие или около того программа превратилась в основную программу для сетевых администраторов, желающих составить карту своих сетей и провести обширные инвентаризации сетей. Это позволяет пользователю находить живые узлы в своей сети, а также сканировать открытые порты и операционные системы. В этом руководстве вы узнаете, как установить и использовать Nmap..
Nmap работает вокруг командной строки, похожей на командную строку Windows, но интерфейс с графическим интерфейсом доступен для более опытных пользователей. При использовании Nmap пользователь просто вводит команды и запускает сценарии через текстовый интерфейс. Они могут перемещаться через брандмауэры, маршрутизаторы, IP-фильтры и другие системы. По своей сути Nmap был разработан для сетей масштаба предприятия и может сканировать тысячи подключенных устройств..
Некоторые из основных применений Nmap включают сканирование портов, пинг развертки, Обнаружение ОС, и определение версии. Программа работает с использованием IP-пакетов для определения доступных хостов в сети, а также того, какие службы и операционные системы они используют. Nmap доступен во многих операционных системах от Linux до Free BSD и Gentoo. Nmap также имеет чрезвычайно активное и активное сообщество поддержки пользователей. В этой статье мы разберем основы Nmap, чтобы помочь вам взяться за дело.
Анализ сети и анализ пакетов с помощью Nmap
Сетевые анализаторы, такие как Nmap, необходимы для безопасности сети по ряду причин. Они могут идентифицировать злоумышленников и тест на уязвимости в сети. Когда дело доходит до кибербезопасности, чем больше вы знаете о своем пакетном трафике, тем лучше вы подготовлены к атаке. Активное сканирование вашей сети — единственный способ убедиться, что вы остаетесь готовыми к потенциальным атакам.
Как сетевой анализатор или анализатор пакетов, Nmap чрезвычайно универсален. Например, он позволяет пользователю сканировать любой активный IP-адрес в своей сети. Если вы обнаружите IP-адрес, которого вы раньше не видели, вы можете запустить сканирование IP-адресов, чтобы определить, является ли это законной службой или внешней атакой..
Nmap — это сетевой анализатор для многих администраторов, поскольку он предлагает широкий спектр функций бесплатно.
Примеры использования Nmap
Например, вы можете использовать Nmap для:
- Определите живые хосты в вашей сети
- Определите открытые порты в вашей сети
- Определите операционную систему служб в вашей сети
- Устранить уязвимости в вашей сетевой инфраструктуре
Как установить Nmap
Смотрите также: Шпаргалка Nmap
Прежде чем мы перейдем к использованию NMap, мы рассмотрим, как его установить. Пользователи Windows, Linux и MacOS могут скачать Nmap здесь.
Установить Nmap в Windows
Используйте самоинсталлятор Windows (называемый nmap-setup.exe) и следуйте инструкциям на экране.
Установите Nmap в Linux
В линуксе, все немного сложнее, так как вы можете выбирать между установкой исходного кода или несколькими бинарными пакетами. Установка Nmap в Linux позволяет создавать собственные команды и запускать пользовательские сценарии. Чтобы проверить, установлен ли у вас Nmap для Ubuntu, запустите Nmap — версия команда. Если вы получили сообщение о том, что nmap в данный момент не установлен, введите sudo apt-get установить nmap в командной строке и нажмите Enter.
Установите Nmap на Mac
На Mac, Nmap предлагает специальный установщик. Чтобы установить на Mac, дважды щелкните файл nmap-.dmg и откройте файл с именем птар-mpkg. Открытие этого запустит процесс установки. Если вы используете OS X 10.8 или более позднюю версию, ваши настройки безопасности могут быть заблокированы, поскольку nmap считается «неопознанным разработчиком». Чтобы обойти это, просто щелкните правой кнопкой мыши файл .mpkg и выберите открыто.
Как запустить сканирование Ping
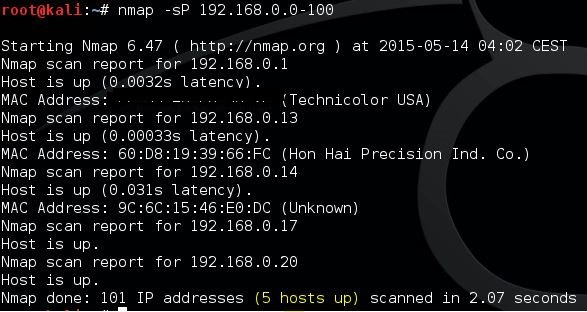
Одной из основ сетевого администрирования является выделение времени для определения активных хостов в вашей сети. На Nmap это достигается с помощью сканирования ping. Сканирование ping (также называемое IP-адресом обнаружения в команде подсети) позволяет пользователю определить, подключены ли IP-адреса к сети. Он также может быть использован как метод обнаружения хоста. Сканирование ARP-пинга является одним из лучших способов обнаружения хостов в сетях LAN..
Чтобы запустить проверку связи ARP, введите в командной строке следующую команду:
# nmap -sp 192.100.1.1/24
Это вернет список хостов, которые ответили на ваши запросы ping вместе с общим количеством IP-адресов в конце. Пример показан ниже:
Важно отметить, что этот поиск не отправляет пакеты перечисленным хостам. Тем не менее, Nmap запускает обратное разрешение DNS на указанных хостах, чтобы идентифицировать их имена..
Методы сканирования портов
Когда дело доходит до сканирования портов, вы можете использовать различные методы в Nmap. Вот основные из них:
- sS TCP SYN сканирование
- sT TCP-соединение
- sU UDP сканирование
- SY SCTP INIT сканирование
- sN TCP NULL
Новые пользователи будут пытаться решить большинство проблем с помощью сканирования SYN, но по мере развития ваших знаний вы также сможете использовать некоторые из этих других методов. Важно отметить, что вы можете использовать только один метод сканирования портов одновременно (хотя вы можете комбинировать сканирование SCTP и TCP вместе).
TCP SYN Scan
sS TCP SYN Scan
TCP SYN Scan это одна из самых быстрых техник сканирования портов в вашем распоряжении на Nmap. Вы можете сканировать тысячи портов в секунду в любой сети, которая не защищена брандмауэром.
Это также хорошая техника сканирования с точки зрения конфиденциальности потому что он не завершает TCP-соединения, которые привлекают внимание к вашей деятельности. Это работает, посылая пакет SYN и затем ожидая ответа. Подтверждение указывает на открытый порт, тогда как отсутствие ответа обозначает отфильтрованный порт. RST или сброс идентифицирует не прослушивающие порты.
TCP Connect Scan
sT TCP Connect Scan
TCP Connect Scan является основным альтернативным сканированием TCP, когда пользователь не может запустить сканирование SYN. В рамках сканирования TCP connect пользователь выполняет системный вызов connect для установления соединения с сетью. Вместо чтения пакетов ответов Nmap использует этот вызов для получения информации о каждой попытке подключения. Один из самых больших недостатков сканирования TCP-соединения заключается в том, что для определения открытых портов требуется больше времени, чем при сканировании SYN.
UDP Scan
sU UDP Scan
Если вы хотите запустить сканирование портов в службе UDP, то UDP-сканирование ваш лучший курс действий. UDP может использоваться для сканирования портов, таких как DNS, SNMP и DHCP в вашей сети. Это особенно важно, потому что они являются областью, которую злоумышленники обычно используют. При запуске сканирования UDP вы также можете запустить сканирование SYN одновременно. Когда вы запускаете сканирование UDP, вы отправляете пакет UDP на каждый целевой порт. В большинстве случаев вы отправляете пустой пакет (кроме портов, таких как 53 и 161). Если вы не получите ответ после передачи пакетов, то порт классифицируется как открытый.
Сканирование порта SCTP INIT
sY SCTP INIT Scan
Сканирование порта SCTP INIT охватывает службы SS7 и SIGTRAN и предлагает комбинацию протоколов TCP и UDP. Как и Syn Scan, SCTP INIT Scan невероятно быстр, способен сканировать тысячи портов каждую секунду. Это также хороший выбор, если вы хотите сохранить конфиденциальность, поскольку он не завершает процесс SCTP. Это сканирование работает, отправляя блок INIT и ожидая ответа от цели. Ответ с другим чанком INIT-ACK идентифицирует открытый порт, тогда как чек ABORT указывает не прослушивающий порт. Порт будет помечен как фильтр, если ответ не получен после нескольких повторных передач.
TCP NULL Scan
sN TCP NULL Scan
TCP NULL сканирование это одна из самых хитрых техник сканирования в вашем распоряжении. Это работает, используя лазейку в TCP RFC, которая обозначает открытые и закрытые порты. По сути, любой пакет, который не содержит биты SYN, RST или ACK, будет запрашивать ответ с возвращенным RST, если порт закрыт, и нет ответа, если порт открыт. Самым большим преимуществом сканирования TCP NULL является то, что вы можете ориентироваться в фильтрах маршрутизаторов и межсетевых экранах. Несмотря на то, что они являются хорошим выбором для скрытности, они все же могут быть обнаружены системами обнаружения вторжений (IDS).
Сканирование хоста
Если вы хотите идентифицировать активные хосты в сети, то сканирование хостов — лучший способ сделать это. Сканирование хоста используется для отправки пакетов запроса ARP всем системам в сети. Он отправит запрос ARP на конкретный IP-адрес в пределах диапазона IP-адресов, а затем активный хост ответит пакетом ARP, отправив свой MAC-адрес с сообщением «host is up». Вы получите это сообщение от всех активных хостов. Чтобы запустить сканирование хоста, введите:
nmap -sP
Это поднимет экран, показывающий следующее:
Определить имена хостов
Одной из самых простых и полезных команд, которую вы можете использовать, является команда -sL, которая указывает nmap выполнить запрос DNS на выбранный вами IP-адрес. Используя этот метод, вы можете найти имена хостов для IP без отправки одного пакета хосту. Например, введите следующую команду:
nmap -sL 192.100.0.0/24
Это возвращает список имен, относящихся к сканируемым IP-адресам, который может быть невероятно полезен для определения того, для чего фактически предназначены определенные IP-адреса (при условии, что у них есть связанное имя!).
Сканирование ОС
Еще одна полезная функция Nmap — определение ОС. Чтобы обнаружить операционную систему устройства, Nmap отправляет пакеты TCP и UDP в порт и анализирует его ответ. Затем Nmap запускает различные тесты от выборки TCP ISN до выборки IP ID и сравнивает ее со своей внутренней базой данных из 2600 операционных систем. Если он находит совпадение или отпечаток пальца, он предоставляет сводку, состоящую из имени поставщика, операционной системы и версии..
Чтобы определить операционную систему хоста, введите следующую команду:
nmap -O 192.168.5.102
Важно отметить, что вам требуется один открытый и один закрытый порт для использования команды –O.
Обнаружение версии
Обнаружение версии — это имя, данное команде, которая позволяет узнать, какую версию программного обеспечения использует компьютер. Что отличает его от большинства других сканирований, так это то, что порт не находится в центре его поиска. Вместо этого он пытается определить, какое программное обеспечение работает на компьютере, используя информацию, предоставляемую открытым портом. Вы можете использовать определение версии, набрав команду -sV и выбрав свой IP-адрес, например:
#nmap -sV 192.168.1.1
Увеличение многословия
При запуске любого сканирования через Nmap вам может потребоваться дополнительная информация. Ввод подробной команды -v предоставит вам дополнительную информацию о том, что делает Nmap. На Nmap доступно девять уровней многословия, от -4 до 4:
- Уровень -4 — Не выводит (например, вы не увидите ответные пакеты)
- Уровень 3 — Аналогично -4, но также предоставляет вам сообщения об ошибках, чтобы показать вам, если команда Nmap не удалась
- Уровень 2 — Есть ли выше, но также есть предупреждения и дополнительные сообщения об ошибках
- 1-й уровень — Показывает информацию во время выполнения, такую как версия, время запуска и статистика
- Уровень 0 — Уровень детализации по умолчанию, который отображает отправленные и полученные пакеты, а также другую информацию
- 1-й уровень — То же, что уровень 0, но также предоставляет подробную информацию о деталях протокола, флагах и времени.
- Уровень 2 — Показывает более обширную информацию об отправленных и полученных пакетах
- Уровень 3 — Показать полную необработанную передачу отправленного и полученного пакета
- Уровень 4 — То же, что 3-й уровень с дополнительной информацией
Увеличение детализации отлично подходит для поиска способов оптимизации ваших сканов. Вы увеличиваете объем информации, к которой имеете доступ, и предоставляете себе больше информации для целенаправленного улучшения своей сетевой инфраструктуры..
Скриптовый движок Nmap
Если вы хотите получить максимальную отдачу от Nmap, вам нужно будет использовать Nmap Scripting Engine (NSE). NSE позволяет пользователям писать сценарии на Lua, чтобы они могли автоматизировать различные сетевые задачи. Ряд различных категорий сценариев может быть создан с помощью NSE. Эти:
- авт — скрипты, которые работают с учетными данными аутентификации или обходят их в целевой системе (например, x11-access).
- широковещательный — скрипты, обычно используемые для обнаружения хостов путем трансляции в локальной сети
- скотина — скрипты, использующие грубую силу для получения доступа к удаленному серверу (например, http-brute)
- дефолт — сценарии, установленные по умолчанию в Nmap на основе скорости, полезности, многословия, надежности, навязчивости и конфиденциальности
- открытие — скрипты для поиска в общедоступных реестрах, службах каталогов и устройствах с поддержкой SNMP
- DOS — скрипты, которые могут вызвать отказ в обслуживании. Может использоваться для тестирования или атаки на сервисы.
- эксплуатировать — скрипты, предназначенные для использования сетевых уязвимостей (например, http-shellshock
- внешний — скрипты, которые отправляют данные во внешние базы данных, такие как whois-ip
- fuzzer — скрипты, которые отправляют рандомизированные поля внутри пакетов
- назойливый — скрипты, которые могут привести к сбою целевой системы и быть восприняты другими администраторами как вредоносные
- вредоносные программы — скрипты, используемые для проверки, была ли система заражена вредоносным ПО
- сейф — сценарии, которые не считаются навязчивыми, предназначены для использования лазеек или аварийных служб
- версия — используется в функции определения версии, но не может быть выбран явно
- vuln — скрипты, предназначенные для проверки уязвимостей и сообщения о них пользователю
Поначалу NSE может быть довольно сложным, чтобы разобраться, но после начальной кривой обучения навигация становится намного проще.
Например, ввод команды -sC позволит вам использовать общие сценарии, встроенные в платформу. Если вы хотите запускать свои собственные сценарии, вы можете вместо этого использовать опцию –script. Важно помнить, что любые скрипты, которые вы запускаете, могут повредить вашу систему, поэтому дважды проверьте все перед принятием решения запустить скрипты.
Инструменты Nmap GUI
Zenmap
В качестве альтернативы интерфейсу командной строки, NMap также предлагает графический интерфейс под названием Zenmap. На Zenmap вы можете создавать и выполнять команды и сканирования. Графический интерфейс намного удобнее, чем интерфейс командной строки, что делает его идеальным для новых пользователей. Графический интерфейс также может отображать графическое сравнение результатов тестирования сервиса, например:
Если вы хотите писать свои собственные команды и сценарии, то графический интерфейс далеко не идеален, и вам лучше придерживаться Nmap и интерфейса командной строки.
Paessler PRTG Сетевой монитор

Paessler PRTG Сетевой монитор использует Простой протокол управления сетью (SNMP), чтобы найти все устройства в вашей сети. Как только каждая единица оборудования была обнаружена, она регистрируется в инвентаре. Инвентаризация составляет основу карты сети PRTG. Вы можете реорганизовать карту вручную, если хотите, а также можете указать индивидуальные макеты. Карты не ограничиваются отображением устройств на одном сайте. Он может отображать все устройства в глобальной сети и даже отображать все сайты компании на реальной карте мира. Облачные сервисы также включены в карту сети.
Функция обнаружения сети PRTG работает постоянно. Таким образом, если вы добавляете, перемещаете или удаляете устройство, это изменение будет автоматически отображаться на карте, а инвентарь оборудования также будет обновляться..
Каждое устройство на карте помечено своим IP-адресом. Кроме того, вы можете выбрать устройства, идентифицируемые по их MAC-адресам или именам хостов. Каждый значок устройства на карте является ссылкой на подробное окно, в котором содержится информация об этом элементе оборудования. Вы можете изменить отображение карты сети, чтобы ограничить ее устройствами определенного типа, или просто показать один раздел сети.
Paessler PRTG — единая система мониторинга инфраструктуры. Он также будет отслеживать ваши серверы и приложения, работающие на них. Существуют специальные модули для мониторинга веб-сайтов, и монитор может охватывать виртуализации и сети Wi-Fi, а также.
Paessler PRTG доступен в виде онлайн-сервиса с установленным в вашей системе агентом локального сборщика. Кроме того, вы можете установить программное обеспечение на месте. Система PRTG работает на компьютерах с Windows, но она может связываться с устройствами под управлением других операционных систем. PRTG доступен для скачивания на 30-дневной бесплатной пробной версии.
WhatsUp Gold
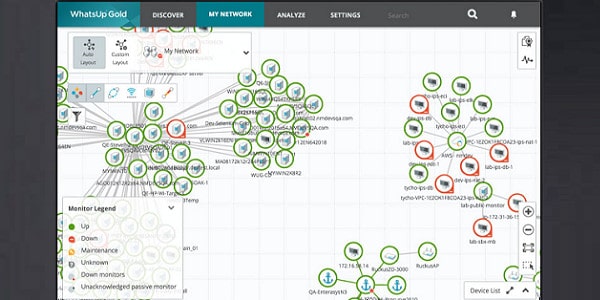
WhatsUp Gold имеет функцию автообнаружения, которая охватывает проводные, беспроводные и виртуальные среды. Программное обеспечение для этого инструмента мониторинга инфраструктуры устанавливается в Windows Server 2008 R2, 2012, 2012 R2 и 2016. При первом запуске утилиты запускаются процедуры обнаружения сети. Они регистрируют все устройства уровня 2 и уровня 3 (коммутаторы и маршрутизаторы) в вашей сети и записывают их в реестр. Процесс обнаружения также генерирует карту сети. Система регистрации постоянно работает, поэтому любые изменения в сети будут отражены на карте. Облачные сервисы, которые использует ваша компания, также включаются в карту, и вы можете охватить несколько сайтов, чтобы построить свою глобальную сеть на одной карте..
В процессе обнаружения WhatsUp Gold используются процедуры Ping и SNMP. Тип устройства также зарегистрирован. Это помогает монитору корректировать процессы соответственно для каждого типа оборудования. Всплывающее окно с деталями, прикрепленное к каждому значку на карте, покажет вам детали об этом оборудовании.
Состояния устройств в сети контролируются с помощью SNMP. Карта показывает состояние каждого устройства с помощью цвета: зеленый — хорошо, желтый — предупреждение, красный — плохо. Так, Вы можете сразу увидеть, как все эти элементы оборудования делают. Состояние сетевого соединения также выделяется цветом: зеленый для хорошего, желтый для предупреждения и красный для перегруженного.
Вы можете получить надстройку для анализа сетевого трафика для WhatsUp Gold, чтобы получить более глубокие сведения о производительности вашей сети. Это дает вам больше возможностей для устранения неполадок благодаря пониманию производительности сети как по каналам связи, так и сквозным. Инструмент планирования мощности помогает вам прогнозировать спрос и при необходимости расширять ресурсы.
Альтернативы Nmap
Хотя обычные пользователи Nmap клянутся в этом, инструмент имеет свои ограничения. Новички в сетевом администрировании научились ожидать графического интерфейса от своих любимых инструментов и лучшего графического представления проблем производительности сети. Адаптация Nmap к карте (см. Ниже) имеет большое значение для удовлетворения этих потребностей..
Если вы не хотите использовать утилиту командной строки, есть альтернативы Nmap, которые вы можете проверить. SolarWinds, один из ведущих мировых производителей инструментов сетевого администрирования, даже предлагает бесплатный сканер портов. Аналитические функции Nmap не так хороши, и вы можете найти другие инструменты для дальнейшего изучения состояния и производительности вашей сети..
Nmap: необходимый инструмент сетевого администрирования
В конечном счете, если вы ищете инструмент, который позволит вам ориентироваться на системы в вашей сети и перемещаться по межсетевым экранам, тогда Nmap — это инструмент для вас. Хотя это не так эффектно, как некоторые другие инструменты сетевого анализа на рынке, оно остается основной частью инструментария большинства ИТ-администраторов. Сканирование Ping и сканирование портов — это только верхушка айсберга, когда мы говорим о том, на что способна эта платформа..
Если вы хотите узнать больше о Nmap, обширный веб-сайт сообщества полон руководств и информации, которые помогут вам извлечь максимальную пользу из своего опыта. Вы можете получить доступ к документации Nmap на сайте инструмента. Пройдя этап обучения, вы не только обеспечите большую прозрачность своей сети, но и сможете защитить свои системы от будущих угроз. Просто начните с изучения основ, и у вас все получится с NMap.
Nmap — это мощный инструмент сетевого сканирования для аудита безопасности и тестирования на проникновение. Это один из основных инструментов, используемых администраторами сети для устранения проблем с подключением к сети и сканирования портов .
Nmap также может определять Mac-адрес, тип ОС , версию службы и многое другое.
В этой статье объясняются основы того, как использовать команду nmap для выполнения различных сетевых задач.
Nmap — это многоплатформенная программа, которую можно установить во всех основных операционных системах. Первоначально он был выпущен как инструмент только для Linux, а позже был перенесен на другие системы, такие как BSD, Windows и macOS.
Если вы предпочитаете графический интерфейс, а не командную строку, Nmap также имеет графический пользовательский интерфейс под названием Zenmap.
Официальные бинарные пакеты доступны для загрузки со страницы загрузки Nmap.
Процедура установки проста и зависит от вашей операционной системы.
Установка Nmap в Ubuntu и Debian
Nmap доступен из репозиториев Ubuntu и Debian по умолчанию. Чтобы установить его, запустите:
sudo apt update
sudo apt install nmap
Установка Nmap на CentOS и Fedora
На CentOS и других производных от Red Hat запускаются:
sudo dnf install nmap
Установка Nmap на macOS
Пользователи macOS могут установить Nmap, загрузив установочный пакет «.dmg» с сайта Nmap или через Homebrew:
brew install nmap
Установка Nmap в Windows
Версия Nmap для Windows имеет некоторые ограничения и, как правило, немного медленнее, чем версия для UNIX.
Самый простой вариант установки Nmap в Windows — это загрузить и запустить самоустанавливающийся exe-файл.
Вы можете запустить Nmap в Windows либо из командной строки, либо запустив программу Zenmap. Для получения дополнительной информации о том, как использовать Nmap в Windows, ознакомьтесь с инструкциями по использованию после установки.
Использование Nmap
Nmap обычно используется для аудита сетевой безопасности, отображения сети, определения открытых портов и поиска сетевых устройств.
Упрощенный синтаксис команды nmap выглядит следующим образом:
nmap [Options] [Target...]
Самый простой пример использования Nmap — сканирование одной цели от имени обычного пользователя без указания каких-либо параметров:
nmap scanme.nmap.org
При вызове от имени пользователя без полномочий root, у которого нет прав на использование сырых пакетов, nmap запускает сканирование TCP-соединения. Параметр -sT по умолчанию включен в непривилегированном режиме.
Вывод будет выглядеть примерно так, включая основную информацию о сканировании и список открытых и отфильтрованных TCP-портов.
Starting Nmap 7.91 ( https://nmap.org ) at 2020-12-16 20:19 CET
Nmap scan report for cast.lan (192.168.10.121)
Host is up (0.048s latency).
Not shown: 981 closed ports
PORT STATE SERVICE
21/tcp open ftp
22/tcp open ssh
25/tcp open smtp
53/tcp open domain
80/tcp open http
110/tcp open pop3
143/tcp open imap
443/tcp open https
587/tcp open submission
993/tcp open imaps
995/tcp open pop3s
1025/tcp open NFS-or-IIS
1080/tcp open socks
8080/tcp open http-proxy
8081/tcp open blackice-icecap

Nmap done: 1 IP address (1 host up) scanned in 1.78 seconds
Самым популярным вариантом сканирования является TCP SYN scan (-sS), который быстрее, чем вариант подключения, и работает со всеми совместимыми стеками TCP.
-sS включается по умолчанию, когда nmap вызывает пользователь с административными привилегиями:
sudo nmap 192.168.10.121
Для более подробного вывода используйте увеличение детализации с помощью -v или -vv:
sudo nmap -vv 192.168.10.121
Чтобы выполнить сканирование UDP, вызовите команду с параметром ( -sU) от имени пользователя root:
sudo nmap -sU 192.168.10.121
Для получения полного списка методов сканирования портов посетите страницу документации Nmap.
Nmap также поддерживает адреса IPv6. Чтобы указать хост IPv6, используйте опцию -6:
sudo nmap -6 fd12:3456:789a:1::1
Указание целевых хостов
Nmap рассматривает все аргументы, которые не являются опциями, как целевые хосты.
Аргументы считаются вариантами, если они начинаются с одинарного или двойного тире (-, --).
Самый простой вариант — передать один или несколько целевых адресов или доменных имен:
nmap 192.168.10.121 host.to.scan
Вы можете использовать нотацию CIDR, чтобы указать диапазон сети:
nmap 192.168.10.0/24
Чтобы указать диапазон октетов, используйте символ тире. Например, для сканирования 192.168.10.1, 192.168.11.1и 192.168.12.1:
nmap 192.168.10-12.1
Другой символ, который вы можете использовать для указания целей, — это запятая. Следующая команда нацелена на те же хосты, что и предыдущая:
nmap 192.168.10,11,12.1
Вы можете комбинировать все формы:
nmap 10.8-10.10,11,12.0/28 192.168.1-2.100,101
Чтобы убедиться, что вы указали правильные хосты перед сканированием, используйте параметр сканирования списка (-sL), который перечисляет только цели без запуска сканирования:
nmap -sL 10.8-10.10,11,12.0/28 192.168.1-2.100,101
Если вы хотите исключить цели, которые включены в указанный вами диапазон, используйте опцию --exclude:
nmap 10.8-10.10,11,12.0/28 --exclude 10.10.12.12
Указание и сканирование портов
По умолчанию Nmap выполняет быстрое сканирование 1000 самых популярных портов. Это не первые 1000 последовательных портов, а 1000 наиболее часто используемых портов в диапазоне от 1 до 65389.
Для поиска всех портов с 1 по 65535 используйте опцию -p:
nmap -p- 192.168.10.121
Каждый порт может находиться в одном из следующих состояний:
- open — программа, запущенная на порту, отвечает на запрос.
- closed — на порту не работает ни одна программа, и хост отвечает на запросы.
- filtered — хост не отвечает на запрос.
Порты и диапазоны портов указываются с помощью опции -p.
Например, чтобы просканировать только порт 443, вы должны использовать следующую команду:
nmap -p 443 192.168.10.121
Чтобы указать более одного порта, разделите целевые порты запятой:
nmap -p 80,443 192.168.10.121
Диапазоны портов можно указать с помощью символа тире. Например, чтобы просканировать все порты UDP в диапазоне от 1 до 1024, вы должны запустить:
sudo nmap -sU -p 1-1024 192.168.10.121
Все вместе:
nmap -p 1-1024,8080,9000 192.168.10.121
Порты также можно указать с помощью имени порта. Например, для поиска порта 22, ssh, вы можете использовать:
nmap -p ssh 192.168.10.121
Ping сканирование
Чтобы выполнить ping-сканирование или обнаружение хоста, вызовите команду nmap с опцией -sn:
sudo nmap -sn 192.168.10.0/24
Эта опция указывает Nmap только на обнаружение сетевых хостов, а не на сканирование портов. Это полезно, когда вы хотите быстро определить, какой из указанных хостов запущен и работает.
Отключение разрешения DNS-имен
По умолчанию Nmap выполняет обратное разрешение DNS для каждого обнаруженного хоста, что увеличивает время сканирования.
При сканировании больших сетей рекомендуется отключить разрешение обратного DNS и ускорить сканирование. Для этого вызовите команду с опцией -n:
sudo nmap -n 192.168.10.0/16
Определение ОС, служб и версий
Nmap может обнаружить операционную систему удаленного хоста с помощью снятия отпечатков стека TCP/IP. Чтобы запустить обнаружение ОС, вызовите команду с опцией -O:
sudo nmap -O scanme.nmap.org
Если Nmap может обнаружить ОС хоста, он напечатает что-то вроде следующего:
...
Device type: general purpose
Running: Linux 5.X
OS CPE: cpe:/o:linux:linux_kernel:5
OS details: Linux 5.0 - 5.4
Network Distance: 18 hops

OS detection performed. Please report any incorrect results at https://nmap.org/submit/ .
Nmap done: 1 IP address (1 host up) scanned in 26.47 seconds
Обычно системные службы прослушивают стандартные порты, которые хорошо известны и зарезервированы для них. Например, если порт 22, соответствующий службе SSH, открыт, вы предполагаете, что на хосте работает SSH-сервер. Однако вы не можете быть абсолютно уверены, потому что люди могут запускать службы на любых портах, которые им нужны.
Благодаря обнаружению службы и версии Nmap покажет вам, какая программа прослушивает порт и версию программы.
Для поиска службы и версии используйте опцию -sV:
sudo nmap -sV scanme.nmap.org
...
PORT STATE SERVICE VERSION
19/tcp filtered chargen
22/tcp open ssh OpenSSH 6.6.1p1 Ubuntu 2ubuntu2.13 (Ubuntu Linux; protocol 2.0)
80/tcp open http Apache httpd 2.4.7 ((Ubuntu))
135/tcp filtered msrpc
139/tcp filtered netbios-ssn
445/tcp filtered microsoft-ds
9929/tcp open nping-echo Nping echo
31337/tcp open tcpwrapped
Service Info: OS: Linux; CPE: cpe:/o:linux:linux_kernel
...
Вы также можете сканировать ОС, версии и запускать traceroute с помощью одной команды, используя параметр -A:
sudo nmap -A 192.168.10.121
Вывод Nmap
По умолчанию Nmap выводит информацию на стандартный вывод (stdout).
Если вы сканируете большую сеть или нуждаетесь в информации для дальнейшего использования, вы можете сохранить результат в файл.
Nmap предоставляет несколько типов вывода. Чтобы сохранить вывод в нормальном формате, используйте параметр, за которым следует имя файла -oN:
sudo nmap -sU -p 1-1024 192.168.10.121 -oN output.txt
Самый популярный вариант — сохранить вывод в формате XML. Для этого воспользуйтесь опцией -oX:
sudo nmap -sU -p 1-1024 192.168.10.121 -oX output.xml
Еще один полезный формат — вывод grepable, который можно анализировать с помощью стандартных инструментов Unix, таких как grep, awk и cut. Вывод grepable указывается с опцией -oG:
sudo nmap -sU -p 1-1024 192.168.10.121 -oG output
Механизм сценариев Nmap
Одна из самых мощных функций Nmap — это скриптовый движок. Nmap поставляется с сотнями скриптов , и вы также можете писать свои собственные скрипты на языке Lua.
Вы можете использовать скрипты для обнаружения вредоносных программ и бэкдоров, выполнения атак методом перебора и т.д.
Например, чтобы проверить, скомпрометирован ли данный хост, вы можете использовать:
nmap -sV --script http-malware-host scanme.nmap.org
Заключение
Nmap — это инструмент с открытым исходным кодом, который в основном используется администраторами сети для обнаружения узлов и сканирования портов.
Обратите внимание, что в некоторых странах сканирование сетей без разрешения является незаконным.
Если у вас есть вопросы или замечания, пожалуйста, оставьте комментарий ниже.
Network exploration tool and security / port scanner
Examples (TL;DR)
- Check if an IP address is up, and guess the remote host’s operating system:
nmap -O ip_or_hostname - Try to determine whether the specified hosts are up (ping scan) and what their names are:
nmap -sn ip_or_hostname optional_another_address - Also enable scripts, service detection, OS fingerprinting and traceroute:
nmap -A address_or_addresses - Scan a specific list of ports (use ‘-p-‘ for all ports from 1 to 65535):
nmap -p port1,port2,...,portN address_or_addresses - Perform service and version detection of the top 1000 ports using default NSE scripts; writing results (‘-oN’) to output file:
nmap -sC -sV -oN top-1000-ports.txt address_or_addresses - Scan target(s) carefully using ‘default and safe’ NSE scripts:
nmap --script "default and safe" address_or_addresses - Scan web server running on standard ports 80 and 443 using all available ‘http-*’ NSE scripts:
nmap --script "http-*" address_or_addresses -p 80,443 - Perform a stealthy very slow scan (‘-T0’) trying to avoid detection by IDS/IPS and use decoy (‘-D’) source IP addresses:
nmap -T0 -D decoy1_ipaddress,decoy2_ipaddress,...,decoyN_ipaddress address_or_addresses
tldr.sh
Synopsis
nmap [Scan Type...] [Options] {target specification}
Description
Nmap (“Network Mapper”) is an open source tool for network exploration and security auditing. It was designed to rapidly scan large networks, although it works fine against single hosts. Nmap uses raw IP packets in novel ways to determine what hosts are available on the network, what services (application name and version) those hosts are offering, what operating systems (and OS versions) they are running, what type of packet filters/firewalls are in use, and dozens of other characteristics. While Nmap is commonly used for security audits, many systems and network administrators find it useful for routine tasks such as network inventory, managing service upgrade schedules, and monitoring host or service uptime.
The output from Nmap is a list of scanned targets, with supplemental information on each depending on the options used. Key among that information is the “interesting ports table”. That table lists the port number and protocol, service name, and state. The state is either open, filtered, closed, or unfiltered. Open means that an application on the target machine is listening for connections/packets on that port. Filtered means that a firewall, filter, or other network obstacle is blocking the port so that Nmap cannot tell whether it is open or closed. Closed ports have no application listening on them, though they could open up at any time. Ports are classified as unfiltered when they are responsive to Nmap’s probes, but Nmap cannot determine whether they are open or closed. Nmap reports the state combinations open|filtered and closed|filtered when it cannot determine which of the two states describe a port. The port table may also include software version details when version detection has been requested. When an IP protocol scan is requested (-sO), Nmap provides information on supported IP protocols rather than listening ports.
In addition to the interesting ports table, Nmap can provide further information on targets, including reverse DNS names, operating system guesses, device types, and MAC addresses.
A typical Nmap scan is shown in Example 1. The only Nmap arguments used in this example are -A, to enable OS and version detection, script scanning, and traceroute; -T4 for faster execution; and then the hostname.
Example 1. A representative Nmap scan
# nmap -A -T4 scanme.nmap.org

Nmap scan report for scanme.nmap.org (74.207.244.221)
Host is up (0.029s latency).
rDNS record for 74.207.244.221: li86-221.members.linode.com
Not shown: 995 closed ports
PORT     STATE    SERVICE     VERSION
22/tcp   open     ssh         OpenSSH 5.3p1 Debian 3ubuntu7 (protocol 2.0)
| ssh-hostkey: 1024 8d:60:f1:7c:ca:b7:3d:0a:d6:67:54:9d:69:d9:b9:dd (DSA)
|_2048 79:f8:09:ac:d4:e2:32:42:10:49:d3:bd:20:82:85:ec (RSA)
80/tcp   open     http        Apache httpd 2.2.14 ((Ubuntu))
|_http-title: Go ahead and ScanMe!
646/tcp  filtered ldp
1720/tcp filtered H.323/Q.931
9929/tcp open     nping-echo  Nping echo
Device type: general purpose
Running: Linux 2.6.X
OS CPE: cpe:/o:linux:linux_kernel:2.6.39
OS details: Linux 2.6.39
Network Distance: 11 hops
Service Info: OS: Linux; CPE: cpe:/o:linux:kernel

TRACEROUTE (using port 53/tcp)
HOP RTT      ADDRESS
[Cut first 10 hops for brevity]
11  17.65 ms li86-221.members.linode.com (74.207.244.221)

Nmap done: 1 IP address (1 host up) scanned in 14.40 seconds
The newest version of Nmap can be obtained from https://nmap.org. The newest version of this man page is available at https://nmap.org/book/man.html. It is also included as a chapter of Nmap Network Scanning: The Official Nmap Project Guide to Network Discovery and Security Scanning (see https://nmap.org/book/).
Options Summary
This options summary is printed when Nmap is run with no arguments, and the latest version is always available at https://svn.nmap.org/nmap/docs/nmap.usage.txt. It helps people remember the most common options, but is no substitute for the in-depth documentation in the rest of this manual. Some obscure options aren’t even included here.
Nmap 7.93 ( https://nmap.org )
Usage: nmap [Scan Type(s)] [Options] {target specification}
TARGET SPECIFICATION:
  Can pass hostnames, IP addresses, networks, etc.
  Ex: scanme.nmap.org, 192.168.0.1; 10.0.0-255.1-254
  -iL <inputfilename>: Input from list of hosts/networks
  -iR <num hosts>: Choose random targets
  --exclude <host1[,host2][,host3],...>: Exclude hosts/networks
  --excludefile <exclude_file>: Exclude list from file
HOST DISCOVERY:
  -sL: List Scan - simply list targets to scan
  -sn: Ping Scan - disable port scan
  -Pn: Treat all hosts as online -- skip host discovery
  -PS/PA/PU/PY[portlist]: TCP SYN/ACK, UDP or SCTP discovery to given ports
  -PE/PP/PM: ICMP echo, timestamp, and netmask request discovery probes
  -PO[protocol list]: IP Protocol Ping
  -n/-R: Never do DNS resolution/Always resolve [default: sometimes]
  --dns-servers <serv1[,serv2],...>: Specify custom DNS servers
  --system-dns: Use OS's DNS resolver
  --traceroute: Trace hop path to each host
SCAN TECHNIQUES:
  -sS/sT/sA/sW/sM: TCP SYN/Connect()/ACK/Window/Maimon scans
  -sU: UDP Scan
  -sN/sF/sX: TCP Null, FIN, and Xmas scans
  --scanflags <flags>: Customize TCP scan flags
  -sI <zombie host[:probeport]>: Idle scan
  -sY/sZ: SCTP INIT/COOKIE-ECHO scans
  -sO: IP protocol scan
  -b <FTP relay host>: FTP bounce scan
PORT SPECIFICATION AND SCAN ORDER:
  -p <port ranges>: Only scan specified ports
    Ex: -p22; -p1-65535; -p U:53,111,137,T:21-25,80,139,8080,S:9
  --exclude-ports <port ranges>: Exclude the specified ports from scanning
  -F: Fast mode - Scan fewer ports than the default scan
  -r: Scan ports sequentially - don't randomize
  --top-ports <number>: Scan <number> most common ports
  --port-ratio <ratio>: Scan ports more common than <ratio>
SERVICE/VERSION DETECTION:
  -sV: Probe open ports to determine service/version info
  --version-intensity <level>: Set from 0 (light) to 9 (try all probes)
  --version-light: Limit to most likely probes (intensity 2)
  --version-all: Try every single probe (intensity 9)
  --version-trace: Show detailed version scan activity (for debugging)
SCRIPT SCAN:
  -sC: equivalent to --script=default
  --script=<Lua scripts>: <Lua scripts> is a comma separated list of
           directories, script-files or script-categories
  --script-args=<n1=v1,[n2=v2,...]>: provide arguments to scripts
  --script-args-file=filename: provide NSE script args in a file
  --script-trace: Show all data sent and received
  --script-updatedb: Update the script database.
  --script-help=<Lua scripts>: Show help about scripts.
           <Lua scripts> is a comma-separated list of script-files or
           script-categories.
OS DETECTION:
  -O: Enable OS detection
  --osscan-limit: Limit OS detection to promising targets
  --osscan-guess: Guess OS more aggressively
TIMING AND PERFORMANCE:
  Options which take <time> are in seconds, or append 'ms' (milliseconds),
  's' (seconds), 'm' (minutes), or 'h' (hours) to the value (e.g. 30m).
  -T<0-5>: Set timing template (higher is faster)
  --min-hostgroup/max-hostgroup <size>: Parallel host scan group sizes
  --min-parallelism/max-parallelism <numprobes>: Probe parallelization
  --min-rtt-timeout/max-rtt-timeout/initial-rtt-timeout <time>: Specifies
      probe round trip time.
  --max-retries <tries>: Caps number of port scan probe retransmissions.
  --host-timeout <time>: Give up on target after this long
  --scan-delay/--max-scan-delay <time>: Adjust delay between probes
  --min-rate <number>: Send packets no slower than <number> per second
  --max-rate <number>: Send packets no faster than <number> per second
FIREWALL/IDS EVASION AND SPOOFING:
  -f; --mtu <val>: fragment packets (optionally w/given MTU)
  -D <decoy1,decoy2[,ME],...>: Cloak a scan with decoys
  -S <IP_Address>: Spoof source address
  -e <iface>: Use specified interface
  -g/--source-port <portnum>: Use given port number
  --proxies <url1,[url2],...>: Relay connections through HTTP/SOCKS4 proxies
  --data <hex string>: Append a custom payload to sent packets
  --data-string <string>: Append a custom ASCII string to sent packets
  --data-length <num>: Append random data to sent packets
  --ip-options <options>: Send packets with specified ip options
  --ttl <val>: Set IP time-to-live field
  --spoof-mac <mac address/prefix/vendor name>: Spoof your MAC address
  --badsum: Send packets with a bogus TCP/UDP/SCTP checksum
OUTPUT:
  -oN/-oX/-oS/-oG <file>: Output scan in normal, XML, s|<rIpt kIddi3,
     and Grepable format, respectively, to the given filename.
  -oA <basename>: Output in the three major formats at once
  -v: Increase verbosity level (use -vv or more for greater effect)
  -d: Increase debugging level (use -dd or more for greater effect)
  --reason: Display the reason a port is in a particular state
  --open: Only show open (or possibly open) ports
  --packet-trace: Show all packets sent and received
  --iflist: Print host interfaces and routes (for debugging)
  --append-output: Append to rather than clobber specified output files
  --resume <filename>: Resume an aborted scan
  --noninteractive: Disable runtime interactions via keyboard
  --stylesheet <path/URL>: XSL stylesheet to transform XML output to HTML
  --webxml: Reference stylesheet from Nmap.Org for more portable XML
  --no-stylesheet: Prevent associating of XSL stylesheet w/XML output
MISC:
  -6: Enable IPv6 scanning
  -A: Enable OS detection, version detection, script scanning, and traceroute
  --datadir <dirname>: Specify custom Nmap data file location
  --send-eth/--send-ip: Send using raw ethernet frames or IP packets
  --privileged: Assume that the user is fully privileged
  --unprivileged: Assume the user lacks raw socket privileges
  -V: Print version number
  -h: Print this help summary page.
EXAMPLES:
  nmap -v -A scanme.nmap.org
  nmap -v -sn 192.168.0.0/16 10.0.0.0/8
  nmap -v -iR 10000 -Pn -p 80
SEE THE MAN PAGE (https://nmap.org/book/man.html) FOR MORE OPTIONS AND EXAMPLES
Target Specification
Everything on the Nmap command-line that isn’t an option (or option argument) is treated as a target host specification. The simplest case is to specify a target IP address or hostname for scanning.
When a hostname is given as a target, it is resolved via the Domain Name System (DNS) to determine the IP address to scan. If the name resolves to more than one IP address, only the first one will be scanned. To make Nmap scan all the resolved addresses instead of only the first one, use the —resolve-all option.
Sometimes you wish to scan a whole network of adjacent hosts. For this, Nmap supports CIDR-style addressing. You can append /numbits to an IP address or hostname and Nmap will scan every IP address for which the first numbits are the same as for the reference IP or hostname given. For example, 192.168.10.0/24 would scan the 256 hosts between 192.168.10.0 (binary: 11000000 10101000 00001010 00000000) and 192.168.10.255 (binary: 11000000 10101000 00001010 11111111), inclusive. 192.168.10.40/24 would scan exactly the same targets. Given that the host scanme.nmap.org is at the IP address 64.13.134.52, the specification scanme.nmap.org/16 would scan the 65,536 IP addresses between 64.13.0.0 and 64.13.255.255. The smallest allowed value is /0, which targets the whole Internet. The largest value for IPv4 is /32, which scans just the named host or IP address because all address bits are fixed. The largest value for IPv6 is /128, which does the same thing.
CIDR notation is short but not always flexible enough. For example, you might want to scan 192.168.0.0/16 but skip any IPs ending with .0 or .255 because they may be used as subnet network and broadcast addresses. Nmap supports this through octet range addressing. Rather than specify a normal IP address, you can specify a comma-separated list of numbers or ranges for each octet. For example, 192.168.0-255.1-254 will skip all addresses in the range that end in .0 or .255, and 192.168.3-5,7.1 will scan the four addresses 192.168.3.1, 192.168.4.1, 192.168.5.1, and 192.168.7.1. Either side of a range may be omitted; the default values are 0 on the left and 255 on the right. Using — by itself is the same as 0-255, but remember to use 0- in the first octet so the target specification doesn’t look like a command-line option. Ranges need not be limited to the final octets: the specifier 0-255.0-255.13.37 will perform an Internet-wide scan for all IP addresses ending in 13.37. This sort of broad sampling can be useful for Internet surveys and research.
IPv6 addresses can be specified by their fully qualified IPv6 address or hostname or with CIDR notation for subnets. Octet ranges aren’t yet supported for IPv6.
IPv6 addresses with non-global scope need to have a zone ID suffix. On Unix systems, this is a percent sign followed by an interface name; a complete address might be fe80::a8bb:ccff:fedd:eeff%eth0. On Windows, use an interface index number in place of an interface name: fe80::a8bb:ccff:fedd:eeff%1. You can see a list of interface indexes by running the command netsh.exe interface ipv6 show interface.
Nmap accepts multiple host specifications on the command line, and they don’t need to be the same type. The command nmap scanme.nmap.org 192.168.0.0/8 10.0.0,1,3-7.- does what you would expect.
While targets are usually specified on the command lines, the following options are also available to control target selection:
- -iL inputfilename (Input from list)
-
Reads target specifications from inputfilename. Passing a huge list of hosts is often awkward on the command line, yet it is a common desire. For example, your DHCP server might export a list of 10,000 current leases that you wish to scan. Or maybe you want to scan all IP addresses except for those to locate hosts using unauthorized static IP addresses. Simply generate the list of hosts to scan and pass that filename to Nmap as an argument to the -iL option. Entries can be in any of the formats accepted by Nmap on the command line (IP address, hostname, CIDR, IPv6, or octet ranges). Each entry must be separated by one or more spaces, tabs, or newlines. You can specify a hyphen (-) as the filename if you want Nmap to read hosts from standard input rather than an actual file.
The input file may contain comments that start with # and extend to the end of the line.
- -iR num hosts (Choose random targets)
-
For Internet-wide surveys and other research, you may want to choose targets at random. The num hosts argument tells Nmap how many IPs to generate. Undesirable IPs such as those in certain private, multicast, or unallocated address ranges are automatically skipped. The argument 0 can be specified for a never-ending scan. Keep in mind that some network administrators bristle at unauthorized scans of their networks and may complain. Use this option at your own risk! If you find yourself really bored one rainy afternoon, try the command nmap -Pn -sS -p 80 -iR 0 —open to locate random web servers for browsing.
- —exclude host1[,host2[,…]] (Exclude hosts/networks)
-
Specifies a comma-separated list of targets to be excluded from the scan even if they are part of the overall network range you specify. The list you pass in uses normal Nmap syntax, so it can include hostnames, CIDR netblocks, octet ranges, etc. This can be useful when the network you wish to scan includes untouchable mission-critical servers, systems that are known to react adversely to port scans, or subnets administered by other people.
- —excludefile exclude_file (Exclude list from file)
-
This offers the same functionality as the —exclude option, except that the excluded targets are provided in a newline-, space-, or tab-delimited exclude_file rather than on the command line.
The exclude file may contain comments that start with # and extend to the end of the line.
- -n (No DNS resolution)
-
Tells Nmap to never do reverse DNS resolution on the active IP addresses it finds. Since DNS can be slow even with Nmap’s built-in parallel stub resolver, this option can slash scanning times.
- -R (DNS resolution for all targets)
-
Tells Nmap to always do reverse DNS resolution on the target IP addresses. Normally reverse DNS is only performed against responsive (online) hosts.
- —resolve-all (Scan each resolved address)
-
If a hostname target resolves to more than one address, scan all of them. The default behavior is to only scan the first resolved address. Regardless, only addresses in the appropriate address family will be scanned: IPv4 by default, IPv6 with -6.
- —unique (Scan each address only once)
-
Scan each IP address only once. The default behavior is to scan each address as many times as it is specified in the target list, such as when network ranges overlap or different hostnames resolve to the same address.
- —system-dns (Use system DNS resolver)
-
By default, Nmap reverse-resolves IP addresses by sending queries directly to the name servers configured on your host and then listening for responses. Many requests (often dozens) are performed in parallel to improve performance. Specify this option to use your system resolver instead (one IP at a time via the getnameinfo call). This is slower and rarely useful unless you find a bug in the Nmap parallel resolver (please let us know if you do). The system resolver is always used for forward lookups (getting an IP address from a hostname).
- —dns-servers server1[,server2[,…]] (Servers to use for reverse DNS queries)
-
By default, Nmap determines your DNS servers (for rDNS resolution) from your resolv.conf file (Unix) or the Registry (Win32). Alternatively, you may use this option to specify alternate servers. This option is not honored if you are using —system-dns. Using multiple DNS servers is often faster, especially if you choose authoritative servers for your target IP space. This option can also improve stealth, as your requests can be bounced off just about any recursive DNS server on the Internet.
This option also comes in handy when scanning private networks. Sometimes only a few name servers provide proper rDNS information, and you may not even know where they are. You can scan the network for port 53 (perhaps with version detection), then try Nmap list scans (-sL) specifying each name server one at a time with —dns-servers until you find one which works.
This option might not be honored if the DNS response exceeds the size of a UDP packet. In such a situation our DNS resolver will make the best effort to extract a response from the truncated packet, and if not successful it will fall back to using the system resolver. Also, responses that contain CNAME aliases will fall back to the system resolver.
Host Discovery
One of the very first steps in any network reconnaissance mission is to reduce a (sometimes huge) set of IP ranges into a list of active or interesting hosts. Scanning every port of every single IP address is slow and usually unnecessary. Of course what makes a host interesting depends greatly on the scan purposes. Network administrators may only be interested in hosts running a certain service, while security auditors may care about every single device with an IP address. An administrator may be comfortable using just an ICMP ping to locate hosts on his internal network, while an external penetration tester may use a diverse set of dozens of probes in an attempt to evade firewall restrictions.
Because host discovery needs are so diverse, Nmap offers a wide variety of options for customizing the techniques used. Host discovery is sometimes called ping scan, but it goes well beyond the simple ICMP echo request packets associated with the ubiquitous ping tool. Users can skip the discovery step entirely with a list scan (-sL) or by disabling host discovery (-Pn), or engage the network with arbitrary combinations of multi-port TCP SYN/ACK, UDP, SCTP INIT and ICMP probes. The goal of these probes is to solicit responses which demonstrate that an IP address is actually active (is being used by a host or network device). On many networks, only a small percentage of IP addresses are active at any given time. This is particularly common with private address space such as 10.0.0.0/8. That network has 16 million IPs, but I have seen it used by companies with less than a thousand machines. Host discovery can find those machines in a sparsely allocated sea of IP addresses.
If no host discovery options are given, Nmap sends an ICMP echo request, a TCP SYN packet to port 443, a TCP ACK packet to port 80, and an ICMP timestamp request. (For IPv6, the ICMP timestamp request is omitted because it is not part of ICMPv6.) These defaults are equivalent to the -PE -PS443 -PA80 -PP options. The exceptions to this are the ARP (for IPv4) and Neighbor Discovery (for IPv6) scans which are used for any targets on a local ethernet network. For unprivileged Unix shell users, the default probes are a SYN packet to ports 80 and 443 using the connect system call. This host discovery is often sufficient when scanning local networks, but a more comprehensive set of discovery probes is recommended for security auditing.
The -P* options (which select ping types) can be combined. You can increase your odds of penetrating strict firewalls by sending many probe types using different TCP ports/flags and ICMP codes. Also note that ARP/Neighbor Discovery is done by default against targets on a local Ethernet network even if you specify other -P* options, because it is almost always faster and more effective.
By default, Nmap does host discovery and then performs a port scan against each host it determines is online. This is true even if you specify non-default host discovery types such as UDP probes (-PU). Read about the -sn option to learn how to perform only host discovery, or use -Pn to skip host discovery and port scan all target addresses. The following options control host discovery:
- -sL (List Scan)
-
The list scan is a degenerate form of host discovery that simply lists each host of the network(s) specified, without sending any packets to the target hosts. By default, Nmap still does reverse-DNS resolution on the hosts to learn their names. It is often surprising how much useful information simple hostnames give out. For example, fw.chi is the name of one company’s Chicago firewall.
Nmap also reports the total number of IP addresses at the end. The list scan is a good sanity check to ensure that you have proper IP addresses for your targets. If the hosts sport domain names you do not recognize, it is worth investigating further to prevent scanning the wrong company’s network.
Since the idea is to simply print a list of target hosts, options for higher level functionality such as port scanning, OS detection, or host discovery cannot be combined with this. If you wish to disable host discovery while still performing such higher level functionality, read up on the -Pn (skip host discovery) option.
- -sn (No port scan)
-
This option tells Nmap not to do a port scan after host discovery, and only print out the available hosts that responded to the host discovery probes. This is often known as a “ping scan”, but you can also request that traceroute and NSE host scripts be run. This is by default one step more intrusive than the list scan, and can often be used for the same purposes. It allows light reconnaissance of a target network without attracting much attention. Knowing how many hosts are up is more valuable to attackers than the list provided by list scan of every single IP and host name.
Systems administrators often find this option valuable as well. It can easily be used to count available machines on a network or monitor server availability. This is often called a ping sweep, and is more reliable than pinging the broadcast address because many hosts do not reply to broadcast queries.
The default host discovery done with -sn consists of an ICMP echo request, TCP SYN to port 443, TCP ACK to port 80, and an ICMP timestamp request by default. When executed by an unprivileged user, only SYN packets are sent (using a connect call) to ports 80 and 443 on the target. When a privileged user tries to scan targets on a local ethernet network, ARP requests are used unless —send-ip was specified. The -sn option can be combined with any of the discovery probe types (the -P* options) for greater flexibility. If any of those probe type and port number options are used, the default probes are overridden. When strict firewalls are in place between the source host running Nmap and the target network, using those advanced techniques is recommended. Otherwise hosts could be missed when the firewall drops probes or their responses.
In previous releases of Nmap, -sn was known as -sP.
- -Pn (No ping)
-
This option skips the host discovery stage altogether. Normally, Nmap uses this stage to determine active machines for heavier scanning and to gauge the speed of the network. By default, Nmap only performs heavy probing such as port scans, version detection, or OS detection against hosts that are found to be up. Disabling host discovery with -Pn causes Nmap to attempt the requested scanning functions against every target IP address specified. So if a /16 sized network is specified on the command line, all 65,536 IP addresses are scanned. Proper host discovery is skipped as with the list scan, but instead of stopping and printing the target list, Nmap continues to perform requested functions as if each target IP is active. Default timing parameters are used, which may result in slower scans. To skip host discovery and port scan, while still allowing NSE to run, use the two options -Pn -sn together.
For machines on a local ethernet network, ARP scanning will still be performed (unless —disable-arp-ping or —send-ip is specified) because Nmap needs MAC addresses to further scan target hosts. In previous versions of Nmap, -Pn was -P0 and -PN.
- -PS port list (TCP SYN Ping)
-
This option sends an empty TCP packet with the SYN flag set. The default destination port is 80 (configurable at compile time by changing DEFAULT_TCP_PROBE_PORT_SPEC in nmap.h). Alternate ports can be specified as a parameter. The syntax is the same as for the -p except that port type specifiers like T: are not allowed. Examples are -PS22 and -PS22-25,80,113,1050,35000. Note that there can be no space between -PS and the port list. If multiple probes are specified they will be sent in parallel.
The SYN flag suggests to the remote system that you are attempting to establish a connection. Normally the destination port will be closed, and a RST (reset) packet sent back. If the port happens to be open, the target will take the second step of a TCP three-way-handshake by responding with a SYN/ACK TCP packet. The machine running Nmap then tears down the nascent connection by responding with a RST rather than sending an ACK packet which would complete the three-way-handshake and establish a full connection. The RST packet is sent by the kernel of the machine running Nmap in response to the unexpected SYN/ACK, not by Nmap itself.
Nmap does not care whether the port is open or closed. Either the RST or SYN/ACK response discussed previously tell Nmap that the host is available and responsive.
On Unix boxes, only the privileged user root is generally able to send and receive raw TCP packets. For unprivileged users, a workaround is automatically employed whereby the connect system call is initiated against each target port. This has the effect of sending a SYN packet to the target host, in an attempt to establish a connection. If connect returns with a quick success or an ECONNREFUSED failure, the underlying TCP stack must have received a SYN/ACK or RST and the host is marked available. If the connection attempt is left hanging until a timeout is reached, the host is marked as down.
- -PA port list (TCP ACK Ping)
-
The TCP ACK ping is quite similar to the just-discussed SYN ping. The difference, as you could likely guess, is that the TCP ACK flag is set instead of the SYN flag. Such an ACK packet purports to be acknowledging data over an established TCP connection, but no such connection exists. So remote hosts should always respond with a RST packet, disclosing their existence in the process.
The -PA option uses the same default port as the SYN probe (80) and can also take a list of destination ports in the same format. If an unprivileged user tries this, the connect workaround discussed previously is used. This workaround is imperfect because connect is actually sending a SYN packet rather than an ACK.
The reason for offering both SYN and ACK ping probes is to maximize the chances of bypassing firewalls. Many administrators configure routers and other simple firewalls to block incoming SYN packets except for those destined for public services like the company web site or mail server. This prevents other incoming connections to the organization, while allowing users to make unobstructed outgoing connections to the Internet. This non-stateful approach takes up few resources on the firewall/router and is widely supported by hardware and software filters. The Linux Netfilter/iptables firewall software offers the —syn convenience option to implement this stateless approach. When stateless firewall rules such as this are in place, SYN ping probes (-PS) are likely to be blocked when sent to closed target ports. In such cases, the ACK probe shines as it cuts right through these rules.
Another common type of firewall uses stateful rules that drop unexpected packets. This feature was initially found mostly on high-end firewalls, though it has become much more common over the years. The Linux Netfilter/iptables system supports this through the —state option, which categorizes packets based on connection state. A SYN probe is more likely to work against such a system, as unexpected ACK packets are generally recognized as bogus and dropped. A solution to this quandary is to send both SYN and ACK probes by specifying -PS and -PA.
- -PU port list (UDP Ping)
-
Another host discovery option is the UDP ping, which sends a UDP packet to the given ports. For most ports, the packet will be empty, though some use a protocol-specific payload that is more likely to elicit a response. The payload database is described at https://nmap.org/book/nmap-payloads.html.
Packet content can also be affected with the —data, —data-string, and —data-length options.
The port list takes the same format as with the previously discussed -PS and -PA options. If no ports are specified, the default is 40125. This default can be configured at compile-time by changing DEFAULT_UDP_PROBE_PORT_SPEC in nmap.h. A highly uncommon port is used by default because sending to open ports is often undesirable for this particular scan type.
Upon hitting a closed port on the target machine, the UDP probe should elicit an ICMP port unreachable packet in return. This signifies to Nmap that the machine is up and available. Many other types of ICMP errors, such as host/network unreachables or TTL exceeded are indicative of a down or unreachable host. A lack of response is also interpreted this way. If an open port is reached, most services simply ignore the empty packet and fail to return any response. This is why the default probe port is 40125, which is highly unlikely to be in use. A few services, such as the Character Generator (chargen) protocol, will respond to an empty UDP packet, and thus disclose to Nmap that the machine is available.
The primary advantage of this scan type is that it bypasses firewalls and filters that only screen TCP. For example, I once owned a Linksys BEFW11S4 wireless broadband router. The external interface of this device filtered all TCP ports by default, but UDP probes would still elicit port unreachable messages and thus give away the device.
- -PY port list (SCTP INIT Ping)
-
This option sends an SCTP packet containing a minimal INIT chunk. The default destination port is 80 (configurable at compile time by changing DEFAULT_SCTP_PROBE_PORT_SPEC in nmap.h). Alternate ports can be specified as a parameter. The syntax is the same as for the -p except that port type specifiers like S: are not allowed. Examples are -PY22 and -PY22,80,179,5060. Note that there can be no space between -PY and the port list. If multiple probes are specified they will be sent in parallel.
The INIT chunk suggests to the remote system that you are attempting to establish an association. Normally the destination port will be closed, and an ABORT chunk will be sent back. If the port happens to be open, the target will take the second step of an SCTP four-way-handshake by responding with an INIT-ACK chunk. If the machine running Nmap has a functional SCTP stack, then it tears down the nascent association by responding with an ABORT chunk rather than sending a COOKIE-ECHO chunk which would be the next step in the four-way-handshake. The ABORT packet is sent by the kernel of the machine running Nmap in response to the unexpected INIT-ACK, not by Nmap itself.
Nmap does not care whether the port is open or closed. Either the ABORT or INIT-ACK response discussed previously tell Nmap that the host is available and responsive.
On Unix boxes, only the privileged user root is generally able to send and receive raw SCTP packets. Using SCTP INIT Pings is currently not possible for unprivileged users.
- -PE; -PP; -PM (ICMP Ping Types)
-
In addition to the unusual TCP, UDP and SCTP host discovery types discussed previously, Nmap can send the standard packets sent by the ubiquitous ping program. Nmap sends an ICMP type 8 (echo request) packet to the target IP addresses, expecting a type 0 (echo reply) in return from available hosts. Unfortunately for network explorers, many hosts and firewalls now block these packets, rather than responding as required by RFC 1122[2]. For this reason, ICMP-only scans are rarely reliable enough against unknown targets over the Internet. But for system administrators monitoring an internal network, they can be a practical and efficient approach. Use the -PE option to enable this echo request behavior.
While echo request is the standard ICMP ping query, Nmap does not stop there. The ICMP standards (RFC 792[3] and RFC 950[4] ) also specify timestamp request, information request, and address mask request packets as codes 13, 15, and 17, respectively. While the ostensible purpose for these queries is to learn information such as address masks and current times, they can easily be used for host discovery. A system that replies is up and available. Nmap does not currently implement information request packets, as they are not widely supported. RFC 1122 insists that “a host SHOULD NOT implement these messages”. Timestamp and address mask queries can be sent with the -PP and -PM options, respectively. A timestamp reply (ICMP code 14) or address mask reply (code 18) discloses that the host is available. These two queries can be valuable when administrators specifically block echo request packets while forgetting that other ICMP queries can be used for the same purpose.
- -PO protocol list (IP Protocol Ping)
-
One of the newer host discovery options is the IP protocol ping, which sends IP packets with the specified protocol number set in their IP header. The protocol list takes the same format as do port lists in the previously discussed TCP, UDP and SCTP host discovery options. If no protocols are specified, the default is to send multiple IP packets for ICMP (protocol 1), IGMP (protocol 2), and IP-in-IP (protocol 4). The default protocols can be configured at compile-time by changing DEFAULT_PROTO_PROBE_PORT_SPEC in nmap.h. Note that for the ICMP, IGMP, TCP (protocol 6), UDP (protocol 17) and SCTP (protocol 132), the packets are sent with the proper protocol headers while other protocols are sent with no additional data beyond the IP header (unless any of —data, —data-string, or —data-length options are specified).
This host discovery method looks for either responses using the same protocol as a probe, or ICMP protocol unreachable messages which signify that the given protocol isn’t supported on the destination host. Either type of response signifies that the target host is alive.
- —disable-arp-ping (No ARP or ND Ping)
-
Nmap normally does ARP or IPv6 Neighbor Discovery (ND) discovery of locally connected ethernet hosts, even if other host discovery options such as -Pn or -PE are used. To disable this implicit behavior, use the —disable-arp-ping option.
The default behavior is normally faster, but this option is useful on networks using proxy ARP, in which a router speculatively replies to all ARP requests, making every target appear to be up according to ARP scan.
- —discovery-ignore-rst
-
In some cases, firewalls may spoof TCP reset (RST) replies in response to probes to unoccupied or disallowed addresses. Since Nmap ordinarily considers RST replies to be proof that the target is up, this can lead to wasted time scanning targets that aren’t there. Using the —discovery-ignore-rst will prevent Nmap from considering these replies during host discovery. You may need to select extra host discovery options to ensure you don’t miss targets in this case.
- —traceroute (Trace path to host)
-
Traceroutes are performed post-scan using information from the scan results to determine the port and protocol most likely to reach the target. It works with all scan types except connect scans (-sT) and idle scans (-sI). All traces use Nmap’s dynamic timing model and are performed in parallel.
Traceroute works by sending packets with a low TTL (time-to-live) in an attempt to elicit ICMP Time Exceeded messages from intermediate hops between the scanner and the target host. Standard traceroute implementations start with a TTL of 1 and increment the TTL until the destination host is reached. Nmap’s traceroute starts with a high TTL and then decrements the TTL until it reaches zero. Doing it backwards lets Nmap employ clever caching algorithms to speed up traces over multiple hosts. On average Nmap sends 5–10 fewer packets per host, depending on network conditions. If a single subnet is being scanned (i.e. 192.168.0.0/24) Nmap may only have to send two packets to most hosts.
Port Scanning Basics
While Nmap has grown in functionality over the years, it began as an efficient port scanner, and that remains its core function. The simple command nmap target scans 1,000 TCP ports on the host target. While many port scanners have traditionally lumped all ports into the open or closed states, Nmap is much more granular. It divides ports into six states: open, closed, filtered, unfiltered, open|filtered, or closed|filtered.
These states are not intrinsic properties of the port itself, but describe how Nmap sees them. For example, an Nmap scan from the same network as the target may show port 135/tcp as open, while a scan at the same time with the same options from across the Internet might show that port as filtered.
The six port states recognized by Nmap
- open
-
An application is actively accepting TCP connections, UDP datagrams or SCTP associations on this port. Finding these is often the primary goal of port scanning. Security-minded people know that each open port is an avenue for attack. Attackers and pen-testers want to exploit the open ports, while administrators try to close or protect them with firewalls without thwarting legitimate users. Open ports are also interesting for non-security scans because they show services available for use on the network.
- closed
-
A closed port is accessible (it receives and responds to Nmap probe packets), but there is no application listening on it. They can be helpful in showing that a host is up on an IP address (host discovery, or ping scanning), and as part of OS detection. Because closed ports are reachable, it may be worth scanning later in case some open up. Administrators may want to consider blocking such ports with a firewall. Then they would appear in the filtered state, discussed next.
- filtered
-
Nmap cannot determine whether the port is open because packet filtering prevents its probes from reaching the port. The filtering could be from a dedicated firewall device, router rules, or host-based firewall software. These ports frustrate attackers because they provide so little information. Sometimes they respond with ICMP error messages such as type 3 code 13 (destination unreachable: communication administratively prohibited), but filters that simply drop probes without responding are far more common. This forces Nmap to retry several times just in case the probe was dropped due to network congestion rather than filtering. This slows down the scan dramatically.
- unfiltered
-
The unfiltered state means that a port is accessible, but Nmap is unable to determine whether it is open or closed. Only the ACK scan, which is used to map firewall rulesets, classifies ports into this state. Scanning unfiltered ports with other scan types such as Window scan, SYN scan, or FIN scan, may help resolve whether the port is open.
- open|filtered
-
Nmap places ports in this state when it is unable to determine whether a port is open or filtered. This occurs for scan types in which open ports give no response. The lack of response could also mean that a packet filter dropped the probe or any response it elicited. So Nmap does not know for sure whether the port is open or being filtered. The UDP, IP protocol, FIN, NULL, and Xmas scans classify ports this way.
- closed|filtered
-
This state is used when Nmap is unable to determine whether a port is closed or filtered. It is only used for the IP ID idle scan.
Port Scanning Techniques
As a novice performing automotive repair, I can struggle for hours trying to fit my rudimentary tools (hammer, duct tape, wrench, etc.) to the task at hand. When I fail miserably and tow my jalopy to a real mechanic, he invariably fishes around in a huge tool chest until pulling out the perfect gizmo which makes the job seem effortless. The art of port scanning is similar. Experts understand the dozens of scan techniques and choose the appropriate one (or combination) for a given task. Inexperienced users and script kiddies, on the other hand, try to solve every problem with the default SYN scan. Since Nmap is free, the only barrier to port scanning mastery is knowledge. That certainly beats the automotive world, where it may take great skill to determine that you need a strut spring compressor, then you still have to pay thousands of dollars for it.
Most of the scan types are only available to privileged users. This is because they send and receive raw packets, which requires root access on Unix systems. Using an administrator account on Windows is recommended, though Nmap sometimes works for unprivileged users on that platform when Npcap has already been loaded into the OS. Requiring root privileges was a serious limitation when Nmap was released in 1997, as many users only had access to shared shell accounts. Now, the world is different. Computers are cheaper, far more people have always-on direct Internet access, and desktop Unix systems (including Linux and Mac OS X) are prevalent. A Windows version of Nmap is now available, allowing it to run on even more desktops. For all these reasons, users have less need to run Nmap from limited shared shell accounts. This is fortunate, as the privileged options make Nmap far more powerful and flexible.
While Nmap attempts to produce accurate results, keep in mind that all of its insights are based on packets returned by the target machines (or firewalls in front of them). Such hosts may be untrustworthy and send responses intended to confuse or mislead Nmap. Much more common are non-RFC-compliant hosts that do not respond as they should to Nmap probes. FIN, NULL, and Xmas scans are particularly susceptible to this problem. Such issues are specific to certain scan types and so are discussed in the individual scan type entries.
This section documents the dozen or so port scan techniques supported by Nmap. Only one method may be used at a time, except that UDP scan (-sU) and any one of the SCTP scan types (-sY, -sZ) may be combined with any one of the TCP scan types. As a memory aid, port scan type options are of the form -sC, where C is a prominent character in the scan name, usually the first. The one exception to this is the deprecated FTP bounce scan (-b). By default, Nmap performs a SYN Scan, though it substitutes a connect scan if the user does not have proper privileges to send raw packets (requires root access on Unix). Of the scans listed in this section, unprivileged users can only execute connect and FTP bounce scans.
- -sS (TCP SYN scan)
-
SYN scan is the default and most popular scan option for good reasons. It can be performed quickly, scanning thousands of ports per second on a fast network not hampered by restrictive firewalls. It is also relatively unobtrusive and stealthy since it never completes TCP connections. SYN scan works against any compliant TCP stack rather than depending on idiosyncrasies of specific platforms as Nmap’s FIN/NULL/Xmas, Maimon and idle scans do. It also allows clear, reliable differentiation between the open, closed, and filtered states.
This technique is often referred to as half-open scanning, because you don’t open a full TCP connection. You send a SYN packet, as if you are going to open a real connection and then wait for a response. A SYN/ACK indicates the port is listening (open), while a RST (reset) is indicative of a non-listener. If no response is received after several retransmissions, the port is marked as filtered. The port is also marked filtered if an ICMP unreachable error (type 3, code 0, 1, 2, 3, 9, 10, or 13) is received. The port is also considered open if a SYN packet (without the ACK flag) is received in response. This can be due to an extremely rare TCP feature known as a simultaneous open or split handshake connection (see https://nmap.org/misc/split-handshake.pdf).
- -sT (TCP connect scan)
-
TCP connect scan is the default TCP scan type when SYN scan is not an option. This is the case when a user does not have raw packet privileges. Instead of writing raw packets as most other scan types do, Nmap asks the underlying operating system to establish a connection with the target machine and port by issuing the connect system call. This is the same high-level system call that web browsers, P2P clients, and most other network-enabled applications use to establish a connection. It is part of a programming interface known as the Berkeley Sockets API. Rather than read raw packet responses off the wire, Nmap uses this API to obtain status information on each connection attempt.
When SYN scan is available, it is usually a better choice. Nmap has less control over the high level connect call than with raw packets, making it less efficient. The system call completes connections to open target ports rather than performing the half-open reset that SYN scan does. Not only does this take longer and require more packets to obtain the same information, but target machines are more likely to log the connection. A decent IDS will catch either, but most machines have no such alarm system. Many services on your average Unix system will add a note to syslog, and sometimes a cryptic error message, when Nmap connects and then closes the connection without sending data. Truly pathetic services crash when this happens, though that is uncommon. An administrator who sees a bunch of connection attempts in her logs from a single system should know that she has been connect scanned.
- -sU (UDP scans)
-
While most popular services on the Internet run over the TCP protocol, UDP[5] services are widely deployed. DNS, SNMP, and DHCP (registered ports 53, 161/162, and 67/68) are three of the most common. Because UDP scanning is generally slower and more difficult than TCP, some security auditors ignore these ports. This is a mistake, as exploitable UDP services are quite common and attackers certainly don’t ignore the whole protocol. Fortunately, Nmap can help inventory UDP ports.
UDP scan is activated with the -sU option. It can be combined with a TCP scan type such as SYN scan (-sS) to check both protocols during the same run.
UDP scan works by sending a UDP packet to every targeted port. For some common ports such as 53 and 161, a protocol-specific payload is sent to increase response rate, but for most ports the packet is empty unless the —data, —data-string, or —data-length options are specified. If an ICMP port unreachable error (type 3, code 3) is returned, the port is closed. Other ICMP unreachable errors (type 3, codes 0, 1, 2, 9, 10, or 13) mark the port as filtered. Occasionally, a service will respond with a UDP packet, proving that it is open. If no response is received after retransmissions, the port is classified as open|filtered. This means that the port could be open, or perhaps packet filters are blocking the communication. Version detection (-sV) can be used to help differentiate the truly open ports from the filtered ones.
A big challenge with UDP scanning is doing it quickly. Open and filtered ports rarely send any response, leaving Nmap to time out and then conduct retransmissions just in case the probe or response were lost. Closed ports are often an even bigger problem. They usually send back an ICMP port unreachable error. But unlike the RST packets sent by closed TCP ports in response to a SYN or connect scan, many hosts rate limit ICMP port unreachable messages by default. Linux and Solaris are particularly strict about this. For example, the Linux 2.4.20 kernel limits destination unreachable messages to one per second (in net/ipv4/icmp.c).
Nmap detects rate limiting and slows down accordingly to avoid flooding the network with useless packets that the target machine will drop. Unfortunately, a Linux-style limit of one packet per second makes a 65,536-port scan take more than 18 hours. Ideas for speeding your UDP scans up include scanning more hosts in parallel, doing a quick scan of just the popular ports first, scanning from behind the firewall, and using —host-timeout to skip slow hosts.
- -sY (SCTP INIT scan)
-
SCTP[6] is a relatively new alternative to the TCP and UDP protocols, combining most characteristics of TCP and UDP, and also adding new features like multi-homing and multi-streaming. It is mostly being used for SS7/SIGTRAN related services but has the potential to be used for other applications as well. SCTP INIT scan is the SCTP equivalent of a TCP SYN scan. It can be performed quickly, scanning thousands of ports per second on a fast network not hampered by restrictive firewalls. Like SYN scan, INIT scan is relatively unobtrusive and stealthy, since it never completes SCTP associations. It also allows clear, reliable differentiation between the open, closed, and filtered states.
This technique is often referred to as half-open scanning, because you don’t open a full SCTP association. You send an INIT chunk, as if you are going to open a real association and then wait for a response. An INIT-ACK chunk indicates the port is listening (open), while an ABORT chunk is indicative of a non-listener. If no response is received after several retransmissions, the port is marked as filtered. The port is also marked filtered if an ICMP unreachable error (type 3, code 0, 1, 2, 3, 9, 10, or 13) is received.
- -sN; -sF; -sX (TCP NULL, FIN, and Xmas scans)
-
These three scan types (even more are possible with the —scanflags option described in the next section) exploit a subtle loophole in the TCP RFC[7] to differentiate between open and closed ports. Page 65 of RFC 793 says that “if the [destination] port state is CLOSED …. an incoming segment not containing a RST causes a RST to be sent in response.” Then the next page discusses packets sent to open ports without the SYN, RST, or ACK bits set, stating that: “you are unlikely to get here, but if you do, drop the segment, and return.”
When scanning systems compliant with this RFC text, any packet not containing SYN, RST, or ACK bits will result in a returned RST if the port is closed and no response at all if the port is open. As long as none of those three bits are included, any combination of the other three (FIN, PSH, and URG) are OK. Nmap exploits this with three scan types:
- Null scan (-sN)
-
Does not set any bits (TCP flag header is 0)
- FIN scan (-sF)
-
Sets just the TCP FIN bit.
- Xmas scan (-sX)
-
Sets the FIN, PSH, and URG flags, lighting the packet up like a Christmas tree.
These three scan types are exactly the same in behavior except for the TCP flags set in probe packets. If a RST packet is received, the port is considered closed, while no response means it is open|filtered. The port is marked filtered if an ICMP unreachable error (type 3, code 0, 1, 2, 3, 9, 10, or 13) is received.
The key advantage to these scan types is that they can sneak through certain non-stateful firewalls and packet filtering routers. Another advantage is that these scan types are a little more stealthy than even a SYN scan. Don’t count on this though—most modern IDS products can be configured to detect them. The big downside is that not all systems follow RFC 793 to the letter. A number of systems send RST responses to the probes regardless of whether the port is open or not. This causes all of the ports to be labeled closed. Major operating systems that do this are Microsoft Windows, many Cisco devices, BSDI, and IBM OS/400. This scan does work against most Unix-based systems though. Another downside of these scans is that they can’t distinguish open ports from certain filtered ones, leaving you with the response open|filtered.
- -sA (TCP ACK scan)
-
This scan is different than the others discussed so far in that it never determines open (or even open|filtered) ports. It is used to map out firewall rulesets, determining whether they are stateful or not and which ports are filtered.
The ACK scan probe packet has only the ACK flag set (unless you use —scanflags). When scanning unfiltered systems, open and closed ports will both return a RST packet. Nmap then labels them as unfiltered, meaning that they are reachable by the ACK packet, but whether they are open or closed is undetermined. Ports that don’t respond, or send certain ICMP error messages back (type 3, code 0, 1, 2, 3, 9, 10, or 13), are labeled filtered.
- -sW (TCP Window scan)
-
Window scan is exactly the same as ACK scan except that it exploits an implementation detail of certain systems to differentiate open ports from closed ones, rather than always printing unfiltered when a RST is returned. It does this by examining the TCP Window field of the RST packets returned. On some systems, open ports use a positive window size (even for RST packets) while closed ones have a zero window. So instead of always listing a port as unfiltered when it receives a RST back, Window scan lists the port as open or closed if the TCP Window value in that reset is positive or zero, respectively.
This scan relies on an implementation detail of a minority of systems out on the Internet, so you can’t always trust it. Systems that don’t support it will usually return all ports closed. Of course, it is possible that the machine really has no open ports. If most scanned ports are closed but a few common port numbers (such as 22, 25, 53) are filtered, the system is most likely susceptible. Occasionally, systems will even show the exact opposite behavior. If your scan shows 1,000 open ports and three closed or filtered ports, then those three may very well be the truly open ones.
- -sM (TCP Maimon scan)
-
The Maimon scan is named after its discoverer, Uriel Maimon. He described the technique in Phrack Magazine issue #49 (November 1996). Nmap, which included this technique, was released two issues later. This technique is exactly the same as NULL, FIN, and Xmas scans, except that the probe is FIN/ACK. According to RFC 793[7] (TCP), a RST packet should be generated in response to such a probe whether the port is open or closed. However, Uriel noticed that many BSD-derived systems simply drop the packet if the port is open.
- —scanflags (Custom TCP scan)
-
Truly advanced Nmap users need not limit themselves to the canned scan types offered. The —scanflags option allows you to design your own scan by specifying arbitrary TCP flags. Let your creative juices flow, while evading intrusion detection systems whose vendors simply paged through the Nmap man page adding specific rules!
The —scanflags argument can be a numerical flag value such as 9 (PSH and FIN), but using symbolic names is easier. Just mash together any combination of URG, ACK, PSH, RST, SYN, and FIN. For example, —scanflags URGACKPSHRSTSYNFIN sets everything, though it’s not very useful for scanning. The order these are specified in is irrelevant.
In addition to specifying the desired flags, you can specify a TCP scan type (such as -sA or -sF). That base type tells Nmap how to interpret responses. For example, a SYN scan considers no-response to indicate a filtered port, while a FIN scan treats the same as open|filtered. Nmap will behave the same way it does for the base scan type, except that it will use the TCP flags you specify instead. If you don’t specify a base type, SYN scan is used.
- -sZ (SCTP COOKIE ECHO scan)
-
SCTP COOKIE ECHO scan is a more advanced SCTP scan. It takes advantage of the fact that SCTP implementations should silently drop packets containing COOKIE ECHO chunks on open ports, but send an ABORT if the port is closed. The advantage of this scan type is that it is not as obvious a port scan than an INIT scan. Also, there may be non-stateful firewall rulesets blocking INIT chunks, but not COOKIE ECHO chunks. Don’t be fooled into thinking that this will make a port scan invisible; a good IDS will be able to detect SCTP COOKIE ECHO scans too. The downside is that SCTP COOKIE ECHO scans cannot differentiate between open and filtered ports, leaving you with the state open|filtered in both cases.
- -sI zombie host[:probeport] (idle scan)
-
This advanced scan method allows for a truly blind TCP port scan of the target (meaning no packets are sent to the target from your real IP address). Instead, a unique side-channel attack exploits predictable IP fragmentation ID sequence generation on the zombie host to glean information about the open ports on the target. IDS systems will display the scan as coming from the zombie machine you specify (which must be up and meet certain criteria). This fascinating scan type is too complex to fully describe in this reference guide, so I wrote and posted an informal paper with full details at https://nmap.org/book/idlescan.html.
Besides being extraordinarily stealthy (due to its blind nature), this scan type permits mapping out IP-based trust relationships between machines. The port listing shows open ports from the perspective of the zombie host. So you can try scanning a target using various zombies that you think might be trusted (via router/packet filter rules).
You can add a colon followed by a port number to the zombie host if you wish to probe a particular port on the zombie for IP ID changes. Otherwise Nmap will use the port it uses by default for TCP pings (80).
- -sO (IP protocol scan)
-
IP protocol scan allows you to determine which IP protocols (TCP, ICMP, IGMP, etc.) are supported by target machines. This isn’t technically a port scan, since it cycles through IP protocol numbers rather than TCP or UDP port numbers. Yet it still uses the -p option to select scanned protocol numbers, reports its results within the normal port table format, and even uses the same underlying scan engine as the true port scanning methods. So it is close enough to a port scan that it belongs here.
Besides being useful in its own right, protocol scan demonstrates the power of open-source software. While the fundamental idea is pretty simple, I had not thought to add it nor received any requests for such functionality. Then in the summer of 2000, Gerhard Rieger conceived the idea, wrote an excellent patch implementing it, and sent it to the announce mailing list (then called nmap-hackers). I incorporated that patch into the Nmap tree and released a new version the next day. Few pieces of commercial software have users enthusiastic enough to design and contribute their own improvements!
Protocol scan works in a similar fashion to UDP scan. Instead of iterating through the port number field of a UDP packet, it sends IP packet headers and iterates through the eight-bit IP protocol field. The headers are usually empty, containing no data and not even the proper header for the claimed protocol. The exceptions are TCP, UDP, ICMP, SCTP, and IGMP. A proper protocol header for those is included since some systems won’t send them otherwise and because Nmap already has functions to create them. Instead of watching for ICMP port unreachable messages, protocol scan is on the lookout for ICMP protocol unreachable messages. If Nmap receives any response in any protocol from the target host, Nmap marks that protocol as open. An ICMP protocol unreachable error (type 3, code 2) causes the protocol to be marked as closed while port unreachable (type 3, code 3) marks the protocol open. Other ICMP unreachable errors (type 3, code 0, 1, 9, 10, or 13) cause the protocol to be marked filtered (though they prove that ICMP is open at the same time). If no response is received after retransmissions, the protocol is marked open|filtered
- -b FTP relay host (FTP bounce scan)
-
An interesting feature of the FTP protocol (RFC 959[8]) is support for so-called proxy FTP connections. This allows a user to connect to one FTP server, then ask that files be sent to a third-party server. Such a feature is ripe for abuse on many levels, so most servers have ceased supporting it. One of the abuses this feature allows is causing the FTP server to port scan other hosts. Simply ask the FTP server to send a file to each interesting port of a target host in turn. The error message will describe whether the port is open or not. This is a good way to bypass firewalls because organizational FTP servers are often placed where they have more access to other internal hosts than any old Internet host would. Nmap supports FTP bounce scan with the -b option. It takes an argument of the form username:password@server:port. Server is the name or IP address of a vulnerable FTP server. As with a normal URL, you may omit username:password, in which case anonymous login credentials (user: anonymous password:-wwwuser@) are used. The port number (and preceding colon) may be omitted as well, in which case the default FTP port (21) on server is used.
This vulnerability was widespread in 1997 when Nmap was released, but has largely been fixed. Vulnerable servers are still around, so it is worth trying when all else fails. If bypassing a firewall is your goal, scan the target network for port 21 (or even for any FTP services if you scan all ports with version detection) and use the ftp-bounce NSE script. Nmap will tell you whether the host is vulnerable or not. If you are just trying to cover your tracks, you don’t need to (and, in fact, shouldn’t) limit yourself to hosts on the target network. Before you go scanning random Internet addresses for vulnerable FTP servers, consider that sysadmins may not appreciate you abusing their servers in this way.
Port Specification and Scan Order
In addition to all of the scan methods discussed previously, Nmap offers options for specifying which ports are scanned and whether the scan order is randomized or sequential. By default, Nmap scans the most common 1,000 ports for each protocol.
- -p port ranges (Only scan specified ports)
-
This option specifies which ports you want to scan and overrides the default. Individual port numbers are OK, as are ranges separated by a hyphen (e.g. 1-1023). The beginning and/or end values of a range may be omitted, causing Nmap to use 1 and 65535, respectively. So you can specify -p- to scan ports from 1 through 65535. Scanning port zero is allowed if you specify it explicitly. For IP protocol scanning (-sO), this option specifies the protocol numbers you wish to scan for (0–255).
When scanning a combination of protocols (e.g. TCP and UDP), you can specify a particular protocol by preceding the port numbers by T: for TCP, U: for UDP, S: for SCTP, or P: for IP Protocol. The qualifier lasts until you specify another qualifier. For example, the argument -p U:53,111,137,T:21-25,80,139,8080 would scan UDP ports 53, 111,and 137, as well as the listed TCP ports. Note that to scan both UDP and TCP, you have to specify -sU and at least one TCP scan type (such as -sS, -sF, or -sT). If no protocol qualifier is given, the port numbers are added to all protocol lists. Ports can also be specified by name according to what the port is referred to in the nmap-services. You can even use the wildcards * and ? with the names. For example, to scan FTP and all ports whose names begin with “http”, use -p ftp,http*. Be careful about shell expansions and quote the argument to -p if unsure.
Ranges of ports can be surrounded by square brackets to indicate ports inside that range that appear in nmap-services. For example, the following will scan all ports in nmap-services equal to or below 1024: -p [-1024]. Be careful with shell expansions and quote the argument to -p if unsure.
—exclude-ports port ranges (Exclude the specified ports from scanning)
This option specifies which ports you do want Nmap to exclude from scanning. The port ranges are specified similar to -p. For IP protocol scanning (-sO), this option specifies the protocol numbers you wish to exclude (0–255).
When ports are asked to be excluded, they are excluded from all types of scans (i.e. they will not be scanned under any circumstances). This also includes the discovery phase.
- -F (Fast (limited port) scan)
-
Specifies that you wish to scan fewer ports than the default. Normally Nmap scans the most common 1,000 ports for each scanned protocol. With -F, this is reduced to 100.
Nmap needs an nmap-services file with frequency information in order to know which ports are the most common. If port frequency information isn’t available, perhaps because of the use of a custom nmap-services file, Nmap scans all named ports plus ports 1-1024. In that case, -F means to scan only ports that are named in the services file.
- -r (Don’t randomize ports)
-
By default, Nmap randomizes the scanned port order (except that certain commonly accessible ports are moved near the beginning for efficiency reasons). This randomization is normally desirable, but you can specify -r for sequential (sorted from lowest to highest) port scanning instead.
- —port-ratio ratio<decimal number between 0 and 1>
-
Scans all ports in nmap-services file with a ratio greater than the one given. ratio must be between 0.0 and 1.0.
- —top-ports n
-
Scans the n highest-ratio ports found in nmap-services file after excluding all ports specified by —exclude-ports. n must be 1 or greater.
Service and Version Detection
Point Nmap at a remote machine and it might tell you that ports 25/tcp, 80/tcp, and 53/udp are open. Using its nmap-services database of about 2,200 well-known services, Nmap would report that those ports probably correspond to a mail server (SMTP), web server (HTTP), and name server (DNS) respectively. This lookup is usually accurate—the vast majority of daemons listening on TCP port 25 are, in fact, mail servers. However, you should not bet your security on this! People can and do run services on strange ports.
Even if Nmap is right, and the hypothetical server above is running SMTP, HTTP, and DNS servers, that is not a lot of information. When doing vulnerability assessments (or even simple network inventories) of your companies or clients, you really want to know which mail and DNS servers and versions are running. Having an accurate version number helps dramatically in determining which exploits a server is vulnerable to. Version detection helps you obtain this information.
After TCP and/or UDP ports are discovered using one of the other scan methods, version detection interrogates those ports to determine more about what is actually running. The nmap-service-probes database contains probes for querying various services and match expressions to recognize and parse responses. Nmap tries to determine the service protocol (e.g. FTP, SSH, Telnet, HTTP), the application name (e.g. ISC BIND, Apache httpd, Solaris telnetd), the version number, hostname, device type (e.g. printer, router), the OS family (e.g. Windows, Linux). When possible, Nmap also gets the Common Platform Enumeration (CPE) representation of this information. Sometimes miscellaneous details like whether an X server is open to connections, the SSH protocol version, or the KaZaA user name, are available. Of course, most services don’t provide all of this information. If Nmap was compiled with OpenSSL support, it will connect to SSL servers to deduce the service listening behind that encryption layer. Some UDP ports are left in the open|filtered state after a UDP port scan is unable to determine whether the port is open or filtered. Version detection will try to elicit a response from these ports (just as it does with open ports), and change the state to open if it succeeds. open|filtered TCP ports are treated the same way. Note that the Nmap -A option enables version detection among other things. A paper documenting the workings, usage, and customization of version detection is available at https://nmap.org/book/vscan.html.
When RPC services are discovered, the Nmap RPC grinder is automatically used to determine the RPC program and version numbers. It takes all the TCP/UDP ports detected as RPC and floods them with SunRPC program NULL commands in an attempt to determine whether they are RPC ports, and if so, what program and version number they serve up. Thus you can effectively obtain the same info as rpcinfo -p even if the target’s portmapper is behind a firewall (or protected by TCP wrappers). Decoys do not currently work with RPC scan.
When Nmap receives responses from a service but cannot match them to its database, it prints out a special fingerprint and a URL for you to submit it to if you know for sure what is running on the port. Please take a couple minutes to make the submission so that your find can benefit everyone. Thanks to these submissions, Nmap has about 6,500 pattern matches for more than 650 protocols such as SMTP, FTP, HTTP, etc.
Version detection is enabled and controlled with the following options:
- -sV (Version detection)
-
Enables version detection, as discussed above. Alternatively, you can use -A, which enables version detection among other things.
-sR is an alias for -sV. Prior to March 2011, it was used to active the RPC grinder separately from version detection, but now these options are always combined.
—allports (Don’t exclude any ports from version detection)
By default, Nmap version detection skips TCP port 9100 because some printers simply print anything sent to that port, leading to dozens of pages of HTTP GET requests, binary SSL session requests, etc. This behavior can be changed by modifying or removing the Exclude directive in nmap-service-probes, or you can specify —allports to scan all ports regardless of any Exclude directive.
- —version-intensity intensity (Set version scan intensity)
-
When performing a version scan (-sV), Nmap sends a series of probes, each of which is assigned a rarity value between one and nine. The lower-numbered probes are effective against a wide variety of common services, while the higher-numbered ones are rarely useful. The intensity level specifies which probes should be applied. The higher the number, the more likely it is the service will be correctly identified. However, high intensity scans take longer. The intensity must be between 0 and 9. The default is 7. When a probe is registered to the target port via the nmap-service-probes ports directive, that probe is tried regardless of intensity level. This ensures that the DNS probes will always be attempted against any open port 53, the SSL probe will be done against 443, etc.
- —version-light (Enable light mode)
-
This is a convenience alias for —version-intensity 2. This light mode makes version scanning much faster, but it is slightly less likely to identify services.
- —version-all (Try every single probe)
-
An alias for —version-intensity 9, ensuring that every single probe is attempted against each port.
- —version-trace (Trace version scan activity)
-
This causes Nmap to print out extensive debugging info about what version scanning is doing. It is a subset of what you get with —packet-trace.
OS Detection
One of Nmap’s best-known features is remote OS detection using TCP/IP stack fingerprinting. Nmap sends a series of TCP and UDP packets to the remote host and examines practically every bit in the responses. After performing dozens of tests such as TCP ISN sampling, TCP options support and ordering, IP ID sampling, and the initial window size check, Nmap compares the results to its nmap-os-db database of more than 2,600 known OS fingerprints and prints out the OS details if there is a match. Each fingerprint includes a freeform textual description of the OS, and a classification which provides the vendor name (e.g. Sun), underlying OS (e.g. Solaris), OS generation (e.g. 10), and device type (general purpose, router, switch, game console, etc). Most fingerprints also have a Common Platform Enumeration (CPE) representation, like cpe:/o:linux:linux_kernel:2.6.
If Nmap is unable to guess the OS of a machine, and conditions are good (e.g. at least one open port and one closed port were found), Nmap will provide a URL you can use to submit the fingerprint if you know (for sure) the OS running on the machine. By doing this you contribute to the pool of operating systems known to Nmap and thus it will be more accurate for everyone.
OS detection enables some other tests which make use of information that is gathered during the process anyway. One of these is TCP Sequence Predictability Classification. This measures approximately how hard it is to establish a forged TCP connection against the remote host. It is useful for exploiting source-IP based trust relationships (rlogin, firewall filters, etc) or for hiding the source of an attack. This sort of spoofing is rarely performed any more, but many machines are still vulnerable to it. The actual difficulty number is based on statistical sampling and may fluctuate. It is generally better to use the English classification such as “worthy challenge” or “trivial joke”. This is only reported in normal output in verbose (-v) mode. When verbose mode is enabled along with -O, IP ID sequence generation is also reported. Most machines are in the “incremental” class, which means that they increment the ID field in the IP header for each packet they send. This makes them vulnerable to several advanced information gathering and spoofing attacks.
Another bit of extra information enabled by OS detection is a guess at a target’s uptime. This uses the TCP timestamp option (RFC 1323[9]) to guess when a machine was last rebooted. The guess can be inaccurate due to the timestamp counter not being initialized to zero or the counter overflowing and wrapping around, so it is printed only in verbose mode.
A paper documenting the workings, usage, and customization of OS detection is available at https://nmap.org/book/osdetect.html.
OS detection is enabled and controlled with the following options:
- -O (Enable OS detection)
-
Enables OS detection, as discussed above. Alternatively, you can use -A to enable OS detection along with other things.
- —osscan-limit (Limit OS detection to promising targets)
-
OS detection is far more effective if at least one open and one closed TCP port are found. Set this option and Nmap will not even try OS detection against hosts that do not meet this criteria. This can save substantial time, particularly on -Pn scans against many hosts. It only matters when OS detection is requested with -O or -A.
- —osscan-guess; —fuzzy (Guess OS detection results)
-
When Nmap is unable to detect a perfect OS match, it sometimes offers up near-matches as possibilities. The match has to be very close for Nmap to do this by default. Either of these (equivalent) options make Nmap guess more aggressively. Nmap will still tell you when an imperfect match is printed and display its confidence level (percentage) for each guess.
- —max-os-tries (Set the maximum number of OS detection tries against a target)
-
When Nmap performs OS detection against a target and fails to find a perfect match, it usually repeats the attempt. By default, Nmap tries five times if conditions are favorable for OS fingerprint submission, and twice when conditions aren’t so good. Specifying a lower —max-os-tries value (such as 1) speeds Nmap up, though you miss out on retries which could potentially identify the OS. Alternatively, a high value may be set to allow even more retries when conditions are favorable. This is rarely done, except to generate better fingerprints for submission and integration into the Nmap OS database.
Nmap Scripting Engine (Nse)
The Nmap Scripting Engine (NSE) is one of Nmap’s most powerful and flexible features. It allows users to write (and share) simple scripts (using the Lua programming language[10]
) to automate a wide variety of networking tasks. Those scripts are executed in parallel with the speed and efficiency you expect from Nmap. Users can rely on the growing and diverse set of scripts distributed with Nmap, or write their own to meet custom needs.
Tasks we had in mind when creating the system include network discovery, more sophisticated version detection, vulnerability detection. NSE can even be used for vulnerability exploitation.
To reflect those different uses and to simplify the choice of which scripts to run, each script contains a field associating it with one or more categories. Currently defined categories are auth, broadcast, default. discovery, dos, exploit, external, fuzzer, intrusive, malware, safe, version, and vuln. These are all described at https://nmap.org/book/nse-usage.html#nse-categories.
Scripts are not run in a sandbox and thus could accidentally or maliciously damage your system or invade your privacy. Never run scripts from third parties unless you trust the authors or have carefully audited the scripts yourself.
The Nmap Scripting Engine is described in detail at https://nmap.org/book/nse.html
and is controlled by the following options:
- -sC
-
Performs a script scan using the default set of scripts. It is equivalent to —script=default. Some of the scripts in this category are considered intrusive and should not be run against a target network without permission.
- —script filename|category|directory/|expression[,…]
-
Runs a script scan using the comma-separated list of filenames, script categories, and directories. Each element in the list may also be a Boolean expression describing a more complex set of scripts. Each element is interpreted first as an expression, then as a category, and finally as a file or directory name.
There are two special features for advanced users only. One is to prefix script names and expressions with + to force them to run even if they normally wouldn’t (e.g. the relevant service wasn’t detected on the target port). The other is that the argument all may be used to specify every script in Nmap’s database. Be cautious with this because NSE contains dangerous scripts such as exploits, brute force authentication crackers, and denial of service attacks.
File and directory names may be relative or absolute. Absolute names are used directly. Relative paths are looked for in the scripts of each of the following places until found:
—datadir
$NMAPDIR
~/.nmap (not searched on Windows)
APPDATAnmap (only on Windows)
the directory containing the nmap executable
the directory containing the nmap executable, followed by ../share/nmap (not searched on Windows)
NMAPDATADIR (not searched on Windows)
the current directory.When a directory name ending in / is given, Nmap loads every file in the directory whose name ends with .nse. All other files are ignored and directories are not searched recursively. When a filename is given, it does not have to have the .nse extension; it will be added automatically if necessary. Nmap scripts are stored in a scripts subdirectory of the Nmap data directory by default (see https://nmap.org/book/data-files.html).
For efficiency, scripts are indexed in a database stored in scripts/script.db, which lists the category or categories in which each script belongs. When referring to scripts from script.db by name, you can use a shell-style ‘*’ wildcard.
nmap —script «http-*»
Loads all scripts whose name starts with http-, such as http-auth and http-open-proxy. The argument to —script had to be in quotes to protect the wildcard from the shell.
More complicated script selection can be done using the and, or, and not operators to build Boolean expressions. The operators have the same precedence[11] as in Lua: not is the highest, followed by and and then or. You can alter precedence by using parentheses. Because expressions contain space characters it is necessary to quote them.
- nmap —script «not intrusive»
-
Loads every script except for those in the intrusive category.
- nmap —script «default or safe»
-
This is functionally equivalent to nmap —script «default,safe». It loads all scripts that are in the default category or the safe category or both.
- nmap —script «default and safe»
-
Loads those scripts that are in both the default and safe categories.
- nmap —script «(default or safe or intrusive) and not http-*»
-
Loads scripts in the default, safe, or intrusive categories, except for those whose names start with http-.
- —script-args n1=v1,n2={n3=v3},n4={v4,v5}
-
Lets you provide arguments to NSE scripts. Arguments are a comma-separated list of name=value pairs. Names and values may be strings not containing whitespace or the characters ‘{’, ‘}’, ‘=’, or ‘,’. To include one of these characters in a string, enclose the string in single or double quotes. Within a quoted string, ‘’ escapes a quote. A backslash is only used to escape quotation marks in this special case; in all other cases a backslash is interpreted literally. Values may also be tables enclosed in {}, just as in Lua. A table may contain simple string values or more name-value pairs, including nested tables. Many scripts qualify their arguments with the script name, as in xmpp-info.server_name. You may use that full qualified version to affect just the specified script, or you may pass the unqualified version (server_name in this case) to affect all scripts using that argument name. A script will first check for its fully qualified argument name (the name specified in its documentation) before it accepts an unqualified argument name. A complex example of script arguments is —script-args ‘user=foo,pass=»,{}=bar»,whois={whodb=nofollow+ripe},xmpp-info.server_name=localhost’. The online NSE Documentation Portal at https://nmap.org/nsedoc/ lists the arguments that each script accepts.
- —script-args-file filename
-
Lets you load arguments to NSE scripts from a file. Any arguments on the command line supersede ones in the file. The file can be an absolute path, or a path relative to Nmap’s usual search path (NMAPDIR, etc.) Arguments can be comma-separated or newline-separated, but otherwise follow the same rules as for —script-args, without requiring special quoting and escaping, since they are not parsed by the shell.
- —script-help filename|category|directory|expression|all[,…]
-
Shows help about scripts. For each script matching the given specification, Nmap prints the script name, its categories, and its description. The specifications are the same as those accepted by —script; so for example if you want help about the ftp-anon script, you would run nmap —script-help ftp-anon. In addition to getting help for individual scripts, you can use this as a preview of what scripts will be run for a specification, for example with nmap —script-help default.
- —script-trace
-
This option does what —packet-trace does, just one ISO layer higher. If this option is specified all incoming and outgoing communication performed by a script is printed. The displayed information includes the communication protocol, the source, the target and the transmitted data. If more than 5% of all transmitted data is not printable, then the trace output is in a hex dump format. Specifying —packet-trace enables script tracing too.
- —script-updatedb
-
This option updates the script database found in scripts/script.db which is used by Nmap to determine the available default scripts and categories. It is only necessary to update the database if you have added or removed NSE scripts from the default scripts directory or if you have changed the categories of any script. This option is generally used by itself: nmap —script-updatedb.
Timing and Performance
One of my highest Nmap development priorities has always been performance. A default scan (nmap hostname) of a host on my local network takes a fifth of a second. That is barely enough time to blink, but adds up when you are scanning hundreds or thousands of hosts. Moreover, certain scan options such as UDP scanning and version detection can increase scan times substantially. So can certain firewall configurations, particularly response rate limiting. While Nmap utilizes parallelism and many advanced algorithms to accelerate these scans, the user has ultimate control over how Nmap runs. Expert users carefully craft Nmap commands to obtain only the information they care about while meeting their time constraints.
Techniques for improving scan times include omitting non-critical tests, and upgrading to the latest version of Nmap (performance enhancements are made frequently). Optimizing timing parameters can also make a substantial difference. Those options are listed below.
Some options accept a time parameter. This is specified in seconds by default, though you can append ‘ms’, ‘s’, ‘m’, or ‘h’ to the value to specify milliseconds, seconds, minutes, or hours. So the —host-timeout arguments 900000ms, 900, 900s, and 15m all do the same thing.
- —min-hostgroup numhosts; —max-hostgroup numhosts (Adjust parallel scan group sizes)
-
Nmap has the ability to port scan or version scan multiple hosts in parallel. Nmap does this by dividing the target IP space into groups and then scanning one group at a time. In general, larger groups are more efficient. The downside is that host results can’t be provided until the whole group is finished. So if Nmap started out with a group size of 50, the user would not receive any reports (except for the updates offered in verbose mode) until the first 50 hosts are completed.
By default, Nmap takes a compromise approach to this conflict. It starts out with a group size as low as five so the first results come quickly and then increases the groupsize to as high as 1024. The exact default numbers depend on the options given. For efficiency reasons, Nmap uses larger group sizes for UDP or few-port TCP scans.
When a maximum group size is specified with —max-hostgroup, Nmap will never exceed that size. Specify a minimum size with —min-hostgroup and Nmap will try to keep group sizes above that level. Nmap may have to use smaller groups than you specify if there are not enough target hosts left on a given interface to fulfill the specified minimum. Both may be set to keep the group size within a specific range, though this is rarely desired.
These options do not have an effect during the host discovery phase of a scan. This includes plain ping scans (-sn). Host discovery always works in large groups of hosts to improve speed and accuracy.
The primary use of these options is to specify a large minimum group size so that the full scan runs more quickly. A common choice is 256 to scan a network in /24 sized chunks. For a scan with many ports, exceeding that number is unlikely to help much. For scans of just a few port numbers, host group sizes of 2048 or more may be helpful.
- —min-parallelism numprobes; —max-parallelism numprobes (Adjust probe parallelization)
-
These options control the total number of probes that may be outstanding for a host group. They are used for port scanning and host discovery. By default, Nmap calculates an ever-changing ideal parallelism based on network performance. If packets are being dropped, Nmap slows down and allows fewer outstanding probes. The ideal probe number slowly rises as the network proves itself worthy. These options place minimum or maximum bounds on that variable. By default, the ideal parallelism can drop to one if the network proves unreliable and rise to several hundred in perfect conditions.
The most common usage is to set —min-parallelism to a number higher than one to speed up scans of poorly performing hosts or networks. This is a risky option to play with, as setting it too high may affect accuracy. Setting this also reduces Nmap’s ability to control parallelism dynamically based on network conditions. A value of 10 might be reasonable, though I only adjust this value as a last resort.
The —max-parallelism option is sometimes set to one to prevent Nmap from sending more than one probe at a time to hosts. The —scan-delay option, discussed later, is another way to do this.
- —min-rtt-timeout time, —max-rtt-timeout time, —initial-rtt-timeout time (Adjust probe timeouts)
-
Nmap maintains a running timeout value for determining how long it will wait for a probe response before giving up or retransmitting the probe. This is calculated based on the response times of previous probes.
If the network latency shows itself to be significant and variable, this timeout can grow to several seconds. It also starts at a conservative (high) level and may stay that way for a while when Nmap scans unresponsive hosts.
Specifying a lower —max-rtt-timeout and —initial-rtt-timeout than the defaults can cut scan times significantly. This is particularly true for pingless (-Pn) scans, and those against heavily filtered networks. Don’t get too aggressive though. The scan can end up taking longer if you specify such a low value that many probes are timing out and retransmitting while the response is in transit.
If all the hosts are on a local network, 100 milliseconds (—max-rtt-timeout 100ms) is a reasonable aggressive value. If routing is involved, ping a host on the network first with the ICMP ping utility, or with a custom packet crafter such as Nping that is more likely to get through a firewall. Look at the maximum round trip time out of ten packets or so. You might want to double that for the —initial-rtt-timeout and triple or quadruple it for the —max-rtt-timeout. I generally do not set the maximum RTT below 100 ms, no matter what the ping times are. Nor do I exceed 1000 ms.
—min-rtt-timeout is a rarely used option that could be useful when a network is so unreliable that even Nmap’s default is too aggressive. Since Nmap only reduces the timeout down to the minimum when the network seems to be reliable, this need is unusual and should be reported as a bug to the nmap-dev mailing list.
—max-retries numtries (Specify the maximum number of port scan probe retransmissions)
When Nmap receives no response to a port scan probe, it could mean the port is filtered. Or maybe the probe or response was simply lost on the network. It is also possible that the target host has rate limiting enabled that temporarily blocked the response. So Nmap tries again by retransmitting the initial probe. If Nmap detects poor network reliability, it may try many more times before giving up on a port. While this benefits accuracy, it also lengthens scan times. When performance is critical, scans may be sped up by limiting the number of retransmissions allowed. You can even specify —max-retries 0 to prevent any retransmissions, though that is only recommended for situations such as informal surveys where occasional missed ports and hosts are acceptable.
The default (with no -T template) is to allow ten retransmissions. If a network seems reliable and the target hosts aren’t rate limiting, Nmap usually only does one retransmission. So most target scans aren’t even affected by dropping —max-retries to a low value such as three. Such values can substantially speed scans of slow (rate limited) hosts. You usually lose some information when Nmap gives up on ports early, though that may be preferable to letting the —host-timeout expire and losing all information about the target.
—host-timeout time (Give up on slow target hosts)
Some hosts simply take a long time to scan. This may be due to poorly performing or unreliable networking hardware or software, packet rate limiting, or a restrictive firewall. The slowest few percent of the scanned hosts can eat up a majority of the scan time. Sometimes it is best to cut your losses and skip those hosts initially. Specify —host-timeout with the maximum amount of time you are willing to wait. For example, specify 30m to ensure that Nmap doesn’t waste more than half an hour on a single host. Note that Nmap may be scanning other hosts at the same time during that half an hour, so it isn’t a complete loss. A host that times out is skipped. No port table, OS detection, or version detection results are printed for that host.
The special value 0 can be used to mean “no timeout”, which can be used to override the T5 timing template, which sets the host timeout to 15 minutes.
- —script-timeout time
-
While some scripts complete in fractions of a second, others can take hours or more depending on the nature of the script, arguments passed in, network and application conditions, and more. The —script-timeout option sets a ceiling on script execution time. Any script instance which exceeds that time will be terminated and no output will be shown. If debugging (-d) is enabled, Nmap will report on each timeout. For host and service scripts, a script instance only scans a single target host or port and the timeout period will be reset for the next instance.
The special value 0 can be used to mean “no timeout”, which can be used to override the T5 timing template, which sets the script timeout to 10 minutes.
- —scan-delay time; —max-scan-delay time (Adjust delay between probes)
-
This option causes Nmap to wait at least the given amount of time between each probe it sends to a given host. This is particularly useful in the case of rate limiting. Solaris machines (among many others) will usually respond to UDP scan probe packets with only one ICMP message per second. Any more than that sent by Nmap will be wasteful. A —scan-delay of 1s will keep Nmap at that slow rate. Nmap tries to detect rate limiting and adjust the scan delay accordingly, but it doesn’t hurt to specify it explicitly if you already know what rate works best.
When Nmap adjusts the scan delay upward to cope with rate limiting, the scan slows down dramatically. The —max-scan-delay option specifies the largest delay that Nmap will allow. A low —max-scan-delay can speed up Nmap, but it is risky. Setting this value too low can lead to wasteful packet retransmissions and possible missed ports when the target implements strict rate limiting.
Another use of —scan-delay is to evade threshold based intrusion detection and prevention systems (IDS/IPS).
- —min-rate number; —max-rate number (Directly control the scanning rate)
-
Nmap’s dynamic timing does a good job of finding an appropriate speed at which to scan. Sometimes, however, you may happen to know an appropriate scanning rate for a network, or you may have to guarantee that a scan will be finished by a certain time. Or perhaps you must keep Nmap from scanning too quickly. The —min-rate and —max-rate options are designed for these situations.
When the —min-rate option is given Nmap will do its best to send packets as fast as or faster than the given rate. The argument is a positive real number representing a packet rate in packets per second. For example, specifying —min-rate 300 means that Nmap will try to keep the sending rate at or above 300 packets per second. Specifying a minimum rate does not keep Nmap from going faster if conditions warrant.
Likewise, —max-rate limits a scan’s sending rate to a given maximum. Use —max-rate 100, for example, to limit sending to 100 packets per second on a fast network. Use —max-rate 0.1 for a slow scan of one packet every ten seconds. Use —min-rate and —max-rate together to keep the rate inside a certain range.
These two options are global, affecting an entire scan, not individual hosts. They only affect port scans and host discovery scans. Other features like OS detection implement their own timing.
There are two conditions when the actual scanning rate may fall below the requested minimum. The first is if the minimum is faster than the fastest rate at which Nmap can send, which is dependent on hardware. In this case Nmap will simply send packets as fast as possible, but be aware that such high rates are likely to cause a loss of accuracy. The second case is when Nmap has nothing to send, for example at the end of a scan when the last probes have been sent and Nmap is waiting for them to time out or be responded to. It’s normal to see the scanning rate drop at the end of a scan or in between hostgroups. The sending rate may temporarily exceed the maximum to make up for unpredictable delays, but on average the rate will stay at or below the maximum.
Specifying a minimum rate should be done with care. Scanning faster than a network can support may lead to a loss of accuracy. In some cases, using a faster rate can make a scan take longer than it would with a slower rate. This is because Nmap’s adaptive retransmission algorithms will detect the network congestion caused by an excessive scanning rate and increase the number of retransmissions in order to improve accuracy. So even though packets are sent at a higher rate, more packets are sent overall. Cap the number of retransmissions with the —max-retries option if you need to set an upper limit on total scan time.
- —defeat-rst-ratelimit
-
Many hosts have long used rate limiting to reduce the number of ICMP error messages (such as port-unreachable errors) they send. Some systems now apply similar rate limits to the RST (reset) packets they generate. This can slow Nmap down dramatically as it adjusts its timing to reflect those rate limits. You can tell Nmap to ignore those rate limits (for port scans such as SYN scan which don’t treat non-responsive ports as open) by specifying —defeat-rst-ratelimit.
Using this option can reduce accuracy, as some ports will appear non-responsive because Nmap didn’t wait long enough for a rate-limited RST response. With a SYN scan, the non-response results in the port being labeled filtered rather than the closed state we see when RST packets are received. This option is useful when you only care about open ports, and distinguishing between closed and filtered ports isn’t worth the extra time.
- —defeat-icmp-ratelimit
-
Similar to —defeat-rst-ratelimit, the —defeat-icmp-ratelimit option trades accuracy for speed, increasing UDP scanning speed against hosts that rate-limit ICMP error messages. Because this option causes Nmap to not delay in order to receive the port unreachable messages, a non-responsive port will be labeled closed|filtered instead of the default open|filtered. This has the effect of only treating ports which actually respond via UDP as open. Since many UDP services do not respond in this way, the chance for inaccuracy is greater with this option than with —defeat-rst-ratelimit.
- —nsock-engine iocp|epoll|kqueue|poll|select
-
Enforce use of a given nsock IO multiplexing engine. Only the select(2)-based fallback engine is guaranteed to be available on your system. Engines are named after the name of the IO management facility they leverage. Engines currently implemented are epoll, kqueue, poll, and select, but not all will be present on any platform. By default, Nmap will use the «best» engine, i.e. the first one in this list that is supported. Use nmap -V to see which engines are supported on your platform.
- -T paranoid|sneaky|polite|normal|aggressive|insane (Set a timing template)
-
While the fine-grained timing controls discussed in the previous section are powerful and effective, some people find them confusing. Moreover, choosing the appropriate values can sometimes take more time than the scan you are trying to optimize. Fortunately, Nmap offers a simpler approach, with six timing templates. You can specify them with the -T option and their number (0–5) or their name. The template names are paranoid (0), sneaky (1), polite (2), normal (3), aggressive (4), and insane (5). The first two are for IDS evasion. Polite mode slows down the scan to use less bandwidth and target machine resources. Normal mode is the default and so -T3 does nothing. Aggressive mode speeds scans up by making the assumption that you are on a reasonably fast and reliable network. Finally insane mode assumes that you are on an extraordinarily fast network or are willing to sacrifice some accuracy for speed.
These templates allow the user to specify how aggressive they wish to be, while leaving Nmap to pick the exact timing values. The templates also make some minor speed adjustments for which fine-grained control options do not currently exist. For example, -T4 prohibits the dynamic scan delay from exceeding 10 ms for TCP ports and -T5 caps that value at 5 ms. Templates can be used in combination with fine-grained controls, and the fine-grained controls that you specify will take precedence over the timing template default for that parameter. I recommend using -T4 when scanning reasonably modern and reliable networks. Keep that option even when you add fine-grained controls so that you benefit from those extra minor optimizations that it enables.
If you are on a decent broadband or ethernet connection, I would recommend always using -T4. Some people love -T5 though it is too aggressive for my taste. People sometimes specify -T2 because they think it is less likely to crash hosts or because they consider themselves to be polite in general. They often don’t realize just how slow -T polite really is. Their scan may take ten times longer than a default scan. Machine crashes and bandwidth problems are rare with the default timing options (-T3) and so I normally recommend that for cautious scanners. Omitting version detection is far more effective than playing with timing values at reducing these problems.
While -T0 and -T1 may be useful for avoiding IDS alerts, they will take an extraordinarily long time to scan thousands of machines or ports. For such a long scan, you may prefer to set the exact timing values you need rather than rely on the canned -T0 and -T1 values.
The main effects of T0 are serializing the scan so only one port is scanned at a time, and waiting five minutes between sending each probe. T1 and T2 are similar but they only wait 15 seconds and 0.4 seconds, respectively, between probes. T3 is Nmap’s default behavior, which includes parallelization. -T4 does the equivalent of —max-rtt-timeout 1250ms —min-rtt-timeout 100ms —initial-rtt-timeout 500ms —max-retries 6 and sets the maximum TCP and SCTP scan delay to 10ms. T5 does the equivalent of —max-rtt-timeout 300ms —min-rtt-timeout 50ms —initial-rtt-timeout 250ms —max-retries 2 —host-timeout 15m —script-timeout 10m —max-scan-delay as well as setting the maximum TCP and SCTP scan delay to 5ms. Maximum UDP scan delay is not set by T4 or T5, but it can be set with the —max-scan-delay option.
Firewall/Ids Evasion and Spoofing
Many Internet pioneers envisioned a global open network with a universal IP address space allowing virtual connections between any two nodes. This allows hosts to act as true peers, serving and retrieving information from each other. People could access all of their home systems from work, changing the climate control settings or unlocking the doors for early guests. This vision of universal connectivity has been stifled by address space shortages and security concerns. In the early 1990s, organizations began deploying firewalls for the express purpose of reducing connectivity. Huge networks were cordoned off from the unfiltered Internet by application proxies, network address translation, and packet filters. The unrestricted flow of information gave way to tight regulation of approved communication channels and the content that passes over them.
Network obstructions such as firewalls can make mapping a network exceedingly difficult. It will not get any easier, as stifling casual reconnaissance is often a key goal of implementing the devices. Nevertheless, Nmap offers many features to help understand these complex networks, and to verify that filters are working as intended. It even supports mechanisms for bypassing poorly implemented defenses. One of the best methods of understanding your network security posture is to try to defeat it. Place yourself in the mind-set of an attacker, and deploy techniques from this section against your networks. Launch an FTP bounce scan, idle scan, fragmentation attack, or try to tunnel through one of your own proxies.
In addition to restricting network activity, companies are increasingly monitoring traffic with intrusion detection systems (IDS). All of the major IDSs ship with rules designed to detect Nmap scans because scans are sometimes a precursor to attacks. Many of these products have recently morphed into intrusion prevention systems (IPS) that actively block traffic deemed malicious. Unfortunately for network administrators and IDS vendors, reliably detecting bad intentions by analyzing packet data is a tough problem. Attackers with patience, skill, and the help of certain Nmap options can usually pass by IDSs undetected. Meanwhile, administrators must cope with large numbers of false positive results where innocent activity is misdiagnosed and alerted on or blocked.
Occasionally people suggest that Nmap should not offer features for evading firewall rules or sneaking past IDSs. They argue that these features are just as likely to be misused by attackers as used by administrators to enhance security. The problem with this logic is that these methods would still be used by attackers, who would just find other tools or patch the functionality into Nmap. Meanwhile, administrators would find it that much harder to do their jobs. Deploying only modern, patched FTP servers is a far more powerful defense than trying to prevent the distribution of tools implementing the FTP bounce attack.
There is no magic bullet (or Nmap option) for detecting and subverting firewalls and IDS systems. It takes skill and experience. A tutorial is beyond the scope of this reference guide, which only lists the relevant options and describes what they do.
- -f (fragment packets); —mtu (using the specified MTU)
-
The -f option causes the requested scan (including host discovery scans) to use tiny fragmented IP packets. The idea is to split up the TCP header over several packets to make it harder for packet filters, intrusion detection systems, and other annoyances to detect what you are doing. Be careful with this! Some programs have trouble handling these tiny packets. The old-school sniffer named Sniffit segmentation faulted immediately upon receiving the first fragment. Specify this option once, and Nmap splits the packets into eight bytes or less after the IP header. So a 20-byte TCP header would be split into three packets. Two with eight bytes of the TCP header, and one with the final four. Of course each fragment also has an IP header. Specify -f again to use 16 bytes per fragment (reducing the number of fragments). Or you can specify your own offset size with the —mtu option. Don’t also specify -f if you use —mtu. The offset must be a multiple of eight. While fragmented packets won’t get by packet filters and firewalls that queue all IP fragments, such as the CONFIG_IP_ALWAYS_DEFRAG option in the Linux kernel, some networks can’t afford the performance hit this causes and thus leave it disabled. Others can’t enable this because fragments may take different routes into their networks. Some source systems defragment outgoing packets in the kernel. Linux with the iptables connection tracking module is one such example. Do a scan while a sniffer such as Wireshark is running to ensure that sent packets are fragmented. If your host OS is causing problems, try the —send-eth option to bypass the IP layer and send raw ethernet frames.
Fragmentation is only supported for Nmap’s raw packet features, which includes TCP and UDP port scans (except connect scan and FTP bounce scan) and OS detection. Features such as version detection and the Nmap Scripting Engine generally don’t support fragmentation because they rely on your host’s TCP stack to communicate with target services.
- -D decoy1[,decoy2][,ME][,…] (Cloak a scan with decoys)
-
Causes a decoy scan to be performed, which makes it appear to the remote host that the host(s) you specify as decoys are scanning the target network too. Thus their IDS might report 5–10 port scans from unique IP addresses, but they won’t know which IP was scanning them and which were innocent decoys. While this can be defeated through router path tracing, response-dropping, and other active mechanisms, it is generally an effective technique for hiding your IP address.
Separate each decoy host with commas, and you can optionally use ME as one of the decoys to represent the position for your real IP address. If you put ME in the sixth position or later, some common port scan detectors (such as Solar Designer’s excellent Scanlogd) are unlikely to show your IP address at all. If you don’t use ME, Nmap will put you in a random position. You can also use RND to generate a random, non-reserved IP address, or RND:number to generate number addresses.
Note that the hosts you use as decoys should be up or you might accidentally SYN flood your targets. Also it will be pretty easy to determine which host is scanning if only one is actually up on the network. You might want to use IP addresses instead of names (so the decoy networks don’t see you in their nameserver logs). Right now random IP address generation is only supported with IPv4
Decoys are used both in the initial host discovery scan (using ICMP, SYN, ACK, or whatever) and during the actual port scanning phase. Decoys are also used during remote OS detection (-O). Decoys do not work with version detection or TCP connect scan. When a scan delay is in effect, the delay is enforced between each batch of spoofed probes, not between each individual probe. Because decoys are sent as a batch all at once, they may temporarily violate congestion control limits.
It is worth noting that using too many decoys may slow your scan and potentially even make it less accurate. Also, some ISPs will filter out your spoofed packets, but many do not restrict spoofed IP packets at all.
- -S IP_Address (Spoof source address)
-
In some circumstances, Nmap may not be able to determine your source address (Nmap will tell you if this is the case). In this situation, use -S with the IP address of the interface you wish to send packets through.
Another possible use of this flag is to spoof the scan to make the targets think that someone else is scanning them. Imagine a company being repeatedly port scanned by a competitor! The -e option and -Pn are generally required for this sort of usage. Note that you usually won’t receive reply packets back (they will be addressed to the IP you are spoofing), so Nmap won’t produce useful reports.
- -e interface (Use specified interface)
-
Tells Nmap what interface to send and receive packets on. Nmap should be able to detect this automatically, but it will tell you if it cannot.
- —source-port portnumber; -g portnumber (Spoof source port number)
-
One surprisingly common misconfiguration is to trust traffic based only on the source port number. It is easy to understand how this comes about. An administrator will set up a shiny new firewall, only to be flooded with complaints from ungrateful users whose applications stopped working. In particular, DNS may be broken because the UDP DNS replies from external servers can no longer enter the network. FTP is another common example. In active FTP transfers, the remote server tries to establish a connection back to the client to transfer the requested file.
Secure solutions to these problems exist, often in the form of application-level proxies or protocol-parsing firewall modules. Unfortunately there are also easier, insecure solutions. Noting that DNS replies come from port 53 and active FTP from port 20, many administrators have fallen into the trap of simply allowing incoming traffic from those ports. They often assume that no attacker would notice and exploit such firewall holes. In other cases, administrators consider this a short-term stop-gap measure until they can implement a more secure solution. Then they forget the security upgrade.
Overworked network administrators are not the only ones to fall into this trap. Numerous products have shipped with these insecure rules. Even Microsoft has been guilty. The IPsec filters that shipped with Windows 2000 and Windows XP contain an implicit rule that allows all TCP or UDP traffic from port 88 (Kerberos). In another well-known case, versions of the Zone Alarm personal firewall up to 2.1.25 allowed any incoming UDP packets with the source port 53 (DNS) or 67 (DHCP).
Nmap offers the -g and —source-port options (they are equivalent) to exploit these weaknesses. Simply provide a port number and Nmap will send packets from that port where possible. Most scanning operations that use raw sockets, including SYN and UDP scans, support the option completely. The option notably doesn’t have an effect for any operations that use normal operating system sockets, including DNS requests, TCP connect scan, version detection, and script scanning. Setting the source port also doesn’t work for OS detection, because Nmap must use different port numbers for certain OS detection tests to work properly.
—data hex string (Append custom binary data to sent packets)
This option lets you include binary data as payload in sent packets. hex string may be specified in any of the following formats: 0xAABBCCDDEEFF…, AABBCCDDEEFF… or xAAxBBxCCxDDxEExFF…. Examples of use are —data 0xdeadbeef and —data xCAxFEx09. Note that if you specify a number like 0x00ff no byte-order conversion is performed. Make sure you specify the information in the byte order expected by the receiver.
—data-string string (Append custom string to sent packets)
This option lets you include a regular string as payload in sent packets. string can contain any string. However, note that some characters may depend on your system’s locale and the receiver may not see the same information. Also, make sure you enclose the string in double quotes and escape any special characters from the shell. Examples: —data-string «Scan conducted by Security Ops, extension 7192» or —data-string «Ph34r my l33t skills». Keep in mind that nobody is likely to actually see any comments left by this option unless they are carefully monitoring the network with a sniffer or custom IDS rules.
—data-length number (Append random data to sent packets)
Normally Nmap sends minimalist packets containing only a header. So its TCP packets are generally 40 bytes and ICMP echo requests are just 28. Some UDP ports and IP protocols get a custom payload by default. This option tells Nmap to append the given number of random bytes to most of the packets it sends, and not to use any protocol-specific payloads. (Use —data-length 0 for no random or protocol-specific payloads. OS detection (-O) packets are not affected because accuracy there requires probe consistency, but most pinging and portscan packets support this. It slows things down a little, but can make a scan slightly less conspicuous.
—ip-options S|R [route]|L [route]|T|U … ; —ip-options hex string (Send packets with specified ip options)
The IP protocol[12] offers several options which may be placed in packet headers. Unlike the ubiquitous TCP options, IP options are rarely seen due to practicality and security concerns. In fact, many Internet routers block the most dangerous options such as source routing. Yet options can still be useful in some cases for determining and manipulating the network route to target machines. For example, you may be able to use the record route option to determine a path to a target even when more traditional traceroute-style approaches fail. Or if your packets are being dropped by a certain firewall, you may be able to specify a different route with the strict or loose source routing options.
The most powerful way to specify IP options is to simply pass in values as the argument to —ip-options. Precede each hex number with x then the two digits. You may repeat certain characters by following them with an asterisk and then the number of times you wish them to repeat. For example, x01x07x04x00*36×01 is a hex string containing 36 NUL bytes.
Nmap also offers a shortcut mechanism for specifying options. Simply pass the letter R, T, or U to request record-route, record-timestamp, or both options together, respectively. Loose or strict source routing may be specified with an L or S followed by a space and then a space-separated list of IP addresses.
If you wish to see the options in packets sent and received, specify —packet-trace. For more information and examples of using IP options with Nmap, see https://seclists.org/nmap-dev/2006/q3/52.
- —ttl value (Set IP time-to-live field)
-
Sets the IPv4 time-to-live field in sent packets to the given value.
- —randomize-hosts (Randomize target host order)
-
Tells Nmap to shuffle each group of up to 16384 hosts before it scans them. This can make the scans less obvious to various network monitoring systems, especially when you combine it with slow timing options. If you want to randomize over larger group sizes, increase PING_GROUP_SZ in nmap.h and recompile. An alternative solution is to generate the target IP list with a list scan (-sL -n -oN filename), randomize it with a Perl script, then provide the whole list to Nmap with -iL.
- —spoof-mac MAC address, prefix, or vendor name (Spoof MAC address)
-
Asks Nmap to use the given MAC address
for all of the raw ethernet frames it sends. This option implies —send-eth to ensure that Nmap actually sends ethernet-level packets. The MAC given can take several formats. If it is simply the number 0, Nmap chooses a completely random MAC address for the session. If the given string is an even number of hex digits (with the pairs optionally separated by a colon), Nmap will use those as the MAC. If fewer than 12 hex digits are provided, Nmap fills in the remainder of the six bytes with random values. If the argument isn’t a zero or hex string, Nmap looks through nmap-mac-prefixes to find a vendor name containing the given string (it is case insensitive). If a match is found, Nmap uses the vendor’s OUI (three-byte prefix) and fills out the remaining three bytes randomly. Valid —spoof-mac argument examples are Apple, 0, 01:02:03:04:05:06, deadbeefcafe, 0020F2, and Cisco. This option only affects raw packet scans such as SYN scan or OS detection, not connection-oriented features such as version detection or the Nmap Scripting Engine.
- —proxies Comma-separated list of proxy URLs (Relay TCP connections through a chain of proxies)
-
Asks Nmap to establish TCP connections with a final target through supplied chain of one or more HTTP or SOCKS4 proxies. Proxies can help hide the true source of a scan or evade certain firewall restrictions, but they can hamper scan performance by increasing latency. Users may need to adjust Nmap timeouts and other scan parameters accordingly. In particular, a lower —max-parallelism may help because some proxies refuse to handle as many concurrent connections as Nmap opens by default.
This option takes a list of proxies as argument, expressed as URLs in the format proto://host:port. Use commas to separate node URLs in a chain. No authentication is supported yet. Valid protocols are HTTP and SOCKS4.
Warning: this feature is still under development and has limitations. It is implemented within the nsock library and thus has no effect on the ping, port scanning and OS discovery phases of a scan. Only NSE and version scan benefit from this option so far—other features may disclose your true address. SSL connections are not yet supported, nor is proxy-side DNS resolution (hostnames are always resolved by Nmap).
- —badsum (Send packets with bogus TCP/UDP checksums)
-
Asks Nmap to use an invalid TCP, UDP or SCTP checksum for packets sent to target hosts. Since virtually all host IP stacks properly drop these packets, any responses received are likely coming from a firewall or IDS that didn’t bother to verify the checksum. For more details on this technique, see https://nmap.org/p60-12.html
- —adler32 (Use deprecated Adler32 instead of CRC32C for SCTP checksums)
-
Asks Nmap to use the deprecated Adler32 algorithm for calculating the SCTP checksum. If —adler32 is not given, CRC-32C (Castagnoli) is used. RFC 2960[13] originally defined Adler32 as checksum algorithm for SCTP; RFC 4960[6] later redefined the SCTP checksums to use CRC-32C. Current SCTP implementations should be using CRC-32C, but in order to elicit responses from old, legacy SCTP implementations, it may be preferable to use Adler32.
Output
Any security tool is only as useful as the output it generates. Complex tests and algorithms are of little value if they aren’t presented in an organized and comprehensible fashion. Given the number of ways Nmap is used by people and other software, no single format can please everyone. So Nmap offers several formats, including the interactive mode for humans to read directly and XML for easy parsing by software.
In addition to offering different output formats, Nmap provides options for controlling the verbosity of output as well as debugging messages. Output types may be sent to standard output or to named files, which Nmap can append to or clobber. Output files may also be used to resume aborted scans.
Nmap makes output available in five different formats. The default is called interactive output, and it is sent to standard output (stdout). There is also normal output, which is similar to interactive except that it displays less runtime information and warnings since it is expected to be analyzed after the scan completes rather than interactively.
XML output is one of the most important output types, as it can be converted to HTML, easily parsed by programs such as Nmap graphical user interfaces, or imported into databases.
The two remaining output types are the simple grepable output which includes most information for a target host on a single line, and sCRiPt KiDDi3 0utPUt for users who consider themselves |<-r4d.
While interactive output is the default and has no associated command-line options, the other four format options use the same syntax. They take one argument, which is the filename that results should be stored in. Multiple formats may be specified, but each format may only be specified once. For example, you may wish to save normal output for your own review while saving XML of the same scan for programmatic analysis. You might do this with the options -oX myscan.xml -oN myscan.nmap. While this chapter uses the simple names like myscan.xml for brevity, more descriptive names are generally recommended. The names chosen are a matter of personal preference, though I use long ones that incorporate the scan date and a word or two describing the scan, placed in a directory named after the company I’m scanning.
While these options save results to files, Nmap still prints interactive output to stdout as usual. For example, the command nmap -oX myscan.xml target prints XML to myscan.xml and fills standard output with the same interactive results it would have printed if -oX wasn’t specified at all. You can change this by passing a hyphen character as the argument to one of the format types. This causes Nmap to deactivate interactive output, and instead print results in the format you specified to the standard output stream. So the command nmap -oX — target will send only XML output to stdout. Serious errors may still be printed to the normal error stream, stderr.
Unlike some Nmap arguments, the space between the logfile option flag (such as -oX) and the filename or hyphen is mandatory. If you omit the flags and give arguments such as -oG- or -oXscan.xml, a backwards compatibility feature of Nmap will cause the creation of normal format output files named G- and Xscan.xml respectively.
All of these arguments support strftime-like conversions in the filename. %H, %M, %S, %m, %d, %y, and %Y are all exactly the same as in strftime. %T is the same as %H%M%S, %R is the same as %H%M, and %D is the same as %m%d%y. A % followed by any other character just yields that character (%% gives you a percent symbol). So -oX ‘scan-%T-%D.xml’ will use an XML file with a name in the form of scan-144840-121307.xml.
Nmap also offers options to control scan verbosity and to append to output files rather than clobbering them. All of these options are described below.
Nmap Output Formats
- -oN filespec (normal output)
-
Requests that normal output be directed to the given filename. As discussed above, this differs slightly from interactive output.
- -oX filespec (XML output)
-
Requests that XML output be directed to the given filename. Nmap includes a document type definition (DTD) which allows XML parsers to validate Nmap XML output. While it is primarily intended for programmatic use, it can also help humans interpret Nmap XML output. The DTD defines the legal elements of the format, and often enumerates the attributes and values they can take on. The latest version is always available from https://svn.nmap.org/nmap/docs/nmap.dtd.
XML offers a stable format that is easily parsed by software. Free XML parsers are available for all major computer languages, including C/C++, Perl, Python, and Java. People have even written bindings for most of these languages to handle Nmap output and execution specifically. Examples are Nmap::Scanner[14] and Nmap::Parser[15] in Perl CPAN. In almost all cases that a non-trivial application interfaces with Nmap, XML is the preferred format.
The XML output references an XSL stylesheet which can be used to format the results as HTML. The easiest way to use this is simply to load the XML output in a web browser such as Firefox or IE. By default, this will only work on the machine you ran Nmap on (or a similarly configured one) due to the hard-coded nmap.xsl filesystem path. Use the —webxml or —stylesheet options to create portable XML files that render as HTML on any web-connected machine.
- -oS filespec (ScRipT KIdd|3 oUTpuT)
-
Script kiddie output is like interactive output, except that it is post-processed to better suit the l33t HaXXorZ who previously looked down on Nmap due to its consistent capitalization and spelling. Humor impaired people should note that this option is making fun of the script kiddies before flaming me for supposedly “helping them”.
- -oG filespec (grepable output)
-
This output format is covered last because it is deprecated. The XML output format is far more powerful, and is nearly as convenient for experienced users. XML is a standard for which dozens of excellent parsers are available, while grepable output is my own simple hack. XML is extensible to support new Nmap features as they are released, while I often must omit those features from grepable output for lack of a place to put them.
Nevertheless, grepable output is still quite popular. It is a simple format that lists each host on one line and can be trivially searched and parsed with standard Unix tools such as grep, awk, cut, sed, diff, and Perl. Even I usually use it for one-off tests done at the command line. Finding all the hosts with the SSH port open or that are running Solaris takes only a simple grep to identify the hosts, piped to an awk or cut command to print the desired fields.
Grepable output consists of comments (lines starting with a pound (#)) and target lines. A target line includes a combination of six labeled fields, separated by tabs and followed with a colon. The fields are Host, Ports, Protocols, Ignored State, OS, Seq Index, IP ID, and Status.
The most important of these fields is generally Ports, which gives details on each interesting port. It is a comma separated list of port entries. Each port entry represents one interesting port, and takes the form of seven slash (/) separated subfields. Those subfields are: Port number, State, Protocol, Owner, Service, SunRPC info, and Version info.
As with XML output, this man page does not allow for documenting the entire format. A more detailed look at the Nmap grepable output format is available from https://nmap.org/book/output-formats-grepable-output.html.
- -oA basename (Output to all formats)
-
As a convenience, you may specify -oA basename to store scan results in normal, XML, and grepable formats at once. They are stored in basename.nmap, basename.xml, and basename.gnmap, respectively. As with most programs, you can prefix the filenames with a directory path, such as ~/nmaplogs/foocorp/ on Unix or c:hackingsco on Windows.
Verbosity and debugging options
- -v (Increase verbosity level), -vlevel (Set verbosity level)
-
Increases the verbosity level, causing Nmap to print more information about the scan in progress. Open ports are shown as they are found and completion time estimates are provided when Nmap thinks a scan will take more than a few minutes. Use it twice or more for even greater verbosity: -vv, or give a verbosity level directly, for example -v3.
Most changes only affect interactive output, and some also affect normal and script kiddie output. The other output types are meant to be processed by machines, so Nmap can give substantial detail by default in those formats without fatiguing a human user. However, there are a few changes in other modes where output size can be reduced substantially by omitting some detail. For example, a comment line in the grepable output that provides a list of all ports scanned is only printed in verbose mode because it can be quite long.
- -d (Increase debugging level), -dlevel (Set debugging level)
-
When even verbose mode doesn’t provide sufficient data for you, debugging is available to flood you with much more! As with the verbosity option (-v), debugging is enabled with a command-line flag (-d) and the debug level can be increased by specifying it multiple times, as in -dd, or by setting a level directly. For example, -d9 sets level nine. That is the highest effective level and will produce thousands of lines unless you run a very simple scan with very few ports and targets.
Debugging output is useful when a bug is suspected in Nmap, or if you are simply confused as to what Nmap is doing and why. As this feature is mostly intended for developers, debug lines aren’t always self-explanatory. You may get something like: Timeout vals: srtt: -1 rttvar: -1 to: 1000000 delta 14987 ==> srtt: 14987 rttvar: 14987 to: 100000. If you don’t understand a line, your only recourses are to ignore it, look it up in the source code, or request help from the development list (nmap-dev). Some lines are self explanatory, but the messages become more obscure as the debug level is increased.
- —reason (Host and port state reasons)
-
Shows the reason each port is set to a specific state and the reason each host is up or down. This option displays the type of the packet that determined a port or hosts state. For example, A RST packet from a closed port or an echo reply from an alive host. The information Nmap can provide is determined by the type of scan or ping. The SYN scan and SYN ping (-sS and -PS) are very detailed, but the TCP connect scan (-sT) is limited by the implementation of the connect system call. This feature is automatically enabled by the debug option (-d) and the results are stored in XML log files even if this option is not specified.
- —stats-every time (Print periodic timing stats)
-
Periodically prints a timing status message after each interval of time. The time is a specification of the kind described in the section called “Timing and Performance”; so for example, use —stats-every 10s to get a status update every 10 seconds. Updates are printed to interactive output (the screen) and XML output.
—packet-trace (Trace packets and data sent and received)
Causes Nmap to print a summary of every packet sent or received. This is often used for debugging, but is also a valuable way for new users to understand exactly what Nmap is doing under the covers. To avoid printing thousands of lines, you may want to specify a limited number of ports to scan, such as -p20-30. If you only care about the goings on of the version detection subsystem, use —version-trace instead. If you only care about script tracing, specify —script-trace. With —packet-trace, you get all of the above.
- —open (Show only open (or possibly open) ports)
-
Sometimes you only care about ports you can actually connect to (open ones), and don’t want results cluttered with closed, filtered, and closed|filtered ports. Output customization is normally done after the scan using tools such as grep, awk, and Perl, but this feature was added due to overwhelming requests. Specify —open to only see hosts with at least one open, open|filtered, or unfiltered port, and only see ports in those states. These three states are treated just as they normally are, which means that open|filtered and unfiltered may be condensed into counts if there are an overwhelming number of them.
Beginning with Nmap 7.40, the —open option implies
—defeat-rst-ratelimit, because that option only affects closed and filtered ports, which are hidden by —open.
- —iflist (List interfaces and routes)
-
Prints the interface list and system routes as detected by Nmap and quits. This is useful for debugging routing problems or device mischaracterization (such as Nmap treating a PPP connection as ethernet).
Miscellaneous output options
—append-output (Append to rather than clobber output files)
When you specify a filename to an output format flag such as -oX or -oN, that file is overwritten by default. If you prefer to keep the existing content of the file and append the new results, specify the —append-output option. All output filenames specified in that Nmap execution will then be appended to rather than clobbered. This doesn’t work well for XML (-oX) scan data as the resultant file generally won’t parse properly until you fix it up by hand.
- —resume filename (Resume aborted scan)
-
Some extensive Nmap runs take a very long time—on the order of days. Such scans don’t always run to completion. Restrictions may prevent Nmap from being run during working hours, the network could go down, the machine Nmap is running on might suffer a planned or unplanned reboot, or Nmap itself could crash. The administrator running Nmap could cancel it for any other reason as well, by pressing ctrl-C. Restarting the whole scan from the beginning may be undesirable. Fortunately, if scan output files were kept, the user can ask Nmap to resume scanning with the target it was working on when execution ceased. Simply specify the —resume option and pass the output file as its argument. No other arguments are permitted, as Nmap parses the output file to use the same ones specified previously. Simply call Nmap as nmap —resume logfilename. Nmap will append new results to the data files specified in the previous execution. Scans can be resumed from any of the 3 major output formats: Normal, Grepable, or XML
- —noninteractive (Disable runtime interactions)
-
At times, such as when running Nmap in a shell background, it might be undesirable for Nmap to monitor and respond to user keyboard input when running. (See the section called “Runtime Interaction” about how to control Nmap during a scan.) Use option —noninteractive to prevent Nmap taking control of the terminal.
- —stylesheet path or URL (Set XSL stylesheet to transform XML output)
-
Nmap ships with an XSL stylesheet named nmap.xsl for viewing or translating XML output to HTML. The XML output includes an xml-stylesheet directive which points to nmap.xml where it was initially installed by Nmap. Run the XML file through an XSLT processor such as xsltproc[16] to produce an HTML file. Directly opening the XML file in a browser no longer works well because modern browsers limit the locations a stylesheet may be loaded from. If you wish to use a different stylesheet, specify it as the argument to —stylesheet. You must pass the full pathname or URL. One common invocation is —stylesheet https://nmap.org/svn/docs/nmap.xsl. This tells an XSLT processor to load the latest version of the stylesheet from Nmap.Org. The —webxml option does the same thing with less typing and memorization. Loading the XSL from Nmap.Org makes it easier to view results on a machine that doesn’t have Nmap (and thus nmap.xsl) installed. So the URL is often more useful, but the local filesystem location of nmap.xsl is used by default for privacy reasons.
- —webxml (Load stylesheet from Nmap.Org)
-
This is a convenience option, nothing more than an alias for —stylesheet https://nmap.org/svn/docs/nmap.xsl.
- —no-stylesheet (Omit XSL stylesheet declaration from XML)
-
Specify this option to prevent Nmap from associating any XSL stylesheet with its XML output. The xml-stylesheet directive is omitted.
Miscellaneous Options
This section describes some important (and not-so-important) options that don’t really fit anywhere else.
- -6 (Enable IPv6 scanning)
-
Nmap has IPv6 support for its most popular features. Ping scanning, port scanning, version detection, and the Nmap Scripting Engine all support IPv6. The command syntax is the same as usual except that you also add the -6 option. Of course, you must use IPv6 syntax if you specify an address rather than a hostname. An address might look like 3ffe:7501:4819:2000:210:f3ff:fe03:14d0, so hostnames are recommended. The output looks the same as usual, with the IPv6 address on the “interesting ports” line being the only IPv6 giveaway.
While IPv6 hasn’t exactly taken the world by storm, it gets significant use in some (usually Asian) countries and most modern operating systems support it. To use Nmap with IPv6, both the source and target of your scan must be configured for IPv6. If your ISP (like most of them) does not allocate IPv6 addresses to you, free tunnel brokers are widely available and work fine with Nmap. I use the free IPv6 tunnel broker service at http://www.tunnelbroker.net. Other tunnel brokers are listed at Wikipedia[17]. 6to4 tunnels are another popular, free approach.
On Windows, raw-socket IPv6 scans are supported only on ethernet devices (not tunnels), and only on Windows Vista and later. Use the —unprivileged option in other situations.
- -A (Aggressive scan options)
-
This option enables additional advanced and aggressive options. Presently this enables OS detection (-O), version scanning (-sV), script scanning (-sC) and traceroute (—traceroute). More features may be added in the future. The point is to enable a comprehensive set of scan options without people having to remember a large set of flags. However, because script scanning with the default set is considered intrusive, you should not use -A against target networks without permission. This option only enables features, and not timing options (such as -T4) or verbosity options (-v) that you might want as well. Options which require privileges (e.g. root access) such as OS detection and traceroute will only be enabled if those privileges are available.
- —datadir directoryname (Specify custom Nmap data file location)
-
Nmap obtains some special data at runtime in files named nmap-service-probes, nmap-services, nmap-protocols, nmap-rpc, nmap-mac-prefixes, and nmap-os-db. If the location of any of these files has been specified (using the —servicedb or —versiondb options), that location is used for that file. After that, Nmap searches these files in the directory specified with the —datadir option (if any). Any files not found there, are searched for in the directory specified by the NMAPDIR environment variable. Next comes ~/.nmap for real and effective UIDs; or on Windows, HOMEAppDataRoamingnmap (where HOME is the user’s home directory, like C:Usersuser). This is followed by the location of the nmap executable and the same location with ../share/nmap appended. Then a compiled-in location such as /usr/local/share/nmap or /usr/share/nmap.
- —servicedb services file (Specify custom services file)
-
Asks Nmap to use the specified services file rather than the nmap-services data file that comes with Nmap. Using this option also causes a fast scan (-F) to be used. See the description for —datadir for more information on Nmap’s data files.
- —versiondb service probes file (Specify custom service probes file)
-
Asks Nmap to use the specified service probes file rather than the nmap-service-probes data file that comes with Nmap. See the description for —datadir for more information on Nmap’s data files.
- —send-eth (Use raw ethernet sending)
-
Asks Nmap to send packets at the raw ethernet (data link) layer rather than the higher IP (network) layer. By default, Nmap chooses the one which is generally best for the platform it is running on. Raw sockets (IP layer) are generally most efficient for Unix machines, while ethernet frames are required for Windows operation since Microsoft disabled raw socket support. Nmap still uses raw IP packets on Unix despite this option when there is no other choice (such as non-ethernet connections).
- —send-ip (Send at raw IP level)
-
Asks Nmap to send packets via raw IP sockets rather than sending lower level ethernet frames. It is the complement to the —send-eth option discussed previously.
- —privileged
- (Assume that the user is fully privileged)
Tells Nmap to simply assume that it is privileged enough to perform raw socket sends, packet sniffing, and similar operations that usually require root privileges on Unix systems. By default Nmap quits if such operations are requested but geteuid is not zero. —privileged is useful with Linux kernel capabilities and similar systems that may be configured to allow unprivileged users to perform raw-packet scans. Be sure to provide this option flag before any flags for options that require privileges (SYN scan, OS detection, etc.). The NMAP_PRIVILEGED environment variable may be set as an equivalent alternative to —privileged.
- —unprivileged
- (Assume that the user lacks raw socket privileges)
This option is the opposite of —privileged. It tells Nmap to treat the user as lacking network raw socket and sniffing privileges. This is useful for testing, debugging, or when the raw network functionality of your operating system is somehow broken. The NMAP_UNPRIVILEGED environment variable may be set as an equivalent alternative to —unprivileged.
- —release-memory (Release memory before quitting)
-
This option is only useful for memory-leak debugging. It causes Nmap to release allocated memory just before it quits so that actual memory leaks are easier to spot. Normally Nmap skips this as the OS does this anyway upon process termination.
- -V; —version (Print version number)
-
Prints the Nmap version number and exits.
- -h; —help (Print help summary page)
-
Prints a short help screen with the most common command flags. Running Nmap without any arguments does the same thing.
Runtime Interaction
During the execution of Nmap, all key presses are captured. This allows you to interact with the program without aborting and restarting it. Certain special keys will change options, while any other keys will print out a status message telling you about the scan. The convention is that lowercase letters increase the amount of printing, and uppercase letters decrease the printing. You may also press ‘?’ for help.
- v / V
-
Increase / decrease the verbosity level
- d / D
-
Increase / decrease the debugging Level
- p / P
-
Turn on / off packet tracing
- ?
-
Print a runtime interaction help screen
- Anything else
-
Print out a status message like this:
Stats: 0:00:07 elapsed; 20 hosts completed (1 up), 1 undergoing Service Scan
Service scan Timing: About 33.33% done; ETC: 20:57 (0:00:12 remaining)
Examples
Here are some Nmap usage examples, from the simple and routine to a little more complex and esoteric. Some actual IP addresses and domain names are used to make things more concrete. In their place you should substitute addresses/names from your own network. While I don’t think port scanning other networks is or should be illegal, some network administrators don’t appreciate unsolicited scanning of their networks and may complain. Getting permission first is the best approach.
For testing purposes, you have permission to scan the host scanme.nmap.org. This permission only includes scanning via Nmap and not testing exploits or denial of service attacks. To conserve bandwidth, please do not initiate more than a dozen scans against that host per day. If this free scanning target service is abused, it will be taken down and Nmap will report Failed to resolve given hostname/IP: scanme.nmap.org. These permissions also apply to the hosts scanme2.nmap.org, scanme3.nmap.org, and so on, though those hosts do not currently exist.
nmap -v scanme.nmap.org
This option scans all reserved TCP ports on the machine scanme.nmap.org . The -v option enables verbose mode.
nmap -sS -O scanme.nmap.org/24
Launches a stealth SYN scan against each machine that is up out of the 256 IPs on the /24 sized network where Scanme resides. It also tries to determine what operating system is running on each host that is up and running. This requires root privileges because of the SYN scan and OS detection.
nmap -sV -p 22,53,110,143,4564 198.116.0-255.1-127
Launches host enumeration and a TCP scan at the first half of each of the 255 possible eight-bit subnets in the 198.116.0.0/16 address space. This tests whether the systems run SSH, DNS, POP3, or IMAP on their standard ports, or anything on port 4564. For any of these ports found open, version detection is used to determine what application is running.
nmap -v -iR 100000 -Pn -p 80
Asks Nmap to choose 100,000 hosts at random and scan them for web servers (port 80). Host enumeration is disabled with -Pn since first sending a couple probes to determine whether a host is up is wasteful when you are only probing one port on each target host anyway.
nmap -Pn -p80 -oX logs/pb-port80scan.xml -oG logs/pb-port80scan.gnmap 216.163.128.20/20
This scans 4096 IPs for any web servers (without pinging them) and saves the output in grepable and XML formats.
Nmap Book
While this reference guide details all material Nmap options, it can’t fully demonstrate how to apply those features to quickly solve real-world tasks. For that, we released Nmap Network Scanning: The Official Nmap Project Guide to Network Discovery and Security Scanning. Topics include subverting firewalls and intrusion detection systems, optimizing Nmap performance, and automating common networking tasks with the Nmap Scripting Engine. Hints and instructions are provided for common Nmap tasks such as taking network inventory, penetration testing, detecting rogue wireless access points, and quashing network worm outbreaks. Examples and diagrams show actual communication on the wire. More than half of the book is available free online. See https://nmap.org/book for more information.
Bugs
Like its author, Nmap isn’t perfect. But you can help make it better by sending bug reports or even writing patches. If Nmap doesn’t behave the way you expect, first upgrade to the latest version available from https://nmap.org. If the problem persists, do some research to determine whether it has already been discovered and addressed. Try searching for the problem or error message on Google since that aggregates so many forums. If nothing comes of this, create an Issue on our tracker (http://issues.nmap.org) and/or mail a bug report to <dev@nmap.org>. If you subscribe to the nmap-dev list before posting, your message will bypass moderation and get through more quickly. Subscribe at https://nmap.org/mailman/listinfo/dev. Please include everything you have learned about the problem, as well as what version of Nmap you are using and what operating system version it is running on. Other suggestions for improving Nmap may be sent to the Nmap dev mailing list as well.
If you are able to write a patch improving Nmap or fixing a bug, that is even better! Instructions for submitting patches or git pull requests are available from https://github.com/nmap/nmap/blob/master/CONTRIBUTING.md
Particularly sensitive issues such as a security reports may be sent directly to Nmap’s author Fyodor directly at <fyodor@nmap.org>. All other reports and comments should use the dev list or issue tracker instead because more people read, follow, and respond to those.
Authors
Gordon “Fyodor” Lyon <fyodor@nmap.org> wrote and released Nmap in 1997. Since then, hundreds of people have made valuable contributions, as detailed in the CHANGELOG file distributed with Nmap and also available from https://nmap.org/changelog.html. David Fifield and Daniel Miller deserve special recognition for their enormous multi-year contributions!
Legal Notices
Nmap Copyright and Licensing
The Nmap Security Scanner is (C) 1996–2022 Nmap Software LLC («The Nmap Project»). Nmap is also a registered trademark of the Nmap Project. It is published under the Nmap Public Source License[18]. This generally allows end users to download and use Nmap for free. It doesn’t allow Nmap to be used and redistributed within commercial software or hardware products (including appliances, virtual machines, and traditional applications). We fund the project by selling a special Nmap OEM Edition for this purpose, as described at https://nmap.org/oem. Hundreds of large and small software vendors have already purchased OEM licenses to embed Nmap technology such as host discovery, port scanning, OS detection, version detection, and the Nmap Scripting Engine within their products.
The Nmap Project has permission to redistribute Npcap, a packet capturing driver and library for the Microsoft Windows platform. Npcap is a separate work with it’s own license rather than this Nmap license. Since the Npcap license does not permit redistribution without special permission, our Nmap Windows binary packages which contain Npcap may not be redistributed without special permission.
Even though the NPSL is based on GPLv2, it contains different provisions and is not directly compatible. It is incompatible with some other open source licenses as well. In some cases we can relicense portions of Nmap or grant special permissions to use it in other open source software. Please contact fyodor@nmap.org with any such requests. Similarly, we don’t incorporate incompatible open source software into Nmap without special permission from the copyright holders.
If you have received a written license agreement or contract for Nmap (such as an Nmap OEM license[19]) stating terms other than these, you may choose to use and redistribute Nmap under those terms instead.
Creative Commons License for this Nmap Guide
This Nmap Reference Guide is (C) 2005–2022 Nmap Software LLC. It is hereby placed under version 3.0 of the Creative Commons Attribution License[20]. This allows you redistribute and modify the work as you desire, as long as you credit the original source. Alternatively, you may choose to treat this document as falling under the same license as Nmap itself (discussed previously).
Source Code Availability and Community Contributions
Source is provided to this software because we believe users have a right to know exactly what a program is going to do before they run it. This also allows you to audit the software for security holes.
Source code also allows you to port Nmap to new platforms, fix bugs, and add new features. You are highly encouraged to submit your changes as Github Pull Requests (PR) or send them to <dev@nmap.org> for possible incorporation into the main distribution. By submitting such changes, it is assumed that you are offering the Nmap Project the unlimited, non-exclusive right to reuse, modify, and relicense the code. This is important because the inability to relicense code has caused devastating problems for other Free Software projects (such as KDE and NASM). We also sell commercial licenses to Nmap OEM[21]. If you wish to specify special license conditions of your contributions, just say so when you send them.
No Warranty
This program is distributed in the hope that it will be useful, but WITHOUT ANY WARRANTY; without even the implied warranty of MERCHANTABILITY or FITNESS FOR A PARTICULAR PURPOSE.
It should also be noted that Nmap has occasionally been known to crash poorly written applications, TCP/IP stacks, and even operating systems. While this is extremely rare, it is important to keep in mind. Nmap should never be run against mission critical systems unless you are prepared to suffer downtime. We acknowledge here that Nmap may crash your systems or networks and we disclaim all liability for any damage or problems Nmap could cause.
Inappropriate Usage
Because of the slight risk of crashes and because a few black hats like to use Nmap for reconnaissance prior to attacking systems, there are administrators who become upset and may complain when their system is scanned. Thus, it is often advisable to request permission before doing even a light scan of a network.
Nmap should never be installed with special privileges (e.g. suid root). That would open up a major security vulnerability as other users on the system (or attackers) could use it for privilege escalation.
Nmap is not designed, manufactured, or intended for use in hazardous environments requiring fail- safe performance where the failure of the software could lead directly to death, personal injury, or significant physical or environmental damage.
Third-Party Software and Funding Notices
This product includes software developed by the Apache Software Foundation[22]. A modified version of the Libpcap portable packet capture library[23] is distributed along with Nmap. The Windows version of Nmap utilizes the Libpcap-derived Ncap library[24] instead. Regular expression support is provided by the PCRE library[25], which is open-source software, written by Philip Hazel. Certain raw networking functions use the Libdnet[26] networking library, which was written by Dug Song. A modified version is distributed with Nmap. Nmap can optionally link with the OpenSSL cryptography toolkit[27] for SSL version detection support. The Nmap Scripting Engine uses an embedded version of the Lua programming language[28]. The Liblinear linear classification library[29] is used for our IPv6 OS detection machine learning techniques[30].
All of the third-party software described in this paragraph is freely redistributable under BSD-style software licenses.
Binary packages for Windows and Mac OS X include support libraries necessary to run Zenmap and Ndiff with Python and PyGTK. (Unix platforms commonly make these libraries easy to install, so they are not part of the packages.) A listing of these support libraries and their licenses is included in the LICENSES files.
This software was supported in part through the Google Summer of Code[31] and the DARPA CINDER program[32] (DARPA-BAA-10-84).
United States Export Control
Nmap only uses encryption when compiled with the optional OpenSSL support and linked with OpenSSL. When compiled without OpenSSL support, the Nmap Project believes that Nmap is not subject to U.S. Export Administration Regulations (EAR)[33] export control. As such, there is no applicable ECCN (export control classification number) and exportation does not require any special license, permit, or other governmental authorization.
When compiled with OpenSSL support or distributed as source code, the Nmap Project believes that Nmap falls under U.S. ECCN 5D002[34] (“Information Security Software”). We distribute Nmap under the TSU exception for publicly available encryption software defined in EAR 740.13(e)[35].
Notes
- Nmap Network Scanning: The Official Nmap Project Guide to Network Discovery and Security Scanning
https://nmap.org/book/ - RFC 1122
http://www.rfc-editor.org/rfc/rfc1122.txt - RFC 792
http://www.rfc-editor.org/rfc/rfc792.txt - RFC 950
http://www.rfc-editor.org/rfc/rfc950.txt - UDP
http://www.rfc-editor.org/rfc/rfc768.txt - SCTP
http://www.rfc-editor.org/rfc/rfc4960.txt - TCP RFC
http://www.rfc-editor.org/rfc/rfc793.txt - RFC 959
http://www.rfc-editor.org/rfc/rfc959.txt - RFC 1323
http://www.rfc-editor.org/rfc/rfc1323.txt - Lua programming language
http://lua.org - precedence
http://www.lua.org/manual/5.1/manual.html#2.5.3 - IP protocol
http://www.rfc-editor.org/rfc/rfc791.txt - RFC 2960
http://www.rfc-editor.org/rfc/rfc2960.txt - Nmap::Scanner
http://sourceforge.net/projects/nmap-scanner/ - Nmap::Parser
http://nmapparser.wordpress.com/ - xsltproc
http://xmlsoft.org/XSLT/ - listed at Wikipedia
http://en.wikipedia.org/wiki/List_of_IPv6_tunnel_brokers - Nmap Public Source License
https://nmap.org/npsl - Nmap OEM license
https://nmap.org/oem/ - Creative Commons Attribution License
http://creativecommons.org/licenses/by/3.0/ - Nmap OEM
https://nmap.org/oem - Apache Software Foundation
https://www.apache.org - Libpcap portable packet capture library
https://www.tcpdump.org - Ncap library
https://npcap.com - PCRE library
https://pcre.org - Libdnet
http://libdnet.sourceforge.net - OpenSSL cryptography toolkit
https://openssl.org - Lua programming language
https://lua.org - Liblinear linear classification library
https://www.csie.ntu.edu.tw/~cjlin/liblinear/ - IPv6 OS detection machine learning techniques
https://nmap.org/book/osdetect-guess.html#osdetect-guess-ipv6 - Google Summer of Code
https://nmap.org/soc/ - DARPA CINDER program
https://www.fbo.gov/index?s=opportunity&mode=form&id=585e02a51f77af5cb3c9e06b9cc82c48&tab=core&_cview=1 - Export Administration Regulations (EAR)
https://www.bis.doc.gov/index.php/regulations/export-administration-regulations-ear - 5D002
https://www.bis.doc.gov/index.php/documents/regulations-docs/federal-register-notices/federal-register-2014/951-ccl5-pt2/file - EAR 740.13(e)
https://www.bis.doc.gov/index.php/documents/regulations-docs/2341-740-2/file
Referenced By
hping3(8), psad(8), Smokeping_probes_TCPPing(3), thc-ipv6(8).
08/31/2022 Nmap Reference Guide
Nmap is a network mapping tool. It provides a range of powerful scanning options. Many network administrators use Nmap to scan open ports & services on a network, guessing the operating system on the targeted machine, monitoring hosts, and discovering different services with their version information. In this article, you will see how Nmap on windows works.
Nmap is free and open-source software that was created by Gordon Lyon. Nmap is utilized to find out hosts and services on a network by transmitting some packages over the targeted network. Nmap was once limited only to Linux operating systems, but now it is available for Windows and macOS too.
Note: If you want to use Nmap on Windows without the need of installing bare-metal Linux or a virtual machine utilizing the power of WSL 2, we have an entire tutorial series covering how to do that.
Table of Contents
- Why should you use Nmap
- Nmap Installation Process
- Nmap features
- Zenmap for Windows
- Different scan types in Nmap
- Scanning TCP/UDP ports with Nmap on windows
- Scanning all ports
- Scanning specific TCP ports within a range
- Faster Scan option
- Scanning TCP ports without a range
- Scanning UDP ports within a range
- Scanning all UDP ports
- Scanning TCP/UDP at once within a specific range
- Other common Nmap commands
- Scanning OS & service detection
- Detecting vulnerabilities using Nmap
- Saving your Nmap results
- Detecting Malware on the remote hosts
- Conclusion
👀 This Tutorial has some related Articles!
👉 Part 1 – Nmap Basics
👉 Part 2 – Nmap Host Discovery
👉 Part 3 – Advanced Nmap Commands
👉 Part 4 – Nmap NSE Scripts
👉 Part 5 – Nmap on Windows
Why should you use Nmap
Nmap is a network mapping tool with a ton of other useful features. Many security researchers and pentester use this open-source tool. Nmap is also a favorite tool for both black and white hat hackers.
A hacker with good knowledge can create images of your network topology. Scanning your network can help you to make yourself more secure and spot the flaws in your system. You can check for any unauthorized devices that are connected to your network, you can find ports that are meant to be closed but are open for some reason, and to point out the users that are running any unauthorized services on your network.
Nmap Installation Process
Installing Nmap on Windows is extremely easy. You have to follow some short steps to use this powerful tool.
- Go to the following web address nmap.org/download.html and download the latest stable version
- Once the setup is downloaded from their website, now you have to browse to the downloaded “.exe” setup file. Right-click on the file and run it as an administrator.
- Now the installation process will start, read the license agreement thoroughly and only accept the license agreement if you agree, by clicking the “I agree” button.
- Now choose the components that you want to install with Nmap but choosing them all is recommended. Click on the “Next” button.
- The installation location for Nmap will be C:Program Files (x86)Nmap, but you can change the Installation folder to wherever you want. Now click on the “Install” button.
- Now the actual installation process will start, and all files will be extracted. Once it is done, your Nmap is ready to use now.
Nmap features
This powerful tool carries many features that can be used by a hacker to get a lot of information about their targeted machine.
- Identify open ports.
- Network Inventory.
- Map a network.
- Exploiting and finding a vulnerability.
- Host uptime monitoring.
- Network security audit.
- Detecting OS.
- Detect service and version.
Network Mapping – It can be beneficial for you to check the devices present on a network including all the routers, servers, and switches, and to verify how they are connected physically. Nmap on Windows has the capability to show a whole map of the network.
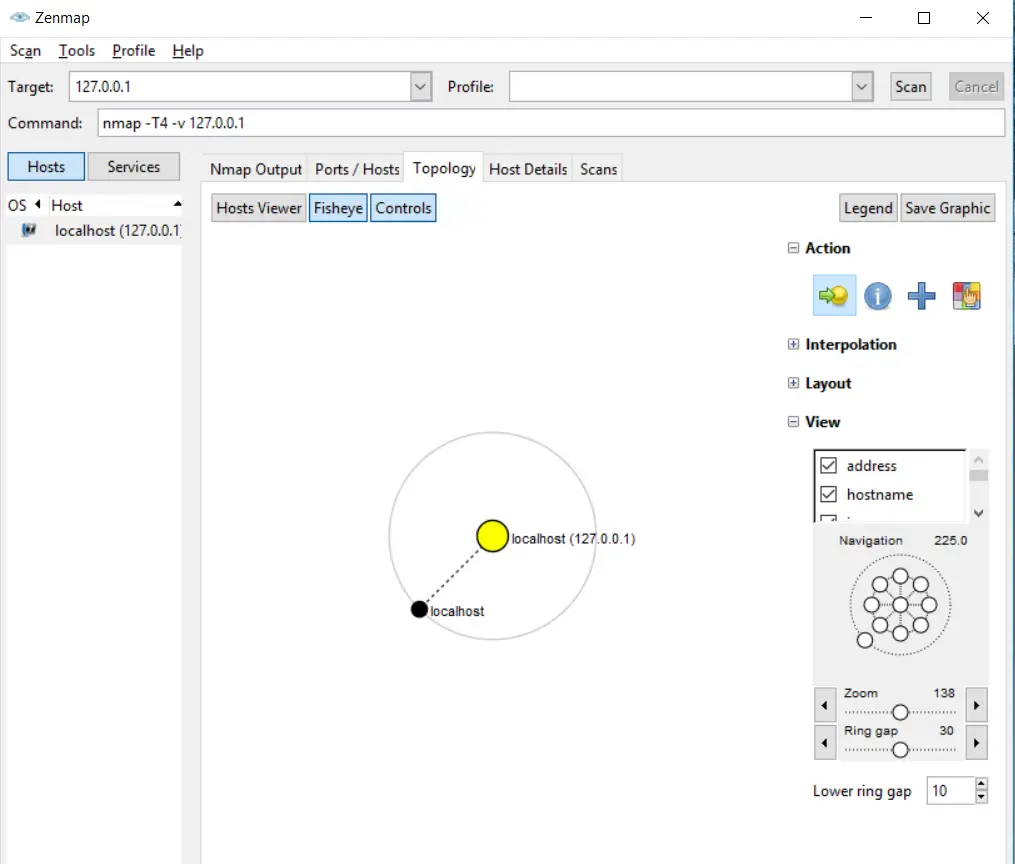
Detecting OS – Nmap can also be used for OS footprinting. You can check the operating system running on your targeted device, including the vendor name and the version of the system. It can also give you an estimate for the ‘devices’ up-time.
Security Auditing – After footprinting the OS and knowing the applications running on the system, network managers now discover the vulnerability that can lead to specific flaws.
Discovering services – By using Nmap you can do more than just find hosts on the network, you can also check their behavior and whether they are acting as web servers or mail servers and information regarding the version of the software they are using.
Zenmap for Windows
Zenmap offers you a graphical user interface for all the tasks you would normally perform in Nmap by using the command line. Zenmap offers you some extraordinary features that you do not see in the classic Nmap, for example, a network topology map.
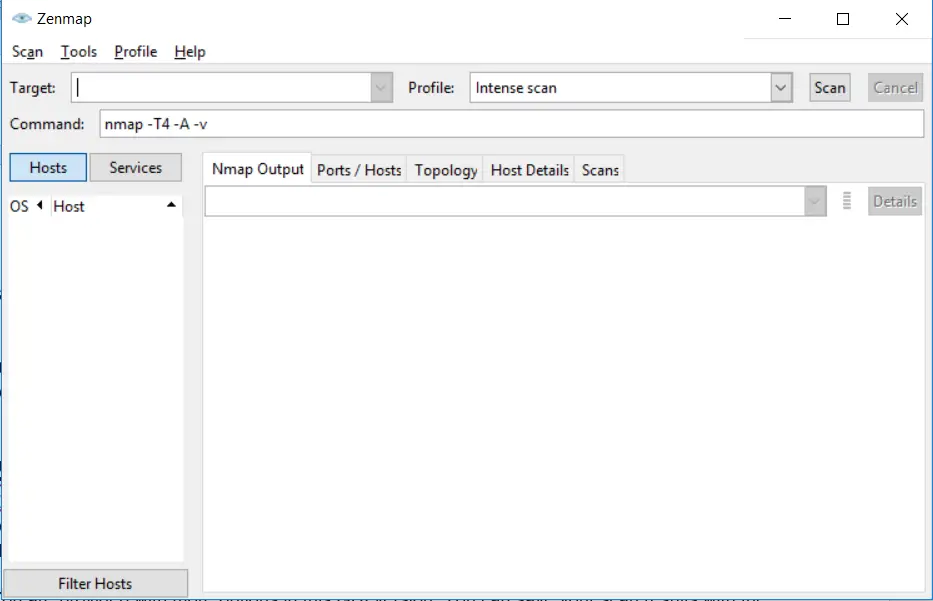
You are provided with more options in this GUI version. You can save your scan results with the Nmap format (.nmap) or in the XML (.xml) format.
This incredible GUI of Nmap is available for Windows, and it is very beneficial for users who do not want to play with the CLI interface of Nmap.
Different scan types in Nmap
There are different types of scans that can be performed by using Nmap. The Nmap user performs these scans for various purposes.
TCP Scan
TCP scan performs a three-way handshake from your device to the targeted device. Someone with minimal effort can easily detect the TCP scan, and your IP address of the sender can be logged by the services efficiently.
UDP Scan
UDP is used to check whether there is any port that is listening for the upcoming requests on the targeted machine. You may get a false report in your scan results, as there is no mechanism to respond positively. The UPD scans can be used to uncover any hidden trojan or any RPC services. These scans are not very fast because the machines handle this kind of traffic slowly.
SYN Scan
It is a type of TCP scan. The syn packets are crafted by using Nmap itself, and this syn packet is used to initiate a TCP connection. Nmap results are based upon these special Syn packets. These packets themselves do not establish a connection, but they are utilized to produce scan results on Nmap.
ACK Scan
To check if ports are filtered or not, ACK scans are used. This type of scan can be beneficial if you want to check for the firewalls. If there is simple packet filtering, then it will allow an established connection with the help of ACK bit set.
FIN Scan
The FIN scan is most likely the SYN scan. If the targeted machine receives FIN input, then most of them will send the reset packet (RST) back.
NULL Scan
As the name suggests, the NULL scan sets all the header fields to zero (null). These kinds of packets are not authentic, and some of the targets do not know how to handle this packet. These targets could be your windows machine, and when you scan them using NULL packets, they produce undependable results.
XMAS Scan
XMAS scan has the same nature as the NULL scan, as both of these are hard to detect. The implementation of the TCP stack will prevent windows from responding to the Xmas scans. The XMAS scans are used to operate the FIN, URG, and PSH flag present in the TCP header.
RPC Scan
These kinds of scans are utilized to find the systems that reply to the RPC (Remote procedure call) services. It can allow the commands to run on a specific machine remotely. RPC services can also be used to run on many different ports; that’s why it becomes difficult to tell whether the RPC services are working or not. RPC scan should be done often to check the running RPC services.
IDLE Scan
From all of the above scans for Nmap on Windows or Linux, the IDLE scan is the stealthiest of them all. The attackers mostly use the IDLE scan for malicious attacks. Some specific conditions are necessary to perform this scan.
Scanning TCP/UDP ports with Nmap on windows
One of the best usages of Nmap is to scan ports on the network. By default, there are 1000 ports that Nmap can automatically scan, and you can change that port range according to your scan requirements.
Scanning all ports
In Nmap, we can specify the port range by using the “-p” option. The maximum or highest port number is 65535. If we want to scan all TCP ports, then we can use -p0-65535 option:
Code language: CSS (css)
nmap -p- 127.0.0.1
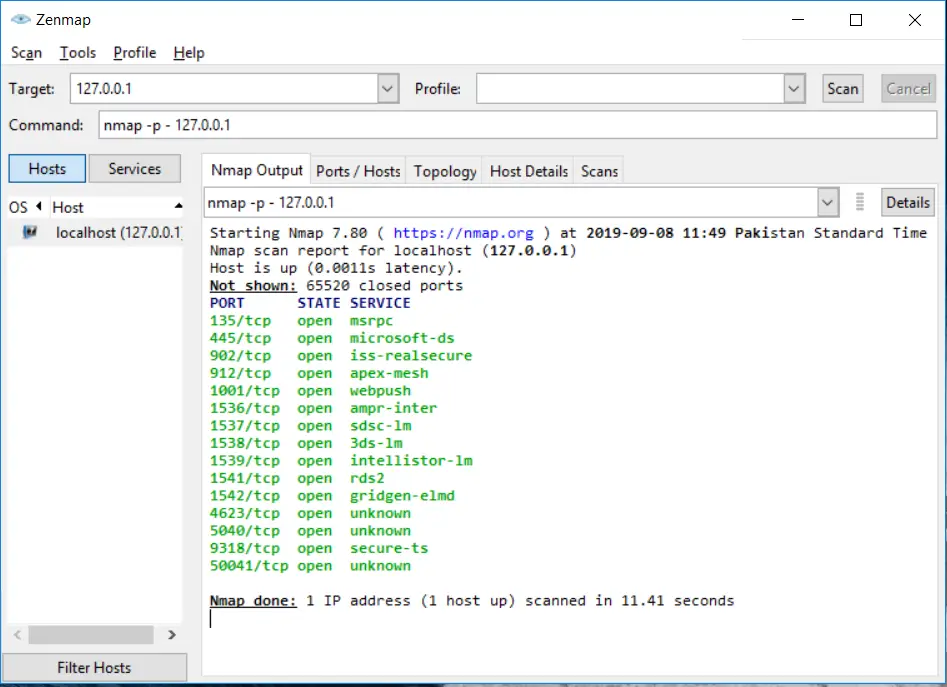
Scanning specific TCP ports within a range
In Nmap, we can specify the port range by using the “-p” option. The maximum or highest port number is 65535. If we want to scan all TCP ports, then we can use -p1-10 option:
Code language: CSS (css)
nmap -p1-500 127.0.0.1
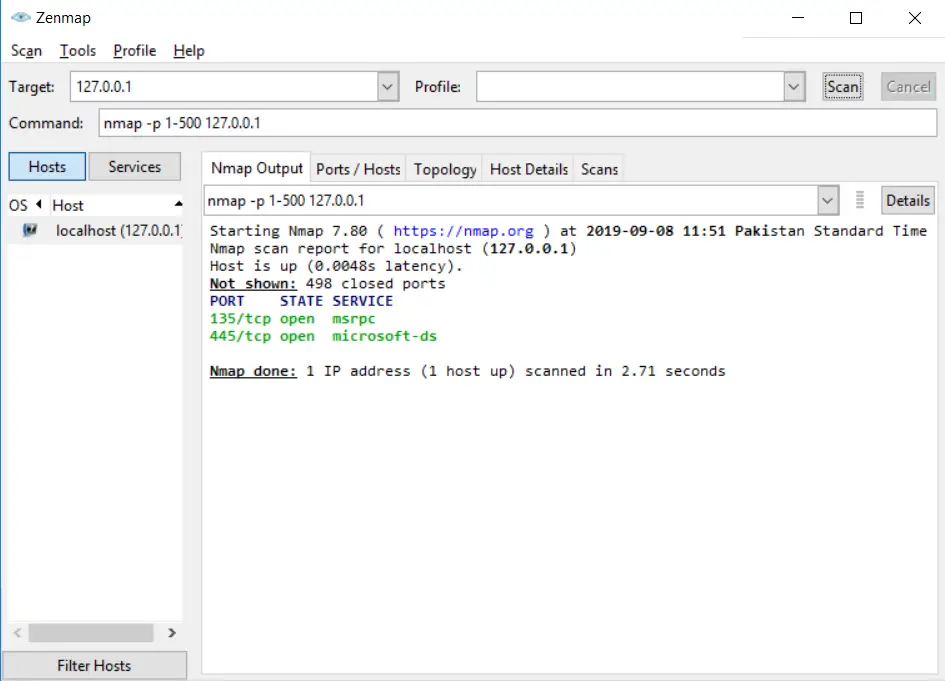

Faster Scan option
If you want your scan to finish fast, then you can use the fast scan option. The regular scan will consume a lot of time, whereas a fast scan option will do it in less time. Use this option if your situation is not critical. You can use -T5 parameter for the quickest level scan of Nmap:
Code language: CSS (css)
nmap -p- -T5 127.0.0.1
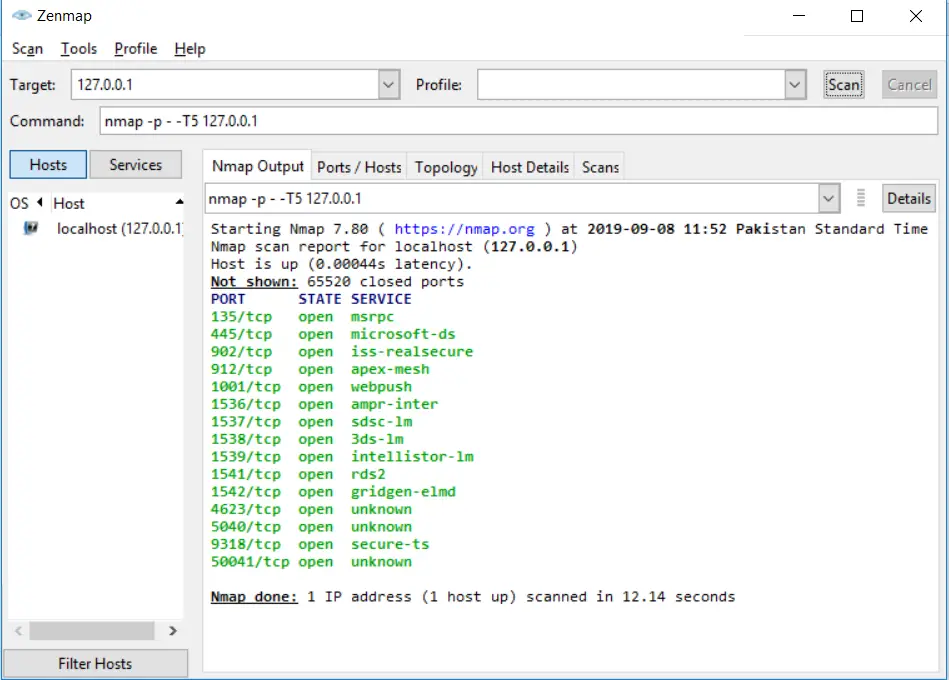
Scanning TCP ports without a range
There is another way of scanning TCP ports without specifying the range of ports. It will scan for the common 1000 ports:
Code language: CSS (css)
nmap 127.0.0.1
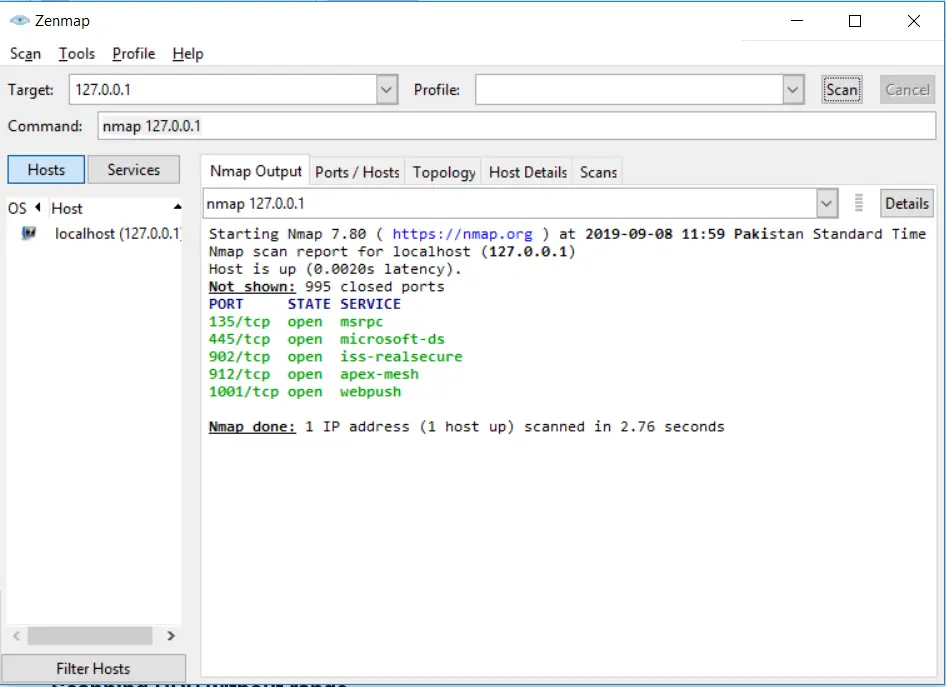
Scanning UDP ports within a range
In Nmap when you scan ports, TCP is scanned per default. In order to scan UDP ports, you have to specify the UDP scan in the statement. You can use -sU for scanning UDP ports.^:
Code language: CSS (css)
nmap -sU -p 1-500 127.0.0.1
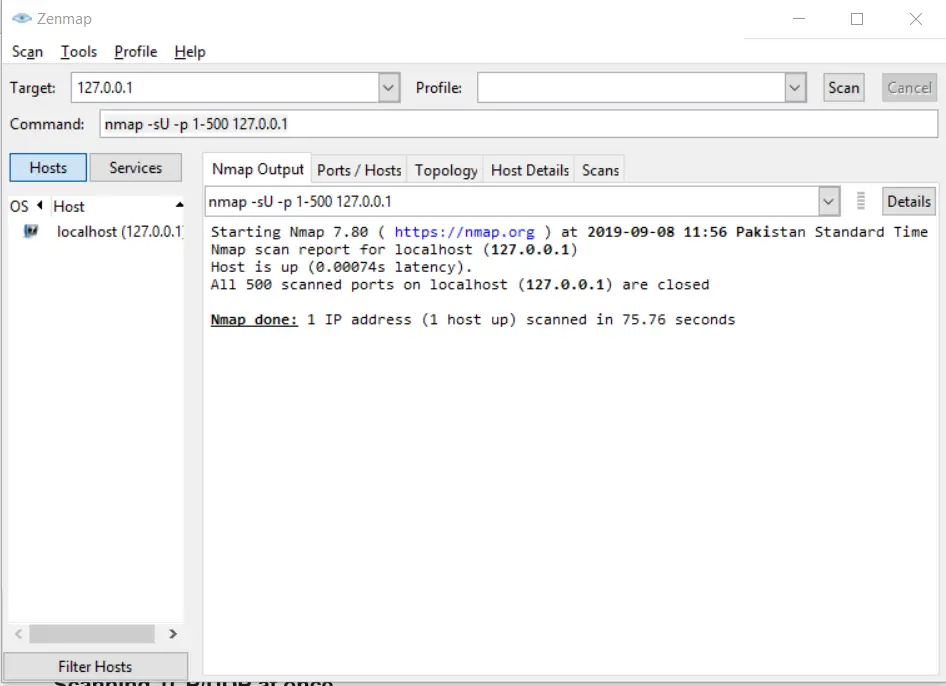
Scanning all UDP ports
Scanning UDP without range is similar to scanning TCP without range. You use the same -p- option to scan UDP ports without specifying a range:
Code language: CSS (css)
nmap -sU -p - -T5 127.0.0.1
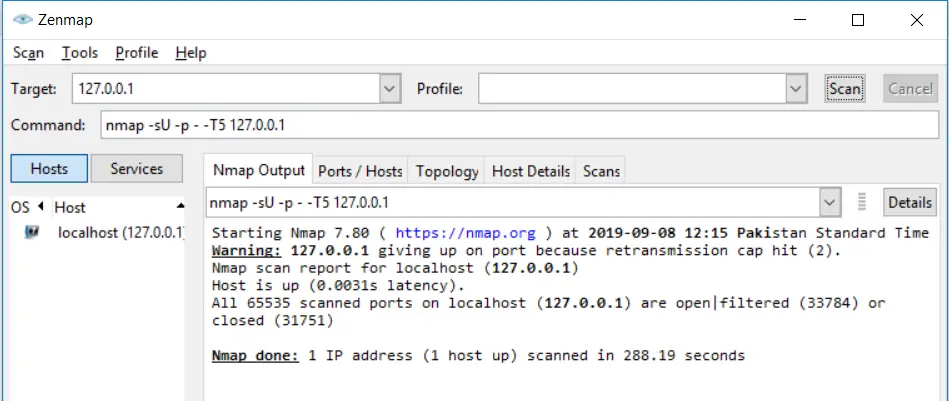
👀 This Tutorial has some related Articles!
👉 How to get started in Cyber Security – The Complete Guide
👉 How to get started with Bug Bounties
👉 Terminal Customization Series
👉 Best Ethical Hacking Books
👉 Download Kali Linux Safe & Easy
👉 Best Ethical Hacking Tools
👉 Install VSCode on Kali Linux
👉 Dual Boot Kali Linux with Windows
👉 Install Kali Linux on VirtualBox – Complete Beginner Guide
👉 Top Things to do after installing Kali Linux
👉 WiFi Adapter for Kali Linux – The Ultimate Guide
👉 Nmap Beginner Guide Series
👉 Metasploit Tutorial Series
👉 Burp Suite Beginner Guide
Scanning TCP/UDP at once within a specific range
You can also scan both TCP/UDP by using a single statement. You have to use -sU for UDP ports and TCP ports ‘; you’ll use the -sT option:
Code language: CSS (css)
nmap -sT -sU -p 1-500 127.0.0.1
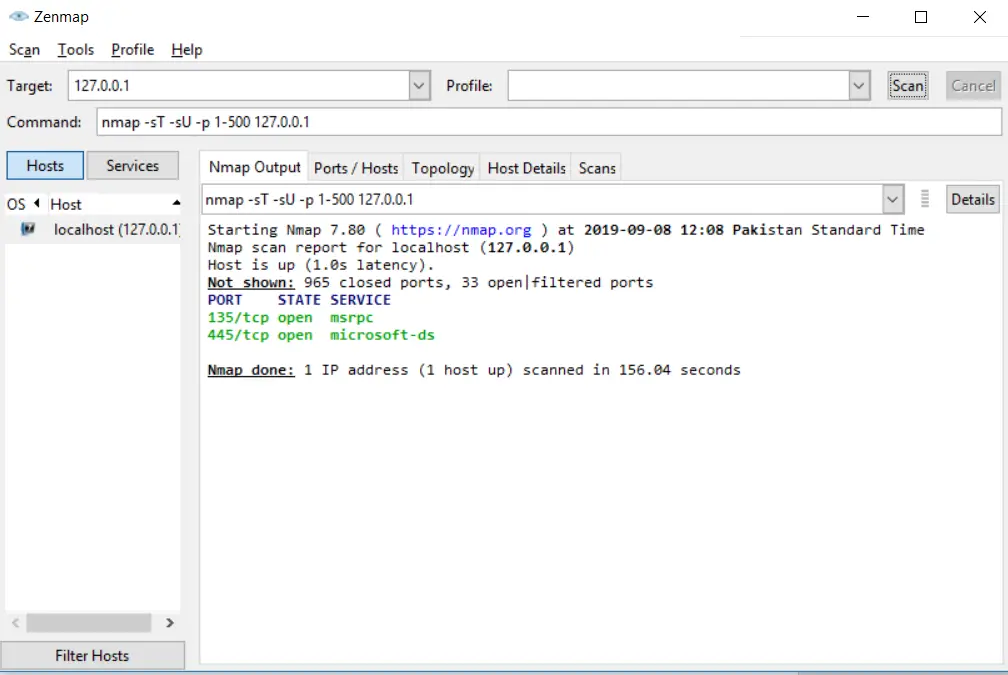
Other common Nmap commands
There are a ton of commands that you cannot master in a day, but there are some common and useful commands that you can use instantly. These commands are the basic ones. You can go advance, once you have learned the basics of it. Have a look at some of the most common yet useful commands.
Scanning OS & service detection
You can enable service detection and OS detection by using the -A option and to allow fast scanning we can use -T4 with it. Here is an example:
Code language: CSS (css)
nmap -T4 -A 127.0.0.1
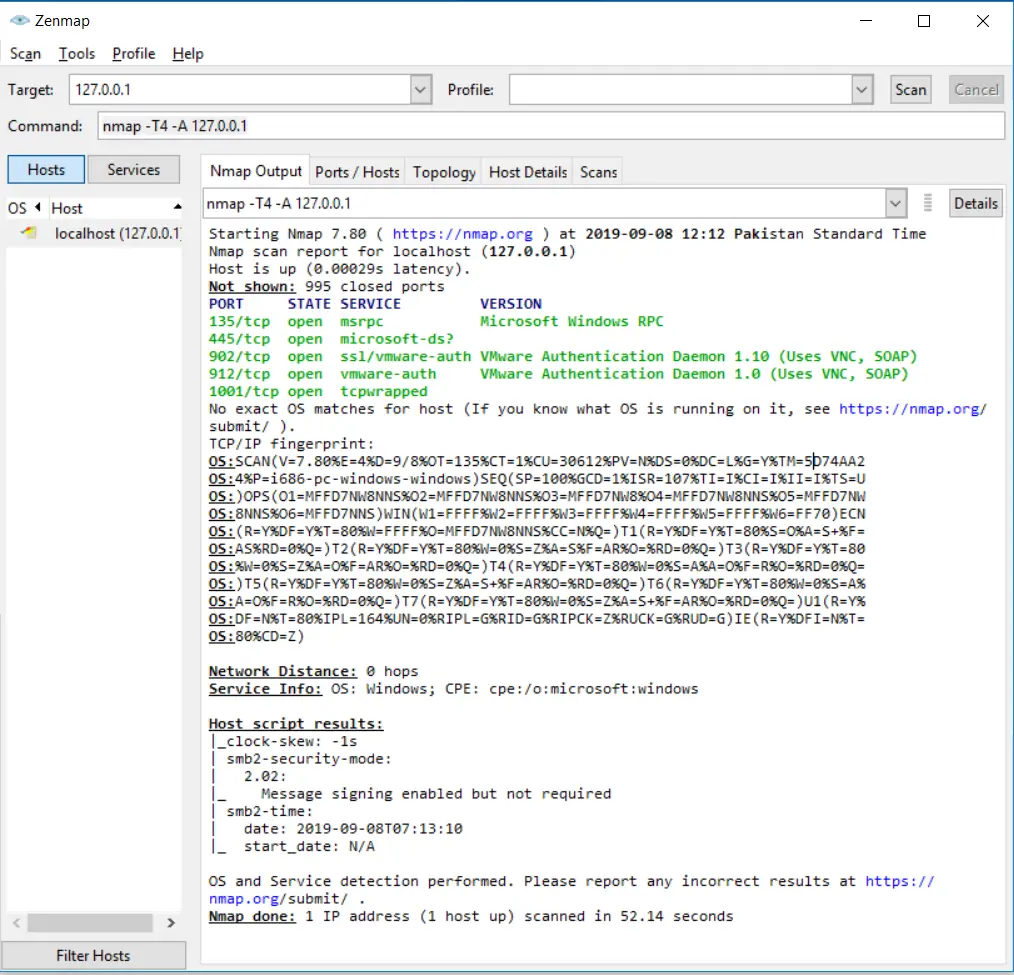
Detecting vulnerabilities using Nmap
One of the most significant Nmap features that allow you to go beyond your expectations is that you can use the “Nmap scripting engine” through which you can execute a set of pre-defined scripts, and you can write your won scripts as well in Lua programming language.
NSE (Nmap Scripting Engine) is essential to use when you have to perform a full vulnerability scan. You have to automate everything during a scan that’s why we use scripts.
To perform a vulnerability test, you can use:
Code language: CSS (css)
nmap -T5 --script vuln 127.0.0.1
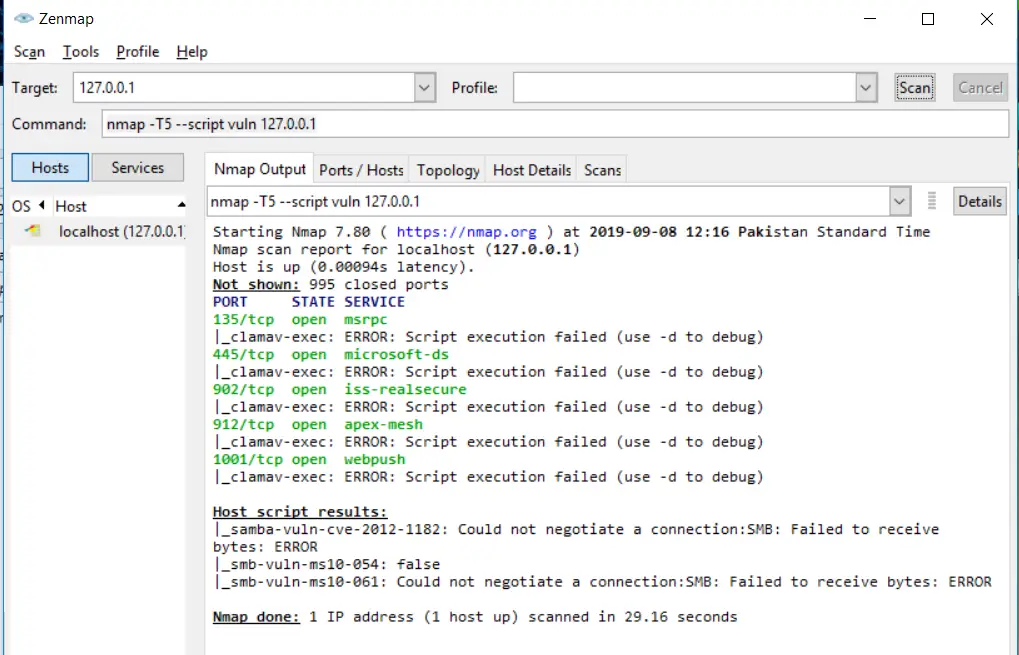
Saving your Nmap results
You can save your results after the scan in Nmap. You can save them in two formats i.e Nmap (.nmap) format or XML (.xml) format. While exporting the results from the Nmap, you have to use the following command statement:
Code language: CSS (css)
nmap -oN output.txt example.com
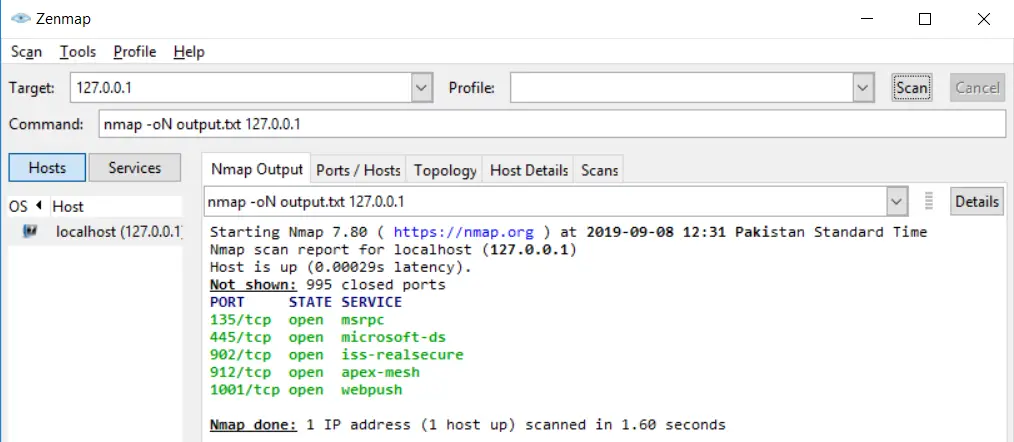
You can export the results as an XML document as well:
Code language: CSS (css)
nmap -oX output.xml example.com
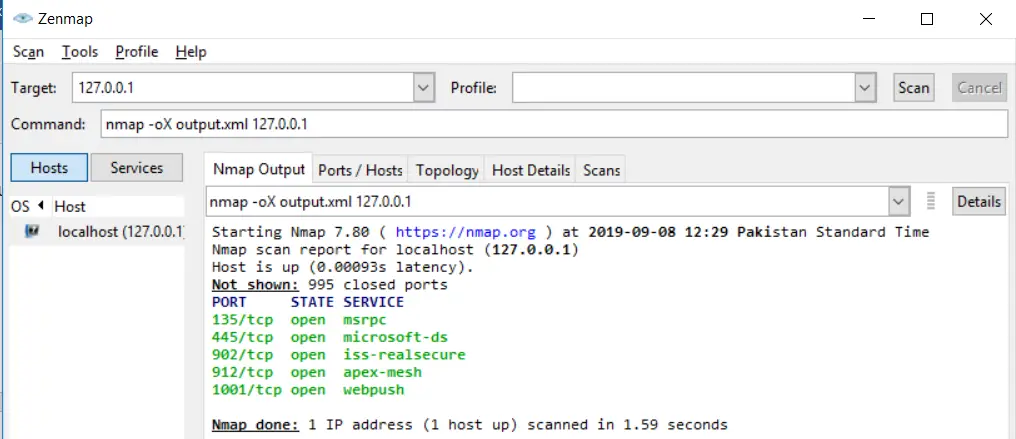
Detecting Malware on the remote hosts
Nmap has the capability to run different tests to check for Malware or backdoor on some popular operating system services like Proftpd, IRC, SMTP, and SMB. It also offers a module that checks for any malicious file signs in Virustotal databases.
To perform a very simple & straight scan:
Code language: CSS (css)
nmap -sV --script http-malware-host 127.0.0.1
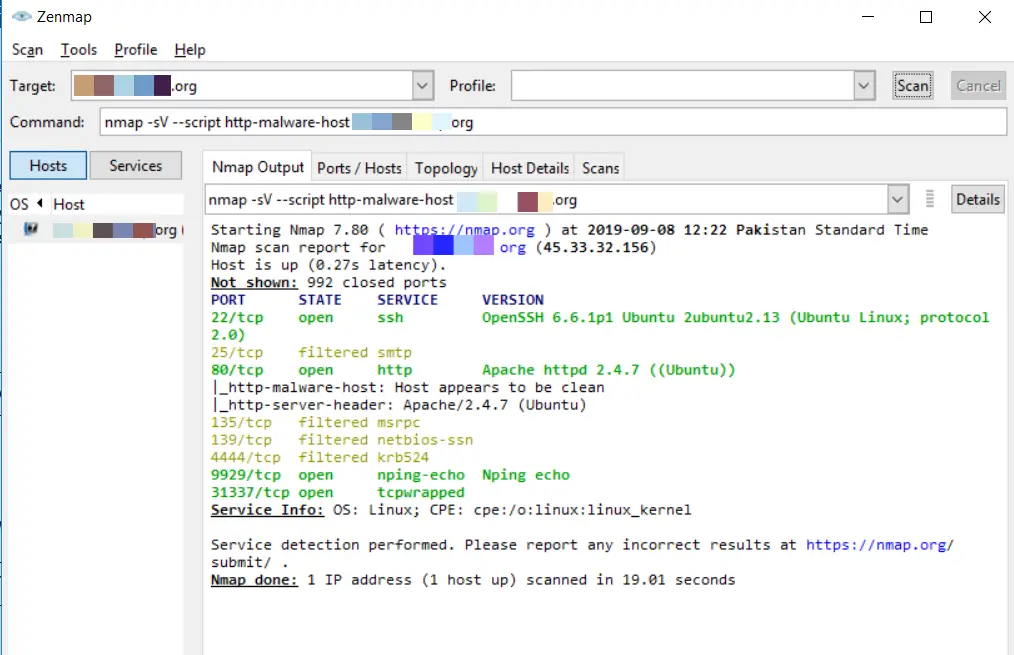
By using ‘google’s malware check:
Code language: CSS (css)
nmap -p 80 --script HTTP-google-malware 127.0.0.1
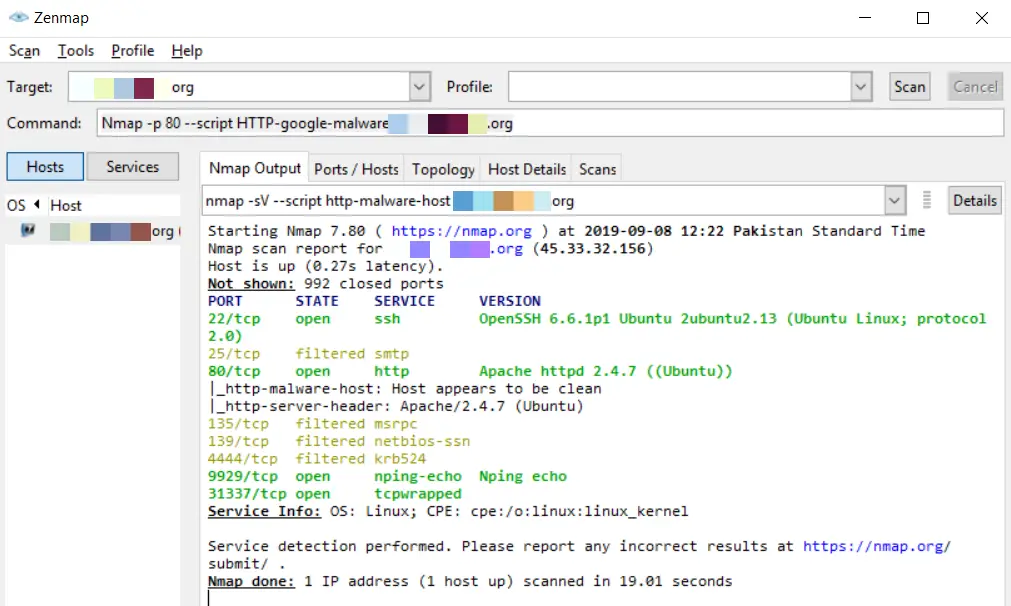
Conclusion
Nmap for Windows is one of the most important and robust tools used for gathering network information and performing operations using NSE. You can stick to Nmap and learn more about it to be a professional. The significance of this tool is enough that every security researcher has heard its name. If you want to be a cybersecurity expert, then you should consider using this tool that carries a lot of flexibility and strength in itself. This beginner’s guide will surely help you to make your base strong so that you can move to advance steps. We also have a series of Nmap tutorials, you may have a look at it to learn more about it here.
👀 This Tutorial has some related Articles!
👉 Part 1 – Nmap Basics
👉 Part 2 – Nmap Host Discovery
👉 Part 3 – Advanced Nmap Commands
👉 Part 4 – Nmap NSE Scripts
👉 Part 5 – Nmap on Windows
Nmap – это очень популярный сканер сети с открытым исходным кодом. Nmap — свободная утилита, предназначенная для разнообразного настраиваемого сканирования IP-сетей с любым количеством объектов, определения состояния объектов сканируемой сети (портов и соответствующих им служб).
Оглавление
- 1 Что такое анализ локальной сети
- 1.1 Что такое сканер портов?
- 2 Как провести сканирование скорости
- 2.1 С помощью «Командной строки»
- 2.2 С помощью сторонних программ
- 3 Как посмотреть список IP-адресов, подключённых к ЛС
- 3.1 Как сканировать LAN, узнать IP и MAC-адреса.
- 3.2 Методы сканирования портов
- 4 Описание NMap
- 4.1 Преимущества и недостатки
- 5 Как работает Nmap?
- 5.1 Сканирование сети с помощью nmap – немного теории
- 5.2 Зачем нужна команда nmap?
- 5.3 Возможности nmap и примеры сканирования
- 5.3.1 #1: Сканирование одного хоста или IP адреса (IPv4)
- 5.3.2 #2: Сканирование нескольких IP-адресов или подсети(IPv4)
- 5.3.3 #3: Чтение списка хостов/сетей из файла (IPv4)
- 5.3.4 #4: Исключение хостов/сетей (IPv4)
- 5.3.5 #5: Включить скрипт сканирования ОС и ее версии (IPv4)
- 5.3.6 #6: Узнать, защищен ли хост брандмауэром
- 5.3.7 #7: Сканирование хоста, если он защищен брандмауэром
- 5.3.8 #8: Сканирование хоста/адреса IPv6
- 5.3.9 #9: Сканирование сети и поиск работающих устройств
- 5.3.10 #10: Быстрое сканирование
- 5.3.11 #11: Показать причину, по которой порт находится в определенном состоянии
- 5.3.12 #12: Показывать только открытые (или возможно открытые) порты
- 5.3.13 #13: Показать все отправленные и полученные пакеты
- 5.3.14 #14: Показать интерфейсы и маршруты хоста
- 5.3.15 #15: Сканирование определенных портов
- 5.3.16 #16: Самый быстрый способ проверить все ваши устройства на наличие открытых портов
- 5.3.17 #17: Определение ОС
- 5.3.18 #18: Как определить версии служб?
- 6 Синтаксис команды nmap и особенности её работы
- 6.1 Примеры команды nmap
- 7 Использование nmap
- 7.1 Установка nmap на Linux
- 7.2 Сканирование чужих узлов.
- 7.3 Сканирование нескольких узлов.
- 7.4 Проверка открытых портов с помощью nmap
- 7.5 Сканирование запущенных сервисов с помощью nmap
- 7.6 Профили сканирования
- 8 Главные особенности и функции ZenMap
- 8.1 Мощность
- 8.2 Простота использования
- 8.3 Свобода
- 8.4 Поддержка разработчиков
- 9 Установка и аудит сетей
- 10 Интерфейс пользователя
- 11 Выводы и рекомендации по использованию nmap
Что такое анализ локальной сети
Комплекс мер по изучению параметров соединения между компьютерами в домашней или корпоративной сети называется анализом локальной сети (АЛС). Процесс включает в себя:
- измерение скорости сети;
- просмотр IP-адресов подключённых устройств;
- анализ трафика сети — процесс, который позволяет выявить конфликтную машину или неисправность паутины в определённом узле.
Эта процедура может обнаружить вредоносное программное обеспечение и изолировать его распространение на всю сеть. Поэтому АЛС стоит проводить даже в профилактических целях.
Что такое сканер портов?
Сканер портов относится к программному приложению, которое сканирует сервер на наличие открытых портов. Он позволяет аудиторам и сетевым администраторам проверять сетевую безопасность, в то время как злоумышленники и хакеры используют ее для определения открытых портов для использования или запуска вредоносных служб на компьютере или сервере.
Сканирование портов представляет собой способ определения, какие порты в сети открыты. Поскольку порты на компьютере – это место, где информация отправляется и принимается, сканирование портов аналогично стуку в дверь, чтобы увидеть, находится ли кто-то дома. Выполнение сканирования портов в локальной сети или на сервере позволяет определить, какие порты открыты и находятся в режиме прослушивания (listening) (получения информации), а также выявить наличие таких устройств безопасности, как межсетевые экраны, которые находятся между отправителем и целью. Этот метод известен как дактилоскопия (fingerprinting). Это также полезно для тестирования сетевой безопасности и надежности брандмауэра системы. Благодаря этой функциональности, это также популярный инструмент разведки для злоумышленников, ищущих слабую точку доступа для проникновения в компьютер или сервер.
Порты различаются по своим назначениям. Они пронумерованы от 0 до 65535, но определенные диапазоны используются чаще. Порты с 0 по 1023 идентифицируются (https://ru.wikipedia.org/wiki/Список_портов_TCP_и_UDP), как «общеизвестные порты» или стандартные порты и были назначены для определенных служб, агентством по присвоению номеров в Интернете (IANA). Некоторые из наиболее известных портов и назначенных им служб включают в себя:
- Порт 20 (UDP) – протокол передачи файлов (FTP) для передачи данных
- Порт 22 (tcp) – протокол Secure Shell (SSH) для безопасного входа, FTP и переадресации портов
- Порт 23 (tcp) – протокол Telnet для не зашифрованных текстовых коммутаций
- Порт 53 (UDP) – Система доменных имен (DNS) переводит имена всех компьютеров в Интернете в IP-адреса
- Порт 80 (tcp) – Всемирная паутина HTTP
Как провести сканирование скорости
Первый параметр, который стоит просмотреть на предмет ошибок, — это скорость передачи данных. Если при обмене пакетами информации в ЛС происходят сбои, замедления потери команд, то налицо нарушение протоколов или конфликт адресов. В таких случаях стоит начинать искать неполадку. Просмотреть информацию о скорости передачи данных можно через «Командную строку» или стороннее ПО.
С помощью «Командной строки»
Терминал «Командной строки» — уникальный инструмент для управления компьютером и вывода необходимой информации пользователю. Консоль также может помочь с АЛС, в частности вывести отчёт о скорости доступа в ЛС:
- Чтобы запустить «Командную строку», открываем меню «Пуск», переходим в папку «Служебные» и кликаем по иконке «Командная строка».
- В терминале прописываем первую команду ipconfig /all. Внимательно смотрим на выведенную информацию и находим строку «Основной шлюз», где будет указан сетевой адрес роутера. Это значение нам понадобится для дальнейших действий.

Прописываем команду ipconfig /all и находим основной шлюз компьютера
- Запускаем команду Ping, указывая адрес шлюза (в данном случае команда имеет вид Ping 192.168.137.1), и ожидаем несколько секунд, пока произойдёт обмен пакетов с маршрутизатором. Результат будет опубликован почти мгновенно, сразу же после обработки данных.

Через команду Ping основного шлюза узнаём скорость обмена данных с роутером
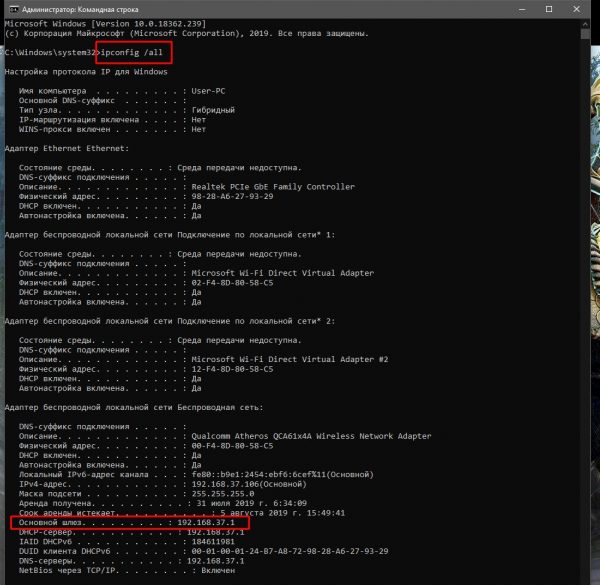
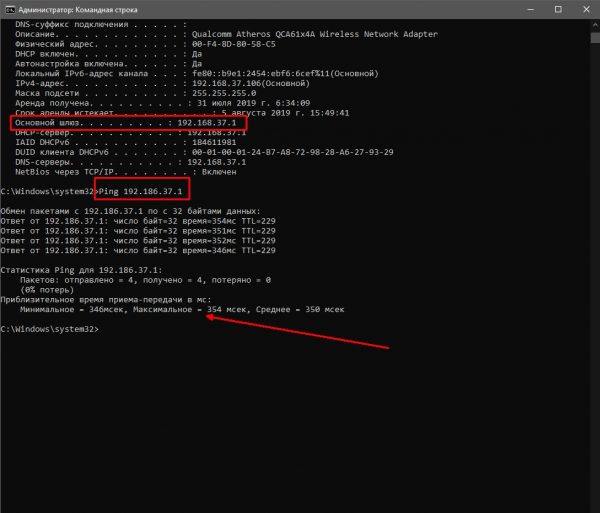
Если максимальное значение будет больше 1500 мсек даже в беспроводной сети, имеет смысл провести анализ трафика, а также проверить каждый компьютер на наличие вредоносного ПО антивирусными программами.
С помощью сторонних программ
Не только с помощью «Командной строки» можно узнать скорость внутри ЛС. Существуют дополнительные инструменты в виде сторонних программ. По интернету их гуляет огромное количество и большинство схожи между собой как по интерфейсу, так и по выводимым данным. Одной из таких утилит является LAN Speed Test. Утилита на должном уровне справляется с анализом скорости, имеет простой и понятный интерфейс.
- Скачиваем, устанавливаем и запускаем программу.
- На главной странице приложения нажимаем кнопку Start Test.

В интерфейсе программы LAN Speed Test нажимаем кнопку Start Test
- В течение пары секунд получаем исчерпывающую информацию о возможностях передачи данных в ЛС.

Данные о скорости в сети выводятся в виде таблицы
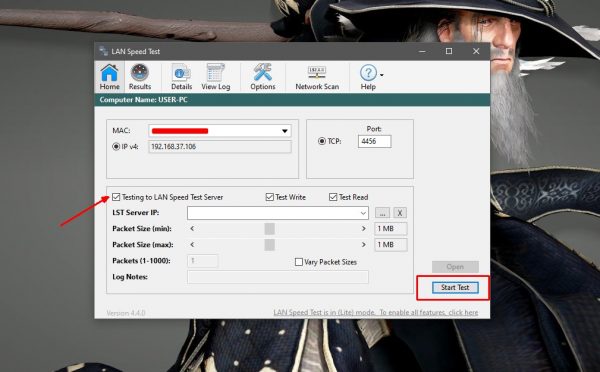
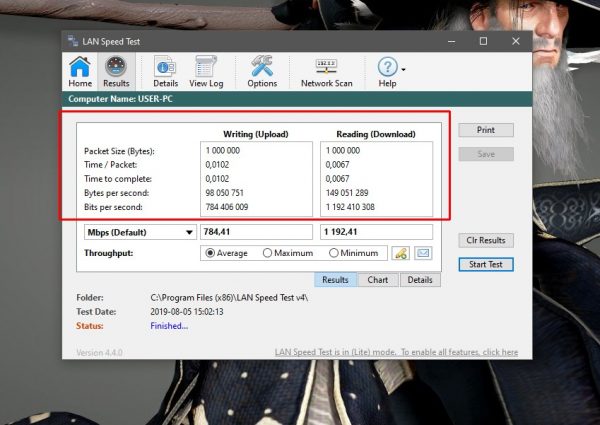
Также для анализа можно использовать другие утилиты, к примеру, Iperf или LAN Bench.
Первая весьма полезная для домашней и небольшой корпоративной сети. Приложение можно установить на все машины и следить за пингом. Оно весьма полезно, так как может производить мониторинг и вести записи продолжительное время.
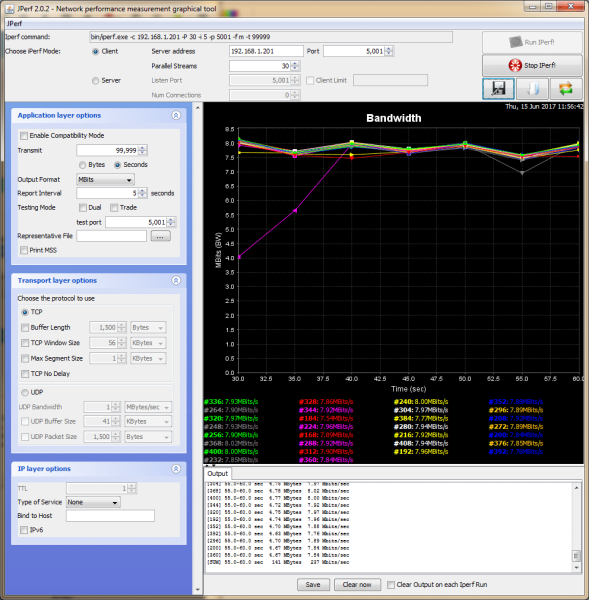
Iperf — это программа для слежки за пингом и выявления небольших неполадок в ЛС
LAN Bench — это минималистическая утилита, похожая на LAN Speed Test. Ею очень легко мониторить скорость и пинг в сети, достаточно открыть интерфейс и нажать кнопку Test. Ниже сразу начнут появляться результаты.

LAN Bench — это простейшая утилита для оценки скорости ЛС
Как посмотреть список IP-адресов, подключённых к ЛС
Иногда возникает необходимость узнать информацию о подключённых к сети устройствах. В основном это касается беспроводных маршрутизаторов, к которым можно подключиться незаметно и «воровать» трафик. Посмотреть список устройств можно сторонними ПО и штатными средствами (веб-админкой маршрутизатора).
С первым всё довольно просто: существует простейшая утилита под названием Wireless Network Watcher. Она, как IP-сканер локальной сети, прекрасно справляется с анализом адресатов сети и выводит на экран всю доступную информацию о них.
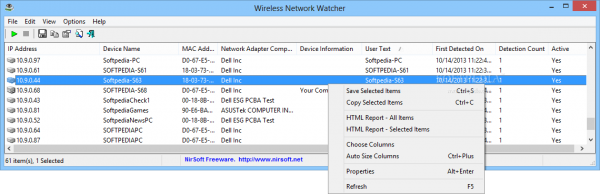
Через программу Wireless Network Watcher можно увидеть список всех подключённых к сети устройств
Однако у программы есть два минуса:
- для её работы необходимо проводное подключение к роутеру;
- инструментарий программы ограничивается только выводом информации. Если нарушитель будет обнаружен, она ничего не сможет с ним сделать. То же касается и аналогичных программ. Заблокировать доступ к сети можно только внутри веб-админки роутера.
Для просмотра информации о подключённых устройствах через веб-админку маршрутизатора необходимо сначала её открыть:
- На тыльной стороне устройства знакомимся с реквизитами для входа.

На тыльной стороне роутера знакомимся с реквизитами для входа
- Вводим данные в браузере и авторизуемся в сервисе управления.

Через браузер открываем панель управления маршрутизатором
- В свойствах админки находим вкладку «Беспроводной режим», а в ней пункт «Статистика беспроводного режима».

Находим пункт «Статистика беспроводного режима» и знакомимся со всеми подключёнными устройствами
- Проверяем IP-адресы всех известных устройств, остальные же можно «Запретить». Только не стоит забывать о подключённых телевизорах, телефонах и планшетах, они также имеют собственный индикатор в этой вкладке настроек.
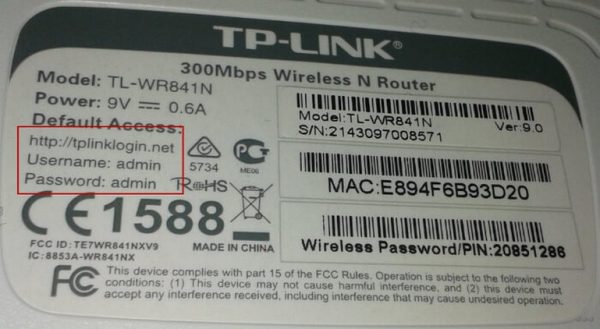
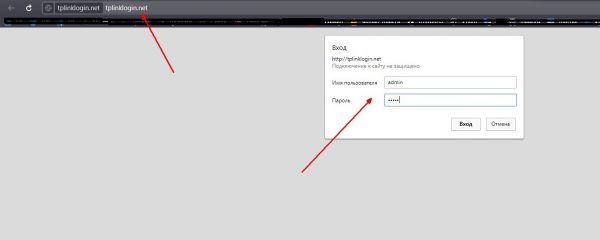
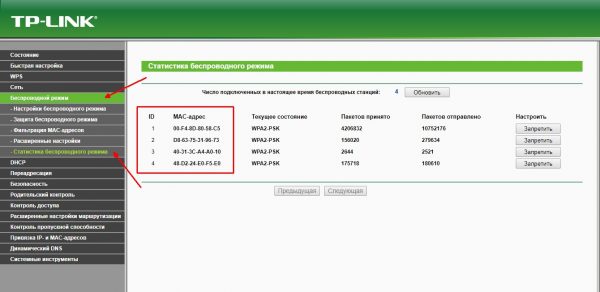
Как сканировать LAN, узнать IP и MAC-адреса.
Порядок действий по сканированию адресов и получению другой информации:
- Первым делом рекомендуется первоначальная настройка установленного ПО, сделать это можно в соответствующем пункте меню.
- Во вкладке «Производительность» выбрать наиболее подходящую для себя (и своего ПК) скорость сканирования. Не рекомендуется выбирать максимальную скорость на офисных ПК или ноутбуках, в таком случае прога может работать нестабильно. При наличии редких и специфичных девайсов (различных сетевых касс, специфичного оборудования для бизнеса или откровенно китайских и никем не поддерживаемых девайсов) рекомендуется поставить галочку «Высокая точность сканирования». При использовании стандартных устройств её можно не ставить.
- Теперь можно переходить к непосредственному поиску гаджетов, указав необходимый диапазон IP-адресов (по умолчанию у большинства коммутаторов или роутеров используется диапазон от 192.168.0.1 до 192.168.0.254), и нажать кнопку «Сканировать». В некоторых случаях диапазон адресов может быть изначально изменён вручную, поэтому вводить нужно будет именно его (сканирование стандартных ip практически ничего не даст).
- В нашем случае было определено три устройства: ПК, на котором запущен сканер, беспроводной роутер и смартфон, подключенный по Wi-Fi. По каждому из гаджетов присутствует полная информация, такая как текущий ip-адрес (при желании его можно поменять), производитель техники и MAC адрес.
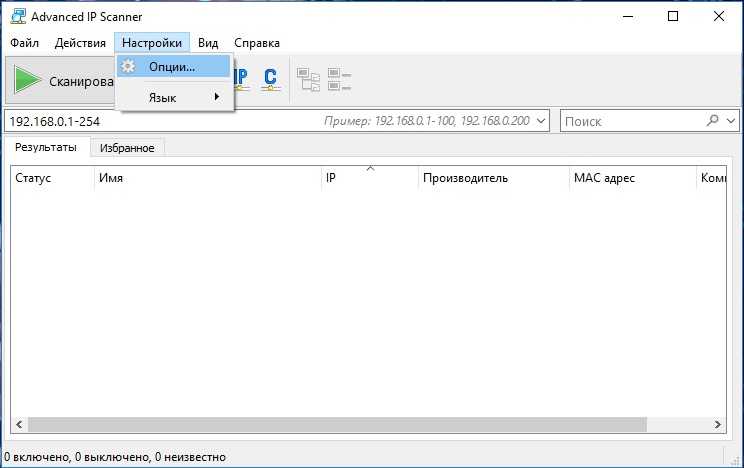
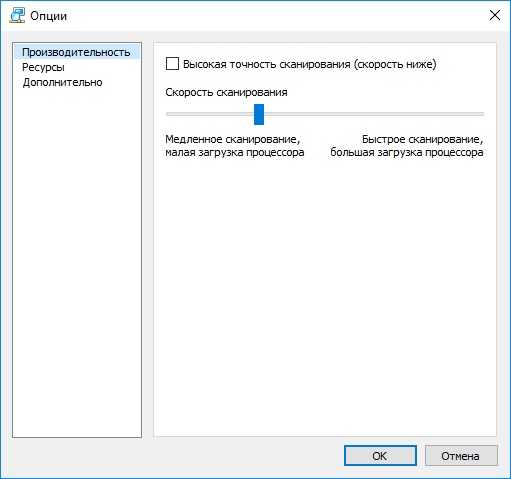

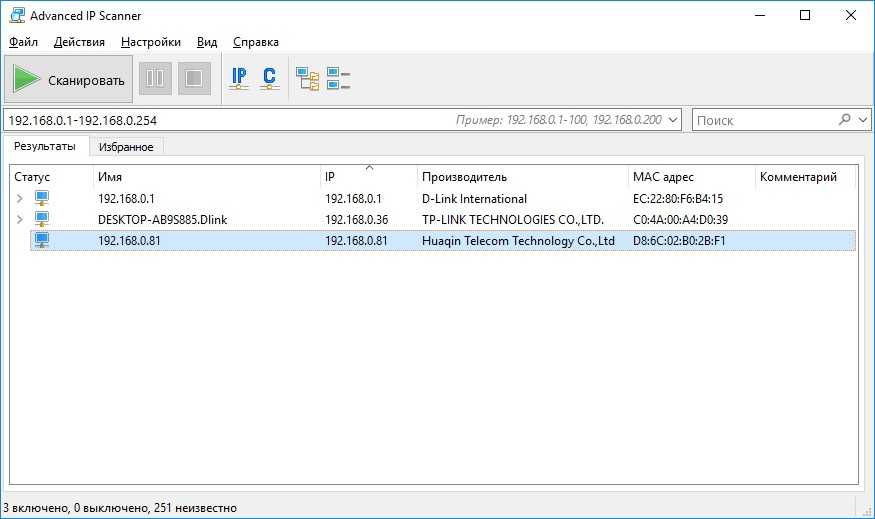
Методы сканирования портов
Сканирование портов отправляет тщательно подготовленный пакет на каждый номер порта назначения. Основные методы, которые может использовать программное обеспечение для сканирования портов:
- Ваниль (Vanilla) – самый простой скан; попытка подключиться ко всем 65 536 портам по по очереди. Ванильное сканирование – это полное сканирование соединения, то есть оно отправляет флаг SYN (запрос на подключение) и после получения ответа SYN-ACK (подтверждение подключения) отправляет обратно флаг ACK. Этот обмен SYN, SYN-ACK, ACK включает квитирование TCP. Полное сканирование подключений является точным, но очень легко обнаруживается, поскольку все подключения всегда регистрируются брандмауэрами.
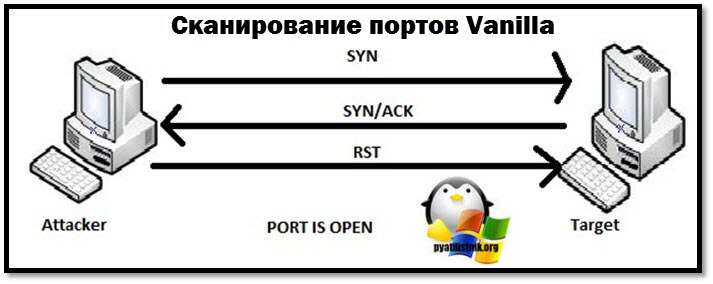
- Сканирование SYN (SYN Scan) – также называется полуоткрытым сканированием, оно только отправляет SYN и ожидает ответа SYN-ACK от цели. Если ответ получен, сканер никогда не отвечает. Так как соединение TCP не было установлено, система не регистрирует взаимодействие, но отправитель узнал, открыт порт или нет.
- Сканирование XMAS и FIN (XMAS and FIN Scans) – набор сканирований, используемых для сбора информации без регистрации в целевой системе. При сканировании FIN незапрошенный флаг FIN (обычно используемый для завершения установленного сеанса) будет отправлен на порт. Ответ системы на этот случайный флаг может показать состояние порта или брандмауэр. Например, закрытый порт, который получает незапрошенный пакет FIN, ответит пакетом RST (мгновенный прерывание), но открытый порт проигнорирует его. Сканирование XMAS просто отправляет набор всех флагов, создавая бессмысленное взаимодействие. Ответ системы может быть интерпретирован для лучшего понимания портов системы и брандмауэра.
- Сканирование отказов FTP (FTP Bounce Scan) – позволяет замаскировать местоположение отправителя путем пересылки пакета через FTP-сервер. Это также предназначено для отправителя, чтобы остаться незамеченным.
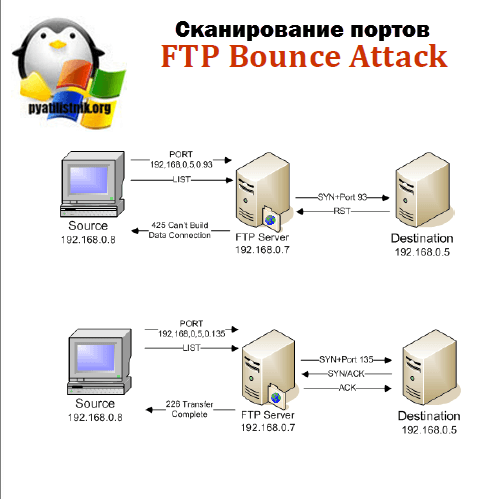
- Сканирование развертки (Sweep scan) – пингует один и тот же порт на нескольких компьютерах, чтобы определить, какие компьютеры в сети активны. Это не раскрывает информацию о состоянии порта, а сообщает отправителю, какие системы в сети активны. Таким образом, его можно использовать как предварительное сканирование.
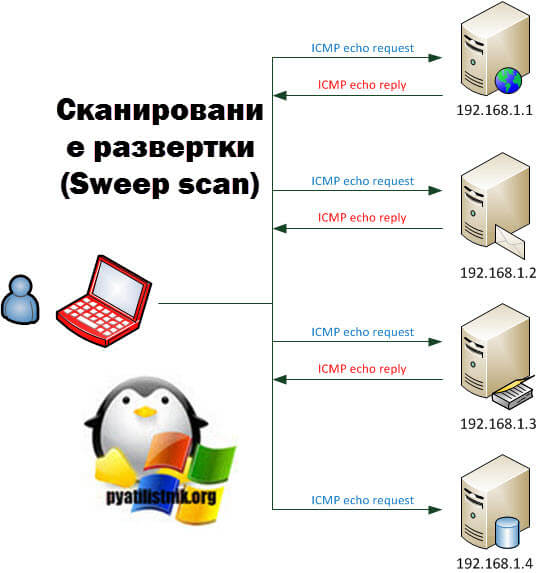
Nmap – бесплатная программа для защиты сетей. Она поддерживает работу с разными протоколами безопасности и сканирует любые порты. Утилита использует различные методы проверки. Это позволяет находить уязвимости сетей и устранять их.
Nmap – одна из лучших программ в своем роде. Она поддерживает работу с TCP, ICMP, UDP, FTP proxy, SYN и другими протоколами. В программе нет ограничений на проверку сетей по размерам или сложности. После проверки можно сравнить результаты анализа и задействовать фильтр хостов.
Работа осуществляется как через командную строку, так и через графическую оболочку с пользовательским интерфейсом. Поэтому использовать Nmap могут как новички, так и профессионалы. Софт совместим с версиями Windows от XP до 10.
Преимущества и недостатки
- Обходит многие фаерволы
- Позволяет проверять доступность серверов
- Работа в анонимном режиме
- Запрещена в некоторых странах
Как работает Nmap?
В компьютерных сетях все подключенные устройства имеют свой ip адрес. Каждый компьютер поддерживает протокол ping, с помощью которого можно определить подключен ли он к сети. Мы просто отправляем ping запрос компьютеру, и если он отзывается, то считаем, что он подключен. Nmap использует немного иной подход. Компьютеры также определенным образом реагируют на те или иные сетевые пакеты, утилита просто отправляет нужные пакеты и смотрит какие хосты прислали ответ.
Но об этом вы, наверное, уже знаете. Более интересно то как Nmap узнает какие сервисы запущены на машине. Суть работы всех сетевых программ основана на портах. Чтобы получить сообщение из сети, программа должна открыть порт на вашем компьютере и ждать входящих соединений. А для отправки сообщения по сети нужно подключиться к уже другой программой (адресатом) порту. Затем программе необходимо будет открыть порт, на котором она будет ждать ответа.
Утилита nmap в процессе сканирования сети перебирает доступный диапазон портов и пытается подключиться к каждому из них. Если подключение удалось, в большинстве случаев, передав несколько пакетов программа может даже узнать версию программного обеспечения, которые ожидает подключений к этому порту. Теперь, после того, как мы рассмотрели основы, рассмотрим как пользоваться nmap для сканирования портов и сети.
Сканирование сети с помощью nmap – немного теории
nmap – свободная утилита, предназначенная для разнообразного настраиваемого сканирования IP-сетей с любым количеством объектов, определения состояния объектов сканируемой сети.
nmap была написана с помощью C, C++, Python, Lua и предустановлена в Kali Linux, который мы с вами уже обозревали.
Изначально утилита была разработана для систем UNIX, сейчас же не составляет проблем установить её и на Windows.
nmap используется злоумышленниками для сканирования сетей WiFi, LAN и обнаружения открытых портов на подключенных устройствах для проведения различных атак.
Если на подключенном устройстве открыты порты, то оно считается уязвимым и легко поддаётся атакам с помощью различных X-sploits. Одним из самых распространнёных является Metasploit.
Metasploit Project – проект, посвящённый информационной безопасности. Создан для предоставления информации об уязвимостях, помощи в создании сигнатур для IDS, создания и тестирования эксплойтов.
Также вы можете прочитать о скрипте для Termux, с помощью него можно легко установить Network Mapper на ваш смартфон.
Зачем нужна команда nmap?
Основная задача команды nmap – сканирование сетевых портов указанных компьютеров для определения, какие из них используются (прослушиваются) программами-серверами. Для подавляющего числа сетевых демонов (служб) определены их стандартные порты по-умолчаню, которые они используют для своей работы. По этому признаку можно делать выводы, о том какие серверные программы запущены на том или ином компьютере в сети.
Также команда nmap – это самый доступный инструмент в руках злоумышленников для организации подготовки хакерской атаки на сеть. Ведь с помощью этой команды очень легко получить информацию, на основе которой можно судить о слабых и уязвимых местах в атакуемой системе.
Возможности nmap и примеры сканирования
Синтаксис Network Mapper
nmap [Тип сканирования] [Параметры] {Целевая спецификация}
В качестве целевой спецификации может быть имя хоста, IP-адрес, сеть и т.п.
Список параметров можно получить написав в терминале команду nmap.
Как вы знаете, роутеры сами раздают IP-адреса в диапазоне 192.168.0(1).0 – 192.168.0(1).255, это функция DHCP.
Для сканирования всего радиуса нам необходимо написать команду:
nmap -sL 192.168.1.1/24
-sL – параметр, запускает сканирование списка
24 в IP-адресе – это 24-битная подсетка, которая имеет нужный нам радиус в 256 символов. То есть сканирование пройдёт от 10.0.0.0 – 10.0.0.255.
Для сканирования подключенных устройств мы использует параметр -sn, в таком случае -sL нам не требуется.
nmap -sn 192.168.1.1/24
Как вы можете увидеть, в моей сети из было просканировано 256 хостов и 3 из них используются. Важно, что 192.168.0.1 – это роутер. Далее идёт мой телефон и ПК.
Теперь давайте просканируем устройства на наличие открытых портов следующей командой:
nmap -Pn {цель}
Мой компьютер не имеет открытых портов, что хорошо для меня и плохо для злоумышленника, так как он не сможет провести атаку.
Однако просканировав роутер, мы видим, что 2 порта открыто, 80 и 1900.
Также можно просканировать и все 256 хостов, однако это займет намного больше времени.
Узнаем версию ОС нашего ПК и роутера. Сканирование на операционную систему требует root привелегий и наличия открытых портов. В случае если порты закрыты, конкретного результата не будет и об этом будет предупреждение. С роутером проблем не возникло и все вывелось корректно, также мы видим MAC-адрес роутера/
#1: Сканирование одного хоста или IP адреса (IPv4)
### Сканирование одного IP nmap 192.168.1.1 ## Сканирование хоста nmap randomsite.com ## Сканирование хоста с дополнительной информацией nmap -v randomsite.com
#2: Сканирование нескольких IP-адресов или подсети(IPv4)
nmap 192.168.1.1 192.168.1.2 192.168.1.3 nmap 192.168.1.1,2,3
Вы также можете сканировать диапазон IP-адресов:
nmap 192.168.1.1-20 nmap 192.168.1.*
Наконец, вы можете сканировать всю подсеть:
nmap 192.168.1.0/24
#3: Чтение списка хостов/сетей из файла (IPv4)
Опция -iL позволяет вам читать список целевых систем, используя текстовый файл. Это полезно для сканирования большого количества хостов / сетей. Создайте текстовый файл следующим образом:
cat > /tmp/test.txt
Заполните его:
randomsite.com 192.168.1.0/24 192.168.1.1/24 10.1.2.3 localhost
Запустите сканирование:
nmap -iL /tmp/test.txt
#4: Исключение хостов/сетей (IPv4)
При сканировании большого количества хостов/сетей вы можете исключить хосты из проверки:
nmap 192.168.1.0/24 –exclude 192.168.1.5 nmap 192.168.1.0/24 –exclude 192.168.1.5,192.168.1.254
Или исключить список с помощью файла /tmp/exclude.txt
nmap -iL /tmp/scanlist.txt –excludefile /tmp/exclude.txt
#5: Включить скрипт сканирования ОС и ее версии (IPv4)
nmap -A 192.168.1.254 nmap -v -A 192.168.1.1 nmap -A -iL /tmp/scanlist.txt
#6: Узнать, защищен ли хост брандмауэром
nmap -sA 192.168.1.254
nmap -sA randomsite.com
#7: Сканирование хоста, если он защищен брандмауэром
nmap -PN 192.168.1.1
nmap -PN randomsite.com
#8: Сканирование хоста/адреса IPv6
Опция -6 включает сканирование IPv6. Синтаксис:
nmap -6 IPv6-Address-Here
nmap -6 randomsite.com
nmap -6 2607:f0d0:1002:51::4
nmap -v A -6 2607:f0d0:1002:51::4
#9: Сканирование сети и поиск работающих устройств
nmap -sP 192.168.1.0/24
Пример вывода:
Host 192.168.1.1 is up (0.00035s latency).
MAC Address: BC:AE:C5:C3:16:93 (Unknown)
Host 192.168.1.2 is up (0.0038s latency).
MAC Address: 74:44:01:40:57:FB (Unknown)
Host 192.168.1.5 is up.
Host nas03 (192.168.1.12) is up (0.0091s latency).
MAC Address: 00:11:32:11:15:FC (Synology Incorporated)
Nmap done: 256 IP addresses (4 hosts up) scanned in 2.80 second
#10: Быстрое сканирование
nmap -F 192.168.1.1
#11: Показать причину, по которой порт находится в определенном состоянии
nmap –reason 192.168.1.1
nmap –reason randomsite.com
#12: Показывать только открытые (или возможно открытые) порты
nmap –open 192.168.1.1
nmap –open randomsite.com
#13: Показать все отправленные и полученные пакеты
nmap –packet-trace 192.168.1.1
nmap –packet-trace randomsite.com
#14: Показать интерфейсы и маршруты хоста
nmap –iflist
Пример вывода:
Starting Nmap 5.00 ( http://nmap.org ) at 2012-11-27 02:01 IST
************************INTERFACES************************
DEV (SHORT) IP/MASK TYPE UP MAC
lo (lo) 127.0.0.1/8 loopback up
eth0 (eth0) 192.168.1.5/24 ethernet up B8:AC:6F:65:31:E5
vmnet1 (vmnet1) 192.168.121.1/24 ethernet up 00:50:56:C0:00:01
vmnet8 (vmnet8) 192.168.179.1/24 ethernet up 00:50:56:C0:00:08
ppp0 (ppp0) 10.1.19.69/32 point2point up
**************************ROUTES**************************
DST/MASK DEV GATEWAY
10.0.31.178/32 ppp0
209.133.67.35/32 eth0 192.168.1.2
192.168.1.0/0 eth0
192.168.121.0/0 vmnet1
192.168.179.0/0 vmnet8
169.254.0.0/0 eth0
10.0.0.0/0 ppp0
0.0.0.0/0 eth0 192.168.1.2
#15: Сканирование определенных портов
nmap -p [port] hostName ## Сканирование 80 порта nmap -p 80 192.168.1.1 ## TCP сканирование 80 порта nmap -p T:80 192.168.1.1 ## UDP сканирование 80 порта nmap -p U:53 192.168.1.1 ## Сканирование двух портов nmap -p 80,443 192.168.1.1 ## Сканирование диапазона портов nmap -p 80-200 192.168.1.1 ## Комбинирование всех параметров nmap -p U:53,111,137,T:21-25,80,139,8080 192.168.1.1 nmap -p U:53,111,137,T:21-25,80,139,8080 randomsite.com nmap -v -sU -sT -p U:53,111,137,T:21-25,80,139,8080 192.168.1.254 ## Сканирование всех портов с помощью * nmap -p “*” 192.168.1.1 ## Сканирование популярных портов, нужно указать количество nmap –top-ports 5 192.168.1.1 nmap –top-ports 10 192.168.1.1
Пример вывода:
Starting Nmap 5.00 ( http://nmap.org ) at 2012-11-27 01:23 IST Interesting ports on 192.168.1.1: PORT STATE SERVICE 21/tcp closed ftp 22/tcp open ssh 23/tcp closed telnet 25/tcp closed smtp 80/tcp open http 110/tcp closed pop3 139/tcp closed netbios-ssn 443/tcp closed https 445/tcp closed microsoft-ds 3389/tcp closed ms-term-serv MAC Address: BC:AE:C5:C3:16:93 (Unknown) Nmap done: 1 IP address (1 host up) scanned in 0.51 seconds
#16: Самый быстрый способ проверить все ваши устройства на наличие открытых портов
nmap -T5 192.168.1.0/24
#17: Определение ОС
Вы можете идентифицировать приложения и ОС удаленного хоста, используя опцию -O:
nmap -O 192.168.1.1
nmap -O –osscan-guess 192.168.1.1
nmap -v -O –osscan-guess 192.168.1.1
Пример вывода:
Starting Nmap 5.00 ( http://nmap.org ) at 2012-11-27 01:29 IST
NSE: Loaded 0 scripts for scanning.
Initiating ARP Ping Scan at 01:29
Scanning 192.168.1.1 [1 port]
Completed ARP Ping Scan at 01:29, 0.01s elapsed (1 total hosts)
Initiating Parallel DNS resolution of 1 host. at 01:29
Completed Parallel DNS resolution of 1 host. at 01:29, 0.22s elapsed
Initiating SYN Stealth Scan at 01:29
Scanning 192.168.1.1 [1000 ports]
Discovered open port 80/tcp on 192.168.1.1
Discovered open port 22/tcp on 192.168.1.1
Completed SYN Stealth Scan at 01:29, 0.16s elapsed (1000 total ports)
Initiating OS detection (try #1) against 192.168.1.1
Retrying OS detection (try #2) against 192.168.1.1
Retrying OS detection (try #3) against 192.168.1.1
Retrying OS detection (try #4) against 192.168.1.1
Retrying OS detection (try #5) against 192.168.1.1
Host 192.168.1.1 is up (0.00049s latency).
Interesting ports on 192.168.1.1:
Not shown: 998 closed ports
PORT STATE SERVICE
22/tcp open ssh
80/tcp open http
MAC Address: BC:AE:C5:C3:16:93 (Unknown)
Device type: WAP|general purpose|router|printer|broadband router
Running (JUST GUESSING) : Linksys Linux 2.4.X (95%), Linux 2.4.X|2.6.X (94%), MikroTik RouterOS 3.X (92%), Lexmark embedded (90%), Enterasys embedded (89%), D-Link Linux 2.4.X (89%), Netgear Linux 2.4.X (89%)
Aggressive OS guesses: OpenWrt White Russian 0.9 (Linux 2.4.30) (95%), OpenWrt 0.9 – 7.09 (Linux 2.4.30 – 2.4.34) (94%), OpenWrt Kamikaze 7.09 (Linux 2.6.22) (94%), Linux 2.4.21 – 2.4.31 (likely embedded) (92%), Linux 2.6.15 – 2.6.23 (embedded) (92%), Linux 2.6.15 – 2.6.24 (92%), MikroTik RouterOS 3.0beta5 (92%), MikroTik RouterOS 3.17 (92%), Linux 2.6.24 (91%), Linux 2.6.22 (90%)
No exact OS matches for host (If you know what OS is running on it, see http://nmap.org/submit/ ).
TCP/IP fingerprint:
OS:SCAN(V=5.00%D=11/27%OT=22%CT=1%CU=30609%PV=Y%DS=1%G=Y%M=BCAEC5%TM=50B3CA
OS:4B%P=x86_64-unknown-linux-gnu)SEQ(SP=C8%GCD=1%ISR=CB%TI=Z%CI=Z%II=I%TS=7
OS:)OPS(O1=M2300ST11NW2%O2=M2300ST11NW2%O3=M2300NNT11NW2%O4=M2300ST11NW2%O5
OS:=M2300ST11NW2%O6=M2300ST11)WIN(W1=45E8%W2=45E8%W3=45E8%W4=45E8%W5=45E8%W
OS_6=45E8)ECN(R=Y%DF=Y%T=40%W=4600%O=M2300NNSNW2%CC=N%Q=)T1(R=Y%DF=Y%T=40%S
OS:=O%A=S+%F=AS%RD=0%Q=)T2(R=N)T3(R=N)T4(R=Y%DF=Y%T=40%W=0%S=A%A=Z%F=R%O=%R
OS_D=0%Q=)T5(R=Y%DF=Y%T=40%W=0%S=Z%A=S+%F=AR%O=%RD=0%Q=)T6(R=Y%DF=Y%T=40%W=
OS:0%S=A%A=Z%F=R%O=%RD=0%Q=)T7(R=N)U1(R=Y%DF=N%T=40%IPL=164%UN=0%RIPL=G%RID
OS:=G%RIPCK=G%RUCK=G%RUD=G)IE(R=Y%DFI=N%T=40%CD=S)
Uptime guess: 12.990 days (since Wed Nov 14 01:44:40 2012)
Network Distance: 1 hop
TCP Sequence Prediction: Difficulty=200 (Good luck!)
IP ID Sequence Generation: All zeros
Read data files from: /usr/share/nmap
OS detection performed. Please report any incorrect results at http://nmap.org/submit/ .
Nmap done: 1 IP address (1 host up) scanned in 12.38 seconds
Raw packets sent: 1126 (53.832KB) | Rcvd: 1066 (46.100KB)
#18: Как определить версии служб?
nmap -sV 192.168.1.1
Пример вывода:
Starting Nmap 5.00 ( http://nmap.org ) at 2012-11-27 01:34 IST Interesting ports on 192.168.1.1: Not shown: 998 closed ports PORT STATE SERVICE VERSION 22/tcp open ssh Dropbear sshd 0.52 (protocol 2.0) 80/tcp open http? 1 service unrecognized despite returning data.
Синтаксис команды nmap и особенности её работы
Команда nmap довольно проста в использовании и каким-то сложным синтаксисом не отличается:
nmap [Тип сканирования…] [Опции] {цель сканирования}
Чего нельзя сказать о количестве, функциональности её ключей и неисчерпаемых возможностях их применения. Официальная документация, доступная на страницах man-руководства (команда man nmap), кроме того, что очень подробная (трудно встретить ещё подробнее), так ещё и имеет качественный перевод (локализации, в том числе и на русском языке) в большинстве Linux-дистрибутивов.
Не всегда утилита nmap предустановлена в системе, поэтому для её использования требуется установка соответствующего пакета, который обычно имеет имя nmap:
$ sudo apt-get install nmap
Или в Centos/Redhat
$ yum install nmap -y
Пример:
$ nmap -sT localhost
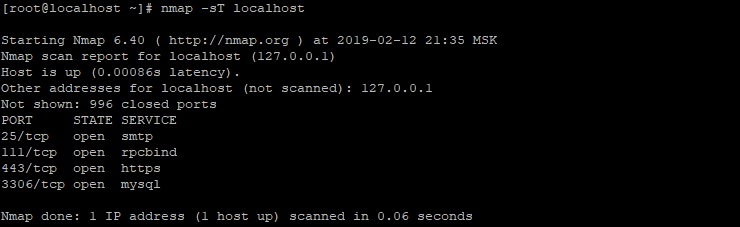
Столбец STATE показывает состояние порта: он может быть открыт (open), когда связан с использующими его службами (соединениями), закрыт (closed), когда порт не используется ни одним сервером. Также доступны состояния: unfiltered, когда nmap не смогла определить состояние порта. А также filtered – когда порт защищён (или заблокирован) брандмауэром.
Для задания хоста можно также использовать цифровую запись в виде IP-адреса. Отчёт из данного примера сформирован для самого обычного компьютера, для которого не была сконфигурирована какая-то защита. Как можно видеть, для прослушивания 80 и 443 портов для работы протоколов HTTP и HTTPS соответственно, запущен веб-сервер. Сервер баз данных (БД) MySQL также работает по стандартному порту.
Примеры команды nmap
Для поиска устройств, подключенных к сети, пользователю необходимо узнать маску локальной сети. Эта информация будет доступна после ввода команды:
$ ip addr show
В открывшемся окне, напротив слова «inet» запомните число, указанное, после слеша. Например, 24. Это число понадобится вам в дальнейшем. Теперь нужно задать команду для сканирования сети с указанием сохраненного числа и IP маршрутизатора:
$ nmap -sL 192.168.1.1/24
Если в операционной системе Linux стоит защита от сканирования портов, процесс не даст никаких результатов. В этом случае пользователю придется пойти на небольшую хитрость – использовать специальную опцию для обхода этой защиты. Как это будет выглядеть на практике:
$ nmap -sn 192.168.1.1/24
Теперь в открывшемся окне должны появиться результаты сканирования. Далее следует провести сканирование портов нужного узла без добавления каких-либо опций. Запуск утилиты:
# nmap 192.168.1.1
В открывшемся окне будут указаны все порты, используемые различными сервисами на ПК. Не забывайте о том, что каждый из этих портов может послужить уязвимым местом в системе. Если вас не устраивает сжатый вид найденной информации о подключенных портах, попробуйте заполучить развернутые данные. Это можно выполнить данным способом:
# nmap -sV 192.168.1.1
Для осуществления проверки конкретного порта понадобится команда в виде:
# nmap -sC 192.168.56.102 -p 21
В предыдущих примерах рассматривался скрипт по умолчанию, но на практике возможности пользователя гораздо обширнее. Для ознакомления с полным списком доступных скриптов необходимо воспользоваться специальной командой. Она выглядит так:
# find /usr/share/nmap/scripts/ -name ‘*.nse’ | grep ftp
Чтобы утилита функционировала в агрессивном режиме (при таком раскладе в окне будет указана развернутая информация о портах, вызванная всего лишь одной командой, что особенно удобно для неопытного владельца Linux), нужно добавить специальную опцию в стандартную команду. А именно:
# nmap -A 192.168.1.1
Использование nmap
При первом запуске Zenmap мы увидим основное окно. Что же неоходимо нам для того, чтобы начать анализ сети?
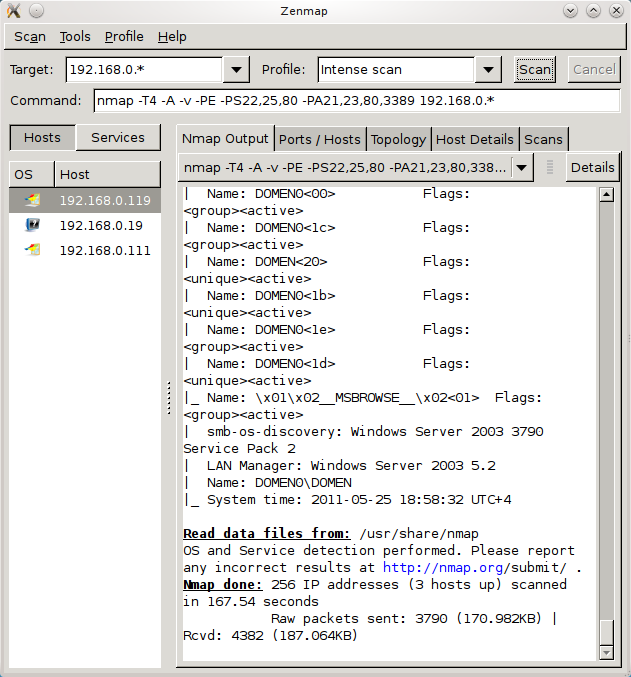
Первый шаг– нам нужно указать Цель (Target). Это то, что мы будем анализировать. Допустим, нам нужно просмотреть сеть вида 192.168.0.100. Мы можем просканировать ее целиком – для этого введем диапазон 192.168.0.* в поле Target. В этом случае будут проанализированы все доступные адреса локальной сети этого диапазона.
Второй шаг – это выбор Профиля сканирования. Поле Профиль (Profile) имеет выпадающий список, в котором находятся шаблоны (наборы предустановленных параметров Nmap) для анализа сети – от простого пингования до интенсивного сканирования. Хочу вас предупредить – последний вариант профиля может быть причиной выхода из строя оборудования в небольших сетях. Если у вас имеются роутеры или маршрутизаторы, то при сканировании они могут стать узким местом (в смысле – пропускной способности).
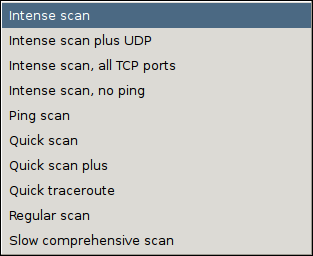
Когда вы выбираете профиль, то можете обратить внимание на происходящие изменения в строке Command. В зависимости от выбранного профиля меняются опции, с которыми запускается Zenmap. Точно такую же строку вы можете ввести в терминале. Другими словами, запуск Nmap с определенными параметрами в командной строке аналогичен запуску Zenmap с соотвествующим профилем.
И так, профиль выбран. Нажимаем кнопку Scan. Процесс сканирования начался. В левом окне будут отображаться обнаруженные IP-адреса (хосты), в правом – лог сканирования.
Внимание! Обязательно дождитесь окончания сканирования, прежде чем переключаться на другие вкладки! Иначе процесс может преждевременно прерваться или вообще завершиться крахом Zenmap. И вы не получите нужных результатов.

На правой панели находятся различные вкладки. Каждая из них служит своей определенной цели.
- Nmap Output: Вкладка по умолчанию. Выводит все команды, выполняемые программой Nmap.
- Ports Hosts: Показывает, какие порты на IP-адресах (хостах) открыты.
- Topology: Представляет в графическом режиме (картинка) топологию сети.
- Host details: Подробная информация о каждом отдельно выбранном хосте. Для того, чтобы выбрать нужный хост, достаточно просто щелкнуть на нем мыщью в левом окне программы.
- Scans: Список всех сканирований, выполненных программой. Вы можете заново запустить любой из них, выбрав его из списка и щелкнув мыщью на кнопке Scan.
Установка nmap на Linux
По умолчанию nmap не установлен в операционною систему Линукс, поэтому его нужно установить.
Centos 8:
dnf install nmap
Для Дебиан / Убунту:
# apt update
# apt install nmap
Centos 7 / Redhat /Fedora
yum install nmap
Сканирование чужих узлов.
В примерах выше для сканирования были выбраны локальный маршрутизатор и одна из рабочих станций, потому что мы имели право на их сканирование. Однако, будет плохой идеей запуск множественного сканирования чужого узла, если вы их не контролируете или не имеете прав для сканирования. Для экспериментов Nmap имеет общедоступный тестовый сервер scanme.nmap.org который Вы можете использовать.
Многие администраторы не любят несанкционированного сканирования их серверов, так что лучшим вариантом будет ограничение сканирования узлов своей локальной сети или тех для которых у вас есть права на сканирование. Также в некоторых случаях вы можете нарушить договор с вашим провайдером, при использовании некоторых особо агрессивных методов сканирования Nmap, поэтому будьте осторожны.
Сканирование нескольких узлов.
Вы можете сканировать больше чем один узел за раз, используя nmap. Если вы производите сканирование по IP-адресу вы можете определить диапазон 10.0.0.1-6 или 10.0.0.0/24.Используя диапазон 10.0.0.1-6 будут сканироваться узлы от 10.0.0.1 до 10.0.0.6. Используя определение /24 будет сканироваться весь диапазон узлов от 10.0.0.0 до 10.0.0.255. Для примера, если нужно просканировать узлы от 10.0.0.1 до 10.0.0.42 и узнать какая ОС вероятно запущена используйте:
nmap –O 10.0.0.1-42
Если у вас есть некоторый список доменных имен вместо IP адресов, вы можете разделить их в командной строке, вот так:
nmap -O host1.target.com host2.target.com
Проверка открытых портов с помощью nmap
Если вы запустите nmap вообще без опций и укажите какой то узел, то он будет сканировать порты и покажет все найденные открытые порты и сервисы запущенные на них. Например запустите:
nmap target.hostname.com
после чего он должен выдать что то похожее на это:
Interesting ports on target.hostname.com (10.0.0.88):
Not shown: 1711 closed ports
PORT STATE SERVICE
22/tcp open ssh
80/tcp open http
3306/tcp open mysql
Nmap done: 1 IP address (1 host up) scanned in 0.228 seconds
Nmap выдаст больше информации если использовать опцию -v (verbose).
Сканирование запущенных сервисов с помощью nmap
Если вы хотите узнать какой сервис возможно запущен попробуйте опцию –sV. Эта опция произведет более агрессивное сканирование и попытается выяснить какая версия сервисов запущена на данном узле, а также может помочь более точно определить какая ОС запущена. Для пример запустим nmap –sV на тестовый сервер и получим следующий ответ:
Starting Nmap 5.21 ( nmap.org ) at 2010-02-28 00:15 EST
Nmap scan report for test.host.net (XX.XXX.XXX.XX)
Host is up (0.090s latency).
Not shown: 965 closed ports, 33 filtered ports
PORT STATE SERVICE VERSION
22/tcp open ssh OpenSSH 4.7p1 Debian 8ubuntu1.2 (protocol 2.0)
80/tcp open http Apache httpd 2.2.8 ((Ubuntu) PHP/5.2.4-2ubuntu5.10 with Suhosin-Patch)
Service Info: OS: Linux
Service detection performed. Please report any incorrect results at nmap.org/submit .
Nmap done: 1 IP address (1 host up) scanned in 11.43 seconds
Как вы видите, Nmap может проанализировать пакеты и определить версию запущенного приложений на SSH и HTTP портах. Здесь вы можете увидеть что опрашиваемая система это Ubuntu с Apache 2.2.8 и OpenSSH 4.7p1. Эта информация может быть полезна по ряду причин. Nmap сканирование может идентифицировать систему под управлением устаревших сервисов которые могут быть уязвимы для известных эксплойтов.
Профили сканирования
Для анализа сети в Zenmap вы можете использовать как профили по умолчанию (предустановленные), так и создавать свои собственные. Для того, чтобы создать свой профиль, щелкните на Profile, затем выберите Новыйпрофиль (NewProfile) или Команда (Command) или Редактироватьсуществующийпрофиль (EditCurrentProfile). Если вы хотите внести небольшие изменения, достаточно выбрать необходимый профиль и затем отредактировать его. Например, на скриншоте показан измененный профиль, в который добавлена информация об операционной системе. Чтобы добавить эту информацию, выберите профиль, затем Profile > EditCurrentProfile. В новом окне открываем вкладку Scan и затем выбираем опцию “OS”. Кнопка SaveChanges сохраняет изменения и закрывает окно редактирования.
Если вы изменили какой-либо профиль, вам нужно перезапустить сканирование, чтобы получить результат от введенных изменений.
Главные особенности и функции ZenMap
Мощность
У Zenmap отсутствуют ограничения в масштабах сканирования — от одного ПК до нескольких сотен тысяч машин, объединенных в одну большую сеть.
Простота использования
Работать в Zenmap может профессионал, используя самые сильные инструменты, и новичок. Причём пользователь может работать в обоих режимах — консоль или графический интерфейс. Сайт разработчика предлагает массу готовых пакетов для пользования в различных операционных системах специально для тех, кто не имеет желания или возможности собственноручно компилировать программу из исходных данных.
Свобода
Zenmap — бесплатная лицензированная программа, которая содержит в себе полный пакет всех исходников.
Поддержка разработчиков
Программа не даёт пользователям гарантию, однако сообщество разработчиков готово отвечать на любые вопросы пользователей. Наиболее часто используемые варианты сканирования могут быть сохранены в профили, чтобы обеспечить их лёгкий неоднократный запуск в дальнейшем. Мастер создания команд позволяет задавать команды в диалоговом режиме. Результаты сканирования сохраняются в базе данных. Это позволяет легко найти нужный результат, а также сравнивать результаты друг с другом. Благодаря активному сообществу разработчиков и хорошей документации Zenmap очень популярен. О высоком качестве этой программы говорят и многочисленные награды. Zenmap стал практически стандартом среди бесплатных программ для аудита сетей.
Установка и аудит сетей
Прежде чем скачать бесплатно «Зенмап», полезно знать — приложение поддерживает различные методы аудита сетей, включая в сканирование портов, определение наименования и точной версии операционной системы. Zenmap невероятно мощный. Ему «по зубам» компьютерная сеть любого размера, он быстро сканирует сеть даже в сто тысяч узлов. Любые преграды, будь то IP-фильтры, маршрутизаторы или что-то ещё, Zenmap с успехом преодолеет. Несмотря на то что он разрабатывался специально для больших сетей, при желании может точно так же применяться и на единичном сервере.
Установить Zenmap в большинство современных дистрибутивов достаточно просто, если используется готовый установочный пакет с запуском из репозиториев. Удобнее всего запускать из-под рут, потому что для полного пакета Nmap требуются привилегии Superuser.
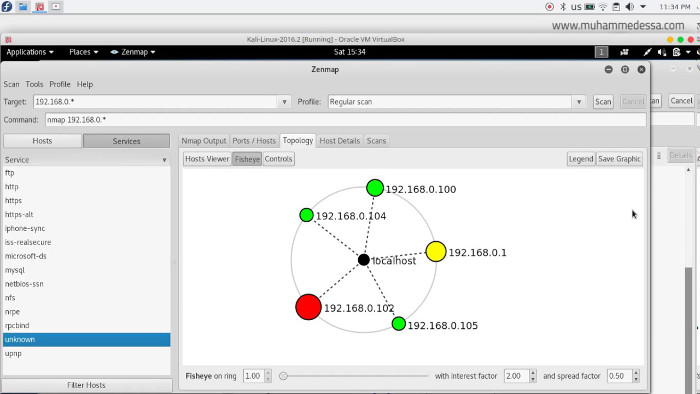
Интерфейс пользователя
Для начала потребуется цель проверки. Предположим, что нужно отсканировать сеть с IP-адресами, используя маску 192.168.101.*:
- данное клише вводится в поле Target;
- затем в раскрывающемся списке «Профиль» нужно подобрать из предоставленных профиль, который лучше всего подойдёт для сканирования;
- нужно иметь в виду, что сканирование с применением функции «Интенсивного анализа», возможно, навредит некоторым сетевым устройствам, таким как роутеры или свичи. С данными устройствами нужно обращаться крайне осторожно;
- после подбора соответствующего профиля также поменяются данные поля Command, которое содержит nmap с установленными параметрами;
- если есть необходимость, то содержимое команды всегда можно скорректировать под себя.
Когда место назначения установлено и профиль сканирования выбран, следует нажать «Сканировать» и заняться своими делами (а может и нет, все будет зависеть от объёма данной задачи nmap и быстроты сети). Как только сканирование завершится, список хостов, которые были найдены, отобразится на левой панели.
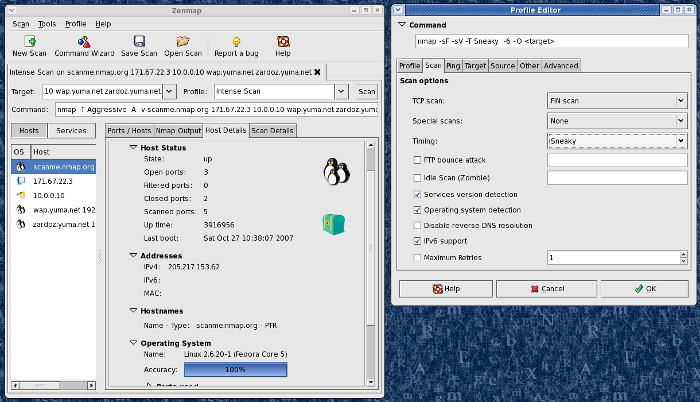
На правой панели можно заметить 5 вкладок:
- nmap output — изначально открывается вкладка, которая отображает вывод текста nmap;
- порты/хосты — в этой вкладке можно посмотреть открытые порты и на каких хостах они открыты;
- topology — эта вкладка отображает топологию данной сети в форме графиков и диаграмм;
- сведения о хосте — здесь отображается вся информация о данных сканирования хоста;
- сканирование — эта вкладка содержит все ранее использованные команды скана, то есть историю.
Зайдя во вкладку Topology, можно отыскать самый занимательный пункт Zenmap. Тут находится топология рассматриваемой сети, которая изображается в формате кластера окружностей с названиями хостов или их сетевыми адресами. Если проверенная сеть довольно велика, разглядеть круги будет практически невозможно.
В таком случае нужно нажать кнопку «Управление», которая находится сверху, и использовать кнопки Zoom и Ring Gap, расположенные справа, чтобы настроить дисплей наилучшим способом. Также можно воспользоваться флажками в разделе «Вид», чтобы выбрать нужную информацию о хосте, отображаемую на карте.
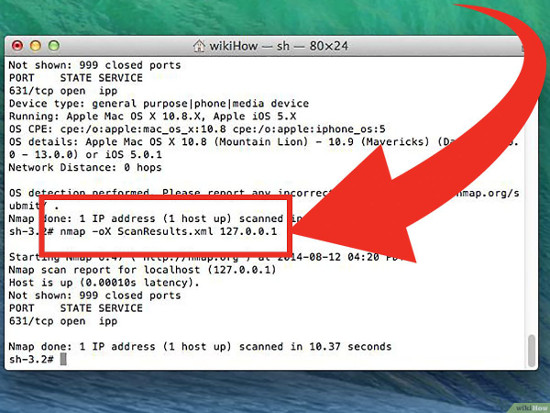
Для комфортного использования новичками Nmap существует официальный графический интерфейс сканера безопасности – Zenmap. Новички зачастую сталкиваются с проблемой, когда невозможно пользоваться программой так же, как и опытным пользователям. Теперь неопытные пользователи без проблем могут использовать все расширенные возможности, которые доступны профессионалам.
Чаще всего результаты сканирования сохраняются в профиле пользователя, чтобы была возможность не единожды повторно их запускать. Чтобы создать команду для Nmap, необходимо перейти в диалоговый режим.
Также существует база данных, где хранятся результаты сканирований, которые можно неоднократно просматривать и при желании сравнивать.
Программа Nmap разработана и создана для быстрого и безопасного сканирования как одного ПК, так и целых компьютерных сетей. Nmap и Zenmap совместимы с большинством операционных сетей. Могут работать и в консольном режиме, и в режиме графического интерфейса.
Zenmap отличает наличие необходимой документации. Установка не представляет собой каких-либо сложностей. Официальный сайт Zenmap публикует установщики для всех распространённых операционных систем — Linux, Windows, FreeBSD.
Выводы и рекомендации по использованию nmap
В заключение хочется сказать, что утилита nmap нередко используется злоумышленниками и я не в коем случае не призываю к действию, данная статья написана в образовательных целях и автор не несет ответственности за ваши действия.
Network Mapper имеет также и графическую оболочку, об этом нужно упомянуть, однако я ей не пользовался и советую сразу работать с терминалом.
Все открытые порты могут использоваться для проведения атак, следовательно стоит закрывать их по возможности на вашем устройстве, особенно в публичных местах и офисах.
- https://itmaster.guru/nastrojka-interneta/analiz-lokalnoy-seti.html
- http://pyatilistnik.org/port-scanner-on-the-local-network/
- https://ip-scaner.ru/
- https://www.softslot.com/software-2862-nmap.html
- https://KtonaSoft.ru/nmap/
- https://losst.ru/kak-polzovatsya-nmap-dlya-skanirovaniya-seti
- https://www.make-info.com/nmap/
- https://ITProffi.ru/skanirovanie-setevyh-portov-v-linux-komanda-nmap/
- https://mordeniuss.ru/nmap-commands-examples/
- https://www.vseprolinux.ru/nmap-skaner
- http://rus-linux.net/nlib.php?name=/MyLDP/lvs/nmap/zenmap.html
- https://habr.com/ru/post/88064/
- https://ZenMap.ru/
-
Установка Nmap
-
Установка Nmap в Ubuntu и Debian
-
Установка Nmap на CentOS и Fedora
-
Установка Nmap на macOS
-
Установка Nmap в Windows
-
СИНТАКСИС NMAP
-
Справка по Nmap
-
КАК ПОЛЬЗОВАТЬСЯ NMAP ДЛЯ СКАНИРОВАНИЯ ПОРТОВ В LINUX
-
Базовые возможности.
-
Определяем название и версию сервиса на порте.
-
Определяем имя и версию ОС.
-
Повышаем скорость сканирования.
-
Скрываем следы.
-
Обходим IDS и брандмауэры.
-
Используем Nmap для обнаружения машин в сети.
-
Выполняем брутфорс, дирбастинг (перебор директорий), DoS и другие атаки.
-
Поднимаем веб-сервер (внезапно).
-
Использование Nmap
-
Указание целевых хостов
-
Указание и сканирование портов
-
Ping сканирование
-
Отключение разрешения DNS-имен
-
Определение ОС, служб и версий
-
Вывод Nmap
-
Механизм сценариев Nmap
-
Заключение
Nmap — эталон среди сканеров портов и один из важнейших инструментов пентестера. Но можешь ли ты сказать, что досконально изучил все его особенности и способы применения? Из этой статьи ты узнаешь, как использовать Nmap для сканирования хостов за файрволом, повысить производительность сканирования, искать дыры в настройках HTTP-сервера, организовать DoS-атаку и даже поднять веб-сервер.
Nmap также может определять Mac-адрес, тип ОС , версию службы и многое другое.
В этой статье объясняются основы того, как использовать команду nmap для выполнения различных сетевых задач.
к содержанию ↑
Nmap — это многоплатформенная программа, которую можно установить во всех основных операционных системах. Первоначально он был выпущен как инструмент только для Linux, а позже был перенесен на другие системы, такие как BSD, Windows и macOS.
Если вы предпочитаете графический интерфейс, а не командную строку, Nmap также имеет графический пользовательский интерфейс под названием Zenmap.
Официальные бинарные пакеты доступны для загрузки со страницы загрузки Nmap.
Процедура установки проста и зависит от вашей операционной системы.
к содержанию ↑
Установка Nmap в Ubuntu и Debian
Nmap доступен из репозиториев Ubuntu и Debian по умолчанию. Чтобы установить его, запустите:
sudo apt update
sudo apt install nmap
Установка Nmap на CentOS и Fedora
На CentOS и других производных от Red Hat запускаются:
sudo dnf install nmap
Установка Nmap на macOS
Пользователи macOS могут установить Nmap, загрузив установочный пакет «.dmg» с сайта Nmap или через Homebrew:
brew install nmap
Установка Nmap в Windows
Версия Nmap для Windows имеет некоторые ограничения и, как правило, немного медленнее, чем версия для UNIX.
Самый простой вариант установки Nmap в Windows — это загрузить и запустить самоустанавливающийся exe-файл.
Вы можете запустить Nmap в Windows либо из командной строки, либо запустив программу Zenmap. Для получения дополнительной информации о том, как использовать Nmap в Windows, ознакомьтесь с инструкциями по использованию после установки.
к содержанию ↑
СИНТАКСИС NMAP
Команда запуска Nmap очень проста для этого достаточно передать ей в параметрах целевой IP адрес или сеть, а также указать опции при необходимости:
$ nmap опции адрес
Теперь давайте рассмотрим основные опции, которые понадобятся нам в этой статье.
- -sL — просто создать список работающих хостов, но не сканировать порты nmap;
- -sP — только проверять доступен ли хост с помощью ping;
- -PN — считать все хосты доступными, даже если они не отвечают на ping;
- -sS/sT/sA/sW/sM — TCP сканирование;
- -sU — UDP сканирование nmap;
- -sN/sF/sX — TCP NULL и FIN сканирование;
- -sC — запускать скрипт по умолчанию;
- -sI — ленивое Indle сканирование;
- -p — указать диапазон портов для проверки;
- -sV — детальное исследование портов для определения версий служб;
- -O — определять операционную систему;
- -T[0-5] — скорость сканирования, чем больше, тем быстрее;
- -D — маскировать сканирование с помощью фиктивных IP;
- -S — изменить свой IP адрес на указанный;
- -e — использовать определенный интерфейс;
- —spoof-mac — установить свой MAC адрес;
- -A — определение операционной системы с помощью скриптов.
Теперь, когда мы рассмотрели все основные опции, давайте поговорим о том, как выполняется сканирование портов nmap.
к содержанию ↑
Справка по Nmap
nmap [Тип(ы) сканирования] [Опции] {определение цели}
ОПРЕДЕЛЕНИЕ ЦЕЛИ СКАНИРОВАНИЯ:
 Можно использовать сетевые имена, IP адреса, сети и т.д.
  Пример: scanme.nmap.org, microsoft.com/24, 192.168.0.1; 10.0.0-255.1-254
  -iL <имя_входного_файла>: Использовать список хостов/сетей из файла
  -iR <количество_хостов>: Выбрать произвольные цели
  --exclude <хост1[,хост2][,хост3],...>: Исключить хосты/сети
  --excludefile <имя_файла>: Исключить список из файла
ОБНАРУЖЕНИЕ ХОСТОВ:
  -sL: Сканирование с целью составления списка - просто составить список целей для сканирования
  -sn: Пинг сканирование - отключить сканирование портов
  -Pn: Рассматривать все хосты будто бы они онлайн -- пропустить обнаружение хостов
  -PS/PA/PU/PY[список_портов]: TCP SYN/ACK, UDP или SCTP обнаружение данных портов пингование заданных портов
  -PE/PP/PM: Пингование с использованием ICMP эхо запросов, запросов временной метки и сетевой маски
  -PO[список_протоколов]: Пингование с использованием IP протокола
  -n/-R: Никогда не производить DNS разрешение/Всегда производить разрешение [по умолчанию: иногда]
  --dns-servers <сервер1[,сервер2],...>: Задать собственные DNS сервера
  --system-dns: Использовать системный DNS преобразователь
  --traceroute: Отслеживать путь к хосту
РАЗЛИЧНЫЕ ПРИЕМЫ СКАНИРОВАНИЯ:
  -sS/sT/sA/sW/sM: TCP SYN/с использованием системного вызова Connect()/ACK/Window/Maimon сканирования
  -sU: UDP сканирование
  -sN/sF/sX: TCP Null, FIN и Xmas сканирования
  --scanflags <флаги>: Задать собственные TCP флаги
  -sI <зомби_хост[:порт]>: "Ленивое" (Idle) сканирование
  -sY/sZ: SCTP INIT/COOKIE-ECHO сканирования
  -sO: Сканирование IP протокола
  -b <FTP ретранслирующий хост>: FTP bounce сканирование
ОПРЕДЕЛЕНИЕ ПОРТОВ И ПОРЯДКА СКАНИРОВАНИЯ:
  -p <диапазон_портов>: Сканирование только определенных портов
    Пример: -p22; -p1-65535; -p U:53,111,137,T:21-25,80,139,8080,S:9
  --exclude-ports <port ranges>: Exclude the specified ports from scanning
  -F: Быстрый режим - Сканировать меньше портов чем при сканировании по умолчанию
  -r: Сканировать порты последовательно - не использовать случайный порядок портов
  --top-ports <количество_портов>: Сканировать <количество_портов> наиболее распространенных портов
  --port-ratio <рейтинг>: Сканировать порты с рейтингом большим чем <рейтинг>
ОПРЕДЕЛЕНИЕ СЛУЖБ И ИХ ВЕРСИЙ:
  -sV: Исследовать открытые порты для определения информации о службе/версии
  --version-intensity <уровень>: Устанавливать от 0 (легкое) до 9 (пробовать все запросы)
  --version-light: Ограничиться наиболее легкими запросами (интенсивность 2)
  --version-all: Использовать каждый единичный запрос (интенсивность 9)
  --version-trace: Выводить подробную информацию о процессе сканирования (для отладки)
СКАНИРОВАНИЕ С ИПОЛЬЗОВАНИЕМ СКРИПТОВ:
  -sC: эквивалентно опции --script=default
  --script=<Lua скрипты>: <Lua скрипты> это разделенный запятыми список директорий, файлов скриптов или
           категорий скриптов
  --script-args=<имя1=значение1,[имя2=значение2,...]>: Передача аргументов скриптам
  --script-args-file=имя_файла: передать скрипту NSE аргументы в файле
  --script-trace: Выводить все полученные и отправленные данные
  --script-updatedb: Обновить базу данных скриптов.
  --script-help=<Lua скрипты>: Показать помощь о скриптах.
           <Lua скрипты> разделённый запятой список файлов скриптов или
           категорий скриптов.
ОПРЕДЕЛЕНИЕ ОС:
  -O: Активировать функцию определения ОС
  --osscan-limit: Использовать функцию определения ОС только для "перспективных" хостов
  --osscan-guess: Угадать результаты определения ОС
ОПЦИИ УПРАВЛЕНИЯ ВРЕМЕНЕМ И ПРОИЗВОДИТЕЛЬНОСТЬЮ:
  Опции, принимающие аргумент <время>, задаются в миллисекундах, пока вы не добавите 's' (секунды), 'm' (минуты),
  или 'h' (часы) к значению (напр. 30m).
  -T[0-5]: Установить шаблон настроек управления временем (больше - быстрее)
  --min-hostgroup/max-hostgroup <кол_хостов>: Установить размер групп для параллельного сканирования
  --min-parallelism/max-parallelism <кол_хостов>: Регулирует распараллеливание запросов
  --min-rtt-timeout/max-rtt-timeout/initial-rtt-timeout <время>: Регулирует время ожидания ответа на запрос
  --max-retries <количество_попыток>: Задает максимальное количество повторных передач запроса
  --host-timeout <время>: Прекращает сканирование медленных целей
  --scan-delay/--max-scan-delay <время>: Регулирует задержку между запросами
  --min-rate <число>: Посылать запросы с интенсивностью не меньше чем <число> в секунду
  --max-rate <число>: Посылать запросы с интенсивностью не больше чем <число> в секунду
ОБХОД ФАЙЕРВОЛОВ/IDS И СПУФИНГ:
  -f; --mtu <значение>: Фрагментировать пакеты (опционально с заданным значениме MTU)
  -D <фикт_хост1,фикт_хост2[,ME],...>: Маскировка сканирования с помощью фиктивных хостов
  -S <IP_адрес>: Изменить исходный адрес
  -e <интерфейс>: Использовать конкретный интерфейс
  -g/--source-port <номер_порта>: Использовать заданный номер порта
  --proxies <url1,[url2],...>: Переправлять подключения через прокси HTTP/SOCKS4
  --data <hex string>: Append a custom payload to sent packets
  --data-string <string>: Дописать пользовательскую ASCII строку к отправляемым пакетам
  --data-length <число>: Добавить произвольные данные к посылаемым пакетам
  --ip-options <опции>: Посылать пакет с заданным ip опциями
  --ttl <значение>: Установить IP поле time-to-live (время жизни)
  --spoof-mac <MAC_адрес/префикс/название производителя>: Задать собственный MAC адрес
  --badsum: Посылать пакеты с фиктивными TCP/UDP контрольными суммами
ВЫВОД РЕЗУЛЬТАТОВ:
  -oN/-oX/-oS/-oG <файл>: Выводить результаты нормального, XML, s|<rIpt kIddi3,
     и Grepable формата вывода, соответственно, в заданный файл
  -oA <базовове_имя_файла>: Использовать сразу три основных формата вывода
  -v: Увеличить уровень вербальности (используйте -vv или более для усиления эффекта)
  -d: Увеличить уровень отладки (используйте -dd или более для усиления эффекта)
  --reason: Отобразить причину, по которой порт в конкретном состоянии
  --open: Показывать только открытые (или возможно открытые) порты
  --packet-trace: Отслеживание принятых и переданных пакетов
  --iflist: Вывести список интерфейсов и роутеров (для отладки)
  --append-output: Добавлять в конец, а не перезаписывать выходные файлы
  --resume <имя_файла>: Продолжить прерванное сканирование
  --stylesheet <путь/URL>: Устанавливает XSL таблицу стилей для преобразования XML вывода в HTML
  --webxml: Загружает таблицу стилей с Nmap.Org
  --no-stylesheet: Убрать объявление XSL таблицы стилей из XML
РАЗЛИЧНЫЕ ОПЦИИ:
  -6: Включить IPv6 сканирование
  -A: Активировать функции определения ОС и версии, сканирование с использованием скриптов и трассировку
  --datadir <имя_директории>: Определяет место расположения файлов Nmap
  --send-eth/--send-ip: Использовать сырой уровень ethernet/IP
  --privileged: Подразумевать, что у пользователя есть все привилегии
  --unprivileged: Подразумевать, что у пользователя нет привилегий для использования сырых сокетов
  -V: Вывести номер версии
  -h: Вывести эту страницу помощи.
ПРИМЕРЫ:
  nmap -v -A scanme.nmap.org
  nmap -v -sn 192.168.0.0/16 10.0.0.0/8
  nmap -v -iR 10000 -Pn -p 80
к содержанию ↑
КАК ПОЛЬЗОВАТЬСЯ NMAP ДЛЯ СКАНИРОВАНИЯ ПОРТОВ В LINUX
Дальше рассмотрим примеры nmap. Сначала давайте рассмотрим как найти все подключенные к сети устройства, для этого достаточно использовать опцию -sL и указать маску нашей сети. в моем случае это 192.168.1.1/24. Маску вашей локальной сети вы можете найти, выполнив команду:
ip addr show
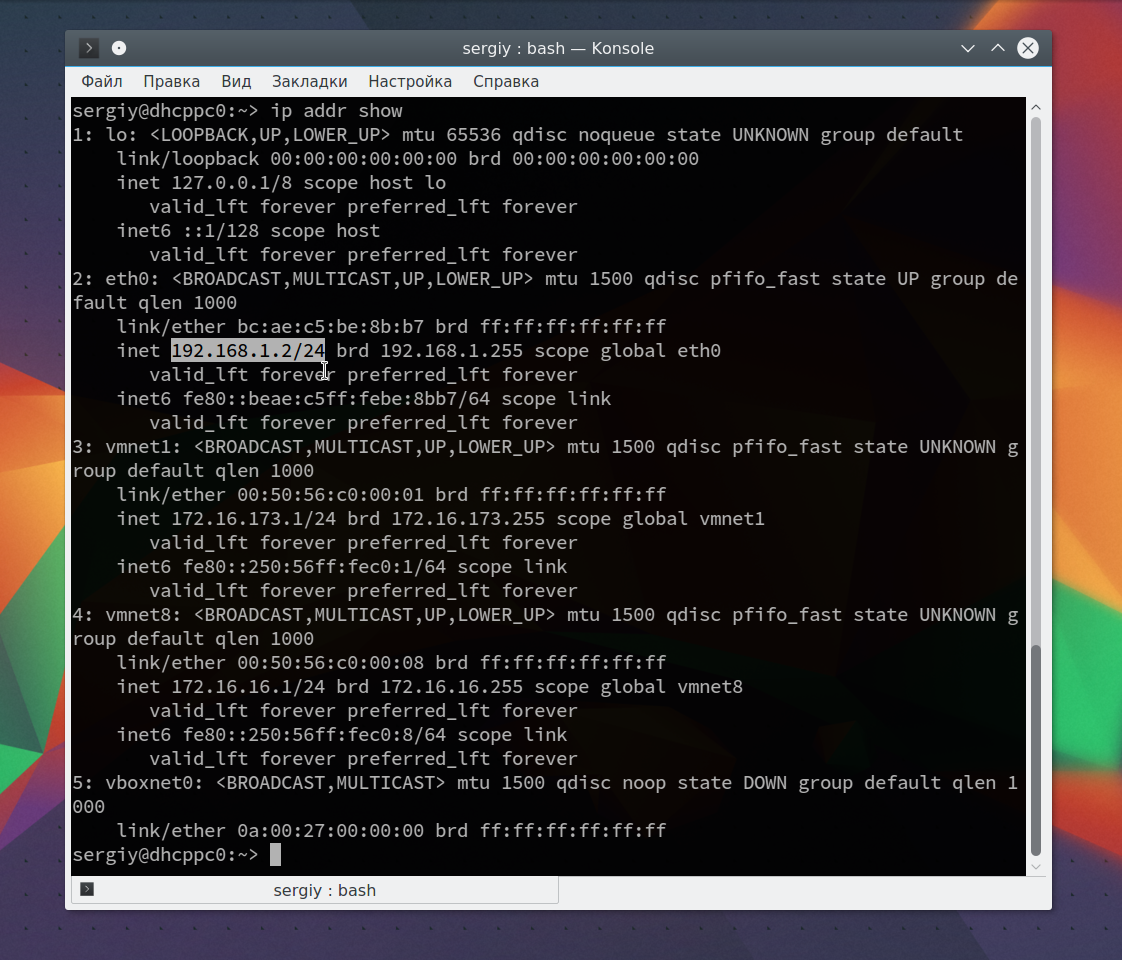
Из вывода для используемого интерфейса возьмите число после слеша, а до слэша укажите ip вашего роутера. Команда на сканирование сети nmap будет выглядеть вот так:
nmap -sL 192.168.1.1/24
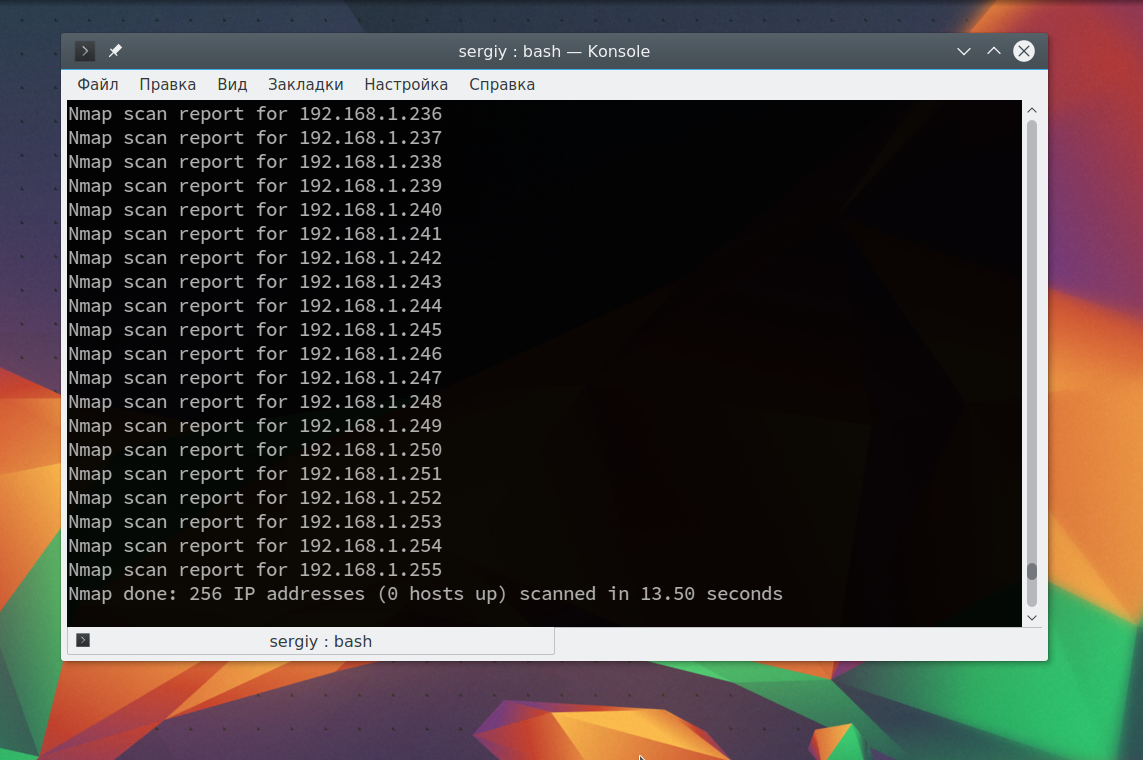
Иногда это сканирование может не дать никаких результатов, потому что некоторые операционные системы имеют защиту от сканирования портов. Но это можно обойти, просто использовав для сканирования ping всех ip адресов сети, для этого есть опция -sn:
nmap -sn 192.168.1.1/24
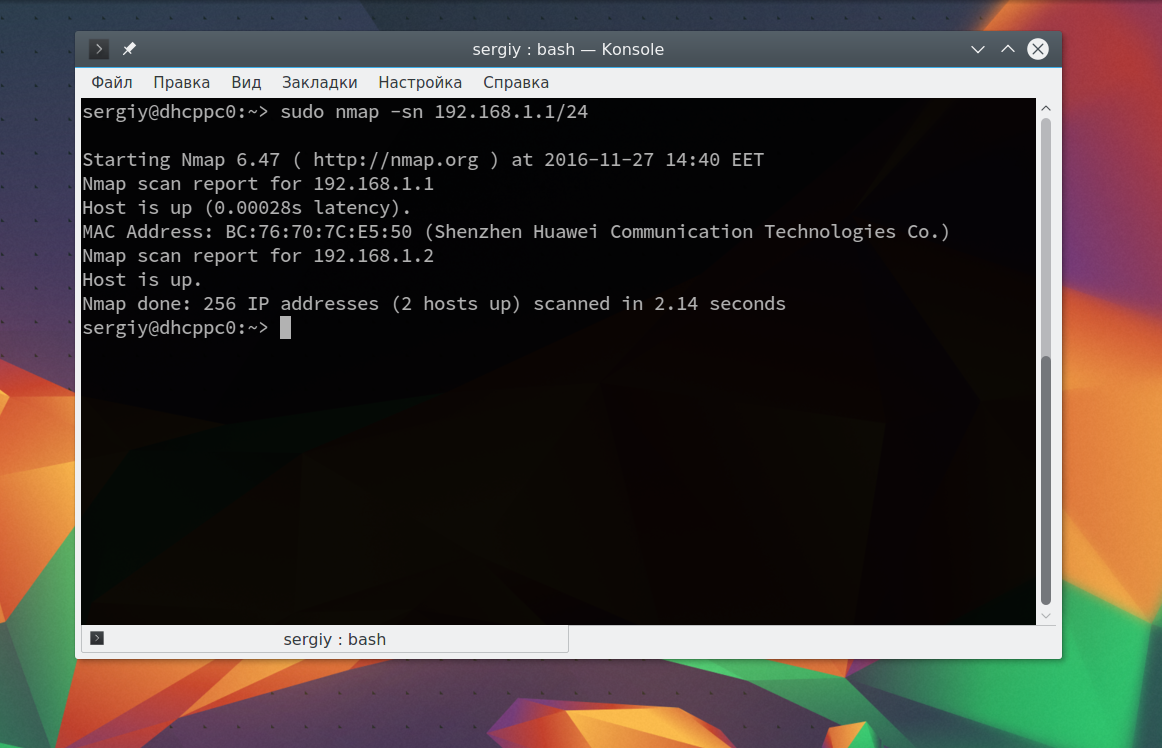
Как видите, теперь программа обнаружила активные устройства в сети. Дальше мы можем сканировать порты nmap для нужного узла запустив утилиту без опций:
sudo nmap 192.168.1.1
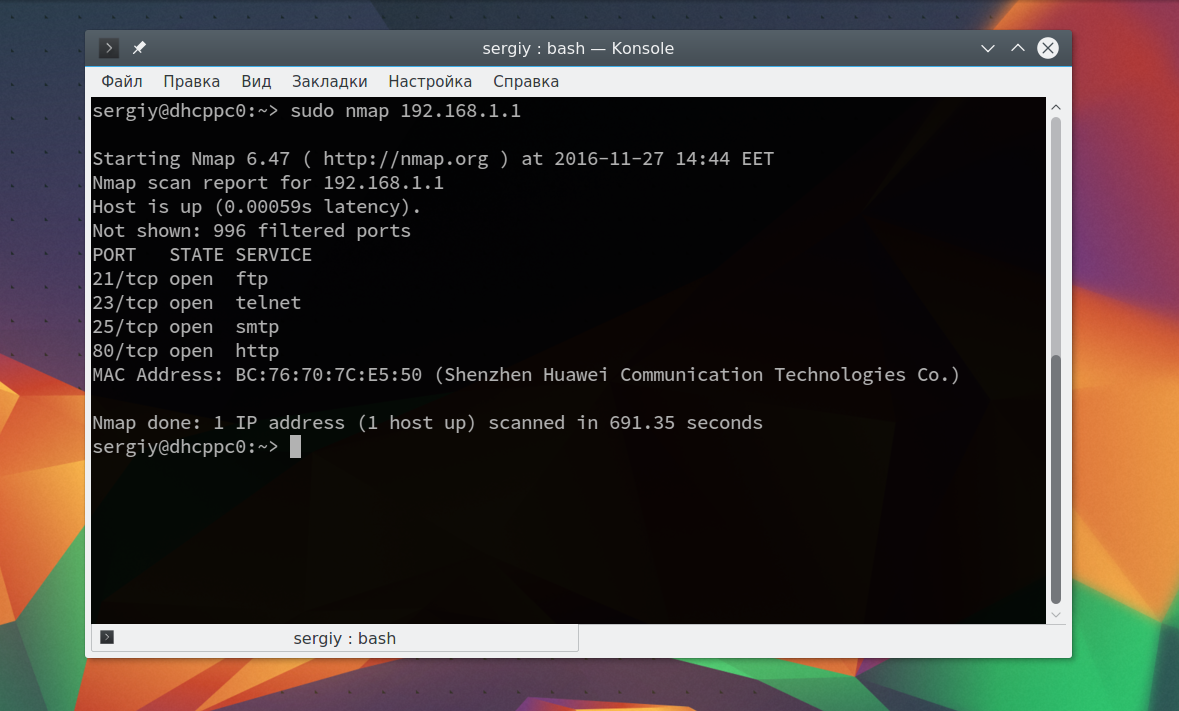
Теперь мы можем видеть, что у нас открыто несколько портов, все они используются каким-либо сервисом на целевой машине. Каждый из них может быть потенциально уязвимым, поэтому иметь много открытых портов на машине небезопасно. Но это еще далеко не все, что вы можете сделать, дальше вы узнаете как пользоваться nmap.
Чтобы узнать более подробную информацию о машине и запущенных на ней сервисах вы можете использовать опцию -sV. Утилита подключится к каждому порту и определит всю доступную информацию:
sudo nmap -sV 192.168.1.1
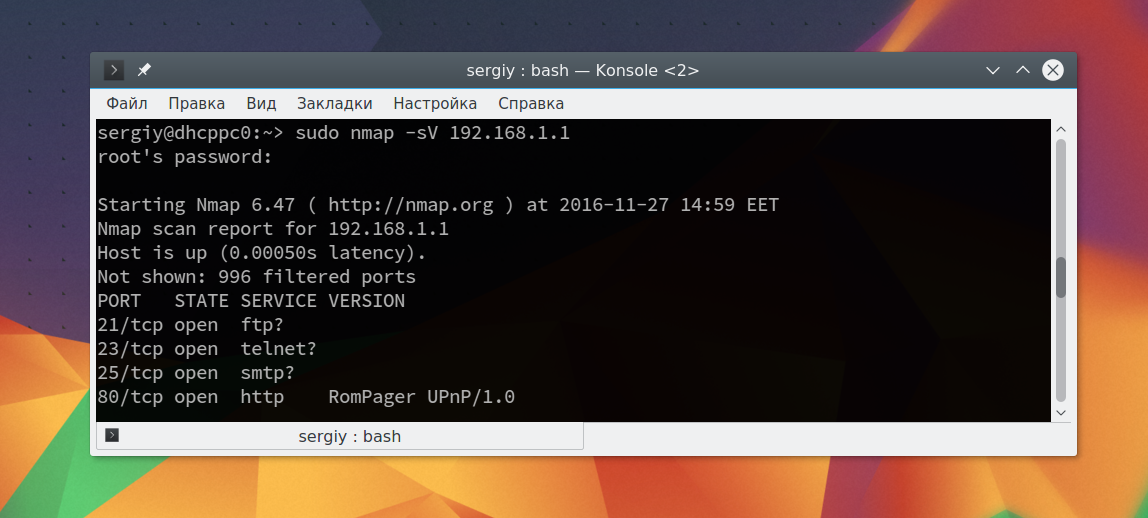
На нашей машине запущен ftp, а поэтому мы можем попытаться рассмотреть эту службу подробнее с помощью стандартных скриптов nmap. Скрипты позволяют проверить порт более детально, найти возможные уязвимости. Для этого используйте опцию -sC и -p чтобы задать порт:
sudo nmap -sC 192.168.56.102 -p 21
Мы выполняли скрипт по умолчанию, но есть еще и другие скрипты, например, найти все скрипты для ftp вы можете командой:
sudo find /usr/share/nmap/scripts/ -name '*.nse' | grep ftp
Затем попытаемся использовать один из них, для этого достаточно указать его с помощью опции —script. Но сначала вы можете посмотреть информацию о скрипте:
sudo nmap --script-help ftp-brute.nse
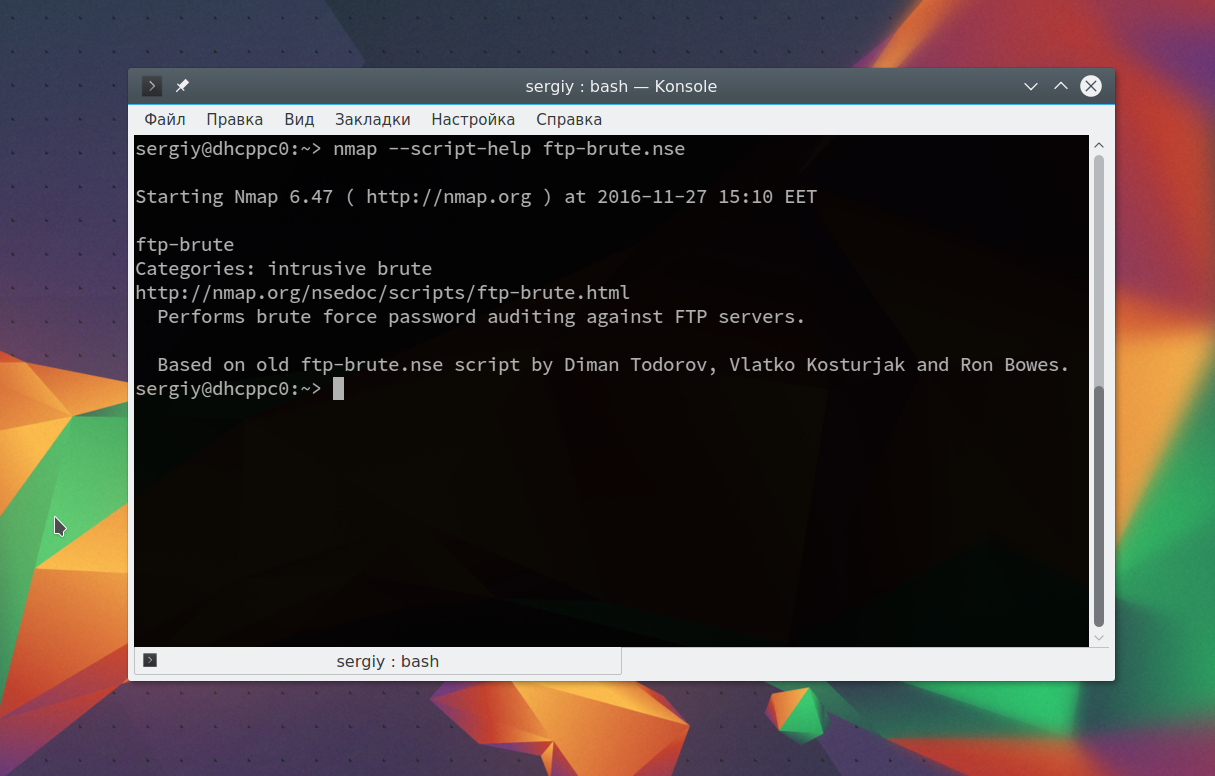
Этот скрипт будет пытаться определить логин и пароль от FTP на удаленном узле. Затем выполните скрипт:
sudo nmap --script ftp-brute.nse 192.168.1.1 -p 21
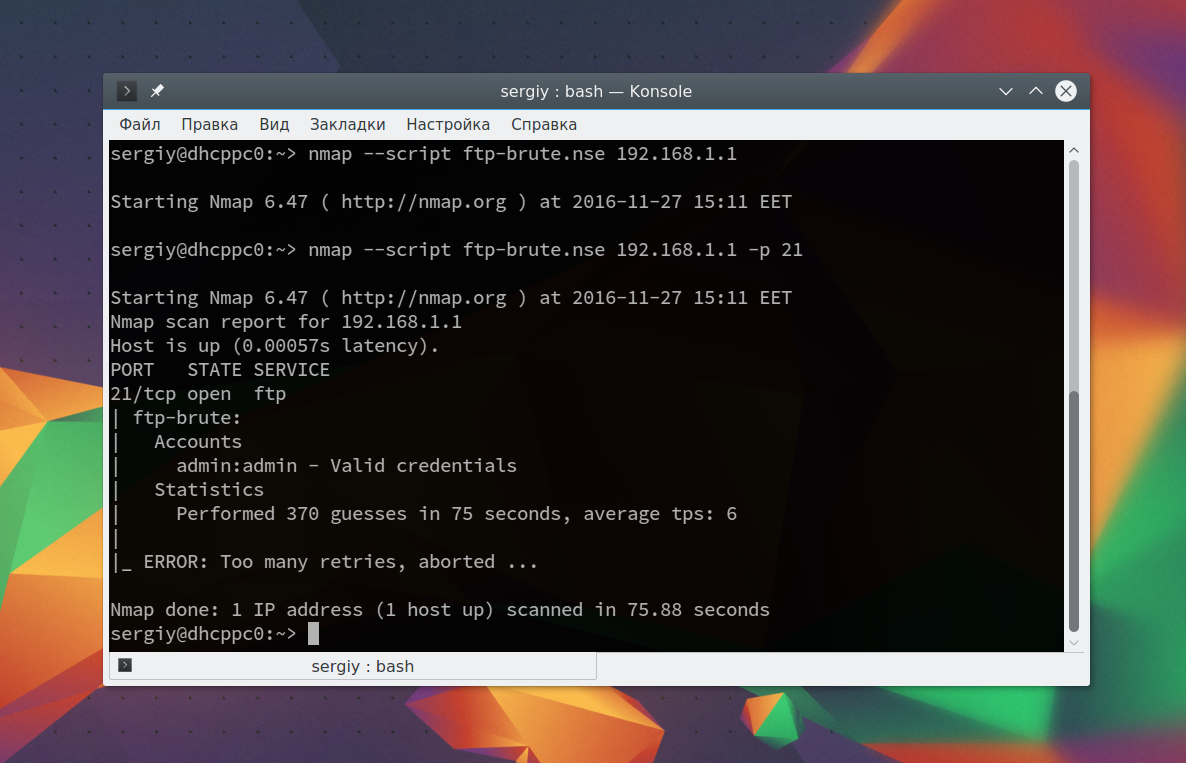
В результате скрипт подобрал логин и пароль, admin/admin. Вот поэтому не нужно использовать параметры входа по умолчанию.
Также можно запустить утилиту с опцией -A, она активирует более агрессивный режим работы утилиты, с помощью которого вы получите большую часть информации одной командой:
sudo nmap -A 192.168.1.1

Обратите внимание, что здесь есть почти вся информация, которую мы уже видели раньше. Ее можно использовать чтобы увеличить защиту этой машины.
к содержанию ↑
Базовые возможности.
Перед тем как перейти к обсуждению продвинутых возможностей Nmap, давай уделим немного внимания использованию Nmap на базовом уровне. Ты можешь возразить, что говорить тут не о чем, — достаточно всего лишь натравить Nmap на нужный хост, и спустя некоторое время он выдаст на экран информацию об открытых портах:
$ nmap 192.168.0.1
Это действительно так, но стоит иметь в виду две особенности реализации Nmap. Первая: запущенный с правами обычного пользователя Nmap крайне неэффективен. Весь процесс сканирования при этом фактически сводится к попытке установить полноценное соединение с каждым из портов. В случае протокола TCP это значит, что Nmap пошлет на удаленную сторону пакет SYN; если запрошенный порт открыт, машина ответит пакетом SYN/ACK, после чего Nmap отправит пакет ACK и только потом закроет соединение с помощью пакета FIN.
Весь этот процесс осуществляется с помощью системного вызова connect() и, по сути, целиком ложится на сетевой стек ОС. В результате страдает как производительность сканирования, так и скрытность (сервисы, висящие на сканируемых портах, будут активно логировать соединения).
Совсем по-другому Nmap ведет себя, когда запущен с правами root:
$ sudo nmap 192.168.0.1
В этом случае он полностью берет на себя формирование пакетов и управление соединением. Подключение к открытым портам будет выглядеть так: Nmap посылает SYN, машина отвечает SYN/ACK, Nmap посылает FIN, разрывая наполовину открытое соединение (это называется TCP SYN сканирование). В результате сервис, висящий на порте, не логирует попытку соединения, а Nmap способен обнаружить брандмауэр, который просто отбрасывает SYN-пакеты вместо того, чтобы отправить в ответ SYN/ACK (порт открыт) или FIN (порт закрыт), как это должна делать операционная система по умолчанию. Кроме того, этот способ сканирования намного более производительный.
Вторая особенность Nmap заключается в том, что на самом деле он сканирует не весь диапазон портов (65 536), а только 1000 портов типовых служб, определенных в файле /usr/share/nmap/nmap-services. Так что, если кто-то повесит сервис на нестандартный порт, которого просто нет в этом файле, Nmap его не увидит. Изменить подобное поведение можно при помощи такой команды:
$ sudo nmap -sS -sU -p 1-65535 192.168.0.1
Nmap будет использовать сканирование типа TCP SYN и UDP-сканирование для всего диапазона портов.
к содержанию ↑
Определяем название и версию сервиса на порте.
Одна из интересных особенностей Nmap в том, что он способен не только определить состояние порта (открыт, закрыт, фильтруется), но и идентифицировать имя демона/службы на этом порте, а в некоторых случаях даже его версию. Для этого Nmap может применять несколько разных техник, например подключиться к порту 80 и послать HTTP-запрос для идентификации имени и версии веб-сервера либо использовать информацию о том, как сервис отвечает на те или иные пакеты и запросы.
Все правила идентификации служб и их версий определены в файле <span class=»nobr»>/usr/share/nmap/nmap-service-probes, а заставит Nmap их применить флаг -sV:
$ sudo nmap -sV 192.168.0.1
Причем есть возможность даже усилить попытки Nmap определить службу с помощью флага —version-all:
$ sudo nmap -sV —version-all 192.168.0.1
Однако обычно это не повышает качество распознавания.

к содержанию ↑
Определяем имя и версию ОС.
Наверное, это одна из самых известных функций Nmap. Отправляя машине нестандартные пакеты и сопоставляя ее ответ (время ответа, значения полей TTL, MTU, ACK и многое другое) с «базой отпечатков ОС» (/usr/share/nmap/nmap-os-db), Nmap способен достаточно точно определить запущенную на машине ОС. Все, что нужно сделать, — это запустить Nmap с флагом -O:
$ sudo nmap -O 192.168.0.1
Однако далеко не всегда Nmap способен на 100% правильно угадать ОС. Если сделать это не получится, Nmap выведет на экран наиболее близкие к правильному варианты, заботливо снабдив их «процентом попадания»: 90%, 82%…
Более того, ты можешь пойти еще дальше и воспользоваться флагом -A, чтобы заставить Nmap попытаться определить версию ОС, версию служб и даже провести более детальный анализ служб с помощью скриптов NSE (о них позже):
$ sudo nmap -A 192.168.0.1

к содержанию ↑
Повышаем скорость сканирования.
Nmap известен своей феноменальной производительностью, которая продолжает улучшаться вот уже двадцать лет. Сканер применяет множество техник и хаков, многопоточный режим с динамически изменяемым количеством портов на поток, умеет использовать несколько ядер процессора. Но даже с целым вагоном оптимизаций в своем коде по умолчанию Nmap не такой быстрый, каким мог бы быть на самом деле.
Nmap поддерживает десяток флагов, позволяющих тонко контролировать такие параметры, как задержка между попытками подключения к порту или количество попыток подключения. Разобраться с ними с наскоку довольно тяжело, поэтому в Nmap есть набор преднастроенных шаблонов агрессивности сканирования. Всего их шесть (от 0 до 5), а сделать выбор можно с помощью опции -T:
$ sudo nmap -T3 192.168.0.1
В данном случае мы выбрали шаблон номер 3. Это дефолтовое значение, своеобразный компромисс между скоростью и точностью сканирования в медленных сетях. Однако в современных условиях, когда минимальная скорость проводного доступа в сеть уже перешагнула за 30 Мбит/с, лучшим выбором будет -T4 или даже -T5. Последний стоит применять только в стабильных сетях без провалов скорости.
Более низкие значения предназначены для обхода систем обнаружения вторжений. Например, -T0 отключает многопоточное сканирование и устанавливает задержку между пробами портов в пять минут; потратив весь день (ночь) на сканирование, ты можешь надеяться, что сама попытка сканирования будет не замечена (тем более что Nmap перебирает порты в случайном порядке). Шаблон -T1 — более быстрый режим с задержкой в 15 с, -T2 — 0,4 с, -T3 — 10 мс, -T4 — 5 мс.

к содержанию ↑
Скрываем следы.
Увеличение задержки между пробами портов — не единственный способ скрыть, что машина сканируется. Еще один интересный метод — одновременно запустить несколько потоков сканирования, подменяя обратный IP-адрес во всех случаях, кроме одного. Смысл здесь в том, чтобы запутать IDS и администратора машины. В логах IDS окажется сразу несколько попыток сканирования с разных адресов, среди которых будет только один настоящий.
Использовать такой метод довольно просто:
$ sudo nmap -D адрес1,адрес2,адрес3 192.168.0.1
Ты можешь указать сколько угодно фиктивных адресов или позволить Nmap сгенерировать рандомные адреса за тебя (в данном случае десять адресов):
$ sudo nmap -D RND:10 192.168.0.1
Однако тут необходимо иметь в виду, что рандомные адреса часто будут указывать на несуществующие или отключенные машины. IDS и хороший админ смогут отсеять их, чтобы вычислить реальный адрес.
Более сложный способ — организовать так называемое Idle-сканирование. Это очень интересная техника, которая базируется на трех простых фактах:
- При выполнении SYN-сканирования удаленная сторона посылает пакет SYN/ACK в случае, если порт открыт, и пакет RST, если нет.
- Машина, получившая незапрошенный пакет SYN/ACK, должна отвечать пакетом RST, а при получении незапрошенного RST — игнорировать его.
- Каждый IP-пакет, отправленный машиной, имеет IPID, а многие ОС при отправке пакета просто увеличивают IPID.
Сама техника заключается в том, чтобы найти неактивную сетевую машину, которая просто ничего не делает (Idle), но при этом находится в рабочем состоянии и способна отвечать на сетевые запросы. Более того, машина должна работать на древней ОС, которая увеличивает IPID пакетов вместо рандомизации, как современные ОС. Сделать это можно с помощью все тех же флагов -O -v Nmap (строка IP ID Sequence Generation в выводе) либо с помощью Metasploit Framework (это удобнее и быстрее):
> use auxiliary/scanner/ip/ipidseq
> set RHOSTS 192.168.0.1-192.168.0.255
> run
Далее ты запускаешь сканирование портов:
$ sudo nmap -sI IP-Idle-машины 192.168.0.1
На каждую пробу порта Nmap сначала будет посылать запрос Idle-машине, записывать IPID пакета, затем посылать SYN-пакет жертве, подменяя обратный адрес на IP Idle-машины, затем снова посылать запрос Idle-машине и сверять IPID с ранее сохраненным. Если IPID увеличился со времени прошлой проверки, значит, машина посылала пакеты, а, как мы знаем из второго пункта выше, это означает, что она ответила пакетом RST. Это, в свою очередь, говорит, что проверяемый порт жертвы открыт. Если IPID не увеличился, значит, порт закрыт.
В современном мире, где уже не осталось Windows 95, это действительно сложно реализуемая техника, но она позволяет полностью отвести от себя подозрения о сканировании. IDS обвинит в сканировании Idle-машину.
к содержанию ↑
Обходим IDS и брандмауэры.
Сразу оговорюсь: сегодняшние IDS и брандмауэры намного умнее тех, что существовали во времена, когда в Nmap появились средства борьбы с ними. Поэтому многие приведенные здесь техники могут уже не работать, но это не повод ими не пользоваться, в Сети полно доисторического оборудования.
Начнем с того, что даже без дополнительных опций Nmap уже способен хоть и не обойти, но обнаружить брандмауэр. Происходит так потому, что при SYN-сканировании состояние открыт/закрыт определяется путем анализа ответа машины: SYN/ACK — открыт, FIN — закрыт. Однако брандмауэры, чтобы минимизировать процессорные ресурсы, зачастую просто дропают пакеты, адресуемые фильтруемым портам (даже при настройке iptables в Linux стандартная практика — это дропнуть пакет с помощью -j DROP). Nmap отслеживает, при пробе каких портов не было получено ответа, и помечает эти порты filtered.
Еще одна техника обнаружения брандмауэра заключается в том, чтобы заставить Nmap генерировать «невероятные пакеты», такие как пакеты без единого флага (-sN), FIN-пакеты (-sF) и Xmas-пакеты, содержащие флаги FIN, PSH и URG (-sX). RFC описывает все эти ситуации, поэтому любое расхождение с RFC Nmap интерпретирует как наличие брандмауэра.
Многие брандмауэры можно обойти и точно определить, фильтруется порт или нет. Для этого можно использовать ACK-сканирование:
$ sudo nmap -sA 192.168.0.1
Теория здесь следующая: брандмауэр должен отбивать все новые TCP-подключения к порту, но также обязан не препятствовать прохождению пакетов в рамках уже установленных соединений. Простой способ сделать это — отбивать все SYN-пакеты (используется для установки соединения), но не мешать ACK-пакетам (используется для отправки пакетов в рамках уже открытого соединения).
Но есть одна тонкость. Дело в том, что есть так называемые stateful-брандмауэры. Они умеют отслеживать состояние соединения и проверяют такие поля пакетов, как IP-адрес и номер последовательности TCP, чтобы отслеживать, какие пакеты действительно пришли в рамках открытого ранее соединения, а какие были отправлены Nmap в рамках ACK-сканирования (iptables в Linux может работать в обоих режимах, но по умолчанию он не stateful, это более производительный вариант).
Выяснить, какой тип брандмауэра используется, можно, выполнив SYN-сканирование и сразу за ним — ACK-сканирование:
$ sudo nmap -sS 192.168.0.1
$ sudo nmap -sA 192.168.0.1
Если во втором случае порты, отмеченные во время SYN-сканирования как filtered, стали unfiltered, значит, перед тобой не stateful-брандмауэр.
Кроме того, можно попробовать обойти брандмауэр с помощью изменения номера исходящего порта:
$ sudo nmap —source-port 53 192.168.0.1
Это эксплуатация старой как мир ошибки настройки брандмауэра, которая заключается в том, что админ открывает доступ всему входящему трафику (включая протокол TCP) с порта 53, чтобы позволить приложениям беспрепятственно выполнять DNS-запросы. Сегодня такое встречается редко, но, как показывает практика, некомпетентность со временем не исчезает.
Кроме всего прочего, в Nmap есть средства для скрытия факта сканирования от глаз брандмауэров и IDS:
$ sudo nmap -f 192.168.0.1
В этом случае Nmap будет разбивать пакеты на крохотные фрагменты размером 8 байт. Делает он это в надежде на то, что брандмауэр или IDS не сможет собрать пакет из фрагментов и проанализировать его заголовок (по причине плохой реализации или в угоду производительности) и просто пропустит пакет или отбросит.
$ sudo nmap —mtu 16 192.168.0.1
Та же история, только с возможностью контролировать размер пакета (в данном случае 16). Можно использовать против брандмауэров и IDS, которые умеют ловить факты сканирования с помощью Nmap, анализируя размер фрагмента.
$ sudo nmap —data-length 25 192.168.0.1
Добавляет в конец пакета указанное количество рандомных байтов. Цель та же, что и в предыдущем случае: обмануть IDS, которая может быть способна обнаружить сканирование, анализируя размер пакета (Nmap всегда посылает пакеты длиной 40 байт при использовании протокола TCP).
к содержанию ↑
Используем Nmap для обнаружения машин в сети.
Хотя Nmap известен именно как сканер портов, это также отличный инструмент для обнаружения машин в сети. Его можно натравить на любое количество хостов и буквально за несколько секунд получить результат пинга тысяч хостов. Вот только пингует хосты он совсем не так, как всем известная утилита ping. По умолчанию перед началом сканирования портов Nmap посылает несколько пакетов, чтобы удостовериться в доступности хоста:
- ICMP Echo request — аналог того, как работает ping;
- SYN-пакет на порт 443;
- ACK-пакет на порт 80;
- ICMP timestamp request.
Так много способов проверки необходимы для обхода брандмауэров и ситуаций, когда, например, в ОС или сетевом оборудовании включен запрет отвечать на запросы ICMP Echo (сегодня это частая практика).
Проверку доступности легко отключить, используя опцию -PN, о чем сам Nmap сообщит, если не сможет удостовериться в доступности порта:
$ sudo nmap -PN 192.168.0.1
Обычно в этом мало смысла, а вот обратная операция, то есть отключение сканера портов, очень даже полезна для проверки доступности множества хостов:
$ sudo nmap -sn 192.168.0.1-255
Эта команда заставит Nmap просканировать адреса с 192.168.0.1 по 192.168.0.255. Ее более удобный аналог:
$ sudo nmap -sn 192.168.0.*
А так можно попросить Nmap просканировать всю подсеть:
$ sudo nmap -sn 192.168.0.0/24
Ну или записать необходимые адреса в файл и попросить просканировать их:
$ sudo nmap -sn -iL /путь/до/файла
Если опустить флаг -sn, Nmap будет не просто проверять доступность хостов, но еще и сканировать порты.
Самих техник пингования также довольно много. Nmap поддерживает определение доступности хоста с помощью посылки SYN-пакета на указанный порт:
$ sudo nmap -sn -PS80 192.168.0.1
ACK-пакета:
$ sudo nmap -sn -PA80 192.168.0.1
UDP-пакета:
$ sudo nmap -sn -PU53 192.168.0.1
ICMP Echo request:
$ sudo nmap -sn -PE 192.168.0.1
ICMP timestamp:
$ sudo nmap -sn -PP 192.168.0.1
Все их можно комбинировать:
$ sudo nmap -sn -PE -PS443 -PA80 -PP 192.168.0.1

к содержанию ↑
Выполняем брутфорс, дирбастинг (перебор директорий), DoS и другие атаки.
Относительно новая фишка Nmap — поддержка скриптов, расширяющих функциональность сканера. Nmap поставляется с более чем 500 скриптами, которые могут относиться к одной или нескольким из четырнадцати категорий:
- auth — проверка возможности логина. Например, скрипт ftp-anon пробует выполнить анонимный логин на FTP-сервер и выводит список файлов, помечая доступные для записи файлы;
- broadcast — различные виды обнаружения хостов в сети. Пример: broadcast-upnp-info — скрипт для поиска UPnP-сервисов;
- brute — реализация техник брутфорса паролей. Пример: http-brute — брутфорс паролей от веб-сервера;
- default — скрипты, запускаемые автоматически при указании опции -A или -sC. Обычно это простые быстрые скрипты, собирающие дополнительную информацию о машине, вроде уже приведенного выше ftp-anon;
- discovery — практически аналог broadcast. Пример: smb-enum-shares — поиск расшаренных с помощью протокола SMB дисков;
- dos — скрипты для организации DoS-атак. Пример: smb-vuln-regsvc-dos — выводит из строя Windows 2000 путем эксплуатации уязвимости MSRC8742;
- exploit — эксплуатация или проверка на уязвимость. Пример: smb-vuln-ms06-025 — проверка машин Windows на уязвимость MS06-025;
- external — скрипты, использующие внешние ресурсы для получения дополнительной информации о машине. Пример: whois;
- fuzzer — скрипты, посылающие удаленной стороне неожиданные и неправильно сформированные данные с целью поиска уязвимостей или попытки выполнить DoS. Пример: dns-fuzz;
- intrusive — скрипты, выполняющие активные действия в отношении машины. Пример: snmp-brute — брутфорс SNMP-сервера;
- malware — проверка на зараженность машины вирусами и бэкдорами. Пример: smtp-strangeport — поиск SMTP-сервера на нестандартном порте, что может быть свидетельством заражения машины трояном, рассылающим спам;
- safe — «безопасные» скрипты, которые не совершают активных действий в отношении машины, не забивают канал пакетами и не эксплуатируют уязвимости. Пример: ssh-hostkey — получает публичные ключи SSH-сервера;
- version — получение версий работающих служб. Пример: pptp-version — выводит на экран дополнительную информацию о PPTP-сервере;
- vuln — проверка служб на уязвимости.
Если указать опции -A или -sC, скрипты категории default будут запускаться автоматически. Для запуска скриптов других категорий можно использовать опцию —script:
$ sudo nmap —script «default and safe» 192.168.0.1
Выбор можно обратить, заставив Nmap запустить все скрипты, кроме тех, что относятся к указанной категории:
$ sudo nmap —script «not intrusive» 192.168.0.1
А можно указать имя нужного скрипта (http-enum выполняет дирбастинг HTTP-сервера):
$ sudo nmap -p80 —script «http-enum» 192.168.0.1
Или попросить Nmap запустить все скрипты, относящиеся к протоколу HTTP:
$ sudo nmap -p80 —script «http-*» 192.168.0.1
Сами скрипты вместе с описанием и примерами использования можно найти в каталоге /usr/share/nmap/scripts.

к содержанию ↑
Поднимаем веб-сервер (внезапно).
Немногие знают, но в комплекте с Nmap идет утилита ncat. Это аналог известнейшего netcat — универсального сетевого инструмента, с помощью которого можно тестировать сетевые службы, выполнять удаленные команды, передавать файлы, прокидывать через сеть аудио, слушать порты и делать множество других интересных вещей.
С его же помощью можно запустить простейший веб-сервер:
$ ncat -lk -p 8080 —sh-exec «echo -e ‘HTTP/1.1 200 OK’; cat index.html»
Шесть состояний порта по версии Nmap
open — порт открыт;
closed — порт закрыт;
filtered — порт фильтруется, неизвестно, закрыт или открыт;
unfiltered — порт не фильтруется, неизвестно, закрыт или открыт (такой результат может дать только ACK-сканирование);
open|filtered — порт либо открыт, либо фильтруется;
closed|filtered — порт либо закрыт, либо фильтруется (такой результат может дать только Idle-сканирование).
к содержанию ↑
Использование Nmap
Nmap обычно используется для аудита сетевой безопасности, отображения сети, определения открытых портов и поиска сетевых устройств.
Упрощенный синтаксис команды nmap выглядит следующим образом:
nmap [Options] [Target...]
Самый простой пример использования Nmap — сканирование одной цели от имени обычного пользователя без указания каких-либо параметров:
nmap scanme.nmap.org
При вызове от имени пользователя без полномочий root, у которого нет прав на использование сырых пакетов, nmap запускает сканирование TCP-соединения. Параметр -sT по умолчанию включен в непривилегированном режиме.
Вывод будет выглядеть примерно так, включая основную информацию о сканировании и список открытых и отфильтрованных TCP-портов.
Starting Nmap 7.91 ( https://nmap.org ) at 2020-12-16 20:19 CET
Nmap scan report for cast.lan (192.168.10.121)
Host is up (0.048s latency).
Not shown: 981 closed ports
PORT STATE SERVICE
21/tcp open ftp
22/tcp open ssh
25/tcp open smtp
53/tcp open domain
80/tcp open http
110/tcp open pop3
143/tcp open imap
443/tcp open https
587/tcp open submission
993/tcp open imaps
995/tcp open pop3s
1025/tcp open NFS-or-IIS
1080/tcp open socks
8080/tcp open http-proxy
8081/tcp open blackice-icecap

Nmap done: 1 IP address (1 host up) scanned in 1.78 seconds
Самым популярным вариантом сканирования является TCP SYN scan (-sS), который быстрее, чем вариант подключения, и работает со всеми совместимыми стеками TCP.
-sS включается по умолчанию, когда nmap вызывает пользователь с административными привилегиями:
sudo nmap 192.168.10.121
Для более подробного вывода используйте увеличение детализации с помощью -v или -vv:
sudo nmap -vv 192.168.10.121
Чтобы выполнить сканирование UDP, вызовите команду с параметром ( -sU) от имени пользователя root:
sudo nmap -sU 192.168.10.121
Для получения полного списка методов сканирования портов посетите страницу документации Nmap.
Nmap также поддерживает адреса IPv6. Чтобы указать хост IPv6, используйте опцию -6:
sudo nmap -6 fd12:3456:789a:1::1
к содержанию ↑
Указание целевых хостов
Nmap рассматривает все аргументы, которые не являются опциями, как целевые хосты.
Аргументы считаются вариантами, если они начинаются с одинарного или двойного тире (-, --).
Самый простой вариант — передать один или несколько целевых адресов или доменных имен:
nmap 192.168.10.121 host.to.scan
Вы можете использовать нотацию CIDR, чтобы указать диапазон сети:
nmap 192.168.10.0/24
Чтобы указать диапазон октетов, используйте символ тире. Например, для сканирования 192.168.10.1, 192.168.11.1и 192.168.12.1:
nmap 192.168.10-12.1
Другой символ, который вы можете использовать для указания целей, — это запятая. Следующая команда нацелена на те же хосты, что и предыдущая:
nmap 192.168.10,11,12.1
Вы можете комбинировать все формы:
nmap 10.8-10.10,11,12.0/28 192.168.1-2.100,101
Чтобы убедиться, что вы указали правильные хосты перед сканированием, используйте параметр сканирования списка (-sL), который перечисляет только цели без запуска сканирования:
nmap -sL 10.8-10.10,11,12.0/28 192.168.1-2.100,101
Если вы хотите исключить цели, которые включены в указанный вами диапазон, используйте опцию --exclude:
nmap 10.8-10.10,11,12.0/28 --exclude 10.10.12.12
к содержанию ↑
Указание и сканирование портов
По умолчанию Nmap выполняет быстрое сканирование 1000 самых популярных портов. Это не первые 1000 последовательных портов, а 1000 наиболее часто используемых портов в диапазоне от 1 до 65389.
Для поиска всех портов с 1 по 65535 используйте опцию -p:
nmap -p- 192.168.10.121
Каждый порт может находиться в одном из следующих состояний:
- open — программа, запущенная на порту, отвечает на запрос.
- closed — на порту не работает ни одна программа, и хост отвечает на запросы.
- filtered — хост не отвечает на запрос.
Порты и диапазоны портов указываются с помощью опции -p.
Например, чтобы просканировать только порт 443, вы должны использовать следующую команду:
nmap -p 443 192.168.10.121
Чтобы указать более одного порта, разделите целевые порты запятой:
nmap -p 80,443 192.168.10.121
Диапазоны портов можно указать с помощью символа тире. Например, чтобы просканировать все порты UDP в диапазоне от 1 до 1024, вы должны запустить:
sudo nmap -sU -p 1-1024 192.168.10.121
Все вместе:
nmap -p 1-1024,8080,9000 192.168.10.121
Порты также можно указать с помощью имени порта. Например, для поиска порта 22, ssh, вы можете использовать:
nmap -p ssh 192.168.10.121
к содержанию ↑
Ping сканирование
Чтобы выполнить ping-сканирование или обнаружение хоста, вызовите команду nmap с опцией -sn:
sudo nmap -sn 192.168.10.0/24
Эта опция указывает Nmap только на обнаружение сетевых хостов, а не на сканирование портов. Это полезно, когда вы хотите быстро определить, какой из указанных хостов запущен и работает.
Отключение разрешения DNS-имен
По умолчанию Nmap выполняет обратное разрешение DNS для каждого обнаруженного хоста, что увеличивает время сканирования.
При сканировании больших сетей рекомендуется отключить разрешение обратного DNS и ускорить сканирование. Для этого вызовите команду с опцией -n:
sudo nmap -n 192.168.10.0/16
Определение ОС, служб и версий
Nmap может обнаружить операционную систему удаленного хоста с помощью снятия отпечатков стека TCP/IP. Чтобы запустить обнаружение ОС, вызовите команду с опцией -O:
sudo nmap -O scanme.nmap.org
Если Nmap может обнаружить ОС хоста, он напечатает что-то вроде следующего:
...
Device type: general purpose
Running: Linux 5.X
OS CPE: cpe:/o:linux:linux_kernel:5
OS details: Linux 5.0 - 5.4
Network Distance: 18 hops

OS detection performed. Please report any incorrect results at https://nmap.org/submit/ .
Nmap done: 1 IP address (1 host up) scanned in 26.47 seconds
Обычно системные службы прослушивают стандартные порты, которые хорошо известны и зарезервированы для них. Например, если порт 22, соответствующий службе SSH, открыт, вы предполагаете, что на хосте работает SSH-сервер. Однако вы не можете быть абсолютно уверены, потому что люди могут запускать службы на любых портах, которые им нужны.
Благодаря обнаружению службы и версии Nmap покажет вам, какая программа прослушивает порт и версию программы.
Для поиска службы и версии используйте опцию -sV:
sudo nmap -sV scanme.nmap.org
...
PORT STATE SERVICE VERSION
19/tcp filtered chargen
22/tcp open ssh OpenSSH 6.6.1p1 Ubuntu 2ubuntu2.13 (Ubuntu Linux; protocol 2.0)
80/tcp open http Apache httpd 2.4.7 ((Ubuntu))
135/tcp filtered msrpc
139/tcp filtered netbios-ssn
445/tcp filtered microsoft-ds
9929/tcp open nping-echo Nping echo
31337/tcp open tcpwrapped
Service Info: OS: Linux; CPE: cpe:/o:linux:linux_kernel
...
Вы также можете сканировать ОС, версии и запускать traceroute с помощью одной команды, используя параметр -A:
sudo nmap -A 192.168.10.121
к содержанию ↑
Вывод Nmap
По умолчанию Nmap выводит информацию на стандартный вывод (stdout).
Если вы сканируете большую сеть или нуждаетесь в информации для дальнейшего использования, вы можете сохранить результат в файл.
Nmap предоставляет несколько типов вывода. Чтобы сохранить вывод в нормальном формате, используйте параметр, за которым следует имя файла -oN:
sudo nmap -sU -p 1-1024 192.168.10.121 -oN output.txt
Самый популярный вариант — сохранить вывод в формате XML. Для этого воспользуйтесь опцией -oX:
sudo nmap -sU -p 1-1024 192.168.10.121 -oX output.xml
Еще один полезный формат — вывод grepable, который можно анализировать с помощью стандартных инструментов Unix, таких как grep, awk и cut. Вывод grepable указывается с опцией -oG:
sudo nmap -sU -p 1-1024 192.168.10.121 -oG output
к содержанию ↑
Механизм сценариев Nmap
Одна из самых мощных функций Nmap — это скриптовый движок. Nmap поставляется с сотнями скриптов , и вы также можете писать свои собственные скрипты на языке Lua.
Вы можете использовать скрипты для обнаружения вредоносных программ и бэкдоров, выполнения атак методом перебора и т.д.
Например, чтобы проверить, скомпрометирован ли данный хост, вы можете использовать:
nmap -sV --script http-malware-host scanme.nmap.org
Заключение
Nmap — это инструмент с открытым исходным кодом, который в основном используется администраторами сети для обнаружения узлов и сканирования портов.
Обратите внимание, что в некоторых странах сканирование сетей без разрешения является незаконным.
Если у вас есть вопросы или замечания, пожалуйста, оставьте комментарий ниже.