C/C++ support for Visual Studio Code is provided by a Microsoft C/C++ extension to enable cross-platform C and C++ development on Windows, Linux, and macOS.
Install the extension
- Open VS Code.
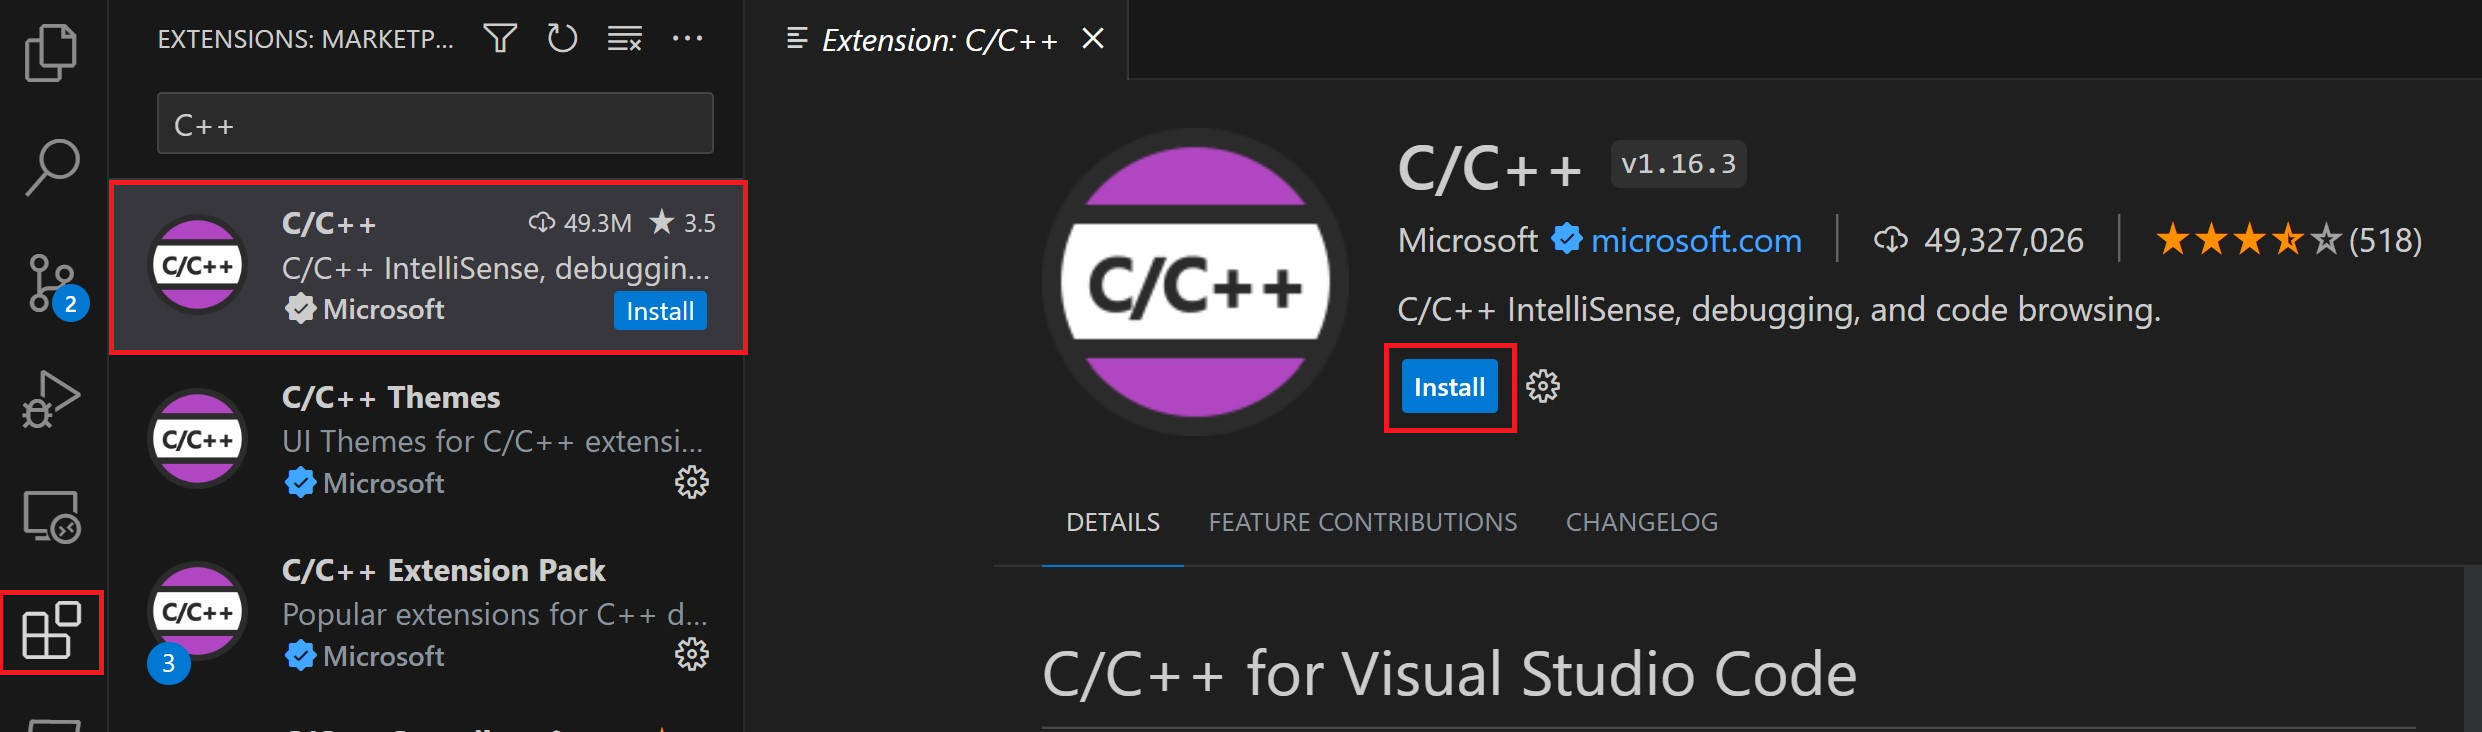
- Select the Extensions view icon on the Activity bar or use the keyboard shortcut (⇧⌘X (Windows, Linux Ctrl+Shift+X)).
- Search for
'C++'. - Select Install.

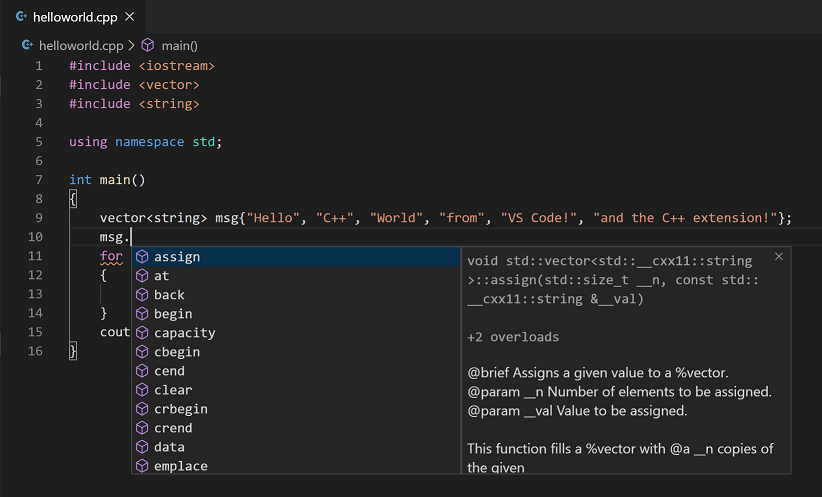
After you install the extension, when you open or create a *.cpp file, you will have syntax highlighting (colorization), smart completions and hovers (IntelliSense), and error checking.
Install a compiler
C++ is a compiled language meaning your program’s source code must be translated (compiled) before it can be run on your computer. VS Code is first and foremost an editor, and relies on command-line tools to do much of the development workflow. The C/C++ extension does not include a C++ compiler or debugger. You will need to install these tools or use those already installed on your computer.
There may already be a C++ compiler and debugger provided by your academic or work development environment. Check with your instructors or colleagues for guidance on installing the recommended C++ toolset (compiler, debugger, project system, linter).
Some platforms, such as Linux or macOS, have a C++ compiler already installed. Most Linux distributions have the GNU Compiler Collection (GCC) installed and macOS users can get the Clang tools with Xcode.
Check if you have a compiler installed
Make sure your compiler executable is in your platform path (%PATH on Windows, $PATH on Linux and macOS) so that the C/C++ extension can find it. You can check availability of your C++ tools by opening the Integrated Terminal (⌃` (Windows, Linux Ctrl+`)) in VS Code and trying to directly run the compiler.
Checking for the GCC compiler g++:
g++ --version
Checking for the Clang compiler clang:
clang --version
Note: If you would prefer a full Integrated Development Environment (IDE), with built-in compilation, debugging, and project templates (File > New Project), there are many options available, such as the Visual Studio Community edition.
If you don’t have a compiler installed, in the example below, we describe how to install the Minimalist GNU for Windows (MinGW) C++ tools (compiler and debugger). MinGW is a popular, free toolset for Windows. If you are running VS Code on another platform, you can read the C++ tutorials, which cover C++ configurations for Linux and macOS.
Example: Install MinGW-x64
We will install Mingw-w64 via MSYS2, which provides up-to-date native builds of GCC, Mingw-w64, and other helpful C++ tools and libraries. You can download the latest installer from the MSYS2 page or use this link to the installer.
Follow the Installation instructions on the MSYS2 website to install Mingw-w64. Take care to run each required Start menu and pacman command.
You will need to install the full Mingw-w64 toolchain (pacman -S --needed base-devel mingw-w64-x86_64-toolchain) to get the gdb debugger.
Add the MinGW compiler to your path
Add the path to your Mingw-w64 bin folder to the Windows PATH environment variable by using the following steps:
- In the Windows search bar, type ‘settings’ to open your Windows Settings.
- Search for Edit environment variables for your account.
- Choose the
Pathvariable in your User variables and then select Edit. - Select New and add the Mingw-w64 destination folder path, with
mingw64binappended, to the system path. The exact path depends on which version of Mingw-w64 you have installed and where you installed it. If you used the settings above to install Mingw-w64, then add this to the path:C:msys64mingw64bin. - Select OK to save the updated PATH. You will need to reopen any console windows for the new PATH location to be available.
Check your MinGW installation
To check that your Mingw-w64 tools are correctly installed and available, open a new Command Prompt and type:
gcc --version
g++ --version
gdb --version
If you don’t see the expected output or g++ or gdb is not a recognized command, make sure your PATH entry matches the Mingw-w64 binary location where the compiler tools are located.
If the compilers do not exist at that PATH entry, make sure you followed the instructions on the MSYS2 website to install Mingw-w64.
Hello World
To make sure the compiler is installed and configured correctly, we’ll create the simplest Hello World C++ program.
Create a folder called «HelloWorld» and open VS Code in that folder (code . opens VS Code in the current folder):
mkdir HelloWorld
cd HelloWorld
code .
The «code .» command opens VS Code in the current working folder, which becomes your «workspace». Accept the Workspace Trust dialog by selecting Yes, I trust the authors since this is a folder you created.
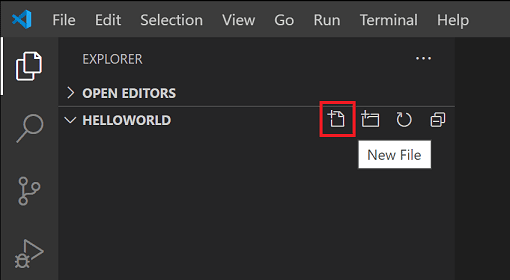
Now create a new file called helloworld.cpp with the New File button in the File Explorer or File > New File command.
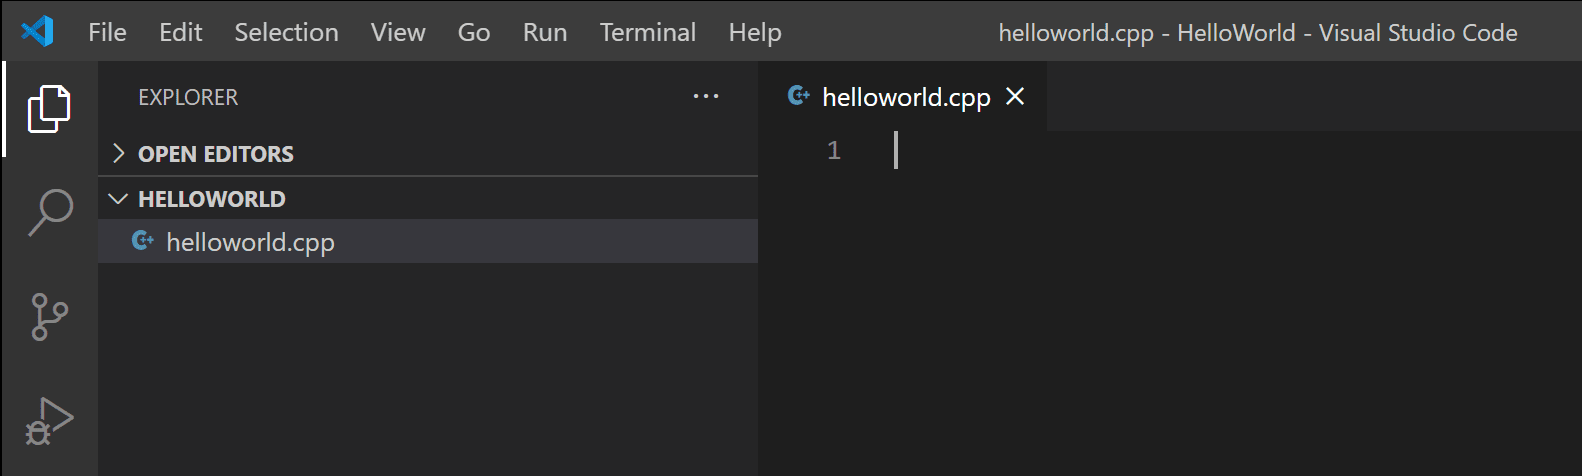
Add Hello World source code
Now paste in this source code:
#include <iostream>

int main()
{
    std::cout << "Hello World" << std::endl;
}
Now press ⌘S (Windows, Linux Ctrl+S) to save the file. You can also enable Auto Save to automatically save your file changes, by checking Auto Save in the main File menu.
Build Hello World
Now that we have a simple C++ program, let’s build it. Select the Terminal > Run Build Task command (⇧⌘B (Windows, Linux Ctrl+Shift+B)) from the main menu.
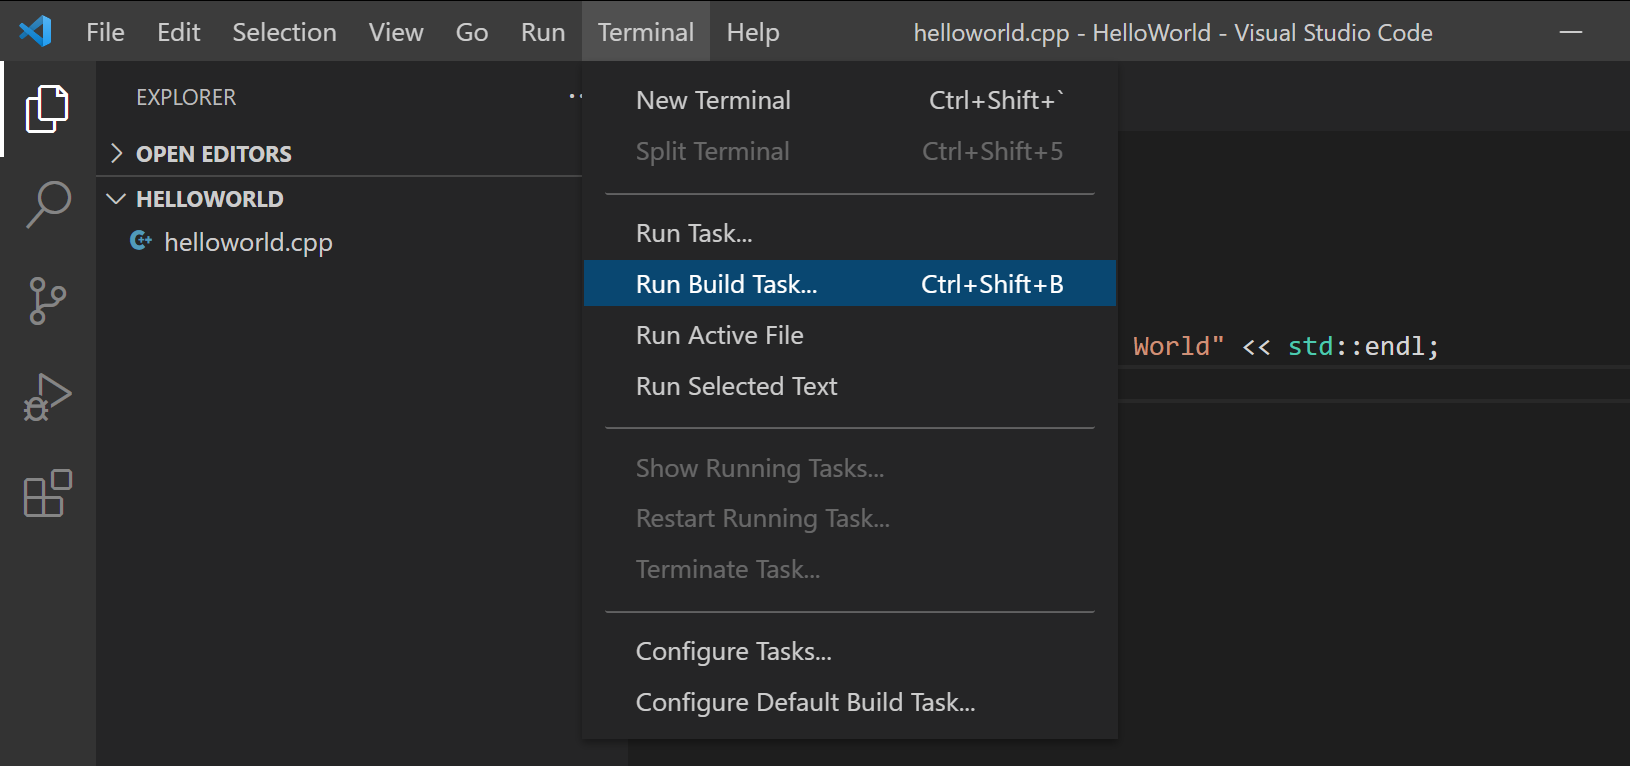
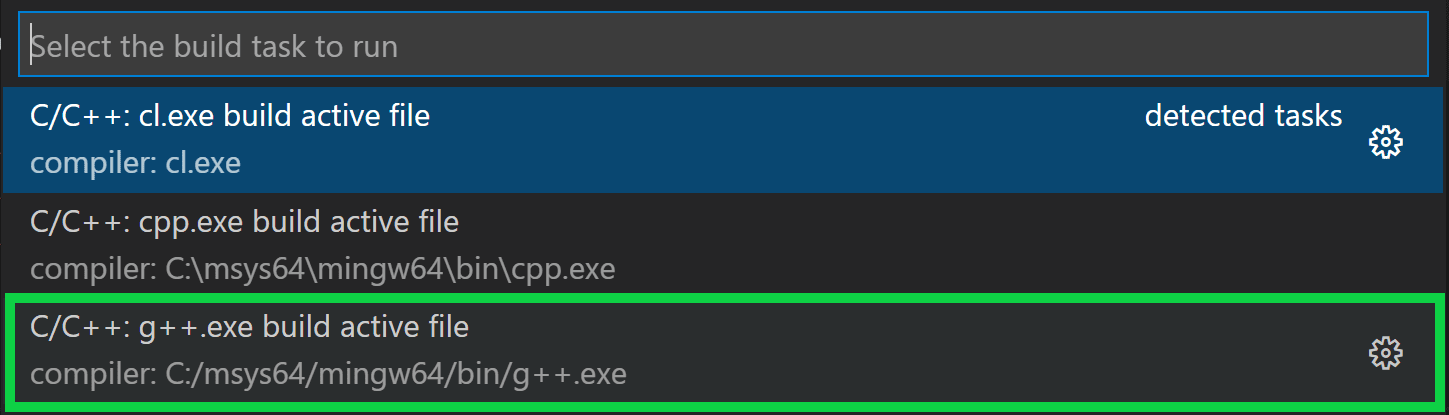
This will display a dropdown with various compiler task options. If you are using a GCC toolset like MinGW, you would choose C/C++: g++.exe build active file.
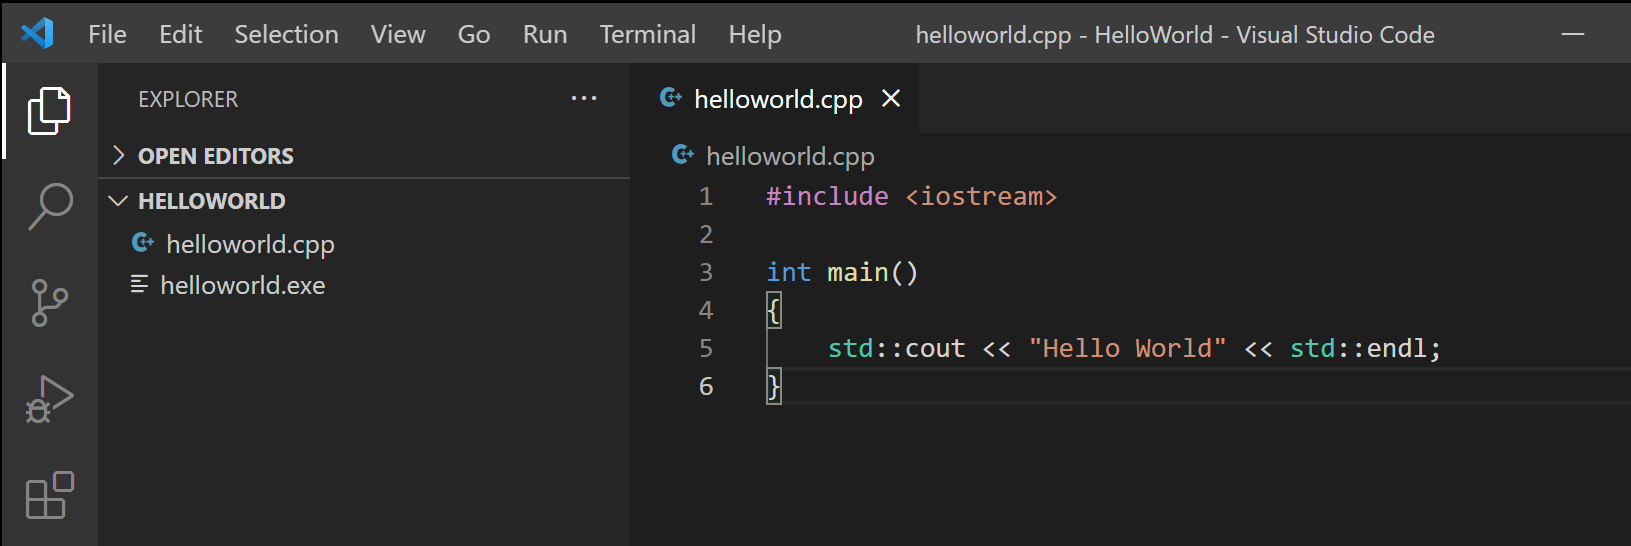
This will compile helloworld.cpp and create an executable file called helloworld.exe, which will appear in the File Explorer.
Run Hello World
From a command prompt or a new VS Code Integrated Terminal, you can now run your program by typing «.helloworld».

If everything is set up correctly, you should see the output «Hello World».
This has been a very simple example to help you get started with C++ development in VS Code. The next step is to try one of the tutorials listed below on your platform (Windows, Linux, or macOS) with your preferred toolset (GCC, Clang, Microsoft C++) and learn more about the Microsoft C/C++ extension’s language features such as IntelliSense, code navigation, build configuration, and debugging.
Tutorials
Get started with C++ and VS Code with tutorials for your environment:
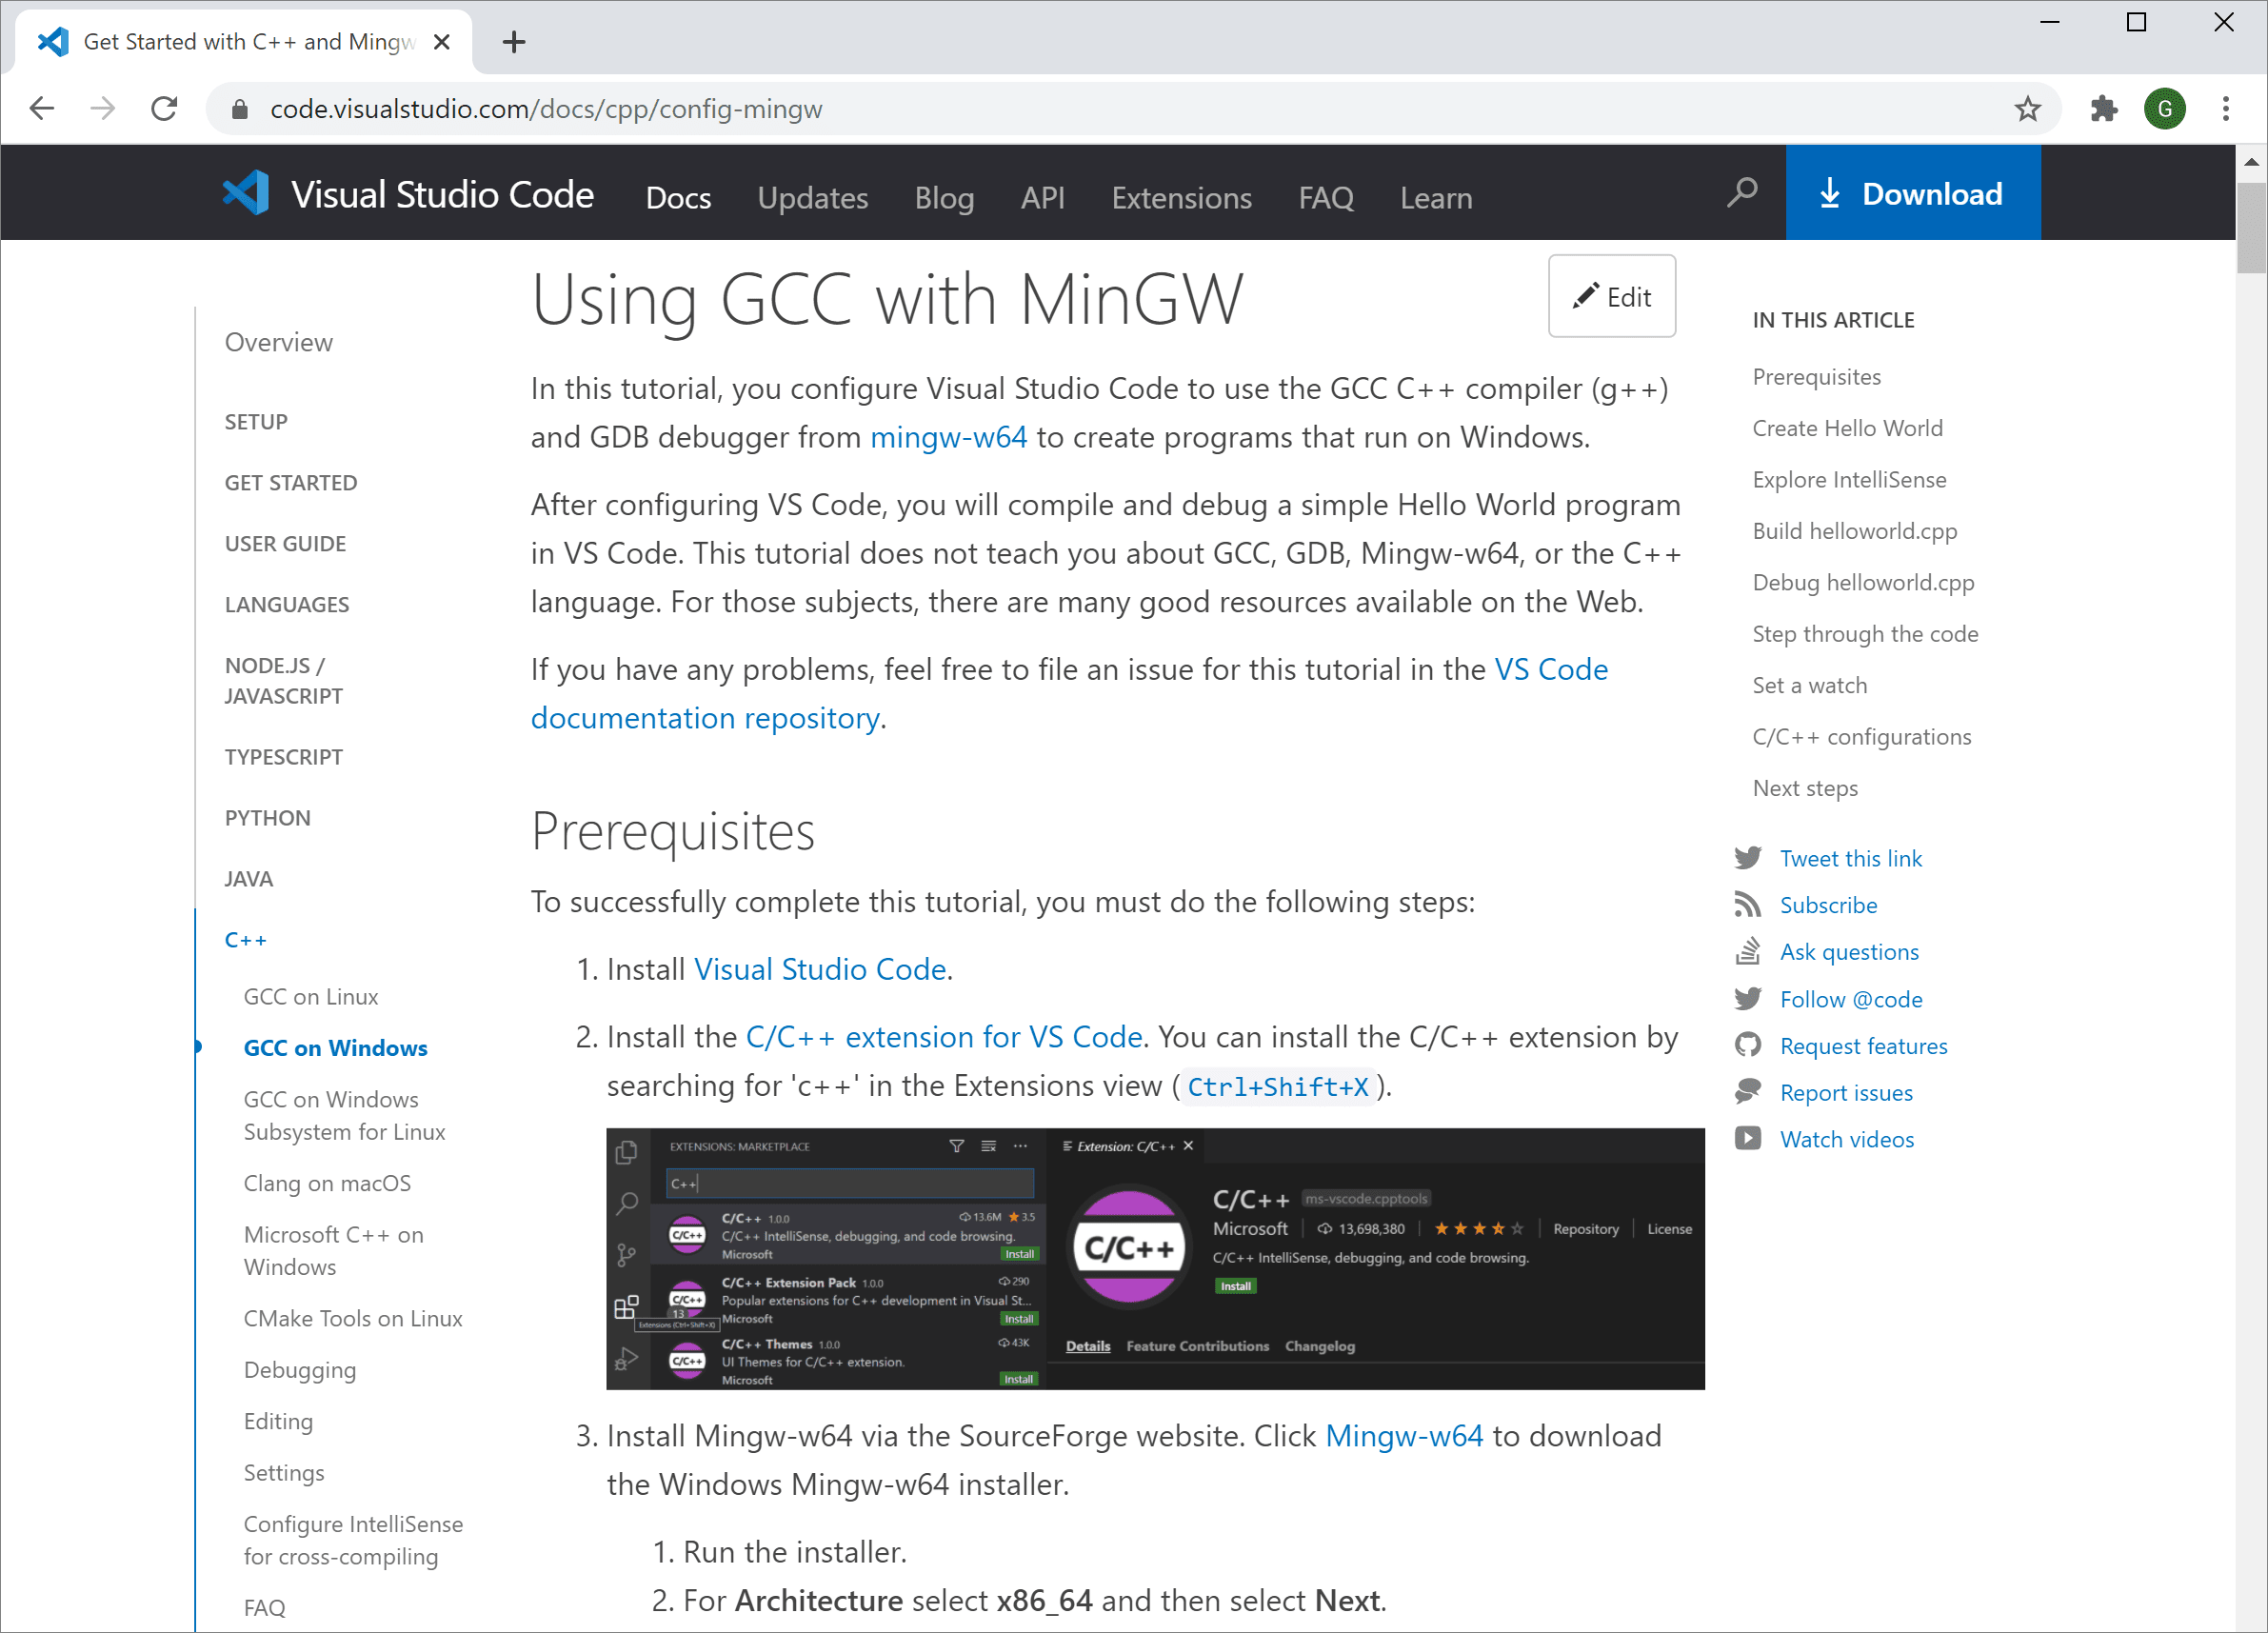
- GCC on Windows via MinGW
- Microsoft C++ on Windows
- GCC on Linux
- GCC on Windows Subsystem For Linux
- Clang/LLVM on macOS
- CMake Tools on Linux
Documentation
You can find more documentation on using the Microsoft C/C++ extension under the C++ section of the VS Code website, where you’ll find topics on:
- Debugging
- Editing
- Settings
- FAQ
Remote Development
VS Code and the C++ extension support Remote Development allowing you to work over SSH on a remote machine or VM, inside a Docker container, or in the Windows Subsystem for Linux (WSL).
To install support for Remote Development:
- Install the VS Code Remote Development Extension Pack.
- If the remote source files are hosted in WSL, use the WSL extension.
- If you are connecting to a remote machine with SSH, use the Remote — SSH extension.
- If the remote source files are hosted in a container (for example, Docker), use the Dev Containers extension.
Enhance completions with AI
GitHub Copilot is an AI-powered code completion tool that helps you write code faster and smarter. You can use the GitHub Copilot extension in VS Code to generate code, or to learn from the code it generates.

GitHub Copilot provides suggestions for numerous languages and a wide variety of frameworks, and it works especially well for Python, JavaScript, TypeScript, Ruby, Go, C# and C++.
You can learn more about how to get started with Copilot in the Copilot documentation.
Feedback
If you run into any issues or have suggestions for the Microsoft C/C++ extension, please file issues and suggestions on GitHub. If you haven’t already provided feedback, please take this quick survey to help shape this extension for your needs.
1/21/2022
Working with C#
The C# support in Visual Studio Code is optimized for cross-platform .NET development (see working with .NET and VS Code for another relevant article). Our focus with VS Code is to be a great editor for cross-platform C# development.

VS Code supports debugging of C# applications running on either .NET or Mono.
For detailed instructions on:
- .NET debugging — see the Microsoft C# extension’s GitHub page.
- Mono debugging — see the Mono Debug extension’s README.
Note: VS Code has limited support for debugging applications running on the Desktop .NET Framework.
Due to this focus, many standard C# project types are not recognized by VS Code. An example of a non-supported project type is an ASP.NET MVC Application (though ASP.NET Core is supported). In these cases, if you want to have a lightweight tool to edit a file — VS Code has you covered. If you want the best possible experience for those projects and development on Windows in general, we recommend you use Visual Studio Community.
Installing C# support
C# language support is an optional install from the Marketplace. You can install it from within VS Code by searching for ‘C#’ in the Extensions view (⇧⌘X (Windows, Linux Ctrl+Shift+X)) or if you already have a project with C# files, VS Code will prompt you to install the extension as soon as you open a C# file.
Roslyn and OmniSharp
Visual Studio Code uses the power of Roslyn and OmniSharp to offer an enhanced C# experience. We offer support for:
- .NET projects
- MSBuild projects
- C# scripts (CSX)
On startup the best matching projects are loaded automatically but you can also choose your projects manually. The status bar will show what projects have been loaded and also allows you to select a different set of projects. To do so, click on the status bar projects item and select Change projects…. In the image below a single project has been picked up:

The available options include:
- Selecting a
project.jsonfile will open a .NET project and VS Code will load that project plus the referenced projects. - Selecting a
*.slnfile opens a MSBuild-project. It will load the referenced*.csprojprojects and sibling or descendantproject.jsonfiles but no other project files that are referenced from the solution file. - Selecting a
folderwill make VS Code scan for*.sln,project.jsonand*.csxfiles (C# scripts) and VS Code will attempt to load them all.
Once the project is loaded the enhanced experiences light up…
Editing Evolved
There is a lot to discover with C# and the editor, such as format on type, IntelliSense, the rename-refactoring, etc.

For a full description of our editing features, go to the Basic Editing and Code Navigation documentation.
Here are a few highlights…
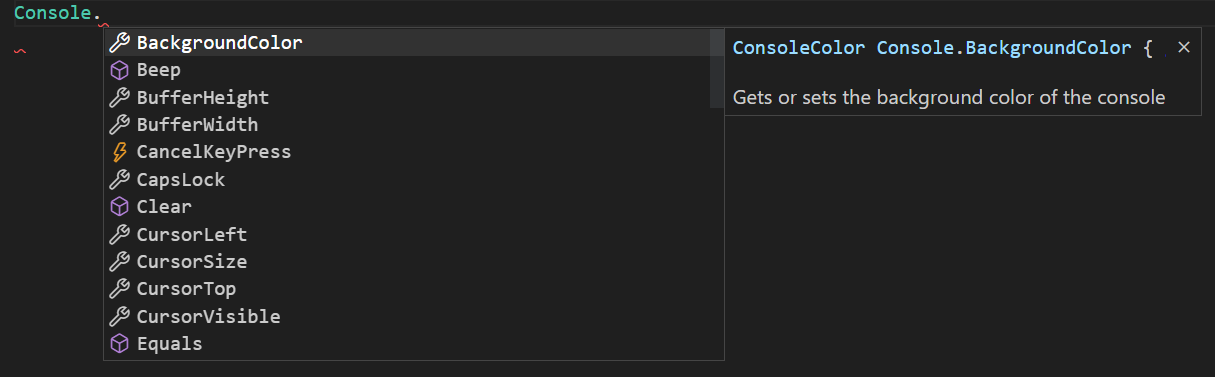
IntelliSense
IntelliSense just works: hit ⌃Space (Windows, Linux Ctrl+Space) at any time to get context specific suggestions.
Enhance completions with AI
GitHub Copilot is an AI-powered code completion tool that helps you write code faster and smarter. You can use the GitHub Copilot extension in VS Code to generate code, or to learn from the code it generates.

GitHub Copilot provides suggestions for numerous languages and a wide variety of frameworks, and it works especially well for Python, JavaScript, TypeScript, Ruby, Go, C# and C++.
You can learn more about how to get started with Copilot in the Copilot documentation.
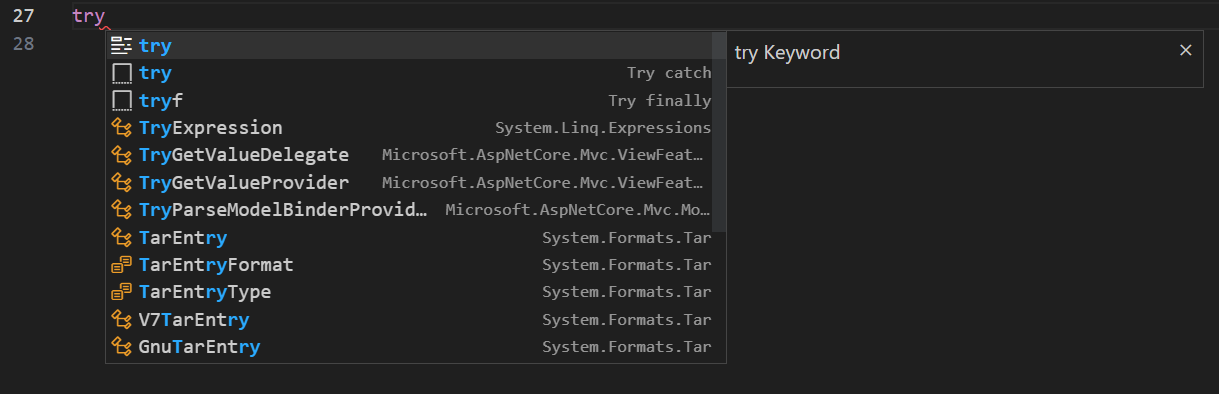
Snippets for C#
We have several built-in snippets included in VS Code that will come up as you type or you can press ⌃Space (Windows, Linux Ctrl+Space) (Trigger Suggest) and we will give you a context specific list of suggestions.
Tip: You can add in your own User Defined Snippets for C#. Take a look at User Defined Snippets to find out how.
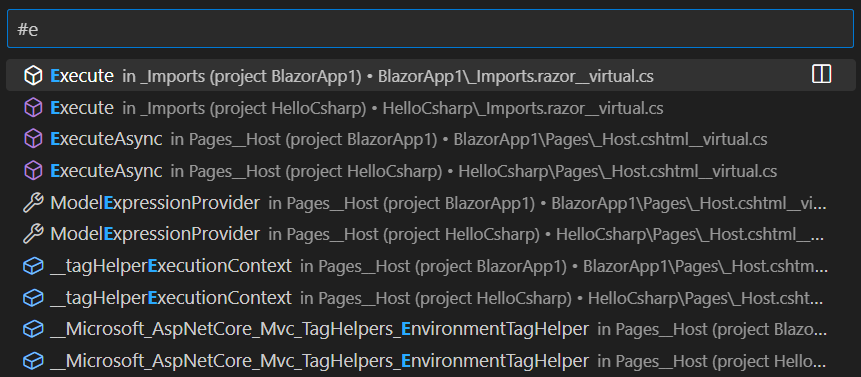
Search for Symbols
There are also features outside the editor. One is the ability to search for symbols from wherever you are. Hit ⌘T (Windows, Linux Ctrl+T), start typing, and see a list of matching C# symbols. Select one and you’ll be taken straight to its code location.
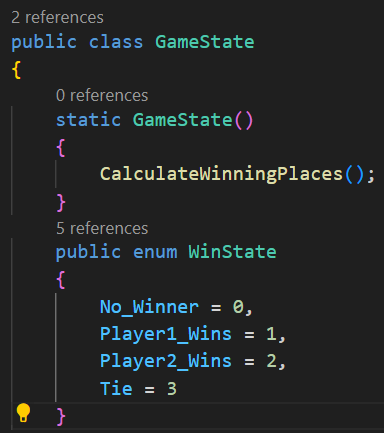
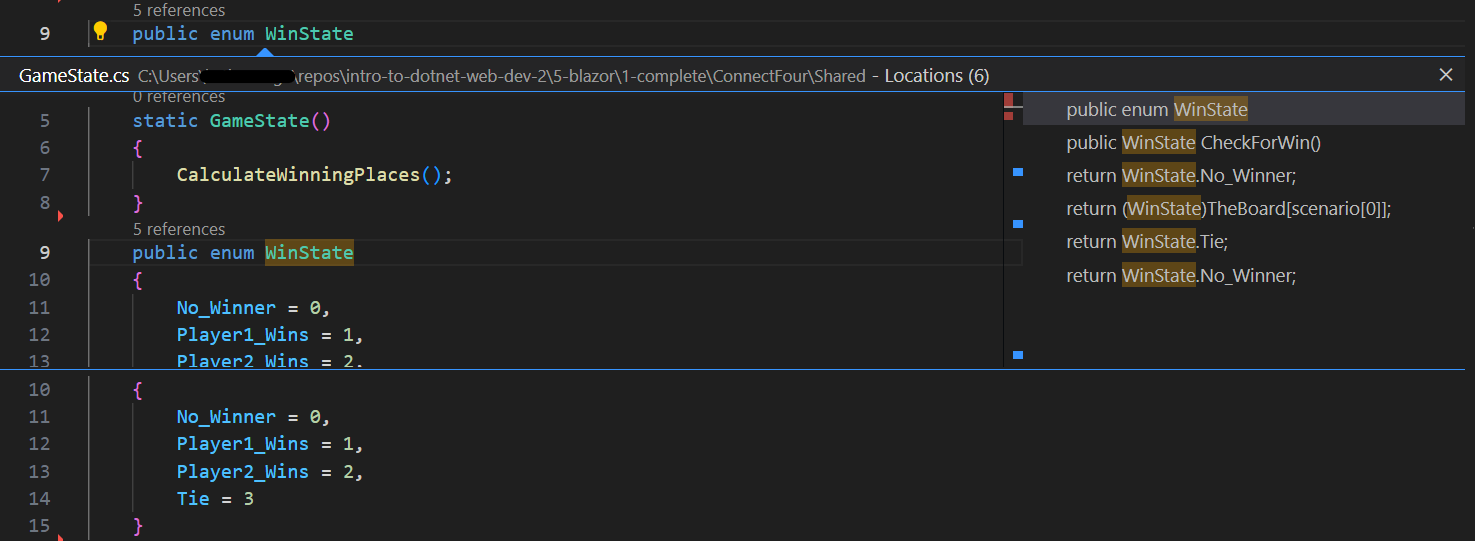
CodeLens
Another cool feature is the ability to see the number of references to a method directly above the method. Click on the reference info to see the references in the Peek view. This reference information updates as you type.
Note: Methods defined in
object, such asequalsandhashCodedo not get reference information due to performance reasons.
Tip: You can turn off references information displayed in CodeLens with the
editor.codeLenssetting.
Find References/Peek Definition
You can click on the references of an object to find the locations of its use in place without losing context. This same experience works in reverse where you can Peek the definition of an object and see it inline without leaving your location.
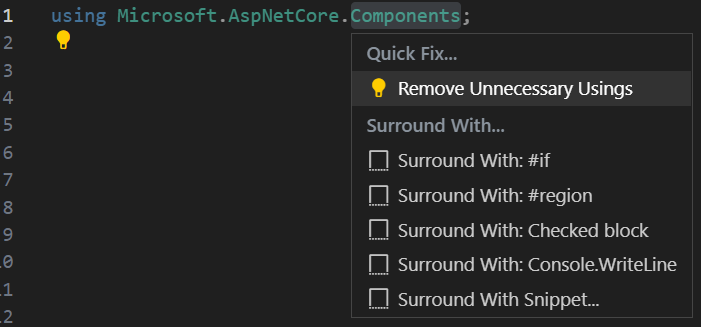
Quick Fixes / Suggestions
There are some basic quick fixes supported in VS Code. You will see a lightbulb and clicking on it, or pressing ⌘. (Windows, Linux Ctrl+.) provides you with a simple list of fixes/suggestions.
Next steps
Read on to find out about:
- .NET Development — get up and running with cross-platform .NET
- Basic Editing — Learn about the powerful VS Code editor.
- Tasks — Use tasks to build your project and more.
- Debugging — Find out how to use the debugger with your project.
- Unity development — Learn about using VS Code with your Unity projects.
Common questions
My Project won’t load
VS Code only supports a limited set of project types. For full .NET project support, we suggest you use Visual Studio Community.
IntelliSense is not working
This is typically as a result of the current project type not being supported. You can see an indication in the OmniSharp flame in the bottom left hand side of the status bar.
How do I build/run my project?
VS Code supports tasks for build and natively understand the output of MSBuild, CSC, XBuild. Find out more in the Tasks documentation.
I’m missing required assets to build and debug C# in VS Code. My debugger says «No Configuration»
The Visual Studio Code C# extension can generate the assets you need to build and debug. If you missed the prompt when you first opened a new C# project, you can still perform this operation through the Command Palette (View > Command Palette ⇧⌘P (Windows, Linux Ctrl+Shift+P)) by typing ‘.NET’, and running .NET: Generate Assets for Build and Debug. This command will generate the necessary launch.json and tasks.json configuration files (under the .vscode folder).
7/16/2018
Working with C#
The C# support in Visual Studio Code is optimized for cross-platform .NET development (see working with .NET and VS Code for another relevant article). Our focus with VS Code is to be a great editor for cross-platform C# development.
VS Code supports debugging of C# applications running on either .NET or Mono.
For detailed instructions on:
- .NET debugging — see the Microsoft C# extension’s GitHub page.
- Mono debugging — see the Mono Debug extension’s README.
Note: VS Code has limited support for debugging applications running on the Desktop .NET Framework.
Due to this focus, many standard C# project types are not recognized by VS Code. An example of a non-supported project type is an ASP.NET MVC Application (though ASP.NET Core is supported). In these cases, if you want to have a lightweight tool to edit a file — VS Code has you covered. If you want the best possible experience for those projects and development on Windows in general, we recommend you use Visual Studio Community.
Installing C# support
C# language support is an optional install from the Marketplace. You can install it from within VS Code by searching for ‘C#’ in the Extensions view (⇧⌘X (Windows, Linux Ctrl+Shift+X)) or if you already have a project with C# files, VS Code will prompt you to install the extension as soon as you open a C# file.
Roslyn and OmniSharp
Visual Studio Code uses the power of Roslyn and OmniSharp to offer an enhanced C# experience. We offer support for:
- .NET projects
- MSBuild projects
- C# scripts (CSX)
On startup the best matching projects are loaded automatically but you can also choose your projects manually. The status bar will show what projects have been loaded and also allows you to select a different set of projects. To do so, click on the status bar projects item and select Change projects…. In the image below a single project has been picked up:
The available options include:
- Selecting a
project.jsonfile will open a .NET project and VS Code will load that project plus the referenced projects. - Selecting a
*.slnfile opens a MSBuild-project. It will load the referenced*.csprojprojects and sibling or descendantproject.jsonfiles but no other project files that are referenced from the solution file. - Selecting a
folderwill make VS Code scan for*.sln,project.jsonand*.csxfiles (C# scripts) and VS Code will attempt to load them all.
Once the project is loaded the enhanced experiences light up…
Editing Evolved
There is a lot to discover with C# and the editor, such as format on type, IntelliSense, the rename-refactoring, etc.
For a full description of our editing features, go to the Basic Editing and Code Navigation documentation.
Here are a few highlights…
IntelliSense
IntelliSense just works: hit ⌃Space (Windows, Linux Ctrl+Space) at any time to get context specific suggestions.
Enhance completions with AI
GitHub Copilot is an AI-powered code completion tool that helps you write code faster and smarter. You can use the GitHub Copilot extension in VS Code to generate code, or to learn from the code it generates.
GitHub Copilot provides suggestions for numerous languages and a wide variety of frameworks, and it works especially well for Python, JavaScript, TypeScript, Ruby, Go, C# and C++.
You can learn more about how to get started with Copilot in the Copilot documentation.
Snippets for C#
We have several built-in snippets included in VS Code that will come up as you type or you can press ⌃Space (Windows, Linux Ctrl+Space) (Trigger Suggest) and we will give you a context specific list of suggestions.
Tip: You can add in your own User Defined Snippets for C#. Take a look at User Defined Snippets to find out how.
Search for Symbols
There are also features outside the editor. One is the ability to search for symbols from wherever you are. Hit ⌘T (Windows, Linux Ctrl+T), start typing, and see a list of matching C# symbols. Select one and you’ll be taken straight to its code location.
CodeLens
Another cool feature is the ability to see the number of references to a method directly above the method. Click on the reference info to see the references in the Peek view. This reference information updates as you type.
Note: Methods defined in
object, such asequalsandhashCodedo not get reference information due to performance reasons.
Tip: You can turn off references information displayed in CodeLens with the
editor.codeLenssetting.
Find References/Peek Definition
You can click on the references of an object to find the locations of its use in place without losing context. This same experience works in reverse where you can Peek the definition of an object and see it inline without leaving your location.
Quick Fixes / Suggestions
There are some basic quick fixes supported in VS Code. You will see a lightbulb and clicking on it, or pressing ⌘. (Windows, Linux Ctrl+.) provides you with a simple list of fixes/suggestions.
Next steps
Read on to find out about:
- .NET Development — get up and running with cross-platform .NET
- Basic Editing — Learn about the powerful VS Code editor.
- Tasks — Use tasks to build your project and more.
- Debugging — Find out how to use the debugger with your project.
- Unity development — Learn about using VS Code with your Unity projects.
Common questions
My Project won’t load
VS Code only supports a limited set of project types. For full .NET project support, we suggest you use Visual Studio Community.
IntelliSense is not working
This is typically as a result of the current project type not being supported. You can see an indication in the OmniSharp flame in the bottom left hand side of the status bar.
How do I build/run my project?
VS Code supports tasks for build and natively understand the output of MSBuild, CSC, XBuild. Find out more in the Tasks documentation.
I’m missing required assets to build and debug C# in VS Code. My debugger says «No Configuration»
The Visual Studio Code C# extension can generate the assets you need to build and debug. If you missed the prompt when you first opened a new C# project, you can still perform this operation through the Command Palette (View > Command Palette ⇧⌘P (Windows, Linux Ctrl+Shift+P)) by typing ‘.NET’, and running .NET: Generate Assets for Build and Debug. This command will generate the necessary launch.json and tasks.json configuration files (under the .vscode folder).
7/16/2018
![]()
Narottam04
Posted on Jun 2, 2021
• Updated on Aug 5, 2021
Why should you use visual studio code ?
Visual Studio Code is a free source-code editor made by Microsoft for Windows, Linux and macOS. Features include support for debugging, syntax highlighting, intelligent code completion, snippets, code refactoring, and embedded Git.
It currently supports hundreds of programming languages and file formats. Several common languages come supported by default (JavaScript, HTML, CSS, etc), and others gain support by adding integrated extensions. If you find a language that isn’t supported by an existing extension, the open nature of the extensions system means you can build one.
In this blog post you will learn how to set up visual studio code on your local environment for C and C++, this can get tricky but if you follow step by step you can set it up easily.
Step 1: Download Visual studio code.
Type vscode on your browser and click on the first link of the page, or just click here.


Now download the installer according to your operating system.
Step 2: Install vscode
This step is easy, accept the agreement and click next.

Check the following options as shown in above image and click next and install.
Step 3: Download extensions for visual studio code.

Once you have installed visual studio code, now its time to install some extensions. Click on the button where red arrow is pointing in above image.
Now click on C/C++ extension from Microsoft as shown in the below image. If you don’t see the extension search C/C++ and you will find it.

Install the extension.

Now we have to install another extension called Code Runner.

Now we have successfully installed code editor but we need a compiler to compile and output our code, for that we will be installing MinGW.
Step 4: Download MinGW
Type mingw on google and choose following first link as shown in the image below or Click Here.

Now click download.

Step 5: Install MinGW
Open the installer, you should see something like the below image. Click on install and choose your directory where the software should be installed and click continue.


After installing, click on continue and right click on every checkbox and choose mark for installation.

After checking all checkboxes you should see something like image below.

Now click Installation on top left corner and then choose Apply Changes. You should see something like shown in the image below.

And then click on Apply.
Once you complete the installation, you should see something like the image below.

Click close and close the installer.
Step 6: Copy Bin Path
Now open ‘This PC’ and open ‘local Disk C’ you should see mingw file and click on bin folder.

Now you have to copy the folder destination which is above the page as shown below.

Now right click and copy or just press ‘Ctrl + C’ on your keyboard.
Step 7: Environment Variables
Open ‘Control Panel’ from your start menu and click on System. If you don’t find system on your control panel just type ‘system’ on the search bar which you can find in top right corner of the control panel.

Click on Advanced system setting on right side you should see system properties as shown in the image below.

Now click on Environment Variables you should see something as shown in the image below.

Now click on the path in system variable and click on edit as shown in the image below.

Now click on new and paste the bin path that we have copied in the previous step and then click Ok.

Now click ok till there are no pop ups left.
Step 8: Let’s check if MinGW has been successfully installed or not.
Click on search button near the bottom left of windows and search for command prompt.

g++ --version
Enter fullscreen mode
Exit fullscreen mode

And if you see something like the image above, voila! we did it.
🛑 🛑 If you get some error don’t worry just reinstall mingw as shown in the step 4 and step 5 and it should solve the problem.🛑🛑
Step 8: Let’s write our first program in C++
Hurray! we have successfully set up vscode for C and C++ now lets test it by writing our first program in vscode.
Open vscode.
Click on ‘File’ in upper left section and choose ‘Open Folder’.
Lets make a new folder in dekstop and select the folder.

Now click on the document symbol in the side bar. If you dont see a sidebar just press Ctrl + B on keyboard.
Now make a file with a extension of .cpp as shown in the image below

Now lets type our first code. You can copy and paste the code that I have provided below.

#include<iostream>
using namespace std;
int main()
{
    cout<<"hello world";
}
Enter fullscreen mode
Exit fullscreen mode
Step 9: Run the code.
Right click and click on run or press keyboard shortcut ‘Ctrl+Alt+N’.

And there you go you have written your first program in C++, I hope this tutorial was helpful if you are facing any problem while installing let me know in the comment section or email me at blog.webdrip.in.

Get more insights like this on my blog, https://blog.webdrip.in.
Для разработки программ на языке c++ вы можете использовать среду разработки Visual Studio Code (VSCode).
Сегодня мы рассмотрим установку поддержки языка программирования с++ в этой IDE.
Выбор компилятора
Перед установкой расширения для поддержки с++ в VSCode нам нужно сначала определиться какой компилятор использовать.
Под Windows существует несколько возможностей:
- Вы можете использовать Windows Subsystem for Linux (WSL) и установив в виртуальной машине все необходимые пакеты компилировать программы с помощью специального расширения для VSCode.
- Вы можете установить MinGW или MSYS2 и использовать их компиляторы.
- Вы можете установить компилятор Microsoft C++ compiler (MSVC)
Сегодня мы рассмотрим самый простой способ – установку Microsoft C++ compiler (MSVC).
Установка Microsoft C++ compiler (MSVC)
Для начала скачаем установщик по ссылке:
https://visualstudio.microsoft.com/ru/thank-you-downloading-visual-studio/?sku=Community&rel=16
Скачиваем файл, в моем случае он называется:
vs_community__1376158839.1570258497.exeЗапускаем, откроется окно:

Нажимаем «Продолжить» и ждем, пока не закончиться скачивание файлов:

После этого откроется окно:

Поставьте галочку рядом с Разработка классических приложений на C++

К сожалению, нет способа не ставить саму IDE.
Снимите галочки с:
- Live Share
- С++ AddressSanitizer
- Адаптер тестов для Boost.Test
- Адаптер тестов для Google Test
Нажмите установить:

Ожидайте окончания установки.
После окончания загрузок перезагрузите ваш ПК
Проверка доступности компилятора
После перезагрузки проверим доступен ли компилятор, для этого запустите cmd.exe скопируйте и вставьте в консоль строку
%comspec% /k "C:Program Files (x86)Microsoft Visual Studio2019CommunityCommon7ToolsVsDevCmd.bat"Будет запущена консоль разработчика:
**********************************************************************
** Visual Studio 2019 Developer Command Prompt v16.8.6
** Copyright (c) 2020 Microsoft Corporation
**********************************************************************
Введите
clРезультат:
**********************************************************************
** Visual Studio 2019 Developer Command Prompt v16.8.6
** Copyright (c) 2020 Microsoft Corporation
**********************************************************************

C:Usersuser >cl
Оптимизирующий компилятор Microsoft (R) C/C++ версии 19.28.29337 для x86
(C) Корпорация Майкрософт (Microsoft Corporation).  Все права защищены.

использование: cl [ параметр... ] имя_файла... [ /link параметр_компоновки... ]

C:Usersuser >
Компилятор успешно установлен и доступен.
Теперь пришло время установить расширение для поддержки с++ в VSCode.
Запустите VSCode
Нажмите
Ctrl+Shift+XОткроется панель Extensions: Marketplace – это каталог, из которого мы можем скачать все необходимые расширения и темы, достаточно знать их название.

Введите
C++
Выберите указанный пункт и нажмите install

Будет начато скачивание дополнительных компонентов. После окончания загрузок расширение будет готово к использованию.
Закройте VSCode
Настройка VSCode для использования компилятора MSVC
Для того, чтобы протестировать работу компилятора создадим тестовый проект.
Для нормального функционирования компилятора MSVC нужно установить несколько переменных окружения. Чтобы упростить задачу воспользуемся Visual Studio 2019 Developer Command Prompt.
Запустите его из меню Пуск введя слово developer, откроется консоль:

Допустим, наши проекты буду находится в папке d:cpp
Создадим данную папку и перейдем в нее:
d:
mkdir d:cpp
cd cpp
Вывод:
**********************************************************************
** Visual Studio 2019 Developer Command Prompt v16.8.6
** Copyright (c) 2020 Microsoft Corporation
**********************************************************************

C:Program Files (x86)Microsoft Visual Studio2019Community>d:
D:>mkdir d:cpp
D:>cd cpp
D:cpp>
Создадим папку для проекта test
mkdir testЗапустим VSCode из этой папки
code .Откроется окно VSCode

Обратите внимание наша папка уже открыта.
Добавим новый файл для этого нажмите на кнопку:

В появившееся поле введите имя файла main.cpp
Введите текст программы и не забудьте сохранить результат:
#include <iostream>

using namespace std;

int main()
{
    cout << "This is a test!n";
}
Настройка компилятора для проекта
Теперь у нас есть программа, осталось её скомпилировать, давайте настроим задачу сборки для проекта.
Настройка задачи сборки (Build Task)
Выберите пункт меню Terminal –> Configure Default Build Task…

В окне выберите – cl.exe
Будет создан файл сборки:

Закройте вкладку с файлом tasks.json
Откройте файл main.cpp и нажмите
Ctrl+Shit+B

Сборка успешно завершена.
Щёлкните мышкой по терминалу и нажмите пробел, чтобы закрыть результаты сборки.
Введите main.exe и нажмите Enter

Поздравляю, мы успешно настроили среду разработки VSCode для работы с языком программирования C++.
Заключение
Сегодня мы добавили поддержку языка программирования C++ в среду разработки VSCode.
Нами был установлен компилятор Microsoft C++ compiler (MSVC) и проверена его работоспособность.
Мы добавили тестовый проект и настроили задачу сборки Build Task для нашего проекта.
Запустили полученный .exe файл.
Уважаемый usernameusername,
примерно год назад я точно так же не мог с первого раза настроить VS Code.
Как справедливо указали в комментариях — есть прекрасная официальная документация по настройке. Тем не менее, я оставлю свой ответ, так как он более детальный в некоторых моментах. А в других моментах — менее детальный 
Чтобы настроить VSC, хорошо бы научиться компилировать и запускать Вашу программу из командной строки. А потом настройки, котрые для этого понадобились, добавить в правильные места в файлах конфигурации VS code.
Труднность этого процесса именно в «зоопарке» разных возможностей. На этого не стоит пугаться.
Кроме того, настройка немного отличатся для разных систем (Linux, windows, macos), а Вы не указали, какая система у вас.
Я приведу пример настройки для компилятора gcc под Win64. Можно повторить мои шаги, а когда получится — сделать самостотельную настройку, например, на другой компилятор.
-
Устанавливаем msys2. Я установил его в
C:Programsmsys64. При этом сам msys2 позаботился о том, чтобы путь к его директорииC:Programsmsys64mingw64binоказался в path. Проверить это можно, выполнив в консоли командуpath -
Устанавливаем компилятор и дебаггер. Я делаю это с помощью пакета msys2, выполнив в окне, котрое открывает msys2, следующие команды:
pacman -SyuuЭта команда обновляет msys2. Она может закрыть консоль — это нормально, нужно перезапустить ее и ввести ту же команду, чтобы завершить обновление. Хорошей идеей будет время от времени обновляться, чтобы всегда иметь последнюю версию компилятора.
Затем:
 pacman -S mingw-w64-x86_64-gcc
 pacman -S mingw-w64-x86_64-gdb
Теперь в Вашей системе есть компилятор и дебаггер. Проверить это просто: открываем новое окно консоли, пишем g++ --version
Если ответом не является версия — надо поискать, что пошло не так. Проверить path, возможно, отредактировать его вручную.
Такую же проверку хорошо бы сделат для дебаггера: gdb --version
-
Пишем hello world. Это позволит нам окончательно убедиться, что компилятор работает. в любой директории созадем файл hello.cpp с текстом
 #include <iostream>
 int main() {
     std::cout << "Hello world!" << std::endl;
     return 0;
 };
потом в этой папке в командной строке компилируем командой g++ hello.cpp -o hello.exe
Если появился файл hello.exe, и он запускается и вывоит строчку — ок, этот шаг завершен.
-
А вот теперь можно поставить VSC. Обратите внимание, что редакций есть несколько, во первых для 32 и 64 битных систем, а во вторых — то, что назывется «User Installer» и «System Installer». Выбираем 64 битный System Installer на странице загрузки
-
В VSC ставим расширение для работы с C++, оно называется
C/C++ for Visual Studio Codeи написано Microsoft -
Теперь запустим VSC в папке Вашего проекта. Пусть это будет папка
C:Projects. Делается это так: запускам консоль. Переходим в консоли в папку (cd C:Projects). Запускаем VSC командойcode ..
Важно то, что при этом создаётся папка настроек VSC, котрые находятся по пути C:Projects.vscode. В этой папке нужно создать 4 файла, я приведу их в минимальном варианте. Пути — для моей системы, где msys2 установлен в C:Programsmsys64.
Файл tasks.json — отвечает за то, чтобы работала комбинация клавиш Ctrl+shift+B для сборки программы:
    {
        "version": "2.0.0",
        "tasks": [
            {
                "type": "shell",
                "label": "g++.exe build active file",
                "command": "C:/Programs/msys64/mingw64/bin/g++.exe",
                "args": [
                    "-std=c++17",
                    "-g",
                    "${file}",
                    "-o",
                    "${fileDirname}\${fileBasenameNoExtension}.exe"
                ],
                "options": {
                    "cwd": "C:\Programs\msys64\mingw64\bin"
                },
                "problemMatcher": [
                    "$gcc"
                ],
                "group": {
                    "kind": "build",
                    "isDefault": true
                }

            }
        ]
    }
Файл launch.json — отвечает за работу дебаггера:
    {
        "version": "0.2.0",
        "configurations": [
            {
                "name": "g++.exe build and debug active file",
                "type": "cppdbg",
                "request": "launch",
                "program": "${fileDirname}\${fileBasenameNoExtension}.exe",
                "args": [],
                "stopAtEntry": false,
                "cwd": "${workspaceFolder}",
                "environment": [],
                "externalConsole": false,
                "MIMode": "gdb",
                "miDebuggerPath": "C:\Programs\msys64\mingw64\bin\gdb.exe",
                "setupCommands": [
                    {
                        "description": "Enable pretty-printing for gdb",
                        "text": "-enable-pretty-printing",
                        "ignoreFailures": true
                    }
                ],
                "preLaunchTask": "g++.exe build active file",
                "internalConsoleOptions": "neverOpen"
            }
        ]
    }
Файл settings.json — как то отвечает за файловые ассоциации, возможно даже, что он не особо нужен. Но лишним не будет:
    {
        "files.associations": {
            "ostream": "cpp",
            "iostream": "cpp",
            "iomanip": "cpp",
            "chrono": "cpp",
            "iosfwd": "cpp",
            "thread": "cpp",
            "array": "cpp",
            "string_view": "cpp",
            "initializer_list": "cpp",
            "utility": "cpp",
            "valarray": "cpp",
            "optional": "cpp",
            "sstream": "cpp"
        }
    }
Файл c_cpp_properties.json — отвечает за расположение include — файлов:
    {
        "configurations": [
            {
                "name": "Win32",
                "includePath": [
                    "${workspaceFolder}/**",
                    "C:/Programs/msys64/mingw64/include/**"
                ],
                "defines": [
                    "_DEBUG",
                    "UNICODE",
                    "_UNICODE"
                ],
                "windowsSdkVersion": "8.1",
                "compilerPath": "C:\Programs\msys64\mingw64\bin\g++.exe",
                "cStandard": "c11",
                "cppStandard": "c++17",
                "intelliSenseMode": "gcc-x86"
            }
        ],
        "version": 4
    }
Если Вы создадите эти файлы, а потом заново запустите в этой директории VSC — то всё уже должно работать. То есть, программы на C++ будут компилироваться, запускаться в отладке (по F5) и показывать значения переменных в окне отладчика.
Теперь — самое важное. Как только заработает — Вам нужно эту папку .vscode копировать к корень каждой папки с проектом на C++. Это позволит VSC запускаться с Вашими настройками.
Даже если мой способ Вам не подходит напрямую — у Вас теперь есть все необходимые ключевые слова, чтобы использовать их для гуглежа.
Успехов!
PS. Время от времени попадаются полезные дополнительные возможности для настройки.
Вот такой фрагмент файла tasks.json позволяет очищать окно терминала перед каждым билдом — полезно, чтобы уже не видеть уже исправленных ошибок, оставшихся от предыдущей попытки сборки (Источник):
    "presentation": {
            "clear": true                        // <-- this line
      }
Improve Article
Save Article
Improve Article
Save Article
In this article, we will learn how to compile and run C++ program in VS Code. There are two ways of doing that you can use any one of them as per your convenience. It is to be noted that a majority of competitive programmers use C++, therefore the compilation and execution of the program needs to be done quickly. Some methods which are discussed in this article almost automate the process of compilation and execution.
Program:
Let below be the code to demonstrate compilation and execution:
C++
#include <bits/stdc++.h>
using namespace std;
int main()
{
int a, b;
cin >> a >> b;
int sum = a + b;
cout << sum;
return 0;
}
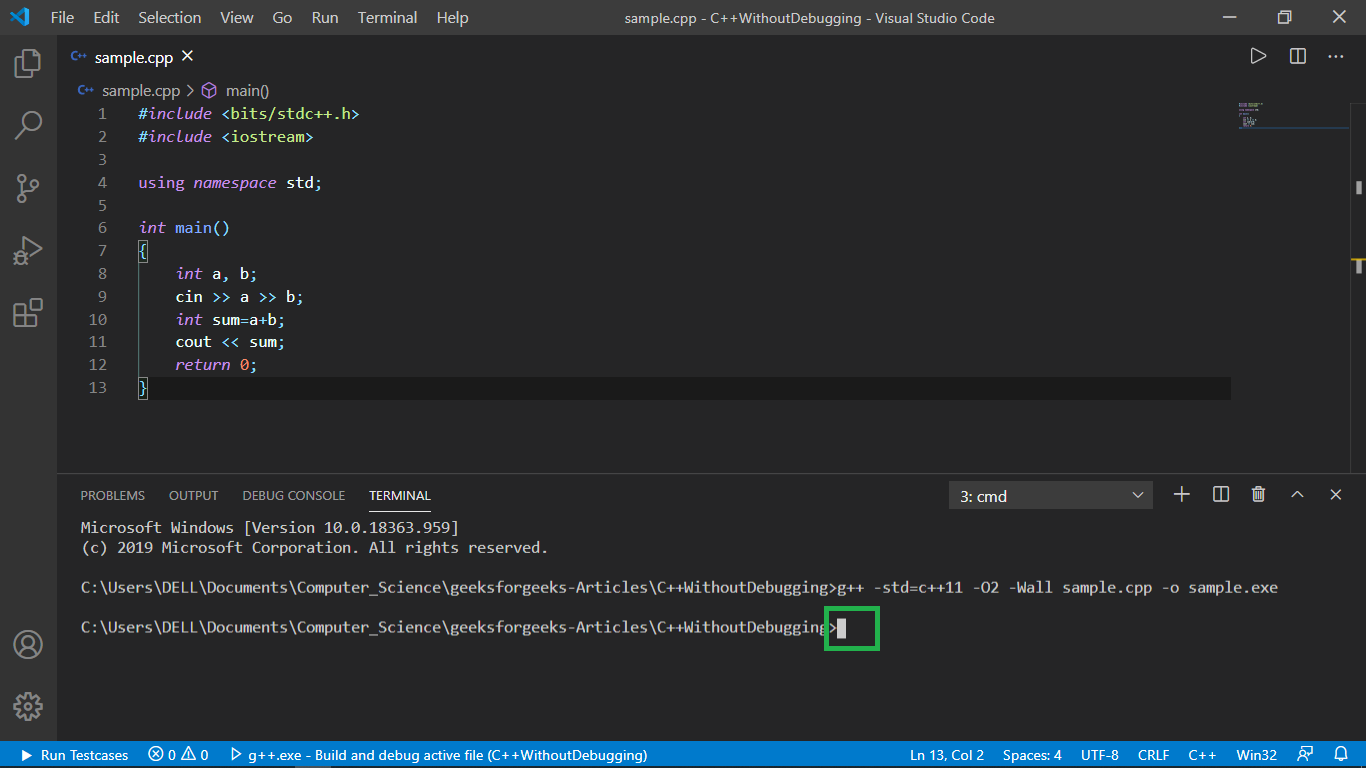
Using Integrated Command Line:
For compilation and creation of executable file run the below command:
g++ -std = c++11 -O2 -Wall programName.cpp -o programName.exe
Understanding different terms in above command:
- g++: tells the computer the given command is for g++ compiler.
- -std = c++11: the compiler follows C++11 standard, you can set it to -std = c++14 or -std=c++17 based on what you want to use.
- -O2: Optimizes the code
- -Wall: shows warnings about possible errors
- programName.cpp: refers to the c++ file to be compiled
- -o programName.exe: creates a executable file of the suggested name( here programName.exe).
Note: The name of cpp file and executable file need not be same.
Steps:
- Hover over terminal tab and select New Terminal.

- Command prompt will open with current directory.
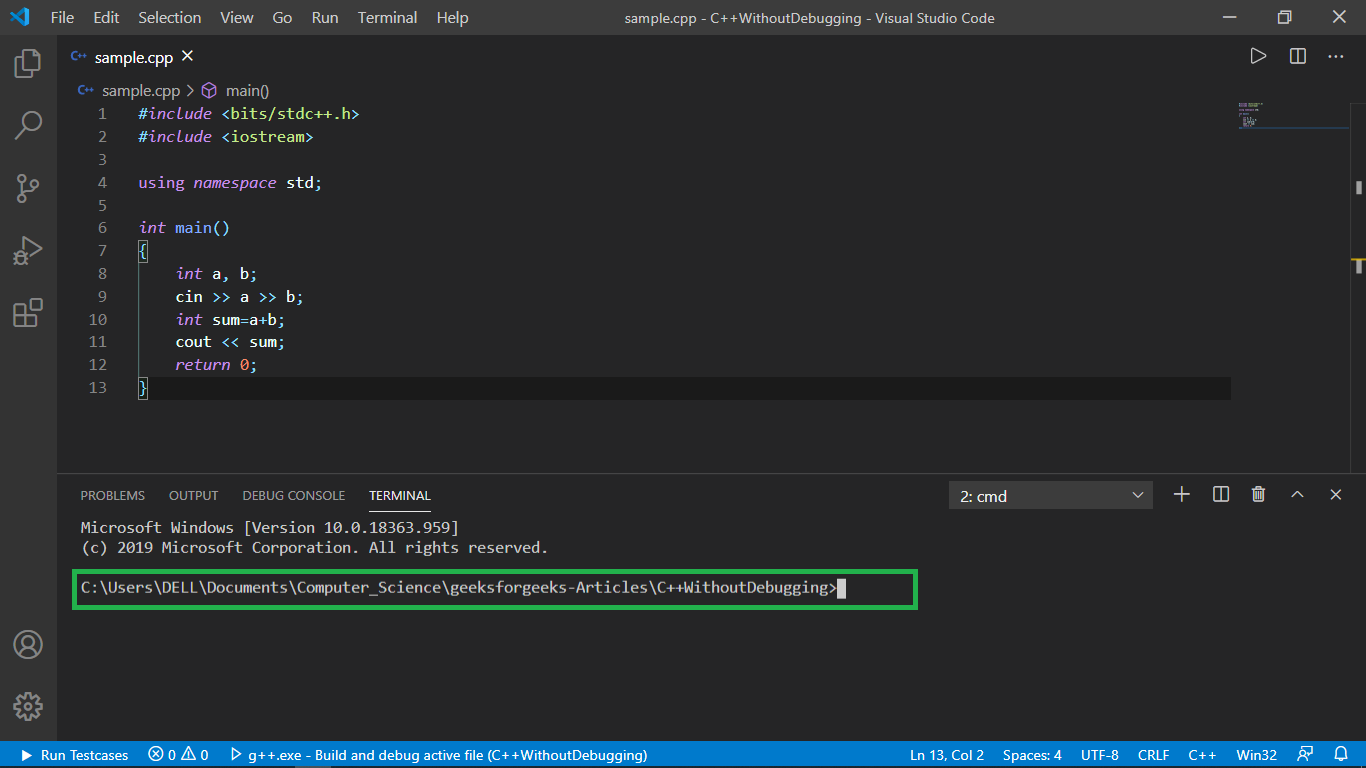
- Type the syntax given above with suitable program-name and executable file name.
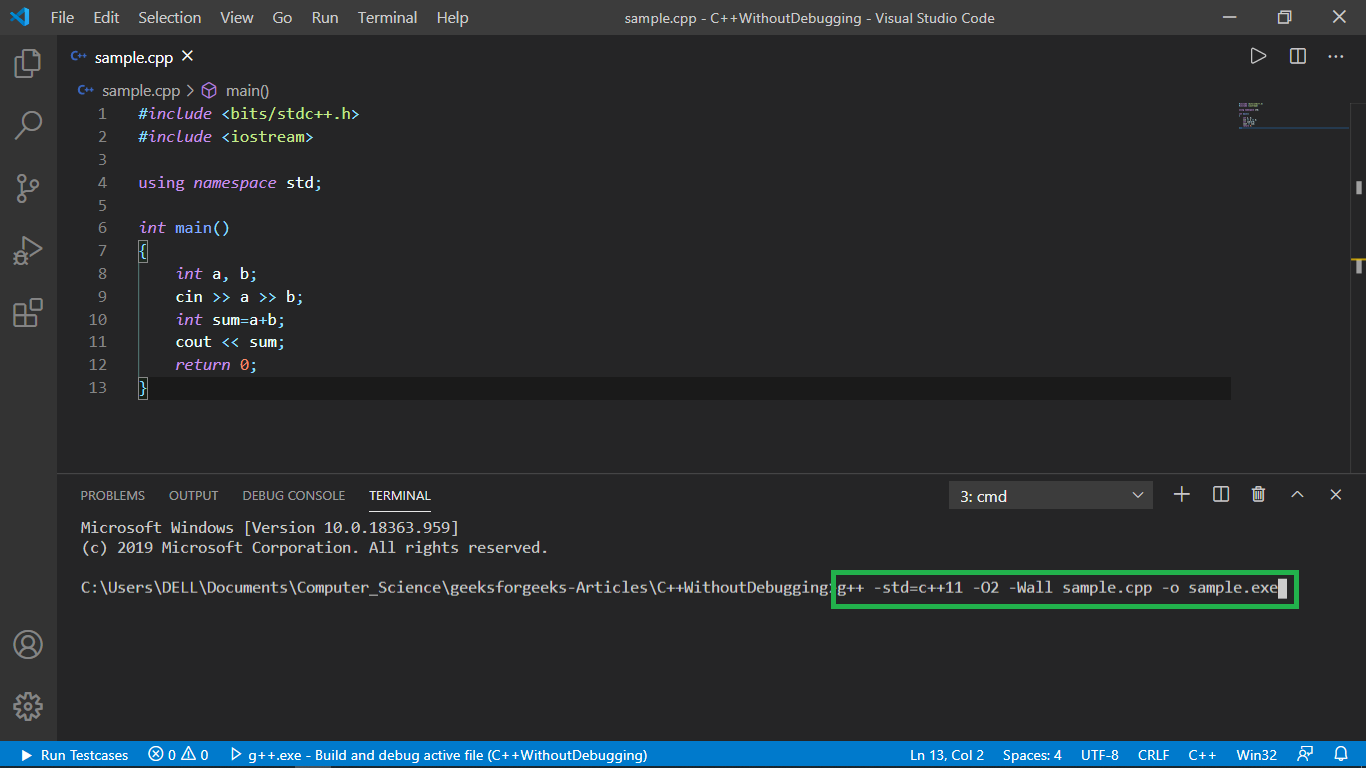
- Press Enter and
Method 1 – Calling Executable File and Managing Input/Output
Input/Output in command line itself:
- Pass the executable file to be run and press enter.
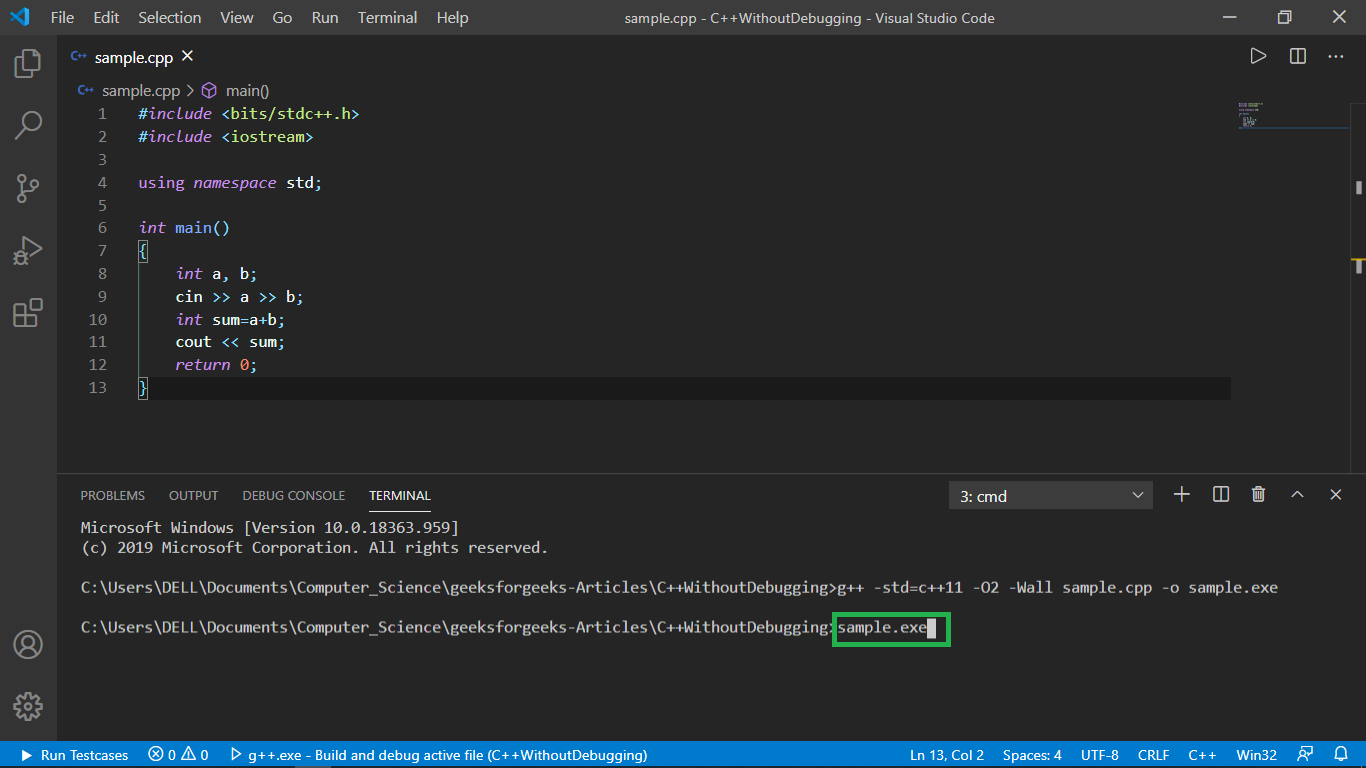
- Type the required input, each separated by space and press enter.
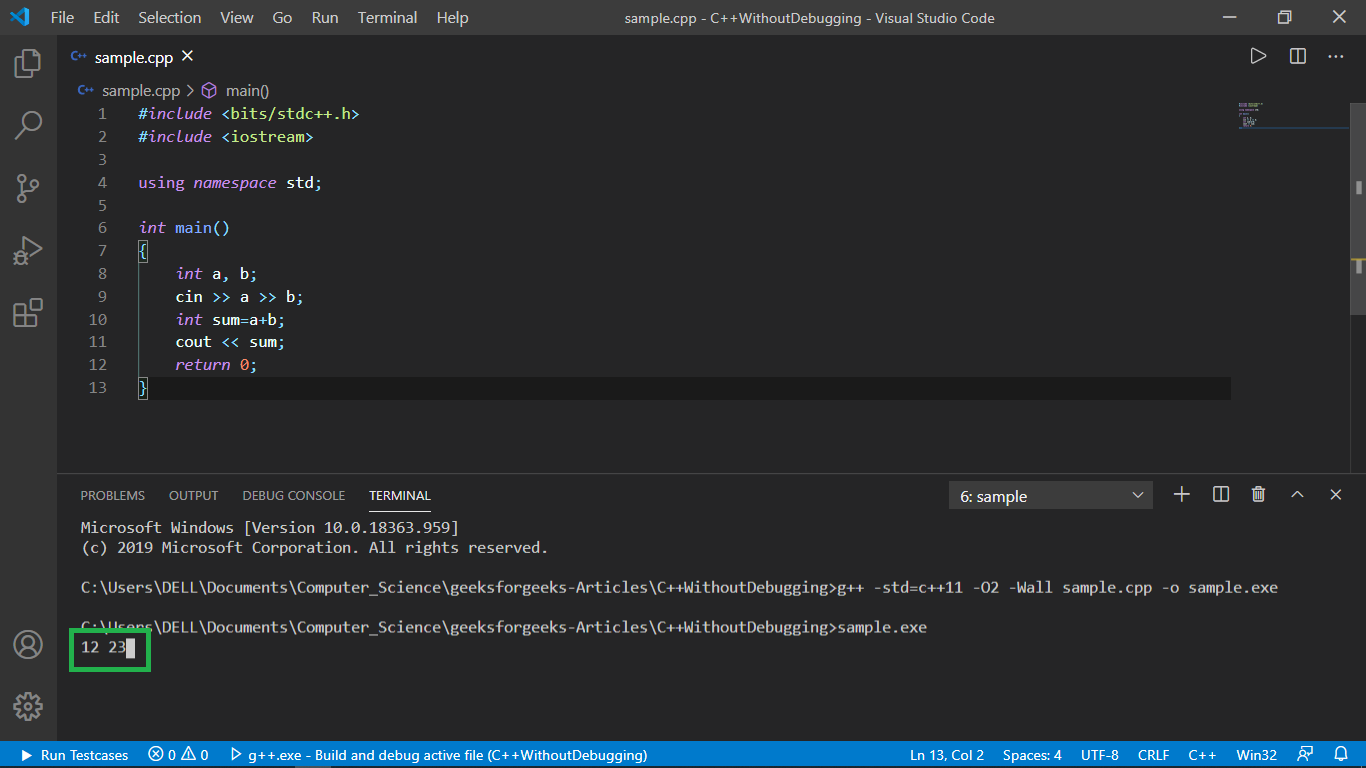
- The required output shall be displayed in a new-line of the command line as shown below.

Input/Output through text files:
- Create two text files input.txt and output.txt. Make sure input.txt contains the required to be input.

- Paste the following code just inside your main() function.
C++
#ifndef ONLINE_JUDGE
freopen("input.txt", "r", stdin);
freopen("output.txt", "w", stdout);
#endif
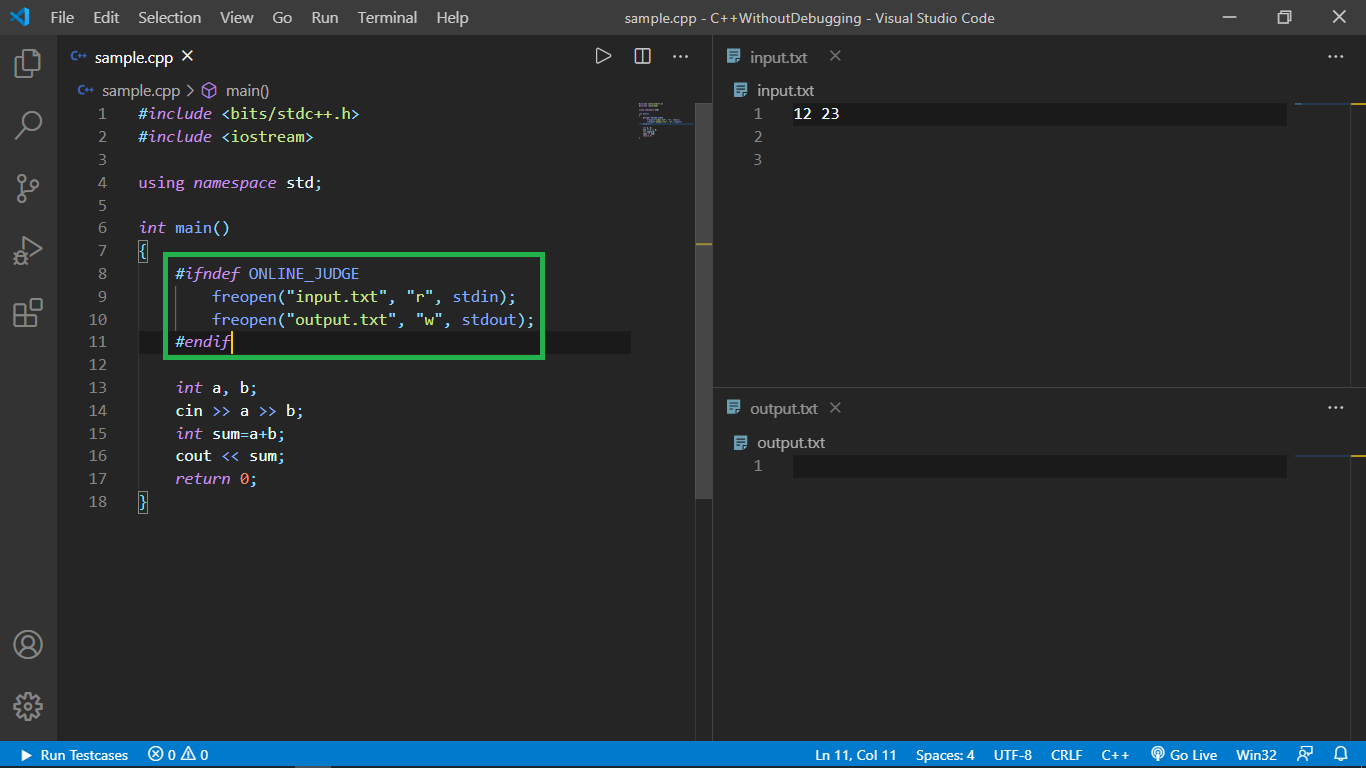
- Compile the new code again with preferably the same name for executable file.

- Pass the executable file to be run in the command line and press enter

- You would notice the output in output.txt file.

Method 2 – Using Code-Runner Extension:
Using the template created so far, we can easily upgrade to code runner. Below are the steps:
- Install the code runner extension as shown below:
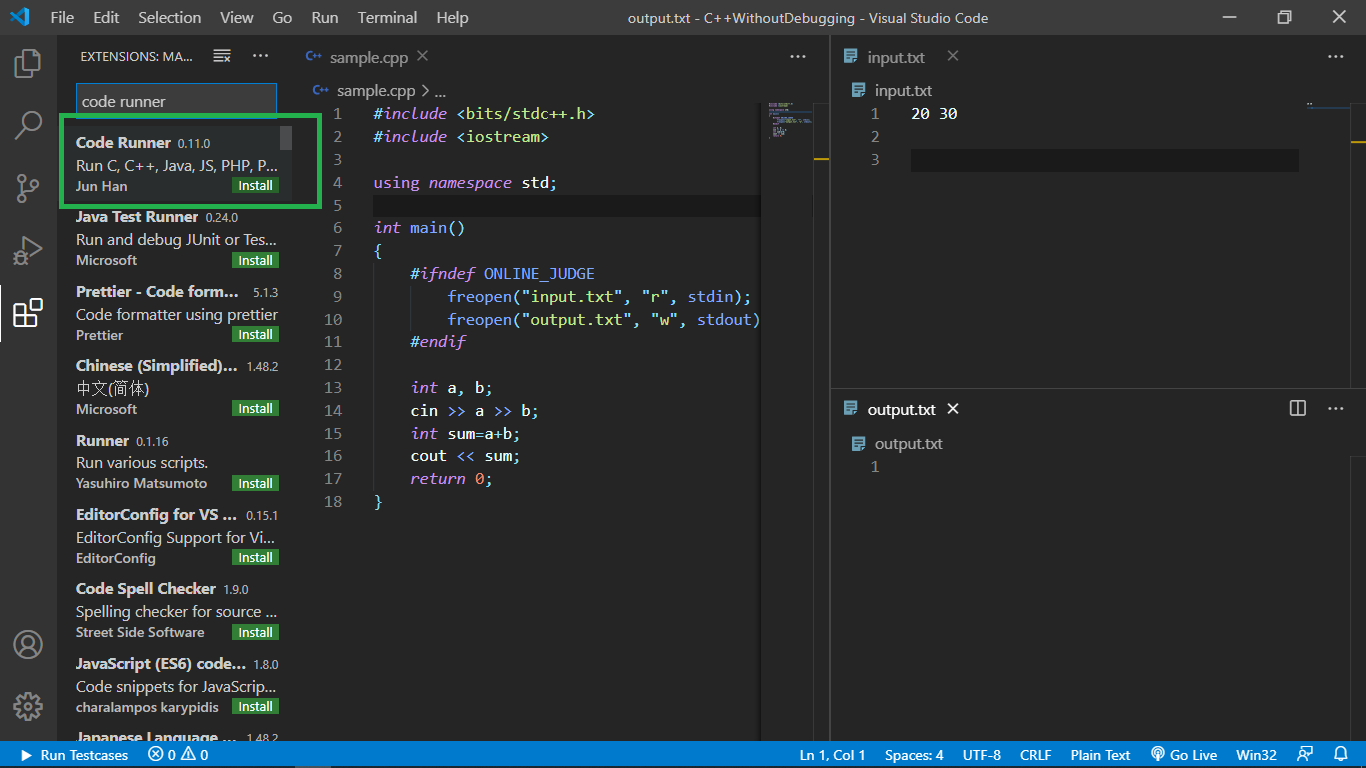
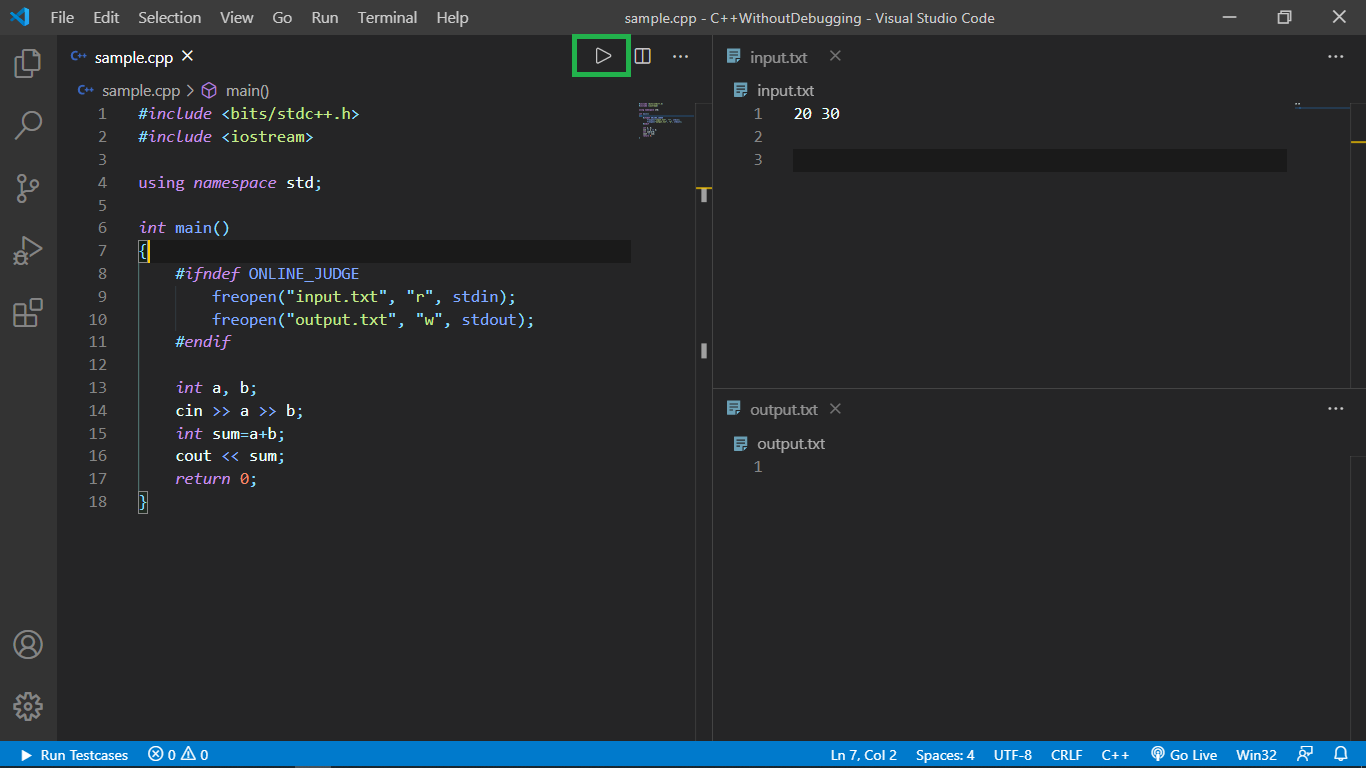
- Click on the play button on the top-right of the window as shown below:
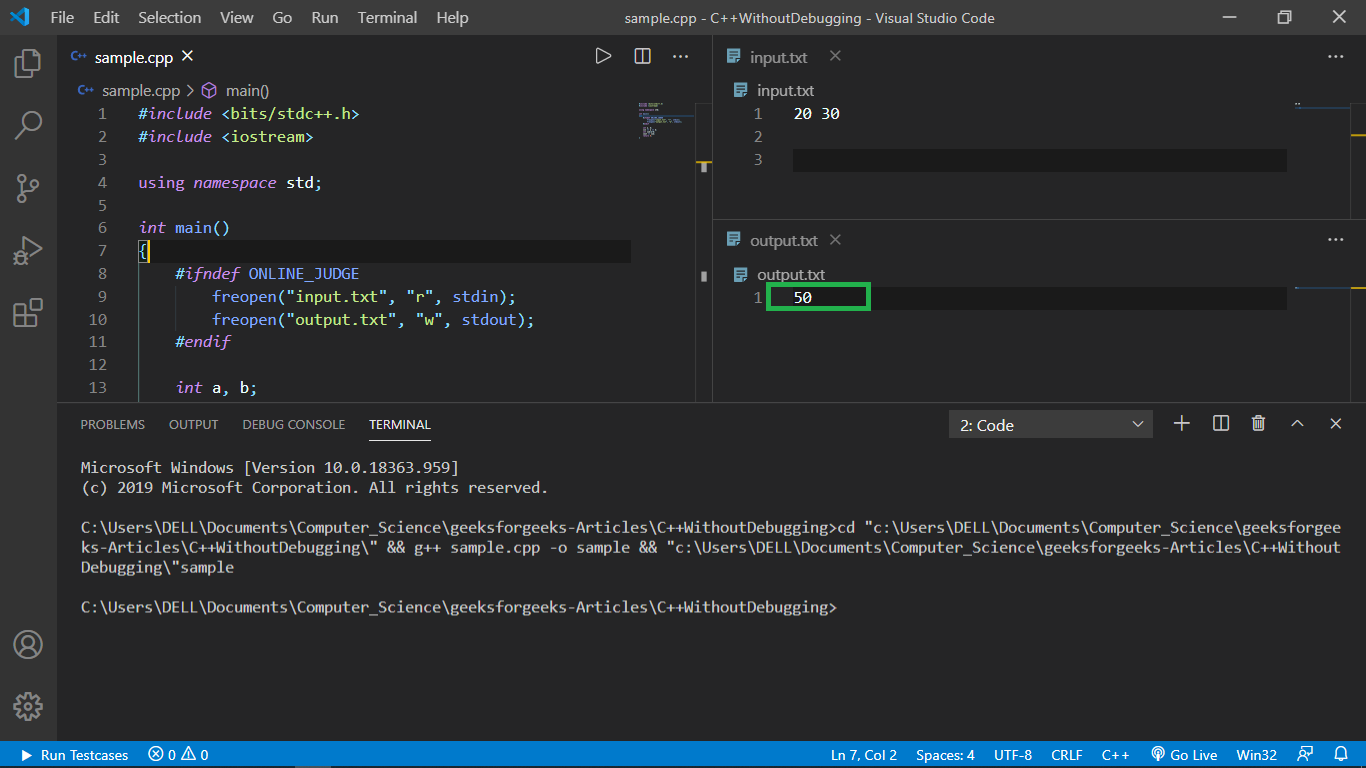
- The output of the program is displayed automatically in output.txt file.
Input/Output using Competitive Programming Helper (cph) extension:
- Firstly search and install cph by Divyanshu Agrawal

- Now, we are going to run a simple program and try to show learn how to use this ext.

- Using +New Testcase, we different test cases and their expected outputs respectively.

- Using Run All , we run all test cases
