First published on MSDN on Apr 10, 2017
Step-by-step guide for setting up
LDAPS
(LDAP over SSL)
The guide is split into 3 sections :
- Create a Windows Server VM in Azure
- Setup LDAP using AD LDS (Active Directory Lightweight Directory Services)
- Setup LDAPS (LDAP over SSL)
NOTE : The following steps are similar for Windows Server 2008, 2012, 2012 R2 , 2016. In this article, we will use Windows Server 2012 R2.
Create a Windows Server VM in Azure
Create a VM named “ldapstest” Windows Server 2012 R2 Datacenter Standard DS12 using the instructions here:
Create a Windows virtual machine with the Azure portal
Connect to the VM ldapstest using Remote Desktop Connection.
Setup LDAP using AD LDS
Now let us add AD LDS in our VM ldapstest
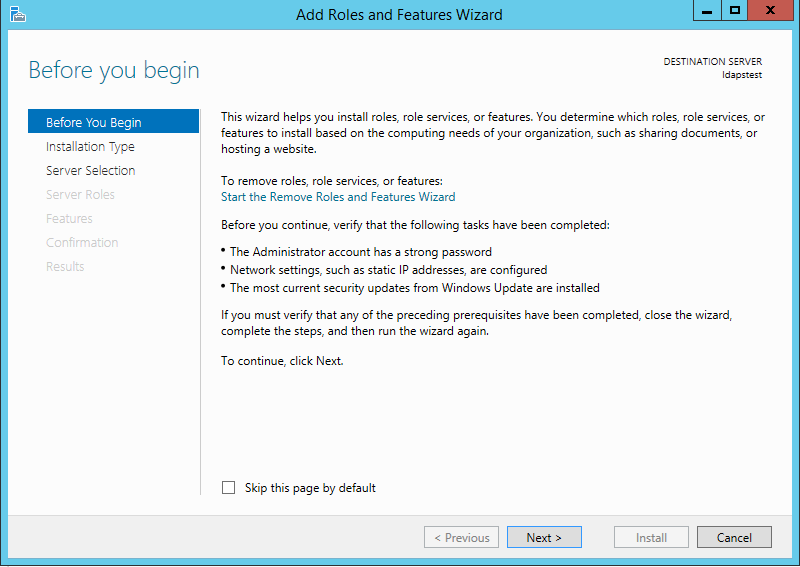
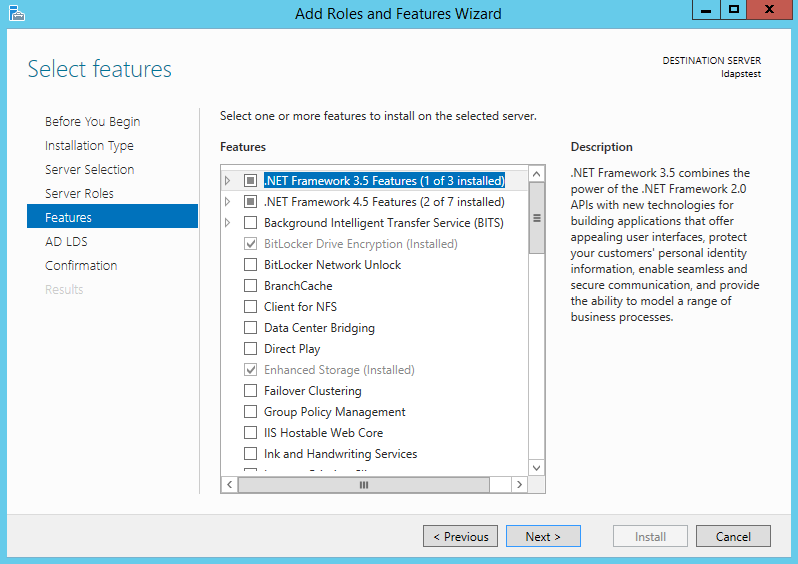
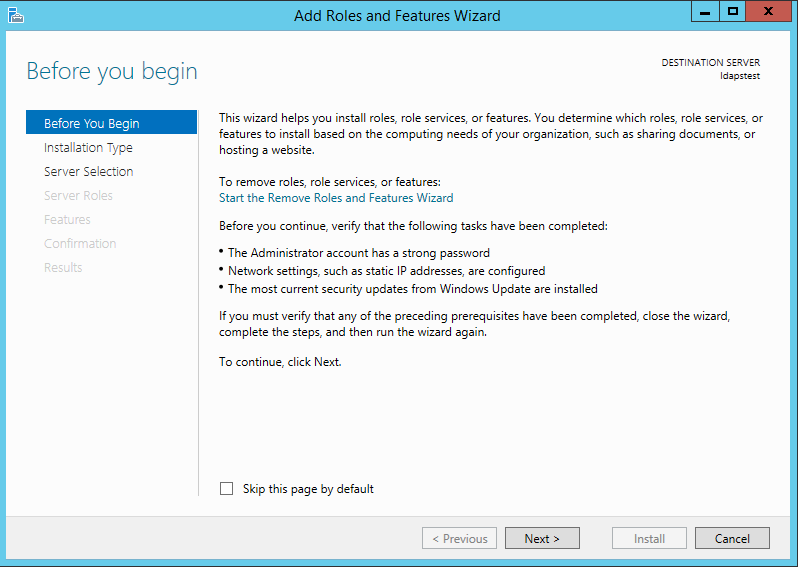
Click on Start —> Server Manager —> Add Roles and Features. Click Next.
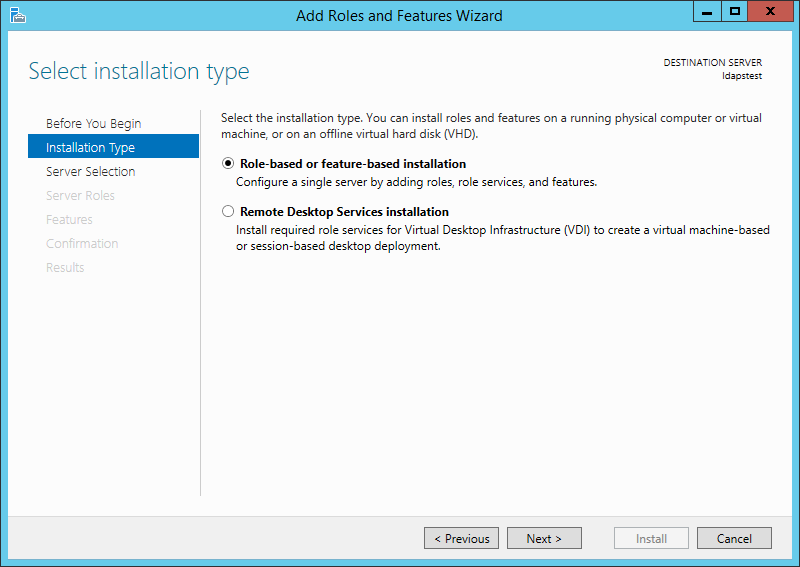
Choose Role-based or feature-based installation. Click Next.
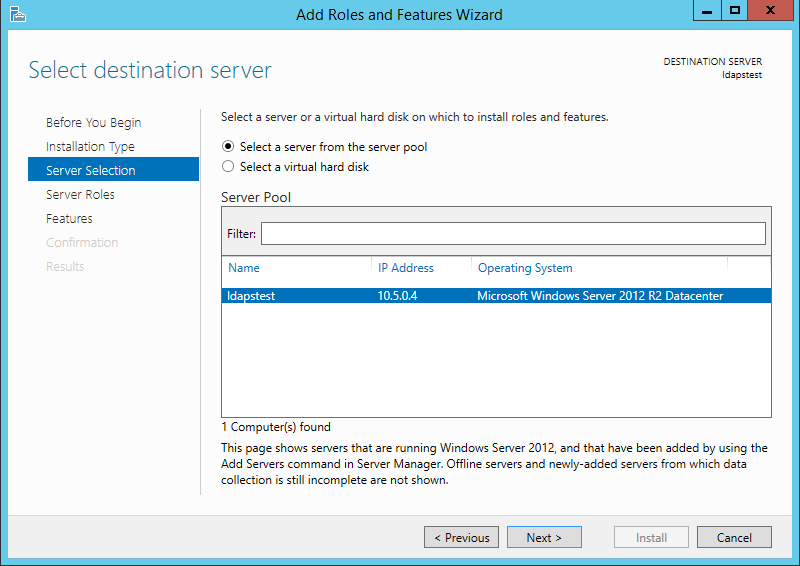
Select ldapstest server from the server pool. Click Next.
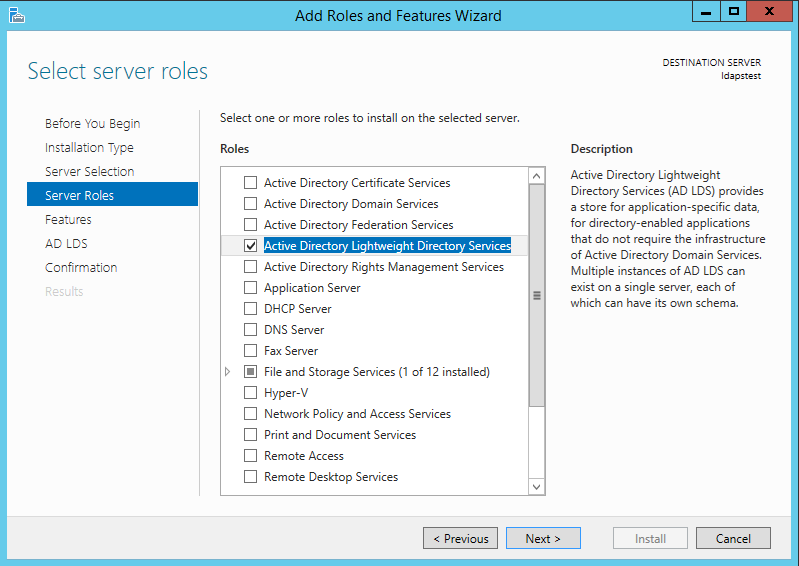
Mark Active Directory Lightweight Directory Services from the list of roles and click Next.
From the list of features, choose nothing – just click Next.
Click Next.

Click Install to start installation.

Once installation is complete, click Close.

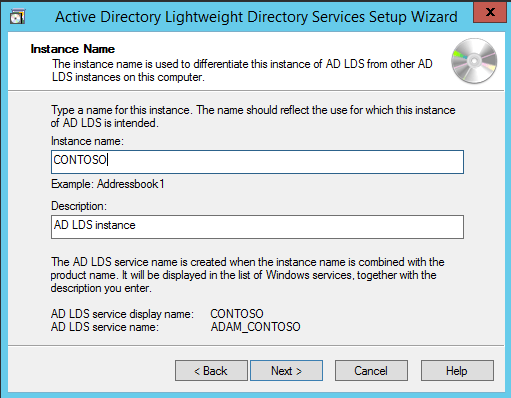
Now we have successfully set up AD LDS Role. Let us create a new AD LDS Instance “CONTOSO” using the wizard. Click the “Run the Active Directory Lightweight Directory Services Setup Wizard” in the above screen. And then Click Close.

Choose Unique Instance since we are setting it up for the first time.

Type “CONTOSO” in Instance Name and click Next.
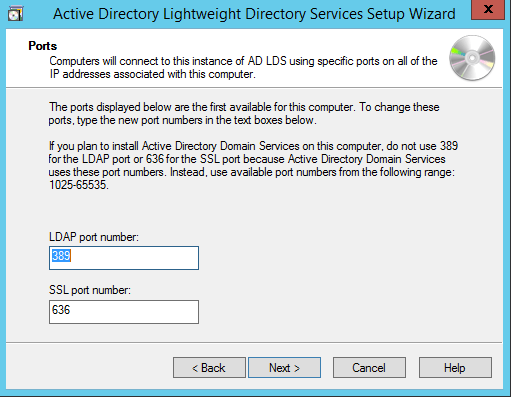
By Default, LDAP Port is 389 and LDAPS port is 636, let us choose the default values — click Next.
Create a new Application Directory Partition named “CN=MRS,DC=CONTOSO,DC=COM”. Click Next.

Using the default values for storage location of ADLDS files- Click Next.

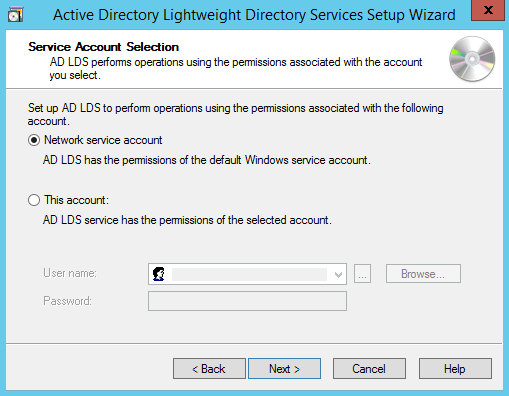
Choosing Network Service Account for running the AD LDS Service.
You will receive a prompt warning about data replication. Since we are using a single LDAP Server, we can click Yes.

Choosing the currently logged on user as an administrator for the AD LDS Instance. Click Next.

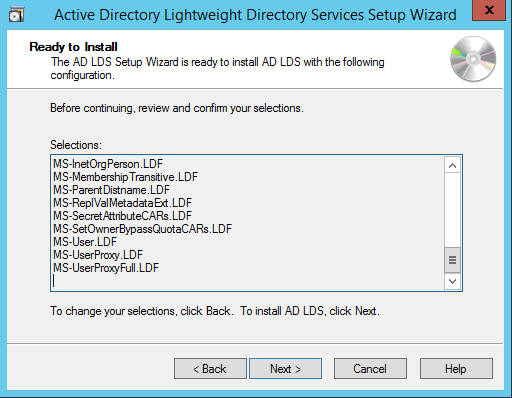
Mark all the required LDIF files to import (Here we are marking all files). Click Next.

Verify that all the selections are right and then Click Next to confirm Installation.
Once the instance is setup successfully, click Finish.

Now let us try to connect to the AD LDS Instance CONTOSO using ADSI Edit.
Click on Start —> Search “ADSI Edit” and open it.
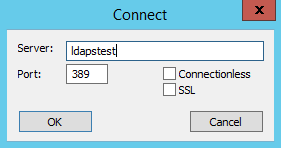
Right Click on ADSI Edit Folder (on the left pane) and choose Connect To.. . Fill the following values and Click OK.
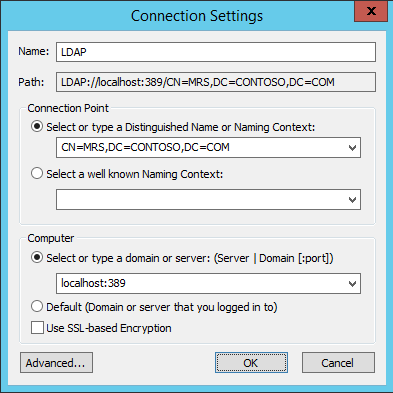
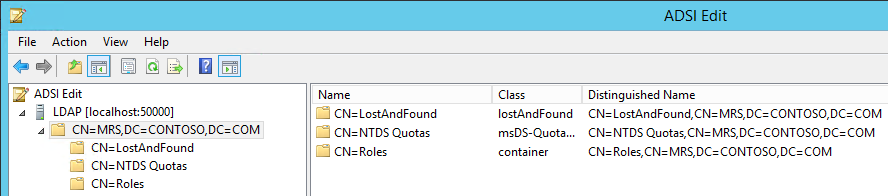
If the connection is successful, we will be able to browse the Directory CN=MRS,DC=CONTOSO,DC=COM :
Setup LDAPS (LDAP over SSL)
The Certificate to be used for LDAPS must satisfy the following 3 requirements:
• Certificate must be valid for the purpose of Server Authentication. This means that it must also contains the Server Authentication object identifier (OID): 1.3.6.1.5.5.7.3.1
• The Subject name or the first name in the Subject Alternative Name (SAN) must match the Fully Qualified Domain Name (FQDN) of the host machine, such as Subject:CN=contosoldaps. For more information, see How to add a Subject Alternative Name to a secure LDAP certificate .
• The host machine account must have access to the private key.
Now, let’s use Active Directory Certificate Services to create a certificate to be used for LDAPS. If you already have a certificate satisfying the above requirements, you can skip this step.
Click on Start —> Server Manager —> Add Roles and Features. Click Next.
Choose Role-based or feature-based installation. Click Next.

Select ldapstest server from the server pool. Click Next.

Choose Active Directory Certificate Services from the list of roles and click Next.

Choose nothing from the list of features and click Next.
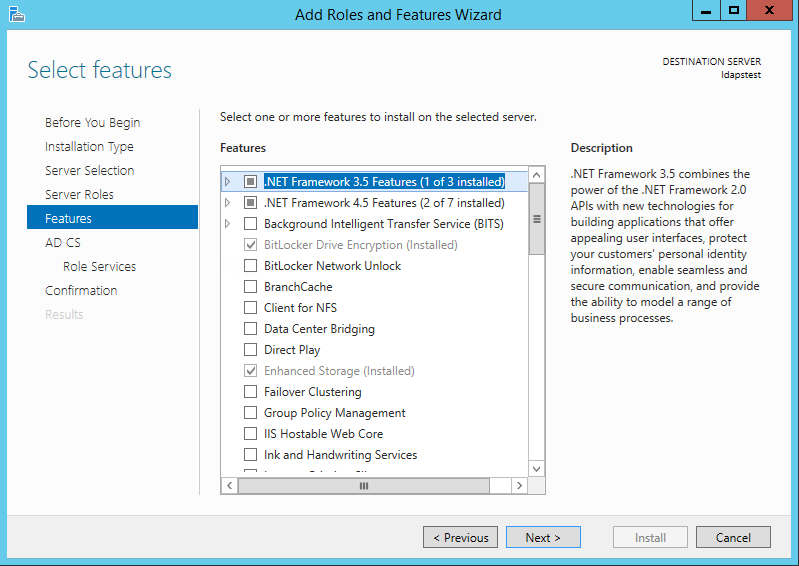
Click Next.

Mark “Certificate Authority” from the list of roles and click Next.
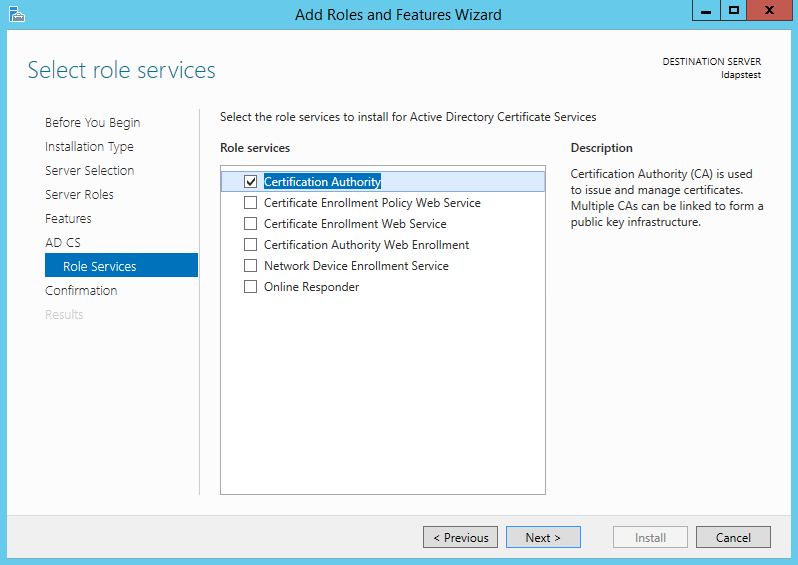
Click Install to confirm installation.

Once installation is complete, Click Close.

Now let’s create a certificate using AD CS Configuration Wizard. To open the wizard, click on “Configure Active Directory Certificate Services on the destination server” in the above screen. And then click Close. We can use the currently logged on user azureuser to configure role services since it belongs to the local Administrators group. Click Next.
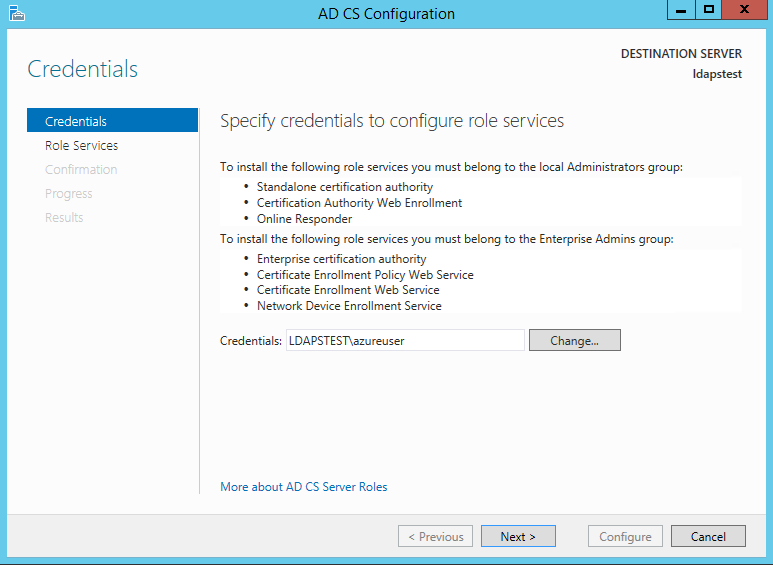
Choose Certification Authority from the list of roles. Click Next.

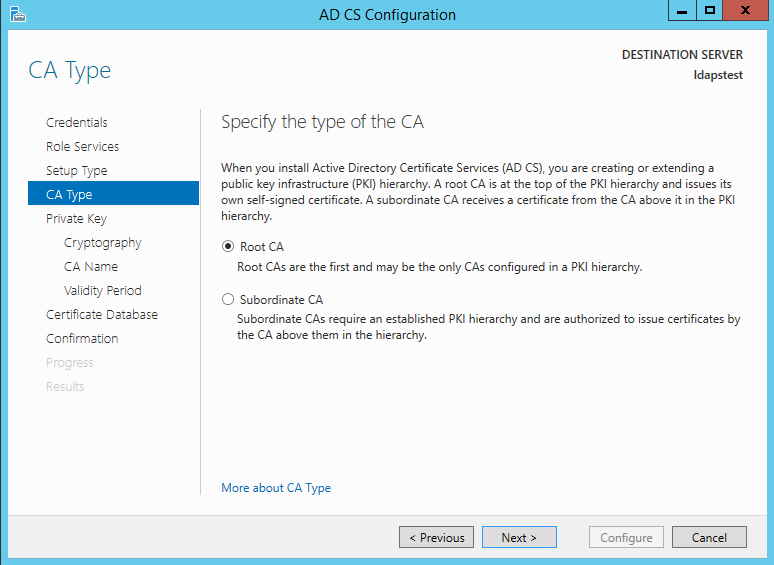
Since this is a local box setup without a domain, we are going to choose a Standalone CA. Click Next.

Choosing Root CA as the type of CA, click Next.
Since we do not possess a private key – let’s create a new one. Click Next.

Choosing SHA1 as the Hash algorithm. Click Next.
UPDATE : Recommended to select the most recent hashing algorithm since
SHA-1 deprecation countdown
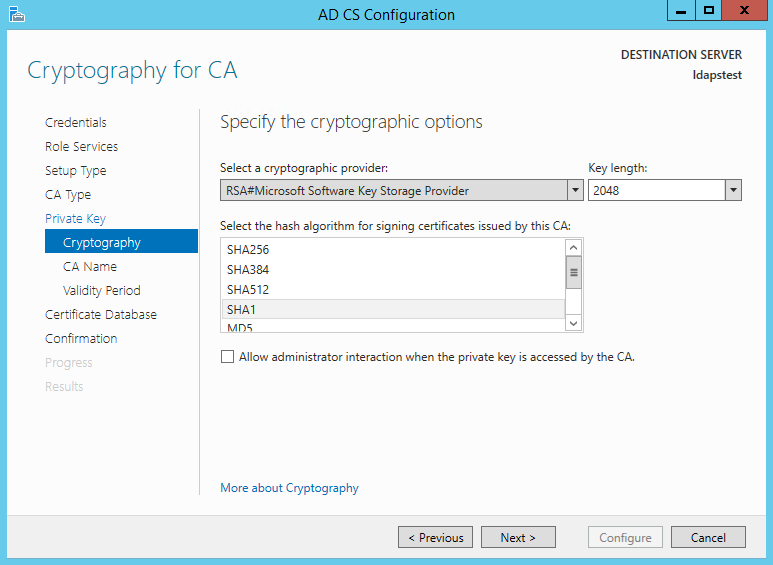
The name of the CA must match the Hostname (requirement number 2). Enter “LDAPSTEST” and Click Next.

Specifying validity period of the certificate. Choosing Default 5 years. Click Next.

Choosing default database locations, click Next.

Click Configure to confirm.
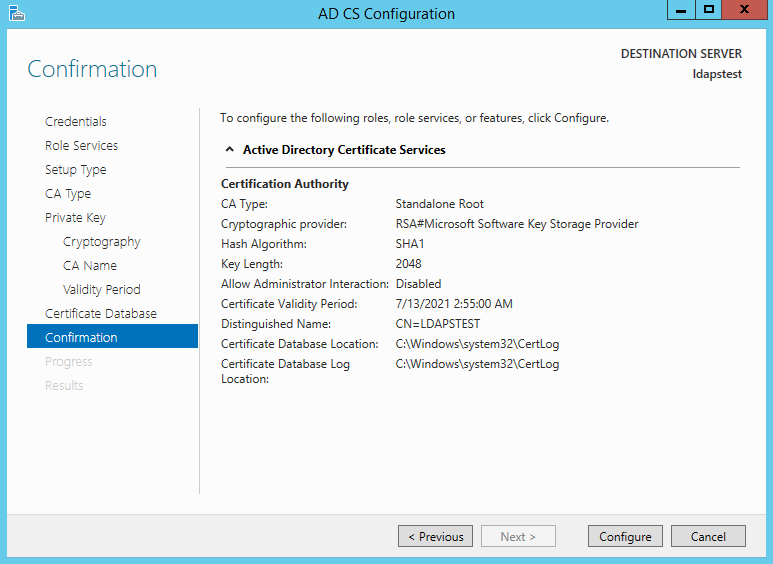
Once the configuration is successful/complete. Click Close.

Now let us view the generated certificate.
Click on Start à Search “Manage Computer Certificates” and open it.
Click on Personal Certificates and verify that the certificate “LDAPSTEST” is present:

Now to fulfill the third requirement, let us ensure host machine account has access to the private key. Using the Certutil utility, find the Unique Container Name. Open Command Prompt in Administrator mode and run the following command: certutil -verifystore MY

The private key will be present in the following location C:ProgramDataMicrosoftCryptoKeys<UniqueContainerName>
Right Click C:ProgramDataMicrosoftCryptoKeys874cb49a696726e9f435c1888b69f317_d3e61130-4cd8-4288-a344-7784647ff8c4 and click properties —> Security and add read permissions for NETWORK SERVICE.

We need to import this certificate into JRE key store since our certificate “CN=LDAPSTEST” is not signed by any by any trusted Certification Authority(CA) which is configured in you JRE keystore e.g Verisign, Thwate, goDaddy or entrust etc. In order to import this certificate using the keytool utility, let us first export this cert as a .CER from the machine certificate store:
Click Start —> Search “Manage Computer Certificates” and open it. Open personal, right click LDAPSTEST cert and click “Export”.

This opens the Certificate Export Wizard. Click Next.

Do not export the private key. Click Next.

Choose Base-64 encoded X .509 file format. Click Next.

Exporting the .CER to Desktop. Click Next.

Click Finish to complete the certificate export.

Certificate is now successfully exported to “C:UsersazureuserDesktopldapstest.cer”.
Now we shall import it to JRE Keystore using the keytool command present in this location:
C:Program FilesJavajre1.8.0_92binkeytool.exe.
Open Command Prompt in administrator mode. Navigate to “C:Program FilesJavajre1.8.0_92bin” and run the following command:
keytool -importcert -alias «ldapstest» -keystore «C:Program FilesJavajre1.8.0_92libsecuritycacerts» -storepass changeit -file «C:UsersazureuserDesktopldapstest.cer»

Type “yes” in the Trust this certificate prompt.
Once certificate is successfully added to the JRE keystore, we can connect to the LDAP server over SSL.
Now let us try to connect to LDAP Server (with and without SSL) using the ldp.exe tool.
Connection strings for
LDAP:\ldapstest:389
LDAPS:\ldapstest:636
Click on Start —> Search ldp.exe —> Connection and fill in the following parameters and click OK to connect:
If Connection is successful, you will see the following message in the ldp.exe tool:

To Connect to LDAPS (LDAP over SSL), use port 636 and mark SSL. Click OK to connect.

If connection is successful, you will see the following message in the ldp.exe tool:

REFERENCES
https://technet.microsoft.com/en-us/library/cc770639(v=ws.10)
https://technet.microsoft.com/en-us/library/cc725767(v=ws.10).aspx
http://social.technet.microsoft.com/wiki/contents/articles/2980.ldap-over-ssl-ldaps-certificate….
https://blogs.technet.microsoft.com/askds/2008/03/13/troubleshooting-ldap-over-ssl/
http://javarevisited.blogspot.com/2011/11/ldap-authentication-active-directory.html
Если Вы хотите развернуть LDAPv3-совместимый Open Source сервер в Windows (XP, Windows 7, 10 или даже, по недоразумению, в Windows Vista), у Вас есть три варианта:
-
OpenLDAP под cygwin.
Разработчики установщика cygwin проделали большую работу, чтобы установка была хоть и многословным, но очень простым процессом (полная установка может занять более 30 минут). И спрятали они OpenLDAP так, чтобы никто не догадался (он в категории Libs установщика, но мы Вам этого не говорили). Главный недостаток — то, что версия OpenLDAP обновляется нерегулярно (хотя, по совести говоря, пакеты обновляются довольно регулярно). Если Вы собираетесь заниматься разработкой, либо запускать другие *nix-пакеты под Windows — выбор очевиден.
-
ApacheDS. Работает под Java и включает прекрасный LDAP-клиент/систему разработки, называемую Apache Directory Studio. Этот превосходный инструмент можно использовать в качестве клиента к любой системе, в том числе OpenLDAP. Возможно, процесс установки покажется Вам немного сложным, поскольку система встроена в среду разработки Eclipse (которая любит всё всегда усложнять), но усилия стоят того.
-
Если же Вы хотите простую инсталляцию текущей версии OpenLDAP на Windows в пару кликов, то нет ничего лучше сборки OpenLDAP для Windows. Она периодически обновляется (по состоянию на ноябрь 2016 года версия OpenLDAP 2.4.44). Она опционально устанавливает различные механизмы манипуляции данными, в том числе базы данных (bdb и hdb OpenLDAP), OpenSSL (обеспечивает поддержку TLS в OpenLDAP) и даже Cyrus SASL (обеспечивает поддержку Kerberos). OpenLDAP выполняется не как задача Windows, а как dos-приложение.
Установка OpenLDAP для Windows
При последней установке данного программного обеспечения (ноябрь 2016 года) стало ясно, что процесс инсталляции с момента нашей предыдущей установки (OpenLDAP 2.4.35) поменялся радикально. Теперь доступны 32-х и 64-битные версии, а процесс инсталляции предоставляет много (слишком много?) опций. Получить программное обеспечение можно здесь, а инструкции по установке находятся здесь. Мы установили 64-битную версию на Windows 10 Home Edition. В нашем случае процесс инсталляции не прошёл гладко (64-битная версия, Home Edition, сами понимаете), но после небольшой доработки напильником за 20 минут мы получили вполне работоспособный OpenLDAP. Не так уж и плохо. Немного сбивало с толку то, что имена директорий/папок сильно отличаются от тех, которые мы привыкли видеть при инсталляции в Lunux/BSD.
Мы оставили наши записи об установке OpenLDAP 2.4.35 в назидание потомкам (не поддавайтесь искушению использовать их для чего-либо, кроме версии 2.4.35). Мы добавили записи о текущей инсталляции (ноябрь 2016 года, OpenLDAP 2.4.44), которые могут оказаться для Вас полезными (или бесполезными).
Примечания:
-
Возможно, вследствие ошибок при инсталляции, мы получили полностью установленный, но не запущенный OpenLDAP. В разных местах мы встречали намёки на то, что OpenLDAP может выполняться как служба Windows, но, как всегда, мы не стали читать документацию целиком. Скрипт запуска: C:OpenLDAPrunrun.cmd (C:OpenLDAP — корневая директория при инсталляции по умолчанию). Для удобства использования мы сделали себе ярлык на него на рабочем столе.
-
При инсталляции по умолчанию slapd при запуске использует slapd.conf (расположен в корневой директории (по умолчанию это C:OpenLDAP), а не в привычной /etc/openldap как в Linux/BSD).
-
Конвертация в slapd.d тривиальна. После внесения необходимых изменений в файл slapd.conf, просто создайте новую директорию/папку с названием slapd.d. Откройте командную строку, перейдите в C:OpenLDAP (или туда, куда Вы произвели установку) и выполните:
slaptest -f slapd.conf -F slapd.d
Откройте C:OpenLDAPrunrun.cmd в любимом редакторе:
cd "%~dp0.."
slapd -d 8 -h "ldaps:/// ldap:///" -f slapd.conf

# удалите аргумент -f чтобы получилось:

cd "%~dp0.."
slapd -d 8 -h "ldaps:/// ldap:///"

# сохраните файл
Запустите сервер, выполнив C:OpenLDAPrunrun.cmd.
-
По умолчанию в скрипте запуска (смотрите предыдущее примечание) используется аргумент -d -1, генерирующий огромное количество отладочной информации и серьёзно снижающий производительность сервера. На первоначальном этапе это полезно, так как Вы получаете максимум диагностической информации. После того, как Вам удастся добиться от сервера стабильной работы, можно либо совсем удалить -d -1 в файле run.cmd, либо задать значение поменьше.
Примечание: Значение аргумента -d, используемое при старте OpenLDAP (slapd), благоразумно отменяет любые попытки динамически изменять значение атрибута oldLogLevel (при использовании OLC, cn=config), либо значения директивы loglevel в slapd.conf. Чтобы эти настройки имели эффект, удалите аргумент -d из строки запуска slapd.
Исторические заметки по установке OpenLDAP 2.4.35 для Windows
Далее следуют некоторые заметки об установке и использовании OpenLDAP (2.4.35) для Windows. При прочтении документации к пакету складывается впечатление, что его возможности значительно больше, чем предоставление основных сервисов OpenLDAP, в частности, там обсуждается использование Microsoft-SQL. Мы проигнорировали все эти новомодные штучки (поскольку не являемся пользователями MS-SQL) и всё равно получили отличную, высоко функциональную инсталляцию OpenLDAP. Порядок действий:
-
Скачайте программное обеспечение отсюда в подходящую директорию файловой системы.
-
Распакуйте архив и дважды щёлкните для запуска OpenLDAP-2.y.xx-x86.exe (y — старший номер версии, а xx — младший номер версии). Следуйте запросам мастера установки. Установка может быть запущена с правами обычного пользователя (административных привилегий не требуется). Далее показаны экраны с немного путанным содержимым, для которых приводятся дополнительные разъяснения.
-
На этом экране Вас просят ввести Ваши данные, но ввод данных не позволяется. Попробуй разберись! Проигнорируйте его и нажмите «Next». Ничего страшного не случится.

-
На этом экране показана директория по умолчанию, куда будет произведена установка. Измените её в соответствии с Вашими потребностями или просто нажмите «Next».
-
После установки файлов этот экран показывает некоторую общую информацию о конфигурации сервера. Большая часть её пригодна лишь в том случае, если Вы собираетесь использовать конфигурацию по умолчанию.
На следующем за этим экране запрашивается, хотите ли Вы прочитать документ readme.pdf. Наш совет — не стоит. Снимите галочку и читайте дальше эту инструкцию.
-
Когда последний экран мастера установки закроется и станет историей, у Вас будет следующая конфигурация (подразумевается, что Вы произвели инсталляцию в директорию по умолчанию C:OpenLDAP, либо, если Вы один из тех, кого раздражает всё, что по умолчанию, скорректируйте значения на свои):
-
Система настроена на использование файла slapd.conf в директории etcopenldap (директория slapd.d отсутствует — смотрите заметки по olc/cn=config здесь). Этот slapd.conf полностью работоспособен, в него стоит заглянуть хотя бы потому, что в нём содержатся относительные пути, указывающие на поддиректории и файлы внутри установочной директории. Обслуживание осуществляется на стандартных номерах портов LDAP (389 и 636 для ldaps). Если Вы собираетесь использовать свой собственный файл slapd.conf, обратите внимание на стандартные расположения, на которые указывают директивы pidfile, argsfile (по умолчанию varrun) и logfile (по умолчанию varlog) стандартного файла и для упрощения процесса подкорректируйте свои значения, аналогично проверьте расположение файлов наборов схемы данных (etcopenldapschema) и директивы directory (vardbopenldap-data) в Вашем разделе (разделах) database (используйте указанную и при необходимости создайте новые директории).
-
Один из самых запутанных аспектов этой инсталляции OpenLDAP — собраны ли модули статически или динамически. В OpenLDAP для Windows они собраны статически (правильный выбор), это означает, что в директивах loadmodule или loadpath нет необходимости.
В назидание потомкам мы приводим файл slapd.conf по умолчанию пакета OpenLDAP для Windows:
#
# See slapd.conf(5) for details on configuration options.
# This file should NOT be world readable.
#
include		/schema/core.schema

# Define global ACLs to disable default read access.

# Do not enable referrals until AFTER you have a working directory
# service AND an understanding of referrals.
#referral	ldap://root.openldap.org

pidfile		/run/slapd.pid
argsfile	/run/slapd.args

# Load dynamic backend modules:
# modulepath
# moduleload	back_bdb.la
# moduleload	back_hdb.la
# moduleload	back_ldap.la

# Sample security restrictions
#	Require integrity protection (prevent hijacking)
#	Require 112-bit (3DES or better) encryption for updates
#	Require 63-bit encryption for simple bind
# security ssf=1 update_ssf=112 simple_bind=64

# Sample access control policy:
#	Root DSE: allow anyone to read it
#	Subschema (sub)entry DSE: allow anyone to read it
#	Other DSEs:
#		Allow self write access
#		Allow authenticated users read access
#		Allow anonymous users to authenticate
#	Directives needed to implement policy:
# access to dn.base="" by * read
# access to dn.base="cn=Subschema" by * read
# access to *
#	by self write
#	by users read
#	by anonymous auth
#
# if no access controls are present, the default policy
# allows anyone and everyone to read anything but restricts
# updates to rootdn.  (e.g., "access to * by * read")
#
# rootdn can always read and write EVERYTHING!

#######################################################################
# BDB database definitions
#######################################################################

database	bdb
suffix		"dc=my-domain,dc=com"
rootdn		"cn=Manager,dc=my-domain,dc=com"
# Cleartext passwords, especially for the rootdn, should
# be avoid.  See slappasswd(8) and slapd.conf(5) for details.
# Use of strong authentication encouraged.
rootpw		secret
# The database directory MUST exist prior to running slapd AND
# should only be accessible by the slapd and slap tools.
# Mode 700 recommended.
directory	/openldap-data
# Indices to maintain
index	objectClass	eq
-
Для запуска сервера выполните «Пуск» (Start) -> «Все программы» (All Programs) -> OpenLDAP -> Start LDAP Server:
Примечание: OpenLDAP для Windows использует инсталляционный файл типа .exe, а не .msi, и потому до появления значков в меню «Все программы» (All Programs) может пройти довольно много времени (до 30 минут).
Если Вы нетерпеливы, перейдите в директорию libexec и дважды щёлкните на StartLDAP.cmd. Это приведёт к немедленному запуску LDAP-сервера.
При старте сервера откроется окно сессии dos, куда будет выведена тонна информации, после чего окно останется открытым (Вы должны явно завершить OpenLDAP, нажав CTL-C в этом окне dos). Если что-то пошло не так, окно немедленно закроется. Если Вы используете директиву logfile (поставляемый по умолчанию файл slapd.conf использует varlogopenldap.log), то ищите ошибки в файле журнала. Если Вы не используете директиву logfile, значит Вам не повезло.
Большой объём информации, выводимой в окне dos, может серьёзно замедлить работу сервера. Чтобы его уменьшить или ликвидировать, просто откройте (с помощью notepad) файл libexecStartLDAP.cmd и из последней строки этого файла либо вообще удалите аргумент -d -1 (для отмены вывода, за исключением катастрофических ошибок), либо измените -1 на какое-либо другое значение (подробнее здесь). Например, если значение равно 8, будет выводиться только информация о соединениях. Вот этот файл во всей красе, чтобы Вы могли увидеть, что представляет из себя последняя строка:
@echo off

verify on

Rem SET HOME=

SET ODBCINI=..etcodbc.ini

SET ODBCSYSINI=..etc

SET FREETDS=..etcfreeTDS.conf

SET TDSVER=8.0

SET TDSDUMP=..varlogfreetds.log

SET RANDFILE=..binrfile.rnd

SET LDAPCONF=..etcopenldapldap.conf

SET LDAPRC=..binldaprc


Rem Adjust accordingly

Rem SET KRB5_CONFIG=C:Heimdaletckrb5-pkinit.conf

Rem SET KRB5_KTNAME=C:Heimdaletckrb5.keytab

Rem SET KRB5CCNAME=FILE:C:/Heimdal/tmp/krb5cc_500

SET FQDN=localhost

slapd.exe -d -1 -h "ldap://%FQDN%/ ldaps://%FQDN%/" -f ..etcopenldapslapd.conf
-
Стандартные ldap-утилиты OpenLDAP (ldapsearch и другие) располагаются в директории bin. В OpenLDAP для Windows есть удобное окно командной строки, предварительно сконфигурированное на эту директорию:
Вы также можете открыть любое окно с сессей dos и перейти в c:openldapbin, либо поместите этот путь в свою переменную path («Пуск» (Start) -> «Панель управления» (Control panel) -> «Система» (System) -> в открывшемся окне «Свойства системы» (Advanced system settings) выберите вкладку «Дополнительно» (Advanced) -> нажмите кнопку «Переменные среды» (Environmental settings) -> в открывшемся окне «Переменные среды» в нижней части найдите переменную path и добавьте ;c:openldapbin). Откройте любое окно с сессией dos («Пуск» (Start)->»Выполнить» (Run)->cmd) и можете запускать утилиты ldap. Примечание: slap-утилиты (slapadd и другие) находятся в директории sbin, возможно, Вы захотите добавить в переменную path также и путь ;copenldapsbin.
-
-
Как мы уже говорили, для остановки сервера OpenLDAP перейти в окно с сессией dos, в котором он выполняется, и нажать CTRL-C. Сервер остановится, и Вам будет выведен запрос «Terminate Batch Job?«; если в ответ на него вы нажмёте «y», окно закроется.
Если эта процедура не была соблюдена (например, Вы завершили работу компьютера, не остановив LDAP-сервер), сервер, вероятнее всего, откажется стартовать при следующем запуске. В этом случае перейдите в директорию c:openldapvarrun и удалите все файлы в этой директории (slapd.args и slapd.pid). Теперь сервер должен запуститься. Если нет — обратитесь к файлу журнала (по умолчанию в varlog). Ведь Вы же установили директиву logfile, правда?


Проблемы, комментарии, предположения, исправления (включая битые ссылки) или есть что добавить? Пожалуйста, выкроите время в потоке занятой жизни, чтобы написать нам, вебмастеру или в службу поддержки. Оставшийся день Вы проведёте с чувством удовлетворения.
Исходные данные:
- организация, использующая в качестве базы данных сотрудников Microsoft Active Directory, базирующуюся на Windows Server 2008 R2 контроллере домена;
- написанная на php информационная система, поддерживающую протокол LDAP для взаимодействия с MS AD (например, Moodle).
Проблема: при соединении с AD по протоколу LDAP (порт 389) не работает функция php для смены пароля пользователю AD. Решением является переход на SSL-версию протокола — LDAPS (порт 636). На поиск способа включить поддержку LDAPS на контроллере домена было потрачено приличное количество времени, сэкономить которое может помочь данная статья.
Шаг 1, установка служб сертификатов на контроллер домена.
Заходим в панель управления сервером (Start — Administrative Tools — Server Manager). Add Roles — Active Directory Certificate Services — Next — Next — отмечаем Certification Authority Web Enrollment (Add Required Role Services) — Next — Enterprise — Next — Root CA — далее Next до конца.
Шаг 2, запрос на сертификат.
Создаём файл request.inf с текстом:
[Version]

Signature= "$Windows NT$"
[NewRequest]
KeySpec = 1
KeyLength = 1024
Exportable = TRUE
MachineKeySet = TRUE
SMIME = FALSE
PrivateKeyArchive = FALSE
UserProtected = FALSE
UseExistingKeySet = FALSE
ProviderName = "Microsoft RSA SChannel Cryptographic Provider"
ProviderType = 12
RequestType = PKCS10
KeyUsage = 0xa0
[EnhancedKeyUsageExtension]
OID=1.3.6.1.5.5.7.3.1
OID=1.3.6.1.5.5.7.3.2
[Extensions]
2.5.29.17=MDiCFURDNC5sb3JlLnVuaS1kdWJuYS5ydaAfBgkrBgEEAYI3GQGgEgQQhePOUDQ+
_continue_=7Uy5GtDgYOzldA==
Critical=2.5.29.17
Затем выполняем
certreq -new request.inf request.req
Шаг 3, получение сертификата у CA.
Вот тут самое интересное. Если попробовать разместить запрос на сертификат штатным способом, т.е. через MMC snap-in «Certification Authority» или командой
certreq -attrib "CertificateTemplate:DomainController" request.req, получаем ошибку «The DNS name is unavailable and cannot be added to the Subject Alternate name. 0x8009480f», которую обойти никаким способом так и не удалось. Зато сработала выдача сертификата через веб.
Заходим на localhost/certsrv/certrqxt.asp и вставляем в первое поле код из файла request.req; в поле Certificate Template выбираем Web Server. Скачиваем получившийся сертификат по ссылке Download certificate.
Шаг 4, импорт сертификата.
Winkey+R — mmc; нажимаем Ctrl+M, Certificates — Add — Computer Account — Next — Local Computer — Finish — OK. Certificates (local computer) — Personal — Certificates (правой кнопкой) — All Tasks — Import. Указываем файл, сделанный на шаге 3.
Шаг 5, проверка.
Winkey+R — ldp; Connection — Connect… Server — это FQDN нашего контроллера домена, например, dc.company.org. Port: 636, галочка SSL. OK. «Cannot open connection» означает, что цель не достигнута. Положительный результат будет выглядеть как много строк в правой половине окошка, включая «Established connection to dc.company.org». Теперь можно указывать ldaps://dc.company.org в качестве url ldap-сервера в информационной системе.
Cookie Preferences
Privacy Policy
This privacy statement applies to miniorange websites describing how we handle the personal
information.
When you visit any website, it may store or retrieve the information on your browser, mostly in the
form of the cookies. This information might be about you, your preferences or your device and is
mostly used to make the site work as you expect it to. The information does not directly identify
you, but it can give you a more personalized web experience.
Click on the category headings to check how we handle the cookies.
For the privacy statement of our solutions you can refer to the privacy policy.
Strictly Necessary Cookies
Always Active
Necessary cookies help make a website fully usable by enabling the basic functions like site
navigation, logging in, filling forms, etc. The cookies used for the functionality do not store any
personal identifiable information. However, some parts of the website will not work properly without
the cookies.
Performance Cookies
Always Active
These cookies only collect aggregated information about the traffic of the website including —
visitors, sources, page clicks and views, etc. This allows us to know more about our most and least
popular pages along with users’ interaction on the actionable elements and hence letting us improve
the performance of our website as well as our services.
Applies to Windows Server 2003, Windows Server 2003 R2, Windows Server 2008, Windows Server 2008 R2, Windows Server 2012, Windows Server 2012 R2
Table of Contents
- Reasons for Enabling LDAPS
- Enabling LDAPS for domain controllers using a single-tier CA hierarchy
- Enabling LDAPS for domain controllers using a multi-tier CA hierarchy
- Publishing a Certificate that Supports Server Authentication
- Requesting a Certificate for Server Authentication
- Enabling LDAPS for Client Authentication
- Active Directory Domain Services Certificate Storage
- Exporting the LDAPS Certificate and Importing for use with AD DS
- Verifying an LDAPS connection
- Troubleshooting LDAP over SSL
- Additional Information
Reasons for Enabling LDAPS
By default, LDAP communications between client and server applications are not encrypted. This means that it would be possible to use a
network monitoring device or software and view the communications traveling between LDAP client and server computers. This is especially problematic when an LDAP simple bind is used because credentials (username and password) is passed over the network
unencrypted. This could quickly lead to the compromise of credentials.
 Note |
|---|
| Only LDAP data transfers are exposed. Other authentication or authorization data using Kerberos, SASL, and even NTLM have their own encryption systems. The Microsoft Management Console (mmc) snap-ins, since Windows 2000 SP4 have used LDAP sign and seal or Simple Authentication and Security Layer (SASL) and replication between domain controllers is encrypted using Kerberos. |
Reasons for enabling Lightweight Directory Access Protocol (LDAP) over Secure Sockets Layer (SSL) / Transport Layer Security (TLS) also known as LDAPS include:
- Some applications authenticate with Active Directory Domain Services (AD DS) through simple BIND. As simple BIND exposes the users’ credentials in clear text, use of Kerberos is preferred. If simple BIND is necessary, using SSL/TLS to encrypt the authentication
session is strongly recommended. - Use of proxy binding or password change over LDAP, which requires LDAPS. (e.g.
Bind to an AD LDS Instance Through a Proxy Object)
- Some applications that integrate with LDAP servers (such as Active Directory or Active Directory Domain Controllers) require encrypted communications. To encrypt LDAP communications in a Windows network, you can enable LDAP over SSL (LDAPS).
 Caution |
|---|
| Before you install a certification authority (CA), you should be aware that you are creating or extending a public key infrastructure (PKI). Be sure to design a PKI that is appropriate for your organization. See PKI Design Brief Overview for additional information. |
Enabling LDAPS for domain controllers using a single-tier CA hierarchy
LDAP over SSL/TLS (LDAPS) is automatically enabled when you install an Enterprise Root CA on a domain controller (although installing a CA on a domain controller is not a recommended practice). You can see examples of this in the
Test Lab Guide Base Configuration for Windows Server 2008 R2,
Building an Enterprise Root Certification Authority in Small and Medium Businesses, and
Install and configure Microsoft Active Directory Certificate Services (AD CS) using Windows Server 2008 R2.
Enabling LDAPS for domain controllers using a multi-tier CA hierarchy
When you have a multi-tier (such as a two-tier or three-tier) CA hierarchy, you will not automatically have the appropriate certificate for LDAPS authentication on the domain controller. In order to enable LDAPS in a multi-tier CA hierarchy, you must request
a certificate that meets the following requirements:
- Certificate must be valid for the purpose of Server Authentication. This means that it must also contains the Server Authentication object identifier (OID):
1.3.6.1.5.5.7.3.1 - The Subject name or the first name in the Subject Alternative Name (SAN) must match the
Fully Qualified Domain Name (FQDN) of the host machine, such as Subject:CN=server1.contoso.com. For more information, see
How to add a Subject Alternative Name to a secure LDAP certificate.
- The host machine account must have access to the private key.
Publishing a Certificate that Supports Server Authentication
- On the issuing Certification Authority computer, open the Certificates console or Certsrv console. To open Certsrv, click
Start. Type certsrv.msc and then click
OK. - Ensure that Certification Authority is expanded as well as the name of the certification authority.
- Right-click Certificate Templates and then click Manage.
- In the Certificate Templates Console, right-click Kerberos Authentication and then select
Duplicate Template. You don’t have to use the Kerberos template. You can create your own or use one of the existing templates that has Server Authentication as a purpose, such as
Domain Controller Authentication, Domain Controller,
Web Server, and Computer. Important: You should be planning on having
only one certificate on each LDAP server (i.e. domain controller or AD LDS computer) with the purpose of
Server Authentication. If you have legitimate reasons for using more than one, you may end up having certificate selection issues, which is discussed further in the
Active Directory Domain Services Certificate Storage.
- On the Duplicate Template dialog box, leave the default selected
Windows Server 2003 Enterprise selected and then click OK. - The Properties of New Template appear. Ensure that settings are as you want them to be for this certificate template. Pay close attention to ensure that the
Template display name is set to an appropriate name along with the following settings:- Validity and Renewal periods are set according to your organization’s security policy
- Key lengths are appropriate
- Select whether you want to place the certificate in Active Directory
- Subject Name tab: DNS name and Service principal name (SPN) are selected
- If you plan to import the certificate into the Active Directory Domain Services certificate store, then should also mark the private key as exportable.
- Click OK.
- Return to the Certificates or Certsrv console and in the details pane of
Certificate Templates, right-click an open area of the console, click
New, and then click Certificate Template to Issue.
- In the Enable Certificate Templates dialog box, select the name of the new template you created and then click
OK.


Requesting a Certificate for Server Authentication
To request a certificate from your LDAPSL server, do the following on each domain controller that requires LDAPS connections:
- Open the Certificates console. Click Start, type
MMC, and then press ENTER. If prompted by User Account Control, ensure it displays the action you want and then click
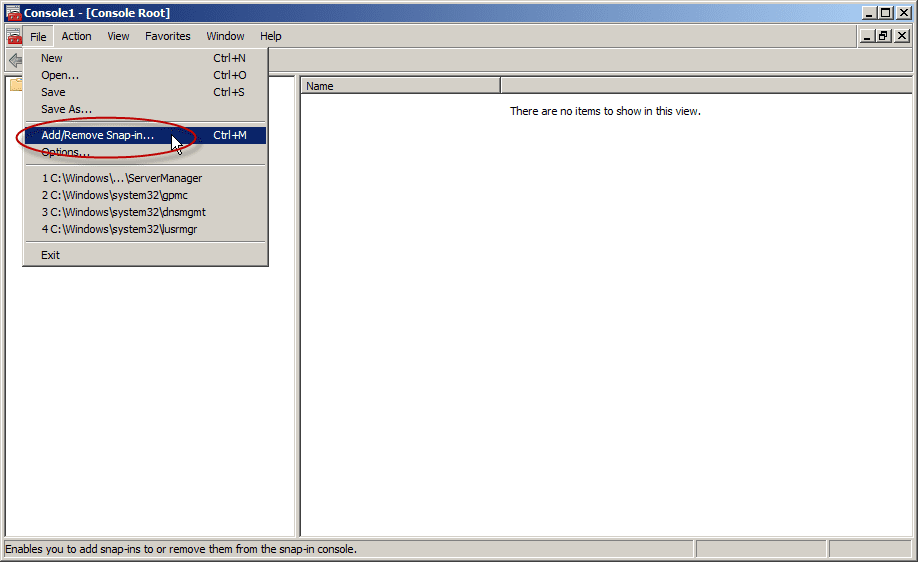
Yes. - In the MMC console that opens (typically Console1), click File
and then click Add/Remove Snap-in - In Add or Remove Snap-ins under Available Snap-ins, click
Certificates, and then click Add. - In Certificates snap-in select Computer account and then click
Next. - In Select Computer, if you are managing the LDAP server requiring the certificate, select
Local. Otherwise, select Another computer and click
Browse to locate the LDAP server requiring the certificate. - Once you have the correct computer selected, click OK and then click
Finish. - In Add or Remove Snap-ins, click OK.
- In the console tree, expand Certificates (<computer>)
- right click Certificates, click All Tasks, and then click
Request New Certificate.
- In Certificate Enrollment, click Next.
- In the Select Certificate Enrollment Policy, typically you would leave the default of
Active Directory Enrollment Policy. If you have a different policy that you should follow, then select that one and click
Next. - Select a certificate that allows for server authentication, Kerberos works, but you can use a custom certificate as described in Publishing a Certificate that Supports Server Authentication. Click
Enroll.
- On the Certificate Enrollment dialog box, click Finish.
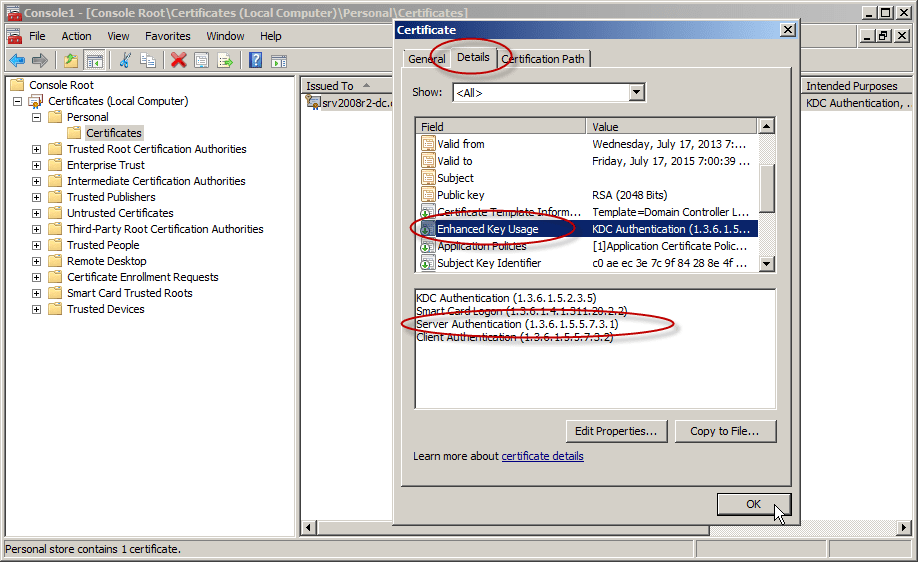
- In the results pane double-click the certificate that you received to open the
Certificate properties dialog box. - Click the Details tab, in the Field column, select Enhanced Key Usage. Confirm that
Server Authentication (1.3.6.1.5.5.7.3.1).


For other step-by-step examples requesting a certificate for server authentication and implementing LDAP over SSL (LDAPS), see the following articles:
- Request a computer certificate for server authentication — Windows
Server 2003, 2003 R2 instructions - How to enable LDAP over SSL with a third-party Certification Authority — Windows Server 2000, 2003, 2003 R2, 2008, 2008 R2 updated instructions
- Appendix A: Configuring LDAP over SSL Requirements for AD LDS — Windows Server 2008 and Windows Server 2008 R2 instructions
Enabling LDAPS for Client Authentication
Enabling LDAPS on the client is not necessary to protect credentials passed from the client to the server when LDAPS is already enabled on the server. This just allows the client to actually authenticate itself to the server — an extra layer of protection to
ensure that the client connecting as COMPUTER_X is actually COMPUTER_X and not some other computer trying to authenticate with COMPUTER_X credentials. The client must be using a certificate from a CA that the LDAP server trusts. Client certificates and AD
DS accounts are mapped using altSecurityIdentities, which can be done through various methods. For more information on those methods, see
HowTo: Map a user to a certificate via all the methods available in the altSecurityIdentities attribute. Certificates are presented to the server during the Transport Layer Security (TLS) key exchange (described in paragraph 7.4 of
RFC 2246). To enable LDAPS authentication for the client, ensure the certificate is placed in the personal store for the user account.
Active Directory Domain Services Certificate Storage
When a certificate is selected from the local machine store (as in
CertEnumCertificatesInStore) the first valid certificate that can be used for Server Authentication (OID: 1.3.6.1.5.5.7.3.1) is returned for use. In cases where customers have multiple certificates valid for Server Authentication in the LDAP server’s (e.g.
AD DS domain controller,
AD LDS, or
ADAM server) local computer certificate store, may see that a different certificate than the one they want is used for LDAPS communications. The best resolution to such an issue is to remove all unnecessary certificates from the local computer certificate
store and have only one certificate that is valid for server authentication.
However, if there is a legitimate reason that two or more certificates and a customer using at least Windows Server 2008 LDAP servers, the Active Directory Domain Services (NTDSPersonal) certificate store can be used for LDAPS communications.
Important There are several significant details to know before you implement the use of the Active Directory Domain Services certificate store.
- Automatic certificate enrollment (auto-enrollment) cannot be utilized with certificates in the NTDSPersonal certificate store.
- Current command line tools do not allow certificate management of the NTDSPersonal certificate store.
- Certificates should be imported into the store, and not moved (using drag and drop) via Certificates console (MMC)
- Each LDAP server will require its own certificate in order to use this option, but it is only necessary to use this option on a server that has multiple certificates with the purpose of Server Authentication in the local certificates store. The best solution
is to have only one certificate in the computer’s personal certificate
Exporting the LDAPS Certificate and Importing for use with AD DS
The following steps will demonstrate how to export an LDAPS enabled certificate from a domain controller computer’s local certificate store to the Active Directory Domain Services service certificate store (NTDSPersonal). You will have to perform this step
for each domain controller that has multiple certificates with the enabled use of Server Authentication. These certificates will have to be manually renewed when they expire and only works starting with Windows Server 2008 domain controllers, as that was the
first Windows Server operating system release in which the NTDS was separated out as its own service.
- Click Start, type mmc and then click
OK. - Click File and then click Add/Remove Snap-in.
- Click Certificates and then click Add.
- In Certificates snap-in select Computer account and then click
Next. - In Select Computer, if you are working at the LDAP server requiring the certificate, select
Local. Otherwise, select Another computer and click
Browse to locate the LDAP server requiring the certificate. - Once you have the correct computer selected, click OK and then click
Finish.In Add or Remove Snap-ins, click OK.
- In the console tree, expand Certificates (<computer>)
- In the certificates console of a computer that contains a certificate that can be used for Server Authentication, right-click the certificate, click
All Tasks, and then click Export. - On the Certificate Export Wizard welcome screen, click
Next. - On the Export Private Key screen, select Yes, export the private key and then click
Next. If you don’t have the option to export the private key, then the certificate template did not allow the exporting of the private key (seePublishing a Certificate that Supports Server Authentication).
- On the Export File Format screen, you should select
Export all extended properties. The other selections are optional.
- On the Password screen, enter a password that you want to be used when the certificate is imported. You will have to type the password twice: once in the
Password box and then again in the Type and confirm password (mandatory) box. Then, click
Next. - On the File to Export screen, enter a path, file name, and .pfx file extension in the
File name box and then click Next.
- Confirm the settings on the completion screen and then click Finish. You should see a pop-up message indicating that the export was successful. Click
OK. - Click File and then click Add/Remove Snap-in.
- Click Certificates and then click Add.
- Select Service account and then click Next.
- In the Select Computer dialog box, ensure that you target the appropriate computer. If you are running the Microsoft Management Console (MMC) and want to target the local computer, you can leave the default selection of
Local computer. Otherwise, select Another computer and then use the
Browse button to select the appropriate computer. Then click
Next. - Select Active Directory Domain Services and then click
Finish. - On the Add or Remove Snap-ins dialog box click OK.
- Expand Certificates — Services (Active Directory Domain Services) and then click
NTDSPersonal. - Right-click NTDSPersonal, click All Tasks, and then click
Import. - On the Certificate Import Wizard welcome screen, click
Next. - On the File to Import screen, click the Browse, and then locate the certificate file that you exported previously.
- On the Open screen, ensure that Personal Information Exchange (*pfx,*.p12) is selected as the file type and then navigate the file system to locate the certificate you exported previously and then click that certificate.
- Click Open and then click Next.
- On the Password screen enter the password you set for the file and then click
Next.
- On the Certificate Store page, ensure that Place all certificates in the following store is selected and reads
Certificate store: NTDSPersonal and then click Next. - On the Certificate Import Wizard completion screen, click
Finish. You should then see a message that the import was successful. Click
OK. - In the Navigation pane, under NTDSPersonal, click Certificates
- In the details pane, right-click the certificate you imported and then click
Open. - Click Details and then click Enhanced Key Usage, you should see that
Server Authentication (1.3.6.1.5.5.7.3.1) is one of the purposes of the certificate and then click
OK.


Verifying an LDAPS connection
After a certificate is installed, follow these steps to verify that LDAPS is enabled:
- Start the Active Directory Administration Tool (Ldp.exe)
- To use LDP.EXE on Windows Server 2003, see
LDAP Overview. - To use LDP.EXE on Windows XP, you must download and install
Windows XP Service Pack 2 Support Tools. - For Windows Vista, Windows 7, or non-domain controller Windows Server 2008, or Windows Server 2008 R2 computers, see
Remote Server Administration Tools (RSAT) for Windows Vista, Windows 7, Windows Server 2008, and Windows Server 2008 R2
- To use LDP.EXE on Windows Server 2003, see
- On the Connection menu, click Connect.
- Type the name of the LDAP server (e.g. domain controller or AD LDS/ADAM server) to which you want to connect.
- Type 636 as the port number.
- Click OK.
Troubleshooting LDAP over SSL
When you have issues with LDAPS, there are several different things that can be wrong. One of the best walkthrough documents regarding troubleshooting LDAPS is on the Ask DS Blog in which a Senior Escalation engineer walks through verification and troubleshooting:
Troubleshooting LDAP over SSL. There is only one Event ID that is directly related to LDAP over SSL, which is Event 1220, expanded upon in the destination of the link in the list below. The rest of the links are related to LDAP signing. LDAP signing does
not encrypt the communications traveling between the LDAP server and client. LDAP signing verifies the identity of the client attempting an LDAP bind and helps to mitigate the chance of replay and man-in-the middle attacks. For more information on LDAP signing,
see LDAP Signing
and
How to enable LDAP Signing in Windows Server 2008.
- Event ID 1220 — LDAP over SSL
- Event ID 2886 — LDAP signing: is logged one each time the domain controller is started, if you do not have signing required
enabled on your domain controller. - Event ID 2887 — If signing required is not enabled, this event keeps a count of how many unsigned binds occurred in the
previous 24 hours. The event is logged every 24 hours. - Event ID 2888 — If signing required is enabled, then this even keeps a count of how many unsigned LDAP binds occurred in the previous
24 hours. Since LDAP signing is required, the binds would be rejected. This is a notice to administrators to investigate the client computers that are trying to bind without signing. - Event ID 2889- Administrators can enable this event to to help identify client computers that are attempting to bind without
signing. This event is logged with the IP address and the bind identity of the client each time an unsigned bind is performed or attempted.
Additional Information
- HowTo: Map a user to a certificate
via ll the methods available in the altSecurityIdentities attribute - WebSphere to Active Directory over SSL
- How to enable LDAP over SSL with a third-party certification authority
- Installing and configuring an Enterprise Root CA on Windows Server 2003
- Implementing and Administering Certificate Templates in Windows Server 2003
- Implementing and Administering Certificate Templates
- Windows 7/2008 Kerberos Default Encryption and Windows
2003/2000 - Install a SSL certificate on your domain controller
- Appendix A: Configuring LDAP over SSL Requirements for AD LDS
- Configuring the JSS to Use LDAP Over SSL When Authenticating with Active Directory
- Windows Server 2003 domain
controller using LDAP over SSL with expired certificate requires restart - How to add a Subject Alternative Name to a secure LDAP certificate
- Troubleshooting PKI Problems on Windows
Microsoft Active Directory поддерживает протокол LDAPv3. С его помощью можно авторизовать пользователей из сторонних приложений. Чтобы обеспечить безопасность при передаче учетной информации серверу необходимо использовать LDAPS (SSL). В этой статье мы рассмотрим настройку контролера доме, для обеспечения поддержки SSL.
Для того, чтобы SSL нормально функционировал нам потребуются сертификат.
Проверяем наличие сертификата
Для начала будет полезно проверить наличие сертификата в вашем домене, для этого запустим на нашем ПК утилиту ldp.exe.
Она не поставляется с Windows 10, чтобы использовать её, вам придется установить компоненты администрирования RSAT.
Нажмите Подключение — подключить, заполните окно аналогично рисунку.

Используйте имя домена, не сервера — тогда сервер для подключения будет выбран автоматически.
Если в ответ вы получили сообщение:
ld = ldap_sslinit("altuninvv.local", 636, 1);
Error 0 = ldap_set_option(hLdap, LDAP_OPT_PROTOCOL_VERSION, 3);
Error 81 = ldap_connect(hLdap, NULL);
Server error: <empty>
Error <0x51>: Fail to connect to altuninvv.local.
Это означает, что либо недоступен ни один контролер домена, либо неправильно настроен DNS, либо ПК не является членом домена, либо не установлен SSL сертификат на контролере домена.
Если сообщение похоже на такое:
Established connection to xxxx.xxxxxxxxx.xxx.
Retrieving base DSA information...
Getting 1 entries:
Dn: (RootDSE)
configurationNamingContext:
...
forestFunctionality: 6 = ( WIN2012R2 );
highestCommittedUSN: 2153249;
isGlobalCatalogReady: FALSE;
isSynchronized: TRUE;
ldapServiceName: XXXXXXXX$@XXXXXXXXXXXXX;
....
supportedCapabilities (6): 1.2.840.113556.1.4.800 = ( ACTIVE_DIRECTORY ); 1.2.840.113556.1.4.1670 = ( ACTIVE_DIRECTORY_V51 ); 1.2.840.113556.1.4.1791 = ( ACTIVE_DIRECTORY_LDAP_INTEG ); 1.2.840.113556.1.4.1935 = ( ACTIVE_DIRECTORY_V61 ); 1.2.840.113556.1.4.2080 = ( ACTIVE_DIRECTORY_V61_R2 ); 1.2.840.113556.1.4.2237 = ( ACTIVE_DIRECTORY_W8 );
supportedControl (37): 1.2.840.113556.1.4.319 = ( PAGED_RESULT ); 1.2.840.113556.1.4.801 = ( SD_FLAGS ); 1.2.840.113556.1.4.473 = ( SORT ); 1.2.840.113556.1.4.528 = ( NOTIFICATION ); 1.2.840.113556.1.4.417 = ( SHOW_DELETED ); 1.2.840.113556.1.4.619 = ( LAZY_COMMIT ); 1.2.840.113556.1.4.841 = ( DIRSYNC ); 1.2.840.113556.1.4.529 = ( EXTENDED_DN ); 1.2.840.113556.1.4.805 = ( TREE_DELETE ); 1.2.840.113556.1.4.521 = ( CROSSDOM_MOVE_TARGET ); 1.2.840.113556.1.4.970 = ( GET_STATS ); 1.2.840.113556.1.4.1338 = ( VERIFY_NAME ); 1.2.840.113556.1.4.474 = ( RESP_SORT ); 1.2.840.113556.1.4.1339 = ( DOMAIN_SCOPE ); 1.2.840.113556.1.4.1340 = ( SEARCH_OPTIONS ); 1.2.840.113556.1.4.1413 = ( PERMISSIVE_MODIFY ); 2.16.840.1.113730.3.4.9 = ( VLVREQUEST ); 2.16.840.1.113730.3.4.10 = ( VLVRESPONSE ); 1.2.840.113556.1.4.1504 = ( ASQ ); 1.2.840.113556.1.4.1852 = ( QUOTA_CONTROL ); 1.2.840.113556.1.4.802 = ( RANGE_OPTION ); 1.2.840.113556.1.4.1907 = ( SHUTDOWN_NOTIFY ); 1.2.840.113556.1.4.1948 = ( RANGE_RETRIEVAL_NOERR ); 1.2.840.113556.1.4.1974 = ( FORCE_UPDATE ); 1.2.840.113556.1.4.1341 = ( RODC_DCPROMO ); 1.2.840.113556.1.4.2026 = ( DN_INPUT ); 1.2.840.113556.1.4.2064 = ( SHOW_RECYCLED ); 1.2.840.113556.1.4.2065 = ( SHOW_DEACTIVATED_LINK ); 1.2.840.113556.1.4.2066 = ( POLICY_HINTS_DEPRECATED ); 1.2.840.113556.1.4.2090 = ( DIRSYNC_EX ); 1.2.840.113556.1.4.2205 = ( UPDATE_STATS ); 1.2.840.113556.1.4.2204 = ( TREE_DELETE_EX ); 1.2.840.113556.1.4.2206 = ( SEARCH_HINTS ); 1.2.840.113556.1.4.2211 = ( EXPECTED_ENTRY_COUNT ); 1.2.840.113556.1.4.2239 = ( POLICY_HINTS ); 1.2.840.113556.1.4.2255 = ( SET_OWNER ); 1.2.840.113556.1.4.2256 = ( BYPASS_QUOTA );
supportedLDAPPolicies (19): MaxPoolThreads; MaxPercentDirSyncRequests; MaxDatagramRecv; MaxReceiveBuffer; InitRecvTimeout; MaxConnections; MaxConnIdleTime; MaxPageSize; MaxBatchReturnMessages; MaxQueryDuration; MaxTempTableSize; MaxResultSetSize; MinResultSets; MaxResultSetsPerConn; MaxNotificationPerConn; MaxValRange; MaxValRangeTransitive; ThreadMemoryLimit; SystemMemoryLimitPercent;
supportedLDAPVersion (2): 3; 2;
supportedSASLMechanisms (4): GSSAPI; GSS-SPNEGO; EXTERNAL; DIGEST-MD5;

-----------
Это значит, что SSL сертификат уже установлен посредством Службы сертификатов Active Directory и дальнейших действий не потребуется.
Установка OpenSSL
В этой статье я буду использовать виртуальный сервер, созданный для цикла статей.
Имя домена — altununvv.local
Имя контролера домена – addc1.altuninvv.local
Виртуальная организация — Altunin Soft
Скачаем свежую версию OpenSSL — вы можете скачать её отсюда — https://slproweb.com/products/Win32OpenSSL.html
Я рекомендую все команды выполнять сразу на сервере, но вы можете так же работать и на вашем ПК, если используете MSYS2.
Те, кто использует, как и я, MSYS2, могут ввести в консоли:
pacman -Sy opensslСоздаем локальный центр сертификации
Создадим папку и назовем её CA.
Создадим в ней файл ca.conf с содержимым:
[ req ]
distinguished_name = req_distinguished_name
req_extensions     = v3_ca

[ req_distinguished_name ]
# Descriptions
countryName=RU
stateOrProvinceName=Magadan region
localityName=Magadan
0.organizationName= Altunin Soft
1.organizationName=IT
commonName=altuninvv.local

#Modify for your details here or answer the prompts from openssl
countryName_default=RU
stateOrProvinceName_default= Magadan region
localityName_default= Magadan
0.organizationName_default= Altunin Soft
1.organizationName_default=IT
commonName_default= altuninvv.local
[ v3_ca ]
keyUsage=critical,keyCertSign
basicConstraints=critical,CA:TRUE,pathlen:1
extendedKeyUsage=serverAuth
subjectAltName = @alt_names
[alt_names]
DNS.1 = *. altuninvv.local
DNS.2 = altuninvv.local
Сгенерируем приватный ключ для CA
openssl genrsa -des3 -out ca.key 4096Укажите пароль для ключа, в нашем случае это будет Pa$$w0rd:
Generating RSA private key, 4096 bit long modulus (2 primes)
......................................................................................................................................
........................................................................................................................................
....++++..........................++++e is 65537 (0x010001)
Enter pass phrase for ca.key:

Verifying - Enter pass phrase for ca.key:
Создадим сертификат для нашего CA:
openssl req -new -x509 -extensions v3_ca -days 3659 -key ca.key -out ca.crt -config ca.confПросто нажимайте Enter все поля будут заполнены автоматически!
Enter pass phrase for ca.key:
 You are about to be asked to enter information that will be incorporated                                                                                                                                           into your certificate request.
 What you are about to enter is what is called a Distinguished Name or a DN.
 There are quite a few fields but you can leave some blank
For some fields there will be a default value,
 If you enter '.', the field will be left blank.
-----
RU [RU]:
Magadan region [Magadan region]:
Magadan [Magadan]:
Altunin Soft [Altunin Soft]:
 IT [IT]:
altuninvv.local [altuninvv.local]:
Теперь нужно импортировать созданный сертификат в хранилище доверенных CA на нашем контролере домена.
Скопируем файл ca.crt на контролер домена. Откроем PowerShell от имени администратора, перейдем в папку с файлом ca.cert и введем команду:
Import-Certificate –Verbose -FilePath ca.crt  -CertStoreLocation 'Cert:LocalMachineRoot'

VERBOSE: Performing the operation "Import certificate" on target "Item: C:caca.crt Destination: Root".


   PSParentPath: Microsoft.PowerShell.SecurityCertificate::LocalMachineRoot

Thumbprint                                Subject
----------                                -------
D5D1306CFFDAF63EDA10710F13F69C0228005350  CN=altuninvv.local, O=IT, O=Altunin Soft, L=Magadan, S=Magadan region, C=RU
Сертификат успешно добавлен.
Теперь пришло время создать запрос на клиентский сертификат, который будет использовать контролер домена.
На контролере домена создадим текстовый файл — req.txt
;----------------- request.inf -----------------
[Version]
Signature="$Windows NT$"

;The Subject will need to be your active directory domain name
[NewRequest]
Subject = "CN=altuninvv.local
KeySpec = 1
KeyLength = 4096
Exportable = TRUE
SMIME = FALSE
MachineKeySet = TRUE
PrivateKeyArchive = FALSE
UseExistingKeySet = FALSE
UserProtected = FALSE
ProviderName = "Microsoft RSA SChannel Cryptographic Provider"
ProviderType = 12
RequestType = PKCS10
KeyUsage = 0xa0

[EnhancedKeyUsageExtension]
OID = 1.3.6.1.5.5.7.3.1 ; Server Authentication
;The following will add a subject alternative name of a wildcard cert on *.example.com
;so any ad controller with a hostname of somththing.example.com can use it.
[Extensions]
2.5.29.17 = "{text}"
_continue_ = "dns=*.altuninvv.local&"
_continue_ = "dns=altuninvv.local&"
Выполним запрос на сертификат:
certreq -new req.txt addc1.csr
CertReq: Request Created
Выполним запрос на сертификат:
certreq -new req.txt addc1.csr
CertReq: Request Created
Скопируем созданный файл на свой ПК в папку нашего CA
В папке CA создадим файл v3ext.txt с содержимым:
# v3ext.txt
keyUsage=digitalSignature,keyEncipherment
extendedKeyUsage=serverAuth
subjectKeyIdentifier=hash
subjectAltName = @alt_names
#Modify for your details. Must include the commonName in the list below also.
#The *.example.com will allow all Domain controllers with
#the hostname somthing.example.com to use the cert.
[alt_names]
DNS.1 = *.altuninvv.local
DNS.2 = altuninvv.local
Сгенерируем сертификат для addc1
openssl x509 -req -days 825 -in addc1.csr -CA ca.crt -CAkey ca.key -extfile v3ext.txt -set_serial 01 -out addc1-server.crt
Signature ok
subject=CN = altuninvv.local
Getting CA Private Key
Enter pass phrase for ca.key:
Введите пароль закрытого ключа: Pa$$w0rd
Скопируем файл с сертификатом addc1-server.crt обратно на контролер домена addc1 и применим сертификат:
certreq -accept addc1-server.crt
Installed Certificate:
  Serial Number: 01
  Subject: CN=altuninvv.local (DNS Name=*.altuninvv.local, DNS Name=altuninvv.local)
  NotBefore: 2/18/2021 5:37 PM
  NotAfter: 5/24/2023 5:37 PM
  Thumbprint: 4721d27e9fe34aaa672d20d68c0ec01fd9f7a82c
Из PowerShell проверим наличие сертификата:
PS C:ca> Get-ChildItem "Cert:LocalMachineMy"

   PSParentPath: Microsoft.PowerShell.SecurityCertificate::LocalMachineMy

Thumbprint                                Subject
----------                                -------
4721D27E9FE34AAA672D20D68C0EC01FD9F7A82C  CN=altuninvv.local
Теперь вы должны перегрузить контролер домена, чтобы все настройки вступили в силу.
Обратите внимание, чтобы подключиться к серверу вы должны указать его полное доменное имя, в нашем случае:
addc1.altuninvv.localЕсли ПК входит в состав домена altuninvv.local, вы можете использовать для подключение его имя:
altuninvv.localТогда контролер домена для подключения будет выбран автоматически из списка доступных, возможно, это будет работать только, при наличии Службы сертификатов на одном из серверов в AD!
Так как мой ПК не входит в домен altuninvv.local и не использует его DNS-сервера, я прописал в файле
C:WindowsSystem32driversetchostsстроку:
192.168.0.10 addc1.altuninvv.localПроверяем подключение
Для проверки подключения мы будет использовать утилиту ldp.exe.
Она не поставляется с Windows 10, чтобы использовать её, вам придется установить компоненты администрирования RSAT.
Запустим ldp.exe, откроется окно:

В этом окне выберите подключение – подключить
Введем:
Сервер: addc1.altuninvv.local
Порт: 636
Установим галочку SSL

Нажмем Ок, будет осуществлено подключение и выведена дополнительная информация:

Теперь мы может сделать bind к серверу
Выберите Подключение – Привязка
Заполните поля:
Пользователь: CN=ldap-bind,CN=Users,DC=altuninvv,DC=local
Пароль: Pas#w0rds#1
Установите: Простая привязка
нажмите Ок

Будет выведено сообщение:
res = ldap_simple_bind_s(ld, 'CN=ldap-bind,CN=Users,DC=altuninvv,DC=local', <unavailable>); // v.3

Authenticated as: 'ALTUNINVVldap-bind'.
Это означает, что подключение прошло успешно.
Далее выберем пункт меню Вид – Дерево
И в окне выберем — DC=altuninvv,DC=local

Нажмем Ок
Откроется дерево с разделами домена,

Таким образом вы можете просматривать каталог AD через LDAP по SSL.
Заключение
Сегодня мы рассмотрели подключение к контролеру домена AD с использованием протокола LDAP по SSL.
Мы создали свой локальный центр сертификации CA с помощью OpenSSL.
Был выпущен сертификат и установлен на контролере домена.
С помощью утилиты ldp.exe было осуществлено подключение к контролеру домена по SSL.
По-умолчанию в Active Directory трафик по протоколу LDAP между контроллерами домена и клиентами не шифруется, т.е. данные по сети передаются в открытом виде. Потенциально это означает, что злоумышленник с помощью снифера пакетов может прочитать эти данные. Для стандартной среды Windows среды это в общем-то не критично, но ограничивает возможности разработчиков сторонних приложений, которые используют LDAP.
Так, например, операция смены пароля должна обязательно осуществляться через безопасный канал (например Kerberos или SSL/TLS). Это означает, что например, с помощью функции-php, обеспечивающей работу с AD по протоколу LDAP изменить пароль пользователя в домене не удастся.
Защитить данные, передаваемых по протоколу LDAP между клиентом и контроллером домена можно с помощью SSL версии протокола LDAP – LDAPS, который работает по порту 636 (LDAP «живет» на порту 389). Для этого на контроллере домена необходимо установить специальный SSL сертификат. Сертификат может быть как сторонним, выданным 3-ей стороной (например, Verisign), самоподписанным или выданным корпоративным центром сертификации.
В этой статье мы покажем, как с помощью установки сертификата задействовать LDAPS (LDAP over Secure Sockets Layer) на котроллере домена под управление Windows Server 2012 R2. При наличии требуемого сертификата служба LDAP на контроллере домена может устанавливать SSL соединения для передачи трафика LDAP и трафика сервера глобального каталога (GC).
Отметим, что LDAPS преимущественно используется сторонними приложениями (имеются в виде не-Microsoft клиенты) в целях защиты передаваемых по сети данных (обеспечить невозможности перехвата имена и паролей пользователей и других приватных данных).
Предположим, в вашей инфраструктуре уже развернут корпоративный удостоверяющий сервер Certification Authority (CA). Это может быть как полноценная инфраструктура PKI, так и отдельной-стоящий сервер с ролью Certification Authority.
На севере с ролью Certification Authority запустите консоль Certification Authority Management Console, выберите раздел шаблонов сертификатов (Certificate Templates ) и в контекстном меню выберите Manage. 
Найдите шаблон Kerberos Authentication certificate и создайте его копию, выбрав в меню Duplicate Template. 
На вкладке General переименуйте шаблон сертификата в LDAPoverSSL, укажите период его действия и опубликуйте его в AD (Publish certificate in Active Directory). 
На вкладке Request Handling поставьте чекбокс у пункта Allow private key to be exported и сохраните шаблон.

На базе созданного шаблона, опубликуем новый тип сертификата. Для этого, в контекстном меню раздела Certificate Templates выберем пункт New -> Certificate Template to issue.

Из списка доступных шаблонов выберите LDAPoverSSL и нажмите OK.

На контроллере домена, для которого планируется задействовать LDAPS, откройте оснастку управления сертификатами и в хранилище сертификатов Personal запросим новый сертификат (All Tasks -> Request New Certificate).

В списке доступных сертификатов выберите сертификат LDAPoverSSL и нажмите Enroll (выпустить сертификат).

Следующее требование – необходимо, чтобы контроллер домена и клиенты, которые будут взаимодействовать через LDAPS доверяли удостоверяющему центру (CA), который выдал сертификат для контроллера домена.
Если это еще не сделано, экспортируем корневой сертификат удостоверяющего центра в файл, выполнив на сервере с ролью Certification Authority команду:
certutil -ca.cert ca_name.cer

Совет. Файл сертификата сохранится в профиле текущего пользователя и в нашем случае имеет имя ca_name.cer.
А затем добавьте экспортированный сертификат в контейнере сертификатов Trusted Root Certification Authorities хранилища сертификатов на клиенте и контроллере домена. Сделать это можно через вручную через оснастку управления сертификатами, через GPO или из командной строки (подробнее здесь).
certmgr.exe -add C:ca_name.cer -s -r localMachine ROOT
Необходимо перезапустить службы Active Directory на контроллере домена, либо целиком перезагрузить DC.
Осталось протестировать работу по LDAPS. Для этого на клиенте запустим утилиту ldp.exe и в меню выбираем Connection-> Connect->Укажите полное (FQDN) имя контроллера домена, выберите порт 636 и отметьте SSL -> OK. Если все сделано правильно, подключение должно установиться.

Примечание. Утилита ldp.exe на клиентах устанавливается в составе пакета Remote Server Administration Kit (RSAT): RSAT для Windows 10, для 8.1.
В последнее время, из-за потребностей проекта, нам нужно настроить сервер LDAP для тестирования и записать его.
Бесплатный OpenLDAP хорош, вот и все, я видел, что это родная версия linux, виртуальная машина linux компании не может быть подключена к внешней сети, пакет не может быть загружен или забыт, следующая версия windows, по сути, должна моделировать конфигурацию linux Лучше всего играть в нативный, если позволяют условия, адрес загрузки для windows:http://www.userbooster.de/download/openldap-for-windows.aspx
Установка: Это относительно просто, далее весь порт по умолчанию — 389, секретный пароль сервера по умолчанию для LDAP, база данных фонового механизма — BDB (Berkeley DataBase);
Конфигурация:
Учетная запись администратора LDAP. Эта учетная запись может использоваться для добавления, удаления и изменения записей в LDAP. Это более важно и является независимо настроенным файлом. Найдите файл slapd.conf в каталоге установки OpenLDAP и измените
suffix		"dc=test,dc=com"
rootdn		"cn=Manager,dc=test,dc=com"
Суффикс является префиксом DN, и все записи LDAP, добавленные после него, должны принадлежать этому пути.
Rootdn указывает администратора, а имя администратора — Manager, который также должен следовать по полному пути, аналогичному имени пакета JAVA.
Начало:
Windows поддерживает два метода запуска: сервис и CLI. Для отладки и просмотра выходных данных журнала мы используем метод CLI для запуска, сначала останавливаем службу LDAP, которая была запущена в службе Windows, а затем используем slapd для запуска каталога LDAP. Другие статьи в Интернете могут быть запущены без указания файла slapd.conf. Не проверено, команда, которую я могу запустить здесь:
slapd -f slapd.conf -d 1-F указывает информацию, считанную в slapd.conf, а -d относится к уровню отладки. После запуска интерфейса:

Импорт данных:
После успешного запуска это пустой LDAP. Нам нужно импортировать некоторые тестовые данные. LDAP может импортировать дерево каталогов через файл LDIF. Команда import для нашей версии Windows — через команду slapadd.
Что мне нужно, так это группа, и в ней есть несколько пользовательских структур. Файл LDIF этой структуры выглядит следующим образом:
dn: ou=users,dc=test,dc=com
objectClass: organizationalUnit
ou: users

dn: uid=qiujinyong,ou=users,dc=test,dc=com
objectClass: inetOrgPerson
sn: qiujinyong
cn: qiujinyong
uid: qiujinyong
userPassword: qiujinyong

dn: uid=yale,ou=users,dc=test,dc=com
objectClass: inetOrgPerson
sn: yale
cn: yale
uid: yale
userPassword: yale

dn: ou=groups,dc=test,dc=com
objectClass: organizationalUnit
ou: groups

dn: cn=ROLE_USER,ou=groups,dc=test,dc=com
objectClass: groupOfNames
cn: ROLE_USER
member: uid=yale,ou=users,dc=test,dc=com
member: uid=qiujinyong,ou=users,dc=test,dc=com

dn: cn=ROLE_SUPERVISOR,ou=groups,dc=test,dc=com
objectClass: groupOfNames
cn: ROLE_SUPERVISOR
member: uid=qiujinyong,ou=users,dc=test,dc=com
Вставьте и сохраните вышеуказанное содержимое в файл user3.ldif и импортируйте его через slapadd -v -l ./user3.ldif:

Вы можете увидеть сообщение об успехе.
Управление конфигурацией:
Редактировать файл ldif вручную сложно. Мы можем управлять LDAP графически с помощью стороннего инструмента ldapadmin.
http://www.ldapadmin.org/
После установки войдите на наш сервер LDAP, интерфейс настройки выглядит следующим образом:

Последние очень просты, добавьте их графически.
Настройка группы:
Класс Object хранит имена DN каждого пользователя в атрибутах groupOfNames, memeber.
Эта статья взята из «Чжу Кунронг«Блог, пожалуйста, держите этот источник
Enable LDAP over SSL (LDAPS) for Microsoft Active Directory servers.
Microsoft active directory servers will default to offer LDAP connections over unencrypted connections (boo!).
The steps below will create a new self signed certificate appropriate for use with and thus enabling LDAPS for an AD server. Of course the «self-signed» portion of this guide can be swapped out with a real vendor purchased certificate if required.
Steps have been tested successfully with Windows Server 2012R2, but should work with Windows Server 2008 without modification. Requires a working OpenSSL install (ideally Linux/OSX) and (obviously) a Windows Active Directory server.
- Create root certificate
- Import root certificate into trusted store of domain controller
- Create client certificate
- Accept and import certificate
- Reload active directory SSL certificate
- Test LDAPS using
ldp.exeutility - Reference
Create root certificate
Using OpenSSL, create new private key and root certificate. Answer country/state/org questions as suitable:
$ openssl genrsa -aes256 -out ca.key 4096
$ openssl req -new -x509 -days 3650 -key ca.key -out ca.crt
Hold onto the resulting ca.key and ca.crt.
Import root certificate into trusted store of domain controller
- From the active directory server, open
Manage computer certificates. - Add the generated
ca.crtto the certificate pathTrusted Root Certification AuthoritiesCertificates. - Done.
Create client certificate
We will now create a client certificate to be used for LDAPS, signed against our generated root certificate.
From the active directory server:
-
Create a new
request.infdefinition with the following contents — replacingACTIVE_DIRECTORY_FQDNwith the qualified domain name of your active directory server:[Version] Signature="$Windows NT$" [NewRequest] Subject = "CN=ACTIVE_DIRECTORY_FQDN" KeySpec = 1 KeyLength = 2048 Exportable = TRUE MachineKeySet = TRUE SMIME = FALSE PrivateKeyArchive = FALSE UserProtected = FALSE UseExistingKeySet = FALSE ProviderName = "Microsoft RSA SChannel Cryptographic Provider" ProviderType = 12 RequestType = PKCS10 KeyUsage = 0xa0 [EnhancedKeyUsageExtension] OID = 1.3.6.1.5.5.7.3.1 ; Server Authentication -
Run the following to create a client certificate request of
client.csr(note: it’s critical this is run from the active directory server itself to ensure correct private key -> certificate association):C:> certreq -new request.inf client.csr
Back to our OpenSSL system:
-
Create
v3ext.txtcontaining the following:keyUsage=digitalSignature,keyEncipherment extendedKeyUsage=serverAuth subjectKeyIdentifier=hash -
Create a certificate
client.crtfrom certificate requestclient.csrand root certificate (with private key):$ openssl x509 -req -days 3650 -in client.csr -CA ca.crt -CAkey ca.key -extfile v3ext.txt -set_serial 01 -out client.crt
-
Verify generated certificate:
$ openssl x509 -in client.crt -text
-
Ensure the following
X509v3 extensionsare all present:X509v3 Key Usage: Digital Signature, Key EnciphermentX509v3 Extended Key Usage: TLS Web Server AuthenticationX509v3 Subject Key Identifier
Accept and import certificate
-
From the active directory server with
client.crtpresent, run the following:C:> certreq -accept client.crt
-
Open
Manage computer certificates, the new certificate should now be present underPersonalCertificates. Ensure that:- Certificate has a private key association.
- The «Intended Purposes» is defined as «Server Authentication».
- Certificate name is the FQDN of the active directory server.
Reload active directory SSL certificate
Alternatively you can just reboot the server, but this method will instruct the active directory server to simply reload a suitable SSL certificate and if found, enable LDAPS:
-
Create
ldap-renewservercert.txtcontaining the following:dn: changetype: modify add: renewServerCertificate renewServerCertificate: 1 - -
Run the following command:
C:> ldifde -i -f ldap-renewservercert.txt
Test LDAPS using ldp.exe utility
-
From another domain controller, firstly install our generated root certificate
ca.crtto the certificate pathTrusted Root Certification AuthoritiesCertificates. -
Open utility:
-
From
Connection, selectConnect. -
Enter name of target domain controller.
-
Enter
636as port number (this is the LDAPS port). -
Click
OKto confirm the connection works. -
You’re all done!
Reference
- Enable LDAP over SSL with a third-party certification authority: https://support.microsoft.com/en-us/kb/321051
- LDAP renewServerCertificate: https://msdn.microsoft.com/en-us/library/cc223311.aspx
- How to Enable LDAPS in Active Directory (similar outcome to above): http://www.javaxt.com/tutorials/windows/how_to_enable_ldaps_in_active_directory
- DigiCert LDAPS certificate install guide: https://www.digicert.com/ssl-certificate-installation-microsoft-active-directory-ldap-2012.htm
Welcome back to our two-part series on how to enable secure LDAP (LDAPS) communications between client/server applications on Windows Server 2008/2012 domain controllers. In part one, I went over what you should know about LDAPS, your options, and prerequisites. After we understood the concepts of why, where and when we should be looking to use LDAPS, let’s move on to the actual configuration.
Enabling Secure LDAP: Configuring LDAPS
1. Create the right certificate template to issue
First, we need to make sure that your CA is allowed to issue the correct types of certificates. Remember, these must contain the Server Authentication OID 1.3.6.1.5.5.7.3.1.
I’ve described the steps you need to take in order to create such a template in my Creating a Digital Certificate Template for the purpose of Server Authentication in Windows Server 2008/R2/2012 article.
2. Request a certificate for server authentication
To request a certificate from your LDAPS server, do the following on each DC that requires LDAPS connections:
- In Start, type MMC, and then press Enter. If User Account Control prompts it, go ahead and ensure it displays the action you want. After that, select Yes.
- In the MMC console that opens, click File and then click Add/Remove Snap-in.
- Under Available Snap-ins, in Add or Remove Snap-ins, go ahead and select Certificates, and then click Add.

- In the Certificates snap-in, select Computer account and then click Next.

Note: If you plan to have more than one digital certificate for that DC, and if you are using Windows Server 2008/R2/2012, please read this following article BEFORE you proceed: The issue with Active Directory Domain Services (NTDSPersonal) certificate store
If you only plan to have one digital certificate on that DC, please proceed to the next step.
- In Select Computer, select Local. Once you have the correct computer selected, click OK and then click Finish.

- In Add or Remove Snap-ins, select OK.

- In the console tree, expand Certificates (<computer>), right-click Certificates, click All Tasks, and then click Request New Certificate. Note: You cannot do this if you’re connected to a remote DC.

In Certificate Enrollment, click Next.

In the Select Certificate Enrollment Policy, choose Active Directory Enrollment Policy (default) and click Next.

- Select a certificate that allows for server authentication. You may want to use a custom certificate as described in Publishing a Certificate that Supports Server Authentication. Now go ahead and click Enroll.

- The process may take a few seconds to complete. Click Finish in the Certificate Enrollment dialog box. Now you have a digital certificate for the first DC!
- To check your shiny new certificate, in the results pane double-click the certificate that you received to open Certificate properties.

Click the Details tab. In the Field column, go ahead and select Enhanced Key Usage. You’ll want to confirm that the Server Authentication (1.3.6.1.5.5.7.3.1) is listed.
- Repeat this on all the DCs on which you need to enable LDAPS.
Test the LDAP over a TLS Connection
To test if LDAP over TLS works properly, use the ldp.exe tool.
Note: If ldp.exe is not available on your system, you will need to install the Active Directory Directory Services (AD-DS) management tools from the Windows Remote Server Administration Kit (RSAT):
Download Remote Server Administration Tools for Windows 7 with SP1Download Remote Server Administration Tools for Windows 8
- Open a command prompt and type ldp. Click Enter. The LDP application window appears.
- Select Connection, then Connect. The Connect dialog box appears.
- In the Server text box, type the name of your AD server. For this example, type the fully qualified domain name (FQDN) of the DC, just as it appears in the Subject Alternative Name (SAN) of the Digital Certificate.
- In the Port text box, type 636.
- Check the box for SSL.

- Click OK. Now, without the above procedure you will not be able to connect.
After the procedure, note that “Host supports SSL, SSL cipher strength = 128 bits”.

Note: If you try to connect to the right DC but do not use the same FQDN as was listed inside the issued certificate (for example, using the IP address instead), you will not be able to connect using LDAPS.
- Select the Connection menu, click Bind, and then click OK.

The command output should display the user name and domain name that you used for binding, if LDAPS is configured properly. You can start browsing through the AD tree.

If you use the command: netstat -no | find “:636”, you will find the connection to the DC.

Enjoy.